

Page 1
Intrinsically Safe Headlamp Lite-Ex® PL 10e H
Operating Instructions | Bedienungsanleitung
Notice d‘utilisation | Istruzioni per l‘uso
Instrucciones de uso | Manual de instruçoes
1
Page 2

English Page 3
Deutsch Seite 15
Français Page 27
Italiano Page 39
Español Página 51
Português Página 63
2
Page 3

Content
1. Application .............................................................................................4
2. Safety information ..............................................................................4
3. Faults and damage .............................................................................4
4. Safety regulations ................................................................................5
4.1 Special conditions for use in
potentially explosive areas ............................................................5
5. Safety instructions ..............................................................................6
6. Ex-data......................................................................................................6
6.1. ATEX .........................................................................................................6
6.2. IECEx ......................................................................................................... 6
7. Technical specifications....................................................................6
8. Functional description / operating instructions .................8
8.1 Assembly of the Lite-Ex® PL 10e H ........................................8
8.2 Getting started ....................................................................................8
8.3 Battery replacement .........................................................................8
8.4 Cleaning the ring switch .................................................................9
8.5 Bulb replacement ............................................................................10
9. Repairs ................................................................................................... 11
10. Cleaning, maintenance and storage ...................................... 11
11. Disposal ................................................................................................12
12. Warranty and liability .................................................................... 13
13. EU Declaration of Conformity ................................................13
14. EU-type examination certificate ..............................................14
Note:
The current operating instructions, the EU Declaration of
Conformity and the Ex-certificate can be downloaded from
the relevant product page at www.ecom-ex.com, or alternatively they can be requested directly from the manufacturer.
3
Page 4

1. Application
The Lite-Ex® PL 10e H is a compact and rugged LED
headlamp that is designed for industrial application in potentially explosive areas classified as Zone 2, 1 and 0, as well as
Zone 22, 21 and 20 in accordance with directive 1999/92/
EC (ATEX).
2. Safety information
These operating instructions contain information and safety
regulations which are to be observed without fail for safe
operation in the described conditions. Non-observance
of this information and these instructions can have serious
consequences or it may violate regulations.
Please read these operating instructions carefully before
starting to use the unit! In case of any doubt (in the form
of translation or printing errors) the German language
operating instructions shall apply.
3. Faults and damage
If there is any reason to suspect that the safety of the unit
has been impaired, it must be withdrawn from use and
removed immediately from the Ex-area.
Measures must be taken to prevent it from being restarted
accidentally.
We recommend that the unit is returned to the manufacturer for inspection.
The safety of the unit may be compromised, if, for example:
- there is visible damage to the housing.
- the unit has been subjected to excessive loads.
- the unit has been improperly stored.
- the unit has been damaged in transit.
- unit markings or inscriptions are illegible.
- malfunctions occur.
- permitted limit values have been exceeded.
4
Page 5

4. Safety regulations
Use of this unit assumes that the operator observes the
conventional safety regulations and has read the certificate
in order to eliminate faulty operation of the unit.
The following safety regulations must also be observed with:
• The unit must not be opened within the Ex-area.
• The batteries must only be changed outside the Ex-area.
• Additional or spare batteries must not be carried in the
Ex-area.
• Only type-approved batteries types may be used.
• Only spare sealing rings and discs of ecom instruments
are allowed.
• Only accessories approved by ecom instruments GmbH
may be used.
• Prevent the unit from coming into contact with aggressive
acidic or alkaline solutions.
• Only the original headband (HB 10 H) should be used.
• Do not open the inside torch head.
4.1
Special conditions for use in potentially explosive areas
• Storing of the torch is prohibited!
• After changing the batteries or the sealing rings always
check to make sure that the sealing rings and threads are
clean and in good condition.
• Before using the lamp in the Ex-hazardous area and in
order to ensure the IP rating, please check that all parts
of the unit are hand tightened up to the stop – being
careful not to over-tighten.
5. Safety instructions
Caution! Strong light may blind other people.
• Do not look directly into the light.
• Do not shine the light directly into the eyes of other
people.
5
Page 6

6. Ex-data
6.1. ATEX
EU type examination certificate :
EPS 16 ATEX 1 170 X
Ex-marking: † II 1 G Ex ia op is IIC T4 Ga IP65
† II 1 D Ex ia IIIC T130° Da IP65
Ambient temperature: -20°C ≤ Ta ≤ +50°C
Approved for Zone 2,1 and 0, device group II, explosion
group IIC, temperature class T4.
Approved for zone 22, 21 and 20, device group II, explosion
group IIIC, maximum Temperature 130°C.
6.2. IECEx
IECEx Certificate of Conformity no.:
IECEx EPS 16.0074X
Ex-marking: Ex ia op is IIC T4 Ga IP65
Ex ia IIIC T130°C Da IP65
Ambient temperature: -20°C ≤ Ta ≤ +50°C
Approved for Zone 2, 1 and 0, device group II, explosion
group IIC, temperature class T4.
Approved for zone 22, 21 and 20, device group II, explosion
group IIIC, maximum Temperature 130°C.
7. Technical specifications
Ambient temperature Ta: -20 ... +50°C
Storage temperature: -30 ... +60°C
Batteries / power supply: 3 x LR03
according to IEC, AAA
Lamp: High-performance LED
Luminosity: approx. 3.000 lx
(at a distance of 1m
/ 6° Optik)
approx. 1800 lx
6
(at a distance of 1 m / 25° Optics)
Page 7

Luminous flux: 64 lm
Operating time: approx. 55 hours
(continuous operation)
Dimensions: 60 x 87 x 69 mm
(H x L x W)
Weight: approx. 180g
(with headband)
IP protection class: IP 65 / IP 67
ESD protection: Anti-static housing
CE-designation:
Manufacturer Model
1 Duracell Industrial
2 Panasonic Pro Power
3 Panasonic Powerline
4 Varta Industrial Alkaline 4003
5 Varta Max Tech 4703
6 Eveready Energizer E92
Table 1
Table of approved sealing rings and protective discs
Manufacturer Model
ecom Sealing ring type PL 10 H
ecom Replacement disc PL 10 H
8. Functional description / operating instructions
Please read these operating instructions carefully so that
you are familiar with, and are able to use, all of the functions
of your Lite-Ex
mation please read the instructions on the following pages
carefully!
®
‡0102
PL 10e H. For your own safety and infor-
7
Page 8
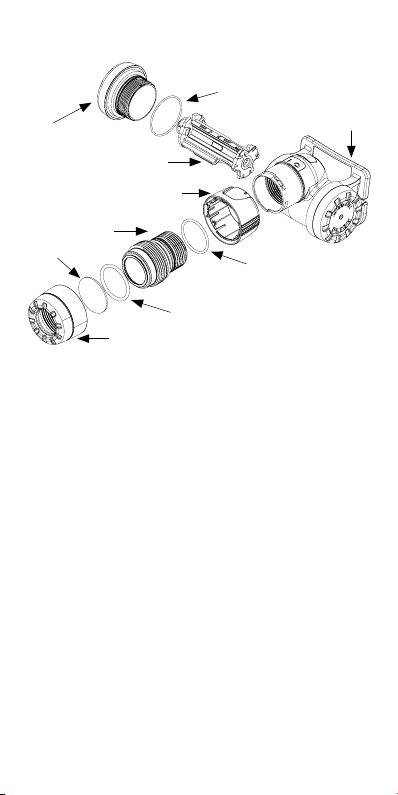
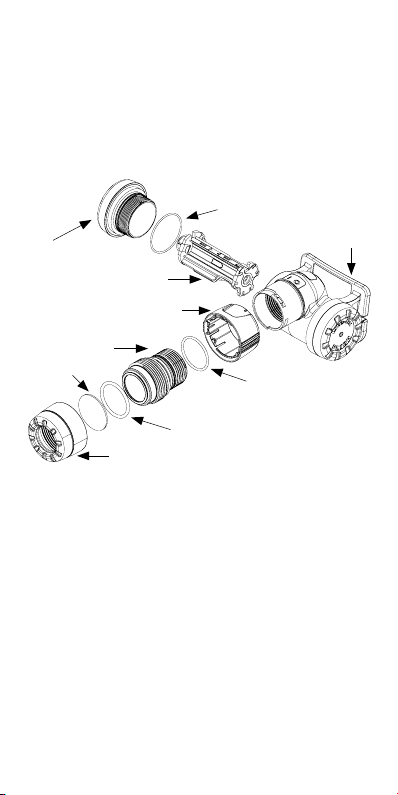
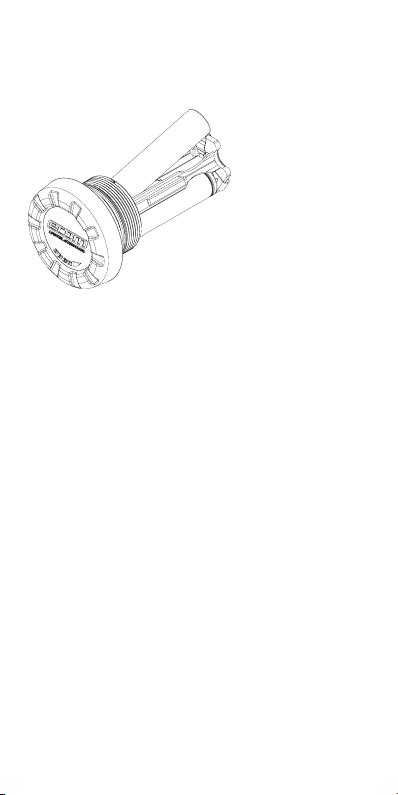
8.1 Assembly of the Lite-Ex® PL 10e H
Sealing ring 27.0 x 1.0
Cap
Flashlight body
Battery adapter
Ring switch
LED housing
Disc
Sealing ring 22.5 x 1.5
Sealing ring 22.5 x 2.0
Lamp head
Fig. 1
8.2 Getting started
The supplied batteries must be inserted to begin with
(outside the Ex-area).
In order to be able to use the lamp in the Ex-area it must
be ensured that the lamp head and the body of the lamp
are screwed together tightly. The lamp can then be switched
on by lightly rotating the yellow ring switch clockwise.
8.3 Battery replacement
The batteries should be replaced if the level of luminance is
no longer deemed to be satisfactory.
It is advisable to change all 3 batteries at the same time.
Only the appropriate, approved types of batteries may be
used (see Table 1).
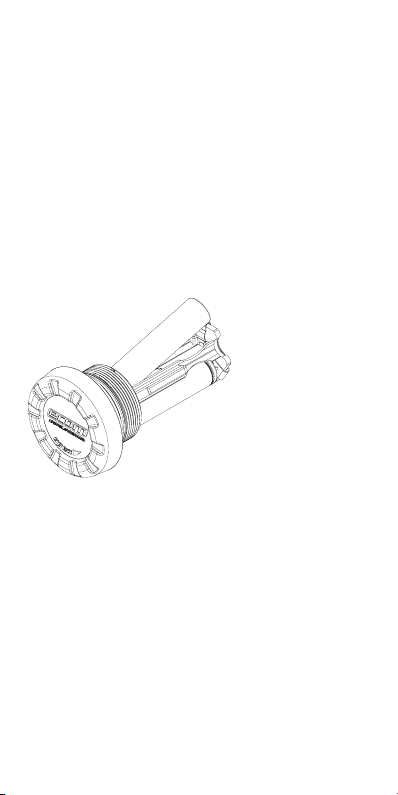
To replace the batteries turn the left-hand side cap (which
bears the „ecom“ inscription) in the direction of the arrow
and then remove the entire battery adapter (see fig. 2).
You can then remove and exchange the batteries. After
inserting the new batteries (while observing the correct
polarity) the battery adapter can be reinserted (please ob
8
-
Page 9

serve the guides in the adapter and battery compartment
when doing this). Then screw the cap back on.
Please make sure the lamp has been screwed together
completely before switching it on again.
Fig. 2
Battery replacement
- Only use type-tested batteries
(see the table 1 under point 7: Technical specifications)
- Always replace all batteries simultaneously.
- Pay attention to the correct polarity.
- Dispose of depleted batteries in an appropriate and
environmentally friendly manner!
- When changing the batteries examine the threads and
seals for cleanliness and signs of damage.
- If you notice any spilled electrolyte when changing the
battery, do not take the unit into the Ex-area, but send it
to the manufacturer for inspection.
8.4 Cleaning the ring switch
A non-contacting ring switch is used to switch on the LiteEx® PL 10e H (see 8.2). Dirt and moisture do not impair
the switching function. The ring switch is easy to clean if excessive amounts of dirt and grime have made it difficult to
turn. Start by unscrewing the lamp head. The ring switch can
now be removed and cleaned. When it has been cleaned,
replace the ring switch and rotate it until it engages firmly in
place (the line marking on the ring switch must be located
opposite the circular marking on the lamp body).
9
Page 10

The lamp head can then be screwed back onto the lamp.
8.5 Bulb replacement
The Lite-Ex® PL 10e H is equipped with a long-life LED
bulb. Under normal conditions it is not necessary to change
the LED. If, however, the lamp becomes defective or its
brightness has diminished, it should be sent to ecom instruments for inspection or repair. The LED housing should
not be opened! Conducting repairs to the LED housing or
bulb yourself poses a risk to the safety of the lamp and is
not permitted.
8.6 Replacing the protective disc
The LED housing is protected by the surrounding housing
head and an additional protective disc, which is located over
the opening where the beam is emitted. The disc is made
of high-quality material. If, however, it should break, it can be
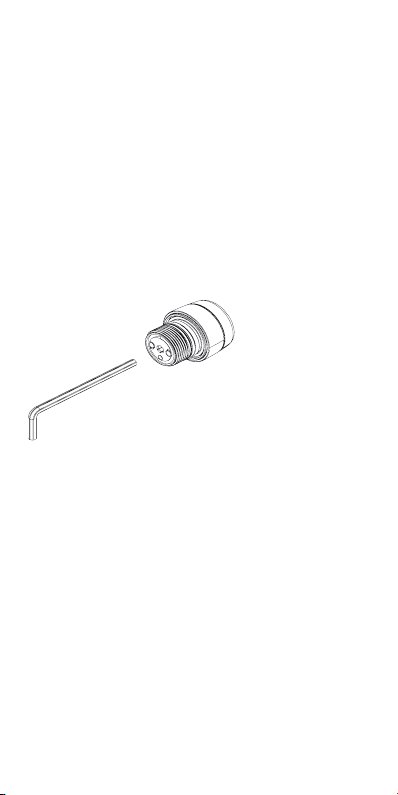
replaced. To do this, grasp the body of the Lite-Ex® PL 10e
H and the ring switch and then carefully unscrew the lamp
head by turning it anti-clockwise. To unscrew the lamp head
from the LED housing use an Allen key (A/F 4) to secure
the LED housing in place (see Fig. 3) and unscrew the
lamp head. The protective disc can now be replaced (only
use original protective discs from ecom). The LED housing
should then be cleaned thoroughly and the sealing ring
checked for signs of damage. If the sealing ring exhibits any
damage, it should also be replaced (the sealing ring is set in
a groove underneath the protective disc / only use original
sealing rings from ecom). When replacing the lamp head
on the LED housing make sure the seal and disc are seated
properly. After assembly no part of the seal should be visible
through the opening where the beam is emitted. If the inner
lamp head or lens has been damaged, the lamp should be
sent to the manufacturer for repair.
10
Page 11
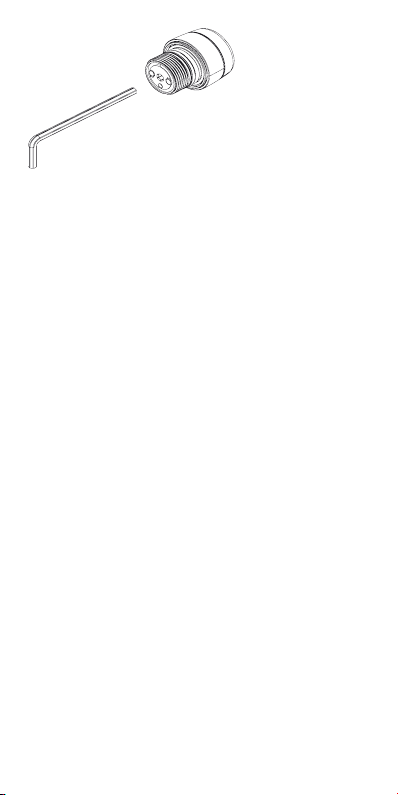
Fig. 3
9. Repairs
Repairs are to be conducted by ecom instruments GmbH
or service centres authorised by ecom instruments GmbH,
because the safety of the unit needs to be tested after
repairs are implemented.
The actual repair report sheet can be downloaded from the
service area at www.ecom-ex.com.
10. Cleaning, maintenance and storage
• Only use a suitable cloth or sponge to clean the unit.
• Do not use any solvents or abrasive cleaning agents
when cleaning.
• We recommended having the operation and lumen
output of the device checked by the manufacturer every
two years.
• The batteries should be taken out of the unit if it is to be
stored for extended periods.
• The storage temperature should be within the permitted
range of -30 °C to +60 °C.
• It should be obser ved that the electrical performance of
specific types of Zinc-Manganese Dioxide (Zn/MnO2)
batteries are limited to ambient temperatures below
the product specified ambient temperature range.
The datasheets for the specific manufacturer and type
of battery used should be consulted to see what the
recommended ambient temperature range of use is to
achieve maximum battery performance”
11
Page 12

11. Disposal
Old electrical devices by ecom instruments GmbH will be
directed to disposal at our expense and disposed of free of
charge in accordance with European Directive 2002/96/EC.
Please follow local regulations for the disposal of electronic
products. The costs associated with returning devices to
ecom instruments GmbH are to be borne by the sender.
In accordance with Article 1, Section 18 and Article 2
of the Act revising the law of Waste-Related Product
Responsibility for Batteries and Accumulators (Gesetz zur
Neuregelung der abfallrechtlichen Produktverantwortung
für Batterien und Akkumulatoren) dated 25 June 2009, we
are obligated to provide the following information.
Your device contains alkaline batteries.
Depleted batteries that can no longer be recharged should
never be disposed of along with normal or household
waste. Old batteries can contain harmful substances that
are hazardous to health and damaging to the environment.
Please return the batteries. Return is free of charge and
required by law. Please only dispose of discharged batteries
in the designated containers and tape the terminals of
lithium batteries.
Note:
The battery used in this unit poses a fire hazard and can
cause chemical injuries if it is used improperly. Neither
the batteries nor the battery cells should be opened or
disassembled and they should not be burned or exposed
to temperatures exceeding 60 °C. If the batteries need to
be disposed of, they can be removed as described under
point (8.3). The disposal regulations specified above are also
applicable for old devices.
12
Page 13

All batteries and rechargeable batteries can be recycled.
Precious raw materials such as iron, zinc and nickel can
therefore be reused.
The symbol has the following meaning:
Old electrical devices should not be disposed of along with
normal or household waste.
12. Warranty and liability
Under the general terms and conditions of business, ecom
instruments GmbH offers a two-year warranty for function
and materials on this product when used under the
specified operating and maintenance conditions. Batteries,
LED/Lamps and working parts are considered consumable
parts and are not covered under the warranty.
More detailed information regarding the General
Conditions of Delivery and Payment of ecom instruments
GmbH are available at www.ecom-ex.com or can
alternatively be requested directly from the manufacturer.
13. EU Declaration of Conformity
The EU Declaration of Conformity is enclosed with the
sales packaging as a separate document.
Please also observe the information provided underneath
the table of contents. The current EU Declaration of
Conformity can be downloaded from the relevant product
page at www.ecom-ex.com.
14. EU-type examination certificate
The certificate is enclosed with the sales packaging as a
separate document. The current EU-type examination
certificate can be downloaded from the relevant product
page at www.ecom-ex.comfrom the relevant product page
at www.ecom-ex.com
13
Page 14

14
Page 15

Inhalt
1. Anwendung ........................................................................................16
2. Sicherheitshinweise.........................................................................16
3. Fehler und unzulässige Belastungen ......................................16
4. Sicherheitsvorschriften ................................................................. 17
4.1 Besondere Bedingungen für den Einsatz in
explosionsgefährdeten Bereichen .......................................... 17
5. Sicherheitshinweise Blendgefahr! ............................................17
6. Ex-Daten ..............................................................................................18
6.1 ATEX ......................................................................................................18
6.2 IECEx ...................................................................................................... 18
7. Technische Daten ............................................................................19
8. Funktionsbeschreibung / Bedienungshinweise ................20
8.1 Aufbau der Lite-Ex® PL 10e H ................................................20
8.2 Inbetriebnahme ................................................................................20
8.3 Batteriewechsel ................................................................................20
8.4 Reinigen des Ringschalters .........................................................22
8.5 Leuchtmittelwechsel ...................................................................... 22
8.6 Wechsel der Schutzscheibe .......................................................22
9. Reparatur ............................................................................................. 23
10. Reinigung, Wartung und Lagerung .........................................23
11. Entsorgung ..........................................................................................24
12. Garantie und Haftung ...................................................................25
13. EU-Konformitätserklärung ......................................................... 26
14. EG-Baumusterprüfbescheinigung ...........................................26
Hinweis:
Die jeweils aktuelle Bedienungsanleitung, die EU-Konformitätserklärung und das Ex-Zer tifikat können auf der jeweiligen Produktseite unter www.ecom-ex.com heruntergeladen
werden, oder direkt beim Hersteller angeforder t werden.
15
Page 16

1. Anwendung
Die Lite-Ex® PL 10e H ist eine kompakte und robuste LEDStirnlampe für den industriellen Einsatz in explosionsgefährdeten Bereichen der Zonen 2, 1 und 0 sowie 22, 21 und 20
nach Richtlinie 1999/92/EG (ATEX).
2. Sicherheitshinweise
Die vorliegende Bedienungsanleitung enthält Informationen
und Sicherheitsvorschriften, die für eine sichere Funktionsweise bei den beschriebenen Bedingungen unbedingt zu
berücksichtigen sind. Eine Nichtbeachtung dieser Informationen und Hinweise kann gefährliche Folgen haben oder
gegen Vorschriften verstoßen.
Vor dem Gebrauch des Geräts ist die Bedienungsanleitung
aufmerksam zu lesen!
Im Zweifelsfall (in Form von Übersetzungs- oder Druckfehlern) gilt die deutsche Bedienungsanleitung.
3. Fehler und unzulässige Belastungen
Sobald zu befürchten ist, dass die Gerätesicherheit beeinträchtigt wird, muss das Gerät außer Betrieb genommen
und unverzüglich aus dem Ex-Bereich entfernt werden.
Die unbeabsichtigte Wiederinbetriebnahme muss verhindert werden.
Wir empfehlen das Gerät zu einer Überprüfung an den
Hersteller zu schicken.
Die Gerätesicherheit kann z.B. gefährdet sein, wenn:
- am Gehäuse Beschädigungen sichtbar sind.
- das Gerät unsachgemäßen Belastungen ausgesetzt wurde.
- das Gerät unsachgemäß gelagert wurde.
- das Gerät Transportschäden erlitten hat.
- Gerätebeschriftungen unleserlich sind.
- Fehlfunktionen auftreten.
- die zulässigen Grenzwerte überschritten wurden.
16
Page 17

4. Sicherheitsvorschriften
Die Benutzung des Geräts setzt beim Anwender die Beachtung der üblichen Sicherheitsvorschriften und das Lesen
des Zertifikates voraus, um Fehlbedienungen am Gerät
auszuschließen.
Folgende Sicherheitsvorschriften müssen zusätzlich beachtet
werden:
• Das Gerät darf im Ex-Bereich nicht geöffnet werden.
• Die Batterien dürfen nur außerhalb des Ex-Bereichs
gewechselt werden.
• Ersatzbatterien dürfen nicht mit in den Ex-Bereich
genommen werden.
• Es dürfen nur typgeprüfte Batterien verwendet werden.
• Es dürfen nur Ersatzdichtungsringe und Scheiben von
ecom instruments verwendet werden.
• Es darf nur von der ecom instruments GmbH
zugelassenes Zubehör verwendet werden.
• Der Kontakt mit aggressiven Säuren oder Basen ist zu
vermeiden.
• Es darf nur das Original-Kopfband HB 10 H verwendet
werden.
• Der innere Lampenkopf darf nicht geöffnet werden.
4.1 Besondere Bedingungen für den Einsatz in
explosionsgefährdeten Bereichen
• Ein Lagern der Lampe ist untersagt!
• Nach jedem Batterie- oder Dichtungsringwechsel sind
Dichtungsringe und Gewinde auf Sauberkeit, korrekten
Sitz und Beschädigungen zu überprüfen.
• Die Gehäuseteile der Lampe müssen vor dem Einsatz im
Ex-Bereich handfest bzw. bis zum Anschlag verschraubt
werden, um den IP-Schutz zu gewährleisten.
5. Sicherheitshinweise Blendgefahr!
• Nicht direkt in den Lichtstrahl blicken
• Lichtkegel nicht direkt auf die Augen einer anderen
Person richten
17
Page 18

6. Ex-Daten
6.1 ATEX
EU-Baumusterprüfbescheinigung: EPS 16 ATEX 1 170 X
Ex-Kennzeichnung: † II 1 G Ex ia op is IIC T4 Ga IP65
† II 1 D Ex ia IIIC T130° Da IP65
Umgebungstemperatur: -20°C ≤ Ta ≤ +50°C
Zugelassen für Zone 2, 1 und 0, Gerätegruppe II,
Explosionsgruppe IIC, Temperaturklasse T4.
Zugelassen für die Zonen 22, 21 und 20, Gerätegruppe II,
Explosionsgruppe IIIC, maximale Temperatur 130°C.
6.2 IECEx
IECEx-Konformitätszertifikat Nr.: IECEx EPS 16.0074X
Ex-Kennzeichnung: Ex ia op is IIC T4 Ga IP65
Ex ia IIIC T130°C Da IP65
Umgebungstemperatur: -20°C ≤ Ta ≤ +50°C
Zugelassen für Zone 2, 1 und 0, Gerätegruppe II,
Explosionsgruppe IIC, Temperaturklasse T4.
Zugelassen für Zone 22, 21 und Zone 20, Gerätegruppe II,
Explosionsgruppe IIIC, maximale Temperatur 130°C
18
Page 19
7. Technische Daten
Umgebungstemp. Ta: -20 ... +50°C
Lagertemperatur: -30 ... +60°C
Batterien /
Stromversorgung: 3 x LR03 nach IEC, AAA
Leuchtmittel: Hochleistungs-LED
Leuchtkraft: 3.000 lx (bei 1m Abstand / 6° Optik)
1800 lx (bei 1m Abstand / 25° Optik)
Lichtstrom: 64 lm
Betriebsdauer: ca. 55 Stunden (Dauerbetrieb)
Abmessungen: 60 x 87 x 69 mm (H x L x B)
Gewicht: ca. 180g (mit Kopfband)
IP-Schutzart: IP 65 / IP 67
ESD-Schutz: antistatisches Gehäuse
CE-Kennzeichnung: ‡0102
Tabelle mit typgeprüften Batterien
Hersteller Ty p
1 Duracell Industrial
2 Panasonic Pro Power
3 Panasonic Powerline
4 Varta Industrial Alkaline 4003
5 Varta Max Tech 4703
6 Eveready Energizer E92
Tabelle 1
Tabelle mit zugelassenen Dichtungen und Schutzscheiben
Hersteller Typ
ecom Dichtungsringe Typ PL 10e H
ecom Ersatzscheibe PL 10e H
19
Page 20
8. Funktionsbeschreibung / Bedienungshinweise
Bitte lesen Sie diese Bedienungsanleitung sorgfältig durch,
damit Sie alle Funktionen Ihrer Lite-Ex® PL 10e H kennen
und nutzen können. Lesen Sie zu Ihrer Sicherheit und Information die Hinweise auf den folgenden Seiten!
8.1 Aufbau der Lite-Ex® PL 10e H
O-Ring 27 x 1,0
Verschlusskappe
Lampengehäuse
Batterieadapter
Ringschalter
LED-Gehäuse
Scheibe
O-Ring 22,5 x 1,5
O-Ring 22,5 x 2,0
Lampenkopf
Bild 1
8.2 Inbetriebnahme
Zuerst müssen die mitgelieferten Batterien eingesetzt
werden (außerhalb des Ex-Bereiches). Damit die Lampe im
Ex-Bereich eingesetzt werden kann, muss sichergestellt sein,
dass der Lampenkopf und das Lampengehäuse komplett
aufgeschraubt sind. Danach kann die Lampe durch eine
leichte Drehung des gelben Ringschalters im Uhrzeigersinn
eingeschaltet werden.
8.3 Batteriewechsel
Sollte festgestellt werden, dass die Leuchtkraft nicht mehr
zufriedenstellend ist, sollten die Batterien gewechselt werden.
Es empfiehlt sich, alle 3 Batterien gleichzeitig zu wechseln.
20
Page 21
Es dürfen nur Batterien des entsprechend zugelassenen Typs
eingesetzt werden (siehe Tabelle 1).
Zum Batteriewechsel die linke, seitliche Verschlusskappe
mit der Aufschrift „ecom“ in Richtung des aufgedruckten
Pfeils drehen und dann den gesamten Batterieadapter
herausnehmen (siehe Bild 2). Danach können die Batterien
entnommen und gewechselt werden. Nach dem Einsetzen
der neuen Batterien (Polarität beachten) kann der Batterieadapter wieder eingesetzt werden (Führungsschienen
im Adapter und Batterieschacht beachten). Danach die
Verschlusskappe wieder aufschrauben. Bitte achten sie darauf, dass die Lampe vor dem erneuten Einschalten wieder
komplett verschlossen ist.
Bild 2
Batteriewechsel
- Nur typgeprüfte Batterien verwenden
(siehe Tabelle 1 unter Punkt 7.: Technische Daten)
- Immer alle Batterien gleichzeitig auswechseln.
- Auf richtige Polarität achten.
- Verbrauchte Batterien sach- und umweltgerecht entsorgen!
- Beim Batteriewechsel sind die Gewinde und Dichtungen
auf Sauberkeit und Beschädigung zu überprüfen.
- Wird beim Batteriewechsel ausgetretenes Elektrolyt
festgestellt, ist das Gerät nicht in den Ex-Bereich
einzubringen und dem Hersteller zur Überprüfung zu
zusenden.
21
Page 22

8.4 Reinigen des Ringschalters
Die Lite-Ex® PL 10e H schaltet kontaktlos über den zuvor
schon beschriebenen Ringschalter. Schmutz und Feuchte
können die Schalterfunktion nicht beeinträchtigen. Sollte der
Ringschalter durch starke Schmutzablagerungen schwergängiger werden, kann der Ring einfach und problemlos
gereinigt werden.
Zunächst den Lampenkopf abschrauben. Der Ringschalter
kann nun nach vorne abgezogen und gereinigt werden.
Nach der Reinigung den Ringschalter wieder aufsetzten und
so lange drehen, bis er fest einrastet (Strich-Markierung des
Ringschalters muss über der Kreis-Markierung des Lampenkörpers sitzen). Danach kann der Lampenkopf wieder
aufgeschraubt werden.
8.5 Leuchtmittelwechsel
Die Lite-Ex® PL 10e H ist mit einem extrem langlebigen
LED-Leuchtmittel ausgestattet. Ein Wechsel der LED wird
im Normalfall nicht notwendig sein. Bei einem Defekt oder
bei nachlassender Helligkeit ist die Lampe zur Überprüfung
oder Reparatur an ecom instruments zu senden. Das
LED-Gehäuse darf nicht geöffnet werden! Selbständige
Eingriffe am LED-Gehäuse oder Leuchtmittel gefährden die
Sicherheit der Lampe und sind nicht zulässig.
8.6 Wechsel der Schutzscheibe
Das LED-Gehäuse ist durch den es umgebenden Gehäusekopf und durch eine zusätzliche Scheibe am Lichtaustritt
geschützt. Sollte es trotz der eingesetzten, hochwertigen
Scheibe zu einem Bruch kommen, so kann diese gewechselt
werden. Dazu wird das Lampengehäuse der Lite-Ex®
PL 10e H sowie der Ringschalter festgehalten und der Lampenkopf vorsichtig gegen den Uhrzeigersinn abgeschraubt.
Um den Lampenkopf vom LED-Gehäuse abzuschrauben,
kontert man mit einem Innensechskant SW4 das LEDGehäuse (siehe Bild 3) und schraubt den Lampenkopf
22
Page 23
herunter. Nun kann die Schutzscheibe ausgetauscht werden
(nur original ecom-Schutzscheibe benutzen). Das LED-Gehäuse ist anschließend gut zu reinigen und der Dichtungsring auf Beschädigungen zu prüfen. Sollte der Dichtungsring
Beschädigungen aufweisen, ist er ebenfalls zu tauschen(der
Dichtungsring ist unter der Schutzscheibe in einer Nut
eingefasst / nur Original ecom Dichtungsringe benutzen).
Beim Aufsetzen des Lampenkopfes auf das LED-Gehäuse ist
darauf zu achten, dass Dichtung und Scheibe sauber anliegen. Es dürfen nach der Montage keine Dichtungsanteile im
Lichtaustritt sichtbar sein. Sind der innere Lampenkopf oder
die Linse ebenfalls beschädigt worden, so ist die Lampe zur
Reparatur an den Hersteller zu senden.
Bild 3
9. Reparatur
Reparaturen dürfen nur von der ecom instruments GmbH
oder Servicecenter, die von der ecom instruments GmbH
autorisiert wurden, durchgefürt werden, da die Sicherheit
des Gerätes nach der Reparatur überprüft werden muss.
Der Reparaturbegleitschein steht im Service-Bereich unter
www.ecom-ex.com zum Download bereit.
10. Reinigung, Wartung und Lagerung
• Gerät nur mit einem geeigneten Tuch oder Schwamm
reinigen. Verwenden Sie zur Reinigung keine Lösungsoder Scheuermittel.
• Es wird empfohlen, die Funktion und Genauigkeit des
Geräts alle zwei Jahre vom Hersteller überprüfen zu
lassen.
23
Page 24

• Bei längerer Lagerung sind die Batterien aus dem Gerät
zu entnehmen.
• Zulässige Lagertemperaturen -30°C bis +60°C nicht
unter- bzw. überschreiten!
• Beachten Sie, dass die Leistungsfähigkeit bestimmter
Zink-Mangandioxid (Zn/MnO2)-Batterien bei
Umgebungstemperaturen bereits unterhalb der für das
Produkt angegebenen Umgebungstemperaturbereiche
nachlässt. Lesen Sie die Informationen des
entsprechenden Batterieherstellers, um den empfohlenen
Umgebungstemperaturbereich der Batterie zum Erzielen
einer maximalen Batterieleistung zu ermitteln.
11. Entsorgung
Elektro- und Elektronik-Altgeräte von der Firma ecom
instruments GmbH werden zu unseren Lasten der
Entsorgung zugeführt und nach der europäischen Richtlinie
2002/96/EG kostenfrei entsorgt. Bitte befolgen sie die
lokalen Bestimmungen zur Entsorgung von ElektronikProdukten.
Der Versand der Geräte zu ecom instruments GmbH geht
auf Kosten des Versenders.
Nach Artikel 1, §18 und Artikel 2 des Gesetzes zur
Neuregelung der abfallrechtlichen Produktverantwortung
für Batterien und Akkumulatoren vom 25. Juni 2009 sind wir
zu folgenden Hinweisen verpflichtet.
Ihr Gerät enthält alkalische Batterien.
Sind die Batterien „leer“ oder lassen sich die Akkus nicht
mehr aufladen, dürfen Sie nicht in den normalen Müll
oder Hausmüll. Altbatterien enthalten möglicherweise
Schadstoffe, die Umwelt und Gesundheit schaden können.
Bitte geben Sie alte Geräte zurück. Die Rückgabe ist
unentgeltlich und gesetzlich vorgeschrieben. Bitte werfen
Sie nur entladene Batterien in die aufgestellten Behälter und
kleben Sie bei Lithium-Batterien die Pole ab.
24
Page 25
Achtung: Die im Gerät eingesetzte Batterie birgt eine
Feuergefahr und die Gefahr von chemischen Verletzungen
bei nicht ordnungsgemäßem Einsatz. Weder die Batterie
noch die Batteriezellen dürfen geöffnet oder demontiert,
nicht über 60 °C erhitzt oder verbrannt werden. Im
Entsorgungsfall kann die Batterie wie in Punkt (7)
beschrieben entnommen werden. Im Übrigen gelten die
oben genannten Entsorgungsvorschriften für Altgeräte.
Alle Batterien und Akkus werden wieder verwertet. So
lassen sich wertvolle Rohstoffe wie Eisen, Zink oder Nickel
wieder gewinnen.
Das Symbol hat folgende Bedeutung:
Elektro- und Elektronik-Altgeräte dürfen nicht in den
normalen Müll oder Hausmüll.
12. Garantie und Haftung
Für dieses Produkt gewährt die ecom instruments
GmbH laut den allgemeinen Geschäftsbedingungen eine
Garantie von zwei Jahren auf Funktion und Material
unter den angegebenen und zulässigen Betriebs- und
Wartungsbedingungen. Ausgenommen hiervon sind alle
Verschleißteile (z.B. Batterien, Leuchtmittel, etc).
Weitere Informationen zu den Allgemeinen Liefer- und
Zahlungsbedingungen der ecom instruments GmbH finden
Sie unter www.ecom-ex.com oder können Sie direkt beim
Hersteller anfordern.
25
Page 26

13. EU-Konformitätserklärung
Die EU-Konformitätserklärung liegt der Verkaufsverpackung
als separates Dokument bei. Bitte beachten Sie auch die
unter dem Inhaltsverzeichnis angegebenen Informationen.
Die aktuelle EU-Konformitätserklärung steht auf der
entsprechenden Produktseite unter www.ecom-ex.com
zum Download zur Verfügung.
14. EG-Baumusterprüfbescheinigung
Die EU-Baumusterprüfbescheinigung liegt der
Verkaufsverpackung als separates Dokument bei. Die
aktuelle EU-Baumusterprüfbescheinigung steht auf der
entsprechenden Produktseite unter www. ecom-ex.com
zum Download zur Verfügung.
26
Page 27

Sommaire
1. Utilisation .............................................................................................28
2. Consignes de sécurité .................................................................. 28
3. Erreurs et efforts non admissibles ......................................... 28
4. Consignes de sécurité .................................................................. 29
4.1 Conditions particulières pour l‘utilisation en zone ...........
dangereuse ..........................................................................................29
5. Consigne de sécurité .................................................................... 30
6. Caractéristiques Ex ........................................................................ 30
6.1 ATEX ......................................................................................................30
6.2 IECEx ...................................................................................................... 30
7. Caractéristiques techniques ...................................................... 31
8. Description fonctionnelle / consignes d‘utilisation ....... 32
8.1 Structure de la Lite-Ex® PL 10e H ........................................32
8.2 Mise en service .................................................................................32
8.3 Remplacement des piles .............................................................32
8.4 Nettoyage du commutateur à anneau ................................ 33
8.5 Remplacement de l‘ampoule ....................................................34
9. Réparation ........................................................................................... 35
11. Élimination ...........................................................................................36
12. Garantie et responsabilité ..........................................................37
13. Déclaration UE de conformité ................................................37
14. Certificat d‘examen de type UE.............................................38
Remarque :
Le mode d‘emploi à jour, la déclaration UE de conformité et
le certificat de conformité Ex peuvent être téléchargés sur
la page produit correspondante, à l‘adresse suivante : www.
ecom-ex.com, ou demandés directement au fabricant.
27
Page 28

1. Utilisation
La Lite-Ex® PL 10e H est une lampe frontale à DEL
compacte et robuste destinée à un usage industriel dans les
atmosphères explosives des zones 2, 1 et 0, ainsi que 22, 21
et 20 conformément à la directive 1999/92/CE (ATEX).
2. Consignes de sécurité
Le présent mode d‘emploi contient des informations et
des consignes de sécurité à respecter impérativement pour
un fonctionnement sûr dans les conditions décrites. Le
non-respect de ces informations et consignes peut avoir des
conséquences dangereuses ou être contraire aux directives.
Avant d‘utiliser l‘appareil, lire attentivement le mode
d‘emploi ! En cas de doute (erreurs de traduction ou
d‘impression), le mode d‘emploi allemand fait foi.
3. Erreurs et efforts non admissibles
Dès qu‘il apparaît un doute sur la capacité de l‘appareil à
assurer une sécurité totale, mettre l‘appareil hors service et
le retirer immédiatement de la zone explosible.
Empêcher toute remise en service accidentelle.
Nous vous recommandons d‘envoyer l‘appareil au fabricant
en vue de son contrôle.
La sécurité de l‘appareil peut par exemple être remise en
question si :
- des dommages sont visibles sur le boîtier ;
- l‘appareil a été soumis à des efforts non conformes ;
- l‘appareil a été stocké de façon non conforme ;
- l‘appareil a subi des dommages lors du transpor t ;
- les inscriptions sur l‘appareil sont illisibles ;
- des dysfonctionnements se produisent ;
- les valeurs limites admissibles ont été dépassées.
28
Page 29

4. Consignes de sécurité
L’utilisation de l’appareil suppose, de la part de l’utilisateur,
le respect des dispositions habituelles relatives à la sécurité
ainsi que la lecture du certificat, et ce afin d’exclure toute
erreur de manipulation de l’appareil.
Les réglementations de sécurité supplémentaires suivantes
doivent également être respectées :
• Il est interdit d’ouvrir l’unité à l’intérieur de la zone
explosive.
• Le remplacement des piles est uniquement autorisé à
l’extérieur de la zone explosive.
• Il est interdit d’introduire des piles supplémentaires ou de
rechange dans la zone explosive.
• Utiliser uniquement des piles homologuées.
• Seule l’utilisation de bagues et rondelles d’étanchéité de
rechange de l’entreprise ecom instruments est autorisée.
• Exclusivement employer les accessoires agréés par
l’entreprise ecom instruments GmbH.
• Éviter de mettre en contact l‘appareil avec des acides ou
bases agressifs.
• N‘utiliser que le bandeau de tête d‘origine HB 10 H.
• Il est interdit d’ouvrir l’intérieur de la tête de la lampe
de poche.
4.1 Conditions particulières pour l‘utilisation en zone
dangereuse
• Il est interdit de stocker la lampe!
• Après chaque remplacement de piles, de joint ou
d’opération de nettoyage, véfifier qu’aucun élément ne
soit endommagé.
• La lampe doit être montée et toutes les pièces vissées
à fond avant son utilisation en zone Ex, afin de garantir
l‘indice de protection IP.
29
Page 30

5. Consigne de sécurité
Risque d‘éblouissement!
• Ne pas regarder directement dans le faisceau lumineux.
• Ne pas diriger le cône lumineux directement dans les
yeux d‘autres personnes.
6. Caractéristiques Ex
6.1 ATEX
Certificat d‘examen de type UE : EPS 16 ATEX 1 170 X
Marquage Ex : † II 1 G Ex ia op is IIC T4 Ga IP65
† II 1 D Ex ia IIIC T130° Da IP65
Température ambiante : -20 °C ≤ Ta ≤ +50 °C
Homologué pour les zones 2, 1 et 0, groupe d’appareils II,
groupe d’explosion IIC, classe de température T4.
Homologué pour les zones 22, 21 et 20, groupe d’appareils
II, groupe d’explosion IIIC, température maximale de 130 °C.
6.2 IECEx
Certificat de conformité IECEx n° : IECEx EPS 16.0074X
Marquage Ex : Ex ia op is IIC T4 Ga IP65
Ex ia IIIC T130°C Da IP65
Température ambiante : -20 °C ≤ Ta ≤ +50 °C
Homologué pour les zones 2, 1 et 0, groupe d’appareils II,
groupe d’explosion IIC, classe de température T4.
Homologué pour les zones 22, 21 et 20, groupe d’appareils II,
groupe d’explosion IIIC, température maximale de 130 °C.
30
Page 31

7. Caractéristiques techniques
Température ambiante Ta : -20°C ... +50°C
Température de stockage : -30°C ... +60°C
Piles / alimentation électrique : 3 x LR03 d‘après CEI,
AAA
Ampoules: DEL hautes performances
Luminosité: environ 3.000 lux
(à une distance de 1 m / 6° Optique)
environ 1.800 lux
(à une distance de 1 m / 25° Optique)
Courant d’éclairage: 64 lm
Autonomie : environ 55 heures
(utilisation prolongée)
Dimensions : 60 x 87 x 69 mm (h x L x l)
Poids : env. 180g (avec bandeau de tête)
Indice de
protection IP : IP 65 / IP 67
Indice ESC : boîtier antistatique
Marquage CE : ‡0102
Tableau des piles de type certifié
Fabricant Type
1 Duracell Industrial
2 Panasonic Pro Power
3 Panasonic Powerline
4 Varta Industrial Alkaline 4003
5 Varta Max Tech 4703
6 Eveready Energizer E92
Tableau 1
Tableau des joints et lentilles de protection homologués
Fabricant Type
ecom Bagues d‘étanchéité type PL 10e H
ecom Lentille de rechange PL 10e H
31
Page 32

8. Description fonctionnelle / consignes d‘utilisation
Veuillez lire attentivement ce mode d‘emploi afin de
connaître et de pouvoir utiliser toutes les fonctions de votre
Lite-Ex® PL 10e H. Pour votre sécurité et votre information,
lisez les consignes figurant sur les pages suivantes !
8.1 Structure de la Lite-Ex® PL 10e H
Joint torique 27,0 x 1,0
Cache
Boîtier de la lampe
Adaptateur pour piles
Commutateur à anneau
Enveloppe de la LED
Lentille
Joint torique 22,5 x 1,5
Joint torique 22,5 x 2,0
Tête de lampe
Illustration 1
8.2 Mise en service
Commencer par installer les piles fournies (en dehors de
la zone explosible). Pour pouvoir utiliser la lampe en zone
explosible, s‘assurer que la tête et le boîtier de la lampe
sont complètement vissés. Il est ensuite possible d‘allumer
la lampe en faisant tourner légèrement le commutateur à
anneau jaune dans le sens horaire.
8.3 Remplacement des piles
S‘il est constaté que l‘intensité lumineuse n‘est plus satisfaisante, remplacer les piles. Il est recommandé de remplacer
les trois piles en même temps. Seules des piles de type
homologué peuvent être utilisées (voir tableau 1).
Pour procéder au remplacement des piles, tournez le
cache latéral gauche portant l‘inscription « ecom » dans
32
Page 33

le sens de la flèche imprimée et retirer l‘adaptateur pour
piles dans son intégralité (voir illustration 2). Vous pouvez
ensuite retirer et remplacer les piles. Après l‘installation
de nouvelles piles (respecter la polarité), vous pouvez
réinstaller l‘adaptateur pour piles (utiliser les rails de guidage
présents au niveau de l‘adaptateur et du logement des piles). Revissez ensuite le cache. Veiller à ce que la lampe soit
parfaitement fermée avant de l‘allumer à nouveau.
Illustration 2
Remplacement des piles
- Utiliser uniquement des piles homologuées (voir le tableau
1 sous le point 7: Caractéristiques techniques)
- Toujours remplacer toutes les piles en même temps.
- Respecter la bonne polarité.
- Éliminer les piles usées de manière appropriée et en
respectant l’environnement !
- Lors du remplacement des piles, vérifier l‘état de propreté
et d‘endommagement du filetage et des joints.
-
Si lors du changement de piles on constate la présence
d‘électrolyte, l‘appareil ne doit pas être introduit dans la zone
explosible. Le renvoyer au fabricant à des fins de contrôle.
8.4 Nettoyage du commutateur à anneau
La Lite-Ex® PL 10e H commute sans contact via le
commutateur à anneau décrit précédemment. La saleté et
l‘humidité ne peuvent pas nuire à la fonction de commutation. Si le commutateur à anneau devient difficile à actionner
en raison d‘importants dépôts de saletés, l‘anneau peut être
nettoyé facilement et sans problème.
33
Page 34

Commencer par dévisser la tête de lampe. Le commutateur
à anneau peut alors être retiré vers l‘avant et nettoyé. Après
le nettoyage, réinstaller le commutateur à anneau et tourner
jusqu‘à ce qu‘il s‘enclenche correctement (la ligne marquée
sur le commutateur à anneau doit se trouver au-dessus
du cercle marqué sur le boîtier de la lampe). Il est ensuite
possible de revisser la tête de lampe.
8.5 Remplacement de l‘ampoule
La Lite-Ex® PL 10e H est équipée d‘une DEL à durée de vie
extrêmement longue. En temps normal, le remplacement de
la DEL n‘est pas nécessaire. En cas de défaut ou d‘éclairage
insuffisant, la lampe doit être envoyée à ecom instruments
en vue de sa vérification ou de sa réparation. Ne jamais
ouvrir l‘enveloppe de la DEL ! Toute intervention au niveau
de l‘enveloppe de la DEL ou de l‘ampoule compromet la
sécurité de la lampe et est interdite.
8.6 Remplacement de la lentille de protection
L‘enveloppe de la DEL est protégée au niveau de la sortie
de lumière par la tête de lampe qui l‘entoure et par une
lentille supplémentaire. Si, malgré sa grande qualité, la
lentille se cassait, il serait possible de la remplacer. Pour cela,
maintenir le boîtier de la lampe Lite-Ex® PL 10e H et le
commutateur à anneau et faire tourner délicatement la tête
de lampe dans le sens anti-horaire. Pour dévisser la tête
de lampe de l‘enveloppe de la DEL, bloquer l‘enveloppe
de la DEL avec une clé six pans de 4 (voir illustration 2) et
dévisser la tête de lampe. Remplacer alors la lentille de protection (n‘utiliser que des lentilles de protection d‘origine
ecom). Bien nettoyer ensuite l‘enveloppe de la DEL et
vérifier que la bague d‘étanchéité n‘est pas endommagée. Si
la bague d‘étanchéité présente des dommages, la remplacer
également (la bague d‘étanchéité est placée dans une rainure sous la lentille de protection / n‘utiliser que des bagues
d‘étanchéité d‘origine ecom). Veiller lors de l‘installation de
la tête de lampe sur l‘enveloppe de la DEL à ce que le joint
34
Page 35

et la lentille soient bien en place. Après le montage, aucune
partie du joint ne doit être visible au niveau de la sortie
de lumière. Si l‘enveloppe de la DEL a été endommagée, la
lampe doit être envoyée au fabricant pour réparation.
Illustration 3
9. Réparation
Les réparations doivent être effectuées par ecom
instruments GmbH ou des centres de réparation autorisés
par ecom instruments GmbH, car la sécurité de l’appareil
doit être testée une fois la réparation effectuée.
Vous pouvez télécharger la fiche de rapport de réparation
actuelle à partir de l’espace dédié au S.A.V. Sur www.
ecom-ex.com.
10. Nettoyage, entretien et stockage
• Nettoyer l‘appareil uniquement avec un chiffon ou une
éponge appropriée. Lors du nettoyage, ne pas utiliser de
solvants ou d‘agents abrasifs.
• Il est recommandé de faire vérifier tous les deux ans,
par le fabricant, le bon fonctionnement et la précision de
l’appareil.
• En cas de stockage prolongé, retirer les piles de l’appareil.
• Respecter les températures de stockage comprises
entre -30 °C et +60 °C !
• Veuillez noter que les performances électriques des types
de batteries spéciales au zinc / dioxyde de manganèse
(Zn/MnO2) se limitent aux températures ambiantes
inférieures à la plage de température ambiante spécifique
au produit.
35
Page 36

Il est conseillé de consulter les fiches de données pour
le fabricant spécifique et le type de batterie employé
afin de connaître la plage de température ambiante
recommandée de manière à garantir des performances
maximales de la batterie.
11. Élimination
Les vieux appareils électriques de ecom instruments GmbH
seront envoyés pour élimination à nos frais et éliminés
gratuitement en vertu de la directive européenne 2002/96/
EC. Veuillez observer les règlements locaux pour
l’élimination des produits électroniques. Les coûts liés au
retour des appareils à ecom instruments GmbH sont à la
charge de l’expéditeur.
Conformément à l‘article 1, § 18 et à l‘article 2 de la
loi du 25 juin 2009 sur la nouvelle réglementation de
la responsabilité pour les produits soumis au droit des
déchets pour les batteries et accumulateurs
(Gesetz zur
Neuregelung der abfallrechtlichen Produktverantwortung
für Batterien und Akkumulatoren),
nous sommes dans
l‘obligation de fournir les informations ci-après.
Votre appareil contient des piles alcalines.
Si les batteries sont « vides » ou si les accumulateurs ne
peuvent plus être rechargés, vous ne devez pas les jeter
avec les déchets normaux ni avec les déchets ménagers.
Les batteries usagées peuvent contenir des polluants
susceptibles de nuire à l‘environnement et à la santé. Prière
de nous retourner l’appareil. Cette restitution est gratuite
et inscrite dans la loi. Veuillez ne déposer des batteries
déchargées que dans les conteneurs appropriés et masquer
les pôles des batteries au lithium. Attention : la batterie
utilisée dans cet appareil peut provoquer des risques
d’incendie ou de blessures chimiques en cas d‘utilisation non
conforme.
36
Page 37

Ne tentez pas d’ouvrir ou de démonter la batterie ni
ses éléments, de les incinérer ni de les porter à des
températures supérieures à 60 °C. Pour la mise au rebut, la
batterie peut être retirée comme indiqué au point (7). Les
directives de mise au rebut indiquées ci-dessus s‘appliquent
en particulier aux appareils usagés. Tous les accumulateurs
et batteries sont revalorisés. Il est notamment possible de
réutiliser des matières premières de grande valeur telles
que le fer, le zinc ou le nickel.
Le symbole a la signification suivante :
Les appareils électriques et électroniques ne doivent pas
être jetés avec les déchets normaux ni avec les déchets
ménagers.
12. Garantie et responsabilité
Conformément à ses conditions générales de vente, ecom
instruments GmbH accorde pour ce produit une garantie
de deux ans pièces et main-d‘œuvre, dans les conditions
d‘utilisation et d‘entretien indiquées et autorisées. En sont
exclues toutes les pièces d‘usure (p. ex. piles, ampoules
d‘éclairage, etc.).
Pour de plus amples informations à propos des Conditions
générales de livraison et de paiement de l’entreprise ecom
instruments GmbH, consultez le site www.ecom-ex.com ou
adressez-vous directement au fabricant.
13. Déclaration UE de conformité
La déclaration UE de conformité est fourni avec le produit
sous forme d’un document distinct. Veuillez également
observer les informations fournies au-dessous de la table
des matières. La déclaration de conformité UE en cours
de validité peut être téléchargée sur la page du produit
correspondant sur www.ecom-ex.com.
37
Page 38

14. Certificat d‘examen de type UE
Le certificat est fourni avec le produit sous forme d’un
document distinct. Le Certificat d‘examen de type UE en
cours de validité peut être téléchargé sur la page du produit
correspondant sur www.ecom-ex.com.
38
Page 39

Indice
1. Uso ..........................................................................................................40
2. Indicazioni di sicurezza..................................................................40
3. Guasti e sollecitazioni non consentite .................................40
4. Prescrizioni di sicurezza ............................................................... 41
4.1 Speciale utilizzo all’ interno della zona classificata Ex..41
5. Avvertenza di sicurezza ............................................................... 41
6. Dati sul rischio di esplosioni ...................................................... 42
6.1 ATEX ......................................................................................................42
6.2 IECEx ...................................................................................................... 42
7. Dati tecnici ..........................................................................................42
8. Descrizione delle funzioni / Funzionamento ................... 43
8.1 Struttura della Lite-Ex
®
PL 10e H .........................................44
8.2 Messa in funzione ............................................................................44
8.3 Sostituzione delle batterie ..........................................................44
8.4 Pulizia del commutatore ad anello ........................................45
8.5 Sostituzione della lampadina .....................................................46
8.6 Sostituzione del vetro di protezione ....................................46
9. Riparazione ......................................................................................... 47
10. Pulizia, manutenzione e conservazione ...............................47
11. Smaltimento .......................................................................................48
12. Garanzia e responsabilità ............................................................49
13. Dichiarazione di conformità UE..............................................50
14. Certificato di esame UE del tipo ........................................... 50
Nota:
La versione aggiornata del manuale d’uso, la dichiarazione
di conformità UE ed il certificato sul rischio di esplosione
possono essere scaricati dalla pagina relativa al prodotto
all’indirizzo www.ecom-ex.com oppure essere richiesti
direttamente al produttore.
39
Page 40

1. Uso
Lite-Ex® PL 10e H è una lampada frontale a LED robusta e
compatta per l’impiego industriale in aree a rischio esplosione delle zone 2,1 e 0 e 22, 21 e 20 come previsto dalla
direttiva 1999/92/EG (ATEX).
2. Indicazioni di sicurezza
Le presenti istruzioni per l’uso contengono informazioni
e prescrizioni di sicurezza che occorre assolutamente
rispettare ai fini di un funzionamento sicuro alle condizioni
descritte. La mancata osservanza di tali informazioni e
indicazioni può avere conseguenze pericolose o violare le
prescrizioni previste.
Prima di usare l’apparecchio, leggere attentamente le
istruzioni per l’uso!
In caso di dubbi (errori di traduzione o di stampa) è da
ritenersi valida la versione in lingua tedesca.
3. Guasti e sollecitazioni non consentite
Se si teme che la sicurezza dell’apparecchio sia pregiudicata,
è necessario spegnerlo immediatamente e allontanarlo dalla
zona a rischio di esplosione.
Evitare la messa in funzione involontaria.
Consigliamo di inviare l’apparecchio al produttore per
essere sottoposto a controllo.
La sicurezza dell’apparecchio può essere pregiudicata se
ad es.:
- la parte esterna è stata visibilmente danneggiata.
- l’apparecchio è stato esposto a sollecitazioni inopportune.
- l’apparecchio è stato conservato in modo inoppor tuno.
- l’apparecchio ha subito danni durante il trasporto.
- le diciture sull’apparecchio sono illeggibili.
- si verificano malfunzionamenti.
- sono stati superati i valori limite consentiti.
40
Page 41

4. Prescrizioni di sicurezza
L’uso dell’unità presuppone che l’utente si attenga alle
normative standard sulla sicurezza e abbia letto il certificato
per evitare un impiego errato del dispositivo.
È inoltre necessario rispettare le normative sulla sicurezza
riportate di seguito:
• L’unità non deve essere aperta all’interno dell’area a
rischio di esplosioni.
• Le batterie devono essere sostituite solo al di fuori
dell’area a rischio di esplosioni.
• Non portare batterie supplementari e di scor ta
all’interno dell’area a rischio di esplosione.
• Impiegare esclusivamente batterie omologarte.
• È consentito impiegare solo guarnizioni ad anello e vetri
di ricambio di ecom instruments.
• Possono essere utilizzati solo gli accessori autorizzati da
ecom instruments GmbH.
• Evitare di far entrare in contatto il dispositivo con acidi o
basi aggressive.
• È consentito utilizzare solo la fascia HB 10 H originale.
• La testa interna della lampada non deve essere aperta.
4.1 Speciale utilizzo all’ interno della zona classificata Ex
• e’ proibito stoccare le torche
• dopo aver cambiato le batterie e la guarnizone, assicurarsi
che i filetti e la guarnizi one stessa siano puliti e in buone
condizioni.
• Prima di utilizzare la torcia in zone pericolose e per
garantire il livello di protezione IP, è necessario verificare
che tutte le parti siano avvitate e serrate a mano
(evitando di eccedere).
5. Avvertenza di sicurezza
Rischio di accecamento!
• Non guardare mai direttamente il raggio di luce
• non puntare mai la luce negli occhi di altre persone
41
Page 42

6. Dati sul rischio di esplosioni
6.1 ATEX
Certificato di esame UE del tipo: EPS 16 ATEX 1 170 X
Marcatura Ex: † II 1 G Ex ia op is IIC T4 Ga IP65
† II 1 D Ex ia IIIC T130° Da IP65
Temperatura ambiente: -20°C ≤ Ta ≤+50°C
Approvato per la zona 2,1 e 0, il gruppo di dispositivi II, il
gruppo di esplosione IIC, la classe di temperatura T4.
Approvato per la zona 22, 21 e 20, il gruppo di dispositivi II,
il gruppo di esplosione IIIC, temperatura max. 130°C.
6.2 IECEx
Certificato di conformità IECEx n.: IECEx EPS 16.0074X
Marcatura Ex: Ex ia op is IIC T4 Ga IP65
Ex ia IIIC T130°C Da IP65
Temperatura ambiente: -20°C ≤ Ta ≤ +50°C
Approvato per la zona 2, 1 e 0, il gruppo di dispositivi II, il
gruppo di esplosione IIC, la classe di temperatura T4.
Approvato per la zona 22, 21 e 20, il gruppo di dispositivi II,
il gruppo di esplosione IIIC, temperatura max. 130°C.
7. Dati tecnici
Temperatura ambiente Ta: -20°C ... +50°C
Temperatura di stoccaggio: -30°C ... +60°C
Batterie / Alimentazione elettrica: 3 x LR03 a norma
IEC, AAA
Lampadine:
LED ad alto rendimento
Intensità luminosa: ca. 3.000 lx
(ad una distanza di 1 m / 6° Ottica)
ca. 1.800 lx
42
(ad una distanza di 1 m / 25° Ottica)
Page 43

Flusso luminoso: 64 lm
Durata di
funzionamento: ca. 55 ore (funzionamento continuo)
Dimensioni: 60 x 87 x 69 mm (A x L x P)
Peso: ca. 180g (con fascia per la testa)
Tipo di
protezione IP: IP 65 / IP 67
Protezione ESD: Parti esterne antistatiche
Marchio CE: ‡0102
Tabella con i tipi di batteria testati
Produttore Modello
1 Duracell Industrial
2 Panasonic Pro Power
3 Panasonic Powerline
4 Varta Industrial Alkaline 4003
5 Varta Max Tech 4703
6 Eveready Energizer E92
Tabella 1
Tabella guarnizioni e vetri di protezione omologati
Produttore Modello
ecom Guarnizioni mod. PL 10e H
ecom Vetro di ricambio PL 10e H
8. Descrizione delle funzioni / Funzionamento
Leggere attentamente le presenti istruzioni per l´uso per
conoscere ed utilizzare tutte le funzioni della vostra Lite-Ex
PL 10e H. Per la propria sicurezza e a titolo informativo,
leggere le indicazioni riportate alle pagine seguenti!
®
43
Page 44

8.1 Struttura della Lite-Ex® PL 10e H
Guarnizione 27,0 x 1,0
Cappuccio
Alloggiamento lampada
Adattatore
Commutatore ad anello
Alloggiamento
LED
Vetro
Guarnizione 22,5 x 1,5
Guarnizione 22,5 x 2,0
Testa lampada
Figura 1
8.2 Messa in funzione
Inserire in primo luogo le batterie fornite in dotazione (fuori
dell’area a rischio di esplosione).
Affinché la lampada possa essere impiegata in ambienti a
rischio di esplosione è necessario accertarsi che tutte le
parti esterne e la fascia siano stati avvitati completamente.
Dopodiché la lampada, può essere azionata girando leggermente il commutatore ad anello giallo in senso orario.
8.3 Sostituzione delle batterie
Quando si nota che l’intensità luminosa è diminuita, è necessario sostituire le batterie. Si consiglia di sostituire tutte
e 3 le batterie. Devono essere utilizzate solo batterie dei
modelli omologati (vedi tabella 1).
Per cambiare le batterie ruotare, il cappuccio laterale
sinistro con la dicitura „ecom“ nella direzione della freccia
stampata, dopodiché rimuovere l’adattatore (vedi fig. 2).
Fatto questo, le batterie possono essere rimosse e sostituite. Dopo aver inserito le nuove batterie (facendo attenzione
alla polarità) l’adattatore può essere reinserito (seguendo
44
Page 45
le guide dell’adattatore e del vano batterie). Infine riavvitare
il cappuccio.
Assicurarsi che la lampada sia completamente chiusa prima
di procedere alla riaccensione.
Fig. 2
Sostituzione delle batterie
- Utilizzare solo batterie omologate (vedi tabella 1 al punto
7: Dati tecnici)
- Sostituire sempre tutte le batterie nello stesso momento.
- Accertarsi della corretta polarità.
- Provvedere allo smaltimento corretto ed ecologico delle
batterie esauste!
- Al momento della sostituzione delle batterie, verificare che
la filettatura e le guarnizioni siano pulite e non siano state
danneggiate.
- Se al momento della sostituzione delle batterie si nota una
fuoriuscita di elettrolita, non utilizzare l’apparecchio nella
zona a rischio esplosione e inviarlo al produttore affinché
venga sottoposto a controllo.
8.4 Pulizia del commutatore ad anello
La Lite-Ex® PL 10e H si aziona senza contatti mediante il
commutatore ad anello sovradescritto. Sporco e umidità
non interferiscono sul funzionamento del meccanismo.
Nel caso in cui il commutatore ad anello risultasse poco
scorrevole a causa di sporco intenso, l’anello può essere
facilmente pulito.
45
Page 46

Per prima cosa svitare la testa della lampada. Sfilare quindi
il commutatore ad anello tirandolo in avanti e procedere
alla rispettiva pulizia. Dopo aver ripulito il commutatore ad
anello reinserirlo e ruotarlo finché non scatta (la lineetta del
commutatore ad anello deve corrispondere al cerchietto
riportato nel corpo della lampada). Fatto questo, riavvitare
la testa della lampada.
8.5 Sostituzione della lampadina
La Lite-Ex® PL 10e H è dotata di una lampadina a LED di
lunga durata. Solitamente non è necessaria
una sostituzione dei LED. In caso di guasto o calo della
luminosità, inviare la lampada alla ecom instruments affinché
venga sottoposta a controllo o riparazione. L’alloggiamento
del LED non deve essere aperto! Interventi arbitrari
sull’alloggiamento del LED o
sulla lampadina compromettono la sicurezza della lampada
e non sono consentiti.
8.6 Sostituzione del vetro di protezione
L’alloggiamento del LED è protetto da un cappuccio che lo
circonda e da un vetro supplementare
in corrispondenza del punto di fuoriuscita della luce. Se,
nonostante la sua qualità, il vetro montato dovesse
rompersi, può essere facilmente sostituito. Per farlo è necessario tenere fermi la parte esterna della Lite-Ex® PL 10e
H e il commutatore ad anello e, facendo molta attenzione,
svitare la testa della lampada in senso antiorario. Per svitare
la testa della lampada dell’alloggiamento del LED, assicurare
l’alloggiamento del LED con un esagono incassato SW4
(vedi fig. 3) e svitare la testa della lampada verso il basso.
Sostituire quindi il vetro di protezione (utilizzare solo vetri
di protezione ecom originali). Dopodiché pulire bene
l’alloggiamento del LED e verificare che la guarnizione
ad anello non sia danneggiata. Se la guarnizione ad anello
dovesse essere danneggiata, provvedere alla sua sostituzione
(la guarnizione ad anello è posizionata nella scanalatura
46
Page 47

sotto il vetro di protezione / utilizzare solo guarnizioni ecom
originali). Durante il rimontaggio della testa della lampada
sull’alloggiamento LED assicurarsi che guarnizione e vetro
siano correttamente posizionati. Alla fine del montaggio la
guarnizione o parti della guarnizione non devono essere
visibili nel punto di fuoriuscita luce. In caso di danni alla lente
o all’interno della lampada, inviare l’apparecchio al produttore affinché venga sottoposto a riparazione.
Figura 3
9. Riparazione
Gli interventi di riparazione devono essere eseguiti da
ecom instruments GmbH o da centri assistenza autorizzati
da ecom instruments GmbH poiché dopo la riparazione è
necessario un controllo tecnico di sicurezza.
Il modulo per la riparazione può essere scaricato nella
sezione ‘Assistenza’, alla voce ‘Riparazione dei prodotti’
cliccando qui: www.ecom-ex.com.
10. Pulizia, manutenzione e conservazione
• Pulire l’apparecchio solo con uno straccio adatto o una
spugna. Non usare solventi o detergenti abrasivi per
pulire l’apparecchio.
• Ogni due anni si consiglia di far controllare dalla casa
produttrice le funzioni e la precisione dell’apparecchio.
• In caso di stoccaggio prolungato rimuovere le batterie
dall’apparecchio.
• La temperatura di stoccaggio deve sempre essere
compresa tra -30°C e +60°C!
47
Page 48

• Le prestazioni elettriche di tipi specifici di batterie
con zinco e biossido di manganese (Zn/MnO2) sono
limitate a temperature ambiente inferiori alla gamma di
temperature ambiente sotto l’intervallo di temperature
ambiente specificate dal prodotto. È necessario
consultare le schede tecniche del produttore specifico
e del tipo di batteria utilizzata per verificare qual è
l’intervallo di temperatura ambiente consigliato per
ottenere prestazioni ottimali dalla batteria.”
11. Smaltimento
Gli apparecchi elettronici dismessi di ecom instruments
GmbH verranno inviati a nostre spese per lo smaltimento
e smaltiti gratuitamente secondo la direttiva europea
2002/96/CE. Vi preghiamo di seguire le disposizioni locali
in materia di smaltimento di prodotti elettronici. I costi
associati alla restituzione dei dispositivi a ecom instruments
GmbH sono invece a carico del mittente.
Ai sensi degli art. 1, §18 e art. 2 della legge del 25 giugno
2009 che disciplina le nuove regole sullo smaltimento
di pile e accumulatori in termini di responsabilità di
prodotto
(Gesetz zur Neuregelung der abfallrechtlichen
Produktverantwortung für Batterien und Akkumulatoren)
,
siamo obbligati a fornire le seguenti informazioni. Il
dispositivo è dotato di batterie al litio o di batterie alcaline.
L‘apparecchio contiene batterie alcaline.
In presenza di batterie „scariche“ esausti non ulteriormente
ricaricabili, non è consentito procedere al loro smaltimento
come rifiuti normali o rifiuti domestici. Le batterie esauste
contengono eventuali sostanze dannose per la salute
e l’ambiente. Restituire il dispositivo. Il conferimento è
gratuito ed è prescritto dalle normative vigenti. Si prega
di consegnare negli appositi contenitori di raccolta solo
batterie esauste e di isolare prima del riciclo i poli delle
batterie al litio.
48
Page 49

Attenzione:
Le batterie utilizzata nell’apparecchio può essere causa
di incendio e lesioni chimiche in caso di impiego non
conforme. Non è consentito aprire o smontare le batterie
o le celle della batterie, né esporle a temperature superiori
a 60 °C o gettarle nel fuoco. In caso di smaltimento è
possibile rimuovere le batterie secondo quanto descritto al
punto (8.2). Trovano per il resto applicazione le norme sullo
smaltimento di apparecchi esausti o usati.
Tutte le batterie possono essere riciclate. In questo modo
è possibile recuperare materie prime preziose come ferro,
zinco e nichel.
Il simbolo ha il seguente significato:
I rifiuti di apparecchiature elettriche ed elettroniche
esausti come rifiuti normali o rifiuti domestici. Quando si
spediscono le batterie, attenersi ai regolamenti IATA. Tali
regolamenti devono sempre essere applicati per le batterie
incorporate e per quelle rimovibili.
12. Garanzia e responsabilità
Conformément à ses conditions générales de vente, ecom
instruments GmbH accorde pour ce produit une garantie
de deux ans pièces et main-d‘œuvre, dans les conditions
d‘utilisation et d‘entretien indiquées et autorisées. En sont
exclues toutes les pièces d‘usure (p. ex. piles, ampoules
d‘éclairage, etc.).
Per maggiori informazioni sulle Condizioni generali di
consegna e pagamento di ecom instruments GmbH
consultare la pagina www.ecom-ex.com o in alternativa
rivolgersi direttamente al produttore.
49
Page 50

13. Dichiarazione di conformità UE
La Dichiarazione di conformità UE e il certificato sono
acclusi alla confezione come documenti separati. Si prega
di osservare altresì l’indicazione alla fine dell’indice. La
Dichiarazione di conformità UE può essere scaricata dalla
pagina del prodotto corrispondente su www.ecom-ex.com.
14. Certificato di esame UE del tipo
La Dichiarazione di conformità UE e il certificato sono
acclusi alla confezione come documenti separati. Il
certificato di esame UE del tipo può essere scaricato dalla
pagina del prodotto corrispondente su www.ecom-ex.com.
50
Page 51

Ìndice
1. Aplicación ............................................................................................52
2. Advertencias ...................................................................................... 52
3. Errores y sometimiento de presiones no permitidas . 52
4. Normativas de seguridad ........................................................... 53
4.1 Condiciones especiales para el uso en zonas
con riesgo de explosiones ...............................................................53
5. Instrucciones de seguridad ........................................................ 54
6. Datos Ex ...............................................................................................54
6.1 ATEX ......................................................................................................54
6.2 IECEx ...................................................................................................... 54
7. Especificaciones técnicas .............................................................55
8. Descripción del funcionamiento /
instrucciones de manejo ............................................................ 56
8.1 Montaje de la Lite-Ex® PL 10e H ...........................................56
8.2 Puesta en marcha ............................................................................56
8.3 Intercambio de las pilas ................................................................57
8.4 Limpieza del anillo interruptor ................................................58
8.5 Cambio del foco de luz ...............................................................58
8.6 Cambio del cristal de protección...........................................58
9. Reparación .......................................................................................... 59
10. Limpieza, mantenimiento y almacenamiento ................... 60
11. Eliminación ..........................................................................................60
12. Garantía y responsabilidad .........................................................62
13. Declaración de conformidad de la UE ...............................62
14. Certificado de examen UE de tipo ........................................62
Aviso:
El correspondiente manual de instrucciones actualizado, la
declaración de conformidad de la UE y el certificado Ex
pueden descargarse desde la página del producto respectivo en www.ecom-ex.com o ser solicitados directamente
al fabricante.
51
Page 52

1. Aplicación
La Lite-Ex® PL 10e H es una compacta y robusta lámpara
frontal LED para el uso industrial en áreas con peligro de
explosión de las zonas 2,1 y 0, así como 22, 21 y 20 según la
directiva 1999/92/CE (ATEX).
2. Advertencias
El presente manual de instrucciones contiene informaciones
y normas de seguridad, las que deben considerarse de
forma estricta para un funcionamiento seguro en las condiciones descritas. La no observancia de estas informaciones
e indicaciones puede tener consecuencias peligrosas o
infringir las normativas.
¡Antes de utilizar el aparato lea detenidamente el manual de
instrucciones!
En caso de duda (debido a errores de traducción o de
imprenta) regirá el manual de instrucciones en alemán.
3. Errores y sometimiento de presiones no permitidas
En cuanto se tema que la seguridad del aparato esté afectada, hay que apagar el aparato y sacarlo inmediatamente
de la zona Ex. Se tiene que evitar que el aparato vuelva a
entrar en función involuntariamente. Recomendamos enviar
el aparato al fabricante para una revisión.
La seguridad del aparato puede estar en peligro, p. ej., si:
- hay daños visibles en la carcasa.
- el aparato ha sido expuesto a presiones inadecuadas.
- el aparato ha sido almacenado inadecuadamente.
- el aparato ha sufrido daños durante el transporte.
- las rotulaciones del aparato son ilegibles.
- surgen fallas en las funciones.
- se han sobrepasado los límites de los valores permitidos.
52
Page 53

4. Normativas de seguridad
El uso del aparato demanda de parte del usuario la observancia de las normas de seguridad habituales y la lectura
del certificado, para descartar así operaciones erróneas en
el aparato. El uso de este dispositivo implica que el usuario
respete las normas convencionales de seguridad y lea el
certificado con objeto de evitar el uso del dispositivo de un
modo incorrecto.
También deberán respetarse las siguientes normas de
seguridad adicionales:
• La unidad no debe abrirse dentro de zonas
potencialmente explosivas.
• Las pilas deben cambiarse únicamente fuera de la zona
potencialmente explosiva.
• No deben llevarse pilas adicionales o de reserva al área
potencialmente explosiva
• Solo se deben utilizar tipos de pilas aprobados;
• Solo están permitidos los discos y las juntas tóricas de
repuesto de ecom instruments.
• Únicamente se admite el uso de accesorios aprobados
por ecom instruments GmbH.
• Evite que el aparato entre en contacto con ácidos
agresivos o lejias.
• Sólo está permitido usar la cinta original para la cabeza
HB 10 H.
• No abra el interior del cabezal de la linterna.
4.1 Condiciones especiales para el uso en zonas con riesgo
de explosiones
• Se prohíbe el depósito de la linterna en almacenes.
• Tras cada cambio de batería o anillo estanqueizante, se
deben comprobar la limpieza, la sujeción, y los posibles
deterioros del anillo estanqueizante y la rosca.
• Las partes de la carcasa de la lámpara deben ser
atornilladas con fuerza o hasta el tope antes de su
empleo en la zona Ex para garantizar la protección IP.
53
Page 54

5. Instrucciones de seguridad
Peligro de deslumbramiento!
• No mire directamente al rayo de luz
• No dirija directamente el cono de luz hacia los ojos de
otra persona
6. Datos Ex
6.1 ATEX
Certificado de examen UE de tipo: EPS 16 ATEX 1 170 X
Marcado Ex: † II 1 G Ex ia op is IIC T4 Ga IP65
† II 1 D Ex ia IIIC T130° Da IP65
Temperatura ambiente: -20°C ≤ Ta ≤ +50°C
Homologado para Zonas 2,1 y 0; grupo de dispositivos
II; grupo de elementos explosivos IIC, categoría de
temperatura T4.
Homologado para las zonas 22, 21 y 20; grupo de
dispositivos II; grupo de elementos explosivos IIIC,
temperatura máxima 130°C.
6.2 IECEx
N.º de Certificado de conformidad
según la norma IECEx: IECEx EPS 16.0074X
Marcado Ex: Ex ia op is IIC T4 Ga IP65
Ex ia IIIC T130°C Da IP65
Temperatura ambiente: -20°C ≤Ta ≤ +50°C
Homologado para Zonas 2, 1 y 0; grupo de dispositivos
II; grupo de elementos explosivos IIC; categoría de
temperatura T4.
Homologado para las Zonas 22, 21 y 20; grupo de
dispositivos II; grupo de elementos explosivos IIIC;
temperatura máxima: 130°C.
54
Page 55

7. Especificaciones técnicas
Temperatura ambiente Ta: -20°C ... +50°C
Temperatura de almacenamiento: -30°C ... +60°C
Baterías / fuente de alimentación: 3 x LR03 de acuerdo
a IEC, AAA
Lámpara: LED de gran potencia
Luminosidad: aprox. 3.000 lx
(a 1 m de distancia / 6° Óptica)
aprox. 1.800 lx
(a 1 m de distancia / 25° Óptica)
Flujo luminoso: 64 lm
Tiempo operativo: aprox. 55 horas
(funcionamiento continuo)
Dimensiones: 60 x 87 x 69 mm
(alto/ largo/ ancho)
Peso: aprox. 180g
(con cinta para la cabeza)
Tipo de protección IP: IP 65 / IP 67
Protección ESD: Carcasa antiestática
Rotulación de la CE: ‡0102
Tabla con pilas homologdas
Manufacturer Model
1 Duracell Industrial
2 Panasonic Pro Power
3 Panasonic Powerline
4 Varta Industrial Alkaline 4003
5 Varta Max Tech 4703
6 Eveready Energizer E92
Tabla 1
55
Page 56

Tabla con juntas y cristales de protección aprobados
Fabricante Tipo
ecom Anillos de juntas tipo PL 10e H
ecom Cristal de repuesto PL 10e H
8. Descripción del funcionamiento / instrucciones de
manejo
Por favor, lea cuidadosamente este manual de instruccio
nes, a fin de que pueda conocer y aprovechar todas las
funciones de su Lite-Ex® PL 10e H. ¡Para su seguridad e
información, lea las indicaciones en las páginas siguientes!
8.1 Montaje de la Lite-Ex® PL 10e H
Junta tórica, 27,0 x 1,0
Tapa de la carcasa
Cuerpo de la linterna
Adaptador para pilas
Conmutador anular
Compartimento de
la bombilla LED
Disco
Junta tórica, 22,5 x 1,5
Junta tórica, 22,5 x 2,0
Cabezal de iluminación
Figura 1
8.2 Puesta en marcha
Primero, hay que colocar las pilas suministradas (fuera de la
zona Ex). Para que la lámpara pueda ser utilizada en la zona
Ex, tiene que estar seguro de que la cabeza y la carcasa de
la lámpara estén completamente atornilladas. Entonces se
puede encender la lámpara girando suavemente el anillo
interruptor amarillo, en el sentido de las manecillas del reloj.
56
Page 57

8.3 Intercambio de las pilas
Si se determina que la intensidad luminosa ya no es satisfactoria, entonces deben cambiarse las pilas. Se recomienda
intercambiar las 3 pilas al mismo tiempo. Sólo está permitido
colocar pilas que correspondan a los tipos que están autorizados (ver Tabla 1). Para intercambiar las pilas, gire la tapa
en el lado izquierdo de la carcasa, señalada con la inscripción
„ecom“, en la dirección que indica la flecha impresa y
entonces retire todo el adaptador para pilas (ver figura 2).
A continuación se pueden extraer las pilas e intercambiarlas.
Después de colocar las pilas nuevas (atención con la polaridad) se puede volver a poner el adaptador para pilas (fijarse
en las guías lineales en el adaptador y las ranuras de las pilas).
A continuación vuelva a atornillar la tapa de la carcasa. Antes
de volver a encender la lámpara, por favor ponga atención a
que la lámpara esté completamente cerrada.
Figura 2
Cambio de pilas
- Utilizar sólo pilas homologadas (ver en la tabla 1 bajo el
punto 7: Especificaciones técnicas)
- Cambie siempre todas las pilas al mismo tiempo.
- Ponga atención a la polaridad correcta.
- ¡Elimine las pilas gastadas adecuadamente y con respeto al
medio ambiente!
- Al cambiar las pilas, hay que controlar si los roscados y
anillos de juntas están limpios y libres de daños.
- Si durante el cambio de pilas se comprueba un escape de
electrolito, no hay que ingresar el aparato en la zona Ex y
tiene que enviarse al fabricante para su revisión.
57
Page 58

8.4 Limpieza del anillo interruptor
La Lite-Ex® PL 10e H se activa sin contacto mediante el
anillo interruptor anteriormente descrito. La suciedad y la
humedad no pueden perjudicar la función de encendido.
Si el anillo interruptor funciona con dificultad debido a una
alta acumulación de suciedad, se puede limpiar dicho anillo
de forma fácil y sin problemas.
Primero, desatornillar la cabeza de la lámpara. Ahora se
puede retirar hacia adelante el anillo interruptor y limpiarlo.
Después de la limpieza, volver a poner el anillo interruptor y
girarlo hasta que encaje firmemente (la marca en forma de
raya del anillo interruptor tiene que quedar puesta sobre el
círculo marcado en la cabeza de la lámpara). A continuación
se puede volver a atornillar la cabeza de la lámpara.
8.5 Cambio del foco de luz
La Lite-Ex® PL 10e H está implementada con un foco LED
de vida útil extremadamente larga. Un cambio del foco LED
normalmente no será necesario. En caso de un defecto o
de una disminución
de la luminosidad, se debe enviar la lámpara a ecom instruments para una revisión o reparación. ¡No se permite abrir
la carcasa LED! Las intervenciones por iniciativa propia en la
carcasa LED o en el foco ponen en peligro la seguridad de
la lámpara y no están autorizadas.
8.6 Cambio del cristal de protección
La carcasa LED está protegida a través de la carcasa circundante a la cabeza y mediante un cristal adicional en la parte
de la salida de la luz. Si pese a la alta calidad del cristal de la
lámpara se produce una rotura, entonces podrá cambiarse.
Para esto se sujeta firmemente la carcasa de la Lite-Ex® PL
10e H, así como también el anillo interruptor y se desatornilla cuidadosamente la cabeza de la lámpara en contra
del sentido de las manecillas del reloj. Para desatornillar la
cabeza de la lámpara desde la carcasa LED, se contraatornilla con una llave Allen SW4 la carcasa LED (ver figura 3) y
58
Page 59

se gira la cabeza de la lámpara para desmontarla. Ahora se
puede cambiar el cristal de protección (utilizar sólo cristales
de protección ecom originales). Finalmente se debe limpiar
bien la carcasa LED y controlar posibles daños en el anillo
de junta. Si el anillo de junta presenta daños, entonces se
tiene que cambiar también (el anillo de junta está debajo
del cristal de protección enmarcado en una ranura / utilizar
sólo anillos de junta ecom originales). Al colocar la cabeza
de la lámpara en la carcasa LED, se debe tener en cuenta
que la junta y el cristal se ajusten perfectamente. Tras el
montaje, no debe verse ninguna parte de la junta en la
salida de la luz. Si se llegan a dañar el interior de la cabeza
de la lámpara o la lente, entonces se debe enviar la lámpara
al fabricante para su reparación.
Figura 3
9. Reparación
Las reparaciones deberán ser realizadas por ecom
instruments GmbH, o bien por personal o centros de
asistencia autorizados por ecom instruments GmbH.
Ello se debe a que es necesario verificar la seguridad del
dispositivo una vez llevadas a cabo las reparaciones. El
formulario de solicitud de reparación está disponible para
su descarga en la sección de servicio del sitio web www.
ecom-ex.com.
59
Page 60

10. Limpieza, mantenimiento y almacenamiento
• El aparato sólo puede limpiarse con un paño o una
esponja apropiados.
• No use para la limpieza disolventes o abrasivos.
• Se recomienda dejar que el fabricante realice
una inspección bianual, con el fin de controlar el
funcionamiento y la precisión del aparato.
• En caso de almacenamiento prolongado, deben retirarse
las pilas del aparato.
• ¡Las temperaturas de almacenamiento permitidas de
30°C hasta +60°C no deben caer o ser sobrepasadas!
• Es necesario asegurarse de que el rendimiento eléctrico
de las baterías de tipos específicos de zinc-dióxido
de manganeso (Zn/MnO2) se limite a temperaturas
ambiente inferiores al rango de temperaturas
ambiente especificadas para el producto. Consulte las
fichas técnicas del fabricante específico y del tipo de
baterías utilizado para ver cuál es el rango de uso de
temperaturas ambiente recomendado para lograr el
rendimiento máximo de las baterías»
11. Eliminación
Los dispositivos eléctricos antiguos de ecom instruments
GmbH pueden ser depositados en nuestras instalaciones sin
cargo alguno de acuerdo a la Directiva Europea 2002/96/
EC. Respete las normativas locales acerca de la eliminación
de productos electrónicos. Los costes derivados de la
devolución de dispositivos a ecom instruments GmbH
correrán a cuenta del remitente.
De acuerdo con la sección 18 del artículo 1 y el ar tículo
2 de la nueva ley acerca de la eliminación responsable
de baterías y acumuladores
(Gesetz zur Neuregelung
der abfallrechtlichen Produktverantwortung für Batterien
und Akkumulatoren)
del 25 de junio de 2009, es nuestra
obligación proporcionar la siguiente información.
60
Page 61

Su aparato contiene pilas alcalinas Si las baterías están
„vacías“ o no dejan recargarse, no está permitido
desecharlas en la basura normal o casera. Las baterías
gastadas pueden contener sustancias peligrosas que pueden
dañar el medio ambiente y la salud. Por favor devuelva las
baterías/acumuladores. La devolución es gratuita y está
fijada por ley. Por favor deseche sólo baterías descargadas
en los recipientes para ello dispuestos y cubra con cinta
adhesiva los polos de las baterías de litio.
Atención:
En caso de un uso inadecuado, la batería empleada en este
aparato puede ocasionar incendios y provocar lesiones
químicas. No está permitido abrir o desmontar la batería
ni sus células, ni tampoco calentarla a más de 60 °C o
quemarla. En caso de ser desechada, se puede extraer la
batería como se describe en el punto (7). Adicionalmente
rigen las normas para la eliminación de aparatos antiguos,
arriba señaladas. Todas las baterías y acumuladores serán
reutilizados. Esto permite recuperar valiosas materias primas
como hierro, zinc o níquel.
El símbolo significa:
Los aparatos eléctricos y electrónicos antiguos no deben
eliminarse en la basura normal o casera.
61
Page 62

12. Garantía y responsabilidad
Ecom instruments GmbH garantiza el funcionamiento y
el material de este producto por un periodo de dos años
en las condiciones de servicio y mantenimiento indicadas.
Quedan excluidas las piezas de desgaste (pilas, lámparas,
etc.).
Dispone de más información respecto a las Condiciones
generales de entrega y pago de ecom instruments GmbH
en www.ecom-ex.com, o también puede solicitarla
directamente al fabricante.
13. Declaración de conformidad de la UE
La Declaración de conformidad de la UE y el certificado
forman parte del paquete comercial del dispositivo, en el
que se incluye como documento independiente. Contemple
también la información que figura bajo el índice.
La Declaración de conformidad de la UE vigente puede
descargarse de la página de producto correspondiente en
www.ecom-ex.com.
14. Certificado de examen UE de tipo
La Certificado de examen CE de tipo forman parte del
paquete comercial del dispositivo, en el que se incluye
como documento independiente. El certificado de
protección contra explosión vigente puede descargarse de
la pági-na de producto correspondiente en www.ecom-ex.
com.
62
Page 63

Indice
1. Aplicação ..............................................................................................64
2. Instruções de segurança .............................................................. 64
3. Erros e cargas inadmissíveis .......................................................64
4. Normas de segurança .................................................................. 65
4.1. Condições especiais para a aplicação em áreas
potencialmente explosivas ......................................................... 65
5. Indicação de Segurança ............................................................... 66
6. Dados Ex..............................................................................................66
6.1 ATEX ......................................................................................................66
6.2 IECEx ...................................................................................................... 66
7. Dados técnicos .................................................................................67
8. Descrição das funções / Indicações de utilização ......... 68
8.1 Estrutura da Lite-Ex® PL 10e H ..............................................68
8.2 Colocação em funcionamento ................................................68
8.3 Substituição das pilhas ..................................................................68
8.4 Limpar o interruptor em anel ..................................................70
8.5 Substituição dos agentes de iluminação .............................70
8.6 Substituição do vidro de proteção........................................70
9. Reparação ............................................................................................ 71
11. Limpeza, manutenção e armazenamento ..........................71
11. Eliminação ............................................................................................72
12. Garantia e responsabilidade ......................................................73
13. Declaração de Conformidade da UE ..................................74
14. Certificado de exame UE de tipo ......................................... 74
Advertência:
O manual de instruções atual, a declaração de conformidade EU e o certificado Ex podem ser transferidos a partir
da página Web do produto, em www.ecom-ex.com, ou
solicitados diretamente ao fabricante.
63
Page 64

1. Aplicação
A Lite-Ex® PL 10e H é uma lanterna de cabeça com LED,
compacta e robusta para utilização na indústria, em áreas
potencialmente explosivas, para as zonas 2, 1 e 0, bem
como 22, 21 e 20 conforme a Diretiva 1999/92/CE (ATEX).
2. Instruções de segurança
Este manual de instruções contém informações e normas
de segurança que devem ser tidas em conta para um
funcionamento em segurança nas condições descritas. A
não observação destas informações e advertências pode
ter consequências perigosas ou incorrer no incumprimento
da legislação.
Antes de utilizar o aparelho, leia atentamente este manual
de instruções!
Em caso de dúvida (erros de tradução ou de impressão),
prevalece a versão alemã do manual de instruções.
3. Erros e cargas inadmissíveis
Assim que houver indícios de que a segurança do aparelho
está em causa, desligue-o imediatamente e afaste-o da área
potencialmente explosiva.
Tome as devidas precauções para evitar que o aparelho se
ligue de novo inadvertidamente. Aconselhamos o envio do
aparelho ao fabricante para verificação.
A segurança do aparelho pode estar em risco se, por
exemplo:
- Forem visíveis defeitos na caixa.
- O aparelho for sujeito a uma carga imprópria.
- O aparelho for armazenado de forma imprópria.
- O aparelho sofrer danos durante o transporte.
- As inscrições no aparelho não forem legíveis.
- Surgirem anomalias.
- Os valores-limite permitidos forem ultrapassados.
64
Page 65

4. Normas de segurança
A utilização deste aparelho pressupõe que o utilizador
cumpre as regras convencionais de segurança e que deve
ler o certificado de modo a excluir a possibilidade de um
funcionamento incorreto do aparelho.
Também devem ser respeitadas as seguintes regras de
segurança:
• O aparelho não pode ser aberto dentro da área Ex.
• As pilhas só podem ser trocadas fora da área Ex.
• Não devem ser transportadas pilhas adicionais ou de
reserva na área Ex.
• Somente baterias de tipo testado devem ser usadas.
• São apenas permitidos anéis de vedação e discos de
instrumentos ecom.
• Apenas podem ser utilizados acessórios aprovados pela
ecom instruments GmbH.
• Deve evitar-se o contacto do aparelho com ácidos on
bases agressivos.
• Sólo está permitido usar la cinta original para la cabeza
HB 10 H.
• Não abrir a cabeça da lanterna interior.
4.1. Condições especiais para a aplicação em áreas
potencialmente explosivas
• É proibido pousar ou armazenar a lanterna!
• Depois de cada substituição das pilhas e do anel de
vedação, os anéis de vedação e a rosca devem ser
verificados quanto a limpeza, assentamento correcto e
danos.
• As peças da caixa do candeeiro têm de ser firmemente
aparafusadas manualmente e até ao encosto antes da
aplicação na área Ex, de modo a garantir a protecção IP.“
65
Page 66

5. Indicação de Segurança
Perigo de encandeamento!
• Não olhar directamente para o raio de luz
• Não direccionar a luz directamente para os olhos de
uma pessoa
•
6. Dados Ex
6.1 ATEX
Certificado de exame CE de tipo: EPS 16 ATEX 1 170 X
Marcação Ex: † II 1 G Ex ia op is IIC T4 Ga IP65
† II 1 D Ex ia IIIC T130° Da IP65
Temperatura ambiente: -20°C ≤ Ta ≤ +50°C
Aprovado para as zonas 2,1 e 0, grupo de dispositivos II,
grupo de explosão IIC, classe de temperatura T4.
Aprovado para as zonas 22, 21 e 20, grupo de dispositivos
II, grupo de explosão IIIC, temperatura máxima 130°C.
6.2 IECEx
Certificado de
conformidade IECEx n.º: IECEx EPS 16.0074X
Marcação Ex: Ex ia op is IIC T4 Ga IP65
Ex ia IIIC T130°C Da IP65
Temperatura ambiente: -20°C ≤ Ta ≤ +50°C
Aprovado para as zonas 2, 1 e 0, grupo de dispositivos II,
grupo de explosão IIC, classe de temperatura T4.
Aprovado para as zonas 22, 21 e 20, grupo de dispositivos
II, grupo de explosão IIIC, temperatura máxima de 130°C.
66
Page 67

7. Dados técnicos
Temperatura ambiente Ta: -20 ... +50 ºC
Temperatura de armazenamento: -30 ... +60 ºC
Pilhas/fonte de alimentação: 3 x LR03, em
conformidade com CEI,
AAA
Lâmpada: LED de alta potência
Potência luminosa: aprox. 3.000 lx
(a uma distância de 1 m / 6° Ótica)
aprox. 1.800 lx
(a uma distância de 1 m / 25° Ótica)
Fluxo luminoso: 64 lm
Autonomia: aprox. 55 horas
(funcionamento contínuo)
Dimensões: 60 x 87 x 69 mm (A x C x L)
Peso: aprox. 180 g (com fita para a cabeça)
Grau de proteção IP: IP 65 / IP 67
Proteção ESD: caixa antiestática
Identificação CE: ‡0102
Tabela com baterias de tipo homologado
Manufacturer Model
1 Duracell Industrial
2 Panasonic Pro Power
3 Panasonic Powerline
4 Varta Industrial Alkaline 4003
5 Varta Max Tech 4703
6 Eveready Energizer E92
Tabela 1
Tabela com as vedações e os vidros de proteção autorizados
Fabricante Tipo
ecom Anéis vedantes tipo PL 10e H
ecom Vidro sobresselente PL 10e H
67
Page 68

8. Descrição das funções / Indicações de utilização
Leia com atenção este manual de instruções para que
possa conhecer e aproveitar todas as funcionalidades da sua
Lite-Ex® PL 10e H. Para sua segurança e informação, leia as
indicações nas páginas que se seguem!
8.1 Estrutura da Lite-Ex® PL 10e H
O-Ring 27,0 x 1,0
Tampa de fecho
Corpo da lanterna
Compartimento
das pilhas
Interruptor em anel
Caixa do LED
Vidro
O-Ring 22,5 x 1,5
O-Ring 22,5 x 2,0
Extremidade da lanterna
Fig. 1
8.2 Colocação em funcionamento
Coloque primeiro as pilhas fornecidas (fora da área
potencialmente explosiva). Para que a lanterna possa ser
instalada numa área potencialmente explosiva, é necessário
garantir que a extremidade da lanterna e a caixa da lanterna
estão completamente aparafusadas. A seguir, pode ligar-se
a lanterna rodando ligeiramente o interruptor amarelo em
forma de anel para a direita.
8.3 Substituição das pilhas
Se for notado um decréscimo considerável da potência
luminosa, está na altura de substituir as pilhas. É aconselhável
substituir as 3 pilhas em simultâneo. Devem ser substituídas
apenas por pilhas do tipo correspondente autorizado (ver
tabela 1). Para trocar as pilhas, rodar a tampa de fecho
68
Page 69

lateral direita, com a inscrição „ecom“ no sentido indicado
pela seta e, a seguir, remover o compartimento das pilhas
completo (ver figura 2).
De seguida, pode retirar as pilhas do respetivo compartimento e substituílas. Depois de ter inserido as pilhas novas
(tenha atenção à polaridade), pode voltar a inserir o compartimento das pilhas (tenha atenção às guias no compartimento e no corpo da pilha). A seguir, aparafuse a tampa
de fecho. Antes de voltar a ligar a lanterna, certifique-se de
que está bem fechada.
Fig. 2
Substituição das pilhas
- Só podem ser usadas pilhas homologadas (ver a tabela 1
no ponto 7: Dados técnicos).
- Substitua sempre todas as pilhas em simultâneo.
- Tenha atenção à polaridade correta.
- As pilhas gastas devem ser eliminadas de forma correta
e ecológica!
- Aquando da substituição das pilhas, é preciso verificar se
as roscas e as vedações estão limpas e sem danos.
- No caso de, ao proceder à troca das pilhas, se detetar
derrame de eletrólito, o aparelho não deve ser levado
para a zona explosiva e deve ser enviado ao fabricante
para inspeção.
69
Page 70

8.4 Limpar o interruptor em anel
A Lite-Ex® PL 10e H é ligada e desligada sem contactos,
através do interruptor em anel descrito anteriormente.
A sujidade e a humidade não prejudicam o funcionamento
do interruptor. No entanto, se o interruptor em anel perder
mobilidade devido à acumulação de sujidade, este pode
simplesmente ser limpo sem quaisquer problemas.
Desenrosque primeiro a extremidade da lanterna. Remova
o interruptor em anel puxando-o para a frente e limpe o
anel. Após a limpeza, volte a colocar o interruptor em anel
e rode-o até ficar bem preso (as riscas de marcação do
interruptor em anel devem ficar posicionadas por cima dos
círculos de marcação no corpo da lanterna). De seguida,
pode voltar a enroscar a extremidade da lanterna.
8.5 Substituição dos agentes de iluminação
A Lite-Ex® PL 10e H está equipada com um LED de longa
duração. Em casos normais, não será necessário substituir
o LED. Em caso de defeito ou de fraca luminosidade, é
necessário enviar a lanterna à ecom instruments para
ser verificada ou reparada. A caixa do LED não pode ser
aberta! Inter venções por moto próprio na caixa do LED ou
na lâmpada prejudicam a segurança da lanterna e não são
autorizadas.
8.6 Substituição do vidro de proteção
A caixa do LED está protegida através da extremidade da
lanterna, que a envolve, e através de um vidro adicional
na saída da luz. Se, apesar do vidro de elevada qualidade
colocado, este se partir, pode ser substituído. Para tal, segure
o corpo da lanterna da Lite-Ex® PL 10e H e o interruptor em anel com firmeza e desaperte cuidadosamente a
extremidade da lanterna para a esquerda. Para desenroscar
a extremidade da lanterna da caixa do LED, fixe a caixa do
LED com uma chave para parafusos sextavados internos
de tamanho 4 (ver Figura 3) e desaperte a extremidade
da lanterna. Agora pode proceder à substituição do vidro
70
Page 71

de proteção (utilize apenas vidros de proteção originais da
ecom). De seguida, limpe bem a caixa do LED e verifique se
há danos no anel vedante. Se for o caso, substitua também
o anel vedante (o anel vedante está fixo numa ranhura debaixo do vidro de proteção / utilize apenas anéis vedantes
originais da ecom). Ao colocar a extremidade da lanterna
sobre a caixa do LED, cer tifique-se de que a vedação e o
vidro estão bem colocados. Após a montagem, não pode
ficar visível qualquer parte da vedação na saída da luz. No
caso de as peças no interior da extremidade da lanterna ou
a lente também apresentarem danos, envie a lanterna ao
fabricante para fins de reparação.
Fig. 3
9. Reparação
Os consertos devem ser realizados pela ecom instruments
GmbH ou por pessoal autorizado ou assistência técnica
autorizada pela ecom instruments GmbH, pois a segurança
do dispositivo deve ser testada depois que os reparos
forem implementados. A folha de relatório do conserto
pode ser baixada na seção de assistência técnica em www.
ecom-ex.com.
11. Limpeza, manutenção e armazenamento
• Limpe o aparelho apenas com uma esponja ou pano
adequado. Não utilize produtos solventes ou abrasivos
na limpeza.
• É aconselhável solicitar ao fabricante que verifique o
funcionamento e a precisão do aparelho de dois em dois
anos.
71
Page 72

• Se o aparelho estiver guardado muito tempo, é
aconselhável retirar as pilhas.
• Temperaturas de armazenamento permitidas de 30 ºC
a +60 ºC. Este intervalo de temperaturas tem de ser
estritamente observado!
• Deve-se observar que o desempenho elétrico dos tipos
específicos de baterias de zinco/dióxido de manganês
(Zn/MnO2) é limitado às temperaturas ambiente
inferiores ao intervalo de temperatura ambiente
especificado pelo produto. As folhas de especificações
técnicas do fabricante e os tipos de bateria específicos
usados devem ser consultados para verificar qual é o
intervalo de temperatura ambiente recomendado para
alcançar desempenho máximo da bateria.
11. Eliminação
Os dispositivos elétricos antigos da ecom instruments
GmbH serão direcionados para descarte às nossas custas
e serão descartados sem nenhum custo, de acordo com
a Diretiva Europeia 2002/96/CE. Siga os regulamentos
locais para o descarte de produtos eletrônicos. Os custos
associados à devolução dos dispositivos para a ecom
instruments GmbH devem ser arcados pelo remetente.
De acordo com o Artigo 1, Seção 18, e Artigo 2 da lei que
altera a Lei de Responsabilidade de Produtos Relacionada
a Resíduos para Baterias e Acumuladores (Gesetz zur
Neuregelung der abfallrechtlichen Produktverantwortung
für Batterien und Akkumulatoren) de 25 de junho de 2009,
somos obrigados a fornecer as seguintes informações:
Seu dispositivo contém baterias alcalinas.
Baterias descarregadas ou baterias recarregáveis que não
podem mais ser carregadas nunca devem ser descartadas
junto com o lixo comum ou doméstico. As baterias antigas
podem conter substâncias nocivas que trazem riscos à
saúde e danos ao meio-ambiente. Devolva o dispositivo. A
devolução é gratuita e é exigida por lei.
72
Page 73

Observação:
A bateria utilizada nesta unidade apresenta risco de
incêndio e pode causar ferimentos químicos caso seja usada
de maneira inadequada.
Nem a bateria nem os elementos da bateria devem ser
abertos ou desmontados, e não devem ser queimados
ou expostos a temperaturas superiores a 60 °C. Caso a
bateria precise ser descartada, pode ser removida conforme
descrito no ponto (7). As normas de descarte especificadas
acima também são válidas para dispositivos antigos. Todas
as baterias, recarregáveis ou não, podem ser recicladas.
Assim, matérias-primas preciosas como ferro, zinco e níquel
podem ser reutilizadas.
O símbolo tem o seguinte significado:
Dispositivos elétricos antigos não
devem ser descartados com o lixo comum ou doméstico.
12. Garantia e responsabilidade
Para este produto a ecom instruments GmbH concede
uma garantia de funcionamento e material de dois anos,
conforme as condições contratuais gerais, sob as condições
operacionais e de manutenção indicadas. Estão excluídas
todas as peças sujeitas a desgaste (p. ex. pilhas, lâmpadas,
etc.). Para mais informações relativas às Condições Gerais
de Entrega e Pagamento da ecom instruments GmbH,
consulte www.ecom-ex.com ou contacte diretamente o
fabricante.
73
Page 74

13. Declaração de Conformidade da UE
A declaração de Conformidade da UE e o certificado
acompanham a embalagem de venda como um documento
separado. Consulte também as informações fornecidas
abaixo do índice. A Declaração de Conformidade da UE
atual pode ser baixada na página de produto específico em
www.ecom-ex.com.
14. Certificado de exame UE de tipo
A declaração de Certificado de exame UE de tipo
acompanham a embalagem de venda como um documento
separado. O certificado Ex atual pode ser baixado na
página de produto específico em www. ecom-ex.com.
74
Page 75

75
Page 76

©
Copyright
2017 ecom instruments GmbH.
Der Inhalt dieses Dokuments darf ohne vorherige schriftliche
Genehmigung durch die ecom instruments GmbH in keiner Form,
weder ganz noch teilweise vervielfältigt, weitergegeben, verbreitet
oder gespeichert werden.
Der Inhalt dieses Dokuments wird so präsentiert, wie er aktuell
vorliegt. Die ecom instruments GmbH übernimmt weder
ausdrücklich noch stillschweigend irgendeine Gewährleistung für
die Richtigkeit oder Vollständigkeit des Inhalts dieses Dokuments,
einschließlich, aber nicht beschränkt auf die stillschweigende
Garantie der Markttauglichkeit und der Eignung für einen
bestimmten Zweck, es sei denn, anwendbare Gesetze oder
Rechtsprechungen schreiben zwingend eine Haftung vor. Die
ecom instruments GmbH behält sich das Recht vor, jederzeit
ohne vorherige Ankündigung Änderungen an diesem Dokument
vorzunehmen oder das Dokument zurückzuziehen.
©
2017 ecom instruments GmbH.
Copyright
The contents of this document, either in part or in their entirety,
may not be reproduced, forwarded, distributed or saved in any way
without ecom instruments GmbH prior written consent.
The contents of this document are presented as they currently
exist. ecom instruments GmbH does not provide any express
or tacit guarantee for the correctness or completeness of the
contents of this document, including, but not restricted to, the tacit
guarantee of market suitability or tness for a specic purpose
unless applicable laws or court decisions make liability mandatory.
ecom instruments GmbH reserves the right to make changes to
this document or to withdraw it any time without prior notice.
PA000718 | 09/2017
WEEE-Reg.-Nr. DE 934 99306
Änderungen vorbehalten. Subject to change.
900017AL04A00
Industriestraße 2 | 97959 Assamstadt | Germany
ecom instruments GmbH
Phone +49 62 94 42 24 0 | Fax +49 62 94 42 24 100
sales@ecom-ex.com | www.ecom-ex.com
76
 Loading...