

Page 1
BLU
QUICK REFERENCE GUIDE
PeopleNet Customer Support
888-346-3486
Page 2
OVERVIEW
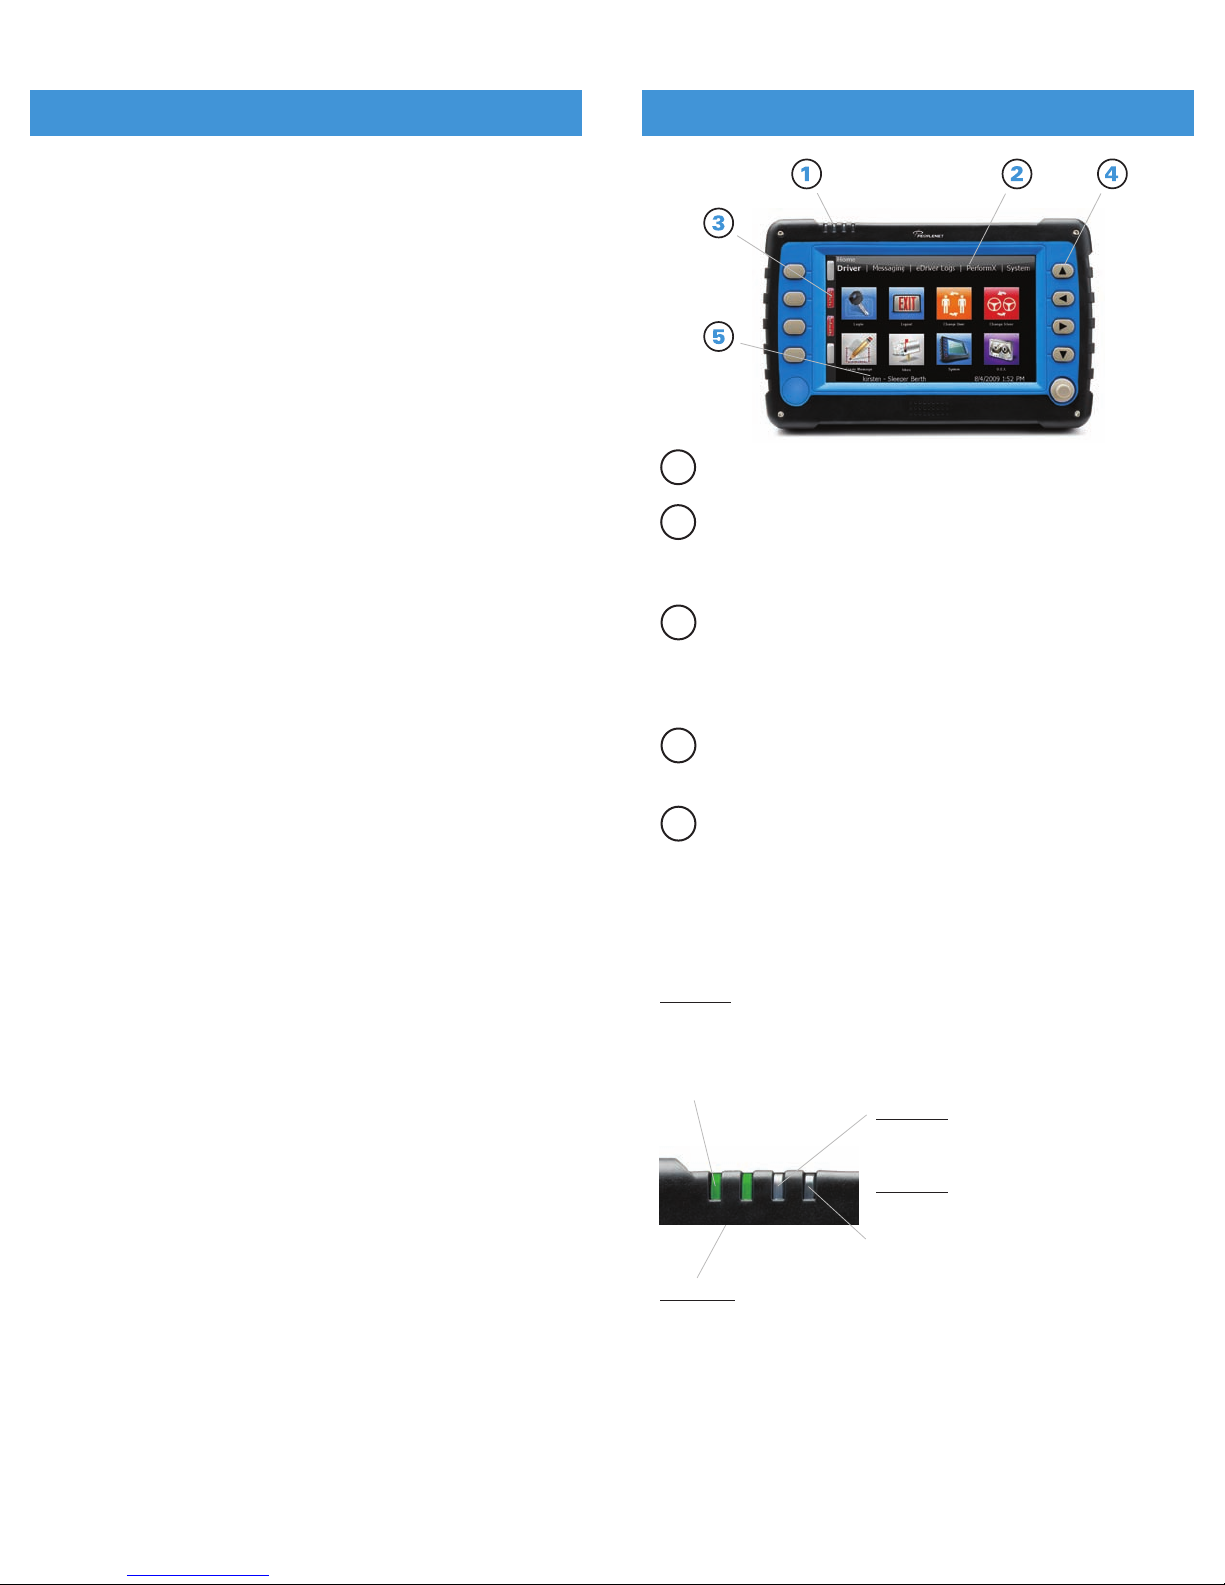
Status LEDs The status LEDs (Light-Emitting Diodes)
are located along the top edge of the BLU device.
Menu Bar The universal menu bar consists of two rows.
The top row is the menu path and shows where you are
within the menu hierarchy, and the bottom row contains the
available options for the current menu in the menu path.
Application Soft Buttons The functions of the soft
buttons along the left edge of the touch screen are defined
by each application. The name on each soft button indicates
the button’s purpose. The image will contain definitions for
the action to be performed (Done) or a specific image (arrow).
Navigation Buttons The dedicated navigation buttons
along the right side of the BLU device allow the user to
move around within the menu hierarchy.
Information Bar The information bar includes the current
date and time, as well as content provided by applications
such as PACOS® or the Login Manager. For instance, the
information bar may display distance and direction to your
destination, or the name of the active user.
1
2
3
4
5
1
TABLE OF CONTENTS
OVERVIEW .............................................................................1
Status LEDS
...........................................................................1
NAVIGATION ........................................................................2
Using Menus
..........................................................................2
Using Soft Buttons
.................................................................3
Using Short Cuts
....................................................................3
Deleting a Short Cut
...............................................................4
Adding a Short Cut
.................................................................5
Returning Short Cuts to Default Settings
..............................6
SAFE MODE DRIVERS ......................................................6
In-Cab Navigation
...................................................................7
eDriver
®
Logs ..........................................................................7
Instant Fuel Efficiency
............................................................7
Trip Average
............................................................................7
Brightness Control
..................................................................7
DRIVERS & USERS ............................................................8
Logging In
...............................................................................8
Changing Current Drivers
.......................................................8
Changing Active Users
...........................................................9
Logging Out
............................................................................9
MESSAGES ............................................................................9
Reading a New Message
.......................................................9
Sending a New Message
.....................................................11
Text to Speech
......................................................................12
Hot Keys
...............................................................................13
PERFORMX—ENGINE DATA ...................................... 14
Onboard Event Recording (OER) ..........................................15
Fault Codes
...........................................................................16
PACOS...............................................................................17
SYSTEM DIAGNOSTICS ..............................................19
IN-CAB NAVIGATION ......................................................21
Searching a Location
............................................................21
Out of Route Indicator
..........................................................22
INTERACTIVE IN-CAB TRAINING ..............................23
STATUS LEDS
1st LED
Flashing Green – Powering up
Solid Green – Powered up and running
Flashing Red – Powering down
Solid Amber – Running on internal battery or initial power up
3rd LED
Flashing Blue – New mail notification
Solid Purple – During initial power up
4th LED
Solid Blue – In standby; power applied
Flashing Blue – Low temp. mode only
occurs at start up
Solid Purple – During initial power up
2nd LED
Solid Green – Ready to send/receive data call
Flashing Green – Active data call (or if no cellular coverage is available
and satellite is installed and enabled)
Solid Red – Low or no cell communications
Flashing Red – Indication that the g3 On-Board Computer is not
communicating properly with BLU
Solid Amber – Incoming call or active voice call or during initial power up
Flashing Amber – Failed data call
Page 3
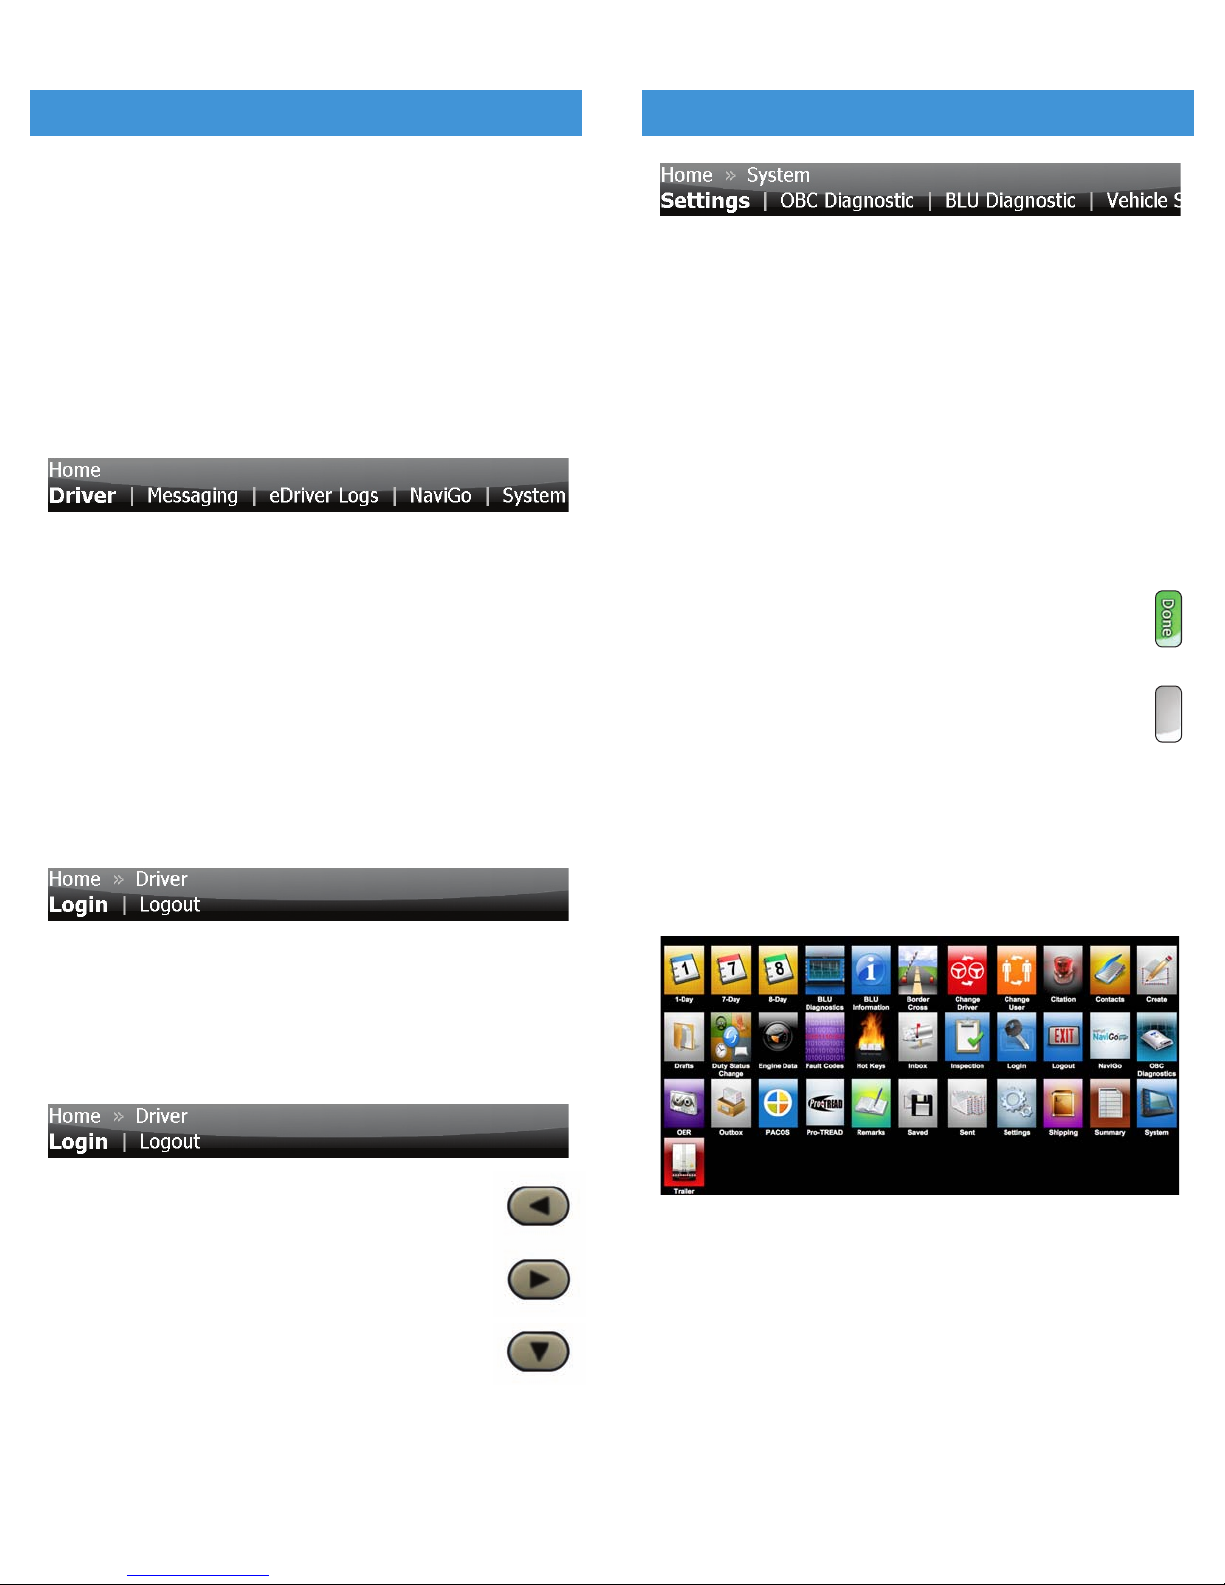
If the selected item requires further input from the user, it will display
submenu options within the selected option (System[Settings from
the Home menu).
Returning to the Home Menu
Regardless of where you are in the menu hierarchy, you can return to the
Home menu by pressing the UP ARROW navigation button until “Home”
is the only menu name displayed in the top row of the menu bar.
USING SOFT BUTTONS
Soft buttons, such as the button to the right, can be used in one
of two ways:
• Touch the soft button on the display.
• Press the corresponding button along the left side of
the BLU device.
NOTE:
If a soft button is blank, as shown to the right, both
it and its corresponding device button are inactive.
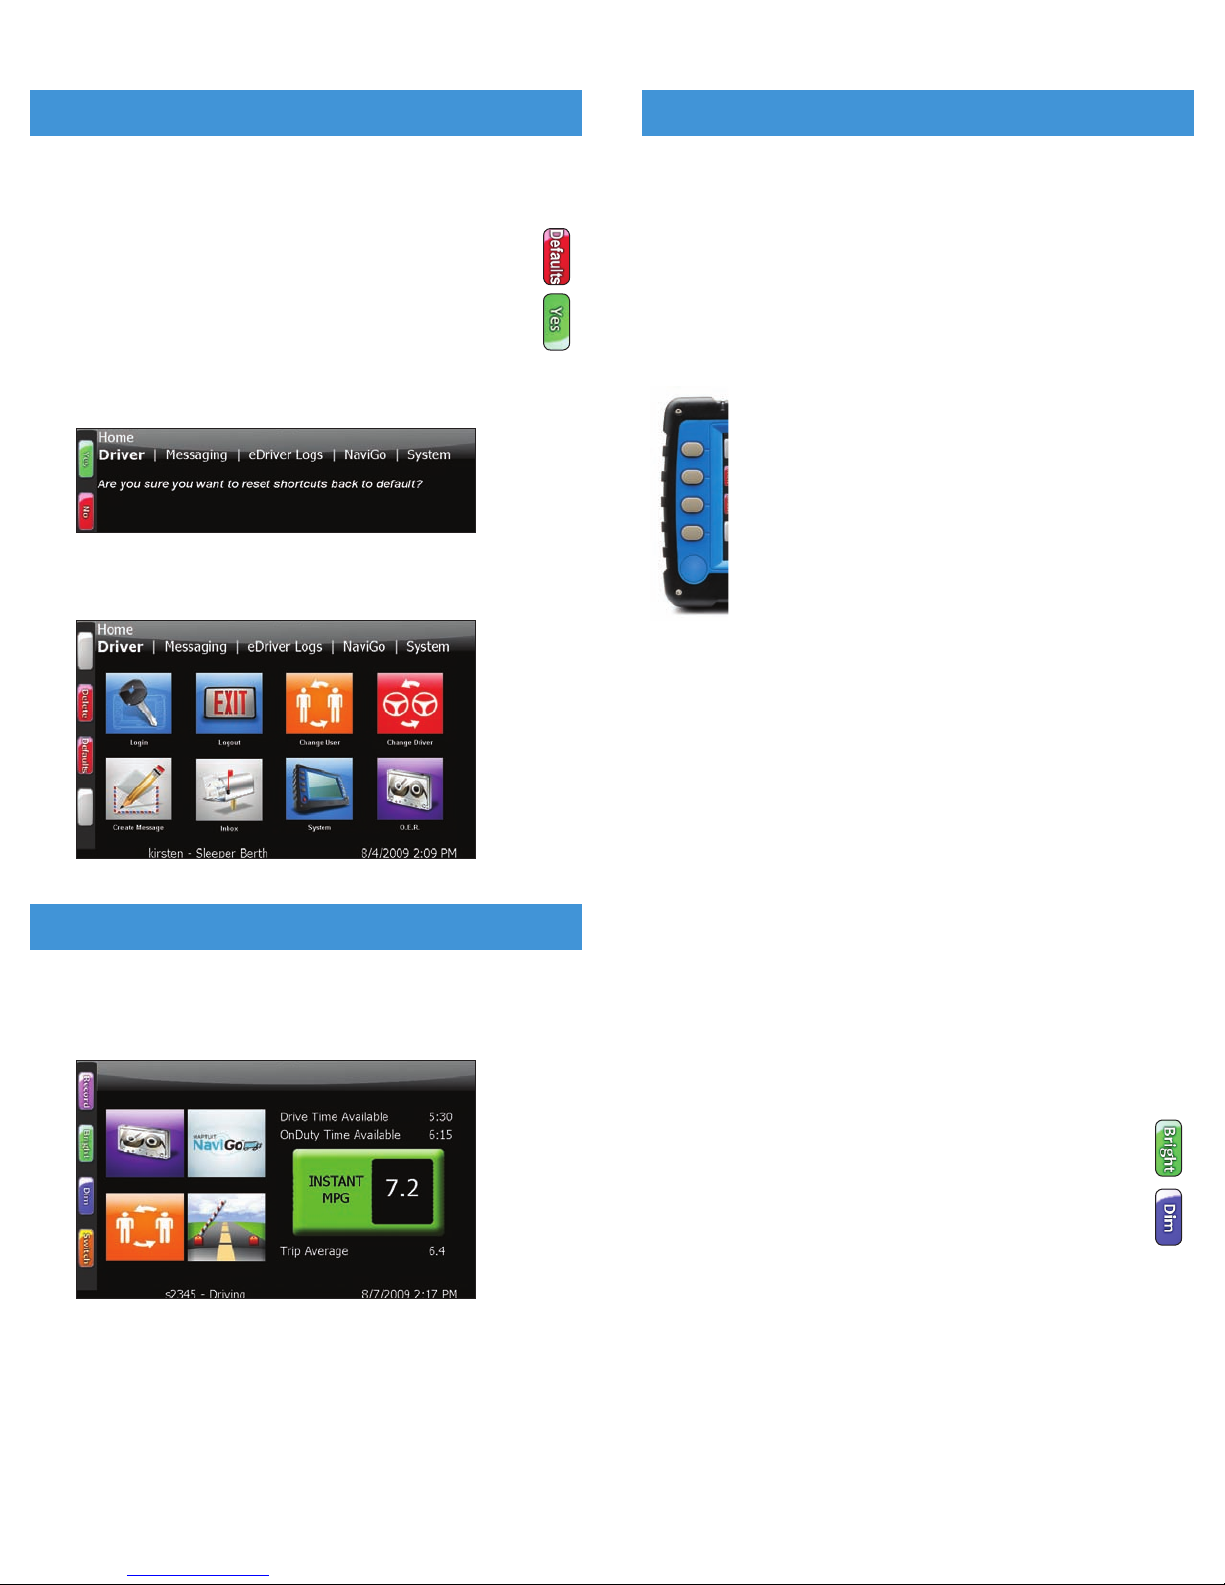
USING SHORT CUTS
Short cuts allow for single touch access to commonly used
BLU functions and are configurable by driver. Each driver can
have up to seven short cuts configured.
Configurable short cuts available:
1-Day Calendar
7-Day Calendar
8-Day Calendar
BLU Diagnostics
BLU Information
Border Crossing
Change Driver
Change User
Citation
Contacts
Create Message
Draft Messages
Duty Status Change
Engine Data
Fault Codes
Hot Keys
Messaging Inbox
Inter Trip Inspection
Login
Logout
NaviGo
OBC Diagnostics
OER
Messaging Outbox
PACOS
Pro-TREAD
eDriver Log Remarks
Saved Messages
Sent Messages
Settings
Shipping
eDriver Log Summary
System
Trailer
NAVIGATION NAVIGATION
BLU has a touch screen that allows you to select virtually anything
directly with a light tap on the display. Navigation can also be done
by using the keyboard or the navigation buttons. The following
segments describe how you can use the device buttons to navigate
throughout BLU.
USING MENUS
Home Menu
The Home menu is the topmost menu in the menu hierarchy.
It is identified by “Home” in the top row of the menu bar.
The content of the Home menu is displayed in the second row of
the menu bar. These menu items may represent either application
screens or submenus.
NOTE:
Any registered plug-in or application with a user interface
will be included in the Home menu.
Submenus
Submenus are identified by the menu path in the top row of the
menu bar.
For example, the Driver menu appears as “Home >> Driver” in
the top row.
The menu items in the second row are keyed to the last item in
the menu path, the Driver menu in this case.
Selecting Menu Items
All menu items are listed horizontally.
Press the LEFT ARROW and RIGHT ARROW
navigation buttons to scroll through the items.
Press the DOWN ARROW navigation button
to select the bold item in the leftmost position.
If that item is a submenu, the menu bar changes to show its
content, as shown on the next page for the System menu.
2 3
Page 4
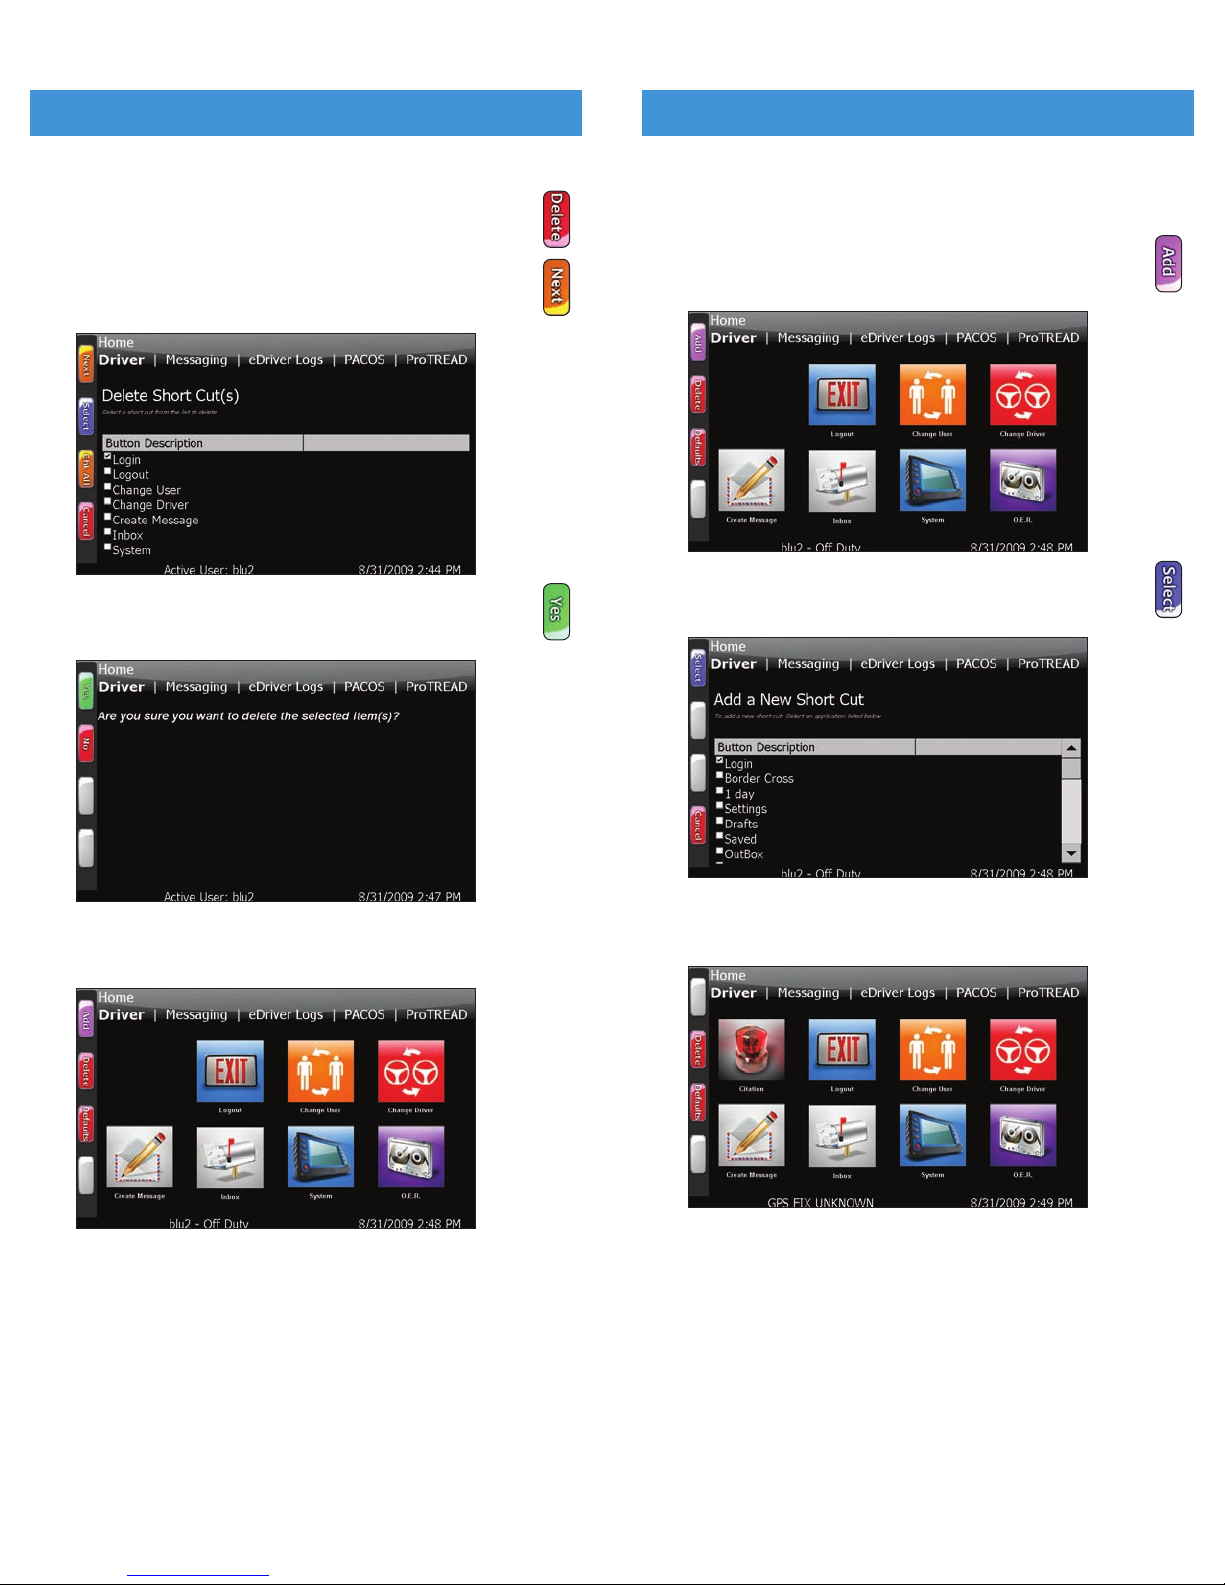
ADDING A SHORT CUT
1. Confirm that there is available short cut space.
2. Press the Add soft button to view the Add a New Short
Cut screen.
3.
Select the short cut(s) you want to add and press the
Select soft button.
4.
The short cut is now added and will display immediately
on the driver screen.
NAVIGATION NAVIGATION
DELETING A SHORT CUT
1. Press the Delete soft button to view the list of short cuts
currently configured.
2.
Select the short cut(s) you want to delete and press the
Next soft button.
3.
Confirm that you want to delete the selected short cuts
by pressing the Yes soft button.
4.
The short cut is now deleted and will be removed immediately
from the driver screen.
4 5
Page 5
IN-CAB NAVIGATION
NaviGo is available to subscribers only. Please contact your fleet
administrator for more information on how to become a NaviGo
In-cab Navigation subscriber.
The NaviGo short cut will appear to the driver in safe mode if
NaviGo is running prior to the vehicle’s movement. The driver
must have already accepted the liability statement for NaviGo
to be considered running and available.
The driver will be prompted and the map will become
visible if NaviGo needs to provide turn-by-turn
instructions.
To bring NaviGo to the foreground, in front of safe
mode, press any hard key at any time.
NaviGo will be inaccessible from safe mode if NaviGo
is not already active prior to the vehicle’s movement.
eDRIVER® LOGS
If the driver utilizes eDriver Logs, then Drive Time Available
and On-Duty Time Available will be visible in safe mode.
INSTANT FUEL EFFICIENCY
Safe mode will display the driver’s instant fuel efficiency, which
is configurable on the BLU for Miles per Gallon (MI/GAL) or Liters
per 100 Kilometers (L/100KM).
TRIP AVERAGE
Safe mode will display the driver’s trip average fuel efficiency.
This measurement is configurable for Miles per Gallon (MI/GAL)
or Liters per 100 Kilometers (L/100KM).
The driver can reset the Trip Average from the In-cab PerformX
screen on BLU.
BRIGHTNESS CONTROL
Control bright and dim settings in safe mode screen
using the hard or soft keys.
SAFE MODE DRIVERSNAVIGATION
SAFE MODE DRIVERS
RETURNING SHORT CUTS
TO DEFAULT SETTINGS
1. At any time when viewing this screen, press the Defaults
soft button to return the short cuts to the default settings.
2.
Confirm that you want to revert to the default short cuts
by pressing the Yes soft button.
3.
If the confirmation is not acknowledged within 15 seconds, the
current short cuts configuration will return on the idle screen.
The default short cuts for all users include: Login, Logout, Change
User, Change Driver, Create Message, Inbox, System, OER
Safe Mode limits driver interaction with the system while the vehicle
is moving. Safe mode is activated by the fleet manager who will
configure your unit and set the parameters for use.
When safe mode is activated the only services available to you are:
• Onboard Event Recorder
• NaviGo
• Change User
• Border Cross
6 7
Page 6
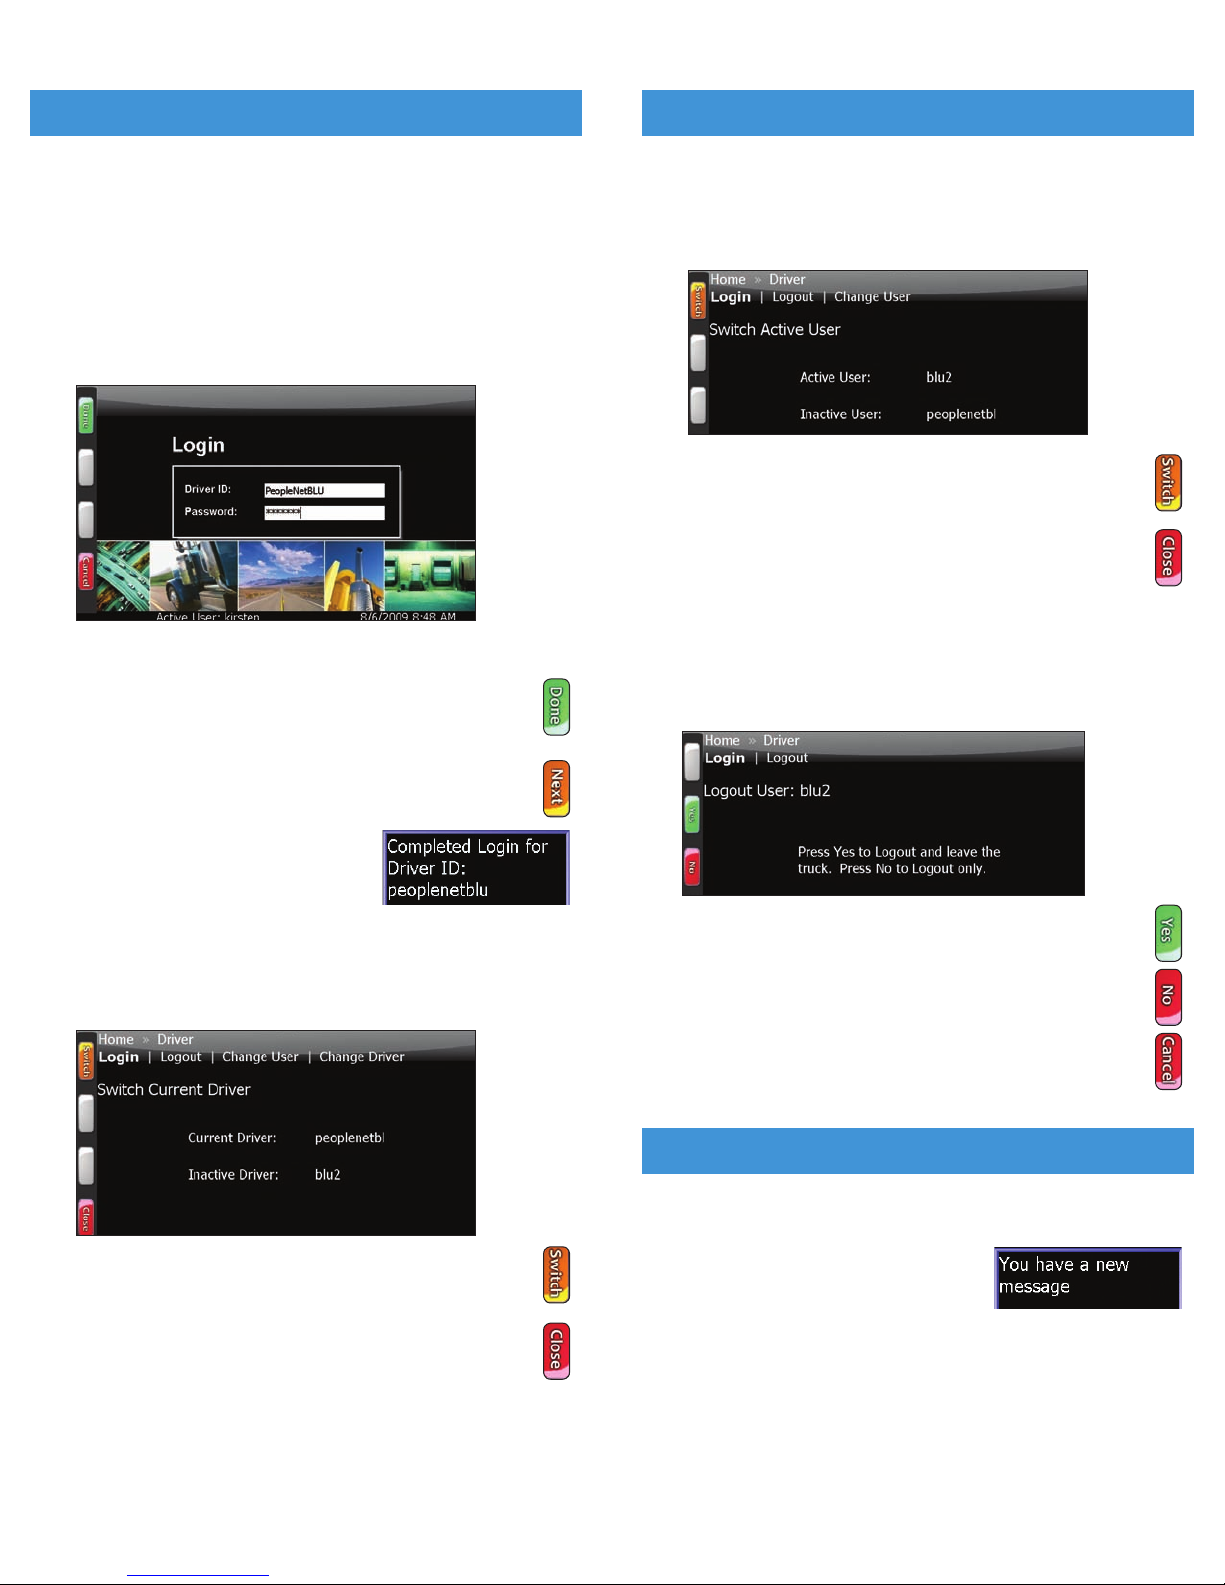
CHANGING ACTIVE USERS
1. Select Driver[Change User on the menu bar to display the
Switch Active User screen.
2.
Press the Switch soft button to make the other logged-in
user the active user and to return to the Home screen.
NOTE:
The Switch Active User screen remains visible
until you press the Close soft button or display
another screen.
LOGGING OUT
1. Select Driver[Logout on the menu bar to display the Logout
screen. The Active User will be displayed as the logout recipient.
• To log out and leave the truck, press the Yes
soft button.
• To just log out, press the No soft button.
• To cancel, press the Cancel soft button.
98
BLU starts up automatically with the truck’s ignition switch and
displays the Login screen.
NOTE:
The Login screen is not automatically displayed if a
driver is already logged in.
LOGGING IN
1. Select Driver[Login in the menu bar to display the Login screen.
2.
Enter Driver ID and Password.
3. Press the Done soft button to initiate a data call to
receive driver information.
NOTE:
If a second user needs to log in at the same time,
press the NEXT soft button (not the navigation button)
to redisplay the Login screen. Repeat steps 1 and 2.
4.
Wait for notification that the login
process was successfully completed.
CHANGING CURRENT DRIVERS
1. Select Driver[Change Driver in the menu bar to display
the Switch Current Driver screen.
2.
Press the Switch soft button to make the other logged-in
user the current driver.
NOTE:
The Switch Current Driver screen remains visible
until you press the Close soft button or display
another screen.
NOTE:
Change Current Driver will appear only if there
are two drivers logged in and you are a non-eDriver
logs user.
DRIVERS & USERS DRIVERS & USERS
READING A NEW MESSAGE
BLU indicates a new message in two
ways: a flashing blue LED and a “You
have a new message” notification.
1.
If the driver has received one mail message, the message will
open when the notification panel is acknowledged (touched).
MESSAGES
Page 7
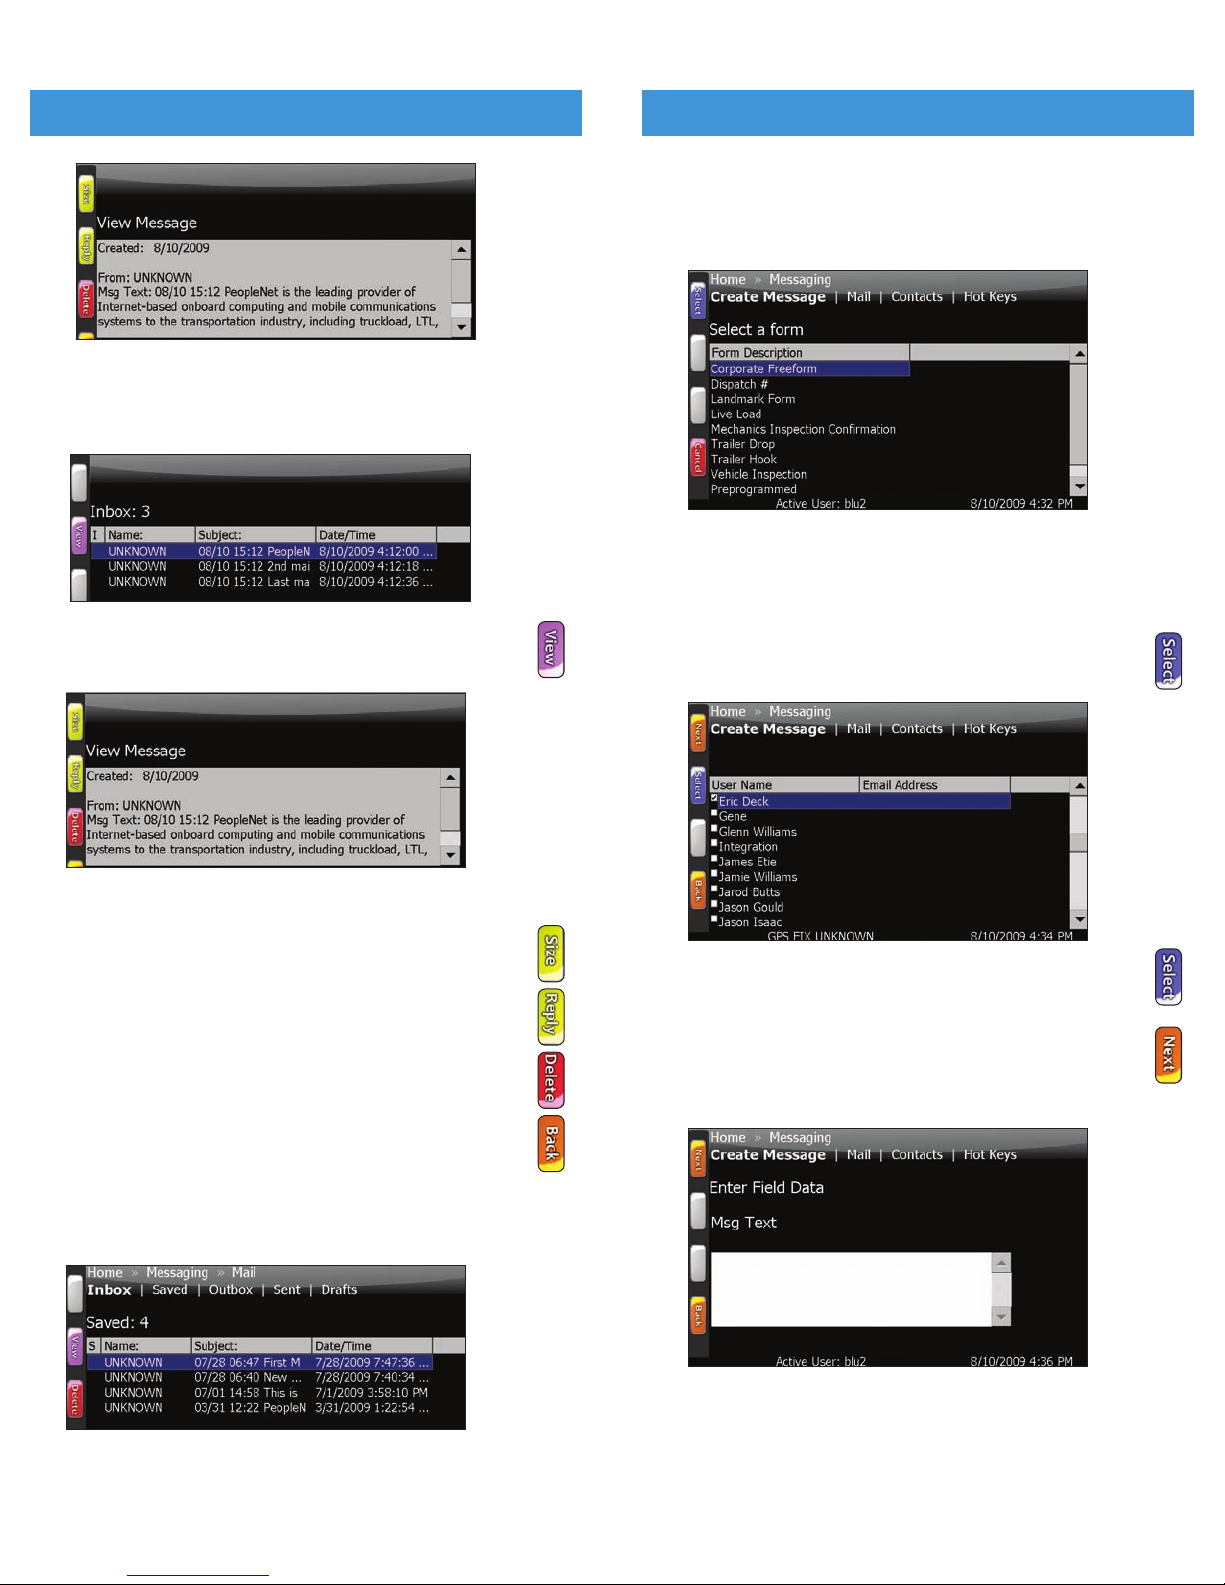
SENDING A NEW MESSAGE
1. Select Messaging[Create Message on the menu bar
to display the Select a form screen.
2.
Highlight the pre-defined form you want to use for
your message.
NOTE:
Select Corporate Freeform to send a text message.
3. Press the Select button to select the form and display
the Select Recipient(s) screen.
4.
Highlight a recipient and press the Select button,
and repeat for multiple recipients.
5.
Press the Next soft button to display the Enter
Field Data screen.
6.
Enter the text of the message.
11
2. If the driver has received more than one mail message,
the driver will be taken to the Inbox where the driver will
be prompted to read the oldest message first.
3.
Press the View button to read the message on the
View Message screen.
4.
While viewing the message, you may do one of the following:
• Press the Size button to cycle through font sizes.
• Press the Reply button to create a response.
• Press the Delete button to delete the message.
• Press the Back soft button (not the navigation
button) to return to the previous screen.
NOTE:
By pressing Back and closing out of the message,
the mail message will be saved in the Saved box
automatically. Press Delete to discard the message.
MESSAGES MESSAGES
10
Page 8
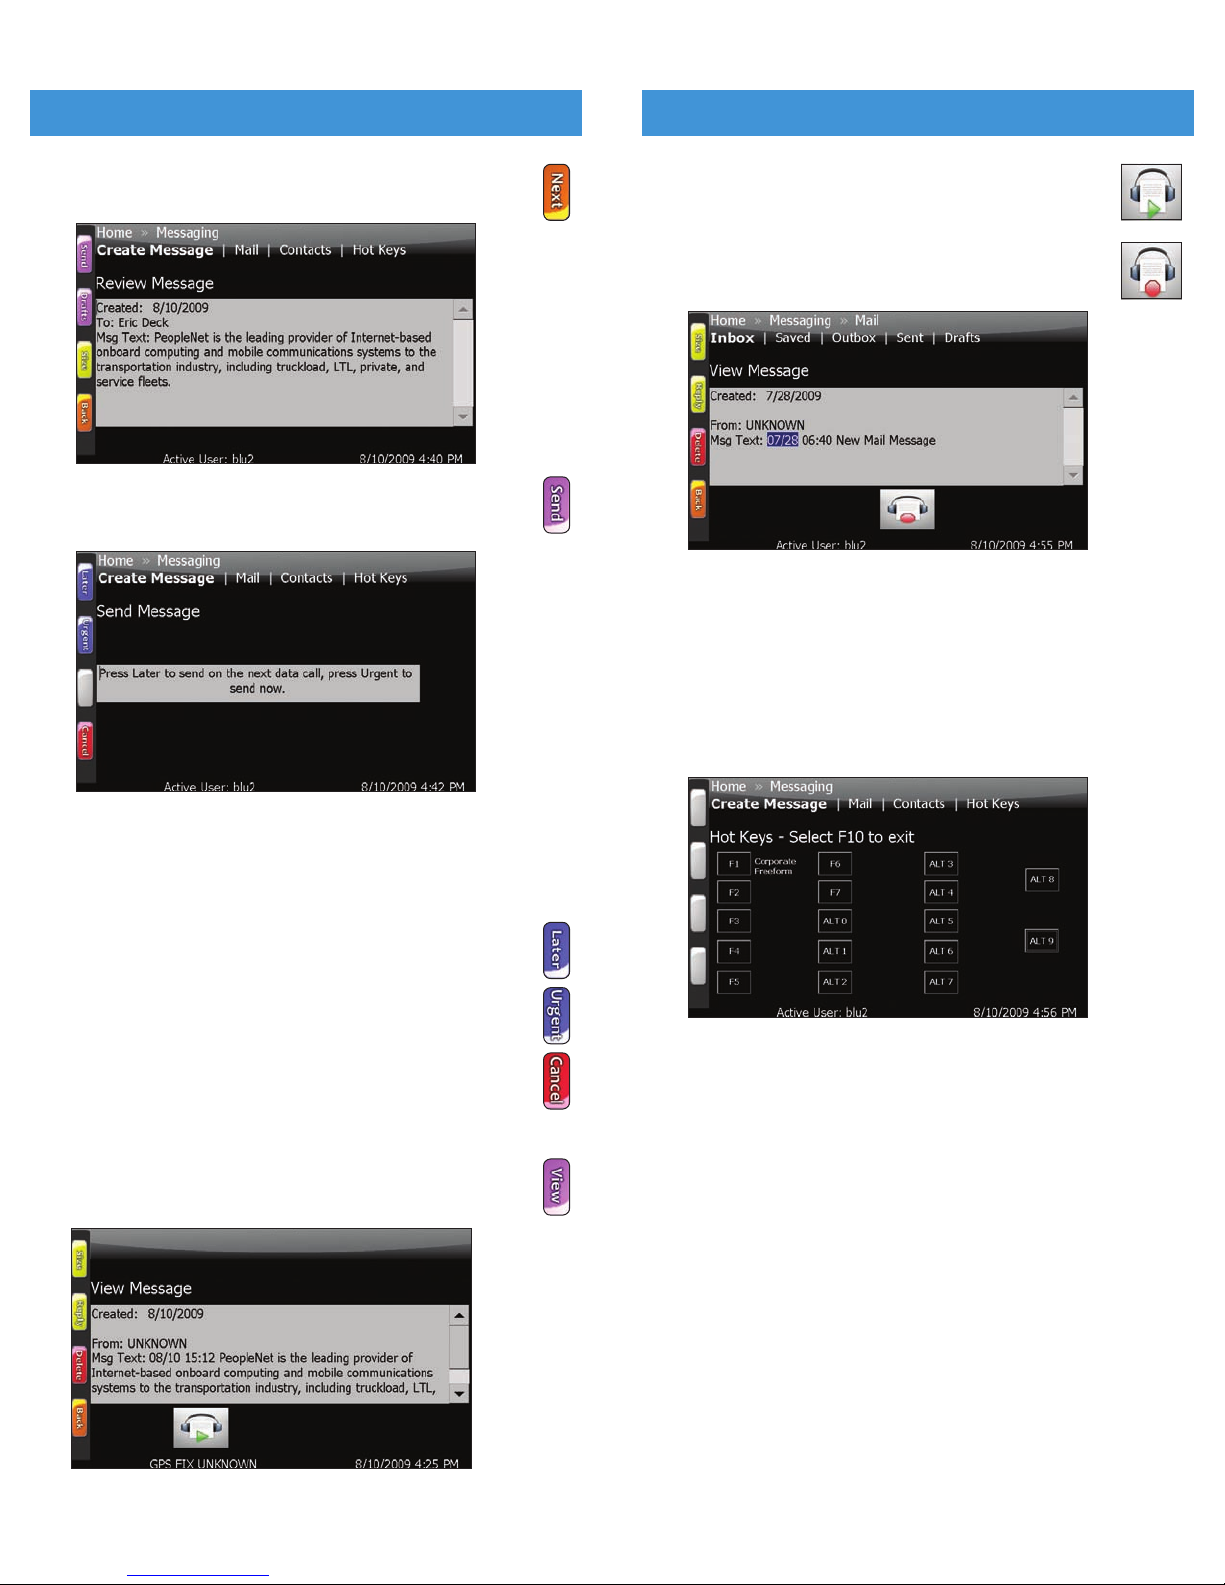
2. While viewing the message, you may touch the
Start Playback shortcut on your screen to begin
playing an audio version of the message on screen.
3.
To stop the playback, touch the Stop Playback
shor t cut on your screen.
NOTE:
Playback is in English only. It will work with non-English
language messages however it may not recognize words
as readily.
HOT KEYS
1. Press F10 on the keyboard to get to the hot keys option
or press the HOT KEYS menu option on the touch screen.
2. Once on the Hot Keys screen, the keyboard or the touch
screen can be used to bring up the form assigned to each
Hot Key.
NOTE:
If there is a form assigned to a Hot Key the form name
will be displayed next to the Hot Key.
3.
Select the Hot Key function on the keyboard or press the
touch screen and the form assigned will be brought up.
4.
Then proceed to the steps of sending a message.
NOTE: F10 will bring you into the Hot Key options and F10 will
exit out of the Hot Key option. If Hot Key is not present
as a menu option, then none have been assigned.
13
7. Press the Next soft button to review the message
on the Review Message screen.
8.
Press the Send soft button. This displays the
Send Message screen.
9.
While the Send Message screen is displayed;
• To accept the default send option, do nothing. The
Send Message screen goes away after 15 seconds and the
message is moved to the Outbox until the next data call.
• Press the LATER soft button to send on the next data call.
• To send the message urgent, tap the Urgent soft
button and the message will be sent urgent.
• To cancel the message, press the Cancel soft button.
This also deletes the message and related selections.
TEXT TO SPEECH
1. Press the View button to read the message on the View
Message screen.
12
MESSAGES MESSAGES
Page 9
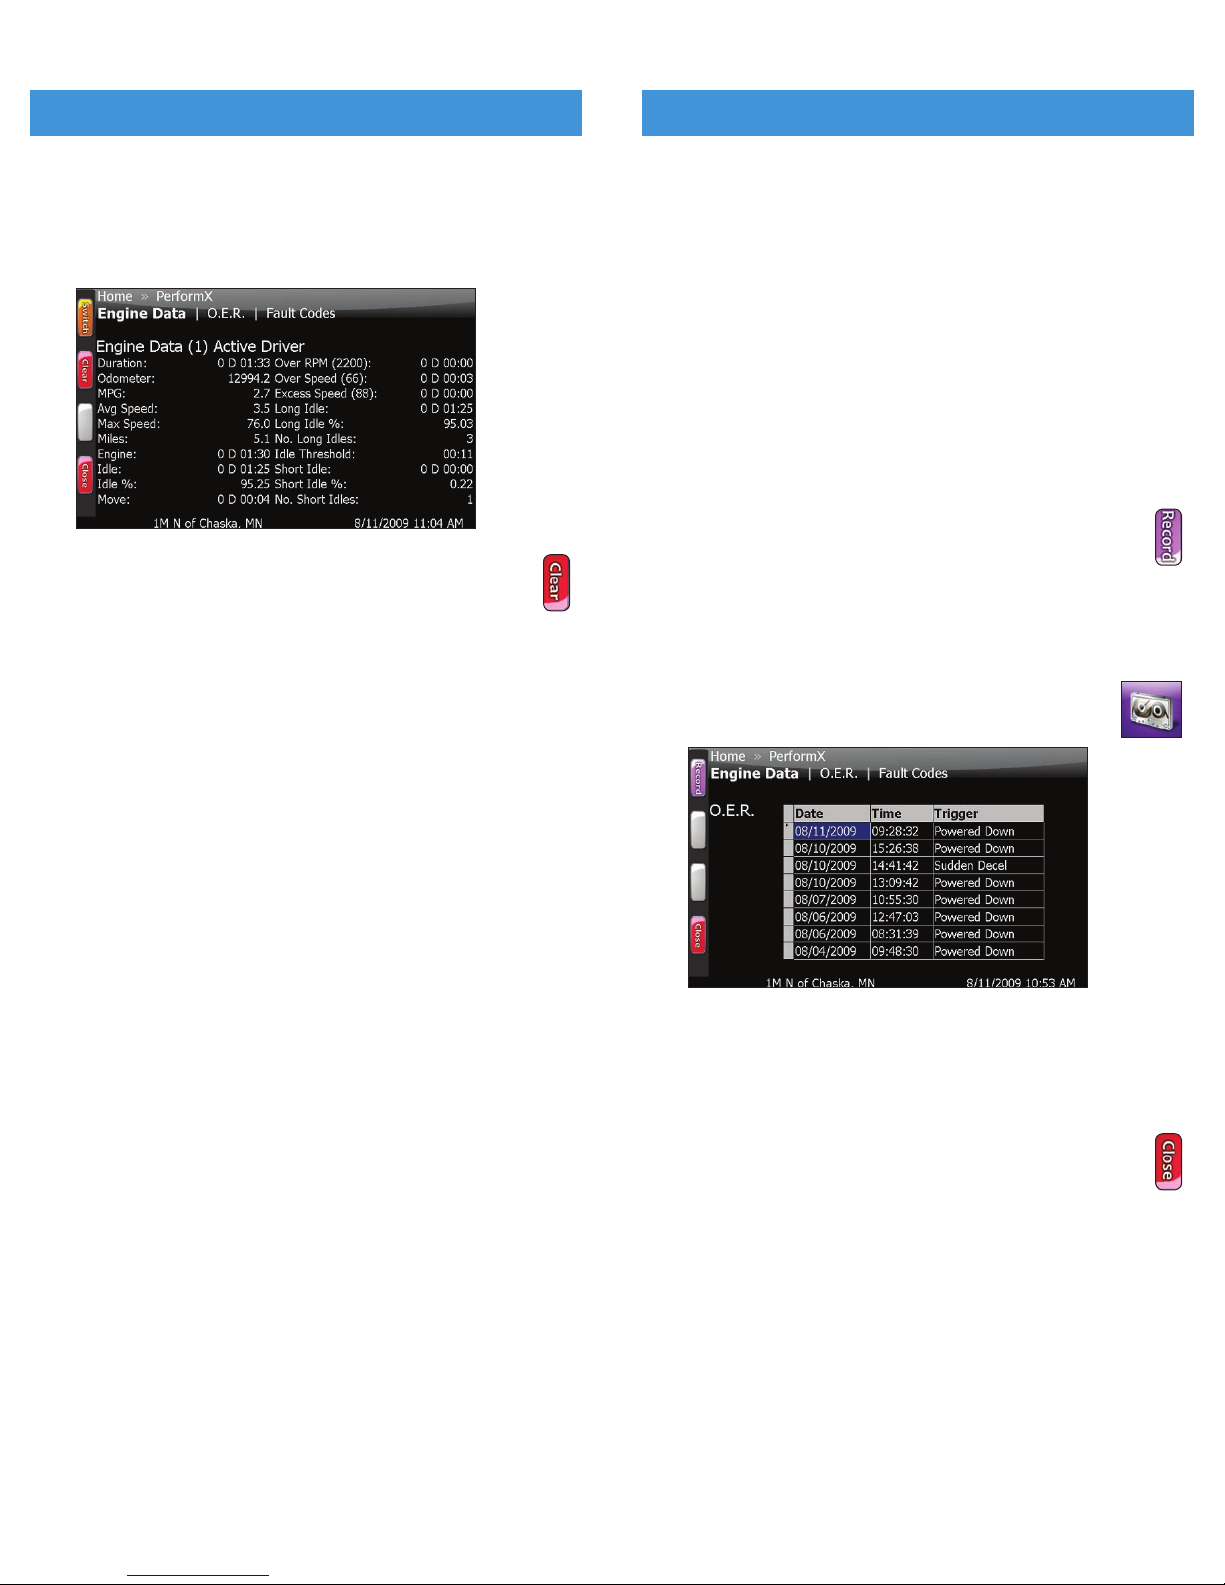
PERFORMX – ENGINE DATA
ONBOARD EVENT RECORDING (OER)
If your company has enabled Onboard Event Recording,® three
types of vehicle events can be recorded during your operation
of the vehicle.
Sudden acceleration (SA): records 6 0 seconds before and
30 seconds after vehicle accelerates beyond a pre-set threshold.
Sudden deceleration (SD): records 6 0 seconds before and
30 seconds after vehicle decelerates beyond a pre-set threshold.
Manual trigger (MT): driver chooses to record 170 seconds
before and 30 seconds after the event. This capability must be
activated by the safety manager.
Drivers receive notification when events are recorded and
can view a listing of recorded events from the OER screen.
If your company allows you to manually trigger events, you
will see a Record option on the OER screen. This feature
must be turned on by your safety manager.
Option 1: Recording Events (manual trigger)
1. From the short cut screen touch the OER short cut on
your screen.
2.
Select Close to exit out of the OER screen.
Option 2: Recording Events (manual trigger)
1. Select PerformX[OER in the menu bar to display the OER data.
2.
Select Close to exit out of the OER screen.
15
PERFORMX – ENGINE DATA
If your company uses PerformX® you can view real-time engine
performance information for a trip, leg or any report duration.
1.
Select PerformX[Engine Data in the menu bar to display the
engine data.
DURATION: Accumulated time since the last reset.
Use the CLEAR button to reset your averages and
trip information (hours : minutes).
ODOMETER: Odometer reading.
MPG: Average Miles Per Gallon.
AVG SPEED: Average speed.
MAX SPEED: Highest speed recorded.
MILES: Number of miles traveled.
ENGINE: Time engine has been running.
IDLE: Time spent idling (hours : minutes).
MOVE: Time spent moving (hours : minutes).
OVER RPM: Time spent exceeding company RPM goals.
The number after RPM is the company target (hours : minutes).
OVER SPEED: Time spent exceeding company speed goals.
The number after Speed is the company target (hours : minutes).
EXCESS SPEED: Time spent moving at an unsafe speed.
The number after Speed is the company target (hours : minutes).
LONG IDLE: Time spent idling longer than the threshold set by
your company (hours : minutes).
LONG IDLE %: Percentage of time spent in long idle.
NO. LONG IDLES: Number of times vehicle idled longer than
the company-set threshold.
IDLE THRESHOLD: Number of minutes used to split long and
short idle events.
SHORT IDLE: The amount of time you have idled less than the
company goal (hours : minutes).
SHORT IDLE %: Percentage of time spent in short idle.
NO. SHORT IDLES: The number of times you have idled less
than the company goal.
14
Page 10
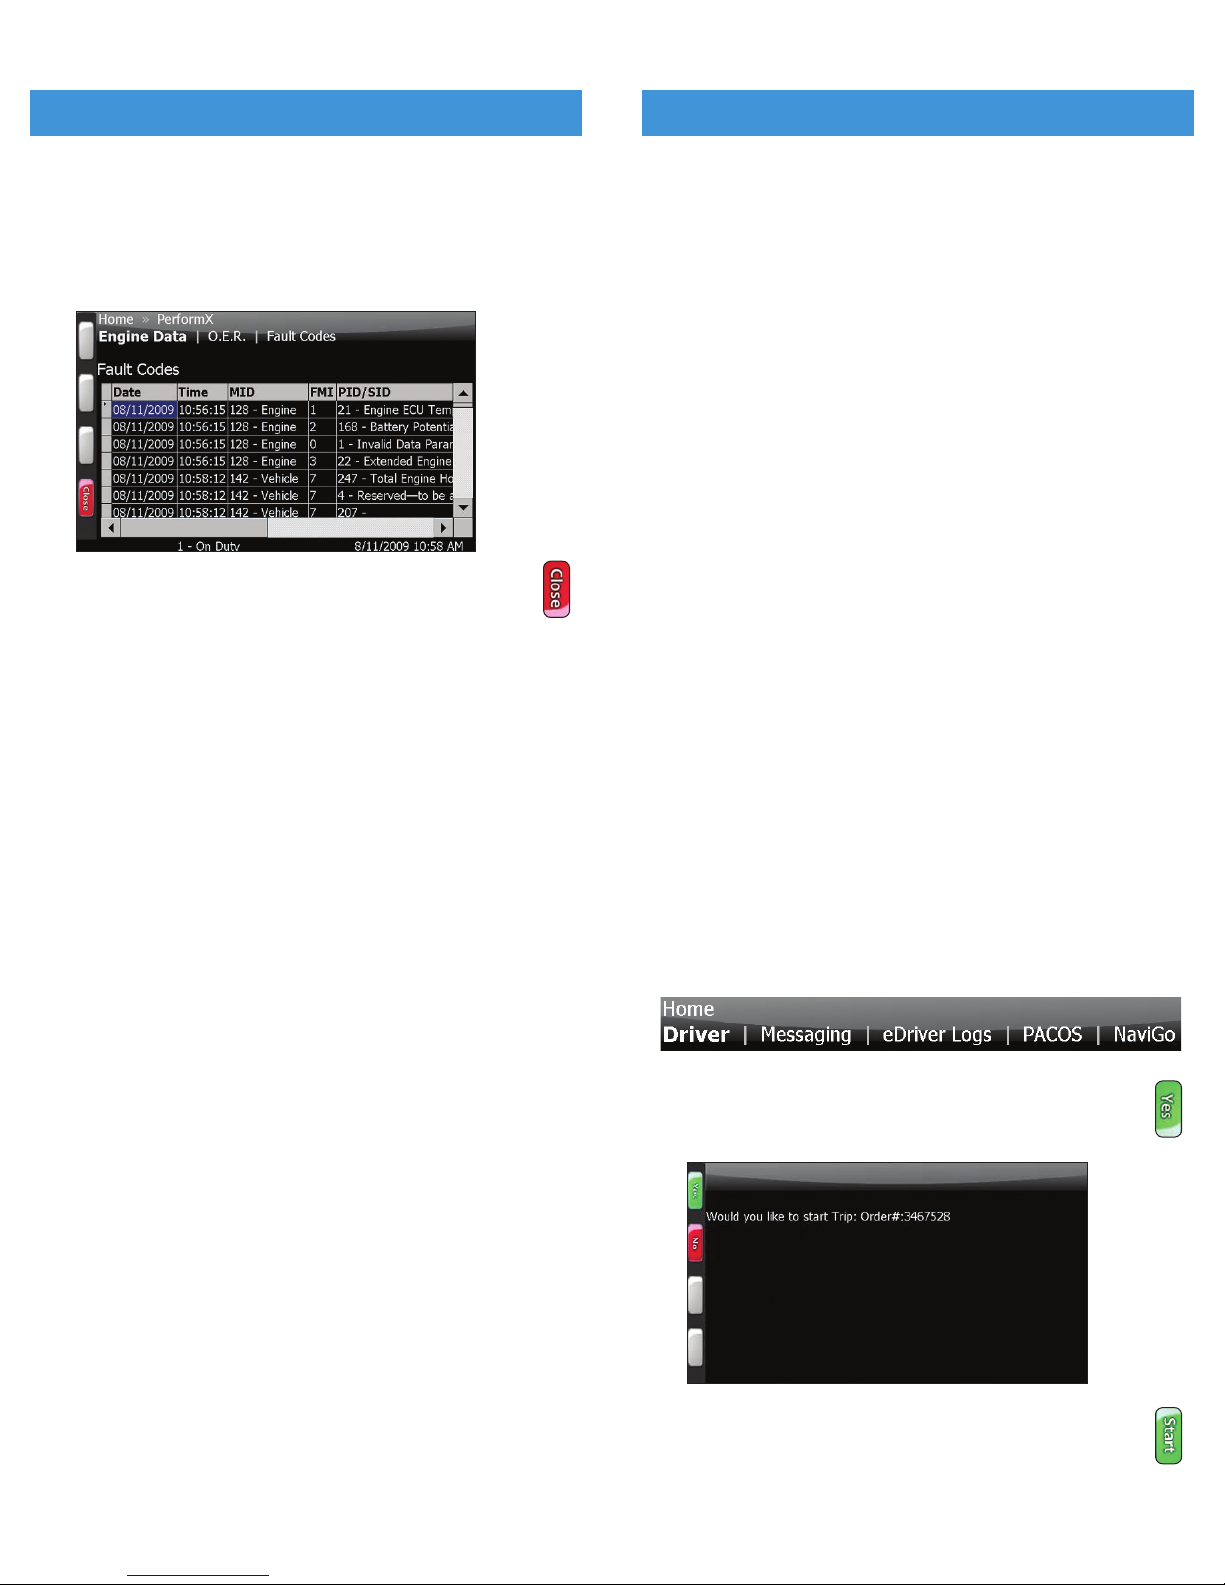
PACOS
17
PACOS® users can take advantage of automated messaging
and viewing of dispatches directly from the BLU in-cab PC. The
automated messaging feature requires no driver interaction and
has three configurable geo-fences for pre-defined stops within
a dispatch:
Approaching: BLU records and transfers the date, time, and
location information. The event is either transferred urgent or
deferred; however, the driver will not be prompted for this event.
It occurs automatically as BLU detects distance from the stop
location as configured by dispatch.
Arrived: BLU notifies the driver upon arrival at the stop (if you
have reached the destination and have not been prompted to
arrive, manually arrive the stop). Some dispatches may require
confirmation of arrival; others are configured to automatically arrive.
Departed: BLU records and transfers the date, time, and
location information. Some dispatches may require confirmation
of departure; others are configured to automatically depart.
Messages may accompany the dispatch(es). All dispatch messages
should be saved, these messages may or may not be presented
to you upon arriving at the stop and a response may be required.
BLU will prompt the driver upon arrival of a stop configured with
a PACOS dispatch.
NOTE:
There are many options available to dispatch for PACOS
and how stops actions for Arrive and Depart will be
presented to the driver. Please consult your fleet manager
for information on how PACOS is setup for your fleet.
1.
Select PACOS from the menu bar to display current
dispatches (trips).
NOTE:
If there are no dispatches, then the PACOS
menu option will not be available.
2.
Once a trip is selected BLU will prompt the driver with
a message “Would you like to start trip: 3467528?”
Select Yes to start trip.
NOTE:
If the driver would like to start the trip prior to the
appointed start time, press the Start button from the
Trip Information screen.
FAULT CODES
Fault codes are assigned MIDs/PIDs triggered by the ECM.
1. Select PerformX[Fault Codes to display the fault codes
that have been triggered (if applicable).
2.
Select Close to exit out of the Fault Codes screen.
16
PERFORMX – ENGINE DATA
Page 11
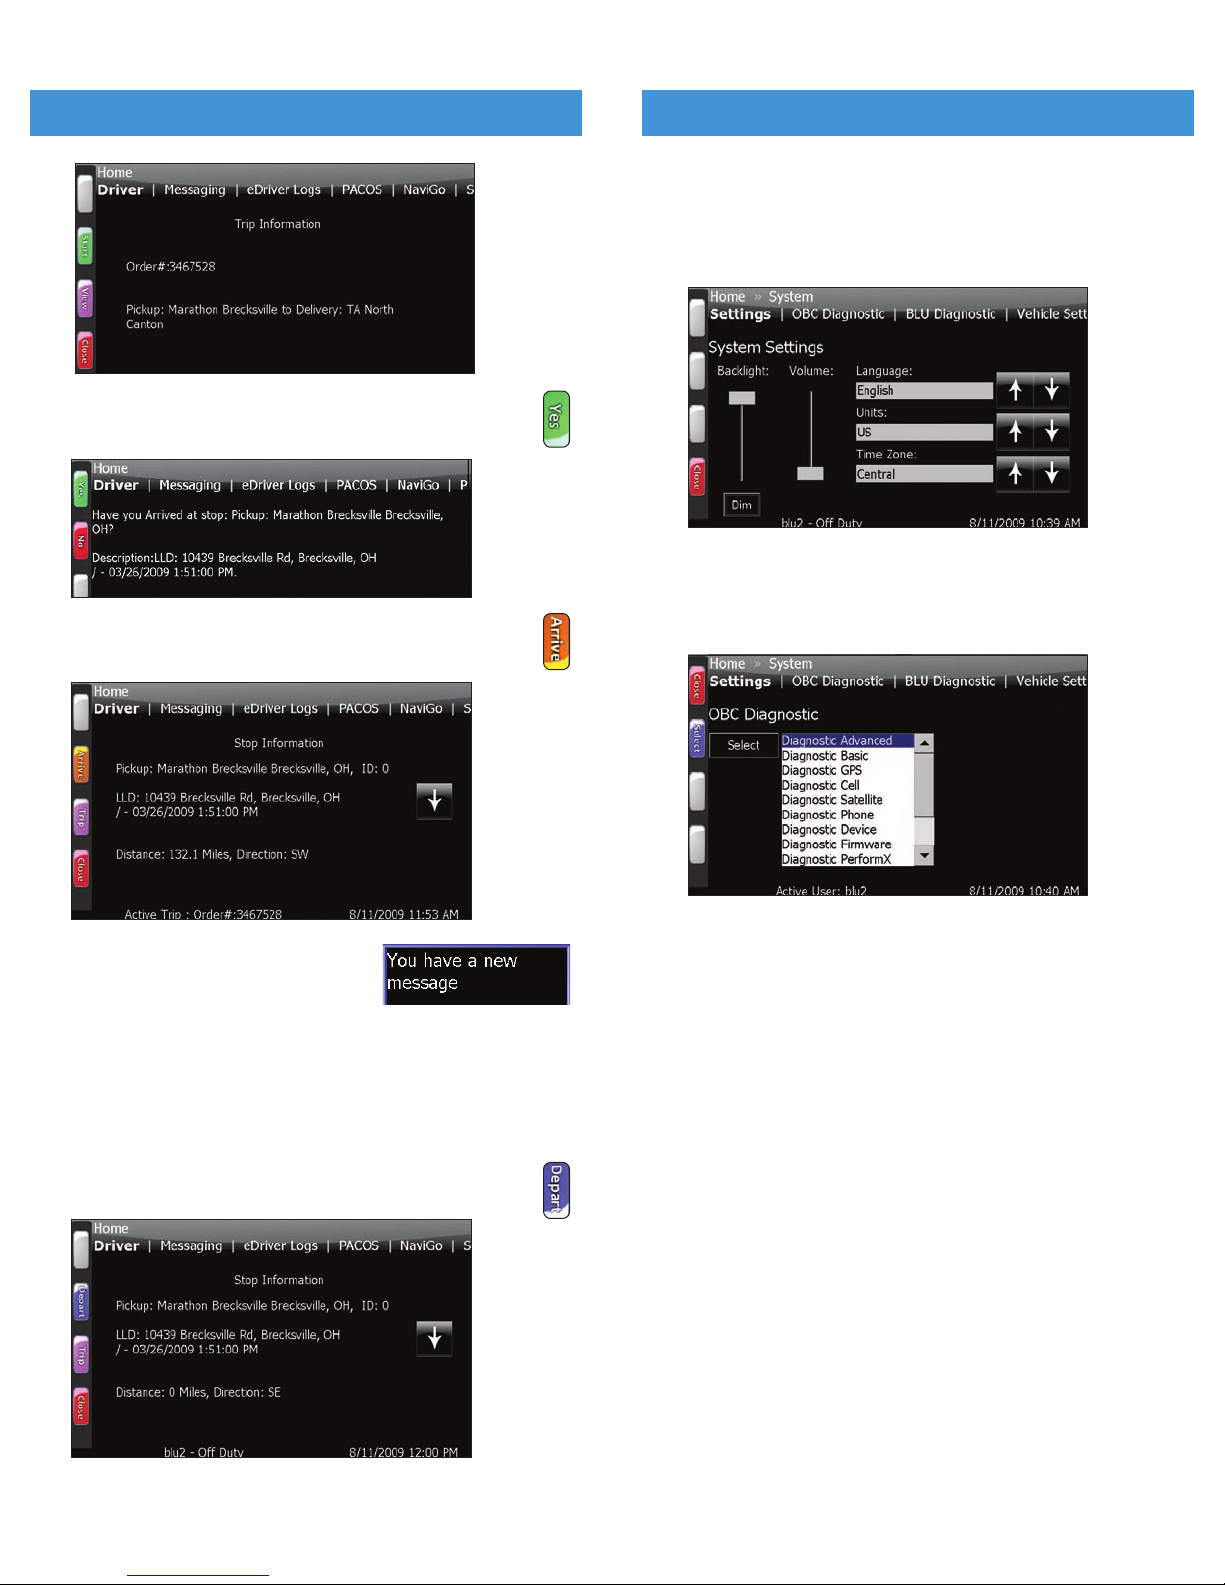
System diagnostics displays the information relating to the
OBC and BLU.
1.
Select System[Settings to display options for configuration
for the system.
SYSTEM DIAGNOSTICS
For OBC diagnostic information:
1.
Select System[OBC Diagnostic to display menu options
for OBC.
19
PACOS
18
3. The driver will be prompted to arrive once at the
designated stop location. Press Yes to confirm arrival.
NOTE:
If the driver is not prompted automatically, press
the Arrive button for the stop to manually arrive.
4.
If there is an embedded message a
notification panel will appear stating
“You have a new message.”
5.
Once the notification panel is touched, BLU will display the
message. Follow steps on replying to a message.
6.
Once the driver departs the stop location, a depart action
will occur automatically and the driver is not required nor
prompted to confirm departure.
NOTE:
To depart manually press the Depart button.
Page 12
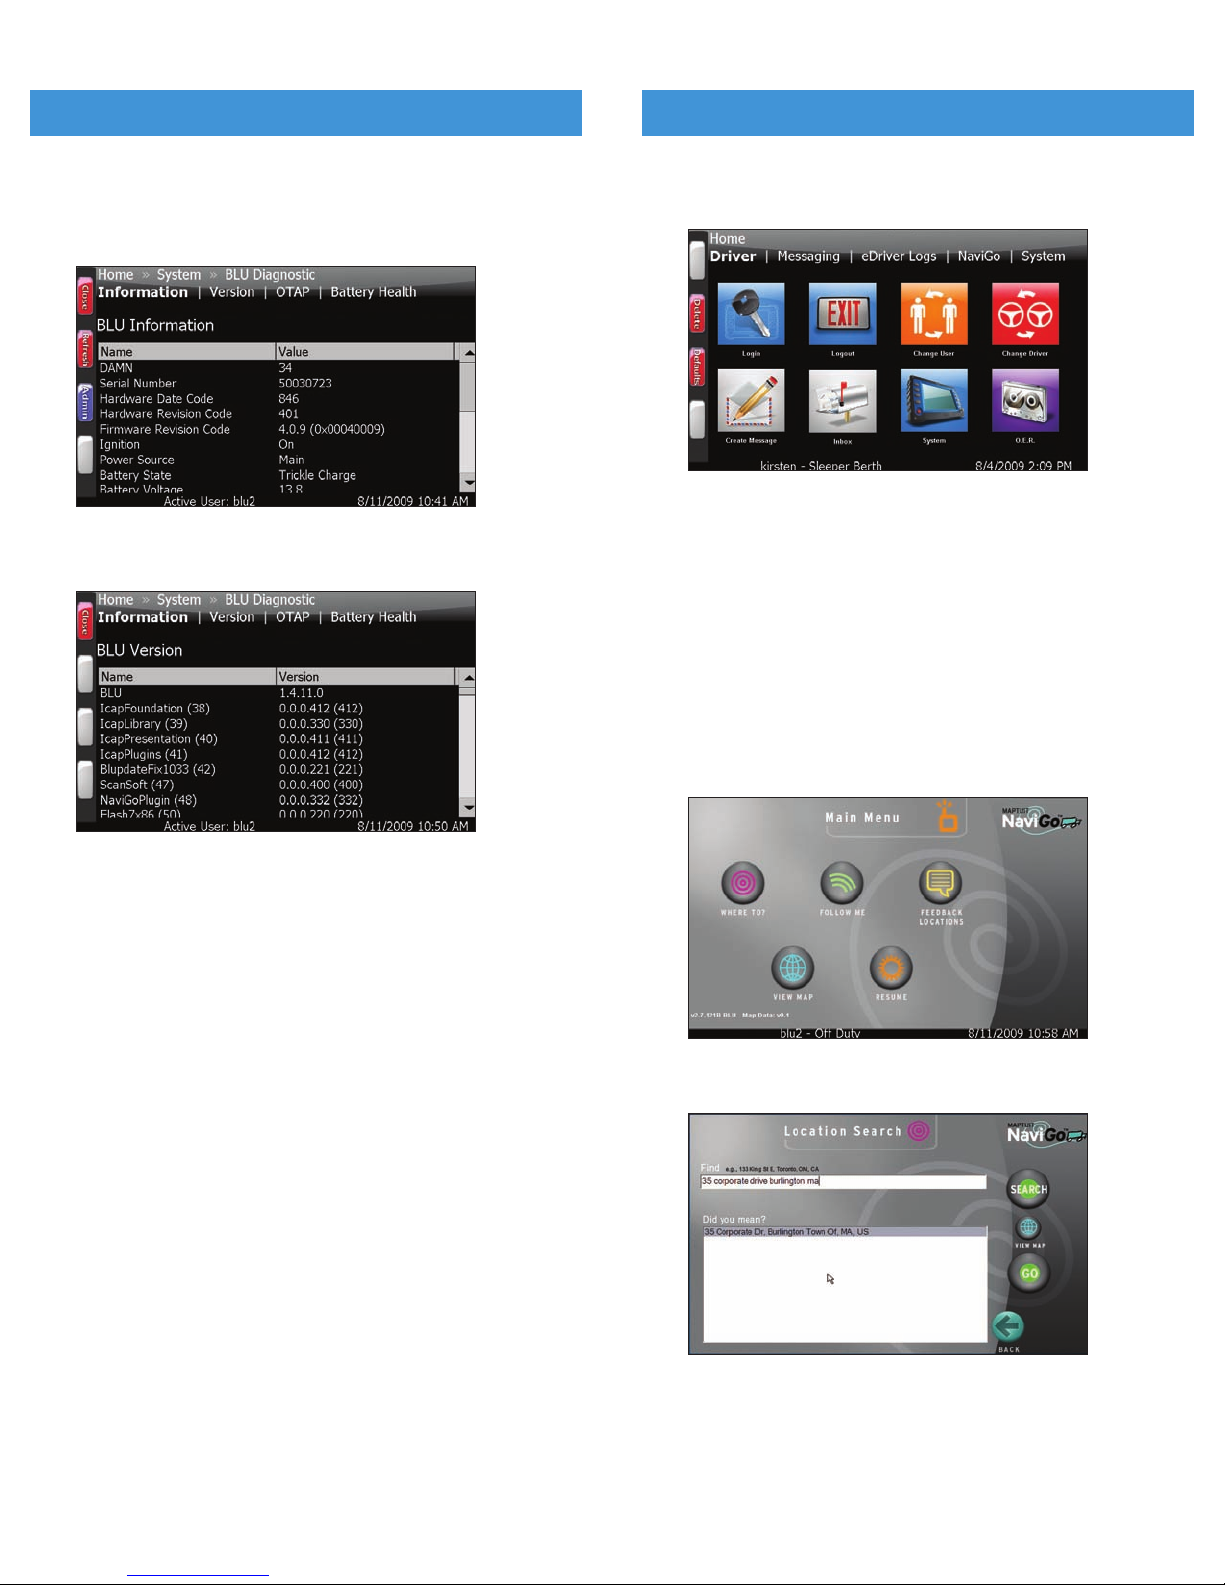
IN-CAB NAVIGATION
To access in-cab navigation touch the NaviGo option on
the Main Menu. There is also a short cut available for NaviGo.
NOTE:
NaviGo In-Cab Navigation is an optional service. Please
contact your fleet administrator to see if your fleet has
activated this service for your vehicle.
NOTE:
If you launch NaviGo and the buttons do not appear
colored, but are grayed out, please contact your fleet
administrator to see if you are authorized to use this
service for your fleet/vehicle.
SEARCHING A LOCATION
1. Touch Where To? on the screen.
2.
In the Find field type in the address you need to locate.
21
SYSTEM DIAGNOSTICS
For BLU diagnostic information:
1.
Select System[BLU Diagnostic[Information for
BLU information.
2.
Select System[BLU Diagnostic[Version to display
BLU version.
20
Page 13
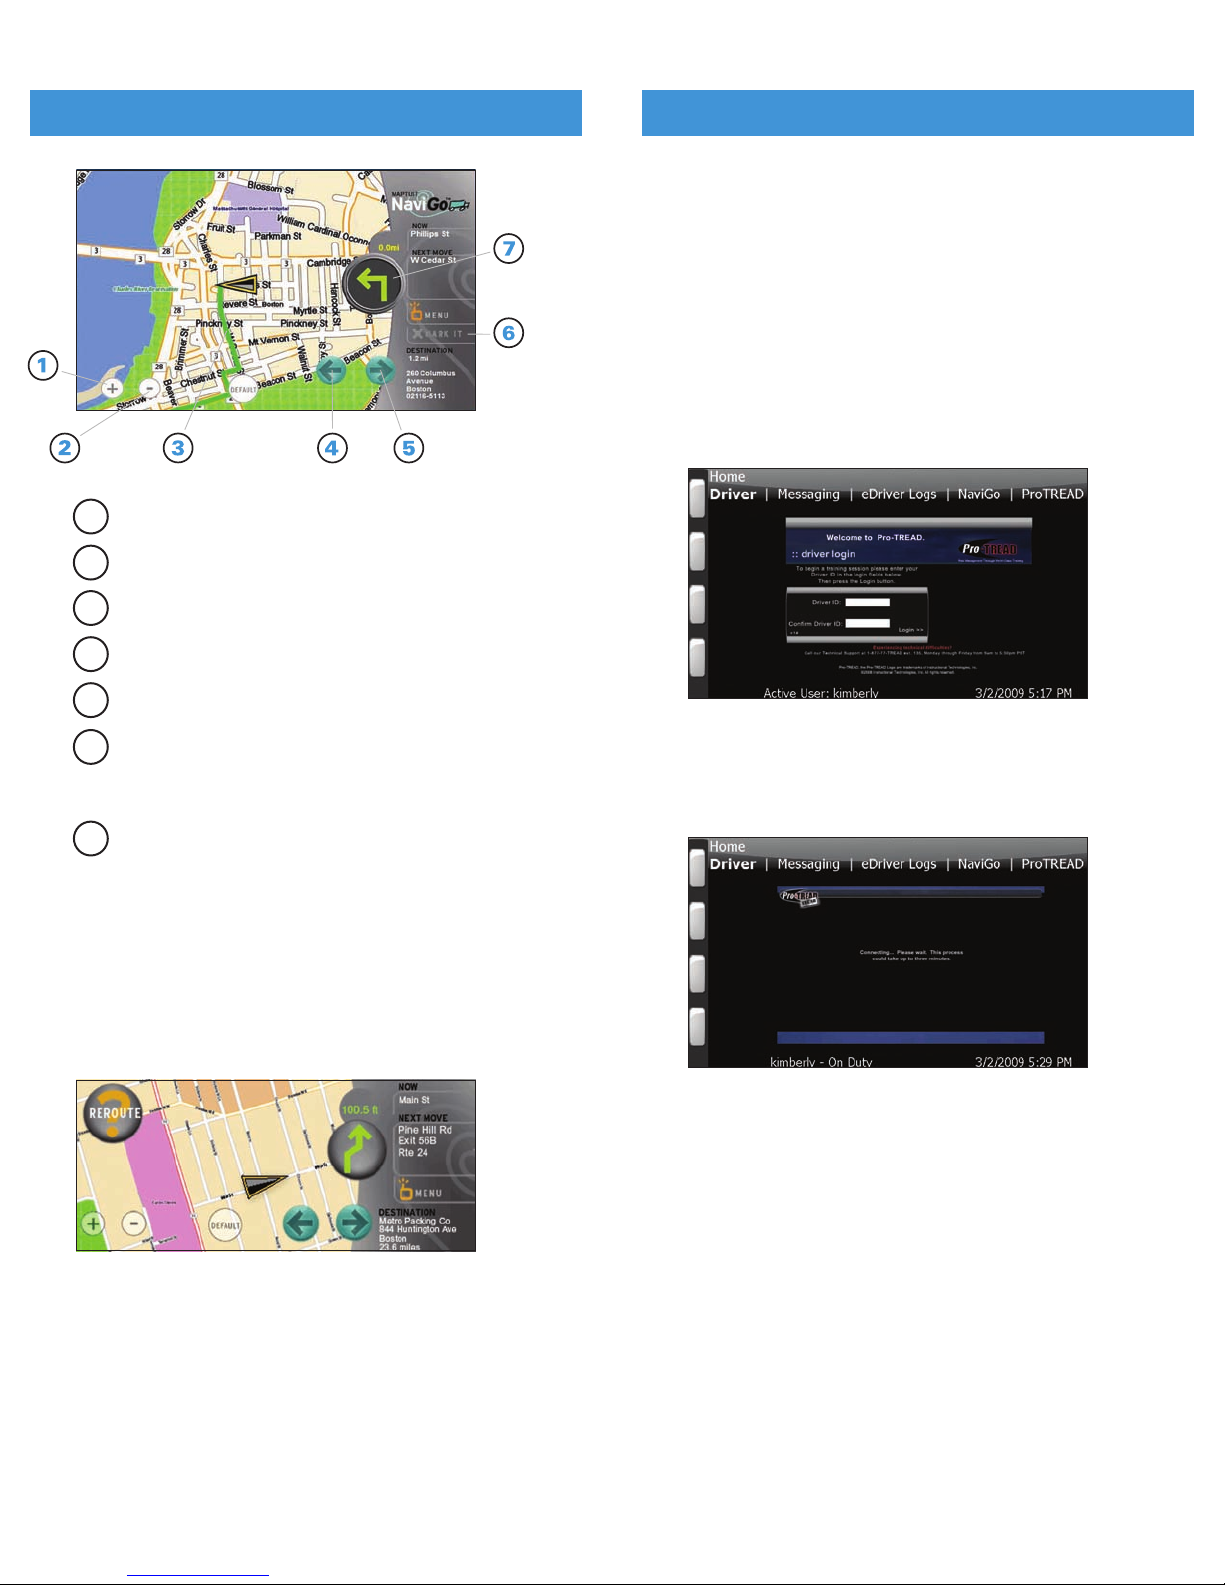
IN-CAB NAVIGATION INTERACTIVE IN-CAB TRAINING
Zoom In Button
Zoom Out Button
Route Line
Button provides audible previous step
Button provides audible next step
Button captures vehicle’s current location and route
information. Places in feedback queue for future
comments.
Maneuver indicator and button. Also repeats previous
announced step.
OUT OF ROUTE INDICATOR
1. To generate a new route touch Reroute button on the screen
(note you can only generate a new route by requesting it).
2.
The Reroute button will display until the route is cancelled
or you return to the original route.
1
2
3
4
6
7
5
22
To access interactive in-cab training with Pro-TREAD touch the
Pro-TREAD option on the Main Menu. There is also a short cut
available for Pro-TREAD.
NOTE: Interactive In-Cab Training with Pro-TREAD is an optional
service. Please contact your fleet administrator to see if
your fleet has activated this service for your vehicle.
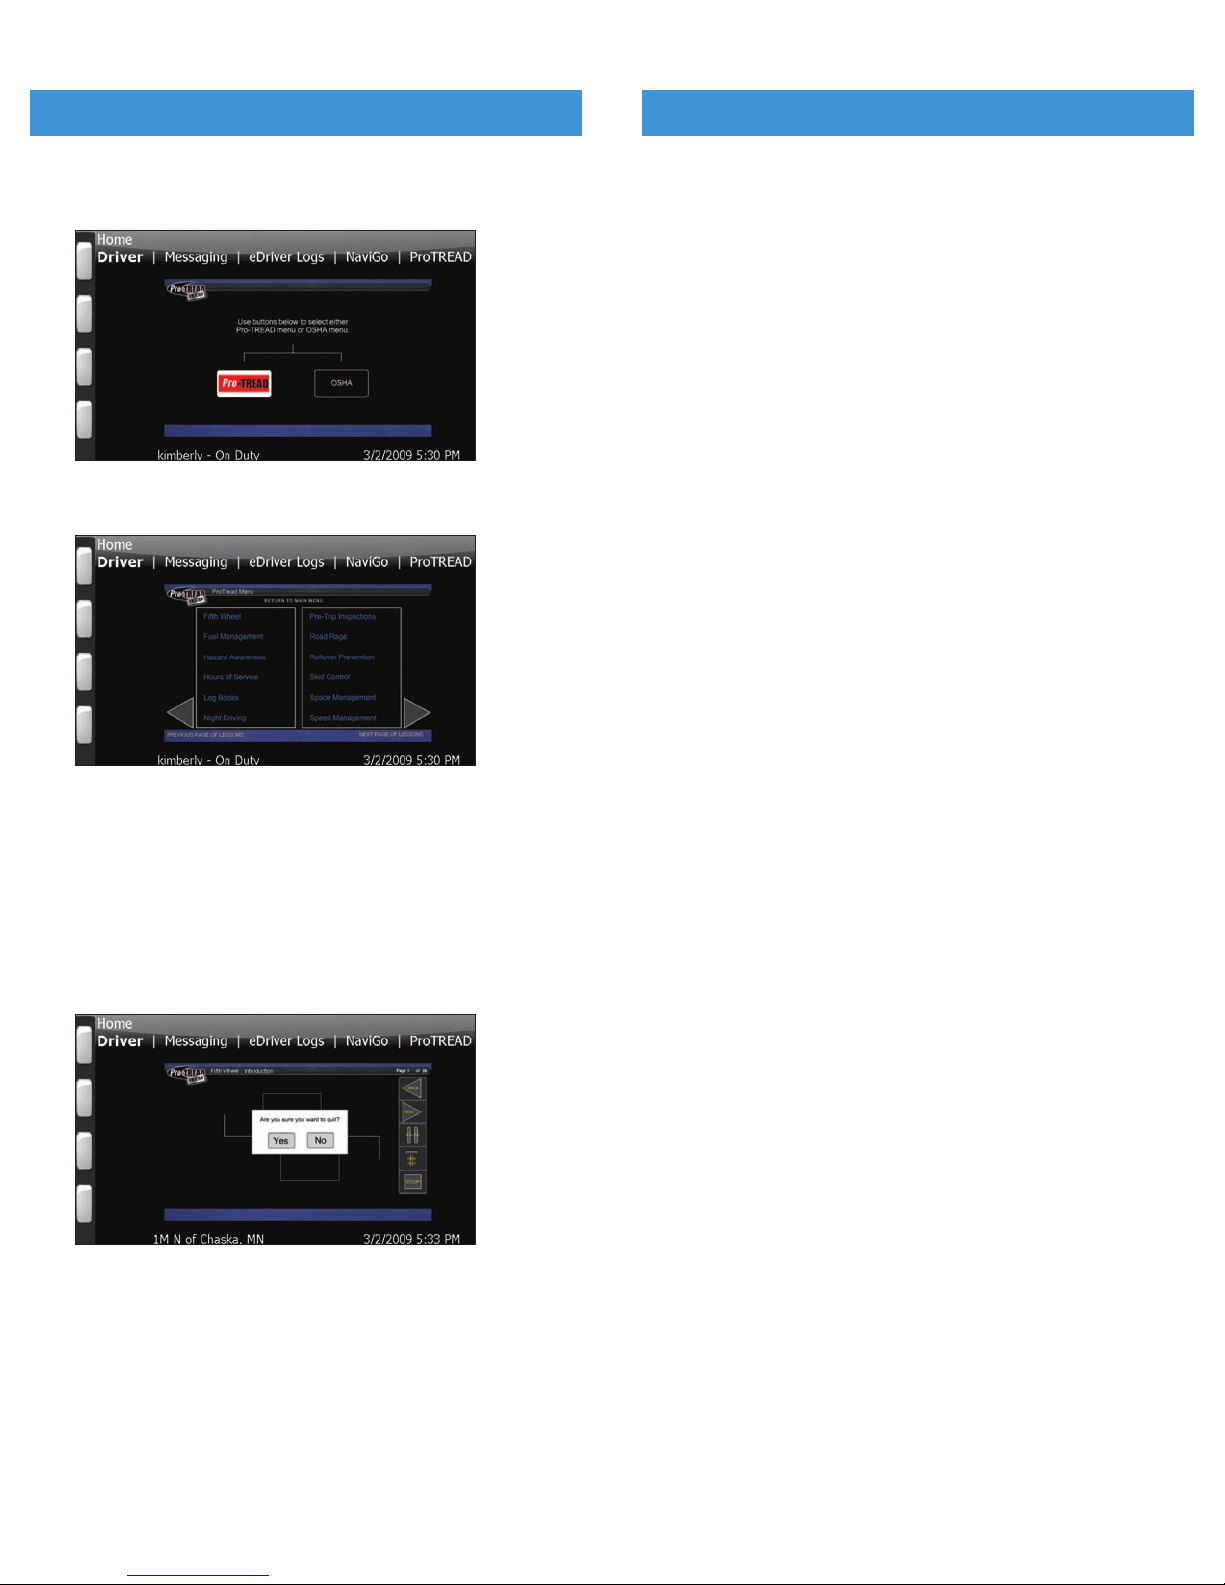
1.
Enter the Driver ID associated with your Pro-TREAD login.
NOTE:
Contact your fleet manager for Driver ID assignment.
PeopleNet Customer Support does not have access to
this information.
2.
Confirm Driver ID by entering it again.
3.
A data call will be placed to validate login and receive lesson
progression from Pro-TREAD’s web portal.
23
Page 14
25
3. Once login is complete, select the lesson category
Pro-TREAD or OSHA.
4.
Select the lesson to play from the menu.
5. From the lesson you can Play, Pause, go Back, and Stop
anywhere within the lesson.
NOTE:
The Pro-TREAD application will cease playing any lesson
if vehicle movement is detected.
6.
To quit the application, press Stop and Pro-TREAD will place
a data call to submit lesson progression to the Pro-TREAD
web Portal.
7.
Once Stop is selected BLU will prompt the driver with a
confirmation “Are you sure you want to quit?” Select Yes
to exit Pro-TREAD.
24
INTERACTIVE IN-CAB TRAINING
Page 15

US Headquarters Canada Contact
PeopleNet PeopleNet Canada (888) 346-3486
4400 Baker Road 1100 Burloak Dr. • Suite 300
(952) 368-9320 Fax
Minnetonka, MN 55343-8684 Burlington, Ontario L 7L 6B2 info
@
peoplenetonline.com
USA Canada www.peoplenetonline.com
PACOS, PerformX, eDriver Logs and OnBoard Event Recording are registered
trademarks and PeopleNet BLU is a trademark of PeopleNet Communications
Corporation. ©2009 PeopleNet Communications Corporation. All rights reserved.
This information is subject to change without notice. Printed in U.S.A. 10/09
D-011-0111-AE
 Loading...