

Pentax smc PENTAX-FA J 18-35mm f/4-5.6AL, smc PENTAX-FA 35mm f/2AL, smc PENTAX-FA 43mm f/1.9Limited, smc PENTAX-FA 50mm f/1.4, smc PENTAX-FA 20-35mm f/4AL Operating Manual
...Page 1
smc PENTAX-FA
INTERCHANGEABLE LENS
OPERATING MANUAL
50
15
8
10
3
2
A
22
16
11
8
5.6
4
2.8
1.4
Page 2

Foreward
Thank you for purchasing the smc PENTAX lens.
This operating manual applies to all of the smc PENTAX FA and FA
J lenses.
Please also read your camera's operating manual.
* In this manual, the "smc PENTAX - FA lens" is referred to as "FA
lens" and the "smc PENTAX - FA J lens" as the "FA J lens".
* Illustrations shown herein may differ from the actual appearance.
* PENTAX and smc PENTAX are trademarks of HOYA CORPORATION.
Page 3
USING YOUR LENS SAFETY
1
Although we have carefully designed these lenses for safe
operation, please pay special attention to items marked with
the following symbols when using this product.
WARNING This symbol indicates precautions that if not
followed, could result in serious injury to the
user.
CAUTION This symbol indicates precautions that if not
followed, could result in minor or medium
injury to the user or damage to the equipment.
Page 4
2
WARNING
• Never look at the sun
through the lens or
camera. Serious damage to
the retina, or total loss of
eyesight may occur.
• Wrapping the strap around
your neck is dangerous.
Make sure that small
children do not get the
strap caught around their
neck. (A strap is supplied
only with some large types
of lenses)
CAUTION
• Do not leave the lens in
direct sunlight without lens
caps. Sunrays passing
through the lens will be
intensified, and should
they focus on flammable
materials, fire may occur.
Page 5

PRECAUTIONS AND LENS MAINTENANCE
3
1. Storage and mildew prevention
• Take the lens out of the protective case or camera bag, and store it in a dry,
well-ventilated place.
• Avoid storing the lens in a poorly ventilated location such as a closet, ward-
robe, drawer, vehicle, or where insect repellent or medicine is kept.
• Avoid storing the lens in areas of high temperature and humidity, where there
is a risk of mildew growth.
Store the lens with a desiccant in a dry cabinet, airtight container, or plastic
bag. (Leaving a saturated desiccant in the storage container can cause dam-
age to the lens. Be sure to read the instructions that come with the desiccant
before use.)
2. The lens is not waterproof. When using the lens in a rain or mist, be careful
not to allow it to get wet.
3. Never use any organic solvent such as thinner, alcohol, or benzine, etc. to
remove dust on the lens.
4. The lens is a precise optical instrument. Be careful not to let it fall, or subject
it to strong shocks or pressure. Use a cushion or similar pad to protect the
lens from the vibrations of motorcycles or other vehicles, boats, etc.
Page 6

4
5. Avoid subjecting the lens to rapid changes in temperature, otherwise con-
densation may occur on both the inside and the outside of the lens. Put the
lens in a plastic bag or camera bag, and take it out after the lens has reached
ambient temperature.
6. When the lens is not attached to the camera body, attach both the provided
lens cap and lens mount cap to protect it from dust.
7. Do not leave the camera with the lens cap off attached to a tripod or other
rigid camera support. The inner parts of the camera can be damaged by
direct sunlight.
8. Have the lens inspected by a dealer every one or two years to maintain its
high performance.
Page 7

CONTENTS
5
PRECAUTIONS AND LENS MAINTENANCE …………………………… 3
About the smc PENTAX-FA/FA J Lens…………………………………… 7
• About the zoom ring ………………………………………………………… 9
Changing the Lens…………………………………………………………… 10
Finger Point on Limited Lenses …………………………………………… 11
Lens Cap ……………………………………………………………………… 11
Focusing ……………………………………………………………………… 12
• Autofocusing ………………………………………………………………… 12
• Manual focusing …………………………………………………………… 12
• FA
lenses …………………………………………………………………… 13
• Setting autofocus …………………………………………………………… 13
• Setting manual focus ……………………………………………………… 13
Setting the Aperture [A (Auto) Lock Switching] ……………………… 15
• About the Zoom Lens Aperture …………………………………………… 16
• Apertures and Click Stops ………………………………………………… 17
Using the Infrared Index …………………………………………………… 18
• Zoom Lens Infrared Index ………………………………………………… 19
Page 8

6
Lens Hood …………………………………………………………………… 20
• Note: ………………………………………………………………………… 20
• Compatible Lens Hoods …………………………………………………… 21
• Attaching a Round Lens Hood …………………………………………… 22
• Attaching a Square Lens Hood …………………………………………… 23
• Using the Built-in Lens Hood ……………………………………………… 24
• PL Filter Window …………………………………………………………… 25
Tripod Mount ………………………………………………………………… 27
Filters…………………………………………………………………………… 28
• Filter Cautions ……………………………………………………………… 28
• Filter Sizes …………………………………………………………………… 28
• Note: Using a Circular Polarizing Filter …………………………………… 29
• Note: Attaching a Specialized Hood ……………………………………… 29
Cautions When Using Flash ……………………………………………… 30
• Compatibility with Built-in Flash …………………………………………… 31
Lens Case……………………………………………………………………… 32
• Lens Case Compatibility Table …………………………………………… 32
Main Specifications ………………………………………………………… 34
STATEMENT OF FCC COMPLIANCE …………………………………… 36
Page 9

About the smc PENTAX-FA/FA J Lens
7
50
15
8
10
3
2
A
22
16
11
8
5.6
4
2.8
1.4
Focusing ring
Aperture ring
Distance scale
Front-ring threads
Depth-of-field scale
Aperture A-lock button
[Single Focal Length Lens]
Page 10
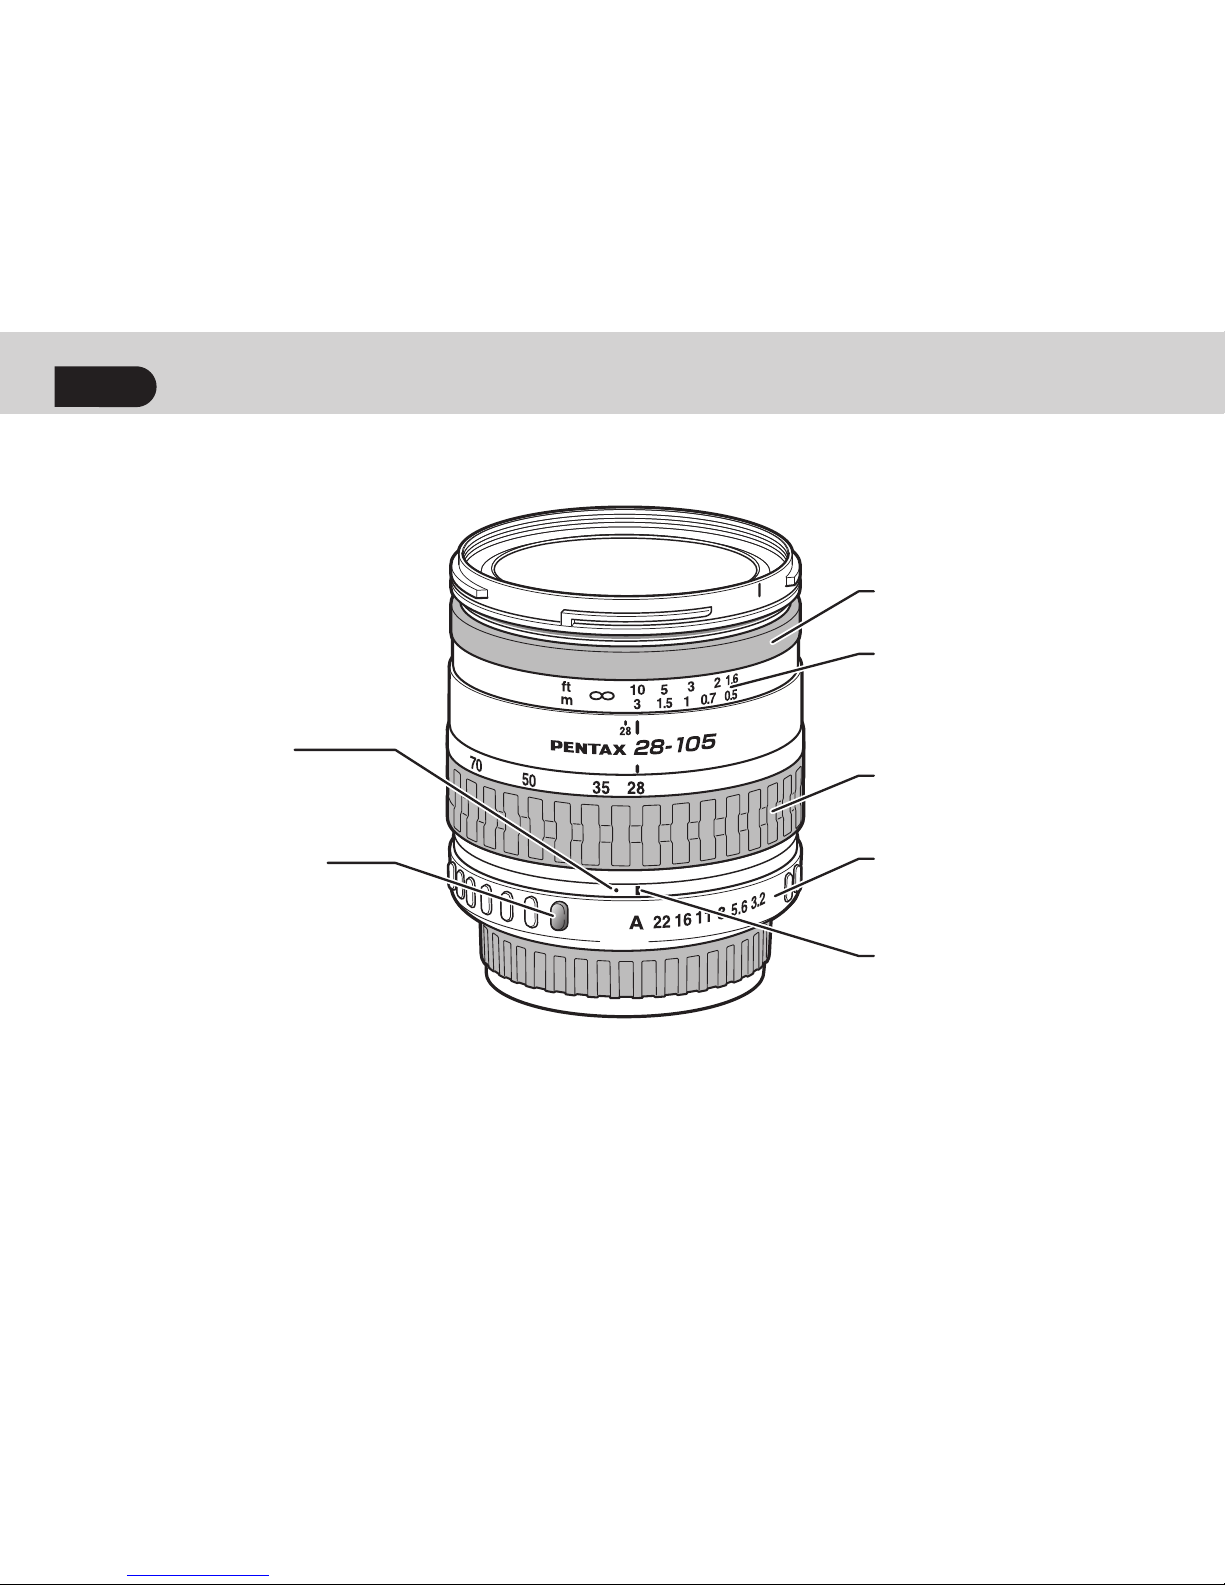
8
Focusing ring
Distance scale
Zoom ring
Aperture ring (note)
Aperture A-lock
button
Aperture index
{short focal length}
Aperture index
{long focal length}
Note: The following lenses do not have an aperture ring: FA J 18-35mm
f/4-5.6AL, FA J 28-80mm f/3.5-5.6AL, and FA J 75- 300mm f/4.5-5.8AL.
The aperture is controlled at the A [Auto] setting. Therefore, the lens is not
compatible with cameras and accessories which are not compatible with
the A setting.
[Zoom Lens]
Page 11

9
A zoom lens has two rings: The
focusing ring at the front of the lens
and the zoom ring behind it. Turn the
zoom ring to obtain the desired angle
of view (focal distance).
* Whenever you turn the zoom ring
to change the angle of view (focal
distance), the focus may also
change slightly. First turn the zoom
ring, then focus.
About the zoom ring
Turning the zoom ring to the right
gets a [Telephoto] effect, making the
subject look larger. Turning it to the
left gets a [Wide angle] effect, covering a wider area.
Page 12
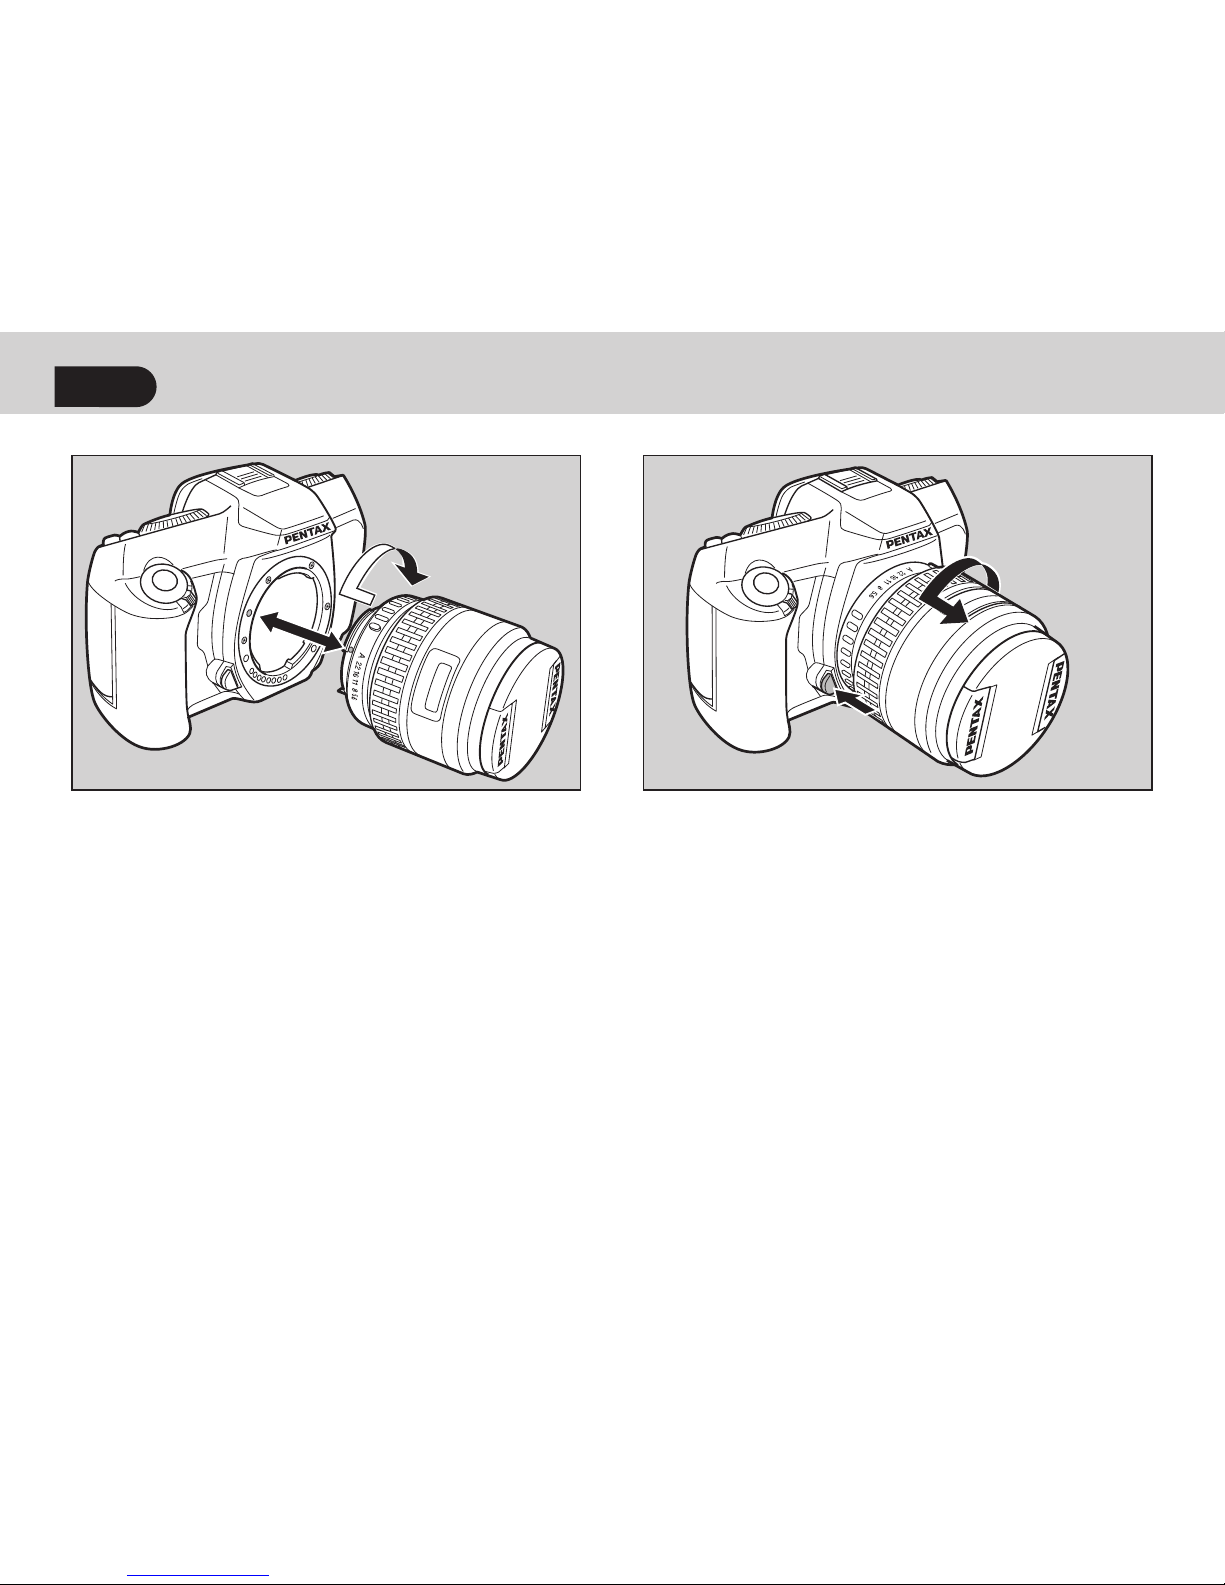
Changing the Lens
10
1. Align the mount index red dots
on the camera body and lens and
attach the lens. Turn the lens clock-
wise until it locks in place.
2. To detach the lens, hold down the
camera's lens unlock button, then
turn the lens counterclockwise.
* When attaching a lens, do not press the camera's lens unlock button. Doing
so causes improper lens attachment.
* After attaching a lens, turn the lens counterclockwise slightly to make sure the
lens is locked in place.
Page 13
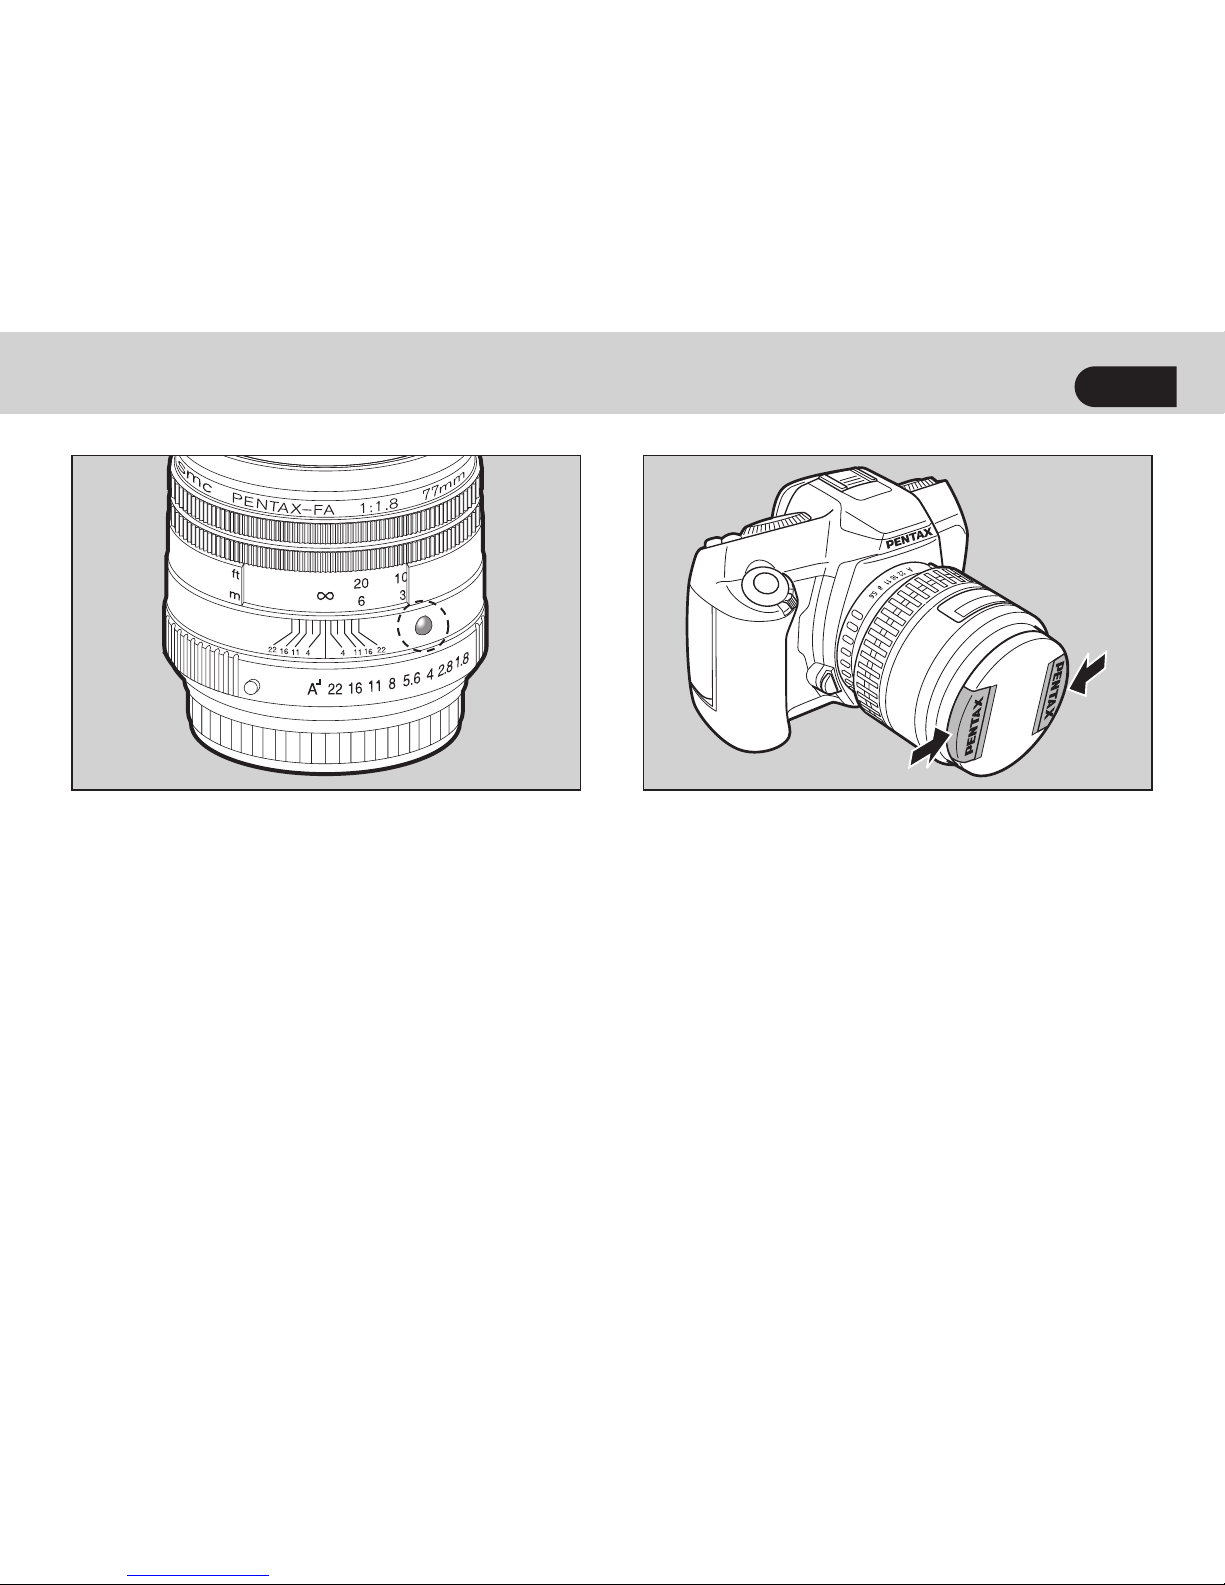
Finger Point on Limited Lenses
Lens Cap
11
You can easily attach a Limited lens
by aligning the finger point on the
lens with the camera's lens unlock
button.
Limited lenses
FA 31mm f/1.8AL Limited
FA 43mm f/1.9 Limited
FA 77mm f/1.8 Limited
To remove the lens cap, squeeze the
tabs as shown in the illustration.
* When not using a lens, be sure to
attach the lens cap.
* For the FA 43mm f/1.9 Limited
lens, attach the lens cap to the
hood. The lens cap cannot be
attached directly to the front of the
lens.
Page 14
Focusing
12
To switch between autofocusing and
manual focusing, use the camera's
focus mode lever. For details, refer to
your camera's instruction manual.
* For FA
lenses, see page 13.
* For non-autofocus cameras, use
manual focusing.
Autofocusing
Press the shutter button halfway to
autofocus.
* During autofocusing, the focusing
ring rotates so do not touch it.
Manual focusing
Turn the focusing ring as shown in
the illustration.
22
16
11
8
5.6
4
28
2
14
A
50
15
8
6
10
3
2
1.5
ft
m
Page 15

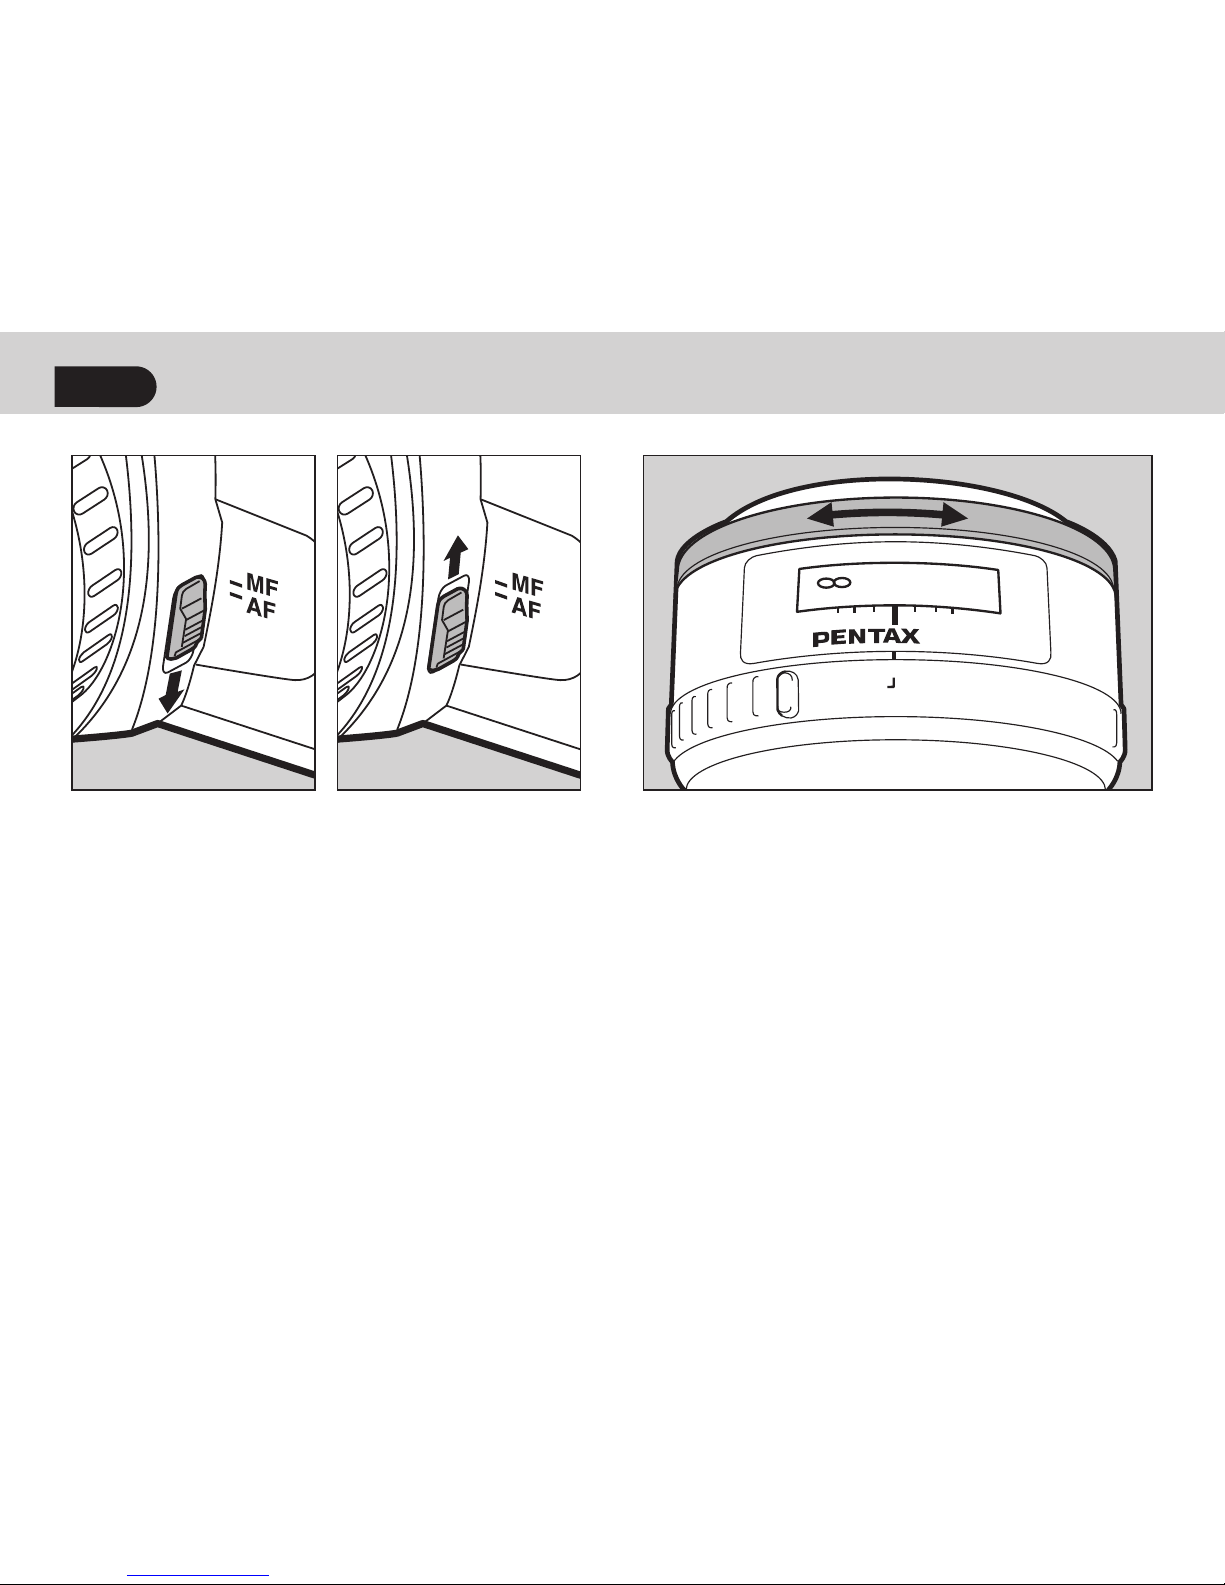
13
FA
lenses
With FA lenses, shift the focusing ring forward or back to switch
between autofocus and manual
focus.
Setting autofocus
Push the focusing ring forward until
you can see AUTO FOCUS.
* When the lens is set for autofocus,
the focusing ring locks.
Setting manual focus
Pull the focusing ring until AUTO
FOCUS is hidden. Turn the focusing
ring to focus manually.
Page 16

14
* If your camera has a KAF2 mount,
you can still switch between autofocus and manual focus with the
lens focusing ring even when the
camera has been set to autofocus.
* If you have a camera (such as the
SF-series) having a K
AF mount, set
both the camera and lens focus
mode switch to the same setting. If
the camera is set to autofocus [AF
single] and the lens is set to manual focus, you cannot take a picture
until the camera's focus indicator
lights.
* If you use a camera which does not
have autofocus, focus manually.
* The telephoto lens' focusing ring
stops turning at slightly past the ∞
infinity symbol. This is because,
the point of focus changes depending on the temperature, and sometimes the focus is achieved beyond
the ∞ infinity symbol.
* Even when focusing at infinity,
always look through the viewfinder to make sure the subject is in
focus.
* When the lens is set for manual
focus, the focusing ring can continue to turn even past the minimum
focusing distance or infinity mark.
Page 17

Setting the Aperture [A (Auto) Lock Switching]
15
To set the aperture ring to A [Auto],
hold down the Aperture A-lock button and align the A index with the
white-line index. To set the aperture
ring to another setting, hold down the
Aperture A-lock button and turn the
aperture ring.
* If your camera has a K mount with
no lens information contacts, set
the aperture ring to any aperture
except A.
22
16
11
8
5.6
4
A
50
15
10
3
2
ft
m
8
22
16 8
22
16
4
2.8
2
1.4
A
50
15
10
3
2
ft
m
8
22
16 8
11
8
5.6
Page 18

16
About the Zoom Lens Aperture
Zoom lenses whose maximum aperture
varies depending on the focal length
have a [Minimum length] aperture
index for the shortest focal length and a
[Maximum length] aperture index for the
longest focal length. To set the aperture
to A [Auto], turn the aperture ring to the
white [Short focal length index] at the
center (regardless of the focal length) as
shown in the illustration.
For the longer focal lengths, if you want
to set an aperture other than A, align the
aperture ring with the long focal length's
aperture.
For example, with a 28-105mm zoom
lens set to 105mm, set the f/8 aperture
by aligning the aperture ring's f/8 to the
[Long focal length aperture index] mark
on the left of the white index.
* When setting the aperture manually
at a middle focal length, use the aperture index for the short and long focal
lengths as a reference.
Page 19

17
Apertures and Click Stops
Certain lenses have a white dot next
to the maximum aperture. The white
dot indicates a difference of one aperture stop. For example, as shown on
the right, the white dot next to f/2
indicates f/2.8.
If there is no white dot for a click stop between the f/numbers, the click stop
indicates the respective f/number shown below. Also, certain lenses have no
intermediate click stop at both ends of the aperture scale due to a lack of space.
Do not set the aperture ring to a position where there is no click stop.
1.4
1.2
2
1.7
2.8
2.4
4
3.4
5.6
4.8
8
6.7
11
9.5
16
13.5
22
19
32
26
45
38
Page 20

Using the Infrared Index
If you use infrared film with an R2
or O2 filter, the point of focus differs
from normal shooting (with visible
light). This means the point of focus
must be corrected.
* Infrared film cannot be used with
the MZ-S, MZ-60, and
cameras since these cameras use
infrared light to detect film transport
operations.
When the subject is in focus in the viewfinder, note the point of focus on the
distance scale (shown in the left illustration). Then turn the focusing ring so the
respective point of focus on the distance
scale is aligned with the infrared index
mark, as shown in the right illustration.
* Before turning the focusing ring, set
the focus mode to manual focus.
* To determine the proper exposure,
refer to the film's instruction manual.
18
22
16
4
2.8
2
1.4
A
50
15
10
3
2
1
ft
m
8
22
16 8
11
8
5.6
22
16
4
2.8
2
1.4
A
50
15
10
3
2
ft
m
8
22
16 8
11
8
5.6
Page 21

19
Zoom Lens Infrared Index
With a zoom lens, the focusing correction amount for infrared film shooting varies depending on the focal
length.
As shown in the illustration, zoom
lenses have an infrared index.
Correct the focus with respect to the
focal length used.
Page 22

Lens Hood
20
The lens hood can be round, square,
or built-in. Using a lens hood is recommended for preventing internal
lens reflections. Suitable hoods are
listed on the next page.
Note:
* Do not use a lens hood if you are
using the camera's built-in flash.
The hood may obstruct the flash,
causing darkened areas in the picture. In the case of the FA 43mm
f/1.9 lens, the flash can be used
with the hood attached.
Page 23

21
Compatible Lens Hoods
Lens
Compatible
Hood
Shape
Attachment
Method
FA 35mm f/2AL PH-RBA49 Round Bayonet
FA 43mm f/1.9Limited MH-RA49 Round Screw-on
FA 50mm f/1.4 PH-RA49 Round Screw-on
RH-RC49 Round Screw-on
PH-SA49 Square Spring
FA J 18-35mm f/4-5.6AL PH-RBL67 Round Bayonet
FA 20-35mm f/4AL PH-RBA58 Round Bayonet
FA J 28-80mm f/3.5-5.6AL PH-RBE58 Round Bayonet
FA 28-105mm f/3.2-4.5AL (IF) PH-RBC58 Round Bayonet
FA J 75-300mm f/4.5-5.8AL PH-RBF58 Round Bayonet
PH: Plastic hood, RH: Rubber hood, MH: Metal hood
Page 24

22
Attaching a Round Lens Hood
Screw-on Type
Screw the hood on to the front of the
lens.
Bayonet Type
Attach the hood to the front of the
lens and turn the hood clockwise until
it snaps in place.
To detach the lens hood, follow this
procedure in reverse.
* When not using the lens hood, you
can attach it to the lens in reverse.
Page 25

23
Attaching a Square Lens Hood
1. The hood attaches in the same
way as a lens cap. While holding
down the two knurled tabs, attach
the hood to the front of the lens.
2. The square hood should be positioned horizontally on the lens. If it
is tilted, vignetting may occur.
Page 26

24
Using the Built-in Lens Hood
To use the built-in lens hood, pull it
out from the lens. In the case of the
FA
600mm f/4 lens, the built-in lens
hood is threaded. To extend or retract
it, turn the hood. For details, see the
FA
lens instruction manual.
Lenses with a Built-in Lens Hood
FA 31mm f/1.8AL Limited
FA 77mm f/1.8 Limited
FA
600mm f/4ED (IF)
* Extending the FA 77mm f/1.8's
lens hood does not obstruct the
camera's built-in flash.
Page 27

25
PL Filter Window
Certain hoods also have a PL filter
window. This enables you to easily
rotate any polarizing or circular polarizing filter attached to the lens.
Lenses with a PL filter window
zFA 35mm f/2AL
zFA J18-35mm f/4-5.6AL
Using the PL filter window
1. Remove the PL filter window cap
by sliding it downward, as shown
by the arrow.
Page 28

26
2. From the PL filter window, turn the
polarizing or circular polarizing filter.
3. Reattach the PL filter window cap.
* Before shooting, be sure the cap
has been reattached so that the
hood can provide the maximum
effect.
Page 29

Tripod Mount
27
The FA 600mm f/4 lens has a tripod mount so you can mount the lens on a
tripod.
Switching between horizontal and vertical shooting
Loosen the lens orientation lock screw and turn the lens by 90˚ left or right.
Then tighten the lens orientation lock screw.
The tripod mount can also be detached. For instructions, see the FA
lens
instruction manual.
Lens orientation lock screw
Tripod mount
Page 30

Filters
Select the filter matching the lens
filter size, then screw it onto the front
of the lens.
* The FA
600mm f/4ED (IF) lens
has a filter holder in the rear to
hold the 43mm filter provided with
the lens. For details, see the FA
lens instruction manual.
Filter Cautions
When attached to the lens, the filter becomes part of the lens optics.
Therefore, handle it in the same way
as the lens. Keep it clean from dust,
scratches, smudges, etc. Except for a
circular polarizing filter, avoid attaching more than one filter to the lens.
Using multiple filters is not effective.
28
Filter Sizes
Lens Size
FA 31mm f/1.8AL Limited 58mm
FA 35mm f/2AL 49mm
FA 43mm f/1.9Limited 49mm
FA 50mm f/1.4 49mm
FA 77mm f/1.8Limited 49mm
FA J 18-35mm f/4-5.6AL 67mm
FA 20-35mm f/4AL 58mm
FA J 28-80mm f/3.5-5.6AL 58mm
FA 28-105mm f/3.2-4.5AL (IF)
58mm
FA J 75-300mm f/4.5-5.8AL 58mm
Page 31

29
Note: Using a Circular Polarizing
Filter
* In the case of the FA 77mm f/1.8
Limited lens, attaching certain discontinued circular polarizing filters
(including the PENTAX Type-A
Circular Polarizing Filter) prevents
the built-in hood from being pulled
out.
* With an autofocus camera, use a
circular polarizing filter instead of
a polarizing filter. A polarizing filter
affects the accuracy of the autofocus and exposure.
Note: Attaching a Specialized Hood
If the PENTAX Type-A Circular Polarizing
Filter (discontinued) is attached to the
FA 28-105mm f/3.2-4.5AL (IF) lens,
you cannot attach the specialized lens
hood since it hits the filter's outer edge.
Also, attaching a non-PENTAX circular
polarizing filter may still prevent the
specialized hood from being attached.
PENTAX Circular Polarizing Filters
(Both discontinued)
* Type A is thicker than Type B.
Type A Type B
Page 32

Cautions When Using Flash
30
With the built-in flash
Use the built-in flash for subjects at least
0.7 meter away. If the subject is closer
than 0.7 meter, overexposure may result.
The built-in flash can usually be used with
a lens as long as the |
| symbol does not
blink in the camera as a warning.
However, with certain lenses vignetting
may still occur even if there is no blinking
symbol warning. It is also possible for a
lens to trigger the blinking symbol warning,
but still be used with no problem.
For details, see the built-in flash compatibility table on page 31.
With the
, the blinking | | symbol
warning does not appear in the camera
even if the lens is unsuitable for the built-in
flash. To find out whether the lens is suitable with the
's built-in flash, see the
camera's instruction manual.
When using the built-in flash, remove any
lens hood. The lens hood may obstruct the
built-in flash.
* The FA 43mm f/1.9 Limited lens is
compatible with the built-in flash even
with the lens hood attached.
With an external flash
If you use an external flash, you
can use the lens with the lens hood
attached. For details, see the external
flash's instruction manual.
With the AF500FTZ flash
If the AF500FTZ flash is used with an
FA lens shorter than 24mm, the flash
does not show a blinking focal length
display as a warning.
Page 33

31
Compatibility with Built-in Flash
FA and FA J lenses other than the following can be used with the built-in flash
with no problems.
Lens
K series
series MZ series
*1
MZ-S Z series
FA
600mm f/4ED (IF)
×× × ××
FA J18-35mm f/4-5.6AL
{
U
*2
U
*3
U
*4
U
*3
FA 20-35mm f/4AL
{{
U
*5
U
*6
U
*5
FA J 28-80mm f/3.5-5.6AL
{{
U
*7
{
U
*8
FA 28-105mm f/4-5.6 (IF)
{{
U
*9
{
U
*9
*1: Except the MZ-S.
*2: Vignetting may occur if the focal length is 18mm and the subject is closer than 1 meter.
*3: Vignetting occurs at the 18-28mm focal lengths.
*4: Vignetting occurs if the focal length is 18-24mm and the subject is closer than 1.5
meter.
*5: Vignetting occurs at the 20-28mm focal lengths.
*6: Vignetting occurs at the 20-24mm focal lengths.
*7: Although a warning is displayed, vignetting does not occur.
*8: Vignetting occurs at the 28-35mm focal lengths.
*9: Vignetting occurs at the 28-40mm focal lengths.
Page 34

Lens Case
32
The soft cases have a case designation as shown in the Lens Case
Compatibility Table on the right.
* A dedicated soft case is provided
with FA Limited series lenses.
Lens Case Compatibility Table
Lens
Compatible
Case
FA 31mm f/1.8AL Limited
Dedicated
case
FA 35mm f/2AL S80-80
FA 43mm f/1.9Limited Dedicated
case
FA 50mm f/1.4 S70-70
FA 77mm f/1.8Limited Dedicated
case
FA
600mm f/4ED (IF)
Dedicated
case
FA J 18-35mm f/4-5.6AL S90-100
FA 20-35mm f/4AL S90-100
FA J 28-80mm f/3.5-5.6AL
S90-100
FA 28-105mm f/3.2-4.5AL
(IF)
S90-100
FA J 75-300mm f/4.5-5.8AL
S90-140
Page 35

MEMO
33
Page 36

Main Specifications
34
*AL: Lens with an aspherical element.
ED: Lens using an Extra-low Dispersion glass.
IF: Lens with internal focusing.
Lens Construction
Minimum
Aperture [F]
Angle of View
(Diagonal extent)
FA 31mm f/1.8AL Limited
9 elements in 7 groups
22 70°
FA 35mm f/2AL
6 elements in 5 groups
22 63°
FA 43mm f/1.9Limited
7 elements in 6 groups
22 53°
FA 50mm f/1.4
7 elements in 6 groups
22 47°
FA 77mm f/1.8Limited
7 elements in 6 groups
22 31.5°
FA
600mm f/4ED (IF)
9 elements in 7 groups
32 4.1°
FA J 18-35mm f/4-5.6AL
12 elements in 10 groups
22-32 100°-63°
FA 20-35mm f/4AL
10 elements in 8 groups
22 94°-63°
FA J 28-80mm f/3.5-5.6AL
8 elements in 8 groups
22-38 75°-30.5°
FA 28-105mm f/3.2-4.5AL (IF)
12 elements in 11 groups
22-32 75°-23.5°
FA J 75-300mm f/4.5-5.8AL
12 elements in 10 groups
32-38 32°-8.2°
FA J lenses do not have an aperture ring. The aperture is controlled at the A
[Auto] position.
Page 37

35
† Includes tripod mount.
‡ Figures in ( ) indicate the thread diameter of the front ring of Filter.
Min. Focusing
Distance [m]
Max.
Magnification [×]
Max. Diameter×Length
Weight [g] Filter
[ømm×mm] Lens only
Lens + Hood
[mm]
0.3 0.16 65×68.5 345 − 58
0.3 0.17 64×44.5 195 215 49
0.45 0.12 64×27 155 165 49
0.45 0.15 65×37 220 − 49
0.7 0.14 64×48 270 − 49
5.0 0.13 176×457 7,000† − 43(150)‡
0.28 0.18 72×68.5 190 217 67
0.3 0.16 69.5×68 245 275 58
0.4 0.25 63×67 180 197 58
0.5 0.19 66×65.5 255 280 58
1.3 0.3 68.5×116 385 425 58
Page 38

STATEMENT OF FCC COMPLIANCE
This device complies with Part 15 of the FCC Rules. Operation is subject to the
following two conditions : (1) This device may not cause harmful interference,
and (2) this device must accept any interference received, including interfer-
ence that may cause undesired operation.
Changes or modifications not approved by the party responsible for compliance
could void the user's authority to operate the equipment.
This equipment has been tested and found to comply with the limits for a
Class B digital device, pursuant to part 15 of the FCC Rules. These limits are
designed to provide reasonable protection against harmful interference in a res-
idential installation. This equipment generates, uses and can radiate radio fre-
quency energy and, if not installed and used in accordance with the instructions,
may cause harmful interference to radio communications. However, there is no
guarantee that interference will not occur in a particular installation. If this equip-
ment does cause harmful interference to radio or television reception, which
36
Page 39

37
can be determined by turning the equipment off and on, the user is encouraged
to try to correct the interference by one or more of the following measures:
• Reorient or relocate the receiving antenna.
Increase the distance between the equipment and receiver.
Connect the equipment to an outlet on a circuit different from that to which the
receiver is connected.
* Consult the dealer or an experienced radio/ TV technician for help.
For customers in Canada
This Class B digital apparatus complies with Canadian ICES-003.
Cet appareil numérique de la classe B est conforme à la norme NMB-003 du
Canada.
Page 40

56808ENG
Copyright © HOYA CORPORATION 2008
H39-200809 Printed in Vietnam
The CE Mark is a Directive conformity mark of the European Union.
HOYA CORPORATION
PENTAX Imaging Systems Division
2-36-9,Maeno-cho, Itabashi-ku, Tokyo 174-8639, JAPAN (http://www.pentax.jp)
PENTAX Europe GmbH Julius-Vosseler-Strasse 104, 22527 Hamburg, GERMANY
(European Headquarters) (HQ - http://www.pentaxeurope.com) (Germany - http://www.pentax.de)
PENTAX U.K. Limited PENTAX House, Heron Drive, Langley, Slough, Berks SL3 8PN, U.K. (http://www.pentax.uk)
PENTAX France S.A.S. 112 Quai de Bezons, B.P. 204, 95106 Argenteuil Cedex, FRANCE (http://www.pentax.fr)
PENTAX Italia S.r.l. Via Dione Cassio, 15, 20138 Milano, ITALY (http://www.pentaxitalia.it)
PENTAX (Schweiz) AG Widenholzstrasse 1, 8304 Wallisellen, Postfach 367 8305 Dietlikon, SWITZERLAND
(http://www.pentax.ch)
PENTAX Europe GmbH (Tyskland) Filial Sverige
Box 650, 75127 Uppsala, SWEDEN (http://www.pentax.se)
PENTAX Imaging Company
A Division of PENTAX of America, Inc.
(Headquarters)
600 12th Street, Suite 300 Golden, Colorado 80401, U.S.A.
(PENTAX Service Department)
12000 Zuni Street, Suite 100B Westminster, Colorado 80234, U.S.A. (http://www.pentaximaging.com)
PENTAX Canada Inc. 1770 Argentia Road Mississauga, Ontario L5N 3S7, CANADA (http://www.pentax.ca)
PENTAX Trading
(SHANGHAI) Limited
23D, Jun Yao International Plaza, 789 Zhaojiabang Road, Xu Hui District, Shanghai, 200032 CHINA
(http://www.pentax.com.cn)
✩
Speci cations and external dimensions are subject to change without notice.
Page 41

PENT
AX
Notification of Change
HOYA CORPORATION
RICOH IMAGING COMPANY,
We
will continue to market a fine line of products under the familiar PENTAX brand to satisfy your
demands and requirements.
We
thank you for your continued support and patronage to PENTAX RICOH IMAGING
LTD
COMPANY,
. and our PENTAX-brand products .
PENTAX
LTD
Imaging Systems Division will officially
. on October 1, 2011 .
in
Company Name
be
renamed PENTAX
Annonce du changement de nom de notre societe
La societe HOYA CORPORATION PENTAX Imaging Systems Division prendra le nom
PENTAX
Suite a notre rachat par
PENTAX
conserveront le nom PENTAX.
Nous tenons a vous remercier par avance pour votre fidelite et esperons que vous continuerez a
faire confiance a
RICOH IMAGING COMPANY,
Ia
societe RICOH, et afin
et conserver
Ia
PENTAX
notoriete
RICOH IMAGING COMPANY,
de
notre marque depuis presque un siecle, nos produits
LTD
. a partir du 1er octobre 2011 .
de
satisfaire les possesseurs d'appareils photo
LTD
. et aux produits PENTAX.
de
Anderung der Firmierung
Am
1.
Oktober 2011 wird die HOYA CORPORATION PENTAX Imaging Systems Division offiziell
den neuen Namen
Unsere hochwertigen Erzeugnisse werden weiterhin unter der bekannten Marke PENTAX
BemOhen vertreiben, den AnsprOchen unserer Kunden stets gerecht zu werden.
Wir bedanken uns
COMPANY,
LTD.
PENTAX
fOr
lhr Vertrauen
RICOH IMAGING COMPANY,
in
PENTAX Produkte und die PENTAX RICOH IMAGING
LTD
. annehmen .
in
dem
Notificaci6n de Cambio del Nombre de Empresa
A partir del 1
denominara oficialmente PENTAX RICOH IMAGING COMPANY.
Continuaremos comercializando una excelente lfnea
PENTAX
Les agradecemos
nuestros productos
a fin
de
octubre
de
satisfacer las exigencias y necesidades
de
2011, HOYA CORPORATION PENTAX Imaging Systems Division se
su
continuo apoyo y lealtad a
de
Ia
marca
PENTAX
.
PENTAX
de
productos bajo
de
nuestra clientela .
RICOH IMAGING COMPANY,
Ia
conocida marca
LTD
. y a
lnformazione sui cambio della denominazione aziendale
La denominazione della HOYA CORPORATION
ufficialmente
Continueremo a commercializzare un'ampia gamma di prodotti di qualita contraddist inti dal nato
marchio
Vi
ringraziamo per
IMAGING COMPANY,
PENTAX
PENTAX, in
RICOH IMAGING COMPANY,
risposta aile vostre richieste e aile vostre esigenze.
il
continuo supporto e per
LTD
. e
ai
nostri prodotti a marchio PENTAX.
PENTAX
Ia
collaborazione offerta a PENTAX RICOH
Imaging Systems Division diventera
LTD.
il
1° ottobre 2011.
Melding wijziging firmanaam
De naam HOYA CORPORATION PENTAX Imaging Systems Division wordt officieel gewijzigd
PENTAX
Wij blijven een betrouwbare lijn van producten op
PENTAX
Wij willen u alvast bedanken voor uw steun en trouw aan PENTAX RICOH IMAGING COMPANY,
LTD
RICOH IMAGING COMPANY,
om te voldoen aan uw vragen en vereisten.
. en aan onze producten van het merk PENTAX.
LTD. op
1 oktober 2011 .
de
markt brengen onder het vertrouwde merk
in
Page 42

Information byte av foretagsnamn
HOYA CORPORATION
officiellt byta namn
Vi
kommer att fortsatta marknadsfora ett fint sortiment produkter
PENTAX
Vi
och
A
HOYA CORPORATION
PENTAX
Continuaremos a
para dar
Agradecemos o vosso continuo apoio
nossos produtos
.:2.0~~~£.1.A.~
Systems
IMAGING COMPANY,
<£[
~~
for
att
fylla
tackar
0
dig
fOr
ditt fortsatta
vara
PENTAX-produkter.
RICOH IMAGING COMPANY,
satisfa<;:ao
~§{A
Division)~
5:.~
Ci
~
[.!-~
~
i::!
OH
~
~
PENTAX
till
PENTAX
din efterfragan och dina behov.
Comunica~ao
PENTAX
comercializar
as
vossas necessidades e requisitos.
da
marca
OIDI~
2011t:'!
LTD.)S:.tt!-?3~
o~~
-'?
¥
§:,1-
c:
2.I3!L;:;;
Imaging
RICOH IMAGING COMPANY,
stod
och fortroende for
Imaging Systems Division mudara
uma
PENTAX
.A.IA'E!J
10~
~
~
Ail5
Ll
q .
Systems Division kommer den 1 oktober 2011
de
Mudan~a
LTD
. em 1
excelente linha
a
PENTAX
.
.A.~~Pf!·(~-§:
1~¥5:.
Ll
~
Ail
'~§{A
q _
i5-oH
PENTAX
de Nome
de
Outubro
de produtos com a
RICOH IMAGING COMPANY,
HOYA
2.l.i!.
OIDI~
q~
Oll
~
Ol
LTD.
under det
RICOH IMAGING COMPANY,
da
Empresa
de
2011 .
CORPORATION
~~£.IN'(~-§
0
5:.
JlZ!j
kanda
oficialmente
familiar
LTD.
PENTAX
:
():j
2.~
;'¥~1
market
de nome para
marca
e aos
PENTAX
tt!
~
\tt
att
LTD.
PENTAX
Imaging
RICOH
~
A:l-'tJ
il-~
HOYA
CORPORATION
RICOH
~
m~~m••~~£·~~~m~•
{f
•
IM
AGING
PENTAX
PENT
COMPANY,
RICOH
IMAGING
AX
LTD.
Imaging
o
COMPANY,
Systems
*
D
ivisio
n
~~~
LTD.
~~fW7$(mJ!l=tf!Ji~~(M~DBl
m~-~~tt~~Mw~•
0~1!~11~
HOYA CORPORATION
PENT
-0-1§,
tF
AX.
RICOH
PENT
(
PENTAX
o
HOYA**:it~U
/~7?-A~~-1:1--V/~~:it~Ut~~*~o
(~:)[~
~{itt,
;:
·
~:Ji
~~m!
IMAGING COMPANY,
AX
)
£~,
PENT
: PENTAX
s~fi':;:
~
~~
~J
PENT
RICOH
m~7JI7cffl?t!mWJ~81f'£
AX
RICOH IMAGING COMPANY,
n
*
~
ct-?
AX.
Imaging
IMAGING
1
:1--
:;· /
*
-r
~.1J:.':
1i
~j~JE\,'
L-
<
sD\-
Systems Division
LTD.
COMPANY,
?.
•
::/.A
7
t;::
t!.
'Efl
L.J:.,f"*
o
,
b~~ftBtd:,
LTD.)
't
.Q
T
20
11
~
10
~
1
B.iEJ:\]1!
PENTAX
o
4ffr
2011
~
10
LTD
.
~fff~:lJ{IH!1!f
~~~g11!}!iJI7cfflP-~DeftH1~t~fD~
2011
~
10
F.l1
E3
~~
~
mm:
L-
-c
*
\,'
~J
*
::g~
PENT
AX
£~
•
iHf~IJi*
~
1
BlErtJ!:gjJ
17J~M~D81~11!}
~
t
"5
*
L-
-c_
/'{
~(J)-r,
sl
~*7'C
~
a
58253
R01
DTI11
Printed
in
Philippines
Page 43

PENT
AX
WORLDWIDE SERVICE NETWORK
Printed
in
Philippines
53142
PENT AX Worldwide Service
1. Your PENT AX product will be repaired
2. The International Warranty seNice will be provided at the seiVice centers marked by "
in other than the country/area where the product was originally purchased.
the International Warranty seNice, present the valid International Warranty card together with the
product. We recommend that you present the original copy
3. To obtain the International Warranty card, consult with the dealer or supplier from where you
originally purchased the product. International Warranty card will
marked by
"0"
where you originally purchased the product in the following list.
refer to the conditions mentioned in the International Warranty card.
please
4. Contents of this document are subject to change without notice.
Weltweltes PENTAX·Kundendienstnetz
1.
lhr PENTAX-Produkt wird
Oer intemationale Garantieservice ist bei den mit
2.
die auBerhalb des Landes/Gebietes des Erstkaufs
den internationalen Garantieservice in Anspruch nehmen, reichen Sie bitte die gUitige internationale Garantiekarte zusammen mit dem Produkt ein.
eine Kopie der Kaufquittung vorzulegen.
3.
Urn
die
intemationale
bei
dem
Sie das Produkt ursprunglich gekauft haben.
"0"
markierten Kundendienststellen ausgegeben,
Einzelheiten entnehmen
4. Wir behalten uns
Reseau mondial d'apres-vente PENT AX
1.
Votre
produit
2. Le seNice
par
"
0"
recours au service offert par
tionals valide avec le produit.
preuve d'achat.
3.
Pour
obtenir
fournisseur
dans les centres
tiate du produit). Pour plus d'informations, veuillez vous reporter aux conditions decrites sur
carte
de
4. Le contenu
Red Mundial
1.
Su producto PENTAX sera reparado en las estaciones
2.
El
servicio
das
con una "
producto.
de Garantia
el original o
3.
Para obtener
Ud. compr6 originalmente el producto. La Tarjeta
las estaciones de servicio marcadas con una
Para mas detalles, consult las condiciones mencionadas en
4. El contenido
das
PENT
AX
de
Ia
Garantie lnternationale est disponible dans les centres d'apres-vente marques
situes en dehors du pays ou de
Ia
carte
oU
vous avez achete votre produit. La carte de Garantie lnternationale sera delivree
de
Garantie lnternationale.
de
ce document est sujet a modifications sans preavis.
de
Servlclo
de
Ia
Garantfa lnternacional sera proporcionado en las estaciones de servicio marca-
0"
ubicada en un sitio que no sea el pals/area donde
En
case de
lnternacional valida junto con el producto. Le recomendamos
Ia
copia
Ia
Tarjeta de Garantfa lnternacional , consulte asu concesionario o proveedor al que
de
este documento esta sujeto a cambios sin previa aviso.
Network
at
the PENT AX
von
den nachstehend aufgelisteten PENTAX-Kundendienststellen repariert.
Garantiekarte
Recht auf Anderungen des fnhalts dieses Dokuments vor.
sera
de
service apres-vente marques d'un
zu
erhalten, wenden
Sie
bitte
deD
auf der intemationalen Garantiekarte angegebenen Bedingungen.
repare
dans
l'un des centr
Ia
Ia
II
Garantie lnternationale, renseignez-vous aupres
region
Garantie lnternationale, presentez
est recommande
PENTAX
que
Ud. solicite el servicio
de
su recibo
de
compra.
seNice
centers listed hereunder.
or
copy of purchase receipt.
be
issued
at
"0"
markierten Kundendienststellen erhiiltlich,
des
Produkts liegen.
Es
wird empfohlen, das Original oder
Sie
sich
bitte
Die
intemationale Garantiekarte wird v
wo
Sie
das
Produkt urspriinglich gekauft haben. Weitere
es
de
service apres-vente dontla lisle
de
l'achat original. Au cas ou vous devez avoir
de
presenter aussi !'original ou
"0
"
(oU
de
seNicio
de
Ia
Garantia lnternacional, presente
de
Garantia lnternacional estara disponible
"0"
en las que compr6 originalmente el producto.
Ia
Tarjeta de Garantia lnternacional.
FOr
an
den
Handler oder Lieferanten,
Ia
carte
vous avez fait !'acquisition ini-
listadas
aqui
se
adquiri6 originalmente el
que
A26BAJ11
0"
In
de
du
located
case you request
the seNice centers
For
further details,
den Fall,
dafl
on
den
figure
ci-apres.
Garantie Interna-
Ia
copie de
revendeur ou du
abajo.
Ia
Tarjeta
presente tambien
Sie
Rede Mundial
1.
0 seu produto PENTAX devera
xo.
2. 0 serviyo
com um
quirido originalmente. Para solicitar o serviyo
Garantia lnternacional valido junto com o produto. Recomenda-se a apresenta9ao
ou
3. Para obter o cartao
voce adquiriu o produto originalmente.
esta¢es
detalhes,
4. 0 conteUdo deste documento esta sujeito a modificac;:Oes sem previa aviso.
~~~~7~·?-~~?1~-~-~~-t~~?-7
1.
7.1s:firll.tlJJ-i!ilt"'
~-~·;z.;z.7-~ 3 ~"-1~ll~s$
2.
~1!1H~mt!JI:J:-:,iJi9j.l'IJ)1JHiE~!II;t
mit
T o
>!~~Lt
~~=~i-tT-:,
3.
~~1Ji\aiEWI.:t~oll.~
~~t~i-*To 1Ji\!if!l)t*J~I.:t,
4.
7.1s:t!J!l)t*J~t.:t,
Ia
PENT
1.1'9U51Utl<!>ll(J PENT
2.
milllllill*
~~ll(Jfill~~l!l--1;-&llloll.
Ia
3.
~-·~lllllill~~m--~;-
tJ:fi
4.
*~f'l'll(JP<l~~~'l!~
en
de
ServiQOS
PENTAX
ser
reparado nas esta96es
de
Garantia lnternacional
"0
", existentes em outras localidades que nao o pais/area em
da
c6pia
do
recibo de compra .
de
Garantia lnternacional , consulte o seu revendedor ou fomecedor onde
de
servic;:os
favor, leia
marcadas com
as
par
t..-t~l!}~l.:t,
~!IIJ)~I;t,
AX
~JiUfl~HIHii'll*l!
"O"
169'1lli!l"'~~~Ji\iiE·~~i;J-IJ)..Cs$
sn-:,!Jl-g-,
Z.
<:
~si!Jd.>~,t~
.::UIJ...
-r~"'
AX
I
i1!!lill±i9fll(Jfill~iliH!lttfJ~&BliUi2tJ..C0f;t~
n~ll(JttflnliB~iUi$111lll!illl~~m--~;-
paden~
ser fornecido pelas esta96es
de
0 cartao
"0"
condic;:Oes
~J!qx•IJ)m:>F~3l<d.>
t-l:il'!:'I!T-:,z.
IIUJ~&B!iUiiiJfJ!IIi!lil(J
o PENT
•
alllllrl*llmi*lllll!lifll.ll.ll(J*!l!~ili~#u!lii
•
~::nHl'iim
onde voce adquiriu o produto original mente. Para mais
mencionadas
z.
(})
'J
~
H:scti
!-?It<
, 0Cfl!l)1;J-~,t~~-t:~
1-:1:
~
nt~~!l)O~P!l)?~'c~'-:,~-
~~iJi\iiE•~siih<t.:~~
AX
s
T o
u <
a;
'J
}t!llll'J~t:il:>FIIIIi!ll&lf.iE:;$:~11U7.1s:
o
de
Garantia lnternacional, apresente o cartao
de
Garantia lnternacional sera emitido nas
no
cartao
~
n
t.:~ ~'o
n.-:,~~n<a;
:I: T o
PENT
AX
~oll.
o
~~aUtl!llll~~m--~;-all!lll(J~~
se1Vi9os
PENT
AX listadas abai-
de
serviyo assinaladas
que
o produto foi ad-
de
Garantia lnternacional.
n'-:,
lM±II!i:lf:IJ)~
~7-~3~l'il'IJ;I;
!-?It<
t.:
~ ~'o
11
:I:TIJ)l',
~-;z.
'
o
o
o
lll:g¥:;J<tttJnRB!~
o
ili9!-l'1Ji\iiE~
~~i*M•t
;z.
7--
~ 3 ~l'~i'J
o
iiJ!t£m!lllllill*~i1!!1&1l(J
de
do
original
~
~
·;
7
;z.
•
~t:ll:>F
o
NORTH & CENTRAL AMERICA
U.S.A.
0
PENTAX
RICOH
AMERICAS CORPORATION
PENTAX
250 North
0 Precision Camera
3 Anngina Dr
0 Camera Repair Japan Co.
3435
0 United Camera & Binocular Repair Corp.
Thorndale Business Center
0 Forster's Camera Service,
W. 2950 South, Salt
40
0
Ca
lifornia Precision Service
1714, 28
0 Picture
25876 The
0 Photo
t413 South
0 Advance Camera Repair
8124
0 C.
R.I.S
250
Canada
0
PENTAX
1770
E-mail: service@prca.pentax.ca
COSiii
Rica
Dima
Avenida Central, Calles 3 Y 5
Mexico
Jorge Meyer Broissin, S.
Av. San
Indonesia
PT
. Aneka
__
_
~1: ~-u~ ~
Singapore
Emjay Enterprises (1984) Pte.
111
Korea
PENT
#904, 9th, Sam
PENT
6th II,
IMAGING
Service Department
54th
Street Chandler, AZ 85226
and
Video Repair
ive
Enfield,
CT
06082
Breckinridge
N. 54'"
North
Blvd,
Suite
130
, Duluth,
1062
Tower
Inc
.
Lake
City,
UT 84115
111
Street, Sacramento, CA 95816
Perfec
t Unltd.
Old
Road
, Suite
300
Tech
King
St.
SW
Bvrtn
Hillsdale
.
Street, Chandler,
RICOH
IMAGING
Road
Argentia
- ----
Industrial Y
Comercial, S.A
Mateo
#35-B, Frace.
Warna
lndah
~~
~!l~~~
-~o_. _s?_~ ~
Bridge
Road
- -
AX
Korea
Customer
Hwan
AX
AIS
Center "82-2-757
Bong
San
Bldg
, Valencia,
, Suite
201,
Honolulu, Hl96814-4309
and
Sales
HWY
.,
Portland, OR
AZ
85226
CANADA
Mississauga, Ontario
------------
.
San
Jose
A.
de
C.
V.
San
Mateo, Col.
~~a'!a
..'
Ltd
.
, #14-0t Peninsula Plaza, Singapore 179098
Service
Center
Digital Venture Tower, SungSu-Dong 2-Ga 280-13, SungOong-Gu, Seoul
.,
4-3
Gwansu-Dong, Jongno-Gu, Seoul
Inc.
GA
30096
Lane, Bensenville,
CA
91381
97225
INC
.
L5N
387
-------- ----
Boulevares
Naucalpan
ASIA
~~~~n_e_s~a-~~~~0
---
--·--
-
__
-
_
IL
60106
..
506·2222-396912257·1772
"52-5-560-20-44/373-95-20
de
Juarez. Edo. de
"1-800-877-0155
"1-877-269-7179
"1-860·749-7380
"1-770·849-0555
"1·630·595-2525
"1·801-487
-1288
"1·916·451-1335
"1·818-998-5204
"t
-808-952-il161
..
t ·503-292-6996
"1·480-940-1103
..1-905-286-5590
Mexico C.P.
53140
..
62-21-6511009
..
65-6338·8948
1r82-2-2024-0150
-95
Camera Oaehak Byungwon
1st fl,
Hwawon
Bldg
.,
157-2
GWANGJU PENT
1m-Dong
94-180
Digital i "82-2-749·2799
A-43,
Sh
in
Kwan
YeonTech "82·53·428·5777
2nd
II,
DongMun·Dong 1-20, Jung·Gu, Daegu
-------
Mataysla
0
DSC
World
Sdn. Bhd
Futuromic Center at
551
00 Kuala Lumpur
E-mail: admin@dscworld.com.my
------ -
Philippines
Thailand
0 Central Trading Co.,
_. _
China
Jebsen
10th
23rd Floor, Guangdong Telecom Plaza,
Hong Kong
0 Jebsen &
Taiwan
0
-------
Japan
0 PENT
0 PENT
0 PENT
0 Camera Service Nagoya
0 Higasa Camera Service
0 Camera SeiVice Kagoshima
t 7
------
Super
East
Asia
#19
Don
A.
Egea st.,
3~~8J25·3
?, ~t_-5~
&
CO
. (China)
Floor, Tower 2, Henderson Center, No.18, Jian Guo
& CO. (China)
Jebsen
Xin
Guang Optical Instrument
3F,
No.141
South ShanXi
Co.,
10/F, Continental Building, 17
--
-·--- ·-
WZC
International Co.,
SA.,
37, Sec
. 1, Kai-Feng Street Taipei
- -
-----
AX
Forum
MB
( Middle Basement ) Floor, Shinj
1-25-1, Nishi-Shinjuku, Shinjuku-ku, Tokyo 163-0690
AX
Tokyo Service Center
3F
Helios
II
BLDG. 1-12-11
AX
Osaka Service Center
Pearl Bldg. 2/F, 17-9, Minami-Senba 1-chome, Chuo-ku, Osaka
2-13 Takebashi-cho, Nakamura-ku, Nagoya 453·0016
9-18, Higashihazemachi, Takamatsu 761-8054
2nd
Floor,
1-2-3, Higashi-Taniyama, Kagoshima 891-0113
Eunhaeng-Dong, Jung-Gu,
AX
Service Center "82·62·651·5555
, Buk-Gu, Gwangju
Kwang
Jang fl, Electronic Land, HanGang-No 3-Ga
----·---
-
----------
Lot
08-41
, level 8, West Wing,
--
-
Enterprises, Inc
Ltd.
---
- -
.
Brgy. Pinagkaisahan
Ltd
. "66·2-229-7000n674
an~
~2:8S
Sri~at
_
Building_
Ltd
. Beijing Service Center "86-10-6518-7889
Ltd.
Guangzhou Service Center
Co., Ltd.
Road
, LuWan District, ShangHai 200020
Wang
-
-------··-·--·----··-·-·---
Ltd.
--- ---
Chiu
-
-------
uku
, Funado, ltabashi-ku, Tokyo
Co.
Co.
Co.
Daejeon
Be~aya
--
- -
1111
Quezon City
a-t
1
'",t5~.
No.18, No
.2 Zhong
Road
, Kowloon
-·-·- ·-
Center Building,
16-9
, YongSan-Gu, Seoul
Times Square,
---··--------
_23"
Fio:>r R_arn•
Men
Nei Avenue , Beijing 100005
Shan
"86-21-6418·2293186·400-820-7756·835
Bay,
-·
·· -
174-0041
Road,
Kow
loon,
542-0081
No.1
-
. 4
Rd.
Guangzhou
Hong
---
·--·
~~o~g:Toe~ _
---
'1!'82-42-254-1110
"60·3-2142-0208
, Jalan lmbi,
'1!'63-2-570-8415
'1!'86-20-8
510081
"852-2926-2300
Kong
-·-·- ·-
..886-2-23816t
..
at
..
81-3-3960·5140
..
81-6-6271-7996
..81 ·52-485·96!2
"81
..81-99-837·8556
B_a_n~k~~ ~~1_1?
713-7262
32
-3-3348·2941
-87-887-1920
_
Page 44

EUROPE
Andorra
(Principality
0 S.I.A.Ltd.
C/Maria Pia
Austria
0 RUdiger Maerz GmbH
~?~~r_s~ra~~e
Belgium
0
H.
De
Boomsesteenweg
- -
Bulgaria
VIP Trading Ltd . (Commercial Office)
15 Stara planina Str., 1000 Sofia
Happy foto Ltd.
2A
Totleben Blvd. 1000 Sofia
Canary
Islands
0 M.U. Oaswani
Subida
0 M.U. Oaswani
La
Naval124
Croatia
Neo Orbis d.o.o.
Pokornoga 8, 10000 Zagreb
INFODATA (Service Center in Croatia)
CMP
Savica Sanci
- - - .
Cyprus
Cyprus Trading Corporation Public Ltd.
0
Shacolas House Athalassa,
----------·--
Czech
Republic
Pentec s.r.
Veleslavinska 19/30, 162 00 Praha 6
0 Foto-Servis
Cs. armady 16 (entrance Elia5ova 25), 160 00 Praha 6
Denmark
Focus Nordic Denmark AS
Erhvervsvej 30,
Estonia
Nordic Digital AS
ToOstuse tee 6, TOrvandi. Olenurme vald, 61715 Tartumaa
Finland
Focus Image Nordic Oy
Pakkalankuja 7, 01510 VANTAA
France
0
PM2SS.A.S
9, Avenue d'Aiembert 78190 Trappes
MEDAS SA (Sport Optics Only)
57 avenue Doumer 03206 Vichy Cedex
--
Germany
0 RUdiger Maerz GmbH
SUderstrasse 75a 20097 Hamburg
0 RUdiger Maerz GmbH
Aroser Allee 60 13407 Berlin-Reinickendorf
0 TRITEC GmbH
KolpingstraBe 5 38159 Vechelde
-
--------
Gibraltar
A.
G.
Day & Sons Ltd.
42 Turnbulls Lane Gibraltar
Greece
0 Salcofol S.A.
43, Stadiou Str, 105
0 Salccfot S.A.
17, Venizelos Str., 546 24 Thessaloniki
Hungary
0 Camera Ltd.
Somogyi B. u. 19, 1085 Budapest
Iceland
Gisli Gestsson
Skipholt 31, 105 Reykjavik
Haly
0 FOWA S.p.A.
V.Tabacchi Odoardo 29, 10132 Torino (TO)
Latvia
Baltijas Servisa Centrs
Brivibas str. 201, Riga, LV1039
Lithuania
Vilbros Prekyba UAB
Svitrigailos str
Malta
Fototek Services Ltd.
22-26 Triq H. Calleja Schembri, Msida MSD1741
Netherlands
0 De Beukelaer BV
Stationspark 430, 3364 DA Sliedrecht
Norway
0 Focus Nordic Norway AS
Rudssletta 97, N-1351 Rud
Poland
0 Apollo Electronics
ul. Poleczki 13, 02-822 Warszawa
Portugal
0 REFLECTA S.A.
C/Europa 12, 08028 Barcelona
Romania
Focus Trading 94 sri
lntr. Tudor Stefan 10, Sector
Russia
Pentar Co. Ltd
Varshavskaya Str., 23/1, 196128 St. Petersburg
Pentar Moscow
Akademika Korolyova Str.
--
Slovakia
0 EXAPRO Slovakia spol. s.r.o.
Masarykova 49, 07101 Michalovce
-----------
Slovenia
Foto BeseniCar, UroS Fabjan S.P.
Dunajska 57, 1000 Ljubljana
of)
26,
Andorra
Ia
Vella
!~~
~~~~ ~-
a~~u!~
Beukelaer & Co n.v./s.a.
n B-2630 Aartselaar
----
------------------
al
Mayorazgo, 4F
o.
, Puerto
2610
Pol.
de
Ia
Luz, 35008 Las Palmas de Gran Canaria
111
, 10000 Zagreb
R0dovre
- - -
-----
---
--------
59
Athens
11
B.
03228 Vilnius
Sp.
z o.o.
.,
--------
- - -
5,
· -·-· --
- ·
---
_______
_
Ind.
El
Mayorazgo- 38110 Santa Cruz
P.O.
Box
21744, 1589 Nicosia
--
1,
011657 Bucharest
office 236, 129515 Moscow
Spain
0 REFLECTA S.A.
C/Europa 12, 08028 Barcelona
Fotoservicio SL '!1'34-93-2073883
..376·803-377
..
49-40-7314077
..32·3·870-5900
..
359-2-980·5065
..359-2·852·5926
de
Tenerife
-
---
----··--
"34·922-201-710
--
Sicilia, 382 08025 Barcelona
Sweden
Focus Nordic
Laxfiskevagen t 6 S-433 38 Partille
0 Kameraservice Kungsor
Kungsgatan 30 S-736 32 KUNGSOR
----·---
Switzerland
0 Jager
CH-5620 Bremgarten Postfach 2135
_,_
Turkey
0 ELITEL FOTOGRAFCILIK
Bab1ah
0 OPTIK ELEKTRONIK
Arpac1lar Caddesi, Anadolu Han k:1, no:1
UnHed
0
JP
Hempstalls Lane, Newcastle under Lyme Staffordshire ST5
AB
- - -
-----------------
AG
·--
·-··-·--
Cadd, Dr
Z1ya
Kingdom
Service Solutions
GUn
Han 28,
Kat 3/36, CaQaloQiu -Istanbul
-------
-
EminOnO
-----------------------
- Istanbul
OSW
"34-93-339-1154
'!1'46-31-336
--------
"90-212·522·43-30
"90-212-514-47-96
"~~"44-1-782-753-350
23
~46-227
-127
--- ---
"41·56·841·2144
00
40
-
MIDDLE EAST
..
385-1-2409140
..357-22·740450
..420·2-20·61 0·753
..
420·2·22·
71
..
45-4485 3400
..
372-7-337700
..
358·9-4730 8451
.. 33-1-30·68·67 -66
..
33-4-70·30·19-30
..
49·40·7314077
..
49·30·3416993
..
49-05·3029181
..350-7
..
30·210-32-17-506
"30-231·0278-600
..
36-1-266·8085
..
354-5·68·04·50/
..39-011-81441
..
371·6·70-70-520
..
370-5-2394118
..356-2
t ·333808
"3
1 -184·43-30-50
..
47·67·173700
..48·22-464·58-00
Bahrain
0 Yaquby Stores W.L.L.
P.O.
Box 158, Manama
Iran
0 See Goal Co. Lid.
No
.6, HosseinAii Pour Alley, Enghelab Sq. ,
- - - -
Israel
0 Karat Israel Lid.
1-045
4-427
The New Karat Building, Hevel Modiin Industrial Park, P.O.Box969, Shoam 73142
•
..
_,
____
, _.
Kuwait
0 Boushahri Group W.L.L.
P.O
. Box 547, 13006 Safat
Lebanon
Gulbenk Corporation
421, Saboundjian building, Jai-EI-Dib Highway, Jai-EI-Dib
Gulbenk Corporation
Sanayegh,
Hagop Saatdjian
Elyssar, Saatdjian Building
_________
____
Oman
(Sultanate
Capital Store L.L.C.
MuHrah High Street
--------
Qatar
0 Salam Studio & Stores
P.B. No.
12t
0 Salam Studio & Stores
P.B. No. 12 t , Sadd Street, Doha
Saudi
Arabia
Shaman Stores
P.O.
Box 1810, Riyadh 11441
Shaman Stores
P.O.
Box 3578, Jeddah 21481
Shaman Stores
P.O.
Box 1353, Khobar 31952
United
Arab
Emirates
0 Salam Studio & Stores L.L.C.
P.O
. Box 4199, Dubai
0 Salam Studio & Stores
P.O.
Box
417
0 Salam Studio & Stores Center
P.O.
Box 4199, Dubai
0 Salam Studio & Stores
P.O. Box 1342, AI·Ain
·--
Yemen
51
AI-
Haidary for Trading
Gamal A. Nasser Street, Sanaa,
Ethiopia
Sunder
ji
Kalidas & Son's (ETH) Pic. ..251-1-55-36·90
P.O
. Box 1243, Aduwa Road, Wereda 2, Kebelle 10, House No. 565, Addis Ababa
Mauritius
Era Photo Cine House
6 Edith Cavell Street, Port-Louis
South
Africa
0 ISO PHOTO Div. New Teltron (Ply) Lid
Building 5, Clearwater Oflice Park,
0 ISO PHOTO Div. New
20 Bolt Avenue, Montague Gardens,
0 ISO PHOTO Div. New
48
York Road, North End, Port Elizabeth, 6001
0 ISO PHOTO Div. New
Unit 1 Chelsea Road Industrial Park, 1 Blase Road, New Germany Durban, 3610
0 Camera Tek CC (PENTAX Workshop)
Unit E3, Strijdom Commercial Park, Tungsten Road, Strijdom Park,
--
-·-
__
·-··-------
AI
Rabih Building
,____
of)
P.O.
Box 570 Muscat
, West Bay, Doha
, Abu-Dhabi
----
-- -
ltd.
Te~ron
Te~ron
Te~ron
P.O.
---·---·--··--
-·- "
P.O.
Box 11-3111 , Beirut
-- -
Box 13185·934, Tehran
..
--
--
---
----------------------
P.O
. Box 2942
AFRICA
.,
JHB
Cnr
Christiaan
CapeTown
.,
Port Elizabeth
De
, 7441
(Pty) Lid., Cape Town
(Pty) Lid
(Ply) Lid., Durban
·
---·--··-··-·----·--
----
--
--·
-
----·----
------
-
--- --
--
---- -
Wet
& Millenium Boulevard, Roodepoort.
JHB
South Africa
"973·17-210956
"98-21-66954090-9t
-·-----
---·-
"972·3-9774302
'B'965-572-9Q-OO
..
961-4-723778
"96
t -1· 738002
..
961·4-92· 78-95
..968-2-4561888
"97
4-4·83-20·50
"97
4-4-42-51·48
..S66-1-463·14-76/85
..
966-2·644-24·
..
966-2·864-11-31
..971-4-324-52-52
..
971-2-79-20·00
..
971-4-69·34-30
..
971-3-64-15- t 4
"967
-1-27-18-93/23-37
..230·212·01-71
"27-11-9910600
JHB
South Africa
"27·21·550·1411
..
27-41·374·4401
..
27·31·705·0650
..
27-11-2512400
73
OCEANIA
"34-93
-339-1154
"40·2t
·2300107
"7·812-3467942
"7-495-9374058
..421-56·6441035
..386-1·2800800
Australia
New
FIJI
E-mail: sales@crkennedy.com.au
0 C.
R.
Kennedy & Company Ply. Lid.
663-669
0 C.
0 C.
0 C.
0 C.
Chapel Stree
R.
Kennedy & Company Pty. Lid .
Level 3,
280
R.
Kennedy & Company Ply. Lid.
80
Kingsford Smith Drive Albion, Brisbane , Queensland 4010
R.
Kennedy & Company Ply. Lid.
261 Sturt Street Adelaide, South Australia 5000
R.
Kennedy & Company Pty. Lid.
17-19 Oxford Close, West Leederville, Perth, Western Australia 6007
Zealand
ian
R.
Little Lid.
Airport Business Park, 14 Mcleans Island Road,
E-mail: irl@irl.co.nz
Islands
Motibhai and Company Limited
Motibhai Building, 1 Industrial Road, PO Box 9175, Nadi Airport
E-mail: service@motibhai.com.fj
t,
South Yarra, Melbourne, Victoria 3141
Coward Street, Mascot, Sydney,
New
South Wales
P.O
. Box 1287, Christchurch
2020
..61-3-9823·1555
..61-2-9552-8300
"61-7
-3862-6222
..61·8·841 0·0533
..61·8-9381-7144
..64-3-360-2550
..
679-6722477
Page 45

 Loading...