

Page 1
RTH221
1-day Programmable Thermostat
Operating
Manual
69-2388ES-03
Page 2

CAUTION: EQUIPMENT DAMAGE HAZARD
To prevent possible compressor damage, do not use Cooling mode when the
outdoor temperature is below 50°F (10°C).
Need Help?
For assistance with this product please visit http://DIYthermostats.honeywell.com
or call Honeywell Customer Care toll-free at 1-800-468-1502.
Read and save these instructions.
Page 3

Table of contents
Overview
Thermostat features ..............................2
Quick start .............................................3
Quick reference to controls ...................4
Quick reference to display.....................5
Programming & Operation
Setting the clock....................................6
System switch (Heat/Cool)....................7
Fan switch (Auto/On).............................8
Using the schedule...........................9-11
Temporary schedule override..............12
Permanent schedule override .............13
Compressor protection........................14
Programmable Thermostat RTH221
Appendices
Battery replacement ........................... 15
In case of difficulty .............................. 16
Customer assistance .......................... 17
One-year limited warranty ..................18
Your new thermostat is pre-programmed
and ready to go!
See page 3 for quick start.
Page 4

Operating Manual
About your new thermostat
Your new thermostat has been designed to give you many years of reliable service and
easy-to-use, push-button climate control.
Features
• Displays ambient (measured) temperature at all times
• One-touch access to setpoint temperature
• Daily heating/cooling schedule to greatly reduce your heating/cooling expenses
• Temporary and permanent override of schedule
• Built-in compressor protection
2
Page 5

Programmable Thermostat RTH221
This thermostat is ready to go
Simply perform the three steps below and the thermostat is in operation:
1 Set the clock ................................................................................................ See page 6
2 Select whether to heat or cool...................................................................... See page 7
3 Select whether to run the fan continuously or only when needed................ See page 8
Your thermostat is pre-programmed with a daily heating/cooling schedule. If you do not
wish to use these settings, you can:
Modify the schedule ....................................................................................See page 11
Temporarily override the schedule ............................................................. See page 12
Permanently override the schedule............................................................ See page 13
3
Page 6
Operating Manual
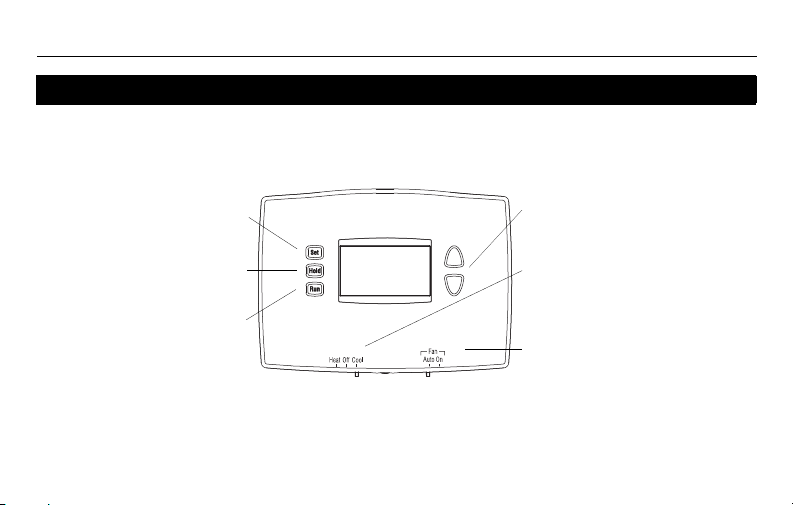
System switch (see page 7)
• Cool: System is in Cooling mode.
• Off: System is off.
• Heat: System is in Heating mode.
Fan switch (see page 8)
• On: Fan runs continuously.
• Auto: Fan runs only when
heating or cooling is activated.
Up/Down buttons
Press to adjust temperature.
Press to set clock, day or
schedule (see pages 6 & 11).
Press to override schedule and
hold temperature (see page 13).
Press to run (follow) schedule
(see page 9).
Quick reference to controls
4
Page 7
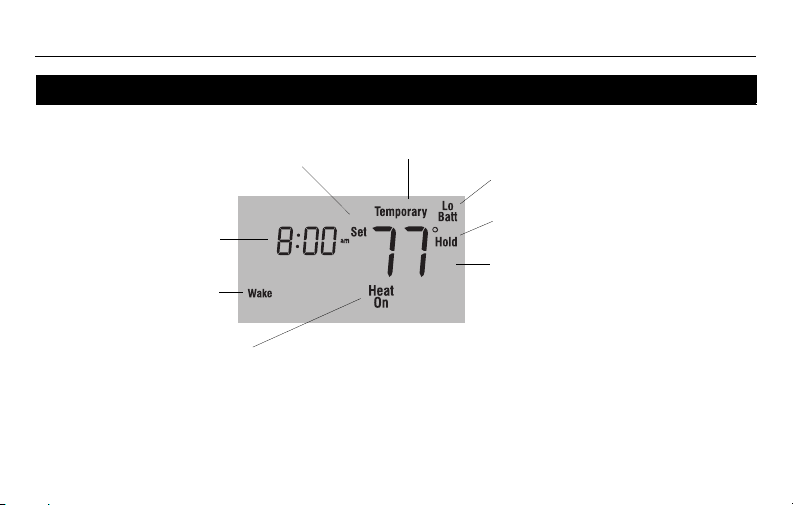
Quick reference to display
* When Heat On or Cool On is flashing, compressor protection is engaged (see page 14).
Temperature
The ambient (measured) temperature is
normally displayed. To view the setpoint
temperature, press the Up or Down
button once. The setpoint temperature
will appear for five seconds.
System status
• Cool On: Cooling is activated. *
• Heat On: Heating is activated. *
Low-battery warning
(see page 15)
Setpoint indicator
Appears when the setpoint
temperature is displayed.
Clock
Schedule period
Permanent schedule override
(see page 13)
Temporary schedule override
(see page 12)
Programmable Thermostat RTH221
5
Page 8
Operating Manual
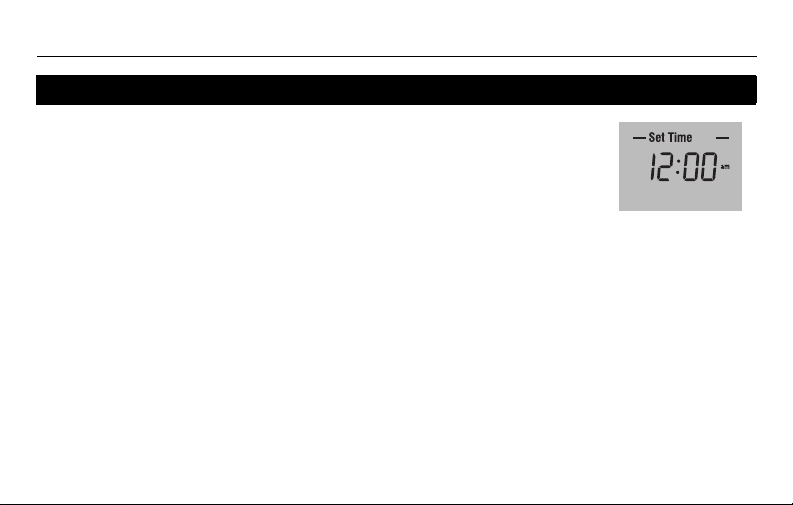
Set the clock
1 Press the Set button. Set Time will appear on the screen and the
time display will flash.
2 Press the Up or Down button to set the time.
3 Press the Run button to save the changes & exit. (The changes
are also saved if you do not press any button for 60 seconds.)
NOTE: The clock has lost its settings when the time display flashes. If the thermostat is
following the schedule, it will use the temperature settings programmed for the Wake
period until you readjust the clock.
6
Page 9
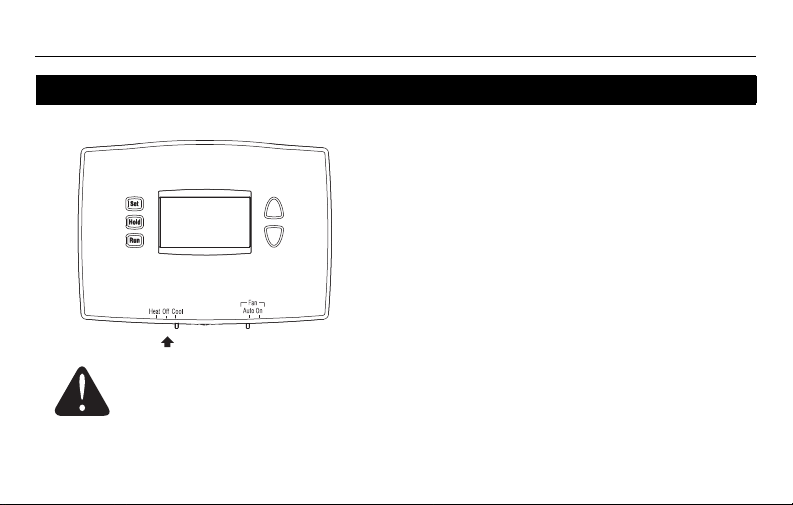
System switch (Heat/Cool)
Use the System switch to place the system in
one of the following modes:
• Cool: System is in Cooling mode.
• Off: System is off.
• Heat: System is in Heating mode.
CAUTION: EQUIPMENT DAMAGE HAZARD.
Do not use Cooling mode when the outdoor temperature is below 50°F (10°C).
Programmable Thermostat RTH221
7
Page 10
Operating Manual
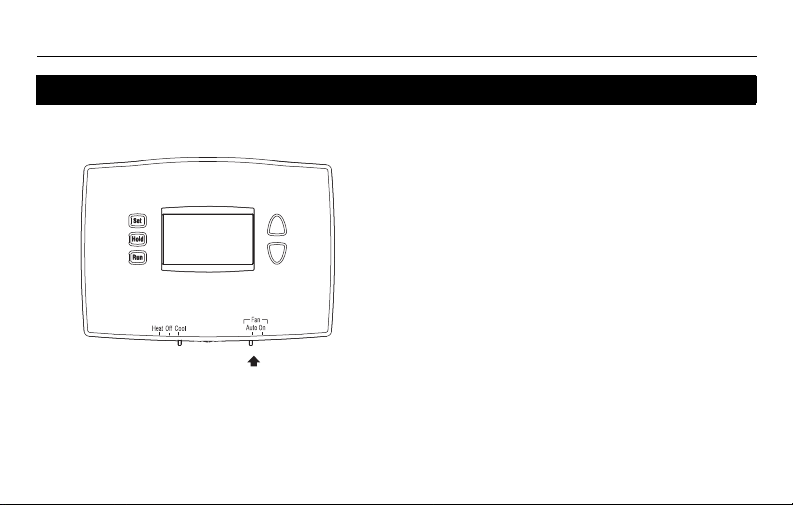
Use the Fan switch to select the fan operation.
• Auto: The fan runs only when heating or
cooling is activated (commonly used setting).
• On: The fan runs continuously.
Fan switch (Auto/On)
8
Page 11
Programmable Thermostat RTH221
Using the schedule
Press the Run button to follow the programmed schedule. For maximum energy savings
while maintaining comfort, you can program the schedule such that the temperature is at
an economical level when you sleep or leave for work and at a comfortable level when you
are awake and at home. You can program up to four periods per day:
Wake Starts when you wake up
Leave Starts when you leave for work
Return Starts when you return home
Sleep Starts when you go to sleep
To program a period, you need to set its start time and its two temperature settings (one
when the thermostat is in cooling mode and another one when it is in heating mode). The
same settings are used every day.
9
Page 12
Operating Manual
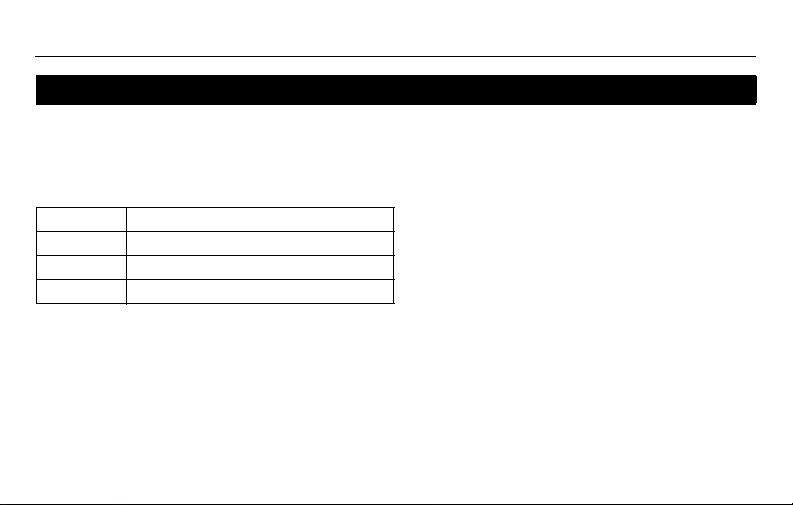
Energy saving settings
The thermostat has been programmed with the following heating/cooling schedule. See the
next page if you wish to modify the settings.
Period Start time Heat Cool
Wake 6:00 AM 70°F (21°C) 78°F (25.5°C)
Leave 8:00 AM 62°F (16.5°C) 85°F (29.5°C)
Return 6:00 PM 70°F (21°C) 78°F (25.5°C)
Sleep 10:00 PM 62°F (16.5°C) 82°F (27.5°C)
10
Page 13
Programmable Thermostat RTH221
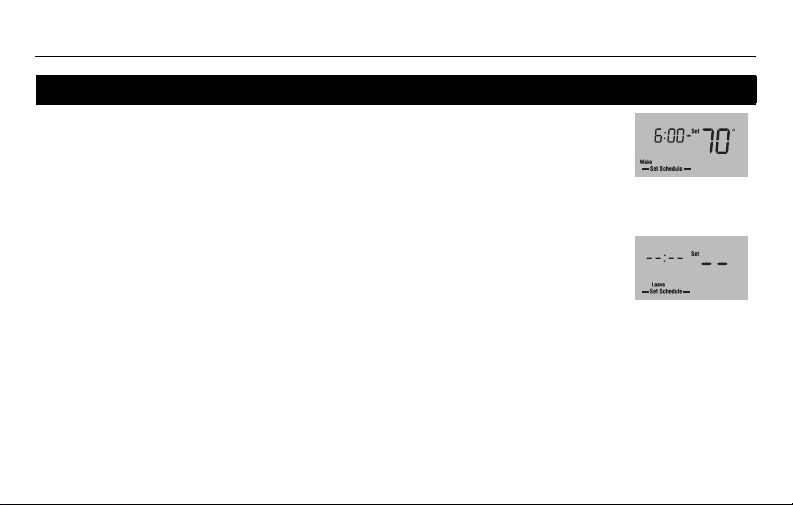
Wake period is set
to 6 a.m. and 70°F
To skip a period
(except Wake),
press the Hold
button for 4 seconds
while that period is
displayed.
Modifying the schedule
1Press the Set button 2 times until Set Schedule appears. The Wake period is
displayed.
NOTE: To set another period, press the Set button as many times as needed until the
desired period is displayed and its time or temperature is flashing.
2 When the time flashes, press the Up or Down button to set the time.
3Press the Set button.
4 To set the temperature for cooling mode, first place the System switch in Cool. To
set the temperature for heating mode, first place the System switch in Heat.
5 When the temperature flashes, press the Up or Down button to set the temperature.
6Press the Set button.
7 Repeat steps 2 through 6 to set each of the remaining periods.
8 Once all changes are made, press the Run button to save them and return to
normal display. (The changes will automatically be saved if you do not press any
button for 60 seconds.)
11
Page 14
Operating Manual
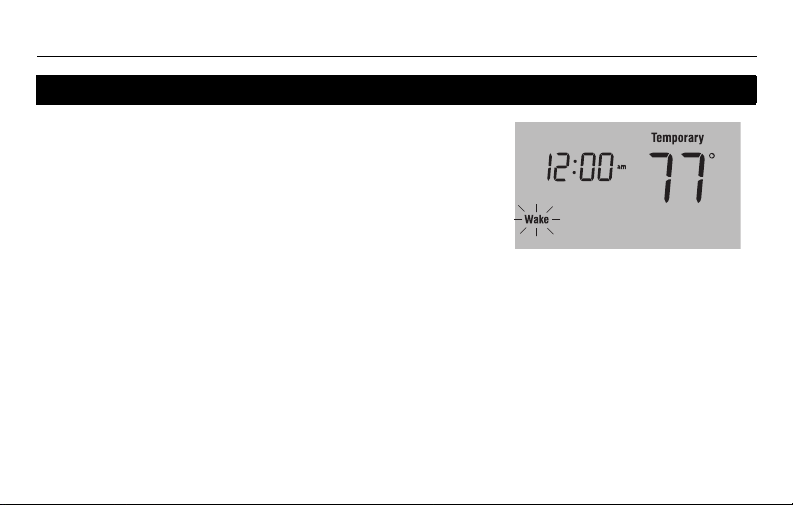
Temporary override of schedule
To temporarily ignore the schedule, press the Up or
Down button until the desired temperature is displayed.
The word Tempo rary will appear on the screen and the
period display will flash to indicate that the current period
has been overridden. The new temperature will be used
until the next period begins.
NOTE: Pressing the Up or Down button once will display the setpoint temperature. To
change the setpoint temperature, press either button more than once.
Press the Run button if you wish to cancel the temporary setting before the beginning of
the next period.
12
Page 15

Permanent override of schedule
To permanently ignore the schedule, press the Up or
Down button until the desired temperature is displayed.
Then, press the Hold button to maintain the new
temperature indefinitely. The word Hold will appear on
the screen.
Press the Run button if you wish to cancel the override
and resume the schedule. The word Hold will disappear
and the thermostat will be set to the temperature
programmed for the current period.
13
Programmable Thermostat RTH221
Page 16

Operating Manual
Built-in compressor protection
Your thermostat has a feature that helps prevent damage to the compressor of your air
conditioning or heat pump system. Because damage can occur if the compressor is
restarted too soon after shutdown, this feature forces the compressor to wait 5 minutes
before restarting. During the wait time, the message Cool On or Heat On flashes on the
screen. When the safe wait time has elapsed, the message stops flashing and the
compressor turns on.
14
Page 17

Battery replacement
Set the System switch to Off before removing the batteries. Otherwise, the
heating/cooling system could remain activated even when batteries are
removed.
Install two fresh AAA batteries when Lo Batt flashes on
the screen. Lo Batt appears for 60 days before the
batteries are depleted.
Replace batteries once a year, or when you will be away
for more than a month.
Most settings are stored in non-volatile (permanent)
memory. Only the clock must be set after you replace the
batteries.
15
Programmable Thermostat RTH221
Page 18

Operating Manual
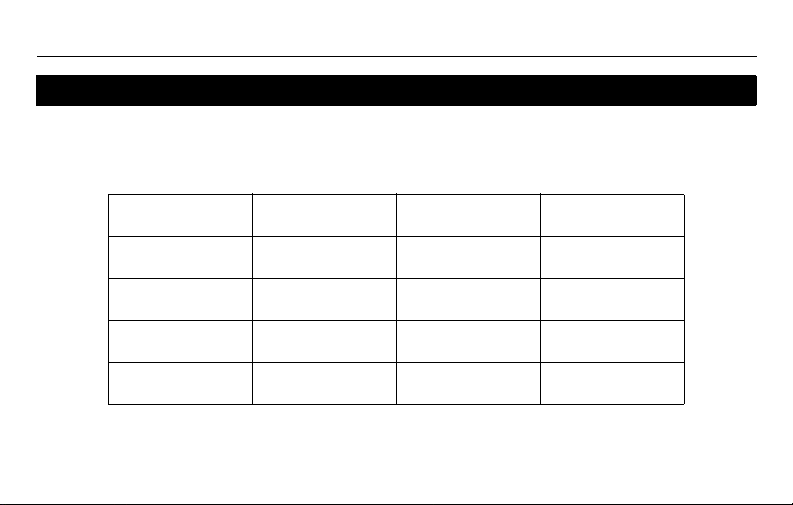
In case of difficulty
Screen is blank. • Ensure two fresh AAA alkaline batteries are correctly installed.
Temperature settings cannot be
changed.
• The System switch is off.
• You are setting the temperature outside its allowable range:
• Heat: 40°F to 90°F (4.5°C to 32°C)
• Cool: 50°F to 99°F (10°C to 37°C)
Cool On or Heat On is flashing. • The compressor protection delay is underway. Wait for the delay
HI appears on the screen. • The ambient (measured) temperature is above 122°F (50°C).
LO appears on the screen. • The ambient (measured) temperature is below 32°F (0°C).
E1 appears on the screen. • The temperature sensor circuit is opened. Replace the thermostat.
E2 appears on the screen. • The temperature sensor circuit is shorted. Replace the thermostat.
to end (maximum of 5 minutes).
16
Page 19

Programmable Thermostat RTH221
Customer assistance
For assistance with this product, please visit http://DIYthermostats.honeywell.com.
Or call Honeywell Customer Care toll-free at 1-800-468-1502.
To save time, before calling, proceed as follows:
1) Loosen the locking screw at the bottom of the thermostat. Note that
the screw is captive and cannot be removed from the wallplate.
2) Separate the thermostat from the wallplate as per figure on the right.
3) Note your model number and date code on the thermostat’s
wallplate.
17
Page 20

Operating Manual
One-year limited warranty
Honeywell warrants this product, excluding battery, to be free from defects in the workmanship or
materials, under normal use and service, for a period of one (1) year from the date of purchase by the
consumer. If at any time during the warranty period the product is determined to be defective or
malfunctions, Honeywell shall repair or replace it (at Honeywell’s option).
If the product is defective,
(i) return it, with a bill of sale or other dated proof of purchase, to the place from which you purchased
it; or
(ii) call Honeywell Customer Care at 1-800-468-1502. Customer Care will make the determination
whether the product should be returned to the following address: Honeywell Return Goods, Dock 4
MN10-3860, 1885 Douglas Dr. N., Golden Valley, MN 55422, or whether a replacement product
can be sent to you.
This warranty does not cover removal or reinstallation costs. This warranty shall not apply if it is shown
by Honeywell that the defect or malfunction was caused by damage which occurred while the product
was in the possession of a consumer.
18
Page 21

Programmable Thermostat RTH221
Honeywell’s sole responsibility shall be to repair or replace the product within the terms stated above.
HONEYWELL SHALL NOT BE LIABLE FOR ANY LOSS OR DAMAGE OF ANY KIND, INCLUDING
ANY INCIDENTAL OR CONSEQUENTIAL DAMAGES RESULTING, DIRECTLY OR INDIRECTLY,
FROM ANY BREACH OF ANY WARRANTY, EXPRESS OR IMPLIED, OR ANY OTHER FAILURE OF
THIS PRODUCT. Some states do not allow the exclusion or limitation of incidental or consequential
damages, so this limitation may not apply to you.
THIS WARRANTY IS THE ONLY EXPRESS WARRANTY HONEYWELL MAKES ON THIS
PRODUCT. THE DURATION OF ANY IMPLIED WARRANTIES, INCLUDING THE WARRANTIES OF
MERCHANTABILITY AND FITNESS FOR A PARTICULAR PURPOSE, IS HEREBY LIMITED TO THE
ONE-YEAR DURATION OF THIS WARRANTY.
Some states do not allow limitations on how long an implied warranty lasts, so the above limitation may
not apply to you. This warranty gives you specific legal rights, and you may have other rights which
vary from state to state.
If you have any questions concerning this warranty, please write to Honeywell Customer Relations,
1985 Douglas Dr, Golden Valley, MN 55422 or call 1-800-468-1502. In Canada, write to Retail
Products ON15-02H, Honeywell Limited/Honeywell Limitée, 35 Dynamic Drive, Toronto, Ontario M1V
4Z9.
19
Page 22

Automation and Control Systems
Honeywell International Inc.
1985 Douglas Drive North
Golden Valley, MN 55422
Honeywell Limited
35 Dynamic Drive
Toronto, Ontario M1V 4Z9
http://DIYthermostats.honeywell.com
Printed in U.S.A.
69-2388ES—03 Rev. 03-11
Page 23

69-2388ES-03
RTH221
Termostato programable para todos los días
Manual del
usuario
Page 24

ADVERTENCIA: PELIGRO DE DAÑAR EL EQUIPO
Para evitar posibles daños en el compresor, el termostato no se debe utilizar en
Modo Enfriamiento cuando la temperatura exterior sea inferior a 50°F (10°C).
¿Asistencia?
Para obtener asistencia relacionada con este producto, se recomienda visitar
o llamar al número sin cargo del Servicio de Atención al Cliente de Honeywell:
Leer y conservar estas instrucciones
http://DIYthermostats.honeywell.com
1-800-468-1502
.
Page 25

Índice
Generalidades
Características del termostato...............2
Puesta en marcha rápida ......................3
Referencia rápida para los controles.....4
Referencia rápida para la pantalla ........5
Programación y funcionamiento
Ajuste del reloj.......................................6
Conmutador del sistema (Heat/Cool)....7
Conmutador del ventilador (Auto/On)....8
Uso del horario.................................9-11
Cancelación temporaria del horario ....12
Cancelación permanente del horario ..13
Protección del compresor....................14
Termostato programable RTH221
Apéndices
Reemplazo de las pilas ...................... 15
En caso de dificultades....................... 16
Asistencia al cliente ............................ 17
Garantía limitada de un año ............... 18
El termostato está preprogramado y
listo para funcionar.
Referirse a la página 3 para un
encendido rápido.
Page 26

Manual del usuario
Información sobre el termostato
Este nuevo termostato ha sido diseñado para brindar muchos años de funcionamiento
fiable y permitir un control climático fácil de usar con sólo apretar un botón.
Características
• Indica la temperatura ambiente (medida) en todo momento.
• Un sólo botón permite ver la temperatura del punto de ajuste.
• El horario diario de calefacción/aire acondicionado permite reducir mucho los gastos
de calefacción/aire acondicionado.
• Cancelación temporaria y permanente del horario.
• Protección del compresor incorporada.
2
Page 27

Termostato programable RTH221
El termostato está listo para funcionar
Basta con llevar a cabo las tres etapas siguientes para poner el termostato en marcha:
1 Ajustar el reloj ...................................................................................................página 6
2 Seleccionar calefacción o enfriamiento............................................................. página 7
3 Seleccionar el modo de funcionamiento del ventilador..................................... página 8
El termostato está preprogramado con un horario de calefacción/aire acondicionado diario.
Si no se desea usarlo, se puede:
Modificar el horario.......................................................................................... página 11
Cancelar el horario de manera temporaria .....................................................página 12
Cancelar el horario de manera permanente ...................................................página 13
3
Page 28

Manual del usuario
Botón conmutador del sistema
(ver la página 7).
• Cool: Modo Enfriamiento.
• Off: apagado.
• Heat: Modo Calefacción.
Botón conmutador del ventilador
(ver la página 8).
• On: el ventilador funciona
continuamente.
• Auto: el ventilador funciona solo
cuando la calefacción o el
enfriamiento están encendidos.
Botones Arriba/Abajo
Presionar para ajustar la
temperatura.
Presionar para ajustar el reloj,
el día o el horario (ver las
páginas 6 y 11).
Presionar para cancelar el
horario y mantener la
temperatura (ver la página 13).
Presionar para activar (seguir)
el horario (ver la página 9).
Referencia rápida para los controles
4
Page 29

Referencia rápida para la pantalla
* Cuando Heat On o Cool On parpadean, la protección del compresor está activada (ver la página 14).
Temperatura
Indica normalmente la temperatura
ambiente (medida). Para ver la
temperatura del punto de ajuste,
presionar el botón Arriba o Abajo una
vez. La temperatura del punto de ajuste
aparecerá durante 5 segundos.
Estado del sistema
• Cool On: está activado el enfriamiento*.
• Heat On: está activada la calefacción*.
Indicador de pilas débiles
(ver la página 15).
Indicador de punto de ajuste
Aparece cuando se visualiza el
punto de ajuste de la temperatura.
Reloj
Período del horario
Cancelación permanente del
horario (ver la página 13).
Cancelación temporaria del horario
(ver la página 12).
Termostato programable RTH221
5
Page 30

Manual del usuario
Ajuste del reloj
1 Presionar el botón Set. En la pantalla aparecerá Set Time y la
hora parpadeará.
2 Presionar el botón Arriba o Abajo para ajustar la hora.
3 Presionar el botón Run para salvaguardar los cambios y salir.
(Las modificaciones se salvaguardan también si no se presiona
ningún botón durante 60 segundos).
NOTA: el reloj no está en hora cuando la pantalla de la hora parpadea. Si el termostato
está siguiendo el horario, usará el ajuste de temperatura programado para el período
Despertar hasta que se vuelva a poner en hora el reloj.
6
Page 31

Conmutador del sistema (Calor/frío)
Utilizar el conmutador del sistema para poner el
termostato en uno de los modos siguientes:
• Cool: el sistema está en Modo Enfriamiento.
• Off: el sistema está apagado.
• Heat: el sistema está en Modo Calefacción.
ADVERTENCIA: PELIGRO DE DAÑAR EL EQUIPO
No se debe usar el Modo Enfriamiento cuando la temperatura exterior es
inferior a los 50°F (10°C).
Termostato programable RTH221
7
Page 32

Manual del usuario
Utilizar el conmutador del ventilador (Fan)
para escoger el funcionamiento del ventilador.
• Auto: el ventilador funciona únicamente
cuando la calefacción o el enfriamiento
están activados (ajuste más común).
• On: el ventilador funciona continuamente.
Conmutador del ventilador (Auto/On)
8
Page 33

Termostato programable RTH221
Uso del horario
Presionar el botón Run para seguir el horario programado. Para obtener una economía
máxima conservando el confort, se puede programar el horario de manera que la
temperatura esté en un nivel económico durante la noche y en un nivel confortable cuando
los moradores están activos en casa. Se pueden programar hasta cuatro períodos por día:
Despertar Comienza al despertar
Salir Comienza al salir para el trabajo
Regresar Comienza cuando se regresa a la casa
Dormir Comienza a la hora de acostarse
Para programar un período, debe fijarse la hora del comienzo y los dos ajustes de la
temperatura (uno cuando el termostato está en Modo Enfriamiento y otro cuando está en
Modo Calefacción). Los mismos ajustes se usan todos los días.
9
Page 34

Manual del usuario
Configuraciones de ahorro de energía
El termostato está programado con el siguiente horario de calefacción/enfriamiento.
Referirse a la página siguiente si se desea modificarlos.
Período Inicio Calefacción Enfriamiento
Despertar 6:00 AM 70°F (21°C) 78°F (25,5°C)
Salir 8:00 AM 62°F (16,5°C) 85°F (29,5°C)
Regresar 6:00 PM 70°F (21°C) 78°F (25,5°C)
Dormir 10:00 PM 62°F (16,5°C) 82°F (27,5°C)
10
Page 35

Termostato programable RTH221
El Despertar es a
las 6 a.m. y a 70°F.
Para saltear un
período (excepto
Despertar) presionar
Hold por cuatro
segundos mientras
se visualiza el
período que se
desea saltear.
Modificación del horario
2
1
Presionar el botón
Despertar
NOTA: para fijar otro período, presionar el botón Set las veces necesarias hasta que el período
deseado aparezca y su hora y temperatura parpadeen
Set
2 veces hasta que se vea
Set Schedule
. Aparece el período
.
.
2 Cuando la hora parpadee, presionar Arriba o Abajo para ajustarla.
3 Presionar el botón Set.
4 Para programar los ajustes de temperatura para el Modo Enfriamiento, colocar
primero el conmutador del sistema en Cool; para el Modo Calefacción, colocar
primero el conmutador del sistema en Heat
.
5 Cuando la temperatura parpadee, presionar Arriba o Abajo para ajustarla.
6 Presionar el botón Set.
7 Repetir los pasos 2 a 6 para cada uno de los períodos siguientes.
8 Una vez hechas las modificaciones, presionar Run para salvar y volver a la pantalla
normal
. (Los cambios se salvaguardan también automáticamente si no se oprime
ningún botón durante 60 segundos)
.
11
Page 36

Manual del usuario
Cancelación temporaria del horario
Para ignorar temporariamente el horario, presionar el
botón Arriba o Abajo hasta que se vea la temperatura
deseada en pantalla. Aparecerá el mensaje Temp ora ry
y el período en curso parpadeará para indicar que ha
sido cancelado. La nueva temperatura estará vigente
hasta que comience el próximo período.
NOTA: presionando el botón Arriba o Abajo una vez se visualizará el punto de ajuste de
la temperatura. Para cambiarlo, presionar cualquiera de los dos botones más de una vez.
Presionar el botón Run si se desea cancelar el ajuste temporario antes de comenzar el
período siguiente.
12
Page 37

Termostato programable RTH221
Cancelación permanente del horario
Para cancelar el horario de manera permanente,
presionar el botón Arriba o Abajo hasta que aparezca
en pantalla la temperatura deseada. Presionar entonces
el botón Hold para mantener la nueva temperatura de
manera indefinida. La palabra Hold aparecerá en la
pantalla.
Presionar el botón Run si se desea anular la
cancelación y retomar el horario. La palabra Hold
desaparecerá y el termostato retomará la temperatura programada para el período
corriente.
13
Page 38

Manual del usuario
Protección del compresor incorporada
El termostato tiene una función que protege el compresor del acondicionador de aire o del
sistema de bomba de calor. El compresor puede dañarse si vuelve a encenderse
inmediatamente después de apagarse. Esta función lo fuerza a esperar 5 minutos antes de
volver a entrar en funcionamiento. Durante este tiempo, en la pantalla parpadeará el
mensaje de Cool On o Heat On. Una vez transcurridos los 5 minutos de seguridad, el
mensaje dejará de parpadear y el compresor se pondrá en marcha.
14
Page 39

Reemplazo de las pilas
Poner el conmutador del sistema en OFF antes de retirar las pilas. De lo
contrario, el sistema de calefacción/enfriamiento puede permanecer activado
aun cuando se hayan sacado las baterías.
Instalar dos pilas AAA nuevas cuando Lo Batt parpadee
en la pantalla. El icono aparecerá 60 días antes de que
las pilas estén completamente descargadas.
Reemplazar las pilas una vez por año o luego de una
ausencia de más de un mes.
La mayor parte de los datos de la configuración están
almacenados en la memoria no volátil (permanente).
Sólo el reloj debe ajustarse después del reemplazo de
las pilas.
15
Termostato programable RTH221
Page 40

Manual del usuario
En caso de dificultades
No aparece nada en la pantalla. • Verificar que las dos pilas AAA estén cargadas y correctamente instaladas.
No puede modificarse la
temperatura.
• El conmutador del sistema está apagado (Off).
• La temperatura está fuera del margen permitido:
• Calefacción: 40 °F a 90 °F (4,5 °C a 32 °C)
• Enfriamiento: 50 °F a 99 °F (10 °C a 37 °C
Cool On o Heat On parpadean
HI aparece en la pantalla.•La temperatura ambiente (medida) es superior a 122 °F (50 °C).
LO aparece en la pantalla.•La temperatura ambiente (medida) es inferior a 32 °F ( 0 °C).
E1 aparece en la pantalla.•El circuito de temperatura de la sonda está abierto. Hay que reemplazar el
E2 aparece en la pantalla.•La sonda de temperatura está en corto circuito. Reemplazar el termostato.
.•El lapso de protección del compresor está en curso y hay que esperar que
termine (máximo de 5 minutos)
termostato
.
16
.
Page 41

Termostato programable RTH221
Asistencia al cliente
Para obtener asistencia con este producto, se recomienda visitar el sitio
http://DIYthermostats.honeywell.com o llamar al Servicio de Asistencia
al Cliente de Honeywell al número sin cargo 1-800-468-1502.
Para ahorrar tiempo, proceder de la siguiente manera antes de llamar:
1) Aflojar el tornillo en la base del termostato. El tornillo está cautivo y
no se podrá retirar de la placa mural.
2) Separar el termostato de la placa mural, como se indica en la figura
de la derecha.
3) Anotar el número de modelo y el código de la fecha que figuran en la
placa mural del termostato.
17
Page 42

Manual del usuario
Garantía limitada de un año
Honeywell garantiza este producto, a excepción de la batería, por el término de un (1) año contra cualquier
defecto de fabricación o de los materiales, a partir de la fecha de compra por parte del consumidor, en
condiciones normales de uso y servicio. Si en cualquier momento durante el período de garantía se verifica
que el producto tiene un defecto o mal funcionamiento, Honeywell lo reparará o reemplazará (a elección de
Honeywell).
Si el producto tiene defectos,
(i) devuélvalo, con la factura de venta u otra prueba de compra fechada, al lugar donde lo compró; o
(ii) comuníquese con el Centro de atención al cliente de Honeywell al 1-800-468-1502. El servicio de
atención al cliente decidirá si se debe devolver el producto a la siguiente dirección: Devolución de
mercaderías de Honeywell, Dock 4 MN10-3860, 1885 Douglas Dr. N., Golden Valley, MN 55422, o si se le
puede enviar un producto en reemplazo.
Esta garantía no cubre los costos de extracción o reinstalación. Esta garantía no se aplicará si Honeywell
demuestra que el defecto o mal funcionamiento estaba causado por daños ocurridos mientras el producto
estaba en posesión de un consumidor.
18
Page 43

Termostato programable RTH221
La única responsabilidad de Honeywell será reparar o reemplazar el producto dentro de los plazos
establecidos anteriormente. HONEYWELL NO RESPONDERÁ POR LA PÉRDIDA O DAÑO DE NINGÚN
TIPO, INCLUIDO EL DAÑO INCIDENTAL O INDIRECTO DERIVADO, DIRECTA O INDIRECTAMENTE, DEL
INCUMPLIMIENTO DE LAS GARANTÍAS, EXPRESAS O IMPLÍCITAS, O DE OTRAS FALLAS DE ESTE
PRODUCTO. Algunos estados no permiten la exclusión o limitación del daño incidental o indirecto, entonces,
esta limitación puede no resultar aplicable a su caso.
LA PRESENTE GARANTÍA ES LA ÚNICA GARANTÍA EXPRESA QUE HONEYWELL PROPORCIONA
RESPECTO DE ESTE PRODUCTO. LA DURACIÓN DE LAS GARANTÍAS IMPLÍCITAS, INCLUIDAS LAS
GARANTÍAS DE COMERCIABILIDAD Y APTITUD PARA UN OBJETIVO PARTICULAR, ESTA LIMITADA A
LA DURACIÓN DE UN AÑO DE LA PRESENTE GARANTÍA.
Algunos estados no permiten las limitaciones sobre la duración del período de una garantía implícita,
entonces la limitación anterior puede no resultar aplicable a su caso. Esta garantía le brinda derechos legales
específicos, y usted podrá tener otros derechos que varían según el estado.
Si tiene preguntas sobre la presente garantía, sírvase escribir a Honeywell Customer Relations, 1985
Douglas Dr, Golden Valley, MN 55422 o llamar al 1-800-468-1502. En Canadá, escriba a Retail Products
ON15-02H, Honeywell Limited/Honeywell Limitée, 35 Dynamic Drive, Toronto, Ontario M1V 4Z9.
19
Page 44

.
Sistemas para automatización y control
Honeywell International Inc.
1985 Douglas Drive North
Golden Valley, MN 55422
Honeywell Limited
35 Dynamic Drive
Toronto, Ontario M1V 4Z9
http://DIYthermostats.honeywell.com
Impreso en EE.UU.
69-2388ES—03 Rev. 03-11
 Loading...