

Page 1
RLV3120
Non-programmable Thermostat
Owner’s
Guide
Page 2

Need Help?
For assistance with this product please visit http://yourhome.honeywell.com
or call Honeywell Customer Care toll-free at 1-800-468-1502.
Read and save these instructions.
® U.S. Registered Trademark. Patents pending.
© 2012 Honeywell International Inc. All rights reserved.
Page 3
RLV3120
Table of contents
About your new thermostat .....................................................................1
Temperature display and setting .............................................................2
Removing the faceplate........................................................................... 3
Wiring ......................................................................................................4
Installing the faceplate.............................................................................5
Selecting the temperature display format................................................6
In case of difficulty...................................................................................7
Specifications ..........................................................................................8
1-year limited warranty............................................................................ 9
Page 4

Owner’s Guide
About your new thermostat
This thermostat can be used to control an electric heating system such as a
baseboard heater or a convector.
The thermostat CANNOT be used with:
• a resistive load under 0.83 A
• a resistive load over 8.3 A
• a system driven by a contactor or a relay (inductive load)
• a fan-forced heating system (e.g. : fan-forced convector)
• a central heating system
SUPPLIED PARTS
• One (1) thermostat
• Two (2) 6-32 mounting screws
• Two (2) solderless connectors
1
Page 5
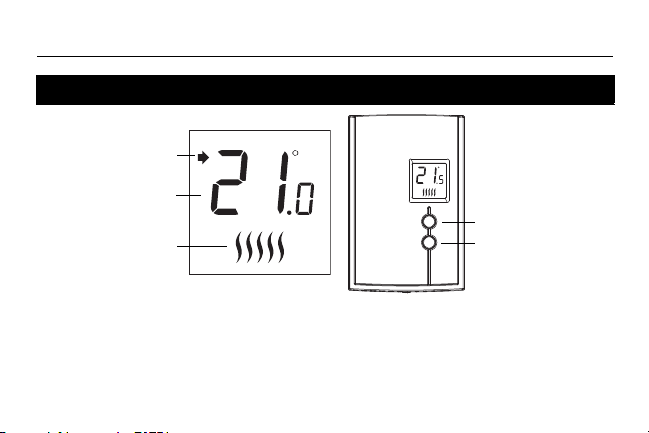
Temperature display and setting
Temperature display
Heating intensity
indicator
(No image appears
when heating is off.)
Up button
Down button
Appears when the
setpoint is displayed
The thermostat normally displays the actual (ambient) temperature.
• To view the setpoint temperature, briefly press the Up or Down button. The setpoint will be
displayed for 5 seconds.
• To change the setpoint temperature, press the Up or Down button until the desired value is
displayed.
2
RLV3120
Page 6
Owner’s Guide
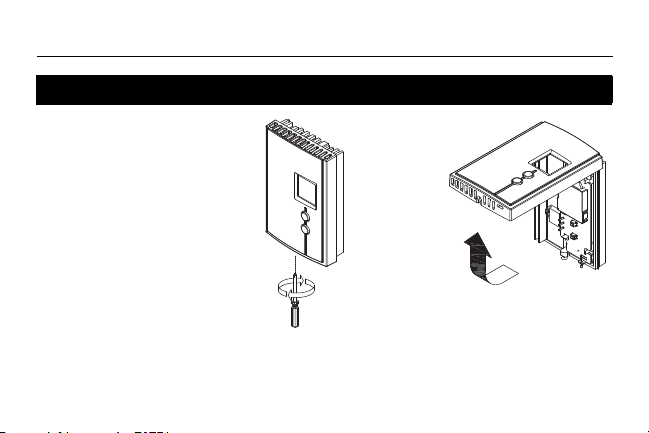
Removing the faceplate
TURN OFF POWER OF THE
HEATING SYSTEM AT THE
MAIN POWER PANEL TO
AVOID ELECTRIC SHOCK.
Loosen the screw holding the
faceplate to the base. The
screw cannot be completely
removed and remains captive
on the base. Remove the
faceplate from the base by
pulling the bottom half.
3
Page 7
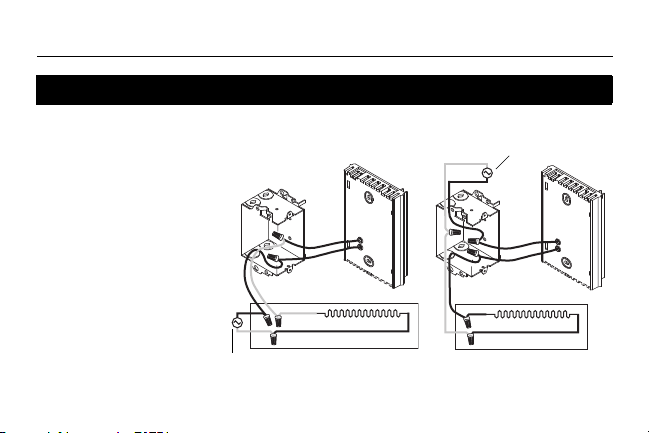
Wiring
2-wire installation
4-wire installation
Power supply
Power supply
Connect either one of the
thermostat wires to the
heater wire and the other
one to the power supply
wire using solderless
connectors for copper
wires.
NOTE: All cables and
connections must conform
to the local electrical code.
Special CO/ALR solderless
connectors must be used
when connecting with
aluminium conductors.
RLV3120
4
Page 8
Owner’s Guide
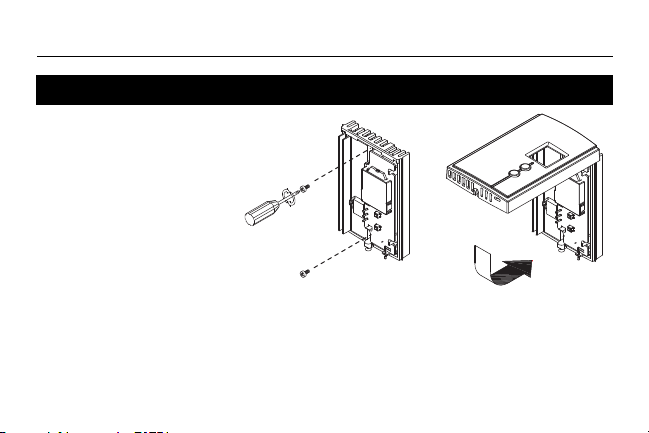
Installing the faceplate
Install the base onto an
electrical box.
Reinstall the faceplate on
the base and secure it in
place with the screw.
NOTE: Keep the air vents of thermostat clean and unobstructed at all times.
5
Page 9

Selecting the temperature display format
To select the temperature display format:
1) Press the Up and Down buttons for three seconds. The
format currently used will be indicated on the screen.
2) Press the Up or Down button to change the format.
ress
3) P
the Up and Down buttons
minute) to return to the normal display
for one second (or wait for one
.
6
RLV3120
Page 10

Owner’s Guide
In case of difficulty
PROBLEM SOLUTIONS
Thermostat is hot. This is normal.
Remediate if any the following conditions exists:
Displayed
temperature is wrong.
Display disappears
and reappears after a
few minutes.
• The thermostat is exposed to air draft.
• The sticker on the thermostat’s screen has not been removed.
• The thermostat is located near or above a heat source such as
a light dimmer.
The thermal protection device on the heater has temporarily
opened. This can happen if the heater is obstructed by furniture or
curtain and has overheated, or if the heater’s thermal protection
device is too sensitive.
7
Page 11

RLV3120
Specifications
Supply: 120/240 VAC, 50/60 Hz
Minimum load: 0.83 A (resistive only)
200 W @ 240 VAC
100 W @ 120 VAC
Maximum load: 8.3 A (resistive only)
2000 W @ 240 VAC
1000 W @ 120 VAC
Display range: 0°C to 50°C (32°F to 99°F)
Setpoint range: 5°C to 30°C (40°F to 85°F)
Storage: -20°C to 50°C (-4°F to 120°F)
Heating cycle length: 15 seconds
Permanent memory: You do not need to adjust the temperature following a
power outage.
8
Page 12

Owner’s Guide
1-year limited warranty
Honeywell warrants this product, excluding batter y, to be free from defects in the workmanship or materials, under nor mal use and
service, for a period of on e (1) year from the date of purchase by the consumer. If at any time during the warranty per iod the product is
determined to be defective or malfuncti ons, Honeywell shall repair or repl ace it (at Honeywell’s option).
If the product is defective,
(i)
return it, with a bill of sale or other dated proof of purchase, to the place from which you purchased i t; or
(ii)
call Honeywell Customer Care at 1-800-46 8-1502. Customer Care will make the determination whether the product should be
returned to the following address: Honeywell Retur n Goods, Dock 4 MN10-3860, 1885 Douglas Dr. N., Golden Valley, MN
55422, or whether a replac ement product can be sent to you.
This warranty does not cover removal or reinstal lation costs. This warranty shall not apply if it is shown by Honeywell that the defect or
malfunction was caused by damage which occurred whi le the product was in the possession of a consumer.Honeywell’s sole
responsibility shall be to repair or replace the product within the ter ms stated above. HONEYWELL SHALL NOT BE LIABLE FOR ANY
LOSS OR DAMAGE OF ANY KIND, INCLUDING ANY INCIDENTAL OR CONSEQUENTIAL DAMAGES RESULTING, DIRECTLY OR
INDIRECTLY, FROM ANY BREACH OF ANY WARRANTY, EXPRESS OR IMPLIED, OR ANY OTHER FAILURE OF THIS PRODUCT.
Some states do not allow the exclusion or limitation of incidental or consequential damages, so this limitation may not apply to you.
THIS WARRANTY IS THE ONLY EXPRESS WARRANTY HONEYWELL MAKES ON THIS PRODUCT. THE DURATION OF ANY
IMPLIED WARRANTIES, INCLUDING THE WARRANTIES OF MERCHANTABILITY AND FITNESS FOR A PARTICULAR
PURPOSE, IS HEREBY LIMITED TO THE ONE-YEAR DURATION OF THIS WARRANTY.
Some states do not allow limitati ons on how long an implied warranty lasts, so the above limitation may not apply to you. This wa rranty
gives you specific legal rights, and you may have other rights which vary from state to state.
If you have any questions concerning this warranty, please write Honeywell Custo mer Relations, 1985 Douglas Dr, Golden Valley, MN
55422 or call 1-800-468-1502. I n Canada, write Retail Products ON15-02H, Honeywell Limited/Honeywell Li mitée, 35 Dynamic Drive,
Scarborough, Ontario M1V4Z9.
Printed in USA 9 09-2012
Page 13

RLV3120
Thermostat non programmable
Guide de
l’utilisateur
Page 14

Besoin d’aide?
Pour obtenir de l’aide sur ce produit, veuillez consulter le http://yourhome.honeywell.com
ou joindre le service à la clientèle en composant sans frais le 1-800-468-1502.
Veuillez lire le guide et le conserver en lieu sûr.
® Marque de commerce enregistrée aux États-Unis. Brevets en instance.
© 2012 Honeywell International Inc. Tous droits réservés.
Page 15

RLV3120
Table des matières
À propos du thermostat........................................................................... 1
Affichage et réglage de la température ...................................................2
Enlever la façade.....................................................................................3
Branchement...........................................................................................4
Installer la façade ....................................................................................5
Selectionner le format d’affichage de la température..............................6
En cas de difficulté ..................................................................................7
Fiche technique.......................................................................................8
Garantie limitée d’un an ..........................................................................9
Page 16

Guide de l’utilisateur
À propos du thermostat
Ce thermostat a été conçu pour commander un appareil de chauffage électrique
tel qu’une plinthe chauffante ou un convecteur.
Ce thermostat NE PEUT être utilisé avec :
• une charge résistive inférieure à 0,83 A
• une charge résistive supérieure à 8,3 A
• un appareil muni d’un contacteur ou d’un relais (charge inductive)
• un appareil muni d’un ventilateur (exemple : ventiloconvecteur)
• un système de chauffage central
PIÈCES FOURNIES
• Un (1) thermostat
• Deux (2) vis de montage 6-32
• Deux (2) connecteurs sans soudure
1
Page 17

Affichage et réglage de la température
Indicateur de l’intensité
du chauffage. (L’absence
de l’image indique l’arrêt
du chauffage.)
Affichage de
la température
Bouton Haut
Bouton Bas
Apparaît lorsque la
température de
consigne est affichée
Le thermostat affiche normalement la température mesurée (ambiante).
• Pour afficher la température de consigne, appuyer brièvement sur le bouton Haut ou Bas.
La température de consigne sera affichée pendant 5 secondes.
• Pour modifier la température, appuyer sur le bouton Haut ou Bas jusqu’à ce que la valeur
désirée apparaisse.
2
RLV3120
Page 18

Guide de l’utilisateur
Enlever la façade
METTRE LE SYSTÈME DE
CHAUFFAGE HORS TENSION
AFIN D’ÉVITER TOUT RISQUE
DE CHOC ÉLECTRIQUE.
Desserrer la vis qui retient la
façade du thermostat à la base.
La vis ne peut être complètement
enlevée et reste captive sur la
base. Séparer la façade de la
base en tirant sur la partie
inférieure du thermostat.
3
Page 19

Branchement
Installation à 4 fils
Installation à 2 fils
Alimentation
Alimentation
Relier n’importe quel fil du
thermostat au fil de l’appareil
de chauffage (charge) et
l’autre fil au fil de
l’alimentation en utilisant des
connecteurs sans soudure
pour fils de cuivre.
NOTA : Tous les câbles et les
raccordements doivent être
conformes au code
d’électricité local. Pour le
raccordement à des fils en
aluminium, employer des
connecteurs identifiés CO/
ALR.
RLV3120
4
Page 20

Guide de l’utilisateur
Installer la façade
Installer la base sur une
boîte électrique.
Remettre la façade du
thermostat sur la base et
resserrer la vis.
NOTA : Garder les ouvertures d’aération du thermostat propres et dégagées en
tout temps.
5
Page 21

Selectionner le format d’affichage de la température
Pour selectionner le format d’affichage de la température :
1) Appuyer sur les boutons Haut et Bas pendant trois secondes.
Le format utilisé sera indiqué à l’écran.
2) Appuyer sur le bouton Haut ou Bas pour changer le format.
3) Appuyer sur les boutons Haut et Bas pendant une seconde
(ou attendre une minute) pour retourner à l’affichage normal.
6
RLV3120
Page 22

Guide de l’utilisateur
En cas de difficulté
PROBLÈMES SOLUTIONS
Le thermostat est chaud. Ceci est normal.
Remédier si l’une des conditions suivantes existe :
La température affichée
est erronée.
L’affichage disparaît et ne
réapparaît qu’après
quelques minutes.
• Il y a un courant d’air à proximité.
• L’autocollant sur l’écran du thermostat n’a pas été enlevé.
• Le thermostat est situé près ou au-dessus d’une source de
chaleur tel qu’un gradateur de lumière.
La protection thermique de la plinthe était temporairement
ouverte. Ceci peut se produire suite à une surchauffe lorsque
la plinthe est obstruée par un meuble ou un rideau, ou si la
protection thermique de la plinthe est trop sensible.
7
Page 23

RLV3120
Fiche technique
Alimentation : 120/240 V c.a., 50/60 Hz
Charge minimale : 0,83 A (résistive seulement)
200 W @ 240 V c.a.
100 W @ 120 V c.a.
Charge maximale : 10,4 A (résistive seulement)
2500 W @ 240 V c.a.
1250 W @ 120 V c.a.
Plage d’affichage : 0 °C à 50 °C (32 °F à 99 °F)
Plage de réglage : 5 °C à 30 °C (40 °F à 85 °F)
Entreposage : -20 °C à 50 °C (-4 °F à 120 °F)
Cycle de chauffage : 15 secondes
Mémoire permanente : Il n’est pas nécessaire de régler la température de
consigne après une panne de courant.
8
Page 24

Guide de l’utilisateur
Garantie limitée d’un an
Honeywell garantit ce produit, à l’exception de la pile, contre tout vice de fabrication ou de matière dans la mesure où il en est fait une utilisation et
un entretien convenables, et ce, pour un (1) an à partir de la date d’achat par le consommateur. En cas de défectuosité ou de mauvais
fonctionnement pendant la période de garantie, Honeywell remplacera ou réparera le produit (au gré de Honeywell) dans un délai raisonnable.
Si le produit est défectueux,
(i) le retourner, accompagné d’un e preuve d’achat indiquant la date d’achat, au dét aillant auprès de qui il a été acheté, ou
(ii) s’adresser aux Services à la clientèle de Honeywell en composant le 1 800 468-1502. Les Services à la clientèle détermineront alors si
le produit doit être retourné à l’adresse suivante : Honeywell Return Goods, Dock 4 MN10-3860, 1885 Douglas Dr. N., Golden Valley, MN
55422, ou si un produit de remplacement peut vous être expédié.
La présente garantie ne cou vre pas les frais de retrait ou de réinstallat ion. La présente garantie ne s’appliquera pas s’i l est démontré que la
défectuosité ou le mauvais fonctionnement est dû à un endommagement du produit alors que le consommateur l’avait en sa possession.
La responsabilité de Honeywell se limite à réparer ou à remplacer le produit conformément aux modalités susmentionnées. HONEYWELL N’EST
EN AUCUN CAS RESPONSABLE DES PERTES OU DOMMAGES, Y COMPRIS LES DOMMAGES INDIRECTS OU ACCESSOIRES
DÉCOULANT DIRECTEMENT OU INDIRECTEMENT D’UNE VIOLATION QUELCONQUE D’UNE GARANTIE, EXPRESSE OU TACITE,
APPLICABLE AU PRÉSENT PRODUIT NI DE TOUTE AUTRE DÉFECTUOSITÉ DU PRÉSENT PRODUIT. Certaines provinces ne permettent
pas l’exclusion ou la restriction des dommages indirects et, par conséquent, la présente restriction peut ne pas s’appliquer.
LA PRÉSENTE GARANTIE TIENT LIEU DE TOUTES LES AUTRES GARANTIES, EXPRESSES OU TACITES, ET LES GARANTIES DE
VALEUR MARCHANDE ET DE CONFORMITÉ À UNE FIN PARTICULIÈRE SONT PAR LES PRÉSENTES EXCLUES APRÈS LA PÉRIODE
D’UN AN DE LA PRÉSENTE GARANTIE.
Certaines provinces ne permettent pas de limiter la durée des garanties tacites et, par conséquent, la présente limitation peut ne pas s’appliquer.
La présente garantie do nne au consommateur des droits légaux spécifiques et peut-être certains autres droits qui peuvent varier d’une province à
l’autre.
Pour toute question concernant la présente garantie, prière d’écrire aux Services à la clientèle de Honeywell à l’adresse suivante : Honeywell
Customer Relations, 1985 Douglas Drive, Golden Valley, MN 55422, ou encore composer le 1 800 468-1502. Au Canada, prière de s’adresser au
service des Produits de détail, Honeywell Limited/Honeywell Limitée, 35, Dynam ic Drive, Scarborough (Ontario) M1V 4Z9.
Imprimé aux É.-U. 9 09-2012
 Loading...