

Page 1
Operating Manual
(Version 3.5)
Page 2
Thank you for purchasing this PENTAX Digital Camera.
This is the manual for “PENTAX REMOTE Assistant 3” software for your
Windows PC or Macintosh for enabling you to set and operate this camera
from a computer. Please read the separate camera Operating Manual and this
manual before using your camera and “PENTAX REMOTE Assistant 3”, in
order to get the most out of all the features and functions.
Keep the camera Operating Manual and this manual safe, as they can be
valuable tools in clarifying and helping you to understand all the camera
capabilities.
Regarding copyrights
Images taken using this camera that are for anything other than personal enjoyment
cannot be used without permission according to the rights as specified in the Copyright
Act. Please take care, as there are even cases where limitations are placed on taking
pictures even for personal enjoyment during demonstrations, performances or of items
on display. Images taken with the purpose of obtaining copyrights also cannot be used
outside the scope of use of the copyright as laid out in the Copyright Act, and care
should be taken here also.
Regarding trademarks
• PENTAX and smc PENTAX are trademarks of PENTAX Corporation.
• PENTAX PHOTO Browser, PENTAX PHOTO Laboratory, PENTAX REMOTE
Assistant are trademarks of PENTAX Corporation.
• Mac OS and Macintosh are registered trademarks of Apple Inc.
• SD logo and SDHC logo are trademarks.
• This product includes DNG technology under license by Adobe Systems
Incorporated.
• The DNG logo is either a registered trademark or trademark of Adobe Systems
Incorporated in the United States and/or other countries.
• All other brands or product names are trademarks or registered trademarks of their
respective companies.
Disclaimer
• PENTAX is not responsible for any damages resulting from the direct or indirect use
of this software or repercussive damages, damage to data, programs or other
intangible property, loss of profit or anticipated profit, or dispute with a third party
resulting from the use of this software.
• The specifications of this software are subject to change without notice.
Symbols used in this manual have the following meanings:
Gives information that is useful to know.
Gives cautions and notes about the operation.
The screen pictures shown in this manual may differ depending on the type of
computer used.
Page 3

Contents
Provided Software ............................................................... 3
Software Provided....................................................................................3
System Requirements..............................................................................4
Installing the Software......................................................... 5
When Using Windows..............................................................................5
When Using Macintosh ............................................................................7
PENTAX REMOTE Assistant 3............................................ 8
Connecting the Camera to Your Computer..............................................8
Opening PENTAX REMOTE Assistant 3.................................................9
Main Window Layout..............................................................................11
Menu Bar................................................................................................15
Tool Bar..................................................................................................17
Connecting the Camera to the Computer ........................ 19
Connecting the Camera .........................................................................19
Selecting the Camera for Operations.....................................................20
[Set Body Number] Dialog Box ..............................................................21
Taking Pictures .................................................................. 23
Getting Ready to Shoot..........................................................................23
Save Modes ...........................................................................................26
Taking Pictures ......................................................................................28
[Shooting Conditions] Dialog Box ................................... 30
1
[Shooting Conditions] Dialog Box...........................................................30
Displaying/Hiding the [Shooting Conditions] Dialog Box........................30
Shooting Condition Settings...................................................................31
Expanded Shooting - Interval/Timer Shooting................ 34
Interval/Timer Shooting..........................................................................34
Displaying the [Interval/Timer shooting] Dialog Box...............................34
Time Delay.............................................................................................35
Interval ...................................................................................................35
Number of Shots ....................................................................................35
Release All Shutters...............................................................................35
Expanded Shooting - Bulb Timer ..................................... 36
Bulb Timer Shooting...............................................................................36
Displaying the [Bulb Timer] Dialog Box..................................................37
Time Delay.............................................................................................37
Interval ...................................................................................................37
Page 4
2
Number of Shots ....................................................................................38
Exposure Time.......................................................................................38
Composite..............................................................................................38
[Set-up]/[Date Adjust] Dialog Box .................................... 40
[Set-up] Dialog Box ................................................................................40
Displaying the [Set-up] Dialog Box.........................................................40
Set-up Settings.......................................................................................41
[Date Adjust] Dialog Box ........................................................................42
[USER Mode Settings] Dialog Box ................................... 43
[USER Mode Settings] Dialog Box.........................................................43
Displaying the [USER Mode Settings] Dialog Box .................................43
USER Mode Settings .............................................................................44
Saving the Settings to the Computer .....................................................44
Loading a USER Mode Settings File......................................................44
[Custom Setting] Dialog Box ............................................ 45
[Custom Setting] Dialog Box ..................................................................45
Displaying the [Custom Setting] Dialog Box...........................................45
Custom Settings.....................................................................................46
Changing the Custom Settings ..............................................................47
Saving the Custom Settings to the Computer........................................47
Loading a Custom Settings File .............................................................47
Resetting the Custom Settings...............................................................47
[Measure Manual White Balance] Dialog Box ................. 48
[Measure Manual White Balance] Dialog Box........................................48
Displaying the [Measure Manual White Balance] Dialog Box ................48
Shutter Release .....................................................................................49
[Change Area]........................................................................................49
[Measure] ...............................................................................................50
[Options] Dialog Box ......................................................... 51
[Options] Dialog Box ..............................................................................51
Displaying the [Options] Dialog Box.......................................................51
Auto-Save Setting ..................................................................................52
Remote Release Button Function ..........................................................53
Display Messages .............................................................. 54
Page 5
Provided Software
The CD-ROM (S-SW75) provided with the u contains the following
software:
• PENTAX REMOTE Assistant 3
This manual describes PENTAX REMOTE Assistant 3 with screen images
from Windows XP.
The operation of this software application is nearly the same on Macintosh with
the exception of some keys. For information on Macintosh-specific instructions,
see the sections labeled “For Macintosh” or the online help.
Software Provided
PENTAX REMOTE Assistant 3
(9 languages: English, French, German, Spanish, Italian, Russian,
Chinese [traditional and simplified], Korean, Japanese)
PENTAX REMOTE Assistant 3 is software for operating and setting
PENTAX Digital SLR cameras (q and u) from your
computer via USB connection.
Shooting and setting operations featured on the camera, as well as
functions not featured on the camera such as superimposed composite
images in bulb timer shooting are available.
Additionally, images shot using PENTAX REMOTE Assistant 3 are saved
directly to your PC. PENTAX REMOTE Assistant 3 saves you the trouble
of transferring images to your PC and allows you to shoot pictures without
worrying about how much memory is left.
3
Page 6
4
System Requirements
The following are the system requirements for installing PENTAX
REMOTE Assistant 3 and operating and setting the camera from your PC.
Windows System Requirements
• Operating System : Computer with Windows XP (Home Edition/
Professional/x64 Edition) SP2 or later or Windows
Vista preinstalled (USB 2.0 port must be standard
equipment)
• CPU : Pentium 4 or higher (Pentium 4 2.0 GHz or faster
recommended)
• RAM : 512 MB or more
• Monitor : 1024×768 pixels or more
• Free Disk Space : 250 MB or more (500 MB or more recommended)
We recommend using the AC adapter (sold separately) when connecting the
camera to the computer. If the battery becomes depleted during image
transfer, the image data or SD Memory Card may be damaged.
Macintosh System Requirements
• Operating System: Macintosh with Mac OS X 10.3.9 or later preinstalled
(USB 2.0 port must be standard equipment)
• CPU : PowerPC G4 1GHz or faster (Universal Binary
format)
• RAM : 512 MB or more
• Monitor : 1024×768 pixels or more
• Free Disk Space : 250 MB or more (500 MB or more recommended)
We recommend using the AC adapter (sold separately) when connecting the
camera to the computer. If the battery becomes depleted during image
transfer, the image data or SD Memory Card may be damaged.
Page 7
Installing the Software
Here is the procedure for installing PENTAX REMOTE Assistant 3.
If an earlier version of PENTAX REMOTE Assistant 3 is installed, it will be
overwritten.
If you wish to continue to use w with PENTAX REMOTE Assistant,
install PENTAX REMOTE Assistant 3 without uninstalling PENTAX
REMOTE Assistant. (The applications will coexist.)
When multiple accounts have been setup in Windows XP/Windows Vista
or Mac OS X, log on with an account that has administrative rights before
installing the software.
When Using Windows
1
Turn your computer on.
Close any other software that is open.
2
Place the provided CD-ROM (S-SW75) into the CD-ROM
drive on your computer.
5
The PENTAX Software Installer screen appears.
• If the PENTAX Software Installer screen does not appear
Display the PENTAX Software Installer screen following the steps below.
1) Click [My Computer] from the start menu.
2) Double-click the [CD-ROM drive (S-SW75)] icon.
3) Double-click [Setup.exe].
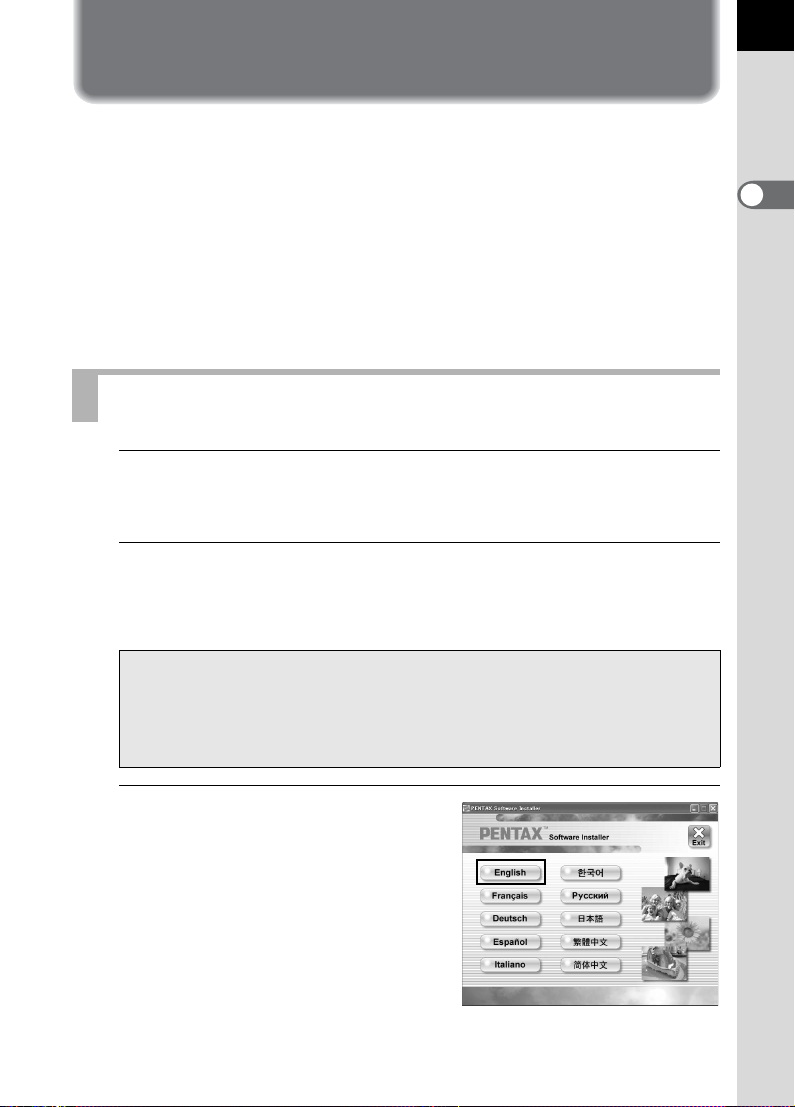
3
Choose a language from the
displayed screen.
The software selection screen
appears.
Page 8
6
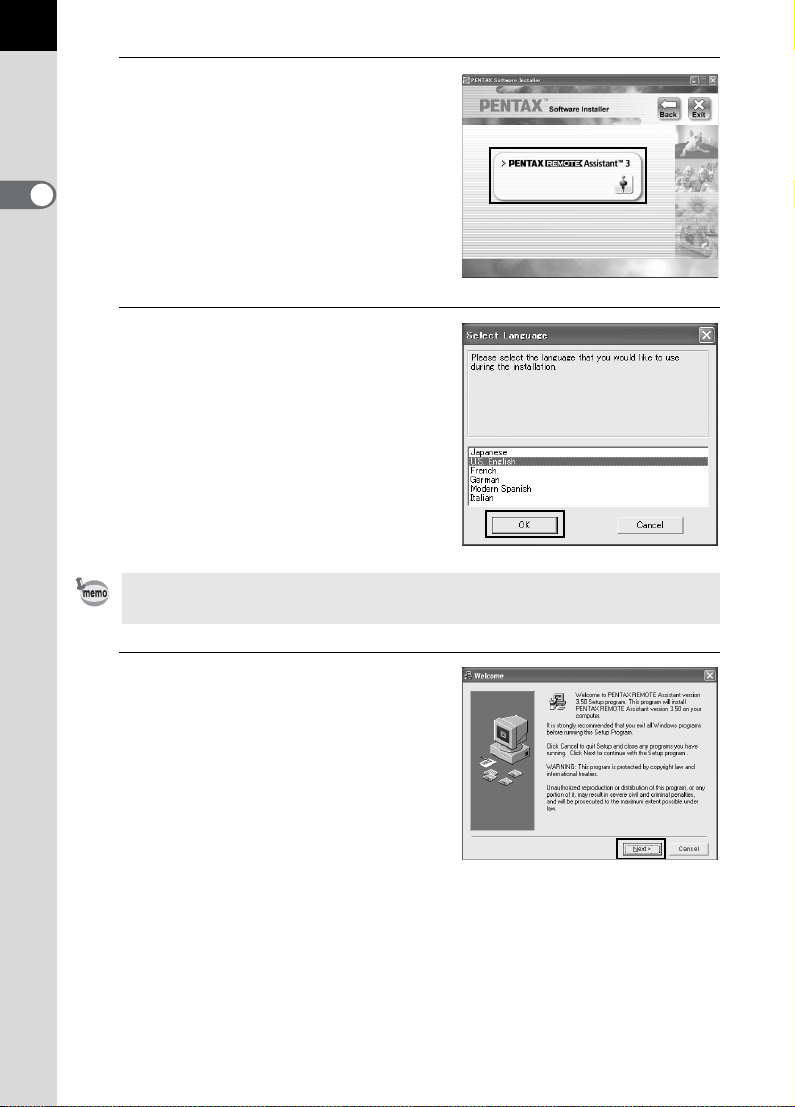
4
Click [PENTAX REMOTE
Assistant].
5
Select the desired language in
the Select Language screen
and click [OK].
Some operating environments select the language automatically. Continue
with the installation in step 6. The installer starts.
6
The installer starts. Click
[Next].
Follow the instructions on the screen
and continue with the installation.
Page 9
When Using Macintosh
1
Turn on your Macintosh.
Close any other software that is open.
2
Place the provided CD-ROM (S-SW75) into the CD-ROM
drive on your Macintosh.
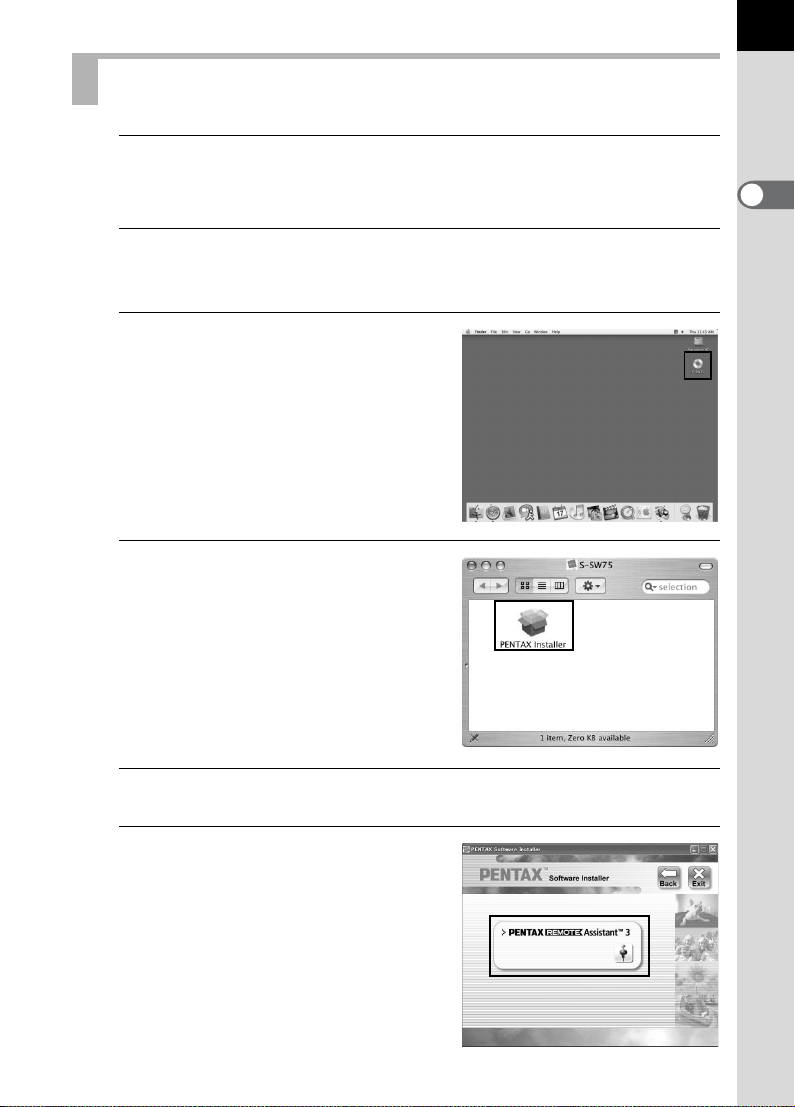
3
Double-click the [CD-ROM
drive (S-SW75)] icon.
The contents of the CD-ROM are
displayed.
4
Double-click the [PENTAX
Installer] icon.
7
The PENTAX Software Installer
screen appears.
5
Select the operating system to install to.
6
Click
[PENTAX REMOTE
ssist
A
Follow the instructions on the screen
and continue with the installation.
ant].
Page 10
8
PENTAX REMOTE Assistant 3
This section explains how to start up and close PENTAX REMOTE
Assistant 3, the main window layout and the functions that are available.
Connecting the Camera to Your Computer
To use the PENTAX REMOTE Assistant 3, connect your camera to your
computer using the USB cable supplied with the camera. (p.19)
You can connect the camera to the computer before starting up or while
operating the PENTAX REMOTE Assistant 3. The program recognizes the
camera, enabling you to use the program functions.
You cannot use the functions of the PENTAX REMOTE Assistant 3 when
a camera is not connected to the computer.
• Auto Power Off does not work when the camera is connected to the
computer.
• It is recommended to power the camera with the AC adapter when using the
PENTAX REMOTE Assistant 3 with the camera connected to the computer
for a long period of time.
• Before using the PENTAX REMOTE Assistant 3, update the q
firmware to Version 1.20 or later. Visit http://www.pentax.co.jp/english/
support/ for information on updating the firmware.
Page 11
Opening PENTAX REMOTE Assistant 3
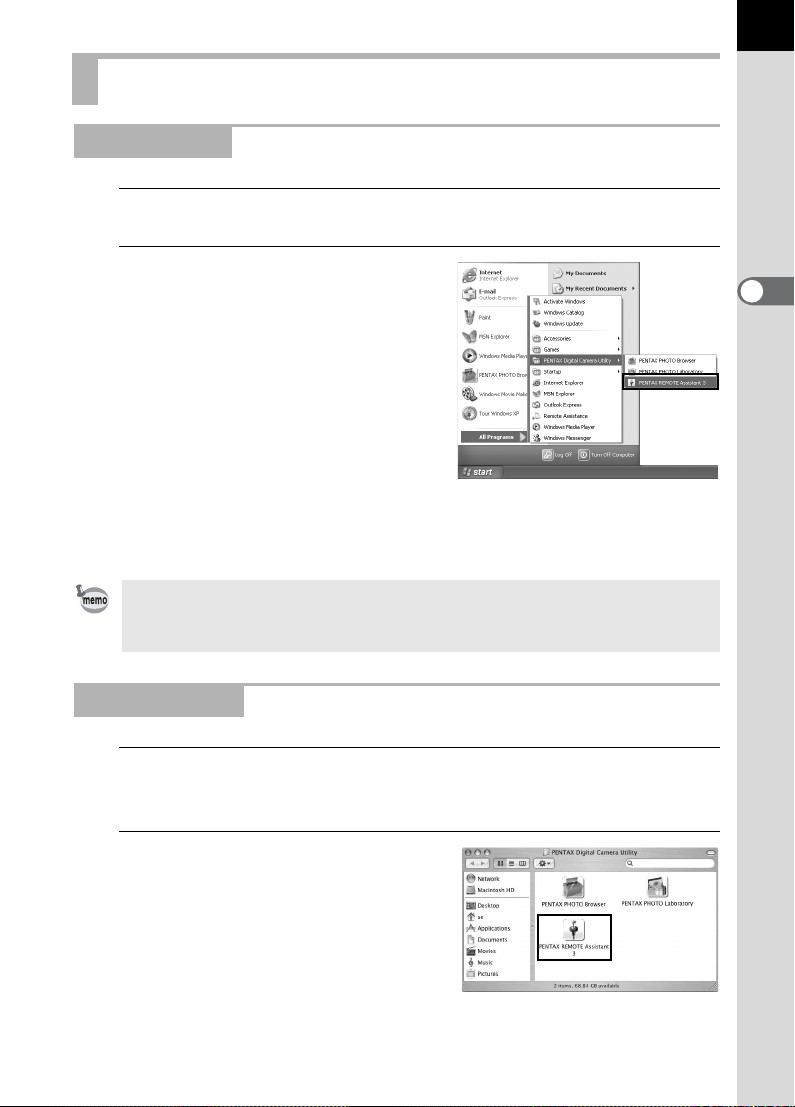
For Windows
1
Select the start menu on the desktop.
2
Select [All Programs] - [PENTAX
Digital Camera Utility] - [PENTAX
REMOTE Assistant 3].
PENTAX REMOTE Assistant 3 starts
and the main window is displayed.
Closing PENTAX REMOTE Assistant 3
Select [Exit] from the [File] menu on the main window.
You can save the settings on the [USER mode settings] and [Custom Setting]
dialog boxes to the computer. Save these settings, if necessary, before closing
the PENTAX REMOTE Assistant 3. (p.43, p.45)
9
For Macintosh
1
Double-click the [PENTAX Digital Camera Utility] folder in
[Applications] on the hard disk.
2
Double-click the [PENTAX
REMOTE Assistant 3] icon.
PENTAX REMOTE Assistant 3 starts
and the main window is displayed.
Page 12
10
Closing PENTAX REMOTE Assistant 3
Select [Quit PENTAX REMOTE Assistant 3] from the [PENTAX REMOTE
Assistant 3] menu on the desktop menu bar.
You can save the settings on the [USER mode settings] and [Custom Setting]
dialog boxes to the computer. Save these settings, if necessary, before closing
the PENTAX REMOTE Assistant 3. (p.43, p.45)
Starting up from PENTAX PHOTO Browser 3
In the PENTAX PHOTO Browser 3 window, select [PENTAX REMOTE
Assistant] J [PENTAX REMOTE Assistant 3] from the [Tools] menu.
You can also click on the toolbar in the PENTAX PHOTO Browser 3
window and select [PENTAX REMOTE Assistant 3] from the drop-down
menu.
The PENTAX REMOTE Assistant 3 starts and the main window is
displayed.
• If PENTAX REMOTE Assistant 3 is not installed properly, [PENTAX
REMOTE Assistant] is not available and cannot be selected on the [Tools]
menu in the PENTAX PHOTO Browser 3 window. In this case, reinstall the
PENTAX REMOTE Assistant 3.
• If you are using w digital SLR and PENTAX REMOTE Assistant (Ver.
1) for w is installed properly, you can start and use this program from
PENTAX PHOTO Browser 3. (Select [PENTAX REMOTE Assistant] from the
[Tools] menu or click on the toolbar and select [PENTAX REMOTE
Assistant]. PENTAX REMOTE Assistant Ver. 1 can only be used with
w.
• Click on the toolbar to start the version selected in the drop-down menu.
Page 13
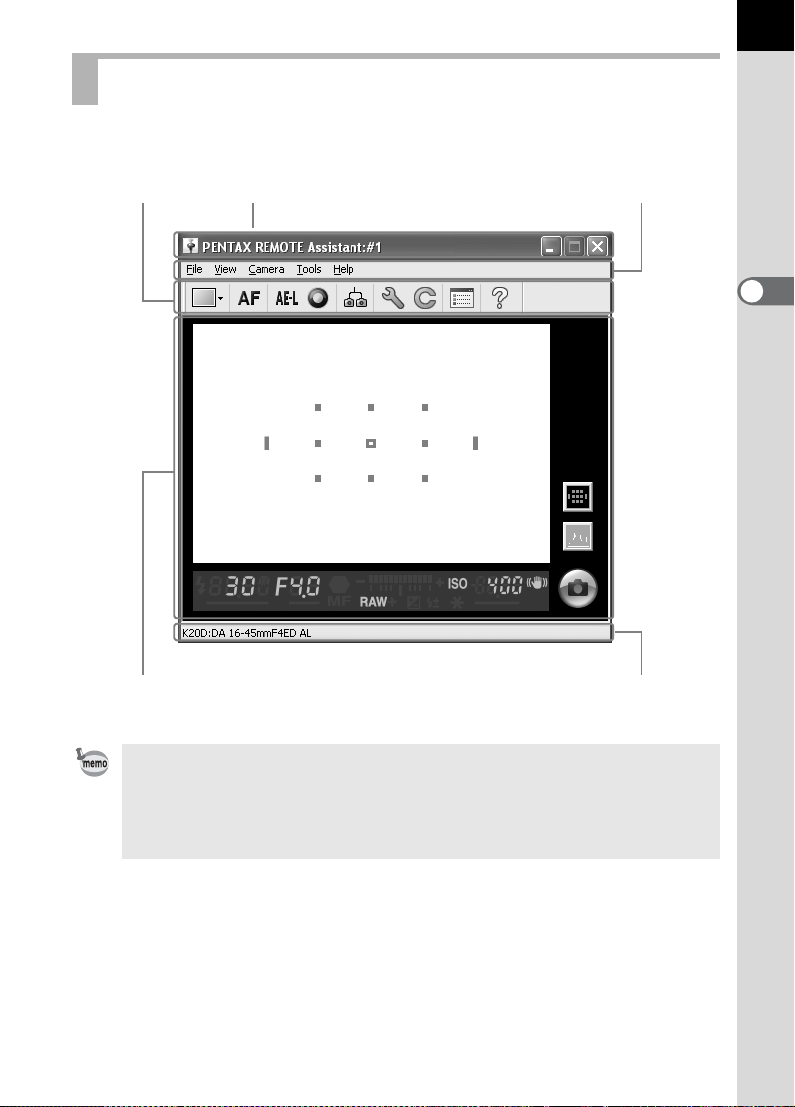
Main Window Layout
This section explains the layout of the PENTAX REMOTE Assistant 3
main window and the functions of the various window elements.
Tool bar Title bar Menu bar
11
Virtual viewfinder display area Status bar
• When multiple cameras are connected to the computer, one main window is
displayed for each camera.
• The camera body number is displayed in the title bar and the camera model
name and attached lens name are displayed in the status bar of each main
window. (p.12, p.14)
Page 14

12
Title Bar
The title bar displays the body number of the camera corresponding to the
main window. You can use the [Set body number] dialog box of this
program to assign a body number to the camera. (p.21)
Menu Bar
You can use the menu bar to select remote shooting operation and
camera settings. You can also use the menu bar to change the PENTAX
REMOTE Assistant 3 settings. (p.15)
Toolbar
The toolbar displays the icons of frequently used functions available in the
menus. Click an icon on the toolbar or select an item from a drop-down list
on the toolbar to set or operate that function. (p.17)
Page 15

Virtual Viewfinder Display Area
Focusing area
indicator
(AF Point)
Focusing area
display button
Histogram
button
Remote
release button
13
Captured image
Viewfinder shooting information
The image captured when shooting with the PENTAX REMOTE Assistant
3 is displayed on the virtual viewfinder screen.
The remote shutter release button for shooting from PENTAX REMOTE
Assistant 3 is also displayed in the virtual viewfinder display area. (p.28)
The following shooting information can also be displayed.
Focusing area
indicator
Histogram When the histogram button is activated, a histogram of the
Viewfinder shooting
information
Checked Images This shows or hides the Checked images pane.
When the focusing area display button is activated, the
focusing area indicator appears gray. In addition, when the
AF point switching dial on the camera is set to j, you
can use the mouse to specify the autofocus area of the
image.
The focusing AF point is displayed red when an image is
focused.
image just previewed in the viewfinder display area is
displayed.
This displays the same shooting information visible in the
viewfinder on the connected camera.
Page 16
14
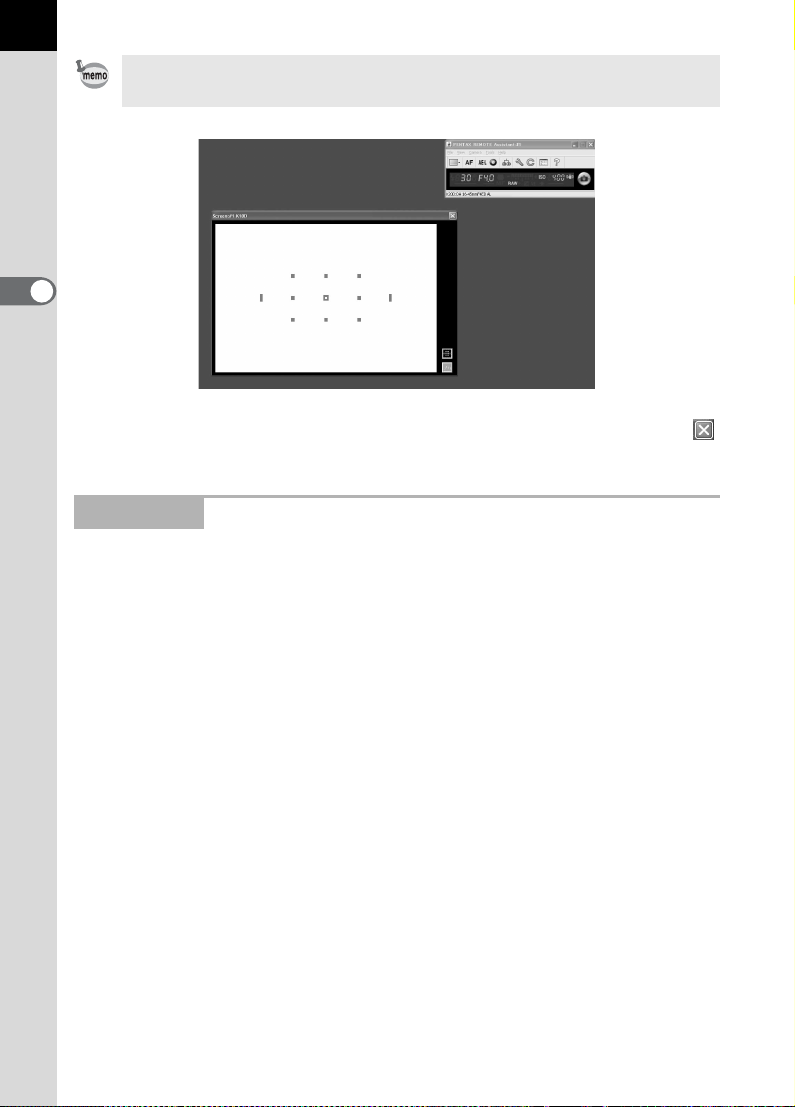
The virtual viewfinder screen can be detached from the main window. (Select
[Separate screen display] from the [View] menu.) (p.15)
To dock the floating virtual viewfinder screen to the main window, click
in the upper right corner of the virtual viewfinder screen.
Status Bar
This displays the model name of the connected camera and the name of
the attached lens.
Page 17

Menu Bar
This executes functions or sets various settings of PENTAX REMOTE
Assistant 3.
For Macintosh, the Menu bar appears at the top of the desktop.
[File] menu
Single shot mode Takes one picture at a time with the PENTAX REMOTE
Assistant 3 and saves it to a specified location. (p.26)
Buffer select mode Takes multiple pictures at a time with the PENTAX
REMOTE Assistant 3 and saves them together or saves
only the specified pictures. (p.26)
Auto save mode Automatically saves pictures taken with the PENTAX
REMOTE Assistant 3 to a set location. (p.26)
Select [Options] from the [Tools] menu to set the save
location. (p.51)
Disconnect Disconnects the camera and closes the main window.
Exit Disconnects all cameras connected to the computer and
closes the PENTAX REMOTE Assistant 3. (p.9)
[View] menu
Detailed viewfinder
display
Simple viewfinder
display
Separate screen
display
Toolbar Displays/hides the toolbar. (p.17)
Status bar Displays/hides the status bar. (p.14)
Shooting Conditions Displays/hides the [Shooting Conditions] dialog box. (p.30)
Switch body When multiple cameras are connected to the computer,
Arrange windows Rearranges all open windows.
Displays a detailed version of the virtual viewfinder screen
of the main window. Displays the virtual viewfinder screen,
focusing area display button, and histogram button. (p.13)
Displays a simplified version of the virtual viewfinder
display area of the main window. Displays only the
shooting information in the viewfinder, not the virtual
viewfinder screen, focusing area display button, or
histogram button. (p.13)
Detaches the virtual viewfinder display area from the main
window. This creates the same layout for the main window
as when selecting [Simple viewfinder display] from the
[View] menu. The virtual viewfinder display area can be
detached when [Detailed viewfinder display] is selected.
this allows you to select from the submenu the camera to
be operated with the PENTAX REMOTE Assistant 3. (p.20)
15
Page 18
16
[Camera] menu
Shutter release Releases the shutter on the camera. The camera shutter
operates according to the settings in the PENTAX
REMOTE Assistant 3.
You can set the shutter release lock function in the
[Options] dialog box when the exposure mode is set to p
(Bulb) or when the drive mode is set to j (Continuous
shooting). (p.53)
AF execution Operates the autofocus function on the camera.
AE lock Turns the camera AE lock on/off.
Green Button Operates the same as the green button on the camera in
accordance with the camera setting conditions.
Measure manual
white balance
Set-up Displays the [Set-up] dialog box. (p.40)
Date Adjust Displays the [Date Adjust] dialog box. (p.40)
USER mode settings Displays the [USER mode settings] dialog box. (p.43)
Custom Setting Displays the [Custom Setting] dialog box. (p.45)
[Tools] menu
Expanded shooting Enables [Interval/Timer shooting] and [Bulb timer]
Synchronous
shooting
Set body number Displays the [Set body number] dialog box. (p.21)
Options Displays the [Options] dialog box. (p.51)
Displays the [Measure manual white balance] dialog box.
(p.48)
expanded shooting from the submenu. (p.34) (p.36)
Enables synchronized shooting for all cameras with this
function activated.
[Help] menu
PENTAX REMOTE
Assistant Help
About PENTAX
REMOTE Assistant
Displays the help window.
Displays the version information of the PENTAX REMOTE
Assistant 3.
Page 19
Tool Bar
This section explains the layout and operations of the toolbar of the
PENTAX REMOTE Assistant 3.
1 2 3 4 5 6 7 8 9
Displaying/Hiding the Toolbar
To display the toolbar, select [Toolbar] from the [View] menu. A check ( )
is added to the left of [Toolbar] on the [View] menu and the toolbar is
displayed on the main window.
To hide the toolbar, select [Toolbar] from the [View] menu. The check ( )
is removed and the toolbar is removed from the main window.
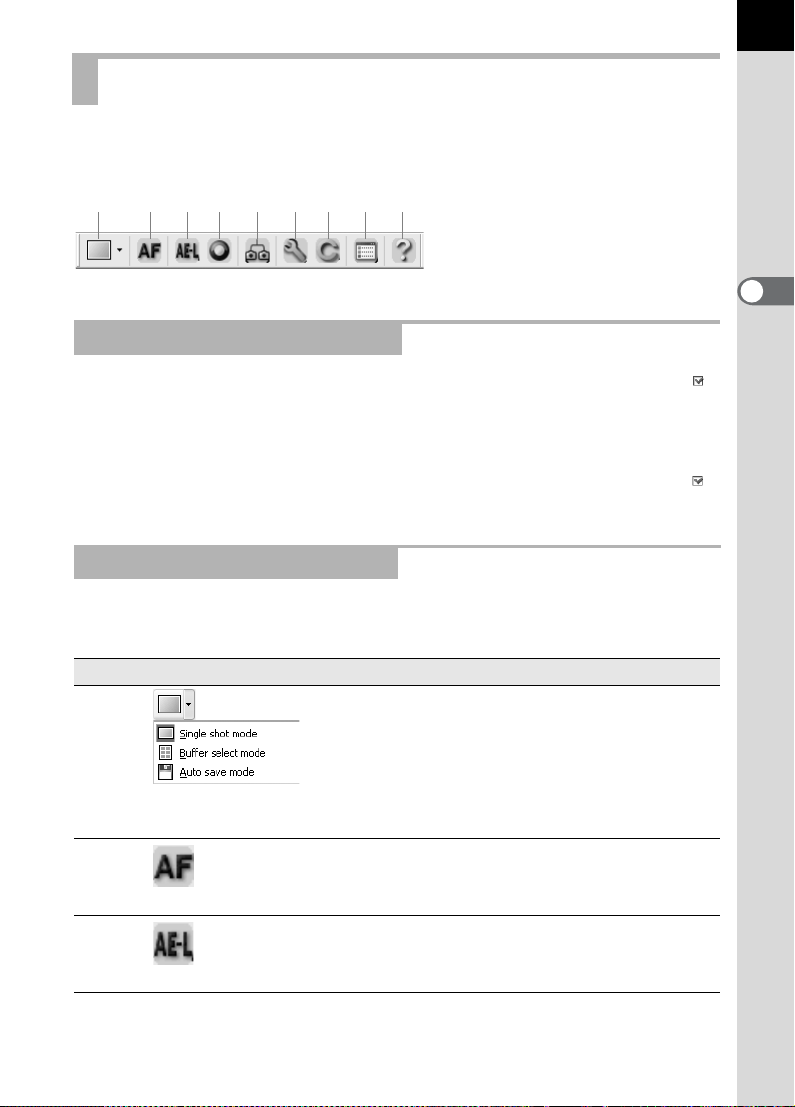
Meaning of the Toolbar Icons
The following explains the meaning of the toolbar icons, as shown from left
to right.
17
Number Icon (button) Description
1
Save Mode
2
AF execution
3
AE lock
Use the drop-down list to select the save mode
([Single shot mode], [Buffer select mode], or
[Auto save mode]) when shooting with PENTAX
REMOTE Assistant 3.
This is the same as selecting [Single shot mode],
[Buffer select mode], or [Auto save mode] from
the [File] menu. (p.26)
Operates the autofocus function on the camera.
This is the same as selecting [AF execution] from
the [Camera] menu.
Turns the camera AE lock on/off.
This is the same as selecting [AE lock] from the
[Camera] menu.
Page 20

18
Number Icon (button) Description
4
Green Button
5
Synchronous
shooting
6
Set-up
7
Custom Setting
8
Options
9
Help
Operates the same as the green button on the
camera in accordance with the camera setting
conditions.
This is the same as selecting [Green Button] from
the [Camera] menu.
When activated, this releases the shutter for the
camera at the same time as the shutters are
released on the main windows of the other
cameras.
This is the same as selecting [Synchronous
shooting] from the [Tools] menu.
Displays the [Set-up] dialog box.
This is the same as selecting [Set-up] from the
[Camera] menu. (p.40)
Displays the [Custom Setting] dialog box.
This is the same as selecting [Custom Setting]
from the [Camera] menu. (p.45)
Displays the [Options] dialog box.
This is the same as selecting [Options] from the
[Tools] menu. (p.51)
Displays the help window.
This is the same as selecting [PENTAX REMOTE
Assistant Help] from the [Help] menu.
Page 21

Connecting the Camera to the Computer
This section explains how to connect your camera to your computer.
Connecting the Camera
To use the PENTAX REMOTE Assistant 3, connect your camera to your
computer using the USB cable supplied with the camera.
You can connect the camera to the computer before starting up or while
operating the PENTAX REMOTE Assistant 3. The program recognizes the
camera, enabling you to use the program functions.
You cannot use the functions of the PENTAX REMOTE Assistant 3 when a
camera is not connected to the computer.
PENTAX REMOTE Assistant 3 can recognize and operate multiple
cameras at the same time. When multiple cameras are connected to the
computer, one main window is displayed for each connected camera.
• Auto Power Off does not work when the camera is connected to the
computer.
• It is recommended to power the camera with the AC adapter when using the
PENTAX REMOTE Assistant 3 with the camera connected to the computer
for a long period of time.
19
Connecting One Camera
Connect the USB cable supplied with the camera to the USB port on the
computer and the USB/Video terminal on the camera.
Connecting Multiple Cameras
If the computer has multiple USB ports, connect each camera to a USB
port on the computer.
If the computer has only one USB port, use a USB hub to connect the
cameras to the computer.
Page 22

20
• Depending on the type of USB hub you are using, the cameras may not
connect to the computer properly.
• The PENTAX REMOTE Assistant 3 guarantees operation for up to four
simultaneously connected cameras. If you connect additional cameras to the
computer, the PENTAX REMOTE Assistant 3 may not recognize or operate
the cameras correctly.
Selecting the Camera for Operations
If multiple cameras are connected to the computer, you can use the
[Switch body] submenu of the [View] menu to select the camera you want
to operate and set.
• You can use the [Set body number] dialog box to set and check the body
number for each camera. (p.21)
• The body number set to each camera is also displayed on the LCD panel of
the individual camera.
Page 23

[Set Body Number] Dialog Box
You can use the [Set body number] dialog box to change the body number
of each camera and the order in which the body numbers are displayed on
the [Switch body] submenu of the [View] menu.
To display the [Set body number] dialog box, select [Set body number]
from the [Tools] menu.
The body numbers of the currently connected cameras are displayed in
the list box in the same order as shown on the [Switch body] submenu of
the [View] menu. (Cameras that have an assigned body number but are
not connected are displayed as [-----].) The camera with body number
[#01] is designated as the master.
21
When you select a camera from the list, the model name and attached lens
name for that camera are displayed in the area below the list box.
Confirming the Selected Camera
When you select a camera from the list and click [Confirm], the self-timer
lamp of the selected camera lights. You can confirm the body number and
camera response.
Page 24

22
Sorting the [Switch Body] List
Select a camera from the list and click [Move Up] or [Move Down]. The
body number of the camera changes according to position of the camera
in the list.
Click [OK] to save the changes and apply the changes to the [Switch body]
submenu of the [View] menu.
• Clicking [Cancel] closes the dialog box without saving any changes to the list
or the body numbers.
• Set body numbers are saved and assigned to the same cameras the next
time they are connected to the computer. When a camera is newly added and
“The same body number already exists. A temporary number will be set and
the body number dialog box will be displayed.” is displayed, a body number
is automatically reassigned. In such a case, confirm the body number in the
[Set body number] dialog box and set again as necessary.
Page 25

Taking Pictures
This section explains how to take pictures with the PENTAX REMOTE
Assistant 3. Before taking pictures with the PENTAX REMOTE Assistant,
be sure to read the sections Getting Ready to Shoot and Save Modes
below.
Getting Ready to Shoot
In addition to connecting the camera to the computer, be sure to make the
following preparations and take the precautions described below before
taking pictures with the PENTAX REMOTE Assistant 3.
Camera Settings
The following settings are to be made using the dial and buttons on the
camera and cannot be made with the PENTAX REMOTE Assistant 3. Be
sure to make these settings on the camera before taking pictures.
23
Exposure
Mode
AE Metering Select with the
Select with the
mode dial (A) on
the camera.
metering mode
lever (B) on the
camera.
(A)
(B)
Page 26

24
Focus Mode Select with the
focus mode lever
(C) on the camera.
Focusing
Area (AF
Point) Mode
Set with the AF
point switching dial
(D) on the camera.
(C)
(D)
• The four camera settings above are displayed on the [Shooting Conditions]
dialog box. (p.30)
• When the mode dial on the camera is set to
Conditions] dialog box of the PENTAX REMOTE Assistant 3 to select the
exposure mode. (p.30)
A, you can use the [Shooting
Page 27

Precautions
Review the following precautions before taking pictures with the PENTAX
REMOTE Assistant 3.
• Auto Power Off does not work when the camera is connected to the
computer.
It is recommended to power the camera with the AC adapter when using
the PENTAX REMOTE Assistant 3 with the camera connected to the
computer for a long period of time.
• Check the location of the camera.
The PENTAX REMOTE Assistant operates the camera from a remote
location. Therefore, be sure to set up the camera according to the
location of the subject and computer, and use a tripod or other method
to secure the camera at a stable location that provides for an easy
connection to the computer. If you are taking pictures outside or
frequently change the position of the camera, you may find it useful to
use a notebook computer.
• Check the save location and available memory on your computer.
Regardless of the selected save mode, be sure to set the save location
for the pictures to be taken and confirm that the save location has
sufficient available memory. It is recommended that you prepare a
secondary hard drive or other media device, especially when taking
pictures in RAW format or RAW+ format.
25
Page 28

26
Save Modes
There are three modes for saving pictures taken with PENTAX REMOTE
Assistant 3 to the computer.
Single Shot Mode
In this mode, one picture is taken at a time and saved to a specified
location.
When you take pictures in this mode, each captured image is displayed on
the virtual viewfinder screen along with the [Save As] dialog box.
The [Save As] dialog box displays the destination folder and file name set
with the [Options] dialog box. You can also change the destination folder
and file name before saving the image. (p.51)
• Clicking [Cancel] or closes the [Save As] dialog box and deletes the
image without saving it.
• Turning off the camera while the [Save As] dialog box is displayed deletes
the image without saving it.
Page 29

Buffer Select Mode
In this mode, you can take multiple pictures at a time and save them
together or save only the specified pictures.
When you take pictures in this mode, the [Camera buffer] window is
displayed. For each picture taken, an image of the picture is added to the
[Camera buffer] window.
You can resize the [Camera buffer] window by dragging the sides or
corners of the window.
27
• In buffer select mode, the captured images are temporarily stored to the
buffer memory of the camera. Even if the images are stored to the computer,
they are not deleted from the buffer memory of the camera. Once the buffer
memory of the camera becomes full, you cannot take any more pictures. Be
sure to delete images saved to the computer or unneeded images from the
buffer memory accordingly.
• If you change the save mode (to single shot mode or auto save mode) while
thumbnails are displayed on the [Camera buffer] window, the message [The
camera buffer memory will be cleared. OK?] is displayed. Clicking [OK]
deletes the images displayed on the [Camera buffer] window and the images
in the buffer memory of the camera.
• Turning the camera off also deletes the images displayed on the [Camera
buffer] window and the images in the buffer memory of the camera.
Page 30

28
A checkbox is displayed in the upper right corner of each thumbnail on the
[Camera buffer] window. You can select an image by clicking the
checkbox and adding a check ( ), and then use the toolbar on the
[Camera buffer] window to perform the operations below.
To select all the images on the [Camera buffer] window, click on the toolbar.
Saves the selected image(s). The [Save As] dialog box is
displayed for each image. The [Save As] dialog box displays the
destination folder and file name set with the [Options] dialog box.
You can also change the destination folder and file name before
saving the image. (p.51)
Deletes the selected image(s). A warning dialog box is
displayed. Click [OK] after confirming the operation.
Auto Save Mode
In this mode, captured images are saved automatically to a set location.
Use the [Options] dialog box to set the destination folder and the file
naming conventions. (p.51)
Taking Pictures
Checking the Composition
You cannot use the virtual viewfinder screen of the PENTAX REMOTE
Assistant 3 to check the composition of the picture prior to shooting. Use
the viewfinder on the camera to compose the picture.
Page 31

Setting the Shooting Conditions
You can use the [Shooting Conditions] dialog box to set and check the
exposure and image quality settings. (p.30)
AF Execution, AE Lock, and Green Button
After checking the composition, perform the following operations as
necessary before taking pictures.
29
Select [AF execution]
from the [Camera] menu
or, click (AF execution)
on the toolbar
Select [AE lock]
from the [Camera] menu
or, click (AE lock)
on the toolbar
Select [Green Button]
from the [Camera] menu
or, click (Green Button)
on the toolbar
Operates the autofocus function on the
camera. Use this when taking pictures in
autofocus mode.
This is the same as pointing the lens toward
the subject in autofocus mode and pressing
the shutter release button on the camera
halfway or the = button on the camera.
In the virtual viewfinder display area, the
focused AF point is displayed in red.
Turns the camera AE lock on/off.
This is the same as pressing the L
button on the camera.
Operates the same as the green button on
the camera in accordance with the camera
setting conditions.
Taking the Picture
Select [Shutter release] on the [Camera] menu or click the remote shutter
release button to release the shutter on the active camera and take a
picture.
When you select [Shutter release] on the [Camera] menu or click the
remote shutter release button, the operation of the shutter on the camera
may differ depending on the camera setting. For more information, see the
Operating Manual of the camera or [Save Modes] in “Taking Pictures”
(p.26) and the “[Options] Dialog Box” (p.51) in this manual.
Page 32

30
[Shooting Conditions] Dialog Box
This section explains the settings on the [Shooting Conditions] dialog box.
[Shooting Conditions] Dialog Box
You can use this dialog box to check the shooting settings of the camera
and change them as necessary.
One dialog box is displayed for each connected camera.
Displaying/Hiding the [Shooting Conditions] Dialog Box
When you connect the camera to the computer and start up the PENTAX
REMOTE Assistant 3, the [Shooting Conditions] dialog box for the
connected camera is displayed.
To hide this dialog box, select [Shooting Conditions] from the [View] menu
to remove the check next to the menu item, or click in the upper right
corner of the dialog box.
To display this dialog box again, select [Shooting Conditions] from the
[View] menu.
Page 33

One [Shooting Conditions] dialog box is displayed for each connected camera.
To display the [Shooting Conditions] dialog box for another connected camera,
select the desired camera from the [Switch body] submenu on the [View] menu,
and then select [Shooting Conditions] from the [View] menu. (p.20)
Shooting Condition Settings
The [Shooting Conditions] dialog box displays the current settings on the
camera. When any changes are made to the settings using this dialog box,
the changes are applied to the settings on the camera.
Exposure Mode This is only activated and can be changed when the mode dial
on the camera is set to A.
AE Metering You cannot change this setting using the PENTAX REMOTE
Assistant 3.
Flash Mode You can change this setting according to the shooting mode.
You can set this even when the built-in flash on the camera is
not popped up. You cannot select r (Wireless mode) when
the drive mode is set to i (3 sec. delay shooting).
Drive Mode You can change this setting. If you select i (3 sec. delay
shooting) when the flash mode is set to r (Wireless mode),
the flash mode changes to E (Flash On).
You cannot select j (Continuous shooting) when the exposure
mode is set to p (Bulb).
When the u is connected, j (Burst Shooting) cannot be
selected.
Synchronize You can copy the current settings to other cameras when
multiple cameras are connected to the computer.
Click [Synchronize] to display the [Synchronize shooting
conditions] dialog box. Add a check next to the body number of
the camera you wish to set the same conditions on, and then
click [OK].
Shutter Speed This setting is available and can be changed when the shooting
mode is set to e (Hyper-program), b (Shutter priority), L
(Shutter & Aperture priority), or a (Hyper-manual).
Aperture This setting is available and can be changed when the shooting
mode is set to e (Hyper-program), c (Aperture priority), L
(Shutter & Aperture priority), a (Hyper-manual), p (Bulb), or M
(Flash X-sync speed).
31
Page 34

32
EV
Compensation
Flash
Compensation
Exposure
Bracket
Extended
Bracket
Expand
Dynamic Range
Sensitivity You can set this to [AUTO] or from [100] to [3200] (or up to 6400
Color Space You can select from [sRGB] or [AdobeRGB].
White Balance You can change this setting.
This setting is available and can be changed when the shooting
mode is set to e (Hyper-program), K (Sensitivity priority), b
(Shutter priority), c (Aperture priority), or L (Shutter &
Aperture priority).
This setting is available and can be changed when the shooting
mode is set to a mode other than B (Green).
This setting is available and can be changed when the shooting
mode is set to a mode other than B (Green) or p (Bulb).
Sets the number of frames and the step interval.
This setting is available and can be changed when the shooting
mode is set to a mode other than B (Green).
Sets the type of bracket shooting and step interval.
The available types of bracket shooting are [White Balance],
[Sharpness], [Saturation], [Contrast] and [Hue]. [Hue] is
available only for the u and [Saturation] and [Hue] are
not available when Image Tone is set to [Monochrome].
The available step intervals vary depending on the connected
PENTAX camera model.
When the u is connected, select [D-Range] to enable
wide dynamic range processing.
according to the setting in the [Custom Setting] dialog box).
However, you can only set up to 1600 when the shooting mode
is set to p (Bulb) or when the q is connected, and you
can only select [AUTO] when the shooting mode is set to L
(Shutter & Aperture priority).
You cannot select [AUTO] when the exposure mode is set to a
(Hyper-manual), p (Bulb), or M (Flash X-sync speed).
Options available in the [Sensitivity] pull-down menu differ
depending on the [Exposure Mode] setting and [Sensitivity
Steps] setting in the [Custom Setting] dialog box.
When this is set to [AUTO], you can set the upper and lower
limits of the automatic sensitivity correction range.
You cannot change this setting when the q is connected
and the Custom Setting is set to [Off].
When the color temperature is specified, you can select the
color temperature from the pull-down list.
You can also fine tune the GM compensation and BA
compensation. Set [Fine tune when AWB] to [Enabled] in the
[Custom Setting] dialog box to fine tune when white balance is
set to Auto.
Page 35

Image Tone You can change this setting.
When the u is connected, select from [Bright], [Natural],
[Portrait], [Landscape], [Vibrant] and [Monochrome]. If
[Monochrome] is selected, [Toning] and [Filter Effect] are
enabled in place of [Saturation] and [Hue].
When the q is connected, select [Bright] or [Natural].
Saturation You can change this setting (except when [Image Tone] is set
to [Monochrome]).
The available number of levels differs depending on the
connected camera.
Hue When the u is connected, you can change this setting
(except when [Image Tone] is set to [Monochrome]).
Contrast You can change this setting.
The available number of levels differs depending on the
connected camera.
Fine Sharpness When the u is connected, click the (Sharpness) icon
to switch to (Fine Sharpness).
Sharpness You can change this setting.
The available number of levels differs depending on the
connected camera.
Toning You can change this setting when the u is connected
and [Image Tone] is set to [Monochrome].
Filter Effect You can change this setting when the u is connected
and [Image Tone] is set to [Monochrome].
Image Save
Mode
Shake
Reduction
Autofocus
Mode
AF Point
(focusing area)
Lens focal
length
You can change the file format, the number of recorded pixels,
and the JPEG quality.
You cannot change this setting using the PENTAX REMOTE
Assistant 3.
You cannot change this setting using the PENTAX REMOTE
Assistant 3.
You cannot change this setting using the PENTAX REMOTE
Assistant 3.
You cannot change this setting using the PENTAX REMOTE
Assistant 3.
33
• Depending on the models or conditions of the cameras to which the settings
are to be copied, some shooting conditions may not be able to be copied
when [Synchronize] is clicked.
• For more information, see the Operating Manual of the camera.
Page 36

34
Expanded Shooting - Interval/Timer Shooting
This section explains the settings of and how to take pictures with interval/
timer shooting.
Interval/Timer Shooting
You can use interval shooting to take multiple pictures at a specified time
interval, and you can use timer shooting to start shooting at a specified
time.
Click [Start] to take pictures with the interval/timer shooting settings.
To cancel this operation, click [Cancel] or click in the upper right corner
of the dialog box.
If any frames cannot be captured during interval shooting because the subject
was out of focus in AF-S mode, or due to another reason, these are indicated
in [Number of failed frame(s)] when interval shooting is finished.
Displaying the [Interval/Timer shooting] Dialog Box
To display the [Interval/Timer shooting] dialog box, select [Expanded
shooting] → [Interval/Timer shooting] from the [Tools] menu.
Page 37

Time Delay
Sets the time (timer) until shooting starts after [Start] is clicked.
You can set this from 0 seconds to 12 hours, 0 minutes, and 0 seconds.
Interval
Sets the time interval between shots when [Number of shots] is set to [2]
or more (Interval shooting).
You can set this from 0 seconds to 24 hours, 0 minutes, and 0 seconds.
If the interval time is set to a very short time or is set shorter than the exposure
time, the actual shooting interval may be longer than the set interval time.
Number of Shots
Sets the number of pictures to be taken. When this is set to [1], the
[Interval] setting is disabled and timer shooting can only be performed.
You can set this from [1] to [99].
35
Release All Shutters
Add a check next to [Release all shutters] to have all connected cameras
shoot at the same time.
• [Synchronous shooting] is disabled in [Interval/Timer shooting]. When
multiple cameras are connected to the computer, only the active camera
takes a picture even if [Synchronous shooting] is selected for the desired
camera unless a check is next to [Release all shutters].
• When multiple cameras are connected to the computer, [Release all shutters]
cannot be applied to only some of the cameras.
Page 38

36
Expanded Shooting - Bulb Timer
This section explains the settings of and how to take pictures with bulb
timer shooting.
Bulb Timer Shooting
You can use bulb timer shooting to take multiple pictures at a specified
time interval using a long exposure.
There are two bulb timer shooting modes: [With one body] mode for taking
pictures with one camera and [With multiple bodies] mode for take pictures
with multiple cameras.
With [With one body] mode, you can create a superimposed composite of
multiple shot images.
Clicking [Start] on the [With one body] tab starts bulb timer shooting on the
selected camera.
Clicking [Start] on the [With multiple bodies] tab simultaneously starts bulb
timer shooting on all connected cameras.
To cancel this operation, click [Cancel] or click in the upper right corner
of the dialog box.
• [Synchronous shooting] is disabled in [With one body] bulb timer shooting.
When multiple cameras are connected to the computer, only the active
camera takes a picture even if [Synchronous shooting] is selected for the
desired camera.
• [With multiple bodies] in bulb timer shooting is applied to all cameras
connected to the computer. This cannot be applied to only desired cameras
when multiple cameras are connected to the computer.
• To use [With multiple bodies], the exposure mode must be set to p (Bulb) for
all cameras connected to the computer.
Page 39

Displaying the [Bulb Timer] Dialog Box
To display the [Bulb timer] dialog box, select [Expanded shooting] and
[Bulb timer] from the [Tools] menu.
Time Delay
37
Sets the time (timer) until shooting starts after [Start] is clicked.
You can set this from 0 seconds to 12 hours, 0 minutes, and 0 seconds.
Interval
Sets the time interval between shots when [Number of shots] is set to [2]
or more.
You can set this from 0 seconds to 60 minutes and 0 seconds.
When [Noise Reduction] is set to [On] on the [Custom Setting] dialog box, the
next picture is not taken until image processing for the current image is
finished. For this reason, the actual shooting interval may be longer than the
time interval set in [Interval].
Page 40

38
Number of Shots
Sets the number of pictures to be taken. When this is set to [1], the
[Interval], [Exposure time increment for second and subsequent frames],
and [Composite] settings are disabled.
You can set this from [1] to [9].
Exposure Time
Sets [Exposure time for first frame] and [Exposure time increment for
second and subsequent frames] in [With one body] mode.
Sets [Exposure time] in [With multiple bodies] mode.
You can set [Exposure time for first frame] and [Exposure time] from 1
second to 60 minutes and 0 seconds.
Exposure Time Increment for Second and Subsequent Frames
Sets the increment for increasing the exposure time for the second and
subsequent frames.
None Pictures are taken with the same exposure time setting.
Equal ratio (x2) Pictures are taken at twice the previous exposure time.
Equal difference Pictures are taken at a time equal to the previous exposure time
plus a set time.
The maximum exposure time is 60 minutes. Therefore when this is set to [Equal
ratio (x2)] or [Equal difference], the exposure time cannot be set to exceed 60
minutes while taking the number of pictures set in [Number of shots].
Composite
Sets whether to create a superimposed composite of shot images.
No Images are not superimposed.
Add Superimposes shot images using a method that adds the RGB
value of each pixel. The more images that are superimposed,
the brighter the composite image becomes.
Average Superimposes shot images using a method to determine the
RGB value of each pixel by dividing the RGB value added to
each pixel by [Number of shots]. The composite image has a
brightness that is the average of the brightness of each
superimposed image.
Page 41

When [Add] or [Average] is selected, the [Exposure time increment for second
and subsequent frames] setting is disabled and the exposure time is fixed to
the [Exposure time for first frame] setting.
Alignment
Sets whether to align the composite image when [Add] or [Average] is
selected.
When [Yes] is selected, you can adjust the angle and vertical and
horizontal position of each shot image after the first image using the
[Adjust composite] dialog box that is displayed after the number of pictures
set in [Number of shots] is taken.
Click two points on the preview image to adjust the position. Display the
two points on the first image, select another image from the drop-down list
on the bottom left of the [Adjust composite] dialog box, use the same
procedures and select the two points. The location is automatically
adjusted so that the points overlap.
Alternatively, adjust the angle and the horizontal and vertical positions with
the buttons on the right of the dialog box.
After adjusting the images, click [OK] to save the composite image as a
single image.
(The preview image is displayed.)
39
Page 42

40
[Set-up]/[Date Adjust] Dialog Box
This section explains the settings on the [Set-up] and [Date Adjust] dialog
box.
[Set-up] Dialog Box
You can use this window to change the Beep, World Time, Guide display,
Brightness Level, Video Output, Folder Name, Dust Removal, and File
Name settings available on the [Set-up] menu of the camera.
Click [OK] to apply the settings to the camera.
To cancel this operation, click [Cancel] or click in the upper right corner
of the dialog box.
Displaying the [Set-up] Dialog Box
To display the [Set-up] dialog box, select [Set-up] from the [Camera]
menu.
Page 43

Set-up Settings
The [Set-up] dialog box displays the current settings of the camera. Click
[OK] to apply the changed settings to the camera.
Beep Sets whether to turn the operation sounds on or off. To
make individual settings, add a check next to the item for
which operation sounds are to be used.
World Time Select the radio button for the desired world time location
(X (Destination) or W (Hometown)).
To set daylight saving time, add a check next to [DST].
Guide display Select the time to display the guide from the drop-down
list.
Brightness Level Adjusts the brightness of the LCD monitor on the camera.
Video Output Select the radio button for the video output format to
activate.
On the u, the appropriate setting is selected
automatically according to the [World Time] setting.
Folder Name Sets the method for assigning folder names on the
camera.
Select the radio button for the desired folder name.
Dust Removal Click [Start immediately] to immediately start Dust
Removal.
Add a check next to [Start-up action] to perform Dust
Removal each time the camera is turned on.
File Name Specify the first 4 characters of the file name for a picture
taken in sRGB mode (available only when the u is
connected). Select each character from the drop-down
list.
41
For more information, see the Operating Manual of the camera.
Page 44

42
[Date Adjust] Dialog Box
Sets the date on the camera.
To display the [Date Adjust] dialog box, select [Date Adjust] from the
[Camera] menu.
Set the date style, date, and time, and then click [OK] to apply the settings
to the camera.
To cancel this operation, click [Cancel] or click in the upper right corner
of the dialog box.
For more information, see the Operating Manual of the camera.
Page 45

[USER Mode Settings] Dialog Box
This section explains the settings on the [USER mode settings] dialog box.
[USER Mode Settings] Dialog Box
You can use this dialog box to change the USER mode settings of the
camera as necessary.
You can also save the settings to the computer and load settings from a
saved file.
Click [OK] to apply the settings to the camera.
To cancel this operation, click [Cancel] or click in the upper right corner
of the dialog box.
Displaying the [USER Mode Settings] Dialog Box
To display the [USER mode settings] dialog box, select [USER mode
settings] from the [Camera] menu.
43
Page 46

44
USER Mode Settings
The following items can be set in the [USER Mode Settings] dialog box.
USER mode settings
Exposure Mode Flash Mode EV Compensation Exposure Bracket
Drive Mode Flash
Compensation
Auto Sensitivity
Adjustment Range
and Expand Dynamic
Range
File Format Recorded Pixels JPEG Quality Image Tone
Saturation Sharpness Contrast
• For more information, see the Operating Manual of the camera.
• When the mode dial of the camera is set to
the [USER mode settings] dialog box are also applied to the [Shooting
Conditions] dialog box.
• When the u is connected, the [Saturation], [Contrast], [Sharpness],
and [Hue] settings of the Extended Bracket setting can be set to one of four
levels.
• [Expand Dynamic Range] and [Color Space] are deactivated when the
q is connected.
• [Image Tone], [Saturation], [Sharpness], and [Contrast] are deactivated
when the u is connected.
Color Space White Balance White Balance
Extended Bracket ISO Sensitivity
Correction
A, any settings changed with
Saving the Settings to the Computer
Click [Save As] to display the [Save As] dialog box.
You can use this dialog box to save the current settings on the [USER
mode settings] dialog box to the computer.
Loading a USER Mode Settings File
Click [Open...] to display the [Open] dialog box. Select a USER mode
settings file saved on the computer and click [Open...] to apply the saved
settings to the [USER mode settings] dialog box.
Page 47

[Custom Setting] Dialog Box
This section explains the settings on the [Custom Setting] dialog box.
[Custom Setting] Dialog Box
You can use this dialog box to check the settings on the [Custom Setting]
menu of the camera and change them as necessary. You can also save
the settings to the computer and load settings from a saved file.
Displaying the [Custom Setting] Dialog Box
To display the [Custom Setting] dialog box, select [Custom Setting] from
the [Camera] menu.
45
Page 48

46
Custom Settings
The [Custom Setting] dialog box displays the current settings of the
camera. Click [OK] to apply the changed settings to the camera.
The [Custom Setting] dialog box settings are divided into five tabs labeled
[Page 1], [Page 2], [Page 3], [Page 4], and [Page 5].
Page 1 Program line, EV Steps, Sensitivity Steps, ISO warning*, Expand
sensitivity**, Meter operating time, AE-L with AF locked, Link AF
Point and AE, One-Push Bracketing**
Page 2 Auto Bracketing order, Auto EV Compensation, WB when using
flash, Fine tune when AWB*, WB Light Source Fine-Tune**, AF
Button Function, AF by Press Halfway, Superimpose AF area, AF
in remote control
Page 3 Slow Shutter Speed NR, High-ISO Noise Reduction**, Color
space, Color Temperature steps, e-dial in Program, e-dial in K
mode, e-dial in b mode, e-dial in c mode, e-dial in L & a**
Page 4 e-dial in p & M**, Green Button in L & a, One-touch
RAW+JPEG*, Illuminate LCD panel, Release when charging,
Flash in wireless mode, Preview Method, Recordable Image No.*,
Display Sensitivity**
Page 5 Initial zoom display*, Auto Image Rotation, Saving rotation info,
Catch-in focus**, Using aperture ring
• Items with a single asterisk (*) are disabled when the u is connected.
Items with a double asterisk (**) are available only when the u is
connected.
• For more information, see the Operating Manual of the camera.
• The setting options for each setting item may vary depending on the
connected PENTAX camera model.
Page 49

Changing the Custom Settings
To change a setting, select the setting from the drop-down menu next to
that item.
If a setting on the drop-down menu is grayed out and cannot be changed,
add a check next to [Setting] to enable the Custom Setting.
Click [OK] to apply the settings to the camera.
To cancel this operation, click [Cancel] or click in the upper right corner
of the window.
Saving the Custom Settings to the Computer
Click [Save As] to display the [Save As] dialog box.
You can use this dialog box to save the current settings on the [Custom
Setting] dialog box to the computer.
Loading a Custom Settings File
Click [Open...] to display the [Open] dialog box. Select a Custom Setting
set file saved on the computer and click [Open...] to apply the saved
settings to the [Custom Setting] dialog box.
47
Resetting the Custom Settings
To return the custom settings to the default settings, click [Reset].
All settings on the [A Custom Setting] menu of the camera are returned to their
default settings.
Page 50

48
[Measure Manual White Balance] Dialog Box
This section explains the settings on the [Measure manual white balance]
dialog box.
[Measure Manual White Balance] Dialog Box
The Measure manual white balance function sets the color standard by
measuring the white color at a desired location according to the lighting
conditions for shooting.
You can use the [Measure manual white balance] dialog box to measure
the manual white balance on the computer.
To close the [Measure manual white balance] dialog box, click [Close] or
click in the upper right corner of the dialog box.
Displaying the [Measure Manual White Balance] Dialog Box
To display the [Measure manual white balance] dialog box, select
[Measure manual white balance] from the [Camera] menu.
Page 51

Shutter Release
Under the light to adjust the white balance, fully display a white sheet of
paper in the viewfinder or select a white area as the subject.
Click [Shutter release] to display the viewfinder image in the [Measure
manual white balance] dialog box.
[Change Area]
49
Click [Change area] to set the measurement area to full measurement or
spot measurement.
When spot measurement is selected, specify the measurement area by
dragging with the mouse or specifying with the cursor keys.
Page 52

50
[Measure]
After determining the measurement area, click [Measure] to measure the
white balance.
If [Manual white balance was measured successfully.] is displayed, the
white balance setting is applied to the camera.
If the manual white balance setting fails, [Failed to measure manual white
balance.] is displayed, change the measurement area or subject and try
measuring the white balance again.
Page 53

[Options] Dialog Box
This section explains the settings on the [Options] dialog box.
[Options] Dialog Box
You can use the [Options] dialog box to set the image file save settings in
auto save mode and the function setting for the remote shutter release
button on the main window.
Displaying the [Options] Dialog Box
To display the [Options] dialog box, select [Options] from the [Tools] menu.
51
Page 54
52
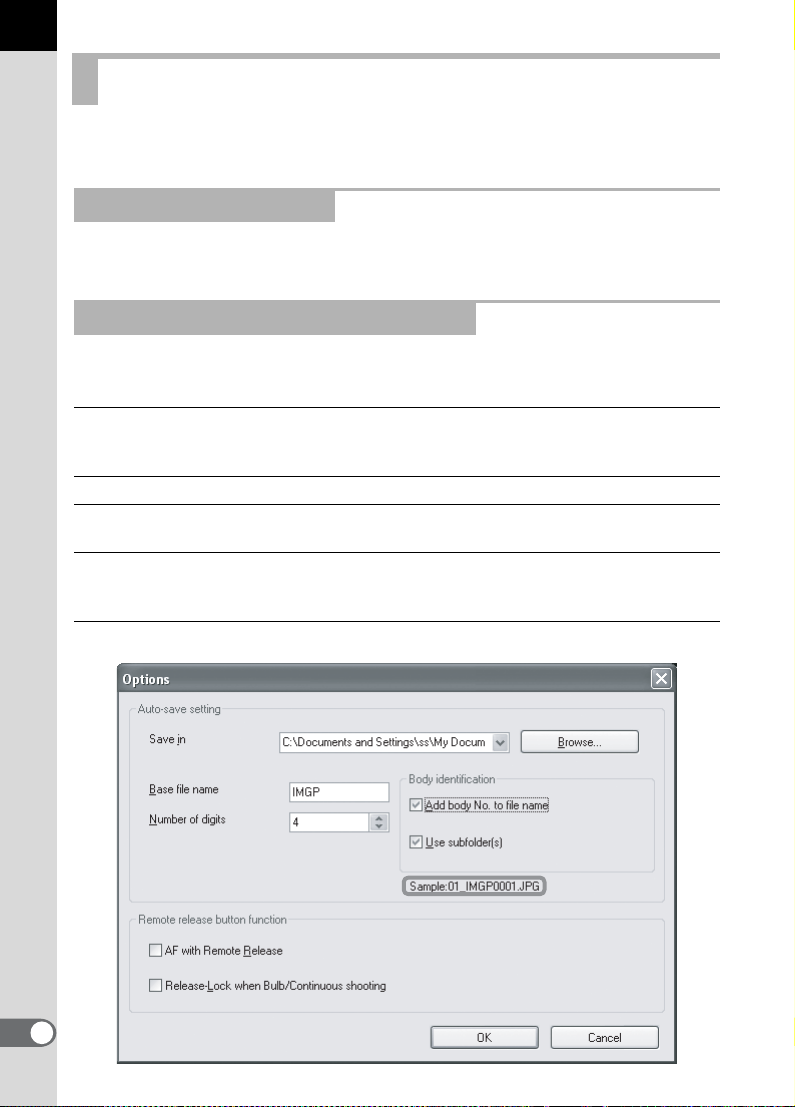
Auto-Save Setting
Sets the settings for the image file destination and file naming conventions
in auto save mode.
Setting the Destination
Click [Browse] to display the directory tree of the computer, and then
select the destination folder. You can also create a new folder.
Setting the File Naming Conventions
In auto save mode, captured images are saved using the sequential
number file name based on the settings below.
Base file name Sets the character string that is used as the base of
the file name.
Enter a character string.
Number of digits Sets the number of digits in the file name.
Add body No. to file name Add a check next to this item to add a two-digit body
number to the beginning of the file name.
Use subfolder(s) Add a check next to this item to save images by the
camera, by creating subfolders labeled with the
camera body number in the destination folder.
The current setting is displayed in [Sample:] below.
Page 55
The file name format is as follows.
01_ABCD0001.JPG
01_ ABCD 0001 .JPG
Body number Base file name Sequential number Extension
Remote Release Button Function
Sets the function of the remote shutter release button on the main window
(and [Shutter release] on the [Camera] menu). (p.16)
53
AF with Remote
Release
Release-Lock
when Bulb/Continuous
shooting
Add a check next to this item to take pictures with
autofocus when you click the remote shutter release
button (or select [Shutter release] from the [Camera]
menu).
Add a check next to this item to start taking pictures
when you click the remote shutter release button once
(or select [Shutter release] from the [Camera] menu).
Click (or select [Shutter release]) again to stop taking
pictures.
During Bulb/Continuous shooting, with a single click of
the mouse, you can continue taking pictures as if you
are continuously pressing the shutter release button
fully.
Page 56

54
Display Messages
This section explains the messages that are displayed during operation of
the PENTAX REMOTE Assistant.
Display Message Description
The same body number
already exists. A
temporary number will
be set and the body
number dialog box will
be displayed.
Unable to focus. The
picture was not taken.
The built-in flash is not
fully charged. The
shutter cannot be
released.
The shutter cannot be
released.
Camera #XX was
disconnected.
The camera buffer
memory will be cleared.
OK?
The specified camera
buffer image will be
cleared. OK?
Manual white balance
was measured
successfully.
This is displayed when a camera has a body number
that already exists at start-up or when connected to
the computer.
Click [OK] to display the [Set body number] dialog
box and change the body number.
This is displayed when the autofocus mode on the
camera is set to AF.S and the camera is unable to
focus and the shutter cannot be released.
Select [AF execution] to enable the camera to focus
on the subject or manually focus on the subject, and
then activate the remote shutter release again.
This is displayed during continuous shooting or
interval shooting when the shutter cannot be
released because the built-in flash is still charging.
Set [Release when charging] to [On] on the [Custom
Setting] window, or provide ample time for the flash
to charge.
This is displayed when the shutter cannot be
released due to a reason other than the camera is
unable to focus or the flash is not fully charged.
Check the settings on the camera and the PENTAX
REMOTE Assistant.
This is displayed when a connected camera loses its
connection.
Check the USB cable and camera power.
This is displayed in B uffer select mode wh en you try
to select a different save mode with images
remaining in the buffer memory of the camera.
Click [OK] to clear the buffer memory of the camera
and delete the images.
This is displayed in B uffer select mode wh en you try
to delete the selected images.
Click [OK] to clear the buffer memory of the camera
and delete the images.
This is displayed when the manual white balance is
measured successfully.
Page 57

Display Message Description
Failed to measure
manual white balance.
Camera #XX will be
disconnected. OK?
This is displayed when measurement of the manual
white balance fails.
Click [OK] and try measuring the manual white
balance again.
This is displayed when you select [Disconnect] or try
to close the main window.
To disconnect the camera, click [OK].
55
Page 58

Memo
Page 59

Memo
Page 60

PENTAX Corporation 2-36-9, Maeno-cho, Itabashi-ku, Tokyo 174-8639, JAPAN
PENTAX Europe GmbH
(European Headquarters)
PENTAX U.K. Limited PENTAX House, Heron Drive, Langley, Slough, Berks
PENTAX France S.A.S. 112 Quai de Bezons, B.P. 204
PENTAX Italia S.r.l. Via Dione Cassio 15, 20138 Milano, ITALY
PENTAX (Schweiz) AG Widenholzstrasse 1, 8304 Wallisellen Postfach 367,
PENTAX Scandinavia AB P.O. Box 650, 75127 Uppsala, SWEDEN
PENTAX Imaging Company
A Division of PENTAX of America, Inc.
PENTAX Canada Inc. 1770 Argentia Road Mississauga, Ontario L5N 3S7,
PENTAX Trading
(SHANGHAI) Limited
(http://www.pentax.co.jp/)
Julius-Vosseler-Strasse, 104, 22527 Hamburg,
GERMANY
(HQ - http://www.pentaxeurope.com)
(Germany - http://www.pentax.de)
SL3 8PN, U.K.
(http://www.pentax.co.uk)
95106 Argenteuil Cedex, FRANCE
(http://www.pentax.fr)
(http://www.pentaxitalia.it)
8305 Dietlikon, SWITZERLAND
(http://www.pentax.ch)
(http://www.pentax.se)
(Headquarters)
600 12th Street, Suite 300 Golden, Colorado 80401, U.S.A.
(PENTAX Service Department)
12000 Zuni Street, Suite 100B
Westminster, Colorado 80234,
U.S.A. (http://www.pentaximaging.com)
CANADA
(http://www.pentax.ca)
23D, Jun Yao International Plaza, 789 Zhaojiabang Road,
Xu Hui District, Shanghai, 200032 China
http://www.pentax.co.jp/english
• Specifications and external dimensions are subject to change without notice.
53301 Copyright © PENTAX Corporation 2008
01-200801 Printed in Philippines
 Loading...