

Page 1
Cover_1-4.fm Page 1 Monday, November 17, 2008 10:46 AM
HOYA CORPORATION
PENTAX Imaging Systems Division
PENTAX Europe GmbH
(European Headquarters)
PENTAX U.K. Limited PENTAX House, Heron Drive, Langley, Slough, Berks SL3 8PN, U.K.
PENTAX France S.A.S. 112 Quai de Bezons - BP 204, 95106 Argenteuil Cedex, FRANCE
PENTAX Italia S.r.l. Via Dione Cassio, 15 20138 Milano, ITALY
PENTAX (Schweiz) AG Widenholzstrasse 1, 8304 Wallisellen, Postfach 367, 8305 Dietlikon, SWITZERLAND
PENTAX Imaging Company
A Division of PENTAX of America, Inc.
PENTAX Canada Inc. 1770 Argentia Road Mississauga, Ontario L5N 3S7, CANADA
PENTAX Trading (SHANGHAI) Limited 23D, Jun Yao International Plaza, 789 Zhaojiabang Road,
Specifications and external dimensions are subject to change without notice.
El fabricante se reserva el derecho de cambiar las especificaciones, el diseño y el ámbito de suministro sin aviso previo.
AP060904/SPA Copyright © HOYA CORPORATION 2008
2-36-9, Maeno-cho, Itabashi-ku, Tokyo 174-8639, JAPAN
(http://www.pentax.jp)
Julius-Vosseler-Strasse, 104, 22527 Hamburg, GERMANY
(HQ - http://www.pentaxeurope.com)
(Germany - http://www.pentax.de)
Hotline: 0180 5 736829 / 0180 5 PENTAX
(http://www.pentax.uk) Hotline: 0870 736 8299
(http://www.pentax.fr)
Hotline: 0826 103 163 (0,15€ la minute) Fax: 01 30 25 75 76
Email: http://www.pentax.fr/_fr/photo/contact.php?photo&contact
(http://www.pentaxitalia.it) Email : info@pentaxitalia.it
(http://www.pentax.ch)
(Headquarters)
600 12th Street, Suite 300 Golden, Colorado 80401, U.S.A.
(PENTAX Service Department)
12000 Zuni Street, Suite 100B
Westminster, Colorado 80234, U.S.A.
(http://www.pentaximaging.com)
(http://www.pentax.ca)
Xu Hui District, Shanghai, 200032 CHINA
(http://www.pentax.com.cn)
The CE Mark is a Directive conformity mark
of the European Union.
La marca CE es una marca de conformidad
con las estipulaciones de la Unión Europea.
FOM 01.11.2008 Printed in Europe
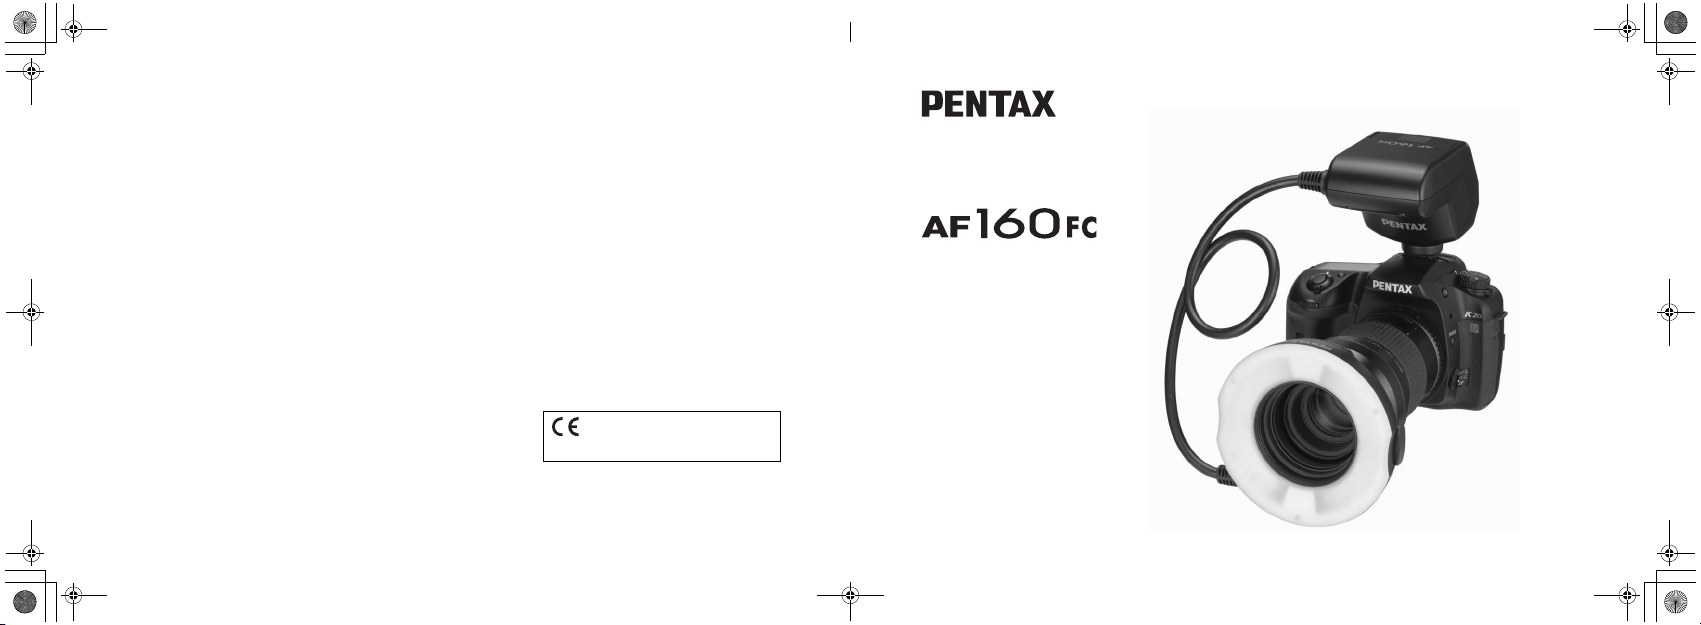
Auto Macro Flash
Flash macro automático
Operating Manual
Manual de instrucciones
Page 2
AF160FC.book Page 1 Monday, November 17, 2008 10:43 AM
Introduction
Thank you for purchasing the PENTAX Auto Macro Flash
AF160FC.
The AF160FC is a flash system for taking close-up photos of
small subjects using a flash to eliminate shadows, allowing you
to really enjoy photography. This operating manual is intended
mainly for digital SLR cameras using the P-TTL auto flash
mode. However, the flash unit is also compatible with the TTL
auto flash and the provided adapter rings make it available for
use with many PENTAX products.
Please read this operation manual carefully before using your
flash unit.
PENTAX is a registered trademark of HOYA CORPORATION.
Introducción
Gracias por comprar el flash Macro automático AF160FC
de PENTAX.
El AF160FC es un sistema de flash para tomar fotografías
de primer plano de objetos pequeños usando un flash para
eliminar las sombras, lo que le permite disfrutar realmente
de la fotografía. Este manual de funcionamiento está destinado
principalmente para cámaras digitales réflex que usen el modo
de flash automático P-TTL. Sin embargo, la unidad de flash
también es compatible con el flash automático TTL y los anillos
adaptadores incluidos permiten su uso con numerosos
productos PENTAX.
Lea este manual de funcionamiento atentamente antes
de utilizar la unidad de flash.
PENTAX es una marca registrada de HOYA CORPORATION.
1
Page 3
AF160FC.book Page 2 Monday, November 17, 2008 10:43 AM
FOR THE SAFE USE OF YOUR FLASH UNIT
Although we have carefully produced this flash unit for safe
operation, please be sure to especially follow warnings and
cautions given on page 3.
WARNING
This symbol indicates that violating this item could cause
serious personal injuries.
CAUTION
This symbol indicates that violating this item could cause minor
or medium personal injuries, or material losses.
is a symbol indicating items that are prohibited.
is a symbol emphasizing a warning.
2
PARA EL USO SEGURO DE SU FLASH
Aunque hemos diseñado este flash cuidadosamente para que
funcione de forma segura, le rogamos que preste atención
a las precauciones que le explicamos en la página 3.
ADVERTENCIA
Este símbolo indica que el incumplimiento de esta información
podría causar lesiones personales graves.
PRECAUCIÓN
Este símbolo indica que el incumplimiento de esta información
podría causar lesiones personales leves o de gravedad media,
o pérdidas materiales.
es un símbolo que indica una prohibición.
es un símbolo que resalta una advertencia.
Page 4
AF160FC.book Page 3 Monday, November 17, 2008 10:43 AM
Warning
The flash contains electronic circuits that operate at
high voltages. Do not attempt to disassemble the flash
unit yourself, as there is danger of an electric shock.
If internal parts of the flash unit become exposed due to
impact, etc., do not touch them as there is danger of an
electric shock.
Do not expose the flash unit to water or moisture as
there is danger of an electric shock.
Caution
Do not use the flash near anyone's eyes, as it may hurt
them. Be particularly careful with the flash around
infants.
The following may lead to an explosion or fire.
l Shorting the batteries
l Exposing the batteries to flames
l Dismantling the batteries
l Attempting to recharge non-rechargeable batteries
Remove the batteries from the flash unit immediately if
they become hot or begin to smoke. Be careful not to
burn yourself during removal.
Advertencia
El flash contiene circuitos electrónicos que funcionan
con alta tensión. No intente desarmar la unidad de flash
ya que podría sufrir descargas eléctricas.
Si las piezas internas del flash quedan expuestas debido
a un impacto, etc., no las toque ya que podría sufrir
descargas eléctricas.
No exponga el flash al agua o a la humedad ya que
podría sufrir descargas eléctricas.
Precaución
No use el flash cerca de los ojos de ninguna persona,
ya que podría provocar lesiones. Ponga especial cuidado
en el uso del flash si hay niños cerca.
A continuación se ofrecen posibles causas de explosión
o incendio.
l Cortocircuito de las pilas
l Exponer las pilas a las llamas
l Desarmar las pilas
l Intentar recargar las pilas no recargables
Extraiga las pilas de la unidad de flash inmediatamente
si se calientan o comienzan a emitir humo.
Tenga cuidado de no quemarse al extraerlas.
3
Page 5
AF160FC.book Page 4 Monday, November 17, 2008 10:43 AM
Precautions for Your Flash Unit
l Never use organic solvents such as paint thinner, alcohol
or benzene to clean the flash unit.
l Avoid leaving the flash unit for extended periods in places
where the humidity and temperature may be very high
such as in a car.
l Be careful not to subject the flash unit to strong vibrations,
shock or pressure. Use a cushion to protect the flash unit
when carrying it in a motorcycle, car, boat, etc.
l Do not use the flash unit where it may be directly exposed
to rain, water, etc.
l Replace all the batteries at the same time. Do not mix
battery brands, type or an old battery with a new one.
It may cause explosion or overheating.
l When using the flash unit off the camera, do not try to
attach any metallic object to the electric contacts or to
mount incompatible accessories. Otherwise, the TTL auto
mechanism may be damaged or rendered inoperable.
l Do not attach any accessories having either fewer or
different electrical contacts (layout other than PENTAX
standard) for the hot shoe or grip. Otherwise, some
functions may not work properly.
4
Para usar su flash de forma segura
l No utilice disolventes orgánicos, como diluyente de pintura,
alcohol o bencina ni disolventes como para limpiar el flash.
l Evite dejar el flash durante períodos prolongados de tiempo
en lugares donde la humedad y la temperatura puedan ser
elevadas, como en un coche.
l Tenga cuidado de no someter el flash a fuertes vibraciones,
golpes o presión. Utilice un cojín para protegerlo cuando
lo transporte en moto, coche, barco, etc.
l No utilice el flash en lugares donde pueda estar expuesto
directamente a la lluvia etc.
l
Cambie todas las pilas al mismo tiempo. No mezcle distintas
marcas o tipos de pilas o una nueva con otra más antigua.
Podría causar explosiones o recalentamiento.
l Cuando utilice el flash desmontado de la cámara, no intente
colocar ningún objeto metálico en los contactos eléctricos
ni montar accesorios incompatibles. De hacerlo, el mecanismo
automático TTL podría sufrir daños o quedar inoperable.
l No instale accesorios que tengan menos o diferentes
contactos eléctricos (disposición distinta de la estándar
de PENTAX) para la zapata de accesorios o el soporte.
De hacerlo, ciertas funciones podrían no funcionar
correctamente.
Page 6
AF160FC.book Page 5 Monday, November 17, 2008 10:43 AM
l We will not be held responsible for any accidents or
damage, etc. caused by using this product with cameras
and accessories made by other companies.
l Periodic checks are recommended every 1 to 2 years in
order to maintain high performance. If the unit has not
been used for an extended period of time, or is being
readied for an important shoot, it is recommended that you
take a test flash with the TEST button and test shoot with
it. Test flash is also important to maintain optimum
performance.
l Avoid contact with garbage, dirt, sand, dust, water, toxic
gases, salt, etc. When the flash unit is subjected to rain or
moisture, wipe it off with a dry soft cloth.
l Remove the batteries when not using the flash unit for
extended periods. Otherwise, battery leakage might result
and cause damage to the circuitry and proper operation of
the flash unit.
l Battery performance may temporarily be hindered in low
temperatures. Batteries should be kept warm in
temperatures below freezing for proper performance.
l When photographing black subjects or white subjects, use
exposure compensation.
l No asumimos ninguna responsabilidad por cualquier
accidente, daño, etc., causado por el uso de este producto
con cámaras o accesorios de otras marcas.
l Se recomienda realizar inspecciones periódicas cada
1 ó 2 años con el fin de mantener el máximo rendimiento.
Si no ha utilizado el flash durante un período de tiempo
prolongado, o si se está preparando para tomar una
fotografía importante, se recomienda que haga un disparo
de prueba del flash con el botón de TEST (Prueba).
El destello de prueba también es importante para
mantener el rendimiento óptimo.
l
Evite el contacto con la basura, suciedad arena, polvo, agua,
gases tóxicos, sal, etc. Si el flash queda expuesto a la lluvia
o la humedad, límpielo con un paño suave y seco.
l Extraiga las pilas cuando no use la unidad de flash durante
períodos prolongados. En caso contrario, las pilas pueden
tener escapes, lo que puede ocasionar daños en los
circuitos y perjudicar el correcto funcionamiento de
la unidad de flash.
l El rendimiento de la pila puede reducirse temporalmente
a bajas temperaturas. Para conseguir un rendimiento
adecuado a temperaturas inferiores a cero, las pilas
deberán mantenerse tibias.
l Cuando fotografíe temas blancos o negros, utilice
la función de compensación de la exposición.
5
Page 7
AF160FC.book Page 6 Monday, November 17, 2008 10:43 AM
Introduction......................................................................................... 1
Contents
FOR THE SAFE USE OF YOUR FLASH UNIT.................................. 2
Precautions for Your Flash Unit.......................................................... 4
Overview of the operating manual...................................................... 9
Packing list........................................................................................ 10
Using the case.................................................................................. 11
Names of parts (Controller) .............................................................. 12
Names of parts (Flash head) ............................................................ 13
Getting ready 14
Inserting the Batteries....................................................................... 14
n About battery types .................................................................................. 15
Charge check and test flash ............................................................. 17
n How to check the charge ................................................................... ...... 17
n How to test the flash unit .................... ..................................................... 17
n About auto power off................................................................................ 17
How to mount the macro flash unit ................................................... 18
n Attach the controller to the camera. ......................................................... 18
n Attach the adapter to the lens that is on the camera................................ 20
n Attach the flash head to the adapter ........................................................ 22
Taking pictures 23
Mode dial functions........................................................................... 23
Taking pictures in auto flash mode................................................... 24
n Auto flash modes ..................................................................................... 24
n Auto flash operations for various cameras............................................... 25
n Procedure........................................................... ...................................... 26
n TTL auto flash compatible cameras. ........................................................ 27
n Compensating flash output with the mode dial ........................................ 27
6
Taking pictures in manual flash mode............................................... 28
n ISO sensitivity and guide numbers ........................................................... 28
n About exposure values ............................................................................. 28
n Conditions of the subject change exposure values................................... 29
n Compensating flash output with the mode dial ......................................... 29
n Procedure .......................................................................................... ....... 29
Other functions 30
Using the flash head output switch.................................................... 30
About the modeling light.................................................................... 31
Appendix 32
Auto flash guidelines and calculation methods ................................. 32
Manual flash guidelines and calculation methods ............................. 33
Lenses with compatibility issues ....................................................... 36
Specifications .................................................................................... 40
Warranty Policy ................................................................................. 41
Page 8

AF160FC.book Page 7 Monday, November 17, 2008 10:43 AM
Introducción ........................................................................................ 1
PARA EL USO SEGURO DE SU FLASH........................................... 2
Para usar su flash de forma segura.................................................... 4
Resumen del manual de instrucciones............................................... 9
Lista del contenido del paquete........................................................ 10
Cómo usar el estuche....................................................................... 11
Nombres de los componentes (Controlador).................................... 12
Nombres de los componentes (Cabezal del flash)........................... 13
Preparación 14
Cómo colocar las pilas...................................................................... 14
n Tipos de pilas...... .................................................................................. ... 15
Comprobación de la carga y flash de prueba................................... 17
n Cómo comprobar la carga ....................................................................... 17
n Cómo comprobar la unidad de flash ....................................................... 17
n Apagado automático ................................................................................ 17
Cómo montar la unidad de flash macro............................................ 18
n Sujete el controlador a la cámara. ........................................................... 18
n Sujete el adaptador a la lente que está en la cámara.............................. 20
n Sujete el cabezal del flash al adaptador .................................................. 22
Cómo fotografiar 23
Funciones del selector de modo....................................................... 23
Cómo tomar fotos en modo de flash automático.............................. 24
n Modos de flash automático ...................................................................... 24
n Operaciones de flash automático para diferentes cámaras..................... 25
n Procedimiento .......................................................................................... 26
n Cámaras compatibles con flash automático TTL................... .................. 27
n Compensación de la potencia del flash con el selector de modo ............ 27
ÍNDICE
Cómo tomar fotos en modo de flash automático............................... 28
n Sensibilidad ISO y números indicativos................... ................................. 28
n Valores de exposición..................................... .......................................... 28
n Las condiciones del sujeto modifican el valor de exposición.................... 29
n Compensación de la potencia del flash con el selector de modo............. 29
n Procedimiento.......................................................................................... . 29
Otras funciones 30
Cómo usar el interruptor de potencia del cabezal del flash .............. 30
Luz de modelado............................................................................... 31
Apéndice 32
Indicaciones para flash automático y métodos de cálculo ................ 32
Indicaciones de flash manual y métodos de cálculo ......................... 34
Objetivos y compatibilidad................................................................. 38
Ficha técnica ..................................................................................... 40
Garantía ............................................................................................ 41
7
Page 9
AF160FC.book Page 8 Monday, November 17, 2008 10:43 AM
MEMO / NOTA
8
Page 10
AF160FC.book Page 9 Monday, November 17, 2008 10:43 AM
Overview of the operating manual
The operating manual includes the following chapters.
1 Getting ready –––––––––––––––––––––––––––––––––––
This chapter explains about getting ready to take pictures after you purchase
the flash unit.
Be sure to read this chapter before you start taking pictures or operating the
flash unit.
2 Taking pictures––––––––––––––––––––––––––––––––––
This chapter explains how to take pictures and how to set the functions for
taking pictures.
3 Other functions –––––––––––––––––––––––––––––––––
This chapter explains how to use the functions of the flash unit.
4 Appendix –––––––––––––––––––––––––––––––––––––––
The appendix includes materials, data tables, and specifications.
Resumen del manual de instrucciones
El manual de instrucciones incluye los siguientes capítulos.
1 Cómo empezar ––––––––––––––––––––––––––––––––––
Este capítulo explica cómo prepararse para tomar fotografías después
de adquirir la unidad de flash.
Asegúrese de leer este capítulo antes de comenzar a tomar fotografías
o usar la unidad de flash.
2 Cómo fotografiar ––––––––––––––––––––––––––––––––
Este capítulo explica cómo tomar fotografías y cómo configurar las funciones
de toma de fotografías.
3 Otras funciones –––––––––––––––––––––––––––––––––
Este capítulo explica cómo usar las funciones de la unidad de flash.
4 Apéndice–––––––––––––––––––––––––––––––––––––––
Este apéndice incluye materiales, tablas de datos y especificaciones.
1
2
3
4
9
Page 11

AF160FC.book Page 10 Monday, November 17, 2008 10:43 AM
1 23
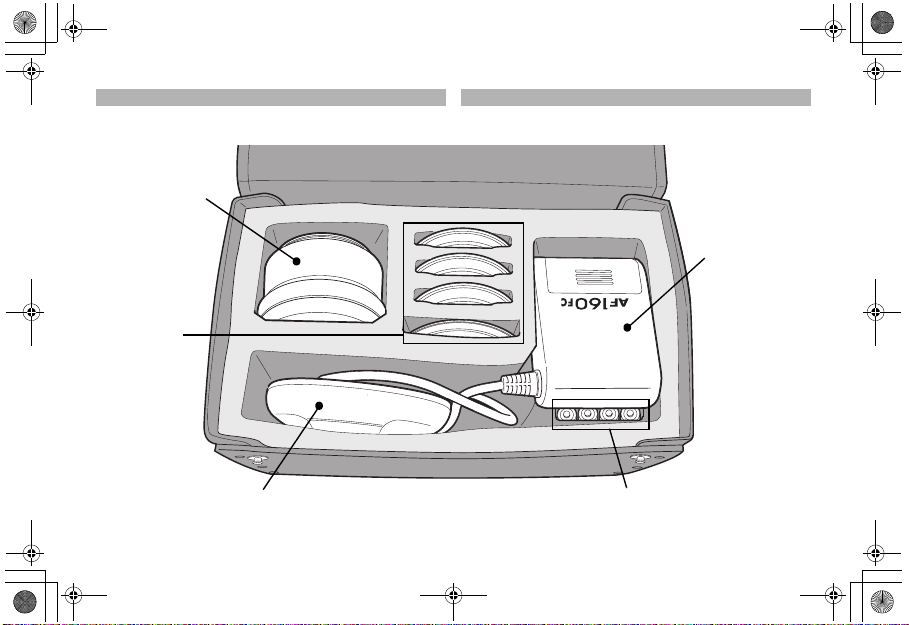
Packing list
Make sure that everything on the list is in the package. Contact
the retailer where you purchased the flash unit if anything is
missing or damaged.
1 Macro flash (controller and flash head)
2 Adapter ring (4 types: 49 mm, 52 mm, 58 mm, and 67 mm)
3 Macro adapter (for D-FA macro lens)
4 Operating manual (this booklet)
5 Case
6 Warranty
10
Lista del contenido del paquete
Asegúrese de que el paquete contiene todo lo indicado en la lista.
Si falta algo o está dañado, póngase en contacto con
el distribuidor al que adquirió la unidad de flash.
1 Flash macro (controlador y cabezal del flash)
2 Anillo adaptador (4 tipos: 49 mm, 52 mm, 58 mm y 67 mm)
3 Adaptador macro (para lentes macro D-FA)
4 Manual de instrucciones (el presente folleto)
5 Estuche
6 Garantía
Page 12
AF160FC.book Page 11 Monday, November 17, 2008 10:43 AM
Macro Adapter
Adaptador macro
Adapter Rings
Anillos adaptadores
Cómo usar el estucheUsing the case
Controller
Controlador
Flash Head
Cabezal del flash
AA Batteries (Optional)
Pilas AA (Opcional)
11
Page 13
AF160FC.book Page 12 Monday, November 17, 2008 10:43 AM
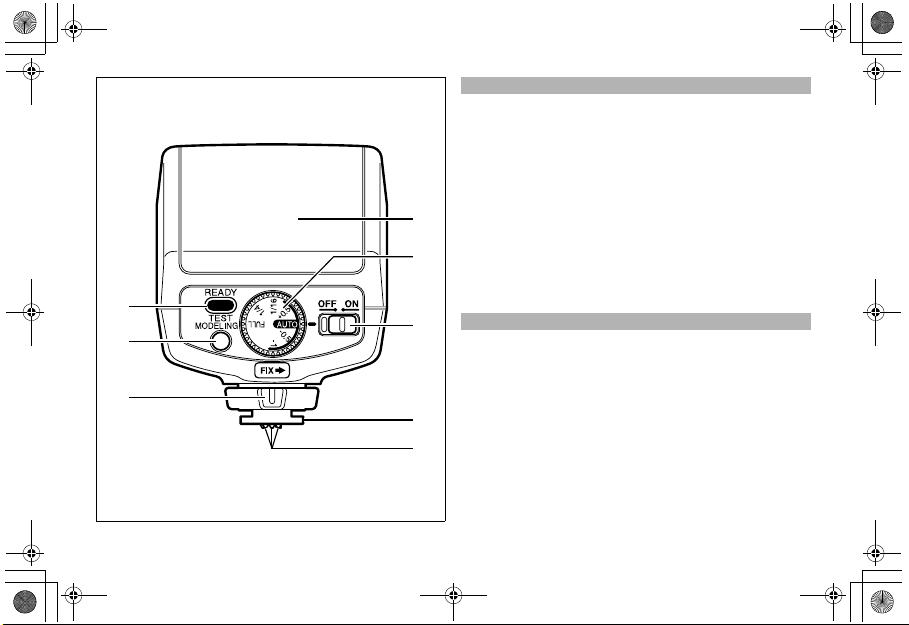
Names of parts (Controller)
1 Battery chamber cover
2 Mode dial: Selects the flash mode. (P.23)
3 Power switch (P.17)
4 Flash shoe
5 Flash signal contacts
6 READY lamp/TEST button (P.17)
Lights when charging is finished. Press to test the flash.
7 MODELING button (P.31)
1
Turns the modeling light on the flash head on and off.
8 Locking lever (P.19)
2
6
7
8
12
Nombres de los componentes (Controlador)
3
1 Tapa de la cámara de las pilas
2 Selector de modo: selecciona el modo flash. (P.23)
3 Interruptor de corriente (P.17)
4 Zapata del flash
5 Contactos de señal del flash
6 Luz de READY (Listo)/botón de TEST (Prueba) (P.17)
4
5
Se ilumina cuando finaliza la carga. Pulsar para probar
el flash.
7 Botón de MODELING (Modelado) (P.31)
Enciende y apaga la luz de modelado del cabezal del flash.
8 Palanca de bloqueo (P.19)
Page 14
AF160FC.book Page 13 Monday, November 17, 2008 10:43 AM
1
3
4
22
4
22
4
4
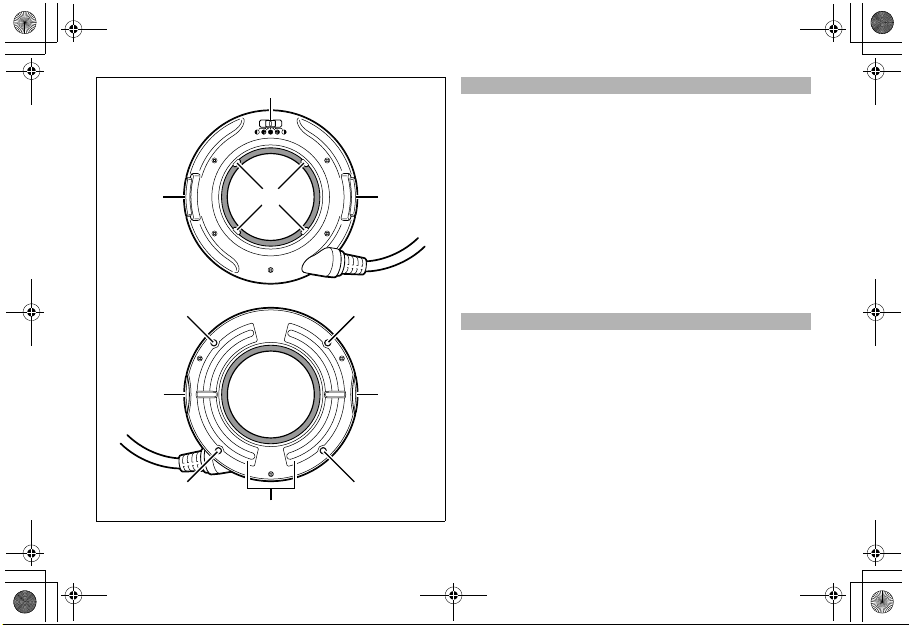
Names of parts (Flash head)
1 Flash head output switch (P.30)
2 Release button (P.22)
3 Mounting tabs (4 positions)
4 Modeling light (LED)
5 Flash lamps
Nombres de los componentes (Cabezal del flash)
1 Interruptor de potencia del cabezal del flash (P.30)
2 Botón de liberación (P.22)
3 Lengüetas de montaje (4 posiciones)
4 Luz de modelado (LED)
5 Lámparas del flash
5
13
Page 15

AF160FC.book Page 14 Monday, November 17, 2008 10:43 AM
1
12
1 Getting ready
Inserting the Batteries
1 Slide the battery chamber cover as shown in the figure and
remove it.
2 Insert the above four AA batteries sequentially from lower
one making sure the plus/minus markings +, - match the
diagram inside the battery chamber and close the battery
chamber cover.
l If you thread the ribbon in the battery chamber under the
batteries beforehand when inserting the batteries, you
can remove the batteries easily by pulling the ribbon
when removing the batteries.
14
1 Preparación
Cómo colocar las pilas
1 Deslice la tapa del compartimiento de las pilas tal como
se muestra en la figura y extráigala.
2 Inserte las cuatro pilas AA comenzando desde la inferior
y asegurándose de hacer coincidir las marcas de más/
menos +, - con el diagrama del interior del compartimento
de las pilas y cierre la tapa.
l Si se coloca la cinta de la cámara bajo las pilas antes
de insertarlas, puede retirarlas fácilmente tirando
de la cinta cuando se proceda a su extracción.
Page 16

AF160FC.book Page 15 Monday, November 17, 2008 10:43 AM
n About battery types
l Compatible batteries
Use four of the same type of battery.
• AA alkaline batteries (LR6)
• AA lithium batteries (FR6)
• AA Nickel-Metal Hydride (Ni-MH) batteries
l Non-compatible batteries
The following batteries cannot be used in the flash unit.
• AA manganese batteries
• AA nickel cadmium batteries (Ni-Cd)
l Recycling times and total number of flashes according to
type of battery
Battery type
AA alkaline batteries (LR6) Approx. 7 sec. Approx. 150
AA lithium batteries (FR6) Approx. 7 sec. Approx. 250
AA Nickel-Metal Hydride
(Ni-MH/2700mAh) batteries
* These figures are for new batteries that are the same type.
Recycling
Approx. 7 sec. Approx. 200
time
Tot al num be r
of flashes
Note
• If the READY lamp does not light up soon after turning on the
power switch, the batteries may be exhausted or inserted
incorrectly.
Verify the orientation of the batteries, or if the READY lamp
still does not light up, replace them with new batteries.
• If charging takes more than 20 seconds, the batteries are
exhausted. The batteries need to be replaced.
n Tipos de pilas
l Pilas compatibles
Usar cuatro pilas del mismo tipo.
• Pilas alcalinas AA (LR6)
• Pilas de litio AA (FR6)
• Pilas de níquel e hidruro metálico (Ni-MH)
l Pilas no compatibles
Las siguientes pilas no pueden usarse en la unidad de flash.
• Pilas de manganeso AA
• Pilas de níquel y cadmio AA (Ni-Cd)
l Los tiempos de reciclado y el número total de disparos
de flash dependen del tipo de pila
Tipo de pila
Pilas alcalinas AA (LR6) Aprox. 7 seg. Aprox. 150
Pilas de litio AA (FR6) Aprox. 7 seg. Aprox. 250
Pilas de níquel e hidruro metálico AA
(Ni-MH/2700 mAh)
* Estos datos son para pilas nuevas del mismo tipo.
Tiempo de
reciclado
Aprox. 7 seg. Aprox. 200
Número total
de flashes
Nota
• Si la luz de READY (listo) no se enciende poco después de
encender el interruptor de alimentación, es posible que la pila
esté gastada o incorrectamente introducida.
Verifique la orientación de las pilas y si la luz de READY (listo)
sigue sin encenderse sustituya las pilas por unas nuevas.
• Si el tiempo de carga excede los 20 segundos, las pilas
se han agotado. Es necesario sustituir las pilas.
1
15
Page 17

AF160FC.book Page 16 Monday, November 17, 2008 10:43 AM
• If you discharge the flash unit repeatedly when using lithium
batteries, the batteries will overheat and activate a safety
circuit that temporarily disables the flash unit. If this occurs,
wait until the batteries cool down before using the flash unit
1
again.
• Do not use different types of batteries at the same time. Also,
do not combine old batteries with new batteries even if they
are the same type.
• Remove the batteries if you are not going to use the flash unit
for a long time.
16
• Si descarga la unidad de flash repetidas veces mientras se
usan pilas de litio, las pilas se sobrecalentarán y se activará
un circuito de seguridad que desactivará temporalmente
la unidad de flash. Si esto ocurre, espere hasta que las pilas
se enfríen antes de volver a usar la unidad de flash.
• No use pilas de distinto tipo al mismo tiempo.
Tampoco combine pilas viejas con pilas nuevas, incluso
si son del mismo tipo.
• Extraiga las pilas si no va a usar la unidad de flash durante
un período prolongado.
Page 18

AF160FC.book Page 17 Monday, November 17, 2008 10:43 AM
A:B:
1
Charge check and test flash
Insert the batteries and then do a test flash.
n How to check the charge
Insert the batteries and then turn on the power.
The READY lamp will light up when the flash is charged.
n How to test the flash unit
When the READY lamp lights, press the READY lamp/TEST
button.
If the flash unit fires, there is no problem.
n About auto power off
The flash unit is equipped with an auto power off function.
The flash unit automatically turns off to save power if it is not
used for about three minutes.
(A:)
(B:)
Comprobación de la carga y flash de prueba
Introduzca las pilas y haga un flash de prueba.
n Cómo comprobar la carga
Introduzca las pilas y encienda el dispositivo.
La luz de READY (listo) se encenderá cuando el flash esté
cargado.
n Cómo comprobar la unidad de flash
Cuando se encienda la luz de READY (listo), pulse el botón
de TEST (Prueba)/ READY (listo).
Si la unidad de flash dispara no hay ningún problema.
n Apagado automático
La unidad de flash está equipada con una función de apagado
automático.
La unidad de flash se apaga automáticamente para ahorrar
energía cuando no se usa durante tres minutos.
(A:)
(B:)
17
Page 19

AF160FC.book Page 18 Monday, November 17, 2008 10:43 AM
1
1 2
How to mount the macro flash unit
Attach the lens you are going to use before mounting the macro
flash.
There are three steps for mounting the flash unit.
1 Attach the controller to the camera.
2 Attach the adapter to the lens that is on the camera.
3 Attach the flash head to the adapter.
This section explains them in order.
n Attach the controller to the camera.
1 Remove the flash shoe cover from the camera.
Keep the flash shoe cover safe and do not lose it.
18
Cómo montar la unidad de flash macro
Acople la lente que vaya a utilizar antes de montar el flash macro.
El proceso de montaje de la unidad de flash consta de tres pasos.
1 Sujete el controlador a la cámara.
2 Sujete el adaptador a la lente que está en la cámara.
3 Sujete el cabezal del flash al adaptador.
Esta sección los explica en orden.
n Sujete el controlador a la cámara.
1 Retire la tapa de la zapata del flash de la cámara.
Guarde la tapa de la zapata del flash y no la pierda.
Page 20

AF160FC.book Page 19 Monday, November 17, 2008 10:43 AM
43
1
2 Turn the locking lever of the controller away from [FIX Ý].
Loosen it so the flash shoe mounts easily.
3 Slide the flash shoe of the controller into the camera's hot
flash shoe from the back of the camera.
Insert it all the way until it stops.
4 Turn the locking lever of the controller toward [FIX Ý].
* Do this procedure in reverse to remove the flash unit. The
flash unit uses a lock pin mechanism. Because of this,
removing the flash unit without loosening the lock lever may
damage the flash shoe of cameras that have the lock-pin
mechanism. Be sure to loosen the lock lever before removing
the flash unit.
2 Aparte la palanca de bloqueo del controlador de [FIX Ý].
Aflójela para poder montar la zapata del flash con facilidad.
3 Deslice la zapata del controlador dentro de la zapata
de la cámara desde la parte trasera de la cámara.
Introdúzcala hasta que llegue al tope.
4
Desplace la palanca de bloqueo del controlador hacia [FIX Ý].
* Para retirar la unidad de flash realice este proceso en orden
inverso. La unidad de flash usa un mecanismo con clavija
de cierre. Debido a esto, la retirada de la unidad de flash sin
aflojar la palanca de bloqueo puede dañar la zapata del flash
de cámaras que tengan un mecanismo con clavija de cierre.
Asegúrese de aflojar la palanca de bloqueo antes de retirar
la unidad de flash.
19
Page 21

AF160FC.book Page 20 Monday, November 17, 2008 10:43 AM
1
B:A:
n Attach the adapter to the lens that is on the camera.
l Types of adapters
The adapters that can be used vary depending on the type of
lens. There are two types of adapters provided.
• A: Adapter ring: Attaches to the filter mounting thread on the
front of lenses (screw type)
Adapter rings are provided in four diameters: 49 mm, 52 mm,
58 mm and 67 mm.
• B: Macro adapter: For the D-FA macro lens, mounts on the
bayonet for the hood.
20
n Sujete el adaptador a la lente que está en la cámara.
l Tipos de adaptadores
Los adaptadores que se pueden usar varían dependiendo del
tipo de objetivo. Se proporcionan dos tipos de adaptadores.
• A: Anillo adaptador: se sujeta a la rosca de montaje del filtro
en la parte frontal del objetivo (tipo rosca)
Se proporcionan anillos adaptadores de cuatro diámetros:
49 mm, 52 mm, 58 mm y 67 mm.
• B: Adaptador macro: para el objetivo macro D-FA, se monta
en la bayoneta del parasol.
Page 22

AF160FC.book Page 21 Monday, November 17, 2008 10:43 AM
B:A:
1
This section explains how to mount these types of adapters.
l Mounting procedure
A: Adapter ring
Screw the adapter ring that is the same size as the lens onto
the front thread of the lens.
B: Macro adapter
1 Line up the macro adapter with the bayonet (hood mount) on
the lens front, and push the adapter straight on.
2 To mount the macro adapter, turn it clockwise (while facing
it) until you hear it click.
Esta sección explica cómo montar estos tipos de adaptadores.
l Procedimiento de montaje
A: Anillo adaptador
Atornille el anillo adaptador del mismo tamaño que la lente
a la rosca frontal del objetivo.
B: Adaptador macro
1 Alinee el adaptador macro con la bayoneta (montura del
parasol) en el frontal del objetivo presione el adaptador.
2 Para montar el adaptador macro gírelo en el sentido de las
agujas del reloj (mirándolo de frente) hasta que haga clic.
21
Page 23

AF160FC.book Page 22 Monday, November 17, 2008 10:43 AM
1
B:A:
n Attach the flash head to the adapter
Press the release buttons on the flash head to insert the four
mounting tabs (circled in the above diagram) on the inside of the
flash head correctly into the groove on the adapter ring (A) or
macro adapter (B).
After the flash head is attached, pull it lightly to make sure the
tabs are inserted into the groove correctly.
The mounting tabs go into this groove.
22
n Sujete el cabezal del flash al adaptador
Pulse el botón de liberación del cabezal del flash para introducir
las cuatro lengüetas de montaje en el interior del cabezal del flash
(marcadas con un círculo en el diagrama superior) de forma
correcta en la ranura del anillo adaptador (A) o del adaptador
macro (B).
Después de sujetar el cabezal del flash, tire suavemente para
asegurarse de que las lengüetas están correctamente insertadas
en la ranura.
Las lengüetas de montaje van en esta ranura.
Page 24

AF160FC.book Page 23 Monday, November 17, 2008 10:43 AM
2 Taking pictures
The flash unit has two modes for adjusting the amount of light
produced by the flash: An automatic mode and a manual mode.
Mode dial functions
Use the mode dial to set the output of the flash. The mode dial
has seven positions.
For the auto flash mode there are "-0.5", "AUTO", "+0.5", and "1" (green area). For the manual mode there is "FULL", "1/4",
and "1/16".
Setting Description Mode and camera settings
+0.5 Flash output is 0.5 EV
higher than standard
AUTO.
AUTO Flash output is
automatically adjusted.
-0.5 Flash output is 0.5 EV
lower than standard
AUTO.
-1 Flash output is 1 EV
lower than standard
AUTO.
FULL Full flash output Manual flash mode
1/4 1/4 of full flash output
1/16 1/16 of full flash output
Auto flash mode
The camera must be set to a
mode other than manual mode.
*If the camera has a flash
output compensation function,
and flash output compensation
is set both on the camera and
the flash unit, the flash output
compensation amounts will be
combined.
Refer to the camera operation
manual for details.
The camera must be set to
manual mode.
2 Cómo fotografiar
La unidad de flash tiene dos modos para ajustar la cantidad
de luz producida por el flash: un modo automático y un modo
manual.
Funciones del selector de modo
Use el selector de modo para ajustar la potencia del flash.
El selector de modo tiene siete posiciones.
Para el modo de flash automático son “-0.5”, “AUTO”, “+0.5”, y “-1”
(zona verde). Para el modo manual son “FULL”, “1/4”, y “1/16”.
Preferencias Descripción
+0.5 La potencia del flash
AUTO La potencia del flash
-0.5 La potencia del flash
-1 La potencia del flash
FULL Potencia del flash
1/4 1/4 de la potencia
1/16 1/16 de la potencia
es 0.5 EV mayor que
en AUTO estándar.
se ajusta
automáticamente.
es 0.5 EV inferior que
en AUTO estándar.
es 1 EV inferior que
en AUTO estándar.
máxima
de flash máxima
de flash máxima
Ajustes de la cámara
ydemodo
Modo de flash automático
La cámara debe ajustarse a un
modo distinto del modo manual.
*Si la cámara cuenta también
con la función de compensación
de la salida de flash, y se ha
ajustado ésta tanto en la cámara
como en el flash,
las cantidades
de la salida del flash.
Consulte el manual
de instrucciones de la cámara
para obtener detalles.
Modo de flash manual
La cámara debe estar
ajustada en modo manual.
se combinarán
de compensación
2
23
Page 25

AF160FC.book Page 24 Monday, November 17, 2008 10:43 AM
Taking pictures in auto flash mode
n Auto flash modes
The AF160FC has two auto flash modes. The flash unit
communicates with the camera and automatically selects a
mode.
P-TTL auto
2
flash
TTL auto
flash
P-TTL auto and TTL auto switch automatically depending on
the camera and lens settings. The table on the following page
shows the modes used by different types of cameras.
24
A pre-flash is discharged before a picture is taken so
that the metering sensor in the camera can assess
the subject and adjust the output of the flash. This
makes it possible to adjust the exposure more
accurately than with TTL auto.
The metering sensor in the camera measures the
amount of light coming through the lens and adjusts
the flash output.
Cómo tomar fotos en modo de flash automático
n Modos de flash automático
La AF160FC tiene dos modos de flash automático. La unidad
de flash se comunica con la cámara y selecciona automáticamente
un modo.
Flash
automático
P-TTL
Flash
automático
TTL
P-TTL automático y TTL automático conmutan automáticamente
dependiendo de la configuración de la cámara y del objetivo.
La tabla de la página siguiente muestra los modos usados
por diferentes tipos de cámaras.
Se dispara un pre-flash antes de tomar una foto para
que el sensor de medición de la cámara pueda evaluar
el objeto y ajustar la potencia del flash. Esto hace posible
el ajuste de la exposición de una forma más precisa
que con TTL automático.
El sensor de medición de la cámara mide la cantidad
de luz que entra por el objetivo y ajusta la potencia
del flash.
Page 26

AF160FC.book Page 25 Monday, November 17, 2008 10:43 AM
n Auto flash operations for various cameras
The following table shows the compatibility for when a camera
is set to auto flash mode ("AUTO", "+0.5", "-0.5", or "-1").
Camera Model
For digital SLR
cameras not
mentioned
above O X
Film SLR
cameras
* With the exception of models MZ-S, MZ-L/MZ-6/ZX-L, and ,
which do support P-TTL.
O : Compatible X : Not Compatible
P-TTL
auto
,
,
OO
X* O
Compatibility
TTL
auto
For lenses with an aperture
ring, P-TTL auto is used if the
lens is set to A, and TTL auto
is used for all other settings.
P-TTL auto is used for lenses
(DA, DA L, and FAJ) that do
not have an aperture ring.
For lenses with an aperture
ring, P-TTL auto is used if the
lens is set to A, and full flash
is used for all other settings.
P-TTL auto is used for lenses
(DA, DA L, and FAJ) that do
not have an aperture ring.
The SF series, those made
prior to the SF series, and
the original 645 format
cameras do not support TTL
auto.
Notes
n
Operaciones de flash automático para diferentes cámaras
La siguiente tabla muestra la compatibilidad para una cámara
configurada en el modo de flash automático (“AUTO”, “+0.5”, “-0.5”,
o “-1”).
Modelo
de cámara
Para cámaras
digitales
réflex no
mencionadas
anteriormente
Cámaras
réflex de
película X* O
* Con excepción de los modelos MZ-S, MZ-L/MZ-6/ZX-L, y ,
que son compatibles con P-TTL.
O : Compatible X : No compatible
P-TTL
auto-
mático
,
,
OO
OX
Compatibilidad
TTL
auto-
mático
Para lentes con un anillo de
abertura se usa P-TTL automático
si el objetivo está configurado en A
y TTL automático para el resto de
configuraciones.
P-TTL automático se usa para
objetivos (DA, DA L y FAJ) que
no tienen un anillo de abertura.
Para objetivos con un anillo de
abertura, se usa P-TTL automático
si el objetivo está configurado en A
y flash completo para el resto
de configuraciones.
P-TTL automático se usa para
objetivos (DA, DA L y FAJ) que
no tienen un anillo de abertura.
Las series SF, las fabricadas
anteriormente a las series SF y
las cámaras originales de formato
645 no son compatibles con TTL
automático.
Notas
2
25
Page 27

AF160FC.book Page 26 Monday, November 17, 2008 10:43 AM
n Procedure
Set the camera to a mode other than manual.
1 Turn the flash on.
2 Set the flash mode dial to "AUTO".
3 If the lens has an aperture ring, set it to A.
* For DA, DA L and FAJ lenses, which do not have aperture
rings, skip to step 4.
2
4 Confirm that the subject is within the effective flash range
and the READY lamp is lit, and then take a picture.
* The effective flash range varies depending on shooting
conditions. Refer to the distance range guidelines for auto
flash photography (P.32) in the appendix and take test
pictures to decide the exposure.
* Use the flash head output switch on the flash head output to
change the ratio of the flash output as necessary. (P.31)
* Turn on the modeling light to see where shadows will fall
before you take a picture. You can adjust where the shadows
fall by rotating the flash head after you have changed the
flash output ratio. (P.30)
Note
• The correct flash output is obtained in P-TTL auto mode only
when the flash unit is used with auto-focus lenses.
• Set the aperture of the lens to A when taking pictures in auto
flash mode.
If your lens has an aperture ring, set it to A. If it is not set to A,
the flash unit cannot function in P-TTL auto mode.
26
n Procedimiento
Ajuste la cámara a un modo distinto del manual.
1 Encienda el flash.
2 Ajuste el selector de modo en “AUTO”.
3 Si el objetivo tiene un anillo de abertura, ajústelo en A.
*
Para objetivos DA, DA L y FAJ, que no tienen anillo de abertura,
avance hasta el paso 4.
4 Confirme que el objeto está dentro del alcance efectivo
del flash y que la luz de READY (listo) está encendida y
entonces podrá tomar la foto.
* El alcance efectivo del flash depende de las condiciones
de disparo. Consulte las indicaciones sobre intervalos
de distancia para la fotografía con flash automático (P.32)
del apéndice y tome fotos de prueba para decidir la exposición.
* Use el in terruptor de potencia del cabezal del flash en la salida
del cabezal del flash para cambiar la relación de potencia
del flash según sea necesario. (P.31)
* Apague la luz de modelado para ver donde habrá sombras
antes de tomar una foto. Puede ajustar la posición de las
sombras rotando el cabezal del flash después de cambiar
la relación de potencia del flash. (P.30)
Nota
• Se obtiene la intensidad adecuada del flash en modo P-TTL
automático sólo cuando se utiliza el flash con objetivos
autoenfoque.
• Ajuste la abertura del objetivo a A cuando tome fotos en modo
de flash automático.
Si el objetivo tiene un anillo de abertura, ajústelo a A. Si no
está ajustado a A, la unidad de flash no puede funcionar en
el modo P-TTL automático.
Page 28

AF160FC.book Page 27 Monday, November 17, 2008 10:43 AM
For cameras that are compatible with both P-TTL auto and
TTL auto ( , and ), pictures can be
taken using TTL auto when the aperture on the lens is not set
to A. However, if the aperture is set to anything other than A
with cameras that are only compatible with P-TTL, full flash
output is used.
n TTL auto flash compatible cameras
In addition to using PENTAX digital SLR cameras, you can use
a film SLR camera to take pictures using the auto flash if it
supports TTL auto. (However, the SF series, those 35mm
cameras made prior to the SF series, and the original 645
format cameras do not support TTL auto.)
n Compensating flash output with the mode dial
Use the mode dial to set the output of the flash. The mode dial
has seven positions.
For the auto flash mode there are "-0.5", "AUTO", "+0.5", and
"-1" (green area).
* The camera must be set to something other than manual mode.
* If the camera uses a flash output compensation function, and
flash output compensation is set both on the camera and the
flash unit, the flash output compensation amounts will be
combined. Refer to the camera operation manual for details.
* Adjustment is only possible with P-TTL (except MZ-S, MZ-L/MZ-6/
ZX-L, or ). Adjustments are not reflected when taking pictures
with TTL.
Setting
+0.5 Flash output is 0.5 EV higher than standard AUTO.
AUTO Flash output is automatically adjusted.
-0.5 Flash output is 0.5 EV lower than standard AUTO.
-1 Flash output is 1 EV lower than standard AUTO.
Description
En las cámaras compatibles tanto con P-TTL automático como
TTL automático ( , y ), se
tomar fotos usando TTL automático cuando la abertura del objetivo
no está ajustado a A. Sin embargo, si la abertura está ajustada
a cualquier otro ajuste distinto de A en cámaras que solo son
compatibles con P-TTL, se usa la potencia de flash máxima.
n Cámaras compatibles con flash automático TTL
Además de usar cámaras digitales réflex PENTAX, puede usar una
cámara réflex para película para tomar fotos usando el flash automático
si es compatible con TTL automático. (Sin embargo, las series SF,
las cámaras de 35 mm anteriores a las series SF y las cámaras de
formato 645 originales no son compatibles con TTL automático).
n Compensación de la potencia del flash con el selector
de modo
Use el selector de modo para ajustar la potencia del flash. El selector
de modo tiene siete posiciones. Para el modo de flash automático
existen las opciones “-0.5”, “AUTO”, “+0.5”, y “-1” (zona verde).
* La cámara debe estar ajustada a cualquier modo distinto del modo
manual.
*
Si la cámara usa una función de compensación de la potencia del flash
la compensación de potencia del flash está seleccionada tanto en la
cámara como en la unidad de flash, las magnitudes de compensación
de la potencia del flash se combinan.
adicional en el manual de instrucciones
* El ajuste solo es posible con P-TTL (excepto MZ-S, MZ-L/MZ-6/ZX-L,
o ). Los ajustes no se aplican al tomar fotos con TTL.
Preferencias
+0.5
AUTO La potencia del flash se ajusta automáticamente.
-0.5
-1
La potencia del flash es 0.5 EV mayor que en AUTO estándar.
La potencia del flash es 0.5 EV inferior que en AUTO estándar.
La potencia del flash es 1 EV inferior que en AUTO estándar.
Puede encontrar información
de la cámara.
Descripción
pueden
2
y
27
Page 29

AF160FC.book Page 28 Monday, November 17, 2008 10:43 AM
Taking pictures in manual flash mode
Effective when you want a specific flash output regardless of the
subject conditions. Determine the flash output from the
exposure and test pictures.
You need to consider the exposure when taking pictures in
manual flash mode. Take test pictures of the actual subject to
decide on an exposure, because conditions of the shot have a
2
large effect on the exposure.
Other than deciding an exposure, taking pictures is basically the
same procedure as for auto flash mode.
n ISO sensitivity and guide numbers
The guide numbers indicate the strength of the maximum flash
output. It is determined by the ISO sensitivity value and the flash
mode of the controller.
Refer to the manual flash guidelines and the calculation
methods in the appendix.
n About exposure values
As the magnification goes up, or as the subject gets closer, the
brightness of the image on the imaging sensor element goes
down.
The exposure value multiplies the basic exposure value to
compensate for the lack of light.
In auto flash mode, the flash output is adjusted automatically by
the pre-flash and main flash. However, in manual flash mode,
the exposure value must be considered and adjusted manually.
Take test pictures of the actual subject to decide on an
exposure, because conditions of the shot and subject have a
large effect on the exposure.
28
Cómo tomar fotos en modo de flash automático
Es eficaz cuando se desea una potencia de flash específica sin
importar las condiciones del objeto. Determine la potencia del
flash en función de la exposición y de las fotos de prueba.
Es necesario considerar la exposición al tomar fotos en modo
de flash automático. Tome fotos de prueba del objeto para
seleccionar una exposición, dado que las condiciones del
disparo pueden tener un gran efecto sobre la exposición.
Aparte de seleccionar una exposición, la toma de fotos sigue
básicamente el mismo procedimiento que con el modo de flash
automático.
n Sensibilidad ISO y números indicativos
Los números indicativos indican la potencia de la salida máxima
del flash. Se determina mediante el valor de sensibilidad ISO
y el modo de flash del controlador.
Consulte las indicaciones para flash manual y los métodos
de cálculo en el apéndice.
n Valores de exposición
Al incrementar la ampliación o al acercase el objeto, disminuye
el brillo de la imagen en el sensor de imágenes.
El valor de exposición multiplica el valor de exposición básica
para compensar la falta de luz.
En modo de flash automático, la potencia del flash es ajustada
automáticamente por el pre-flash y el flash principal. Sin
embargo, en modo de flash manual, el valor de exposición debe
tenerse en cuenta y ajustarse manualmente. Tome fotos de
prueba del objeto para seleccionar una exposición, dado que
las condiciones del disparo y del sujeto tienen un gran efecto
sobre la exposición.
Page 30

AF160FC.book Page 29 Monday, November 17, 2008 10:43 AM
n Conditions of the subject change exposure values
The exposure requirements change according to the condition
of the lighting and the subject. Take test shots to determine the
exposure. Taking test shots is essential to proper use of manual
flash mode.
n Compensating flash output with the mode dial
Use the mode dial to set the output of the flash. The mode dial
has seven positions, of which three, "FULL", "1/4", and "1/16",
are for manual flash mode.
Setting Description
FULL Full flash output
1/4 1/4 of full flash output
1/16 1/16 of full flash output
n Procedure
The camera needs to be in manual mode.
1 Turn the flash on.
2 Set the mode dial to "FULL".
3 Measure the subject distance (flash distance).
4 Use the subject distance guidelines (P.33) to determine a
combination of ISO sensitivity, mode dial setting, and
aperture.
5 Confirm that the READY lamp is lit, and take a picture.
n Las condiciones del sujeto modifican el valor
de exposición
Los requisitos de exposición cambian en función de las
condiciones de iluminación y del sujeto. Realice disparos de
prueba para determinar la exposición. Es fundamental realizar
disparos de prueba para un uso adecuado del modo de flash
manual.
n Compensación de la potencia del flash con el selector
de modo
Use el selector de modo para ajustar la potencia del flash.
El selector de modo tiene siete posiciones, de las que tres,
“FULL”, “1/4” y “1/16”, son para el modo de flash manual.
Preferencias Descripción
FULL Potencia del flash máxima
1/4 1/4 de la potencia de flash máxima
1/16 1/16 de la potencia de flash máxima
n Procedimiento
La cámara necesita estar en modo manual.
1 Encienda el flash.
2 Ajuste el selector de modo a “FULL”.
3 Mide la distancia al objeto (distancia de flash).
4 Use las indicaciones sobre distancia al objeto (P.34) para
determinar una combinación de sensibilidad ISO, ajuste
de selector de modo y abertura.
5 Confirme que la luz de READY (listo) está encendida y tome
la foto.
2
29
Page 31

AF160FC.book Page 30 Monday, November 17, 2008 10:43 AM
3
3 Other functions
Using the flash head output switch
You can change the ratio of the amount of flash output from the
left or right flash lamp by using the flash head output switch on
the flash head.
It is also possible to rotate the flash unit while it is on the lens to
adjust the flash output vertically.
The position of the switch changes the percentage of flash
output on the left and right. The total flash output does not
change.
The switch has five different settings.
30
3 Otras funciones
Cómo usar el interruptor de potencia del cabezal
del flash
Puede cambiar la relación de la magnitud de la potencia del flash
de la lámpara de flash izquierda o derecha mediante el interruptor
de potencia situado en el cabezal del flash.
También es posible girar la unidad de flash mientras está en
el objetivo para ajustar la salida del flash verticalmente.
La posición del interruptor modifica el porcentaje de potencia
de salida del flash a la izquierda o derecha. La potencia total
del flash no cambia.
El interruptor tiene cinco ajustes diferentes.
Page 32

AF160FC.book Page 31 Monday, November 17, 2008 10:43 AM
Switch position
Left end 1:0 (only left flashes)
Left center 3:1
Center 1:1
Right center 1:3
Right end
Ratio of left and right
flash (left:right)
0:1 (only right
flashes)
Notes
Right does not do pre-
flash or main flash
Uniform flash
(eliminate shadows)
Left does not do pre-
flash or main flash
About the modeling light
The modeling light can be used to grasp roughly where
shadows may appear when using the flash or to check the
subjects by sight in the dark.
Press the MODELING button on the controller to turn the
modeling light on the flash head on and off.
The brightness on the right or left depends on the flash head
output switch setting.
* Modeling light turns off automatically when the shutter button is
pressed.
Note
In manual flash mode, the flash head output switch's "Left
center" and "Right center" settings do not change the ratio of the
amount of flash output from the left or right. (It operates the
same as when set to "Center".)
Posición
del interruptor
Extremo
izquierdo
Centrar
izquierda
Centrar 1:1
Centrar
derecha
Extremo
derecha
Relación entre flash
izquierdo y derecho
(izquierdo:derecho)
1:0 (solo el flash
izquierdo se
enciende)
3:1
1:3
0:1 (solo se ilumina
el flash derecho)
Notas
El derecho no se
enciende para pre-
flash ni para flash
principal
Flash uniforme
(elimina las sombras)
El izquierdo no se
enciende para pre-flash
ni para flash principal
Luz de modelado
La luz de modelado puede usarse para saber de forma general
donde aparecerán las sombras al usar el flash o para verificar
el objeto a la vista en la oscuridad.
Pulse el botón de MODELING(modelado) del controlador para
encender y apagar la luz de modelado en el cabezal del flash.
El brillo a la izquierda o derecha depende de la configuración
del interruptor de potencia del cabezal del flash.
* La luz de modelado se apaga automáticamente al presionar
el botón del obturador.
Nota
En modo de flash manual, los ajustes “Centrar izquierda” y “Centrar
derecha” del interruptor de potencia del cabezal del flash no
cambian la relación de la magnitud de salida del flash en
la izquierda o la derecha. (Funciona del mismo modo que con
el ajuste “Centrar”).
3
31
Page 33

AF160FC.book Page 32 Monday, November 17, 2008 10:43 AM
4 Appendix
Auto flash guidelines and calculation methods
Distance range guidelines for auto flash photography (Unit: m)
ISO F2.8 F4 F5.6 F8 F11 F16 F22 F32 F45
100 0.50 - 5.7 0.35 - 4.0 0.25 - 2.8 0.18 - 2.0 0.13 - 1.4 0.10 - 1.0 0.10 - 0.71 0.10 - 0.50 0.10 - 0.35
200 0.71 - 8.0 0.50 - 5.7 0.35 - 4.0 0.25 - 2.8 0.18 - 2.0 0.13 - 1.4 0.10 - 1.0 0.10 - 0.71 0.10 - 0.50
400 1.0 - 8.0 0.71 - 8.0 0.50 - 5.7 0.35 - 4.0 0.25 - 2.8 0.18 - 2.0 0.13 - 1.4 0.10 - 1.0 0.10 - 0.71
800 1.4 - 8.0 1.0 - 8.0 0.71 - 8.0 0.50 - 5.7 0.35 - 4.0 0.25 - 2.8 0.18 - 2.0 0.13 - 1.4 0.10 - 1.0
1600 2.0 - 8.0 1.4 - 8.0 1.0 - 8.0 0.71 - 8.0 0.50 - 5.7 0.35 - 4.0 0.25 - 2.8 0.18 - 2.0 0.13 - 1.4
3200 2.8 - 8.0 2.0 - 8.0 1.4 - 8.0 1.0 - 8.0 0.71 - 8.0 0.50 - 5.7 0.35 - 4.0 0.25 - 2.8 0.18 - 2.0
6400 4.0 - 8.0 2.8 - 8.0 2.0 - 8.0 1.4 - 8.0 1.0 - 8.0 0.71 - 8.0 0.50 - 5.7 0.35 - 4.0 0.25 - 2.8
How to read the distance range guidelines
You can determine the distance from the ISO sensitivity and aperture settings.
Example: If the ISO sensitivity = 200, aperture = F11, then the distance range is about 0.18 to 2.0 m.
* The ranges of distance given in the table are guidelines. The range of distances for taking photos varies depending on the subject and shooting conditions.
4
We recommend taking test shots to check the shot.
4 Apéndice
Indicaciones para flash automático y métodos de cálculo
Indicaciones sobre intervalos de distancia para la fotografía con flash automático (unidad: m)
ISO F2.8 F4 F5.6 F8 F11 F16 F22 F32 F45
100 0.50 - 5.7 0.35 - 4.0 0.25 - 2.8 0.18 - 2.0 0.13 - 1.4 0.10 - 1.0 0.10 - 0.71 0.10 - 0.50 0.10 - 0.35
200 0.71 - 8.0 0.50 - 5.7 0.35 - 4.0 0.25 - 2.8 0.18 - 2.0 0.13 - 1.4 0.10 - 1.0 0.10 - 0.71 0.10 - 0.50
400 1.0 - 8.0 0.71 - 8.0 0.50 - 5.7 0.35 - 4.0 0.25 - 2.8 0.18 - 2.0 0.13 - 1.4 0.10 - 1.0 0.10 - 0.71
800 1.4 - 8.0 1.0 - 8.0 0.71 - 8.0 0.50 - 5.7 0.35 - 4.0 0.25 - 2.8 0.18 - 2.0 0.13 - 1.4 0.10 - 1.0
1600 2.0 - 8.0 1.4 - 8.0 1.0 - 8.0 0.71 - 8.0 0.50 - 5.7 0.35 - 4.0 0.25 - 2.8 0.18 - 2.0 0.13 - 1.4
3200 2.8 - 8.0 2.0 - 8.0 1.4 - 8.0 1.0 - 8.0 0.71 - 8.0 0.50 - 5.7 0.35 - 4.0 0.25 - 2.8 0.18 - 2.0
6400 4.0 - 8.0 2.8 - 8.0 2.0 - 8.0 1.4 - 8.0 1.0 - 8.0 0.71 - 8.0 0.50 - 5.7 0.35 - 4.0 0.25 - 2.8
Cómo leer las indicaciones de intervalo de distancia
Puede determinar la distancia a partir de la sensibilidad ISO y los ajustes de abertura.
Ejemplo: si la sensibilidad ISO = 200 y la abertura = F11, el intervalo de distancia es aprox. 0,18 a 2,0 m.
* Los intervalos de distancia de la tabla son indicativos. Los intervalos de distancias para tomar fotos varían en función del objeto y de las condiciones de disparo.
Se recomienda realizar disparos de prueba para comprobar el disparo.
32
Page 34

AF160FC.book Page 33 Monday, November 17, 2008 10:43 AM
Manual flash guidelines and calculation methods
Subject distance guideline
Unit: m
ISO mode GN F2.8 F4 F5.6 F8 F11 F16 F22 F32 F45
FULL 16.0 5.7 4.0 2 .8 2.0 1.4 1.0 0. 71 0.50 0.35
100
1/4 8.0 2.8 2.0 1.4 1.0 0.71 0.50 0.35 0.25 0.18
1/16 4.0 1.4 1.0 0.71 0.50 0.35 0.25 0.18 0.13 0.09
FULL 22.6 8.0 5.7 4.0 2.8 2.0 1.4 1.0 0.71 0.50
200
1/4 11.3 4.0 2.8 2.0 1.4 1.0 0.71 0.50 0.35 0.25
1/16 5.7 2.0 1.4 1.0 0.71 0.50 0.35 0.25 0.18 0.13
FULL 32.0 11 8.0 5.7 4.0 2.8 2.0 1.4 1.0 0.71
400
1/4 16.0 5.7 4.0 2.8 2.0 1.4 1.0 0.71 0.50 0.35
1/16 8.0 2.8 2.0 1.4 1.0 0.71 0.50 0.35 0.25 0.18
FULL 45.3 16 11 8.0 5.7 4.0 2.8 2.0 1.4 1.0
800
1/4 22.6 8.0 5.7 4.0 2.8 2.0 1.4 1.0 0.71 0.50
1/16 11.3 4.0 2.8 2.0 1.4 1.0 0.71 0.50 0.35 0.25
FULL 64.0 23 16 11 8.0 5.7 4.0 2.8 2.0 1.4
1600
1/4 32.0 11 8.0 5.7 4.0 2.8 2.0 1.4 1.0 0.71
1/16 16.0 5.7 4.0 2.8 2.0 1.4 1.0 0.71 0.50 0.35
FULL 90.5 32 23 16 11 8.0 5.7 4.0 2.8 2.0
3200
1/4 45.3 16 11 8.0 5.7 4.0 2.8 2.0 1.4 1.0
1/16 22.6 8.0 5.7 4.0 2.8 2.0 1.4 1.0 0.71 0.50
FULL 128.0 45 32 23 16 11 8.0 5.7 4.0 2.8
6400
1/4 64.0 23 16 11 8.0 5.7 4.0 2.8 2.0 1.4
1/16 32.0 11 8.0 5.7 4.0 2.8 2.0 1.4 1.0 0.71
How to use the flash guidelines
You can determine the distance from the ISO sensitivity, the flash mode dial setting (FULL, 1/4, 1/16), and the aperture settings.
Example: If the ISO sensitivity = 200, the mode dial setting = 1/4, and the aperture = F11, then the distance is about 1.0 m. (Exposure = 1x)
You can also determine a combination of aperture, mode dial setting, and ISO sensitivity by figuring backwards from the distance.
* The values in the guideline are for 1x exposure. The exposure for taking photos varies depending on the subject and shooting conditions. We recommend taking test
shots to check the exposure for the shot. (Try opening the aperture and increasing the exposure.)
4
33
Page 35

AF160FC.book Page 34 Monday, November 17, 2008 10:43 AM
Indicaciones de flash manual y métodos de cálculo
Indicaciones de distancia al objeto
Unidades: m
ISO modo GN F2.8 F4 F5.6 F8 F11 F16 F22 F32 F45
FULL 16.0 5.7 4.0 2.8 2.0 1.4 1.0 0.71 0.50 0.35
100
1/4 8.0 2.8 2.0 1.4 1.0 0.71 0.50 0.35 0.25 0.18
1/16 4.0 1.4 1.0 0.71 0.50 0.35 0.25 0.18 0.13 0.09
FULL 22.6 8.0 5.7 4.0 2.8 2.0 1.4 1.0 0.71 0.50
200
1/4 11.3 4.0 2.8 2.0 1.4 1.0 0.71 0.50 0.35 0.25
1/16 5.7 2.0 1.4 1.0 0.71 0.50 0.35 0.25 0.18 0.13
FULL 32.0 11 8.0 5.7 4.0 2.8 2.0 1.4 1.0 0.71
400
1/4 16.0 5.7 4.0 2.8 2.0 1.4 1.0 0.71 0.50 0.35
1/16 8.0 2.8 2.0 1.4 1.0 0.71 0.50 0.35 0.25 0.18
4
FULL 45.3 16 11 8.0 5.7 4.0 2.8 2.0 1.4 1.0
800
1/4 22.6 8.0 5.7 4.0 2.8 2.0 1.4 1.0 0.71 0.50
1/16 11.3 4.0 2.8 2.0 1.4 1.0 0.71 0.50 0.35 0.25
FULL 64.0 23 16 11 8.0 5.7 4.0 2.8 2.0 1.4
1600
1/4 32.0 11 8.0 5.7 4.0 2.8 2.0 1.4 1.0 0.71
1/16 16.0 5.7 4.0 2.8 2.0 1.4 1.0 0.71 0.50 0.35
FULL 90.5 32 23 16 11 8.0 5.7 4.0 2.8 2.0
3200
1/4 45.3 16 11 8.0 5.7 4.0 2.8 2.0 1.4 1.0
1/16 22.6 8.0 5.7 4.0 2.8 2.0 1.4 1.0 0.71 0.50
FULL 128.0 45 32 23 16 11 8.0 5.7 4.0 2.8
6400
1/4 64.0 23 16 11 8.0 5.7 4.0 2.8 2.0 1.4
1/16 32.0 11 8.0 5.7 4.0 2.8 2.0 1.4 1.0 0.71
Cómo usar las indicaciones del flash
Puede determinar la distancia a partir de la sensibilidad ISO, la configuración del selector de modo del flash (FULL, 1/4, 1/16) y la configuración de abertura.
Ejemplo: si la sensibilidad ISO = 200, el ajuste del selector de modo = 1/4 y la abertura = F11, la distancia es aprox. 1,0 m. (Exposición = 1x)
También se puede determinar una combinación de abertura, ajuste de selector de modo y sensibilidad ISO a partir de la distancia.
* Los valores de las indicaciones son para una exposición de 1x. La exposición para tomar fotos varía en función del objeto y de las condiciones de disparo.
Se recomienda realizar disparos de prueba para comprobar el disparo.
34
Page 36

AF160FC.book Page 35 Monday, November 17, 2008 10:43 AM
MEMO / NOTA
4
35
Page 37

AF160FC.book Page 36 Monday, November 17, 2008 10:43 AM
Lenses with compatibility issues
The flash head can be mounted on the following lenses using the adapter ring, but there may be some problems when using them.
Basically, a lens cannot be used if the front ring turns during focusing.
smc PENTAX-DA 16-45mm F4 ED AL - Vignetting occurs (from 16-24 mm)
smc PENTAX-DA 18-55mm F3.5-5.6 AL - Vignetting occurs (from 18-23 mm)
smc PENTAX-DA 18-55mm F3.5-5.6 AL II - Vignetting occurs (from 18-21 mm)
smc PENTAX-DA 40mm F2.8 Limited - Interference between flash head and camera
smc PENTAX-DA 17-70mm F4 AL[IF] SDM - Vignetting occurs (from 17-50 mm)
smc PENTAX-DA
smc PENTAX-FA 20mmF2.8 - Slight vignetting
smc PENTAX-FA
smc PENTAX-FA MACRO 50mmF2.8 - Focus mechanism is unstable
4
smc PENTAX-FA MACRO 100mmF3.5 - Focus mechanism is unstable
smc PENTAX-FA 20-35mmF4 AL - Vignetting occurs (from 20-23 mm)
smc PENTAX-FA 24-90mmF3.5-4.5 AL(IF) - Vignetting occurs (around 24 mm)
smc PENTAX-FA
smc PENTAX-FA 28-70mmF4 AL N
smc PENTAX-FA 28-80mmF3.5-4.7 N Focus mechanism is unstable
smc PENTAX-FA 28-80mmF3.5-5.6 N Focus mechanism is unstable
smc PENTAX-FA 28-90mmF3.5-5.6 N
smc PENTAX-FA 28-105mmF4-5.6 N Focus mechanism is unstable
smc PENTAX-FA 35-80mmF4-5.6 N Focus mechanism is unstable
smc PENTAX-FA 70-200mmF4-5.6 N Focus mechanism is unstable
smc PENTAX-FA 80-200mmF4.7-5.6 N Focus mechanism is unstable
smc PENTAX-FA 80-320mmF4.5-5.6 N
smc PENTAX-FA 100-300mmF4.7-5.8 N
smc PENTAX-FA 100-300mmF4.5-5.6 N
smc PENTAX-FAJ 28-80mmF3.5-5.6 AL N
smc PENTAX-FAJ 75-300mmF4.5-5.8 AL N
smc PENTAX-FAJ 18-35mmF4.0-5.6 AL - Vignetting occurs (from 18-20 mm)
36
For DA lenses + digital SLR cameras Front ring turns Description of problem
50-135mmF2.8 ED[IF] SDM - Vignetting occurs (from 50-90 mm)
For FA & FAJ lenses + digital SLR cameras Front ring turns Description of problem
24mmF2 AL(IF) - Focus mechanism is unstable
28-70mmF2.8 AL N Vignetting occurs (around 28 mm)
Page 38

AF160FC.book Page 37 Monday, November 17, 2008 10:43 AM
smc PENTAX-F 24-50mmF4 N
smc PENTAX-F 28-80mmF3.5-4.5 - Focus mechanism is unstable
smc PENTAX-F 35-70mmF3.5-4.5 - Focus mechanism is unstable
smc PENTAX-F 35-80mmF4-5.6 - Focus mechanism is unstable
smc PENTAX-F 35-105mmF4-5.6 N
smc PENTAX-F 35-135mmF3.5-4.5 N
smc PENTAX-F 70-210mmF4-5.6 N
smc PENTAX-F 80-200mmF4.7-5.6 N
PENTAX-F 28-80mmF3.5-4.5 N
PENTAX-F 70-200mmF4-5.6 - Focus mechanism is unstable
smc PENTAX-FA645 45mmF2.8 Vignetting
smc PENTAX-FA645 150-300mmF5.6 ED[IF] Vignetting
smc PENTAX-A645 45mmF2.8 Vignetting
smc PENTAX-A645 55mmF2.8 Slight vignetting
smc PENTAX67 75mmF2.8 AL Vignetting
smc PENTAX67 Macro 100mmF4 + life-size converter Vignetting (can be used from 1/1.4 to 1.0)
smc TAKUMAR67 90mmF2.8 LS Vignetting
smc Macro TAKUMAR67 135mmF4 Slight vignetting
smc TAKUMAR67 150mmF2.8 Vignetting
For F lenses + digital SLR cameras Front ring turns Description of problem
645 lens + 645N/645NII cameras Description of problem
67 lens + 67II cameras Description of problem
(Vignetting: Light does not reach the edges of the image creating dark areas.)
4
37
Page 39

AF160FC.book Page 38 Monday, November 17, 2008 10:43 AM
Objetivos y compatibilidad
El cabezal del flash puede montarse en las siguientes lentes mediante el anillo adaptador, pero pueden surgir ciertos problemas
al usarlos.
Básicamente, una lente no puede usarse si el anillo frontal gira durante el enfoque.
Para objetivos DA + cámaras réflex digitales Giro del anillo frontal Descripción del problema
smc PENTAX-DA 16-45 mm F4 ED AL - Se produce viñeteado (desde 16-24 mm)
smc PENTAX-DA 18-55 mm F3.5-5.6 AL - Se produce viñeteado (desde 18-23 mm)
smc PENTAX-DA 18-55 mm F3.5-5.6 AL II - Se produce viñeteado (desde 18-21 mm)
smc PENTAX-DA 40 mm F2.8 limitada - Interferencia entre el cabezal del flash y la cámara
smc PENTAX-DA 17-70 mm F4 AL[IF] SDM - Se produce viñeteado (desde 17-50 mm)
smc PENTAX-DA
smc PENTAX-FA 20 mm F2.8 - Ligero viñeteado
smc PENTAX-FA
4
smc PENTAX-FA MACRO 50 mm F2.8 - Mecanismo de enfoque inestable
smc PENTAX-FA MACRO 100 mm F3.5 - Mecanismo de enfoque inestable
smc PENTAX-FA 20-35 mm F4 AL - Se produce viñeteado (desde 20-23 mm)
smc PENTAX-FA 24-90 mm F3.5-4.5 AL(IF) - Se produce viñeteado (alrededor de 24 mm)
smc PENTAX-FA
smc PENTAX-FA 28-70 mm F4 AL N
smc PENTAX-FA 28-80 mm F3.5-4.7 N Mecanismo de enfoque inestable
smc PENTAX-FA 28-80 mm F3.5-5.6 N Mecanismo de enfoque inestable
smc PENTAX-FA 28-90 mm F3.5-5.6 N
smc PENTAX-FA 28-105 mm F4-5.6 N Mecanismo de enfoque inestable
smc PENTAX-FA 35-80 mm F4-5.6 N Mecanismo de enfoque inestable
smc PENTAX-FA 70-200 mm F4-5.6 N Mecanismo de enfoque inestable
smc PENTAX-FA 80-200 mm F4.7-5.6 N Mecanismo de enfoque inestable
smc PENTAX-FA 80-320 mm F4.5-5.6 N
smc PENTAX-FA 100-300 mm F4.7-5.8 N
smc PENTAX-FA 100-300 mm F4.5-5.6 N
smc PENTAX-FAJ 28-80 mm F3.5-5.6 AL N
smc PENTAX-FAJ 75-300 mm F4.5-5.8 AL N
smc PENTAX-FAJ 18-35 mm F4.0-5.6 AL - Se produce viñeteado (desde 18-20 mm)
38
50-135 mm F2.8 ED[IF] SDM - Se produce viñeteado (desde 50-90 mm)
Para objetivos FA y FAJ + cámaras réflex digitales Giro del anillo frontal Descripción del problema
24 mm F2 AL(IF) - Mecanismo de enfoque inestable
28-70 mm F2.8 AL N Se produce viñeteado (alrededor de 28 mm)
Page 40

AF160FC.book Page 39 Monday, November 17, 2008 10:43 AM
Para objetivos F + cámaras réflex digitales Giro del anillo frontal Descripción del problema
smc PENTAX-F 24-50 mm F4 N
smc PENTAX-F 28-80 mm F3.5-4.5 - Mecanismo de enfoque inestable
smc PENTAX-F 35-70 mm F3.5-4.5 - Mecanismo de enfoque inestable
smc PENTAX-F 35-80 mm F4-5.6 - Mecanismo de enfoque inestable
smc PENTAX-F 35-105 mm F4-5.6 N
smc PENTAX-F 35-135 mm F3.5-4.5 N
smc PENTAX-F 70-210 mm F4-5.6 N
smc PENTAX-F 80-200 mm F4.7-5.6 N
PENTAX-F 28-80 mm F3.5-4.5 N
PENTAX-F 70-200 mm F4-5.6 - Mecanismo de enfoque inestable
smc PENTAX-FA645 45 mm F2.8 Viñeteado
smc PENTAX-FA645 150-300 mm F5.6 ED[IF] Viñeteado
smc PENTAX-A645 45 mm F2.8 Viñeteado
smc PENTAX-A645 55 mm F2.8 Ligero viñeteado
smc PENTAX67 75 mm F2.8 AL Viñeteado
smc PENTAX67 Macro 100 mm F4 + convertidor de tamaño real Viñeteado (puede usarse desde 1/1.4 a 1.0)
smc TAKUMAR67 90 mm F2.8 LS Viñeteado
smc Macro TAKUMAR67 135 mm F4 Ligero viñeteado
smc TAKUMAR67 150 mm F2.8 Viñeteado
Objetivo 645 + cámaras 645N/645NII Descripción del problema
Objetivo 67 + cámaras 67II Descripción del problema
(Viñeteado: la luz no alcanza los bordes de la imagen creando áreas oscuras).
4
39
Page 41

AF160FC.book Page 40 Monday, November 17, 2008 10:43 AM
Specifications
Type AF160FC
Cameras that
support auto flash
Guide Number 16 (ISO100/m)
Flash coverage
angle
Color temperature Daylight (Suited for daylight color film)
Effective flash
range
4
ISO sensitivity
setting
Flash output
compensation
Power saving Auto power off function (180 seconds)
Power source Four AA batteries (Four of one type of battery,
Dimensions Flash head: Ø 113 x 29.5(D) mm
Mass (weight) Approx. 405g
40
Digital SLR series
35mm (Film) Z series and later autofocus SLR
cameras
645N, 645NII and 67II cameras
60 degrees vertically and horizontally
Approx. 0.18 to 2.0 m
(guide number 16, ISO 100, aperture F8)
ISO100 - 6400
+0.5, -0.5, -1.0 EV according to mode dial
switch
either Alkaline, Lithium, or Nickel-Metal Hydride)
Controller: 68(W) x 83(H) x 115(D) mm
Ficha técnica
Tipo AF160FC
Cámaras
compatibles con
el flash automático
Número indicativo 16 (ISO100/m)
Ángulo de cobertura
del flash
Temperatura
del color
Alcance efectivo
del flash
Ajuste de la
sensibilidad ISO
Compensación
de la potencia
del flash
Ahorro de energía Desconexión automática de la alimentación
Alimentación Cuatro pilas AA (cuatro pilas del mismo tipo,
Dimensiones Cabezal del flash: Ø 113 x 29,5(D) mm
Peso Aprox. 405 g
Series réflex digitales
Series Z 35 mm (película) y cámaras posteriores
réflex con enfoque automático
Cámaras 645N, 645NII y 67II
60 grados en vertical y horizontal
Luz diurna (adecuado para películas en color
para luz diurna)
Aprox. 0,18 a 2,0 m
(número indicativo 16, ISO 100, abertura F8)
ISO100 - 6400
+0.5, -0.5, -1.0 EV en función del interruptor
del selector de modo
(180 segundos)
alcalinas, de litio o de níquel e hidruro metálico)
Controlador: 68(W) x 83(H) x 115(D) mm
Page 42

AF160FC.book Page 41 Monday, November 17, 2008 10:43 AM
Warranty Policy
All PENTAX camera accessories purchased through authorized
bona fide photographic distribution channels are guaranteed
against defects of material or workmanship for a period of twelve
months from date of purchase. Service will be rendered, and
defective parts will be replaced without cost to you within that
period, provided the equipment does not show evidence of impact,
sand or liquid damage, mishandling, tampering, battery or chemical
corrosion, operation contrary to operating instructions, or
modification by an unauthorized repair shop. The manufacturer or
its authorized representatives shall not be liable for any repair or
alterations except those made with its written consent and shall not
be liable for damages from delay or loss of use or from other indirect
or consequential damages of any kind, whether caused by
defective material or workmanship or otherwise; and it is expressly
agreed that the liability of the manufacturer or its representatives
under all guarantees or warranties, whether expressed or implied,
is strictly limited to the replacement of parts as herein before
provided. No refunds will be made on repairs performed by nonauthorized PENTAX service facilities.
Procedure During 12-month Warranty Period
Any PENTAX which proves defective during the 12-month warranty
period should be returned to the dealer from whom you purchased
the equipment or to the manufacturer. If there is no representative
of the manufacturer in your country, send the equipment to the
manufacturer, with postage prepaid. In this case, it will take a
considerable length of time before the equipment can be returned
to you owing to the complicated customs procedures required. If the
Garantía
Todos los accesorios para cámaras PENTAX adquiridos en los
canales de distribución fotográfica autorizados, están garantizados
contra los defectos de los materiales o de fabricación durante un
período de doce meses a partir de la fecha de compra. Se prestará
el servicio y se reemplazarán las piezas defectuosas sin cargo
alguno para Vd. dentro de ese período, siempre que el equipo
no muestre indicios de golpes, daños por arena o líquido, manejo
erróneo, indicios de haber sido forzada, corrosión química o de
las baterías, funcionamiento en contra de las instrucciones de uso,
o modificación realizada por un establecimiento de reparaciones
no autorizado. El fabricante o sus representantes autorizados no
serán responsables de ninguna reparación o alteración excepto las
realizadas con su autorización por escrito, y no serán responsables
de los daños por demora o por imposibilidad de su uso o de
cualesquiera otros daños indirectos o emergentes de la clase que
fuera, bien causados por defectos en los materiales o en la fabricación
o en lo que fuere; y queda expresamente acordado que la
responsabilidad del fabricante o sus representantes con respecto
a todas y cualesquiera de garantías o cert ificaciones, tanto expresas
como implícitas, queda exclusivamente limitada a la reposición de
las piezas tal y como se indica anteriormente. No se devolverá
ninguna cantidad de dinero en casos de reparaciones realizadas
por servicios de reparación no autorizados por PENTAX.
Procedimiento durante el período de garantía de 12 meses
Cualquier cámara PENTAX que se compruebe que es defectuosa
durante el periodo de 12 meses de garantía deberá ser devuelta
al distribuidor al que compró la cámara o al fabricante. Si no existe
representación del fabricante en su país, envíe el equipo al fabricante,
a portes pagados. En este caso, transcurrirá un periodo de tiempo
bastante largo antes de que el equipo le pueda ser devuelto debido
41
Page 43

AF160FC.book Page 42 Monday, November 17, 2008 10:43 AM
equipment is covered by warranty, repairs will be made and parts
replaced free of charge, and the equipment will be returned to you
upon completion of servicing. If the equipment is not covered by
warranty, regular charges of the manufacturer or of its
representatives will apply. Shipping charges are to be borne by the
owner. If your PENTAX was purchased outside of the country
where you wish to have it serviced during the warranty period,
regular handling and servicing fees may be charged by the
manufacturer's representatives in that country. Notwithstanding
this, your PENTAX returned to the manufacturer will be serviced
free of charge according to this procedure and warranty policy.
In any case, however, shipping charges and customs clearance
fees are to be borne by the sender. To prove the date of your
purchase when required, please keep the receipts or bills covering
the purchase of your equipment for at least a year. Before sending
your equipment for servicing, please make sure that you are
sending it to the manufacturer's authorized representatives or their
approved repair shops, unless you are sending it directly to the
manufacturer. Always obtain a quotation for the service charge, and
only after you accept the quoted service charge, instruct the service
station to proceed with the servicing.
This warranty policy does not affect customer's statutory rights.
The local warranty policies available from PENTAX distributors in
some countries can supersede this warranty policy.
Therefore, we recommend that you review the warranty card
supplied with your product at the time of purchase, or contact the
PENTAX distributor in your country for more information and to
receive a copy of the warranty policy.
42
a los complicados procedimientos de aduanas requeridos. Si el equipo
está bajo garantía, se realizarán las reparaciones y la sustitución
de las piezas sin cargo, y le será devuelto el equipo al terminar
la reparación. Si el equipo no se encuentra bajo garantía, le será
cargado el coste de la reparación según la tarifa oficial del fabricante
o sus representantes. Los portes correrán a cargo del propietario.
Si ha comprado su PENTAX fuera del país en el que desea que le
sea prestado el servicio de asistencia técnica durante el periodo de
garantía, le podrá ser cargado el coste de la reparación de acuerdo
con la tarifa oficial por el representante del fabricante del país de
que se trate. No obstante, su PENTAX enviada al fabricante tendrá
servicio libre de costes de acuerdo con este procedimiento y política
de garantía.
No obstante todo lo anterior, si devuelve su Pentax al fabricante
le será prestado sin cargo el servicio de asistencia que precise con
el procedimiento aquí descrito y el presente certificado de garantía.
Para comprobar la fecha de la compra siempre que sea necesario,
le rogamos guarde el recibo o la factura que le extiendan en el
momento de la compra del equipo, por lo menos durante un año.
Antes de enviar su equipo al servicio de asistencia técnica, asegúrese
de enviarlo al representante autorizado por el fabricante o a los
talleres autorizados, a menos que lo envíe directamente al fabricante.
Pida siempre presupuesto de la reparación, y solicite al servicio
de asistencia técnica que realicen el trabajo después de dar
su aprobación al presupuesto.
Esta garantía no afecta a los derechos estatutarios del cliente.
La política de garantía local otorgada por los distribuidores de
PENTAX en algunos países puede sustituir a esta política de garantía.
Por ello, le recomendamos revisar la tarjeta de garantía suministrada
con el producto en el momento de la compra, o ponerse en contacto
con el distribuidor de PENTAX en su país para obtener más
información y recibir una copia de la política de garantía.
Page 44

AF160FC.book Page 43 Monday, November 17, 2008 10:43 AM
For customers in the USA
STATEMENT OF FCC COMPLIANCE
This device complies with Part 15 of the FCC Rules. Operation is subject to the following two conditions: (1) This device may not cause
harmful interference, and (2) this device must accept any interference received, including interference that may cause undesired operation.
Changes or modifications not approved by the party responsible for compliance could void the user's authority to operate the equipment.
This equipment has been tested and found comply with the limits for a Class B digital device, pursuant to part 15 of the FCC Rules.
These limits are designed to provide reasonable protection against harmful interference in a residential installation.
This equipment generates, uses and can radiate frequency energy and, if not installed and used in accordance with the instructions, may
cause harmful interference to radio communications. However, there is no guarantee that interference will not occur in a particular installation.
If this equipment does cause harmful interference to radio or television reception, which can be determined by turning the equipment off
and on, the user is encouraged to try to correct the interference by one or more of the following measures:
• Reorient or relocate the receiving antenna.
• Increase the separation between the equipment and receiver.
• Consult the dealer or an experienced radio/TV technician for help.
For customers in Canada: This Class B digital apparatus complies with Canadian ICES-003.
Pour les utilisateurs au Canada: Cet appareil numérique de la classe B est conforme a la norme NMB-003 du Canada.
Information for Users on Collection and Disposal of Old Equipment and Used Batteries
1. In the European Union
These symbols on the products, packaging and/or accompanying documents mean that used electrical and electronic
equipments and batteries should not be mixed with general household waste.
Used electrical/electronic equipments and batteries must be treated separately and in accordance with legislation that
requires proper treatment, recovery and recycling of these products.
Following the implementation by member states, private households within the EU states may return their used
electrical/electronic equipments and batteries to designated collection facilities free of charge*.
In some countries your local retailer may also take back your old product free of charge if you purchase a similar new one.
*Please contact your local authority for further details.
By disposing of this product correctly you will help ensure that the waste undergoes the necessary treatment, recovery
and recycling and thus prevent potential negative effects on the environment and human health which could otherwise
arise due to inappropriate waste handling.
2. In other countries outside the EU
These symbols are only valid in the European Union. If you wish to discard these items, please contact your local
authorities or dealer and ask for the correct method of disposal.
43
Page 45

AF160FC.book Page 44 Monday, November 17, 2008 10:43 AM
For Switzerland: Used electrical/electronic equipment can be returned free of charge to the dealer, even when you don't
purchase a new product. Further collection facilities are listed on the home page of www.swico.ch or www.sens.ch.
Note for the battery symbol (bottom two symbol examples):
This symbol might be used in combination with a designation for the chemical element or compound in use. In this case
you have to comply with the requirement set by the Directive for the chemicals involved.
Información para usuarios sobre recogida y reciclado de equipo usado y baterías
1. En la Unión Europea
Estos símbolos en los productos, el embalaje y/o en la documentación que acompaña significa que el equipo eléctrico
y electrónico y las pilas no deben mezclarse con los residuos domésticos generales.
El equipo eléctrico/electrónico y las pilas deben tratarse por separado y de acuerdo con las normativas que requieren
el tratamiento, recuperación y reciclaje adecuados para estos productos.
Tras la implementación por parte de los estados miembros, los hogares de los estados de la UE podrán devolver,
sin coste alguno, sus equipos eléctricos/electrónicos usados y las pilas a las instalaciones para ello designadas*.
En algunos países, su establecimiento local también recogerá su producto, sin coste alguno, si adquiere uno nuevo similar.
*Para más detalles, póngase en contacto con sus autoridades locales.
Desechando este producto correctamente ayudará a garantizar que los residuos reciban el tratamiento, recuperación
y reciclaje necesarios, evitando así los posibles efectos nocivos para la salud y el medio ambiente, que podrían
surgir si se manipulan los residuos de forma incorrecta.
2. En otros países fuera de la UE
Estos símbolos son válidos sólo en la Unión Europea. Si desea deshacerse de estos artículos, le rogamos se ponga
en contacto con las autoridades locales o con su distribuidor para solicitar información sobre el método de reciclaje
correcto.
Para Suiza: El equipo eléctrico/electrónico puede devolverse al concesionario, sin cargo alguno, incluso si no adquiere
un nuevo producto. Encontrará más información en la página de inicio de www.swico.ch
Nota para el símbolo de la pila (los dos ejemplos de símbolos inferiores):
Este símbolo puede utilizarse en combinación con una denominación del elemento o compuesto químico en uso.
En este caso el usuario deberá atenerse a la normativa establecida en la Directiva sobre productos químicos pertinente.
44
o www.sens.ch.
 Loading...