

Page 1

User Guide
Enjoying Your
Digital Camera
Images On Your PC
Page 2

About This Guide
This guide describes the basic procedures for using ACDSee for PENTAX. Refer
to the online help for a more detailed description of each function.
Welcome to ACDSee for PENTAX
Thank you for choosing ACDSee, the world’s top digital imaging software.
ACDSee is the ideal all-round application for acquiring, organizing, viewing,
editing and sharing images. With the image browser, you can search for, organize
and preview images and media files stored in the computer. You can also acquire
images from a digital camera, scanner or other devices quickly.
The image viewer and media player are equipped with a wide range of functions
for high speed, high quality display of images and media files. You can run a slide
show, play back embedded sound and display multiple images. ACDSee
supports more than 50 image and multimedia file formats.
ACDSee provides a wide range of tools for creating, editing and processing digital
images. You can use the red-eye reduction, cropping, sharpness, blur and
embossing tools to edit and correct images. There are also a number of tools for
adjusting the exposure, converting, resizing, changing the name, rotating and
mirroring multiple files at the same time.
ACDSee for PENTAX is a high-speed, user-friendly system for managing images
that can be used and enjoyed by both beginners and professionals.
* Not all of the above-mentioned functions are supported by Macintosh.
Technical Support
If you have access to the internet, before contacting our technical support center,
visit our website at www.acdsystems.com and check the latest information. You
may find the answer to your question in the FAQ section.
QuickTime™ and QuickTime logo are trademarks used under license. The
QuickTime logo is registered in U.S. and other countries.
Page 3

Contents
Windows (ACDSee for PENTAX 2.0)
Starting 6
Starting ACDSee ........................................................................ 6
About the User Interface ........................................................... 6
Displaying 11
Displaying Images in the File List pane................................. 11
Opening a File in the Viewer ................................................... 11
Displaying a Slide Show.......................................................... 12
Setting an Image as the Desktop Wallpaper.......................... 13
Customizing 15
Customizing the Browser Pane .............................................. 15
Changing the File List Pane Display Mode............................ 15
Setting an Image Editor........................................................... 16
Editing 17
Editing Images ......................................................................... 17
Resizing an Image.................................................................... 19
Rotating/Flipping an Image ..................................................... 21
Saving an Image in Edit Mode ................................................ 22
Photostitcher............................................................................ 23
Organizing 25
Organizing Files ....................................................................... 25
Using the Categories Pane...................................................... 25
Displaying Categorized Files .................................................. 27
Editing File Properties............................................................. 28
Using the Image Basket Pane................................................. 30
Changing Multiple File Names................................................ 31
Searching 32
Searching for Files................................................................... 32
Searching for Duplicate Files.................................................. 36
2
Page 4

Sharing 37
Sharing Images ........................................................................ 37
Sending an Image from ACDSee by E-mail ........................... 37
Creating an HTML Album ........................................................ 37
Creating a Sharable Slide Show ............................................. 38
Transferring an Image to a Digital Camera............................ 39
About SendPix ......................................................................... 40
Creating a CD or DVD .............................................................. 42
Printing 43
Printing Images ........................................................................ 43
Adding Text to Images............................................................. 44
ACD FotoSlate™ 3.0 45
About FotoSlate ....................................................................... 45
Starting FotoSlate .................................................................... 47
Creating a Contact Sheet ........................................................ 47
Creating a Calendar ................................................................. 49
Creating a Paper-saving Layout ............................................. 51
Saving the Layout as an Image............................................... 52
Printing a Layout...................................................................... 52
ACD Showtime! for PENTAX 53
About ACD Showtime! for PENTAX ....................................... 53
Starting ACD Showtime! for PENTAX .................................... 53
Creating a Video File ............................................................... 54
Creating a Show....................................................................... 56
Saving a Video File .................................................................. 60
3
Page 5

Macintosh (ACDSee for PENTAX)
Starting 64
Starting ACDSee ...................................................................... 64
About the User Interface ......................................................... 64
Displaying 67
Displaying Images in the File List Pane................................. 67
Opening a File in the Viewer ................................................... 67
Displaying a Slide Show.......................................................... 68
Setting an Image as the Desktop Wallpaper.......................... 69
Customizing 70
Customizing the Browser Panes ............................................ 70
Changing the File List Pane Display Mode............................ 70
Editing 71
Cropping an Image .................................................................. 71
Rotating or Flipping an Image ................................................ 71
Photostitcher............................................................................ 72
Searching 73
Searching for Files................................................................... 73
Printing 74
Printing Images ........................................................................ 74
4
Page 6

Windows
(ACDSee for PENTAX 2.0)
Page 7

Starting
Starting ACDSee
The application icon appears on the desktop and in the [Start] menu
when you install ACDSee on your computer.
Use either of the following methods to start ACDSee:
• Double-click the [ACDSee for PENTAX 2.0] icon on the desktop.
• Select [Programs] from the [Start] menu, then select [ACD Systems]
followed by [ACDSee for PENTAX 2.0].
Opening the ACDSee Browser Copy
You can open the ACDSee copy and display images while browsing files
on the other ACDSee. You can also drag files from one ACDSee to the
other.
Use either of the following methods to open the ACDSee copy:
• Click [New] from the [File] menu and then click [Window].
• Click the right mouse button on the File List pane (in the space
between the thumbnails and the icons) to display the context menu
and click [Window] from [New].
If the mouse pointer is not in the right place when you click the
button, a different context menu will appear.
About the User Interface
The ACDSee user interface is designed for quick access to tools and
functions and can be customized to suit individual needs.
6
Page 8

Browser
The main window, called the Browser, opens when you start ACDSee.
The ACDSee Browser consists of a maximum of eight panes (windows),
seven of which can be displayed or closed when not in use. The File List
pane is always displayed and shows the contents of the currently
selected folder or the results of the most recent search, in other words
the file or folder that matches the search item. You can open and close
the panes, move them to another place on the screen or put one pane
on top of or next to another.
In addition to the panes, there are three bars:
Menu bar You can access the various menu commands from the
menu bar at the very top of the Browser.
Toolbar The Browser toolbar is below the menu bar and provides
quick access to shortcuts for frequently used tasks and
functions. You can customize the toolbar to suit your
needs.
Status bar The status bar is at the bottom of the Browser window and
displays information and properties for the selected file.
About the Browser Panes
The ACDSee Browser consists of the following eight panes:
File List pane
The File List pane displays the contents of the currently selected folder
or the results of the most recent search, in other words the file or folder
that matches the search item. It is the only pane that always appears in
the Browser and it cannot be hidden or closed. There is a toolbar at the
bottom of the File List pane and you can choose up to three toolbars at
the top.
Folders pane
The Folders pane displays the configuration of folders in your computer.
When you browse a folder, the contents of the folder appear in the File
List pane. There is a toolbar at the top of the Folders pane and check
boxes (easy select bar) showing the selected folder on the left.
7
Page 9

Categories pane
The Categories pane displays a list of the categories to which images or
files can be added. You can use the categories as another way of
organizing images.
There are check boxes on both sides of the Categories pane and a
toolbar at the top.
Search pane
The Search pane provides access to the powerful ACDSee search
function. Simply choose the type of search and enter the search item in
the field.
Calendar pane
The calendar displayed in this pane can be used to organize and browse
images by the date associated with the files. There is a toolbar at the
bottom of the Calendar pane.
Properties pane
The Properties pane displays the properties and database information of
the file selected in the File List pane. In the Properties pane, you can
display or edit the database information or display the metadata
embedded in digital images.
Image Basket pane
This pane displays files selected in the File List pane. By choosing
images and files and putting them in the Image Basket pane, you can
use the editing and creating functions on images from different folders
and categories. Menu icons for accessing frequently used tools and
functions are provided on the right of the Image Basket pane.
Preview pane
The Preview pane displays a preview of the image or media file currently
selected in the File List pane. You can change the size of the preview
image or play back the media file. The Preview pane can be moved to
any position on the screen.
8
Page 10
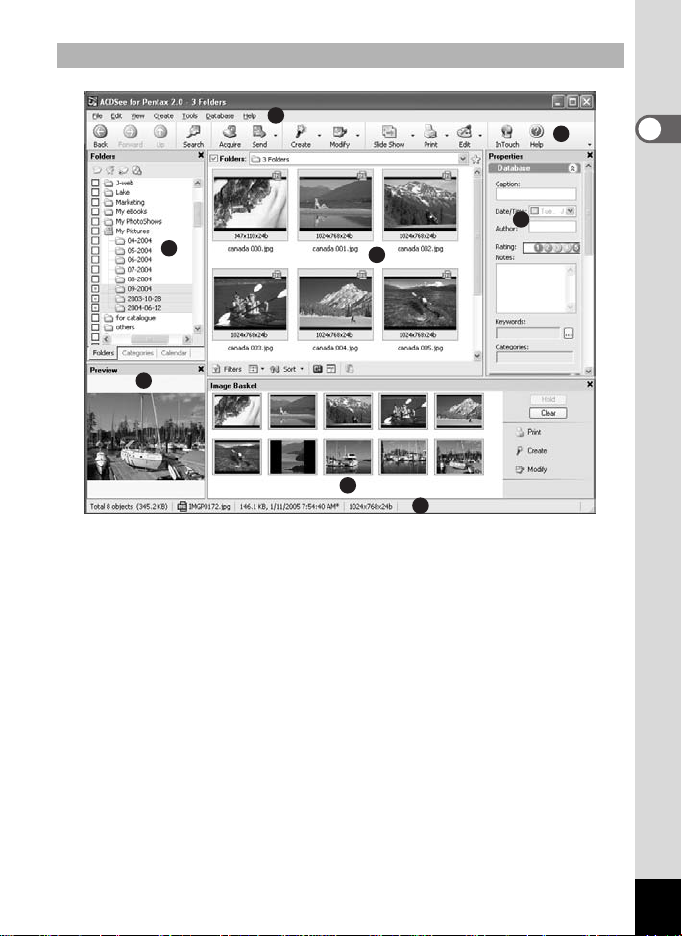
ACDSee Browser Interface
A
C
D
A Menu bar E File List pane
B Toolbar F Properties pane
C Folders pane G Image Basket pane
D Preview pane H Status bar
Note: The Properties pane is hidden when ACDSee is
started. When the Category, Calendar and Search panes
are displayed by default, they appear as tabs with the
Folders pane.
E
G
H
B
F
9
Page 11

Viewer
The ACDSee window called the Viewer opens when you double-click on
any file in the File List pane. The ACDSee Viewer plays back media files
and displays images one at a time at full resolution. You can open the
Properties pane in the Viewer and display the properties of the image or
magnify a part of the image.
The Viewer toolbar is below the menu bar and provides quick access to
shortcuts for frequently used tasks and functions. You can customize the
toolbar to suit your needs.
The Viewer status bar is at the bottom of the Viewer and displays
information about the file currently displayed in the Viewer window.
10
Page 12

Displaying
Displaying Images in the File List pane
The File List pane displays the images and media files stored in the
folder selected in the Folders pane, or the images or media files that
match the conditions specified in the Categories, Calendar or Search
pane.
To select multiple folders and display all the images contained in
them:
1 Click [+] in the folder list displayed in the Folders pane
to display the subfolders and click on a folder name.
2 To choose another folder, click on the check box (easy
select bar) on the left of the Folders pane.
Opening a File in the Viewer
You can use the Viewer to display images and media files in the actual
size or in a choice of sizes. You can also display images one after
another.
To open an image or media file in the Viewer:
1 Do one of the following in the File List pane.
• Choose a file and press the [Enter] key.
• Double-click on a file.
• Click the right mouse button on an image or media file and select
[View].
2 To navigate the image in the Viewer, do the following.
• To display the next image, click [Next Image] from the [View] menu.
• To display the previous image, click [Previous Image] from the
[View] menu.
11
Page 13

The Viewer displays all the files in the folder by default. To display
only the image files selected in the File List pane, unselect the [View
all images in folder] option in the [Options] dialog box.
To return to the Browser from the Viewer window:
Do one of the following:
• Press the [Esc] key.
• Press the [Enter] key.
• Double-click on an image.
• Click [Browse...] from the [File] menu.
• Click the [Browse] button on the toolbar.
Displaying a Slide Show
You can display a slide show from the Browser or from the Viewer. You
can also set the slide show to launch automatically.
To start a slide show from the Browser:
1 Choose multiple images from the File List pane.
2 Click [Slide Show...] from the [Tools] menu.
3 In the [Slide Show Properties] dialog box, click on the
tabs and set or change the options, such as the
transition effect.
4 To save the current settings as the default slide show
options, select the [Save current settings as default]
check box.
5 Click the [OK] button.
12
Page 14

To start a slide show from the Viewer:
1 Click [Slide Show...] from the [View] menu.
2 In the [Slide Show Properties] dialog box, click on the
tabs and set or change the options, such as the
transition effect.
3 To save the current settings as the default slide show
options, select the [Save current settings as default]
check box.
4 Click the [OK] button.
To stop the slide show:
Do one of the following:
• Press the [Esc] key.
• Click the [×] (Close) button in the slide show toolbar (at the bottom right
of the screen).
Setting an Image as the Desktop Wallpaper
You can choose an image and set it as the wallpaper on the Windows
desktop. You can automatically enlarge the image to fit the screen or
restore the previous wallpaper.
To set an image as the desktop wallpaper:
1 Choose the image that you want to use as the wallpaper
from the File List pane of the ACDSee Browser.
2 Do one of the following:
• In the Browser, choose an image and click [Set Wallpaper] from the
[Tools] menu.
• In the Viewer, click [Set Wallpaper] from the [Tools] menu.
3 Select one of the following:
• Centered The image is positioned in the center of the screen. If
the image is bigger than the screen, it is made smaller
to fit the screen.
• Tiled The image is displayed in a tile pattern across the
whole desktop.
13
Page 15

The selected image is saved as “ACD Wallpaper.bmp” in the Windows
folder and ACDSee displays the image by automatically changing the
wallpaper settings in the control panel.
To enlarge the wallpaper automatically to fit the screen:
1 Click [Options...] from the [Tools] menu.
2 In the [Options] dialog box, click [General].
3 In the [General] page, select the [Automatically stretch
wallpaper to fit screen] check box.
4 Click the [OK] button.
To display the previous wallpaper:
Select [Set Wallpaper] from the [Tools] menu and then select [Restore].
14
Page 16

Customizing
Customizing the Browser Pane
You can customize the ACDSee interface and adjust it to suit your
needs. You can display or hide the Browser panes or move them to any
position on the screen.
To move a pane:
Drag the title bar of the pane you want to move (except the File List pane)
to the desired position on the screen.
To return the pane layout to the default status:
Select [Reset Layout] from the [View] menu.
To hide/display a pane:
Unselect or select the pane from the [View] menu. (A check mark
appears in the box on the left of the panes that are displayed on the
screen.)
Changing the File List Pane Display Mode
You can change the display mode easily by choosing one of the
following five File List pane display modes: [Filmstrip], [Thumbnails],
[Icons], [List] and [Details].
Note: In Windows XP, you can also choose [Tile].
To change the File List pane display mode:
Select [View Mode] from the [View] menu and choose a display mode.
To change the size of the thumbnails:
Select [View Mode] from the [View] menu, then select [Thumbnail Size]
and choose the desired size.
15
Page 17

Setting an Image Editor
If you want to edit images using an image editor other than ACDSee, you
can set the desired image editor to open by default when you switch to
edit mode.
To add an image editor to ACDSee:
1 Click [Open in Editor] from the [Tools] menu and then
click [Configure Editors…].
2 In the [Configure Photo Editors] dialog box, click the
[Add...] button.
3 Browse the folder containing the application you want
to use for editing images.
4 Choose the executable file (*.exe) for the image editing
application.
5 Click the [Open] button.
6 Enter the name of the editor in the [Application name:]
field.
7 To set the application as the default image editor, click
the [Set As Default] button. The default editor is
highlighted in bold letters.
8 Click the [OK] button.
16
Page 18

Editing
Editing Images
You can edit images using the edit mode of the Viewer window.
To edit an image using the edit mode:
Do one of the following:
• Choose the image you want to edit from the File List pane of the
ACDSee Browser and click the [Edit] icon on the toolbar.
• Choose the image you want to edit from the File List pane of the
ACDSee Browser and click [Open in Editor] from the [Tools] menu and
then click [ACDSee].
• In the ACDSee Viewer, click the [Edit] icon on the toolbar or click [Edit
Mode] from the [Modify] menu.
The image editor set as the default opens. (The ACDSee image editor
opens unless a customized setting has been made.)
To edit an image using an image editor other than the default image
editor:
Click [Open in Editor] from the [Tools] menu of the ACDSee Browser and
choose the editor you want to use. (Only ACDSee appears unless an
image editor has been added by customized settings.)
Using the Edit Mode
In edit mode, the Edit Panel appears on the right of the image for quick
access to the editing tools and effect tools. Click on a name in the Edit
Panel to open a tool and use it to edit the image.
The editing tabs are immediately below the edit mode toolbar at the top
of the screen. You can click on the tabs at any time to preview the edited
image and compare it with the original image before saving the edited
effect to the hard disc.
You can customize the edit mode toolbar for quick access to frequently
used commands, scroll function and zoom control.
17
Page 19

Editing/Effect Tools
You can access the following image editing and effect tools from the Edit
Panel or [Modify] menu.
Tool Description of Effect
Exposure Tools
Auto Exposure The exposure is corrected automatically. Auto exposure makes
Brightness You can adjust the brightness, contrast and grayscale of the
Levels You can adjust the contrast and brightness of the image to a
Color Tools
Auto Color The color of the image is adjusted automatically.
Color Cast You can delete unwanted hues from the image. For example, if
HSL You can adjust the HSL values (H=hue, S=saturation,
RGB You can adjust the red (R), green (G) and blue (B) values of the
Red Eye Tool You can correct the red glare that appears in the eyes of
Sharpness Tools
Sharpness The difference in pixel colors is emphasized to give the image
Unsharp Mask The medium/high contrast edges are accentuated to give the
Blur You can apply different gradations to the image.
Noise Tools
Remove Noise You can remove noise from the image while retaining the
Add Noise You can add a grainy pattern to the image. Adding a little noise
the dark pixels of the image darker and the bright pixels
brighter.
image.
fine degree.
you do not like the reddish hue of a sunset picture, you can
remove it using the color cast tool.
L=lightness) of the image.
image.
subjects in digital photos.
a sharp finish.
image a sharp finish.
details you want to keep.
makes slight defects in the original image less conspicuous.
18
Page 20

Tool Description of Effect
Effects Tools
Crosshatch Adds a parallel line pattern to the image.
Emboss Adds an embossed effect to the grayscale of the image.
OilPaint Makes the image look like an oil painting.
Pencil Drawing Makes the image look like a pencil drawing.
Negative Makes the image look like the negative of a photo.
Sepia Makes the image look like an old photo.
Edge Detect Makes the image look as though the outlines have been traced.
Customizing the Edit Panel
You can change the size, move, fix and automatically hide the Edit Panel
to suit your needs.
To customize the Edit Panel:
1 Drag the title bar of the Edit Panel to the new position.
You can drag the Edit Panel to the right or left side of
the window and fix it there.
2 To change the size of the Edit Panel, drag one edge of
the panel outwards.
Resizing an Image
You can change the size of an image by adjusting the [Pixels], [Percent]
or [Actual/Print Size in:]. When you change the size, you can adjust the
appearance of the changed image by selecting [Preserve Aspect Ratio:]
or choosing a resampling filter.
You can also use the cropping tool to delete unwanted parts of the image
or reduce the image to a specific size.
19
Page 21

To resize an image:
1 In edit mode, click [Resize] on the Edit Panel.
2 In the [Resize] tab, select the [Pixels], [Percent] or
[Actual/Print Size in:] radio button according to your
purpose.
3 Do one of the following:
• Unselect the [Preserve Aspect Ratio:] check box and enter the new
[Width:] and [Height:] in the spin boxes.
• Select the [Preserve Aspect Ratio:] check box and choose an aspect
ratio from the dropdown list. Enter the new size in the [Width:] or
[Height:] spin box. ACDSee automatically enters the size for the item
not entered while preserving the aspect ratio.
4 If you selected [Actual/Print Size in:], choose the print
resolution from the [Resolution:] dropdown list.
5 Select a resampling filter from the [Filter:] dropdown
list.
6 Do one of the following:
• Click the [Done] button to apply the changes and close the resize
tool.
• Click the [Cancel] button to close the tool without applying the
changes.
Tips for Resizing
• The quality is maintained when the image is reduced by 33%, 50% or
66%, but the correct aspect ratio may not be obtained if any other ratio
is selected.
• Do not change the size repeatedly. Each resizing places image pixels
using a slightly different sequence, so repeated resizing may affect the
overall color and appearance of the image. If you are not satisfied with
the first size change, click the [Undo] button.
• Avoid enlarging the image. Increasing the image size may make the
pixels in the image more conspicuous and add grainy noise.
20
Page 22

To crop an image:
1 In edit mode, click [Crop] on the Edit Panel.
2 Change the size of the cropping window.
3 Drag the cropping window and move it so that it
encloses the part of the image that you want to keep.
4 Do one of the following:
• Double-click on the cropping window to crop the image and close
the tool.
• Click the [Done] button to apply the changes and close the tool.
• Click the [Cancel] button to close the tool without cropping the
image.
Rotating/Flipping an Image
You can rotate images 90 degrees at a time or specify the number of
degrees.
To rotate an image:
1 In edit mode, click [Rotate] on the Edit Panel.
2 In the [Rotate] tab, click on a rotate radio button.
3 If you chose to customize the settings, do one of the
following:
• From the [Custom angle rotation] area, specify the [Angle] and
[Background color].
• From the [Custom angle rotation] area, click the horizontal or vertical
button and drag the pointer onto the image to draw a horizontal or
vertical baseline.
4 Do one of the following:
• Click the [Apply] button to apply the changes and set the other tab
options in the rotate/flip tool.
• Click the [Done] button to apply the changes and close the tool.
• Click the [Cancel] button to close the tool without applying the
changes.
21
Page 23

To flip an image:
1 In edit mode, click [Rotate] on the Edit Panel.
2 In the [Flip] tab, do one or both of the following.
• Click the [Flip horizontally] check box.
• Click the [Flip vertically] check box.
3 Click the [Done] button to apply the changes and close
the tool.
Saving an Image in Edit Mode
After you have edited an image in edit mode, you can save the image in
a new format or overwrite the original image.
To save an image in edit mode:
1 Click the [Save As...] button on the toolbar.
2 From the [Save Image As] dialog box, browse the save
destination folders.
3 Enter the name of the edited image in the [File name:]
field.
4 Choose a file format for the new image from the [Save
as type:] dropdown list. Click the [Options...] button
and choose the particular settings for that format.
5 Click the [Save] button.
22
Page 24

Closing Edit Mode
You can exit edit mode and return to the status prior to entering edit
mode or return to the Browser or Viewer.
To close edit mode:
Do one of the following:
• Click the [Finished Editing] icon on the toolbar.
• Press the [Esc] key once in edit mode to return to the Viewer.
• If you returned to the Viewer, you can press the [Esc] key again and
return to the Browser.
Photostitcher
You can use the photostitcher function to join several images together to
create a single panorama image.
To use the photostitcher function:
1 Choose the images for stitching from the File List pane
of the ACDSee Browser.
2 Select [ACD photostitcher] from the [Create] menu.
3 The [ACD photostitcher – Automatic Alignment]
window opens.
4 If necessary, you can drag the images to adjust the
stitching position.
5 When the images are properly aligned, click .
6 Choose the options in the [Stitch] dialog box.
7 After you have chosen the options, click the [Big Plane]
or [Cylinder] icon.
8 In the [ACDSee photostitcher – Panoramic Image
Viewer] dialog box, click the [Save] icon to save the
image.
9 Click the [Exit] icon to close the dialog box.
23
Page 25

To correct the automatic alignment manually:
If you have tried the automatic alignment but without satisfactory results,
you can drag the images to adjust the position.
To set the base image:
1 Choose the base image for panorama stitching from the
list displayed at the bottom of the screen.
2 When you have selected the base image, click on the
[E] icon.
3 [E] appears at the bottom of the selected base image.
Input images
3 different images for panorama stitching
Stitched result
When image in middle is base image
(default)
24
Page 26

Organizing
Organizing Files
In addition to the browse, search and edit functions, ACDSee has a
number of tools for improving the organizing and sorting of images and
media files.
For example, you can use the Categories pane to add files to different
categories.
Once files have been added to a category, it is possible to display only
the files in a specific category.
File information, image properties and EXIF metadata are displayed in
the Properties pane, and you can use the pane to add a caption,
creator’s name, comment, keyword and level of importance to files or
edit the EXIF metadata or date.
ACDSee also provides a database function for storing image and file
information. You can use the database to conduct a search of the hard
disc drive or recover or make a backup of important file information.
Using the Categories Pane
You can use the Categories pane to create, delete or change the name
of a category. The Categories pane contains five preset categories Albums, People, Places, Various, Write Disc - to which you can add
multiple subcategories.
To create a category:
1 In the Categories pane, choose the category to which
you want to add a subcategory.
2 Do one of the following:
• Click the right mouse button on the selected category and select
[New] and then [Category].
• From the toolbar at the top of the Categories pane, click the [New
Category] icon.
3 Enter the name of the new category and click [Enter].
25
Page 27

To delete a category:
1 Choose the category you want to delete from the
Folders pane. The subcategories in the selected
category will also be deleted.
2 Do one of the following:
• Click the right mouse button on the selected category and select
[Delete].
• Click the [Remove Category] icon on the toolbar at the top of the
Categories pane.
To change the name of a category:
1 In the Categories pane, choose the category that you
want to change the name of.
2 Click the right mouse button on the selected category
and select [Rename].
3 Enter the new name and click [Enter].
Adding a File to a Category
You can add a file to one or more categories without changing the
location of the file itself.
To add a file to a category:
1 From the File List pane, choose the file you want to add
to a category.
2 Do one of the following:
• Drag the selected file onto the desired category in the Categories
pane.
• In the Categories pane, select the check box in the column on the
right of the category to which you want to add the file.
26
Page 28

Deleting a File From a Category
You can delete a file from a category without moving or deleting the
original file and without affecting the other files in that category.
To delete a file from a category:
1 From the File List pane, choose the file you want to
delete.
2 In the Categories pane, unselect the check box in the
column on the right of the category from which you
want to delete the file.
Displaying Categorized Files
You can use the Categories pane to search for and display files
associated with a specific category, regardless of the location of the files.
You can choose whether to include all the files associated with the
subcategories, display multiple categories using the easy select bar or
only display files associated with multiple categories. You can also use
selective browsing to further refine which files you display.
To display the files in a category:
1 From the Categories pane, double-click on a category.
2 To include the subcategories, click the [Match Any/All]
icon on the toolbar and select [Include Sub-categories].
27
Page 29

To display multiple categories:
1 In the Categories pane, click on the check boxes (easy
select bar) in the left column to choose multiple
categories.
2 Click the [Match Any/All] icon and choose one of the
following options.
• Match All Displays only files associated with all the selected
categories.
• Match Any Displays files associated with any of the selected
categories.
To search not only for files in the folders selected in the Folders
pane but also to search the entire database for files that have been
added to a category, you must unselect the [Folders] check box
displayed at the top of the File List pane.
Editing File Properties
The Properties pane appears on the right of the Browser as the default
layout. You can move the Properties pane or change its size and
superimpose it on another pane. In the Properties pane, you can display
file properties, image properties, database information and metadata
saved in files. You can also do the following in the Properties pane.
• Add a caption to a file
• Change the file date
• Add the creator’s name to a file
• Add a level of importance to a file
• Add a comment to a file
• Add a keyword to a file
• Set/Cancel a file as a read-only or hidden file
• Edit EXIF metadata
To open the Properties pane:
In the Browser or Viewer, select [Properties] from the [View] menu.
28
Page 30

Properties Pane Areas
Database The following file information is entered in this area which
File File information, such as the file name, location, type, size, date
Image Attributes If the file selected in the File List pane or Viewer is an image file,
EXIF Metadata EXIF metadata information on images downloaded from a
includes a display field:
• Caption:
•Date/Time:
• Author:
• Rating:
•Notes:
•Keywords:
The category associated with the file is also displayed in the
[Database] area.
Important:
The information entered in the database will be lost if the file is
copied or moved or the name is changed using a program other
than ACDSee, such as Windows Explorer or MS-DOS
Command Prompt.
created and date of last modification or most recent access,
and the file properties, such as hidden file or read-only file, are
displayed in this area.
information such as size, number of colors, number of pages
and image format is displayed.
scanner or digital camera is displayed. The metadata is
embedded in the file and ACDSee retains this information when
the image is edited. You can edit a specific type of metadata.
29
Page 31

Using the Image Basket Pane
You can put images and media files from different folders into the Image
Basket pane. When you have put the items into the Image Basket pane,
you can use the Image Basket pane tools to perform tasks such as
sending images by e-mail, creating an HTML album and printing images.
You can also perform batch processing, such as changing the file format
or updated date, adjusting the exposure, rotating and resizing multiple
files.
To add a file to the Image Basket pane:
Do one of the following:
• Drag files from the File List pane to the Image Basket pane.
• In the File List pane, choose the file you want to add to the Image
Basket pane, and from the Image Basket pane, click the [Hold] button.
The thumbnails of the images held in the Image Basket pane are
enclosed in a red frame.
You can also add images to the Image Basket pane by dragging
images from Windows Explorer.
To delete a file from the Image Basket pane:
Do one of the following:
• To delete multiple files, choose the files and click [Clear].
• To delete all the files, click [Clear] and select [Yes] in the confirmation
message.
To perform a task on images in the Image Basket pane:
1 Choose one or more images from the Image Basket
pane. If no images are chosen, the task will be
performed on all the images in the Image Basket pane.
2 In the Image Basket pane, do one of the following.
• Click the [Print] button.
• Click [Create] and choose a task.
• Click [Modify] and choose a task.
3 Choose an appropriate command from the menu that
appears.
30
Page 32

Changing Multiple File Names
You can use the batch renaming tool to change the names of multiple
files.
To change multiple file names:
1 In the Browser, choose multiple files and click [Batch
Rename...] from the [Tools] menu.
2 In the [Batch Rename] dialog box, do one of the
following.
• Click the [Template] tab and specify the template options.
• Click the [Search and Replace] tab to set the search and substitute
options.
• Click the [Advanced Options] tab to adjust the [Batch Rename]
wizard settings.
3 Confirm the changed file name in the [Preview] field.
4 Click the [Start Rename] button.
31
Page 33

Searching
Searching for Files
You can use the Search pane to conduct a basic search by file name or
keyword, or narrow down the scope of the search by folder, category or
image properties. You can also conduct a search by file name pattern or
search for duplicate files.
To search for an item:
1 Below the [Quick Search] area of the Search pane, do
one or both of the following.
• Enter a keyword or string in the [With the text:] field. You can choose
a previously used keyword or string from the dropdown list.
• Enter the file name pattern in the [With the filename pattern:] field.
2 Click the [5] button next to the [With the text:] and
[With the filename pattern:] fields and specify the
search options.
3 Do one of the following:
• To search the entire database, click [Entire database].
• To search a category or folder, click [Within folder/category selection
below] and specify the category or folder to be searched.
4 Click the [Start] button.
The search results appear in the File List pane. You can display the file
information from the Properties pane to check the location of the file. To
browse the folder in which the retrieved file is stored, click the path in the
[Location:] field.
32
When searching a folder for a file based on [With the text:] and [With
the filename pattern:], the item must contain both conditions to
obtain a match.
Page 34

[Quick Search] Options
With the text: Find all words The item must match all the letters.
Find whole words
only
Search in Caption Search for item containing caption
Search in
Keywords
Search in Notes Search for item containing comment
Search in
Categories
With the
filename
pattern:
[Filter] options affect which items are displayed in the search results.
Depending on the filter, the retrieved file may be hidden.
Images only Search for image files only.
The item must match the letters not
partially, but completely.
entered in string.
Search for item containing keyword
entered in string.
entered in string.
Search category entered in string.
Narrowing Down a Search
You can narrow down the search results based on categories, folders,
file properties and metadata.
To define a narrowed-down search:
1 Enter a keyword, phrase or wild card in the [With the
text:] or [With the filename pattern:] field and click
[Within folder/category selection below].
2 To use the current browse settings in the [Categories
and Folders] area, click [Sync to browser settings].
3 Click the [Add...] button below the [In any of the
following categories:] area in the [Categories and
Folders] area.
33
Page 35

4 In the [Choose Category] dialog box, choose a category
to be included in the search and click the [OK] button.
Repeat this step to add more categories.
5 To search the subcategories, click the [5] button and
select [Include sub-categories].
6 Click the [Add...] button below the [In any of the
following folders:] area in the [Categories and Folders]
area.
7 In the [Choose Folder] dialog box, choose a folder to be
included in the search and click the [OK] button. Repeat
this step to add more folders.
8 To search the subfolders, click the [5] button and
select [Include sub-folders].
9 If you want to limit the search only to the database
rather than searching all or part of the hard disc, select
the [Search cataloged items only] check box.
10 Click the [Add...] button below the [Properties] area.
11 In the [Add Search Criterion] dialog box, choose a
property to be included in the search and click the [OK]
button. Repeat this step to add more properties.
12 In the [Properties] area, click the hyperlink to define the
condition command for each property.
13 Click the [Start] button.
The search results appear in the File List pane. You can check the
storage location of the file by displaying the file information from the
Properties pane. To browse the folder where the file is, click on the path
in the [Location:] field.
34
Page 36

Searching by Filename Pattern
You can enter a pattern in the [With the filename pattern:] field of the
Search pane and conduct a search by filename. The pattern can range
from a simple pattern, such as part of a filename, to a more sophisticated
pattern containing a wild card.
Filename Pattern Wild Cards
Wild Card Search Result Example
? Tallies with one letter in
filename.
* Tallies with none or one
or more letters in
filename.
[...] Tallies with any of the
letters in brackets.
[!...] Tallies with letters other
than those in brackets.
[...-...] Tallies with any letter in
specified range.
\ Prevents use of other wild
cards containing letters
used in filenames, like
brackets ([).
[ ] . asterisk (*) and
question mark (?) are not
recognized as filenames
and cannot be used with
this function.
ca?.jpg tallies with cat.jpg, cap.jpg and
car.jpg, but not with cats.jpg.
cat* tallies with cat.jpg, cats.jpg and
cathy.jpg.
ca [tr] tallies with cat.jpg or car.jpg, but
not with cap.jpg.
ca [!0] tallies with cata.jpg and catb.jpg,
but not with cat0.jpg.
cat [a-f0-9] tallies with cata.jpg,
catb.jpg, …, catf.jpg and cat0.jpg,
cat1.jpg, …, cat9.jpg.
As brackets are a wild card, to search
for a filename containing brackets, the
brackets are combined with a back
slash (\).
ACD\ [123\] tallies with ACD [123].gif.
• There is no need to distinguish between capital and small letters
in the pattern.
• To use multiple patterns, separate the names with a space or
semi-colon (;).
• To check against patterns containing a space or semicolon,
enclose in quotation marks.
• If the pattern does not contain a wild card*, it will be compared as
a substring. For example, cat tallies with cat, cathy, bobcat, *cat*
and similar patterns.
35
Page 37

Searching for Duplicate Files
You can use the duplicate search plug-in to locate duplicate files in the
hard disc drive. If duplicate files are found, you can change the name or
delete the files and improve organization of your files.
To search for duplicate files:
1 In the Browser, click [Find Duplicates…] from the
[Tools] menu.
2 Click the [Add Files...] or [Add Folder...] button to add a
search target to the list.
3 Specify a duplicate file search method and click the
[Next] button. If you selected [Find duplicates between
these files and another list.], specify the second search
list.
4 Specify the duplicate item and click the [Next] button to
conduct the search.
36
Page 38

Sharing
Sharing Images
With ACDSee, you can share images by displaying them as an album on
the internet, in e-mail or on a website. You can also create a slide show
for your friends that they can play back without any special software.
Sending an Image from ACDSee by E-mail
With the e-mail plug-in, you can send images directly from ACDSee
without using any external e-mail software.
To send an image by e-mail:
1 Choose the image you want to share.
2 Select [E-mail Images...] from the [File] menu.
3 Follow the steps in the [E-mail Image Sharing] wizard.
Creating an HTML Album
Using the HTML album plug-in, you can create HTML pages of
thumbnails for an online album.
To create an HTML album:
1 Choose the images you want to share.
2 Click [Create HTML Album...] from the [Create] menu.
3 Follow the steps in the [Create HTML Album] wizard.
37
 Loading...