

Page 1

PENTAX Service Co.,Ltd
Technical Service Dep.
04,06 KN
PRODUCT No. 76670
TM
ENGLISH
Page 2

76670 -1/12-
[TABLE OF CONTENTS]
1. PREPARATION …................................................................................................... 2
1-1 Prepare the SD card for confirmation of adjustment
1-2 Setting the computer and copy the adjustment file to SD card
1-3 Set up the VB run time
2. DISASSEMBY AND ASSENBLY............................................................................ 6
Outline of Disassembly and Assembly..................................................................
2-1 Caution 6
2-2 Chart for Assemble, Adjustment and Confirmation......................................... 6
3.DISASSEMBLY AND ASSEMBLY PROCEDURES.
4.ADJUSTMENT THE PROGRAM SOFT (SLR function)
6
4-1 Setting the computer
4-2 Preparation
4-3 Adjustment display
4-4 Items for Adjustment and checking
4-5 Procedure for adjustment
4-6 Procedure for ending the program soft
5.ADJUSTMENT THE PROGRAM SOFT (Digital function)
5-1 Procedure for adjustment
7
7
7
8
9
11
11
11
6. Firmware 12
7. INFORMATION OF JIGS, TOOLS AND TESTERS FOR *ISTDS....................... 12
Page 3

76670 -2/12-
Summary
*istDL2 (76670) is basically same as *istDL (76570)
The information in this manual is only for istDL2. For other information, please refer to the service
manual for istDL.
The service equipments are common use with istDL except service program soft.
1-1. Preparation for adjustment
Adjustment program soft for 76670(*ist DL2) --- (Supply with CD-R)
Computer
SD memory card x 2 --- The size of memory should be bigger than 8MB
SD card reader or Camera and USB cable (I-USB17) --- Connect to PC
Preparation for SD memory card
1. Two SD memory card for FW
The following SD card is common use with istDL/istDS
2. For SW test
3. For Test mode ON
4. For test mode OFF
5. For initial set
1-2.Setting the computer and copy the adjustment file to SD card
(1) Copy the [76670 SLR] folder from the Programmed software contained in the CD-ROM to [C: drive] as
shown in the picture below. (For SLR adjustment)
(2) Copy the [76670] folder from the Programmed software contained in the CD-ROM to [C: drive] as shown in
the picture below. (For Digital adjustment)
(3) Copy the file of [kb411b.bin] from [GM_FW] holder
(4) Copy the file of [kb392.bin] from [Product ID FW] --- FW for new T100
76670
76670 SLR
Page 4

76670 -3/12-
1-3 .Set up the VB run time
If your computer is not installed “VisualBasic” software, set up the VB run time is required as follow.
[Procedure]
① Set the 76670 adjustment program soft into the computer
② Execute the setup.exe in the folder of [vb6run_csx.x.x]
Installer will be started
* The Execute file and uninstall setting file will be generated
Page 5

76670 -4/12-
③ Click OK
④ * Do not click Directory, Click installation button
Page 6

76670 -5/12-
⑤ Set up will be started
⑥ Click OK to end the installation
Page 7

76670 -6/12-
2. DISASSEMBY AND ASSENBLY.
2-1. Caution:
◆ About FW installation and adjustment after replaced T100
The following procedure will be required ( Same as *istDS2(76640))
2-2. Chart for Assemble, Adjustment and Confirmation.
Procedure of Adjustment and confirmation is same as *ist DL(76570)
Refer to the *ist DL(76570)Service manual
3, Procedure for Disassemble/Assembly
Procedure of Disassemble/Assembly is same as *ist DL(76570)
① FW for new T100
② FW for service
Adjustment
Page 8

76670 -7/12-
4. ADJUSTMENT THE PROGRAM SOFT (SLR function)
Caution: When replaced T100, the following procedure should be completed
Preparation:
Programmed software for 76670 (for SLR operation), USB cable (I-USB17)
Computer (Windows 2000 / XP), AC-adaptor (D-AC10), Light source (Shutter tester)
Temporary bottom cover (Hand made/exclusive item), Power supply (8V,3A)
Shutter tester (1/4000 can be measured), Diaphragm set ring F8 (KA-0-1A), FA (F) 35-80mm F4-5.6,
AF positioning jig (Square) for 27830, AF positioning jig (Cross) for 27250, Power adaptor,
AF chart for 2m x2 (Exclusive item), AF master lens for 2m, FA Macro 50mmF2.8,
Driver1.5mm (HD-M1.5)、
4-1. SETTING THE COMPUTER
z Setting the computer (Page2) and Set up the VB run time (Page3)
should be completed
4-2. Preparation
When replaced T100 or CCD, the CCD ID number will be used
for digital adjustment
① Install battery cover for battery adaptor and temporally bottom cover
to the camera
② Set focus mode lever to [MF]
4-3. DISPLAY FOR ADJUSTMENT
When start the adjustment software, the following display will be opened
7667
0S
LR
A. Tool Bar
C. Menu display
Adjustment items
Product number
Menu Bar
B. USB connecting display
76670
Page 9

76670 -8/12-
TOOL Bar
Display the status of USB connecting
Display the status of USB connecting
USB Connecting is ON:Connect
USB Connecting is OFF:Unconnect
4-4. MENU Display
When click the items, the detailed will be displayed as follows
Detailed of adjustment items
1:[Eeprom checking] --- Check the data
2:[Exposure adjust] --- Adjustment of exposure
[BV adjust] (brightness value) --- Adjustment of measurement sensor
3:[AF and related adjust] --- Adjustment of AF
[CCD position adjust] --- Adjustment of CCD position
[AGC level adjust] --- Adjustment of AGC level
[Uniformity adjust] --- Adjustment of uniformity
[Focus offset adjust] --- Adjustment of AF focus
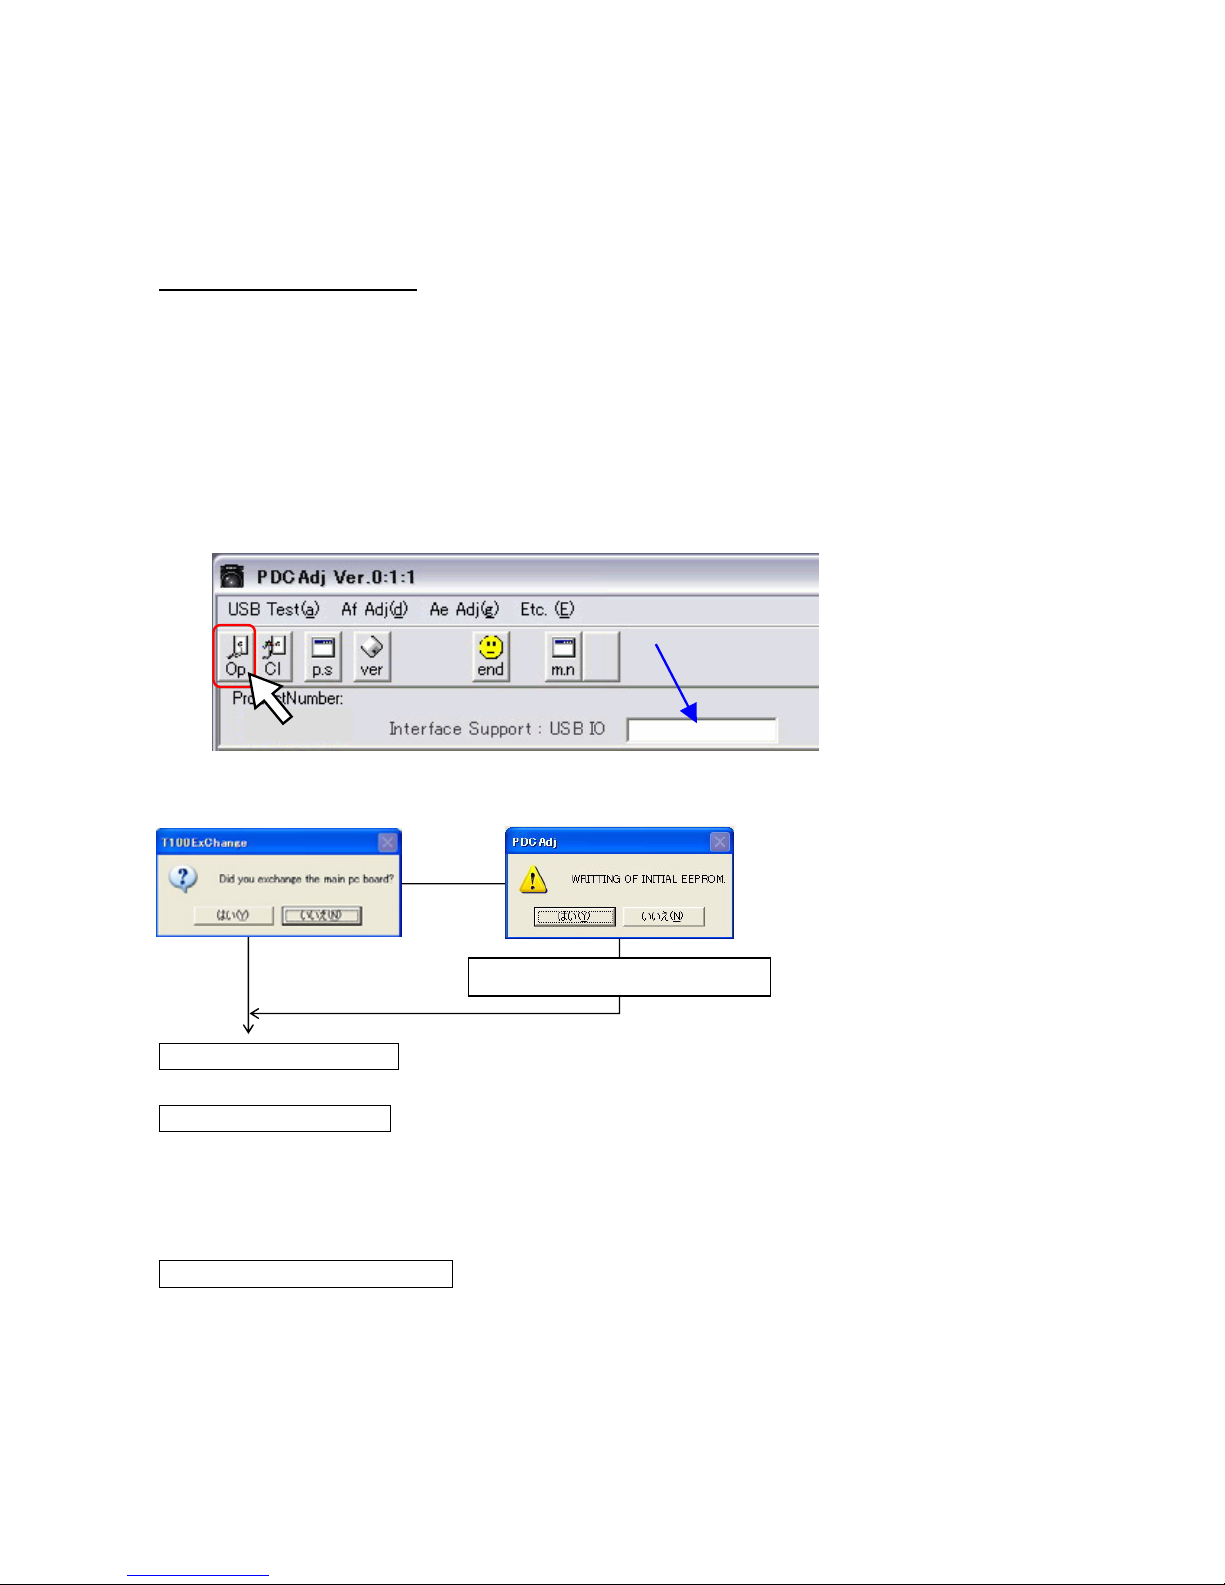
Op Start the correspond with Camera
Cl Close the correspond with Camera
p.s Print screen
ver Display FW version
end End of adjustment
m.n Display Menu screen
Connect
Page 10
76670 -9/12-
4:[Number of repairs] --- Record the number of repair
5:[Eeprom checking] --- Check the data
6:[Battery level adjust] --- Adjustment of Battery level
7:[Shutter speed adjust] --- Adjustment of High shutter speed
4-5. Adjustment procedure
① Turn the power of the camera Off and then install AC adaptor
* Suggest installing battery to avoid the Power supply interception
② Connect the camera to the computer via USB cable
③ Turn the power of the camera ON and confirm that the camera is recognized by computer
④ Click [PDCAdj01.exe] in the EXE folder
⑤ Adjustment screen will be displayed
⑥ Click [Op] to start correspond
*Confirmation: [Connect] should display as follow
⑦ Execute the check/adjustment following the display screen as follows
1:EEPROM CHECKING
↓
2:EXPOSURE ADJUST
[BV ADJUST]
↓Tools:Focus master lens for 35mm (KML-01), Diaphragm set ring F8 (KA-0-1A)
↓Light source (LV6,LV8,LV12,LV15) or (LV6,LV9,LV12,LV16)
↓
3:AF AND RELATED ADJUST
↓Tools: AF positioning jig (Square) for 27830, AF positioning jig (Cross) for 27250, Light source LV12
↓Driver1.5mm (HD-M1.5), AF master lens for 2m, FA (F) 35-80mm F4-5.6,
↓AF chart for 2m x2 (Exclusive item), FA Macro 50mmF2.8,
↓
Connect
76670
Initialize the data
(Yes/No)
Yes
Replaced Main PCB?
No
T100ExChange
Did you exchange the
main pc board?
PDC Adj
Writing of initial EPROM.
6:BATTERY LEVEL ADJUST
Page 11

76670 -10/12-
※ 2m AF chart have to be set as follows
1)Distance between chart and mount of camera --- 1,954.5mm
(=1.9545m)
2)Chart should be set at perpendicularly against light axis of the lens
↓
[CCD POSITION ADJUST]
ADJUSTMENT
1) Alpha-CROSS --→- Dump Start --→ Adjustment --→ Stop
2) Beta-SQUARE --→- Dump Start --→ Adjustment --→ Stop
3) Focus --- Start -→- Next → Stop → Close
* When replaced M100, Click M100 button and then start adjustment
↓
POSITION CHECK
[AGC LEVEL ADJUST]
[UNIFORMITY ADJUST]
[FOCUS OFFSET ADJUST]
TEMP ADJUSTMENT( Select /F → Input temperature→ Temp Adjust → Close)
HORIZONTAL・VERTICAL*
(START→ Adjust position of chart → STOP → ADJUST → Close)
5:EEPROM CHECKING
When finished all adjustment, click 5:EEPROM CHECKING
* When replaced T100, the following adjustment should be done additionally
6:BATTERY LEVEL ADJUST
Tools: Battery adaptor, Power supply (8V, 3A)
① Follow the screen
When open and close the battery cover, [Pc] will be displayed in the LCD panel of the camera
② Click Op and then start the correspond with camera. Display will change to「- - -」
③ Press BC Adjust and execute the adjustment
④ After finished the adjustment, press Close button
※ If the power turned ON again, execute above ②
7:SHUTTER SPEED ADJUST
Tools: Shutter tester
① Select the shutter tester
② Press RELESE button and release the shutter several times, also measure the data
③ Input Measurements data and press Input Data
④ After finished the adjustment, press Close button
Finish the [5:EEPROM CHECKING] and execute [End procedure]
Page 12

76670 -11/12-
4-6. Procedure for Ending the program soft
Finish the program soft with following procedure
① USB Close
Click “Cl”icon and disconnect the correspond with camera
Confirmation: 「Unconnect」should be display as follow
② Click “end” icon and finish the adjustment program soft
③ Double-click hot plug icon
of the taskbar at the lower right of a desktop, and then follow "safe removal of
hardware." -> "PENTAX USB DISK Device"
④ Turn the power of the camera OFF and remove AC adaptor, USB cable
(Battery cover and temporally bottom cover can be stayed for next adjustment)
5. ADJUSTMENT THE PROGRAM SOFT (Digital part)
5-1 .The procedure is same as 76570 except following adjustment procedure
① When the setting and connecting is ready, start the “SLR MTest.exe” in the CSAdjust folder
② Input Lens ID number
③ When the program soft start, the following screen will be displayed and then wait for 20 seconds
Unconnect
76670
Page 13

76670 -12/12-
6. FW Firmware
Method of updating FW and how to check the FW version are same as istDL(76570)
But, SD card for FW of istDL2 should be prepared, refer to the “ Setting the computer and copy the
adjustment file to SD card” page 2
7. List of service equipments, tools for istDL2
Ordering No
Exclusive use for 76670(*istDL2)
Program soft for 76670 ( SLR / Digital) ---- Supply with CD-ROM No.95901-P407
For other equipments and tools are common use with istDL (76570), please refer to the service manual for
istDL(76570)
But, the following tools are no need for istDL2 (76670)
* Camera multi adaptor II, or A
* Connecting cable for 27250 MZ-5)
 Loading...