

Page 1
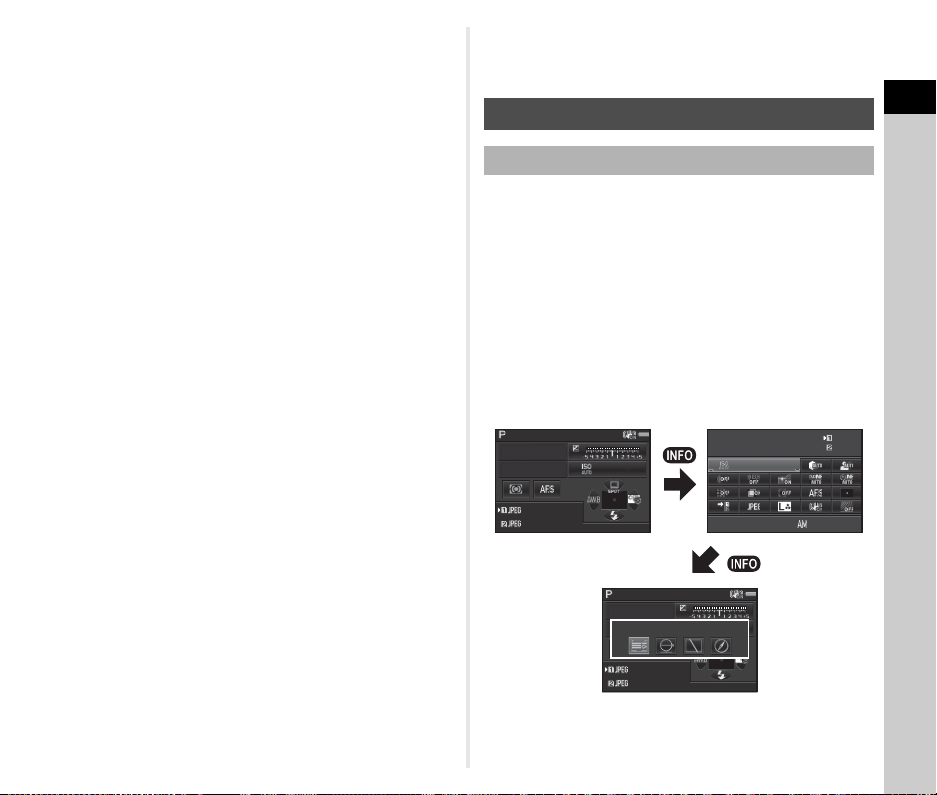
Introduction
1
SLR Digital Camera
PENTAX
Operating Manual
Getting Started
Shooting
Playback
Settings
Appendix
To ensure the best performance from your
camera, please read the Operating Manual
before using the camera.
2
3
4
5
6
Page 2
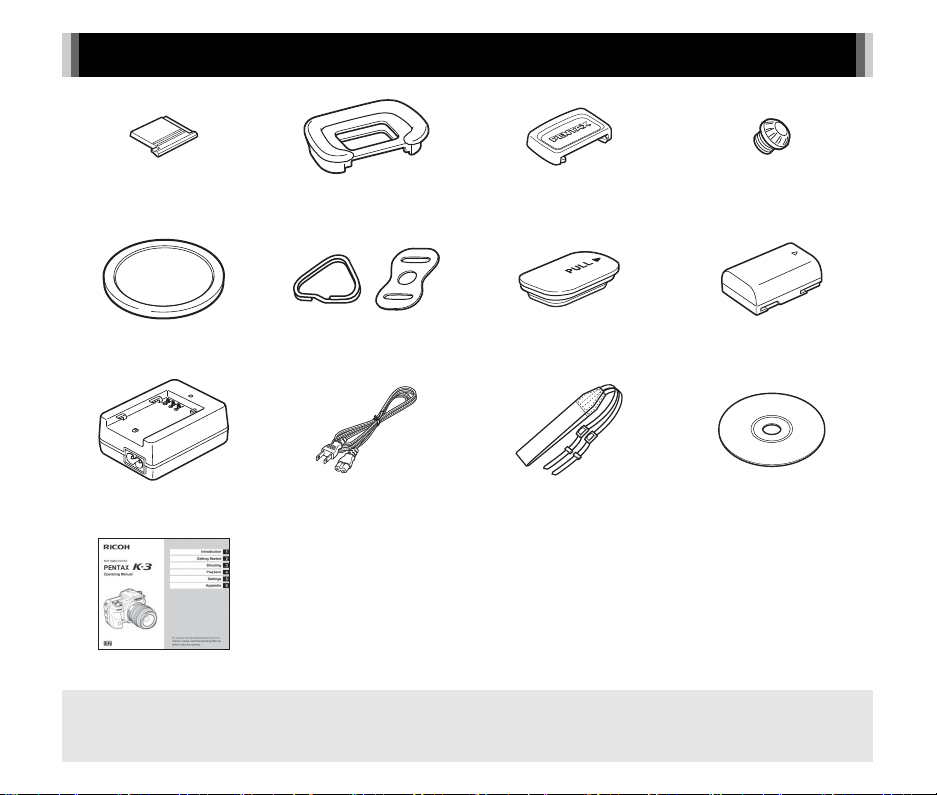
Checking the Contents of the Package
Hot shoe cover FK
(Installed on camera)
Body mount cover
(Installed on camera)
Battery charger
D-BC90
Operating Manual (this manual)
Lenses you can use
Lenses that can be used with this camera are DA, DA L, D FA and FA J lenses and lenses that have an 9 (Auto) position on the
aperture ring. To use any other lens or accessory, see p.81.
(Installed on camera)
Triangular ring and protective cover
(Installed on camera)
AC plug cord Strap
Eyecup F
s
ME viewfinder cap Sync socket 2P cap
Battery grip terminal cover
(Installed on camera)
O-ST132
(Installed on camera)
Rechargeable Lithium-ion
Battery D-LI90
Software (CD-ROM)
S-SW140
Page 3

Introducing the K-3
1
Getting Started
Taking Pictures
Playback Functions
Changing the Settings
Appendix
2
3
4
5
6
1
Page 4

v
How to Use This Manual
1
How to Use This Manual
Introducing the K-3...............................p.7
Gives you an overview of the K-3.
Read this and get to know your K-3!
Names and Functions of the Working
Parts .............................................................p.7
How to Change Function Settings ............. p.16
Menu List ......................................................p.18
2
Getting Started .......................................p.25
Explains how to get your K-3 ready for shooting as
well as basic operations.
Attaching the Strap .....................................p.25
Attaching a Lens .........................................p.25
Using the Battery and Charger ..................p.26
Inserting a Memory Card ............................p.28
Initial Settings ..............................................p.29
Basic Shooting Operation ..........................p.31
Reviewing Images .......................................p.34
3
Taking Pictures ......................................p.35
Once you’ve confirmed that the camera works
properly, try out the camera and take lots of
pictures!
Configuring the Capture Settings ..............p.35
Taking Still Pictures ....................................p.36
Recording Movies .......................................p.38
Setting the Exposure ..................................p.39
Using the Built-in Flash ..............................p.41
Setting the Focus Method .......................... p.42
Setting the Drive Mode ...............................p.47
Setting the White Balance .......................... p.52
Controlling the Image Finishing Touch .....p.54
Correcting Images .......................................p.57
2
Page 5

4
Playback Functions..............................p.59
Explains various operations for playing back and
editing images.
Playback Mode Palette Items .....................p.59
Changing the Playback Method ................. p.60
Connecting the Camera to a Computer ..... p.64
Editing and Processing Images .................p.65
5
Changing the Settings ........................p.71
Explains how to change other settings.
Camera Settings ..........................................p.71
File Management Settings ..........................p.75
6
Appendix ...................................................p.80
Provides various resources.
Restrictions on the Combinations of Special
Functions .....................................................p.80
Functions Available with Various
Lenses ..........................................................p.81
Functions when Using an External
Flash .............................................................p.84
Using the GPS Unit .....................................p.85
Troubleshooting ..........................................p.86
Main Specifications .....................................p.90
Index .............................................................p.96
For Using Your Camera Safely ...................p.100
Care to be Taken During Handling ............ p.101
WARRANTY POLICY ...................................p.104
How to Use This Manual
There is a possibility that the illustrations and the display screen
of the monitor in this manual are different from the actual ones.
3
Page 6

Contents
How to Use This Manual .........................2
Contents
Introducing the K-3 ..................................7
Names and Functions of the Working Parts ......7
Buttons and Dials ........................................................... 8
Monitor Display .............................................................. 9
Viewfinder .................................................................... 14
LCD Panel ................................................................... 15
Electronic Level ........................................................... 15
How to Change Function Settings ....................16
Using the Direct Keys .................................................. 16
Using the Control Panel ............................................... 16
Using the Menus .......................................................... 17
Menu List .............................................................18
Rec. Mode Menu ......................................................... 18
Movie Menu ................................................................. 21
Playback Menu ............................................................ 21
Set-up Menu ................................................................ 22
Custom Setting Menu .................................................. 23
Getting Started .......................................25
Attaching the Strap ............................................25
Attaching a Lens .................................................25
Using the Battery and Charger ..........................26
Charging the Battery .................................................... 26
Inserting/Removing the Battery ................................... 27
Using the AC Adapter .................................................. 28
Inserting a Memory Card ...................................28
Initial Settings .....................................................29
Turning the Camera On ............................................... 29
Setting the Display Language ...................................... 29
Setting the Date and Time ........................................... 30
Formatting a Memory Card .......................................... 31
4
Basic Shooting Operation .................................31
Shooting with Live View ............................................... 33
Reviewing Images ..............................................34
Taking Pictures ......................................35
Configuring the Capture Settings ..................... 35
Memory Card Settings ................................................. 35
Image Capture Settings ............................................... 35
Movie Capture Settings ................................................ 35
Taking Still Pictures ...........................................36
EV Compensation ........................................................ 37
Recording Movies ...............................................38
Playing Back Movies .................................................... 39
Setting the Exposure ..........................................39
Sensitivity ..................................................................... 39
AE Metering ................................................................. 40
Using the Built-in Flash .....................................41
Setting the Focus Method .................................. 42
Setting the AF Mode when Shooting with the
Viewfinder .................................................................... 43
Setting the AF Mode during Live View ......................... 44
AF Fine Adjustment ..................................................... 45
Checking the Depth of Field (Preview) ........................ 46
Setting the Drive Mode .......................................47
Continuous Shooting .................................................... 48
Self-timer ...................................................................... 48
Remote Control ............................................................ 49
Exposure Bracketing .................................................... 49
Mirror Lock-up Shooting ............................................... 50
Multi-exposure ............................................................. 50
Interval Shooting .......................................................... 51
Interval Composite ....................................................... 51
Interval Movie Record .................................................. 52
Page 7

Setting the White Balance .................................52
Adjusting the White Balance Manually ........................ 53
Adjusting the White Balance with Color
Temperature ................................................................ 54
Controlling the Image Finishing Touch ............54
Custom Image ............................................................. 54
Digital Filter .................................................................. 56
Correcting Images ..............................................57
Brightness Adjustment ................................................. 57
Lens Correction ........................................................... 57
Composition Adjustment .............................................. 58
Anti-Aliasing Filter Simulator ........................................ 58
Playback Functions ...............................59
Playback Mode Palette Items ............................ 59
Changing the Playback Method ........................60
Displaying Multiple Images .......................................... 60
Displaying Images by Folder ....................................... 61
Displaying Images by Shooting Date ........................... 61
Playing Back Images Continuously (Slideshow) .......... 62
Displaying Rotated Images .......................................... 62
Connecting the Camera to an AV Device .................... 63
Connecting the Camera to a Computer ............64
Editing and Processing Images ........................65
Copying an Image ........................................................ 65
Changing the Image Size ............................................ 65
Correcting Color Moiré ................................................. 66
Processing Images with Digital Filters ......................... 66
Creating a Composite Image (Index) ........................... 68
Editing Movies ............................................................. 68
RAW Development ...................................................... 69
Selecting Settings to Save in the Camera ................... 75
File Management Settings .................................75
Protecting Images from Deletion (Protect) ................... 75
Selecting the Folder/File Settings ................................ 76
Setting the Copyright Information ................................ 78
Using a Wireless Memory Card ................................... 78
Appendix.................................................80
Restrictions on the Combinations of Special
Functions ............................................................80
Functions Available with Various Lenses ........81
Setting the Focal Length .............................................. 82
Using the Aperture Ring ............................................... 83
Functions when Using an External Flash ........84
Using the GPS Unit .............................................85
Shooting Celestial Bodies (ASTROTRACER) ............. 85
Troubleshooting .................................................86
Sensor Cleaning .......................................................... 87
Error Messages ............................................................ 88
Main Specifications ............................................90
Operating Environment for USB Connection and
Provided Software ........................................................ 94
Index ....................................................................96
For Using Your Camera Safely ........................ 100
Care to be Taken During Handling ..................101
WARRANTY POLICY ........................................104
Contents
Changing the Settings ...........................71
Camera Settings .................................................71
Customizing the Button/E-dial Functions ..................... 71
Saving Frequently Used Settings ................................ 73
Displaying the Local Date and Time of the Specified
City ............................................................................... 74
5
Page 8

1
Introduction
Regarding copyrights
Images taken with this camera that are for anything other
than personal enjoyment cannot be used without permission
according to the rights as specified in the Copyright Act.
Please take care, as there are cases where limitations are
placed on taking pictures even for personal enjoyment
during demonstrations, performances or of items on display.
Images taken with the purpose of obtaining copyrights also
cannot be used outside the scope of use of the copyright as
laid out in the Copyright Act, and care should be taken here
also.
To users of this camera
• Do not use or store this camera in the vicinity of equ ipment
that generates strong electromagnetic radiation or
magnetic fields. Strong static charges or the magnetic
fields produced by equipment such as radio transmitters
could interfere with the monitor, damage the stored data,
or affect the camera’s internal circuitry and cause camera
misoperation.
• The liquid crystal panel used for the monitor is
manufactured using extremely high precision technology.
Although the level of fu nctioning pixels is 99.99% or better,
you should be aware that 0.01% or fewer of the pixels may
not illuminate or may illuminate when they should not.
However, this has no effect on the recorded image.
• In this manual, the generic term “computer(s)” refers to
either a Windows PC or a Macintosh.
• In this manual, the term “battery(ies)” refers to any type of
batteries used for this camera and its accessories.
6
Page 9
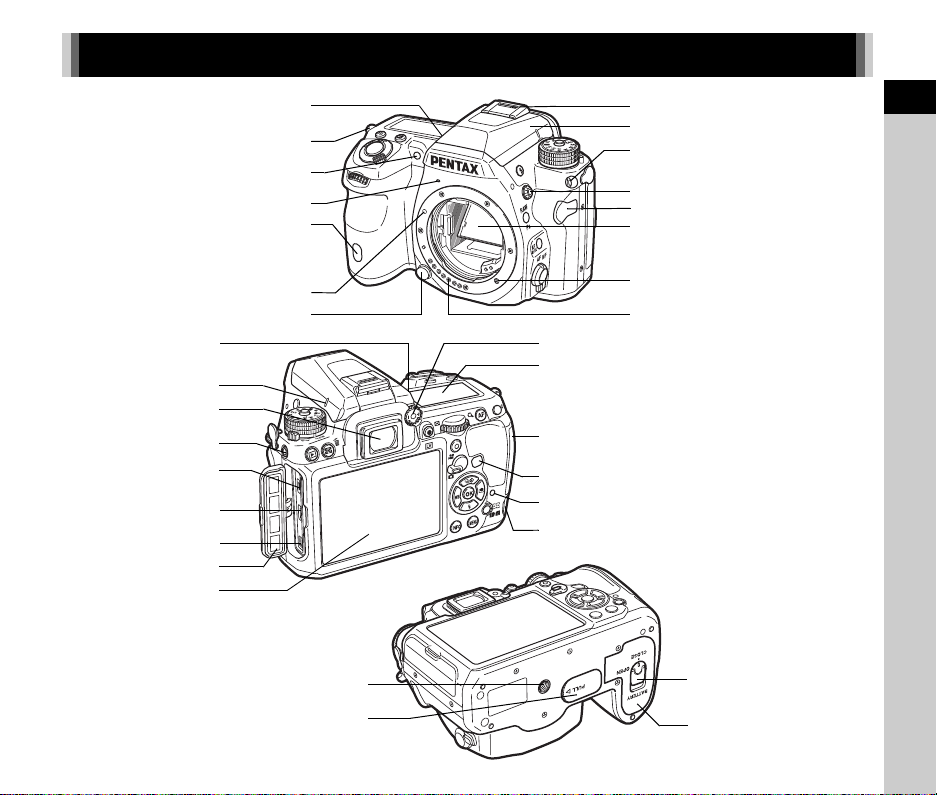
Names and Functions of the Working Parts
Self-timer lamp/
Remote control receiver
AF coupler
Mirror
Lens unlock button Lens information contacts
Strap lug
Hot shoe
Lens mount index
Speaker
X-sync socket
Strap lug
AF assist light
Card access lamp
USB terminal (micro B)
DC input terminal
LCD panel
Terminal cover
Cable switch terminal
Self-timer lamp/
Remote control receiver
Diopter adjustment dial
HDMI terminal (type D)
Microphone terminal
Microphone
Image plane indicator
Viewfinder
Monitor
Dual card slot for SD Memory Cards
Tripod socket
Battery cover
Battery cover unlock knob
Battery grip contacts
Headphone terminal
Built-in flash
Dial indicator
1
Introduction
7
Page 10
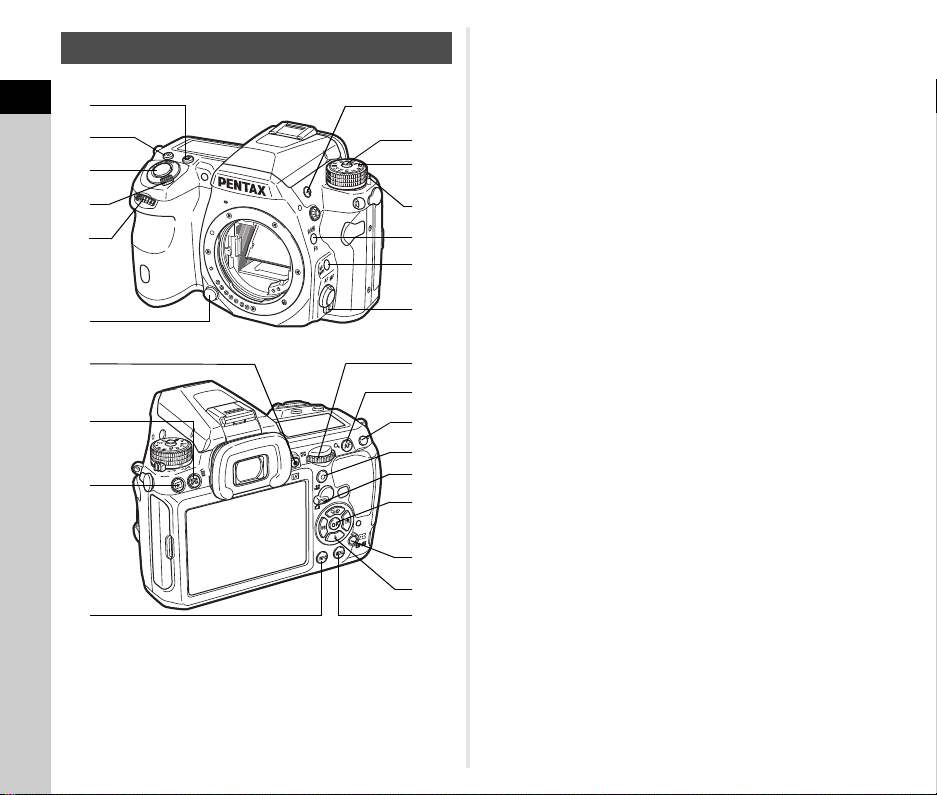
Buttons and Dials
6
2
f
c
j
k
n
p
9
8
g
i
h
o
7
4
3
a
0
5
1
e
d
l
b
m
1
Introduction
1 EV Compensation button (J)
Press to change the exposure compensation value. (p.37)
2 ISO button (N)
Press to change the ISO sensitivity. (p.39)
8
3 Shutter release button
Press to capture images. (p.32)
In playback mode, press halfway to switch to capture mode.
4 Main switch
Move to turn the power on/off or to preview. (p.29, p.46)
5 Front e-dial (Q)
Changes the value for camera settings such as exposure. (p.36)
You can change the menu category when a menu screen is
displayed. (p.17)
In playback mode, use this to select a different image.
6 Lens unlock button
Press to detach a lens. (p.25)
7 Flash pop-up button (1)
Press to pop up the built-in flash. (p.41)
8 Mode dial lock button
Press to allow the mode dial to be turned. (p.32)
9 Mode dial
Changes the exposure mode. (p.32)
0 Mode dial lock release lever
Use this lever to release mode dial lock to operate the mode
dial without pressing the mode dial lock button. (p.32)
a RAW/Fx button (P)
You can assign a function to this button. (p.71)
b AF Mode button (b)
Press to change the AF Mode or AF point. (p.43)
c Focus mode switch
Press to change the focus mode. (p.42)
d Live View/REC button (K/a)
Displays the Live View image. (p.33)
Starts/stops recording a movie in C mode. (p.38)
e AE Metering/Delete button (2/L)
Press to change the metering method. (p.40)
In playback mode, press to delete images. (p.34)
f Playback button (B)
Switches to playback mode. (p.34) Press the button again to
switch to capture mode.
g INFO button (G)
Changes the style of the display on the monitor. (p.9, p.12)
Page 11
h Rear e-dial (R)
100-320 0
10: 30
12 345
12 345
12 345
12 345
1/
F
250
160 0
5.6
12 345
12 345
1/
F
250
160 0
5.6
St atus Scr een
IS O AU TO S etti ng
Ad just ment Ra ng e
09/ 09/201 3
Standby mode
(Status Screen)
Shooting Info Display selection screen
Control panel
Changes the value for camera settings such as exposure. ( p.36)
You can change the menu tabs when a menu screen is
displayed. (p.17)
You can change the settings when the control panel is
displayed. (p.16)
In playback mode, use this to magnify an image or display
multiple images at the same time. (p.34, p.60)
i AF button (I)
Available for adjusting focus, instead of pressing the shutter
release button halfway. (p.42)
j AE Lock button (H)
Locks the exposure value before shooting.
In playback mode, the JPEG image that was just taken can
also be saved in RAW format. (p.34)
k Green button (M)
Resets the values being adjusted.
Switches to ISO AUTO when adjusting the sensitivity.
l Stills/Movies switch
Switches between A (Still capture) mode and C (Movie
recording) mode. (p.31)
m OK button (E)
When a menu or the control panel is displayed, press this
button to confirm the selected item.
n Change AF Point/Card slot switch button (c / d)
In capture mode, press this button to enable changing the
AF point. (p.44)
In playback mode, press this button to switch between the
memory cards inserted in the two slots, SD1 and SD2.
(p.34)
o Four-way controller (ABCD)
Displays the Drive Mode/Flash Mode/White Balance/
Custom Image setup menu. (p.16)
When a menu or the control panel is displayed, use this to
move the cursor or change the item to set.
Press B in single image display of play back mode to display
the playback mode palette. (p.59)
When selecting the area of an image to magnify or to use as
a focusing area, you can move the area diagonally by
pressing two keys at the same time.
p MENU button (F)
Displays a menu. Press this button while the menu is
displayed to return to the previous screen. (p.17)
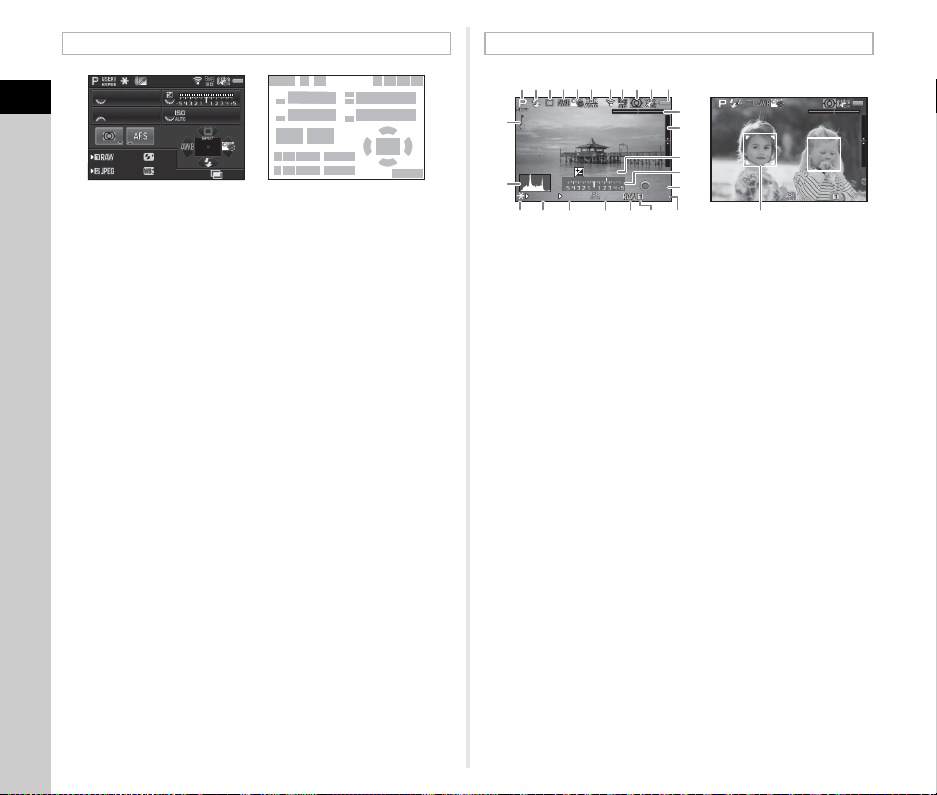
Monitor Display
Capture Mode
With this camera, you can take pictures while looking through
the viewfinder or while viewing the image on the monitor.
When using the viewfinder, you can take pictures while
checking the status screen displayed on the monitor and the
viewfinder. When not using the viewfinder, you can take
pictures while viewing the Live View image displayed on the
monitor.
The camera is in “standby mode” when it is ready to shoot, such
as when the status screen or Live View image is displayed.
Press G in standby mode to display the “control panel” and
change settings. (p.16) You can change the type of information
displayed in standby mode by pressing G while the control
panel is displayed. (p.12)
1/
250
F
5.6
12345
12345
1600
1/
250
F
5.6
12345
12345
ISO AUTO Setting
Adjustment Range
09/09/2013
Status Screen
1600
100-3200
10:30
12345
12345
1
Introduction
9
Page 12
Status Screen
123
8
9
11
8
8
12
13
10
14 15
17 18 19
21
25
24262322
16
17 18 2016
8
4567
12 34512345
20 002000
G1 A1G1A1
12 34512345
1/1/
FF
400 04000
128 0 012800
5.65.6
+1 .0+1.0
1/
200 01/2000 F2. 8F2.8 160 01600 9999999999
+1. 7EV+1.7
EV
1/
200 01/2000 F2. 8F2.8 160 01600 9999999999
±0EV ±0EV
123456 91011
23
87
13
14
17
16
18
24 2519 20 21 22 26
12
15
1
Introduction
1 Exposure Mode (p.36) 14 AE Metering (p.40)
2 AE Lock 15
3 Digital Filter (p.56)/HDR
Capture (p.57)
4 Wireless LAN status
(p.78)
(p.85)
Horizon Correction
7 Battery level 22
8 E-dial guide 23 AF point (p.44)
9 Shutter speed 24 Custom Image (p.54)
10 Aperture value 25
11 EV Compensation
(p.37)/Exposure
Bracketing (p.49)
12 EV bar scale
13 Sensitivity (p.39)
10
Focus Method (p.42)
16 Card slot number (p.35)
17 File Format (p.35)
18 Image storage capacity
19 Flash Exposure
Compensation (p.41)5 GPS positioning status
20 White Balance fine-
tuning (p.53)6 Shake Reduction/
21 Drive Mode (p.47)
White Balance (p.52)
Flash Mode (p.41)
26 Operation guide, and
number of shots during
Multi-exposure, Interval
Shooting or Interval
Composite
Live View
1 Exposure Mode (p.36) 14 Electronic Level (vertical
2 Flash Mode (p.41)
tilt) (p.15)
3 Drive Mode (p.47) 15 Histogram
4 White Balance (p.52) 16 EV Compensation (p.37)
5 Custom Image (p.54) 17 EV bar scale
6 Digital Filter (p.56)/HDR
Capture (p.57)
7 Wireless LAN status
(p.78)
8 GPS positioning status
(p.85)
18 Operation guide
19 AE Lock
20 Shutter speed
21 Aperture value
22 Sensitivity (p.39)
23 File Format
9 AE Metering (p.40) 24 Card slot number in use
10 Shake Reduction/
Horizon Correction/
Movie SR
11 Battery level
12 Temperature warning
13 Electronic Level
(p.35)
25 Image storage capacity
26 Face detection frame
(when [Contrast AF] is
set to [Face Detection])
(p.44)
(horizontal tilt) (p.15)
t Memo
•
In [Live View] of the A3 menu, you can change the settings of
the items displayed on the moni tor during Live View. (p.19)
Page 13
Control Panel
1
2
334
4
576
9
14
19
8
13
18
10
15
20
11
16
21
12
17
22
6
17
20
23
16
18
7
10
26
8
24
21
9
25
27 28
1
2
334
4
27 28
10: 3010:30
1: 23' 45 "1:23'45"
1: 23' 45 "1:23'45"
100-320 0100-3200
10: 3010:30
12 34512345
12 34512345
IS O AU TO S etti ngISO AUTO Setting
Ad just ment Ra ng eAdjustment Range
09/ 09/201 309/09/2013
Ex posu re S ett in gExposure Setting
Pr ogra m AEProgram AE
09/ 09/201 309/09/2013
C mode
A mode
1 Function name 16 AF Mode (p.43)/Contrast
2 Setting
3 Card slot number (p.35) 17 AF point (p.44)/Focus
4 Number of recordable
5 ISO AUTO Setting (p.39) 19 File Format (p.35)
6 Highlight Correction
7 Shadow Correction
8 Digital Filter (p.56) 21 Shake Reduction/Movie
9 HDR Capture (p.57)
10 AF Assist Light (p.43) 22 AA Filter Simulator (p.58)
11 High-ISO NR (p.40) 23 Exposure Setting (p.38)
12 Slow Shutter Speed NR 24 Recording Sound Level
13 Distortion Correction
14 Lateral Chromatic
15 Peripheral Illumination
AF (p.44)
Peaking (p.45)
still pictures/movie
recordable time
18 Memory Card Options
(p.35)
20 JPEG Recorded Pixels
(p.57)
and Quality Level (p.35)/
movie recorded pixels
(p.57)
(p.35)
SR
(p.38)
(p.57) 25 Playback Sound Volume
26 Framerate (p.35)
Aberration Adjustment
(p.57)
Correction (p.57)
27 Current date and time
28 Destination (p.74)
t Memo
• Items that can be selected vary depending on the current
camera setup.
• If no operations are made within 1 minute while the control
panel is displayed, the camera will return to standby mode.
• You can change the display color of the status screen, menu
cursor and control panel in [Display Color] of [LCD Display] in
the D1 menu. (p.22)
1
Introduction
11
Page 14

Shooting Info Display
Example:
Tilted 1.5° to the left (yell ow)
Vertically level (green)
12 345
12 345
1/
F
250
1600
5.6
1/
200 01/2000 F2 .8F2.8 200200 +0 .3+0.3
100 -0001100-0001
1/
200 01/2000 F2 .8F2.8 200200 +0. 3+0.3
100 -0001100-0001
St anda rd I nfor mat ion Disp layStandard Information Display
Single image display
(Standard Information Display)
Playback Info Display
selection screen
You can change the type of information displayed in standby
mode by pressing G while the control panel is displayed. Use
1
CD to select the type and press E.
Introduction
When shooting with the viewfinder
Status
Screen
Electronic
Level
Display Off Nothing is displayed on the monitor.
Electronic
Compass
When shooting with Live View
Standard
Information
Display
No
Information
Display
12
Displays the settings for shooting with the
viewfinder. (p.10)
Displays the camera
angle.
A bar scale indicating
the horizontal camera
angle appears at the
bottom of the screen,
and a bar scale
indicating the vertical
camera angle appe ars
on the right side. If the camera angle cannot be
detected, both ends and the center of the bar
scales flash red.
The current latitude, longitude, altitude,
direction, and Coordinated Universal Time
(UTC) are displayed. Turn the camera off and on
again to return to the status screen.
Available only when the optional GPS unit is
attached to the camera and is operating. (p.85)
The Live View image and the settings for
shooting with Live View are displayed. (p.10)
Certain icons, such as those for the Exposure
Mode and Drive Mode, are not displayed.
When the camera is held vertically
When the camera is rotated to the vertical
position, the status screen and control
panel are displayed in a vertical position.
1/
250
F
5.6
1600
To not display images in the vertical
position, set [Auto Screen Rotation] to
[Off] in [LCD Display] of the D1 menu.
(p.22)
12345
12345
Playback Mode
The captured image and shooting information are displayed in
single image display of the playback mode.
Press G to change the type of information displayed in single
image display. Use CD to select the type and press E.
Standard
Information Display
Detailed
Information Display
Histogram Display
RGB Histogram
Display
No Information
Display
Captured image, file format, exposure value,
and operation guide indicators are displayed.
Detailed information on how and when the
image was taken is displayed (p.13).
Captured image and brightness histogram are displayed (p.13).
Not available during movie playback.
Captured image and RGB histogram are displayed (p.13).
Not available during movie playback.
Only the captured image is displayed.
t Memo
•
The display selected in Playback Info Display selection screen appears in
playback mode when the camera is turned off and on again. If [Pl ayback Info
Display] is set to [Off] in [Memory] of the
Display] always appears first when the camera is turned on. (p.75)
A
4 menu, t he [Standard Information
Page 15
Detailed Information Display
1
3
4567 8
123511109
2
2
13 14 15 18
191716
21
25
28 37
26 27 29 30 3132 33 34
22 24
20
36
1
3
4567 8
40
35
389
13 14 15 39
191716
21
253726 41 29 30
22 24
23
36
1
3
42
44
45
46
48
49
47
47
43
657 8
+1. 0+1.0
1/
200 01/2000 F2 .8F2.8
55. 0mm55.0mm
55. 0mm55.0mm
160 01600
500 0K5000K
500 0K5000K
100 -0001100-0001
+1. 5+1.5
±0±
0
±0±
0
±0±
0
±0±
0
±0±
0
±0±
0
±0±
0
10: 3010:30
10' 10"10'10"
1/
1251/125 F8.0F8.0
G1A 1G1A1
100 -0001100-0001
0.00.0
160 01600
G1A 1G1A1
±0±
0
±0±
0
±0±
0
±0±
0
±0±
0
±0±
0
±0±
0
10: 3010:30
100 -0001100-0001
0m0m 123 °123°
N 36°45 .410'N 36°45.410'
09/ 09/201 309/09/2013
10: 00:0010:00:00
ABCD EFGHIJK LMNOPQR STUVWXY ZABCDEFGHIJKLMNOPQRSTUVWXYZ
123 456123456
ABCD EFGHIJK LMNOPQR STUVWXY ZABCDEFGHIJKLMNOPQRSTUVWXYZ
123 456123456
W14 0°02.0 00'W140°02.000'
09/ 09/201 309/09/2013
09/ 09/201 309/09/2013
Still pictures
Movies
Page 2
AB
100 -0001
100 -0001
1/
200 0
F2. 8
200
+0. 3
1/
200 0
F2. 8
200
+0. 3
Brightne ss histo gram
AB
RGB histogram
1 Captured image 10 Flash Mode (p.41)
2 Rotation information
3 Exposure Mode (p.36) 12 Color Moiré Correction
4 Digital Filter (p.56)/HDR
(p.62)
Capture (p.57) 13 Shutter speed
5 Transferred via Wireless
LAN (p.78)
6 Protect setting (p.75)
7 Card slot number in use
8 Folder number-File
number (p.76)
9 Drive Mode (p.47) 18 Focus Method (p.42)
11 Flash Exposure
Compensation (p.41)
(p.66)
14 Aperture value
15 Shake Reduction/
Horizon Correction/
Movie SR
16 Sensitivity (p.39)
17 EV Compensation (p.37)
19 AE Metering (p.40) 34 Color Fringe Correction
20 AF point (p.44)
(p.69)
21 White Balance (p.52) 35 Custom Image setting
22
White Balance fine-tuning
(p.53) 36
23
AA Filter Simulator (p.58)
(p.54)
Custom Image parameters
37 Shooting date and time
24 Lens focal length 38 Length of time of the
25 File Format (p.35)
26 JPEG Recorded Pixels
(p.35)/movie recorded
pixels (p.35)
recorded movie
39 Volume
40 Sound
41 Framerate (p.35)
27 JPEG Quality (p.35) 42 Altitude (p.85)
28 Color Space (p.24) 43 Lens direction (p.85)
Highlight Correction (p.57)
29
Shadow Correction (p.57)
30
Distortion Correction (p.57)
31
Lateral Chromati c Aberration
32
Adjustment (p.57)
33 Peripheral Illumination
44 Latitude (p.85)
45 Longitude (p.85)
46 Universal Coordinated
Time
47 Information tampering
warning
Correction (p.57) 48 Photographer (p.78)
49 Copyright Holder (p.78)
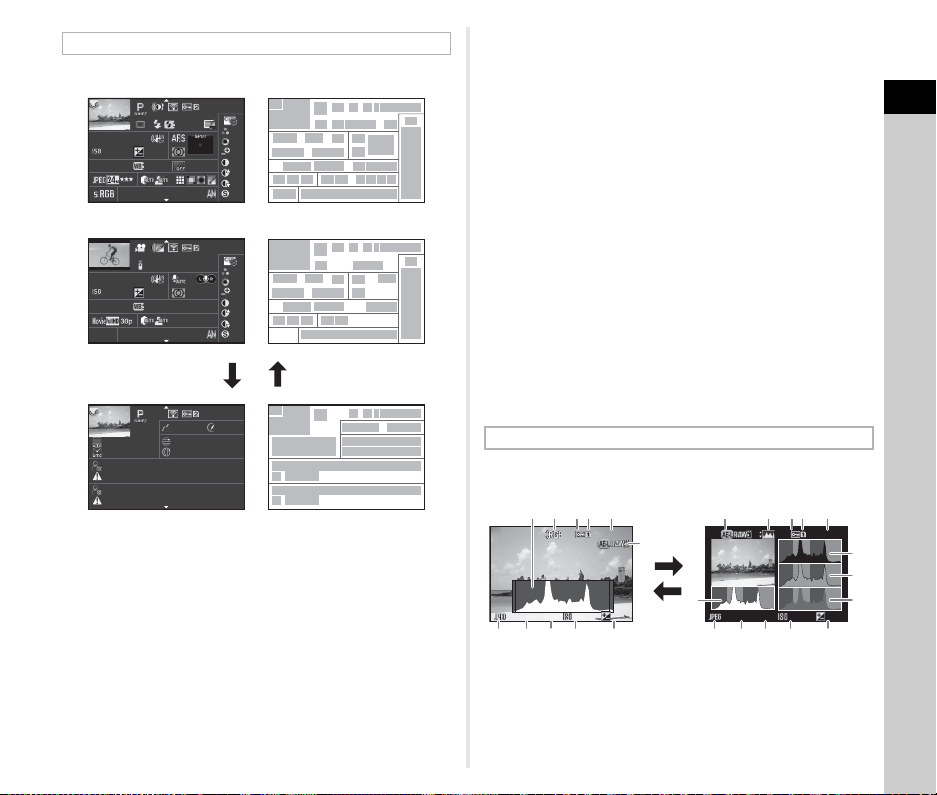
Histogram Display/RGB Histogram Display
Use AB to switch between the Histogram Display and RGB
Histogram Display.
145
32
100-0001
1/
2000
F2.8
200
7 8 9 10 11
+0.3
6
1
1/
2000
7 8 9 1110
F2.8
200
45326
100-0001
+0.3
1 Histogram (Brightness) 5 Folder number-File
2 Switch RGB histogram/
number
Brightness histogram 6 Save RAW Data
3 Protect setting 7 File Format
4 Card slot number in use 8 Shutter speed
1
Introduction
12
13
14
13
Page 16
9 Aperture value 12 Histogram (R)
1
4
19
181716151413
61011
12
2
1
3
5 7 8 9
10 Sensitivity 13 Histogram (G)
11 EV Compensation 14 Histogram (B)
1
Introduction
Viewfinder
When shooting with the viewfinder, the following information
appears in the viewfinder.
1 AF frame (p.32) 11 Sensitivity (p.39)/
2 Spot metering frame
(p.40)
3 AF point (p.44) 12 AE Lock
4 Flash indicator (p.41) 13 Change AF Point (p.44)
5 Focus Method (p.42) 14 Multi-exposure (p.50)
6 Shutter speed 15 AE Metering (p.40)
7 Aperture value 16 Shake Reduction
8 Focus indicator 17 Flash Exposure
9 EV bar scale/Electronic
Level (p.15) 18 EV Compensation
10 ISO/ISO AUTO
Exposure compensation
value
Compensation (p.41)
(p.37)/Exposure
Bracketing (p.49)
19 File Format (p.35)
t Memo
• The information is displayed in the viewfinder when the
shutter release button is pressed halfway, or during the meter
operating time (default setting: 10 sec.).
• The AF point in use for autofocus appears in red
(Superimpose AF Area) when the shutter release button is
pressed halfway. You can set it to [Off] in [14. Superimpose
AF Area] of the E2 menu.
• You can adjust the diopter in the
viewfinder using the diopter
adjustment dial. Adjust the di al until
the AF frame in the view finder is
focused.
14
Page 17
LCD Panel
3
1
2
4
10
11
12
13
14
67 8 9
191716
5
15 18
When level (at 0°)
When tilted 5° to the left
When held vertically and tilted 3° to the right
1 Shutter speed 12 Battery level
2 Multi-exposure (p.50) 13 GPS unit connected
3 Aperture value
4 Mirror Lock-up Shooting
(p.50)
5 AE Metering (p.40) 15 Flash Mode (p.41)
6 AF point (p.44) 16 Drive Mode (p.47)
7 Flash Exposure
Compensation (p.41)
8 EV bar scale/Electronic
Level (p.15)
9 EV Compensation
(p.37)/Exposure
Bracketing (p.49)
10 HDR Capture (p.57)
11 Wireless LAN
connection (p.78)
t Memo
• You can change the LCD panel backlight setting in [22. LCD
Panel Illumination] of the E4 menu. (p.24) You can also set
the camera so that the LCD panel illumination turns on or off
when P is pressed. (p.71)
(p.85)
14 Sensitivity (p.39)/EV
Compensation (p.37)
17 Card slot number (p.35)
18 File Format (p.35)
19 Remaining image
storage capacity/USB
Connection mode (p.64)/
External flash channel
(p.84)/Sensor cleani ng in
progress
Electronic Level
You can check whether the camera is tilted horizontally by
displaying the electronic level. The electronic level can be
displayed in the EV bar scale in the viewfinder and/or LCD
panel, or on the Live View screen.
Select whether to display the electronic level in [Electronic
Level] of the A3 menu. (p.19)
1
Introduction
15
Page 18
How to Change Function Settings
10: 23
12 34 5
12 34 5
12 34 5
12 34 5
100-320 0
Fi le Fo rm at
09/ 09 /20 13
Fi le Fo rm at
Ca nc el
OK
Use ABCD to select an item.
Use R to change
settings.
Press F to
cancel setting
operation.
Press E to confirm the
selected item and return to
the control panel.
Press E to make
detailed settings.
The camera functions and their settings can be selected and
1
changed by using the following ways.
Introduction
Direct keys Press ABCD in standby mode.
Control panel
Menus Press F.
Press G in standby mode.
(indicated with the v mark in this manual)
Using the Control Panel
G
You can set frequently used shooting functions. Press G in
standby mode.
File Format
100-3200
12345
12345
Using the Direct Keys
A Drive Mode p.47
B Flash Mode p.41
C White Balance p.52
D Custom Image p.54
16
WXYZ
09/09/2013
File Format
Cancel
10:23
12345
12345
OK
Page 19

Using the Menus
Me mory Car d O pt ionsMemory Card Options
Im age Capt ure S etti ngsImage Capture Settings
Di gita l Fi lte rDigital Filter
HD R Ca ptur eHDR Capture
Le ns C orre cti onLens Correction
Ex itExit
1 234
AF Ass is t Li ghtAF Assist Light
D- Rang e Se tti ng sD-Range Settings
IS O AU TO S etti ngISO AUTO Setting
Sl ow S hutt er Sp eed NRSlow Shutter Speed NR
Pr ogra m Li neProgram Line
GP SGPS
Ex itExit
1 2 34
Hi gh-I SO N RHigh-ISO NR
D- Rang e Se tti ng sD-Range Settings
IS O AU TO S etti ngISO AUTO Setting
Sl ow S hutt er Sp eed NRSlow Shutter Speed NR
Pr ogra m Li neProgram Line
GP SGPS
Ca ncelCancel
1 2 34
Hi gh-I SO N RHigh-ISO NR
OKOK
Me mory Car d O pt ionsMemory Card Options
Im age Capt ure S etti ngsImage Capture Settings
Di gita l Fi lte rDigital Filter
HD R Ca ptur eHDR Capture
Le ns C orre cti onLens Correction
Ex itExit
1 234
AF Ass is t Li ghtAF Assist Light
Fi le F orma tFile Format
JP EG R ecor ded P ixel sJPEG Recorded Pixels
Im age Capt ure S etti ngsImage Capture Settings
JP EG Q uali tyJPEG Quality
RAW Fil e F or matRAW File Format
PE FPEF
Use AB to select an item.
Use R to switch between menu tabs.
Press F to exit the
menu screen.
Menu numbers
Press D to display the
pop-up menu.
Press D to display
the submenu.
Press E to confirm the
selected item.
Press F to cancel the pop-up menu.
Press F to return to the
previous screen.
Use AB to select an item.
Use Q to change the menu category.
Most functions are set from the menus. Functions that can be set on the control panel can also be set from the menus.
t Memo
• For the Custom Setting menu (E1-4), you can show the setting screen of the next item in order of the menu on the monitor by
turning R while the submenu of the currently selected item is displayed.
• Press F to display the first tab of the menu that is appropriate to the current conditions. To display the menu tab last selected
first, set in [24. Save Menu Location] of the E4 menu.
• Settings are returned to their default values with [Reset] of the D3 menu. To reset all the settings in the Custom Setting menu to
the defaults, use [Reset Custom Functions] of the E4 menu. (Some settings do not apply.)
F
1
Introduction
17
Page 20
Menu List
1
Introduction
Rec. Mode Menu
Menu Item Function Default Setting Page
Exposure Modes
Memory Card Options
Image
Capture
Settings
AF Assist Light
A1
Digital Filter
HDR
Capture
Lens
Correction
D-Range Settings
A2
ISO AUTO Setting
High-ISO NR
*1
File Format
JPEG Recorded
*2
Pixels
JPEG Quality
RAW File Format Sets the RAW file format. PEF
*2
*2
HDR Capture
Exposure Bracket
*2
Value
Auto Align Sets whether to automatically adjust the composition. On
Distortion
Correction
Lat-Chromatic-Ab
Adj
Peripheral Illumin.
Corr.
*2
*2
*2
*2
*2
*2
Temporarily changes the exposure mode when the mode dial is
set to O, P or Q.
*2
Sets the recording method for when two memory cards are inserted.
*2
Sets the file format of images. JPEG
Sets the recording size of images saved in JPEG format. q
*2
Sets the quality of images saved in JPEG format. m
Sets whether to use the assist light when autofocusing in dark
locations.
Specifies a digital filter effect when taking pictures. No Filter p.56
*2
Sets the type of high dynamic range shooting. Off
Sets the range in which to change the exposure. ±2EV
Reduces distortions occurring due to lens properties. Off
Reduces lateral chromatic aberrations occurring due to lens
properties.
Reduces peripheral light fall-off occurring due to lens properties. Off
Expands the dynamic range and prevents bright and dark areas
from occurring.
Sets the range of automatic correction in ISO AUTO and AUTO
ISO Parameters.
ISO 100 to ISO
3200/Standard
Sets the Noise Reduction setting when shooting with a high ISO
sensitivity.
Auto/Auto p.57
G p.74
W p.35
p.35
On p.43
p.57
On
p.57
p.39
Auto p.40
18
Page 21
Menu Item Function Default Setting Page
Sets the Noise Reduction setting when shooting with a slow
Slow Shutter Speed NR
A2
Program Line Selects Program Line. Normal p.37
GPS Sets the camera action for when the optional GPS unit is used. – p.85
Contrast AF
Focus Peaking
Live
View
A3
Electronic
Level
Horizon Correction Corrects horizontal tilt of the camera. Off –
AA Filter Simulator
Shake Reduction
Input Focal Length
Instant
A4
Review
Grid Display Displays the grid during Live View. Off
Highlight Alert Bright (overexposed) areas blink red during Live View. Off
Composition
Adjust.
Viewfinder
Live View Displays the electronic level during Live View. On p.10
Display Time Sets the Instant Review display time. 1sec.
Zoom Instant
Review
Save RAW Data
Delete Sets whether to delete the image during Instant Review. On
Histogram Display Displays the histogram during Instant Review. Off
Highlight Alert Bright (overexposed) areas blink red during Instant Review. Off
*2
shutter speed.
*2
Sets the AF Mode for shooting with Live View. Face Detection p.44
Emphasizes the outline of the subject in focus and makes it
*2
easier to check the focus.
Allows you to adjust the composition of your image using the
Shake Reduction mechanism.
Displays the electronic level in the EV bar scale in the viewfinder
and/or LCD panel.
*2
*2
Applies low-pass filter effects using the Shake Reduction
mechanism.
Activates the Shake Reduction function. On –
Sets the focal length when using a lens of which focal length
information cannot be obtained.
Sets whether to display a magnified image during Instant
Review.
Sets whether to save the RAW image during Instant Review.
Auto –
Off p.45
p.10Histogram Display Displays the histogram during Live View. Off
Off p.58
Off p.15
Off p.58
35mm p.82
On
On
p.32
1
Introduction
19
Page 22
Menu Item Function Default Setting Page
Zoom Instant
Review
1
Introduction
Digital
Preview
E-Dial
Programming
A4
Button
Customization
Memory Determines which settings to save when the power is turned off.
Save USER Mode
*1 Appears only when the mode dial is set to O, P, or Q.
*2 Can also be set from the control panel.
Save Preview
Image
Histogram Display Displays the histogram during Digital Preview. Off
Highlight Alert Bright (overexposed) areas blink red during Digital Preview. Off
G
H
I
J
K
L
M
N
m -, -, n -, J, GLINE
p I
o I, J, G
Rotation Direction Reverses the effect obtained when Q or R is turned. Rotate Right
RAW/Fx Button Sets the P operation.
Preview Dial
Sets whether to display a magnified image during Digital
Preview.
Sets whether to enable saving an image displayed in Digital
Preview.
Sets the Q / R / M operation for each exposure mode.
Sets the camera action for when the main switch is turned to the
U position.
You can save freque ntly used capture settings to O, P or Q
of the mode dial.
I, J, XG
-, ISO, I, -, -
-, J, -
I
, J, GLINE
, J, GLINE
I
-, J, -
-, J, -
, J, GLINE
One Push File
Format
Optical
Preview
On for settings
other than
Digital Filter
and HDR
Capture
On
On
–p.73
p.46
p.71
LINE
p.71AF Button Sets the I operation. Enable AF1
p.75
20
Page 23
Movie Menu
Menu Item Function Default Setting Page
Exposure Setting
Memory Card Options
Movie Capture Settings
Recording Sound Level
C1
Digital Filter
HDR Capture
Movie SR
*1 Can also be set from the control panel.
*1
*1
*1
*1
Sets the exposure mode for C mode. m p.38
Selects one of memory cards inserted in SD1 and SD2 slots for
*1
recording movies.
*1
Sets the number of recorded pixels and framerate. u/30p p.35
Sets the Recording Sound Level and the volume level for
*1
recording.
Sets a digital filter effect when taking pictures. No Filter p.56
Sets the type of high dynamic range shooting when the drive
mode is set to [Interval Movie Record].
Activates the Movie Shake Reduction function. On –
SD1 p.35
Auto –
Off p.57
Playback Menu
Menu Item Function Default Setting Page
Display Duration Sets an image display interval. 3sec.
Screen Effect Sets a transition effect when the next image is displayed. Off
Slideshow
Quick Zoom Sets the initial magnification when magnifying images. Off –
B1
Highlight Alert
Auto Image Rotation
Protect All Images Protects all images stored in the memory card at once. – –
Delete All Images Deletes all images stored in the memory card at once. – –
Repeat Playback
Auto Movie
Playback
Starts the slideshow again from the beginning after the last
image is displayed.
Plays back movies during the slideshow. On
Bright (overexposed) portions blink red in Standard Information
Display or Histogram Display in playback mode.
Images are rotated when playing back images captured with the
camera held vertically or images for which the rotation
information has been changed.
Off
Off –
On p.62
p.62
1
Introduction
21
Page 24
Set-up Menu
Menu Item Function Default Setting Page
1
Introduction
22
Language/W Changes the display language. English p.29
Date Adjustment Sets the date and time or display format. 01/01/2013 p.30
World Time
Text Size Sets whether to magnify the text size when selecting a menu. Standard p.30
Sound Effects
D1
Guide Display
LCD
Display
LCD Display Settings Adjusts the brightness, saturation and the color of the monitor. 0 –
USB Connection Sets the USB connection mode when connecting to a computer. MSC p.64
HDMI Out
Folder Name Sets the folder name in which images are stored. Date p.76
Create New Folder Creates a new folder on the memory card. – p.76
File Name Sets the file name assigned to the image. IMGP/_IMG p.77
D2
File No.
Copyright Information
Flicker Reduction Cuts down on screen flicker by setting the power frequency. 50Hz –
Auto Power Off
D3
Select Battery
Auto Screen
Rotation
Display Color
Sequential
Numbering
Reset File Number
Switches between the date and time display of your hometown
city and that of a specified city.
Switches the operation sound on/off and changes the volume for
In-focus, AE-L, Self-timer, Remote Control, Mirror Up, Change
AF Point, and the P button operation.
Sets whether to display the operation guides when the exposure
mode is changed.
Sets whether to display the status screen and control panel
vertically if the camera is held vertically.
Sets the display color of the status screen, menu cursor, and
control panel.
Sets the output format when connecting to an AV device with an
HDMI input terminal.
Sets whether to continue the sequential numbering for the file
name when a new folder is created.
Resets the file number setting, and returns to 0001 each time a
new folder is created.
Sets the photographer and copyright information embedded in
Exif.
Sets the time until the camera turns off automatically if no
operations are made for a certain period of time.
Sets the camera action for when the optional battery grip is
attached to the camera.
Hometown p.74
Volume 3/
All On
1 min. p.29
Auto Select/
Auto-detect
–
On p.32
On p.12
1 p.11
Auto p.63
On
p.77
–
Off p.78
p.27
Page 25

Menu Item Function Default Setting Page
Wireless Memory Card
D3
Reset
Pixel Mapping
Dust Alert
Dust Removal Cleans the CMOS sensor by shaking it. – p.86
D4
Sensor Cleaning
Format Formats a memory card. – p.31
Firmware Info/Options Displays the camera’s firmware version. – –
Sets the camera action for when an Eye-Fi card or a Flucard is
used.
Resets the settings of the direct keys and for the items of the A
menu, C menu, B menu, D menu, control panel, and
playback mode palette.
Maps out and corrects any defective pixels on the CMOS sensor.
Detects dust adhering to the CMOS sensor and visually displays
the location of the dust on the monitor.
Locks the mirror in the up position for cleaning the CMOS sensor
with a blower.
– p.78
––
– p.86
– p.87
– p.87
Custom Setting Menu
Menu Item Function Default Setting Page
1. EV Steps Sets the adjustment steps for exposure. 1/3 EV Steps p.37
2. Sensitivity Steps Sets the adjustment steps for ISO sensitivity. 1 EV Step p.39
3. Meter Operating Time Sets the meter operating time. 10sec. –
4. AE-L with AF Locked
E1
5. Link AE and AF Point
6. Auto EV Compensation
7. Bulb (B) Mode Options
8. Bracketing Order Sets the order for Exposure Bracketing shooting. 0 - + p.49
9. One-Push Bracketing
E2
10. WB Adjustable Range
11. WB When Using Flash Sets the white balance setting for when using flash.
Sets whether to lock the exposure value when the focus is locked.
Sets whether to link the exposure and AF point in the focusing
area.
Sets whether to automatically compensate when the proper
exposure cannot be determined.
Sets the camera operation when pressing the shutter release
button in M mode.
Sets whether to shoot all frames with one release when using
Exposure Bracketing.
Sets whether to automatically fine-tune the white balance when
the light source is specified for the white balance setting.
Off –
Off p.40
Off –
Mode1 –
Off p.49
Fixed p.53
Auto White
Balance
p.53
1
Introduction
23
Page 26

Menu Item Function Default Setting Page
1
Introduction
12. AWB in Tungsten Light
E2
13. Color Temperature Steps Sets the adjustment steps for color temperature. Kelvin p.54
14. Superimpose AF Area
15. AF.S Setting
16. 1st Frame Action in AF.C
17. Action in AF.C Continuous
E3
18. Hold AF Status
19. AF with Remote Control
20. Release While Charging
21. Color Space Sets the color space to use. sRGB –
22. LCD Panel Illumination Sets the illumination for the LCD panel. High p.15
23. Save Rotation Info Sets whether to save rotation information when shooting. On p.62
24. Save Menu Location
25. Catch-in Focus
E4
26. AF Fine Adjustment
27. Using Aperture Ring
Reset Custom Functions
Sets the tungsten light color tone for when the white balance is
set to g (Auto White Balance).
Sets whether to display the active AF point in red in the viewfinder.
Sets the action priority for when the focus mode is set to x
and the shutter release button is fully pressed.
Sets the action priority for the first frame when the focus mode is
set to y and the shutter release button is fully pressed.
Sets the action priority during continuous shooting when the
focus mode is set to y.
Sets whether to maintain the focus for a certain amount of time
when the subject happens to move out of the selected focusing
area after being focused.
Sets whether to use autofocus when shooting with a remote
control unit.
Sets whether to release the shutter while the built-in flash is
being charged.
The last menu tab displayed on the monitor is saved, and it is
displayed again the next time F is pressed.
Sets whether to enable Catch-in Focus shooting when a manual
focus lens is attached, and the shutter is released automatically
when the subject comes into focus.
Allows you to precisely fine tune your lenses with the camera’s
autofocus system.
Sets whether to enable shutter release when the lens aperture
ring is set to a position other than 9.
Resets all the settings of the Custom Setting menu to the
defaults.
Subtle
Correction
Focus-priority p.43
Release-
priority
Focus-priority p.43
Reset Menu
Location
Disable p.83
p.53
On p.14
p.43
Off p.43
Off p.49
Off p.41
p.17
Off –
Off p.45
––
24
Page 27
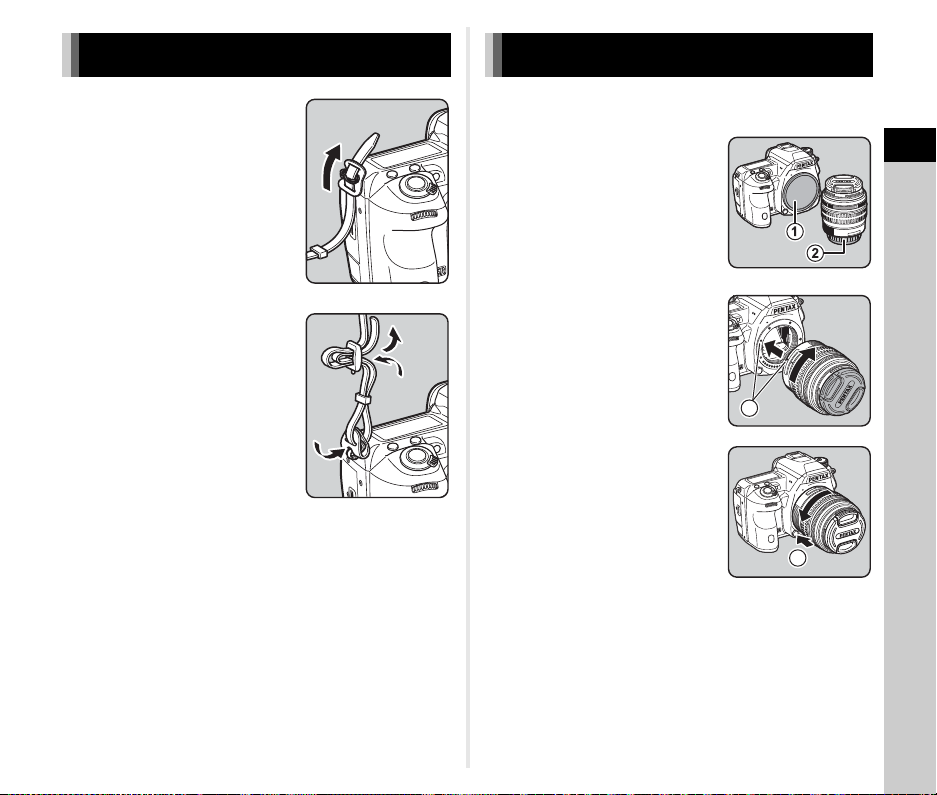
Attaching the Strap Attaching a Lens
1 Pass the end of the strap
through the protective
cover and triangular ring.
2 Secure the end of the strap
on the inside of the clasp.
1 Make sure that the camera is turned off.
2 Remove the body mount
cover (1) and lens mount
cover (2).
After removing the cover, be sure
to put the lens down with the lens
mount side facing upward.
3 Align the lens mount index
(red dots: 3) on the
camera and the lens, and
secure by turning the lens
clockwise until it clicks.
3
To remove the lens
Attach the lens cap turn the
lens counterclockwise while
pressing the lens unlock button
(4).
4
2
Getting Started
25
Page 28
u Caution
Lithium-ion
battery
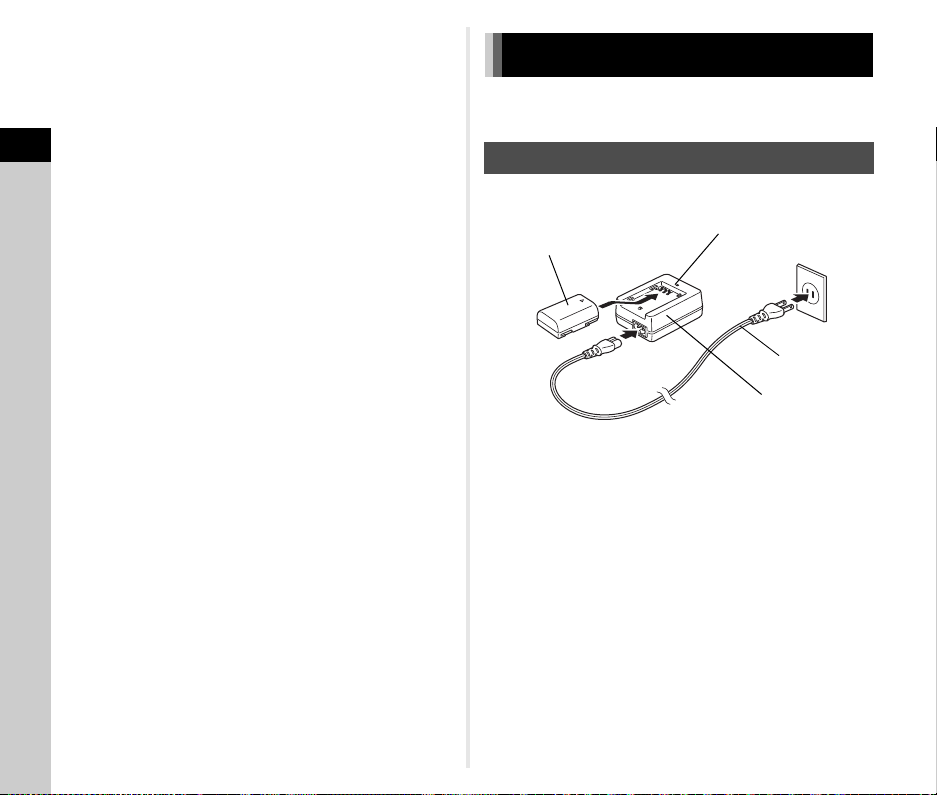
Battery charger
Indicator lamp
AC plug cord
3
1
2
• When attaching or removing the lens, cho ose an environment
that is relatively free of dirt and dust.
• Keep the body mount cover on the camera when a lens is not
attached.
• Be sure to attach the lens mount cover and lens cap to the
lens after removing it from the camera.
2
• Do not insert your fingers inside the lens mount of the camera
Getting Started
or touch the mirror.
• The camera body and lens mount incorporate lens
information contacts. Dirt, dust, or corrosion may damage the
electrical system. Please contact your nearest service center
for professional cleaning.
• We assume no responsibility nor liability for accidents,
damages and malfunctions resulting from the use of lenses
made by other manufacturers.
t Memo
• Refer to “Functions Available with Various Lenses” (p.81) for
details on the functions of each lens.
26
Using the Battery and Charger
Use the battery D-LI90 and battery charger D-BC90 exclusively
developed for this camera.
Charging the Battery
1 Connect the AC plug cord to the battery charger.
2 Plug the AC plug cord into the power outlet.
3 Face the A mark on the battery up, and insert it
into the battery charger.
The indicator lamp is lit while charging and turns off when
the battery is fully charged.
u Caution
• Do not use the battery charger D-BC90 to charge batteries
other than D-LI90. Charging other batteries may cause
damage or heating.
• Replace the battery with a new one in the following cases:
• If the indicator lamp blinks or does not light after the battery
is inserted correctly
• If the battery starts to run down more quickly even after
being charged (the battery may have reached the end of its
service life)
Page 29
t Memo
• The maximum charging time is approximately 390 minutes (it
depends on temperature and remaining battery power).
Charge in a location where the temperature is between 0°C
and 40°C (32°F and 104°F).
Inserting/Removing the Battery
u Caution
• Insert the battery correctly. If the battery is inserted
incorrectly, it may not be removed.
• Wipe the electrodes of the battery with a soft dry cloth before
inserting.
• Do not open the battery cover or remove the battery while the
power is on.
• Be careful as the camera or battery may become hot when
the camera is used continuously for a long period of time.
• Remove the battery when you will not use the camera for a
long time. The battery may leak and damage the camera if left
installed during prolonged periods of non-use. If the removed
battery will not be used for six months or longer, charge the
battery for about 30 minutes before storing it, and after that,
recharge the battery every six to twelve months.
• Store the battery in a location where the temperature will
remain at or below room temperature. Avoid locations with
high temperatures.
• The date and time may be reset if you leave the battery out of
the camera for long periods of time. If this happens, set the
current date and time.
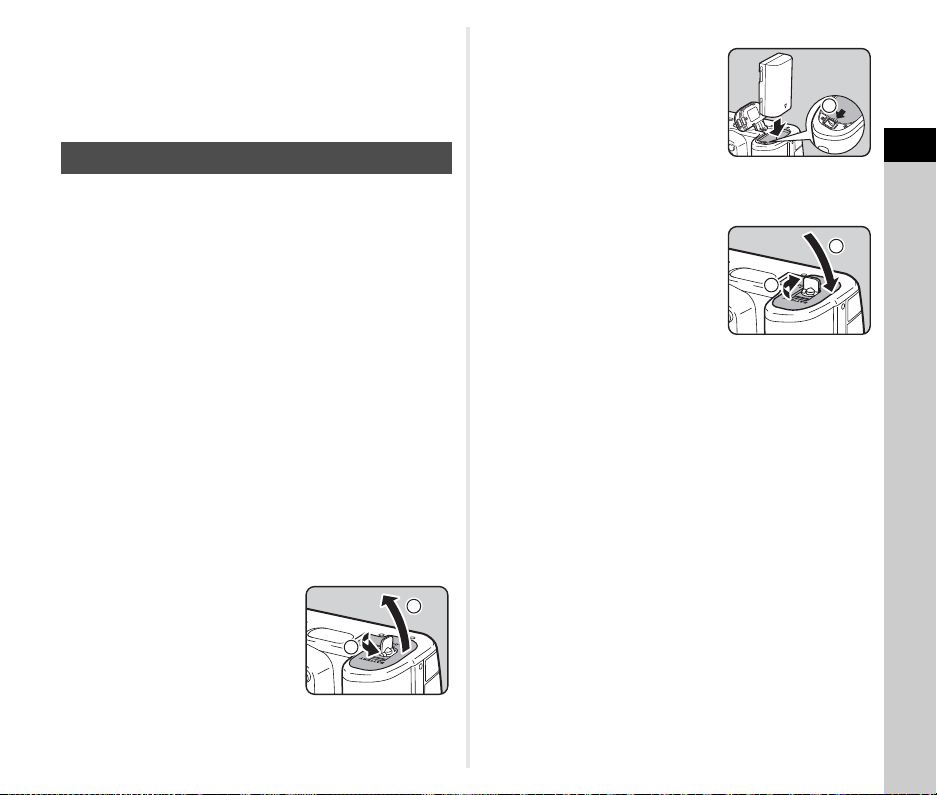
1 Open the battery cover.
Lift the battery cover unlock
knob, turn it towards OPEN to
unlock, and then pull the cover
open.
1
2
2 Face the A mark on the
battery towards outside of
the camera, and insert the
battery until it locks into
place.
To remove the battery, push the
battery lock lever in the direction
of 3.
3 Close the battery cover.
Turn the battery cover unlock
knob towards CLOSE to lock.
t Memo
• The battery level may not be displayed properly if the camera
is used at low temperatures or when performing continuous
shooting for a long time.
• Battery performance temporarily decreases as the
temperature decreases. When using the camera in cold
climates, have extra batteries at hand and keep them warm in
your pocket. Battery performance will return to normal when
returned to room temperature.
• Have extra batteries ready when traveling overseas, or taking
a lot of pictures.
• When the optional Battery Grip D-BG5 is used, the following
settings can be made in [Select Battery] of the D3 menu.
• Priority of battery use
• Type of AA batteries used
3
4
5
2
Getting Started
27
Page 30
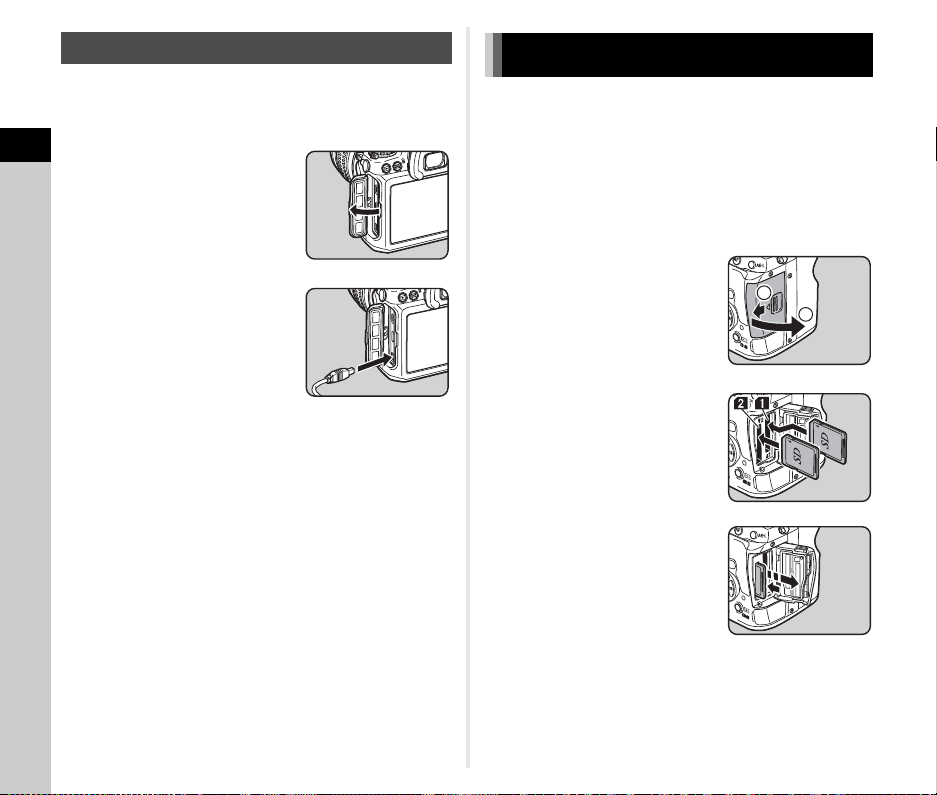
Using the AC Adapter
We recommend the use of the optional AC adapter kit K-AC132
when using the monitor for a long time or when connecting the
camera to a computer or AV device.
2
1 Make sure that the camera
Getting Started
is turned off, and open the
terminal cover.
2 Align the A marks on the
DC terminal of the AC
adapter and DC input
terminal of the camera, and
connect.
3 Connect the AC adapter to the AC plug cord, and
plug the cord into the power outlet.
u Caution
• Make sure the camera is turned off before connecting or
disconnecting the AC adapter.
• Make sure connections are secure between the terminals.
The memory card or data may be corrupted if the connection
to the power supply is lost while the card is being accessed.
• Be sure to read the manual of the AC adapter kit before using
the AC adapter.
Inserting a Memory Card
The following memory cards can be used with this camera.
• SD Memory Card, SDHC Memory Card, and SDXC Memory
Card
• Eye-Fi card
• Flucard compatible with this camera
In this manual, they are referred to as memory cards.
1 Make sure that the camera is turned off.
2 Slide the card cover in the
direction of 1.
1
2
3 Insert the card all the way
into the memory card slot
with the memory card label
facing toward the monitor.
Insert the card in the SD2 slot to
use an Eye-Fi card or a Flucard.
Push the memory card in once to
remove.
28
Page 31

4 Close the card cover, and
In itia l Se ttin g
Se ttin gs c ompl ete
Ca ncel
En glis h
Ne w Yor k
Tex t Si ze
St anda rd
slide it in the direction of
4.
Initial Settings
4
Turn the camera on and make the initial settings
u Caution
• Do not remove the memory card while the card access lamp
is lit.
• If the card cover is opened while the power is on, the camera
will turn off. Do not open the cover while the camera is in use.
• Use this camera to format (initialize) a memory card that is
unused or has been previously used on other devices. (p.31)
• Use a high-speed memory card when recording movies. If a
write speed cannot keep up with a recording speed, the
writing may stop during recording.
t Memo
• For details on how the data is recorded when two memory
cards are inserted, refer to “Memory Card Settings” (p.35).
• When using an Eye-Fi card or a Flucard, refer to “Using a
Wireless Memory Card” (p.78).
3
Turning the Camera On
1 Turn the main switch to
2
Getting Started
[ON].
The first time the camera is
turned on after purchasing, the
[Language/W] screen
appears.
t Memo
• The power will automatically turn off when you do not perform
any operations within a set period of time. (Default setting:
1min.) You can change the setting in [Auto Power Off] of the
D3 menu.
Setting the Display Language
1 Use ABCD to select the desired language and
press E.
The [Initial Setting] screen
appears in the selected
language.
Proceed to Step 6 if F
(Hometown) does not need to be
changed.
Initial Setting
New York
Text Size
Settings complete
Cancel
English
Standard
2 Press B to move the frame to F and press D.
The [F Hometown] screen appears.
29
Page 32

3 Use CD to select a city.
Ho meto wn
Ne w Yor k
DS T
Ca ncel
OK
In itia l Se ttin g
Se ttin gs c ompl ete
Ca ncel
En glis h
Ne w Yor k
Tex t Si ze
St anda rd
La rge
OK
In itia l Se ttin g
Se ttin gs c ompl ete
Ca ncel
En glis h
Ne w Yor k
Tex t Si ze
St anda rd
OK
Da te F orma t
Da te Ad jus tmen t
Da te
01/ 01/201 3
Tim e
00: 00
Se ttin gs c ompl ete
mm /dd /yy
24h
Ca ncel
OK
Da te F orma tDate Format
Da te Ad jus tmen tDate Adjustment
Da teDate
01/ 01/201 301/01/2013
Tim eTi me
00: 0000:00
Se ttin gs c ompl eteSettings complete
mm /dd /yymm/dd/yy
24h24h
Ca ncelCancel OKOK
OK
MENU
Da te F orma t
Da te Ad jus tmen t
Da te
09/ 09/201 3
Tim e
10: 00
Se ttin gs c ompl ete
mm /dd/ yy
24h
Ca ncel
OK
Hometown
Use R to change the region.
Refer to “List of World Time
Cities” (p.94) f or cities that can be
selected as a hometown.
2
Getting Started
4 Press B to select [DST] (daylight saving time),
New York
DST
Cancel
and use CD to select S or T.
5 Press E.
The camera returns to the [Initial Setting] screen.
6 Press B to select [Text Size] and press D.
7 Use AB to select
[Standard] or [Large], and
press E.
Selecting [Large] increases the
text size of the selected menu
items.
Initial Setting
New York
Text Size
Cancel
English
Standard
Settings complete
Large
Setting the Date and Time
1 Press D, and use AB to
select the date format.
OK
2 Press D, and use AB to select 24h or 12h.
3 Press E.
The frame returns to [Date Format].
4 Press B, and then press D.
The frame moves to the month if the date format is set to
[mm/dd/yy].
5 Use AB to set the month.
OK
Set the day, year and time in the
same manner.
Date Adjustment
Date Format
Date
Time
Settings complete
MENU
Cancel
mm/dd/yy
01/01/2013
00:00
24h
OK
OK
8 Press B to select [Settings
complete] and press E.
The [Date Adjustment] screen
appears.
30
Initial Setting
New York
Text Size
Settings complete
Cancel
English
Standard
6 Press B to select [Settings
complete] and press E.
OK
The camera switches to capture
mode and is ready to take a
picture.
Date Adjustment
Date Format
Date
Time
Cancel
t Memo
• You can change the language, text size, and date and time
settings from the D1 menu. (p.22)
mm/dd/yy
09/09/2013
10:00
Settings complete
24h
OK
Page 33

Formatting a Memory Card
Fo rmat
SD 1
SD 2
Fo rmat
OK
Ca ncel
Al l da ta o n SD 1 m emor y
ca rd w ill be d ele ted
Fo rmat
1 Press F.
The A1 menu appears.
2 Use Q or R to display D4 menu.
3 Use AB to select [Format] and press D.
The [Format] screen appears.
4 Use AB to select the
memory card slot in which
the memory card to format
is inserted and press D.
Format
SD1
SD2
D4
Basic Shooting Operation
Take pictures in T mode in which the camera automatically
sets the optimal exposure.
1 Remove the front lens cap
by pushing the top and
bottom portions as
indicated in the
illustration.
2 Turn the camera on.
2
Getting Started
5 Press A to select [Format]
and press E.
Formatting starts. When
formatting is completed, the D4
menu reappears.
u Caution
• Do not remove the memory card while formatting, or the card
may be damaged.
• Formatting deletes all data, both protected and unprotected.
t Memo
• When a memory card is formatted, the volume label assigned
to the card is “K-3”. When this camera is connected to a
computer, the memory card is recognized as a removable
disk with the name “K-3”.
Format
All data on SD1 memory
card will be deleted
Format
Cancel
OK
3 Turn the Stills/Movie
switch to A.
4 Set the focus mode switch
to v.
AF
MF
31
Page 34

5 Set the mode dial to T
Mode dial lock
button
Dial indicator
Gr een Mode
Focus indicator
while pressing the mode
dial lock button.
2
Getting Started
The selected exposure mode is
displayed on the monitor (Guide
Display).
y Guide Display settings
(p.22)
6 Look through the
viewfinder to view the
subject.
When using a zoom l ens, turn the
zoom ring to the right or left to
change the angle of view.
7 Position the subject inside
the AF frame and press the
shutter release button
halfway.
P appears and you will hear a
beep when the subject comes
into focus.
y Setting the Sound Effects
(p.22)
8 Press the shutter release button fully.
The captured image is displayed on the monitor (Instant
Review).
Available operations during Instant Review
L Deletes the image.
R Magnifies the image.
H Saves the RAW image.
Green Mode
Easy operation of the mode dial
Release the mode dial lock using
the mode dial lock release lever to
easily operate the mode dial
without having to press the mode
dial lock button.
32
Page 35

Shooting with Live View
1/
200 0
F2. 8
160 0
123 45
AF frame
1 Press K in Step 6 on p.32.
The Live View image is displayed
on the monitor.
2 Position the subject inside
the AF frame on the
monitor and press the
shutter release button
halfway.
The AF frame turns green and
you will hear a beep when the
subject comes into focus.
Available operations during Live View
E Magnifies the image.
Use R to change the magnification (up to
10x).
Use ABCD to change the display area.
Press M to return the display area to the
center.
Press E to return to the actual size.
K Exits the Live View shooting.
Subsequent steps are the same as shooting with the
viewfinder.
1/
2000
F2.8
1600
12345
t Memo
• You can use I to focus on the subject. (p.42)
• You can preview the image on the monitor and check the
depth of field before shooting. (p.46)
• You can set the operation and display settings during Instant
Review in [Instant Review] of the A4 menu (p.19). When
[Display Time] is set to [Hold], Instant Review will be
displayed until the next operation.
u Caution
• Some functions are not available in T mode. If you attempt
to use the functions that are not available, such as the direct
key operation, the message [This function is not available in
the current mode] appears.
2
Getting Started
33
Page 36

Reviewing Images
1/
200 0
F2. 8
200
0.0
100 -0001
Review the captured image on the monitor.
1 Press B.
2
Getting Started
G Changes the type of
information displayed (p.12).
t Memo
• When Hv is displayed on the monitor, the JPEG
image that was just taken can also be saved in RAW format
(Save RAW Data).
The camera enters playback
mode and the most recently
captured image is displayed
(single image display).
2 Review the captured image.
Available operations
C/Q to the left Displays the previous image.
D/Q to the right Displays the next image.
L Deletes the image.
R to the right
R to the left Switches to the thumbnail
d Switches between the SD1
H Saves the RAW image (only
34
100-0001
1/
2000
F2.8
200
Magnifies the image (up to 16×).
Use ABCD to change the
display area.
Press M to return the display
area to the center.
Press E to return the display
area to the entire image.
display (p.60).
card and SD2 card.
when the data is available).
0.0
Page 37

Configuring the Capture Settings
Memory Card Settings
The recording method for when two memory cards are inserted
can be set in [Memory Card Options] of the A1 menu or the
control panel.
W Sequential
Use
Y Save to Both Saves the same data to the memory
Z Separate
RAW/JPEG
t Memo
• When in C mode, data is saved to the card in either SD1 or
SD2. Set in [Memory Card Options] of the C1 menu.
When the memory card in SD1 slot
becomes full, data is saved to the card in
SD2.
cards in SD1 and SD2.
Saves the RAW data to the memory card
in SD1, and JPEG data to the card in
SD2.
A1/v
t Memo
• When [File Format] is set to [RAW+], a JPEG image and a
RAW image with the same file number are saved at the same
time.
• You can take pictures with a different file format setting only
when P is pressed. (p.72)
• [PEF] of [RAW File Format] is a PENTAX original RAW file
format.
Movie Capture Settings
Set the file format for movies in [Movie Capture Settings] of the
C1 menu or from the control panel.
Recorded Pixels Framerate
u
(default setting)
t 60p, 50p, 30p, 25p, 24p
60i, 50i, 30p (default setting), 25p, 24p
C1/v
3
Shooting
Image Capture Settings
Set the file format for still pictures in [Image Capture Settings] of
the A1 menu or from the control panel.
File Format JPEG (default setting), RAW, RAW+
JPEG Recorded
Pixels
JPEG Quality m (default setting), l, k
RAW File Format PEF (default setting), DNG
q (default setting), p, o, r
A1/v
u Caution
• When [Memory Card Options] is set to [Separate RAW/
JPEG], [File Format] is fixed to [RAW+].
35
Page 38

Taking Still Pictures
12 345
12 345
1/
F
30
100
4.5
1/
30
F4. 5
100
123 45
Select the exposure mode that suits the subject and shooting
conditions.
The following exposure modes are available on this camera.
3
Shooting
Mode
G
Program
Automatic Ex posure
H
Sensitivity Priority
Automatic Ex posure
I
Shutter Priority
Automatic Ex posure
J
Aperture Priority
Automatic Ex posure
K
Shutter & Aperture
Priority Automatic
Exposure
L
Manual Exp osure
M
Bulb Exposure
N
Flash X-sync Speed
*1 You can set the value to be changed in [E-Dial Programming] of the
A4 menu. (p.71)
*2 [ISO AUTO] is not available.
*3 Fixed to [ISO AUTO].
*4 Fixed to 1/180 seconds.
x: Available #: Restricted
Change
Shutter
Speed
#
××
x
×
Change
Aperture
Value
*1
Change
Sensitivity
*1
#
xx
x
×
xx
xxx
xxx*3x
xxx*2x
×
×
xx
*4
xx*2x
: Not available
×
EV Com-
pensation
*2
x
*2
×
1 Turn the mode dial to select the desired
exposure mode.
Q or R appears on the
status screen for the value that
can be changed.
The value that can be changed is
underlined in the viewfinder.
D appears on the LCD panel for
the value that can be changed.
During Live View, D appears for
the value that can be changed.
1/
1/
F
30
30
4.5
12345
12345
F4.5
2 Turn R.
The aperture value is changed in
J, K, L, M, or N mode.
The sensitivity is changed in H
mode.
3 Turn Q.
The shutter speed is changed in
I, K, or L mode.
100
100
12345
36
Page 39

t Memo
A Auto
The camera determines the
appropriate settings.
B Normal
Basic Program Automatic
Exposure (default setting)
C Hi-speed priority Prioritizes high shutter speeds.
D
DOF priority
(deep)
Closes the aperture for a deep
depth of field.
E
DOF priority
(shallow)
Opens the aperture for a shallow
depth of field.
F MTF priority
Prioritizes the best aperture
setting of the attached lens when
a DA, DA L, D FA, FA J or FA
lens is used.
• The settings for exposure can be specified in increments of
1/3 EV steps. In [1. EV Steps] of the E1 menu, you can
change the adjustment steps to 1/2 EV steps.
• A proper exposure may not be obtained with the selected
shutter speed and aperture value when the sensitivity is set
to the fixed value.
•In L or N mode, the difference from the proper exposure is
displayed in the EV bar scale while the exposure is adjusted.
•In M mode, the drive mode cannot be set to Continuous
Shooting, Exposure Bracketing, Multi-exposure+Continuous,
Interval Shooting, or Interval Composite.
• For each exposure mode, you can set the camera operation
for when Q or R is turned or M is pressed. Set in [E-Dial
Programming] of the A4 menu. (p.71)
Program Line
In [Program Line] of the A2 menu, you can specify how
exposure is controlled when [GLINE] is selected for the M
button operation.
EV Compensation
The compensation value can be set between -5 and +5 EV (-2
and +2 EV in C mode).
1 Press J, and then turn
R.
e and the compensation value
are displayed on the status
screen, Live View screen, LCD
panel and in the viewfinder
during adjustment.
Available operations
J Starts/ends adjusting the compensation
value.
M Resets the adjustment value to the default
setting.
t Memo
• Exposure Bracketing shooting enables you to take pictures
while automatically changing exposure. (p.49)
3
Shooting
37
Page 40

Recording Movies
10' 30"
Sound
Recordable Time
Microphone terminal
Headphone terminal
Plug Stereo mini plug (ø3.5 mm)
Format Stereo electret condenser
Power
Plug-in Power Method (operating
voltage of 2.0 V or lower)
Impedance 2.2 kΩ
1 Turn the Stills/Movie switch to C.
Live View is displayed.
3
Shooting
10'30"
t Memo
• Recording can be started or stopped by pressing the shutter
release button fully.
• You can change the movie settings in the C1 menu or from
the control panel. (p.21) When [Exposure Setting] is set to
J, K or L, you can set the exposure before shooting.
• When [Recording Sound Level] is set to [MANUAL], a bar
graph indicating the microphone volume level appears on the
left edge (both edges when a stereo microphone is
connected) of the monitor.
• You can record a movie continuously up to 4 GB or 25
minutes. When the memory card is full, recording stops.
2 Focus on the subject.
In v mode, press the shutter release button halfway.
3 Press a.
Movie recording starts.
In the upper left area of the
monitor, “REC” blinks and the
size of the file being recorded is
displayed.
4 Press a again.
Movie recording stops.
u Caution
• When recording a movie with sound, the camera operation
sounds are also recorded.
• When recording a movie with an image processing function
such as Digital Filter applied, the movie file may be saved with
some frames omitted.
• If the internal temperature of the camera becomes high
during recording, the recording may be terminated.
38
Using a Microphone or
Headphones
You can record stereo sound by
connecting a commercially
available stereo microphone to
the microphone terminal on the
camera. Using an external
microphone can also help to
reduce the possibility of recording
camera operation sounds.
The following specifications are recommended for external
microphones.
If the external microphone is disconnected during recording,
no sound will be recorded.
You can record and play back movies while listening to the
sound by connecting commercially available headphones to
the headphone terminal.
Page 41

Playing Back Movies
10' 00"
100 -0001
IS O AUT O Se tti ng
AU TO I SO P aram eter s
100
320 0
Ca ncel
OK
Setting the Exposure
100-0001
Sensitivity
Available operations
A Plays back/pauses a movie.
D
Forwards a frame (when paused).
Press and hold D Fast-forwards playback.
C
Reverses a frame (when paused).
Press and hold C Fast-reverses playback.
B Stops playback.
R Adjusts the volume (21 levels).
H Saves the displayed frame as a
JPEG file (when paused).
t Memo
• In [Movie Edit] of the playback mode palette, movies can be
divided or selected frames can be deleted. (p.68)
10'00"
1 Press N, and then turn
R.
The sensitivity displayed on the
status screen, Live View screen,
LCD panel and in the viewfinder
changes.
Press M to set the sensitivity to
[ISO AUTO].
t Memo
• The adjustment steps for ISO sensitivity is 1 EV step. To
adjust the sensitivity in accordance with the EV step setting
for exposure, set from [2.Sensitivity Steps] of the E1 menu.
Setting the Range of ISO AUTO A2
You can set the range in which the
sensitivity is automatically adjusted
when the sensitivity is set to ISO
AUTO. Set in [ISO AUTO Setting] of
the A2 menu. (Default setting: ISO
100 to ISO 3200)
The manner in which the sensitivity is
increased can be specified in [AUTO ISO Parameters].
H Slow Increases the sensitivity as little as possible.
I Standard (Default setting)
J Fast Actively increases the sensitivity.
u Caution
• When [HDR Capture] is set and [Auto Align] is set to on,
[AUTO ISO Parameters] is fixed to J.
ISO AUTO Setting
100--
AUTO ISO Parameters
Cancel
3200
3
Shooting
OK
39
Page 42

Noise Reduction when Shooting with a
Hi gh-I SO N R
Au to
Lo w
Me dium
Hi gh
Cu stom
Of f
Ca ncel
OK
Hi gh-I SO N R
Re set
100
200
400
800
160 0
320 0
640 0
12 345
12 345
1/
F
250
3200
5.6
High ISO Sensitivity
You can set the Noise Reduction
setting when shooting with a high ISO
sensitivity in [High-ISO NR] of the
A2 menu.
3
Shooting
Auto
Low/
Medium/
High
Custom
Off
When [Custom] is selected, select
[Setting] and set the noise reduction
level according to the ISO sensitivity.
40
Applies Noise Reduction at optimally calculated
levels throughout ISO range. (Default setting)
Applies Noise Reduction at constant chosen
level throughout ISO range.
Applies Noise Reduction at user-defined levels
for each ISO setting.
Does not apply Noise Reduction at any ISO
setting.
High-ISO NR
Auto
Low
Medium
High
Custom
Off
Cancel
High-ISO NR
100
200
400
800
1600
3200
6400
A2
AE Metering
Choose the part of the sensor to use for measuring brightness
and determining exposure.
1 Turn R while pressing
2.
OK
The sensor meters the brightness in multiple
different zones. (Default setting)
In backlit locations, this mode automatically
adjusts exposure.
Metering is weighted at the center of the
sensor.
The sensitivity increases at the center and no
automatic adjustment is performed even
during backlit scenes.
The brightness is measured only within a
limited area at the center of the sensor.
Useful when the subject is small.
1 2
Reset
A
B
Multisegment
Centerweighted
C Spot
t Memo
• In [5. Link AE and AF Point] of the E1 menu, you can set the
camera to adjust the exposure automatically according to the
position of the focusing point.
1/
F
250
5.6
12345
12345
3200
Page 43

Using the Built-in Flash X
Fl ash On
Ca ncel
OK
0.0
Fl ash On
Ca ncel
OK
+0. 7
1 Press B in standby mode.
2 Select a flash mode.
Flash On
Cancel
3
To compensate the flash
K
output or when
selected, press
R
use
Press M to reset the value to 0.0.
For [Wireless], first press B, then
use CD to select 8 or 9.
0.0
OK
4 Press E.
The camera returns to standby mode.
to adjust the value.
is
B
and then
Cancel
Flash On
+0.7
OK
3
Shooting
Auto Flash
A
Discharge
Auto
B
Flash+Red-eye
Reduction
Flash On
C
Flash On+Red-
D
eye Reduction
Slow-speed
E
Sync
Slow-speed
F
Sync+Red-eye
HGTrailing Curtain
Sync
Manual Flash
K
Discharge
8
Wireless
9
Automatically measures the
ambient light and determines
whether to use the flash.
Discharges a pre-flash for red-eye
reduction before an automatic
flash.
Discharges a flash for ea ch picture.
Discharges a pre-flash for red-eye
reduction before the main flash.
Sets to a slow shutter speed.
Use this when shooting a portrait
with the sunset in the background.
Discharges a pre-flash for red-eye
reduction before the main flash is
discharged with Slow-speed Sync.
Discharges a flash immediately
before closing the shutter.
Sets to a slow shutter speed.
Captures moving objects as if they
are leaving a light trail behind them.
Sets the amount of flash disc harge
between FULL and 1/128.
Synchronizes the dedicated external
flash without using a sync cord. (p.83)
Select [Wireless (Master)] or
[Wireless (Controller)].
5 Press 1.
The built-in flash is popped up.
t Memo
• The flash modes that can be selected vary depending on the
exposure mode.
Exposure Modes Selectable Flash Mode
T A, B (No flash compensation)
G, H, J C, D, E, F, H, K, 8, 9
I, K, L, M C, D, G, K, 8, 9
N C, D, K, 8, 9
• You cannot take pictures while the flash is being charged. If
you want to take pictures while the flash is being charged, set
[20. Release While Charging] in the E3 menu.
• Depending on the lens being used, the use of the built-in flash
may be limited. (p.82)
• When the built-in flash is used in J mode, the shutter speed
automatically changes over a range from 1/180 seconds to a
slow shutter speed depending on the lens being used. The
shutter speed is locked at 1/180 seconds when a lens other
than a DA, DA L, D FA, FA J, FA or F lens is used.
41
Page 44

• When the built-in flash is used in I, K or L mode, any
desired shutter speed of 1/180 seconds or slower can be set.
• The built-in flash is optimum for a subject at a distance from
approx. 0.7 m to 5 m. Vignetting may occur when used at a
distance closer than 0.7 m (this distance varies slightly
depending on the lens being used and the sensitivity setting).
Sensitivity
3
Shooting
ISO 100 Approx. 13 ISO 3200 Approx. 73.5
ISO 200 Approx. 18.4 ISO 6400 Approx. 104
ISO 400 Approx. 26 ISO 12800 Approx. 147
ISO 800 Approx. 36.8 ISO 25600 Approx. 208
ISO 1600 Approx. 52 ISO 51200 Approx. 294
• For details on using an external flash, refer to “Functions
when Using an External Flash” (p.84).
Guide
Number
Sensitivity
Guide
Number
Setting the Focus Method
Set the focus mode switch to v or
w.
AF
MF
The autofocus methods for shooting with the viewfinder differ
from those for shooting with Live View.
TTL phase-matching autofocus
Select from x, y, or z mode
Shooting with
the viewfinder
Shooting with
Live View
t Memo
• You can use I to focus on the
subject. The I button operation
can be set in [Button
Customization] of the A4 menu.
(p.71)
which enables automatically switching
between x and y.
Set the focusing point in [AF Point]. (p.44)
Faster autofocus performance than “contrast
detection AF” is possible.
Contrast detection AF
Face Detection and Tracking are available.
(p.44)
42
Page 45

Setting the AF Mode when Shooting
12 345
12 345
1/
F
250
3200
5.6
with the Viewfinder
1 Turn Q while pressing
b.
1/
250
F
5.6
12345
12345
When the shutter release button is
x
Single mode
y
Continuous
mode
z
Auto-select
mode
pressed halfway and the subject comes
into focus, the focus is locked at that
position. (Default setting)
The AF assist light turns on as necessary.
The subject is kept in focus by continuous
adjustment while the shutter release
button is pressed halfway.
P appears in the viewfinder when the
subject comes into focus.
The shutter can be released even if the
subject is not in focus.
Switches automatically between x and
y modes according to the subject.
3200
v
t Memo
• The following settings pertaining to AF operations can be set
in the E3 menu.
15. AF.S Setting
16. 1st Frame Action in
AF.C
17. Action in AF.C
Continuous
18. Hold AF Status
• In [18. Hold AF Status], you can set whether to immediately
reactivate AF or to maintain the focus for a certain amount of
time before activating AF when the subject happens to move
out of the selected focusing area after being focused. The
default setting is to immediately activate AF when focusing is
unsuccessful.
Focus-priority (default setting),
Release-priority
Release-priority (default setting),
Auto, Focus-priority
Focus-priority (default setting),
Auto, FPS-priority
Off (default setting), Low,
Medium, High
3
Shooting
43
Page 46

Selecting the Focusing Area (AF Point) v
12 345
12 345
1/
F
250
800
5.6
1 Turn R while pressing b.
Out of the 27 AF points, the camera
automatically selects the optimum
focusing point. (Default setting)
Out of the selected 9 AF points, the
camera automatically selects the
optimum focusing point.
Sets the focusing point to the user
selected point from 27 points.
Sets the focusing point to the user selected
point from 27 points. When the subject
happens to move out of the selected focusing
area after being focused, 8 peripheral points
are used as back-up points.
Not available in x mode.
Sets the focusing point to the user selected
point from 27 points. When the subject
happens to move out of the selected focusing
area after being focused, 24 peripheral
points are used as back-up points.
Not available in x mode.
Sets the focusing point to the user selected
point from 27 points. When the subject
happens to move out of the selected focusing
area after being focused, 26 peripheral
points are used as back-up points.
Not available in x mode.
Sets the focusing point to the center of
the 27 points.
3
Shooting
Auto (27 AF
J
Points)
I Zone Select
E Select
Expanded
F
Area AF (S)
Expanded
G
Area AF (M)
Expanded
H
Area AF (L)
D Spot
Proceed to Step 2 when a mode other than J or D is
selected.
2 Select the desired AF
point.
44
1/
250
F
5.6
12345
12345
800
Available operations
ABCD Changes the AF point.
E Returns the AF point to the center.
c Switches the function of ABCD to that
Setting the AF Mode during Live View
You can select an autofocus mode when shooting with Live
View in [Live View] of the A3 menu, or in [Contrast AF] of the
control panel. The autofocus mode can also be changed by
turning R while pressing b during Live View.
Face
e
Detection
f Tracking
Multiple AF
g
Points
Select
h
i Spot
for Change AF Point or the direct key
operation.
A3/v
Detects and tracks faces of people.
(Default setting)
The main face detection frame for AF and
AE is displayed in yellow.
Tracks the subject in focus.
The shutter can be released even if the
subject is not in focus.
Sets the focusing area to the desired area.
The sensor is divided into 45 areas (9
horizontal by 5 vertical), and you can select
a wider or narrower focusing area by using
1, 9, 15, or 21 of those 45 available areas.
Sets the focusing area by the number of
pixels.
Sets the focusing area to a limited area at
the center.
u Caution
• When f is selected, the focus lock operation (composition
adjustment with the half press of the shutter release button)
does not work.
Page 47

Selecting the Desired Focusing Area
OK
AF Fin e Ad just ment
26 .
Ap ply A ll
2
Se ttin g
±
0
±
0
Ca ncel
OK
You can set the position and range of the autofocusing area (AF
area).
AF Fine Adjustment
You can precisely fine tune your lenses with the camera’s
autofocus system.
E4
1 Set [AF Mode] to g or h.
2 Press c.
3 Select the AF area.
Use the frame that appears on
the monitor to change the
position and size of the AF area.
Available operations
ABCD Changes the position of the AF area.
R Increases/reduces the size of the AF
M Returns the AF area to the center.
area (when g is selected).
4 Press E.
The AF area is set.
t Memo
• When [Focus Peaking] is set to [ON] in [Live View] of the A3
menu, the outline of the subject in focus is emphasized and
makes it easier to check the focus. This function works in both
v and w modes.
1 Select [26. AF Fine Adjustment] in E4 menu and
press D.
The [26. AF Fine Adjustment] screen appears.
2 Select [Apply All] or [Apply One] and press E.
Apply All
OK
Apply One
3 Select [Setting] and adjust
the value.
Available operations
D/R to the right Adjusts the focus to a closer
C/R to the left Adjusts the focus to a farther
M Resets the adjustment value to
Applies the same adjustment value to all
lenses.
Saves an adjustment value for the lens being
used. (Up to 20 values)
AF Fine Adjustment
26.
Apply All
2
Setting
Cancel
position.
position.
the default setting.
4 Press E.
The adjustment value is saved.
5 Press F twice.
The camera returns to standby mode.
t Memo
• Check focus accuracy by magnifying the image during Live
View (p.33) or Digital Preview (p.46).
3
Shooting
±
0
OK
±
0
45
Page 48

Checking the Depth of Field (Preview)
Turn the main switch to U to use the
preview function.
There are two preview methods.
3
Shooting
Optical Preview
Digital Preview
Setting the Preview Method A4
For checking the depth of field with the
viewfinder. (Default setting)
For checking the composition, exposure
and focus on the monitor. (The maximum
display time: 60 seconds)
You can magnify the image or save the
preview image.
1 Select [Button Customization] in A4 menu and
press D.
The [Button Customization] screen appears.
2 Select [Preview Dial] and press D.
The [Preview Dial] screen appears.
3 Select [Optical Preview] or [Digital Preview] and
press E.
4 Press F three times.
The camera returns to standby mode.
t Memo
• Optical Preview is always used when the drive mode is set to
[Mirror Lock-up Shooting], [Multi-exposure], [Interval
Shooting] or [Interval Composite], or when ASTROTRACER
is activated.
• The display settings and camera operation during Digital
Preview can be changed in [Digital Preview] of the A4 menu.
(p.20)
• The preview function can also be assigned to P. (p.71)
You can easily switch between Optical Preview and Digital
Preview after assigning different kinds of preview methods to
the two controls, U of the main switch and P.
46
Page 49

Setting the Drive Mode
You can choose from the following drive modes.
Single Frame
Shooting (L)
Continuous
Shooting
(Z/a/b)
Self-timer
(O/P)
Remote Control
(Q/R/S)
Exposure
Bracketing
(T/1/U)
Mirror Lock-up
Shooting
(c/d)
Multi-exposure
(V/2/W/X)
Interval Shooting
(Y)
Normal capture mode
Continuously takes pictures while the
shutter release button is kept pressed.
The number of pictures that can be taken
continuously varies according to the
shutter speed.
Releases the shutter about 12 seconds or
2 seconds after the shutter release button
is pressed.
Enables shooting with remote control.
Select from [Remote Control], [Remote
Control (3 sec. delay)] or [Remote
Continuous Shooting].
Takes consecutive images at different
exposure levels.
Select from [Exposure Bracketing], [Selftimer+Exposure Bracketing] or [Exposure
Bracket+Remote Ctrl].
Takes images with the mirror raised.
Select from [Mirror Lock-up Shooting] or
[Remote Control+Mirror Lock-up].
Creates a composite picture by taking
multiple exposures and merging them into
a single image.
Select from [Multi-exposure], [Multiexposure+Continuous], [Self-timer+Multiexposure] or [Remote Control+Multiexposure].
Takes pictures at a set interval from a set
time.
W
Interval
Composite (3)
Interval Movie
Record (Y)
Takes still pictures at a set interval and
merges them into a single image.
Star and moon trails can be captured in
one image.
Takes still pictures at a set interval from a
set time and saves them a s a single movie
file.
Available only in C mode.
u Caution
• There are restrictions on some drive modes when used in
combination with some other functions. (p.80)
t Memo
•Only 4, Q or Y can be selected in C mode.
• The Drive Mode setting is saved even after the power is
turned off. If [Drive Mode] is set to [Off] in [Memory] of the A
4 menu, the setting returns to Single Frame Shooting when
the power is turned off. (p.75)
• The Shake Reduction function is automatically turned off
when Self-timer, Remote Control, or Mirror Lock-up Shooting
is selected.
• When the drive mode that employs
the self-timer or remote control is
selected, the exposure may be
affected if light enters the
viewfinder. In such a case, use the
AE Lock function or attach the
optional ME viewfinder cap.
Remove the eyecup before attaching the ME viewfinder cap.
3
Shooting
47
Page 50

Continuous Shooting
Co ntin uous Sho oti ng ( H)
Ca ncel
OK
Se lf-t imer (12 se c.)Self-timer (12 sec.)
Ca ncelCancel OKOK
Self-timer
1 Press A in standby mode.
The Drive Mode screen appears.
2 Select Z and press B.
Continuous Shooting (H)
3
Shooting
Cancel
3 Select Z, a, or b and press E.
The camera returns to standby mode.
u Caution
• You cannot take pictures while the flash is being charged. If
you want to take pictures while the flash is being charged, set
[20. Release While Charging] in the E3 menu.
t Memo
•In x mode, the focus position is locked in the first frame.
1 Press A in standby mode.
The Drive Mode screen appears.
2 Select O and press B.
OK
3 Select O or P and press E.
The camera returns to standby mode.
4 Press the shutter release button halfway, then
fully.
The self-timer lamp blinks.
The shutter will be released about 12 seconds or 2
seconds.
48
Page 51

Remote Control
Re mote Con trolRemote Control
Ca ncelCancel OKOK
Ex posu re B rack eti ngExposure Bracketing
Ca ncelCancel
3 imag es3 images
OKOK
±0 .3EV±0.3EV
Exposure Bracketing
1 Press A in standby mode.
The Drive Mode screen appears.
2 Select Q and press B.
3 Select Q, R, or S and press E .
The camera returns to standby mode.
The self-timer lamp blinks.
4 Press the shutter release button halfway.
5 Point the remote control unit towards the remote
control receiver on the front or back of the
camera, and press the shutter release button on
the remote control unit.
t Memo
• The maximum operating distance of the remote control unit is
approx. 4 m from the front of the camera and approx. 2 m
from the back of the camera.
• To adjust focus with remote control, set in [19. AF with
Remote Control] of the E3 menu.
• When using the Remote Control Waterproof O-RC1, the
autofocus system can be operated with the q button. The r
button cannot be used.
1 Press A in standby mode.
The Drive Mode screen appears.
2 Select T and press B.
3 Select T, 1, or U and press B.
4 Use Q to select the number of shots.
Select from 2 images (Standard/+), 2 images (Standard/-),
3 images or 5 images.
5 Set the bracket value.
Available operations
R Changes the bracket value (up to ±2
EV).
JR Adjusts the exposure compensation
value.
M Resets the adjustment value to the
default setting.
6 Press E.
The camera returns to standby mode.
t Memo
• You can set the bracketing order in [8. Bracketing Order] of
the E2 menu.
• The bracket value can be set in increments of 1/3 EV steps or
1/2 EV steps according to the [1. EV Steps] setting made in
the E1 menu.
• Set [9. One-Push Bracketing] to [On] in the E2 menu to shoot
the specified number of images with one press of the shutter
release button.
3
Shooting
49
Page 52

Mirror Lock-up Shooting
Mi rror Loc k-up Sh ooti ngMirror Lock-up Shooting
Ca ncelCancel OKOK
Nu mber of Shot s
ti mes
Co mpos ite Mode
000 2
Ca ncel
OK
Mu lti- expo sure
Multi-exposure
1 Press A in standby mode.
The Drive Mode screen appears.
2 Select c and press B.
3
Shooting
3 Select c or d and press E.
The camera returns to standby mode.
4 Press the shutter release button halfway, then
fully.
The mirror pops up and the AE Lock function is activated.
5 Press the shutter release button fully again.
The mirror returns to its original position after the image is
taken.
t Memo
• The mirror automatically returns to its original position if 1
minute elapses after the mirror pops up.
u Caution
• Mirror Lock-up Shooting cannot be selected when shooting
with Live View.
1 Press A in standby mode.
The Drive Mode screen appears.
2 Select V and press B.
3 Select V, 2, W or X, and press B.
4 Select [Composite Mode].
5 Average
6 Additive
7 Bright
Creates a composite image with the
average exposure.
Creates a composite image with the
cumulatively added exposure.
Creates a composite image that combines
only bright parts.
Multi-exposure
Composite Mode
Number of Shots
Cancel
5 Specify [Number of Shots].
Select from 2 to 2000 shots.
6 Press E.
The camera returns to standby mode.
7 Shoot.
Instant Review is displayed.
Available operations during Instant Review
L Discards pictures taken up to that point and
F Saves pictures taken up to that point and
After the set number of pictures are taken, the camera
returns to normal capture mode.
takes pictures again from the first picture.
displays the A menu.
0002
times
OK
50
Page 53

Interval Shooting
In terv al
In terv al S hoot ing
Nu mber of Shot s
St art Inte rval
000 2
tim es
No w
00 :00' 02"
Ca ncel
OK
In terv al C ompo sit e
Co mpos ite Mode
St art Inte rval
Nu mber of Shot s
In terv al
Sa ve P roce ss
Ca ncel
OK
ti mes
000 2
00: 00'02"
No w
Interval Composite
1 Press A in standby mode.
The Drive Mode screen appears.
2 Select Y and press B.
3 Set the shooting
conditions.
Interval
Number of Shots
Start Interval
Cancel
Interval Select from 2 seconds to 24 hours.
Number of
Shots
Start Interval
Select from 2 to 2000 shots.
Select whether to take the first picture
now or at a set time.
When [Set Time] is selected, set the time
at which to start shooting in [Start Time].
4 Press E to finish the setting.
The camera returns to standby mode.
5 Shoot.
When [Start Interval] is set to [Now], the first picture is
taken. When set to [Set Time], shooting starts at the set
time.
To cancel shooting, press F in standby mode.
After the set number of pictures are taken, the camera
returns to normal capture mode.
t Memo
• A new folder is created when Interval Shooting is performed,
and the captured images are saved there. When shooting in
a different drive mode after performing Interval Shooting, a
new folder will be created.
• The shortest interval time that can be set for [Interval] is 10
seconds for [Digital Filter] and 20 seconds for [HDR Capture].
Interval Shooting
00:00'02"
0002
times
Now
1 Press A in standby mode.
The Drive Mode screen appears.
2 Select 3 and press B.
3 Set the shooting
conditions.
OK
Composite
Mode
Save
Process
Interval Select from 2 seconds to 24 hours.
Number of
Shots
Start
Interval
Select from [Average], [Additive] or [Bright].
(Refer to “Multi-exposure” (p.50).)
Select T to save images in the middle of
processing.
Select from 2 to 2000 shots.
Select whether to take the first picture now or
at a set time.
When [Set Time] is selected, set the time at
which to start shooting in [Start Time].
Composite Mode
Save Process
Interval
Number of Shots
Start Interval
Cancel
4 Press E to finish the setting.
The camera returns to standby mode.
5 Shoot.
When [Start Interval] is set to [Now], the first picture is taken.
When set to [Set Time], shooting starts at the set time.
To cancel shooting, press F in standby mode.
After the set number of pictures are taken, the camera
returns to normal capture mode.
t Memo
• When [Save Process] is set to T, a new folder is created and
the composite image is saved there. When shooting in
another different drive mode after performing Interval
Composite, another new folder will be created.
• Mount the camera on a tripod during Interval Composite.
Interval Composite
00:00'02"
times
0002
Now
3
Shooting
OK
51
Page 54

Interval Movie Record
2s ec.
Ca ncel
OK
In terv al
Re cord ed P ixel s
In terv al M ovie Re cord
Re cord ing Time
St art Inte rval
00 :00 '1 4"
No w
Au to W hite Bal anc e
Ca ncel
Ch eck
WB
±
OK
In C mode, you can use [Interval Movie Record] to take still
pictures at a set interval from a set time and save them as a
single movie file (Motion JPEG, file extension: .AVI).
1 Turn the Stills/Movie switch to C and press A.
The Drive Mode screen appears.
2 Select Y and press B.
3
Shooting
3 Set the shooting
conditions.
Recorded
Pixels
Interval
Recording
Time
Start
Interval
Select from z, u, or t.
Select from 2 sec., 5 sec., 10 sec., 20 sec., 30
sec., 1min., 5 min., 10 min., 30 min., or 1 hour.
Set the time from the start to the end of recording.
Select from 14 seconds to 99 hours. The time that
can be set varies depending on the [Interval] setting.
Select whether to take the first picture now or
at a set time.
When [Set Time] is selected, set the time at
which to start shooting in [Start Time].
Recorded Pixels
Interval
Recording Time
Start Interval
4 Press E to finish the setting.
The camera returns to standby mode.
5 Press the shutter release button to start
shooting.
When [Start Interval] is set to [Now], the first picture is taken.
Instant Review is displayed, and then the monitor turns off.
After the set number of pictures are taken, the camera
returns to standby mode.
t Memo
• The shortest interval time that can be set for [Interval] is 10
52
seconds for [Digital Filter] and 20 seconds for [HDR Capture].
Interval Movie Record
2sec.
00: 00'14"
Now
Cancel
Setting the White Balance
1 Press C in standby mode.
The White Balance setting screen appears.
2 Select the White Balance.
g Auto White Balance
g
OK
u Multi Auto White Balance
h Daylight
i Shade
j C loudy
q Fluorescent - Daylight Color
r Fluorescent - Daylight White
k
s Fluorescent - Cool White
t Fluorescent - Warm White
l Tungsten
m Flash
n Color Temperature Enhancement
o Manual White Balance 1 to 3
p Color Temperature 1 to 3
Available operations when shooting with the
viewfinder
Main switch to U Uses Digital Preview to preview
H
Proceed to Step 5 if you do not need to change the
parameters.
Auto White Balance
Check
Cancel
the background image with the
white balance effect applied.
Saves the preview image (only
when the data is available).
WB
±
Y
OK
Page 55

3 Press G.
Ca ncel
±
0
G3G3A2
OK
Ch eck
Ma nual Whi te B ala nce
Ca ncel
Ad just
WB
±
OK
Ch eck
The fine-tuning screen appears.
A2
Check
Cancel
Available operations
AB Adjust: Green-Magenta
CD Adjust: Blue-Amber
M Resets the adjustment value to the default
setting.
4 Press E.
The screen of Step 2 reappears.
5 Press E.
The camera returns to standby mode.
t Memo
• When u is set, even if various light sources are present at
the shooting location, the camera automatically adjusts the
white balance according to the light source of each area.
• The following settings pertaining to the white balance can be
set in the E2 menu.
10. WB Adjustable Range
11. WB When Using Flash
12. AWB in Tungsten Light
13. Color Temperature
Steps
Fixed (default setting), Auto
Adjustment
Auto White Balance (default
setting), Multi Auto White
Balance, Flash, Unchanged
Subtle Correction (default
setting), Strong Correction
Kelvin (default setting), Mired
Adjusting the White Balance Manually
Measure the white balance of a given scene.
1 Select o in Step 2 on p.52 and press B.
OK
±
0
2 Select from o1 to o3.
Manual White Balance
3
Adjust
Check
Cancel
WB
±
Shooting
OK
3 Under the light you wish to measure the white
balance of, select a white area as the subject,
and press the shutter release button fully.
The captured image is displayed.
[The operation could not be completed correctly] appears
when measuring is unsuccessful. Press E to remeasure
the white balance.
4 Use ABCD to specify the measuring range.
5 Press E.
The White Balance setting screen reappears.
t Memo
• You can copy the white balance settings of a captured image
and save them as o1 to o3 in [Save as Manual WB] of the
playback mode palette. (p.59)
53
Page 56

Adjusting the White Balance with Color
Ca ncel
Ch eck
±
0
±
0
±
0
OK
Br ight
Ca ncel
OK
Pa rame ter Adj.
Ch eck
Temperature
Specify the white balance with the color temperature.
1 Select p in Step 2 on p.52, and press B.
2 Select from p1 to p3.
3
Shooting
3 Press G.
4 Adjust the color
temperature.
Set the color temperature value
within the range from 2500K to
10000K.
Available operations
Q 100 Kelvin units
R 1000 Kelvin units
ABCD Fine-tunes the color temperature.
±
0
Check
Cancel
5 Press E.
The White Balance setting screen reappears.
t Memo
• Select [Mired] in [13. Color Temperature Steps] of the E2
menu to set the color temperature in mired units. The color
temperature can be changed in 20 mired units with Q, and
100 mired units with R. However, figures are converted to
and displayed in Kelvin.
Controlling the Image Finishing Touch
When you want to take pictures with a slightly different style,
you can set the desired picture style before shooting.
Try out the various settings, and find your best picture style.
Custom Image
Z
1 Press D in standby mode.
The Custom Image setting screen appears.
±
0
±
0
2 Select an image finishing
touch.
OK
Bright (default setting)
Natural
Portrait
Landscape
Vibrant
Radiant
Available operations when shooting with the
viewfinder
Main switch to U Uses Digital Preview to preview
H
Proceed to Step 6 if you do not need to change the
parameters.
Muted
Bleach Bypass
Reversal Film
Monochrome
Cross Processing
the background image with the
selected setting applied.
Saves the preview image (only
when the data is available).
Bright
Parameter Adj.
Cancel
Check
OK
54
Page 57

3 Press G.
Sa tura tionSaturation
Ca ncelCancel OKOK
Ch eckCheck
Sa ve a s Fa vori te 1
Sa ves this ima ge' s Cr oss
Pr oces sing set tin gs
100 -0001
Sa ve a s Fa vori te 2
Sa ve a s Fa vori te 3
OK
Ca ncel
The parameter setting screen appears.
4 Set the parameters.
Saving the Cross Processing Settings of a
Captured Image
The outcome of Cross Processing varies each time a picture is
taken. If you take a cross processed image that you like, you
can save the Cross Processing settings used in that image so
that you can repeatedly use the same settings.
Available operations
AB Selects a parameter.
CD Adjusts the value.
Q Switches between [Contrast], [Contrast
R Switches between [Sharpness], [Fine
M Resets the adjustment value to the default
5 Press E.
The screen of Step 2 reappears.
6 Press E.
The camera returns to standby mode.
Highlight Adjustment] and [Contrast Shadow
Adjustment].
Sharpness] and [Extra Sharpness].
(Not available in C mode).
setting.
1 Press B in single image display of playback
mode.
The playback mode palette appears.
2 Select a and press E.
The camera will search for cross processed images starting
from the most recent image taken.
[No cross processed image] appears if there are no cross
processed images.
3 Use Q to select a cross
processed image.
Saves this image's Cross
Processing settings
Save as Favorite 1
Save as Favorite 2
Save as Favorite 3
Cancel
100-0001
4 Select a number and press E.
The settings of the selected image are saved to Favorite 1
to 3.
t Memo
• The saved Cross Processing settings can be loaded by
selecting [Cross Processing] in Step 2 of “Custom Image”
(p.54), and selecting [Favorite 1 - 3] for the parameter.
3
Shooting
OK
55
Page 58

Digital Filter
Ex trac t Co lor
Ca ncel
OK
Pa rame ter Adj.
Ch eck
Ex trac ted Colo r 1
Ca ncel
OK
Ch eck
1 Select [Digital Filter] in A1 menu and press D.
The Digital Filter setting screen appears.
2 Select a filter.
Select [No Filter] to not shoot with
a digital filter.
3
Shooting
Extract Color
Toy Camera
Retro
High Contrast
Available operations when shooting with the
viewfinder
Main switch to U Uses Digital Preview to preview
H
Proceed to Step 6 if you do not need to change the
parameters.
the background image with the
filter effect applied.
Saves the preview image (only
when the data is available).
Parameter Adj.
Cancel
Shading
Invert Color
Unicolor Bold
Bold Monochrome
3 Press G.
The parameter setting screen appears.
A1/v
Extract Color
Check
4 Set the parameters.
MENU
Cancel
Available operations
AB Selects a parameter.
OK
CD Adjusts the value.
5 Press E.
The screen of Step 2 reappears.
6 Press E.
7 Press F.
The camera returns to standby mode.
u Caution
• This function cannot be used in combination with some other
functions. (p.80)
• Depending on the filter used, it may take longer to save
images.
t Memo
• Images can also be processed with digital filters in playback
mode. (p.66)
Extracted Color 1
OK
Check
56
Page 59

Correcting Images
Ca ncel
OK
HD R Ca ptur e
Ex posu re B rack et Value
Au to Al ign
HD R Ca ptur e
Brightness Adjustment
Highlight Correction/
Shadow Correction
Expands the dynamic range and enables a wider range of tones
by the CMOS sensor and reduces the occurrence of
overexposed/underexposed areas.
Set the correction functions from [D-Range Settings] of the A2
menu or the control panel.
u Caution
• When the sensitivity is set to less than ISO 200, [Highlight
Correction] cannot be set to [On].
HDR Capture A1/v
Takes three consecutive images at three different exposure
levels to create a single composite picture with them.
1 Select [HDR Capture] in A1 menu and press D.
The [HDR Capture] screen appears.
2 Select [HDR AUTO], [HDR
1], [HDR 2] or [HDR 3], and
press E.
HDR Capture
HDR Capture
Exposure Bracket Value
Auto Align
3 Set the range in which to change the exposure in
[Exposure Bracket Value].
Select from ±1, ±2 or ±3.
Cancel
A2/v
4 Set whether to use Auto Align or not.
T Uses Auto Align. (Default setting)
S Does not use Auto Align.
5 Press F twice.
The camera returns to standby mode.
u Caution
• HDR Capture is not available in M or N mode.
• This function cannot be used in combination with some other
functions. (p.80)
• When the drive mode is set to [Interval Shooting], [Auto Align]
is fixed to [Off].
•In C mode, HDR Capture is available only when the drive
mode is set to [Interval Movie Record].
• For HDR Capture, multiple images are combined together to
create a single image, so it will take time to save the image.
Lens Correction
The following features can be set from [Lens Correction] of the
A1 menu or the control panel.
Distortion
Correction
Lat-ChromaticAb Adj
Peripheral
Illumin. Corr.
t Memo
• Corrections can only be made when a compatible lens is
OK
attached. (p.81) The features are disabled when using an
accessory such as a rear converter that is attached between
the camera and the lens.
• When the file format is set to [RAW] or [RAW+], the correction
information is saved as a RAW file parameter and you can
select [ON] or [OFF] when developing the RAW images. For
the RAW Development function, [Color Fringe Correction]
can also be set. (p.69)
Reduces distortions occurring due to lens
properties.
Reduces lateral chromatic aberrations
occurring due to lens properties.
Reduces peripheral light fall-off occurring
due to lens properties.
3
Shooting
A1/v
57
Page 60

Composition Adjustment
Ad just the com pos itio n
of the ima ge
000
0
Ca ncel
OK
Li ve V iew
El ectr onic Lev el
AA Filt er Simu lato r
Sh ake Redu ctio n
In put Foca l Le ngt h
Ca ncel
Ho rizo n Co rrec tio n
OK
It allows you to adjust the composit ion of your image using the
Shake Reduction mechanism. Use this when you want to adjust the
composition, such as when using a tripod during Live View shoot ing.
1 Select [Live View] in A3 menu and press D.
The [Live View] screen appears.
3
2 Select [Composition Adjust.] and set to T.
Shooting
3 Press F twice.
The camera returns to standby mode.
4 Press K.
Live View is displayed and the message [Adjust the
composition of the image] appears.
5 Adjust the composition.
The amount of adjustment (the
number of steps) is displayed at
the top right of the screen.
Available operations
ABCD Moves the composition (up to 24 steps).
R Adjusts the level of the composition (up
to 8 steps. Not available when the
amount of adjustment is 17 steps or
more).
M Resets the adjustment value to the
default setting.
Adjust the composition
Cancel
of the image
A3
u Caution
• This function cannot be used in the following situations.
• When the drive mode is set to [Interval Shooting], [Interval
Composite] or [Interval Movie Record]
• While shooting with ASTROTRACER
t Memo
• The adjusted composition is saved even if Live View is ended
or the camera is turned off. To reset the saved adjustment
value when Live View is ended, set [Composition Adjust.] to
[Off] in [Memory] of the A4 menu. (p.75)
Anti-Aliasing Filter Simulator
By shaking the Shake Reduction unit, moiré reduction effect
simulating that of a low-pass filter can be achieved.
1 Select [AA Filter Simulator] in A3 menu and
0
0
OK
press D.
2 Select [TYPE1] or [TYPE2]
and press E.
123 4
Live View
Electronic Level
Horizon Correction
AA Filter Simulator
Shake Reduction
Input Focal Length
Cancel
u Caution
• This function cannot be used in the following situations.
• When [HDR Capture] is set
•In C mode
• When the shutter speed is faster than 1/1000 second s, the full
effect of this function cannot be achieved.
A3/v
OK
58
6 Press E.
The camera returns to standby mode in Live View.
Page 61

Playback Mode Palette Items
Im age Rota tion
Ro tate s ca ptur ed imag es.
Us eful for ima ge play back on
TV and oth er d isp lay devi ces
Ex it
OK
Playback functions can be set in the
playback mode palette as well as the
B1 menu (p.21).
Press B in single image display of
the playback mode to display the
playback mode palette.
Item Function Page
Image Rotation
S
*1
T Digital Filter
Color Moiré
h
Correction
V Resize
W Cropping
X Index
Y Protect
Z Slideshow
o
a
*1 *2
*1
Save as Manual
*1
WB
Save Cross
Processing
Changes the rotation
information of images.
Processes images with
*1
digital filters.
Reduces color moiré in
*1 *2
images.
Changes the number of
recorded pixels or size of the
image.
Crops out only the desired
area of an image.
Joins a number of images
together and creates an
index image with them.
Protects images from being
accidentally erased.
Plays back images one after
another.
Saves the white balance
settings of the captured
image as Manual White
Balance.
Saves the settings used for
an image captured in Cross
Processing mode of Custom
Image as your “Favorite”
settings.
Image Rotation
Rotates captured images.
Useful for image playback on
TV and other display devices
Exit
OK
p.62
p.66
p.66
p.65
p.65
p.68
p.75
p.62
p.53
p.55
Item Function Page
RAW
b
Development
c Movie Edit
i Image Copy
Eye-Fi Image
e
Transfer
*1 Not available when a movie is displayed.
*2 Not available when a RAW image is displayed.
*3 Available only when a RAW image is saved.
*4 Available only when a movie is displayed.
*5 Available only when an Eye-Fi card is inserted in the SD2 slot.
Develops RAW images into
JPEG images and saves
*3
them as a new file.
Divides a movie or deletes
*4
unwanted segments.
Copies images between
cards in SD1 and SD2 slots.
Transfers selected images
wirelessly using an optional
*1 *5
Eye-Fi card.
p.69
p.68
p.65
p.78
t Memo
• The functions of the B1 menu and playback mode palette
can be used only for the images saved on the memory card
that is currently being played back. To use the functions for
the images saved on the other memory card, switch to the
other memory card slot with d during single image display,
then display the B1 menu or playback mode palette.
4
Playback
59
Page 62

Changing the Playback Method
100_050 5
100_050 5
12 Thu mbna il D isp lay
100_050 5
001 /500
Displaying Multiple Images
You can display 6, 12, 20, 35 or 80 thumbnail images at the
same time. (Default setting: 12 Thumbnail Display)
Deleting Selected Images
1 Press L in Step 1 of “Displaying Multiple
Images”.
2 Select the images to
delete.
001/500
100_0505
1 Turn R to the left in
4
Playback
playback mode.
The multi-image display screen
appears.
Available operations
ABCD Moves the selection frame.
Q Shows the next/previous page.
d Switches between the SD1 card and
G Shows the
L Deletes the selected images.
2 Press E.
The selected image appears in single image display.
60
SD2 card.
display style
selection
screen.
100_0505
100_0505
12 Thumbnail Display
Available operations
ABCD Moves the selection frame.
E Confirms/cancels the selection of the
image to delete.
J Selects the range of images to delete.
R Shows the selected image in single
image display.
Use Q to select a different image.
In the upper left area of the monitor, the number of selected
images is displayed.
3 Press L.
The delete confirmation screen appears.
4 Select [Select & Delete] and press E.
t Memo
• You can select up to 500 images at a time.
• Protected images cannot be selected.
• You can select one image at a time or a range of images.
• Use the same steps to select multiple images for the following
functions.
• Image Copy (p.65)
• Index (p.68)
• RAW Development (p.69)
• Protect (p.75)
• Eye-Fi Image Transfer (p.78)
Page 63

Displaying Images by Folder
123
100
101
102
100P ENTX
103
104
105
106
107
5
201 3.9
201 3.10
THU
14
SAT
23
MON
27
FRI
6
SUN
17
THU
29
TUE
2/5
100–050 5
Shooting
date
Thumbnail
1 Turn R to the left in Step
1 of “Displaying Multiple
Images”.
The folder display screen
appears.
Available operations
ABCD Moves the selection frame.
L Deletes the selected folder.
100
104
2 Press E.
The images in the selected folder are displayed.
Displaying Images by Shooting Date
100PENTX
103
102
101
105
106
107
Images will be grouped and displayed by shooting date.
1 Select G in Step 1 of “Displaying Multiple
Images”.
The display style selection screen appears.
123
2 Select [Calendar Filmstrip
Display].
2013.9
THU
SAT
MON
FRI
2013.10
SUN
THU
TUE
5
14
23
27
6
17
29
100–0505
4
Playback
2/5
Deleting a Folder
1 Select a folder to delete in Step 1 of “Displaying
Images by Folder”, and press L.
The delete confirmation screen appears.
2 Select [Delete] and press E.
The selected folder and all images in it are deleted.
When there are protected images in the folder, select
[Delete all] or [Leave all].
Available operations
AB Selects a shooting date.
CD Selects an image taken on the
selected shooting date.
R to the right Shows the selected image in
single image display.
L Deletes the selected image.
3 Press E.
The selected image appears in single image display.
61
Page 64

Playing Back Images Continuously
Ca ncel
OK
(Slideshow)
1 Select Z in the playback mode palette.
Slideshow starts.
Available operations
E Pauses/resumes playback.
C Displays the previous image.
4
Playback
D Displays the next image.
B Stops playback.
R Adjusts the volume of the movie.
After all images are played back, the camera returns to
single image display.
t Memo
• You can change the [Display Duration], [Screen Effect],
[Repeat Playback] and [Auto Movie Playback] settings for
slideshow in [Slideshow] of the B1 menu. Slideshow can be
started from the Slideshow setting screen.
Displaying Rotated Images
When you take pictures with the camera held vertically, image
rotation information is saved when shooting. When [Auto Image
Rotation] in the B1 menu is set to [On], the image is
automatically rotated based on the rotation information during
playback (default setting).
The rotation information of an image can be changed by
following the procedure below.
1 Display the image to edit in single image
display.
2 Select S in the playback mode palette.
The selected image is rotated in 90° increments and the
four thumbnail images are displayed.
3 Use ABCD to select the
desired rotation direction
and press E.
The image rotation information is
saved.
u Caution
• When [23. Save Rotation Info] is set to [Off] in the E4 menu,
image rotation information is not saved when shooting.
• You cannot change the rotation information in the following
cases.
• Protected images
• Images without a rotation information tag
• When [Auto Image Rotation] is set to [Off] in the B1 menu
• Movie files cannot be rotated.
MENU
Cancel
OK
OK
62
Page 65

Connecting the Camera to an AV Device
Connect to an AV device, such as a TV, equipped with an HDMI
terminal to display Live View images while shooting or to play
back images in playback mode.
Make sure to have a commercially available HDMI cable
equipped with an HDMI terminal (type D).
1 Turn the AV device and camera off.
t Memo
• Check the operating manual of the AV device and select a
suitable input terminal for connecting the camera.
• If you intend to use the camera continuously for a long period,
use of the optional AC adapter kit is recommended.
• By default, the maximum resolution corresponding to the AV
device and camera is automatically selected. If it fails to play
back images properly, change the setting in [HDMI Out] of the
D2 menu.
2 Open the terminal cover of the camera, and
connect the cable to the HDMI terminal.
3 Connect the other end of the cable to the input
terminal on the AV device.
4 Turn the AV device and camera on.
The camera turns on in HDMI mode, and the camera
information is displayed on the screen of the connected AV
device.
u Caution
• While the camera is connected to an AV device, nothing is
displayed on the camera monitor. Also, you cannot adjust the
volume on the camera. Adjust the volume on the AV device.
4
Playback
63
Page 66

Connecting the Camera to a
USB 3.0 USB 2.0
Computer
Connect the camera to a computer using an USB cable.
Make sure to have a commercially available USB cable
equipped with a micro B terminal.
1 Turn the computer on.
2 Turn the camera off.
4
Playback
3 Open the terminal cover of the camera, and
connect the USB cable to the USB terminal.
4 Connect the USB cable to the USB port of the
computer.
5 Turn the camera on.
The camera is recognized as a removable disk.
If the “K-3” dialog appears, select [Open folder to view files
using Windows Explorer] and click the OK button.
u Caution
• The camera cannot be operated while it is connected to a
computer. To operate the camera, terminate the USB
connection on the computer, then turn off the camera and
remove the USB cable.
t Memo
• Refer to “Operating Environment for USB Connection and
Provided Software” (p.94) for system requirements to
connect the camera to a computer or to use the software.
• The USB connection mode when connecting the camera to a
computer can be set in [USB Connection] of the D1 menu.
Normally, you do not need to change the default setting
([MSC]).
USB terminal
The micro B termina l supports both USB 3.0 cables and USB
2.0 cables. Both types can be used with this camera. If the
host controller of the device to be connected to the camera
supports USB 3.0, the data transfer speed is faster when a
USB 3.0 cable is used.
6 Save the captured images to the computer.
7 Disconnect the camera from the computer.
64
Page 67

Editing and Processing Images
Ca ncel
OK
Copying an Image
Copies images between memory cards in SD1 and SD2 slots.
1 Select an image saved on the memory card from
which the images have to be copied, and display
it in single image display.
2 Select i in the playback mode palette.
3 Select [Select image(s)] or [Select a folder] and
press E.
4 Select the image(s) or folder to copy.
Refer to Step 2 of “Deleting Selected Images” (p.60) for how
to select image(s) or a folder.
5 Press G.
The save confirmation screen appears.
6 Select the location to save the image(s) or folder
and press E.
Changing the Image Size
u Caution
• Only JPEG images captured with this camera can be resized
or cropped.
• Images already resized or cropped to the minimum file size
cannot be processed.
Changing the Number of Recorded Pixels (Resize)
Changes the number of recorded pixels, and saves the image
as a new file.
1 Display the image to edit in single image
display.
2 Select V in the playback mode palette.
The screen to select the number of recorded pixels
appears.
3 Use CD to select the
number of recorded pixels
and press E.
You can select an image size
smaller than that of the original
image.
The save confirmation screen appears.
Cancel
4 Select [Save to SD1] or [Save to SD2] and press
E.
Cropping Out Part of the Image (Cropping)
Crops out only the desired area of the selected image and
saves it as a new image.
4
Playback
OK
1 Display the image to edit in single image
display.
2 Select W in the playback mode palette.
The cropping frame to specify the size and position of the
area to crop appears on the screen.
65
Page 68

3 Specify the size and
Ca ncel
OK
Ba se P aram eter Adj
St op
OK
Pa rame ter Adj.
100 -0001
position of the area to crop
by using the cropping
frame.
Available operations
R Changes the size of the cropping frame.
ABCD Moves the cropping frame.
4
Playback
G Changes the aspect ratio or Image
Rotation setting.
M Rotates the cropping frame (only when
possible).
4 Press E.
The save confirmation screen appears.
5 Select [Save to SD1] or [Save to SD2] and press
E.
Correcting Color Moiré
Reduces color moiré in images.
1 Display the image to edit in single image
display.
2 Select h in the playback mode palette.
If the image cannot be edited, [This image cannot be
processed] appears.
3 Use CD to select the level
and press E.
The save confirmation screen
appears.
66
Cancel
4 Select [Save to SD1] or [Save to SD2] and press
E.
u Caution
• The Color Moiré Correction function can be used only for the
JPEG images captured with this camera.
Processing Images with Digital Filters
1 Display the image to edit in single image
display.
2 Select T in the playback mode palette.
The screen to select a filter appears.
3 Select a filter.
Use Q to select a different
image.
Parameter Adj.
Stop
Sketch
Water Color
Pastel
Posterization
Miniature
Soft
Starburst
Fish-eye
Slim
OK
Base Parameter Adj
Extract Color
Toy Camera
Retro
High Contrast
Shading
Invert Color
Unicolor Bold
Bold Monochrome
Tone Expansion
Proceed to Step 6 if you do not need to change the
parameters.
4 Press G.
The parameter setting screen appears.
Base Parameter Adj
100-0001
OK
Page 69

5 Set the parameters.
Br ight ness
Ca ncel
OK
OKOK
MENU
Re crea ting fil ter eff ectsRecreating filter effects
Se arch ing for the ori gina l i mageSearching for the original image
Ap plyi ng t he d igi tal filt erApplying the digital filter
Re appl ies foll owi ng d igit al filt er
ef fect s fr om p rev ious ima ge
OK
De tail s
100 -0001
20.
19.
18.
17.
16.
--
--
--
--
--
--
15.
14.
13.
12.
11.
10.
9.
8.
7.
6.
5.
4.
3.
2.
1.
Pe rfor ms d igit al filt er
pr oces sing to thi s im age
OK
100 -0001
Brightness
Recreating Filter Effects
Retrieves the filter effects of the selected image and applies the
same filter effects to other images.
Available operations
AB Selects a parameter.
CD Adjusts the value.
6 Press E.
The save confirmation screen appears.
7 Select [Apply additional filter(s)], [Save to SD1]
or [Save to SD2], and press E.
Select [Apply additional filter(s)] when you want to apply
additional filters to the same image. The screen of Step 3
reappears.
u Caution
• Only JPEG and RAW images captured with this camera can
be edited with the digital filters.
t Memo
• Up to 20 filters, including the digital filter used during shooting
(p.56), can be applied to the same image.
Cancel
1 Display a filter-processed image in single image
OK
display.
2 Select T in the playback mode palette.
3 Select [Recreating filter
effects] and press E.
The filter effects used for the
selected image appear.
4 To check the parameter
details, press G.
Press G again to return to the
previous screen.
Reapplies following digital filter
effects from previous image
1.
2.
3.
4.
5 Press E.
The image selection screen appears.
6 Use Q to select an
image for applying the
same filter effects, and
press E.
You can only select an image
saved in the same memory card
that has not been processed with a filter.
The save confirmation screen appears.
processing to this image
7 Select [Save to SD1] or [Save to SD2] and press
E.
t Memo
• If [Searching for the original image] is selected in Step 3, the
original image prior to digital filter application can be
retrieved.
100-0001
17.
13.
9.
5.
6.
7.
8.
Performs digital filter
10.
11.
12.
Details
14.
--
15.
--
16.----
100-0001
18.
19.
20.
4
Playback
--
--
--
-OK
OK
67
Page 70

Creating a Composite Image (Index)
La yout
Im ages
Ba ckgr nd.
Se lect ion
Cr eate an inde x i mage
Ca ncel
OK
St op
OK
00 '00 "
10 '00 "
00 '05 "
10 '00 "
Se lect seg ment s f or d elet ion
Joins a number of images together and creates a new image with them.
1 Select X in the playback mode palette.
The Index setting screen appears.
2 Select [Layout].
Select from l (Thumbnail), k
(Square), m (Random1), n
(Random2), o (Random3) or
4
p (Bubble).
Create an index image
MENU
Cancel
Playback
3 Select the number of images from 12, 24 or 36 in
[Images].
When the number of saved images is smaller than the number
selected, empty spaces will appear when [Layout] i s set to
and some images may be duplicated for other layouts.
4 Select the background color from white or black
in [Backgrnd.].
5 Select a type of image selection in [Selection].
q Auto
select
r Select
image(s)
s Select a
folder
Picks images automatically from all of
the images saved.
Lets you select images that you want to
include in the index image.
If r is selected, [Select image (s)] appears
and leads you to the image selection screen.
Picks images automatically from the
folder selected.
If s is selected, [Select a folder] appears
and leads you to the folder selection screen.
6 Select [Create an index image] and press E.
The index image appears.
7 Select [Save to SD1], [Save to SD2] or
[Reshuffle], and press E.
When [Reshuffle] is selected, you can reselect the images
to be included in the index and display a new index image.
68
Layout
Images
Backgrnd.
Selection
t Memo
• The file name format for index image is “INDXxxxx.JPG”.
Editing Movies
1 Display the movie to edit in single image
display.
2 Select c in the playback mode palette.
The movie editing screen appears.
3 Select the point where you
OK
l
OK
want to divide the movie.
The frame at the dividing point is
displayed at the top of the screen.
Up to four points can be selected
to divide the original movie into
five segments.
Available operations
A Plays back/pauses a movie.
D
Press and hold D Fast-forwards playback.
C
Press and hold C Fast-reverses playback.
R Adjusts the volume.
G
Proceed to Step 7 if you do not delete any segment.
Forwards a frame (when paused).
Reverses a frame (when paused).
Confirms/cancels a dividing point.
4 Press L.
The screen to select segments to delete is displayed.
5 Use CD to move the
selection frame and press
E.
The segments to delete are
specified. (Multiple segments
can be deleted at once.)
Press E again to cancel the
selection.
00' 00"
10' 00"
Stop
00' 05"
10' 00"
Select segments for deletion
MENU
OK
OK
Page 71

6 Press F.
100_050 5
001 /500
De velo p im ages as sho t
De velo p im ages wi th
mo difi ed s etti ngs
OK
100 -0001
Im age Capt ure Set ting s
The screen of Step 3 reappears.
7 Press E.
The save confirmation screen appears.
8 Select [Save to SD1] or [Save to SD2] and press
E.
t Memo
• Select dividing points in chronological order from the
beginning of the movie. When canceling the selected dividing
points, cancel each of them in reverse order (from the end of
the movie to the beginning). In an order other than specified,
you can neither select frames as a dividing point nor cancel
the selections of the dividing points.
RAW Development
You can develop RAW images into JPEG images, and save
them as a new file.
1 Select b in the playback mode palette.
The screen for selecting a RAW image processing option
appears.
2 Select the desired option and press E.
Select single
image
Select multiple
images
Select a folder Develops up to 500 images in the
When [Select single image] is selected, proceed to Step 6.
The image/folder selection screen appears.
Develops an image.
Develops up to 500 images with the
same settings.
selected folder with the same settings.
3 Select the image(s) or a folder.
Refer to Step 2 of “Deleting Selected Images” (p.60) for how
to select the image(s) or a folder.
4 Press G.
The screen for selecting the parameter setting method
appears.
5 Select the parameter
setting method and press
E.
Develop
images as shot
Develop
images with
modified
settings
Allows you to change Image Capture
Settings (File Format, JPEG Recorded
Pixels, and JPEG Quality).
Allows you to change Image Capture
Settings (File Format, Aspect Ratio,
JPEG Recorded Pixels, JPEG Quality,
Color Space), Lens Correction
(Distortion Correction, Lat-Chromatic-Ab
Adj, Peripheral Illumin. Corr., Color
Fringe Correction), White Balance,
Custom Image, Digital Filter, HDR,
Sensitivity, High-ISO NR, and Shadow
Correction.
6 Set the parameters.
Available operations
AB Selects a parameter.
CD Changes the value.
Q Selects a different image (when in single
For Image Capture Settings and Lens Correction, press D
and use AB to select an item.
For White Balance, Custom Image and Digital Filter, press
D to display the setting screen.
image display).
001/500
Develop images as shot
Develop images with
modified settings
Image Capture Settings
7 Press E.
The save confirmation screen appears.
100_0505
OK
4
Playback
100-0001
69
Page 72

8 Select [Save to SD1] or [Save to SD2] and press
E.
When [Select single image] is selected, select [Continue] or
[Exit], and press E.
u Caution
• Only RAW images captured with this camera can be
developed.
t Memo
• When [Select multiple images] or [Select a folder] is selected
in Step 2, a folder with a new number is created, and the
JPEG images are stored in the new folder.
4
• With the provided software “Digital Camera Utility 5”, you can
Playback
develop RAW files on a computer,
70
Page 73

Camera Settings
Ex posu re M ode
Ca ncel
OK
Bu tton Cus tomi zat ion
RAW /Fx Butt on
AF But ton
Pr evie w Di al
t Memo
• If you select [Rotation Direction] in Step 2, you can reverse
the effect obtained by turning Q or R.
Customizing the Button/E-dial Functions
Setting the Q/R/M Operation
For each exposure mode, you can select the parameters for
when Q and R are turned and M is pressed.
1 Select [E-Dial Programming] in A4 menu and
press D.
The [E-Dial Programming] screen appears.
2 Select an exposure mode and press D.
The screen for the selected exposure mode appears.
3 Select the desired setting
Exposure Mode
for each exposure mode
and press E.
I
J
ISO Change Sensitivity
e EV Compensation
XG Return to G Mode
GSHIFT Program Shift
GLINE Program Line
-- Not available
Change Shutter
Speed
Change Aperture
Value
4 Press F.
The [E-Dial Programming] screen reappears.
Repeat Steps 2 to 4.
5 Press F twice.
Cancel
A4
Setting the Button Operation
You can set the functions for when P or I is pressed, or
when the main switch is turned to U.
1 Select [Button Customization] in A4 menu and
press D.
The [Button Customization] screen appears.
2 Select [RAW/Fx Button],
[AF Button] or [Preview
Dial] and press D.
The screen to set the function for
the selected item is displayed.
Button Customization
RAW/Fx Button
AF Button
Preview Dial
3 Select a function and press E.
The following functions can be assigned to each button.
OK
RAW/
Fx
Button
Setting Function Page
One Push
File Format
Exposure
Bracketing
Optical
Preview
Digital
Preview
Shake
Reduction
LCD Panel
Illumination
Temporarily changes
the file format. (Default
setting)
Sets the Exposure
Bracketing.
Activates the Optical
Preview.
Activates the Digital
Preview.
Turns the Shake
Reduction function on/off.
Turns the LCD panel
illumination on/off.
5
Settings
p.72
p.49
p.46
–
p.15
71
Page 74

Setting Function Page
On e Pu sh F ile For mat
RAW /Fx Butt on
Ca ncel
OK
Ca ncel aft er 1 sh ot
Autofocus is performed
when I is pressed.
Autofocus is performed
when I is pressed and
not when the shutter
release button is
pressed halfway.
While I is pressed,
autofocus is not
performed even when
the shutter release
button is pressed
halfway.
Activates the Optical
Preview.
Activates the Digital
Preview.
5
Settings
AF
Button
Preview
Dial
Enable AF1
Enable AF2
Cancel AF
Optical
Preview
Digital
Preview
4 Press F.
The [Button Customization] screen reappears.
Repeat Steps 2 to 4.
5 Press F twice.
u Caution
• [LCD Panel Illumination] in [RAW/Fx Button] cannot be
selected when [22. LCD Panel Illumination] is set to [Off] in
the E4 menu.
p.42
p.46
Setting the One Push File Format
1 Set [RAW/Fx Button] to [One Push File Format]
in Step 3 of “Setting the Button Operation”
(p.71).
2 Select T or S for [Cancel after 1 shot].
The recording format returns to the [File Format]
T
setting of [Image Capture Settings] in the A1 menu
after a picture is taken. (Default setting)
The setting is retained until any of the following
operations is performed:
S
• When P is pressed again
• When B, F or G is pressed, or when the
mode dial or main switch is turned
3 Select the file format when
P is pressed.
The left side is the [File Format]
setting and the right side is the
file format when P is pressed.
u Caution
• The One Push File Format function cannot be used when
[Memory Card Options] is set to [Separate RAW/JPEG] in the
A1 menu. (p.35)
RAW/Fx Button
One Push File Format
Cancel after 1 shot
Cancel
OK
72
Page 75

Saving Frequently Used Settings
Sa ve U SER Mode
Sa ve S etti ngs
Re name USE R Mo de
Ch eck Save d Se tti ngs
Re set USER Mod e
Ca ncel
De lete One Cha rac ter
En ter
Fi nish
Re name USE R Mo de
Text selection cursor
Text input cursor
Camera settings can be saved to O, P, and Q of the mode
dial and used repeatedly.
The following settings can be saved.
Exposure Mode (except
for T / C)
Sensitivity
EV Compensation
AE Metering
AF point
Flash Mode
Drive Mode
White Balance
Custom Image
A1-4 menu settings (with
exceptions)
E1-4 menu settings
A4
Saving the Settings
1 Set all of the settings to save on the camera.
t Memo
• The settings saved as USER mode can be displayed on the
monitor when you select [Check Saved Settings] in Step 3.
• To reset the settings to the default values, select [Reset
USER Mode] in Step 3.
Editing a Setting Name
You can change the name of the USER mode in which you
saved settings.
1 Select [Rename USER Mode] in Step 3 of
“Saving the Settings” and press D.
The [Rename USER Mode] screen appears.
2 Select [USER1], [USER2] or [USER3], and press
D.
The text-entry screen appears.
5
Settings
2 Select [Save USER Mode] in A4 menu and
press D.
The [Save USER Mode] screen appears.
3 Select [Save Settings] and
press D.
The [Save Settings] screen
appears.
4 Select [USER1], [USER2] or [USER3], and press
D.
5 Select [Save] and press E.
The screen of Step 3 reappears.
u Caution
• [Save USER Mode] cannot be selected when the mode dial
is set to T.
Save USER Mode
Save Settings
Rename USER Mode
Check Saved Settings
Reset USER Mode
3 Change the text.
Up to 18 single-byte
alphanumeric characters and
symbols can be entered.
Available operations
ABCD Moves the text selection cursor.
R Moves the text input cursor.
J Switches between upper and lower case
letters.
E Enters a character selected with the text
selection cursor at the positio n of the text
input cursor.
L Deletes a character at the position of the
text input cursor.
Rename USER Mode
Delete One Character
Cancel
Finish
Enter
73
Page 76

4 After entering the text, move the text selection
ABCDEFGHIJKLMNOPQR
Me mory Car d Op tio ns
Im age Capt ure Set ting s
Di gita l Fi lter
HD R Ca ptur e
Le ns C orre ctio n
Ca ncel
AF Assi st Ligh t
Ex posu re M ode
OK
Wor ld Time
De stin atio n
Lo ndon
Ho meto wn
Ne w Yor k
16: 00
10: 00
Tim e S etti ng
De stin atio n
+6 :00
16: 00
DS T
Lo ndon
Ca ncel
OK
cursor to [Finish], and press E.
The [Rename USER Mode] screen reappears.
Using the Saved USER Mode
1 Set the mode dial to O , P, or Q.
The USER mode guide is
displayed for 30 seconds.
Use AB to check the saved
settings.
ABCDEFGHIJKLMNOPQR
Displaying the Local Date and Time of the Specified City
D1
The date and time set in Initial Setting (p.29) serve as the date
and time of your present location and are reflected in the
shooting date and time for images.
Setting the destination to a location other than your present
location enables you to display the local date and time on the
monitor when traveling abroad and also save images timestamped with the local date and time.
1 Select [World Time] in D1 menu.
5
Settings
2 Change the settings as necessary.
The exposure mode can be
changed in [Exposure Mode] of
the A1 menu.
t Memo
• The settings changed in Step 2 are not saved as USER mode
settings. When the camera is turned off, the camera returns
to the originally saved settings. To change the original
settings, save the USER mode settings again.
74
Exposure Mode
Memory Card Options
Image Capture Settings
AF Assist Light
Digital Filter
HDR Capture
Lens Correction
1 234
Cancel
2 Select the time you wish to
display in [Time Setting].
Select F (Hometown) or G
(Destination).
3 Select [G Destination] and press D.
OK
The [G Destination] screen appears.
4 Use CD to select a city.
World Time
Time Setting
Destination
London
Hometown
New York
Destination
Use R to change the region.
London
DST
Cancel
5 Select [DST] (daylight saving time), and use CD
to select S or T.
6 Press E.
The [World Time] screen reappears.
16:00
10:00
16:00
+6:00
OK
Page 77

t Memo
Se lect a f olde r
Se lect ima ge(s )
OK
• Refer to “List of World Time Cities” (p.94) for cities that can be
selected as a hometown or destination.
• Select [F Hometown] in Step 3 to change the city and DST
settings for the hometown.
• G appears in the control panel when [Time Setting] is set to
G.
Selecting Settings to Save in the Camera
Most of the functions set on this camera are saved even if the
camera is turned off. For the following function settings, you can
select whether to save the settings (T) or to return the settings
to their default values (S) when the camera is turned off. The
default settings are S for Digital Filter and HDR Capture, and
T for other functions.
Set in [Memory] of the A4 menu.
Flash Mode
Drive Mode
White Balance
Custom Image
Sensitivity
EV Compensation
t Memo
• When [Reset] of the D3 menu is performed, all Memory
settings return to the default values.
Flash Exposure Compensation
Digital Filter
HDR Capture
Composition Adjust.
Playback Info Display
A4
File Management Settings
Protecting Images from Deletion (Protect)
You can protect images from being accidentally deleted.
u Caution
• Even protected images are deleted if the inserted memory
card is formatted.
1 Select Y in the playback mode palette.
The screen for selecting the unit for processing appears.
2 Select [Select image(s)] or
[Select a folder] and press
E.
Select image(s)
Select a folder
3 Select the image(s) or folder to protect.
Refer to Step 2 of “Deleting Selected Images” (p.60) for how
to select the image(s) or a folder.
Proceed to Step 5 if [Select a folder] is selected.
4 Press G.
The confirmation screen appears.
5
Settings
OK
5 Select [Protect] and press E.
t Memo
• To protect all images stored in the memory card, select
[Protect All Images] of the B1 menu.
75
Page 78

Selecting the Folder/File Settings
Ca ncel
OK
Fo lder Nam e
Da te
PE NTX
_
M MD D
Fo lder Nam e
Folder Name
When images are captured with this camera, a folder is
automatically created and the captured images are stored in the
new folder. Each folder name consists of a sequential number
from 100 to 999 and a string of 5 characters.
You can change the folder name in [Folder Name] of the D2
menu.
1 Select [Folder Name] in D2 menu and press D.
5
Settings
The [Folder Name] screen appears.
2 Select a folder name and
press E.
The two digits of the month and day on which the
picture was taken are assigned after the folder
number. (Default setting)
Date
[MMDD] appears according to the date format
set in [Date Adjustment].
Example) 101_0125: for images taken on
January 25th
The character string “PENTX” is assigned after
PENTX
the folder number.
Example) 101PENTX
Proceed to Step 5 if you do not need to change the folder
name.
Folder Name
Folder Name
Cancel
_
MMDD
D2
Date
PENTX
4 Change the text.
Enter 5 single-byte alphanumeric characters.
Refer to Steps 3 and 4 of “Editing a Setting Name” (p.73) for
how to enter text.
5 Press F twice.
t Memo
• A folder with a new number is created when the folder name
is changed.
• A maximum of 500 images (100 images for Eye-Fi card) can
be stored in a single folder. When the number of captured
images exceeds 500, a new folder is created with the number
following the number of the folder currently being used. In
Exposure Bracketing shooting, images will be stored in the
same folder until shooting is completed.
• When [Create New Folder] is selected in the D2 menu, a
folder is created with a new number when the next image is
saved. When a memory card is inserted in both SD1 and
OK
SD2, a new folder is created on both memory cards.
• When [Select multiple images] or [Select a folder] of [RAW
Development] is performed, a folder with a new number is
created, and the JPEG images are stored in the new folder.
(p.69)
u Caution
• The maximum folder number is 999. After the folder number
reaches 999, you cannot capture new images if you attempt
to change the folder name or create a new folder, or when the
file name number reaches 9999.
3 Press B, and then press D.
The text-entry screen appears.
76
Page 79

File Name
Fi le N ame
IIMMGGP
IIMMGGP
_
IIMMG
Re set File Num ber
Fi le N o.
Us es s eque ntia l f ile numb er
in new fol der bas ed o n la st
nu mber in prev iou s fo lder
Se quen tial Num ber ing
One of the following s tring of characters is used as the file name
prefix depending on the [21. Color Space] setting of the E3
menu.
Color Space File Name
sRGB IMGPxxxx.JPG
AdobeRGB _IMGxxxx.JPG
The first four characters can be changed to a character string of
your choice.
1 Select [File Name] in D2 menu and press D.
The [File Name] screen appears.
2 Select A or C and press
File Name
D.
The text-entry screen appears.
3 Change the text.
Up to 4 single-byte alphanumeric characters can be
entered.
Refer to Steps 3 and 4 of “Editing a Setting Name” (p.73) for
how to enter text.
4 Press F twice.
t Memo
• When [Color Space] is [AdobeRGB], the file name prefix is “_ ”
and first three characters of the specified character string
becomes the file name.
• For movies, regardless of the [Color Space] setting, the file
name is “IMGPxxxx.MOV” or a file name with the specified
string of characters.
_
xxxx.JPG
P
xxxx.JPG
G
xxxx.MOV
P
File No.
Each file name consists of a string of 4
characters and a sequential number
from 0001 to 9999 . You can set whether
to continue the sequential numbering
for the file name even if a new folder is
created in [Sequential Numbering] of
[File No.] in the
T
S
D
2 menu.
Continues the sequential numbering for the file name
even if a new folder is created. (Default setting)
Returns the file number of the first image saved to a
folder to 0001 each time a new folder is created.
Select [Reset File Number] to reset the file number to its default
value.
File No.
Sequential Numbering
Reset File Number
Uses sequential file number
in new folder based on last
number in previous folder
t Memo
• When the file number reaches 9999, a new folder is created
and the file number is reset.
5
Settings
77
Page 80

Setting the Copyright Information
Co pyri ght Info rma tion
Em bed Copy righ t D ata
Ph otog raph er
Co pyri ght Hold er
Ca ncel
OK
Ac tion Mod e
Au to R esiz e
Co mmun icat ion Inf o
Fi rmwa re I nfo/ Opt ions
Wir ele ss M emor y C ard
Au toma tica lly tra nsfe rs
un sent ima ges fro m me mory ca rd
Sets the photographer and copyright information embedded in
Exif data.
1 Select [Copyright Information] in D2 menu and
press D.
The [Copyright Information] screen appears.
2 Use CD to set [Embed
Copyright Data].
Copyright Information
Embed Copyright Data
Photographer
Copyright Holder
5
Settings
Does not embed copyright information in the Exif.
S
(Default setting)
Embeds copyright information in the Exif.
T
3 Select [Photographer] or [Copyright Holder],
and press D.
The text-entry screen appears.
4 Change the text.
Up to 32 single-byte alphanumeric characters and symbols
can be entered.
Refer to Steps 3 and 4 of “Editing a Setting Name” (p.73) for
how to enter text.
5 Press F twice.
t Memo
• The Exif information can be checked using the provided
software “Digital Camera Utility 5”.
78
D2
Using a Wireless Memory Card
A memory card with a built-in wireless LAN “Eye-Fi card” (Wi-Fi
transmission) or a “Flucard” compatible with this camera can be
used. By using these cards, images can be transferred from the
camera to a computer or other device via wireless LAN.
Select the camera action when using an Eye-Fi card or a
Flucard in [Wireless Memory Card] of the D3 menu.
D3
1 Select [Wireless Memory Card] in D3 menu and
press D.
The [Wireless Memory Card] screen appears.
2 Select [Action Mode].
Items that can be set are
displayed according to the type of
card inserted.
Eye-Fi card
Transfers automatically when images are
AUTO
SELECT
OFF Stops the communication function.
Flucard
ON Enables wireless data transfer with Flucard.
OFF Disables wireless data transfer with Flucard.
taken, new images are saved, or images are
overwritten. (Default setting)
For movies, only files under 2 GB can be
transferred.
Transfers images o r folders that are selected in
[Eye-Fi Image Transfer] of the playback mode.
Only JPEG and RAW images can be transferred.
Wireless Memory Card
Action Mode
Auto Resize
Communication Info
Firmware Info/Options
Automatically transfers
unsent images from memory card
Cancel
3 Specify [Auto Resize].
When set to T, JPEG images are saved to the Eye-Fi card
or Flucard at the size of r.
4 Press F twice.
OK
Page 81

u Caution
• Be sure to insert an Eye-Fi card or a Flucard in the SD2 slot.
If it is inserted in the SD1 slot, the wireless LAN function
cannot be used. When an Eye-Fi card or a Flucard is not
inserted in the SD2 slot, the [Wireless Memory Card] settings
of the D3 menu cannot be set.
• Be sure to set up a wireless LAN access point on a computer
for the card connection.
• For RAW images and movie files, the success of transfer
depends on the specifications and settings of the Eye-Fi card
in use.
• Images may not be transferred when the battery level is low.
• It may take time to transfer a large number of images. The
camera may turn off if the internal temperature of the camera
becomes high.
• For precautions on the Eye-Fi card, refer to “About Eye-Fi
Cards” (p.102).
t Memo
• A smartphone can be used to operate this camera when a
Flucard compatible with this camera is used. Refer to the
Flucard manual for details on how to use the card.
• When an Eye-Fi card is used, 100 images can be stored in a
single folder. For RAW+ images, two files are counted as one
image.
• In Step 2, select [Communication Info] to check the Wireless
LAN information, and [Firmware Info/Options] to check the
firmware version of the cards.
• When [Reset Transfer Settings] is selected in Step 2, the
[Action Mode] setting is returned to their default values.
5
Settings
79
Page 82

Restrictions on the Combinations of Special Functions
: Not available
×
Composition
Adjust.
Flash
Continuous Shooting
Exposure Bracketing
Mirror Lock-up Shooting
Multi-exposure
Interval Shooting
Drive Mode
6
Appendix
Interval Composite
Interval Movie Record
HDR Capture
AA Filter Simulator
×
×× ××
××
HDR Capture Save RAW Data
×
××
×
×
×××
×
Distortion
Correction
Digital Filter
×
80
Page 83

Functions Available with Various Lenses
All exposure modes are available when DA, DA L, or FA J lens
is used, or when a lens with an 9 position is used with the
aperture ring set to the 9 position.
When they are used in a position other than 9, or other lenses
are used, the following restrictions apply.
Function
Autofocus
(Lens only)
(With AF adapter 1.7x)
Manual focus
(With focus indicator)
(With matte field)
Quick-shift focus #
Focus point selection mode
[Auto]
AE Metering [Multi-segment] xxxx
G/H/I/J/K mode xxxx #
L mode xxxx #
P-TTL auto flash
Power zoom –
Automatically obtaining the
lens focal length information
Lens Correction x*5
*1 Lenses with a maximum aperture of F2.8 or faster. Only available at
the 9 position.
*2 Lenses with a maximum aperture of F5.6 or faster.
*3 Available when using the built-in flash, AF540FGZ, AF540FGZ II,
AF360FGZ, AF360FGZ II, AF200FG or AF160FC.
x: Available #: Restricted ×: Not available
DA
FA J
Lens
[Mount type]
*1
*2
*3
DA L
D FA
[KAF]
[KAF2]
[KAF3]
x–x–x––
xxxxx
*4
xxx #
xxxx
xxx
F *6A M
*6
FA
[KAF]
[KAF] [KA] [K]
[KAF2]
××××
–––
×
*7
×
×××
P
–
#
#
*8
×
×
*9
×
××
*4 Only available with compatible lenses.
*5 Distortion Correction and Peripheral Illumination Correction are
disabled when a DA FISH-EYE 10-17mm lens is used.
*6 To use an FA SOFT 28mm F2.8 lens, FA SOFT 85mm F2.8 lens, or
F SOFT 85mm F2.8 lens, set [27. Using Aperture Ring] to [Enable] in
the E4 menu. Pictures can be taken with the aperture you set, but
only within a manual aperture range.
*7 Only available with an FA 31mm F1.8 Limited, FA 43mm F1.9
Limited, or FA 77mm F1.8 Limited lens.
*8 Fixed to [Spot].
*9 J with the aperture open. (The aperture ring has no effect on the
actual aperture value.)
u Caution
• When the aperture ring is set to a position other than 9 or a
lens without an 9 position or accessories such as an auto
extension tube or auto bellows are used, the camera will not
operate unless [27. Using Aperture Ring] is set to [Enable] in
the E4 menu. Refer to “Using the Aperture Ring” (p.83) for
details.
Lens names and mount names
DA lenses with a motor and FA zoom lenses with power
zoom use the K
coupler use the K
FA single focal length lenses (non-zoom lenses), DA or DA
L lenses without a motor, and D FA, FA J and F lenses use
the K
AF mount.
Refer to respective lens manuals for details.
AF2 mount. DA lenses with a motor and no AF
AF3 mount.
6
Appendix
81
Page 84

Compatibility with the Built-in Flash
In put Foca l Le ngt h
OK
35
mm
Depending on the lens being used, the use of the built-in flash
may be limited.
Restrictions when using the
built-in flash
The built-in flash is not available
due to vignetting.
Vignetting may occur if the focal
length is less than 20 mm.
When the focal length is less than
28 mm, or when the focal length
is 28 mm and the shooting
distance is 1 m or less, vignetting
may occur.
When the focal length is 20 mm
or less or when the focal length is
35 mm and the shooting distance
is less than 1.5 m, vignetting may
occur.
When the focal length is less than
24 mm or when the focal length is
35 mm and the shooting distance
is 1 m or less, vignetting may
occur.
Vignetting may occur if the focal
length is less than 35 mm.
Vignetting may occur if the focal
length is less than 24mm.
DA FISH-EYE 10-17mm
F3.5-4.5 ED (IF)/
DA 12-24mm F4 ED AL/
DA 14mm F2.8 ED (IF)/
k
FA
300mm F2.8 ED (IF)/
k
DA
560mm F5.6 ED AW/
k
FA
600mm F4 ED (IF)/
k
FA
250-600mm F5.6 ED
(IF)
F FISH-EYE 17-28mm
6
F3.5-4.5
Appendix
DA 16-45mm F4 ED AL
k
DA
16-50mm F2.8 ED
AL (IF) SDM
DA 17-70mm F4 AL (IF)
SDM
DA 18-250mm F3.5-6.3
ED AL (IF)
DA 18-270mm F3.5-6.3
ED SDM
82
Lens
Lens
FAk28-70mm F2.8 AL
FA SOFT 28mm F2.8/
FA SOFT 85mm F2.8
Setting the Focal Length
The Shake Reduction function operates by obtaining the lens
information such as focal length. Set the focal length when
using a lens of which the focal length information cannot be
automatically obtained.
Restrictions when using the
built-in flash
Vignetting may occur if the focal
length is 28 mm and the shooting
distance is less than 1 m.
The built-in flash always
discharges fully.
A3
1 Turn the camera off.
2 Attach a lens to the camera and turn the camera
on.
The [Input Focal Length] screen appears.
3 Use AB to set the focal
length.
Press C to select a value from
the list.
When using a zoom lens, select
the actual focal length which the
zoom is set to.
Input Focal Length
35
mm
4 Press E.
The camera returns to standby mode.
t Memo
• The focal length setting can be changed in [Input Focal
Length] of the A3 menu.
• When using a lens without an 9 position or a lens with an 9
position with the aperture ring set to a position other than 9,
set [27. Using Aperture Ring] to [Enable] in the E4 menu.
(p.83)
OK
Page 85

Using the Aperture Ring
Ca ncel
OK
Sh utte r wi ll r ele ase when
ap ertu re r ing is not set to the
"A " po siti on
Us ing A per ture Rin g
27 .
Di sabl e
1
En able
2
26 .
The shutter can be released even if the aperture ring of the D
FA, FA, F or A lens is not set to the 9 position or a lens without
an 9 position is attached.
Select [Enable] in [27. Using Aperture
Ring] of the E4 menu.
The following restrictions apply depending on the lens being used.
Expo-
Lens Used
sure
Mode
D FA, FA, F, A, M
(lens only or with
automatic diaphragm
accessories such as
auto extension tube K)
The aperture remains open.
The shutter speed changes in
J
relation to the open aperture
but an exposure deviation may
occur.
D FA, FA, F, A, M, S
(with diaphragm
accessories such as
extension tube K)
Manual diaphragm
lens such as reflex
J
Pictures can be taken with a
set aperture value but an
exposure deviation may occur.
J
lens (lens only)
FA SOFT 28mm/
FA SOFT 85mm/
F SOFT 85mm
(lens only)
Pictures can be taken with a
set aperture value in the
J
manual aperture range.
The exposure can be checked
with Optical Preview.
Pictures can be taken with a
set aperture value and shutter
All lenses L
speed.
The exposure can be checked
with Optical Preview.
Using Aperture Ring
27.
Disable
1
Enable
2
Shutter will release when
aperture ring is not set to the
"A" position
Restriction
Cancel
26.1.1.
E4
t Memo
• If the aperture ring is set to a position other than 9, the
camera operates in J mode regardless of the mode dial
setting except when set to L, M or N mode.
• [F--] appears for the aperture indicator in the status screen,
Live View screen and viewfinder and on the LCD panel.
OK
6
Appendix
83
Page 86

Functions when Using an External Flash
Using an optional external flash AF540FGZ, AF540FGZ II,
AF360FGZ, AF360FGZ II, AF200FG or AF160FC enables a
variety of flash modes, such as P-TTL auto flash mode.
Camera Function
Red-eye reduction flash xxx
Auto Flash Discharge xxx
Automatically switching to
the flash sync speed
6
Aperture value is
Appendix
automatically set in G mode
and I mode.
P-TTL auto flash x
Slow-speed Sync xxx
Flash Ex posure
Compensation
AF assist light of external
flash
Trailing Curtain Sync
Contrast control sync flash
mode
Slave flash
High-speed sync
Wireless flash #
*1 Available only when using a DA, DA L, D FA, FA J, FA, F or A lens.
*2 Shutter speed of 1/90 seconds or slower.
*3 When combined with the AF540FGZ, AF540FGZ II, AF360FGZ, or
AF360FGZ II, 1/3 of the flash discharge can be output by the built-in
84
flash and 2/3 can be output by the external flash.
x: Available #: Restricted ×: Not available
AF540FGZ
AF540FGZ II
AF360FGZ
AF360FGZ II
xxx
xxx
*1
xxx
×
xx
*3
#
×
×
*4
*1
x
x
x #
x
x
*5
x
*2
Flash
Built-in
Flash
AF200FG
AF160FC
*1
x
×
×
*4
×
×
×
*4 Available only when combined with the AF540FGZ, AF540FGZ II,
AF360FGZ, or AF360FGZ II.
*5 Multiple AF540FGZ, AF540FGZ II, AF360FGZ, or AF360FGZ II units,
or a combination of an AF540FGZ, AF540FGZ II, AF360FGZ, or
AF360FGZ II unit and the built-in flash is required.
u Caution
• Never press the 1 button when any external flash unit is
attached to the camera. The built-in flash will hit the external
flash. If you want to use both at once, set the wireless mode
or connect them using an extension cord.
• Flashes with the reversed polarity (the center contact on the
hot shoe is minus) ca nnot be used due to the risk of damaging
the camera and/or flash.
• Do not combine with accessories that have a different
number of contacts, such as a Hot Shoe Grip, as a
malfunction may occur.
• Combining with flashes from other manufacturers may cause
equipment breakdown.
t Memo
• With the AF540FGZ, AF540FGZ II, AF360FGZ, or
AF360FGZ II, you can use the high-speed sync flash to
discharge the flash and take a picture at a shutter speed
faster than 1/180 seconds. Select an exposure mode (such
as I) which allows you to set the shutter speed.
• By using two external flashes (AF540FGZ, AF540FGZ II,
AF360FGZ, or AF360FGZ II) or using the built-in flash with
one or more external flashes, you can use the wireless mode
to shoot in P-TTL flash mode without connecting the flash
units with a cord. In this case, set the camera channel on the
external flashes. The set channel can be checked on the
status screen, Live View screen, LCD panel, and in the
viewfinder.
• You can connect an external flash
to the camera with a sync cord by
using the X-sync socket. Remove
the Sync socket 2P cap to connect
a sync cord to the X-sync socket.
Page 87

Using the GPS Unit
N 36° 45.410 '
W14 0°02.0 00'
89m
09/ 09/201 3
10: 00:00
Ac tion in B Mo de
AS TROT RACE R
Pr ecis e Ca libr ati on
Tim ed Expo sure
Ex posu re T ime
GP S LE D In dica tor s
The following functions are available when the optional GPS
unit O-GPS1 is attached to this camera.
The current latitude,
Electronic
Compass
ASTROTRACER
GPS Time
Sync
t Memo
• Refer to the manual of the GPS unit for details on how to
attach the unit and information on the unit’s functions.
• To display [Electronic Compass], refer to “Shooting Info
Display” (p.12).
u Caution
• “Simple Navigation” cannot be used with this camera.
longitude, altitude,
direction, and
Coordinated
Universal Time
(UTC) are displayed.
Tracks and captures celestial bodies.
By matching the movement of the camera’s
built-in Shake Reduction unit with the
movement of celestial bodies, celestial bodies
can be captured as indivi dual points even when
shooting with a long exposure setting. (p.85)
Automatically adjusts the camera’s date and
time settings using information acquired from
GPS satellites.
N 36°45.410'
W140°02.000'
89m
09/09/2013
10:00:00
Shooting Celestial Bodies (ASTROTRACER)
A2
1 Set the mode dial to M.
2 Select [GPS] in A2 menu and press D.
0°
The [GPS] screen appears.
3 Select [ASTROTRACER] and press D.
The [ASTROTRACER] screen appears.
4 Set [Action in B Mode] to
a and press E.
ASTROTRACER
Action in B Mode
Precise Calibration
Timed Exposure
Exposure Time
GPS LED Indicators
6
Appendix
5 To set the desired exposure time, first set
[Timed Exposure] to [ON].
You can set the exposure time between 0'10" and 5'00" in
[Exposure Time].
6 Press F three times.
The camera returns to standby mode.
7 Press the shutter release button fully.
Shooting starts.
8 Press the shutter release button fully again.
Shooting stops.
When [Timed Exposure] is enabled, shooting ends
automatically after the set time has elapsed.
u Caution
• When ASTROTRACER is activated, the drive mode cannot
be set to [Mirror Lock-up Shooting] and [Multi-exposure].
85
Page 88

Troubleshooting
t Memo
• In rare cases, the camera may not operate correctly due to
static electricity. This can be remedied by taking the battery
out and putting it back in again. If the camera operates
correctly, it does not require any repairs.
6
Appendix
Problem Cause Remedy
The camera does
not turn on.
The shutter cannot
be released.
Autofocus does
not work.
The focus cannot
be locked.
Battery is not
installed properly.
The battery power
is low.
The built-in flash is
being charged.
There is no
availabl e space on
the memory card.
Data being
processed.
The lens aperture
ring is set to a
position other than
9
The subject is
difficult to focus
on.
The subject is too
close.
AF Mode of Live
View is set to f.
Check the orientation of the
battery.
Charge the battery.
Wait until charging is finished.
Insert a mem ory card with
available space or delete
unwanted images.
Wait until processing is
finished.
Set the lens aperture ring to the
9 position or select [Enable] in
[27. Using Aperture Ring] of the
E4 menu. (p.83)
v cannot work well for low-
contrast objects (the sky, white
walls, etc.), dark colors,
intricate designs, rapidlymoving objects or scenery shot
through a window or a net-like
pattern.
Lock focus on another object
located at the same distance as
your subject, then aim at the
target and take a picture.
Alternatively, use w.
Move away from the subject
and take a picture.
Set [Contrast AF] to e, g,
h or i. (p.44)
Problem Cause Remedy
The built-in flash
does not
discharge.
The camera is not
recognized when it
is connected to a
computer.
Dust or dirt
particles appear in
images.
There are pixels in
the monitor or
captured images
that do not light up
or remain lit.
The flash mode is
set to A or B.
The USB
connection mode
is set to [PTP].
The CMOS sensor
is dirty or dusty.
There are
defective pixels in
the CMOS sensor.
When the flash mode is set to
A or B, the flash will not
discharge if the subject is
bright.
Change the flash mode. (p.41)
Set [USB Connection] to [MSC]
in the D2 menu.
Activate [Dust Removal] from
the D4 menu. The Dust
Removal function can be
activated every time the camera
is turned on and off.
Refer to “Sensor Cleaning”
(p.87) if the problem persists.
Activate [Pixel Mapping] from
the D4 menu.
It takes about 30 seconds to
correct the defective pixels, so
be sure to install a fully charged
battery.
86
Page 89

Sensor Cleaning
Ex it
x1
Detecting Dust on the CMOS Sensor (Dust Alert)
Dust Alert is the function that detects dust adhering to the
CMOS sensor and visually displays the location of the dust.
Make sure that the camera is in the following status.
• Attach a DA, DA L, FA J lens or a D FA, FA or F lens that has
an 9 position, and set the aperture ring to the 9 position.
• Turn the Stills/Movie switch to A.
• Set the focus mode switch to v.
Removing Dust with a Blower
Raise the mirror up and open the shutter when cleaning the
CMOS sensor with a blower.
1 Turn the camera off and remove the lens.
2 Turn the camera on.
3 Select [Sensor Cleaning] in D4 menu and press
D.
The [Sensor Cleaning] screen appears.
1 Select [Dust Alert] in D4 menu and press D.
The [Dust Alert] screen appears.
2 Fully display a white wall or other bright subject
with no detail in the viewfinder and press the
shutter release button fully.
After image processing is performed, the Dust Alert image
appears.
If [The operation could not be completed correctly] appears,
press E and take another picture.
3 Check the sensor for dust.
Use R to display the Dust Alert
image at full screen display.
x1
4 Press E.
The Dust Alert image is saved and the D4 menu reappears.
t Memo
• Only the latest Dust Alert image is saved to the SD1 slot
memory card for approximately 30 minutes. If Sensor
Cleaning is performed during this time, the Dust Alert image
can be checked while cleaning the sensor. (If the SD1 slot is
disabled, the image is not saved. You cannot check the image
in playback mode.)
4 Select [Mirror Up] and press E.
The mirror rises up.
If a Dust Alert image is saved, it appears.
5 Clean the CMOS sensor with a blower.
6 Turn the camera off.
The mirror automatically returns to its original position.
u Caution
• Never use a spray blower or a blower with a brush. The
CMOS sensor may be damaged. Do not wipe the CMOS
sensor with a cloth.
• Do not put the tip of the blower inside the lens mount area. If
Exit
the power is turned off, this may cause damage to the shutter,
CMOS sensor and the mirror.
• When the battery level is low, the message [Not enough
battery power remaining to clean sensor] is displayed on the
monitor. Install a fully charged battery. If the battery capacity
becomes low during cleaning, a warning beep will sound. In
this case, stop cleaning immediately.
t Memo
• Please contact your nearest service center for professional
cleaning as the CMOS sensor is a precision part.
• You can use the optional Imagesensor Cleaning kit O-ICK1
when cleaning the CMOS sensor.
6
Appendix
87
Page 90

Error Messages
6
Appendix
This image is protected
88
Error Messages Description
Memory card full
No image
This image cannot be
displayed
No card in the camera
Memory card error
Card is not formatted
Card is locked
This image cannot be
magnified
The memory card is full and no more
images can be saved. Insert a new
memory card or delete unwanted files.
There are no images that can be played
back on the memory card.
You are trying to play back an image in a
format not supported by this camera. You
may be able to play it back on a computer.
There is no memory card inserted in the
camera.
The memory card has a problem, and
image capture and playback are
impossible. You may be able to play it
back on a computer.
Failed to initialize the Eye-Fi function
when using the Eye-Fi card. Press E.
The memory card you have inserted is
unformatted or has been previously used
on another device and is not compatible
with this camera. Use the card after
formatting it with this camera.
The write-protect switch on the memory
card you have inserted is locked. (p.102)
You are trying to magnify an image that
cannot be magnified.
You are trying to delete an image that is
protected. Remove protection from the
image. (p.75)
Error Messa ges Description
Not enough battery
power remaining to
activate Pixel Mapping
Not enough battery
power remaining to
clean sensor
Not enough battery
power remaining to
update the firmware
Unable to update firmware.
There is a problem with the
firmware update file
Image folder cannot be
created
Unable to store image
The operation could not be
completed correctly
No more images
can be selected
No image can be processed
This image cannot be
processed
The camera failed
to create an image
Appears during Pixel Mapping, Sensor
Cleaning, or when trying to update the
firmware if the battery level is insufficient.
Install a fully charged battery.
Unable to update the firmware. The
update file is damaged. Try downloading
the update file again.
The maximum folder number (999) is
being used, and no more images can be
saved. Insert a new memory card or
format the card.
The image could not be saved because of
a memory card error.
The camera was unable to adjust the
manual white balance. Try the operation
again.
You are trying to select more than the
maximum number of images for the
following functions.
• Select & Delete
• Image Copy
• Index
• RAW Development
•Protect
• Eye-Fi Image Transfer
There are no images that can be
processed using the Digital Filter or RAW
Development function.
Appears when you try to perform Resize,
Cropping, Digital Filter, Movie Edit, RAW
Development, or Save as Manual WB for
images captured with other cameras, or
when you try to perform Resize or
Cropping for minimum file size images.
The creation of an index print image
failed.
Page 91

Error Messages Description
This function is not available
in the current mode
The camera will turn off
to prevent damage from
overheating
Set the Eye-Fi
communication
to “SELECT”
Image not found
Cannot be
selected
You are trying to set a function that is not
available for the exposure mode that is
set.
The camera will turn off because its
internal temperature gets too hot. Leave
the camera turned off until it has had time
to cool down before turning on the
camera again.
Images cannot be transferred when
[Action Mode] is not set to [SELECT] in
[Wireless Memory Card] of the D3 menu.
(p.78)
There are no images that can be
transferred when an Eye-Fi card is used.
This folder cannot be selected because
the number of files exceeds the maximum
number allowed.
6
Appendix
89
Page 92

Main Specifications
Model Descri ption
Type
Lens Mount
Compatible Lens
Image Capture Unit
Image Sensor Primary color filter, CMOS, Size: 23.5 × 15.6 (mm)
Effective Pixels Approx. 24.35 megapixels
Total Pixels Approx. 24.71 megapixels
Dust Removal
6
Sensitivity
(Standard Output)
Appendix
Image Stabilizer Sensor-shift shake reduction (SR: Shake Reduction)
AA Filter
Simulator
File Formats
Recording
Formats
Recorded Pixels
Quality Level
Color Space sRGB, AdobeRGB
Storage Media
Dual Card Slots
Storage Folder
Storage File
90
TTL autofocus, auto-exposure SLR digital camera
with built-in retractable P-TTL flash
PENTAX KAF2 bayonet mount (AF coupler, lens
information contacts, K-mount with power contacts)
KAF3, KAF2 (power zoom compatible), KAF, KA
mount lenses
Image sensor cleaning using ultrasonic vibrations
“DR II” with the Dust Alert function
ISO AUTO/100 to 51200 (EV steps can be set to
1 EV, 1/2 EV, or 1/3 EV)
Moiré reduction using SR unit: Type1/Type2/OFF
RAW (PEF/DNG), JPEG (Exif 2.30), DCF 2.0
compliant
JPEG: q (24M: 6016×4000), p (14M: 4608×
3072), o (6M: 3072×20 48), r (2M: 1920x1280)
RAW: q (
24M: 6016×4000
RAW (14bit): PEF, DNG
JPEG: m (Best), l (Better), k (Good),
RAW + JPEG simultaneous capturing available
SD Memory Card, SDHC Memory Card, SDXC
(UHS-I compatible) Memory Card, Eye-Fi card,
Flucard
Sequential Use, Save to Both, Separate RAW/
JPEG, Copying images between slots possible
Folder Name: Date (100_1018, 101_1019...) or a
user-assigned name (default: PENTX)
File Name: user-assigned name (default: IMGP****)
File No.: Sequential Numbering, Reset
)
Viewfinder
Type Pentaprism Finder
Coverage (FOV) Approx. 100%
Magnification Approx. 0.95× (50 mm F1.4 at infinity)
Eye-Relief Length
Diopter
Adjustment
Focusing
Screen
Live View
Type TTL method using CMOS image sensor
Focusing
Mechanism
Display
LCD Monitor
Type
Size 3.2 inches (aspect ratio 3:2)
Dots Approx. 1037K dots
Adjustment Brightness, saturation and colors adjustable
White Balance
Type
White Balance
Fine Adjustment Adjustable ±7 steps on A-B axis and G-M axis
Approx. 20.5 mm (from the view window),
Approx. 22.3 mm (from the center of lens)
Approx. -2.5 to +1.5 m
Interchangeable Natural-Bright-Matte III focusing
screen
Contrast detection (Face Detection, Tracking,
Multiple AF Points, Select, Spot)
Focus Peaking: ON/OFF
Field of view: approx. 100%, Magnified view (2×, 4×,
8×, 10×), Grid Display (4 × 4 Grid, Golden Section,
Scale display), Histogram, Highlight Alert,
Composition Adjustment
Wide viewing angle TFT color LCD with an AR
coating and air gapless glass
Method using a combination of the CMOS image
sensor and the light source detection sensor
AUTO White Balance, Multi Auto White Balance,
Daylight, Shade, Cloudy, Fluorescent Light (D:
Daylight Color, N: Daylight White, W: Cool White, L:
Warm White), Tungsten Light, Flash, n, Manual
White Balance (up to 3 settings), Color Temperature
(up to 3 settings), Copying the white balance settings
of a captured image
-1
Page 93

Autofocus System
Type TTL: phase-matching autofocus
Focus Sensor
Brightness Range EV -3 to 18 (ISO100, at normal temperature)
AF Modes
Focus Point
Selection Modes
AF Assist Light Dedicated LED AF assist light
Exposure Contro l
Type
Metering Range EV -3 to 20 (ISO100 at 50mm F1.4)
Exposure Modes
EV Compensation ±5 EV (1/2 EV steps or 1/3 EV steps can be selected)
AE Lock
Shutter
Type
Shutter Speed
Drive Modes
Mode Selection
SAFOX 11, 27 points (25 cross type focus points in
the center)
Single AF (x), Contin uous AF (y), Auto
select AF (z)
Focus operation customizable
Spot, Select, Expanded Area AF (S, M, L), Zone
Select, Auto (27 AF Points)
TTL open aperture metering using 86K pixel RGB
sensor, Metering Modes: Multi-segment metering,
Center-weighted metering, Spot metering
Green, Program, Sensitivity Priority, Shutter Priority,
Aperture Priority, Shutter & Aperture Priority,
Manual, Bulb, Flash X-sync Speed,
USER1, USER2, USER3
Button type (timer-control: two times the meter
operating time set in Custom Setting); continues as
long as the shutter button is halfway pressed.
Electronically controlled vertical-run focal plane
shutter
Auto: 1/8000 to 30 seconds, Manual: 1/8000 to 30
seconds (1/3 EV steps or 1/2 EV steps), Bulb
Still image: Single frame, Continuous (H, M, L), Selftimer (12 sec., 2 sec.), Remote Control (immediately,
3 sec., continuous), Exposure Bracketing (2, 3, or 5
frames; available with Self-timer or Remote Control),
Mirror Lock-up Shooting (available with Remote
Control), Multi-exposure (available with Self-timer or
Remote Control), Interval Shooting, Interval
Composite
Movie: Remote Control, Interval Movie Record
Max. approx. 8.3 fps, JPEG (q: m at
Continuous H): up to approx. 60 frames, RAW: up to
approx. 23 frames
Continuous
Shooting
Multi-Exposure
Interval Shooting
Built-in Flash
Type
Flash Modes
Sync Speed 1/180 seconds
Flash Ex posure
Compensation
Capture Functions
Custom Image
Cross Processing Random, Preset 1-3, Favorite 1-3
Noise Reduction Slow Shutter Speed NR, High-ISO NR
Dynamic Range
Settings
Lens Correction
Max. approx. 4.5 fps, JPEG (q: m at
Continuous M): up to approx. 100 frames, RAW: up
to approx. 32 frames
Max. approx. 3.0 fps, JPEG (q: m at
Continuous L): up to approx. 200 frames, RAW: up
to approx. 52 frames
*When the sensitivity is set to ISO100.
Composite Mode: Additive, Average, Bright
Number of Shots: 2 to 2000 images
Still image:
Interval: 2 sec. to 24 hr., Number of shots: 2 to 2000
images, Start Interval: Now, Set Time
Movie:
Recorded size: z/u/t, Interval: 2 sec. to 1 hr.,
Recording time: 14 sec. to 99 hr., Start Interval: Now,
Set Time
Built-in retractable P-TTL pop-up flash
Guide number: approx. 13 (ISO100/m)
Angle of view coverage: equivalent to 28mm lens in
35 mm format
Auto Flash Discharge (Green mode), Flash On,
Red-eye Reduction, Slow-speed Sync, Trailing
Curtain Sync., Manual Flash Discharge (FULL to
1/128)
High-speed sync and wireless sync are also
available with a dedicated external flash.
-2.0 to +1.0 EV
Bright, Natural, Portrait, Landscape, Vibrant,
Radiant, Muted, Bleach Bypass, Reversal Film,
Monochrome, Cross Processing
Highlight Correction, Shadow Correction
Distortion Correction, Lateral Chromatic Aberration
Correction, Peripheral Illumination Correction
6
Appendix
91
Page 94

Digital Filter
HDR Capture
Horizon
Correction
Composition
Adjustment
Electronic Level
Movie
File Formats
Recorded Pixels
6
Sound
Appendix
Recording Time
Custom Image
Cross Processing Random, Preset 1-3, Favorite 1-3
Digital Filter
HDR Capture
*available only for
Interval Movie
Record
Playback Functions
Playback View
92
Extract Color, Toy Camera, Retro, High Contrast,
Shading, Invert Color, Unicolor Bold, Bold
Monochrome
Auto, Type1, Type2, Type3
Exposure Bracket Value adjustable
Auto Align (automatic composition correction)
SR On: corrects up to 1 degree, SR Off: corrects up
to 2 degrees
Adjustment range of ±1.5 mm up, down, left or right
(±1mm when rotated); rotating range of ±1 degree
Displayed in viewfinder and LCD panel (horizontal
direction only); displayed on LCD monitor (horizontal
direction and vertical direction)
MPEG-4 AVC/H.264 (MOV)
*Motion JPEG (AVI) for Interval Movie Record
u (1920×1080, 60i/50i/30p/25p/24p)
t (1280×720, 60p/50p/30p/25p/24p)
Built-in monaural microphone, external microphone
(stereo recording compatible)
Recording Sound Level adjustable
Up to 25 minutes; automatically stops recording if the
internal temperature of the camera becomes high.
Bright, Natural, Portrait, Landscape, Vibrant,
Radiant, Muted, Bleach Bypass, Reversal Film,
Monochrome, Cross Processing
Extract Color, Toy Camera, Retro, High Contrast,
Shading, Invert Color, Unicolor Bold, Bold
Monochrome
Auto, Type1, Type2, Type3,
Exposure Bracket Value adjustable
Single frame, multi-image display (6, 12, 20, 35, 80
thumbnails), display magnification (up to 16×, 100%
display and quick zoom), image rotation, histogram
(Y histogram, RGB histogram), highlight alert, auto
image rotation, detailed information display,
copyright information (photographer, copyright
holder), folder display, calendar filmstrip display,
slideshow, GPS (latitude, longitude, altitude,
Coordinated Universal Time (UTC))
Delete
Digital Filter
RAW
Development
Edit
Customization
USER Mode Up to 3 settings can be saved.
Custom Functions 27 items
Mode Memory 11 items
E-Dial
Programming/
Button
Communication
Text Size Standard, Large
World Time World Time settings for 75 cities (28 time zones)
Language (Depends on the country or region)
AF Fine
Adjustment
Copyright
Information
Power Supply
Battery Type Rechargeable Lithium-ion Battery D-LI90
Single image, all images, select & delete, folder,
instant review image
Base Parameter Adj, Extract Color, Toy Camera,
Retro, High Contrast, Shading, Invert Color, Unicolor
Bold, Bold Monochrome, Tone Expansion, Sketch,
Water Color, Pastel, Posterization, Miniature, Soft,
Starburst, Fish-eye, Slim
Development options: Select single image, Select
multiple images, Select a folder
Development parameters: File Format (JPEG/TIFF),
Aspect Ratio, JPEG Recorded Pixels, JPEG Quality,
Color Space, Distortion Correction, Lat-ChromaticAb Adj, Peripheral Illumin. Corr., Color Fringe
Correction, Digital Filter, HDR, White Balance,
Custom Image, Sensitivity, High-ISO NR, Shadow
Correction
Color Moiré Correction, Resize, Cropping (aspect
ratio can be changed and tilt correction is available),
Index, Movie Edit (dividing a movie file and deleting
unwanted segments), Capturing a JPEG still picture
from a movie, Save RAW Data, Image Copy, Eye-Fi
Image Transfer
P button: One Push File Format, Exposure
Bracketing, Optical Preview, Digital Preview, Shake
Reduction, LCD Panel Illumination
I button: Enable AF1, Enable AF2, Cancel AF
E-dials (front/rear): customizable to each exposure
mode.
±10 steps, adjustment for all lenses or individual
lenses (up to 20 can be saved)
Names of “Photographer” and “Copyright Holder”
are embedded to the image file.
Revision history can be checked using the provided
software.
Page 95

AC Adapter AC Adapter Kit K-AC132 (optional)
Number of recordable images:
(with 50% flash usage): approx. 560 images,
(without flash usage): approx: 720 images
Battery Life
Interfaces
Connection Port
USB Connection MSC/PTP
Dimensions and Weight
Dimensions
Weight
Accessories
Included
Software Digital Camera Utility 5
Optional Accessories
GPS Unit
Flucard Remote capture, image browsing
Playback time: approx. 370 minutes
* Tested in compliance with CIPA standard using a
fully charged lithium-ion battery under the
temperature of 23°C.
Actual results may vary depending on the shooting
conditions/circumstances.
USB 3.0 (micro B), external power supply terminal,
cable switch terminal, X-sync socket, HDMI
output terminal (type D), stereo microphone input
terminal, headphone terminal
Approx. 131.5 mm (W) × 100 mm (H) × 77.5 mm (D)
(excluding protrusions)
Approx. 800 g (Including dedicated battery and SD
Memory Card), Approx. 715 g (body only)
Strap O-ST132, ME Viewfinder Cap, Rechargeable
Lithium-ion Battery D-LI90, Battery Charger D-BC90,
AC plug cord, Software (CD-ROM) S-SW140
<Mounted to the camera> Eyecup Fs, Hot shoe
cover FK, Sync socket 2P cap, Body mount cover,
Battery grip terminal cover
O-GPS1: GPS information (latitude, longitude,
altitude, time (UTC)), Electronic Compass,
ASTROTRACER
Approximate Image Storage Capacity and
Playback Time
(When using the fully charged battery)
Battery
D-LI90 23°C 720 560 460
• The image storage capacity (normal recording and flash use 50%) is
based on measuring conditions in accordance with CIPA standards,
while other data is based on our measuring conditions. Some deviation
from the above figures may occur in actual use depending on the
selected capture mode and shooting conditions.
Tempe-
rature
Normal
Shooting
Flash Photography
50%
Use
100%
Use
Playback
Time
370
minutes
Approximate Image Storage Capacity by Size
(When using a 2 GB memory card)
Recorded
Pixels
q 24M
p 14M
o 6M
r 2M
• The number of storable images may vary depending on the subject,
shooting conditions, selected capture mode and memory card, etc.
JPEG Quality
m l k
111 252 495 37
189 423 819 –
418 917 1707 –
1024 2119 3615 –
RAW
6
Appendix
93
Page 96

List of World Time Cities
The following cities can be set as Hometown and Destination.
Region City
Honolulu, Anchorage, Vancouver, San
Francisco, Los Angeles, Calgary, Denver,
Chicago, Miami, Toronto, New York, Halifax
Mexico City, Lima, Santiago, Caracas, Buenos
Aires, Sao Paulo, Rio de Janeiro
Lisbon, Madrid, London, Paris, Amsterdam,
Milan, Rome, Copenhagen, Berlin, Prague,
Stockholm, Budapest, Warsaw, Athens, Helsinki,
Moscow
Dakar, Algiers, Johannesburg, Istanbul, Cairo,
Jerusalem, Nairobi, Jeddah, Tehran, Dubai,
Karachi, Kabul, Male, Delhi, Colombo,
Kathmandu, Dacca
Yangon, Bangkok, Kuala Lumpur, Vientiane,
Singapore, Phnom Penh, Ho chi Minh, Jakarta,
Hong Kong, Beijing, Shanghai, Manila, Taipei,
Seoul, Tokyo, Guam
Perth, Adelaide, Sydney, Noumea, Wellington,
Auckland, Pago Pago
6
Appendix
North
America
Central
and South
America
Europe
Africa/
West Asia
East Asia
Oceania
Operating Environment for USB Connection and Provided Software
With the provided software “Digital Camera Utility 5”, you can
develop RAW files, make color adjustments, or check shooting
information on a computer. Install the software from the
provided CD-ROM (S-SW140).
We recommend the following system requirements to connect
the camera to a computer or to use the software.
Windows
OS
CPU Intel Core 2 Duo or higher
RAM 2 GB or more
HDD
Monitor 1280×1024 dots, 24 bit full-color or higher
Macintosh
OS Mac OS X 10.8 / 10.7 / 10.6
CPU Intel Core 2 Duo or higher
RAM 2 GB or more
HDD
Monitor 1280×1024 dots, 24 bit full-color or higher
Windows 8 (32 bit/64 bit) / Windows 7 (32 bit/64
bit) / Windows Vista (32 bit/64 bit), Windows XP
SP3 (32 bit)
Program installation and start-up: 100 MB or more
of available space
Image file saving: Approximately 10 MB per file
(JPEG) / approximately 30 MB (RAW)
Program installation and start-up: 100 MB or more
of available space
Image file saving: Approximately 10 MB per file
(JPEG) or approximately 30 MB (RAW)
94
Page 97

t Memo
• QuickTime is required to play back movies transferred to a
computer. You can download it from the following site:
http://www.apple.com/quicktime/download/
6
Appendix
95
Page 98

Index
Symbols
A menu .......................... 18
C menu .......................... 21
B menu ......................... 21
D menu........................... 22
E menu ........................... 23
C mode .......................... 38
T mode.......................... 31
Numerics
1st Frame Action in AF.C
........................................ 43
A
6
AA (Anti-Aliasing) Filter
Appendix
Simulator ......................... 58
AC adapter ...................... 28
Action in AF.C Continuous
........................................ 43
AE Metering..................... 40
AE-L with AF Locked ....... 23
AF area............................ 45
AF Assist Light ............ 7, 43
AF Button ........................ 71
AF coupler ......................... 7
AF Fine Adjustment ......... 45
AF frame.................... 32, 33
AF Mode .................... 43, 44
AF Point........................... 44
AF with Remote Control .. 49
z ............................... 43
y................................ 43
x................................ 43
AF.S Setting .................... 43
Aperture Priority Automatic
Exposure ......................... 36
Aperture value ................. 36
96
Aspect Ratio .............. 66, 69
ASTROTRACER ............. 85
Auto (AF point) ................ 44
Auto EV Compensation ... 23
Auto Flash Discharge ...... 41
Auto Image Rotation........ 62
AUTO ISO Parameters .... 39
Auto mode (AF Mode) ..... 43
Auto Power Off ................ 29
Auto Resize ..................... 78
Auto Screen Rotation ...... 12
Autofocus ........................ 44
AV device ........................ 63
J mode ......................... 36
AWB in Tungsten Light.... 53
B
M mode ........................... 36
Base Parameter Adj (Digital
Filter) ............................... 66
Battery ............................. 26
Battery grip contacts.......... 7
Bleach Bypass (Custom
Image) ............................. 54
Bold Monochrome (Digital
Filter) ......................... 56, 66
Bracketing Order ............. 49
Bright (Custom Image) .... 54
Brightness adjustment ..... 57
Brightness histogram ....... 13
Built-in flash ..................... 41
Bulb (B) Mode Options .... 23
Bulb Exposure ................. 36
Button Customization ...... 71
Buttons .............................. 8
C
Cable switch terminal ........ 7
Calendar Filmstrip Display
........................................ 61
Capture mode.................. 36
Card access lamp.............. 7
Catch-in Focus ................ 24
Center-weighted metering
........................................ 40
Changing the image size
........................................ 65
Charging the battery ........ 26
City names ................ 29, 94
Color Fringe Correction ... 69
Color Moiré Correction .... 66
Color Space............... 24, 77
Color Temperature .......... 54
Color Temperature Steps
........................................ 53
Composition Adjustment
........................................ 58
Computer......................... 64
Continuous mode (AF Mode)
......................................... 43
Continuous playback ....... 62
Continuous Shooting ....... 48
Contrast ........................... 55
Contrast AF ..................... 44
Contrast detection AF ...... 42
Control panel ............. 11, 16
Copyright Holder ............. 78
Copyright Information ...... 78
Correcting images ........... 57
Create New Folder .......... 76
Cropping .......................... 65
Cross Processing (Custom
Image) ............................. 54
n................................. 52
Custom Image ................. 54
Custom Setting menu ...... 23
Customization.................. 71
D
Date Adjustment .............. 30
DC input terminal............. 28
Delete .............................. 34
Delete All Images ............ 21
Destination....................... 74
Detailed Information Display
........................................ 13
Developing RAW images
........................................ 69
Dial indicator.................... 32
Digital Camera Utility 5 .... 94
Digital Filter................ 56, 66
Digital Preview................. 46
Diopter adjustment dial .... 14
Direct keys....................... 16
Display Color ................... 22
Display style selection screen
......................................... 60
Distortion Correction ........ 57
DNG................................. 35
D-Range Settings ............ 57
Drive Mode ...................... 47
DST (daylight saving time)
.................................. 30, 74
Dust Alert......................... 87
Dust Removal .................. 86
Dynamic range ................ 57
E
E-dial operation ............... 71
E-Dial Programming ........ 71
Page 99

Editing images ................. 65
Electronic Compass .. 12, 85
Electronic Level ......... 12, 15
Error messages ............... 88
EV Compensation ........... 37
EV Steps ......................... 37
Expanded Area AF (AF point)
......................................... 44
Exposure Bracketing ....... 49
Exposure Mode ......... 36, 74
Exposure Setting ............. 38
External flash................... 84
Extract Color (Digital Filter)
.................................. 56, 66
Eye-Fi card ................ 28, 78
Eye-Fi Image Transfer..... 78
F
Face Detection (Contrast AF)
......................................... 44
File Format ...................... 35
File Name ........................ 77
File No. ............................ 77
Filter .......................... 56, 66
Firmware ......................... 23
Firmware Info/Options ..... 23
Fish-eye (Digital Filter) .... 66
Flash................................ 84
Flash compensation ........ 41
Flash On .......................... 41
Flash X-sync Speed ........ 36
Flicker Reduction............. 22
Flucard ...................... 28, 78
Focus indicator ................ 32
Focus Method.................. 42
Focus mode switch.... 31, 42
Focus Peaking................. 45
Folder display .................. 61
Folder Name.................... 76
Format ............................. 31
Framerate ........................ 35
G
GPS Time Sync ............... 85
GPS unit .......................... 85
Green button operation ... 71
Green mode .................... 31
Grid Display ..................... 19
Guide Display ............ 22, 32
Guide number.................. 42
H
HDMI Out ........................ 63
HDR Capture ................... 57
Headphones .................... 38
High Contrast (Digital Filter)
.................................. 56, 66
High-ISO NR ................... 40
Highlight Alert ............ 19, 21
Highlight Correction ......... 57
Histogram Display ..... 13, 19
Hold AF Status ................ 43
Hometown ................. 29, 74
Horizon Correction .......... 19
Hot shoe ............................ 7
I
Image Capture Settings... 35
Image Copy ..................... 65
Image finishing touch ...... 54
Image plane indicator ........ 7
Image storage capacity ... 93
Index................................ 68
Initial settings................... 29
Initializing a memory card
........................................ 31
Input Focal Length ........... 82
Instant Review ........... 19, 32
Interval Composite .......... 51
Interval Movie Record ..... 52
Interval Shooting ............. 51
Invert Color (Digital Filter)
.................................. 56, 66
ISO AUTO Setting ........... 39
ISO sensitivity.................. 39
J
JPEG ............................... 35
K
Kelvin............................... 54
L
Landscape (Custom Image)
........................................ 54
Language setting ............. 29
Language/W ................ 29
Lat-Chromatic-Ab Adj ...... 57
LCD Display .................... 22
LCD Display Settings ...... 22
LCD Panel ....................... 15
LCD Panel Illumination
.................................. 15, 71
Lens........................... 25, 81
Lens Correction ............... 57
Lens focal length ............. 82
Lens information contacts
.......................................... 7
Lens mount index ........ 7, 25
Lens unlock button .......... 25
Lens with aperture ring .... 83
Link AE and AF Point ...... 40
Live View ............. 10, 19, 33
M
L mode........................... 36
Macintosh ........................ 94
Magnify ............................ 34
Manual Exposure ............ 36
Manual Flash Discharge.. 41
Manual White Balance .... 53
ME viewfinder cap ........... 47
Memory ........................... 75
Memory card ................... 28
Memory Card Options ..... 35
Menus.............................. 17
Meter Operating Time...... 23
Microphone.................. 7, 38
Miniature (Digital Filter) ... 66
Mired................................ 54
Mirror ................................. 7
Mirror Lock-up Shooting .. 50
Mode dial ......................... 32
Mode dial lock button....... 32
Mode dial lock release lever
........................................ 32
Monitor............................... 9
Monochrome (Custom
Image) ............................. 54
Motion JPEG ................... 52
Movie Capture Settings ... 35
Movie Edit........................ 68
Movie menu ..................... 21
Movie mode ..................... 38
Movie SR ......................... 21
MSC................................. 86
Multi-exposure ................. 50
Multi-image display .......... 60
Multiple AF Points (Contrast
AF)................................... 44
Multi-segment metering ... 40
Muted (Custom Image).... 54
N
Natural (Custom Image) .. 54
Noise Reduction .............. 40
O
One Push File Format ..... 72
One-Push Bracketing ...... 49
Operating environment .... 94
Optical Preview................ 46
P
G mode ........................... 36
6
Appendix
97
Page 100

Pastel (Digital Filter) ........ 66
PEF ................................. 35
Peripheral Illumination
Correction ........................ 57
Photographer................... 78
Pixel Mapping .................. 86
Playback Info Display
selection screen .............. 12
Playback menu ................ 21
Playback mode ................ 34
Playback mode palette .... 59
Portrait (Custom Image) .. 54
Posterization (Digital Filter)
........................................ 66
Power .............................. 29
Preview............................ 46
Preview Dial .............. 46, 71
Processing images .......... 65
6
Program Automatic Exposure
Appendix
......................................... 36
Program Line ................... 37
Protect ............................. 75
Protect All Images ........... 21
Provided software............ 94
PTP ................................. 86
Q
Quality ............................. 35
Quick Zoom ..................... 21
QuickTime ....................... 95
R
Radiant (Custom Image)
........................................ 54
RAW ................................ 35
RAW Development .......... 69
RAW/Fx Button................ 71
Rec. Mode menu ............. 18
Recordable time .............. 38
Recorded Pixels .............. 35
98
Recording Sound Level
.................................. 21, 38
Red-eye Reduction.......... 41
Release While Charging
.................................. 41, 48
Remote control receiver .... 7
Remote Control shooting
........................................ 49
Reset ......................... 23, 24
Resize ............................. 65
Retro (Digital Filter) ... 56, 66
Reversal Film (Custom
Image) ............................. 54
RGB Histogram Display .. 13
Rotating images .............. 62
Rotation Direction ............ 71
S
Save as Manual WB ........ 53
Save Cross Processing ... 55
Save Menu Location ........ 17
Save RAW Data ........ 19, 34
Save Rotation Info ........... 62
SD Memory Card ............. 28
Select (AF point) .............. 44
Select (Contrast AF) ........ 44
Select & Delete................ 60
Select Battery .................. 27
Self-timer lamp .................. 7
Self-timer shooting .......... 48
Sensitivity .................. 39, 69
Sensitivity Priority Automatic
Exposure ......................... 36
Sensitivity Steps .............. 39
Sensor Cleaning .............. 87
Sequential Numbering ..... 77
Set-up menus .................. 22
Shading (Digital Filter)
.................................. 56, 66
Shadow Correction .......... 57
Shake Reduction ............. 19
Sharpness ....................... 55
Shooting .......................... 31
Shooting celestial bodies
........................................ 85
Shooting Info Display
selection screen .............. 12
Shutter & Aperture Priority
Automatic Exposure ........ 36
Shutter Priority Automatic
Exposure ......................... 36
Shutter speed .................. 36
Single image display
.................................. 12, 34
Single mode (AF Mode) .. 43
Sketch (Digital Filter) ....... 66
Slideshow ........................ 62
Slim (Digital Filter) ........... 66
Slow Shutter Speed NR .. 19
Slow-speed Sync ............. 41
Soft (Digital Filter)............ 66
Sound .............................. 38
Sound Effects .................. 22
Speaker ............................. 7
Specifications .................. 90
Spot (AF point) ................ 44
Spot (Contrast AF) .......... 44
Spot metering .................. 40
Standby mode ................... 9
Starburst (Digital Filter).... 66
Status Screen .................. 10
Stills/Movie switch ........... 31
Strap ................................ 25
Superimpose AF Area ..... 14
H mode ......................... 36
T
K mode......................... 36
Text input......................... 73
Text Size ......................... 30
Thumbnail display ..... 34, 60
Time Setting .................... 74
Tone Expansion (Digital
Filter) ............................... 66
Toy Camera (Digital Filter)
.................................. 56, 66
Tracking (Contrast AF) .... 44
Trailing Curtain Sync ....... 41
TTL phase-matching
autofocus ......................... 42
I mode ......................... 36
U
Unicolor Bold (Digital Filter)
.................................. 56, 66
Updating firmware ........... 23
USB Connection ........ 86, 94
USB terminal ................... 64
USER mode..................... 73
Using aperture ring .......... 83
V
Vertical position ............... 12
Vibrant (Custom Image) .. 54
Viewfinder.................. 14, 32
Volume label.................... 31
W
WARRANTY POLICY.... 104
Water Color (Digital Filter)
........................................ 66
WB Adjustable Range ..... 53
WB When Using Flash .... 53
White Balance ................. 52
Wi-Fi transmission ........... 78
Windows .......................... 94
Wireless (Flash)............... 41
Wireless LAN................... 78
Wireless Memory Card .... 78
World Time ...................... 74
X
N mode........................... 36
 Loading...