

Page 1
for Concrete
Fiberglass
and
Vinyl Pools
Installation Guide
ASME/ANSI
A112.19.8M — 1987 LISTED
U.S. Patent No.: 6,810,537
Model: Xport Series 004-XXX-XXXX-YY 2½” / 004-XXX-XXXX-YY 75mm
Listed by IAPMO Research & Testing, Inc. File No. SP-4370
IMPORTANT SAFETY INSTRUCTIONS
READ AND FOLLOW ALL INSTRUCTIONS
SAVE THESE INSTRUCTIONS
Page 2

© 2005 Pentair Water Pool and Spa Incorporated. All rights reserved.
1620 Hawkins Ave., Sanford, NC 27330 • (919) 566-8000
10951 West Los Angeles Ave., Moorpark, CA 93021 • (805) 523-2400
Information in this document is subject to change without notice.
Pentair Water Pool and Spa is a registered trademark of Pentair Water Pool and Spa Incorporated. Other trademarks
and trade names may be used in this document to refer to either the entities claiming the marks and names or their
products. Pentair Water Pool and Spa disclaims proprietary interest in marks and names of others.
004-027-8763-00 Rev C - April 2005
Page 3

Contents
IMPORTANT SAFETY PRECAUTIONS ......................................................................................... ii
Xport Drain System Installation Steps Summary ........................................................................... iv
Technical Support .......................................................................................................................... iv
General Overview
Xport Drain System Design .............................................................................................................1
Xport Drain System for Concrete (Required installation method for the state of Florida) ..................2
Xport Drain System for Fiberglass (Required installation method for the state of Florida)................ 2
Xport Drain System for Vinyl (Required installation method for the state of Florida) ........................3
Hydrostatic Fitting Requirements ....................................................................................................5
Winterization Procedure ..................................................................................................................5
Xport Drain System Installation Methods ........................................................................................5
Steel and Concrete Installation Methods ................................................................................... 5
Fiberglass Installation Options .................................................................................................. 5
Vinyl Installation Options ..........................................................................................................5
Xport Pressure Test ........................................................................................................................6
Installation and Replacement Parts List (Concrete Pools).......................................................... 7
Steel and Concrete Xport Drain Installation Methods ......................................................................9
Vacuum Breaker in Steel and Concrete (Method 1) ...................................................................9
Vacuum Breaker in Steel and Concrete (Method 2) .................................................................10
Vacuum Breaker in Steel and Concrete (Method 3) .................................................................11
Vacuum Breaker in Steel and Concrete (Method 4) .................................................................11
Steel and Concrete Installation ............................................................................................... 12
Plumbing Requirements ................................................................................................... 12
Pressure Test ...................................................................................................................13
Sump Installation ............................................................................................................. 13
Concrete Ring Installation ................................................................................................ 14
Funnel Installation ............................................................................................................ 14
Xport Drain System Replacement Parts List (Concrete) ......................................................... 15
Installation and Replacement Parts List (Fiberglass Pools) .....................................................17
Fiberglass Xport Drain Installation Methods ........................................................................... 19
Vacuum Breaker Installation Methods for Fiberglass .............................................................. 19
Fiberglass Installation ...................................................................................................... 20
Sump Installation to Fiberglass Pool Shell ....................................................................... 20
Pressure Test ...................................................................................................................20
Funnel Installation ............................................................................................................ 21
Xport Drain System Replacement Parts List (Fiberglass) ....................................................... 22
Installation and Replacement Parts List (Vinyl Pools) .............................................................. 25
Vinyl Drain Installation Methods ............................................................................................. 27
Vacuum Breaker Installation Methods for Vinyl .......................................................................27
Vinyl Installation ..................................................................................................................... 28
Plumbing Requirements .......................................................................................................... 28
Pressure Test ...................................................................................................................28
Vinyl Installation to Pool Base.......................................................................................... 28
Liner Installation ............................................................................................................... 28
Funnel Installation ............................................................................................................ 29
Xport Drain System Replacement Parts List (Vinyl) ............................................................... 30
i
Xport Drain System Installation Guide
Page 4
ii
IMPORTANT SAFETY PRECAUTIONS
Important Notice:
Attention Installer: This manual contains important information about the installation, operation and
safe use of this product. This information should be given to the owner and/or operator of this
equipment.
WARNING - RISK OF ENTRAPMENT IF INSTRUCTIONS ARE NOT FOLLOWED. Before
installing this product, read and follow all warning notices and instructions which are included. Failure
to follow safety warnings and instructions can result in severe injury, death, or property damage.
Call (800) 831-7133 for additional free copies of these instructions.
WARNING - POOL PUMP SUCTION IS HAZARDOUS. IMPROPER INSTALLATION OR
USE OF THIS PRODUCT MAY PRESENT A RISK OF HAIR OR BODY ENTRAPMENT AND
DROWNING. Install this suction outlet in accordance with the instructions provided. Use only with
the components and mounting hardware provided. FAILURE TO FOLLOW THESE INSTRUCTIONS
AND/OR USE WITH COMPONENTS NOT PROVIDED BY PENTAIR WATER POOL AND SPA
AND INTENDED TO BE USED WITH THIS PRODUCT MAY RESULT IN IMPROPER
POSITIONING OR FUNCTIONING OF DRAIN COVER AND MAY CAUSE SEVERE PERSONAL
INJURY OR DEATH.
WARNING - DO NOT EXCEED MAXIMUM FLOW RATE. Do not use these suction outlets
with a pumping system rated for more than 90 GPM. USE OF THESE SUCTION OUTLETS IN
POOL OR SPA SYSTEMS WITH FLOW RATES GREATER THAN 90 GPM CAN RESULT IN
HAIR OR BODY ENTRAPMENT, WHICH CAN CAUSE SEVERE PERSONAL INJURY OR
DEATH. If in doubt about the maximum flow rating of your system, consult a qualified pool or spa
professional or call Pentair Water Pool and Spa at (800) 831-7133.
WARNING - INSTALL AT LEAST TWO SUCTION OUTLETS. The suction outlet connected to
a swimming pool or spa pump can pull a high vacuum if it is blocked. Therefore, if only one suction
outlet is used, anyone blocking the suction outlet with their body can be trapped and held against the
suction outlet. Disembowelment or drowning can result. To prevent this entrapment, install at least
the suction outlets provided with Xport for each pump in the plumbing system. Separate these
suction outlets as described and shown in the installation instructions in this manual. Use of these
multiple suction outlets is required for proper Xport operation and to reduce risk of entrapment.
Xport Drain System Installation Guide
Page 5

IMPORTANT SAFETY PRECAUTIONS (continued)
WARNING - USE ONLY APPROVED COVERS TO PREVENT HAIR ENTRAPMENT.
The covers used on suction outlets should be approved to the currently published version of ANSI/
ASME A1121.19.8 Standard covering Suction Fittings for use in Swimming Pools, Wading Pools,
Spas and Hot Tubs. These covers should be inspected regularly and replaced if cracked, broken or
older than the design lifetime indicated on them by the manufacturer. The design flow rate of the pool
and spa should be less than or equal to the maximum flow rate indicated on the cover by the
manufacturer. THE USE OF UNAPPROVED COVERS OR ALLOWING USE OF THE POOL OR
SPA WHEN COVERS ARE CRACKED OR BROKEN CAN RESULT IN HAIR ENTANGLEMENT
WHICH CAN RESULT IN DEATH.
For additional information on proper drain installation refer to National Spa and Pool Institute
Standards ANSI/NSPI 1 through 7, the US Consumer Product Safety Commission Guidelines for
Entrapment Hazard Pub. No. 363-009801 and ANSI/ASME A112.19.8 Standard.
iii
Xport Drain System Installation Guide
Page 6

iv
Xport Drain System Installation Steps Summary
The recommended installation steps for the Xport Drain System is as follows:
1
Review the Xport Drain System Design (page 1): Review this important information before
installing the Xport Drain System.
Review Hydrostatic Fitting Requirements (page 5): Before installing the Xport sump, review the
2
hydrostatic fitting requirements. Also review the winterization information.
3
Review the Xport Drain System Installation Methods (page 5): Choose the type of installation
method: Steel and concrete, fiberglass, or vinyl.
Pressure test the Xport Drain System (page 6): Review the pressure test instructions. This test
4
should be performed before installing the Xport Drain System.
Install the Xport Drain System: Install the Xport sump in steel and concrete (page 9), fiberglass
5
(page 19), or vinyl (page 27).
Technical Support
Contact Technical Support at:
Sanford, North Carolina (8 A.M. to 5 P.M.)
Phone: (800) 831-7133
Fax: (919) 566-8920
Moorpark, California (8 A.M. to 5 P.M.)
Phone: (800) 831-7133 (Ext. 6502)
Fax: (805) 530-0194
Web site
visit www.pentairpool.com
Xport Drain System Installation Guide
Page 7
Xport Drain System Design
Before installing the Xport Drain System please read the following important information
SECOND SUCTION OUTLET: The Xport Drain System requires the proper installation of all anti-
entrapment features including a second suction outlet with a listed suction outlet fitting and one of the
following three vacuum breaker installation methods:
• Vacuum Breaker for Steel and Concrete - Refer to one of the four installation methods
illustrated on pages 9, 10, and 11.
• Vacuum Breaker for Fiberglass - Refer to one of the three installation methods illustrated on
page 19.
• Vacuum Breaker for Vinyl - Refer to one of the three installation methods illustrated on
page 27.
These Xport instructions provide four design methods to choose from. Your local codes may require
additional safety measures. Pentair Water Pool and Spa and its representatives cannot recommend or
endorse installation methods other than those provided in these Xport instructions.
SUCTION PLUMBING - Install a 2½" pipe between the Xport suction outlet and the debris collection
point, which could be the optional debris canister, a self-priming pump or in-line strainer basket.
1
WARNING - Maximum Pump Size: Xport is rated for a maximum of 90 GPM. While system
flow rate will vary with pump size and the Total Head Loss for a given system, virtually any modern
pump is capable of exceeding this limit. Therefore it is the responsibility of the system designer to
make sure it is not possible to exceed 90 GPM.
IMPORTANT NOTE: 18" of 2½" pipe is required for connection to the center outlet of the Xport
Drain System. The Pentair Water Pool and Spa Xport Drain System kit includes an 18" x 2½" length
of pipe and a coupler. It is recommended the 2½" pipe be used throughout the suction side of the
system for optimum performance.
Xport Drain System Installation Guide
Page 8
2
Xport Drain System for Concrete (Required installation method for the state of FLORIDA)
Xport Drain System for Fiberglass (Required installation method for the state of FLORIDA)
Xport Drain System Installation Guide
Page 9
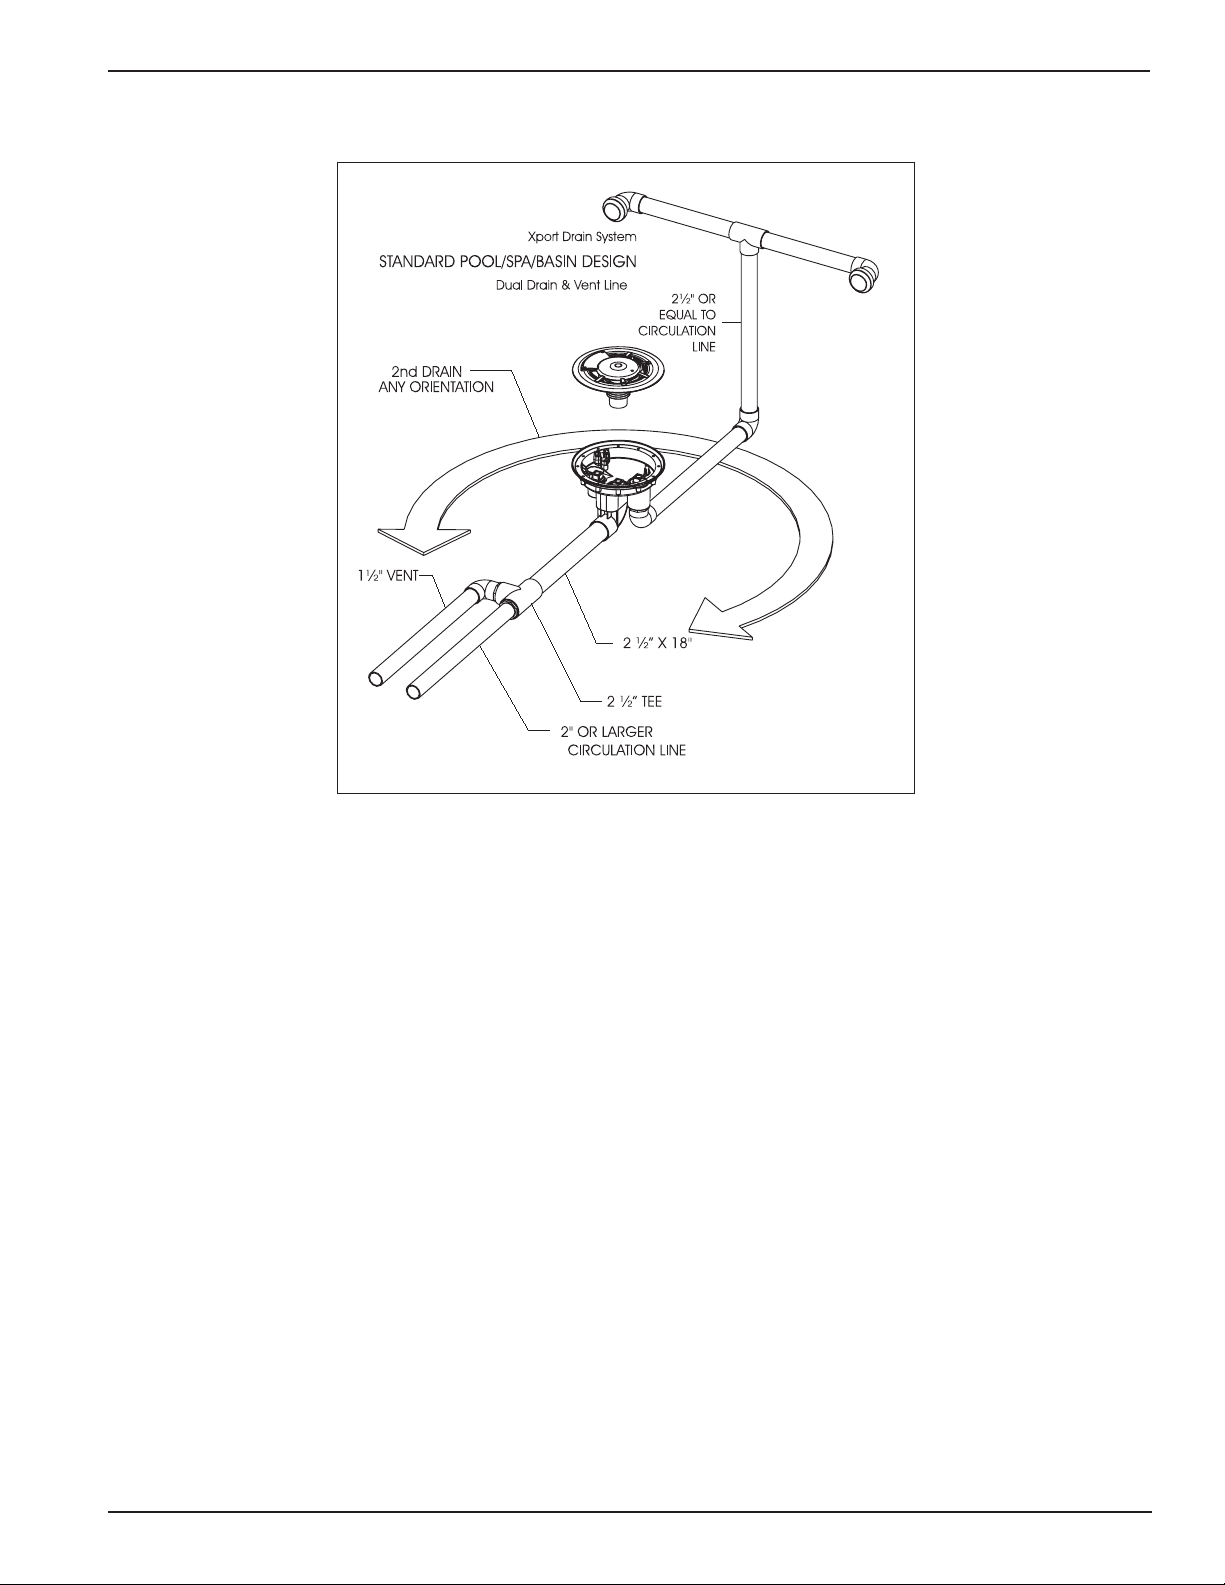
Xport Drain System for Vinyl (Required installation method for the state of FLORIDA)
3
IMPORTANT INSTALLATION INSTRUCTIONS FOR THE STATE OF FLORIDA: The Xport Drain System requires
the proper installation of all anti-entrapment features including the second Suction Outlet and 1½” Vent Line or
approved Safety Vacuum Relief System (SVRS).* Install 2½” pipe between Xport sump and the debris collection
point which may be the optional debris canister, or a self-priming pump basket.
Note: (*) The Xport Drain System instructions provide two design options to choose from; Vent Line or approved
SVRS. Follow all regulations requiring specific plumbing solutions and you may use officially approved vacuumbreaker products and vacuum breaker methods.
Note: The Xport Drain System is rated for a maximum of 90 GPM. While system flow rate will vary with pump size
and the Total Head Loss for a given system, virtually any modern pump is capable of exceeding this limit, therefore it is the responsibility of the system designer to make sure it is not possible to exceed 90 GPM.
Xport Drain System Installation Guide
Page 10
4
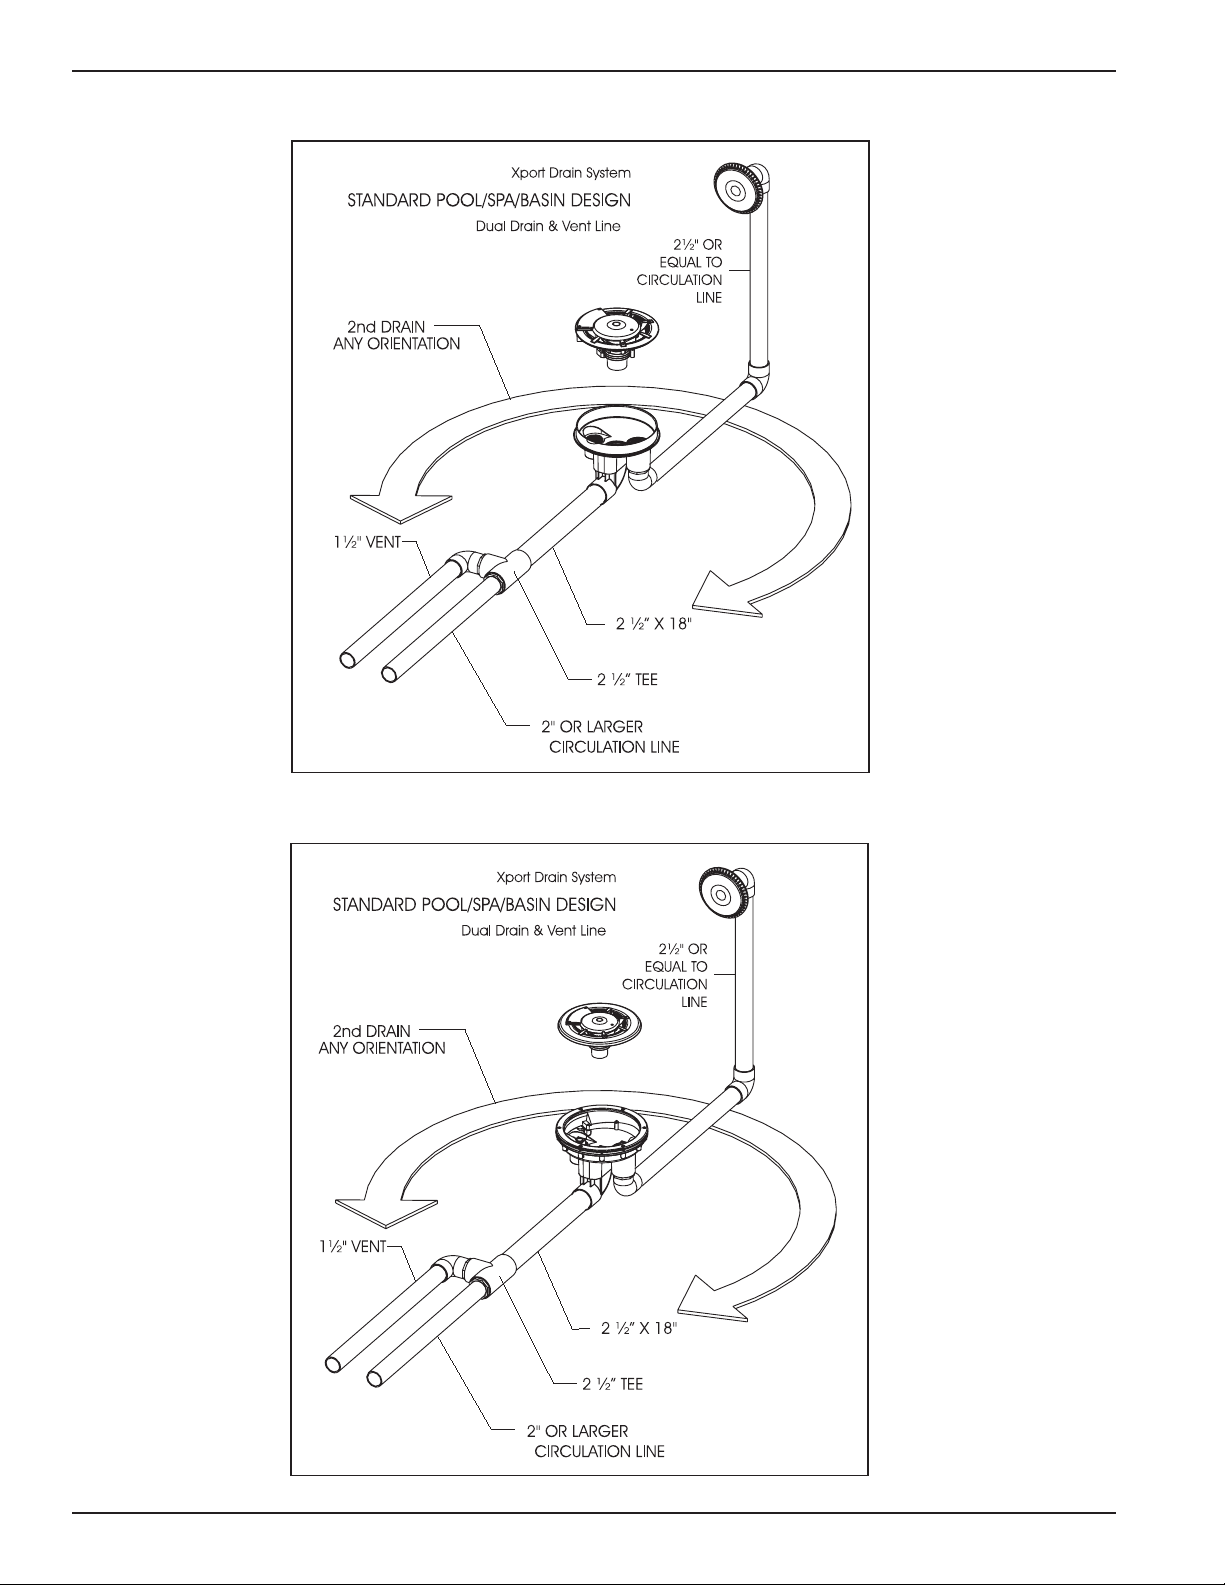
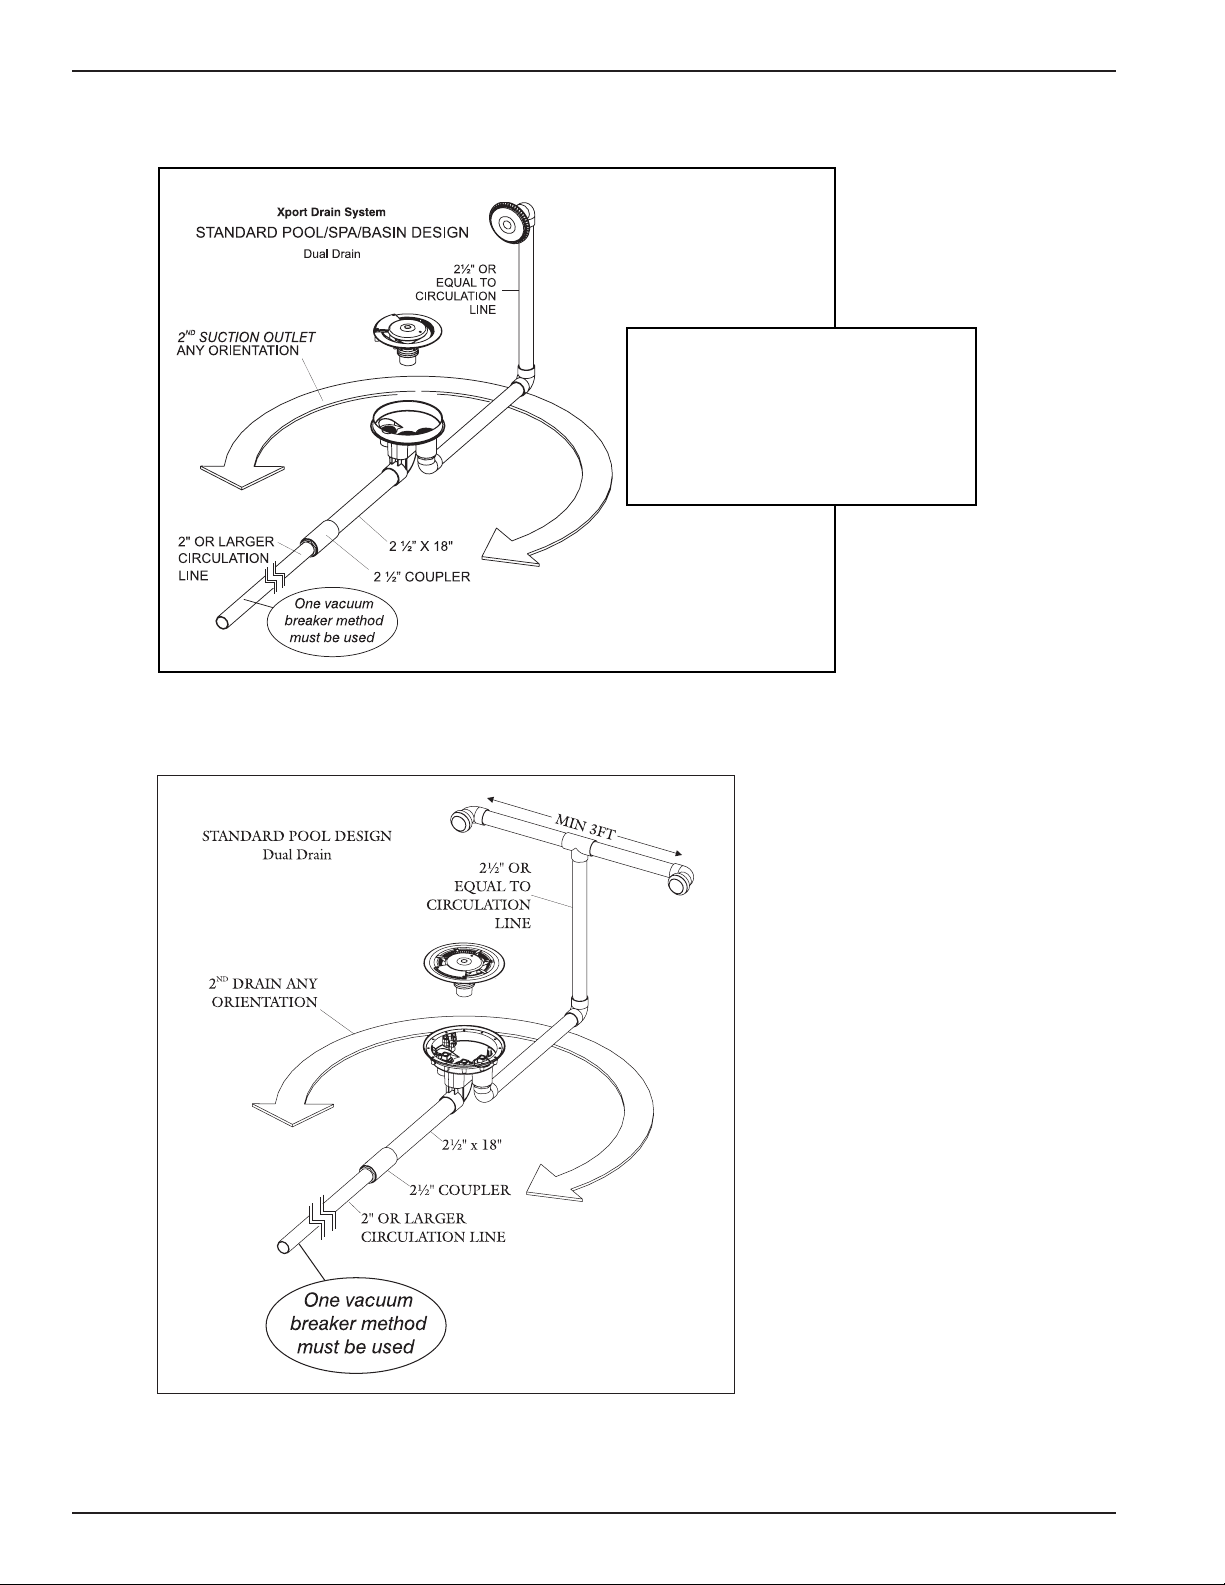
Xport Drain System for Concrete and Fiberglass
Xport Drain system
STANDARD POOL/SPA/BASIN DESIGN
2nd DRAIN
ANY ORIENTATION
Dual Drain
2" OR LARGER
CIRCULATION LINE
2½" OR
EQUAL TO
CIRCULATION
2½" X 18"
2½" COUPLER
LINE
Design Flow Rate = 90 GPM
Maximum GPM = 90
Velocity through cover opening
at 90 GPM = 1.386 FPS
Xport Drain System for Vinyl
Xport Drain System
Note: The Xport Drain System is
rated for a maximum of 90 GPM.
While system flow rate will vary with
pump size and the Total Head Loss
for a given system, virtually any
modern pump is capable of exceeding this limit, therefore it is the
responsibility of the system designer
to make sure it is not possible to
exceed 90 GPM.
Xport Drain System Installation Guide
Page 11

Hydrostatic Fitting Requirements
The hydrostatic fitting requirements for concrete, fiberglass, and vinyl are as follows:
• The hydrostatic port inside the Xport Sump is a 2" female adapter and a 2" slip fitting outside the
Xport Sump. For non-hydrostatic installations, install the 2" plug that is provided.
Note: For concrete installation, the sump elevation should be 1" below the interior finish.
Winterization Procedure
Optional positioning of second suction outlet
Outlet may be placed low on the pool wall below the frost depth to avoid having to winterize or high on the
pool wall for easy access to the blow line.
To winterize the Xport Drain System:
1. Blow out and air lock the vacuum breaker line and second suction outlet.
2. Blow out and air lock the main 2½" line to the pump.
5
Xport Drain System Installation Methods
This manual describes recommended Xport installation methods. Other methods may be available
depending on your local codes. Follow all National Standards and local regulations requiring specific
plumbing solutions and use approved vacuum-breaker products and vacuum breaker methods. Any of these
methods may be used as long as it is NOT possible for a swimmer to be exposed to single-point-suction
when drains are fully disassembled.
For additional information on proper drain installation refer to National Spa and Pool Institute Standards
ANSI/NSPI 1 through 7, the US Consumer Product Safety Commission Guidelines for Entrapment Hazard
Pub. No. 363-009801 and ANSI/ASME A112.19.8 Standard.
Note: Pentair Water Pool and Spa and its representatives can not recommend nor endorse
installation methods beyond those provided in this manual.
Steel and Concrete Installation Methods
• Vacuum Breaker in Steel and Concrete (four methods) - see page 9, 10, and11.
Fiberglass Installation Methods
• Vacuum Breaker for Fiberglass (three methods) - see page 19.
Vinyl Installation Methods
• Vacuum Breaker for Vinyl (three methods) - see page 27.
Xport Drain System Installation Guide
Page 12

6
Xport Pressure Test
The pressure test should be performed before installing the Xport Drain System. Use the two pressure
plugs included with the kit to perform this test.
To pressure test the Xport sump:
1. Install a plug into both 2½" ports of the Xport Sump.
2. Install a pressure stack to both lines at a location away from the Xport Sump.
3. Pressure should remain on the system throughout the construction until the liner is installed and
interior cleanup.
4. Release the pressure on the system, then remove the plugs from both sump ports.
WARNING - Release pressure on the system before removing plugs.
2" Hydrostatic Plug
2½" Plugs (Qty. 2)
Xport Drain System Installation Guide
Page 13

Xport Drain System Installation
and Replacement Parts List
(Concrete Pools)
7
Xport Drain System Installation Guide
Page 14

8
Xport Drain System Installation Guide
Page 15

Steel and Concrete Xport Drain Installation Methods
There are four methods that can be used to install the Xport drain system in steel and concrete. The
following illustrations show the different methods.
Vacuum Breaker in Steel and Concrete (Method 1)
Method one is recommended for best debris removal performance.
9
With Canister
POOL POOL
SPASPA
Without Canister
BASIN
BASIN
Xport Drain System Installation Guide
Page 16

10
Vacuum Breaker in Steel and Concrete (Method 2)
Without Canister With Canister
POOL
SPA
BASIN BASIN
POOL
SPA
Xport Drain System Installation Guide
Page 17

Vacuum Breaker in Steel and Concrete (Method 3)
11
POOL
SPA
With Canister
Without Canister
POOL
SPA
BASIN
BASIN
Vacuum Breaker Installation in Steel and Concrete (Method 4)
Suction vacuum release device, mechanical, or electromechanical, venting or non-venting, may be used
provided it is tested and listed by a nationally recognized testing laboratory in accordance with ANSI/
ASME A112.19.17 – Manufactured SVRS for Residential and Commercial Swimming Pool.
Xport Drain System Installation Guide
Page 18

12
Steel and Concrete Installation
Use the following instructions to install the Xport sump into steel and concrete.
INTERIOR FINISH RING
8"
7"
3"
3"
3"
3 1/4"
TOP OF PIPE
6 1/8"
6"
12"
6"
10 1/8"
12"
Note: KEEP REBAR 3” AWAY
Plumbing Requirements
FROM XPORT SUMP.
The Xport Drain System plumbing requirements are:
1. Position the Xport Sump 1" below the finished depth of the pool, spa or basin.
2. Position the required second Suction Outlet on a sidewall of the pool, spa or basin. If necessary,
the second Suction Outlet may be positioned on the floor a minimum of three (3) feet away from
the Xport Sump.
Xport Drain System Installation Guide
Page 19

Pressure Test
• Perform the pressure test using the provided pressure plugs. For instructions, see “Xport Pressure
Test,” on page 6.
Sump Installation
1. Clear the dirt to completely expose the sweep elbow. This allows the sump to be fully encased in
concrete.
2. Pack concrete around and under the sump to ensure a strong seal and strengthen the shell.
13
3. Angle the shell downward to the sump.
4. Make a cutout around the sump.
5. Proceed with “Concrete Ring Installation” on page 14.
Xport Drain System Installation Guide
Page 20

14
Concrete Ring Installation
The concrete ring must be attached to the Xport Drain sump before finishing the interior surface of the pool,
spa, or basin.
To install the concrete ring:
1. Align the concrete ring key way with the sump alignment key.
2. Align the elevation and the angle of the concrete ring with the finished interior surface of the pool,
spa, or basin.
3. Use a sealing compound compatible with the interior surface to lock the concrete ring in place.
Make sure the seal is water tight.
• Recommended sealing compounds: Topping mix cement, hydraulic cement, and
ThoroAcryl
®
60 by ChemRex® or equivalent.
4. Continue with the Funnel installation instructions below.
Funnel Installation
Note: Assemble the drain before adding water.
To install the funnel assembly: (For Xport replacement parts identification (i.e. No. 3), refer to illustration on
page 16).
1. Install the funnel assembly (No. 3) into the concrete ring (No. 2) by pressing the flexible funnel
adapter inside the center 2½" female threaded fitting. Press down and hold the funnel assembly and
install the screws.
2. Use a T25 screwdriver to install the two large screws (No. 5) in the support (No. 8).
3. Use a T25 screwdriver to install the two medium screws (No.6) in the funnel assembly
(No. 3). Tighten the screws until the funnel assembly (No. 3) contacts the interior finish of the pool,
spa, or basin.
4. Place the Xport cover (No. 4) on the funnel assembly (No. 3). Use a Phillips screwdriver to secure
the cover in place with the three small screws (No. 7).
5. The Xport drain system installation is complete.
Xport Drain System Installation Guide
Page 21

Xport Drain System Replacement Parts List (Concrete)
-----------------------------------------------------------Xport Assembly Kit (Concrete) ---------------------------------------------------------------Part Number Description
540120 Xport Kit, Concrete, White
540121 Xport Kit, Concrete, Grey
540122 Xport Kit, Concrete, Black
540123 Xport Kit, Concrete, Light Blue
540124 Xport Kit, Concrete, White
540125 Xport Kit, Concrete, Grey
540126 Xport Kit, Concrete, Black
540127 Xport Kit, Concrete, Light Blue
540128 Xport Kit, Concrete, 75 MM, White
540129 Xport Kit, Concrete, 75 MM, Grey
540130 Xport Kit, Concrete, 75 MM, Black
540131 Xport Kit, Concrete, 75 MM, Light Blue
Item Part Number Description Material
1 * Sump Assembly with Cap, 2½" (3 pieces) PVC - 1
* Sump Assembly without Cap, 2½" (3 pieces) PVC - 1
2 540168 Concrete Leveling Ring
3 540148 Funnel Assembly, White
540149 Funnel Assembly, Grey
540150 Funnel Assembly, Black
540151 Funnel Assembly, Blue
4 540156 XPort Cover with Screws, White
540157 XPort Cover with Screws, Grey
540158 XPort Cover with Screws, Black
540159 XPort Cover with Screws, Light Blue
540163 Screw Kit, Concrete (includes items 5, 6, 7)
5 * Screw: No.12, 2 5/8" Countersink, Security Head (12 pieces) 316-SS
6 * Screw: No.10, 1 7/8" Security Head, (12 pieces) 316-SS
7 * Screw: No.10, 7/8" Phillips Head, (12 pieces) 316-SS
8 N/A Support
9 * Cap Xport Plaster
* Cap Xport Plaster (12 pieces)
10 * Cap Xport Sump Construction
* Cap Xport Sump Construction (6 pieces)
11 * Plug Pressure Test, NPT 2½” (4 pieces)
12 * Plug 2” NPT (6 PK)
13 540132 Drain Second, Black
540133 Drain Second, Light Blue
540152 Drain Second, White
540153 Drain Second, Grey
14 * Sump Adaptor Kit Required to Reduce Pipe Size PVC, SCH. 40
**R1 N/A REQUIRED CONNECTION TO A 2nd Suction Outlet 2½" pipe PVC, SCH. 40
N/A 540166 Screwdriver Security, T-25
(*) Part of main assembly
(**) Not part of kit
15
Xport Drain System Installation Guide
Page 22

16
9
10
14
11
13
Xport Drain System for Concrete
(Required installation method for the
State of FLORIDA)
Xport Drain System (Concrete)
Xport Drain System Installation Guide
Page 23

Xport Drain Installation
and
Replacement Parts List
(Fiberglass Pools)
17
Xport Drain System Installation Guide
Page 24

18
Xport Drain System Installation Guide
Page 25

Fiberglass Xport Drain Installation Methods
There are three methods that can be used to install the Xport drain system in fiberglass. The following
illustrations show the different methods.
Vacuum Breaker Installation Methods for Fiberglass
Use one of the following methods to install the XPort Drain System into a fiberglass base.
19
With Canister
Method 1 Method 1
This method is recommended for best
debris removal performance.
Without Canister
Method 2
Method 2
Vacuum Breaker Installation in Fiberglass (Method 3)
Suction vacuum release device, mechanical, or electromechanical, venting or non-venting, may be used
provided it is tested and listed by a nationally recognized testing laboratory in accordance with ANSI/
ASME A112.19.17 – Manufactured SVRS for Residential and Commercial Swimming Pool.
Xport Drain System Installation Guide
Page 26

20
Fiberglass Installation
Use the following instructions to install the Xport Drain System into a fiberglass shell.
Sump Installation to Fiberglass Pool Shell
Shell Preparation
1. Determine the location of the sump in the shell and mark the center point.
2. Draw an 11¼” circle and cut it out using a jigsaw.
3. Insert the seal ring into the hole and point keyway to the back wall. Note: The Keyway aligns with
the sweep ninety that needs to point to the back wall).
4. Mark the location of the six holes in the flange and drill with a ¼” bit.
5. Make sure that the bottom surface around the hole is flat.
6. Continue with Sump Installation to Shell below.
Pressure Test
• Perform the pressure test using the provided pressure plugs. For instructions, see “Xport Pressure
Test,” on page 6.
Sump Installation to Shell
To install the sump with high flange into the pool shell:
1. Apply sealing compound to the top surface of the Xport sump flange.
2. From the outside of the pool shell, align the sump with screw holes in the mounting ring and sweep
ninety pointing to the back wall of pool shell. Refer to “Sump Installation to Shell” on page 23 for
illustration.
3. Apply a small bead of sealing compound to the bottom surface of the seal ring flange.
4. From the inside of pool shell, align the seal ring keyway with the tab in the sump, and press into
place.
5. Secure the seal ring and sump together with the six 12" x 1½" flathead screws.
6. Secure the second Suction Outlet fitting through the sidewall in the desired locations.
7. Make the plumbing connection between the second Suction Outlet and the 2½” outlet on the
bottom of the Xport sump. The pipe must be equal to circulation line.
8. Proceed with the Funnel installation instructions on the following page.
Xport Drain System Installation Guide
Page 27

Funnel Installation
Note: Assemble the drain before adding water.
21
Sump Installation to Shell
To install the funnel assembly: (For Xport replacement parts identification (i.e. No. 6), refer to illustration on
page 23).
1. Install the funnel assembly (No. 6) into the sump (No. 11) by pressing the flexible funnel adapter
inside the center 2½" female threaded fitting. Press down and hold the funnel assembly to install
screws.
2. Use a T25 screwdriver to install the two large screws (No. 5) in the support (No. 7).
3. Use a T25 screwdriver to install the two medium screws (No.4) in the funnel assembly
(No. 6). Tighten the screws until the funnel assembly (No. 6) contacts the interior finish of the pool,
spa, or basin.
4. Place the Xport cover (No. 2) on the funnel assembly (No. 6). Use a Phillips screwdriver to secure
the cover in place with the three small screws (No. 1).
5. The Xport drain system installation is complete.
Xport Drain System Installation Guide
Page 28

22
Xport Drain System Replacement Parts List (Fiberglass)
-------------------------------------------------Xport Assembly Kit (Fiberglass) ---------------------------------------------
Part Number Description
540141 Xport Kit, Fiberglass, Bolt On, White
540142 Xport Kit, Fiberglass, Bolt On, Light Blue
540145 Xport Kit, Fiberglass, 75 MM, Bolt On, White
540146 Xport Kit Fiberglass, 75 MM, Bolt On, Light Blue
Item Part Number Description Material
1 * Screw, No. 10-7/8" Phillips Head, (12 pieces) 316-SS
2 540156 XPort Cover with Screws, White
540157 XPort Cover with Screws, Grey
540158 XPort Cover with Screws, Black
540159 XPort Cover with Screws, Light Blue
3 * Plug 2" NPT (6 pieces)
540164 Screw Kit, Fiberglass (includes item 4, ,5 and 8)
4 * Screw, No. 10-1 7/8" Security Head, (12 pieces), 316-SS
5 * Screw, 12 x 2-5/8" Security Head (12 pieces) 316-SS
6 540154 Funnel Assembly, Bolt On, White
540155 Funnel Assembly, Bolt On, Light Blue
7 N/A Support
8 * Screw, 12-14 x 1½" (12 pieces) 316-SS
9 540176 Seal Ring
10 * Sump Assembly - 2½" PVC - 1
11 * Sump Adaptor Kit Required to Reduce
Pipe Size PVC, SCH. 40
13 * Plug Pressure Test 2½” NPT (4 pieces)
14 540140 Drain Second, White
540143 Drain Second, Light Blue
**R1 N/A REQUIRED CONNECTION TO
A 2nd Suction Outlet 2½" pipe PVC, SCH. 40
N/A 540166 Screwdriver Security, T-25
(*) Part of main assembly
(**) Not part of kit
Xport Drain System Installation Guide
Page 29

14
23
13
11
Xport Drain System for Fiberglass
(Required installation method for the
State of FLORIDA)
Xport Drain System Installation Guide
Page 30

24
Xport Drain System Installation Guide
Page 31

Xport Drain Installation
and
Replacement Parts List
(Vinyl Pools)
25
Xport Drain System Installation Guide
Page 32

26
Xport Drain System Installation Guide
Page 33

Vinyl Xport Drain Installation Methods
There are three methods that can be used to install the Xport drain system in vinyl. The following illustrations
show the different methods.
Vacuum Breaker Installation Method for Vinyl
Use one of the following methods to install the XPort Drain System into a vinyl shell.
27
With Canister
Method 1
This method is recommended for best debris
removal performance.
Without Canister
Method 1
Method 2 Method 2
Vacuum Breaker Installation in Vinyl (Method 3)
Suction vacuum release device, mechanical, or electromechanical, venting or non-venting, may be used
provided it is tested and listed by a nationally recognized testing laboratory in accordance with ANSI/
ASME A112.19.17 – Manufactured SVRS for Residential and Commercial Swimming Pool.
Xport Drain System Installation Guide
Page 34

28
Vinyl Installation
Use the following instructions to install the XPort Drain System into a vinyl shell.
Plumbing Requirements
The Xport Drain System plumbing requirements for vinyl pools are:
1. Position the Xport Sump flush with the finished depth of the pool, spa, or basin (see illustration
below for details).
2. Whichever pool base is used, the drain sump must be encased in concrete as shown to anchor it in
place.
3. Position the
the second Suction Outlet may be positioned on the floor a
required second Suction Outlet on a sidewall of the pool, spa or basin. If necessary,
minimum of three (3) feet away from
the Xport Sump.
Pressure Test
• Perform the pressure test using the provided pressure plugs. For instructions, see “Xport Pressure
Test,” on page 6.
Xport Sump Installation to Pool Base
• Finish pool base flush with upper edge of Xport sump as shown below.
Liner Installation
1. Make sure the bottom gasket is in place before installing the liner.
2. Set the liner in the pool and draw tight with the vacuum.
3. Install the top gasket, seal ring, and 12 screws.
4. Cut out the liner inside the sump.
5. Proceed with the Funnel Installation instructions on the following page.
Liner
Concrete Footing
Xport Drain System Installation Guide
Pool Base
Page 35

Funnel Installation
Note: Assemble the drain before adding water.
To install the funnel assembly: (For Xport replacement parts identification (i.e. No. 6), refer to illustration on
page 31)
1. Install the funnel assembly (No. 6) into the sump (No. 12) by pressing the flexible funnel adapter
inside the center 2½" female threaded fitting. Press down and hold the funnel assembly to install
screws.
2. Use a T25 screwdriver to install the two large screws (No. 5) in the support (No. 7).
3. Use a T25 screwdriver to install the two medium screws (No.4) in the funnel assembly
(No. 6). Tighten the screws until the funnel assembly (No. 6) contacts the interior finish of the pool,
spa, or basin.
4. Place the Xport cover (No. 2) on the funnel assembly (No. 6). Use a Phillips screwdriver to secure
the cover in place with the three small screws (No. 1).
5. The Xport drain system installation is complete.
29
Xport Drain System Installation Guide
Page 36

30
Xport Drain System Replacement Parts List (Vinyl)
------------------------------------------------Xport Assembly Kit (Vinyl)---------------------------------------------------------
Part Number Description
540134 Xport Kit, Vinyl, White
540135 Xport Kit, Vinyl, Grey
540136 Xport Kit, Vinyl, Black
540137 Xport Kit, Vinyl, Light Blue
tem Part Number Description Material
540162 Screw Kit, Concrete (includes item 1, 4, 5, 8)
1 * Screw, No. 10-7/8" Phillips Head, (12 pieces) 316-SS
2 540156 XPort Cover with Screws, White
540157 XPort Cover with Screws, Grey
540158 XPort Cover with Screws, Black
540159 XPort Cover with Screws, Light Blue
3 * Plug 2" NPT (6 pieces)
4 * Screw, No. 10-1 7/8" Security Head, (12 pieces), 316-SS
5 * Screw, 12 x 2-5/8" Security Head (12 pieces) 316-SS
6 540152 Funnel Assembly, White
540153 Funnel Assembly, Light Blue
7 * Support
8 * Screw, 12-14 x 1½" Vinyl Sump (12 pieces) 316-SS
9 540175 Seal Ring
10 540173 Vinyl Gaskets (2 pieces)
11 * Support Bracket (2 pieces)
12 * Sump Assembly - 2½" PVC - 1
13 * Sump Adaptor Kit Required to Reduce
Pipe Size PVC, SCH. 40
14 * Plug Pressure Test 2½” NPT (4 pieces)
15 540138 Drain, Second, White
540139 Drain, Second, Light Blue
**R1 N/A REQUIRED CONNECTION TO A 2nd
Suction Outlet 2½" pipe PVC, SCH. 40
*N/A 540166 Screwdriver Security, T-25
(*) Part of main assembly (**) Not part of kit
Xport Drain System Installation Guide
Page 37

15
31
14
13
Xport Drain System for Vinyl (Required
installation method for the State of
FLORIDA)
Xport Drain System (Vinyl)
Xport Drain System Installation Guide
Page 38

32
Xport Drain System Installation Guide
Page 39

Notes
33
Xport Drain System Installation Guide
Page 40

34
Notes
Xport Drain System Installation Guide
Page 41

Page 42

P/N 540117 - Rev. C
 Loading...