


SpaBrite™ / AquaLight™ Underwater Light Owner’s Manual
IMPORTANT SAFETY INSTRUCTIONS
READ AND FOLLOW ALL INSTRUCTIONS
SAVE THESE INSTRUCTIONS
Table of Contents
SECTION I. Installing Light Fixture During New Pool Construction.................................................................................. 1
SECTION II. Replacing Light Fixture in Existing Pool .......................................................................................................... 3
SECTION III. Replacing A Lamp Only .................................................................................................................................... 4
SECTION IV. Technical Data ................................................................................................................................................... 6
SECCIÓN I. Instalación del accesorio portalámpara durante la construcción de una piscina nueva............................... 9
SECTION I. Installation de l’appareil d’éclairage lors de la construction d’une nouvelle piscine ................................ 17
DANGER
Risk of Electrical Shock or Electrocution.
This underwater light must be installed by a licensed or certified electrician in accordance with the National
Electrical Code and all applicable local codes and ordinances. Improper installation will create an electrical
hazard which could result in death or serious injury to pool users, installer, or others due to electrical
shock, and may also cause damage to property. Read and follow the specific instructions below.
WARNING
Before installing this underwater light, read and follow all warning notices and instructions accompanying this light. Failure
to follow safety warnings and instructions can result in severe injury, death, or property damage. Call (800) 831-7133 for
additional free copies of these instructions.
Important Notice
Attention Installer.
This manual contains important information about the installation, operation and safe use of this
product. This information should be given to the owner/operator of this equipment.
I. Installing light fixture during new pool construction.
A. The electrician must complete preparatory steps before light fixture is installed; see Figure 1.
1. Ensure that the pool meets the requirements of the current National Electrical Code and all local codes and
ordinances. A licensed or certified electrician must install the electrical system to meet or exceed those
requirements before the underwater light is installed. Some of the requirements of the National Electrical
Code which the pool’s electrical system must meet are as follows.
a. The lighting circuit must have a Ground Fault Circuit Interrupter (GFCI), and must have an
appropriately rated circuit breaker.
Pentair Pool Products
1620 Hawkins Ave., Sanford, NC 27330 • (919) 774-4151
10951 West Los Angeles Ave., Moorpark, CA 93021 • (805) 523-2400
Rev. D • Rev. D • Rév. D 7-2-01 1 P/N • Núm/Pte. • Réf. 99410000
Listed
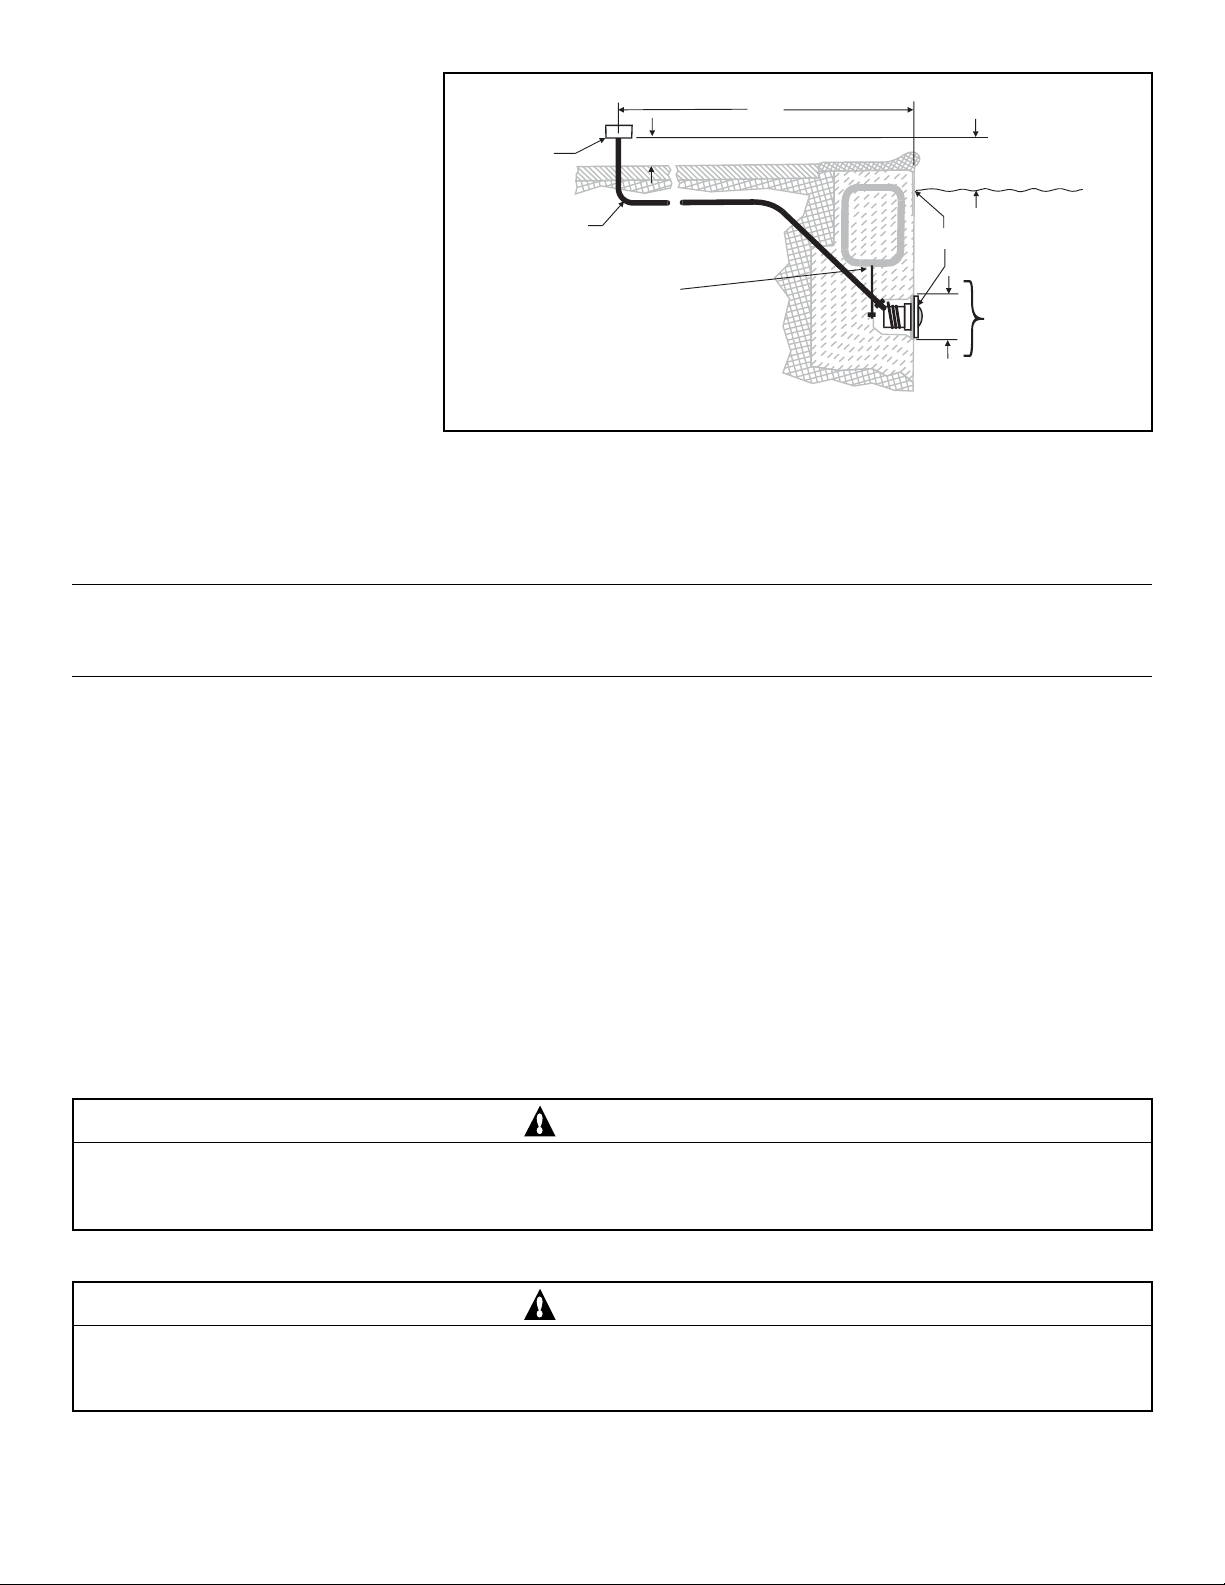
b. The Junction Box (or, for 12
volt models, the low voltage
transformer) must be located
at least eight (8) inches
To GFCI, Circuit
Breaker and
Power Source.
4" min.
48"
min.
8" min. Junction Box or
low Voltage Transformer.
above water level, at least
four (4) inches above ground
level, and at least 48 inches
from the edge of the pool;
see Figure 1.
c. The light fixture and all metal
Rigid
Conduit
#8 AWG Ground
Connector bonded
to rebar.
18" min. to top of Lens.
Concrete must be cut
6.0"
back around Niche to
allow for a compacted
plaster seal.
items within five (5) feet of
the pool must be properly
Figure 1.
electrically bonded.
d. The wet niche must be properly installed so that the top edge of the underwater light’s lens is at least
18 inches below the surface of the water in the pool; see Figure 1.
e. The wet niche must be properly electrically bonded and grounded via the No. 8 AWG ground connector
located at the rear of the niche; see Figure 1.
NOTE
The pool or spa electrical system can be verified with a Pool and Spa Electrical Qualification Test kit. The test kit is available
from Pentair Pool Products. The electrical system inspection using this kit must be performed by trained and certified personnel.
2. To be certain that the pool’s electrical system meets all applicable requirements, the electrician should also consult
the local building department.
3. Use only Pentair Pool Products wet niches to insure proper bonding and grounding connections.
B. Steps to perform after the electrical system requirements are met.
1. Feed cord through conduit to Junction box, leaving at least four (4) feet of cord at the light fixture to coil around
the light; see Figure 1. This four (4) feet of cord around the light allows the light to be serviced after the pool is
filled with water.
2. Cut the cord at the Junction Box, leaving at least six (6) inches of cord to make connections.
3. Strip six (6) inches of the outer cord jacket to expose the three insulated wires.
Be careful not to damage the
insulation on the three (3) inner wires.
4. Connect all three (3) wires to the corresponding circuit wires in the Junction Box, and secure the Junction Box
cover in place.
WARNING
Never operate this underwater light for more than 10 seconds unless it is totally submerged in water. Without total submersion, the light assembly will get extremely hot, which may result in serious burns or in breakage of the lamp or lens. This
may result in serious injury to pool users, installers, or bystanders, or in damage to property.
5. Replace the light assembly into niche and tighten special pilot screw.
WARNING
Use only the special pilot screw provided with this underwater light. This screw mounts and electrically grounds the housing
securely to the mounting ring and wet niche. Failure to use the screw provided could create an electrical hazard which could
result in death or serious injury to pool users, installers or others due to electrical shock.
6. Fill the pool until the underwater light is completely submerged in water before operating the light for more than
10 seconds. Turn on main switch or circuit breaker, as well as the switch which operates the underwater light
itself, to check for proper operation.
P/N • Núm/Pte. • Réf. 99410000 2 Rev. D • Rev. D • Rév. D 7-2-01
II. Replacing light fixture in existing pool.
DANGER
Risk of Electrical Shock or Electrocution.
This underwater light must be installed by a licensed or certified electrician or a qualified pool serviceman in accor-
dance with the National Electrical Code and all applicable local codes and ordinances. Improper installation will
create an electrical hazard which could result in death or serious injury to pool users, installers or others due to
electrical shock, and may also cause damage to property.
Always disconnect the power to the pool light at the circuit breaker before servicing the light. Failure to do so could
result in death or serious injury to serviceman, pool users or others due to electrical shock.
A. Before replacing the light fixture.
1. Verify that the pool meets the requirements of the current National Electrical Code and all local codes and
ordinances. A licensed or certified electrician must install the electrical system to meet or exceed those
requirements before the underwater light is installed. Some of the requirements of the National Electrical Code
which the pool’s electrical system must meet are as follows:
a. The lighting circuit must have a Ground Fault Circuit Interrupter (GFCI), and must have an appropriately
rated circuit breaker.
b. The Junction Box (or, for 12 volt models, the low voltage transformer) must be located at least 8 inches above
ground or water level, at least four (4) inches above ground level, and at least 48 inches from the edge of the
pool; see Figure 1.
c. The light fixture and all metal items within 5 feet of the pool must be properly electrically bonded.
d. The wet niche must be properly installed so that the top edge of the underwater light’s lens is at least 18
inches below the surface of the water in the pool; see Figure 1.
e. The wet niche must be properly electrically bonded and grounded via the No. 8 AWG ground connector
located at the rear of the niche; see Figure 1.
NOTE
The pool or spa electrical system can be verified with a Pool and Spa Electrical Qualification Test Kit. The test kit is available
from Pentair Pool Products. The electrical system inspection using this kit must be performed by trained and certified personnel.
2. To be certain that the pool’s electrical system meets all applicable requirements, the electrician should also consult
the local building department.
3. Use only Pentair Pool Products wet niches to insure proper bonding and grounding connections.
B. Replacing the light fixture after electrical system requirements are met.
WARNING
Failure to bring the pool’s electrical system up to code requirements before installing the underwater light will create an electrical
hazard which could result in death or serious injury to pool users, installers, or others due to electrical shock, and may also
cause damage to property.
1. Turn off main electrical switch or circuit breaker, as well as the switch which operates the underwater light itself.
2. To remove the light assembly, remove the special pilot screw at top of the face ring, remove the light assembly
from the niche, and place the assembly on the deck.
WARNING
Be sure to keep the special pilot screw from this underwater light. This screw mounts and electrically grounds the housing
securely to the mounting ring and wet niche. Failure to use the screw provided could create an electrical hazard which could
result in death or serious injury to pool users, installers or others due to electrical shock.
3. Remove Junction Box cover, disconnect the light fixture wires, and pull the cord through the conduit.
4. Feed the new light fixture cord through the conduit from the niche to the Junction Box.
Rev. D • Rev. D • Rév. D 7-2-01 3 P/N • Núm/Pte. • Réf. 99410000

NOTE
Depending on the length of the conduit, special tools may be required to pull the cord through the conduit.
5. Leave at least 4 feet of cord to coil around the light fixture; see Figure 1. This 4 feet of cord coiled around the light
allows the light to be serviced after the pool is filled with water.
6. Cut the cord at the Junction Box, leaving at least 6 inches of cord to make connections.
7. Strip 6 inches of the outer cord jacket from the cord to expose the three insulated wires--be careful not to damage
the insulation on the three inner wires.
8. Connect all three wires to the corresponding circuit wires in the Junction Box, black wire to power, white wire to
common, and green wire to ground, and secure the Junction Box cover in place.
WARNING
Use only the special pilot screw provided with this underwater light. This screw mounts and electrically grounds the housing
securely to the mounting ring and wet niche. Failure to use the screw provided could create an electrical hazard which could
result in death or serious injury to pool users, installers or others due to electrical shock.
9. Replace light assembly into niche and tighten special pilot screw.
WARNING
Never operate this underwater light for more than 10 seconds unless it is totally submerged in water. Without total submersion, the light assembly will get extremely hot, which may result in serious burns or in breakage of the lamp or lens. This
may result in serious injury to pool users, installers, or bystanders, or in damage to property.
10. Fill the pool until the underwater light is completely submerged in water before operating the light for more than
10 seconds. Turn on main switch or circuit breaker, as well as the switch which operates the underwater light
itself, to check for proper operation.
III. Replacing a lamp only.
DANGER
Always disconnect power to the pool light at the circuit breaker before servicing the light. Failure to do so could result in
death or serious injury to installer, serviceman, pool users or others due to electrical shock.
A. Turn off main electrical switch or circuit breaker, as well as the switch which operates the underwater light itself.
B. You will need the following items:
1. A new lens gasket (part number 79108600).
2. A lamp, refer to Table 1 for the correct type and wattage.
WARNING
Replace lamp with a similar type and wattage. Failure to replace lamp with the same type of lamp will damage the light
assembly and may cause an electrical hazard resulting in death or serious injury to pool users, installers, or others due to
electrical shock, and may also cause damage to property.
WARNING
Always install a new lens gasket (part number 79108600) whenever disassembling the light. Failure to do so may permit
water to leak into the assembly which could cause:
(a) An electrical hazard resulting in death or serious injury to pool users, installers, or others due to electrical shock.; or,
(b) breakage of the lamp or lens, which likewise could result in serious injury to pool users, installers, or bystanders, or
in damage to property.
C. To remove light assembly, remove the special pilot screw at top of face ring, remove light assembly from niche, and
place assembly on deck.
WARNING
Be sure to keep the special pilot screw from this underwater light. This screw mounts and electrically grounds the housing
securely to the mounting ring and wet niche. Failure to use the screw provided could create an electrical hazard which could
result in death or serious injury to pool users, installers or others due to electrical shock.
P/N • Núm/Pte. • Réf. 99410000 4 Rev. D • Rev. D • Rév. D 7-2-01

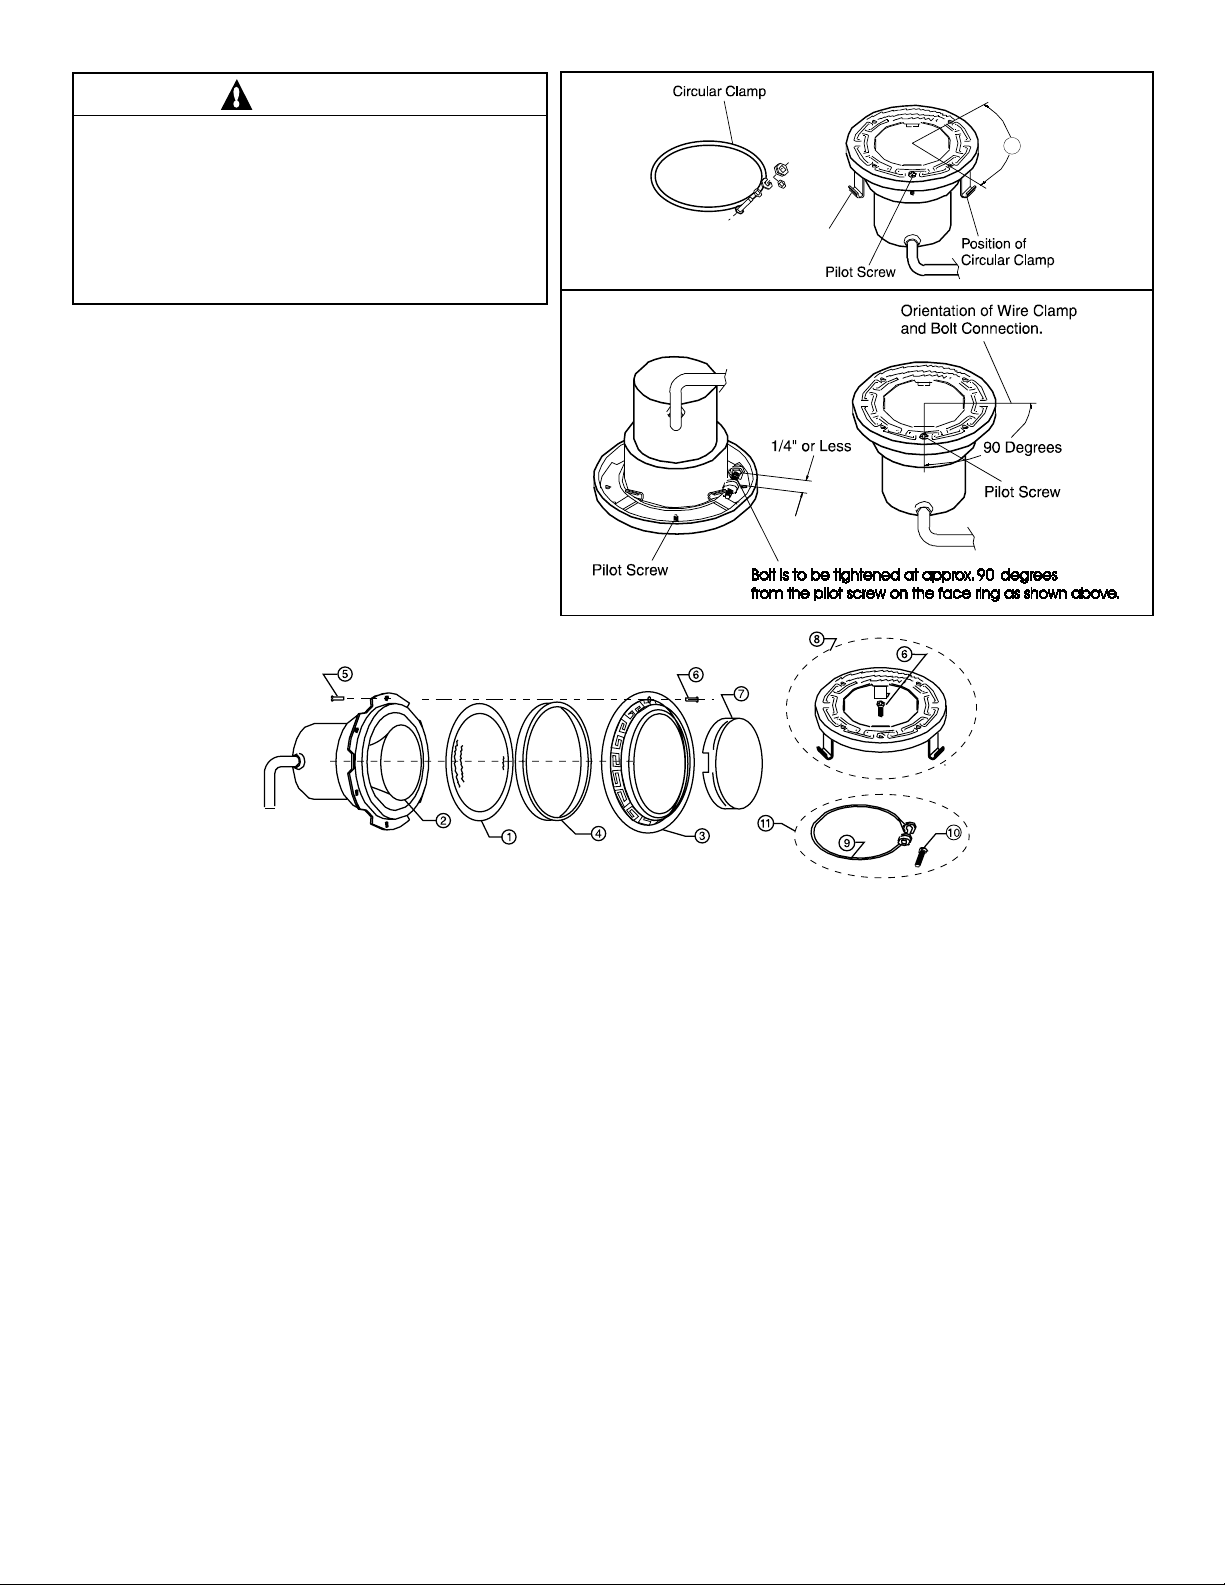
D. Disassemble light fixture and remove bulb. Remove and
discard old gasket.
E. Install new gasket during reassembly of light, Pentair
Pool Products part number 79108600.
F. Select the replacement bulb from Table 1.
1. For AquaLight of 100 watt and 250 watt; see
Figures 2-3.
2. Squeeze wire form at rounded ends until the wire
comes together and forms a diamond shape opening; see Figures 2-3.
Lamp Specifications: 12* volt Models
120 volt - 250 watt - T-4 lamp 75 watt
120 volt - 100 watt - T-4 lamp 100 watt
120 volt - 100 watt - R-20 lamp *Transformer required
12 volt - 100 watt - R-20 lamp
12 volt - 75 watt - MR-16 lamp 120 volt Models
100 watt
Table 1.
250 watt
IMPORTANT
Be careful not to touch bulb with bare skin, as this will reduce the life of the bulb. Use the plastic wrapping of the new bulb,
or a cloth to grasp the bulb.
3. While holding wire form in diamond shape, insert bulb through diamond opening and thread bulb into socket.
WARNING
Never operate the underwater light for more than 10 seconds unless it is totally submerged in water. Without total submersion, the light assembly will get extremely hot and may result in serious burns or in breakage of the lamp or lens. This may
result in serious injury to pool users, installers, or bystanders, or in damage to property.
4. With the light resting on its base, place the gasket on top of the light shell. A NEW LENS GASKET MUST BE
USED EACH TIME THE LIGHT IS REASSEMBLED. Locate the word "TOP" on the lens surface. Align the
pilot screw on the face ring with the letter "O" in the word "TOP" and the arrow on the label marked, "Arrow on
this label must line up with the pilot screw on the face ring."
5. The semi-assembled light will now include the face ring and its new gasket properly aligned with the light shell.
Place this light upside down on the old gasket, using the old gasket as an assembly fixture. This will keep the lens
and gasket assembly from being pushed out of the face ring while you secure it to the light fixture.
G. Secure the face ring to the light fixture. Sealing screws must be tightened in the following manner to ensure a proper
seal.
1. For lights with chrome or brass face ring:
a. Partly tighten the screw at the 3 o’clock position, and then partly tighten the screw at the 9 o’clock position.
Partly tighten the screw at another ‘opposite’ position, and then partly tighten the screw directly across from it.
b. Continue partly tightening all screws in the above sequence until all screws are evenly and securely tightened.
Recommended 20 inch pounds torque.
2. For lights with stainless steel face ring:
a. With the bent ends of the circular unitension clamp pointing down spread the clamp and place it in the "U"
recesses of the locking levers. Ensure that the bent ends of the clamp are located between the pair of locking
levers as shown in Figure 4, location A. Check to see that the clamp is properly engaged with all of the levers;
see Figure 4.
b. Hold the ends of the unitension clamp together. Insert the bolt
through one end of the bend end and then insert the other end
through the other bent end and thread the bolt into the nut. Using
a #3 Phillips head screwdriver tighten the screw and nut until the
distance between the ends of the clamp equals ¼ inch or less, see
Figure 5.
H. Replace the light assembly into the niche and tighten the special pilot
screw.
Rev. D • Rev. D • Rév. D 7-2-01 5 P/N • Núm/Pte. • Réf. 99410000
Figure 2.
Figure 3.
WARNING
Use only the special pilot screw provided with this
underwater light. This screw mounts and electrically
grounds the housing securely to the mounting ring and
wet niche. Failure to use the screw provided could
create an electrical hazard which could result in death
or serious injury to pool users, installers or others due
to electrical shock.
A
Figure 4.
I. Fill pool until the underwater light is
Figure 5.
completely submerged in water before
operating the light for more than 10 seconds.
Turn on main switch or circuit breaker, as
well as the switch which specifically
operates the underwater light, to check for
proper operation.
IV. Technical Data.
1 79107800 Lens, clear, 4 in. dia., tempered
2 79108000 Floodlamp, med. base, 100 watt, 120 volt, (SpaBrite)
2 79108100 Floodlamp, med. base, 100 watt, 12 volt, (SpaBrite)
2 79102900 100 watt halogen quartz screw base, (AquaLight)
2 79113800 250 watt halogen quartz screw base, (AquaLight)
2 79112400 Bulb, 75 watt, 12 volt, bi-pole, (AquaLight)
2 070517 Bulb, 100 watt, 120 volt, bayonet, (AquaLight)
2 79112700 Bulb, 250 watt, 120 volt, bayonet, (AquaLight)
3 79108400 Face Ring, chrome-brass UL
4 79108500 Gasket, 4 in. dia. lens
4 79108600 Gasket, silicone, 100 watt, 250 watt (AquaLight)
5 98208600 Screw, S/S 10-24 x 3/8 in., 6 required, for chrome-brass
6 79104800 Pilot Screw with captive gum washer
7 79108900 Kwik-change color lens, red
7 79109000 Kwik-change color lens, blue
7 650015 Kwik-change color lens, magenta
7 650016 Kwik-change color lens, purple
7 650017 Kwik-change color lens, teal
7 650018 Kwik-change color lens, green
7 650019 Kwik-change color lens pack (5 colors)
8 79111600 Face Ring assy, S/S
9 79210500 Wire spring clamp
10 79210600 1/4-20 x 5/8 in. bolt
11 79210400 Uni-tension wire assy., S/S with welded nut
SAVE THESE INSTRUCTIONS.
P/N • Núm/Pte. • Réf. 99410000 6 Rev. D • Rev. D • Rév. D 7-2-01

Pentair Pool Products
1620 Hawkins Ave., Sanford, NC 27330 • (919) 774-4151
10951 West Los Angeles Ave., Moorpark, CA 93021 • (805) 523-2400
Rev. D Rev. D Rév. D 7-2-01 7 P/N Núm/Pte. Réf. 99410000

This page is blank.
P/N • Núm/Pte. • Réf. 99410000 8 Rev. D • Rev. D • Rév. D 7-2-01
 Loading...