

Page 1
Small Plastic Niche
(For use with Pentair Water Pool and Spa® wet niche light fixtures)
Installation Guide
IMPORTANT SAFETY INSTRUCTIONS
READ AND FOLLOW ALL INSTRUCTIONS
SAVE THESE INSTRUCTIONS
Page 2

© 2008 Pentair Water Pool and Spa, Inc. All rights reserved
This document is subject to change without notice
1620 Hawkins Ave., Sanford, NC 27330 • (919) 566-8000
10951 West Los Angeles Ave., Moorpark, CA 93021 • (805) 523-2400
Pentair Water Pool and Spa® is a registered trademark of Pentair Water Pool and Spa, Inc. 3M® and Scotchast® are
registered trademarks of 3M Company Corporation. Weld On® is a registered tradmark of IPS Corporation. Unless
noted, names and brands of others that may be used in this document are not used to indicate an affiliation or
endorsement between the proprietors of these names and brands and Pentair Water Pool and Spa, Inc. Those
names and brands may be the trademarks or registered trademarks of those parties or others.
P/N 99791600 Rev E - 07/23/08
Page 3
IMPORTANT SAFETY PRECAUTIONS
Attention Installer: This manual contains important information about the installation,
operation and safe use of this product. This information should be given to the owner and/or
operator of this equipment after installation.
WARNING — Before installing this product, read and follow all warning notices and instructions
which are included. Failure to follow safety warnings and instructions can result
in severe injury, death, or property damage. Call (800) 831-7133 for additional
free copies of these instructions.
DANGER! Risk of Electrical Shock or Electrocution!
This product must be installed by a licensed or certified electrician or a qualified pool serviceman
in accordance with the National Electrical Code and all applicable state and local codes and
ordinances. Improper installation will create an electrical hazard which could result in death --- or
serious injury to pool users, installers or others due to electrical shock, and may also cause
damage to property. Always disconnect the power to the pool light at the circuit breaker before
servicing the light. Failure to do so could result in death or serious injury to serviceman, pool users
or others due to electrical shock. READ AND FOLLOW ALL INSTRUCTIONS IN THIS MANUAL.
i
WARNING — Important Safety Information for Pentair Niche and Light Installation
•
All Niche and Light installations must conform with all codes.
• Under no circumstances replace lights by splicing wire under water or behind niche.
WARNING —
RISK OF ELECTRIC SHOCK AND INJURY.
USE ONLY THE INSTALLATION METHOD SPECIFIED BELOW.
Important Safety Information for Fountain Fixture Installations
Location of Pentair Fountain Fixture* Required Installation Method
Luminaire Use (P/N 560000 – P/N 560001)
(P/N 560002 – P/N 560003)
Swimming Pool or Spa Wet-Niche Swimming Pool Fixture Housing (Forming Shell) ONLY.
(or Spa) Luminaire (Light) DO NOT USE Fountain Fixture Stand.
Fountain Wet-Niche Submersible Fixture Housing (Forming Shell) or
Swimming Pool (or Spa) Fountain Fixture Stand.
Luminaire (Light)
(*) Note: Wet-niche luminaires complying with requirements for both uses may bear both the Listed Wet-Niche
Swimming Pool (or Spa) Luminaire UL Mark and the Listed Wet-Niche Submersible Luminaire UL Mark. A luminaire
not bearing the corresponding UL Listing Mark is not considered by UL to have been produced under UL’s Listing
and Follow-Up Service for the associated usage location.
CAUTION: The Pentair IntelliBrite LED light fixture must only be used with Pentair fixture housings (niches). If the
IntelliBrite LED light fixture is installed into other niches, the installation will not carry U.L. approval and will void all
warranties.
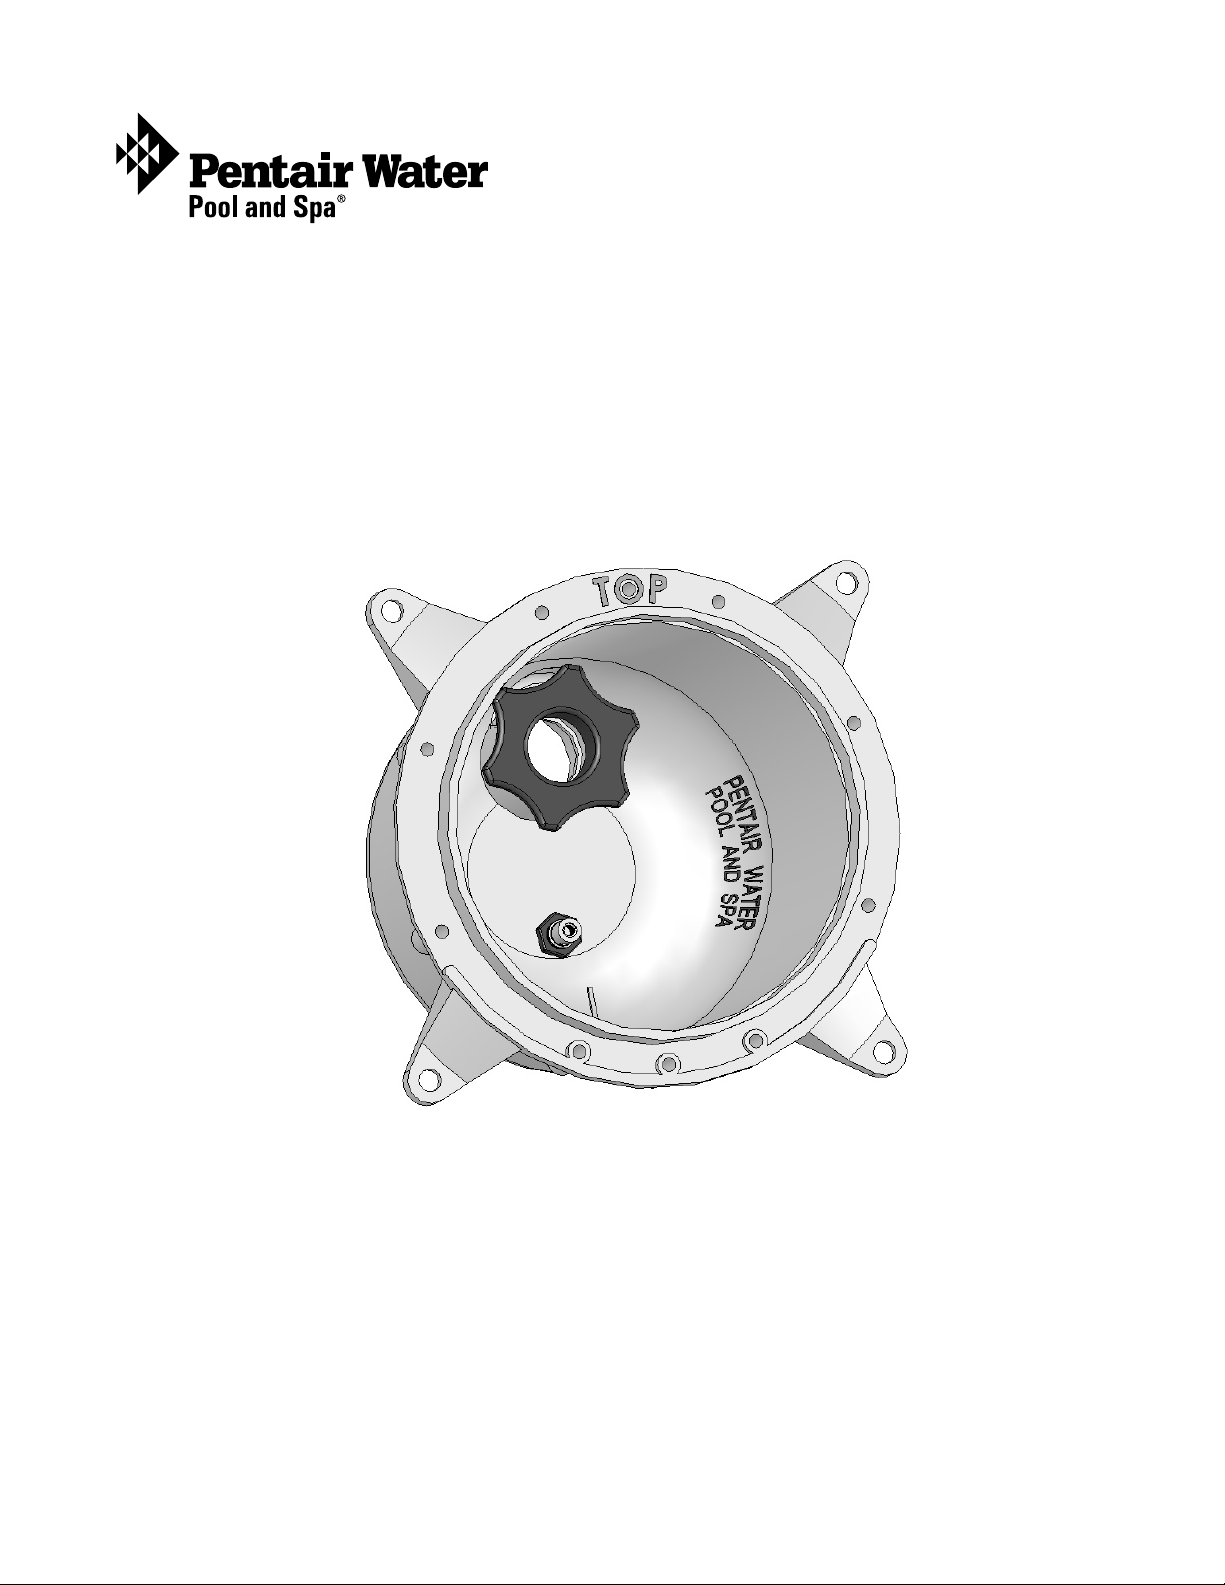
Small Plastic Niche Installation Guide
Page 4

ii
Contents
Small plastic niche overview ....................................................................................................... 1
Read this first before installing ..................................................................................................... 1
Small plastic niche concrete/gunite pool installation ................................................................ 2
Installing the seal in the small plastic niche ............................................................................... 3
Seal removal and replacement....................................................................................................6
Small Plastic Niche Kit Contents
The following items are included in the Small Plastic Niche kit. If any items are missing please contact Pentair
Technical Support.
• Plastic niche (large) (P/N 79206700)
• Cap, Cord Seal Assembly (P/N 670040)
• PVC Conduit, Elbow (P/N 520272)
• Large Plastic Niche Installation Guide (this manual)
Cord Seal Grommet Assembly Accessory (sold separately)
The cord seal grommet assembly accessory includes:
• Cord Seal Grommet Assembly (P/N 670044)
• Seal
• Stub
Pentair compatible light fixture part numbers
Use the large plastic niche with any of the following Pentair wet niche light fixture part numbers:
P/N 783xxxxx
P/N 784xxxxx
P/N 788xxx xx
P/N 789xxxxx
P/N 6000xx
Technical Support
Contact Technical Support at:
Sanford, North Carolina (8 A.M. to 5 P.M. ET)
Moorpark, California (8 A.M. to 5 P.M. PT)
Phone: (800) 831-7133
Fax: (800) 284-4151
Web sites: visit www.pentairpool.com and www.staritepool.com
Small Plastic Niche Installation Guide
Page 5

Small Plastic Niche Overview
READ THIS FIRST BEFORE INSTALLING THE NICHE
1. Ensure that the electrical system of your pool conforms with the following requirements of the
National Electrical Code (NEC), and all local codes and ordinances. A licensed or certified electrician
must install the electrical system to meet or exceed those requirements before the Small Plastic
Niche (fixture-housing) is installed.
2. Some of the NEC requirements are as follows:
• The lighting circuit must have a Ground Fault Circuit Interrupter (GFCI), and have an appropriately
rated circuit breaker.
• The junction box or the low voltage transformer is located at least 12 inches above water level and at
least 48 inches from the edge of the pool, see Figure 1 below.
• The light fixture and all metal items within five (5) feet of the pool must be properly electrically
bonded.
• The niche must be properly installed so the pilot screw hole is at the 12 o’clock position and the top
edge of the Underwater Light’s lens is at least 18 inches below the surface of the water in the pool,
see Figure 1. This requirement may be less than 18” if the fixture is installed in an area of the
swimming pool that is not used for swimming and the lens is adequately guarded to keep any person
from coming in contact with the lens. Consult your local codes and ordinances and the National
Electrical Code (NEC).
1
Detail A
The niche is properly electrically bonded and grounded using the No. 8 AWG ground connector located at the
rear of the niche, see Figure 1.
Use only Pentair Water Pool and Spa, Inc. lighting fixtures in this niche to ensure proper bonding and
grounding connections.
Figure 1.
Small Plastic Niche Installation Guide
Page 6

2
Small Plastic Niche Concrete/Gunite Pool Installation
The following steps describe how to install the large plastic niche to the pool rebars, connect the metal conduit
to the niche and connect the bonding/grounding wire to the outside of the niche. Also, included are installation
instructions for the optional Cord Seal Grommet kit (sold separately). For more information, see page 3.
DANGER RISK OF ELECTRICAL SHOCK OR ELECTROCUTION
WARNING — Risk of electrical shock or electrocution.
For proper bonding and grounding connections, use only Pentair Water Pool and Spa Inc.
Underwater Light Fixtures with this niche-fixture housing. Failure to do so could create an
electrical hazard which would result in death or serious injury to pool users, installers and
others
1. Locate position on the vertical surface where the niche and light is to be installed. The top of the light
lens must be a minimum of 18” below normal water level.
2. Connect the PVC conduit to the niche using a PVC solvent, such as Weld On
Note: If required, a 45° PVC 1” to 3/4” conduit elbow adapter is provided with the kit. When
gluing the PVC elbow to the niche, ensure to insert the elbow with the niche facing up, to avoid
glue running into the inside of the niche.
3. Secure the niche-fixture housing to the rebar with tie wires. Orient the niche so that the pilot screw
receptacle is located at the top of the niche.
4. Connect the bonding wire from rebar and bonding grid to the bonding lug at the rear of the niche.
5. Bond the niche-fixture housing to all other metallic items within 5 feet of the pool, using a No. 8 AWG
bond wire. The Bond connection is located at the rear of the niche.
Note: If using non-metallic conduit (PVC), a No. 8 AWG bonding/grounding wire must be
installed through the conduit from the junction box to the bonding/grounding lug inside the
niche. The connection inside the niche must be sealed with a listed sealant such as 3M
Scotchcast® 2135 (see page 5, step13).
®
710.
TM
PVC 1” to 3/4”
conduit adapter
(provided in kit)
Rear bonding lug
(connect bonding
Small Plastic Niche (side view)
wire here)
6. Support conduit to hold the Small Plastic Niche at the proper distance in front of rebar so that the
front of mounting ring is flush with the desired finish surface.
7. If pool surface is to be plastered, you must allow proper concrete cut-back for plaster thickness.
Finished concrete surface must be cut-back behind the niche flange, see Detail A of Figure 1.
Finished area surrounding niche must be flat and flush with the front face of the niche. This ensures a
snug fit between light and wall.
Small Plastic Niche Installation Guide
Page 7

Installing the large plastic niche (with optional cord seal grommet)
Before installing the niche, read through the installation steps. Also, if required by local code, included are
installation instructions for the optional cord seal grommet assembly, which can be purchased separately
(P/N 670044).
To install the bonding wire (and optional seal grommet) in the niche:
1. The seal cap is factory installed in the conduit thread.
2. Route the bonding/ground wire and the light cord through the conduit and seal cap into the inside of
the niche.
3. Pull the required length of light cord through the niche.
4. Pull the bonding/ground wire through with enough slack to connect to the niche bonding lug.
Note: If a cord seal grommet is being installed, proceed with Step 5, if not continue Step 12 to finish
the installation.
3
Seal cap
Route bonding/ground wire and
light cord through seal cap
Bonding lug
Small Plastic Niche Installation Guide
Page 8

4
5. Installing the optional Cord Seal Grommet: Remove the plastic bag containing the cord seal
grommet assembly (seal and stub) from the inside of the niche. Remove the seal and stub from the
bag.
6. Grasp the seal and spread the smaller opening, and clip onto the for bonding/ground wire. Spread the
larger opening, and clip onto the light cord as shown. Orient the seal pins facing outward.
Note: If a bonding/ground wire is not being used, insert the stub in small opening where the
bonding/ground wire would be.
Seal
Stub
Cord seal grommet
assembly
Clip bonding wire
Seal
into seal
Clip light cord
into seal
7. Ensure that the seating surface in the threaded hub is clean and clear of any debris or glue.
8. Slide the seal down the wires and insert it into the threaded hub in the niche. Push the seal and wires
into the hub until it bottoms out.
Threaded hub
Insert seal/wires into
threaded hub
Small Plastic Niche Installation Guide
Page 9

9. Slide the seal cap into the niche threaded hub. Carefully position and align the cap with the threaded
hub. Hand tighten the cap clockwise two or three turns.
10. Gently tug on the wire, you still should be able to pull the wires in or out of the seal to adjust the wire
length if necessary.
11. Tighten the cap clockwise to lock the seal and wires in place. Tug on the wires to ensure that they do
not move. The seal will form a water tight seal so that water cannot enter the conduit from inside of
the niche.
12. Connect the bonding/ground wire to the lug inside the niche. Tighten the screw to secure the wire to
the lug. Ensure that the wire has sufficient slack to allow removal of the cap and seal in the future.
13. Sealed the wire/lug connection with a listed sealant such as 3M Scotchcast
Tighten cap
2135.
5
Bonding/grounding wire
(leave slack before
connecting to lug)
Bonding/grounding lug
14. The niche installation is complete. The niche is ready for the light installation.
Small Plastic Niche Installation Guide
Page 10

6
Seal Removal and Replacement
When replacing a pool or spa light, in order to route the new light cord to the junction box, the existing seal and
cap should be replaced. The cord seal grommet assembly kit (P/N 670044) can be purchased separately.
WARNING — Risk of electrical shock or electrocution.
For proper bonding and grounding connections, use only Pentair Water Pool and Spa Inc.
Underwater Light Fixtures with this niche-fixture housing. Failure to do so could create an
electrical hazard which would result in death or serious injury to pool users, installers and
others.
To remove and replace the seal (refer to illustrations on previous pages):
1. Remove the light assembly from the niche and cut the wire that is connected to the existing light.
2. Unscrew the cap from the niche hub.
3. Tug on the light cord to loosen the seal from the niche threaded hub. Using needle-noise pliers, gently
pull on each of the seal pins to remove the seal and wires from the hub.
4. Unsnap the seal from the wires and remove the seal from the niche. Leave the bonding/ground wire
connected to the lug inside the niche.
5. Insert the light cord through the cap.
6. Run the new light cord into the niche hub and through the conduit to the junction box.
7. Allow for the required length of light cord to wrap around the light assembly.
8. Spread the larger opening of the seal, and clip it onto the light cord. Spread the smaller opening, and
clip it onto the bonding/ground wire.
9. Ensure that the seating surface in the threaded hub is clean and clear of any debris or glue.
10. Slide the seal down the wires and insert it into the niche hub. Push the seal and wires into the hub
until it bottoms out.
11. Slide the seal cap into the niche threaded hub. Carefully position and align the cap with the threaded
hub. Hand tighten the cap clockwise two or three turns.
12. Gently tug on the wire, you still should be able to pull the wires in or out of the seal to adjust the wire
length if necessary.
13. Tighten the cap clockwise to lock the seal and wires in place. Tug on the wires to ensure that they do
not move. The seal will form a water tight seal so that water cannot enter the conduit from inside of
the niche.
14. The installation is complete.
Small Plastic Niche Installation Guide
Page 11

Page 12

P/N 99791600 Rev E 07/17/08
*99791600*
 Loading...