

Page 1
Owner’s Manual
Spa Blower
Should the installer or owner be unfamiliar with the correct
installation or operation of this type of equipment you should
contact the distributor/manufacturer for the correct advice before
proceeding with the installation or operation of this product.
Installation & operation
instructions
®
ONGA
Page 2
®
ONGA
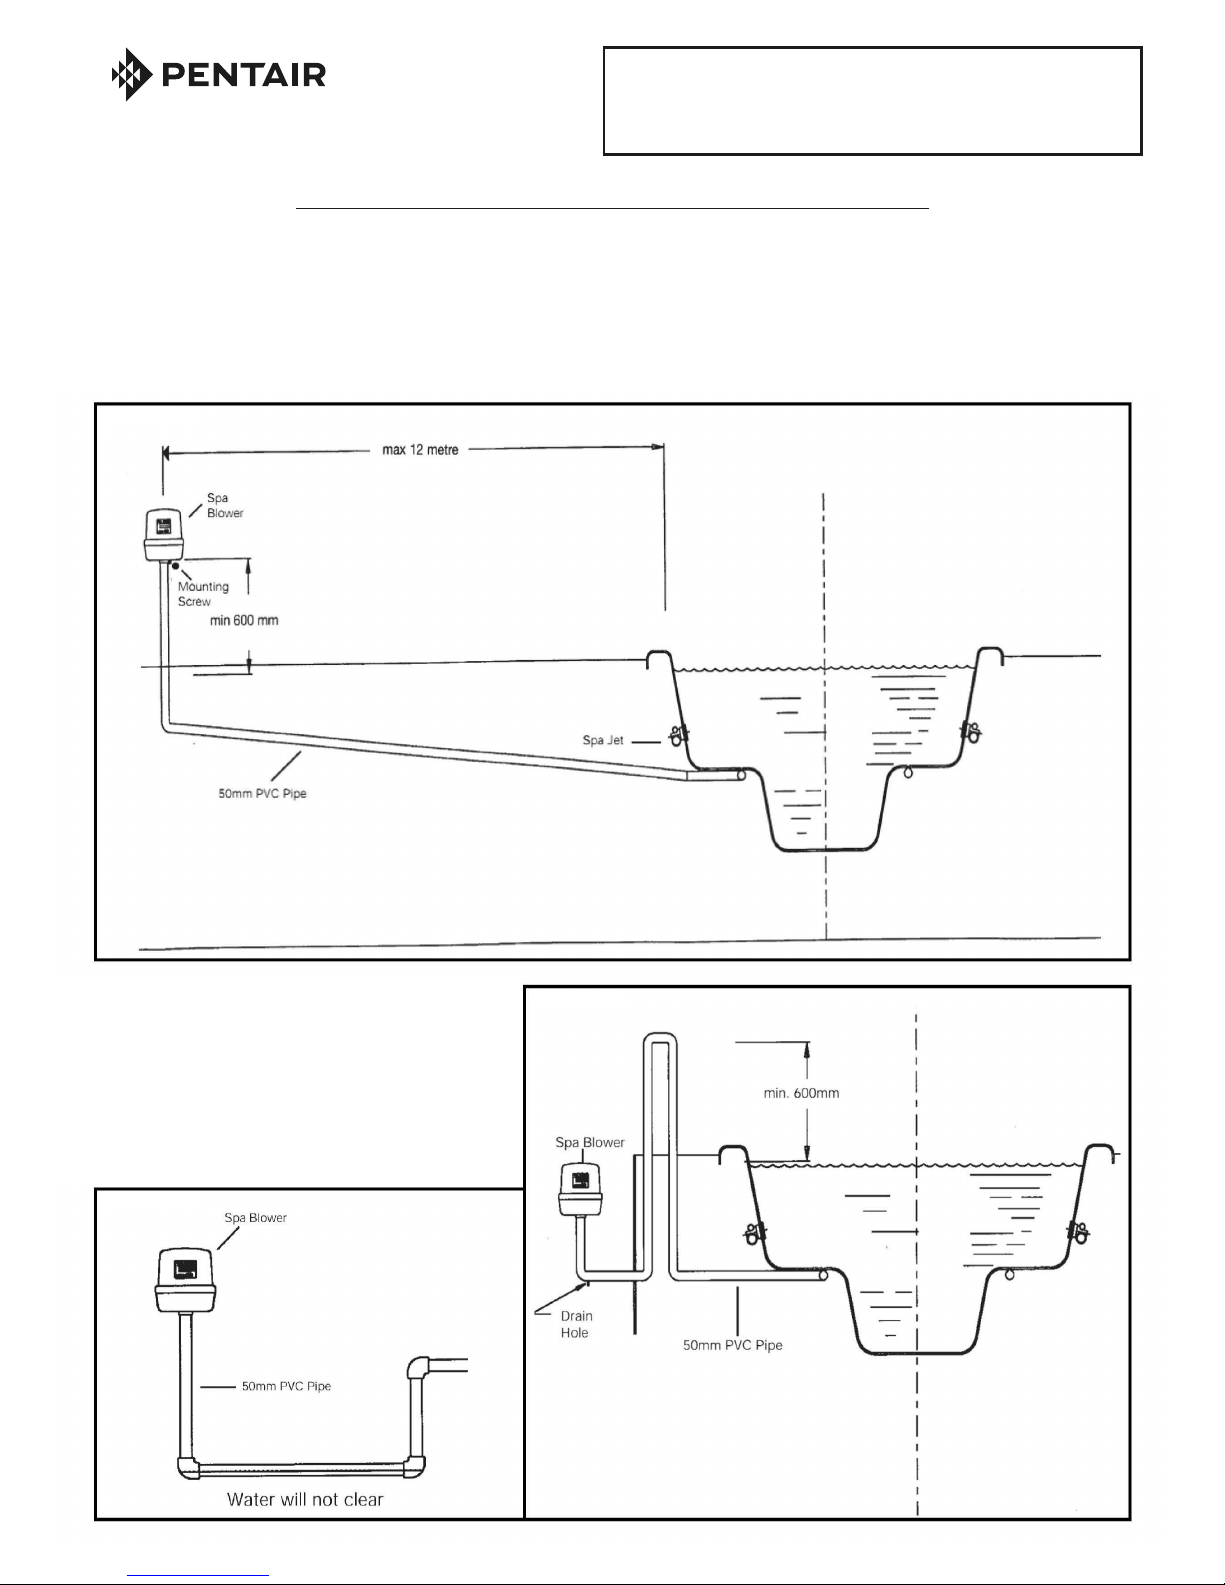
1. Run 50mm PVC pipe line from the spa pool manifold outlet to spa blower position
(maximum operating distance 12 metres), ensuring that the 50mm pipe line has a
minimum fall of 1:10 back to the spa, this will allow the pipe line to have minimum
water lying in the pipe (refer diagram 1).
2. Run your vertical 50mm pvc pipe a minimum of 600mm above
the spa pools maximum water level.
Allow 24 hours for glue vapours to dissipate from the pipe work before
mounting spa blower onto pipe (failure to do so may cause damage to the
spa blower, pipe work and void warranty). Place the blower on the pipe and
tighten the stain-less steel mounting screw located on the check-valve
(refer diagram 1).
DO NOT GLUE THE SPA BLOWER TO THE 50MM PIPE.
SPA BLOWER INSTALLATION AND OPERATION INSTRUCTIONS
3. If the spa blower is to be mounted below water level, extend the
air loop 600mm above the maximum water level and return back to
the spa blower, drill a bleed hole after loop to remove any
condensation (refer diagram 2). DO NOT create a water trap in the
blower supply pipe (refer diagram 3), as the water lying in the pipe
will create additional back pressure on the spa blower. Mount the
spa blower as instructed above (2).
Diagram 1
Diagram 3
Diagram 2
Page 2
These instructions act as a guide only and do not cover every contingency.
People not familiar with pool filtration and pumping equipment should seek
advice from an authorised Onga stockist.
Page 3

4. If the spa blower is to be used for additional spa jet venturi, connect the
supply line into the air supply line of the spa jet using a tee, then follow the
instructions of 1 & 2 and refer to (diagram 4)
5. Spa blower MUST be mounted in a vertical position only, with the
discharge downwards (refer diagram 1, 2, & 4).
6. If a air switch or three speed option is being fitted a roll of air tube is
supplied, enclose the air line in conduit for mechanical protection, place one
end of the tube onto the nipple of the air button fitted on the spa pool, place
the other end of the air line onto the spa blower, the air nipple is located on
the under side of the spa blower.
7. Place the spa blower 10 amp lead into a 240 volt 50Hz designated power
point.
8. Minimal Air Hole Specifications
36 x 6 mm Diameter Holes
18 x 8 mm Diameter Holes
(refer diagram 5)
IMPORTANT INSTALLER PLEASE NOTE
The diameter and quantity of air holes listed above are based on a spa pool
air manifold maximum water submergence depth of:
(1) 600mm (seat/recliner manifold)
(2) 800mm (footwell manifold)
If the spa depth/manifold dimensions vary from above please contact the
Pentair Water office in your state for advice and verification, failure to
comply may damage the equipment and void the product warranty.
OPERATION OF YOUR SPA BLOWER
1. Switch power on, your spa blower will start.
(a) If your spa blower has been plugged into another controller it may not
start until the air button or some other form of switching has been pressed.
(Check with your installer).
(b) Air Switch Blower Operation
Simply press the air button located on the spa and your spa blower will
start on high speed, press your button again and this will turn the spa
blower off.
WARNING This appliance is not intended for use by persons (including
children) with reduced physical, sensory or mental capabilities, or lack of
experience and knowledge, unless they have been given supervision or
instruction concerning the use of the appliance by a person responsible for
their safety.
Children should be supervised to ensure they do not play with the
appliance.
If the supply cord is damaged, it must be replaced by the manufacturer, its
service agent or similarly qualified persons in order to avoid a hazard.
No part of this appliance is to be located above the spa pool and must be
inaccessible to a person in the spa pool. All parts must be fixed so they cannot
fall into the spa pool.
The appliance should be supplied through a residual current device (RCD) having
a rated current not exceeding 30mA.
Page 3
Page 4

Spa Blower
1 Cover
1100508
2 Motor (1200 Watt)
707431
3 EMC Filter
707425
4 Micro Switch
N/A
5 Air Switch Holder
N/A
Air Sensor Assembly (Includes Items 4&5) 302470
6 Motor Housing N/A
7 Checkvalve (40mm-50mm) N/A
Motor Housing and Check -Valve Assembly
(Includes Items 6&7)
707435
8 Cowl 707497
Plug & Cord (Air-Switch Model) 707492
Plug & Cord (Non Air-Switch Model) 707494
TROUBLE SHOOTING GUIDE
SYMPTOM REMEDY
Spa blower will not start.
Check power point is switched on and sp a blower is plugged
in. Check Fuses.
Check that air line is connected from the air button to the spa
blower.
Check that the air line is not kinked. If kinks are visible,
remove them otherwise this will stop the pulse of air that
operates the micro switch inside the spa blower.
Check micro switch operation.
Push air button and a faint click should be heard at the spa
blower, if no click is heard check all connections if they are
all OK and spa blower still doesn't start, remove spa blower
and take it to the nearest Pentair Water service agent.
Spa blower is making a grinding noise when operating.
Bearings/brushes may need replacing.
Spa blower makes a noise when stopping. This is only the check-valve operating correctly.
Spa blower operates the n stops (cutting out on thermal
overload),
Could be caused by blockage or insufficient air holes, check
installation of the spa blower pipe work, ensure that it has
been installed to the specifications, if incorrect call installer.
If all plumbing is correct remove the spa blower and take it to
your nearest Pentair Water service agent.
Page 4
Page 5

IMPORTANT
Please attach your sales invoice/docket here as proof of purchase should
warranty service be required.
Please do not return Warranty Form to Pentair Australia please retain for your records.
Purchased From ...................................................................................................................
Purchase Date..................................... Serial No.............................. Model No........................
© Information contained here-in remains the property of Pentair Water Pty Ltd. Any reproduction,
display, publication, modif ication or distribution is strictly prohibited without the prior written
permission of Pentair Water Pty Ltd.
Disclaimer: Every endeavour has been made to publish the correct details in this data sheet.
No responsibility will be taken for errors, omissions or changes in product specif ications.
Pentair Water reserves the right to change specif ications
Head Office
Pentair AU/NZ: 1-21 Monash Drive,
Dandenong South, Vic 3175
Australia
National Customer Service: Phone: 1300 137 344
Fax: 1800 006 688
National Dealer Locator: Phone: 1800 664 266
Ema il: au.sales@pentair.com
We b: www.pentair.com.au
New Zealand
National Customer Service: Phone: 0800 654 112
Fax: 0800 806 642
National Dealer Locator: Phone: 0800 664 269
Ema il: nz.sales@pentair.com
Web: www.pentair.co.nz
International Australia/New Zealand
Phone: +61 3 9709 5800
Fax: +61 3 9709 5888
L300220 A0513
Rainbow Pool Products
PO Box 2388, Mansfield Qld 4122
Telephone STD 61-7-3849 5385
Facsimile STD 61-7-3849 5384
Email: info@rainbowpoolproducts.com.au
Web: www.rainbowpoolproducts.com.au
 Loading...