

AIR SOURCE UNIT
INSTALLATION MANUAL
POOL/SPA HEATERS, CHILLERS,
REVERSE CYCLE & COMMERCIAL MODELS
!
WARNING
FOR YOUR SAFETY - READ BEFORE OPERATING
Warning: If you do not follow these instructions exactly, a fire or explosion may result, causing
property damage, personal injury or loss of life.
!
WARNING
Improper installation, adjustment, alteration, service or maintenance may cause property damage, personal injury or
death. Installation and service must be performed by a qualified technician or service agency.
Models:
MiniMax Plus HP 400 (XLS400)
MiniMax Plus HP 600 (XLS600)
MiniMax Plus HP 800 (XLS800)
MiniMax Plus HP 1000 (XLS1000)
MiniMax Plus HP 230 (CP12)
FOR QUALIFIED TECHNICIANS ONLY
Part # 471950 Revision #E
© HydroTemp Manufacturing Co., Inc.
Note: Specifications may change without notice.
!
WARNING
FOR PROFESSIONAL USE ONLY
Trained Technicians Only !
!
WARNING
The following installation manual is for FACTORY AUTHORIZED- licensed professional trade use only !
The owner/user should review the following section for reference and knowledge needed to verify proper
installation for warranty validation. The owner/user should not attempt to perform any internal adjustments, electrical, plumbing or any installation procedures in this manual. The owner/user should never
open the access panel for any reason unless accompanied by a factory warranty representative.
Owners/users/installers should contact the factory service department for advice at
239-768-1555
!
WARNING
Always review the wiring schematic located inside the heater,
since it may have changed after this manual was printed !
!
WARNING
THE MISUSE OF THIS PRODUCT CAN RESULT IN SEVERE INJURY, DEATH,
OR PROPERTY DAMAGE. BE ADVISED OF THE FOLLOWING CONDITIONS THAT MAY EXIST:
1. ELECTROCUTION AND/OR FIRE DUE TO IMPROPER WIRING.
2. HAND AND HAIR ENTRAPMENT MAY OCCUR NEAR THE FAN LO CATED ON THE TOP OF THIS UNIT.
3. LOSS OF POOL WATER AND/OR FLOODING AND/OR PROPERTY DAM AGE.
4. DAMAGE AND/OR MISUSE TO THE PRODUCT RESULTING IN FAILURE
OR EXCESSIVE WEAR.
5. ALL ELECTRICAL WORK BY LICENSED PROFESSIONAL ONLY.
6. BACK OR BODY INJURY DUE TO MISHANDLING.
2

INSTALLATION MANUAL - TABLE OF CONTENTS
1. HEAT PUMP DESIGN FEATURES ..............................................................................................
.
2. HEATER PLACEMENT & REQUIRED CLEARANCES ..........................................................
Clearances for Airflow
Condensate Drainage
Heater Elevation
Sprinkler Location
3. PLUMBING & WATER FLOW ......................................................................................................
Placement and Chemical Protection
Chlorinator Location and Chemical Use
Standard Plumbing
Pool / Spa Combination Plumbing
Separate Pool / Spa Plumbing
Plumbing with Solar Panels
Commercial Applications
Water Flow Switch Options
4. START UP PRECAUTIONS ..........................................................................................................
Compressor Warm Up, Starting & Time Delay
Setting Water Pump Timer
Confirming Water Flow at Bypass Manifold
Operational Sequence Description
Water Pressure Switch Check
Freeze Protection Requirements
4 - 5
6 - 7
8 - 19
20 - 23
5. ELECTRICAL WIRING AND SETUP ..........................................................................................
Bonding to Pool Shell
Unit Specifications
Electrical Connections-Access Description
Electronic Thermostat & Diagnosis
Wiring Diagrams
Wiring Diagrams for Compool
6. TROUBLE SHOOTING GUIDE ...................................................................................................
7. WARRANTY AND DEALER SERVICE.......................................................................................
8. GLOSSARY OF TERMS ..............................................................................................................
Manufactured for Pentair Pool Products by HydroTemp Mfg. Co., Inc.
24 - 34
35 - 36
37
38-41
3
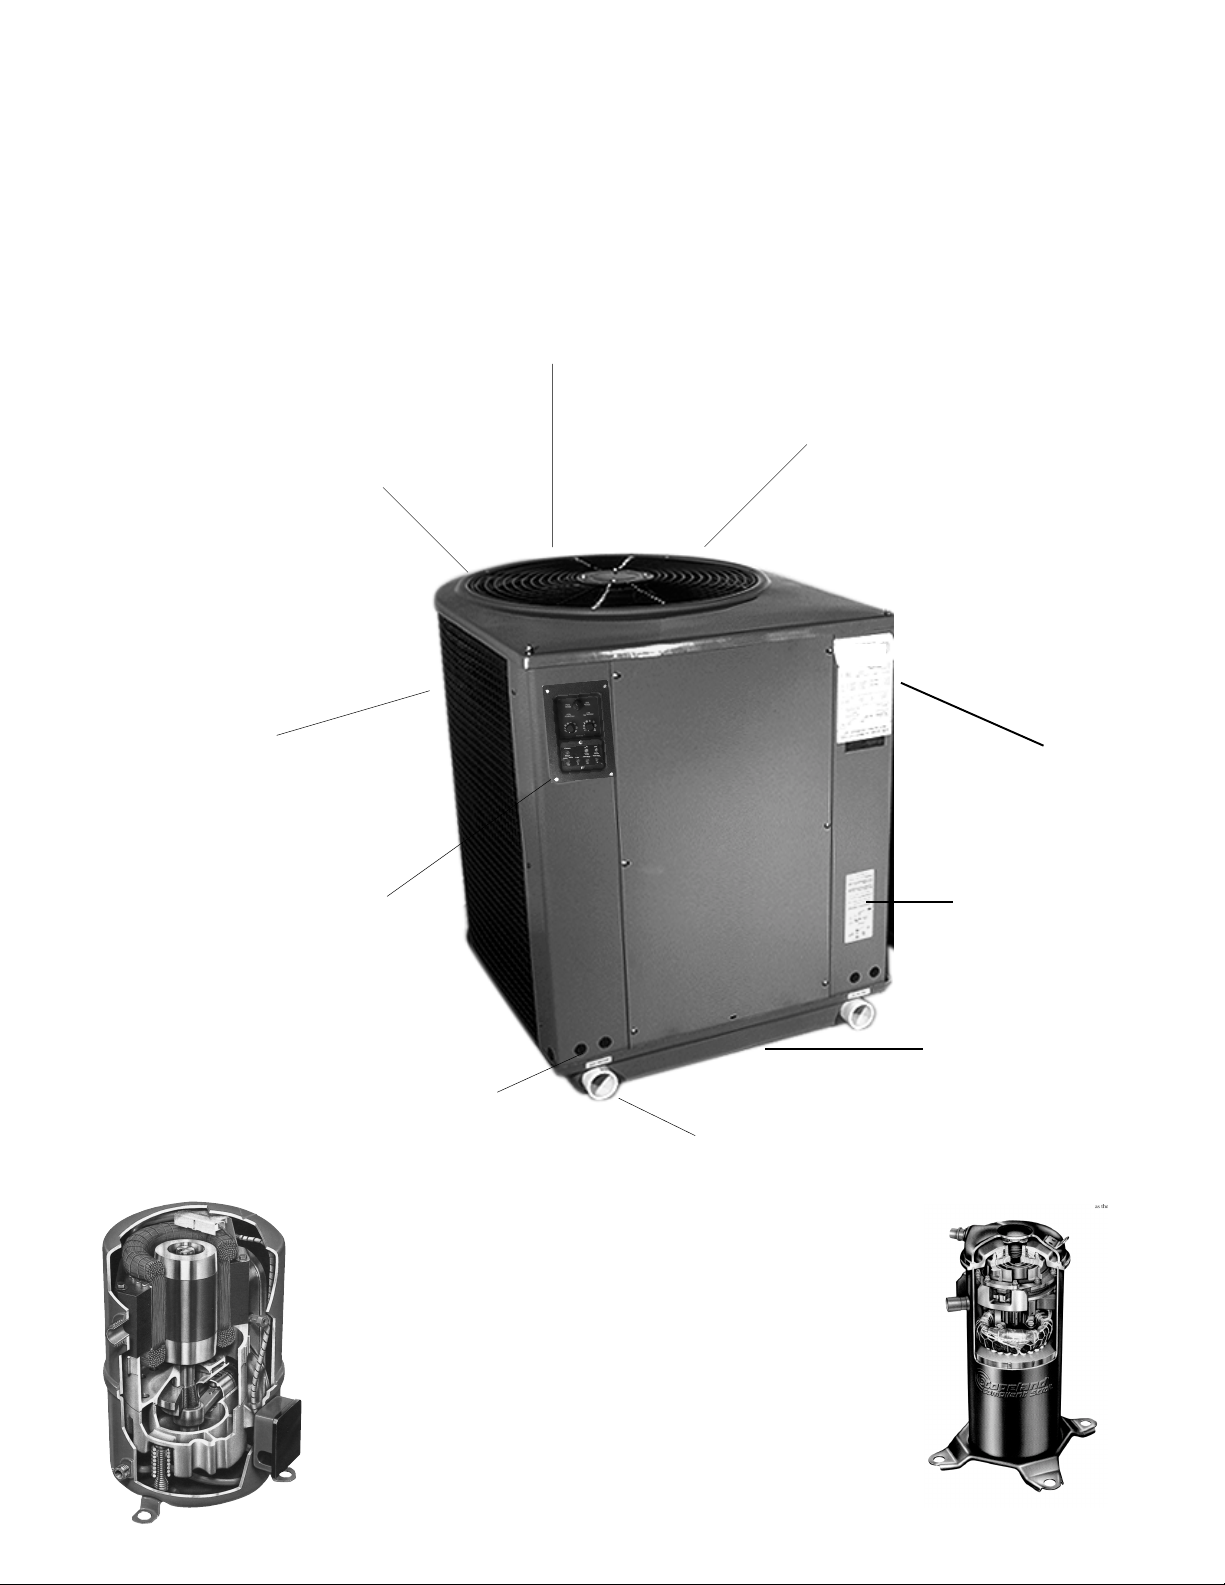
SPECIAL FEATURES
Separate Air Handling / Electric Compartment
An internal electrical compartment substantially reduces
future service from moisture and salt laden air flow.
Sturdy Rust Proof
Fiberglass Top
Non Fading
Large Aluminum & Copper
Lanced Fin
Evaporator Air Coil with
Vinyl Coil Guard
Automatic Diagnostics With
L.E.D. Display & Dual Pool/Spa
Electronic Thermostat
Optional Pool/Spa Wiring
Access Holes
Quiet
High Volume
Fan With
Vinyl Coated
Guard
Easy Connect
2 Inch Plumbing With
"Internal Automatic Bypass"
Up To 90 GPM
Product
Name Plate
Chemical
Warning Label
Sturdy Elevated
Fiberglass
Rust Proof
Bottom Provides
Proper Drainage
TRANE®
COMPRESSOR
with 410-A, the safe
and clean refrigerant.
Super Quiet & Highly Efficient Compressor Design
4
COMPRESSOR
And
SCROLL
W ATER SWITCH
CONTROL
POOL
SPA
T-STAT
LOW PRESS. HIGH PRESS.
MODE
MODE
READY
OK
ON
OK OK
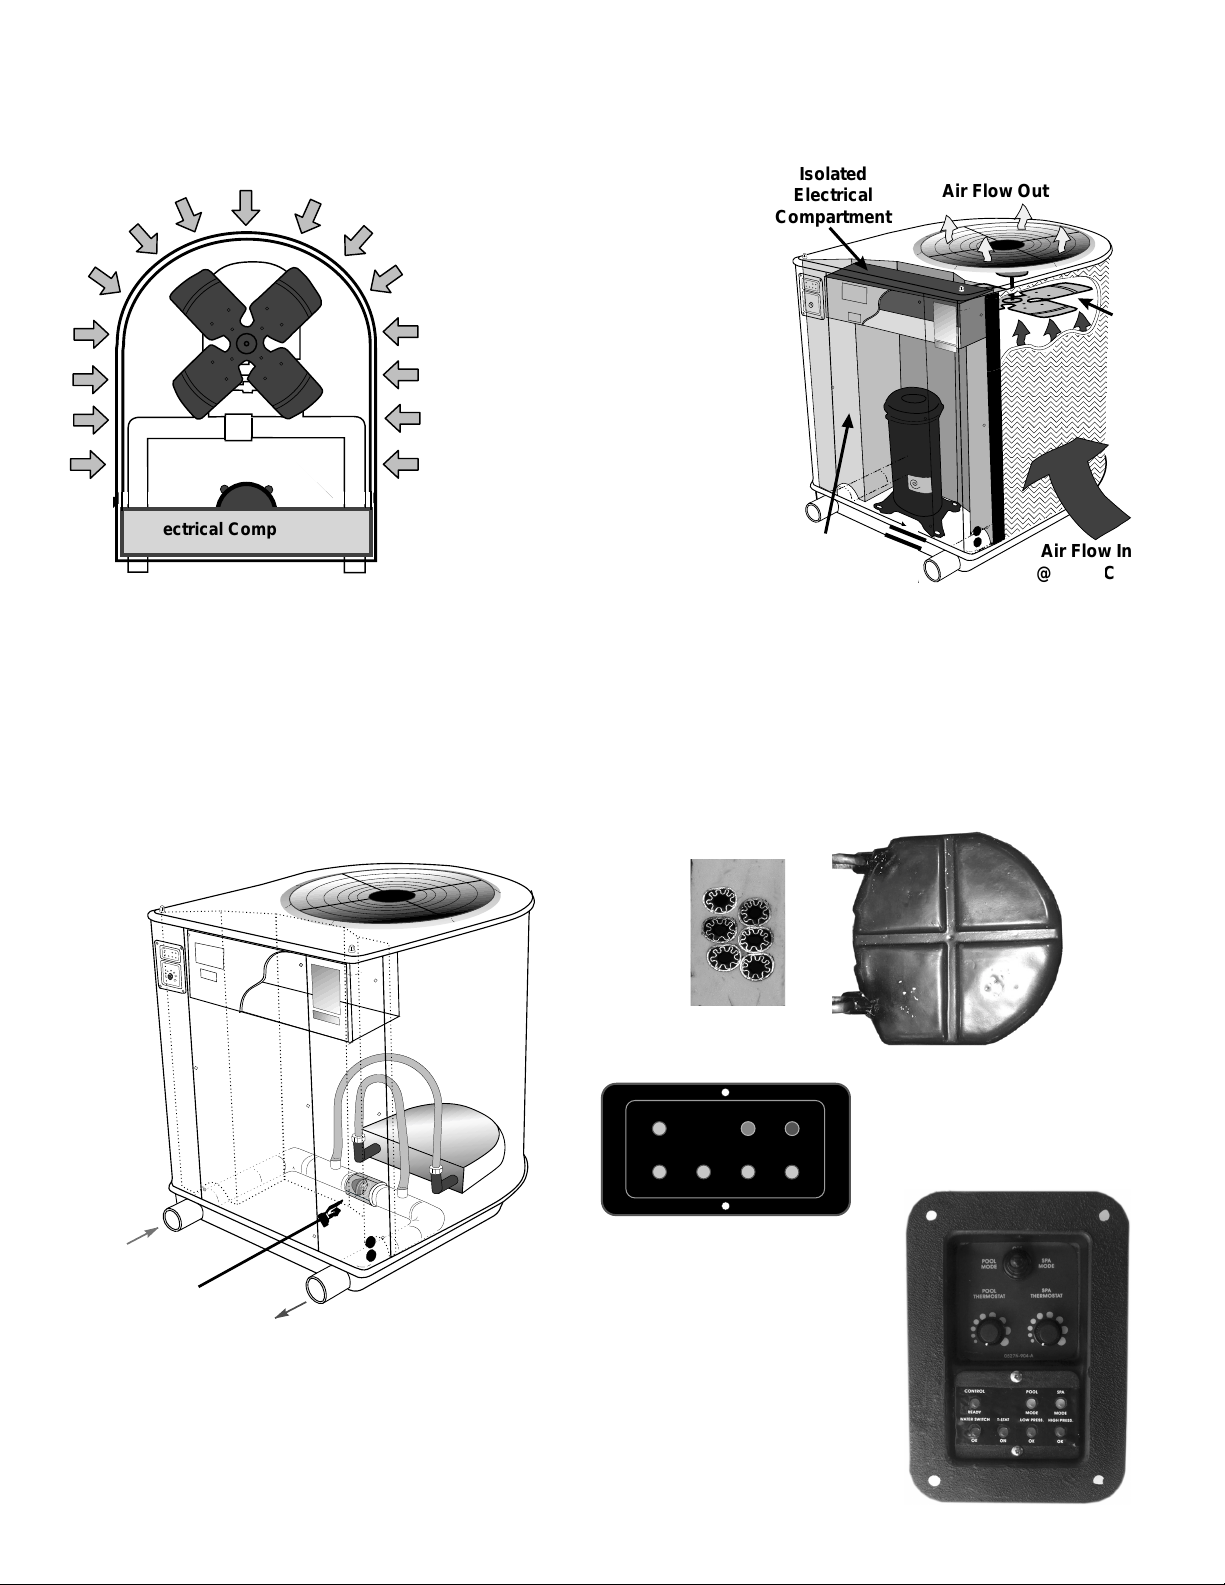
Air Flow Out
Air Flow In
@ 4200 CFM
Bulkhead
Air/Electrical/
Mechanical
Separation
Wall
Isolated
Electrical
Compartment
Compressor
Fan
T
H
E
R
M
O
S
T
A
T
S
P
A
M
O
D
E
M
O
D
E
R
E
A
D
Y
P
O
O
L
C
O
N
T
R
O
L
W
A
T
E
R
S
W
T
S
T
A
T
L
O
W
P
R
E
S
S
.
H
I
G
H
P
R
E
S
.
O
K
O
K
O
K
O
K
ead
ation
ll
@
n
4
I
2
w
o
l
F
r
i
A
l
i
o
C
r
i
A
r
o
t
a
5
0
Evapor
Compressor
Electrical Compartment
Top View
DESIGN ADVANTAGES
C
F
M
Fan
The electrical panel has an
isolated compartment, located
within the mechanical compartment to prevent corrosion.
The heat from the compressor
located just below the electrical compartment helps eliminate moisture as well. This
exclusive design will substantially extend the life cycle of
the heater. The fiberglass cabinets is corrosion proof and is
much stronger than plastic
cabinets.
4250
2" PVC
Water IN
20-90 GPM
Internal
Automatic
Bypass
Internal Automatic Bypass
Free Flow 2" Plumbing
Automatically adjusts the water flow.
Lowest water flow restriction available.
C
O
N
T
R
O
L
P
O
O
L
S
P
R
A
E
A
D
Y
W
A
T
E
M
R
O
S
D
W
E
M
T
O
S
T
D
A
E
T
L
O
W
P
R
E
S
S
.
H
I
G
H
O
P
K
R
E
S
.
O
K
O
K
O
K
T
H
E
R
M
O
S
T
A
T
Elevated
Fiberglass
2" PVC
Water OUT
Bottom Pan
for Proper
Condensation
Drainage.
Heat Exchanger
Special Cupronickel Alloy
Encased In A Block of Foam
to Prevent Heat Loss & Corrosion
T-STAT
L.E.D. Diagnostic Lights
Dual Thermostat
See specification sheet to determine
electrical breaker requirement.
5
INSTALLATION GUIDELINES
IMPORTANT NOTICE: The following are the installation requirements that must be followed in order to meet
the general factory specifications. The installer may engineer other types of installation techniques that are suited
for each particular installation, regarding placement and plumbing, but should still follow this basic format. The
factory warranty will not warrant other field installed options unless factory parts are used according to this
booklet. This information is intended for a licensed professional contractor only.
!
WARNING
The pool owner or operator should not attempt to perform or change any aspect of
the installation, because serious bodily injury and or electrocution may result.
HEATER PLACEMENT & CLEARANCE
CLEARANCE & AIR FLOW
Prepare a level area near the pool/spa filtering system.
Remove any plants or equipment that do not meet the
minimum clearance requirements for the side air inlets
or the top air discharge, see diagram on next page.
a
n
r
c
a
e
l
C
.
n
i
M
"
9
l
i
o
C
r
i
A
r
o
t
a
Evapor
Bulkhead
Compressor
12" Min. Clearance On Sides
Electrical Compartment
24" to 36" Service Access Front
Make sure the air flow is not restricted in any way. Do
not install the unit in an area where the cooler discharge
air may accumulate and be drawn back into the unit.
Provide ventilation through containment walls or fencing for the air intake if needed.
CAUTION
!
Do not install this unit indoors or
in filtering system equipment rooms.
e
A
t
E
n
d
Fan
EQUIPMENT SLAB & PITCH
To support the heater, place
a concrete or fabricated slab
C
O
N
T
R
O
L
P
O
O
near the filtering system.
L
S
P
R
A
E
A
D
Y
W
A
T
E
R
S
W
T
M
O
S
T
D
A
E
T
L
O
W
P
R
E
S
S
.
H
I
G
H
P
R
E
S
.
O
K
O
K
T
H
E
R
M
O
S
T
A
T
Whenever possible, the slab
should be placed at the same
level or some what above
the filtering system slab.
Make sure the slab does not
hold water and see that it is
1/4"
pitched no more than 1/4 inch away from the compressor end (front) of the heater. Pitch slab from
front to back 1/4" maximum and level from side
to side.
CONDENSATION DRAINAGE
The heat pump will precipitate water that drains from
the unit at a steady rate while it is running. This condensation is from the humidity in the outside air. The
more humidity, the more condensation it will produce. There are several drain ports in the bottom of
12" Min. Clearance On Sides
the unit, make sure they do not become clogged with
debris.
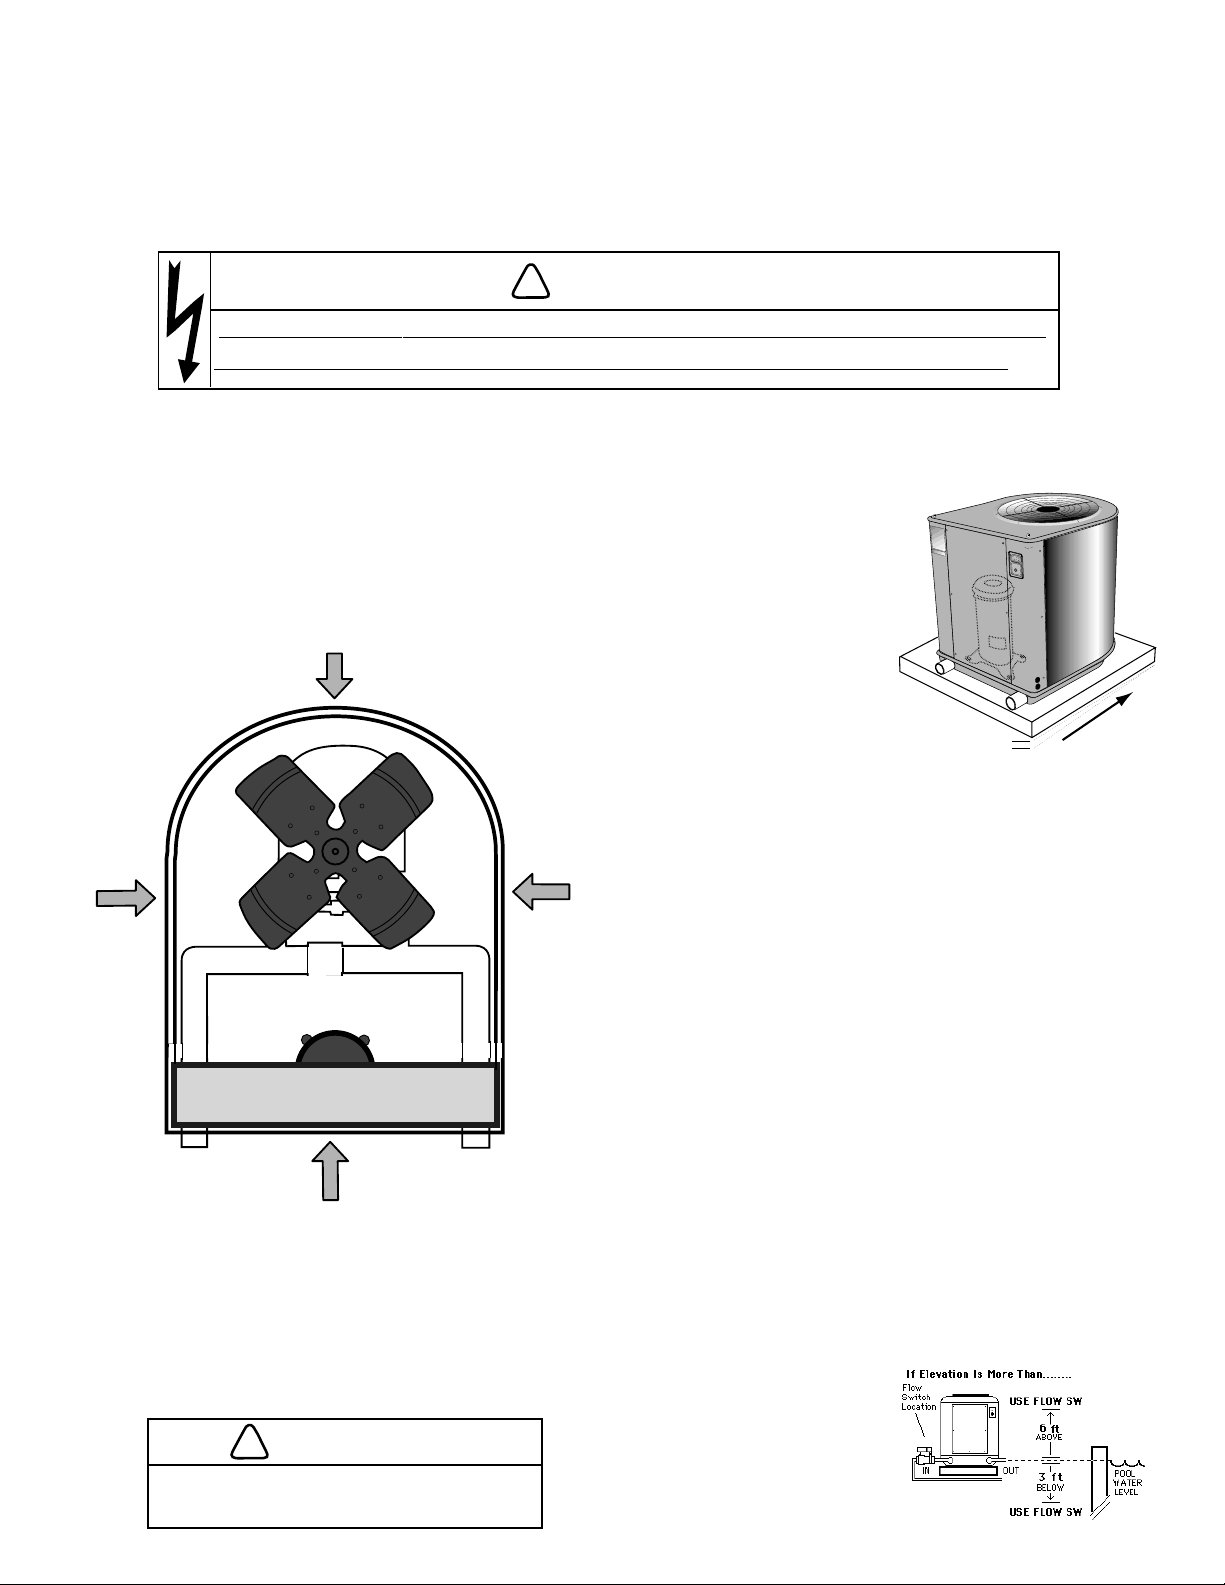
HEATER ELEVATION
If the heater is to be installed more than 6 feet above,
or more that 3 feet below the pool water level, you
may need to install an external flow switch as shown
in the plumbing section of this manual. If a solar
system or special equipment is in use, you may require either a special water pressure switch or the
use of an external flow
switch as shown in "Water
Flow Switch Section",
6
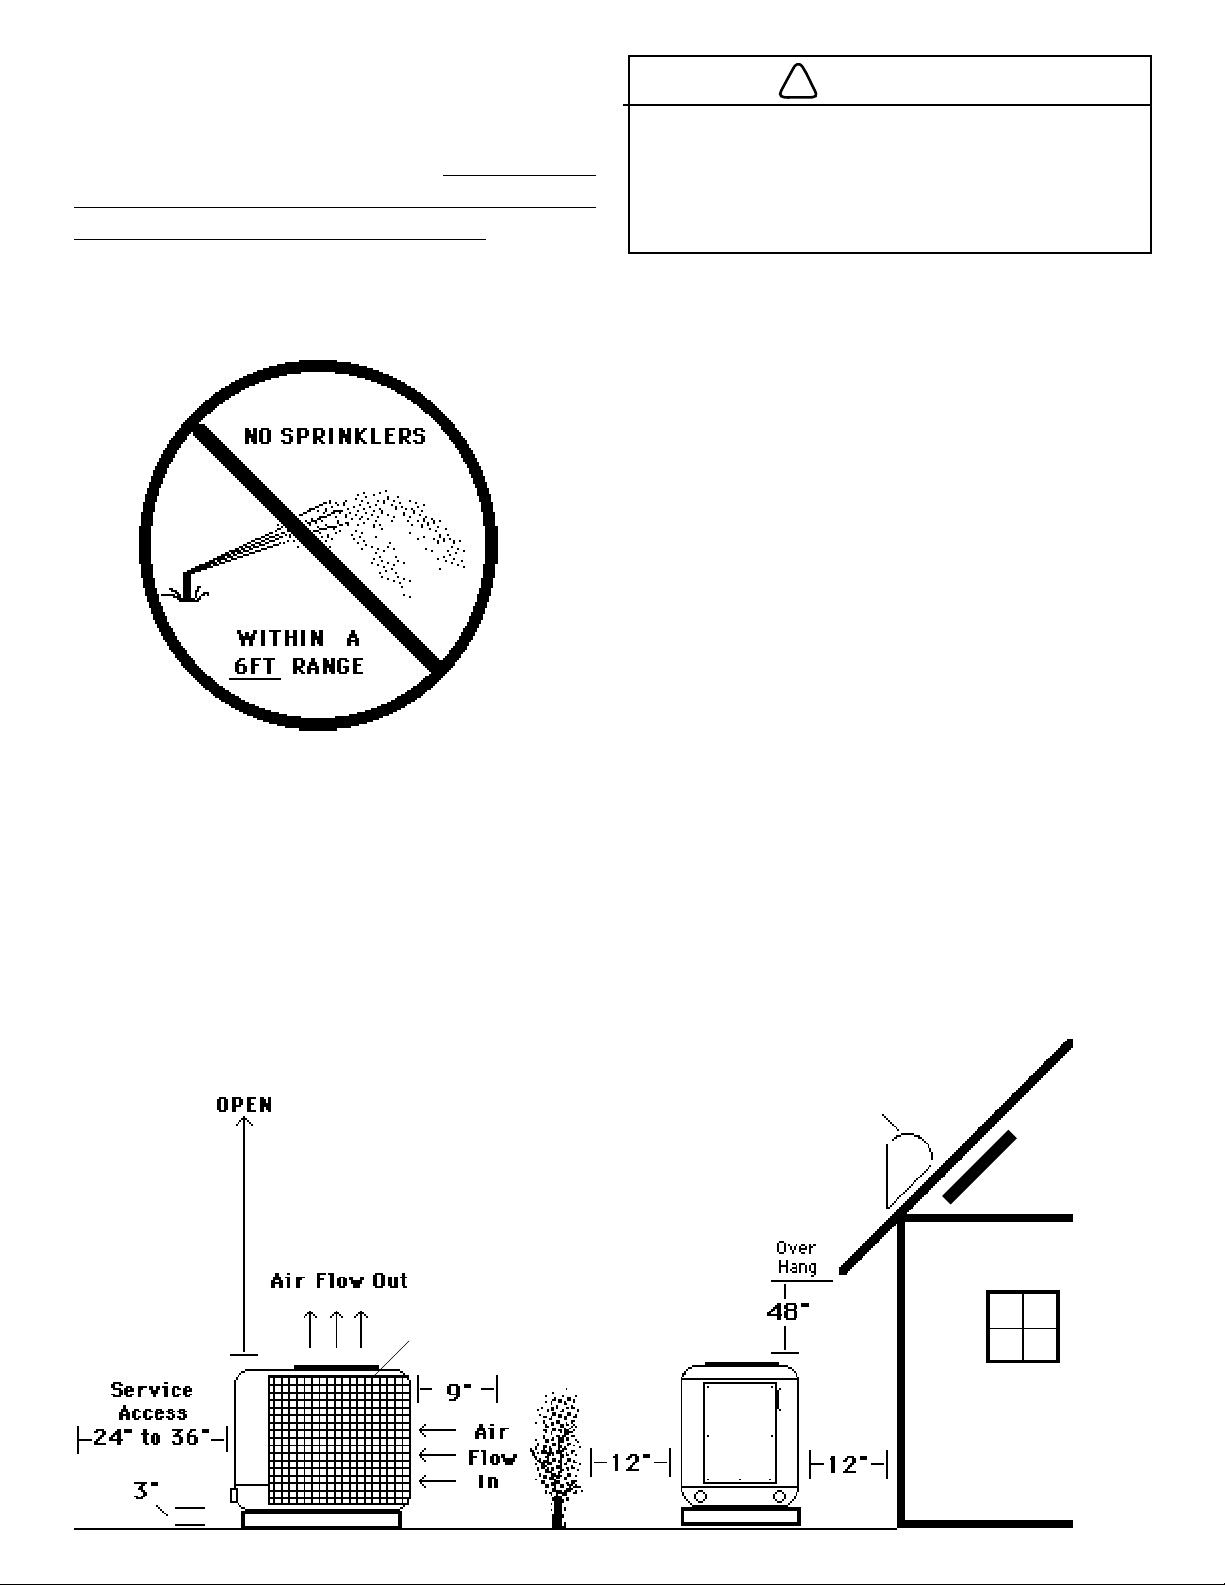
SPRINKLER LOCATION
Relocate or remove any sprinkler heads that have the
chance of spraying on or into the unit.
are absolutely no sprinkler heads near the heater that
will in any way spray on or into the heater. Sprinkler
damage is not covered under the warranty agreement. Make sure they are a sufficient distance away so
normal wind currents will not carry the mist to the heater.
The heater is designed to handle the wettest weather
conditions that are typical of rain and humidity, etc.
However, sprinkler heads force high pressure water into
the unit from the side at an odd angle. Most sprinkler
systems are connected to a well system. Most well water
is high in minerals, sulphur and other aggressive contaminates. These contaminates will leave a build up on
the evaporator coils and electronics causing corrosion
and hamper the efficiency. If you are located within 15
miles of the coast, salt may be in the well water also.
Make sure there
!
CAUTION
Chemicals should NOT be stored near the heater. The
fan may draw corrosive chemical vapor through the unit
causing damage. Do NOT store anything on top, underneath or around the heater. You will need access to the
disconnect breakers in the event of an emergency.
CLEANING
To clean the heater you should take a sponge and mild
soapy water and wipe the surfaces clean. Do not use a
pressurized garden hose to clean the heater. Never force
water into the unit from any direction. You may use a
garden hose at low pressure with no nozzle attachment
to rinse the air coils. Pour a mild liquid soap into the
water stream as you rinse the air coils. Clean the evaporator air coils at least 4 times a year. If you live near the
sea coast, you will need to clean at least 6 times a year
or more to remove salt and sand. Clogged evaporator
coils will reduce the efficiency of the unit and cause
corrosion. A professional should clean the coils periodically, every year or two.
ROOF CLEARANCE & RUN OFF
Be aware of roof slope and overhang above the heater.
Sharp sloping roofs without gutters will allow massive
amounts of rain water, mixed with debris from the roof
to be forced through the unit. Roof valleys that collect
run of f from two slopes are especially important to avoid.
If space is limited, determine if a gutter or down spout
is needed to protect the heater. Low roof overhangs may
obstruct the air flow out of the unit and require 48 inches
of clearance, See diagram below.
No water directly off
roof into heater
4 Feet
Evaporator Air Coils
7
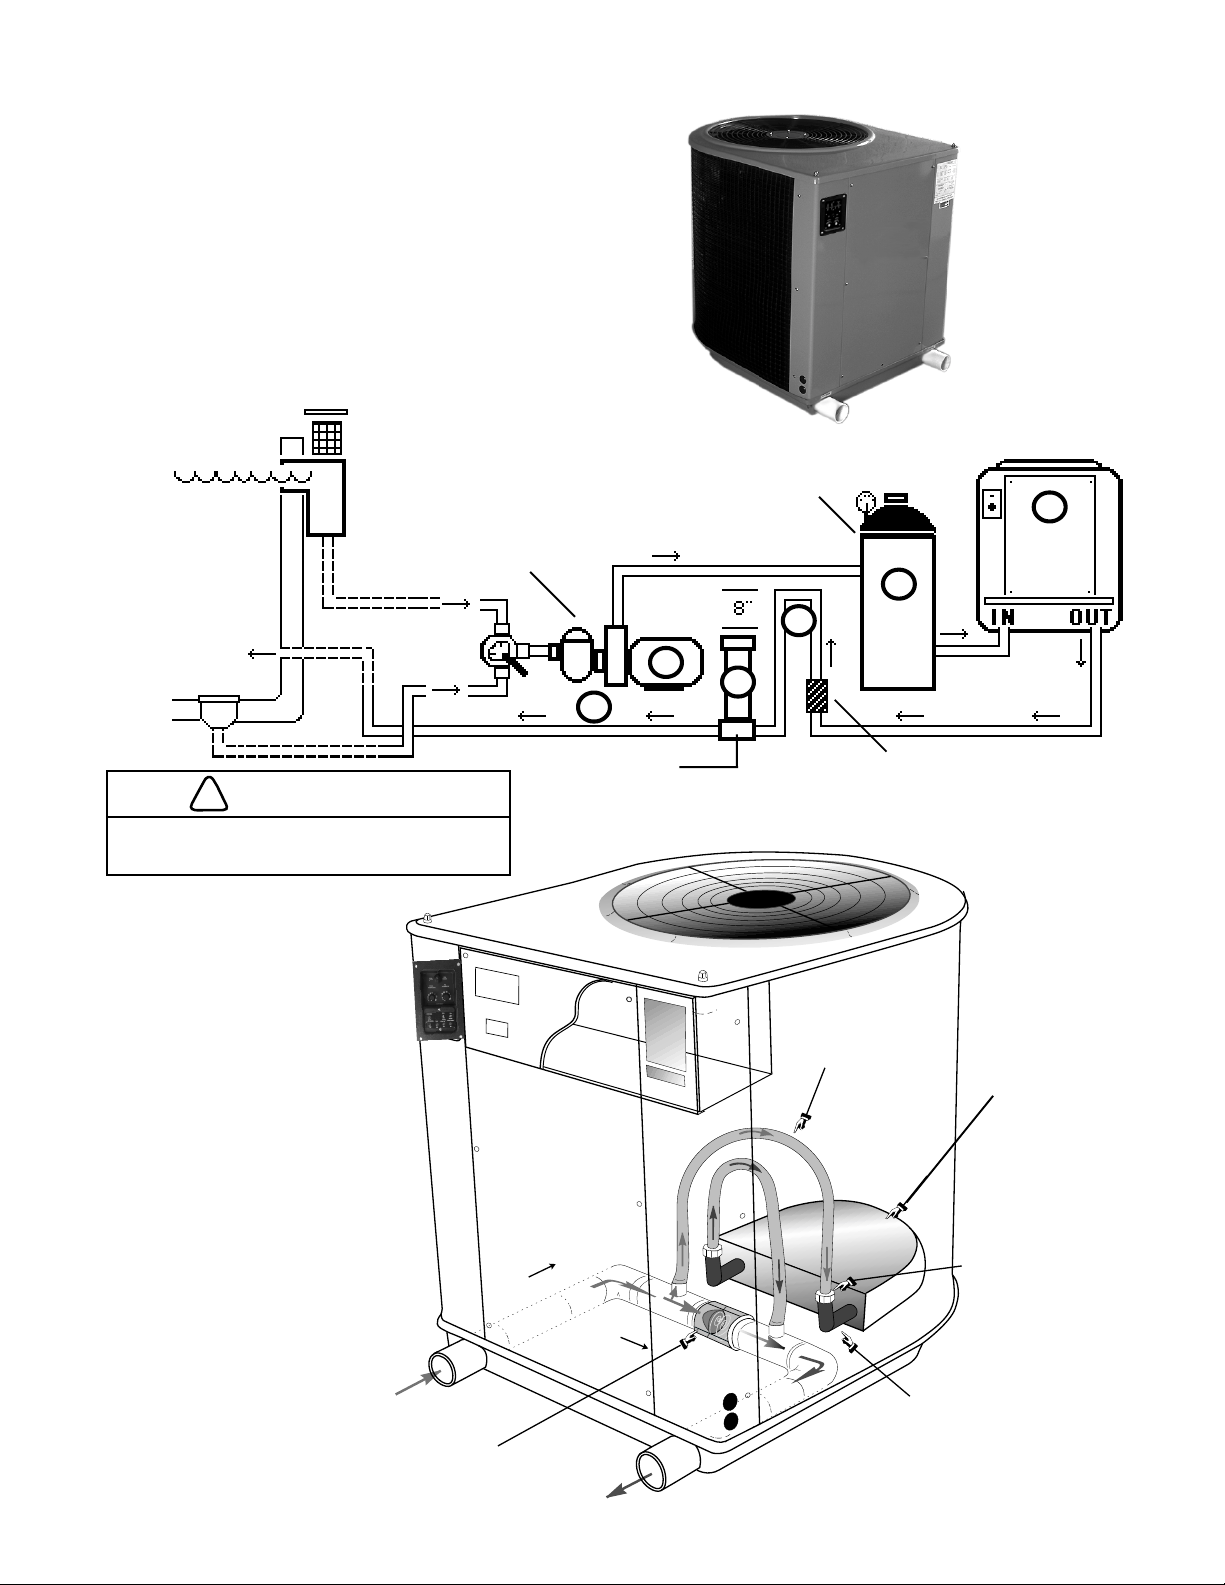
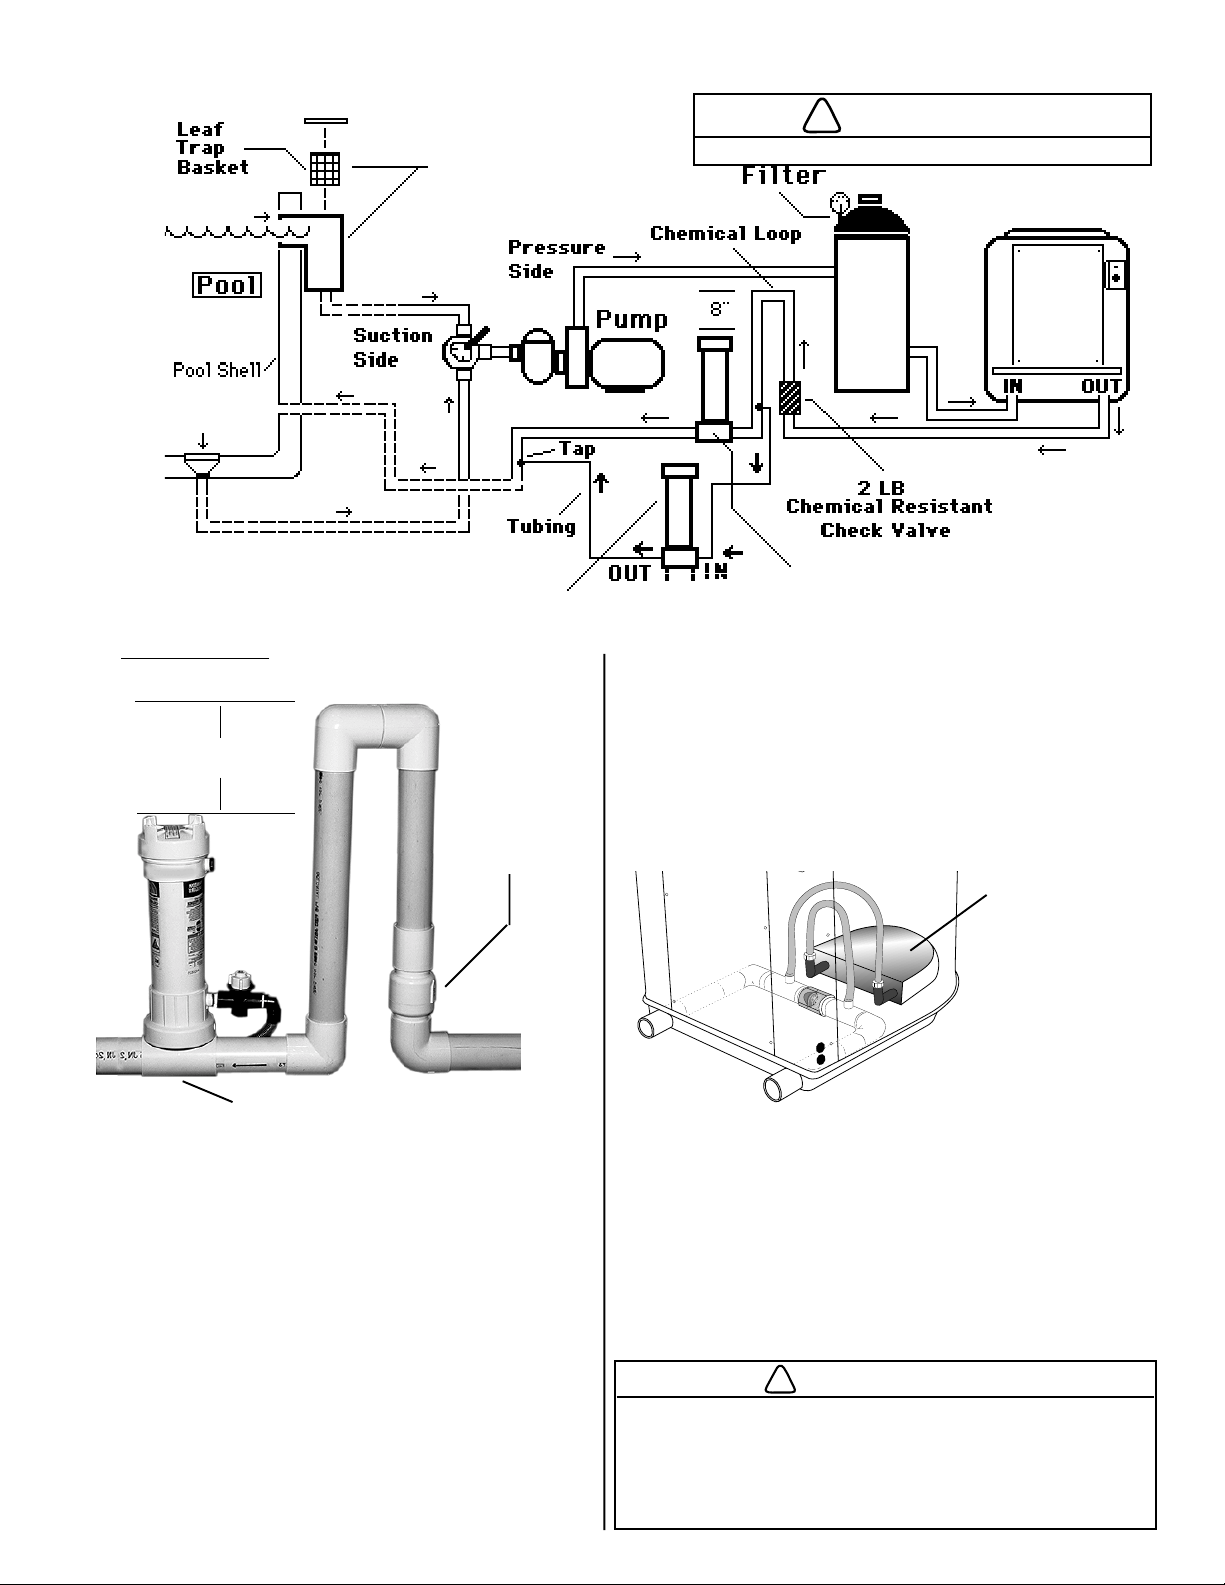
PLUMBING & WATER FLOW
PLUMBING CONNECTIONS
Filtered Water “IN” on the LEFT front.
Heated Water "OUT" on the RIGHT front.
The plumbing inlets are "slip" p.v.c. pipe that will accept
a 2 inch p.v.c. glue fitting. The pipe is left plain so you
can adapt to your needs. Use p.v.c. cleaner to prime the
fitting and pipe. Use a quality medium body p.v.c. glue.
FOR PUMPS UP TO 2 H.P. OR 90 G.P.M. MAX.
SEE NEXT PAGE FOR LARGER WATER PUMPS.
1. PUMP
2. FILTER
3. HEATER
4. LOOP & CHECK
5. CHLORINATOR
6. RETURN TO POOL
Water
Pump
WATER OUT
WATER IN
Heater
Filter
3
2
4
!
WARNING
See mandatory chlorinator placement
and install of the loop & check valve.
INTERNAL
AUTOMATIC BYPASS
The heat pump in equipped with
a internal "Automatic Bypass"
valve. A variable rate spring
valve is used to regulate the water flow through the heat exchanger. Steady flow will be delivered over a wide range of flow
rates. This automatic valve can
handle a maximum flow rate of
90 gallons per minute.
The automatic valve will compensate for flow loss due to normal filter debris accumulation or
changes if flow due to valving
and other conditions.
IN
1
5
6
Chlorinator or
Chemical Feeder
C
O
N
T
R
O
L
P
O
O
L
S
P
R
A
E
A
D
Y
W
A
T
E
M
R
O
S
D
W
E
M
T
-
O
S
T
D
A
E
T
L
O
W
P
R
E
S
S
.
H
I
G
H
O
P
K
R
E
S
.
O
K
O
K
O
K
THERMOSTAT
Water Inlets
"
d
l
o
C
m
p
e
"
T
R
˚
70 GPM "Cold"
50 GPM
Bypassed
0
2
M
P
G
n
I
C
o
t
l
i
o
u
O
Hot & Cold
Mix Here
i
5
s
1
e
-
˚
0
1
t
"
H
o
t
"
Chlorinator Loop & 2 lb. Chem.
Resistant Check Valve
Free Flow
Flexible
Marine Grade
Cupronickel
Heat Exchanger
Encased in
Closed Cell Foam
Special
Compression Fitting
See chlorinator
placement guidelines.
Automatic Bypass Valve
Variable Rate Self Adjusting
up to 90 G.P.M.
OUT
8
HIGH RATE WATER PUMPS
EXCESSIVE FLOW BYPASS MANIFOLD
FOR LARGE 2 H.P. PUMPS OR OVER 90 G.P.M.
If the pool circulation pump is over 2 HP OR if the total
flow exceeds 90 GPM you will have to add the "excessive
flow valve" as shown here. Do not install a bypass valve
that will completely shut off flow to the heater, see "Shutdown Procedures".
Some larger water pumps may be restricted if the pipe size is
not adequate therefore reducing its overall flow rate. When
determining if you need an excessive bypass valve, one has to
consider the hydraulic restriction of the filter, valving, amount
of 90˚ fittings and the distance of pipe to the pool in the existing filtering system. If you have a 2 HP water pump that does
not exceed 90 G.P.M. considering the above, you may not need
the excessive bypass. Excessive water flow can damage the
heat exchanger. SPECIAL NOTE: See chlorinator placement instructions (Pg. 10).
IN
2" p.v.c. "T"
OUT
Bypass Pipe Size:
1.5" or 2" pipe @ 2 H.P.
2" pipe @ 3 +.H.P
2 H.P Pumps
Close Bypass 50%
All others must be set by flow meter.
See Commercial Plumbing Diagram
Close Bypass 25%
Ball Valve
@ 45 Deg.
3 H.P. Pumps
2" p.v.c. "T"
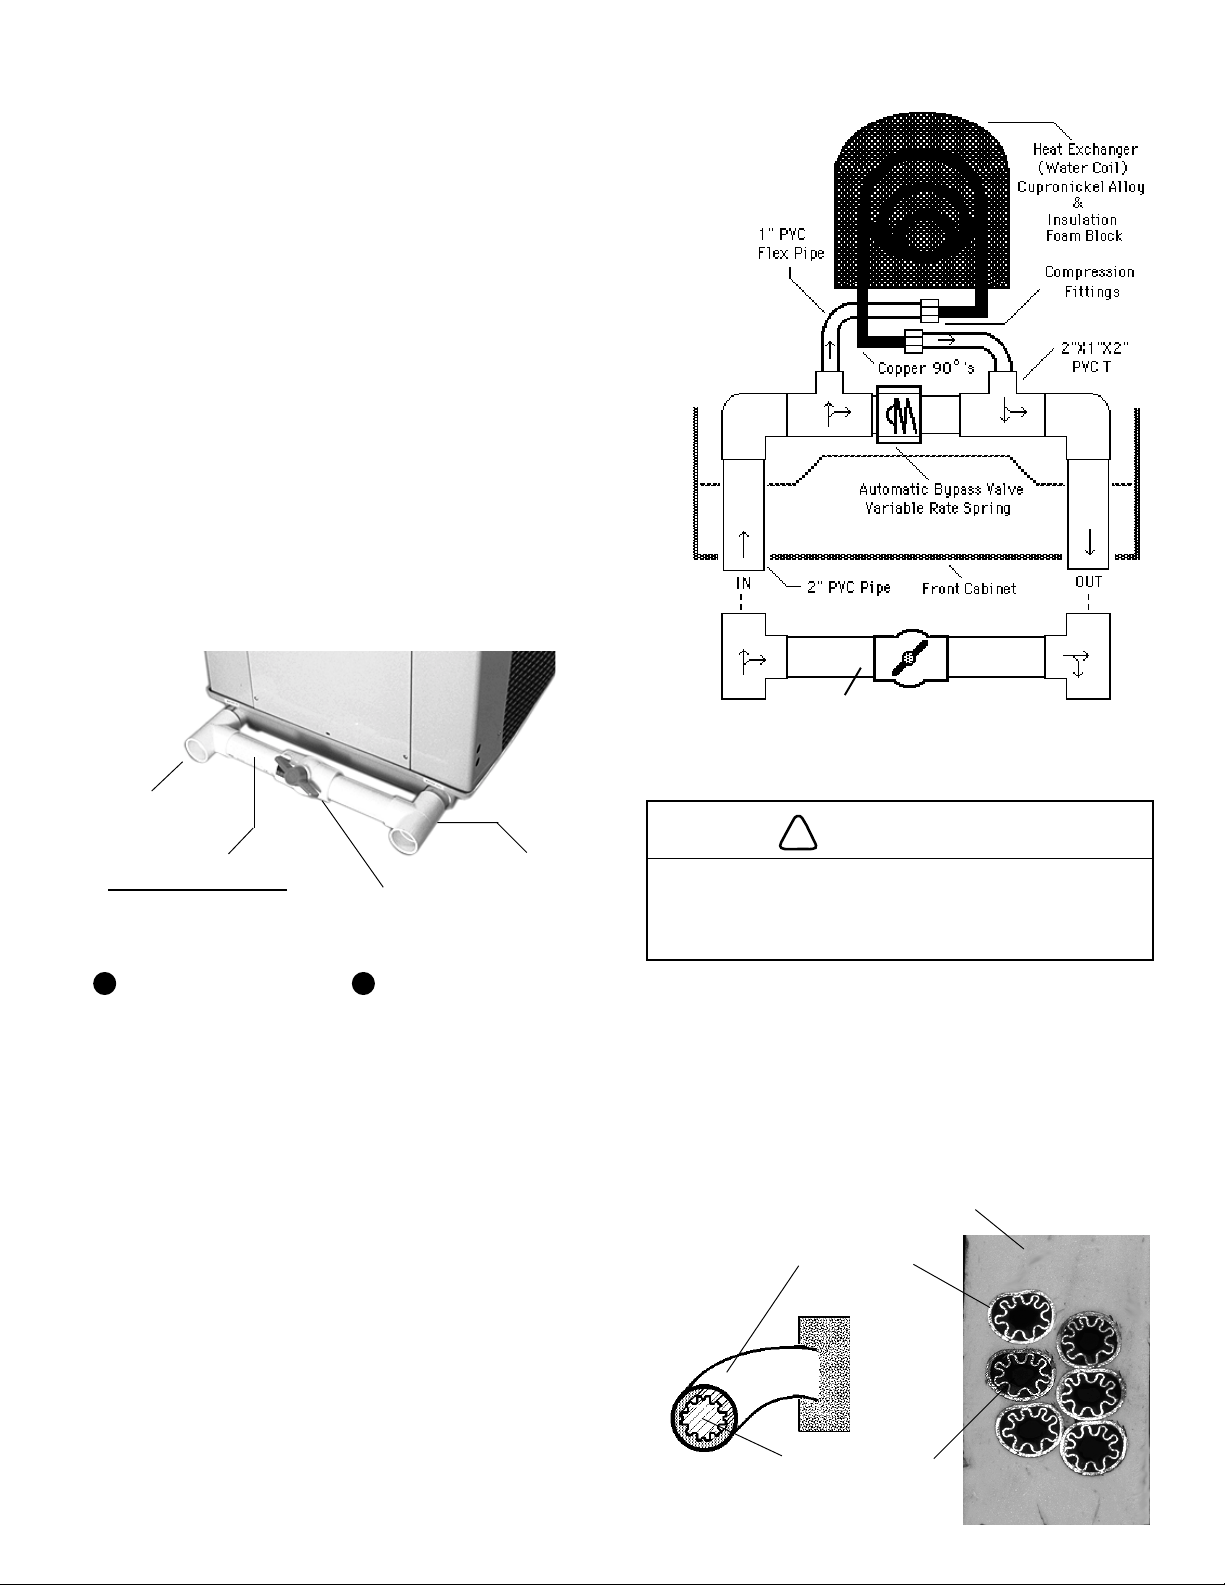
ADVANCED HEAT EXCHANGER DESIGN
This diagram is a cross section of the heat exchanger.
The seamless tube within another tube design transfers heat very efficiently.
The inner water tube is made of thicker resilient cupronickel metal alloy to help resist corrosive pool
water. The outer heavy gauge Freon™ tube is dipped
in a special weather proofing material.
"Excessive Flow Valve Manifold"
Do not valve in a manner that will totally
isolate heater from water flow.
CAUTION
!
BE SURE THE BYPASS VALVE IS
POSITIONED TO ALLOW REMOVAL OF
THE FRONT ACCESS PANEL!
Position the valve so that the access panel can be
easily removed, always check before final gluing. Angle the valve out 45˚ to provide adequate
clearance. You may use a Compool 2-way valve
or other type if desired. "Do not" use a brass
gate valve or a 3-way valve for bypass !
Heat Exchanger Cross Section
Closed Cell Insulation Foam
Hot
Refrigerant
Passage
Then, to insulate from heat loss and help prevent corrosion further, the heat exchanger is encased in a block
of special "closed cell" sealing foam.
Water Passage
Cupronickel
9
Metal Alloy
CHEMICAL PROTECTION PRECAUTIONS
!
CAUTION
NO CHEMICALS
IN SKIMMER !!!
Off Line
All Chlorinators Go Down Line of Heater !
In Line
OFF LINE TYPE
CHLORINATOR
MANDA TORY CHECK VALVE & LOOP
LOOP ABOVE
8" MIN.
TO
POOL
CHLORINATOR
2 LB
CHEMICAL
RESISTANT
CHECK VALVE
(PN# 888-018)
FROM
HEA TER
The chemical resistant check valve and loop MUST
be installed with all types of chlorinators to prevent chlorine migration to the heater. The loop
should extend at least 8 inches above the chlorinator
top. The chemical resistant check valve should be
placed on the pipe leading "up" to the chlorinator.
Therefore, the weight of the water above the check
valve will hold it closed even if the spring is weak or
damaged. Mount the check valve as low as possible.
Be sure to keep the chlorinator, pump and filter lid orings lubricated with silicone grease to insure a good
seal. If it looses its seal, it will allow the chlorine to
migrate to the heater when the system shuts off. The
loss of vacuum will allow reverse flow.
10
IN LINE TYPE
CHLORINA TOR
Insulated Heat
Exchanger
!
Air leaks or suction leaks that allow air into the system will
cause turbulence and damage to the sacrificial fittings. Correct immediately ! Do not add isolation valves unless required
for seasonal shut down & freeze pr otection procedures. Stagnant water left in the heat exchanger can cause corrosion !
CAUTION
CHLORINATOR PLACEMENT & CHEMICAL USE
Chlorinator placement, water balance and where chemicals are added are very important aspects of installation.
The failure to protect the unit from chemical damage which is not covered under the warranty.
PROTECT HEAT EXCHANGER
You want to prevent any chemicals from running
through the piping and heat exchanger of the heater.
Eliminate chlorinating devices which inject chlorine solution through the suction side of the filtering system,
thus the chlorine passes through the heat exchanger at
full strength before it has a chance to mix and dilute
with the rest of the pool water. Do not add isolation
valves unless done for seasonal shut down & freeze
protection procedures. Stagnantwater left in the heat
exchanger can cause corrosion !
CHLORINE MIGRATION
Some chlorinating devices will back siphon when the
system is shut off, therefore allowing the chlorine solution from a chlorinator to flow through the heat exchanger causing damage. You have to make sure your
filtering system does not have a vacuum leak that would
allow the system to lose prime. When this happens,
water will move backwards through the chlorinator thus
moving the chlorine solution into the heat exchanger.
CHLORINATOR PLACEMENT
A) All chlorinators should have a chemical resistant "check valve and a loop" plumbed at least 8
inches above the chlorinator, between it and the
heater, as far down line from the heater as possible.
B) Never plumb a chlorinator into the suction side
of the circulation pump.
C) Do not use chemicals through the skimmer basket.
D) All automatic chemical feeders should be as far
down line of the heaters water flow as possible.
E) Off line type chlorinators should be tapped into
the plumbing only as shown on the diagram. See
pool/spa combinations that require special placement.
F) Do not install a chlorinator in at a higher elevation than the heater itself even if a loop and check
valve is used. This may allow chlorine to migrate to
the heat exchanger. Chlorinator should be the lowest point in the system.
ADDING CHEMICALS
Do not place any chemicals in the skimmer throat.
Chlorine tablets placed in the skimmer will allow a
concentrated solution of chlorine to pass through
the heat exchanger. Do not place any chemicals in
the pump lint trap cavity or filter. Do not over load
chlorinator feeder cavity. Excessive amounts of
chlorine tablets will increase the chance of migration of acidic and concentrated chlorine to the heat
exchanger causing damage. 25% of maximum is
suggested.
When adding any chlorine make sure that the pH
does not drop below 7.4 and the alkalinity does not
drop below 90 p.p.m. Fiberglass pools, spa & liner
pools PH & chlorine levels are difficult to maintain.
Please be advised heater damage may occur if minimum water balance levels are not maintained.
COMMERCIAL FEEDERS
In a commercial pool situation where there is a vacuum
type filter system is used in conjunction with a surge
tank, there are exceptions to chemical injection. Some
liquid chlorine (sodium hypochlorite) feeders and liquid muriatic acid feeders will inject their solutions into
the surge tank on the suction side of the unit. As long
as the liquid chlorine and, muriatic acid is diluted with
75% water in a supply tank and fed at a slow enough
rate, you can allow this type of chemical injection to
take place. As long as the water in the surge tank has
not conflicted with the chemical values described in
this booklet. You should test the surge tank while the
feeders and circulation pumps are running, just as you
would the pool water. Then adjust the solution or rate
of feed accordingly.
Never place chlorine tablets in the surge tank. Never
allow a tablet type chlorinator to inject solution into
the surge tank under any circumstance.
MINIMUM WATER BALANCE
PH.......................................7.4 to 7.8
Chlorine/Bromine..............1 to 5 ppm
Total Alkalinity............90 to 120 ppm
Calcium Hardness.......250 to 400 ppm
11
!
CAUTION
!
CAUTION
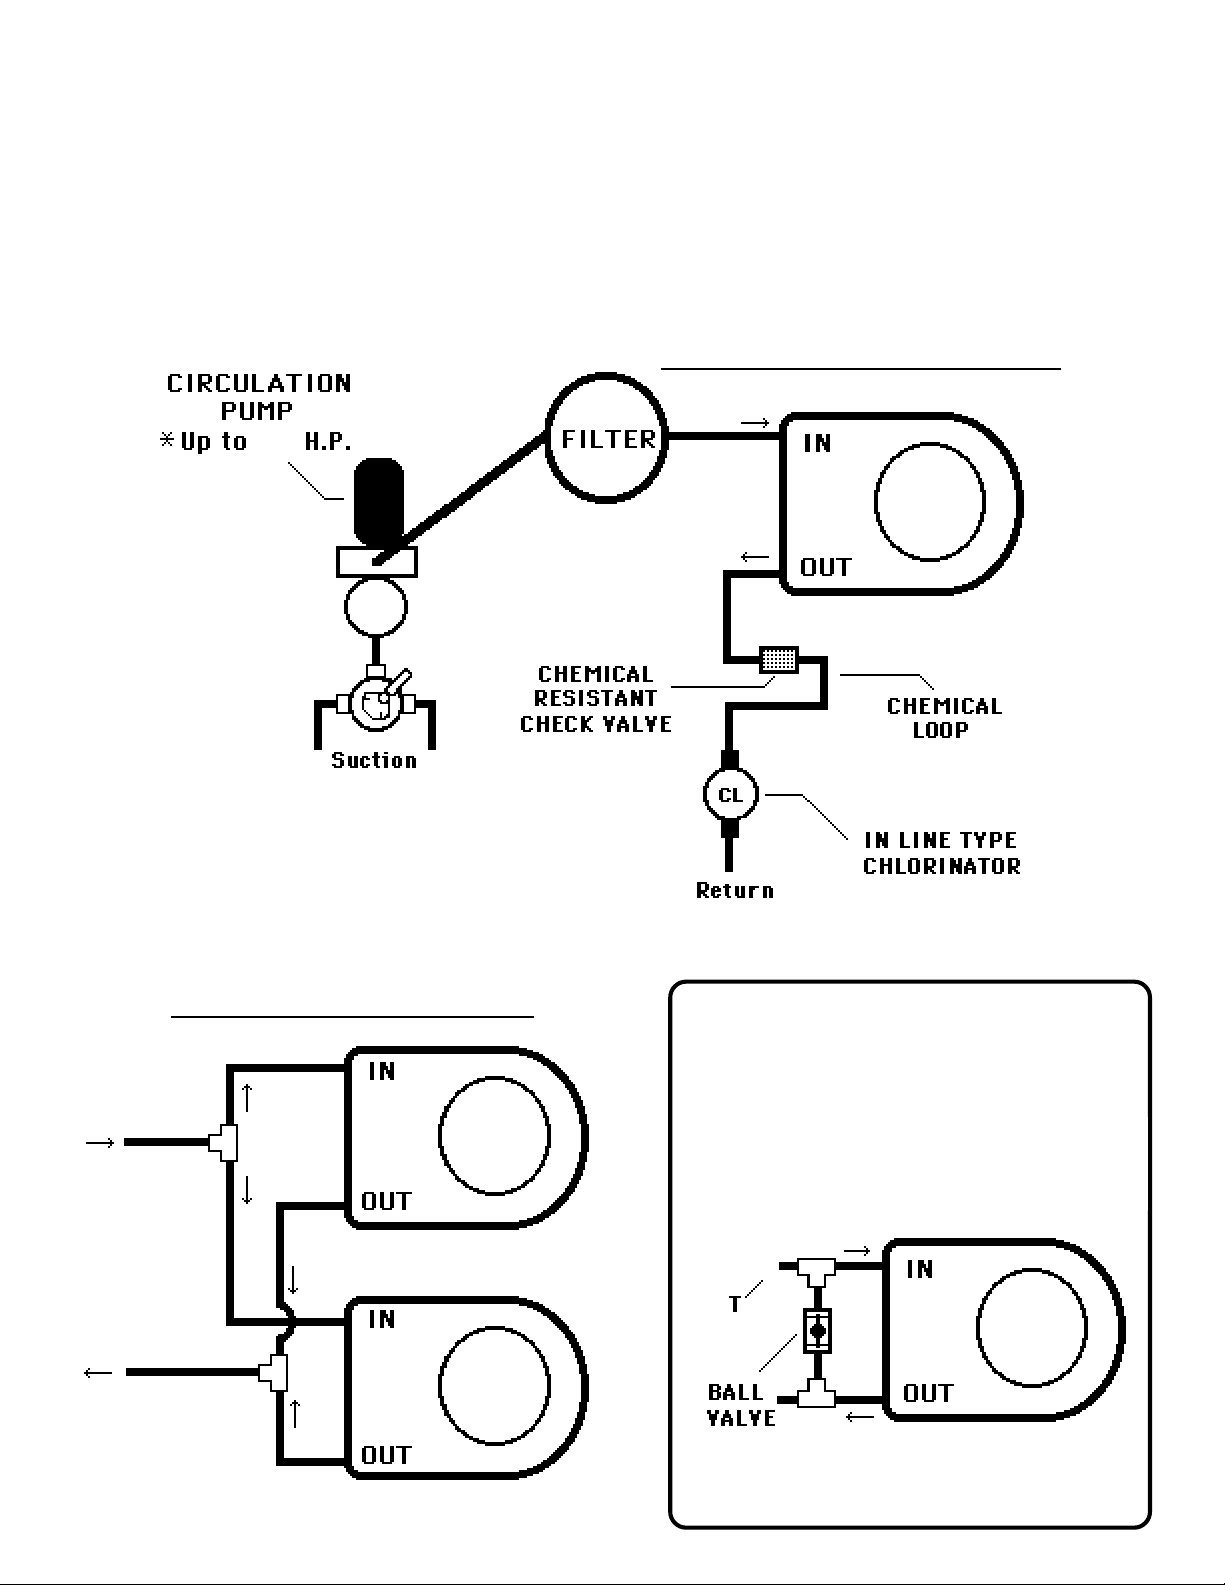
STANDARD PLUMBING 1 OR 2 UNITS
The following diagram is for standard plumbing of either one or two units. Plumb the unit in "after" the filter and
"before" the chlorinator. SPECIAL NOTE: See chlorinator placement instructions in this manual (Pg. 10).
Be advised that if your circulation pump is over 2 HP OR if the total flow exceeds 90 GPM, you will have to add
the "excessive flow valve" as shown below. Some larger water pumps may be restricted if the pipe size is not
adequate therefore reducing its overall flow rate. When determining if you need an excessive bypass valve, one
has to consider the hydraulic restriction of the filter, valving, amount of 90˚ fittings and the distance of pipe to the
pool in the existing filtering system. If you have a 2 HP water pump that does not exceed 90 G.P.M., considering
the above, you may not need the excessive bypass See the diagram shown at the bottom of this page. Excessive
water flow will damage the heat exchanger.
2
Up to 90 Gallons
Per Minute
Maximum Flow
Per Unit Before
Optional Exterior
Bypass Is
Required.
SINGLE UNIT INSTALLATION
TWO UNIT INSTALLATION
"Vertical"
*
NOTE:"EXCESSIVE WATER
FLOW VALVE" PUMPS OVER 2
HP OR 90 GPM
* NOTE:"MUST BE ADDED WHEN THE
TOTAL FLOW IS OVER 90 GALLONS
PER MINUTE * USE IF WATER PUMP IS
OVER 2 H.P.
12
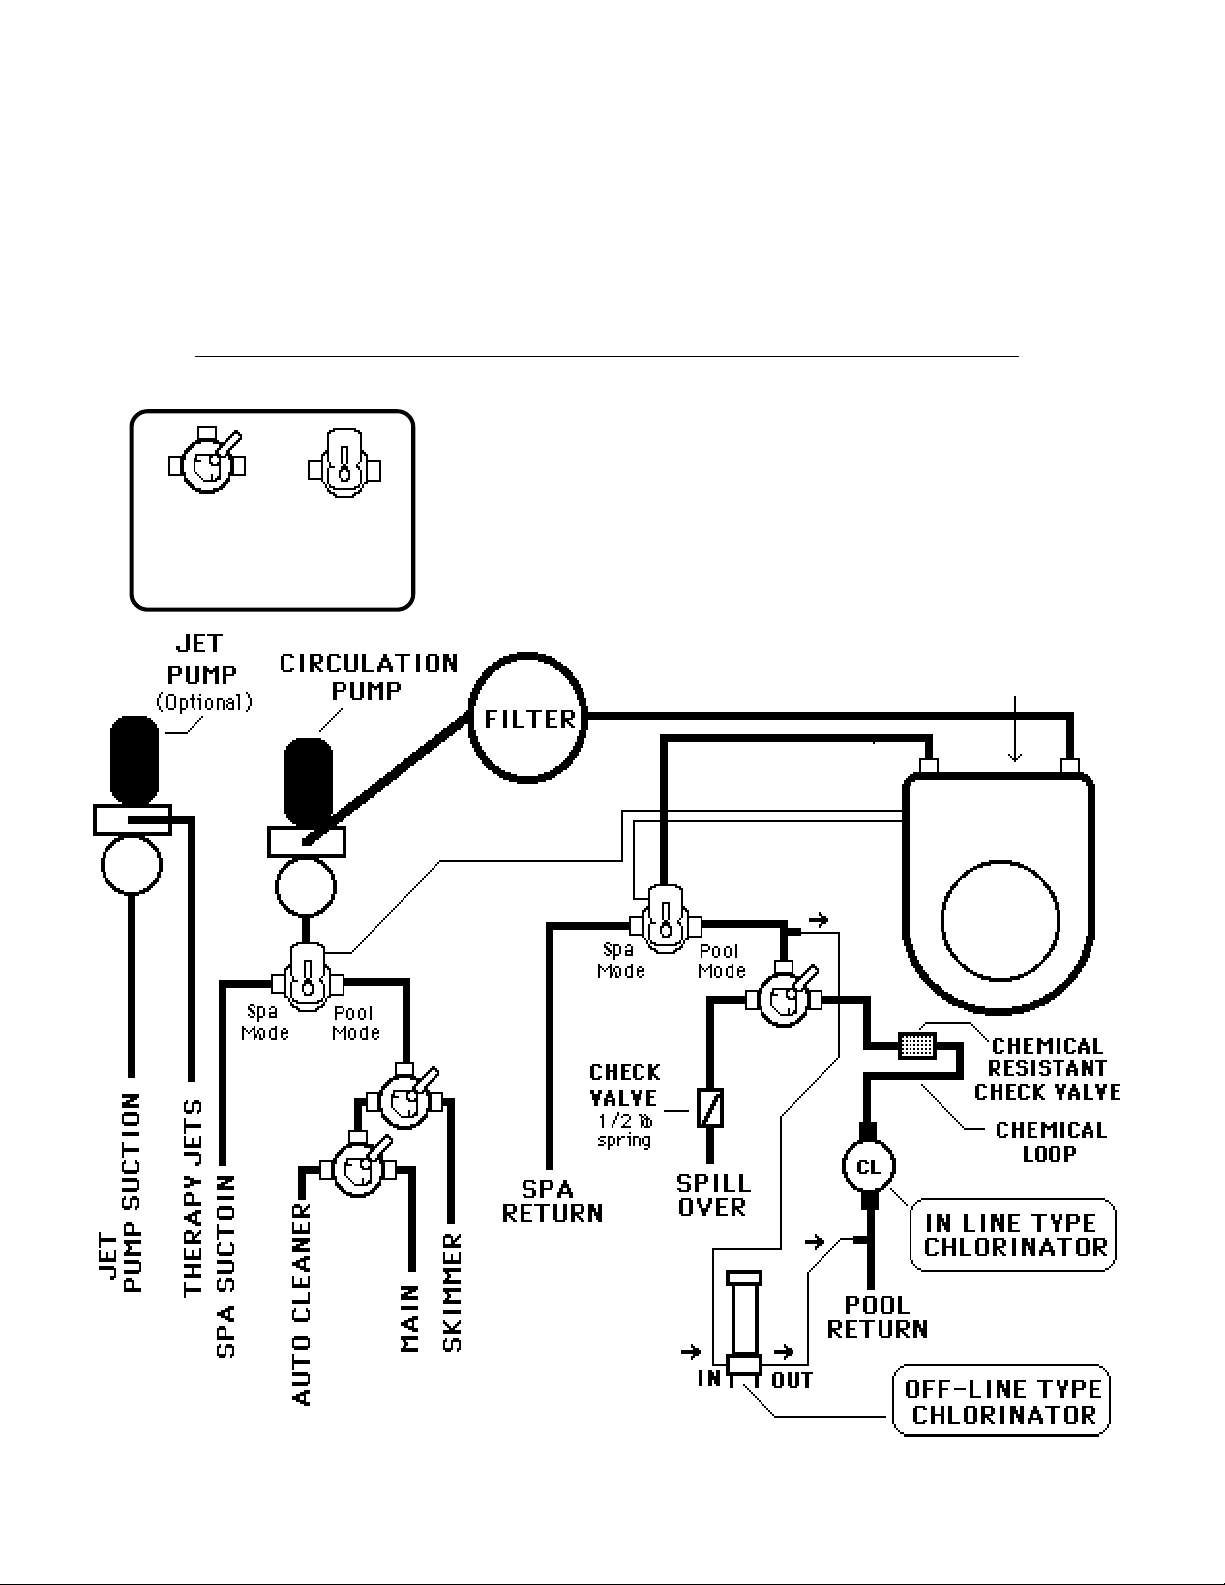
POOL & SPA COMBO PLUMBING
Heating a connected pool and spa spill over with one heater. For a single pump system.
The following is a schematic of the suggested plumbing set up when using the standard dual thermostat kit. This
design is used for pool/ spa combinations where the pool and spa are connected via a spill over, when one filtering
pump is used to circulate the water to either the pool or spa. The motorized valves turn to isolate the pool or spa
when the dual thermostat is activated by the user. The motorized valves shown, can be manual if automatic
operation is not desired. See "Dual Thermostat Kit". Note the chlorinator placement to protect the heater. A
separate hydrotherapy pump is suggested for newly constructed pools to eliminate restriction to the spa jets.
Remember
::
: If the water pump is larger than 2 HP the excessive water flow valve may be needed.
::
Manual
3-Way
Valve
Motor
Driven
3-Way
Valve
::
:
"Note Chlorinator Placement"
::
13
"Vertical"
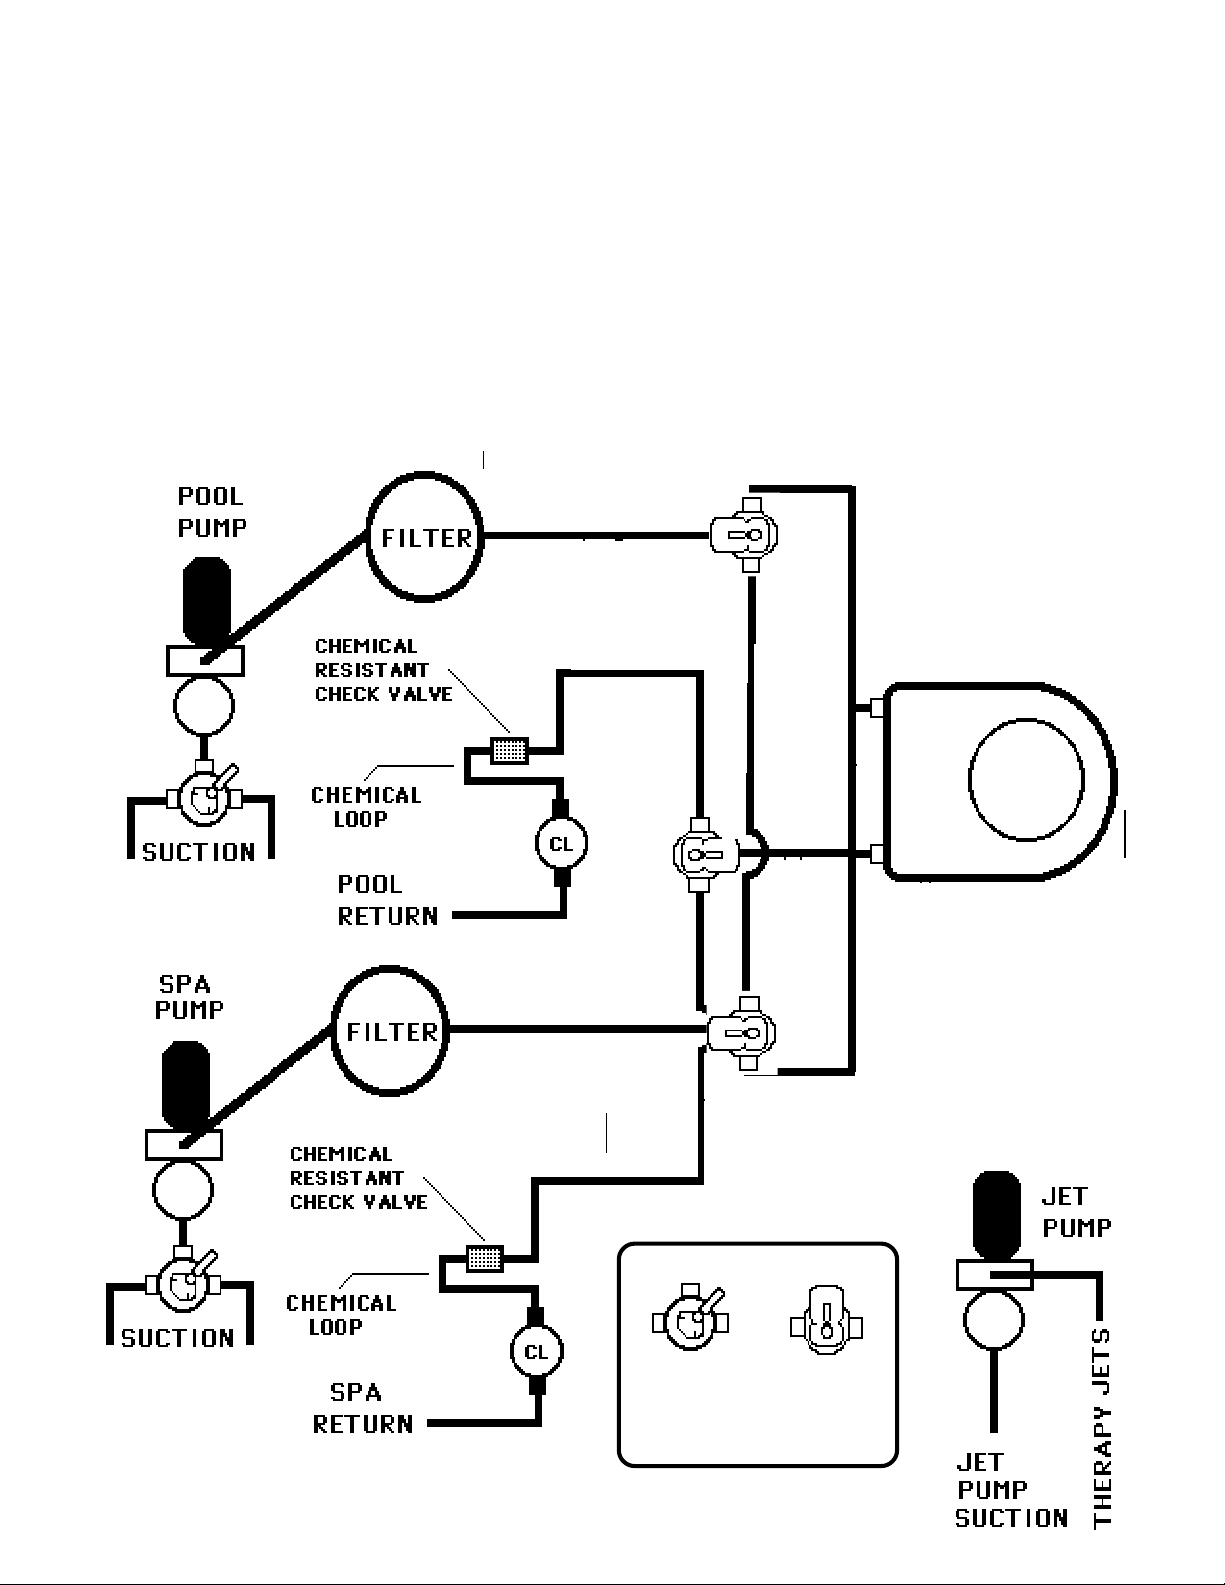
SEPARATE POOL & SPA PLUMBING
Heating a separate pool & spa, "without" a spill over, with one heater. Two pump system.
The following schematic is the suggested plumbing set up when using the dual thermostat kit. This design is for
"separate" pool and spa combinations, where the two are totally isolated from one another. The motorized valve
turns so that the heater is isolated to either the pool or the spa when the dual thermostat is activated by the user. The
motorized valves shown can be manual if automatic operation is not desired. Please note the 10 pound spring
valve and ball valve used as a bypass when the valves are turning. This will eliminate the possibility of "dead
heading" by the user.
NOTE: An exchange of water between the pool & spa may occur. This will depend on pump size, pipe size
and equipment distances. The possibility of the spa flooding over or draining should be considered. Most
commercial pool/spa codes do not allow this type of plumbing set up.
"Vertical"
"Vertical"
In
Out
Remember: If either water pump is over 2 HP,
the excessive water flow valve will be needed.
14
Manual
3-Way
Valve
Motor
Driven
3-Way
Valve

PLUMBING WITH SOLAR PANELS
Always plumb through the heat pump first before plumbing to solar. If the water flow is not adequate to provide
proper flow for both, you will have to operate one or the other by adjusting the 3-way valve accordingly or
increase your pumps size. Low water flow to the heat pump will cause the unit to cycle on & off. In some cases
an external flow switch may have been installed in place of the existing pressure switch, if the draining of the solar
panels effect the heater. A special use water pressure switch may be substituted for the factory water pressure
switch in most cases, call the factory for advice. The static pressure created by the solar panels may allow the unit
to operate without water flow.
"Vertical"
Special Use Water
Pressure Switch
OR
Or Optional
Special Use
Water Pressure
Switch
SPECIAL NOTE: Do not run water through the solar panels at night or on very cloudy days. This will have a
cooling effect and counteract the heat pumps heat input to the pool water. There should always be a vacuum relief
valve on the solar panels to eliminate static pressure. Do not run the solar and the heat pump when there is no
available heat coming from the solar. The user must manually turn solar off & on if there is no automatic
device installed by the solar contractor. These automatic solar switching devices are usually optional.
15

COMMERCIAL PLUMBING
When plumbing a heating system into a high rate commercial filtering system, you should be prepared to evaluate
the entire system in order to accommodate the heaters. The control of the water flow is most critical. The more
planning done prior to this type of installation will prevent service problems later.
PLACEMENT AREA
Inspect the placement area and be sure that the piping does not obstruct any serviceable items such as
electric or other utilities. When installing multiple
units, be sure to allow enough spacing for proper
air flow. You do not want the units competing for
air flow.
CHEMICAL FEEDERS
Inspect all chemical feeding devices and storage
tanks. Follow the chemical feeder and chemical introduction guidelines described in this manual.
The life of the unit depends on you following these
suggestions to prevent chemical damage to the unit.
Keep chemical storage tanks well away from the
units so that the chemical vapor is not drawn into
the unit
FLOW METERS
We strongly advise the use of flow meters when installing on a commercial application. The usually
higher water flow must be controlled. When installing flow metering equipment to gauge water
flow, be sure to follow the manufacturers directions
to the letter. There are certain pipe length requirements, before and after the flow meters placement.
An improperly placed or sized flow meter will give
a false reading.
WATER FLOW SEQUENCE
Water is drawn into the filter surge tank from the pool.
The circulation pump forces water to the diverting valve.
The diverting valve is partially closed in order to force
a certain amount of water through the heater plumbing
manifold. The diverting valve is closed until the proper
flow rate is indicated on the flow meter.
You should set the diverting valve so the flow meter
reads approximately 35 to 40 G.P.M."
More flow may be required depending upon hydraulic
restriction and "feet of head" on the filtering system.
Special considerations must be made to insure proper
flow rate to the heater(s).
The water flow is diverted to the heater's internal
bypass where it is automatically adjusted as long as the
proper flow rate has been set at the main diverting valve.
The internal bypass will regulate the water flow through
the heat exchanger. This water is heated and returned
to the main water flow. The balance of the water is
"bypassed" and returned to the main water flow.
A flapper check valve is used to prevent the possibil-
ity of reverse flow. The shut off valves are used to
isolate the heater from the water flow for servicing and
may be required by local codes.
A loop 8 inches above chlorinator (or other chemical
injectors) and the 2 to 5 lb. check valve will prevent
chemical damage to the heater. See page 10 and 11 for
the required chemical damage protection precautions.
per heater".
INDEPENDENT BOOSTER PUMP
In some situations, it will be necessary to install a
booster pump that will provide the water flow
needed for the heaters. This pump will be independent of the circulation pump to prevent filtering restriction. They should be wired on a relay so they
both run together . Call the factory for advice. Booster
pumps should be used when the heaters are installed
too far away from the filtering system or if the heaters are at a different elevation than the pool or if the
filtering system is not capable of providing good
flow at all times, to satisfy the health department.
Keep all chemical and chlorine feeders as far down
line from the heater as possible to prevent the possibility of corrosion to the heater.
16

COMMERCIAL PLUMBING (Cont'd)
9 to 12 In.
9 to 12 In.
12 In.
IN
36 In.
Access
Cap
!
WARNING
Do not place or inject chemicals into the surge
tank ! No tablet type chlorine in the surge tank !
OUT
24 In.
Air Flow
Clearance
Clear
1 1/4 Lb.
Check Valve
IN
12 In.
OUT
Cap
15 Ft.
Min.
Filter Surge Tank
Recommended
In Line Type
Chlorinator
Flow
Meter
Shut
Off
Valves
Check
Valve
Main Divert-
ing
Valve
!
CAUTION
Do not place chemicals or
storage tanks near heater.
Keep them at least 15 feet
away to prevent corrosive
vapor from being drawn inside the heater.
Divert Approximately 50-60
GPM per 6 ton unit or 100-120
GPM per 12 ton unit.
Off Line Type
Chlorinator
Peristaltic Type Chemical Feeders
& Solution Tanks
Check Valve & Loop
All chemical injection devices must be
"down line" of the check valve & loop.
(If applicable)
17

OPTIONAL WATER "FLOW" SWITCH
Some installations require an external water “FLOW” switch in place of the water “PRESSURE” switch. This
switch will keep the unit from running without water flow.
BELOW WATER LEVEL
If the unit is installed three feet or more below water
level, the pressure switch will be effected by static pressure. This static pressure may cause the “pressure"
switch to stay activated thus allowing the unit to run
when the water flow stops. You then may require the
external flow switch or the special use water pressure
switch.
LONG RUNS & LOW FLOW
The "flow" switch or special water pressure switch may
be needed on systems when the heater is installed more
than 30 or 40 feet from the circulation pump. Weak or
heavy load filtering systems will slow the water flow
and cause the standard water pressure switch to cycle.
SUCTION LEAKS
Be advised that suction leaks that allow air into the system will cause erratic operation of the water "pressure"
switch and water "flow "switch. The air turbulence
causes the switch to malfunction.
SOLAR PANELS
If you have a solar system plumbed in the same system
as the heat pump, you may experience static pressure
on certain brands of solar panels. Often times the pressure switch will detect back pressure created from elevation of the solar panels.
Some solar systems may reverse flow (drain) when the
circulation pump shuts off. This may cause problems
with the internal "pressure" switch. In some cases you
may have to add check valves to control the reverse
flow. Check with the solar panel manufacturer or installer before using check valves. Make sure that your
solar system is capable of draining into the pool, via a
vacuum relief valve.
These and other conditions may require the use of this
added type of flow switch or special use water pressure
switch. Reverse flow and static pressure may allow
the unit to run without water flow or cycle off and on,
causing damage.
The added “flow” switch only detects water movement
and will not be effected by static, low or high pressure,
therefore, it is best suited in these situations.
18

WATER FLOW SWITCH INSTALLATION
In most cases the existing water pressure switch located
inside the access compartment can be changed to this special use water pressure switch. This water pressure switch
can be set at a higher rating to offset the static pressure in
some cases. The factory part number is #408. Install this
switch in place of the existing water pressure switch when
needed. If it does not solve the static pressure problem then
use the optional Grid™ flow switch. The factory part number is #888-032.
See "Water Pressure Switch" for more information regarding the water pressure switch.
Plumb the optional water FLOW switch externally on the water
1
"in" piping. Position the flow switch on the water "in" line so it
only detects the water flow through the unit itself.
Remove the existing leads from the water PRESSURE switch.
2
Then connect them to an insulated two pair cable with 14 to 12
gauge wire.
Run the cable from the flow switch to the inside of the units cabi-
3
net and wire accordingly. Make sure all connections are water
tight. Use the proper slip connectors. Leave the existing water
pressure switch in place or remove and replace with a 1/4 inch
machine threaded "copper" or "p.v.c." plug. Use teflon tape and
pipe sealer.
Start the circulation pump and heater. Adjust the set screw
clockwise until the unit shuts off. Then turn the set screw clockwise until the unit starts, then add three more turns clockwise.
Test run all equipment that may slow the water flow and readjust
as needed. Make sure the heater shuts off when the circulation
pump does.
2
1
counter
3
Gauge
19

PRE-START UP PROCEDURES
C
O
N
T
R
O
L
P
O
O
L
S
P
R
A
E
A
D
Y
W
A
T
E
M
R
O
S
D
W
E
M
T
O
S
T
D
A
E
T
L
O
W
P
R
E
S
S
.
H
I
G
H
O
P
K
R
E
S
.
O
K
O
K
O
K
T
H
E
R
M
O
S
T
A
T
Plumbing
Manifold
IN
Auto
Bypass
Valve
OUT
Heat
Exchanger
NOTE: COMPRESSOR TIME DELAY
BE AWARE THERE IS A 5 TO 7 MINUTE TIME DELAY BEFORE THE COMPRESSOR WILL START
ONCE THE UNIT IS TURNED ON OR WHENEVER
IT RESTARTS.
SET THE WATER PUMP TIMER
Set the circulation pump timer for 24 hours until the
pool reaches temperature. Then it can be reset for 8 to
18 hours per day, depending on pool size and weather
conditions, time of the year, some fall/winter conditions may require a 24 hour run time.
CHECK FLOW AT AUTO BYPASS
Make sure the pump is running with a full prime. Eliminate any suction leaks that allow air into the system.
Confirm that the internal automatic bypass valve is working properly. Turn the power to the heater "OFF"
Confirm there are no air leaks at the pump skimmer
basket.
The auto valve should have no air passing through it.
Air pumped through the heater due to a suction leak on
the existing pool filtering system will cause turbulence
and physical erosion to the heat exchanger.
COMMON 24Hr. MECHANICAL TIMER
Tripper
ON
Tripper
Peg
PVC TO COPPER COMPRESSION
FITTING
Once the water is flowing, examine the water tubing at
the two p.v.c. to copper compression fittings. If you see
a leak here call the factory warranty service department.
Compression
Assembly
Tubing to Heat
Exchanger
20
1" M.A.
PVC Flex Pipe
OFF
Peg

OPERATIONAL SEQUENCE
WATER FLOW & EXISTING WATER PUMP
To filter the pool water each day, the water pump will come
on & off according to the existing timer device. The heater
will only heat if there is water running through it and it operates long enough.
WATER PRESSURE SWITCH
When water starts flowing through the unit the
water pressure switch will activate and allow
the unit to run. When the circulation pump
timer stops the water flow, the water pressure switch will shut the unit
off. When the pump restarts for the
next day, the pressure switch will
activate and allow the heater to run
again.
THERMOSTAT CONTROL & SETTINGS
Turning up the thermostat will start the unit.
When the pool water has been heated to the
thermostat setting, the unit will shut off. When
the pool water temperature loses one to two
degrees, the thermostat will activate the unit.
There are no temperature graduate numbers
printed on the thermostat face. To obtain an
exact temperature for a pool, turn the
t-stat 3/4's of the way up and then place a pool
type thermometer in the pool water itself. Once
the water has reached your target temperature
on the thermometer, turn the thermostat knob
backwards until the heater just shuts off. Therefore your thermostat will be set at the thermometer reading.
THERMOSTAT CONTROL & SETTINGS
FOR HEAT & COOL MODELS
For heating mode on these models, make sure
toggle is selected to heat and follow the previous instructions above. For cooling mode,
make sure toggle is selected to cool. Turning
down the thermostat counter clockwise will
start the unit running. When the pool water
has been cooled to the thermostat setting, the unit will shut
off. When the pool water temperature rises one to two degrees, the thermostat will activate the unit. There are no
temperature graduate numbers printed on the thermostat
face. To obtain an exact temperature, turn the t-stat all the
way down and then place a pool type thermometer in the
pool water itself. Once the water has reached your target
temperature on the thermometer, turn the thermostat knob
forwards until the heater just shuts off. Therefore your
thermostat will be set at the thermometer reading.
pool
or
spa
Water
Pressure
Switch
Location
FAN-AIR CIRCULATION
Once the t-stat is activated the fan will begin to turn. To
collect the heat from the air, the fan circulates warmer air
through the evaporator air coil at about 4200 cubic feet per
minute. The fan runs independently from the compressor.
The compressor will start within 5 to 7 minutes after the fan.
EVAPORATOR AIR COIL
The fan circulates the warmer outside air
through the evaporator air coil to collect any
available heat. The cooler refrigerant absorbs this heat. This evaporates the refrigerant into a gas. Therefore the compressor can
compress the gas to maximize the gained heat
from the air.
COMPRESSOR
Once the fan is running, the compressor will start
5 to 7 minutes later and is controlled by a time
delay device. The compressor pumps and compresses refrigerant gas. When gas is compressed
it gets very hot and intensifies the energy and
then is released to the pool water. This compressed hot gas is pumped through the heat exchanger where it delivers heat to the pool water
passing through the same heat exchanger.
WATER HEAT EXCHANGER
The compressed hot gas releases its heat to the
pool water inside the heat exchanger. The exchanger is a tube within a tube construction,
water passing through the inner tube, and the
hot refrigerant passing through the outer tube.
The refrigerant is transformed into a liquid (condensed) state
as it releases it's heat to the pool water. Therefore, it is also
referred to as a condenser coil. The alloy exchanger is designed for maximum transfer surface area and strength.
Cross section
SYSTEM OVERVIEW
The heat pump system
uses 410-A refrigerant to
Warm Water
In
Cool Water
Foam Insulated
Out
transfer the heat from the
outside air to the pool water.
Warm
Air
In
Air Coil
Cool Air Out
Refrigerant Lines
Orifice
Assembly
Filter
Dryer
Heat
Exchanger
Plumbing Bypass
Manifold
Hot Gas
Compressor
21
C
O
N
T
R
O
L
P
O
O
L
S
P
R
A
E
A
D
Y
W
A
T
E
M
R
O
S
D
W
E
M
T
O
S
T
D
A
E
T
L
O
W
P
R
E
S
S
.
H
I
G
H
O
P
K
R
E
S
.
O
K
O
K
O
K
T
H
E
R
M
O
S
T
A
T
Switch
HP
Switch
LP

WATER PRESSURE SWITCH CHECK
The water pressure switch is preset at the factory and should only be adjusted "if needed".
The water pressure switch is designed to shut the heater off when the water circulation pump shuts of f. The water
pressure switch will keep the unit from running when there is no water flow. The water pressure switch has a 1 to
5 psi pressure range on water pressure rise or fall.
After you have plumbed and wired the heater, you should check to see if the heater will shut off when the circulation pump shuts off. Also, test run other pool equipment (automatic pool vacuums, spas, solar panels, etc.), that
may restrict the water flow. If the heater stops running when these items are operating, you may have to adjust the
water pressure switch to compensate for flow restriction. The unit will suffer severe damage if it operates
without enough water running through the heat exchanger. If the system will not work due to low or fluctuating
water flow with the above mentioned items, you may require another optional, external water "FLOW" switch
(part# 888-032) OR a special use pressure switch (part# 408). A "flow" type switch can be used in place of the
existing water pressure switch inside the unit.
If the heater does not shut off when the circulation pump
does, or the heater cycles off and on, there may be a problem
in the filtering system or other equipment creating back pressure on the system. Items such as solar panels, units installed above or below water elevation or suction leaks causing water to back siphon through the unit, may keep the
pressure switch engaged. Determine what can be done to
improve water flow to accommodate the addition of the new
heater.
Water Pressure
Switch Location
(Inlet Pipe)
Remove Main
Compressor
Access Cover
Compressor
Turn the adjustment
counter clockwise
and the switch will
require "less" pressure rise or drop to
activate and deactivate the heater.
The water pressure switch is preset at the factory and
should only be adjusted slightly by one to two turns
maximum, in either direction. Adjust only when the
heater does not shut off with the water circulation pump.
Turn the adjustment
clockwise and the
switch will require
"more" pressure rise
or drop to activate
and deactivate the
heater.
!
CAUTION
NOTE: Be careful not to turn the adjustment
knob too far counterclockwise or the adjustment knob and internal spring may come apart.
22

SHUT DOWN & FREEZE PROTECTION PROCEDURES
When shutting the unit down for the end of the swimming season, you must consider some items to protect the unit
from inclement weather. It is best in most situations to shut the unit off by turning the thermostat all the way
down, to the "left". Leave power (circuit breaker), to the unit “on” unless the pool or spa water temperature
drops below 50 degrees F.
SHORT TERM FREEZE PROTECTION PROCEDURES
When the outside air temperature is forecast to drop below 32 degrees F for a short time:
You should set the circulation pump timer to run 24 hours per day in order to circulate water through the unit and
filtration system. Standing water inside the piping will freeze and damage the water heat exchanger and refrigerant system. Shut the heat pump off and do not try to heat the pool during freezing temperatures. If the unit is left
running it may ice up and the compressor will stop running. The defrost control inside the unit will shut the
compressor off, but allow the fan to run. The fan will circulate air through the unit to help defrost the evaporator
air coil. If you know that the temperatures are going to be below 36 degrees F, you should eliminate the possibility of icing and just shut the unit off. Do not use the circuit breaker as the “on/off” switch, if you want to shut down
for a long period of time use the discconnect. (See page 27)
LONG TERM FREEZE PROTECTION / DRAIN VALVE INSTALLATION
If you live in a climate that has a seasonal swim season due to winter, you should follow these
long term freezing procedures.
Spigot Type
Drain Valves
(Hose bibb)
OUT
IN
2-way
Shut Off
Valves
Shut the water pump off. Close both shut off
valves. Open both drains and allow water to
exit. Use pressurized air on the water in, one
spigot only, to force the rest of the water out
the other spigot.
If you live in an area that experiences freezing temperatures,
the heat exchanger/water coil and bypass plumbing must
have all water removed to prevent freeze and chemical damage to the heat pump system. This procedure should be done
prior to the first freeze along with your other pool winterizing routine. When you drain the filter system and piping you
should include the heat pump as well.
There should be two spigot type drains, (hose bibbs),
plumbed into the heater's water in and water out piping. Place
these valves as close to the heater and at the lowest point
possible so as much water will drain as possible. Install two
shut off valves on the water in and out lines as shown here.
The rest of the water should be blown out with pressurized
air to insure all water is removed. A antifreeze designed for
pool equipment may be used, see a local pool professional.
!
CAUTION
Do not add isolation valves unless you
intend to clear the heat exchanger of
water with pressurized air! Stagnant
water left in the heat exchanger can
cause corrosion and will freeze causing
damage!
23

ELECTRICAL WIRING GROUND &
EQUIPMENT COMMON BONDING
A certified electrician should prepare to wire the heater according to national, local codes and specifications from
the factory in regards to supply voltage and amperes. Most codes require that a power disconnect be placed near
the heater for emergency shut off.
!
WARNING
The heater must be electrically grounded and bonded
in accordance with local codes, or in the absence of
local codes, with the latest national electrical codes
ANSI/NFPA No. 70. All wiring must comply with all
local codes, or in the absence of local codes, with the
latest national electrical codes ANSI/NFPA No. 70.
For proper wire and/or breaker size, please refer to
specification sheet and your local licensed electrician.
REQUIRED BONDING TO POOL STEEL
Make sure that the unit cabinet is bonded to the pool
steel. Most codes require that the circulation pump be
bonded as well. You can connect at that point using at
least a #8 gauge or larger solid copper bond wire. Use
the external bond lug on the cabinet to insure a good
bond.
BONDING
ONLY
#8 Solid
Copper bond
wire
Circulation
Pump
NOTE: This is NOT
a ground wire!
Bonding the unit to the pool steel will help reduce the
chance of electrolysis, also know as electrical corrosion. A heater left un-bonded may experience corrosion to the metal water tubing inside the heater. Do
not confuse with electrical ground.
External
Bond Wire Lug
bond wire
To Pool Steel
WIRE SIZE & GROUNDING
SEE SPECIFICATION SHEET TO DETERMINE
REQUIRED BREAKER AND WIRE SIZE.
!
WARNING
Always review the wiring schematic located inside the heater, since it may have changed after
this manual was printed !
Field Wired
220 Volt
Supply
"Line"
Bottom
"Load"
Top
Ground
From
Source
Internal
Ground
Lug
Main
Contactor
Factory Wired to
Compressor
START CAPACITOR FOR
208 VOLTAGE
The compressor must be protected from low voltage
situations to meet the warranty requirements. A unit
drawing high amps due to low voltage, is not considered a proper installation. Contact the factory service
for advise about low supply voltage. Many coastal communities have 208 volts. 208 volt supply requires
changing transform leads to 208V from 240V, see
wiring schematic.
TIME DELAY COMPRESSOR
NOTE: The compressor will attempt to start after a 5 to
7 minute time delay has passed from when the unit was
activated. If the compressor starts then shuts right off,
allow the 5 to 7 minute time delay to pass before expecting the compressor to start.
Inform the owners not to use the circuit breaker as
the on/off switch or the unit will not preheat as
needed between cycles. Turn the thermostat all the
way down when you do not want the unit to heat.
24

40º / 105º
CP12A-3B
HP1000A-3E
HP1000A-1E
HP800A-1E
160,300/4.7
BTUH/COP
40º-105º
95,000/3.4
BTUH/COP
40º-105º
95,000/3.4
BTUH/COP
40º-105º
82,000/3.5
BTUH/COP
230,500/6.5
145,000/4.5
145,000/4.5
127,000/4.7
30-100
Auto/Internal
Auto/Internal
Auto/Internal
Auto/Internal
2.5 @ 60 GPM
Ext.Field Install
15-90
3.1@50GPM
Ext. Field Install
15-90
3.1@50GPM
Ext. Field Install
15-90
2.2@30GPM
Ext. Field Install
2"PVC
60º-105ºF
2"PVC
60º-105ºF
2"PVC
60º-105ºF
2"PVC
60º-105ºF
#6
3 Phase
208 or 230
#10
3 Phase
208 or 230
#6
1 Phase
208 or 230
#6
1 Phase
208 or 230
3/4
60-90
40
1/3
60
1/3
60
1/3
6.2
1.9
1.9
1.9
6,300
1,075
4,250
1,075
4,250
1,075
4,250
1,075
22"
22"
22"
22"
39.7
Vertical
27.9
Vertical
34.5
Vertical
33.7
Vertical
254
129
142
141
10
R-22
410A
3 Lbs. 8 Oz.
410A
3 Lbs. 8 Oz.
410A
3 Lbs. 8 Oz.
Yes
475
Composite
Yes
298
Composite
Yes
298
Composite
Yes
298
Composite
35.5"H
31.5"W
35.5"H
31.5"W
35.5"H
31.5"W
35.5"H
31.5"W
36.75"L
36.75"L
36.75"L
36.75"L
. Products covered by Patent No.: US 6,227,003 B1, other patents pending.
only
MiniMax® Plus HP
Factory Specifications
Pool/Spa Heat Pumps
40º-105º
68,000/3.0
HP600A-1D
40º-105º
460512 460513 460514 460515 460521 460526
HP400A-1D
Model Number
Pentair Model Order Number
Min./Max. Air Inlet Temperature (ºF)
115,000/4.5
BTUH/COP
62,000/3.2
BTUH/COP
Air Temperature Relative humidity
50.0˚F 63%
Auto/Internal
Ext. Field Install
99,000/4.6
Auto/Internal
Ext. Field Install
80.6ºF˚ 63%
Water Bypass Type (up to 1.5 HP pump)
Water Bypass Type (2 HP pump or above)
Water Flow & Plumbing Characteristics
#8
50
15-90
15-90
Min./Max. Water Flow Rate ( GPM )
2"PVC
60º-105ºF
2.2@30GPM
2"PVC
60º-105ºF
2.2@30GPM
Condenser Pressure Drop ( PSI )
Plumbing Connection Size ( In. Slip )
Min./Max. Water Inlet Temperature ( ˚F )
1 Phase
208 or 230
1 Phase
208 or 230
Supply Voltage Phase
Electrical Characteristics
60 Htz Dual Rated Supply Voltage( VAC )
1/3
#8
50
1/3
Evaporator Fan Motor ( HP )
Min. HACR Breaker or Fuse(AMP)
Min Sup.Wire Size Copper Strand(AWG)
25
1.9
1.9
Fan Full Load Amp (FLA )
22"
4,250
1,075
22"
4,250
1,075
Fan Discharge
Air Flow (CFM)
Fan Speed (RPM)
Fan Diameter (Inches)
145
29.2
Vertical
119
27.5
Vertical
Refrigerant Characteristics
Compressor Rated Load Amps (RLA)
Compressor Locked Rotor Amps (LRA)
Yes
410A
3 Lbs. 2. Oz.
410A
3 Lbs. 2. Oz.
Refrigerant Type
Physical Characteristics
Initial Factory Refrigerant Charge (Lbs.)
270
Composite
Composite
Cabinet Construction
27.25"H
Yes
270
27.25"H
Weight (Lbs.)
Dimensions (inches)
See installation manual for
Separate Electric Compartment
Ed.) 3 phase units performance not within scope of ETL testing procedure. Specifications may change without notice. The actual wire
nd
31.5"W
36.75"L
31.5"W
36.75"L
Edition and CAN/CSA C22.2 No. 236, 2
nd
other important details!
* Standard for Heating and Cooling Equipment (UL 1995, 2
or breaker required may be larger and must be determined by local licenced electrician to meet United States local building safety codes. Minimum suggestion

.
...
COMFORT
...
WINTER
HEAT & COOL Specifications
460523
71,000/3.0
124,000/4.6
BTUH/COP
HP1000R-3E
BTUH/EER
94,000/12.4
Unit Mounted
15-90
Auto/Internal
3.1@50GPM
Ext.Field Install
2"PVC
60º-105ºF
THE
IN
SUMMER
POOL
THE
IN
IT
YOUR
EAT
OOL
H
C
#10
3 Phase
208 or 230
PERSONAL
IN
LTIMATE
U
HE
T
1.9
1/3
40-50
4,250
other patents pending.
Minimum suggestion only.
Specifications may change without notice.
*Single phase only verified. Heat only tested.
Tested to ANSI/ASHRAE 146-1998 standard.
to meet United States local building safety codes.
and must be determined by local licenced electrician
* The actual wire or breaker required may be larger
118
1,075
16.5
40º-105º
Vertical / 22"
4.5 lbs.
R-410A
Products covered by Patent No.: US 6,227,003 B1,
See installation manual for other important details!
Yes
Composite
460522
MiniMax® Plus HP
Factory Specifications
Pool/Spa Heat Pumps
Pentair Model Order Number
71,000/3.0
124,000/4.6
BTUH/COP
HP1000R-1E
TING MODE
Relative humidity
HEA
ACITY
CAP
emperature
Air T
COOLING MODE
ACITY
50.0ºF 63ºF
80˚.6ºF 63ºF
CAP
94,000/12.4
BTUH/EER
emperature
Air T
emperature
ater T
W
65% 85ºF 105ºF
Relative Humdity
15-90
Auto/Internal
Unit Mounted
Thermostat & Heat/Cool Select Switch
Ext.Field Install
Min./Max. Water Flow Rate ( GPM )
Water Bypass Type (up to 1.5 HP pump)
Water Bypass Type (2 HP pump or above)
Water Flow & Plumbing Characteristics
2"PVC
60º-105ºF
3.1@50GPM
Condenser Pressure Drop ( PSI )
Plumbing Connection Size ( In. Slip )
Electrical Characteristics
Min./Max. Water Inlet Temperature ( ˚F )
#6
*1 Phase
208 or 230
Supply Voltage Phase
*Min Sup.Wire Size Copper Strand(AWG)
60 Htz. Dual Rated Supply Voltage ( VAC )
50-60
*Min / Max HACR Breaker or Fuse(AMP)
1.9
1/3
4,250
1,075
Air Flow (CFM)
Fan Speed (RPM)
Fan Full Load Amp (FLA )
Evaporator Fan Motor ( HP )
129
27.9
40º-105º
Vertical / 22"
Min./Max. Air Inlet Temperature (˚F)
Fan Discharge / Fan Diameter (Inches)
Compressor Rated Load Amps (RLA)
Compressor Locked Rotor Amps (LRA)
4.5 lbs.
R-410A
Refrigerant Type
Refrigerant Characteristics
Composite
Cabinet Construction
Physical Characteristics
Initial Factory Refrigerant Charge (Lbs.)
Yes
298
35.5"H -31.5"W - 36.75"L
Weight (Lbs.)
Dimensions (inches)
Separate Electric Compartment
26

ELECTRICAL ACCESS & WIRING
!
WARNING
The heater must be electrically grounded and bonded in accordance with local codes, or in the absence of local codes,
with the latest national electrical codes ANSI/NFPA No. 70. All wiring must comply with all local codes, or in the
absence of local codes, with the latest national electrical codes ANSI/NFPA No. 70. For proper wire and/or breaker
size, please refer to specification sheet and your local licensed electrician.
To run the main 240 volt supply wiring, remove the outer ac-
!
WARNING
Shut main power disconnect
"OFF" before removing
access panels.
Internal Electrical
Compartment Cover
2, 5/16" Hex Head Screws
cess panel and seven phillips head screws. Carefully slide the
panel up and out.
The electrical compartment has a separate cover panel. Remove it by loosening the 5/16 inch, hex head screws on the
bottom of the panel. Slide the panel down then guide one corner out from behind the body cabinet corner post.
Connect the proper conduit to the 3/4 inch electrical port shown
below. Run wire of the proper size allowing enough slack to
wire tie the supply line inside the cabinet. Run the wire up
through the provided knock out on the bottom of the high voltage compartment. All conduit connections should be 3/4" and
water tight.
Internal
Ground Lug
3/4" Electrical
Knock-Out for Incoming
Supply Wiring
3/4" 90˚
Electrical
Fitting
External Access Panel
( 7, Phillips Head Screws)
C
O
N
T
R
O
L
P
O
O
L
S
P
R
A
E
A
D
Y
W
A
T
E
M
R
O
S
D
W
E
M
T
-
O
S
T
D
A
E
T
L
O
W
P
R
E
S
S
.
H
I
G
H
O
P
K
R
E
S
.
O
K
O
K
O
K
THERMOSTAT
220V Field Connection Here
at Line Side (Top) of "Main Contactor"
Field Installed High Voltage
Supply Wire w Ground
in 3/4" Conduit
See Wire Size Requirements
External
Pool Steel Bond
Wire Lug Here
(side of unit)
Factory Wiring from
Load Side (Bottom) of Main
Contactor to Compressor
Do Not Change !
27

HIGH VOLTAGE COMPARTMENT
!
WARNING
Always review the wiring schematic shipped with the heater located inside the heaters electrical
compartment, since it may have changed after this manual was printed ! Note 3 phase specifications available upon request @ 239-768-1555.
Main 240V
Contactor
Connect"LINE"
Fan Relay
Compressor
Capacitor
Side on " TOP"
Connect Here
Factory Wiring
Load Side
(Bottom)
To Compressor
DO NOT CHANGE !
24 Volt
Transformer
Fan Capacitor
Ground Lug
to Main Supply
for Ground Wire
Required Transformer Line Side Leg Change for 208 Voltage
The high voltage side of the 24 volt transformer must be rewired for 208 voltage. The orange 240 volt
lead should be swapped with the unused red 208 volt lead connected to the line side of the main contactor.
If the transformer is not rewired, the transformer will not produce an adequate amount of voltage to
operate the contactor coils in the various relays of the heater. This can cause intermittent contact and
damage to the compressor and contactors. Trace the orange wire to the terminal board, remove it and
replace it with the red wire. Cap and secure the orange wire.
NOTE: If the unit has the factory optional dual thermostat kit and motorized plumbing valve kit, you
must rewire the transformer on the motor valve kit as well. Damage due to improper low voltage installation is not covered under the warranty.
28

WIRING DIAGRAM SCHEMA TIC FOR DUAL THERMOST AT UNITS 208-230 VOLT/SINGLE PHASE
,
WIRING DIAGRAM SCHEMATIC FOR DUAL THERMOSTAT UNITS 208-230 VOLT/SINGLE PHASE
29
MODELS: S300, S500, S700, S900, P4000, P5000, P6000, P7000, XL350, XL550, XL750, XL950, XLS400, XLS600, XLS800, XLS1000, SP3.5
SP5.5, SP6.5, SP7.5, SPS4, SPS6, SPS7, SPS8, HT75, HT95, HT115, HT135, HTS80, HTS100, HTS120, HTS140, 350HS, 550HS, 750HS, 950HS,
400HSS, 600HSS, 800HSS, 1000HSS, HP400, HP600, HP800, HP1000.

WIRING DIAGRAM SCHEMA TIC FOR DUAL THERMOST AT UNITS 208-230 VOLT/THREE PHASE
30
Models: XLS1000, HP1000 & CP12.

WIRING DIAGRAM SCHEMA TIC FOR SINGLE THERMOST AT UNITS 208-230 VOLT/SINGLE PHASE
REVERSE CYCLE
31
Models: XLS800R, HP800R, XLS1000R, HP1000R & XLS1000R

WIRING DIAGRAM SCHEMA TIC FOR SINGLE THERMOST AT UNITS 208-230 VOLT/THREE PHASE
REVERSE CYCLE
32
Models: XLS800R. XLS1000R, HP800R & HP1000R & CP12R

Low
Voltage
Heater
connections
at Compool
controller
How to hook up a heat pump to a Digital Compool
for Models CP3800, CP3600, CP34000
2 wire connections
1) Run two wires from Compool controller into unit.
2) Cut one of the purple wires to water pressure
switch.
3) Splice one Compool wire to each purple wire.
Leave unit thermostats on maximum.
33

How to hook up a heat pump to a Non Digital Compool
for Models CP100 & CP30
3 wire connections
TB2
BLUE
1
BLACK
2
3
4
RED
5
ORANGE
6
7
YELLOW
8
L.E.D. MODULE (Optional)
BLACK
DUAL POT BEZEL
Spa
Pot.Dial
POOL / SPA
YEL
WHITE
Pool
Pot.Dial
34
Remove yellow, blue and white wires
from bottom row of pool spa switch.
Connect theseto the Compool wires.
C - Common to Blue Wire
L - Low to Yellow Wire (pool)
H - High to White Wire (spa)

OWNER TROUBLE SHOOTING GUIDE
!
WARNING
Risk of electrical shock or electrocution.
Improperly installation will create an electrical hazard which could result in death or serious injury to pool users,
installers, or others due to electrical shock, and may also cause damage to property.
Do NOT attempt any internal adjustments inside the heater.
1. Keep your hands and hair clear of the fan blades to avoid injury.
2. If you are not familiar with your pool filtering system and heater:
a. Do not attempt to adjust or service without consulting your dealer, professional pool or air conditioning
contractor.
b. Read the entire Owner and Installation Manual before attempting to use, service
or adjust the heater or pool filtering system.
All control lights off.
Unit will not start.
Control Ready light ON.
Water Press. OK light OFF.
T-Stat On light OFF.
Low & High Press. lights OFF.
Unit will not start.
Control Ready light ON.
Water Press. OK light ON.
T-Stat On light OFF.
Low & High Press. lights OFF.
Unit will not start.
Control Ready light ON.
Water Press. OK light ON.
T-Stat On light ON.
Low Press. light OFF.
High Press. light OFF.
Unit will not start.
OR
Unit is forming ice or frost on the
outer air coil, usually at the bottom.
POSSIBLE CAUSECONDITION
No power supply to heater. Tripped breaker or
blown fuse. Control failure.
Low water flow through heater. Dirty or worn
filters or clogged lint traps. Clogged filter pump
impeller. Improper plumbing valve settings.
Suction leak allowing air into the water flow.
Internal water pressure switch failure.
Thermostat is not set higher than the pool/spa
water temperature. The water temperature has
reached the maximum setting. The thermostat
is malfunctioning. Dual thermostat, the pool spa
select switch is not in the correct mode.
Outside air temperature below operating range
of 45˚F., unit is in "defrost" mode. Discharge
air flow is restricted. Discharge air is accumulating and being drawn back through the outer
air coil. The fan is obstructed, low air flow.
Large amounts of roof run off water restricting
fan blade rotation. Sprinklers spraying on the
outer air coil during cooler temperatures. Outer
air coil clogged with debris. Plants too close to
heater, blocking air flow. Low refrigerant pressure caused by a Freon™ leak. Possible malfunctioning of the internal low refrigerant pressure switch.
POSSIBLE REMEDY
Reset breaker. Replace fuse. Call dealer for
advice. Call factory for advice.
Clean entire filtering system and or replace
filter element. Inspect & clean pump impeller. Adjust plumbing valves. Repair suction air leaks, grease pump lid o-ring. Replace filter. Replace water pressure switch.
Turn the thermostat up to the "right" more.
Use a high quality thermometer to test the
water temperature. Maximum water temperature is 104˚F + or - 3˚F. Call your dealer
for advice. Call the factory for advice.
Do not try to operate the heater when the
outside air temperature drops below 36˚F
and 45˚F with very high humidity or high
wind speed. Make sure heater is installed
with the required placement clearances for
air flow and roof clearance. Do not install
indoors. Make sure that your sprinklers do
not spray on the heater in any way what so
ever. If ice forms on the outer coil, shut the
heater off and allow ice to thaw. You may
use water at low pressure to thaw ice build
up on the outer coil, shut the heater off when
doing so. Call the factory for advice.
Control Ready light ON.
Water Press. OK light ON.
T-Stat On light ON.
Low Press. light ON.
High Press. light OFF.
Unit will not start.
Control Ready light ON.
Unit is cycling on & off.
Low or restricted water flow through heater.
Dirty or worn filters or clogged lint traps.
Clogged filter pump impeller. Improper plumbing valve settings. Suction leak allowing air
into the water flow. Low water flow when
switched to spa mode. Unit is plumbed backwards. Heat exchanger clogged with debris.
Internal bypass valve damaged or clogged with
debris. Water temperature exceeding 104˚F
maximum. Refrigerant system malfunction.
Low or restricted water flow through heater.
Dirty or worn filters or clogged lint traps.
Clogged filter pump impeller. Improper plumbing valve settings. Suction leak allowing air
into the water flow. Low water flow when
switched to spa mode. Unit is plumbed backwards. Heat exchanger clogged with debris.
Internal bypass valve damaged or clogged with
debris.
35
Clean entire filtering system and or replace
filter element. Inspect & clean pump impeller. Adjust all plumbing valves. Repair
suction air leaks, grease pump lid o-ring.
Replace filter. Wrong filter pump pipe size.
Automatic pool vacuum causing restriction.
Thermostat not shutting unit off at 104˚F.
Call your dealer for advice. Call the factory for advice.
Clean entire filtering system and or replace
filter element. Inspect & clean pump impeller. Adjust all plumbing valves. Repair
suction air leaks, grease pump lid o-ring.
Replace filter. Wrong filter pump pipe size.
Automatic pool vacuum causing restriction.
Call your dealer for advice. Call the factory for advice.

Control Ready light ON.
Water Press. OK light ON
T-Stat On light ON
Fan is not turning.
Unit will not start.
All control lights ON
Fan is turning, no cool air discharging out the top of heater.
Unit is not heating.
Low water flow through heater. Dirty or worn
filters or clogged lint traps. Clogged filter pump
impeller. Improper plumbing valve settings.
Compressor has not started yet. Low water
flow through heater. Dirty or worn filters or
clogged lint traps. Clogged filter pump impeller. Improper plumbing valve settings.
Clean entire filtering system and or replace filter element. Inspect & clean pump impeller.
Adjust plumbing valves. Call the factory for
advice.
Wait for the 5 minute compressor time delay.
Clean entire filtering system and or replace filter element. Inspect & clean pump impeller.
Adjust plumbing valves. Call factory or dealer.
Spa will not heat to maximum
temperature of 104˚F + or - 3˚.
Thermostat is turned all the way
up.
OR
Spa is heating very slowly.
Pool is heating very slowly.
Pool is not getting up to temperature.
For dual thermostat units:
Unit is in pool mode but spa is
on, or unit is in spa mode but
pool is on.
Low or restricted water flow through heater.
Dirty or worn filters or clogged lint traps.
Clogged filter pump impeller. Improper plumbing valve settings. Suction leak allowing air
into the water flow. Low water flow when
switched to spa mode or the control is not in
spa mode. Unit is plumbed backwards. Heat
exchanger clogged with debris. Internal bypass
valve damaged or clogged with debris. Your spa
thermometer is not reading the correct temperature. Air blower is running. Venturi air inlets
are open. It is very cold outside. Spa pump is
not running.
Low or restricted water flow through heater.
Dirty or worn filters or clogged lint traps.
Clogged filter pump impeller. Improper plumbing valve settings. Suction leak allowing air
into the water flow. It is cold outside. Pool pump
timer is not set for a long enough running period. Pool is not covered. High wind speed
over pool. Shaded pool area.
The optional motorized plumbing valves are out
of synchronization with the dual thermostat control. The motor valves are not turning. The
manual pool/spa valves have not been turned
correctly. A third party external control device
is overriding the dual control. Motor valves have
a tendency to rotate after a power outage and
then they are out of sync.
Clean entire filtering system and or replace filter element. Inspect & clean pump impeller.
Adjust all plumbing valves. Repair suction air
leaks, grease pump lid o-ring. Shut off air
blower and or Venturi inlets that allow air turbulence in the spa. Use a cover while heating
the spa. Outside air temp. too cold. Set spa
pump timer for longer time. Call your dealer
for advice. Call the factory for advice.
Clean entire filtering system and or replace filter element. Inspect & clean pump impeller.
Adjust all plumbing valves. Repair suction air
leaks, grease pump lid o-ring. Use a pool cover.
Place a wind break around pool. Set pool pump
timer longer. Call your dealer for advice. Call
the factory for advice.
Use the motor valve actuator switches so the
valves go to the mode selected on the dual thermostat pool/spa select switch. Grease motor
valves. Adjust manual valves correctly. Adjust third party control device. Possible defective motor valve. Call your installer for advice.
Call the factory for advice.
Compressor will not start. Fan
comes on, compressor time delay passes, compressor attempts
to start but unit shuts all the way
off ( and or circuit breaker trips).
Water running from the bottom
of the heater when it is running.
OR
The heater seems to have a water leak.
Low or restricted water flow through heater.
Dirty or worn filters or clogged lint traps.
Clogged filter pump impeller. Improper plumbing valve settings. Suction leak allowing air into
the water flow. Low water flow when switched
to spa mode. Compressor was not preheated
properly (reciprocating type R-series only).
Scroll type (S-series) compressors "only" require
several start cycles before it will start when new,
during cold temperatures or if the unit has been
idle for some time. Weak power supply voltage.
The heater produces water condensation when
it operates. The water will trickle from the drain
holes designed in the bottom of the heater. The
higher the humidity the more water condensation the heater will produce. This is similar to
the effect that a glass of ice water has when it
sweats. Corrosive pool water, chemical damage to water tubing inside heater. Chlorinator is
not isolated from the heater, chlorine migration.
36
Clean entire filtering system and or replace filter element. Inspect & clean pump impeller.
Adjust all plumbing valves. Repair suction air
leaks, grease pump lid o-ring. Replace filter.
Preheat reciprocating type (R-series) compressor for 8 hours. Allow Scroll type (S-series)
compressors several start cycles. Have a licensed electrician check the power supply voltage and wire size. Call your installer for advice. Call the factory for advice.
Shut the heater off for several hours but leave
the pool water pump running. Allow enough
time for all the normal condensation to evaporate. If the heater continues to trickle water after that time, when it is not running, you may
have a pool water leak. You can test this water
for chlorine to confirm. Make sure your chlorinator has a check valve and loop installed between the heater & chlorinator.

WARRANTY & DEALER SERVICE
When requesting factory warranty service, please follow these guidelines to insure a smooth process.
PROBLEM DESCRIPTION
Get a full description of the problem from the pool owner. The more details you obtain from the pool owner, the
easier it is to satisfy their exact needs.
VISIT THE SITE
Always visit the site and check the following non-warranty conditions:
Electrical breakers and switches.
Plumbing, valving water flow and clean filters.
Proper running time allowed for circulation pump.
Proper Installation, Plumbing & Electrical.
Chlorinator Placement and Water Quality.
ELIMINATE USER ERROR
You must eliminate all user errors before calling for warranty service. The warranty covers factory defects only.
The above mentioned conditions and others like them are not considered factory defects. All guidelines detailed in
the owners and installation manual must be followed to receive warranty service. Damage due to improper installation or use is not covered under the warranty. If the warranty service crew arrives and finds there is a user or
installer error, the service invoice is collected from the pool owner at the time of service.
FACTORY SUPPORT
Our service department will call the pool owner directly and pre-qualify each service request to help you eliminate
user errors before dispatching service. We take the time over the phone to assist the pool owner on checking their
filtering system and associated equipment, if they are able. We always assume that the installation is to factory
specifications. The warranty policy is explained to the pool owner directly so there is no misunderstanding. It is
impossible to pre-qualify every service call over the phone, therefore, we must insist that you visit the site prior to
warranty service.
REQUIRED INFORMATION
Please have the following information ready when calling for warranty service:
Required Information:
12 digits
Heat Pump Service Department
12155 Metro Parkway Serial #
Ft. Myers, Florida 33912 Model # ____________,
239-768-1555 Install Date ___ / ___ /___
239-768-2856 Fax
www.warmpool.com Dealer Name ______________________
The actual receipt or canceled check may be needed to verify installation date and proof of ownership.
37

GLOSSARY OF TERMS
A/C Contractor: A company licensed by the state and local authorities to perform heating ventilation and air-conditioning installation or repair including pool heat pumps. Allow no others to
repair this unit.
Acidic: Describing pool/spa water that is aggressive in nature with
a Ph value below 7.6. Like acid, orange juice, vinegar etc.
Accumulator: a containment housing in the Freon circuit that collects liquid forms freon that does not evaporate after passing through
the evaporator coil, thus protecting the compressor from damage.
Air Blower: An electronic device that forces air under pressure
through the spa plumbing giving the spa a bubbling effect.
Air Inlet: Used to create bubbling effects for the spa jets. Water
passing through a vortex draws air into the plumbing without the
use of an electronic air blower. Usually controlled by some sort of
knob or lever to shut it on or off.
Alkaline: Describing pool/spa water that is the opposite of acidic
with a Ph value above 7.6. Base, like milk or chalk etc.
Anti Short Cycle Time Delay Device: Keeps the compressor from
being damaged due to the freon gas not being allowed to settle
between cycles, preventing liquid freon from entering the compressor. When the unit stops there will be a certain time delay
before the compressor will start again.
Automatic Chlorinator: A device that feeds either tablet type or
liquid type chlorine concentration into the plumbing piping and
then delivered to the pool/spa water.
Authorized Factory Service: An A/C Contractor factory trained
and under contract with the manufacturer to provide repair service.
Back-Siphon: In regards to pool filtering systems where the water
flow reverses through the system when the circulation pump shuts
off. This is usually caused by the vacuum created by the water in
the filtering being above the pool level, or breach in the sealed
water plumbing, allowing air into the system. This condition is
sometimes referred to as a suction or vacuum leak.
Back Pressure: The pressure created by the circulation pump being restricted by plumbing, filters, solar panels and other related
equipment. Usually due to a dirty filter, measured by the pressure
gauge in the filter housing
Broadcast Type Sprinklers: Part of an irrigation system used to
water plants or grass where the water is sprayed into the air and
distributed directional.
Bypass: Used in the water piping to allow the control of water
flow through the heater at a prescribed rate, thus the rest of the
water flow not needed is diverted through the bypass
Calcium Hardness: The amount of calcium and magnesium content in pool/spa water calculated by using a test kit for such purposes.
Calcium Hypochlorite: A form of chlorine in a powder form and
rarely in a tablet form used to sanitize pool/spa water. Calcium is
a major component and by-product.
Cartridge Filter: A pool/ spa water filter that is made of pleated
paper and nylon. Usually round with plastic base and top, placed
into a tank that the water is pumped through trapping debris and
dirt. Usually removed and cleaned with a high pressure garden
hose.
Check Valve: A P.V.C. fitting used on the water piping to prevent
reverse flow through the system and insure proper water direction.
Sometimes used to create back pressure and slow the water velocity.
Chemical Values: The numerical reading you get by using a pool/
spa water test kit to calculate levels of pool chemicals and minerals in the pool water at any given time.
Chemical Damage: Any damage or corrosion from pool chemicals
or any other chemicals used around the heat pump or pool. Usually concentrated chlorine or acidic water corroding the copper
piping or the heat exchanger or other equipment.
Chemical Resistant Check Valve: A check valve placed between
the heater and a chlorinator to prevent the migration of concentrated chlorine into the heater.
Chlorinator: A device that is used to feed chlorine to the pool/spa
through the filtering system. Water is pumped through a containment holding the chlorine. This makes a solution that is then fed to
the pool or spa.
Chlorinator Placement: (Illustrated in this owners manual), showing the proper location and placement of chlorinating devices in
order to prevent chemical damage to the heater.
Blanket: A plastic cover several mills thick with trapped air bubbles,
cut to the same size as the pool and floats on top of the water to
provide insulation and prevent heat loss. Some types collect small
amounts of heat from the sun and transfer it to the pool water.
Sometimes referred to as a solar blanket.
BTU: British Thermal Units. Measures heat output of a heat pump,
in Btu’s per hour.
Chlorine: A common pool/spa water sanitizer available in several
different forms of powder, solid tablets, liquid or gas.
Chlorine Tablets: A common form of chlorine that is solid in nature used in a chlorinator that is eroded by water rushing over these
tablets, making a solution to be slowly fed to the pool water.
38

Circuit Breaker: An automatic switch that will shut the power off
to an electrical device (heater, circulation pump) when an overload or short occurs. Located in the electrical supply panel in your
home or near the associated equipment.
Circulation Pump: An electric water pump that circulates water
through the filter and other pool related equipment. Usually controlled by a timer.
Condensation: Water that accumulates inside the heater due to the
humidity in the air coming in contact with the colder Freon™ piping in the evaporator coil. This water will trickle out of the drain
ports on the bottom of the heater. Like sweat on a glass of ice
water.
Control Devices: Electronic devices used to manipulate the pool/
spa functions and equipment other than those manufactured into
the heater itself. Sometimes by remote control, switches or sensors.
Convection: The transfer of heat from between two mediums, of
different temperatures, in this case from hot to cold, from warm
pool to cooler outside air
Compressor: A reciprocating piston in a cylinder, much like a car
engine, that compresses freon gas in a chamber before it is released to the heat exchanger.
Commercial Pool: A pool for public use or for the use of community residents that are governed by state and local codes. Usually
larger than a residential pool with a larger capacity filtering system, running at a high rate of water flow.
Copper Piping: The piping inside the unit as it was manufactured.
Corrosion: The dissolving of the metals in the heater due to chemical action.
Cover: Used to cover the pool surface and prevent heat loss, referred to as a blanket.
Cupronickel Metal Alloy: A special metal blend copper and nickel
that is corrosion resistant.
tor coil from getting an ice build up when the outside air temperature drops below 36 degrees. It will shut the compressor off, but
allow the fan to run until the air temperature increases.
Down Line: A reference that pertains to chlorinator placement and
chemical application meaning, to introduce such, into the water
flow piping, after it passes through the heater, as far away from the
unit as possible.
Drain Holes: Located in the heater cabinet bottom, that allows the
condensation water produced normally to drain out.
Drain Plug: A type of valve installed on the plumbing near the
heater to allow the heat exchanger to be completely drained of
pool water to prevent freeze damage in such climates.
Dry Acid Powder: A dry powder (sodium bisulfate) used to lower
Ph in pool or especially spa water.
Dual Thermostat: A kit added to the unit to allow for two separate
thermostats to be used for a pool and spa sharing the same heater.
It is also capable of other functions such as motorized valve operation.
Initial Heat Up Time: The time required to heat the pool up to the
desired temperature when you turn the unit on for the first time.
When the pool water temperature is at its lowest temperature.
Electrocution: To be shocked by electrical current, to have electrical current pass through your body resulting in death or injury.
Elevation: The height of the installed unit, in comparison to the
pool water level.
Evaporation: When referring to heat loss of the pool water, when
the pool water changes from a liquid to a gas then dissipates into
the air, taking heat away with it.
Evaporator Coil: The aluminum and copper air/freon manifold
that is used to change the properties of the Freon as it passes through
it. The warmer air is forced through the fins to produce the reaction due to dissimilar temperatures.
Expansion Valve: A control valve that regulates the Freon pressure
to the evaporator coil.
Fan: Used to move air through the evaporator coil.
Cycle: Referred to here as, on and off repeatedly, either the fan
and or compressor.
D.E. Filter: A filter type that uses diatomaceous earth powder as a
filter media. The D.E. is discharged with the debris via a valve
that reverses flow through the filter. This is referred to as backwashing. The D.E. must then be replaced in the filter.
Dealer: As authorized by agreement, with the factory to sell and
install this particular brand of heat pump.
Defrost Control: An internal device that will prevent the evapora-
Fan Blades: The aluminum mechanism that moves the air through
the unit. Located on top of the cabinet. Caution: fan blades can be
sharp and cause injury.
Filter: Use to clean the pool water by pumping water through a
media that collects debris and is cleaned later as part of regular
pool maintenance.
Filter System: The equipment installed to circulate and clean the
pool water usually consisting of an electric water pump on a timer,
a filter containment, flow control valves, and other equipment
needed for that particular pool and/or spa.
39

Floating Chlorinator: A device that floats on the pool waters surface that feeds chlorine to the water by eroding solid tablet type
chlorine, inside its containment.
Lint Trap Basket: A strainer type basket that collects debris and
prevents such from being trapped in other equipment, including
the heat exchanger.
Floating Thermometer: A thermometer that floats on the water
surface with the main sensing bulb in the water. Indicates the actual pool or spa temperature it’s floating in. A tie on type will
work the same.
Flow Control Valve: A valve or check valve that controls water
flow either automatically or manually.
Freon™: Trade name for a type of refrigerant. The heat transfer
medium used to transfer the generated heat to the pool water, in
the vapor compression cycle of the heat pump system. Changing
from a gas to a liquid state in cycles.
Full Prime: A reference used to describe a water pump running
normally without air entering into the system, running at full capacity.
Gas Chlorine: Chlorine in a pure state, gas.
G.P.M. : Gallons per minute, used to measure flow rate
Heat Exchanger: A manifold where the compressed hot freon gas
transfers its heat to the pool water. A tube within a tube. Hot freon
gas passing through one tube and water passing through the other
tube, bent in a coiled fashion. Made from a cupronickel metal
alloy.
Liquid Chlorine: Chlorine in a liquid form, (sodium hypochlorite).
Long Term Freeze: When the outside air temperature drops below
36 degrees as part of a seasonal weather change lasting for an extended period of time.
Marcite: A white plaster type pool wall and surface finishing material made of white Portland cement and marble dust.
Migrate: Referring to concentrated chlorine moving through the
filter system plumbing with or without the water flowing.
Motorized Plumbing Valves: Valves' that are driven by low voltage motors mounted on top of such a valve. Usually used to change
from pool to spa mode via a control switch or device without having to go to the filter system and turn these valves manually.
Muriatic Acid: A liquid acid that is used to lower the Ph of pool
water. Handle with extreme caution. (Use a dry powder acid for
spas.)
Normal Operation: When the heat pump is running as intended by
the manufacturer.
Heat and Cool: Reverse cycle unit capable of both heating and
cooling the pool.
Heat Loss: The act of the pool losing heat due to certain conditions
such as weather, wind, evaporation, radiance, convection etc.
Heat Pump: The unit, the heater, the appliance referenced in this
manual.
Hydro-Therapy Jets: Used in spas to create high pressure water
flow with air turbulence. Water is forced through a restriction that
creates a vortex that draws air into the water flow thus increasing
velocity. This air flow is usually regulated by a manual control.
Icing Up: Ice forming on the evaporator coil.
In Line Type Chlorinator: A chlorinating device that is mounted
directly on the piping, that has an internal manifold within the
plumbing, used to allow water flow through the containment, where
a solid tablet type chlorine is held. This type requires no water
tubing in and out of the containment.
Injection: In regard to feeding pool chemicals into the water flow
in whatever fashion.
Installer: Same as dealer, person or company where the unit was
purchased.
Internal Adjustments: Any part or component inside the cabinet of
the unit.
Nozzle Attachment: A device attached to the end of a garden hose,
that increases pressure and controls direction.
On/Off Switch: Located on the unit next to the thermostat dial use
to shut the unit off and on, so you do not have to move the thermostat or shut off the circuit breaker to control the unit.
O-Ring: A round rubber gasket that is used for sealing removable
access lids to pool filtering equipment and other related items.
Ph: A term used when determining the alkalinity or acidic nature
of water.
Pool/Spa Combination: When you have a pool and spa together,
where the two body’s of water are connected by a spill-over or
other plumbing means.
PPM: Parts per million. Use as a term to tell you how much of a
certain chemical ratio is in the water.
Pressure Switch: A device inside the heater, that senses water pressure and keeps the unit from running when there is little or no
water flow going through it.
Radiant Heat Loss: When the water loses heat through the walls
and floor of the pool shell.
Return: The term used to indicate water flow direction back to the
pool, after it passes through the filtering system. There are orifices in the pool called return outlets.
40

Run Dry: When any pool equipment is running without water,
usually causing some sort of damage.
Thermometer: Used to determine the actual pool or spa water temperature. Sometimes a floating type or a tie on type.
Serial Number: A twelve digit number on the identification sticker
on the outside of the heater cabinet. Needed for all records, warranty request etc.
Shadow-Box Fence: A fence that is made to allow air to pass
through it freely without restriction.
Shock Treatment: Adding a larger than normal dose of chlorine to
the pool water to kill contaminates, algae and to remove combined
chlorine.
Short Cycle: The act of the compressor going on and off without
letting the refrigerant gas to settle.
Short Term Freeze: When the outside air temperature drops below
36 degrees for a short period of time, usually for only a few days
or so, but not part of a normal seasonal change where lower temperatures are expected as a norm.
Sodium Hypochlorite: A liquid form of chlorine.
Skimmer: A housing mounted at the pool water level in the pool
wall and deck, that is used to capture debris as water is drawn into
it. The water is drawn in by the suction created by the circulation
pump.
Skimmer Basket: The strainer type debris catch, inside the skimmer housing that keeps debris from clogging other related equipment.
Thermostat: Located on the unit itself, used to set the desired temperature you would like the actual pool or spa water to be.. The
unit will activate if the water temperature is below the setting. The
unit will shut off when the water temperature has reached that particular setting.
Three-Way Valve: A plumbing valve that controls water flow having three ports in which to connect plumbing to.
Timer: A timing device that activates the water circulation pump
according to preset times.
Time Delay: A device inside the heater, that will delay the compressor from running until the refrigerant gas and crank case oil
settle, before allowing the compressor to run, preventing damage
to the compressor..
Trickle Type Sprinkler: An irrigation distributor that does not broadcast water into the air but slowly waters the surrounding ground
directly.
Vacuum Type Filter: A filter on the suction side of the circulation
pump usually mounted inside a surge tank. Water is drawn through
the filter media trapping debris.
Variable Rate Flow Control Valve: The "internal" valve used to as
a bypass for the heater water flow. This spring type valve will
automatically adjust the water flow rate to the unit when the flow
rate changes for what ever reason, (30 to 70 G.P.M. range).
Skimmer Inlet: The square opening right at the pool water level,
flush with the pool wall.
Skimmer Throat: The main cavity of the skimmer where the skimmer basket is located.
Solar Panels: A manifold placed on a roof top, to collect heat from
the sun and transfer it to the pool water being pumped through it.
Spa: a smaller body of water using hotter water temperature and
high pressure water flow mixed with air to create a therapy effect.
Sprinkler Heads: Irrigation water distribution device, placed in areas of the yard that broadcast water to the surrounding area.
Surge Tank: Part of a filtering system that holds a specific amount
of water to supply the circulation pump. Filter elements are sometimes placed in this tank so when the pump suctions water through
them it cleans the water. This tank is fed pool water through plumbing piped from the pool by gravity.
Temperature Rise/Difference: A calculation used to determine how
many degrees the water passing through the heat exchanger is increased in order to set it at a prescribed difference.
Water Coil: Same as heat exchanger.
Water Chemical Balance: The standard pool water test and chemical amounts and values, that the water needs to be considered balanced, according to standard practice.
41

This page is blank.
42

This page is blank.
43

Heat Pumps
Manufactured by:
© 2002 HydroTemp Manufacturing Co., Inc.
239-768-1555
www.warmpool.com
 Loading...