

Pentair Mastertemp 175K BTU/HR, Mastertemp 200K BTU/HR, Mastertemp 250K BTU/HR, Mastertemp 300K BTU/HR, Mastertemp 400K BTU/HR Installation And User Manual
Rev. H 9-5-12 MASTERTEMP®Pool and Spa Heater Installation and User’s Guide
&(+,"''",&)(!"(#!-+$*.+!%-&#$
d
>2CD6BD6>A!!!A@@=!2?5!CA2!962D6B
=G!FGK!bc^aU!^a!dbU!WQb^[Y]U!^a!^cXUa!V[Q\\QR[U!eQ_^ab!Q]T![Y`dYTb!Y]!cXU!eYSY]Ych
^V!cXYb!^a!^cXUa!Q__[YQ]SUb*
2;>
C;A>
?.21@C
B\_a^_Ua!Y]bcQ[[QcY^](!QTZdbc\U]c(!Q[cUaQcY^](!bUaeYSU!^a!\QY]cU]Q]SU!SQ]!SQdbU
_a^_UachTQ\QWU(!_Uab^]Q[!Y]Zdah!^a!TUQcX*!B]bcQ[[QcY^]!Q]T!bUaeYSU!\dbc!RU!_UaV^a\UT
Rh!Q!`dQ[YVYUT!Y]bcQ[[Ua(!bUaeYSU!QWU]Sh!^a!cXU!WQb!bd__[YUa*
B4.@!@;! 0;!52!C;A!?8177!3.?
w =^!]^c!cah!c^![YWXc!Q]h!Q__[YQ]SU*
p =^!]^c!c^dSX!Q]h!U[UScaYSQ[!bfYcSX7!T^!]^c!dbU!Q]h!_X^]U!Y]!h^da!RdY[TY]W*
j B\\UTYQcU[h!SQ[[!h^da!WQb!bd__[YUa!Va^\!Q!]UYWXR^a$b!_X^]U*
?^[[^f!cXU!WQb!bd__[YUa$b!Y]bcadScY^]b*
j BV!h^d!SQ]]^c!aUQSX!h^da!WQb!bd__[YUa(!SQ[[!cXU!VYaU!TU_Qac\U]c*
).*(!9H^RPUZ!2]L&$!CHUMVYK$!?4!*/++(!a!"0((#!0+)%/)++!VY!"1)1#!-..%0(((
)(1-)!G&!=VZ!2UNLSLZ!2]L&$!>VVYWHYR$!42!1+(*)!a!"0((#!0+)%/)++!VY!"0(-#!--+%-(((
120/240 VAC NATURAL GAS/LP GAS
Models Natural Propane
175K BTU/HR 460792 460793
200K BTU/HR
(A SME)
461000 461001
200K BTU/HR 460730 460731
250K BTU/HR 460732 460733
250K BTU/HR (HD) 460806 –
250K BTU/HR
(A SME)
460771 460772
250K BTU/HR
(HD AS ME)
461020 –
300K BTU/HR 460734 460735
400K BTU/HR 460736 460737
400K BTU/HR (HD) 460805 –
400K BTU/HR
(A SME)
460775 460776
400K BTU/HR
(HD AS ME)
461021 –
FORYOURSAFETY -Thisproductmustbeinstalled andservicedby authorizedpersonnel,qualifiedinpool/spa
heaterinstallation.Improperinstallationand/oroperationcan create carbonmonoxidegasandfluegaseswhichcan
cause seriousinjury,propertydamage, or death. For indoor installations, as an additionalmeasureofsafety, Pentair
AquaticSystems stronglyrecommendsinstallationof suitable CarbonMonoxide detectors in the vicinity of this
applianceandin anyadjacent occupiedspaces.Improperinstallationand/or operationwillvoidthewarranty.
2;>!C;A>!?.21@C!"!>1.0!/12;>1!;<1>.@593
BV!h^d!T^!]^c!V^[[^f!cXUbU!Y]bcadScY^]b!UgQSc[h(!Q!VYaU!^a!Ug_[^bY^]!\Qh!aUbd[c(!SQdbY]W
_a^_Uach!TQ\QWU(!_Uab^]Q[!Y]Zdah!^a![^bb!^V![YVU*!?^a!QTTYcY^]Q[!VaUU!S^_YUb!^V!cXYb
\Q]dQ[7!SQ[[!%4,,&!4/-)3-//*
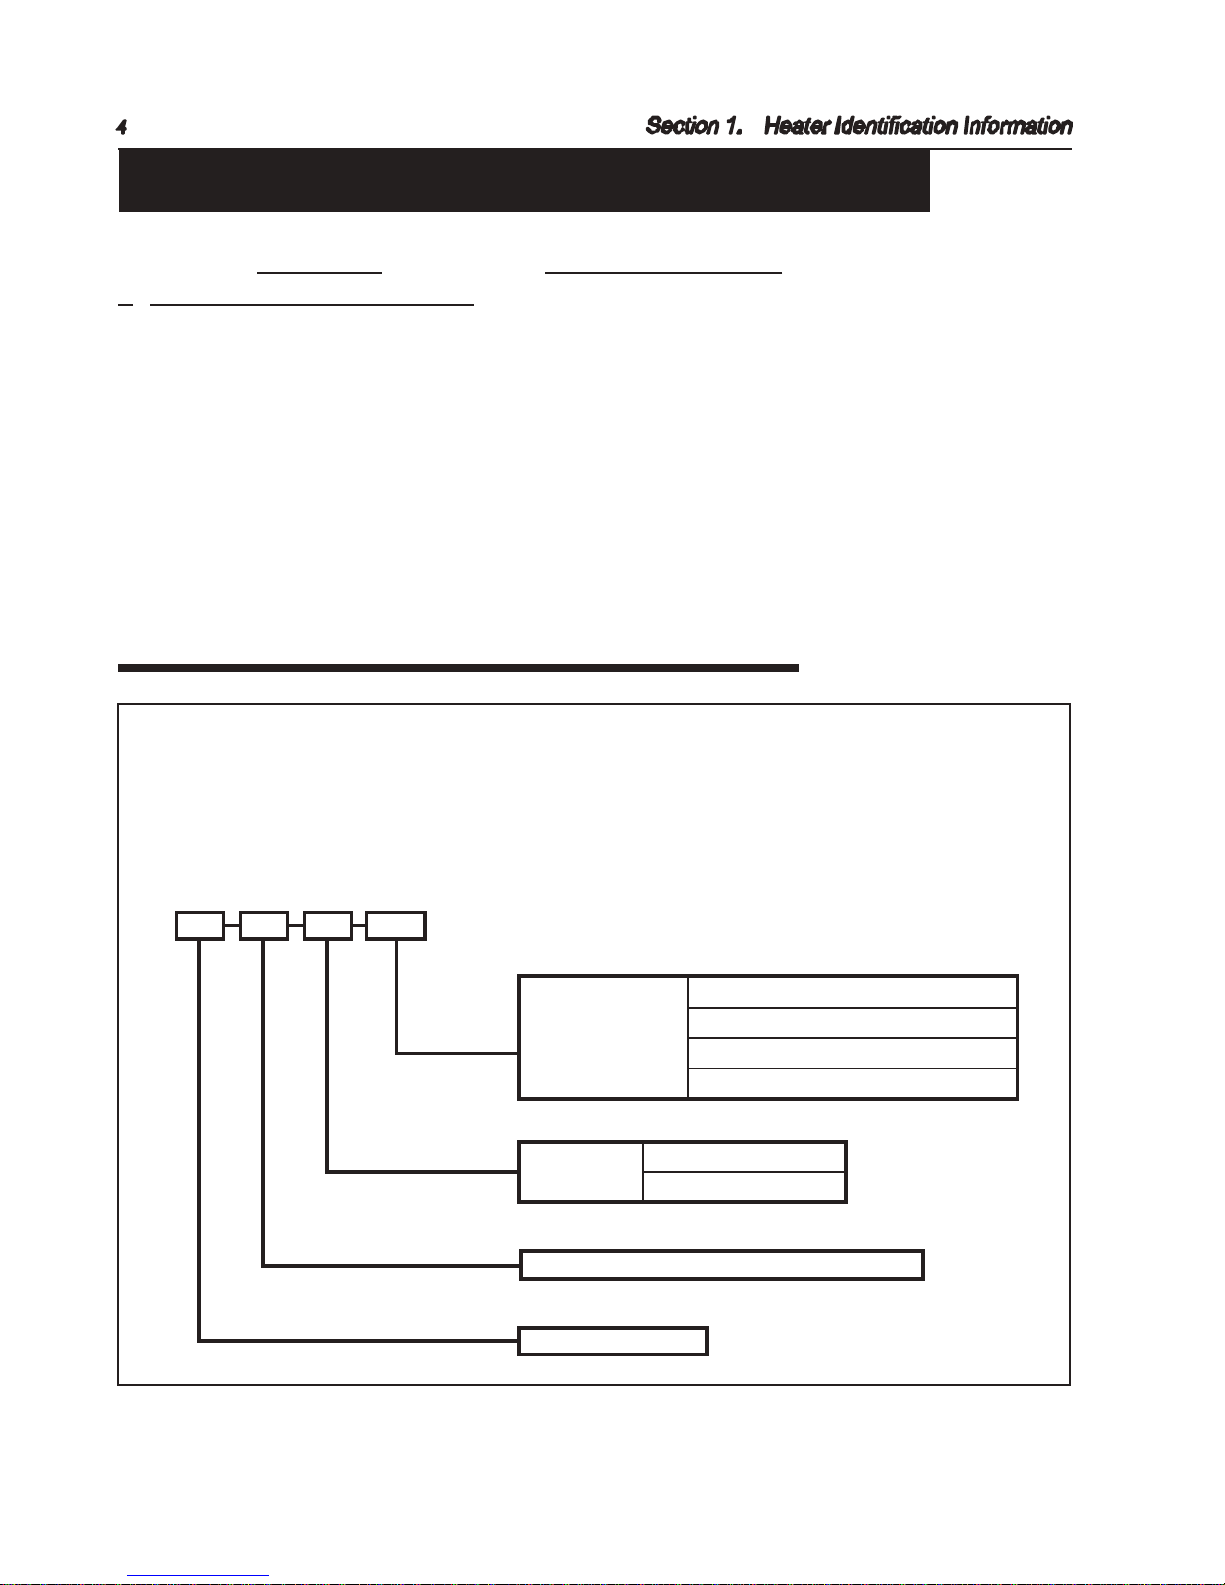
ALU[HPY!2X\H[PJ!C`Z[LTZ
;B91>-
>HTDLO!2PR
2UTURH
>HIHRHOFH

MASTERTEMP®Pool and Spa Heater Installation and User’s Guide Rev. H 9-5-12
Customer Service and Tecnincal Support
If youhave questions about orderingPentair Aquatic Systemsreplacement parts,andpool
products, please call:
Phone: (800) 831-7133
Fax: (800) 284-4151
(8A.M.to 4:30PMEasternTime/PacificTime)
Web sites:www.pentairpool.com - www.staritepool.com

Rev. H 9-5-12 MASTERTEMP®Pool and Spa Heater Installation and User’s Guide
Contents
?HFTLPO!%#!4HDTHR!5GHOTLILFDTLPO!5OIPRNDTLPO ####################################################################### (
?HFTLPO!&#!BDROLOJ!DOG!?DIHTV!5OIPRNDTLPO ######################################################################### )
Important Notices................................................................................................................................................................................. 5
Warranty Information ............................................................................................................................................................................ 5
Code Requirements.............................................................................................................................................................................. 6
ConsumerInformation andSafety Information ...................................................................................................................................... 6 - 9
GeneralSpecifications ......................................................................................................................................................................... 9
?HFTLPO!'#!5OSTDMMDTLPO ############################################################################################################# %$
Heater Description................................................................................................................................................................................ 10
Puttingthe Heaterinto Service ............................................................................................................................................................ 10
Specifications ...................................................................................................................................................................................... 11
Plumbing Connections .......................................................................................................................................................................... 12
Valves .................................................................................................................................................................................................. 12
Manual By-Pass .................................................................................................................................................................................. 12
WaterConnections ............................................................................................................................................................................... 13
BelowPool Installation ......................................................................................................................................................................... 13
Gas Connections ................................................................................................................................................................................. 14
Sediment Traps.................................................................................................................................................................................... 14
Gas PipeSizing ................................................................................................................................................................................... 15
Testing GasPressure/GasPressureRequirements ............................................................................................................................. 16
Outdoor Installation .............................................................................................................................................................................. 17
Outdoor Installation VentingGuidelines ................................................................................................................................................ 18
Indoor Venting—GeneralRequirements (Category I& Category III–clarification) ............................................................................... 19
HeaterClearances................................................................................................................................................................................ 19
OutsideVent Removal ......................................................................................................................................................................... 19
CombustionAirSupply......................................................................................................................................................................... 20
CorrosiveVaporsand PossibleCauses ................................................................................................................................................ 20
VentInstallation(Indoor Installationfor U.S.or OutdoorShelterfor Canada) ........................................................................................ 21
Vertical Venting- Negative Pressure ................................................................................................................................................... 21 -23
Horizontal or Vertical Venting - PositivePressure ................................................................................................................................ 24
ConnectingSpecialGas Venting .......................................................................................................................................................... 24 -26
OutdoorShelter Vent Installation .......................................................................................................................................................... 27
Garage or Utility Room Installation ....................................................................................................................................................... 27
ControlPanelIndexing ......................................................................................................................................................................... 28
Final Installation Check ........................................................................................................................................................................ 28
Electrical Connections .......................................................................................................................................................................... 29
Fireman’sSwitchConnection/Remote ControlConnections .................................................................................................................. 30
MasterTempHeaterWiringDiagram ..................................................................................................................................................... 31
Electrical Schematic LadderDiagram ................................................................................................................................................... 32
?HFTLPO!(#!;QHRDTLPO############################################################################################################### ''
Basic System Operation ...................................................................................................................................................................... 33
HSI (Hot-Surface Ignition) Lighting/Operation ....................................................................................................................................... 33
Operating ............................................................................................................................................................................................. 34
To Turn Off Gas to Appliance ............................................................................................................................................................... 34
Safety Controls .................................................................................................................................................................................... 35 - 37
?HFTLPO!)#!@RPUEMHSKPPTLOJ ################################################################################################### ',
InitialTroubleshootingandTroubleshootingChart ................................................................................................................................. 38
Heater Will Not FireTroubleshooting .................................................................................................................................................... 39 -42
LED Diagnostics.................................................................................................................................................................................. 43 -44
Burner / HeatExchanger Troubleshooting ............................................................................................................................................ 45
?HFTLPO!*#!8DLOTHODOFH########################################################################################################## (*
Care andMaintenance .......................................................................................................................................................................... 46
PressureRelief Valve........................................................................................................................................................................... 46
After Start-Up ...................................................................................................................................................................................... 47
Spring,Falland Winter Operation ......................................................................................................................................................... 47
MaintainingPoolTemperature............................................................................................................................................................... 48
Energy SavingTips .............................................................................................................................................................................. 49
Chemical Balance ................................................................................................................................................................................ 48- 49
ReplacementParts .............................................................................................................................................................................. 50- 54
MASTERTEMP®Pool and Spa Heater Installation and User’s Guide Rev. H 9-5-12
La
Rev. H 9-5-12 MASTERTEMP®Pool and Spa Heater Installation and User’s Guide
=a`YdSfg^Sf[a`e!a`!kagd!bgdUZSeW!aX!S!FSefWdLW_b!Z[YZ!bWdXad_S`UW!ZWSf[`Y!ekefW_+!IdabWd![`efS^^Sf[a`!S`V!eWdh[UW!aX
kagd!`Wi!ZWSf[`Y!ekefW_!S`V!UaddWUf!UZW_[US^!_S[`fW`S`UW!aX!fZW!iSfWd!i[^^!W`egdW!kWSde!aX!W`\ak_W`f+!LZW!FSefWdLW_b
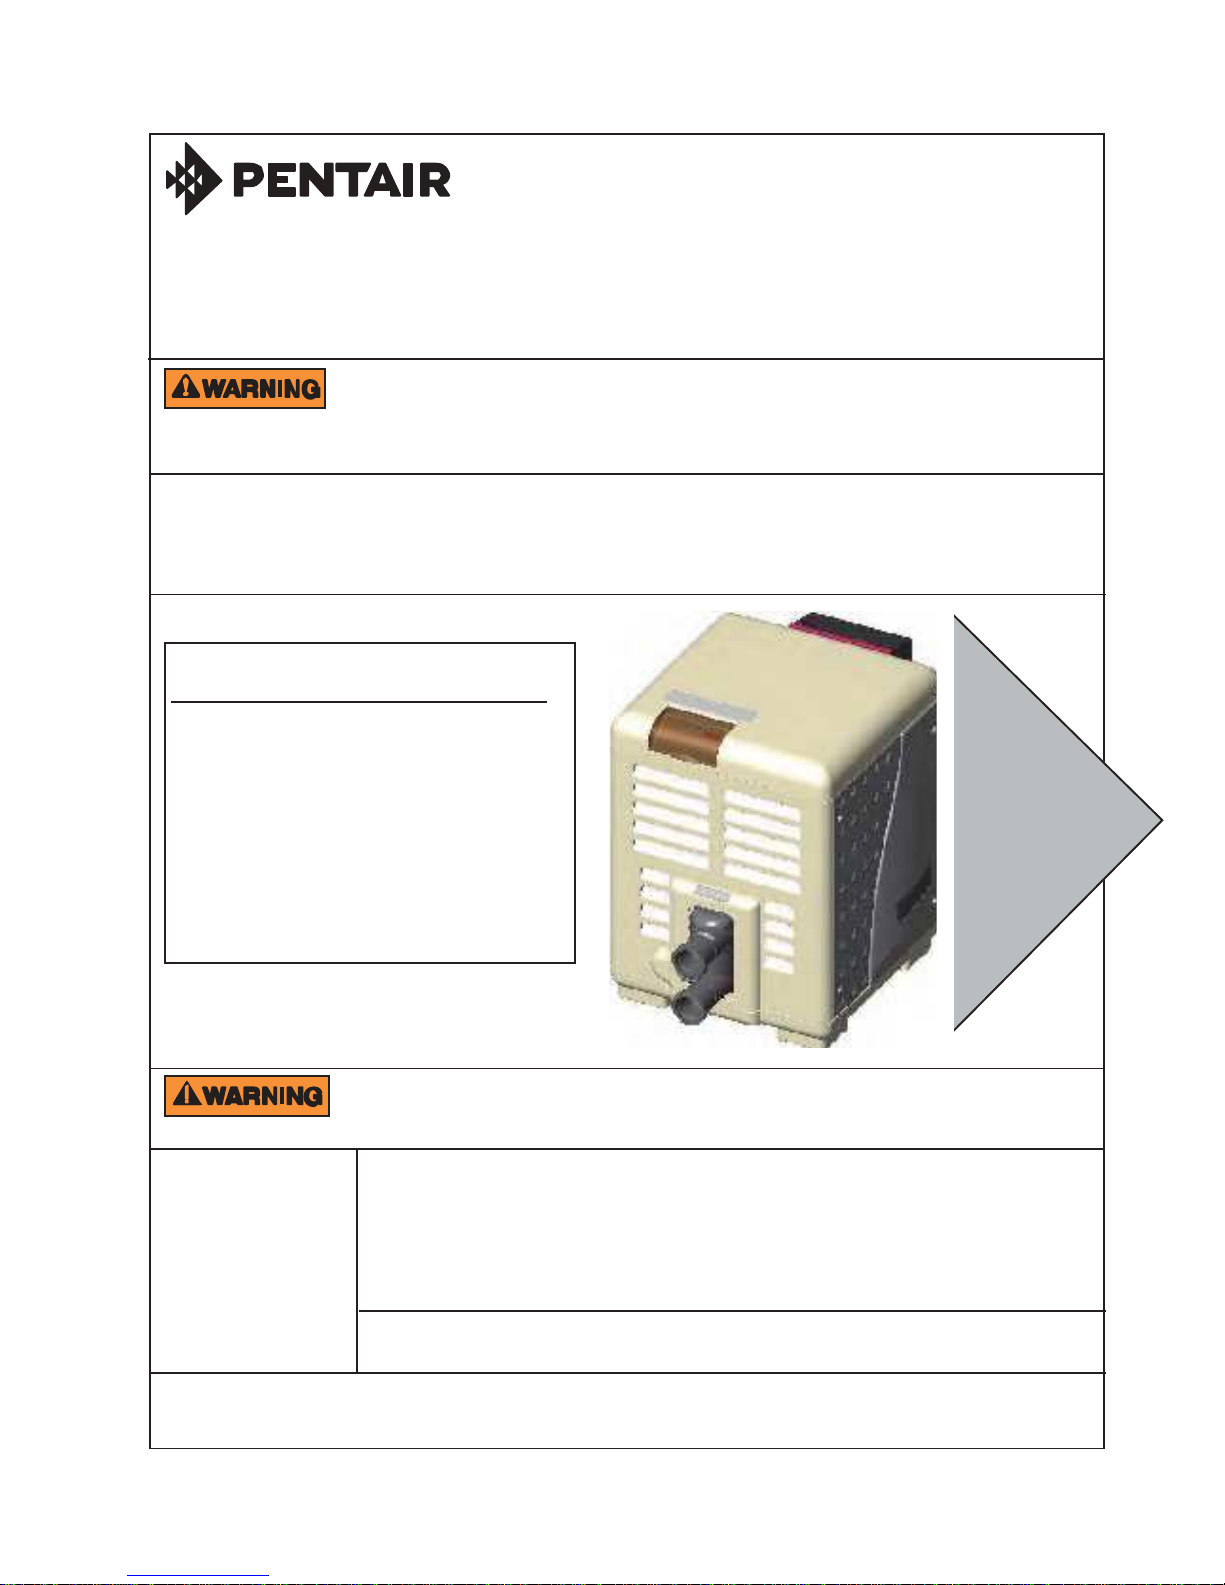
ZWSfWd![e! S!Ua_bSUf)!^[YZfiW[YZf)! WXX[U[W`f)![`VgUWV*VdSXf)!YSe!X[dWV!Z[YZ!bWdXad_S`UW!baa^!S`V!ebS! ZWSfWd!fZSf!US`!TW
V[dWUf^k!Ua``WUfWV!fa!eUZWVg^W!1-!IN=!b[bW+!LZW!FSefWdLW_b!ZWSfWd!S^ea!Ua_We!Wcg[bbWV!i[fZ!fZW!IW`fS[d!_g^f[Xg`Uf[a`
fW_bWdSfgdW!Ua`fda^^Wd!iZ[UZ! eZaie)!Sf!S! Y^S`UW)!fZW! bdabWd! Xg`Uf[a`[`Y!aX! fZW!ZWSfWd+!;^^!FSefWdLW_b!ZWSfWde!SdW
VWe[Y`WV!i[fZ!S!V[dWUf![Y`[f[a`!VWh[UW)!BKC!&Zaf*egdXSUW! [Y`[f[a`')!iZ[UZ!W^[_[`SfWe!fZW!`WWV!Xad! S!efS`V[`Y!b[^af+!LZW
FSefWdLW_b!ZWSfWd!dWcg[dWe!S`!WjfWd`S^!baiWd!eagdUW!&./-,/1-!N;=!3-!Bl'!fa!abWdSfW+
A?5391;!9 =AB@C3B9>=A!B>!>E=5@0!JWfS[`!fZ[e!_S`gS^!Xad!XgfgdW!dWXWdW`UW+!LZ[e![`efdgUf[a`!_S`gS^!bdah[VWe
abWdSf[`Y![`efdgUf[a`e)![`efS^^Sf[a`!S`V!eWdh[UW![`Xad_Sf[a`!!Xad!fZW!FSefWdLW_b!Z[YZ!bWdXad_S`UW!ZWSfWd+!LZW![`Xad_Sf[a`
[`!fZ[e!_S`gS^!Sbb^[We!fa!S^^!FSefWdLW_b!ZWSfWd!_aVW^e+!@514!1=4!@5D95E!B89A!<1=C1;!3><?;5B5;F%
[f![e!hWdk![_badfS`f!fZSf!fZW!ai`Wd,[`efS^^Wd!dWSV!S`V!g`VWdefS`V!fZW!eWUf[a`!UahWd[`Y![`efS^^Sf[a`![`efdgUf[a`e)!S`V!dWUaY`[lW
fZW!^aUS^!S`V!efSfW!UaVWe!TWXadW![`efS^^[`Y!fZW!FSefWdLW_b!ZWSfWd+!Cfe!geW!i[^^!dWVgUW!eWdh[UW!US^^e!S`V!UZS`UW!aX![`\gdk
S`V!i[^^!^W`YfZW`!bdaVgUf!^[XW+!B[efadk!S`V!WjbWd[W`UW!ZSe!eZai`!fZSf!_aef!ZWSfWd!VS_SYW![e!USgeWV!Tk![_bdabWd![`efS^^Sf[a`
bdSUf[UWe+
IMPORTANTNOTICES
+++@ad!fZW![`efS^^Wd!S`V!abWdSfad!aX!fZW!FSefWdLW_b!baa^!S`V!ebS!ZWSfWd+!LZW!_S`gXSUfgdWdte!iSddS`fk!_Sk!TW!ha[V![X)!Xad
S`k!dWSea`)!fZW!ZWSfWd![e![_bdabWd^k![`efS^^WV!S`V,ad!abWdSfWV+!<W!egdW!fa!Xa^^ai!fZW![`efdgUf[a`e!eWf!XadfZ![`!fZ[e!_S`gS^+
CX!kag!`WWV!S`k!_adW![`Xad_Sf[a`)!ad![X! kag!ZShW!S`k!cgWef[a`e!dWYSdV[`Y!fa! fZ[e!baa^!ZWSfWd)!b^WSeW!Ua`fSUf!IW`fS[d
;cgSf[U!KkefW_e!Sf!&5--'!50.*4.00+
WARRANTYINFORMATION
LZW!FSefWdLW_b!baa^!ZWSfWd![e!ea^V!i[fZ!S!^[_[fWV!XSUfadk!iSddS`fk+!!;MB@FCF@! ABQ>FIP!>OB!ABP@OF?BA!LK!QEB!T>OO>KQU
OBDFPQO>QFLK!@>OA!TEF@E!FP!FK@IRABA!TFQE!QEB!MOLAR@Q'!!JWfgd`!fZW!iSddS`fk!dWY[efdSf[a`!USdV!SXfWd!X[^^[`Y![`!fZW!eWd[S^
`g_TWd!Xda_!fZW!dSf[`Y!b^SfW![`e[VW!fZW!ZWSfWd+
<EMSAIQ!1PTASIC! =XRSELR!HIGH! RSAMDAQDR! NF!EWCEKKEMCE! IMCKTDE! A!ONKICX!NF!CNMSIMTNTR!OQNDTCS!ILOQNUELEMS!QERTKSIMG
IM!XNTQ!RSASE%NF%SHE%AQS! HEASEQ&! ?E! QEREQUE!SHE!QIGHS! SN!LAJE!ILOQNUELEMSR! VHICH! CHAMGE!SHE!ROECIFICASINMR! NF!SHE
HEASEQ!VISHNTS! IMCTQQIMG!AM! NBKIGASINM! SN!TODASE! SHE!CTQQEMS!HEASEQ!EPTIOLEMS&
BNKYK! NKGZKXY!GXK!JKYOMTKJ! LUX! ZNK!NKGZOTM!UL!INRUXOTK%!HXUSOTK!UX!YGRZ!Y^YZKS! Y]OSSOTM! VUURY!GTJ!YVGY!UX
OT!TUT&YZGZOUTGX^! OTYZGRRGZOUTY%!GTJ! YNU[RJ! TK\KX! HK! KSVRU^KJ! LUX! [YK! GY!YVGIK! NKGZOTM!HUORKXY! UX! MKTKXGR
V[XVUYK!]GZKX!NKGZKXY'!BNK!SGT[LGIZ[XKX`Y!]GXXGTZ^!SG^! HK! \UOJ!OL%!LUX!GT^!XKGYUT%!ZNK!NKGZKX!OY!OSVXUVKXR^
OTYZGRRKJ! GTJ(UX!UVKXGZKJ'!2K! Y[XK!ZU!LURRU]! ZNK!OTYZX[IZOUTY!YKZ!LUXZN! OT!ZNOY!SGT[GR'
CAUTION
OPERATING THIS HEATER CONTINUOUSLY AT WATER TEMPERATURE BELOW 68° F. WILL CAUSE HARMFUL
CONDENSATION AND WILL DAMAGE THE HEATER AND VOID THE WARRANTY. Do not use the heater to protect
pools or spas from freezing if the finalmaintenance temperature desired is below 68° F., as this willcause condensation
related problems.
Section 2: Warning and Safety Instructions
IMPORTANT SAFETY INSTRUCTIONS
SAVE THESE INSTRUCTIONS
MASTERTEMP
®
Pool and Spa Heater
MASTERTEMP®Pool and Spa Heater Installation and User’s Guide Rev. H 9-5-12
CONSUMERINFORMATIONANDSAFETY
WARNING
The U.S. Consumer Product Safety Commission warns that elevated water temperature can be hazardous.
See below for water temperature guidelines before setting temperature.
.+ KbS!ad!Zaf!fgT!iSfWd!fW_bWdSfgdWe!eZag^V!`WhWd!WjUWWV!.-1~!@!&1-~!='+!!;!fW_bWdSfgdW!aX!.--~!@!&05~!='![e!Ua`e[VWdWV!eSXW!Xad!S
ZWS^fZk!SVg^f+!!KbWU[S^!USgf[a`![e!egYYWefWV!Xad!kag`Y!UZ[^VdW`+
/+ >d[`][`Y!aX!S^UaZa^[U!TWhWdSYWe!TWXadW!ad!Vgd[`Y!ebS!ad!Zaf!fgT!geW!US`!USgeW!Vdaie[`W ee!iZ[UZ!Uag^V!^WSV!fa!g`Ua`eU[age`Wee
S`V!egTeWcgW`f^k!dWeg^f![`!Vdai`[`Y+
0+ IdWY`S`f!ia_W`!TWiSdW"!!KaS][`Y![`!iSfWd!STahW!.-/~!@!&06~!='!US`!USgeW!XWfS^!VS_SYW!Vgd[`Y!fZW!X[def!fZdWW!_a`fZe!aX!bdWY`S`Uk
&dWeg^f[`Y![`!fZW!T[dfZ!aX!S!TdS[`*VS_SYWV!ad!VWXad_WV!UZ[^V'+!!IdWY`S`f!ia_W`!eZag^V!ef[U]!fa!fZW!.--~!@!&05~!='!_Sj[_g_!dg^W+
1+ <WXadW!W`fWd[`Y!fZW!ebS!ad!Zaf!fgT)!fZW!geWd!eZag^V!UZWU]!fZW!iSfWd!fW_bWdSfgdW!i[fZ!S`!SUUgdSfW!fZWd_a_WfWd+!!KbS!ad!Zaf!fgT
fZWd_aefSfe!_Sk!Wdd![`!dWYg^Sf[`Y!iSfWd!fW_bWdSfgdWe!Tk!Se!_gUZ!Se!1~!@!& /+/~!='+
2+ IWdea`e!i[fZ!S!_WV[U S^!Z[efadk!aX!ZWSdf!V[eWSeW)!U[dUg^Sfadk!bdaT^W_e)!V[STWfWe!ad!T^aaV!bdWeegdW!bdaT^W_e!eZag^V!aTfS[`!fZW[d
bZke[U[S`%e!SVh[UW!TWXadW!ge[`Y!ebSe!ad!Zaf!fgTe+
3+ IWdea`e!fS][`Y!_WV[USf[a`!iZ[UZ
Rev. H 9-5-12 MASTERTEMP®Pool and Spa Heater Installation and User’s Guide
SAFETYINFORMATION
The MasterTemp®pool heaters are designed and manufactured to providemany years of safe and reliable service when
installed, operated and maintainedaccording to theinformation inthismanual.Throughoutthemanual,safetywarnings and
cautions are identifiedby the “ “symbol. Be sure to read and comply with all of the warnings andcautions.
WARNING —
This heater is equipped with an unconventional gas control valve that is factory set with a
manifold pressure of -.2 inches wc.
Improper installation, adjustment, alteration, service or
maintenancecancause property damage, personalinjury or loss of life. Installation or servicemust
be performed by a qualified installer, service agency or the gassupplier. If this control isreplaced, it
must be replaced with an identical control.
Do not attempt to adjust the gas flow by adjusting the regulator setting.
CARBON MONOXIDE GAS IS DEADLY
READ OWNERS MANUAL COMPLETELY BEFORE OPERATING
THIS PRODUCT MUST BE INSTALLED AND SERVICED BY A PROFESSIONAL SERVICE
TECHNICIAN, QUALIFIED IN POOL HEATER INSTALLATION. Some jurisdictions require that
installers be licensed. Check with your local building authority about contractor licensingrequirements.
Improper installationand/oroperationcouldcreatecarbon monoxide gasandfluegaseswhichcould cause
serious injuryor death. Improper installation and/or operation will void the warranty.
Exhaustfromthis pool heater containstoxic levelsof carbon monoxide, a dangerous,poisonousgas
you cannot see or smell. Symptoms of carbon monoxide exposure or poisoning include dizziness,
headache, nausea, weakness, sleepiness, muscular twitching, vomiting and inability to thinkclearly.
IF YOU EXPERIENCE ANYOF THE ABOVE SYMPTOMS, IMMEDIATELY TURNOFF THEPOOL
HEATER,LEAVETHEVICINITYOFTHEPOOLORSPAANDGETINTOFRESHAIRIMMEDIATELY.
THE POOL HEATER MUST BE THOROUGHLY TESTED BY A GAS PROFESSIONAL BEFORE
RESUMING OPERATION.
EXCESSIVECARBON MONOXIDEEXPOSURECAN CAUSE BRAIN DAMAGE ORDEATH.
NEVERuse thispoolheater indoorswithoutspecified ventilation system(and properlyinstalledvent pipe).
NEVER use this pool heater in the home or in partly enclosedareas (suchas garages), unless
the specified ventilation system is used. If used outdoors, install far from open windows, doors,
vents and other openings.
Pentair strongly recommends that all vents, pipes and exhaust systems be initially and periodically
testedfor proper operation. Thistestingcanbe accomplishedby usinga hand-heldcarbonmonoxide
meter and/or by consulting with a gas professional.
Poolheatersmust beusedinconjunctionwith carbon monoxidedetectorsinstallednearthepool heater.
The carbon monoxide detectors must be periodically inspected for proper operation so as to insure
continued safety.Brokenor malfunctioning carbon monoxidedetectorsmustbe replacedimmediately.
DANGER —
WARNING —FOR YOUR SAFETY
Thisproduct must be installed and serviced by a professional service technician, qualified in pool
heater installation. Some jurisdictions require that installers be licensed. Check with your local
building authority about contractor licensing requirements. Improper installation and/or operation
couldcreatecarbonmonoxidegasand fluegaseswhichcouldcauseseriousinjuryordeath.Improper
installation and/or operation will void the warranty.

MASTERTEMP®Pool and Spa Heater Installation and User’s Guide Rev. H 9-5-12
SAFETYINFORMATION,(cont’d.)
WARNING —
Risk of fire or explosion from incorrect fuel use or faulty fuel conversion.
Do not try to run a
heater set up for naturalgason propane gasor viceversa.Onlyqualifiedservicetechniciansshould
attempt to convert heater from one fuel totheother. Donot attempt to alterthe ratedinput or type of
gas by changingtheorifice. If itis necessary toconvert toa different typeof gas, consultyourPentair
dealer. Serious malfunction of the burner can occur which may result in loss of life.Any additions,
changes, or conversions required in order for the appliance to satisfactorily meet the application
needs must be made by a Pentair dealer or other qualified agency using factory specified and
approved parts. The heater is available for use with natural gas or LP (propane) gas only. It is not
designed to operate with any other fuels. Refer to the nameplate for the type of gas the heater is
equipped to use.
• Use heater only with the fuel for which it is designed.
• If a fuel conversionis necessary,refer this work to a qualifiedservice technician or gas supplier
before putting the heater into operation.
WARNING —
Risk of fire or explosion from flammable vapors.
Donotstoregasoline, cleaningfluids,varnishes,
paints, or othervolatile flammable liquids near heater or in the same room with heater.
WARNING —
Risk of explosion if unit is installed near propane gas storage.
Propane (LP) gas is heavier
than air. Consult local codes and fire protection authorities about specific installation requirements
andrestrictions. Locate the heater awayfrom propane gasstorage andfillingequipmentas specified
by the Standard for the Storage and Handling of Liquefied Petroleum Gases, CAN/CSA B149.2
(latest edition)or ANSI/NFPA58 (latest edition).
WARNING —
Risk of fire, carbon monoxide poisoning, or asphyxiation if exhaust venting system leaks.
Only qualified service technicians should attempt to service the heater, as leakage of exhaust
products or flammable gas may result from incorrect servicing.
WARNING —
Risk of asphyxiation if exhaust is not correctly vented. Follow venting instructions exactly
when installing heater.
Do not use a drafthood with this heater, as the exhaust is under
pressure from the burner blower and a draft hood will allow exhaust fumes to blow into the room
housing the heater. The heater is supplied with an integral venting system for outdoor installation.
A vent conversion kit (See Page24 for Part Numbersfor ConversionKits) is available for installations
in enclosures (Canada) or indoors (U.S.). Use thespecifiedventing, and only the specifiedventing,
when heater isinstalled in an enclosure or indoors. In Canada, this pool heater can only beinstalled
outdoors or in an enclosurethat is not normallyoccupied and has no openings directly intooccupied
areas. See Page 20 for enclosure venting requirements.
CAUTION —
Label all wires prior to disconnection when servicing controls. Wiring errors can cause
improper and dangerous operation. Wiring errors can also destroy the control board.
• Connect heater to
120or240
Volt, 60Hz., Single Phase power only.
• Verify proper operation after servicing.
• Do not allow children to play on or around heater or associated equipment.
• Neverallow children to use the pool or spa without adult supervision.
• Read and follow other safety information contained in thismanual prior to operating this pool
heater.

Rev. H 9-5-12 MASTERTEMP®Pool and Spa Heater Installation and User’s Guide
GENERALSPECIFICATIONS
NOTICE:
• Combustion air contaminated by corrosivechemical fumes can damage the heater and will void the warranty.
• The Combination Gas Control Valve on this heater differs from most appliance gas controls. If it must be replaced,
for safety reasonsreplace it only with an identical gas control.
• The access door panels must be in place to provide proper ventilation. Do not operate the heaterfor more than five (5)
minutes with the access door panels removed.
• This heater is design certified by CSA International as complying with the Standard for Gas Fired Pool Heaters,
ANSI Z21.56/CSA 4.7, and is intended for use in heating fresh water swimming pools or spas.
• Theheater isdesignedfor the heatingof chlorine, bromineor salt systemswimmingpools and spas.It should
NOT
be
used as a space heating boiler, or general purpose water heater.
• The heater is design certified by CSA International for installation on combustible flooring. Specified minimum
clearances must be maintained to combustible surfaces (see “Heater Clearances”, page 19).
• The heater should be located in anarea whereleakage of the heater orconnections will not result in damageto the
areaadjacent tothe heater or tothe structure. When such locations cannot be avoided, it is recommendedthat a
suitable drain pan, adequately drained, be installed under the heater. The pan must not restrict air flow.
• Theheatermay notbe installedwithin5 ft. (1.5M ) oftheinside surfaceof a pool or spaunlessit isseparated by a solid
fence, wall or other permanent barrier.
CONSUMER INFORMATION ANDSAFETY
WARNING
The U.S. Consumer Product Safety Commission warns that carbon monoxide is an "invisible killer". Carbon monoxide
is a colorless and odorless gas.
.+ =SdTa`!_a`aj[VW![e!bdaVgUWV!Tk!Tgd`[`Y!XgW^)![`U^gV[`Y!`SfgdS^!YSe!S`V!bdabS`W+
/+ IdabWd![`efS^^Sf[a`)!abWdSf[a`!S`V!_S[`fW`S`UW!aX!XgW^*Tgd`[`Y!Sbb^[S`UWe![`!fZW!Za_W![e!fZW!_aef![_badfS`f
XSUfad![`!dWVgU[`Y!USdTa`!_a`aj[VW!ba[ea`[`Y+
0+ <W!egdW!fZSf!XgW^!Tgd`[`Y!Sbb^[S`UWe!egUZ!Se!ZWSfWde!SdW![`efS^^WV!Tk!bdaXWee[a`S^e!SUUadV[`Y!fa!_S`gXSUfgdWd%e
[`efdgUf[a`e!S`V!UaVWe+
1+ ;^iSke!Xa^^ai!fZW!_S`gXSUfgdWd%e!V[dWUf[a`e!Xad!eSXW!abWdSf[a`+
2+ BShW!fZW!ZWSf[`Y!ekefW_!&[`U^gV[`Y!hW`fe'![`ebWUfWV!S`V!eWdh[UWV!S``gS^^k!Tk!S!fdS[`WV!eWdh[UW!fWUZ`[U[S`+
3+ ?jS_[`W!hW`fe!dWYg^Sd^k!Xad![_bdabWd!Ua``WUf[a`e)!h[e[T^W!UdSU]e)!dgef!ad!efS[`e+
4+ C`efS^^!TSffWdk*abWdSfWV!USdTa`!_a`aj[VW!S^Sd_e+!LZW!S^Sd_e!eZag^V!TW!UWdf[X[WV!fa!fZW!dWcg[dW_W`fe!aX!fZW
_aef!dWUW`f!ME)!C;K)!=K;!S`V!C;IFH!efS`VSdV!Xad!USdTa`!_a`aj[VW!S^Sd_e+!LWef!USdTa`!_a`aj[VW!S^Sd_e
dWYg^Sd^k!S`V!dWb^SUW!VWSV!TSffWd[We+
MASTERTEMP®Pool and Spa Heater Installation and User’s Guide Rev. H 9-5-12
?HFTLPO! '-! ! 5OSTDMMDTLPO! 5OSTRUFTLPOS
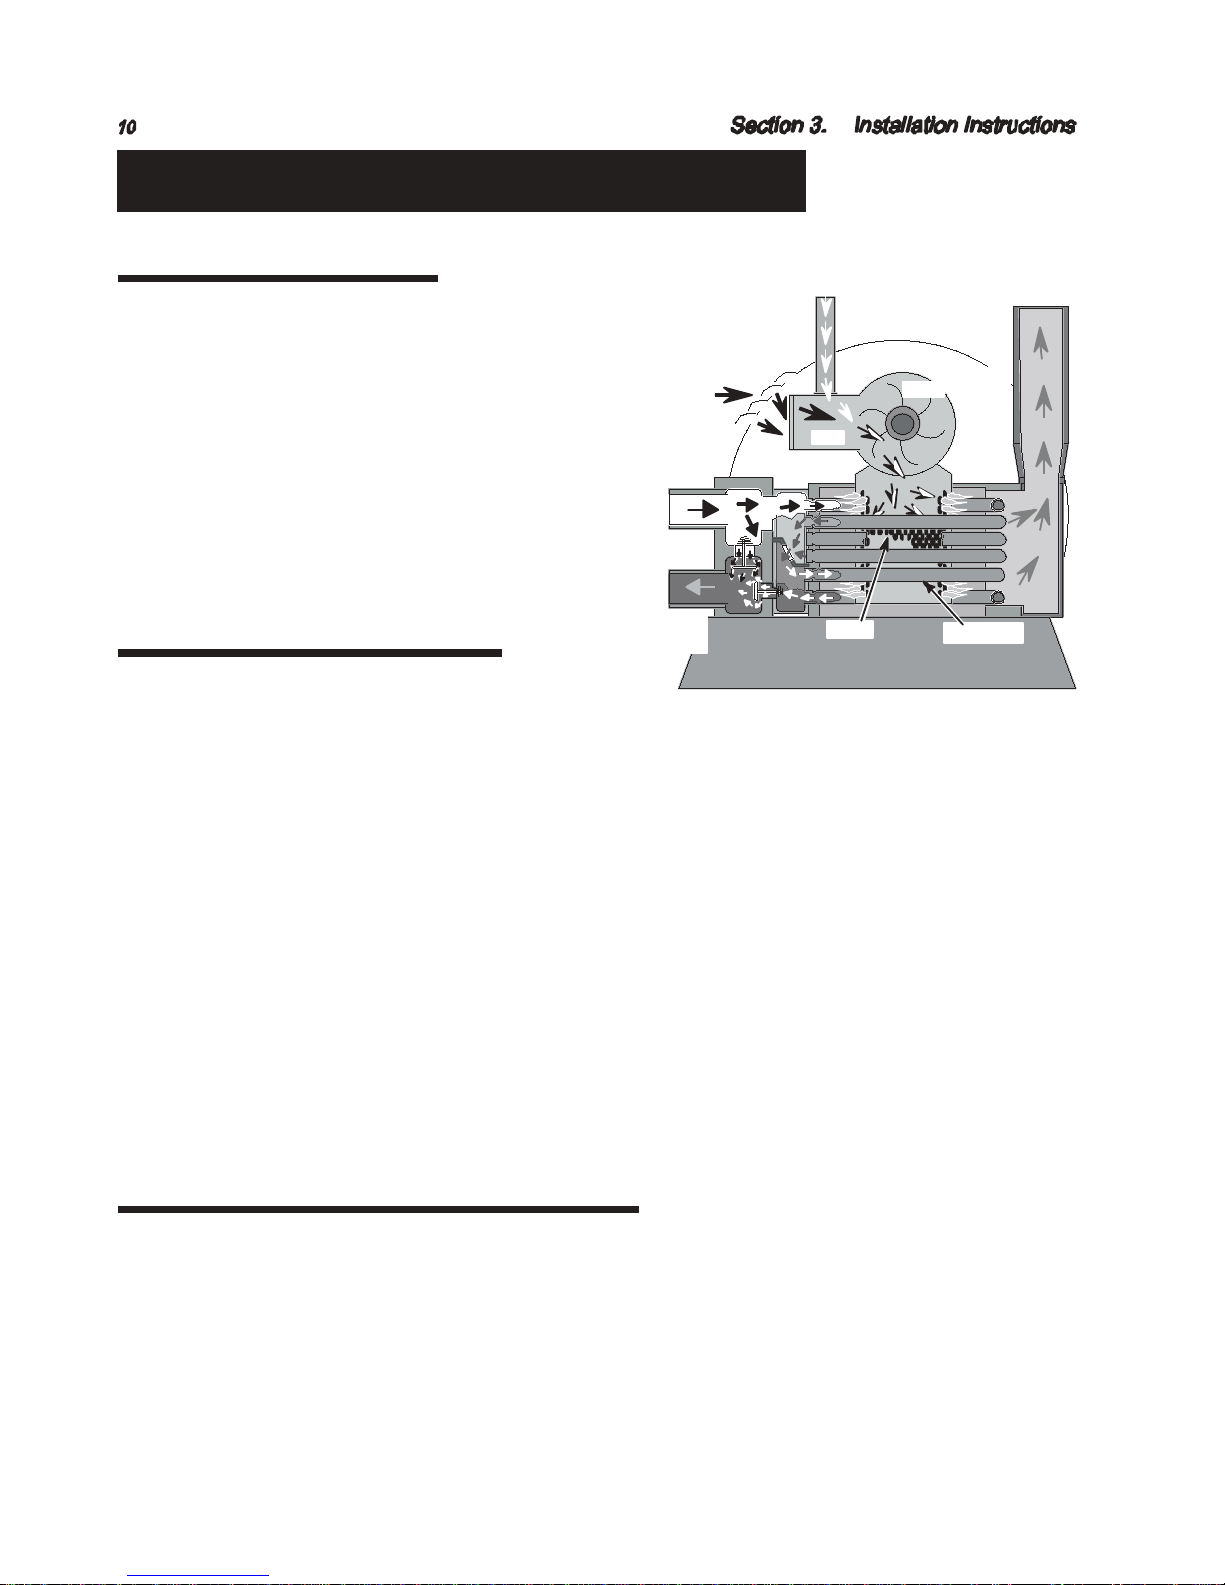
Gas
Air
Mixer
Blower
Inlet
(Cold
Water)
Exhaust
HeatingCoils
Outlet
(Mixed
Water)
Burner
Figure1.
HEATERDESCRIPTION
@[YgdW!.![e!S!V[SYdS_!aX!fZW!ZWSfWd!eZai[`Y!Zai![f!abWdSfWe+!IdWU[eW^k
_SfUZWV!ad[X[UW! b^SfWe!_WfWd! fZW!S[d! S`V! YSe![`fa!fZW!_[jWd+! LZW
T^aiWd!VdSie!fZW!S[d!S`V!YSe!fZdagYZ!fZW!_[jWd!S`V!XadUWe![f![`fa
fZW!Tgd`Wdte!X^S_W!Za^VWd+!;!eWS^WV!ZWSf!WjUZS`YWd!egddag`Ve!fZW
X^S_W!Za^VWd)!V[eUZSdY[`Y!WjZSgef!YSeWe!agf!fZW!X^gW+
Lia![`UZ!IN=!iSfWd!b[b[`Y!Ua``WUfe!V[dWUf^k!fa!fZW!_S`[Xa^V,ZWSVWd
a`!fZW!ZWSf!WjUZS`YWd!ge[`Y!/#!IN=!e^[b!g`[a`e!bdah[VWV!i[fZ!fZW
ZWSfWd+!LZW!agfWd!_S`[Xa^V!dW_S[`e!Uaa^8!`a!ZWSf!e[`]e!SdW!dWcg[dWV+
;!fZWd_S^!dWYg^Sfad!S`V!S`![`fWd`S^!TkbSee!dWYg^SfW!fZW!iSfWd!X^ai
fZdagYZ!fZW! ZWS f! WjUZS`YWd! f a!_S[`fS[ `!fZW! UaddWU f! agf^Wf
fW_bWdSfgdW+!LZW!ZWSfWd!abWdSfad!Ua`fda^!bS`W^!TaSdV!SeeW_T^k![e
^aUSfWV!a`!fab!aX!fZW!ZWSfWd+
SEQUENCE OFOPERATION
;`! W^WUfda`[U! fW_bWdSfgdW! eW`e[`Y! ZNKXSOYZUX! [`!fZW!_S`[Xa^V
SVSbfWd![`^Wf!Ua`fda^e! fZW!ZWSfWd!abWdSf[a`+! OZW`!fZW![`^Wf!iSfWd
fW_bWdSfgdW!Vdabe! TW^ai! fZW!fW_bWdSfgdW! eWf! a`!fZW!UVKXGZOTM
IUTZXUR)!fZW!H[XTKX!IUTZXURRKX!egbb^[We!baiWd!fa!fZW!Ua_Tgef[a`
GOX!HRU]KX!fZdagYZ!S!eWd[We!aX!YGLKZ^!OTZKXRUIQY+!LZW![`fWd^aU]e!Ua`e[ef!aX7
n fZW!VXKYY[XK!Y]OZIN!&?A')!iZ[UZ!eW`eWe!fZSf!fZW!bg_b![e!dg``[`Y)
n fZW!NOMN!ROSOZ!Y]OZIN!&8;A')!iZ[UZ!abW`e![X!fZW!ZWSf!WjUZS`YWd!agf^Wf!fW_bWdSfgdW!YaWe!STahW!.02~!@!&24~!=')!S`V
n fZW!GOX!LRU]!Y]OZIN!&16A')!iZ[UZ!eW`eWe!fZW!bdWeegdW!Vdab!SUdaee!fZW!S[d!_WfWd[`Y!ad[X[UW)
n fZW!G[ZUSGZOI!MGY!YN[Z&ULL!&17A'!ei[fUZ)!iZ[UZ!abW`e![X!fZW!ZWSf!WjUZS`YWd!agf^Wf!fW_bWdSfgdW!YaWe!STahW!.1-~!@
&3-~!='+
n fZW!YZGIQ!LR[K!YKTYUX!&A6A')!iZ[UZ!eZgfe!Vai`!fZW!ZWSfWd![X!fZW!X^gW!YSe!fW_bWdSfgdW!dWSUZWe!15-~!@!&/16~!='+
LZW!S[d!X^ai!ei[fUZ!&;@K'!eW`eWe!fZW!bdWeegdW!Vdab!SUdaee!fZW!S[d!_WfWd[`Y!ad[X[UW+!;e!eaa`!Se!fZWdW![e!egXX[U[W`f!S[d!X^ai)
fZW!;@K!U^aeWe)!U^ae[`Y!fZW!U[dUg[f!fa!fZW!NUZ!Y[XLGIK!OMTOZKX!&8A9')!iZ[UZ![Y`[fWe!fZW!XgW^!_[jfgdW+!H`!S!US^^!Xad!ZWSf)!fZW
T^aiWd!S`V!BKC!SdW!W`WdY[lWV+!C`!STagf!/-!eWUa`Ve)!fZW!YSe!hS^hW!abW`e!S`V![Y`[f[a`!aUUgde+!LZW!BKC!fZW`!ei[fUZWe!fa!S
eW`e[`Y!_aVW!S`V!_a`[fade!fZW!X^S_W+
LZW!ZWSfWd![e! Wcg[bbWV!i[fZ!S!V[Y[fS^!abWdSf[`Y!Ua`fda^! fZSf!W`ST^We!fZW!geWd!fa!bdW*eWf!fZW!VWe[dWV!baa^!S`V!ebS!iSfWd
fW_bWdSfgdWe+!LZW!Ua`fda^!W`ST^We!fZW!geWd!fa!eW^WUf!TWfiWW`!baa^!S`V!ebS!ZWSf[`Y)!S`V!XWSfgdWe!S!V[Y[fS^!V[eb^Sk!fZSf
[`V[USfWe!fZW!iSfWd!fW_bWdSfgdW+
PUTTINGTHEHEATER INTO SERVICE
CX!fZW!ZWSfWd![e![`efS^^WV!TW^ai!fZW!^WhW^!aX!fZW!baa^)!ad!_adW!fZS`!fia!XWWf!STahW!baa^!^WhW^)!fZW!bdWeegdW!ei[fUZ!eWff[`Y
eZag^V!TW!SV\gefWV+!KWW!O;L?J!IJ?KKMJ?!KOCL=B)![`!fZW!K;@?LQ!=HGLJHEK!KWUf[a`+
<WXadW!bgff[`Y!fZW!ZWSfWd![`fa!eWdh[UW!Xad!fZW!X[def!f[_W)!Xa^^ai!fZW![`efdgUf[a`e!g`VWd!u<?@HJ?!KL;JL*MIv!&bSYW!00'![`
fZW! Xda`f! aX!fZ[e! _S`gS^+! =ZWU]! Xad! bdabWd! abWdSf[a`!aX! fZW!ZWSfWd! Tk! Xa^^ai[`Y!fZW!efWbe!g`VWd! uHI?J;LCHG
CGKLJM=LCHGK+v
>S_SYW!fa!Wcg[b_W`f!USgeWV!Tk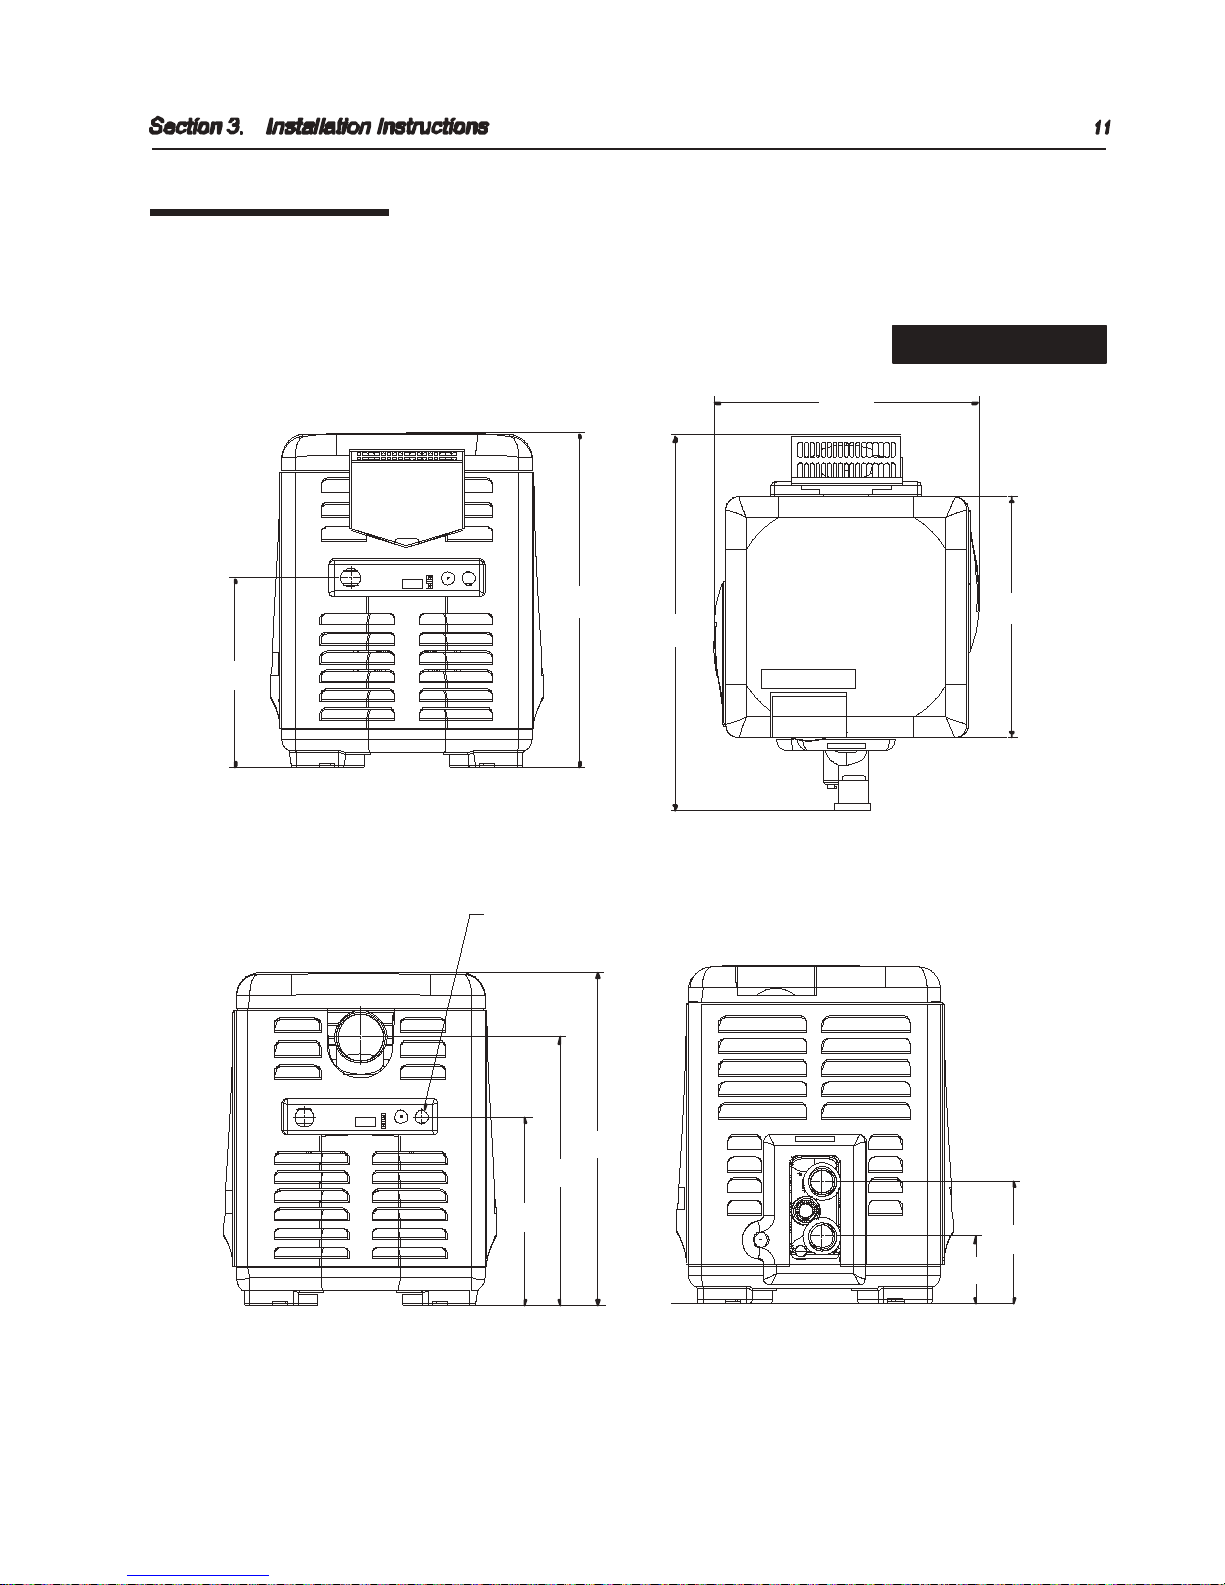
Rev. H 9-5-12 MASTERTEMP®Pool and Spa Heater Installation and User’s Guide
LZWeW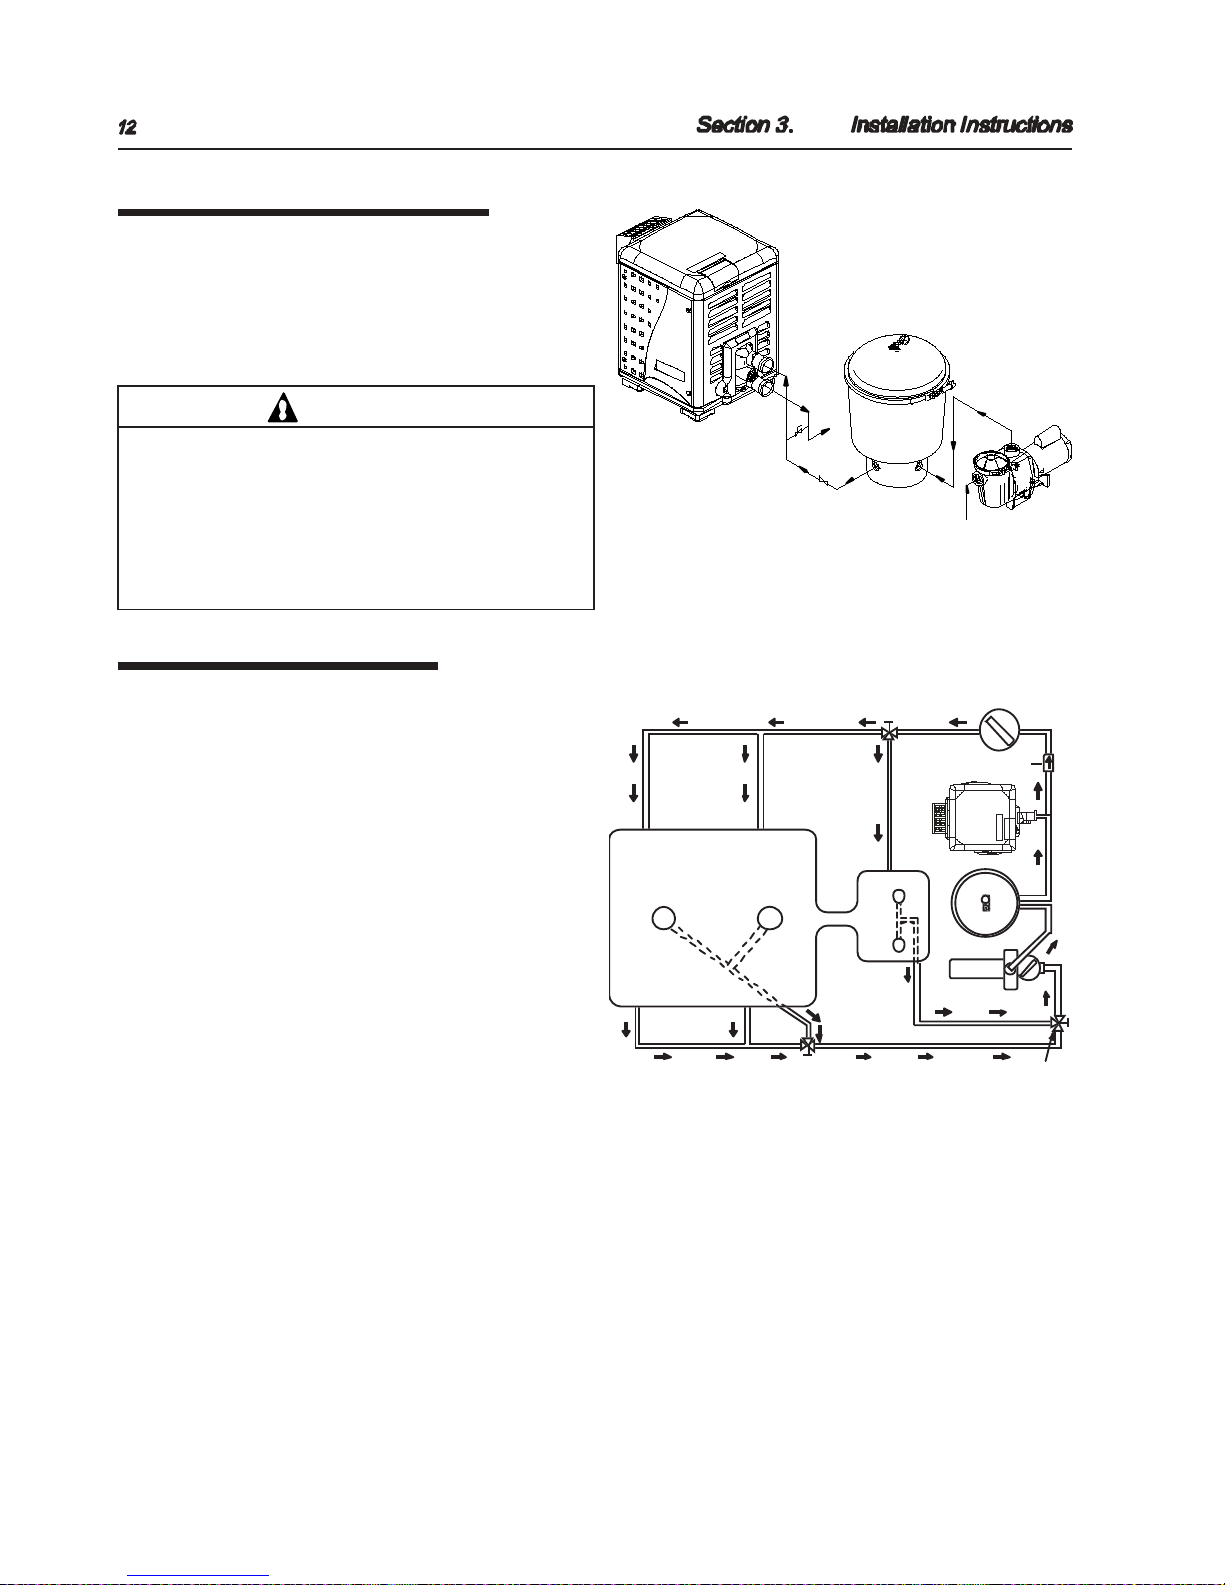
MASTERTEMP®Pool and Spa Heater Installation and User’s Guide Rev. H 9-5-12
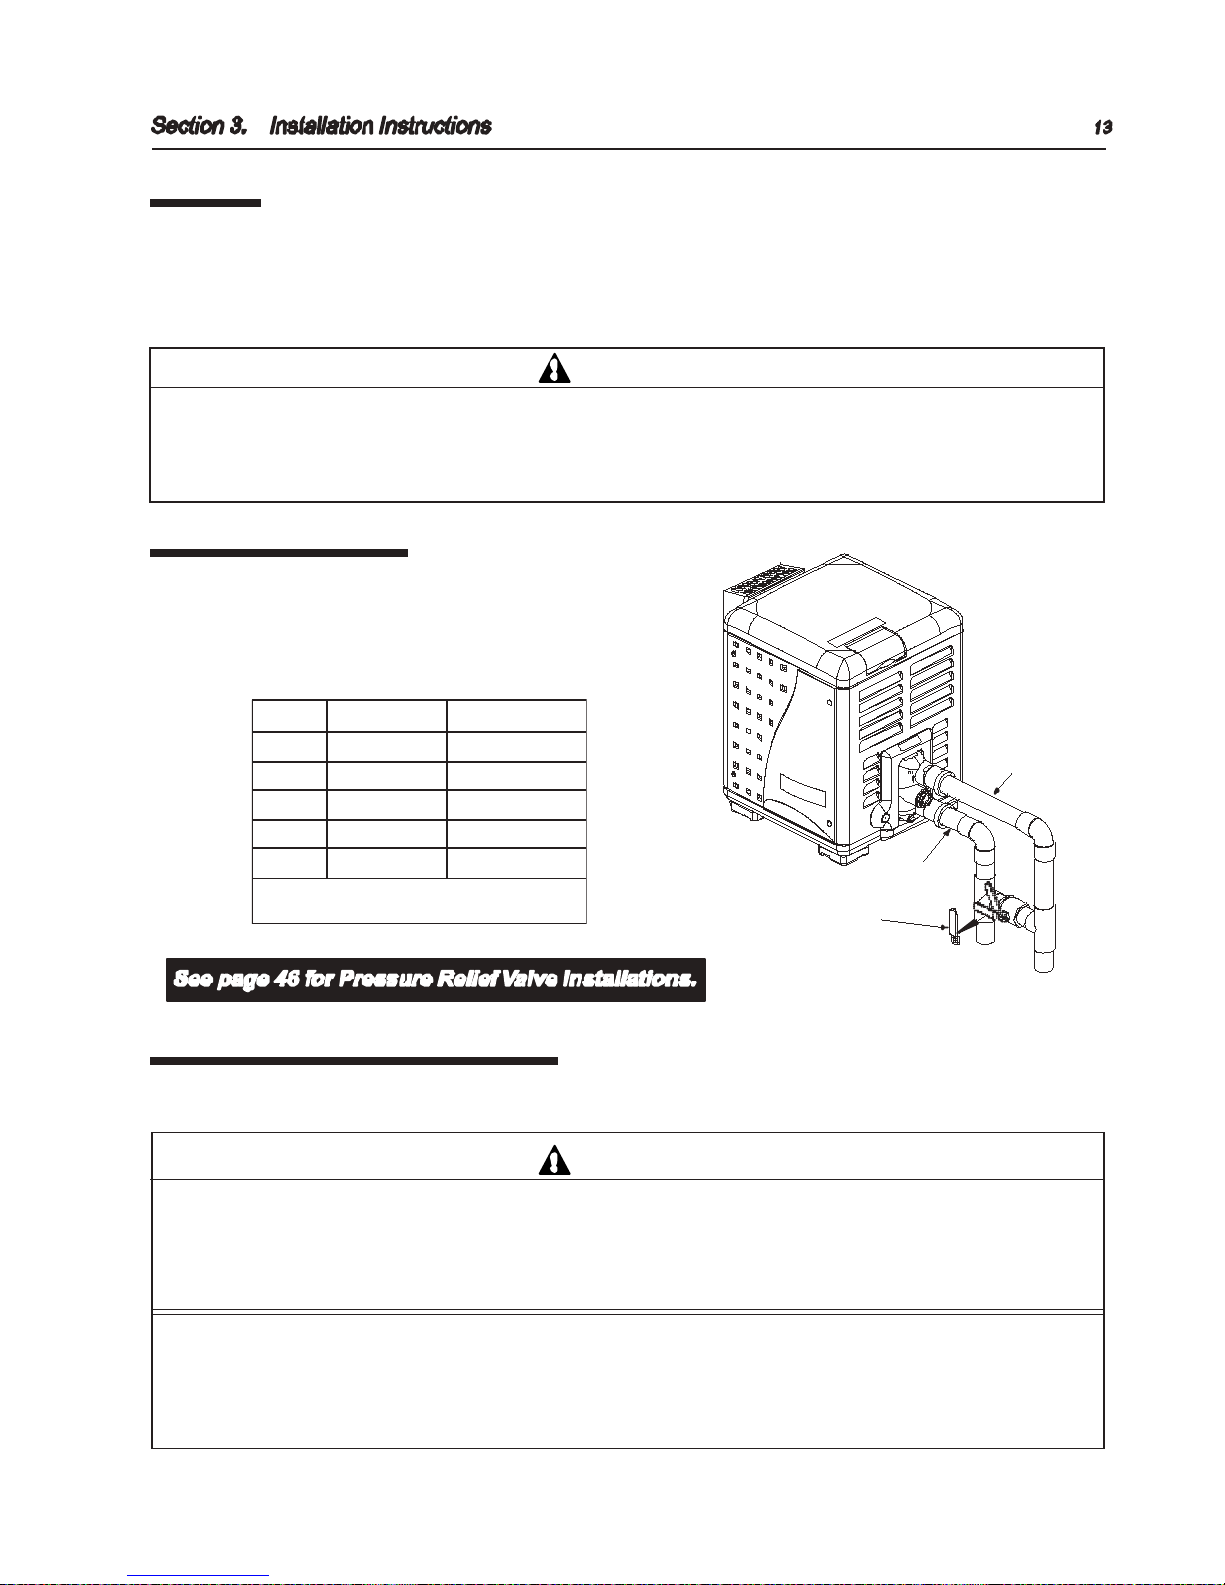
PLUMBINGCONNECTIONS
LZW!FSefWdLW_b!ZWSfWd!ZSe!fZW!g`[cgW!USbST[^[fk!aX!V[dWUf
eUZWVg^W!1-!IN=!b^g_T[`Y!Ua``WUf[a`e+!!;!eWf!aX!Tg^]ZWSV
X[ff[`Ye![e![`U^gVWV! i[fZ!fZW!FSefWdLW_b!ZWSfWd! fa![`egdW
Ua`Xad_[fk! i[fZ!IW`fS[dte!dWUa__W`VWV!IN=!b^g_T[`Y
bdaUWVgdW+! HfZWd!b^g_T[`Y!Ua``WUf[a`e! US`! TW! geWV+! KWW
@[YgdW!0!Xad!b^g_T[`Y!Ua``WUf[a`e+
CAUTION
Before operating the heater on a new installation, turn
on the circulation pump and bleed all the air from the
filter using the air relief valve on top of the filter. Water
should flow freely through the heater. Do not operate
the heater unless water in the pool/spa is at the proper
level. If a manual by-pass is installed, temporarily close it
to insure that all air is purged from the heater.
WATERCONNECTIONS
LZW!ZWSfWd!dWcg[dWe!bdabWd!iSfWd!X^ai!S`V!bdWeegdW!Xad![fe
abWdSf[a`+ KWW!@[YgdW!2!Xad!fZW!dWUa__W`VWV! [`efS^^Sf[a`+
LZW!X[^fWd!bg_b!V[eUZSdYWe!fa!fZW!X[^fWd)!fZW!!X[^fWd!V[eUZSdYWe
fa!fZW!ZWSfWd)!S`V!fZW!ZWSfWd!V[eUZSdYWe!V[dWUf^k!fa!fZW!baa^
ad!ebS+
;!_S`gS^!TkbSee!hS^hW!eZag^V!TW![`efS^^WV!SUdaee!fZW!ZWSfWd
iZW`! fZW!bg_b! X^ai!WjUWWVe!./-!AIF!&121!EIF'+!KWW
uO;L?J!@EHO!J;L?v!a`!bSYW!4*!LST^W!.!Xad!eWff[`Y!aX
fZW!_S`gS^!Tk*bSee!hS^hW+
FS]W!egdW!fZSf!fZW!agf^Wf!b^g_T[`Y!Xda_!fZW!ZWSfWd!Ua`fS[`e
`a!eZgf*aXX!hS^hWe!ad!afZWd!X^ai!dWefd[Uf[a`e!fZSf!Uag^V!bdWhW`f
X^ai!fZdagYZ!fZW!ZWSfWd!&WjUWbf!Xad!baa^![`efS^^Sf[a`e!Se!`afWV
TW^ai)!ad!i[`fWd[l[`Y!hS^hWe!iZWdW!`WWVWV'+!La!ei[fUZ!X^ai
TWfiWW`!fZW!baa^!S`V!ebS)!geW!S!V[hWdfWd!hS^hW+!>a!`af!geW
S`k!hS^hW!fZSf!US`!eZgf!aXX!fZW!X^ai+
C`efS^^!fZW!UZW_[US^!XWWVWd!Vai`efdWS_!aX!fZW!ZWSfWd+!C`efS^^
S!UZW_[US^!dWe[efS`f!a`W*iSk!UZWU]!hS^hW!TWfiWW`!fZW!ZWSfWd
S`V!fZW!UZW_[US^!XWWVWd!fa!bdWhW`f!TSU]*e[bZa`[`Y!fZdagYZ
fZW!ZWSfWd!iZW`!fZW!bg_b![e!aXX+
78<4.0,!CX!fZW!ZWSfWd![e!b^g_TWV![`!TSU]iSdVe)![f!i[^^!UkU^W!Ua`f[`gage^k+!FS]W!egdW!b[b[`Y!Xda_!X[^fWd![e!`af!dWhWdeWV
iZW`![`efS^^[`Y!ZWSfWd+
=a``WUf!fZW!ZWSfWd!V[dWUf^k! fa!/#!IN=!b[bW)!ge[`Y!fZW![`fWYdS^!g`[a`e!bdah[VWV+!BWSf!e[`]e!SdW!`af!dWcg[dWV+!LZW!^ai
fZWd_S^!_See!aX!fZW!ZWSfWd!i[^^!bdWhW`f!ahWdZWSf[`Y!aX!fZW!b[b[`Y!Ua``WUfWV!fa!fZW!bg_b!WhW`![X!fZW!ZWSfWd!eZgfe!Vai`
g`WjbWUfWV^k+
HUUSe[a`S^^k!S!fia*ebWWV!bg_b!i[^^!`af!VWhW^ab!W`agYZ!bdWeegdW!a`!fZW!^ai!ebWWV!fa!abWdSfW!fZW!ZWSfWd+!C`!fZ[e!USeW)!dg`
fZW!bg_b!Sf!Z[YZ!ebWWV!a`^k!fa!abWdSfW!fZW!ZWSfWd+!CX!fZ[e!VaWe!`af!ea^hW!fZW!bdaT^W_)!Va!`af!fdk!fa!dg`!fZW!ZWSfWd+!C`efWSV)
UaddWUf!fZW![`efS^^Sf[a`+
>a!`af!abWdSfW!fZW!ZWSfWd!iZ[^W!S`!Sgfa_Sf[U!baa^!U^WS`Wd![e!S^ea!abWdSf[`Y+!CX!fZW!U[dUg^Sf[a`!bg_b!egUf[a`![e!b^gYYWV!&Xad
WjS_b^W!Tk!^WShWe')!fZWdW!_Sk!`af!TW!SVWcgSfW!X^ai!fa!fZW!ZWSfWd+!>a!`af!dW^k!a`!fZW!bdWeegdW!ei[fUZ![`!fZ[e!USeW+
Pool
Main
Drain
Spa
From Pool
3-Way
Valve
3-Way
Valve
3-Way
Valve
Chlorinator
8MI[MY
A\UX
3PMKS!FIT ]M
6QT[MY
Figure5.
PUMP
FILTER
POOL
HEATER
MANUAL
BY-PASS
TO
POOL
GATE
VALVE
FROM
POOL
Figure3.
Rev. H 9-5-12 MASTERTEMP®Pool and Spa Heater Installation and User’s Guide
BELOW POOLINSTALLATION
CX!fZW!ZWSfWd![e!TW^ai!iSfWd!^WhW^)!fZW!bdWeegdW!ei[fUZ!_gef!TW!SV\gefWV+!LZ[e!SV\gef_W`f!_gef!TW!Va`W!Tk!S!cgS^[X[WV
eWdh[UW!fWUZ`[U[S`+!KWW!Xa^^ai[`Y!31CB9>=!TWXadW![`efS^^Sf[a`+
CAUTION
BELOW OR ABOVEPOOLINSTALLATION
The water pressure switch is set in the factory at 3.00 PSI (± 0.75 PSI). This setting is for a heater installed at pool level.
If the heater is to be installed more than 1’ above or below, the water pressure switch must be adjusted by a qualified
service technician. See page 35, Figure 29.
FLOWSWITCH
If the heater is installed more than 5’ above the pool or more than 4’below the pool level, you will be beyond the limits
of the pressure switch and a flow switch must be installed. Locate and install the flow switch externally on the outlet
piping from the heater, as close as possible to the heater. Connect the flow switch wires in place of the water
pressure switch wires.
VALVES
OZW`!S`k!Wcg[b_W`f![e!^aUSfWV!TW^ai!fZW!egdXSUW!aX!fZW!baa^!ad!ebS)!hS^hWe!eZag^V!TW!b^SUWV![`!fZW!U[dUg^Sf[a`!b[b[`Y
ekefW_!fa![ea^SfW!fZW!Wcg[b_W`f!Xda_!fZW!baa^!ad!ebS+!=ZWU]!hS^hWe!SdW!dWUa__W`VWV!fa!bdWhW`f!TSU]*e[bZa`[`Y+!<SU]*
e[bZa`[`Y![e!_aef!^[]W^k!fa!aUUgd!iZW`!fZW!bg_b!efabe)!UdWSf[`Y!S!bdWeegdW*egUf[a`!V[XXWdW`f[S^+!>a!=>B!eS`[f[lW!fZW!baa^
Tk!bgff[`Y!UZ^ad[`W!fST^Wfe!ad!ef[U]e![`fa!fZW!e][__Wd&e'+!OZW`!fZW!bg_b![e!aXX)!fZ[e!i[^^!USgeW!S!Z[YZ!Ua`UW`fdSf[a`!aX
UZ^ad[`W!fa!W`fWd!fZW!ZWSfWd)!iZ[UZ!Uag^V!USgeW!Uaddae[a`!VS_SYW!fa!fZW!ZWSf!WjUZS`YWd+
CAUTION
Exercise care when installing chemical feeders so as to not allow back siphoning of chemical into the heater, filters
or pump. When chemical feeders are installed in the circulation of the piping system, make sure the feeder outlet line
is down stream of the heater, and is equipped with a positive seal noncorrosive “Check Valve”, (P/N R172288),
between the feeder and heater.
MANUALBY-PASS
OZWdW!fZW!iSfWd!X^ai!dSfW!WjUWWVe!fZW!_Sj[_g_!./-!AIF)!S!_S`gS^
TkbSee!eZag^V!TW![`efS^^WV!S`V!SV\gefWV+!!;XfWd![`efS^^[`Y!fZW!hS^hW)
SV\gef!fZW!hS^hW!fa!Td[`Y!fZW!X^ai!dSfW!i[fZ[`!fZW!SUUWbfST^W!dS`YW+
LZW`!dW_ahW!fZW!hS^hW!ZS`V^W!ad!^aU]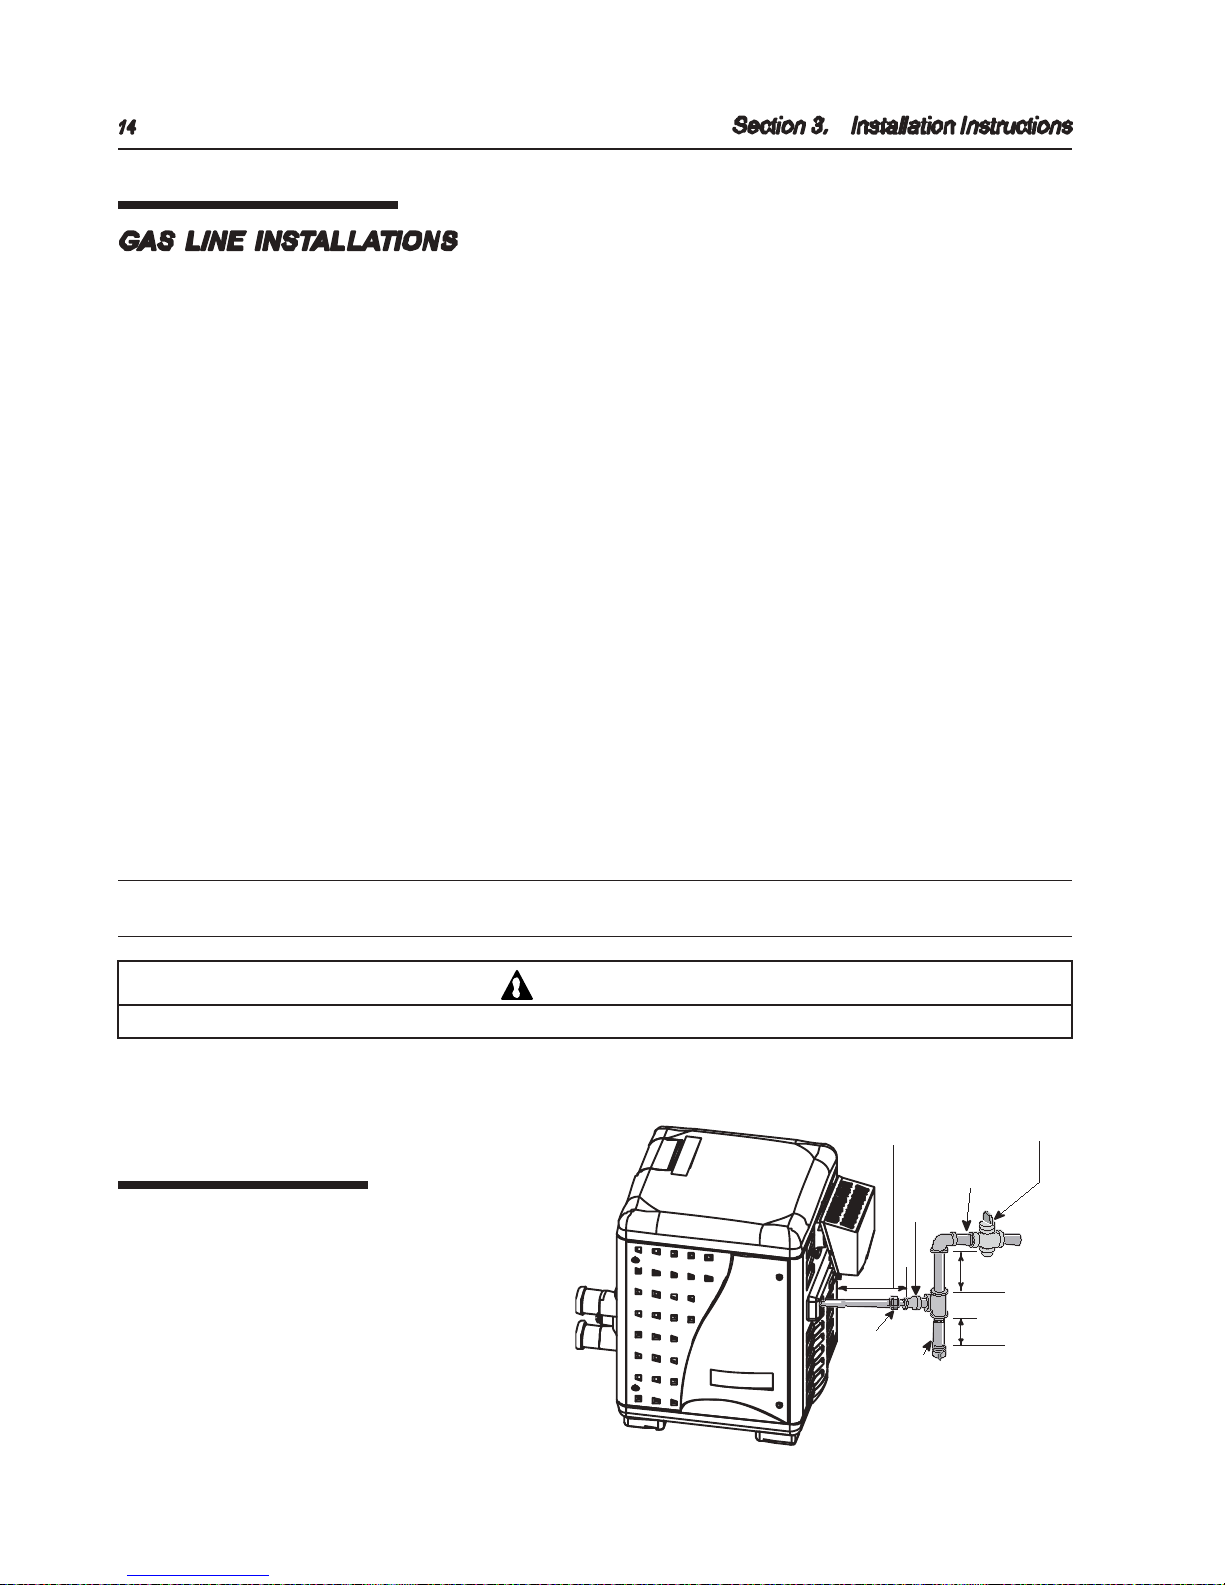
MASTERTEMP®Pool and Spa Heater Installation and User’s Guide Rev. H 9-5-12
GASCONNECTIONS
<WXadW![`efS^^[`Y!fZW!YSe!^[`W)!TW!egdW!fa!UZWU]!iZ[UZ!YSe!fZW!ZWSfWd!ZSe!TWW`!VWe[Y`WV!fa!Tgd`+!LZ[e![e![_badfS`f!TWUSgeW
V[XXWdW`f!fkbWe!aX!YSe!dWcg[dW!V[XXWdW`f!YSe!b[bW!e[lWe+!LZW!dSf[`Y!b^SfW!a`!fZW!ZWSfWd!i[^^![`V[USfW!iZ[UZ!YSe!fZW!ZWSfWd![e
VWe[Y`WV!fa!Tgd`+!LZW!fST^We)!eZai`!a`!bSYW!.1)!eZai!iZ[UZ!e[lW!b[bW![e!dWcg[dWV!Xad!fZW!V[efS`UW!Xda_!fZW!YSe!_WfWd!fa
fZW!ZWSfWd+!LZW!fST^W![e!Xad!`SfgdS^!YSe!Sf!S!ebWU[X[U!YdSh[fk!aX!+32!S`V!bdabS`W!Sf!S!ebWU[X[U!YdSh[fk!aX!.+22+
OZW`!e[l[`Y!YSe!^[`We)!US^Ug^SfW!fZdWW!&0'!SVV[f[a`S^!XWWf!aX!efdS[YZf!b[bW!Xad!WhWdk!W^Tai!geWV+!OZW`![`efS^^[`Y!fZW!YSe!^[`W)
Sha[V!YWff[`Y!V[df)!YdWSeW!ad!afZWd!XadW[Y`!_SfWd[S^![`!fZW!b[bW!Se!fZ[e!_Sk!USgeW!VS_SYW!fa!fZW!YSe!hS^hW)!iZ[UZ!_Sk!dWeg^f
[`!ZWSfWd!XS[^gdW+
>HE!GAR!LESEQ!RHNTKD!BE!CHECJED!SN!LAJE!RTQE!SHAS!IS!VIKK!RTOOKX!EMNTGH!GAR!SN!SHE! HEASEQ!AMD!AMX!NSHEQ!AOOKIAMCER
SHAS!LAX!BE!TRED!NM! SHE!RALE!LESEQ&!>HE!GAR!KIME!FQNL!SHE!LESEQ!VIKK! TRTAKKX!BE!NF!A!KAQGEQ!RIYE!SHAM!SHE!GAR!UAKUE
RTOOKIED!VISH! SHE!HEASEQ&! >HEQEFNQE! A!QEDTCSINM! NF!SHE!CNMMECSIMG!GAR!OIOE!VIKK!BE!MECERRAQX&!9AJE! SHIR!QEDTCSINM
AR! CKNRE!SN! SHE!HEASEQ!AR! ONRRIBKE&
LZW!ZWSfWd! dWcg[dWe! S!YSe! egbb^k! aX!`af!^Wee!fZS`!1#!&.-+/!U_'!iU!S`V!`af!_adW!fZS`! .1#!&02+3! U_'!iU+! ASe! egbb^k
bdWeegdWe!agfe[VW!aX!fZ[e!dS`YW!_Sk!dWeg^f![`![_bdabWd!Tgd`Wd!abWdSf[a`+!;!_[`[_g_!X^ai[`Y!ad!Vk`S_[U![`^Wf!bdWeegdW
&iZ[^W!fZW!ZWSfWd![e!dg``[`Y'!aX!1#!&.-+/U_'!iU![e!dWcg[dWV!fa!_S[`fS[`![`bgf!dSf[`Y!i[fZ!`a!_adW!fZS`!S!/v!bdWeegdW!Vdab
TWfiWW`! efSf[U! S`V!Vk`S_[U+! LZW!YSe! egbb^k! _gef!TW![`efS^^WV![`!SUUadVS`UW! i[fZ! fZW!;ASINMAK! 4TEK!5AR! 3NDE$
1;=7@**+&))! ad!efS`VSdV! 3=1!2),/&)) ;ASTQAK!5AR!AMD! <QNOAME! 7MRSAKKASINM!3NDER)!Se!Sbb^[UST^W! S`V!S^^!Sbb^[UST^W
^aUS^!UaVWe+!C`efS^^!S!_S`gS^!eZgf*aXX!hS^hW!S`V!S!eWV[_W`f!fdSb!S`V!g`[a`!^aUSfWV!agfe[VW!fZW!ZWSfWd!bS`W^e)!eWW!@[YgdW!3+
>a!`af!geW!S!dWefd[Uf[hW!YSe!UaU]+!LZW!Xa^^ai[`Y!_[`[_g_!YSe!b[bW!e[lWe!SdW!dWUa__W`VWV!Xad!`SfgdS^!YSe!egbb^k!b[b[`Y)
eWW LST^W!/!a`!bSYW!.1+!@ad!^ai!bdWeegdW!EI!YSe)!b[bW!e[lW!_Sk!TW!dWVgUWV!Tk!.,1#)!i[fZ!S!_[`[_g_!b[bW!e[lW!aX!.,/#+
=ZWU]!Xad!Ua_b^[S`UW!i[fZ!^aUS^!UaVWe+
LZW!ZWSfWd!S`V!S`k!afZWd!YSe!Sbb^[S`UWe!_gef!TW!V[eUa``WUfWV!Xda_!fZW!YSe!egbb^k!b[b[`Y!ekefW_!Vgd[`Y!S`k!bdWeegdW
fWef[`Y!a`!fZSf!ekefW_)!&YdWSfWd!fZS`! !IKC'+!LZW!ZWSfWd! S`V![fe!YSe!Ua``WUf[a`!_gef!TW!^WS]!fWefWV!TWXadW!b^SU[`Y!fZW
ZWSfWd! [`!abWdSf[a`+!4U!TUZ![YK!LRGSK!ZU!ZKYZ!ZNK!MGY!ROTK'!MeW!eaSbk!iSfWd!ad!S`afZWd!`a`X^S__ST^W!_WfZaV+
NOTE
A manualmain shut-off valve must be installedexternally to the heater.
WARNING
DO NOT INSTALL THE GAS LINE UNION INSIDE THE HEATER CABINET. THIS WILL VOID YOUR WARRANTY.
SEDIMENTTRAPS
C`efS^^!S!eWV[_W`f!fdSb!S`V!g`[a`!^aUSfWV!agfe[VW! fZW
ZWS fWd! bS`W^e! [ `! SU UadVS`UW! i[f Z!GSf [a`S^ ! UaVW
dWcg[dW_W`fe+!>a!`af!geW!S!dWefd[Uf[hW!YSe!UaU]+!LZW
eWV[_W`f!fdSb!e ZS^^!TW!W[fZWd!S!fWW!X[ff[`Y!i[fZ!S!USbbWV
`[bb^W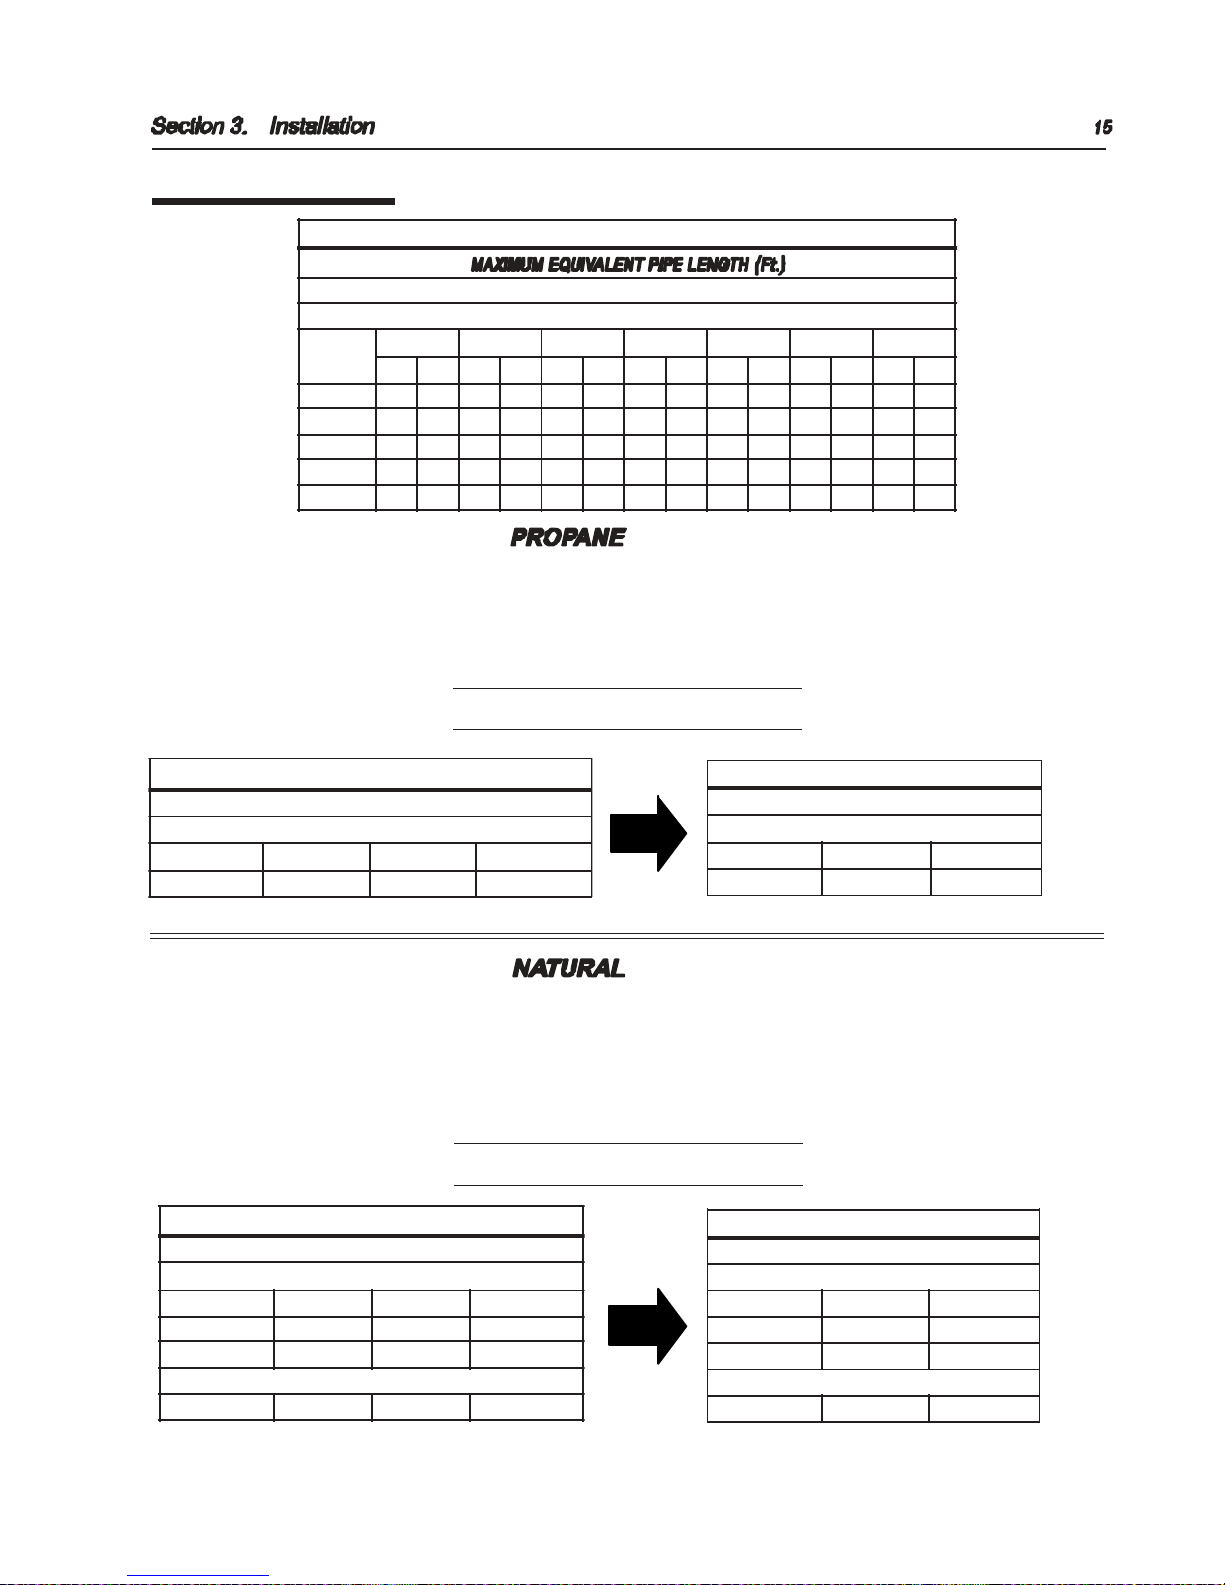
Rev. H 9-5-12 MASTERTEMP®Pool and Spa Heater Installation and User’s Guide
V90;4/07<4-5W !2-;!(!;<-20!902=5-<487
7M!LAMX!<QNOAME!GAR!KIME!IMRSAKKASINMR$!SHE!GAR!RTOOKIEQ!AMD'NQ!IMRSAKKEQ!VIKK!TSIKIYE!A!SVN!RSAGE!QEGTKASINM!OQNCERR
VHEQE!BX!AS!SHE!RTOOKX!SAMJ!SHEX!VIKK!IMRSAKK!SHE!FIQRS!RSAGE!GAR!QEGTKASNQ$!VHICH!VNTKD!BE!AS!A!HIGHEQ!OQERRTQE$!TRTAKKX
)(!ORI&!>HIR!HIGHEQ!OQERRTQE!AKKNVR!FNQ!A!LTCH!KNMGEQ!DIRSAMCE!AMD!IM!A!LTCH!RLAKKEQ!OIOE!RIYE&!!>HEM!VISHIM!A!RHNQS
DIRSAMCE!NF!!SHE!ONNK!HEASEQ$!TRTAKKX!AQNTMD!*,!IMCHER$!SHEX!VIKK!IMRSAKK!A!RECNMD!QEGTKASNQ$!VHICH!IR!SHE!RECNMD!RSAGE$
AMD!SHIR!VNTKD!BE!RES!AS!SHE!QEPTIQED!IMKES!OQERRTQE!NF!!SHE!HEASEQ&
AKK!a7GY!?XKYY[XK!@KW[OXKSKTZ!3NGXZYb
Table 3. Table 4.
GAS PIPE SIZING
Table 2.
V90;4/07<4-5W !2-;!(!;<-20!902=5-<487
7M!LAMX!;ASTQAK!GAR!KIME!IMRSAKKASINMR$!SHE!GAR!RTOOKIEQ!AMD'NQ!IMRSAKKEQ!LAX!TSIKIYE!A!SVN!RSAGE!QEGTKASINM!OQNCERR
VHEQE!BX!AS!SHE!RSQEESR!LAIM!GAR!RTOOKX!SHEX!VIKK!IMRSAKK!SHE!FIQRS!RSAGE!GAR!QEGTKASNQ$!VHICH!VNTKD!BE!AS!A!HIGHEQ
OQERRTQE&!>HIR!HIGHEQ!OQERRTQE!IR!TRTAKKX!RES!AS!*!ORI!NQ!-!ORI!AMD!CAM!BE!FNQ!KNMG!DIRSAMCER!AMD!IM!A!LTCH!RLAKKEQ!OIOE
RIY E&!!>HEM!VISHIM!A!RHNQS!DIRSAMCE!NF!!SHE!ONNK!HEASEQ$!GEMEQAKKX!AQNTMD!*,!IMCHER$!SHEX!VIKK!IMRSAKK!A!RECNMD!QEGTKASNQ$
VHICH!IR!SHE!RECNMD!RSAGE&!>HIR!RECNMD!RSAGE!QEGTKASNQ!VNTKD!BE!RES!AS!SHE!LIMILTL!NOEQASIMG!OQERRTQE!FNQ!SHE!HEASEQ&
4NQ!Z;ASTQAK!5AR!<EMSAIQ!<NNK!6EASEQR[!SHE!LIMILTL!IR!.!IMCHER!?&3&
AKK!a7GY!?XKYY[XK!@KW[OXKSKTZ!3NGXZYb
Table 5. Table 6.
SNOITCENNOCENILSAGROFGNIZISEPIP
tooFcibuCrep.U.T.B0001tasaGlarutaN
tooFcibuCrep.U.T.B0052tasaGenaporP
LEDOM
”2/1 ”4/3 ”1 ”4/1-1 ”2/1-1 ”2 ”2/1-2
TAN ORP TAN ORP TAN ORP TAN ORP TAN ORP TAN ORP TAN ORP
571 - ’02 ’03 ’08 ’521 ’052 ’054 ’006 - - - - - 002 - ’02 ’03 ’08 ’521 ’052 ’054 ’006 - - - - - 052 - ’01 ’02 ’05 ’07 ’051 ’052 ’005 ’006 - - - - 003 - - ’01 ’03 ’05 ’001 ’002 ’053 ’004 ’006 - - - 004 - - - ’01 ’02 ’06 ’001 ’051 ’002 ’054 ’004 - - -
gniziSepiPsaG"erusserPhgiH"enOegatS
.TF.UCreP.U.T.B0052@ISP01
HTGNELEPIPTNELAVIUQEMUMIXAM
ledoM .tF05ot0 .tF001ot05 .tF051ot001
004hguorht571 .ni2/1 .ni2/1 .ni2/1
gniziSepiPsaG"erusserPwoL"owTegatS
.C.W.ni41tates2egatS
HTGNELEPIPTNELAVIUQEMUMIXAM
ledoM .tF01ot
0 .
tF02ot01
004hguorht571 .ni4/3 .ni4/3
gniziSepiPsaG"erusserPhgiH"enOegatS
.TF.UCreP.U.T.B0001@ISP2
HTGNELEPIPTNELAVIUQEMUMIXAM
ledoM .tF05ot0 .tF001ot05 .tF051ot001
003hguorht571 .ni2/1 .ni2/1 .ni2/1
004 .ni4/3 .ni4/3 .ni4/3
.TF.UCreP.U.T.B0001@ISP5
004hguorht571 .ni2/1 .ni2/1 .ni2/1
gniziSepiPsaG"erusserPwoL"owTegatS
.C.W.ni7tates2egatS
HTGNELEPIPTNELAVIUQEMUMIXAM
ledoM .tF01ot
0 .
tF02ot01
003hguorht571 .ni4/3 .ni4/3
004 .ni4/3 .ni1
.C.W.ni7tates2egatS
004hguorht571 .ni4/3 .ni1
MASTERTEMP®Pool and Spa Heater Installation and User’s Guide Rev. H 9-5-12
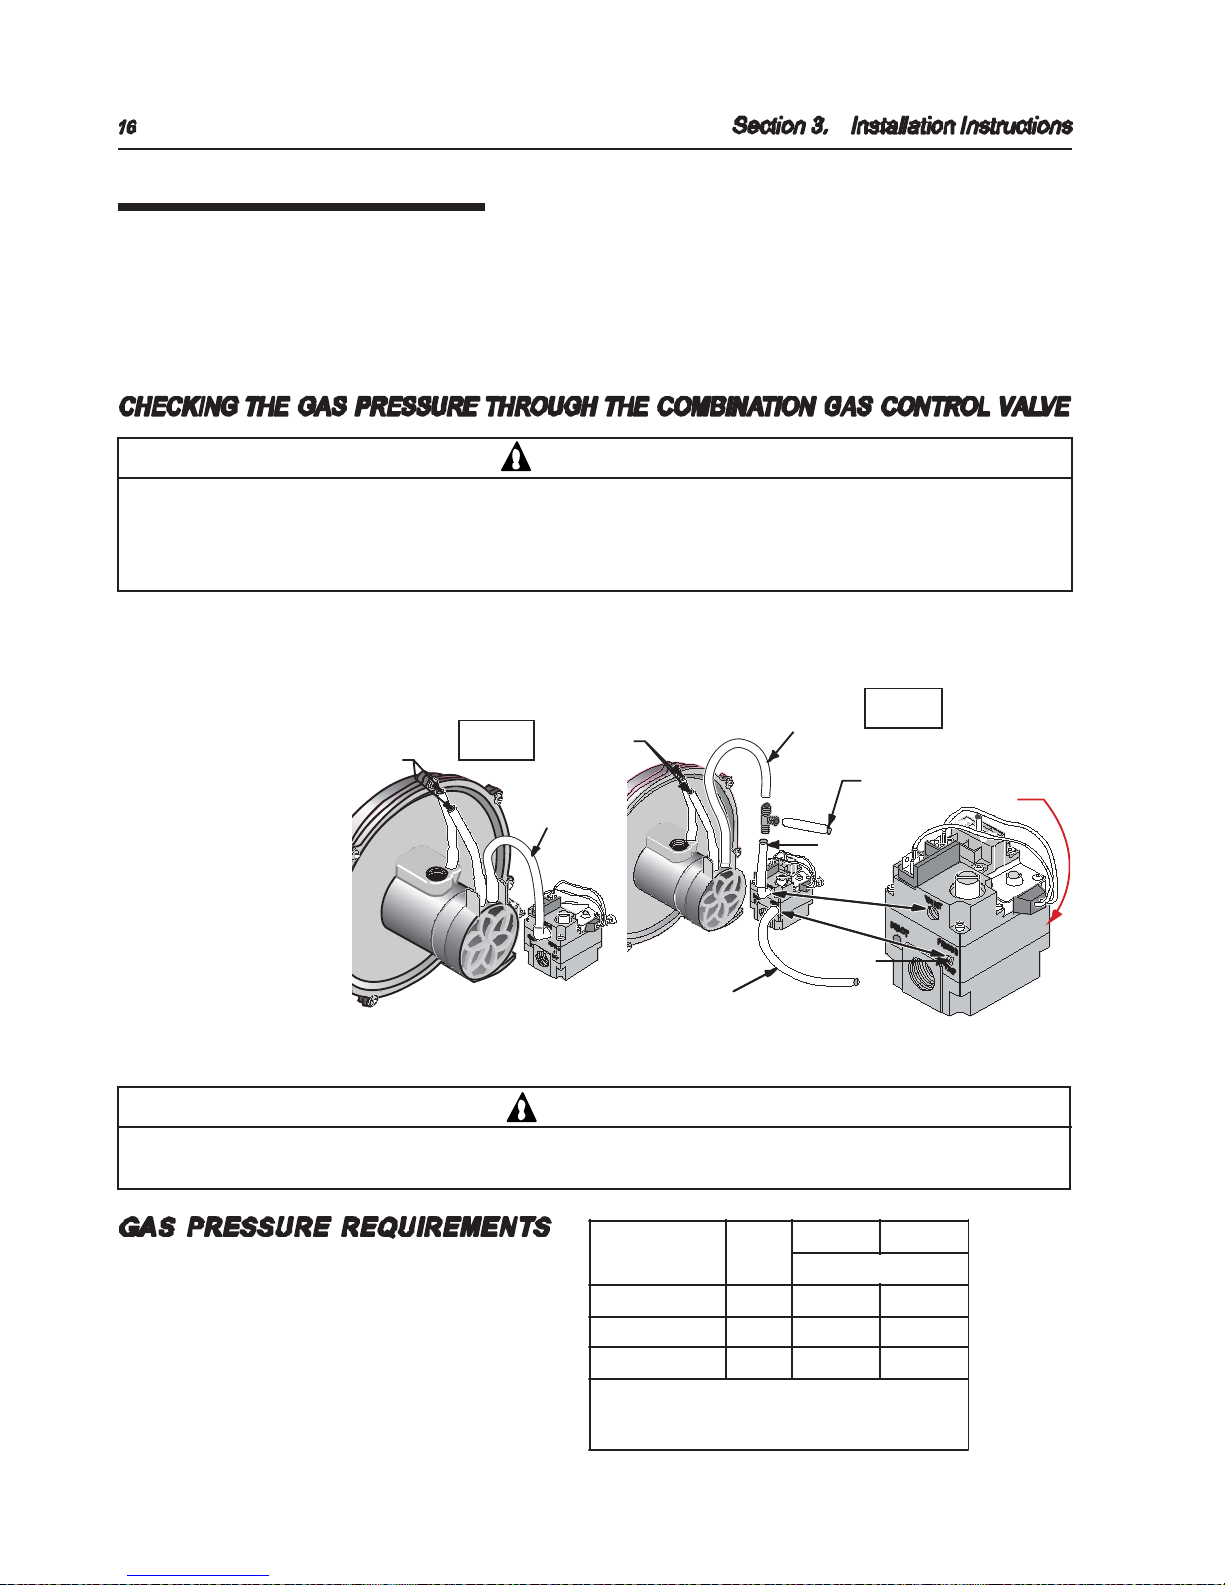
TESTING GAS PRESSURE
DW!1QY!6TW^
C^Q[KP
DW!7IZ
FIT]M!FMV[
FM V[
AYMZZ\YM!DIX
DW!8QOP!CQLM
WN!4QNNMYMV[QIT
AYMZZ\YM!7I\OM
DW!=W^!CQLM!WN
4QNNMYMV[QIT!AYMZZ\YM!7I\OM
AYMZZ\YM!DIX
9VTM[
Figure 7.
Table 7.
To Air Flow
Switch
ToGas
ValveVent
C
onnection
for Service
C
onnection
for Test
<WXadW!abWdSf[`Y!fZW!ZWSfWd)!fZW!ZWSfWd!S`V![fe!YSe!Ua``WUf[a`e!_gef!TW!^WS]!fWefWV+!4U!=>B![YK!GT!UVKT!LRGSK!ZU!ZKYZ
LUX!RKGQY '!LWef!S^^!YSe!Ua``WUf[a`e!Xad!^WS]e!i[fZ!eaSbk!iSfWd!ad!S`afZWd!`a`*X^S__ST^W!_WfZaV!&eWW!bSYW!.1'+
LZW!ZWSfWd!S`V![fe![`V[h[VgS^!eZgf*aXX!hS^hW!_gef!TW!V[eUa``WUfWV!Xda_!fZW!YSe!egbb^k!b[b[`Y!ekefW_!Vgd[`Y!S`k!bdWeegdW
fWef[`Y!aX!fZSf!ekefW_!Sf!fWef!bdWeegdWe![`!WjUWee!aX!.,/!be[Y!&0+2!]IS'+
LZW!ZWSfWd!_gef!TW![ea^SfWV!Xda_!fZW!YSe!egbb^k!ekefW_!Tk!U^ae[`Y![fe![`V[h[VgS^!_S`gS^!eZgf*aXX!hS^hW!Vgd[`Y!S`k!bdWeegdW
fWef[`Y!aX!fZW!YSe!egbb^k!Sf!fWe f!bdWeegdWe!WcgS^!fa!ad!^Wee!fZS`!.,/!be[Y!&0+2!]IS'+
WARNING
Risk of fire and explosion.
Improper installation, incorrect adjustment,alteration, service, or maintenance of theCombination
Gas Control Valve canlead to fire or explosion, causingloss of life, personalinjury, and/or property damage. If it is necessary
to adjust the gas valve, this must be done by only by a qualified service agency.
These instructions are for the use of
qualified service technicians only!
LZ[e!Sbb^[S`UW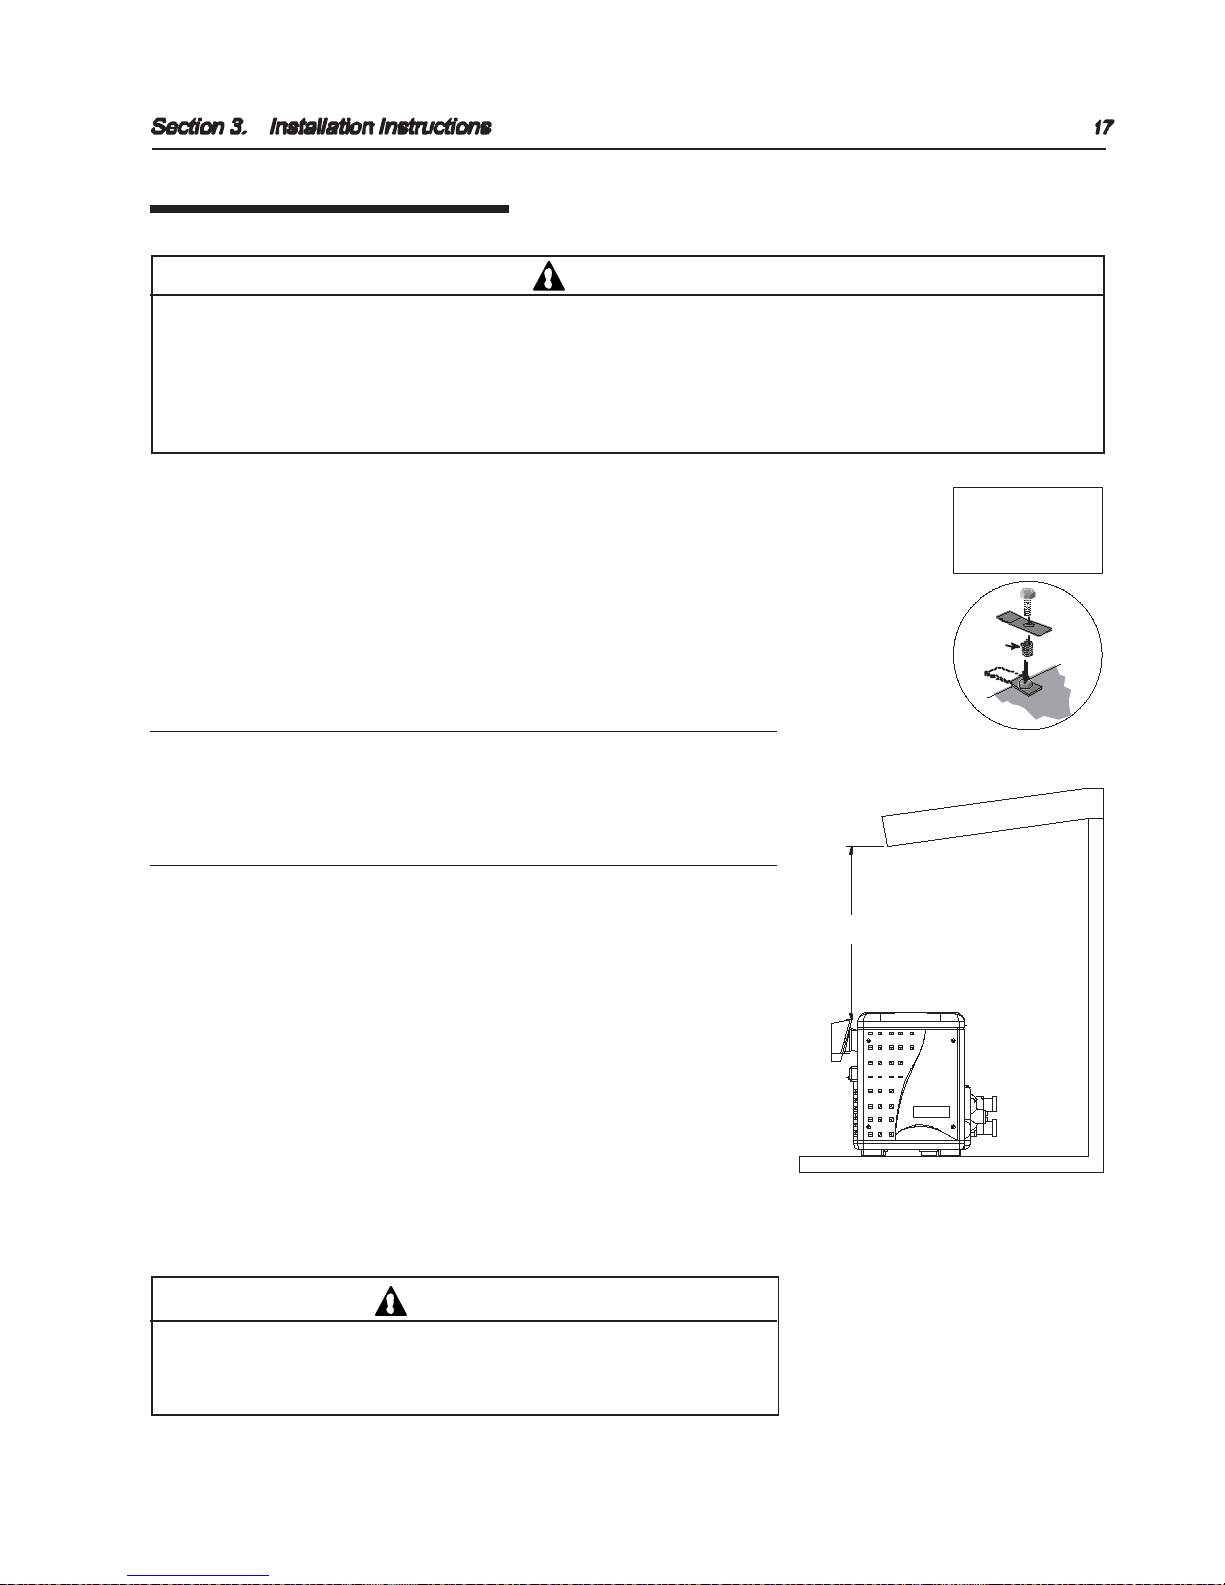
Rev. H 9-5-12 MASTERTEMP®Pool and Spa Heater Installation and User’s Guide
OUTDOORINSTALLATION
@ad!ZWSfWde!^aUSfWV!agfVaade)!ge[`Y!fZW!Tg[^f*[`!e fSU]^Wee!hW`f[`Y!ekefW_+
WARNING
Risk of explosion if a unit burning propane gas is installed in a pit or other low spot.
Propaneis heavierthanair. Do not
install the heater using propane in pits or other locations where gas might collect. Consult your local building code officials to
determine installation requirements and specific installation restrictions of the heater relative to propane storage tanks and
filling equipment. Installation must meet the requirements for the Standard for the Storage and Handling of Liquid Petroleum
Gases,ANSI/NFPA 58 (latest edition) inthe U.S., or CAN/CSA B149.2 (latest edition) in Canada. Consult local codes and fire
protection authorities about specific installation restrictions.
EaUSfW!fZW!ZWSfWd! a`!S!^WhW^!egdXSUW![`!S`!abW`!SdWS!fZSf![e!bdafWUfWV!Xda_!VdS[`SYW!ad! dg`*aXX+
C`efS^^!fZW!ZWSfWd![`!S`!SdWS!iZWdW!^WShWe!ad!afZWd!VWTd[e!i[^^!`af!Ua^^WUf!a`!ad!Sdag`V!fZW!ZWSfWd+
La!Sha[V!VS_SYW!fa!fZW!W^WUfda`[U!Ua_ba`W`fe![`!fZW!ZWSfWd)!fS]W!USdW!fa!bdWhW`f!bda^a`YWV!WjbaegdW
fa!Vd[h[`Y!eagdUWe!aX!iSfWd!&egUZ!Se!^Si`!ebd[`]^Wde)!ZWShk!daaX!dg`aXX)!ZaeWe)!WfU+'+!;ha[V!abWdSf[a`
[`!bWde[efW`f)!WjfdW_W)!_a[ef!ad!eS^fk!W`h[da`_W`fe+
C`!WjfdW_W!iWSfZWd)!eZgf! Vai`! fZW!ZWSfWd!S`V!V[eUa``WUf!fZW!baiWd!fa! [f! g`f[^!fZW! iWSfZWd!ZSe
_aVWdSfWV+!C`!SdWSe!egT\WUf!fa!Zgdd[US`We!ad!hWdk!Z[YZ!i[`Ve)!bgdUZSeW!fZW!<a^f!>ai`!<dSU]Wf!D[f)
I,G!13-405+
HEATER CLEARANCES – OUTDOOR
IMPORTANT!
• In an outdoor installation it is important to ensure water is diverted
from overhangingeves withapropergutter/drainagesystem.The heater
must be setona level foundationforproperdrainage.
• Thisunit shallnot beoperatedoutdoorsat temperaturesbelow-20oF.
CX!fZW!ZWSfWd Loading...