

Pentair Lifegard R440430 Instructions Manual
Lifegard®
All In One
Pond Filter System
I N S T R U C T I O N S
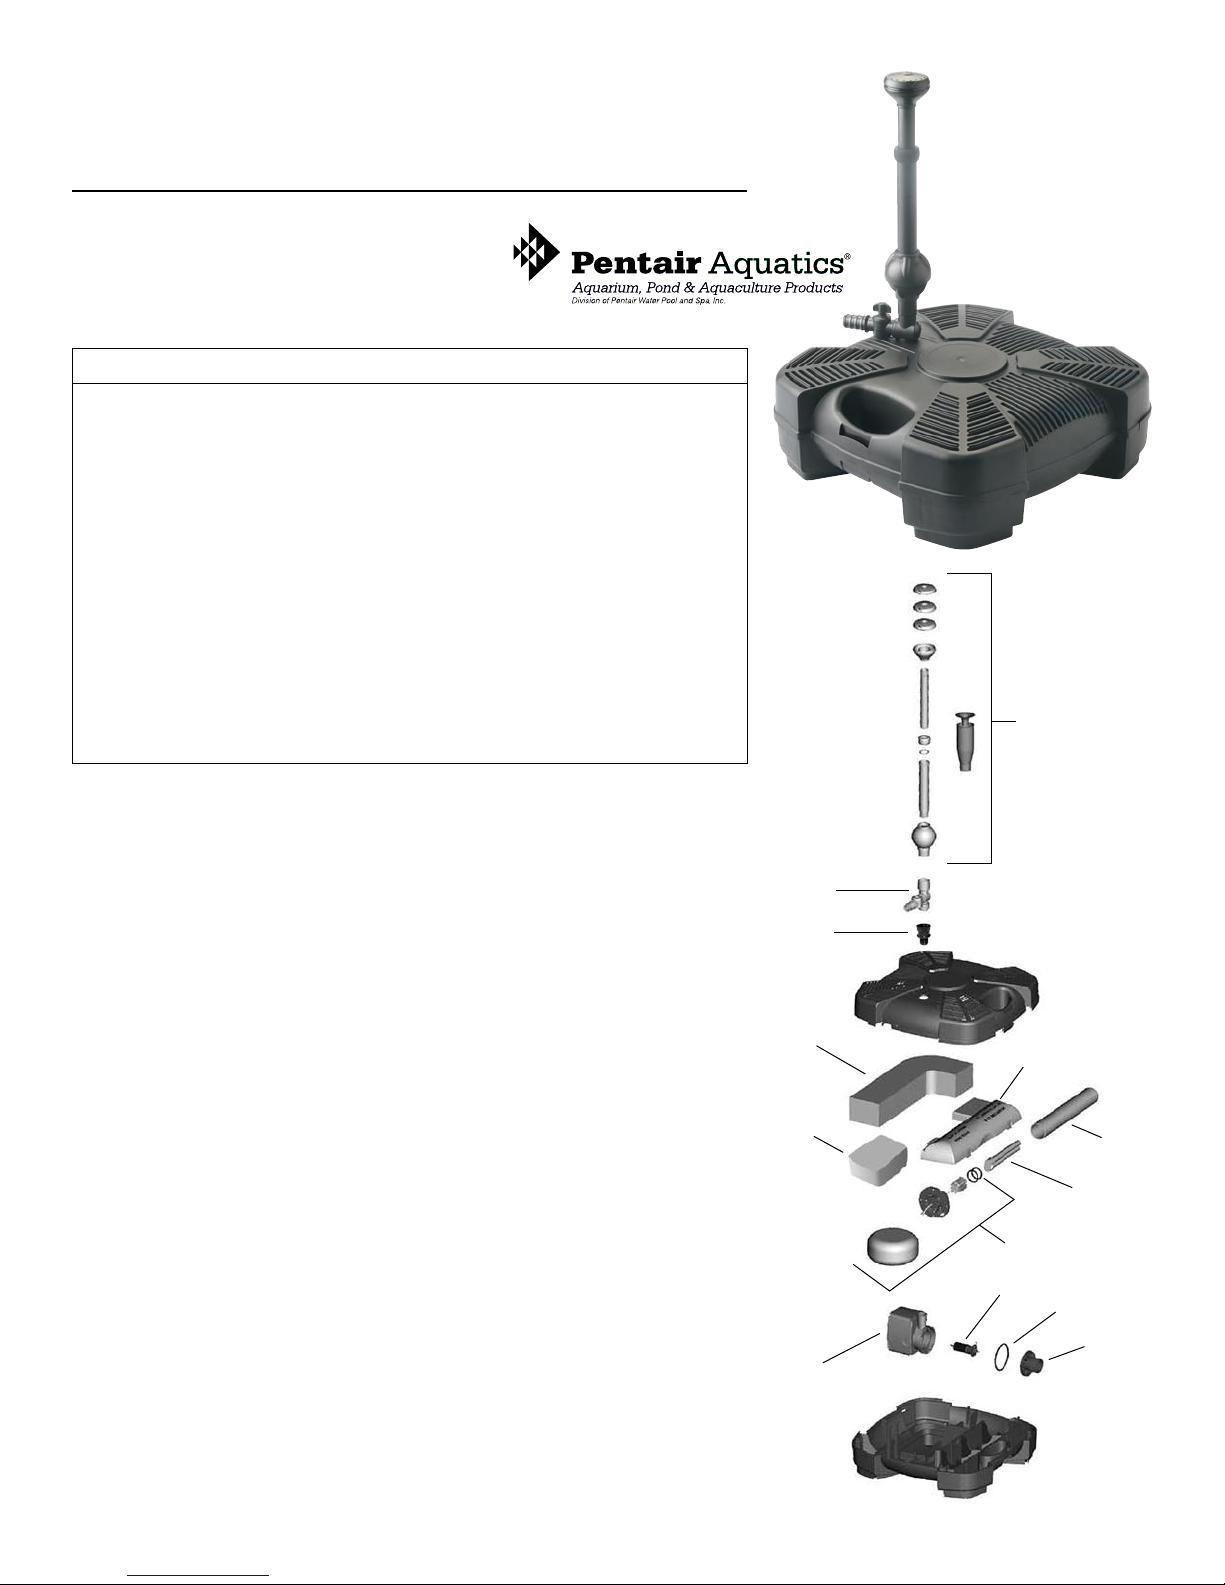
Parts Breakdown
ITEM# PART# DESCRITION
1 R440435 Fountain Kit
2 R440439 Diverter Valve
3 R440440 Fitting
4 R440446 Mechanical Filter Sponge Media
5 R440447 Biological Filter Media
6 R440448 UV Cover Housing
7 R440436 Quartz Sleeve
8 R440437 UV Replacement Bulb
9 R440438 “O” ring, Connector, Cap and Ballast
10 R440442 Pump
11 R440443 Pump Impeller
12 R440444 Pump “O” Ring
13 R440445 Front Housing
R440430
1
Read Instructions Before Installing
The advanced features of this compact filter system allow efficient
operation and if installed according to instructions, will keep the
water in your pond or water garden crystal clear.
The ALL IN ONE FILTER SYSTEM is a compact filter for ponds and
water gardens, easy to install and designed for easy maintenance.
Besides offering 4 different fountain spray patterns, it performs
three different filtering functions:
1.
MECHANICAL to remove solids.
BIOLOGICAL to promote beneficial bacteria growth.
2.
ULTRAVIOLET STERILIZER to kill free floating algae. The
3.
ultraviolet sterilizer has a separate plug so that you can
operate it only when needed.
Technical Data
Voltage 115 Volt / 60 Hz
Wattage 55 Watts
Maximum Flow Rate 650 GPH
Maximum Head 8.2 Feet
Maximum Depth 3.3 Feet
Power Cables 25 Feet
Weight 12 Lbs.
Maximum Water Temp 95° F
Pond Volume 300 Gallons up to 1500 Gallons
UV Lamp 9 Watt
Ballast UL Listed 115V / 60 Hz
4
5
10
2
3
6
7
8
9
11
12
13
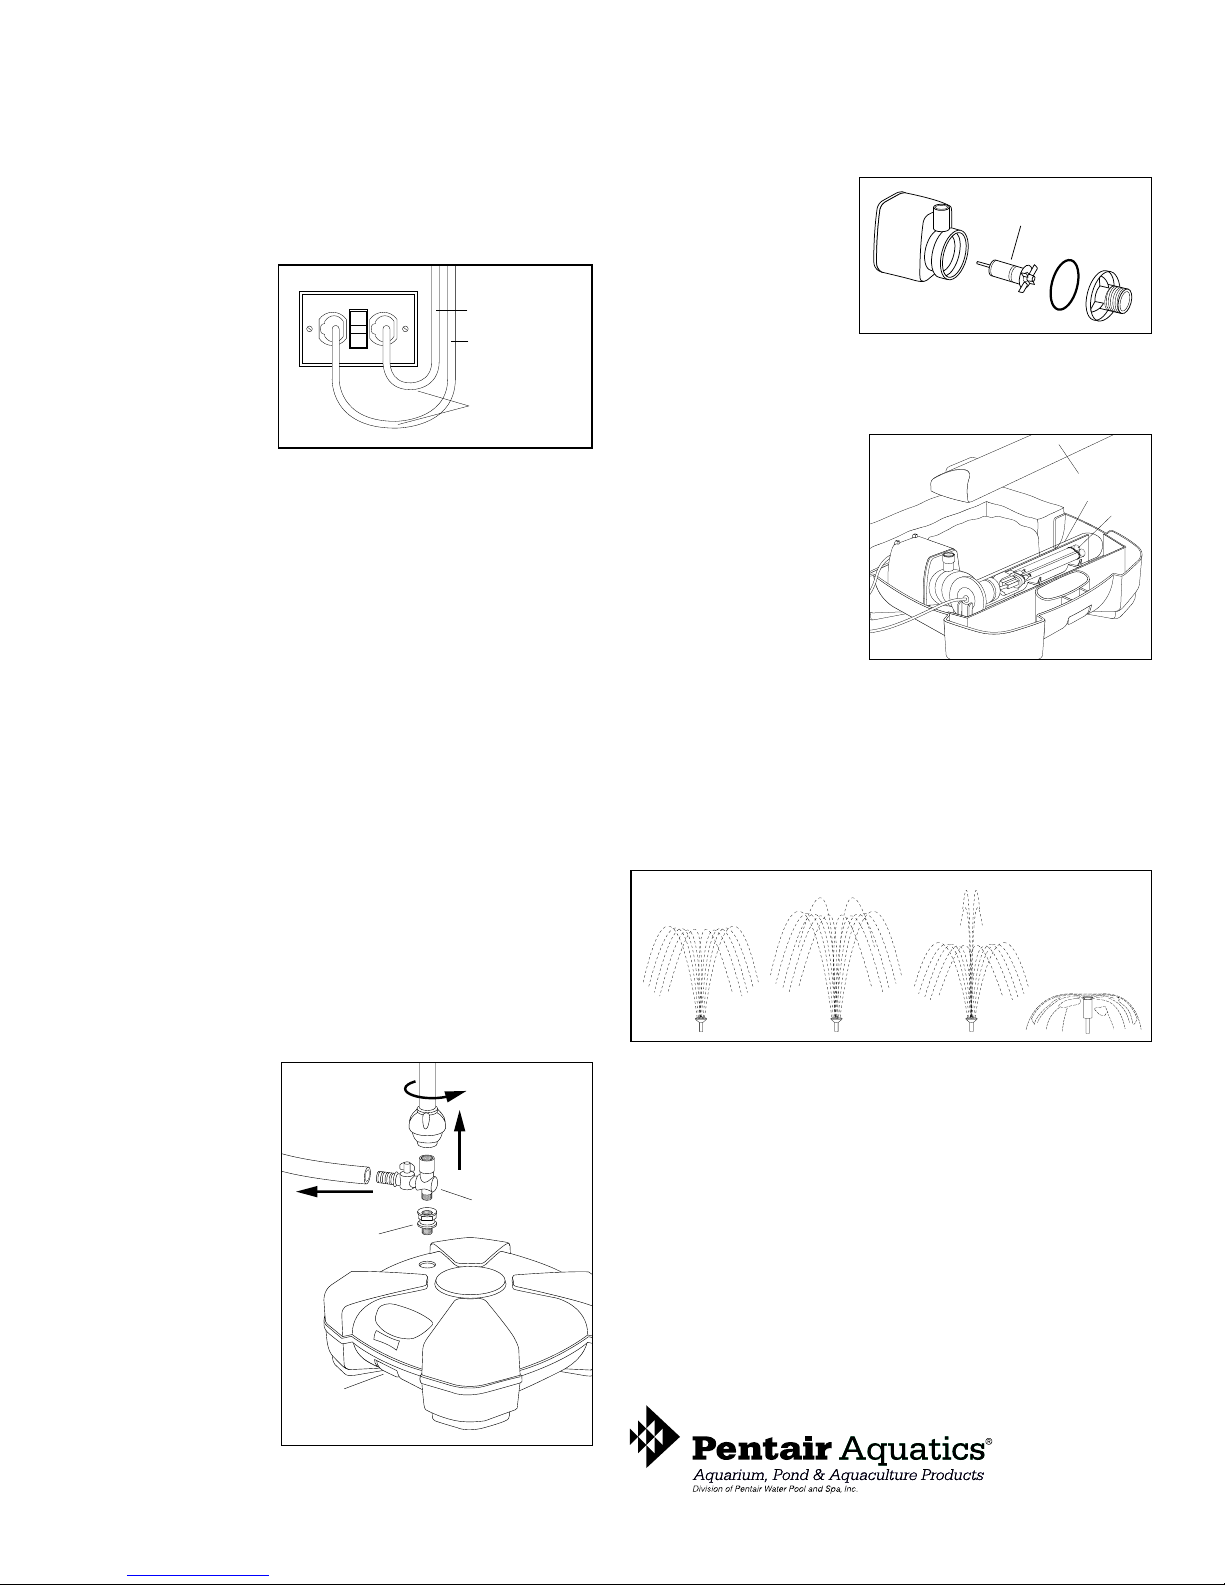
Installation
Filter Power Cord
UV Sterilizer Power Cord
GFCI Grounded Outlet
Drip Loop
Impeller
Unscrew Fountain
Assermbly, Diverter
Valve and Fitting
Unlock Filter
Housing
Fitting
Connect a Hose
to Water Feature
if Desired
Diverter Valve
Remove Upper Lid
Quartz Sleeve
UV Bulb
WARNING: Disconnect the unit from power source before
performing any maintenance or installation in the water or out.
DANGER: Do not operate UV bulb outside housing. Ultraviolet
radiation can be harmful to skin and eyes. To check if the UV
bulb is operating, observe lit bulb through holes of the upper lid.
DRIP LOOP: To prevent
accidental dripping of
water on power plug or
outlet, use the cord to
create a drip loop.
Connect both power
cords to a grounded
(GFCI) outlet.
1. Determine the exact place to install filter. The peculiar shape
of your Filter System unit makes it stable and easy to place in
any pond.
2. Connect the diverter valve and ball-joint leveling device, the
telescopic tube and your choice of water nozzle to the outlet
of the pump. Turn diverter valve into closed position.
3. Place the filter on a horizontal surface about 4” from the
bottom, away from mud and algae.
4. In order to have a good water jet, the bottom surface must
be horizontal and the jet must be in a vertical position. Use the
ball-joint on the telescopic pole to adjust it to a vertical position.
5. The filter is now ready for use. Plug in the power cord to the
pump.
(NOTE: The power cord to the UV sterilizer should only be used
when free floating algae control is required).
3. To Clean Pump: If necessary to remove pump, first remove
media and UV cover. Turn the front housing counterclockwise,
extract the impeller being careful not to lose any internal parts.
Wash the parts with water and check the wear condition by
turning the impeller
while keeping the shaft
firm. The impeller should
turn smoothly. Reassemble
all parts paying attention
to proper placement
of all components.
4. To Clean UV Sleeve: If algae proliferate it may be
necessary to check proper functioning of the UV bulb. If bulb
is functioning, it may be necessary to clean quartz sleeve. To
do this, make sure unit is
disconnected (both pump
and lamp). Remove upper
lid. Using a screwdriver,
extract the quartz sleeve.
Use rubbing alcohol to
remove any build up of dirt
or slime. Check that quartz
sleeve has not been
damaged and replace.
5. To Change UV Bulb: For best efficiency UV bulb should be
replaced yearly. (Approx 9000 hours of use). Disconnect both
pump and UV. Remove the upper lid. Remove the bulb lid. Using
a screwdriver, extract the quartz sleeve and UV bulb and replace
with a new one available from your dealer. Reassemble all parts
making sure that all gaskets in the bulb cap are placed correctly.
Four Different Spray Patterns Included
Maintenance
WARNING: Unplug pump and UV sterilizer before removing
unit from pond and performing and maintenance.
Maintenance is required when the height of the water fountain
or pump flow decreases. Usually, maintenance is required
every two months.
1. To Open Filter:
Unscrew, counterclockwise, the fountain
assembly, diverter
valve and fitting. Unlock
filter housing and open
the 2 sides. The
fountain assembly,
diverter valve and
fitting must be
removed from the
pump prior to
opening up the
filter housing.
2. To Clean Filter:
Open upper lid and remove mechanical filter sponge.
Wash sponge with water. Do not use solvents or detergents.
Warranty
PENTAIR AQUATICS, warrants to the original purchaser of this equipment to be free from
defects in workmanship or materials for a period of one year from the date of installation,
provided this equipment is installed in accordance with factory instructions and operated
within the environments and limitations for which it was designed. Due to numerous
operational circumstances beyond Pentair’s control, the germicidal bulbs are excluded
from warranty. Should any of the integral parts of the unit become defective within one
year from the date of purchase, they will be repaired or replaced, if proved defective in
workmanship or material in the opinion of the manufacturer. PENTAIR AQUATICS will not
be liable for any labor cost of removing or replacing component parts. This shall be the
responsibility of the original purchaser, as will be all shipping charges to and from the
plant. Damage or failure of any part of a unit covered by this warranty, which results from
causes directly, or indirectly connected with the installation, operation, environment,
use or willful abuse, including without limitation, improper repackaging and damage
incurred in shipping, is not covered by this warranty. Unless state law provides otherwise,
manufacturer will only be responsible for repair or replacement of any of its products or
parts thereof that are found to be defective, and will not bear the cost of any incidental
or consequential damages arising out of the occurance of such defect. The warranty gives
you specific legal rights and you may also have other rights which vary from state to state.
Website: www.pentairaquatics.com Email: info@ pentairaquatics.com
 Loading...