

Page 1
KREEPY KRAULY® PROWLER® 930
ROBOTIC INGROUND POOL CLEANER
IMPORTANT SAFETY INSTRUCTIONS
READ AND FOLLOW ALL INSTRUCTIONS
SAVE THESE INSTRUCTIONS
INSTALLATION AND
USER’S GUIDE
Page 2

i
CUSTOMER SERVICE / TECHNICAL SUPPORT
If you have questions about ordering Pentair Aquatic Systems replacement parts, and pool products, please use
the following contact information:
Customer Service (8 A.M. to 4:30 P.M. — Eastern
and Pacific Times)
Phone: (800) 831-7133
Fax: (800) 284-4151
Web site
Visit www.pentairpool.com or www.staritepool.com
to find information about Pentair products.
TABLE OF CONTENTS
Important Warning and Safety Instructions .......
Preparation of the Pool and Cleaner ...................
Overview
Cleaner Components
Cleaner Features
Initial Setup
Caddy Assembly
Operation ...............................................................
Control Panel Overview
Weekly Timer Feature
Setting the Weekly Timer
Cleaning Speed (Quick Clean Feature)
Delayed Start
Bluetooth Wireless Technology
Technical Support
Sanford, North Carolina (8 A.M. to 4:30 P.M. ET)
Phone: (919) 566-8000
Fax: (919) 566-8920
Moorpark, California (8 A.M. to 4:30 P.M. PT)
Phone: (805) 553-5000 (Ext. 5591)
Fax: (805) 553-5515
ii
Maintenance ........................................................
1
1
1
1
1
3
5
5
5
5
5
6
6
LED Indicator Lights
Removing the Cleaner from the Pool
Cleaning the Filter Baskets
Periodic Filter Screen Cleaning
Cleaning the Impeller
Storing the Cleaner
Troubleshooting ..................................................
Replacement Parts ..............................................
7
7
7
8
9
10
11
12
13
P/N 372052 Rev. A 6/9/17
KREEPY KRAULY® PROWLER® 930 Robotic Inground Pool Cleaner Installation and User’s Guide
Page 3
IMPORTANT WARNING AND SAFETY INSTRUCTIONS
Important Notice:
Attention Installer: This guide contains important information about the
installation, operation and safe use of this product. This information should
be given to the owner and/or operator of this equipment after installation
of the pool cleaner.
Attention User: This manual contains important information that will help
you in operating and maintaining this pool cleaner. Please retain it for future
reference. Consult Pentair with any questions regarding this equipment.
Before installing this product, read and follow all
warning notices and instructions which are included.
Failure to follow safety warnings and instructions can result in severe
injury, death, or property damage. Call (800) 831-7133 for additional free
copies of these instructions.
Consumer Information and Safety
The pool cleaners are designed and manufactured to provide many years
of safe and reliable service when installed, operated and maintained
according to the information in this manual. Throughout the manual, safety
warnings and cautions are identified by the “ ” symbol. Be sure to read
and comply with all of the warnings and cautions.
RISK OF ELECTRICAL SHOCK OR
ELECTROCUTION.
Connect only to a grounding type receptacle protected
by a ground-fault circuit-interrupter (GFCI). Contact
a qualified electrician if you cannot verify that the
receptacle is protected by a GFCI.
HAZARDOUS SUCTION.
Do not play with cleaner or hose or apply to body.
Can trap and tear hair or body parts. Hose can trip or
entangle swimmers which could result in drowning.
Do not operate the robotic pool cleaner when there
are people swimming in the pool. Hose can trip or
entangle swimmers which could result in drowning.
When examining the robotic pool cleaner, disconnect
the main power supply.
Keep the robotic pool cleaner out of reach of
children.
Keep the robotic pool cleaner out of reach of
persons with reduced physical, sensory or mental
capabilities, or lack of experience and knowledge, without proper
supervision and understanding of the instructions.
Only an original power cable must be used, at all
times. Replaced by a robotic pool cleaner certified
technician, in case of need to avoid hazard.
To reduce the risk of electrical shock, do not use
extension cord to connect unit to electrical supply;
provide a properly located outlet.
This product contains a chemical known to the state
of California to cause cancer, birth defects or other
reproductive harm.
Only a trained operator should operate the robotic
pool cleaner.
To avoid hand injury, operator should keep hands
away from driving belt mechanism.
Position the caddy and power supply at least 10 feet
(3 m) from the edge of the pool during operation.
KREEPY KRAULY® PROWLER® 930 Robotic Inground Pool Cleaner Installation and User’s Guide
ii
Do not bury cord - locate cord to minimize abuse
from lawn mowers, hedge trimmers and other
equipment.
When lifting the robotic pool cleaner, take care to
prevent back injury.
General Installation Information
FCC Statement
NOTE: This equipment has been tested and found to comply with the
limits for a Class B digital device, pursuant to part 15 of the FCC Rules.
These limits are designed to provide reasonable protection against harmful
interference in a residential installation. This equipment generates, uses
and can radiate radio frequency energy and, if installed and used in
accordance with the instructions, guarantees that interference will not
occur in a particular installation. If this equipment does cause harmful
interference to radio or television reception, which can be determined by
turning the equipment off and on, the user is encouraged to try to correct
interference by one or more following measures:
• Reorient or relocate the receiving antenna.
• Increase the separation between the equipment and the receiver.
• Connect the equipment into an outlet on a circuit different from
that to which the receiver is connected.
• Consult the dealer or an experienced radio/TV technician for help.
Changes or modifications to this equipment not expressly approved by the
party responsible for compliance (Pentair) could void the user’s authority
to operate this equipment.
Pre-Installation Check List
Before installing your cleaner, review and understand all warnings and
safety information in this guide. Failure to follow these instructions or
improper installation of the cleaner can result in damage to the pool
finish or the vinyl liner, Pentair Aquatic Systems disclaims any liability for
repairs or replacement to any of these structures or components of the
customer’s pool.
Before installing the cleaner in a vinyl liner pool:
Check liner closely for signs of deterioration or damage from age,
chemicals, pool wall damage, etc. If any damage is found, have a qualified
pool professional make all the necessary repairs. Also, if there are stones,
roots, etc., under the liner, remove them before installing the cleaner.
Before installing the cleaner in a gunite pool or a pool that is partially
or completely tiled:
Repair loose tiles and tighten any loose light rings.
Before installing the cleaner, clean your filter system:
Make sure you have cleaned the filter, including backwashing, rinsing,
and emptying all baskets. A clean system is necessary for proper cleaner
operation and coverage.
Before installing the cleaner, understand cleaner coverage:
The cleaner is designed to rid your pool of debris in approximately 4-6
hours. Less time could be needed, depending on the pool size. The
cleaner was not designed to automatically clean steps or swimouts or to
work under a solar cover. It was also not designed to do initial cleanup
for a new pool or when opening your pool for the season.
AFTER installing the cleaner, make sure the cleaner is operating
correctly:
The cleaner may need some minor adjustments to make sure it is
operating properly so there is no damage to the pool finish. Certain
vinyl liner patterns are particularly susceptible to surface wear, pattern
removal, ink rubbing off of, or serious scratches to the pattern caused by
objects coming into contact with the vinyl surface, including automatic
pool cleaners. Pentair Aquatic Systems is not responsible for any pattern
removal, abrasions or markings on vinyl liners.
Page 4

iii
IMPORTANT WARNING AND SAFETY INSTRUCTIONS
Disclaimer of Liability
About your Pool and PROWLER 930
There are a multitude of factors that contribute to the life of your pool.
The Prowler 930 robotic pool cleaner are very passive products that will
have no impact on pool life.
Please be aware that over time, deterioration, discoloration and brittleness
of any pool finish can be caused separately by, or in combination with,
age, an imbalance in pool water chemistry, improper installation and other
factors. Robotic pool cleaners, such as the Prowler 930, will not remove
or cause wear on “good” pool plaster. In fact, the opposite is true–pool
plaster will eventually cause wear on the cleaner.
The same situation holds true for vinyl-lined in-ground swimming pools,
because vinyl liners are also affected by the environment and factors such
as pool water chemistry, sunlight and the pool’s surroundings. Therefore
over time, vinyl can become brittle and weak. In addition, vinyl-lined pools
are affected by the workmanship, composition and installation of the
liner and the workmanship and quality of construction of the supporting
walls and pool base. These are all factors which can contribute to liner
failure. The existence of any of these type of conditions in your pool is
not caused by the use or operation of the Prowler 930. The manufacturer
disclaims any liability for repairs or replacement to any of these structures
or components of the customer’s pool.
The pool owner must assume all responsibility for the condition and
maintenance of the pool’s surface, water and deck.
SAVE THESE INSTRUCTIONS
KREEPY KRAULY® PROWLER® 930 Robotic Inground Pool Cleaner Installation and User’s Guide
Page 5
1
3m/10ft
PREPARATION OF THE POOL AND CLEANER
Overview
Prowler® 930 Robotic Pool Cleaners are designed to scrub, vacuum, and filter (including the waterline) your inground
pool. Before operating this product, be sure to read and follow all warning and safety instructions on pages ii-iii.
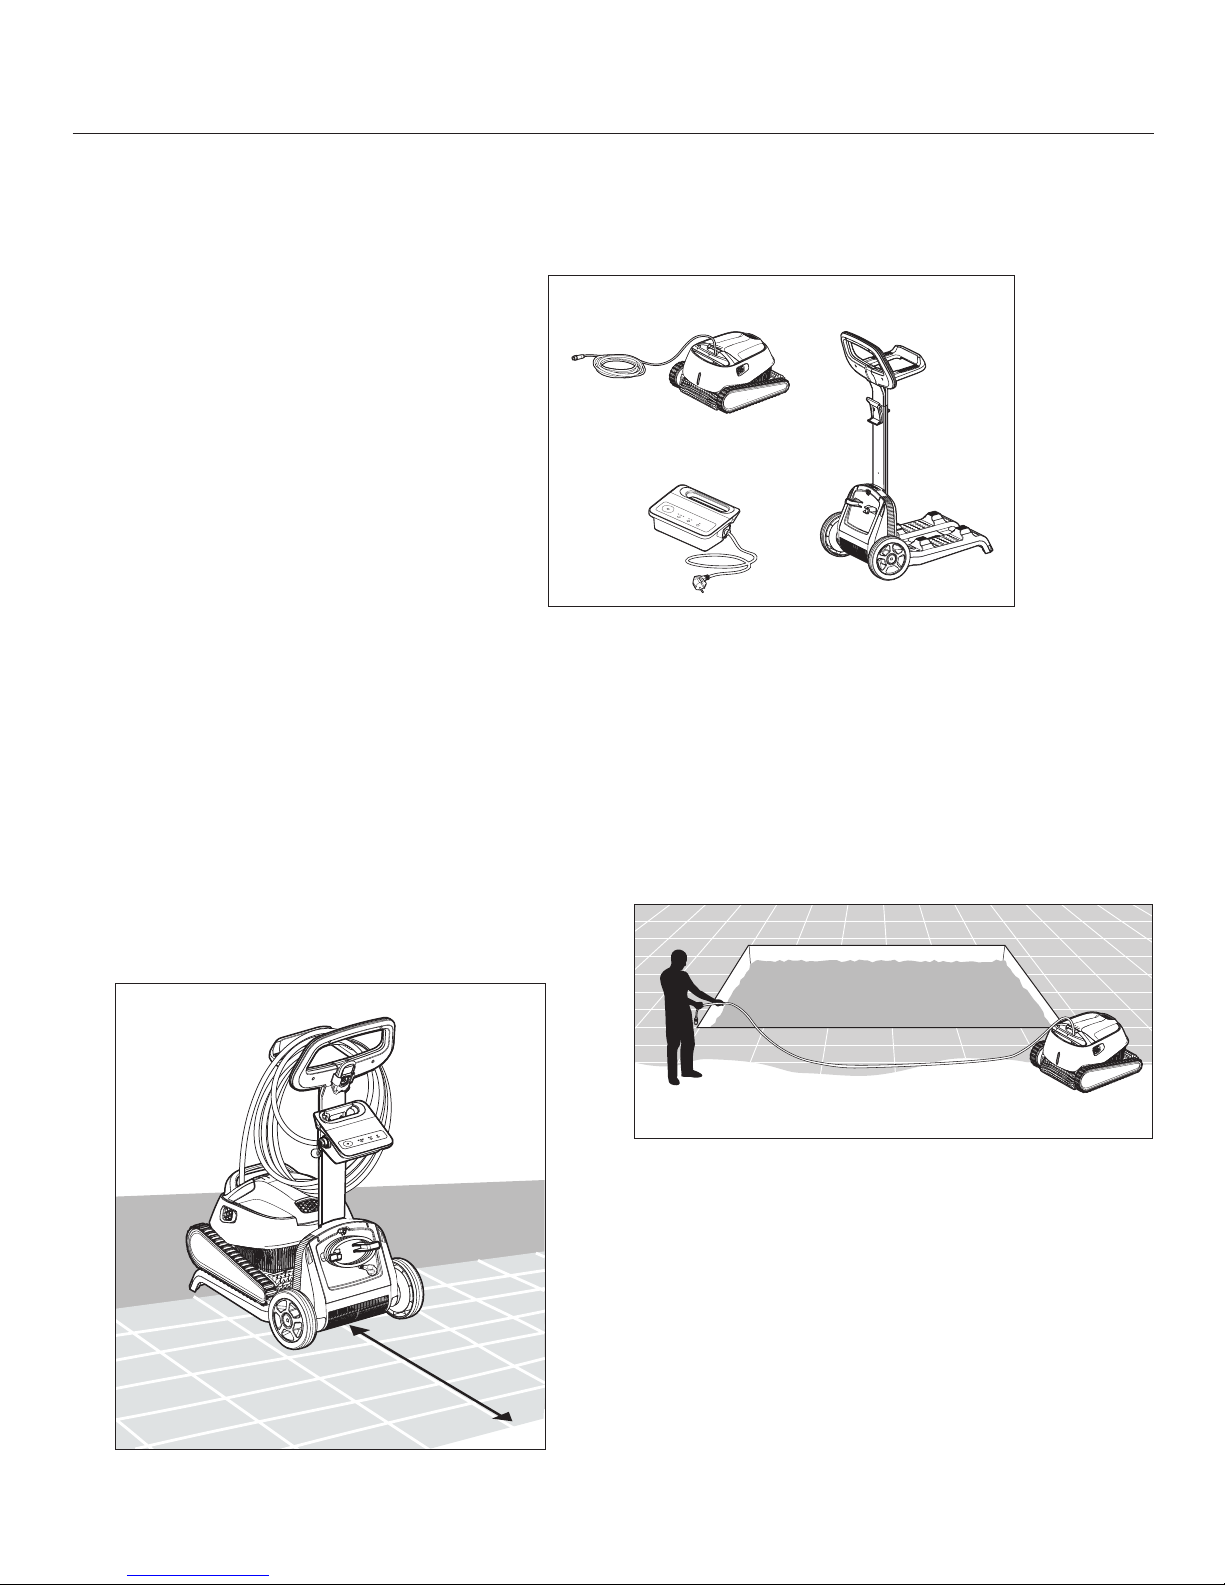
Cleaner Components:
• Cleaner with 60 ft. Communication Cable
• Power Supply
• Cleaner Caddy
Cleaner with 60’
Communication Cable
Cleaner Features:
• Weekly Timer
• Wall and Waterline Scrubbing
• Top Loading Basket Filtration
• Delayed Start
• Quick Clean
• Bluetooth® Wireless Technology Connectivity
• “Prowler 930” Mobile App for Smartphones
Power Supply
Initial Setup
Before using the cleaner for the first time, perform the following procedures:
STEP 1:
Power Supply and Caddy Placement
The cleaner comes with a cleaner caddy that will need to
be assembled before continuing further into this section.
See page 3 for Caddy Assembly instructions.
Position the caddy and power supply at least 10 feet (3 m)
from the edge of the pool. See Figure 1.
STEP 2:
Unroll Communication Cable
Unroll the communication cable and stretch it out
completely so that is has no kinks. See Figure 2.
Cleaner Caddy
KREEPY KRAULY® PROWLER® 930 Robotic Inground Pool Cleaner Installation and User’s Guide
Figure 1
Figure 2
Page 6
2
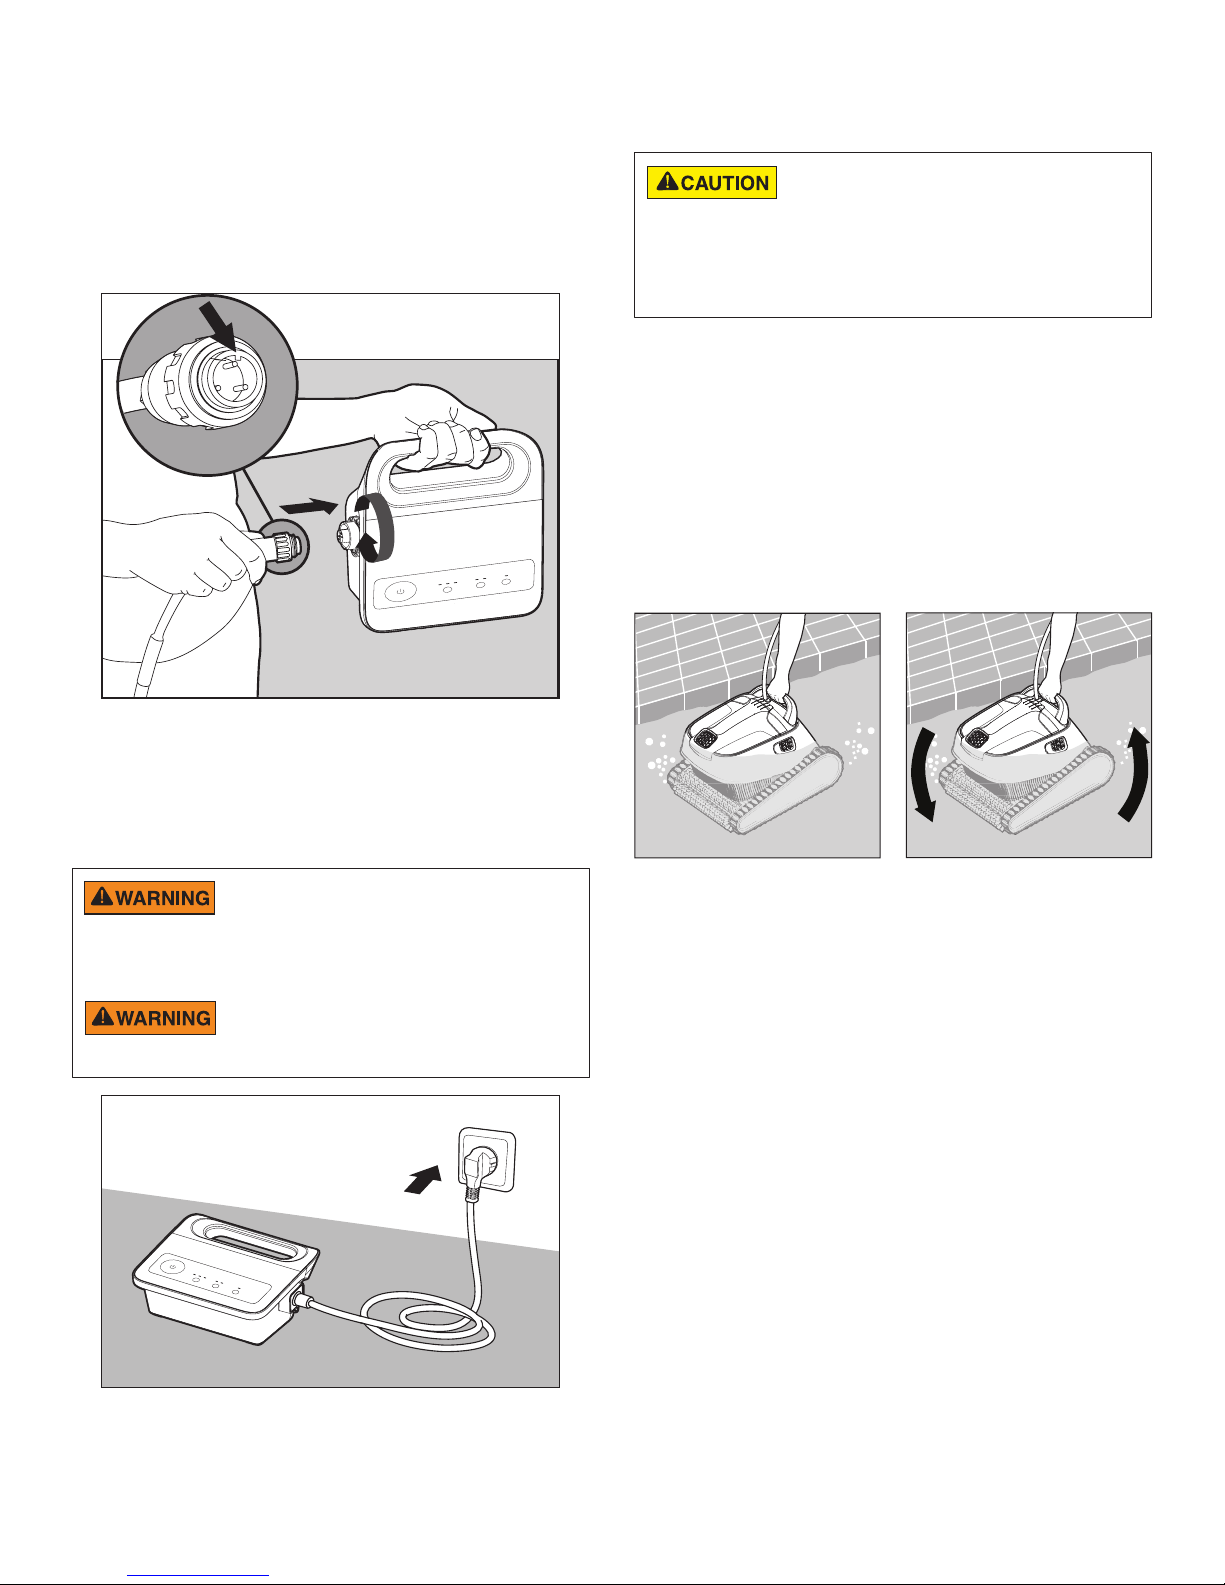
STEP 3:
Connect Power Supply to Cleaner
Connect the communication cable to the power supply.
Ensure the connector notch is lined up with the
corresponding groove in the socket on the power supply.
Turn the cable connector clockwise to lock the cable into
the power supply connection. See Figure 3.
Figure 3
STEP 5:
Placing the Cleaner in the Pool
Do not switch the pool cleaner to “ON” if it is not
fully immersed in water. Operating the cleaner out
of water will immediately cause severe damage and will result in loss
of warranty. Do not leave the cleaner in the pool all the time. Always
remember to turn the power supply “OFF” and unplug it from the power
outlet before removing the cleaner from the pool.
1. Be sure the power supply is positioned at least 10 feet
(3 m) from the pool.
2. Lower the cleaner into the pool by the handle (see
Figure 5).
Note: Never lower the cleaner into the pool by the
communication cable. This puts an unnecessary
strain on the cable and could result in damage to the
cleaner.
3. Gently tilt the cleaner from side to side or turn upside
down to release trapped air. See Figure 6.
STEP 4:
Connect Power Supply to Power Source
Connect the power supply to the electrical source/outlet.
See Figure 4.
RISK OF ELECTRICAL SHOCK OR
ELECTROCUTION: Connect only to a grounding
type receptacle protected by a ground-fault circuit-interrupter
(GFCI). Contact a qualified electrician if you cannot verify that the
receptacle is protected by a GFCI.
To reduce the risk of electrical shock, do not use
extension cord to connect unit to electrical supply;
provide a properly located outlet.
Figure 4
Figure 5 Figure 6
KREEPY KRAULY® PROWLER® 930 Robotic Inground Pool Cleaner Installation and User’s Guide
Page 7

3
B
A
Caddy Assembly
The following section contains instructions for assembling the included cleaner caddy:
STEP 1:
Removing the Communication Cable Holder
1. While holding the caddy chassis in place, pull the top
of the communication cable holder straight out until it
snaps loose. See Figure 7.
2. Place the attachment to the side. It will be reinstalled
in Step 4.
Figure 7
STEP 2:
Installing the Caddy Wheels
1. Using two of the shorter Phillips-head screws provided
with the caddy, secure both caddy wheels to the
caddy chassis. See Figure 8.
STEP 3:
Installing the Handle
Support
1. Slide the handle
support into it’s groove
on the caddy chassis
and push it firmly down
into it’s seat in the
chassis. See Figure 9.
Note: The handle
support seats tightly
into the chassis and
substantial force may
be needed. Ensure the
support is seated all the
way into the chassis, otherwise the securing screws will
not line up correctly.
2. Using two of the shorter Phillips-head screws provided
with the caddy, secure the caddy chassis to the handle
support. See Figure 10.
Figure 10
Figure 9
Figure 8
STEP 4:
Reinstall the Communication Cable Holder
1. Slide the bottom of communication cable holder into
it’s seat on the front of the caddy chassis.
2. While holding the caddy chassis in place, push the
top of the attachment in until it clicks into place. See
Figure 11.
Figure 11
KREEPY KRAULY® PROWLER® 930 Robotic Inground Pool Cleaner Installation and User’s Guide
Page 8

4
5/16”
(8mm)
A
B
STEP 5:
Install the Caddy Handle
1. Insert the caddy handle
into the handle support.
See Figure 12.
2. Push the handle into
it’s support as far as
possible.
Figure 12
STEP 6:
Install the Power Supply Clip
1. Using the two longer Phillips-head screws, two washers
and two 5/16” (8mm) nuts provided with the caddy,
install the power supply hook to the caddy’s handle
support. See Figure 13.
STEP 7:
Install the Power Cable Holder
1. Using the final two shorter Phillips-head screws
provided with the caddy, secure the power cable holder
to the caddy handle. See Figure 14.
Figure 14
Figure 13
STEP 8:
Attach the Power Supply to the Caddy
1. Hook the power supply’s handle over the top lip of the
power supply clip. See Figure 15 (A).
2. Tilt the power supply toward the handle support until
the power supply snaps into place on the bottom lip of
the power supply clip. See Figure 15 (B).
Figure 15
KREEPY KRAULY® PROWLER® 930 Robotic Inground Pool Cleaner Installation and User’s Guide
Page 9

Control Panel Overview
Bluetooth® Wireless Technology
Connection Indicator
3 Schedule
LEDs
5
OPERATION
2 Cleaning
Speed LEDs
Delayed
Start LED
On/Off
Button
1 2
Weekly Timer
Button
3
Cleaning
Speed Button
Delayed Start
Button
Weekly Timer Feature
The power supply has a timer control that allows you to set an automatic cleaning schedule each week. Be sure the cleaner
is fully immersed in water before turning on the power.
Setting the Weekly Timer
When the power supply is activated, you may choose a pool cleaning schedule for the coming week by pressing the Weekly
Timer button.
Note: The cleaner will always begin to work upon set-up.
Schedule LEDS:
LED 1 - The cleaner will automatically work every day for a full cycle = 7 times per week. Press the Weekly Timer
button once to select this interval.
LED 2 - The cleaner will automatically work every other day for a full cycle = 3 times per week. Press the Weekly Timer
button twice to select this interval.
LED 3 - The cleaner will automatically work every 3 days = 2 times a week. Press the Weekly Timer button three times
to select this interval.
Pressing the Weekly Timer button four consecutive times will reset the cleaner’s schedule. If you do not press any of the
buttons within the first 5 seconds after the power has been switched on, the cleaner will default to running one cycle only.
While the cleaner is working in weekly timer mode, the appropriate Weekly Timer LED will blink constantly between cycles.
At the end of the week the power supply automatically shuts off.
Cleaning Speed (Quick Clean Feature)
The Prowler® 930 Robotic Pool Cleaner can be set to clean your pool at either its standard cleaning speed or at a higher
cleaning speed referred to as Quick Clean.
1. The cleaner’s default speed is symbolized by the icon on the power supply. When the cleaner is performing a
default cleaning cycle the LED under this icon will illuminate.
2. Quick Clean is symbolized by the icon on the power supply. When the cleaner is performing a Quick Clean cleaning
cycle the LED under this icon will illuminate.
To begin a Quick Clean cycle, press the Cleaning Speed button once. The cleaner will immediately enter Quick Clean
mode and will clean the pool for one hour.
Note: While in Quick Clean mode the cleaner will only clean the pool floor. The cleaner will NOT climb and clean pool
walls.
Note: Once Quick Clean is selected, the cleaner will continue to clean in Quick Clean mode each time the cleaner is
activated. To return to the default cleaning cycle the Cleaning Speed button must be pressed while the cleaner is active.
KREEPY KRAULY® PROWLER® 930 Robotic Inground Pool Cleaner Installation and User’s Guide
Page 10

6
Delayed Start Feature
The Prowler® 930 Robotic Pool Cleaner includes a Delayed Start feature that allows the owner to delay the cleaner’s
start time for two hours. This delay allows time for debris to settle on the pool floor and walls after use, resulting in more
effective and thorough cleaning.
When the power supply is activated, you may activate the Delayed Start feature by pressing the Delayed Start button
once. The Delayed Start LED [ ] will illuminate and the ON/OFF button will continuously blink for two hours as the
cleaner waits to begin the next cleaning cycle. Refer to the Control Panel Overview graphic on the previous page.
Bluetooth® Wireless Technology
TO DOWNLOAD THE “PROWLER 930” MOBILE APP, OR FOR INSTRUCTIONS ON HOW TO OPERATE YOUR
CLEANER VIA THE MOBILE APP VISIT WWW.PENTAIRPOOL.COM/EN/PRODUCTS/CLEANERS
This cleaner can be connected and controlled via Bluetooth connection. When the Bluetooth Connection Indicator [
located on the power supply (see previous page), is illuminated it indicates that the smartphone paired with the cleaner is
within range of the cleaner and has been identified.
Note: Bluetooth pairing must be activated on your smartphone before the power supply will identify and connect with your
phone.
®
],
KREEPY KRAULY® PROWLER® 930 Robotic Inground Pool Cleaner Installation and User’s Guide
Page 11

7
Make sure the cleaner’s power supply is turned “OFF” and is disconnected from the electrical source/outlet before servicing
the cleaner. Moving parts may injure hands or fingers if cleaner inadvertently powers on during servicing.
Figure 16
LED Indicator Lights
The Prowler® 930 Robotic Pool Cleaner includes an LED indicator just
above the scrubber on the front side of the cleaner (see Figure 16).
During normal operation powered by the power supply the LED indicator
will blink blue.
LED
Indicator
Removing the Cleaner from the Pool
The cleaner will shut off automatically at the end of a cleaning cycle. Follow the steps below
to remove the cleaner from the pool.
MAINTENANCE
Ensure the power supply is turned “OFF” and disconnected from the electrical source/outlet
before removing the cleaner from the pool. Operating the cleaner out of water will immediately
cause severe damage and will result in loss of warranty. Do not leave the cleaner in the pool all the time.
1. Disconnect the power supply cable from the electrical outlet and disconnect the
cleaner communication cable from the power supply.
2. Using the cleaner’s communication cable, slowly and gently pull the cleaner to the
waterline at the edge of the pool until you can reach the handle. DO NOT lift the
cleaner out of the water by the cable.
3. Using the handle, lift the cleaner out of the pool. See Figure 17.
Note: Never lift the cleaner out of the pool by the communication cable. This puts an
unnecessary strain on the cable and could result in damage to the cleaner.
4. Place the cleaner on the edge of the pool and allow excess water to drain from the
cleaner body and basket. See Figure 18.
5. Disconnect the communication cable from the power supply.
6. If caddy is included, store the cleaner in the caddy with communication cable coiled
when not in use.
If not using a caddy, store the cleaner in a covered area with the communication cable
coiled.
Figure 17
Figure 18
KREEPY KRAULY® PROWLER® 930 Robotic Inground Pool Cleaner Installation and User’s Guide
Page 12

8
1
2
Cleaning the Filter Baskets
Note: It is highly recommended that you clean the filter baskets after each cleaning cycle. Too much debris in the filter will
restrict the suction power of the Prowler® 930 Robotic Pool Cleaner and reduce its effectiveness.
To clean the filter baskets, follow the instructions given below:
STEP 1:
Open the Filter Cover
When the filter cover is opened the outer filter basket
handle will pop up independently. See Figures 19 and 20.
Figure 19
Figure 20
STEP 3:
Remove and Rinse the
Inner Filter Basket
Remove the inner filter
basket from the outer filter
basket (see Figure 22).
Dump any loose debris
from the inner basket and
thoroughly rinse out any
remaining debris with a
garden hose.
Figure 22
STEP 4:
Empty the Outer Filter
Basket
Open the latch at the
bottom of the filter basket.
This will release the
bottom lid of the basket
and dump much of the
collected debris. See
Figure 23.
STEP 2:
Lift the basket out of the cleaner body.
Figure 21
KREEPY KRAULY® PROWLER® 930 Robotic Inground Pool Cleaner Installation and User’s Guide
Figure 23
STEP 5:
Clean the Outer Filter Basket
Thoroughly rinse the filter basket with a garden hose. See
Figure 24.
Figure 24
Page 13

9
Periodic Filter Screen Cleaning
Note: It is recommended that you clean the filter screens at least once a month. Too much debris in the filter screens will
restrict the suction power of the Prowler® 930 Robotic Pool Cleaner and reduce its effectiveness.
To dismantle and clean the four filter screens, follow the instructions given below:
STEP 1:
Empty the Inner and Outer Filter Baskets.
Follow steps 1-5 on the previous page.
The inner and outer filter baskets should be emptied and
rinsed clean before removing the outer basket’s filter
screens.
STEP 2:
Remove the Filter Screens
Using your thumbs, firmly press inwards on the top of
Panel 1 to remove the filter screen from its frame (see
Figure 25).
Each filter screen is stamped with a number (see Figure
26). Remove the filter screens in numerical order; Screen
1 > 2 > 3 > 4.
Figure 25
STEP 3:
Clean the Filter Screens
Thoroughly clean the filter screens with a garden hose.
See Figure 27.
Figure 27
STEP 4:
Reassemble the Filter Screens
Replace the filter screens by seating the bottom of the
screen into its frame, then pushing firmly outwards on the
top of the screen until a click is heard.
Each filter screen is stamped with a number (see Figure
28). Replace the filter screens in numerical order; Screen
4 > 3 > 2 > 1.
Figure 26
KREEPY KRAULY® PROWLER® 930 Robotic Inground Pool Cleaner Installation and User’s Guide
Figure 28
Page 14

10
2
1
3
1
Cleaning the Impeller
Always disconnect power to the cleaner before servicing, disassembly, or reassembly. Failure to do so could result in death or
serious injury to servicemen, pool users or others due to electrical shock. Read all servicing instructions before servicing the cleaner.
Every so often debris may become trapped in the Prowler® 930 Robotic Pool Cleaner’s impeller. To clean out debris
trapped in the impeller opening, follow the instructions below:
STEP 1:
Open the Filter Cover and Remove the Basket
See Figure 29 and Figure 30.
Figure 29
Figure 30
STEP 2:
Unmount and Remove the Intermediate Cover and
Manifold Assembly
1. Using a No. 2 Phillips-head screwdriver, remove the two
screws that hold the intermediate cover and manifold
assembly in place. These screws can be found in the
inside corners of the intermediate cover. See Figure 31.
2. Place the two screws to the side.
3. Gently pull the intermediate cover (Item #2 in Figure 31)
away from the cleaner and place it to the side.
4. Gently pull the manifold assembly (Item #3 in Figure 31)
away from the cleaner and place it to the side.
STEP 3:
Unmount and Remove the Impeller Cover
Press the tabs on both sides of the impeller cover
(Item #1 in Figure 32) to unlock the cover from the
impeller assembly. While pressing both tabs, pull the
cover away from the cleaner.
Place the impeller cover to the side.
Figure 32
STEP 4:
Clean Debris from the Impeller
By hand, remove any debris that has become trapped
around the impeller. See Figure 33.
Figure 31
KREEPY KRAULY® PROWLER® 930 Robotic Inground Pool Cleaner Installation and User’s Guide
Figure 33
Page 15

11
2
1
3
STEP 5:
Remount the Impeller Cover
Gently push the impeller cover back onto the impeller
assembly. See Figure 34.
The tabs on the motor unit will lock the cover into place.
Figure 34
STEP 6:
Remount the Intermediate Cover and Manifold
Assembly
Reseat the intermediate cover and manifold assembly and
reinstall the two screws that hold the cover and manifold
assembly in place. See Figure 35.
Figure 35
Storing the Cleaner
Any time the cleaner will not be in use for an extended period of time, for
example during the winter, follow the storage recommendations below:
• Be sure to disconnect the power supply after use.
• Store the power supply, cable, and cleaner with the caddy if included
with the cleaner.
• Store the cleaner in a protected area out of direct sun, rain and frost,
at a temperature between 5°-45°C / 41°-113°F.
• Drain all water from the pool cleaner.
• Thoroughly clean the filter baskets and filter screens and store the
cleaner with them installed.
KREEPY KRAULY® PROWLER® 930 Robotic Inground Pool Cleaner Installation and User’s Guide
Page 16

12
TROUBLESHOOTING
Problem Possible Cause Corrective Action
Cable twisting or cable
coils up.
Cleaner is moving in
circles
Cleaner does not reach
all areas of the pool
Cleaner does not
climb walls
Motor not working
Cleaner will not sink
Power supply or power
supply switch light is
not working
Obstruction in pool
Gets stuck on main drain cover
Excess cable in the pool
Dirt stuck in moving parts
Tracks worn due to extended use
Power supply positioned incorrectly
Algae in pool
Power supply positioned incorrectly
Cleaner does not climb walls
Algae on pool walls and floor
Pool filter and pump is on
Cleaner is too heavy
Algae on walls
Water temperature too low and/or too high
Brushes are worn
Debris caught around impeller
Cleaner is too light from trapped air
Unsuitable pH level
Impeller blocked
Drive system blocked
Electrical problem - motor unit,
communication cable, or power supply
Air caught in trapped in cleaner Turn cleaner upside down under water to remove
Not plugged in properly or main socket
is damaged
Remove obstruction in pool.
Turn off filter and install main drain cover ring.
Straighten cable and lay in sun periodically.
Remove excess cable from pool.
Remove dirt from moving parts.
Contact your dealer. Replace tracks.
Place power supply in a position so that the cleaner
can reach all walls.
Correct pool and water conditions.
Place power supply in a position so that the cleaner
can reach all walls.
Check reasons for not climbing walls below.
Brush pool walls and floor.
Turn off pool filter and pump and run another
cleaning cycle.
Clean and wash cartridge.
Brush walls.
Ideal water temperature between 54-90° F (12-32° C)
Replace brushes - contact your dealer.
Clean impeller (see page 10).
Turn cleaner upside down under water to remove
trapped air.
Check pH level - should be between 7.4 - 7.8;
minimum level of 7.2.
Clean impeller (see page 9).
Clean tracks and wheels.
Consult with your dealer or service center.
trapped air. Wash the cartridge. Remove calcium
deposits or other chemical sediments.
Open inlet flap in the bottom lid to remove dirt and/or
trapped air.
Reconnect and check main power supply.
KREEPY KRAULY® PROWLER® 930 Robotic Inground Pool Cleaner Installation and User’s Guide
Page 17

13
REPLACEMENT PARTS
Illustrated Parts List
Item # Part # Description
1 360360 Power Supply
2 360446 Communication Cable
3 360362 Outer Filter Basket
* 360445 Inner Filter Basket
* 360363 Cartridge Filter Kit
* 360449 Net Filter Kit
6 360365 Motor Unit
7 360366
8 360366
9 360367 Rear Brush
10 360368 Rear Brush Mounting
11 360370 Manifold Assembly
12 360371 Impeller Cover
13 360372
14 360373 Latch
15 360447 Filter Cover
16 360375 Intermediate Cover
17 360448 External Housing
18 360377 Left Grill
19 360378 Right Grill
20 360379 Internal Float
21 360380 Side Panel
22 360381
23 360382 Bypass Cover, Left
24 360383 Bypass Cover, Right
25 360384 Rapid Drain Flap
26 360385 Handle Assembly
27 360345 Active Brush
28 360357 Rubber Strips
* 360340 Impeller
* 360386
* 360387
* 360165 Cleaner Caddy
Front Brush Mounting,
Left
Front Brush Mounting,
Right
Front Wheel Assembly
(1 Set)
Rear Wheel Assembly
(1 Set)
Small Screw Set,
KA50 x 20
Large Screw Set,
KA50 x 16
KREEPY KRAULY® PROWLER® 930 Robotic Inground Pool Cleaner Installation and User’s Guide
Note (*): Not Shown
13
Page 18

NOTES
Page 19

NOTES
Page 20

1620 HAWKINS AVE., SANFORD, NC 27330 • (919) 566-8000
*372052*
10951 WEST LOS ANGELES AVE., MOORPARK, CA 93021 • (805) 553-5000
WWW.PENTAIRPOOL.COM
All Pentair trademarks and logos are owned by Pentair or one of its global affiliates. Kreepy Krauly® and Prowler® are trademarks and/or registered
trademarks of Pentair Water Pool and Spa, Inc. and/or its affiliated companies in the United States and/ or other countries. The Bluetooth® word
mark and logos are registered trademarks owned by the Bluetooth SIG, Inc. and any use of such marks by Pentair Water Pool and Spa, Inc. is under
license. Other trademarks and trade names are those of their respective owners. Unless expressly noted, names and brands of third parties that may
be used in this document are not used to indicate an affiliation or endorsement between the owners of these names and brands and Pentair Water
Pool and Spa, Inc. Those names and brands may be the trademarks or registered trademarks of those third parties. Because we are continuously
improving our products and services, Pentair reserves the right to change specifications without prior notice. Pentair is an equal opportunity employer.
© 2017 Pentair Water Pool and Spa, Inc. All rights reserved. This document is subject to change without notice.
P/N 372052 REV. A 6/9/17
 Loading...