

Pentair Hydromatic S4PP, Hydromatic H4HP, Hydromatic H3HP, Hydromatic S4MP, Hydromatic S4HVP Installation And Service Manual
...Page 1
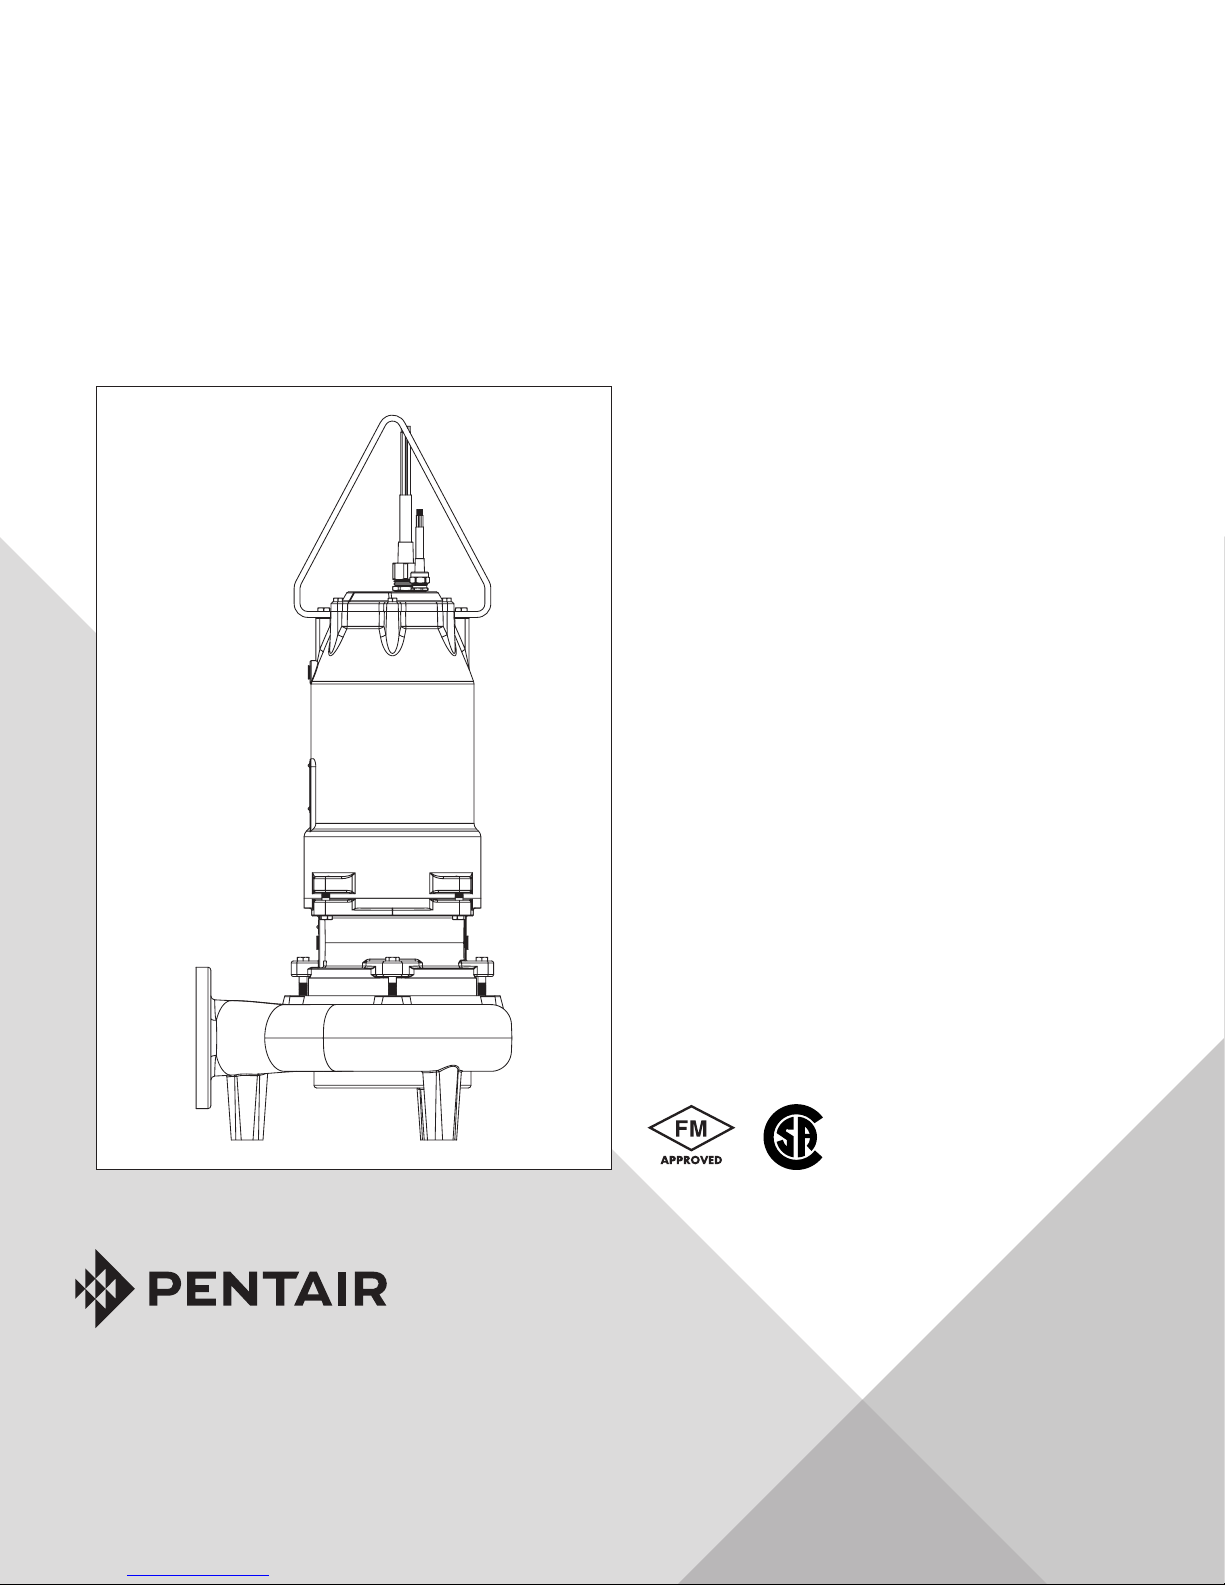
INSTALLATION AND SERVICE MANUAL
HYDROMAT IC
SUBMERSIBLE
SOLIDS HANDLING
PUMP
Models
C4S(X)P, H3H(X)P,
H4H(X)P, S4M(X)P,
S4P(X)P, S4HV(X)P
and S4MV(X)P
(Class I, Division 1, Groups C & D): FM
ENGLISH: PAGES 2-12
Installation and Service Manual
For use with product built with Premium
Efficient motor.
Make sure this manual is provided to the owner
of the equip ment or to the responsible party who
maintains the system.
NOTE! To the installer: Please make sure you provide this manual to the owner of the equip ment or to the responsible
party who maintains the system.
Item # E-03-557 | Part # 056255571 | © 2018 Pentair plc | 09/25/18
(Hazardous Location
Motor End)
Page 2

General Information
Attention:
This manual contains important
information for the safe use of this
product. Read completely and do not
throw away.
Reasonable care and safe methods
should be practiced. Check local codes
and requirements before installation.
Unpacking Pump:
When unpacking unit, check for damage.
Claims for damage must be made at
the receiving end through the delivery
carrier. Damage cannot be processed
from the factory.
WARNING: Before handling these
pumps and controls, always
disconnect the power first. Do not
smoke or use sparkable electrical
devices or flames in a septic
(gaseous) or possible septic sump.
CALIFORNIA PROPOSITION 65 WARNING:
This product and
related accessories contain
chemicals known to the State of
California to cause cancer, birth
defects or other reproductiveharm.
Pumps in Storage or Not Operating:
Pumps with silicon/carbide seals
must have impellers manually rotated
(6 revolutions) after setting nonoperational for 3 months or longer and
prior to electrical start-up.
Pumps with tungsten carbide seals
must have impellers manually rotated
(6 revolutions) after setting nonoperational for 3 weeks or longer and
prior to electrical start-up.
Seal Failure Probes:
All hazardous location submersible
pumps have two factory installed
moisture detectors (seal failure
probes). They are in a normally open
series circuit in the seal chamber.
Under normal operating conditions,
the circuit remains open. If the lower
seal leaks and moisture enters this
chamber, the moisture would settle to
the bottom of the chamber and will
complete the circuit between the
moisture detectors.
This circuit must be connected to a
sensing unit and signaling device. This
is supplied in a Hydromatic® built control
panel.
NOTE: Failure to install such a device
negates all warranties by Hydromatic.
Heat Sensors:
All motors in this family have heat
sensors on or embedded in the motor
winding to detect excessive heat.
This prevents damage to the motor.
If sensor trips due to excessive
winding temperature, the starter in
the panel breaks power to the pump.
Once the sensor resets, the starter is
automatically reset for FM for continued
operation of the pump. This circuitry is
supplied in a Hydromatic control panel.
The sensors are set to trip at 130°C.
NOTE: Failure to install such circuitry
would negate FM approvals and all
warranties by Hydromatic.
Power Cords:
The power cord and heat sensor seal
failure cord are potted into the cord
cap. The cords must not be spliced.
NOTE: Each cable has a green lead.
This is the ground wire and must
be grounded properly per NEC and/
or local codes. Cords should be
inspected for abnormal wear and
replaced accordingly.
Overload Heaters:
If the Hydromatic electrical panel is not
used, starters with 3 leg overload relay
must be supplied on 3 phase pumps.
Each leg is to have an identical heater
sized in accordance with the nameplate
amps on the motor housing. The amp
draw on these submersible motors is
slightly higher than a corresponding
horsepower surface motor, so heaters
must be sized by the nameplate rating.
Capacitor start single phase pumps
have a run and start winding that draws
different currents. To adequately
protect these windings with the
appropriate heaters, consult the
factory.
NOTE: The red lead is always the
start winding of a pump using single
phase.
Pump Installation
Installing Sump Level Controls Float
Controls:
In either simplex, duplex or triplex
systems the lower or turn-off control
is to be set to maintain a minimum level
in the sump. This level shall be no more
than 3-1/4" from the top of the motor
housing down to the surface of the
sewage.
The second or turn-on control is set
above the lower turn-off control. The
exact distance between the two floats
must be a compromise between a
frequent pumping cycle (10 starts per
hour max.) to control septicity, solids
and a slower cycle for energy economy.
This distance should be determined by
the engineer or consulting engineer,
depending on the conditions of
the application.
Installing Pump in Sump:
Before installing the pump in the
sump, lay it on its side and rotate
impeller. Impeller may be slightly
stuck due to factory test water.
The impeller should turn freely.
Do not connect the power until
after this test.
Clean all debris from sump and connect
pump to piping. A check valve must
be installed on each pump. A gate or
plug valve in each pump discharge is
highly recommended. This valve should
be installed on the discharge side of the
check valve so if necessary to service
the check valve, the line pressure can
be cut off. Single pump systems are
sometimes installed without a check
valve where it is desirable to self-drain
the discharge line to prevent freezing.
This can be done only with short
discharge lines; otherwise water will
return to the sump and cause short
cycling of the pump.
Making Electrical Connections:
All electrical wiring must be in
accordance with local codes, and only
competent electricians should make
the installations. Complete wiring
diagrams are glued to the inside
cover of the panel. All wires should be
checked for grounds with an ohmmeter
or Megger® after the connections are
made.
2
Page 3
THIS IS IMPOR TANT, AS ONE GROUNDED
WIRE SIZE TABLE
FOR REMOTE LOCAT ION OF CONTROL PA NEL
LENGTHS ARE BASED ON A VOLTAGE DROP OF TWO PERCENT
Maximum length in feet from NEMA 4 Junction Box to control panel. All contro l wire s can be = 14–16 or 18 gauge wire. If power lines are greater than
300 volts, and the control wires are used in the same conduit, then the insulation of the control wires must be for 600 volts.
1 Phase 3 Phase
HP HP
Wire Size Volts 1
1
⁄2 2 3 5 Volts 11⁄2 2 3 5 71⁄2 10 15
200V - - - - 200 217 190 101 - - - -
230 105 95 - - 230 291 250 134 - - - -
12 460 1165 1019 540 412 333 233 -
575 1820 1450 820 624 515 364 -
200 121 111 103 - 200 340 297 158 119 - - -
230 163 148 139 - 230 456 390 210 161 - - -
10
460 1822 1594 846 645 522 364 -
575 2847 2270 1360 976 806 569 -
200 190 175 162 - 200 533 466 249 187 155 - -
230 257 232 219 - 230 715 613 330 252 204 - -
8 460 2860 2500 1328 1013 819 572 390
575 4468 3570 2145 1532 1266 894 -
200 296 272 252 - 200 830 726 387 291 242 170 -
230 400 362 340 181 230 1114 955 514 393
318 223 -
6 460 4455 3898 2068 1577 1275 891 607
575 - - 3341 2386 1972 1392 -
200 452 416 384 - 200 1268 1110 592 444 370 260 -
230 610 553 520 276 230 1701 1458 785 601 486 340 232
4 460 - - 3160 2410 1449 1361 928
575 - - - 3646 2513 2127 -
200 689 633 586 - 200 1932 1690 902 676 563 395 -
230 930 842 792 421 230 2592 2222 1196 915 741 578 353
*2* 460 - - - 3672 2969 2074 1414
575 - - - - 4590 3240 -
*Special junction box required for wire sizes larger than #4.
WIRE CAN CAUSE CONSIDERABLE
TROUBLE.
IMPORTANT: If equipment is not
properly wired and protected as
recommended, the warranty is void.
Caution: The 230 volt 3 phase pump
has a dual marked nameplate. Voltage
may be rewired by the manufacturer
or a Class I Div 1 equipment qualified
electrician. Once the voltage is changed,
the factory cord tag indicating 230 volt
3 phase must be removed.
For record keeping purposes, we
suggest the pump be marked externally
with the new voltage and qualified
personnel that performed the change.
Pumps shipped from the factory as 460
volt 3 phase cannot be rewired to any
other voltage.
To Re-wire the pump from 230V to
460V 3 phase:
Only a 230V pump from the factory
is considered dual voltage, a cord
label clearly states the factory wound
voltage.
Remove all six cap screws then raise
the cord cap assembly enough to slip
a prying instrument on opposite sides
between the cord cap casting and
the motor housing. Take care to not
damage the o-ring or the machined
surfaces of the castings. Doing so
could void FM agency certifications.
While prying evenly on both sides;
NUMBER OF CONDUCTORS REQUIRED BETWEEN CONTROL PANEL AND NEMA 4 JUNCTION BOX
POWER LINES AND CONTROL WIRES CAN BE CARRIED IN CONDUIT OR CAN BE UNDERGROUND BURIED CABLE
System Number of Number of Number of
Type Control Wires Power Lines Ground Wires #8 Number of Number of
Sensor Wires Ground Wires
Simplex 4 3 1 3 1
Simplex with Alarm 6 3 1 3 1
Duplex 6 6 2 6 2
Duplex with Alarm 8 6 2 6 2
230V 3ø 460V 3ø
3 PHASE MOTOR WIRING
DUAL VOLTAGE
separate the cord cap casting from the
motor housing, the assembly is airtight
and will have a vacuum effect when
disassembling. Once separated, the
cord cap can be inverted and rotated
to the outside of the pump assembly,
and a bolt can be re-used to secure
the upside down cord cap to the motor
housing for ease of rewiring.
Refer to the wiring diagram within
this manual for wiring details. Once
all electrical connections are finished
and secure (a crimped electrical
connector is best to prevent issues
due to vibration if required), the cord
cap should be re-attached reversing
the steps above. Ensure the o-ring is
in place and perform a hi-pot test for
safety once everything is complete.
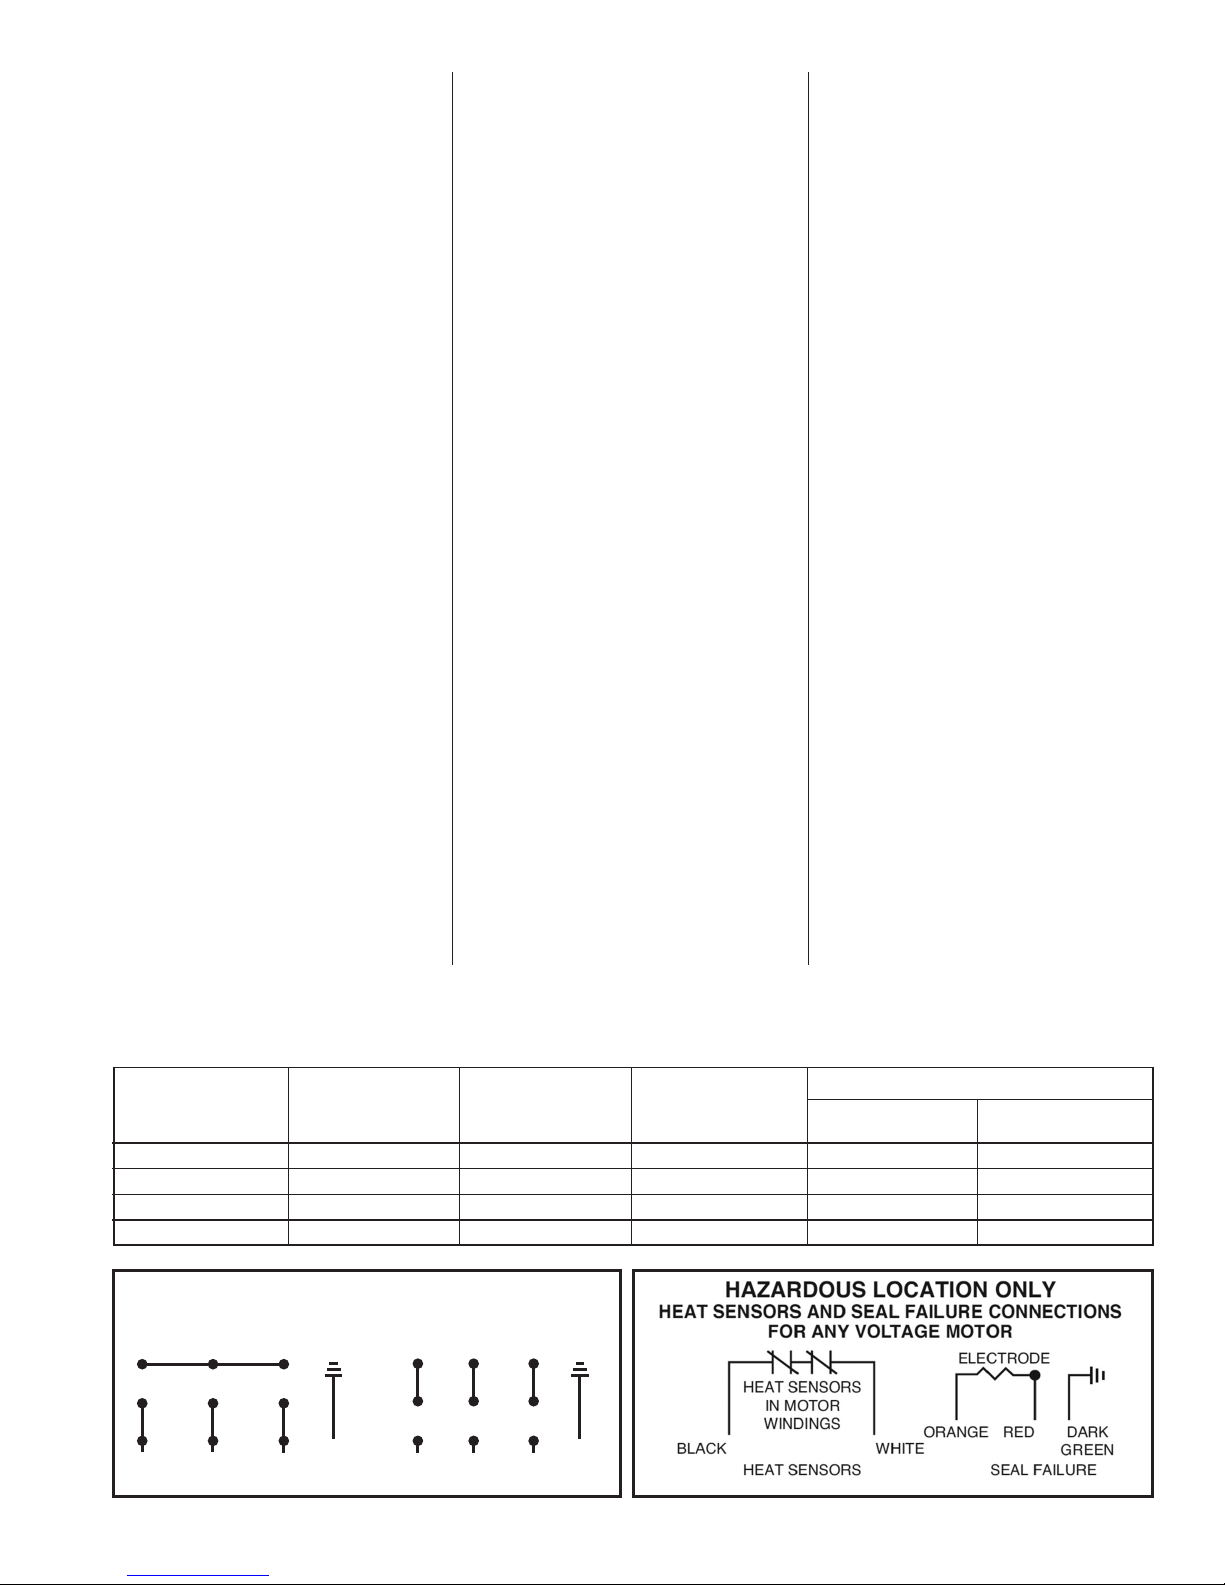
Heat Sensors and Seal Failure Connections:
Be sure heat sensor wires are
connected in series with the starter
coil. Connections are provided on the
terminal strip.
Pump Operations
Starting System:
1. Double check all wire connections.
2. Turn pumps to Off position on
H-O-A switches.
3. Turn on breakers.
4. When using single phase pumps,
make sure red pump lead is
connected to capacitor circuit.
Connect amprobe to pump power
cord and turn pump on. The pump will
show high amp draw momentarily,
then as pump comes off start wirings,
amps will drop to normal nameplate
amps.
When using three phase pumps
(230/460/575), turn the H-O-A
switch to Hand position on one
pump and notice operation. If
pump is noisy and vibrates, rotation
is wrong. To change rotation,
interchange any two line leads to
pump. Do not interchange main
incoming lines. Check rotation of
all pumps in this same manner.
5. Now set both H-O-A switches to
Auto position and allow water to
rise in sump until one pump starts.
Allow pump to operate until the
level drops to turn-off point.
6. Allow sump level to rise to start
other pump(s). Notice run lights
in panel. Pumps should alternate
on each successive cycle of
operation.
7. Turn both H-O-A switches to Off
position and allow sump to ll to
the override control level(s).
8. Turn switches to Auto position, and
pumps should start and operate
together until level drops to turnoff point.
9. Repeat this operation and cycle
several times before leaving the
job.
HEAT SENSOR & SEAL FAILURE
45 6
78 9
12 3
BL
(L1)
W
(L2)
GREEN GREEN
R
(L3)
45 6
78 9
12 3
BL
(L1)
W
(L2)
R
(L3)
ELECTRODE RESISTANCE 330 kΩ
3
Page 4
10. Check voltage when pumps are
operating and check the amp draw
of each pump. Check amps on each
wire as sometimes a high leg will
exist. For excessive voltage on one
leg, the electric utility company
should be consulted.
Pump Maintenance
As the motors are oil filled, no lubrication
or other maintenance is required.
If the heat sensor and seal failure are
hooked up properly, no attention is
necessary as long as the seal failure
indicator light does not come on. To
ensure continuity of the seal sensor
leads, a test light is provided on
intrinsically safe Hydromatic panels as
standard equipment.
Pump should be checked every quarter
for corrosion and wear.
Field Service on Hydromatic Hazardous Location Pumps:
If a Hydromatic hazardous location
pump is used in a hazardous location,
the pump must be returned to the
factory for electrical and motor
service. This will ensure the integrity
of the hazardous location rating of the
pump and comply with our warranty
requirements.
A
The quick disconnect cords, upper
and lower seal, volute and impeller
components may be repaired or
replaced by an authorized Hydromatic
service facility without compromising
the hazardous location rating to the
pump.
Any time the seal is disturbed, it must
be replaced.
Check the pump for proper rotation
before returning to service.
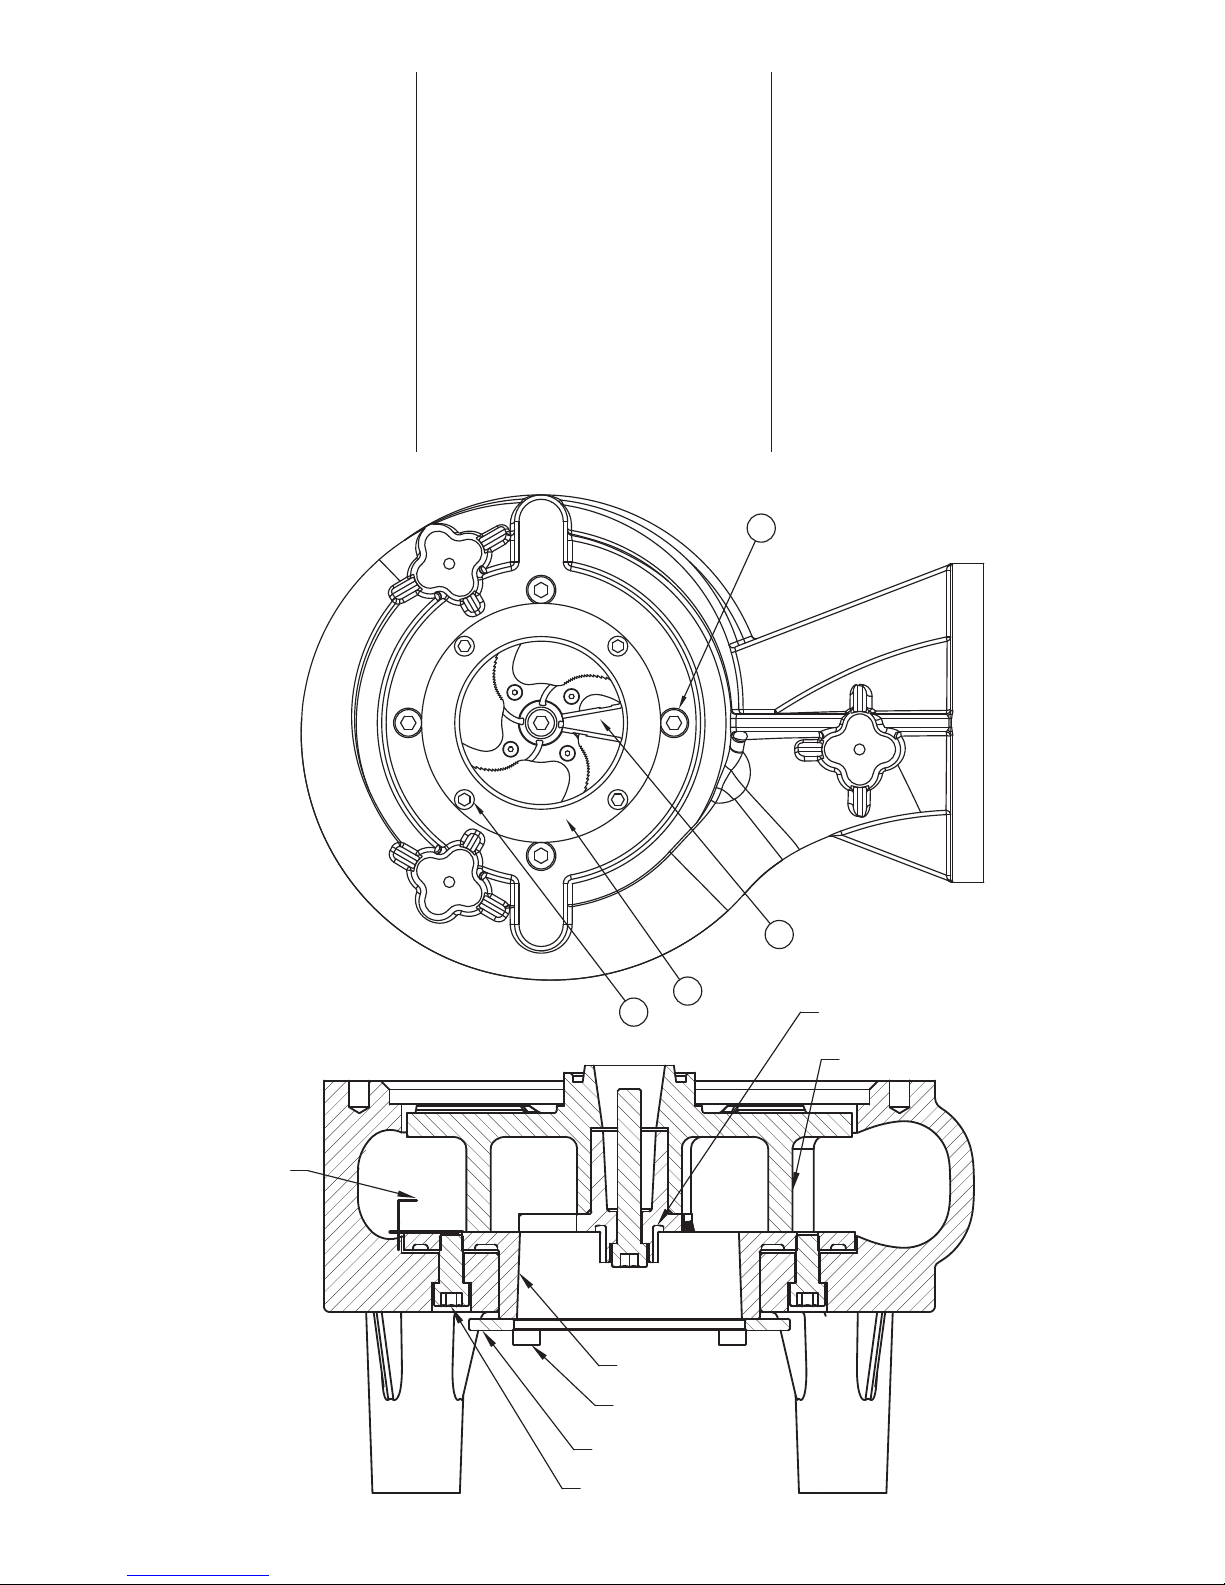
RECOMMENDED
MAX CUTTER GAP
.015
.010
B
C
CHOPPER PLATE
3/8-16 BOLTS
PLATE RETAINING RING
1/2-20 BOLTS
D
CUTTER INSERT
IMPELLER
4
Page 5

Adjust Cutter Clearance on
Chopper Pump
WARNING: Disconnect power before
adjusting chopper clearance; always
keep fingers and hands away from
chopper parts.
1. First install the chopper plate (Item
D) into the volute. It may be helpful
to install ½-20 studs into the
chopper plate to line up the holes
with the corresponding volute
holes. You may have to tap the
plate all the way down with a rubber
hammer.
2. Remove the studs and replace with
four ½-20 x 1 (Item A) in long socket
head screws from beneath the
volute, do not tighten.
3. Install motor with impeller
mounted, tighten motor housing
bolts to the volute
4. Install the chopper retainer
ring (Item B) and tighten the four
3/8 -16 x 1" long (Item C) socket head
cap screws to force the chopper
plate up against the impeller and
chopper blade
5. Next back off these 3/8-16 (Item
C) bolts one quarter of a turn. This
should give you .015 clearances.
6. Tighten the outer four ½ -20 screws
(Item A) to 75-85 Ft-lbs.
7. Measure the clearance with a feeler
gage it should be between .010 and
.015.
8. Spin impeller with a hex wrench
on the Impeller hub screw or use a
wooden pry bar to spin impeller to
make sure there is no rub.
9. If you hear or feel a rub readjust the
clearance by loosening the inner
3/8-16 screws evenly and tightening
the ½- 20 screws.
Pump Troubleshooting
Below is a list of common problems and
the probable causes:
Pump will not start.
1. No power to the motor. Check for
blown fuse or open circuit breaker.
2. Selector switch may be in the Off
position.
3. Control circuit transformer fuse
may be blown.
4. Overload heater on starter may be
tripped. Push to reset.
Pump will not start and overload
heaters trip.
1. Turn off power and check motor
leads with Megger or ohmmeter for
possible ground.
2. Check resistance of motor
windings. All 3 phases should show
the same reading.
3. If no grounds exist and the motor
windings check OK, remove pump
from sump and check for clogged
or blocked impeller.
Pump operates with selector switch
in Hand position but will not operate
in Auto position.
1. This indicates trouble in the oat
level control or the alternator relay.
2. Check control panel for trouble.
Pump runs but will not shut off.
1. Pump may be air locked. Turn pump
off and let set for several minutes,
then restart.
2. Lower oat control may be hung-
up in the closed position. Check in
sump to be sure control is free.
3. Selector switch may be in the Hand
position.
Pump does not deliver proper
capacity.
1. Discharge gate valve may be
partially closed or partially clogged.
2. Check valve may be partially
clogged. Raise level up and down to
clear.
3. Pump may be running in wrong
direction. Low speed pumps
can operate in reverse direction
without much noise or vibration.
4. Discharge head may be too high.
Check total head with gauge
when pump is operating. Total
head is discharge gauge pressure
converted to feet plus vertical
height from water level in sump
to center line of pressure gauge
in discharge line. Gauge should be
installed on pump side of all valves.
Multiply gauge pressure in pounds
by 2.31 to get head in feet.
5. If pump has been in service for
some time and capacity falls off,
remove pump and check for wear
or clogged impeller.
Motor stops and then restarts after
short period but overload heaters in
starter do not trip.
1. This indicates heat sensors in the
motor are tripping due to excessive
heat. Impeller may be partially
clogged giving a sustained overload
but not high enough to trip overload
heater switch.
2. Motor may be operating out of
liquid due to a failed level control.
3. Pump may be operating on a short
cycle due to sump being too small
or from water returning to sump
due to a leaking check valve.
5
Page 6

C4S(X)P, H3H(X)P, H4H(X)P, S4M(X)P, S4P(X)P,
S4HV(X)P and S4MV(X)P Parts List
For use with product built with Premium Efficient motor.
7
24
10
3, 4
16
A1
A2
5
6
14
A4
1
9
A3
8
2
11
21
15
19
16
17
20
22
13
12
B5
18
B6
23
Ref.
Part
No.
No.
1 28010D000 MOTOR HOUSING 1
2 27818D010 BEARING HOUSING 1
3 27882A009 TERMINAL BLOCK 1
4 06106A069 SCREW (TERMINAL BLOCK) 2
5 110650033 SCREEN 1
6 19331A007 WASHER SPRING (THRUST) 1
7 19101A017 CAP SCREW (CORD CAP) 6
8 026032103 STATOR RING 1
9 05818A090 KEY SQ. 5/32 1
10 001500191 O-RING (CORD CAP) 1
11 05876A135 O-RING (MOTOR HOUSING) 1
12 05876A121 O-RING (SEAL PLATE) 1
13 19103A048 SCREW CAP 1/2–13 x 2.5 LG 4
14 000650111 BALL BEARING UPPER 1
15 071670181 DOUBLE ROW BALL BEARING LOWER 1
16 009240101 PIPE PLUG 1/2 SOCKET HEAD BRASS 3
Part
Description Qty.
66
Ref.
Part
No.
No.
17 19103A048 CAPSCREW – S4M(X)P, S4MV(X)P, S4HV(X)P 4
19103A060 CAPSCREW – S4P(X)P, H3H(X)P, H4H(X)P, C4S(X)P 4
18 109010011 SEAL FAILURE PROBE 2
19 109000025 SENSOR WIRES 1
20 12558A017 RETAINING RING EXTERNAL 1
21 009740031 RETAINING RING INTERNAL 1
22 110491001 UPPER SEAL 1
23 009201001 LOWER SEAL 1
24 152880315 CORD CAP ASSEMBLY – 10-4 SOOW 1
152880325 CORD CAP ASSEMBLY – 8-4 W 1
152880335 CORD CAP ASSEMBLY – 6-4 W 1
B5 278190003 SEAL PLATE - S4M(X)P, S4MV(X)P, S4HV(X)P 1
278190103 SEAL PLATE- S4P(X)P, H3H(X)P, H4H(X)P, C4S(X)P 1
B6 07597A017 BOLT(SEAL PLATE) S4M(X)P, S4MV(X)P, S4HV(X)P 4
047560061 BOLT(SEAL PLATE) S4P(X)P, H3H(X)P, H4H(X)P, C4S(X)P 4
Part
Description Qty.
Page 7

Hydraulic End Parts List
D7
D6 D5
D1
D7 D6 D5 D1
D8
S4MXP
D7
D15
D5
D6
D8
S4PXP
D7 D1
D15
D5
D6
D8
S4HVXP
D7
D5 D6 D1
D15
D8D15
S4MVXP
D1
D7 D5
D6
D15
D1
D8
H3HXP
D1 D15
D10 D8 D9 D12 D11 D13
C4SXP
D15
D8
H4HXP
Item No. Description S4M(X)P S4MV(X)P S4HV(X)P S4P(X)P H3H(X)P H4H(X)P C4S(X)P
D1 O-RING 001500581 001500581 001500581 05876A136 05876A136 05876A136 05876A136
D5 IMPELLER KEY 083460033 083460011 083460011 083460033 083460033 083460033 083460033
D6 WASHER – IMPELLER 080230001 080230001 080230011 080230001 080230001 080230001 N/A
D7 VOLUTE 070680015 070800002 082120002 137210015 151540015 151470015 153300002
D8 IMP BOLT 005680021 005680021 029210041 005680021 005680021 005680021 005680191
D9 CHOPPER PLATE N/A N/A N/A N/A N/A N/A 153340002
D10 CHOPPER BLADE N/A N/A N/A N/A N/A N/A 153320002
D11 RETAINER PLATE N/A N/A N/A N/A N/A N/A 153330001
D12 SCREW-CAP (RETAINER) N/A N/A N/A N/A N/A N/A 06106A028
D13 SCREW-CAP (CHOPPER PLATE) N/A N/A N/A N/A N/A N/A 005680021
D14 SCREW - FLAT HEAD SOCKET N/A N/A N/A N/A N/A N/A 07597A037
D15 IMPELLER 070710012 070810002 082130052 137220012 151465002 151465002 153310002
77
Page 8

Motor Parts Group
10 – 15 hp
Item 2-Pole 3450 RPM
A1 STATOR 27889D003 27889D003 27889D603 27887D003 27887D003 27887D603
A2 ROTOR/SHAFT ASSEMBLY 27887D011 27887D011 27887D011 27887D011 27887D011 27887D011
A3 BOLT – STATOR (4) 001780051 001780051 001780051 001780051 001780051 001780051
A4 SPACER 007362141 007362141 007362141 007362141 007362141 007362141
CONNECTOR – 12672A001 – – 12672A001 –
Item 4-Pole 1750 RPM
A1 STATOR 27886D003 27886D003 27886D603 27885D001 27884D003 27884D003 27884D603
A2 ROTOR/SHAFT ASSEMBLY 27886D011 27886D011 27886D011 27885D011 27884D011 27884D011 27884D011
A3 BOLT – STATOR (4) 06106A070 06106A070 06106A070 001780051 001780041 001780041 001780041
A4 SPACER – – – 007362141 007362141 007362141 007362141
CONNECTOR – 12672A001 – – – 12672A001 –
Item 6-Pole 1150 RPM
A1 STATOR 27883D003 27883D003 27883D603
A2 ROTOR/SHAFT ASSEMBLY 27883D011 27883D011 27883D011
A3 BOLT – STATOR (4) 001780051 001780051 001780051
A4 SPACER 007362141 007362141 007362141
CONNECTOR – 12672A001 –
208-230/3/60
10 – 15 hp
208-230/3/60
3 – 5 hp
208-230/3/60
10 – 15 hp
460/3/60
10 – 15 hp
460/3/60
3 – 5 hp
460/3/60
10 – 15 hp
575/3/60
10 – 15 hp
575/3/60
3 – 5 hp
575/3/60
7.5 hp
208-230/3/60
5 – 7.5 hp
208-230/1/60
7.5 hp
460/3/60
5 – 7.5 hp
208-230/3/60
7.5 hp
575/3/60
5 – 7.5 hp
460/3/60
5 – 7.5 hp
575/3/60
Impeller Parts List
H3H(X)P
Description Part No. hp Voltage/ph Cord Trim Impeller
1750 RPM
H3H(X)P500BC 528040007 5 208/1 8-4 7.50 151465102
H3H(X)P500CC 528040017 5 230/1 8-4 7.50 151465102
H3H(X)P500DC 528040027 5 208/3 10-4 7.50 151465102
H3H(X)P500EC 528040037 5 230/3 10-4 7.50 151465102
H3H(X)P500FC 528040047 5 460/3 10-4 7.50 151465102
H3H(X)P500GC 528040057 5 575/3 10-4 7.50 151465102
H3H(X)P750CC 528040067 7. 5 230/1 8-4 8.00 151465082
H3H(X)P750DC 528040077 7.5 208/3 8-4 8.00 151465082
H3H(X)P750EC 528040087 7. 5 230/3 8-4 8.00 151465082
H3H(X)P750FC 528040097 7.5 460/3 10-4 8.00 151465082
H3H(X)P750GC 528040107 7.5 575/3 10-4 8.00 151465082
H3H(X)P1000DC 528040117 10 208/3 8-4 8.50 151465062
H3H(X)P1000EC 528040127 10 230/3 8-4 8.50 151465062
H3H(X)P1000FC 528040137 10 460/3 10-4 8.50 151465062
H3H(X)P1000GC 528040147 10 575/3 10-4 8.50 151465062
H3H(X)P1500DC 528040157 15 208/3 8-4 10.00 151465002
H3H(X)P1500EC 528040167 15 230/3 8-4 10.00 151465002
H3H(X)P1500FC 528040177 15 460/3 8-4 10.00 151465002
H3H(X)P1500GC 528040187 15 575/3 10-4 10.00 151465002
H4H(X)P
Description Part No. hp Voltage/ph Cord Trim Impeller
1750 RPM
H4H(X)P500BC 528050007 5 208/1 8-4 7.50 151465102
H4H(X)P500CC 528050017 5 230/1 8-4 7.50 151465102
H4H(X)P500DC 528050027 5 208/3 10-4 7.50 151465102
H4H(X)P500EC 528050037 5 230/3 10-4 7.50 151465102
H4H(X)P500FC 528050047 5 460/3 10-4 7.50 151465102
H4H(X)P500GC 528050057 5 575/3 10-4 7.50 151465102
H4H(X)P750CC 528050067 7.5 230/1 8-4 8.00 151465082
H4H(X)P750DC 528050077 7.5 208/3 8-4 8.00 151465082
H4H(X)P750EC 528050087 7.5 230/3 8-4 8.00 151465082
H4H(X)P750FC 528050097 7.5 460/3 10-4 8.00 151465082
H4H(X)P750GC 528050107 7.5 575/3 10-4 8.00 151465082
H4H(X)P1000DC 528050117 10 208/3 8-4 8.63 151465142
H4H(X)P1000EC 528050127 10 230/3 8-4 8.63 151465142
H4H(X)P1000FC 528050137 10 460/3 10-4 8.63 151465142
H4H(X)P1000GC 528050147 10 575/3 10-4 8.63 151465142
H4H(X)P1500DC 528050157 15 208/3 8-4 9.50 151465022
H4H(X)P1500EC 528050167 15 230/3 8-4 9.50 151465022
H4H(X)P1500FC 528050177 15 460/3 8-4 9.50 151465022
H4H(X)P1500GC 528050187 15 575/3 10-4 9.50 151465022
8
Page 9

Impeller Parts List
S4M(X)P
Description Part No. hp Voltage/ph Cord Trim Impeller
1750 RPM
S4M(X)P500BC 528010177 5 208/1 8-4 6.75 070710312
S4M(X)P500CC 528010187 5 230/1 8-4 6.75 070710312
S4M(X)P500DC 528010127 5 208/3 10-4 6.75 070710312
S4M(X)P500EC 528010137 5 230/3 10-4 6.75 070710312
S4M(X)P500FC 528010147 5 460/3 10-4 6.75 070710312
S4M(X)P500GC 528010157 5 575/3 10-4 6.75 070710312
S4M(X)P750CC 528010167 7.5 230/1 8-4 7.63 070710442
S4M(X)P750DC 528010087 7.5 208/3 8-4 7.63 070710442
S4M(X)P750EC 528010097 7.5 230/3 8-4 7.63 070710442
S4M(X)P750FC 528010107 7.5 460/3 10-4 7.63 070710442
S4M(X)P750GC 528010117 7.5 575/3 10-4 7.63 070710442
S4M(X)P1000DC 528010047 10 208/3 8-4 8.13 070710202
S4M(X)P1000EC 528010057 10 230/3 8-4 8.13 070710202
S4M(X)P1000FC 528010067 10 460/3 10-4 8.13 070710202
S4M(X)P1000GC 528010077 10 575/3 10-4 8.13 070710202
S4M(X)P1500DC 528010007 15 208/3 8-4 8.63 070710172
S4M(X)P1500EC 528010017 15 230/3 8-4 8.63 070710172
S4M(X)P1500FC 528010027 15 460/3 8-4 8.63 070710172
S4M(X)P1500GC 528010037 15 575/3 10-4 8.63 070710172
1150 RPM
S4M(X)P300DB 528010237 3 208/3 10-4 7.75 070710062
S4M(X)P300EB 528010247 3 230/3 10-4 7.75 070710062
S4M(X)P300FB 528010257 3 460/3 10-4 7.75 070710062
S4M(X)P300GB 528010267 3 575/3 10-4 7.75 070710062
S4M(X)P500DB 528010197 5 208/3 10-4 8.75 070710022
S4M(X)P500EB 528010207 5 230/3 10-4 8.75 070710022
S4M(X)P500FB 528010217 5 460/3 10-4 8.75 070710022
S4M(X)P500GB 528010227 5 575/3 10-4 8.75 070710022
S4MV(X)P
Description Part No. hp Voltage/ph Cord Trim Impeller
1750 RPM
S4MV(X)P500BC 528020007 5 208/1 8-4 6.50 070810332
S4MV(X)P500CC 528020017 5 230/1 8-4 6.50 070810332
S4MV(X)P500DC 528020027 5 208/3 10-4 6.50 070810332
S4MV(X)P500EC 528020037 5 230/3 10-4 6.50 070810332
S4MV(X)P500FC 528020047 5 460/3 10-4 6.50 070810332
S4MV(X)P500GC 528020057 5 575/3 10-4 6.50 070810332
S4MV(X)P750CC 528020067 7.5 230/1 8-4 7.38 070810072
S4MV(X)P750DC 528020077 7.5 208/3 8-4 7.38 070810072
S4MV(X)P750EC 528020087 7.5 230/3 8-4 7.38 070810072
S4MV(X)P750FC 528020097 7.5 460/3 10-4 7.38 070810072
S4MV(X)P750GC 528020107 7.5 575/3 10-4 7.38 070810072
S4MV(X)P1000DC 528020117 10 208/3 8-4 8.00 070810022
S4MV(X)P1000EC 528020127 10 230/3 8-4 8.00 070810022
S4MV(X)P1000FC 528020137 10 460/3 10-4 8.00 070810022
S4MV(X)P1000GC 528020147 10 575/3 10-4 8.00 070810022
S4MV(X)P1500DC 528020157 15 208/3 8-4 8.75 070810092
S4MV(X)P1500EC 528020167 15 230/3 8-4 8.75 070810092
S4MV(X)P1500FC 528020177 15 460/3 8-4 8.75 070810092
S4MV(X)P1500GC 528020187 15 575/3 10-4 8.75 070810092
1150 RPM
S4MV(X)P300DB 528020197 3 208/3 10-4 7.75 070810102
S4MV(X)P300EB 528020207 3 230/3 10-4 7.75 070810102
S4MV(X)P300FB 528020217 3 460/3 10-4 7.75 070810102
S4MV(X)P300GB 528020227 3 575/3 10-4 7.75 070810102
S4MV(X)P500DB 528020237 5 208/3 10-4 8.75 070810092
S4MV(X)P500EB 528020247 5 230/3 10-4 8.75 070810092
S4MV(X)P500FB 528020257 5 460/3 10-4 8.75 070810092
S4MV(X)P500GB 528020267 5 575/3 10-4 8.75 070810092
S4HV(X)P
Description Part No. hp Voltage/ph Cord Trim Impeller
3450 RPM
S4HV(X)P750DD 528000087 7.5 208/3 8-4 4.63 082130172
S4HV(X)P750ED 528000097 7.5 230/3 8-4 4.63 082130172
S4HV(X)P750FD 528000107 7. 5 460/3 10-4 4.63 082130172
S4HV(X)P750GD 528000117 7.5 575/3 10-4 4.63 082130172
S4HV(X)P1000DD 528000047 10 208/3 8-4 5 082130042
S4HV(X)P1000ED 528000057 10 230/3 8-4 5 082130042
S4HV(X)P1000FD 528000067 10 460/3 10-4 5 082130042
S4HV(X)P1000GD 528000077 10 575/3 10-4 5 082130042
S4HV(X)P1500DD 528000007 15 208/3 8-4 5.38 082130192
S4HV(X)P1500ED 528000017 15 230/3 8-4 5.38 082130192
S4HV(X)P1500FD 528000027 15 460/3 10-4 5.38 082130192
S4HV(X)P1500GD 528000037 15 575/3 10-4 5.38 082130192
S4P(X)P
Description Part No. hp Voltage/ph Cord Trim Impeller
1750 RPM
S4P(X)P500BC 528030007 5 208/1 8-4 6.50 137226152
S4P(X)P500CC 528030017 5 230/1 8-4 6.50 137226152
S4P(X)P500DC 528030027 5 208/3 10-4 6.50 137226152
S4P(X)P500EC 528030037 5 230/3 10-4 6.50 137226152
S4P(X)P500FC 528030047 5 460/3 10-4 6.50 137226152
S4P(X)P500GC 528030057 5 575/3 10-4 6.50 137226152
S4P(X)P750CC 528030067 7.5 230/1 8-4 7.75 137226102
S4P(X)P750DC 528030077 7.5 208/3 8-4 7.75 137226102
S4P(X)P750EC 528030087 7.5 230/3 8-4 7.75 137226102
S4P(X)P750FC 528030097 7. 5 460/3 10-4 7.75 137226102
S4P(X)P750GC 528030107 7.5 575/3 10-4 7.75 137226102
S4P(X)P1000DC 528030117 10 208/3 8-4 8.63 137226162
S4P(X)P1000EC 528030127 10 230/3 8-4 8.63 137226162
S4P(X)P1000FC 528030137 10 460/3 10-4 8.63 137226162
S4P(X)P1000GC 528030147 10 575/3 10-4 8.63 137226162
S4P(X)P1500DC 528030157 15 208/3 8-4 9.63 137226182
S4P(X)P1500EC 528030167 15 230/3 8-4 9.63 137226182
S4P(X)P1500FC 528030177 15 460/3 8-4 9.63 137226182
S4P(X)P1500GC 528030187 15 575/3 10-4 9.63 137226182
C4S(X)P
Description Part No. hp Voltage/ph Cord Trim Impeller
1750 RPM
C4S(X)P750CC 528280067 7.5 230/1 8-4 7.0 0 153310192
C4S(X)P750DC 528280077 7.5 208/3 8-4 7.00 153310192
C4S(X)P750EC 528280087 7.5 230/3 8-4 7.00 153310192
C4S(X)P750FC 528280097 7.5 460/3 10-4 7.00 153310192
C4S(X)P750GC 528280107 7.5 575/3 10-4 7.0 0 153310192
C4S(X)P1000DC 528280117 10 208/3 8-4 7.00 153310192
C4S(X)P1000EC 528280127 10 230/3 8-4 7.00 153310192
C4S(X)P1000FC 528280137 10 460/3 10-4 7.00 153310192
C4S(X)P1000GC 528280147 10 575/3 10-4 7.00 153310192
C4S(X)P1500DC 528280157 15 208/3 8-4 8.50 153310072
C4S(X)P1500EC 528280167 15 230/3 8-4 8.50 153310072
C4S(X)P1500FC 528280177 15 460/3 8-4 8.50 153310072
C4S(X)P1500GC 528280187 15 575/3 10-4 8.50 153310072
1150 RPM
C4S(X)P300DB 528280197 3 208/3 10-4 7.25 153310172
C4S(X)P300EB 528280207 3 230/3 10-4 7.25 153310172
C4S(X)P300FB 528280217 3 460/3 10-4 7.25 153310172
C4S(X)P300GB 528280227 3 575/3 10-4 7.25 153310172
C4S(X)P500DB 528280237 5 208/3 10-4 8.88 153310122
C4S(X)P500EB 528280247 5 230/3 10-4 8.88 153310122
C4S(X)P500FB 528280257 5 460/3 10-4 8.88 153310122
C4S(X)P500GB 528280267 5 575/3 10-4 8.88 153310122
9
Page 10

Wiring Diagrams
10
Page 11

THIS PAGE INTENTIONALLY LEFT BLANK
11
Page 12

STANDARD LIMITED WARRANTY
HYDROMAT IC
Pentair Hydromatic® warrants its products against defects in material and workmanship for a period of 12 months
from the date of shipment from Pentair Hydromatic or 18 months from the manufacturing date, whichever
occurs first – provided that such products are used in compliance with the requirements of the Pentair Hydromatic
catalog and technical manuals for use in pumping raw sewage, municipal wastewater or similar, abrasive-free,
noncorrosive liquids.
During the warranty period and subject to the conditions set forth, Pentair Hydromatic, at its discretion, will repair
or replace to the original user, the parts that prove defective in materials and workmanship. Pentair Hydromatic
reserves the right to change or improve its products or any portions thereof without being obligated to provide such
a change or improvement for prior sold and/or shipped units.
Start-up reports and electrical schematics may be required to support warranty claims. Submit at the time of start up
through the Pentair Hydromatic website: http://forms.pentairliterature.com/startupform/startupform.asp?type=h.
Warranty is effective only if Pentair Hydromatic authorized control panels are used. All seal fail and heat sensing
devices must be hooked up, functional and monitored or this warranty will be void. Pentair Hydromatic will cover
only the lower seal and labor thereof for all dual seal pumps. Under no circumstance will Pentair Hydromatic be
responsible for the cost of field labor, travel expenses, rented equipment, removal/reinstallation costs or freight
expenses to and from the factory or an authorized Pentair Hydromatic service facility.
This limited warranty will not apply: (a) to defects or malfunctions resulting from failure to properly install, operate or
maintain the unit in accordance with the printed instructions provided; (b) to failures resulting from abuse, accident
or negligence; (c) to normal maintenance services and parts used in connection with such service; (d) to units that
are not installed in accordance with applicable local codes, ordinances and good trade practices; (e) if the unit is
moved from its original installation location; (f) if unit is used for purposes other than for what it is designed and
manufactured; (g) to any unit that has been repaired or altered by anyone other than Pentair Hydromatic or an
authorized Pentair Hydromatic service provider; (h) to any unit that has been repaired using non factory specified/
OEM parts.
Warranty Exclusions: PENTAIR HYDROMATIC MAKES NO EXPRESS OR IMPLIED WARRANTIES THAT EXTEND
BEYOND THE DESCRIPTION ON THE FACE HEREOF. PENTAIR HYDROMATIC SPECIFICALLY DISCLAIMS THE
IMPLIED WARRANTIES OF MERCHANTABILITY AND FITNESS FOR ANY PARTICULAR PURPOSE.
Liability Limitation: IN NO EVENT SHALL PENTAIR HYDROMATIC BE LIABLE OR RESPONSIBLE FOR
CONSEQUENTIAL, INCIDENTAL OR SPECIAL DAMAGES RESULTING FROM OR RELATED IN ANY MANNER TO
ANY PENTAIR HYDROMATIC PRODUCT OR PARTS THEREOF. PERSONAL INJURY AND/OR PROPERTY DAMAGE
MAY RESULT FROM IMPROPER INSTALLATION. PENTAIR HYDROMATIC DISCLAIMS ALL LIABILITY, INCLUDING
LIABILITY UNDER THIS WARRANTY, FOR IMPROPER INSTALLATION. PENTAIR HYDROMATIC RECOMMENDS
INSTALLATION BY PROFESSIONALS.
Some states do not permit some or all of the above warranty limitations or the exclusion or limitation of incidental or
consequential damages and therefore such limitations may not apply to you. No warranties or representations at any
time made by any representatives of Pentair Hydromatic shall vary or expand the provision hereof.
1101 Myers Parkway
Ashland, Ohio 44805
USA
Ph: 855.274.8947
490 Pinebush Road
Unit 4
Cambridge, Ontario N1T 0A5
Canada
Ph: 800.363.PUMP
www.Hydromatic.com
Warranty Rev. 09/18
 Loading...