

Page 1
Hi-Flow™ Valve
Installation, Operation & Service Manual
IMPORTANT SAFETY INSTRUCTIONS
READ AND FOLLOW ALL INSTRUCTIONS
SAVE THESE INSTRUCTIONS
Table of Contents
SECTION I. Valve Installation. . . . . . . . . . . . . . . . . . . . . . . . . . . . . . . . . . . . . . . . . . . . . . . . . . . . . . . . . . . . . 3
SECTION II. Winterizing. . . . . . . . . . . . . . . . . . . . . . . . . . . . . . . . . . . . . . . . . . . . . . . . . . . . . . . . . . . . . . . . . . 3
SECTION III. Replacement of Valve Top and Diverter Assembly. . . . . . . . . . . . . . . . . . . . . . . . . . . . . . . . . 3
SECTION IV. Complete Disassembly. . . . . . . . . . . . . . . . . . . . . . . . . . . . . . . . . . . . . . . . . . . . . . . . . . . . . . . . 3
SECTION V. Technical Data. . . . . . . . . . . . . . . . . . . . . . . . . . . . . . . . . . . . . . . . . . . . . . . . . . . . . . . . . . . . . . . 4
WARNING
Before installing this product, read and follow all warning notices and instructions accompanying this valve. Failure to
follow safety warnings and instructions can result in severe injury, death, or property damage. Call (800) 831-7133 for
additional free copies of these instructions.
Important Notice
Attention Installer.
This manual contains important information about the installation, operation and safe use of this
product. This information should be given to the owner/operator of this equipment.
Pentair Pool Products
1620 Hawkins Ave., Sanford, NC 27330 • (919) 774-4151
10951 West Los Angeles Ave., Moorpark, CA 93021 • (805) 523-2400
Rev. E 5-11-01 1 P/N 272133
MEMBER
NATIONAL
SPA & POOL
INSTITUTE
R
Page 2
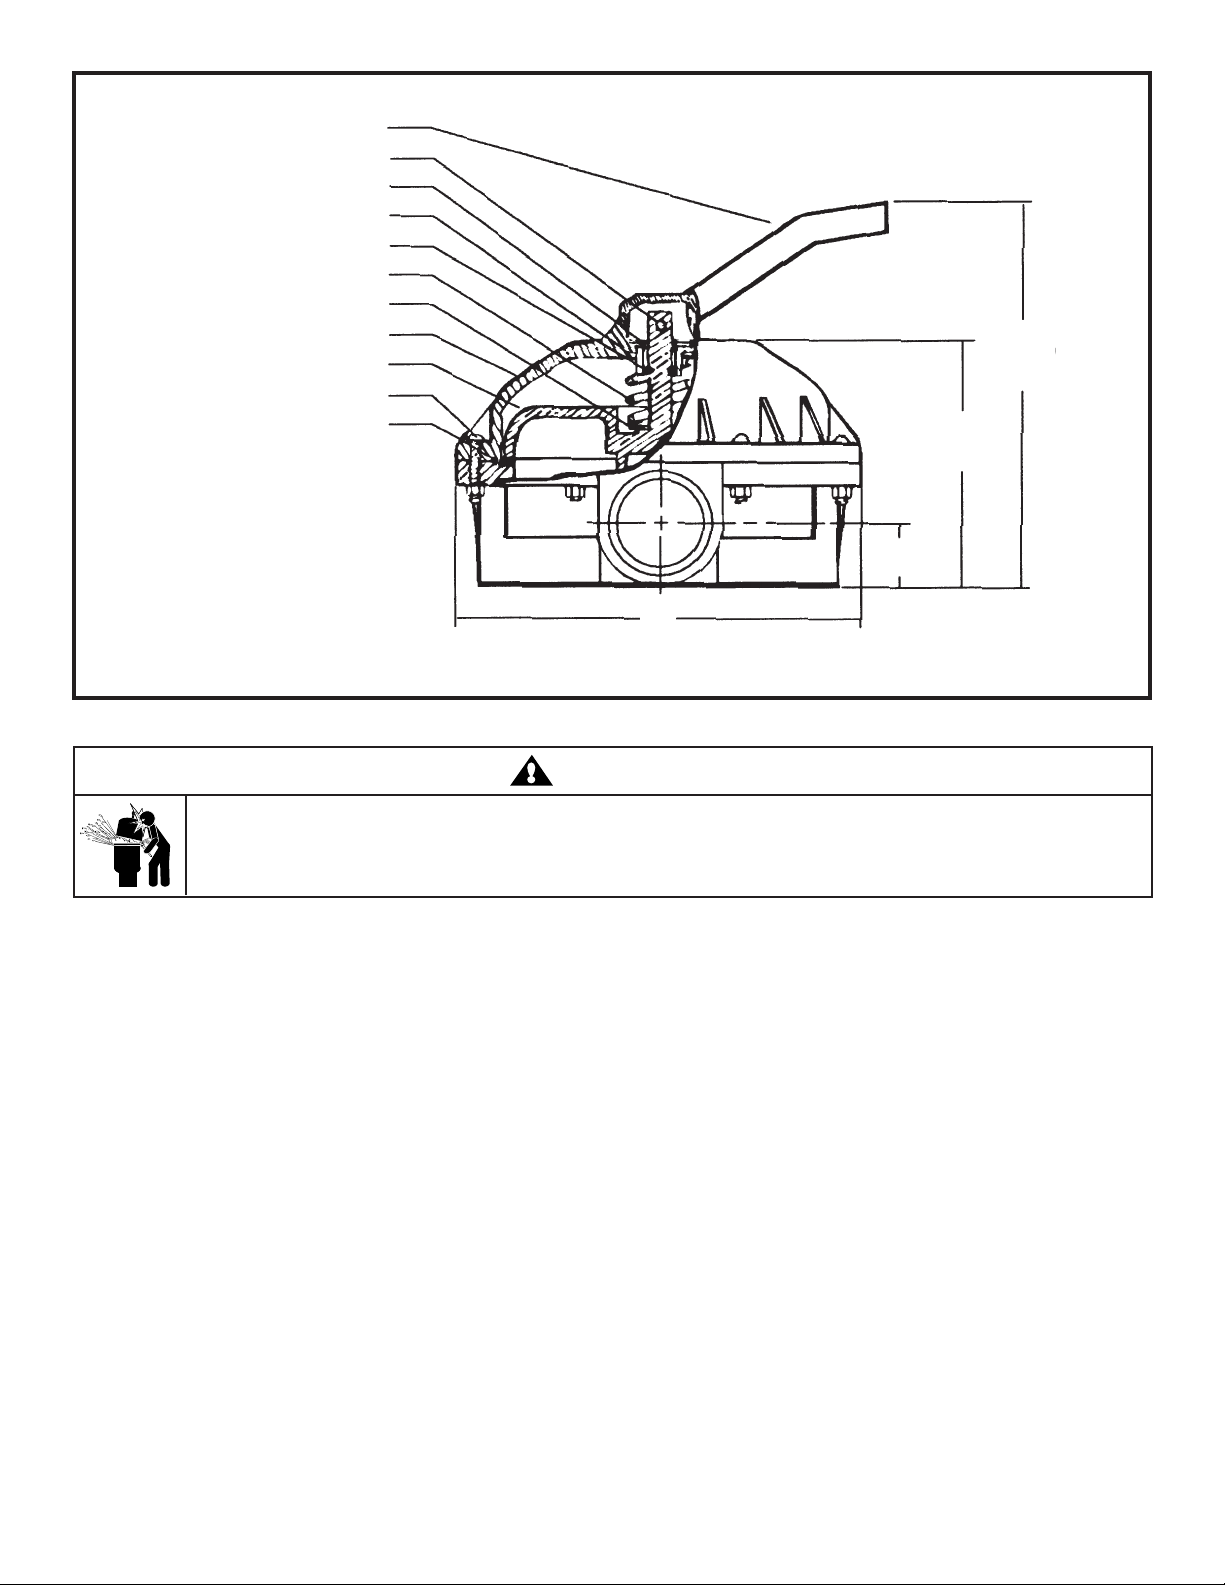
Handle
Handle Screw
Polymeric Washer
Washer
O-Ring Stem Seal
Spring
Washers
Valve Top
Diverter
Cover Screw
Valve Seat Gasket
9-1/4"
5-1/2"
1-5/8"
Cross Section View
9 "
WARNING
CHANGING VALVE POSITIONS WHILE THE PUMP IS RUNNING CAN DAMAGE THE VALVE SEAL AND/OR
DEAD HEAD YOUR SYSTEM AND CAN CAUSE SEVERE BODILY AND/OR PROPERTY DAMAGE. ALWAYS
TURN THE PUMP OFF BEFORE CHANGING VALVE POSITIONS.
VALVE POSITIONS
SETTING FLOW PATH
FILTER PUMP - SAND TOP/DE BOTTOM - THRU FILTER - DE TOP/SAND BOTTOM - RETURN
For normal filter action and vacuuming pool thru filter.
BACKWASH PUMP - DE TOP/SAND BOTTOM - THRU FILTER - SAND TOP/DE BOTTOM - WASTE
For cleaning filter by reversing flow.
RINSE PUMP - DE TOP/SAND BOTTOM - THRU FILTER - DE TOP/SAND BOTTOM - WASTE
For start-up cleaning and resetting filter bed after backwashing.
WASTE PUMP-WASTE
For vacuuming directly to waste, lowering pool level or draining pool.
CLOSED NO CIRCULATION - DO NOT USE THIS SETTING WITH PUMP OPERATING
RECIRCULATE PUMP - RETURN
For circulating water without going thru filter.
P/N 272133 2 Rev. E 5-11-01
Page 3

SECTION I. Valve Installation.
CAUTION
This valve is available in two models for use with sand type or diatomaceous earth (DE) type pool filters. Be certain that you
have the correct model for your filter. Installing the incorrect model may cause your pump to dead head, or drain the pool when
in the backwash position.
1. Confirm correct valve is being used; DE valves for DE filters and Sand valve for Sand filters.
2. Install valve to filter by securing bulkhead nuts on valve to fittings on filter.
CAUTION
Tighten the nuts by hand only - no additional tightness is required.
3. Plumb pump piping to center pipe in valve.
4. Plumb return and waste lines.
SECTION II. Winterizing.
1. Drain and winterize pump and filter per manufacturer's instructions.
2. Depress valve handle and rotate so pointer on handle is between any two settings.
SECTION III. Replacement of Valve Top and Diverter Assembly.
1. Set valve handle in any setting.
2. Remove cover screws.
3. Lift off valve top and diverter assembly.
4. Install new valve top and diverter assembly making sure arrows on valve top and bottom are aligned.
5. Tighten cover screws evenly and alternately. Do not overtighten.
SECTION IV. Complete Disassembly.
1. Remove handle to diverter screw. Note arrow on top of diverter stem as handle is removed.
2. Evenly and alternately loosen cover screws.
CAUTION
Top is under spring load. Loosen all screws before removing any of them.
3. Remove cover screws and then valve top.
4. Note location of O-ring and spring and number of washers on diverter stem. Remove O-Ring, spring and
washers.
5. Assemble in reverse order.
NOTE
Prior to assembly, insure bottom gasket and diverter sealing surface are clean and free from nicks to insure positive
sealing.
6. When replacing valve handle, make sure arrow on diverter stem and pointer on handle are pointed in the
same direction.
CAUTION
Do NOT overtighten the screws, or use motorized screwdrivers; as this can cause damage to the threads.
Rev. E 5-11-01 3 P/N 272133
Page 4

SECTION V. Technical Data.
A. Replacement Parts
This Form Covers Assemblies
26-1049
26-1050
26-1142
12
1
2
3
4
5
6
7
5
8
9
Item P/N Description Qty.
1 27-2411 Handle 1
2 27-2405 Screw - Handle 1
3 27-2402 Washer, Plastic 1
4 27-2412 Valve Top 1
5 27-2401 Washer - 1/32 in. 3
6 27-2400 Spring - Compression 1
7 27-2406 O-ring - Diverter 1
8 27-2413 Diverter 1
9 27-2409 Seal - Diverter 1
10 98211400 Nut - 1/4 in. - 20 Hex 8
11 27-2415 Plate - 2 in. Valve Bottom 1
12 27-2403 Screw - 1/4 in. - 20 8
27-2422* Valve Top Assy. 1
* This part number includes items 1 thru 9.
NOTE
When replacing gasket P/N 27-2409, secure it to valve
bottom with an instant cyanoacrylate adhesive suitable for
bonding rubber to plastic such as Permabond #102 or a
similar product available from an industrial supply retailer.
11
10
SAVE THESE INSTRUCTIONS.
Pentair Pool Products
1620 Hawkins Ave., Sanford, NC 27330 • (919) 774-4151
10951 West Los Angeles Ave., Moorpark, CA 93021 • (805) 523-2400
P/N 272133 4 Rev. E 5-11-01
 Loading...