

Page 1

CAL™ (
Color AquaLuminator
®
) Light and Return Water Flow
for Above Ground Pools Owners Manual
IMPORTANT SAFETY INSTRUCTIONS
READ AND FOLLOW ALL INSTRUCTIONS
SAVE THESE INSTRUCTIONS
Table of Contents
SECTION I. IMPORTANT SAFETY INSTRUCTIONS .......................................................... 2
SECTION II. LAMP HOUSING INSTALLATION ................................................................... 2
SECTION III. ELECTRICAL CONNECTIONS FOR STORABLE POOLS ............................... 5
SECTION IV. ELECTRICAL CONNECTIONS FOR PERMANENT POOLS ........................... 6
SECTION V. RELAMPING INSTRUCTIONS .......................................................................... 9
SECTION VI. STORAGE AND WINTERIZING INSTRUCTIONS ........................................11
SECTION. VII. TECHNICAL DATA .......................................................................................... 12
A. Replacement Parts ..............................................................................................................12
WARNING
Before installing this product, read and follow all warning notices and instructions
accompanying this light. Failure to follow safety warnings and instructions can result in
severe injury, death, or property damage. Call (800) 831-7133 for additional free copies
of these instructions.
Important Notice
Attention Installer.
This manual contains important information about the installation,
operation and safe use of this product. This information should be
given to the owner/operator of this equipment.
Pentair Water Pool and Spa, Inc.
1620 Hawkins Ave., Sanford, NC 27330 • (919) 566-8000
10951 West Los Angeles Ave., Moorpark, CA 93021 • (805) 523-2400
Visit us on the Internet at: www.pentairpool.com
REV. B 1-6-05 1 P/N 619582
Listed
Page 2
SECTION I. IMPORTANT SAFETY INSTRUCTIONS
When installing and using this electrical equipment, basic safety precautions should always be followed,
including the following.
1. This light can be installed on storable above ground or permanent above ground pools.
2. A storable pool has a maximum water depth of 42 inches and is so constructed that it may be readily
disassembled for storage and re-assembled to its original integrity.
3. A permanent pool has a maximum water depth of over 42 inches. Do not install on therapeutic pools,
hydro-massage bathtubs, spas or hot tubs.
4. To reduce the risk of electric shock, if any cord becomes damaged, return the entire transformer assembly
for repair or replacement.
5. Risk of entrapment, injury or death. Use plumbing passageways only to return water to pool.
Do not use as a suction device.
6. Risk of electrical shock. Connect only to a grounding type circuit protected by a ground fault circuit
interrupter (GFCI). Contact a licensed electrician if you cannot verify that the receptacle or circuit is
protected by a GFCI. Do not use an extension cord.
7. Locate your pool so that the wall is at least 10 feet from all electrical receptacles and at least 20 feet from
all receptacles not protected by a GFCI. It is also very important to locate the pool so that it is not under
any electrical wiring, that is less than 18 feet vertically above the pool wall and within an area located
10 feet outside the pool walls. The pool must also never be located under any lighting fixture or within
five (5) feet measured horizontally from any fixture mounted less than five (5) feet vertically above the
pool water level.
8. Risk of injury. Install the top of the lens with a minimum of 8 inches and a maximum of 10 inches
below top of pool wall or in manufacturers pre-punched return fitting hole.
9. Do not use electrical equipment within 10 feet of pool wall unless specifically U.L. listed for that use.
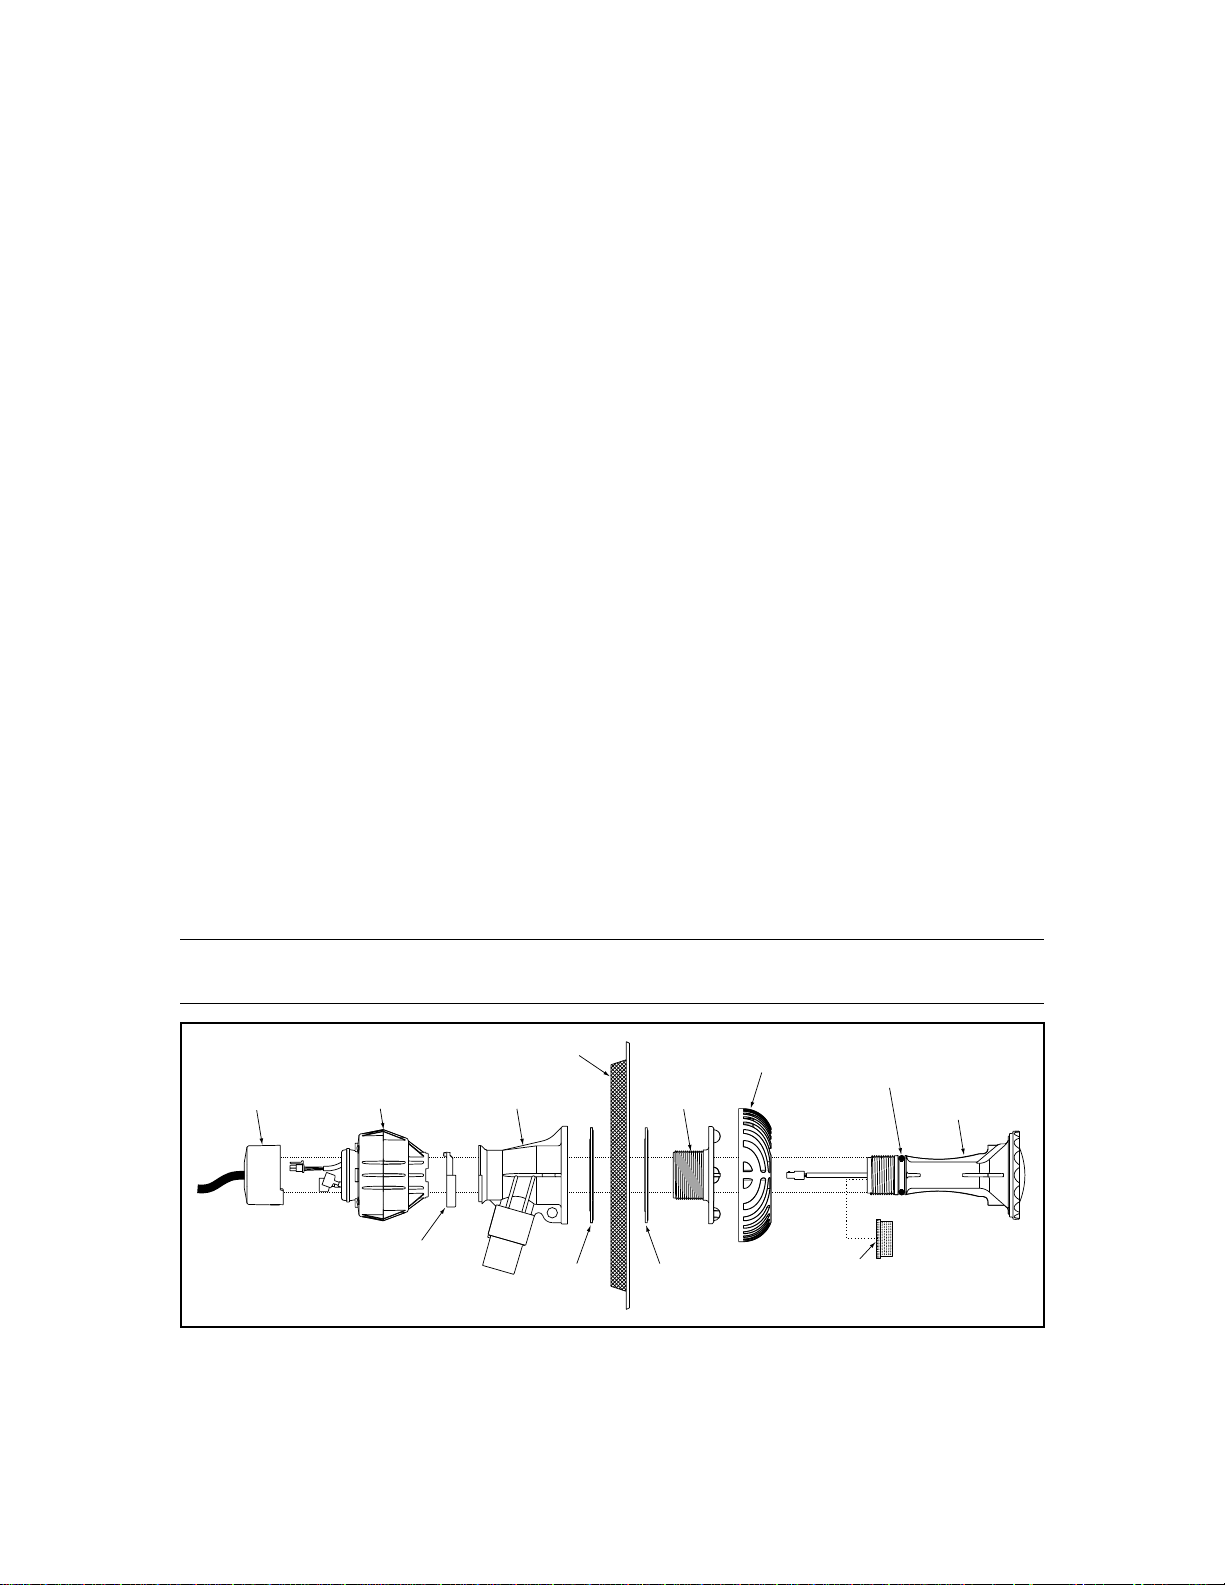
SECTION II. LAMP HOUSING INSTALLATION
NOTE
Installation of the lamp housing into the pool wall is the same for both the storable and the permanent above ground pools.
Pool Wall
Snap-On
Cord Cap
Control
PCB Assy.
Clip
Washer
(12 o'clock position)
Body
Fitting
Gasket Gasket
Wall
Flange
Figure 1.
P/N 619582 2 REV. B 1-6-05
Flow
Director
Red Cap/Plug
Remove after bulb is in
place in the Fitting Body.
O-ring—
Use silicone
lubricant only. Do not use
any petroleum lubricants.
Bulb Assy.
Page 3

1. Push the bulb assembly out from the rear of the body fitting so that
it will come out of the front of the fitting. The flow director will come
off along with the bulb assembly; see Figure 2. Push the red cap/
plug in the end of the bulb assembly. It will be removed later.
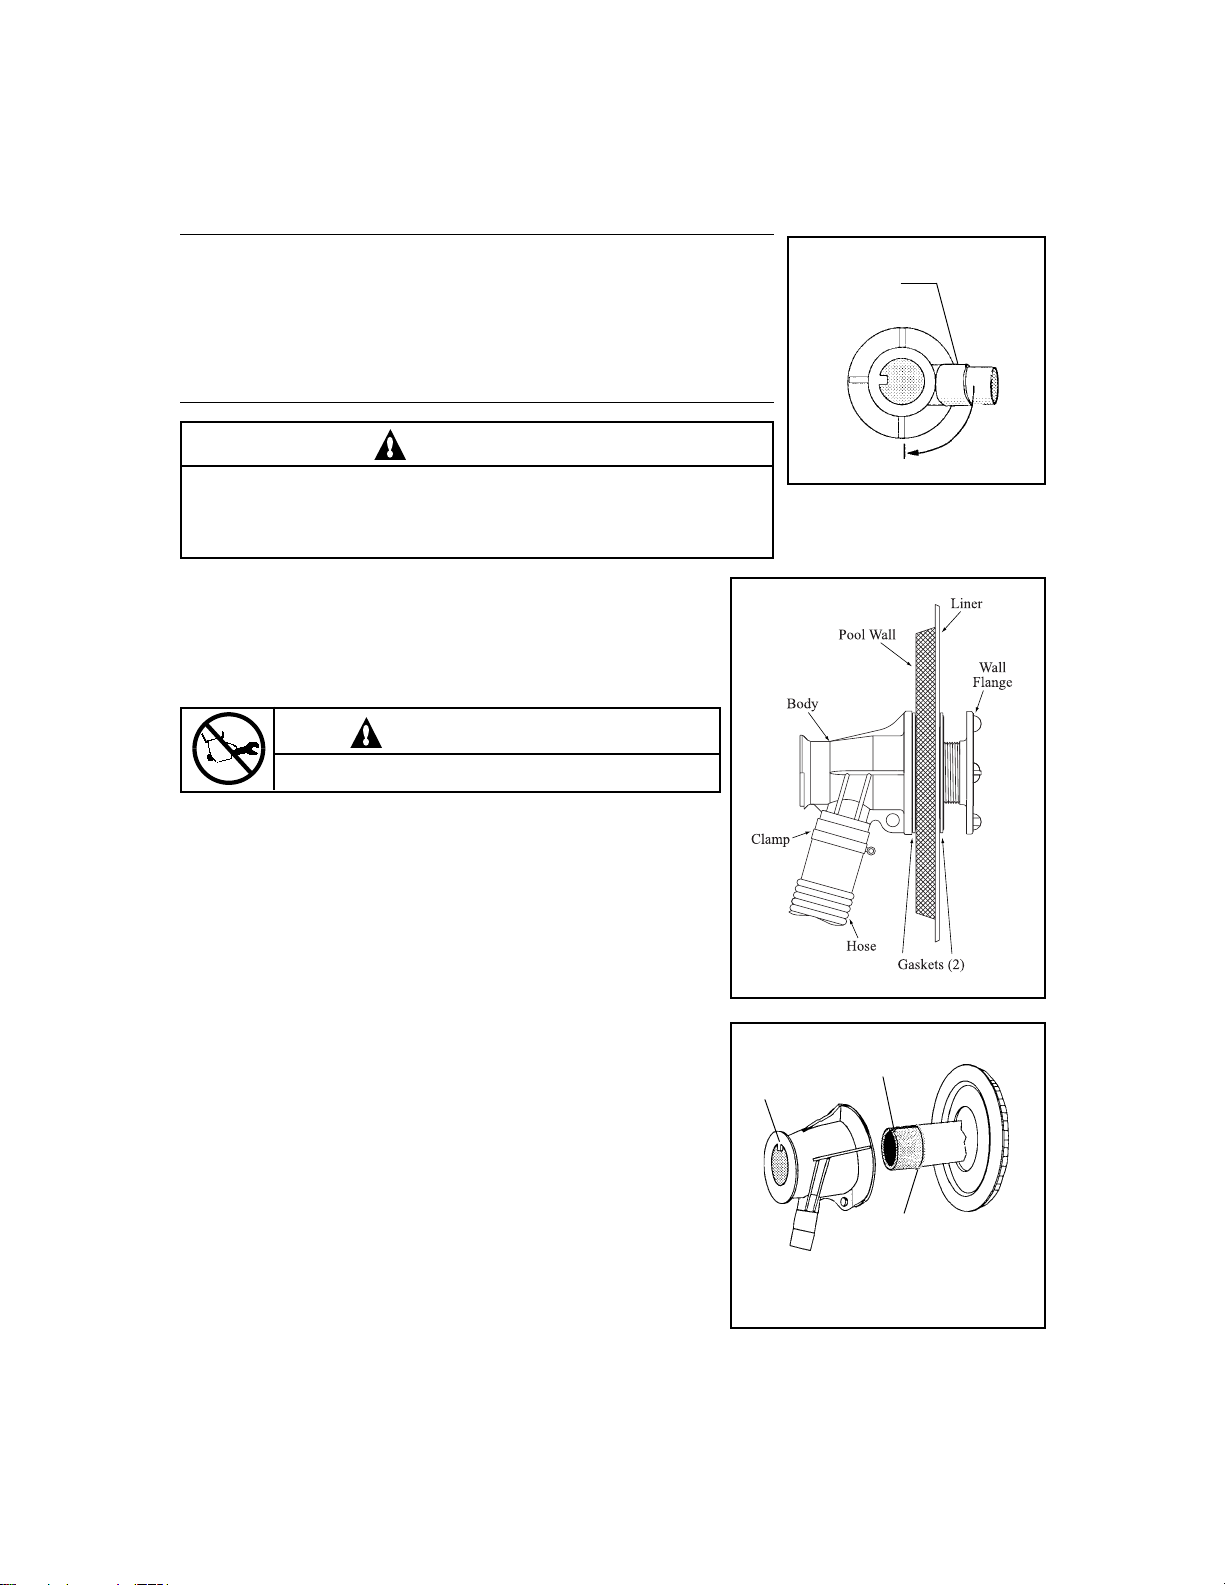
2. Unscrew the threaded wall flange from the body fitting by rotating
it counter-clockwise.
NOTE
Retain the gaskets supplied and keep them accessible.
3. Use the Teflon™ tape provided. Snugly wrap the threaded wall
flange in a clockwise direction (as viewed from the back) starting at
the edge of the threads; see Figure 3. Work towards the wall flange
lip (overlapping 1/2 of the tape width with each wrap) then back
towards the starting point.
• If you have a new pool, move on to Step 10.
• If the water level is below the return fitting on an existing pool, remove
the old fitting and move on to Step 10.
• If the pool is full of water, follow Steps 5 through 9.
Figure 2.
Always wrap
Teflon™ tape
clockwise
Start at
the edge
NOTE
Figure 3.
Steps 4 through 8 require two (2) No. 9 winterizing plugs (not supplied).
4. Remove the existing eyeball fitting from the return fitting on your
pool wall, see Figure 4.
5. Place a winterizing plug in the front side of the existing return fitting
and disconnect the return hose and clamp from the existing fitting.
6. Place a winterizing plug in the front side of the CAL threaded wall
flange.
7. While holding the existing return fitting from the inside of the pool,
remove the large nut or the existing body fitting on the outside of the
pool wall.
8. Using a folded rag in the palm of your hand, push the old return
fitting out of the wall from the outside of the pool; see Figure 5. Hold
the rag firmly against the wall to prevent water spillage.
9. Insert the wall flange and gasket from the inside of the pool through
the hole cut out for the inlet fitting. Ensure that the threaded wall
flange is centered on the hole.
10. Take the remaining gasket and put it on the threaded wall flange from
the outside of the pool; see Figure 1. Standard sheet metal walls will
have one gasket and one spacer left over. Do not use these two items, as they are for use on narrow
interlocking wall panels only.
Pool Wall
Hose
Return
Fitting Nut
Use a folded rag in the palm of your
hand to hold the water in the pool
while changing fittings.
Figure 5.
Figure 4.
Liner
Existing
Eyeball
REV. B 1-6-05 3 P/N 619582
Page 4
NOTE
• For narrow, interlocking, extruded aluminum wall panels, center wall flange between
the ridges while viewed from the inside of the pool. Add the spacer and additional
gasket to the wall flange before inserting the wall flange through the wall panel.
• The spacer and additional gasket is necessary to accommodate a
fountain attachment.
Inlet Port
3 O’clock
position
WARNING
The light fixture must be mounted so that the word "top" is at the top of
the fixture when installed. Incorrect orientation and a low water condition
can damage the light fixture.
11. With the inlet port of the body fitting in the 3 O’clock position,
place the body fitting against the threads of the wall flange
and keeping the inlet port in the 3 O’clock position; see Figure
6. Hand tighten the wall flange as tight as possible. Rotate the
wall flange, not the body.
CAUTION
Do not over tighten the wall flange.
12. To complete the tightening process, hold the wall flange in
place and rotate the body fitting until the inlet port is in the
6 o’clock position; see Figure 6.
13. Take a hose clamp and place it over the return hose cuff.
14. Slip the return hose from the equipment, over the inlet port,
and tighten the hose clamp securely; see Figure 7.
15. If applicable, remove winterizing plug that was applied in Step 6.
16. Take the bulb assembly and insert it through the flow director.
Note the aligning keyway on the bulb assembly as shown in
Figure 8. The keyway must point in the same direction as the
top key on the body fitting.
17. Now, from inside the pool, push the bulb assembly and flow
director with the red cap/plug in place into the body fitting until
the bulb assembly/flow director are nearly flush against the
inside pool wall.
18. Slide clip washer into position with the plastic stopper at the
12 o'clock position as shown in Figure 1.
19. Feed wire from the bulb body through the center hole of the
controller as you align the controller with the bulb body.
6 O’clock
Figure 7.
Key
Figure 8.
Figure 6.
Keyway
O-Ring—use silicone
lubricant only. Do not use
any petroleum products.
P/N 619582 4 REV. B 1-6-05
Page 5

20. If applicable, take the red cap/plug off and gently bring the wire connectors through the back side
of the bulb assembly. Save the red cap/plug for storage and winterizing.
21. Thread the controller and the bulb body together until light is secured in wall.
22. For safety purposes, ensure that plastic stopper in the clip washer is within one of the slots in the
controller. This will prevent the controller from coming loose unexpectedly, see Figure 9.
CAUTION
Do not over tighten as adjustability of flow director may be impaired and/or damage to parts causing
leakage may occur. If low director does not rotate by hand, nut is too tight.
23. Connect together the black connector from the bulb body with the black connector from the controller.
CAUTION
0˚C 32˚F
This lighting fixture may be damaged if subjected to freezing
weather. See winterizing instructions for details on how to
store the bulb assembly.
SECTION III. ELECTRICAL CONNECTIONS FOR
STORABLE POOLS
1. Connect the wire connectors from the bulb assembly to the
wire connectors attached to the snap-on cord cap.
NOTE
There is no polarity (no positive or negative) to the wires, either connection will work.
2. Snap the cap onto the end of the body so that the electrical cord is pointing down.
3. Mount the transformer on the vertical wall using the single screw provided.
4. Plug the power cord’s 3-prong plug into an appropriate 110V GFCI protected receptacle at least
10 feet from the pool.
5. If the light is not on, press the switch on the transformer case once.
WARNING
Risk of electric shock. Connect only to a grounding-type receptacle protected by a GFCI. Do not use
extension cords for connection. Failure to do so can result in death or severe personal injury.
¿¿¿WHAT IS A GFCI???
Figure 9.
A ‘Ground Fault Circuit Interrupter’ is an electrical safety device designed to measure electrical
leakage in a circuit. It is far more sensitive than a standard circuit breaker. GFCI equipped
breakers and outlet combinations react to unsafe leakage and shut the power off before electrical
shock injury can occur. Any electrical device used within 10 feet of a pool must be protected by a
GFCI equipped outlet or a GFCI equipped circuit breaker and be intended for such use.
REV. B 1-6-05 5 P/N 619582
Page 6

SECTION IV. ELECTRICAL CONNECTIONS FOR PERMANENT POOLS
NOTE
To install the transformer assembly for permanent above ground pools, several modifications must be completed.
WARNING
Disconnect all power before cutting cords to length. Failure to do so could result in personal
injury and/or death.
This installation requires cutting the two cords to specified lengths.
Risk of electrical shock. Permanent installations must be performed by a licensed electrical
professional in accordance with the National Electrical Code and any Local Codes that apply.
Failure to do so could result in personal injury and/or death.
1. Identify the cord from the transformer assembly to the snap-on cord cap and cut it at a distance of
five (5) feet from the transformer assembly; see Figure 10.
2. Strip a 2 inch section of the outer insulation jacket from the cord. This will expose the two insulated
conductors of the cord; see Figure 11.
Figure10.
Outer Jacket
Insulated Conductors
2"
Figure 11.
3. Remove the strain relief and the snap-on cord cap from the cut section of cord. To remove the strain relief
it is necessary to use a pair of strain relief pliers; if these are not available, then a pair of needle-nose
pliers can be used. Compress the lower tab against the upper part
of the strain relief from the inside of the cap while pushing the cord
and the strain relief through the cap; see Figure 12.
4. Route cord through the cord hole in the body; see Figure 13.
Press Together
WARNING
Do not attach or hang anything but this cord from the cord cap
through the hole in the body to the transformer housing.
Attaching or hanging items from this location can result in
failure to the body or the pool wall which can result in serious
personal injury and/or property damage.
Press Together
Figure 12.
P/N 619582 6 REV. B 1-6-05
Page 7

5. Reinstall the snap-on cord cap to the stripped end of the cord
leaving 1/4 inch black insulation protruding into the cap with
the strain relief positioned as illustrated in Figure 14.
NOTE
Strain relief must be reinstalled at the end of the outer insulation jacket.
This will leave the two insulated conductors extending from the inside of
the snap end of the cord cap.
Pool Wall
Run cord
along wall.
6. Strip the insulation back 1/4 inch on the two insulated
conductors and install the two wire connectors provided into
the end of each insulated conductor using a crimping pliers.
7. Connect the wire connectors from the bulb assembly to the wire
connectors attached to the snap-on cord cap.
NOTE
There is no polarity (no positive or negative) to the wires, either connection
will work.
8. Snap the cap onto the end of the body so that the electrical
cord is pointing down.
9. Cut off the cord with the 3-prong plug seven (7) in. from where
it exits the transformer box; see Figure 10. Discard the
remaining cord and plug.
10. Insert the cord from the plug through the smooth hole
and then insert the cord through the threaded hole.
Slide the cord from the light assembly into the angled
slot on the junction box bottom. Make sure the cord by
the transformer box starts by the deep end of the angled
slot; see Figure 15.
11. Place the junction box cover on the junction box bottom
so that the junction box can more easily snap into the
transformer box; see Figure 16. Snap the pieces together,
then
remove
junction
box cover.
Figure 13.
Strain
Relief
Snap-on Cord Cap
Figure 14.
Rear view of transformer assy.
Figure 16.
REV. B 1-6-05 7 P/N 619582
Figure 15.
Page 8

12. Mount the transformer box on a pool support approximately 18 inches above the ground, in a
position accessible to electrical connection; see Figure 17. To mount the transformer junction box,
insert one of the screws provided, to a pool support.
NOTE
Do not install the transformer directly onto the pool wall.
13. Pull cord out of the junction box and strip a six (6) inch section of the outer insulation jacket from
the cord, see Figure 18.
WARNING
Risk of electric shock. Connect only to a circuit protected by a GFCI. Failure to do so can result in serious
personal injury and/or death.
14. Connect the conduit to the junction box. Make electrical connections in the junction box. Reinstall
the cover to the junction box.
15. Using the cable clamp provided, attach the cable
clamp to the cord and mount the cable clamp to
the pool support, see Figure 19, so that the cord
lies flush against the pool wall. Do not attach
directly to the pool wall. This will keep the cord
flush to the wall; see Figure 17.
16. Make electrical connections to the power supply
protected by a GFCI. Turn on the power.
Pool
Support
Top
Mounting
Screw
17. If the light is not ON, press the switch on the
transformer case once.
Figure 18.
Insulated
Connectors
P/N 619582 8 REV. B 1-6-05
Junction
Box
Conduit
Figure 17.
Sheet Metal
Screw
Side of
Pool
Support
Pool Wall
Cable Clamp
to hold wire
tight against
the wall.
Figure 19.
Conduit
Page 9

SECTION V. RELAMPING INSTRUCTIONS
WARNING
Risk of electric shock. Disconnect power before servicing this unit. Failure to disconnect power
can result in death or severe personal injury.
1. When replacing the bulb assembly, make sure to use the correct bulb assembly unit for CAL light, see
Figure 20.
2. It is desirable to reduce the water level to the lower edge
of the flow director. This makes bulb assembly
replacement easier, but it is not mandatory.
3. Remove power from the unit by taking the power cord’s
3-prong plug and disconnecting it from its electrical
outlet, or in the case of a hard-wired application, by
turning the respective circuit breaker to the OFF position.
4. Remove the snap-on cord cap by inserting a slotted screw driver into the access hole, as illustrated in
Figure 21, and prying upwards.
5. Disconnect all three wire connectors and put the snap-on
cord cap aside in a dry location.
6. With the end of a flat head screw driver, push the plastic
stopper in the clip washer forward towards the front of the
light, see Figure 22.
7. With the plastic stopper pushed forward, unthread the
controller out of the bulb body.
8. Remove the clip washer from the bulb body.
9. At this point you should have the new replacement bulb
assembly accessible and confirm that the red cap/plug is
pressed firmly into the bulb assembly to prevent water
from entering the bulb assembly.
10. If you were able to lower the water level as suggested in
Step 1, then simply remove the old bulb assembly by
pulling on the flow director while pushing the bulb assembly
from the outside of the pool. If you were unable to lower
the water level, follow these instructions: push the bulb
assembly out from the outside of the pool, keeping the back
of the fitting covered with a folded rag in the palm of your hand
to prevent water loss from the rear of the body fitting;
see Figure 5. Pull the flow director and bulb.
11. Take the new replacement bulb assembly with the red cap/
plug in place and insert it through the flow director. Note the aligning keyway on the bulb assembly
as shown in Figure 8. The keyway must point in the same direction as the top key on the body fitting.
Now, from inside the pool, push the bulb assembly with the flow director into the body fitting until both
are nearly flush against the inside pool wall. You can now remove your hand and the fitting should again
be sealed.
REV. B 1-6-05 9 P/N 619582
CAL Bulb Assembly
P/N 619580
Figure 20.
Figure 21.
Figure 22.
Page 10

12. If applicable, take the red cap/plug off and gently bring the wire connectors through the back side
of the bulb assembly. Save the red cap/plug for storage and winterizing.
13. Slide clip washer into position with the plastic stopper at the 12 o'clock position as shown in Figure 1.
14. Feed wire from the bulb body through the center hole of the controller as you align the controller
with the bulb body.
15. Thread the controller and the bulb body together until light is secured in wall.
CAUTION
Do not over tighten as adjustability of flow director may be impaired and/or damage to parts causing
leakage may occur. If low director does not rotate by hand, nut is too tight.
16. For safety purposes, ensure that plastic stopper in clip washer is within one of the slots in the
controller. This will prevent the controller from coming loose unexpectedly, see Figure 9.
17. Connect together the black connector from the bulb body with the black connector from the
controller.
18. Connect the wire connectors from the bulb assembly to the wire connectors attached to the
snap-on cord cap. Make sure to use the correct bulb assembly unit for a CAL light, see Figure 20.
The wrong bulb assembly will permanently damage light.
NOTE
There is no polarity (no positive or negative) to the wires, either connection will work.
19. Snap cap onto end of body so that the electrical cord is pointing down; see Figure 13.
WARNING
Risk of electric shock. Connect only to a circuit protected by a GFCI. Failure to do so can result in
death and/or serious injury.
20. Reconnect the power to a circuit in accordance with the appropriate electrical connections.
See Sections III and IV, Electrical Connections. If the light is not on, press the switch on the
transformer case once.
WARNING
This is an electrical appliance. Unsupervised use of this product by children can result in injury
and/or death.
P/N 619582 10 REV. B 1-6-05
Page 11

SECTION VI. STORAGE AND WINTERIZING INSTRUCTIONS
1. It is common practice to drain the water level to a point below the skimmer and the light, for
winterizing.
2. For storable pools: remove power from the unit by taking the power cords’ three-prong plug and
disconnecting it from its electrical outlet.
For permanent pools: turn off all electrical power supplying the light circuit at the main circuit
breaker.
3. Remove the snap-on cord cap by inserting a slotted screwdriver into the access hole and prying
upwards, as illustrated in Figure 21, in the relamping instructions.
4. The wire connectors should be gently disconnected and pushed into the rear of the bulb assembly.
5. With the end of a flat head screw driver, push the plastic stopper in the clip washer forward
towards the front of the light, see Figure 22.
6. With the plastic stopper pushed forward, unthread the controller out of the bulb body.
7. Remove the clip washer from the bulb body.
8. Push red cap/plug into rear of bulb assembly to seal it.
9. Remove the bulb assembly by pulling on the flow director while pushing the bulb assembly from
the outside of the pool.
NOTE
The body fitting, threaded wall flange and gaskets may remain attached to the pool wall when winterizing, but
should be removed if pool is to be stored.
10. For storable pools: remove the transformer from its mounting by lifting up and out.
For permanent pools: cover the cord cap on the end of the flexible cord with a plastic bag and seal
with a twist tie or rubber band. Wrap the cord into a coil, cover with a plastic bag and seal. Elevate
cord to prevent contact with ground moisture.
11. Place all the parts together in a box and store indoors.
When reinstalling bulb assembly next season do not use petroleum base product.
CAUTION
Do not use any petroleum base lubricant. Petroleum base products will destroy plastic parts.
Lubricate o-ring with a silicone lubricant only. A new o-ring should be used each time the bulb
assembly is removed.
REV. B 1-6-05 11 P/N 619582
Page 12

SECTION VII. TECHNICAL DATA
A. REPLACEMENT PARTS
1
1 619580 CAL bulb assy.
2 79116900 O-ring
3 79102800 Flow director
4 79118300 Wall flange, threaded
4 79126900 Body fitting
6 619545 Clip Washer
7 619544 Control, PCB assy.
8 79116800 Gasket, 2 req.
9 83000000 Transformer assy. with cord and cap
10 619552 J-Box assy.
11 79401000 J-Box gasket
79110700 Spacer, mounting
2
3
4
5
8
6
7
9
10
11
SAVE THESE INSTRUCTIONS.
Pentair Water Pool and Spa, Inc.
1620 Hawkins Ave., Sanford, NC 27330 • (919) 566-8000
10951 West Los Angeles Ave., Moorpark, CA 93021 • (805) 523-2400
Visit us on the Internet at: www.pentairpool.com
© 2004 Pentair Water Pool and Spa Incorporated. All rights reserved. Information in this document is subject to change without notice.
Trademarks and Disclaimers. The Pentair Water Pool and Spa logo and CAL are trademarks of Pentair Water Pool and Spa Incorporated.
AquaLuminator is a registered trademark of Pentair Water Pool and Spa Incorporated. Other trademarks and trade names may be used in this
document to refer to either the entities claiming the marks and names of their products. Pentair Water Pool and Spa Incorporated disclaims any
proprietary interest in trademarks and trade names other than its own.
P/N 619582 12 REV. B 1-6-05
 Loading...