

Pentair AQUALUMIN III Installation Manual
AQUALUMIN® III NICHELESS POOL LIGHT
INSTALLATION GUIDE
IMPORTANT SAFETY INSTRUCTIONS
READ AND FOLLOW ALL INSTRUCTIONS
SAVE THESE INSTRUCTIONS
Section Contents
1. Installing a mounting bracket and light fixture during new vinyl pool construction...........3
2. Replacing light fixture in existing pools......................................................................7
3. Replacing a lamp only..............................................................................................10
Parts List / Replacement Part Kits........................................................................13-15
Minimum Qualifications
• Licensed or Certified Electrician
• Electrician or qualified pool person
• Qualified pool service person
IMPORTANT NOTICE
This AquaLumin III Nicheless Pool Light will install only with the following AquaLumin III Nichless Pool
Light Mounting Brackets, manufactured after JUNE 6, 1994:
Vinyl Mounting Bracket Assembly 1" (P/N 78887800 - For more information see page 2)
Vinyl Mounting Bracket Assembly 3/4" (P/N 78887700 - For more information see page 2)
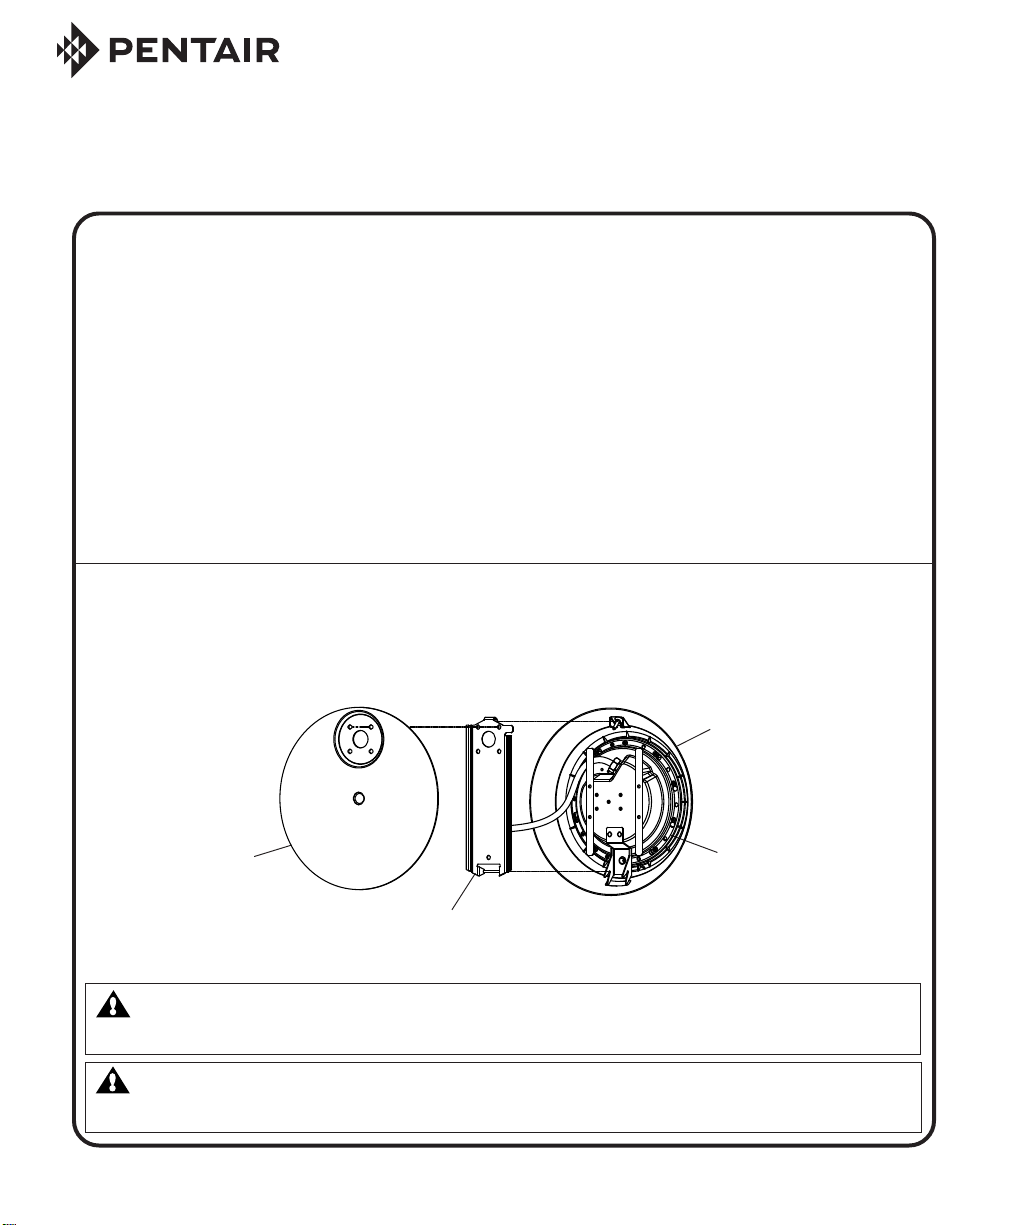
BACK VIEW
Housing
1
Mounting
Mounting
AquaLumin III Nichless Pool Light - Manufactured after June 6, 1994
WARNING! DO NOT install the AquaLumin III Nichless Pool Light in ocean salt water pools,
spas and hot tubs. The AquaLumin III Nichless Pool Light is designed for use in fresh water
pools, spas and hot tubs (including those using salt chlorine generators).
WARNING! THE LIGHT LENS MAY GET HOT WHEN IN USE. USERS SHOULD AVOID
CONTACT WITH THE LIGHT AS SERIOUS BURNS MAY RESULT FROM PROLONGED
CONTACT WITH THE LIGHT.
AQUALUMIN
®
III Nicheless Pool Light Installation Guide
Housing
2
Contact Technical Support at: (800) 831.7133
Web sites: visit www.pentairpool.com and www.staritepool.com
IMPORTANT NOTICE
Kits required for installation
Required for new installation (Contains all parts required to install light in a new installation)
78887700 3/4 inch conduit
78887800 1 inch conduit
The following part may be required for new light in an existing installation (Contains
only the mounting parts on the water side of the vinyl liner)
619547 Bracket Wall Mount Assembly
Follow these guidelines when installing Pentair Aquatic Systems Pool and Spa fixed luminaries:
Before Installing luminaries read the following:
WARNING! Always install a new lens gasket (see part number in User’s Guide), when ever
reassembling the light. Failure to do so may permit water to leak into the assembly which
could cause; (a) an electrical hazard resulting in death or serious injury to pool users,
installer, or others due to electrical shock, or (b) breakage of the lamp or lens, which
likewise could result in serious injury to pool user, installers, or bystanders, or in damage to
property.
REPLACE ANY CRACKED PROTECTIVE SHIELD (CRACKED LENS) WITH NEW LENS
AND GASKET.
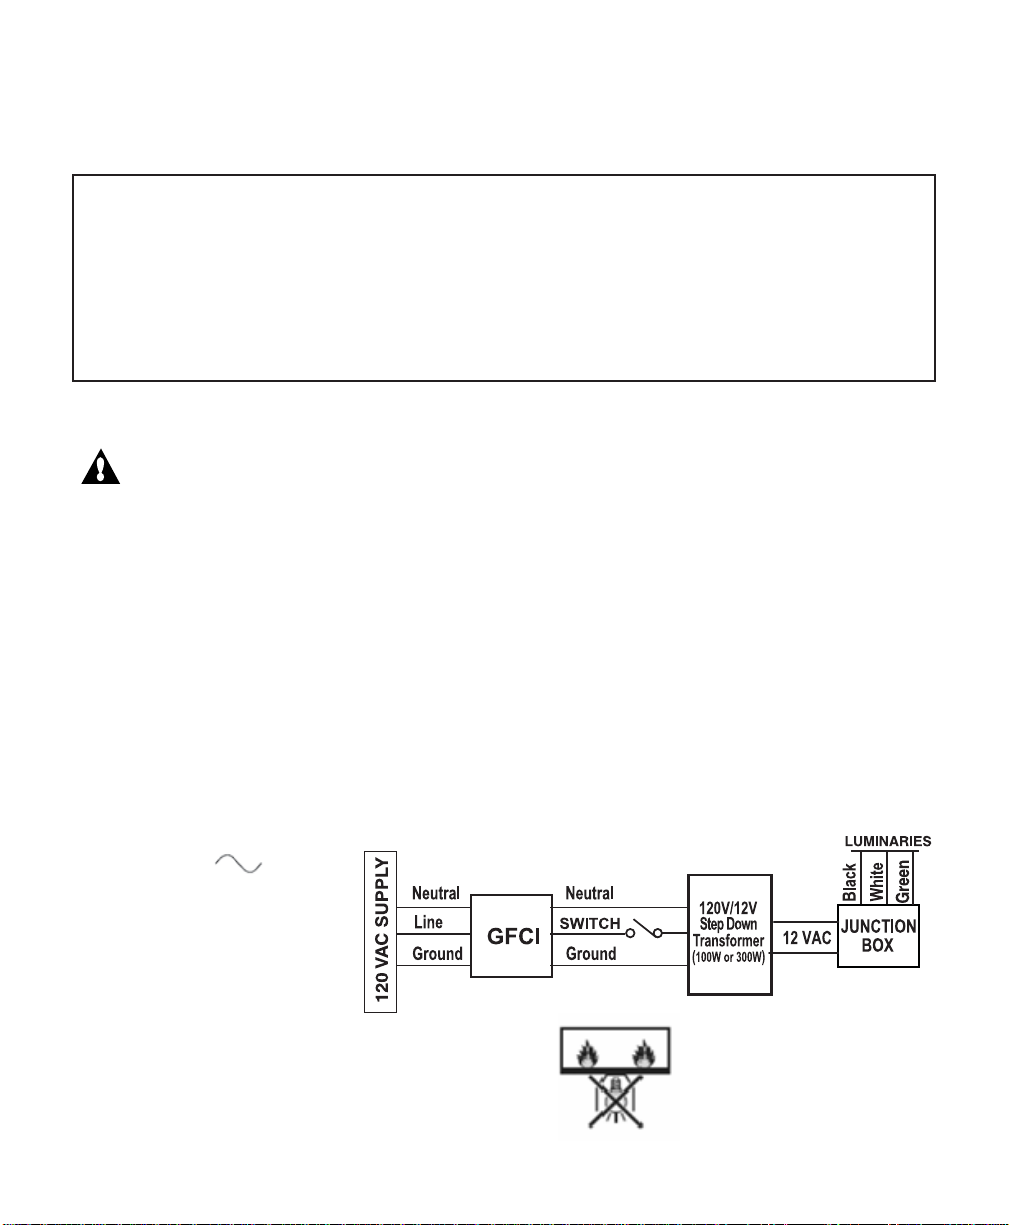
• FOR 12 VAC LUMINARIES: ALWAYS USE A SEPARATE SAFETY ISOLATION
TRANSFORMER TO POWER LUMINARIES. See diagram below.
Note: Connect all three light wires (or two light wires) to the corresponding circuit wires in
the Junction Box. For 3-wire connection; connect black wire to power, white wire to
common, and green wire to ground).
• 12 VAC LUMINARIES SPECIFICATION:
120VAC , 50/60 Hz
Luminaires not suitable for direct mounting
on normally flammable surfaces (suitable
ONL Y for mounting on non-combustible
surfaces.
Surface Mount
AQUALUMIN
®
III Nicheless Pool Light Installation Guide
Section 1: Installing a mounting bracket and light fixture during new vinyl
IMPORTANT:
DO NOT install the light in the
the light
of the pool/spa surface, with t
t
beam pointing upward. ONLY
the light in the side of the poo
with the light beam in the hor
o
pool construction
DO NOT install the AquaLumin® III Nichless Pool Light in ocean salt water pools, spas and hot tubs. The
AquaLumin III light is designed for use in fresh water pools, spas and hot tubs, including those using salt chlorine
generators).
WARNING !
D A N G E R !
RISK OF ELECTRICAL SHOCK OR ELECTROCUTION
This Nicheless light fixture must be installed by a licensed or certified electrician or a
qualified pool service person in accordance with the current National Electrical Code
and all applicable local codes and ordinances. Improper installation will create an
electrical hazard which could result in death or serious injury to pool users, installers or
others due to electrical shock and may also cause damage to property. Always disconnect power to the pool light at the circuit breaker before servicing the light. Failure to do
so could result in death or serious injury to serviceman, pool users or others due to
electrical shock.
A. Preparatory steps which must be completed by the electrician before light is installed,
see Figure 1.
1. Be sure the electrical system of the pool conforms with the requirements of the current
National Electrical Code (NEC) and all local codes and ordinances. A licensed or certified
electrician must install the electrical system to meet or exceed those requirements before
the AquaLumin III Nicheless Pool Light is installed. Some of the requirements of the NEC
are listed on the next page.
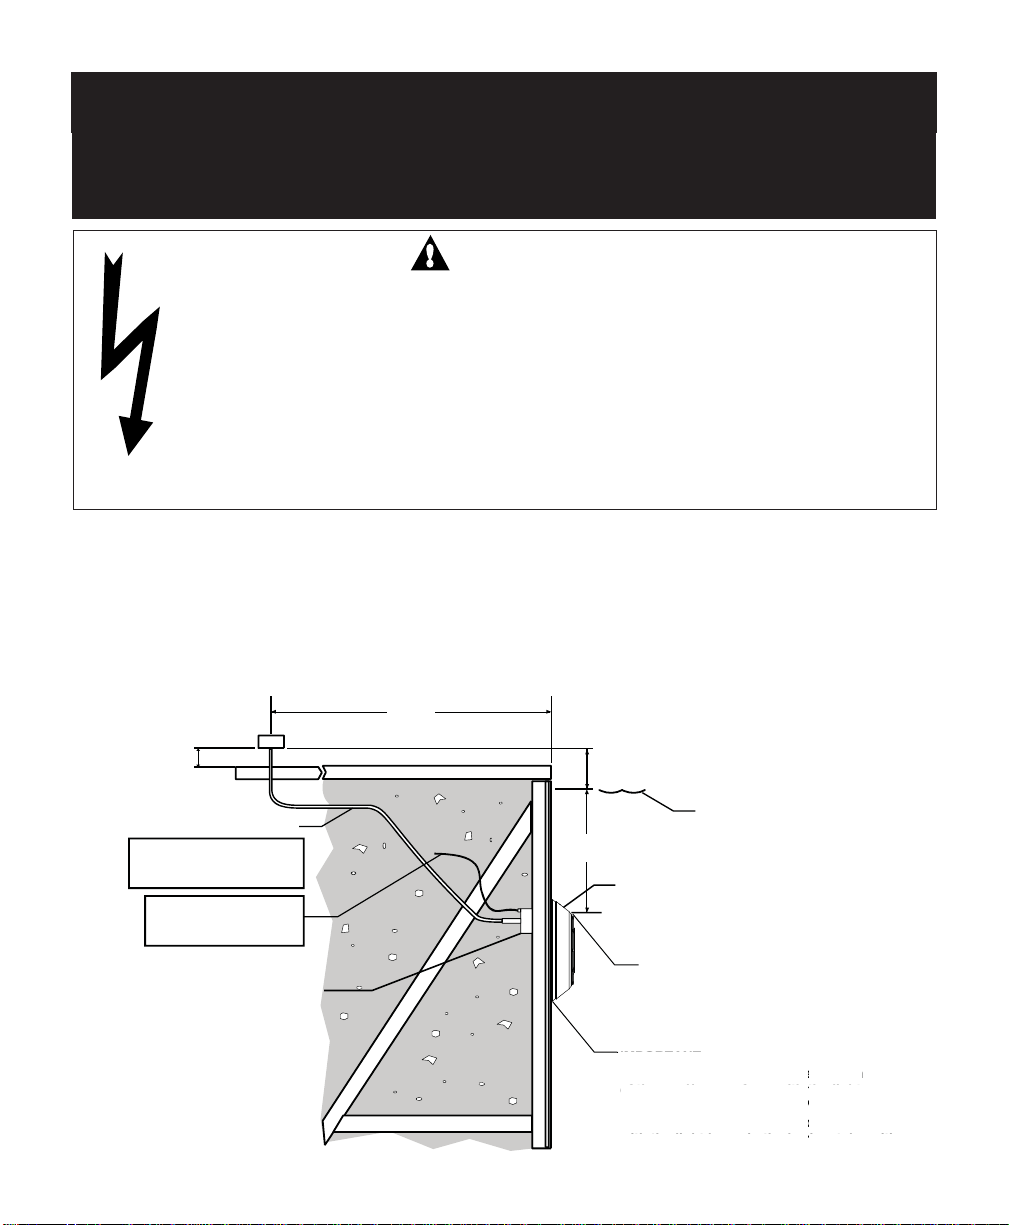
TO GFCI, CIRCUIT
BREAKER AND
POWER SOURCE
4" MIN.
ABOVE DECK
RIGID CONDUIT
FOR PVC CONDUIT #8
GROUNDING WIRE
MUST BE USED
#8 AWG WIRE TO
EXISTING BONDING
CONNECTOR
MOUNTING HUB
48"
MIN.
8" MIN. FROM BOTTOM
OF JUNCTION BOX
OR LOW VOLTAGE
TRANSFORMER TO
MAXIMUM WATER LINE
WATER
LEVEL
18" MIN. FROM WATER
TO TOP OF FACE RING
PILOT SCREW AT TOP
TOP OF FACE RING
CORRESPONDS
TO CENTER OF
MOUNTING HUB
3
Figure 1
AQUALUMIN
IMPORTANT:
DO NOT install the light in the bottom
of the pool/spa surface, with the light
beam pointing upward. ONLY INSTALL
the light in the side of the pool/spa wall,
with the light beam in the horizontal position.
®
III Nicheless Pool Light Installation Guide
4
Section 1: Installing a mounting bracket and light fixture during new vinyl
pool construction (Continued)
AquaLumin® III Nicheless Pool Light is installed. Some of the requirements of the NEC are listed
below.
a. The lighting circuit must have a Ground Fault Circuit Interrupter (GFCI), and have an
appropriately rated circuit breaker.
b. The mounting bracket and mounting hub must be properly installed so that the top
edge of the face ring of the Nicheless Light is at least 18 inches below the surface of
the water in the pool. The top of the face ring will line up with the center of the Plastic
Mounting Hub, see Figure 1 on page 3.
c. If using plastic conduit, install PVC conduit adapter (provided) before installing plastic
mounting hub. Use only recommended sealant for PVC/ABS threads. Position mounting
hub over hole with the word “TOP” at the top, and secure with mounting flange and two (2)
hex nuts and lock washers. Tighten hex nuts evenly with equal torque.
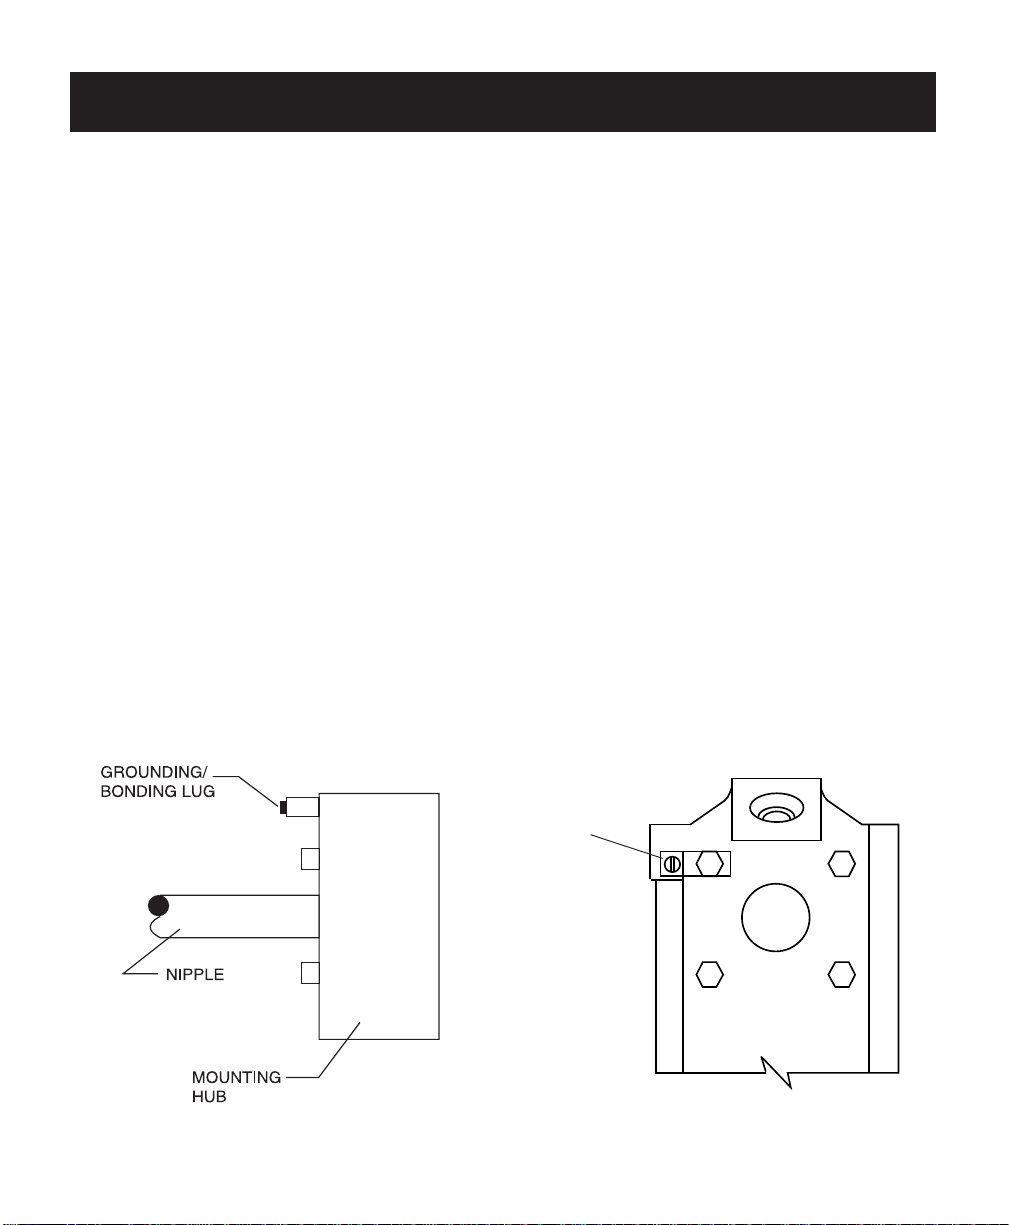
When non-metallic conduit (PVC) is used, a No. 8 AWG bonding/grounding wire must
be installed through the conduit from the Junction Box to the bonding/grounding lug on the
mounting bracket (see Figure 3). Seal the wire/lug connection with a listed sealant such
as 3M™ Scotchcast™ Potting Kit 2136 or equivalent, to protect the connection from
possible pool water corrosion. See 680.23 (D).
2. The junction box or the low voltage transformer shall be located at least 8 inches above the
maximum water line and at least 4 inches above the ground level or pool deck whichever
provides the greater elevation. The junction box shall be no less than 48 inches from the
inside wall of the pool, unless separated from the pool by a solid fence, wall or other
permanent barrier. See NEC 680.24
3. The light fixture and all metal items within five (5) feet of the pool must be properly
electrically bonded using a No. 8 AWG wire (see Figure 2). The connection point for the #8
AWG is located at the rear of the mounting assembly. See NEC 680.26.
Grounding lug
for #8 AWG
grounding wire
for use with
PVC conduit
AQUALUMIN
Bonding Wire.
Figure 2
®
III Nicheless Pool Light Installation Guide
Grounding Wire.
Figure 3

B. Perform the following steps after the electrical system requirements are met
(see Section 1A (page 3) for requirements)
1. Locate position on a vertical wall where light is to be installed. The top of the light face ring
must be 18 inches below normal water level as required by NEC Article 680.23 (5).
2. Cut or punch a three (3) inch diameter hole through pool wall with center 18 inches below
normal water level for mounting hub and mounting bracket installation.
3. If using plastic conduit, install PVC conduit adapter (provided) before installing plastic
mounting hub. Use only recommended sealant for PVC/ABS threads. Position mounting hub
over hole with the word “TOP” at the top, and secure with mounting flange and two (2) hex
nuts and lock washers. Tighten hex nuts evenly with equal torque.
When non-metallic conduit (PVC) is used, a No. 8 AWG bonding/grounding wire must be
installed through the conduit from the Junction Box to the bonding/grounding lug on the
mounting bracket (see Figure 4). Seal the wire/lug connection with a listed sealant such as
3M™ Scotchcast™ Potting Kit 2136 or equivalent, to protect the connection from possible
pool water corrosion. See 680.23 (D).
NOTE: Attach the stainless steel mounting bracket temporarily to ABS mounting hub.
Perfect top and bottom alignment of ABS hub will be easier.
CAUTION: Remove mounting bracket before liner is installed. Failure to
remove mounting bracket can damage the liner during installation.
5
Grounding lug
for #8 AWG
grounding wire
for use with
PVC conduit
Grounding Wire.
Figure 4
AQUALUMIN
®
III Nicheless Pool Light Installation Guide
 Loading...