

Page 1

1
HD2
HD 2K
Camera
Pen
USER
MANUAL
www.penrecorderpro.com
PenRecorderPro™ and respective logos are trademarks of
Teton Webstores LLC ©2016 ALL RIGHTS RESERVED
Page 2

2
Key Features
1. Operating Tips
2. Charging
3. Turn on/off & Standby
4. Continuous Recording
5. Motion Activated Recording
6. Loop Recording Explained
7. Taking Photos
8. Audio Only Recording
9. Auto Power Off
10. Reset
11. Time/Date Stamp
12. Change Video Settings
13. Settings Explained
14. Caution
15. Legal Information
16. Specifications
3
4
4
5
5
6
7
7
8
8
9
9
12
13
15
15
16
Table of
Contents
Page 3
3
Key
Features
- Superior image sensor for low light video
recording, quickly responds to changes
in lighting;
- Super HD 2K @ 30fps (2304x1296);
- HD 1080P @ 30fps (1920x1080);
- 720P @ 30/60fps - uid fast action recording;
- H.264 compression;
- Motion Activation Mode;
- Easy one button operation;
- No ashing light while recording;
- MAC/Windows, direct USB plug design;
Page 4

4
1Operating Tips
2Charging
**PLEASE READ**
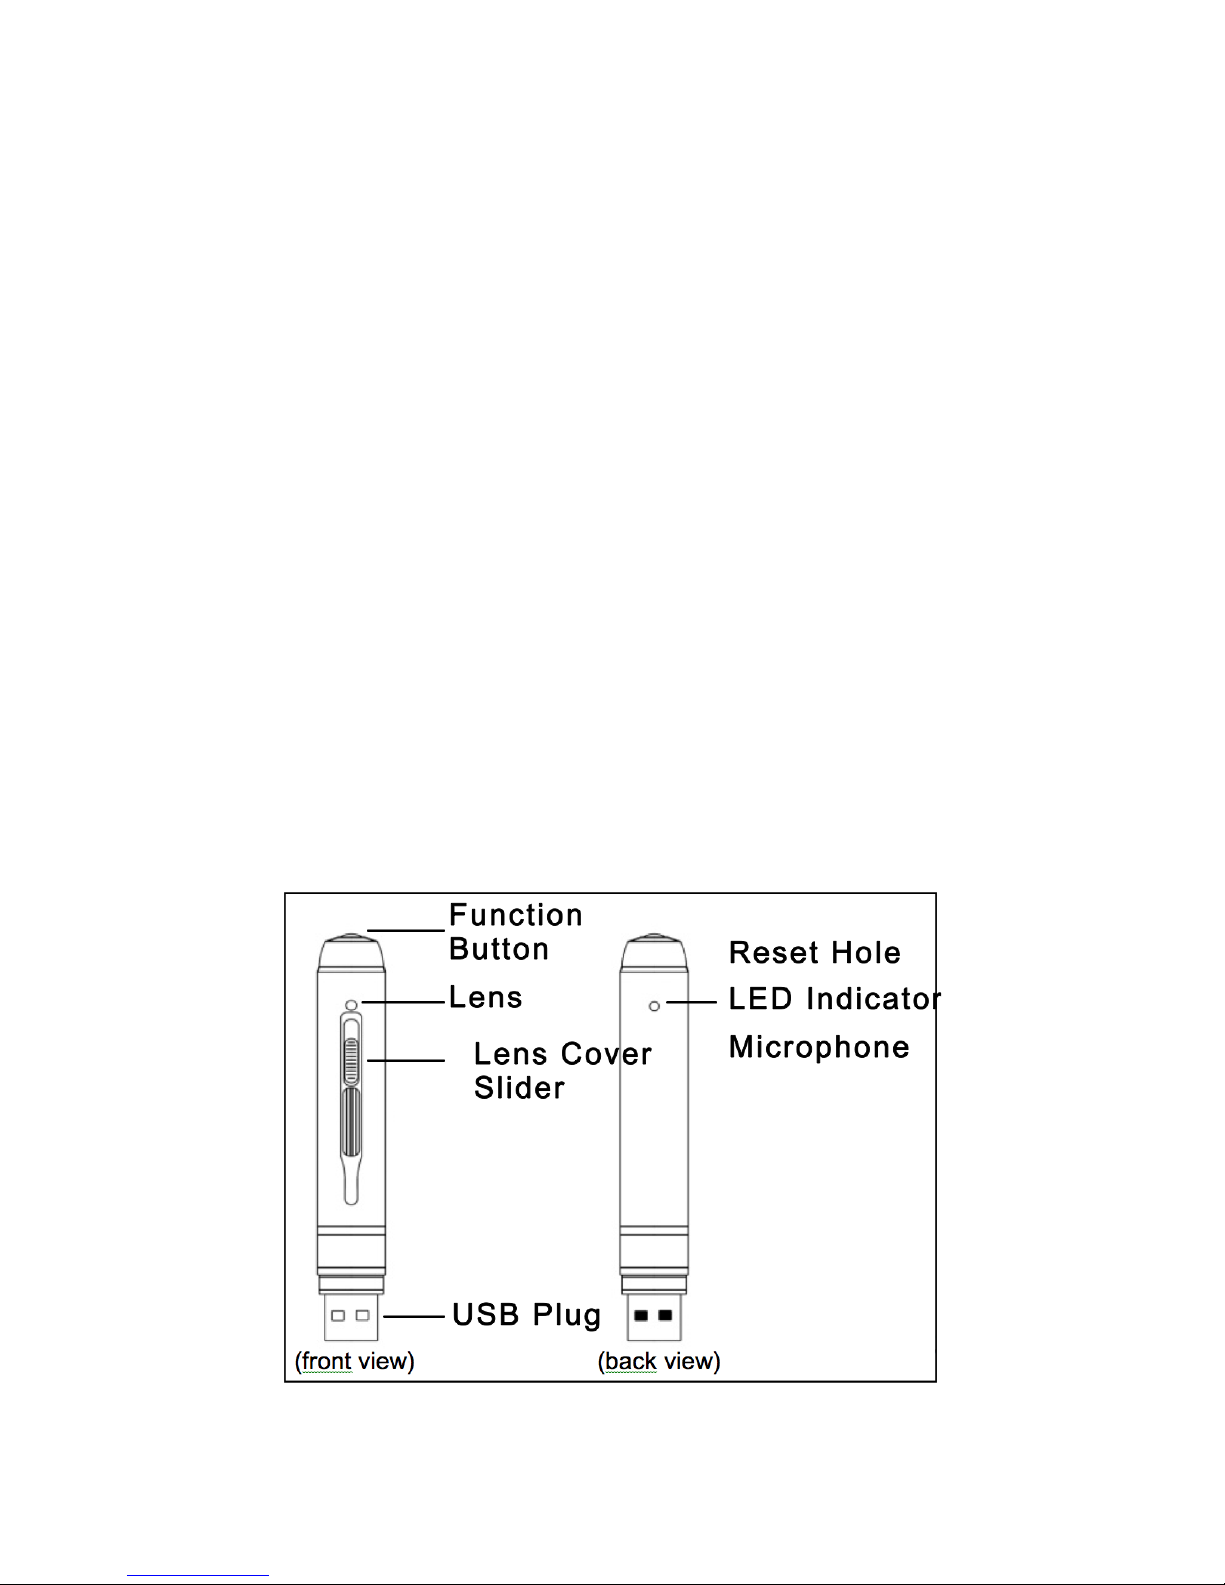
A. The indicator light on the back of the HD2
can be dicult to see if you look at it straight
on. To see it more easily try looking through the
hole at an angle;
B. If your HD2 malfunctions, please reset it
(step 10);
Before using the HD2 for the rst time, we
recommend giving it a full charge. It has an
internal rechargeable battery. The battery can
be charged the following ways:
A. Plug into a computer’s USB port;
B. Plug the HD2 into one of our optional
charging accessories (wall/car/portable charger)
If you use your own charger, make sure it is
no more than 5V and 1000mAH output (most
standard cell phone chargers will work);
C. While charging, the light will ash blue; when
charging is complete the light will stop ashing
and turn a solid blue;
Page 5

5
3Turn on/o &
Standby
4Continuous
Recording
A. Power on: press and hold the function button
for about 1-2 seconds and release (you will
see the blue light come on while you press the
button). The green light will icker several times
while pen is loading. The green ickering light
will turn o and the HD2 will begin to record
video. The indicator light will remain o while it
is recording;
B. Standby: During recording, press the function
button to stop recording and enter standby
mode. This mode is indicated by a solid blue
light. Standby means that the HD2 is on, but not
recording. The device will automatically turn o
after 2 minutes in standby;
C. Power o: Push and hold the function button
until all indicator lights turn o;
A. Power on the HD2 as in step 3. The HD2 will
automatically begin to record video;
B. Press button to stop recording. The HD2 will
enter standby mode and the indicator light will
be solid blue;
C. Press button again to begin recording.
Indicator light will icker green to let you know
recording has started;
Page 6

6
D. Each time you start/stop recording, a new
video le is created;
NOTE: In order to avoid large le sizes that
may cause the HD2 or your computer to freeze,
recordings are divided into 10 minute intervals.
NOTE: Be sure to open lens cover before
recording.
5Motion Activated
Recording
A. Enter standby mode (see step 3b, indicated
by a solid blue light);
B. Click button 4 times quickly, the green light
will begin to blink. The HD2 is now recording
video in motion activation mode. The green
light will blink continually;
C. When no motion is detected the green light
blinks slowly and the recording is paused;
D. When motion is detected, the green light
blinks quickly and the HD2 is recording;
E. Click button once to pause recording,
indicated by a solid green light;
F. Exit motion activation mode: With solid green
light showing, click button 4 times quickly. The
HD2 will enter standby mode indicated by a
solid blue light;
Page 7

7
6Loop Recording
Explained
7Taking Photos
This pen features loop recording while in motion
activation mode. When the memory lls up the
HD2 will automatically start recording over the
oldest les. While recording in motion activation
mode the HD2 will never stop recording due to
a full memory.
NOTE: Loop recording does not function in
continuous video recording or audio only mode.
A. Enter standby mode (see step 3b, indicated
by a solid blue light);
B. Double click the button to go into photo
mode; the green and blue light will start
ashing alternately;
C. Click the button once to take a picture, the
blue light blinks twice to indicate that the
picture was taken successfully;
D. To quit photo mode, double-click the button
again, the device will go back to standby mode;
Page 8

8
8Audio Only
Recording
9Auto Power O
A. Enter standby mode (see step 3b, indicated
by a solid blue light);
B. Click the button 3 times quickly, the blue light
will blink several times and then turn o. The
HD2 will automatically begin recording audio;
C. Click the top button once to stop recording.
The HD2 will enter standby mode (solid blue
light);
A. When the battery is about to run out, the
blue light will blink for a few seconds, and the
HD2 will shut down;
B. When the memory is full, both the blue and
green light will blink for a few seconds and
the HD2 will shut down (unless it is in motion
activated mode);
C. If the HD2 is in standby mode for over 2
minutes, it will shut down;
Page 9

9
10Reset
11Time/Date Stamp
If your pen is malfunctioning, we recommend
resetting it. Use a thin object to press the reset
button (located inside indicator light hole). After
resetting, the HD2 should work normally.
NOTE: Resetting the HD2 only resets the
software within the HD2 and does not delete
any les.
NOTE: We have included universal instructions
that work for both MAC and Windows. However,
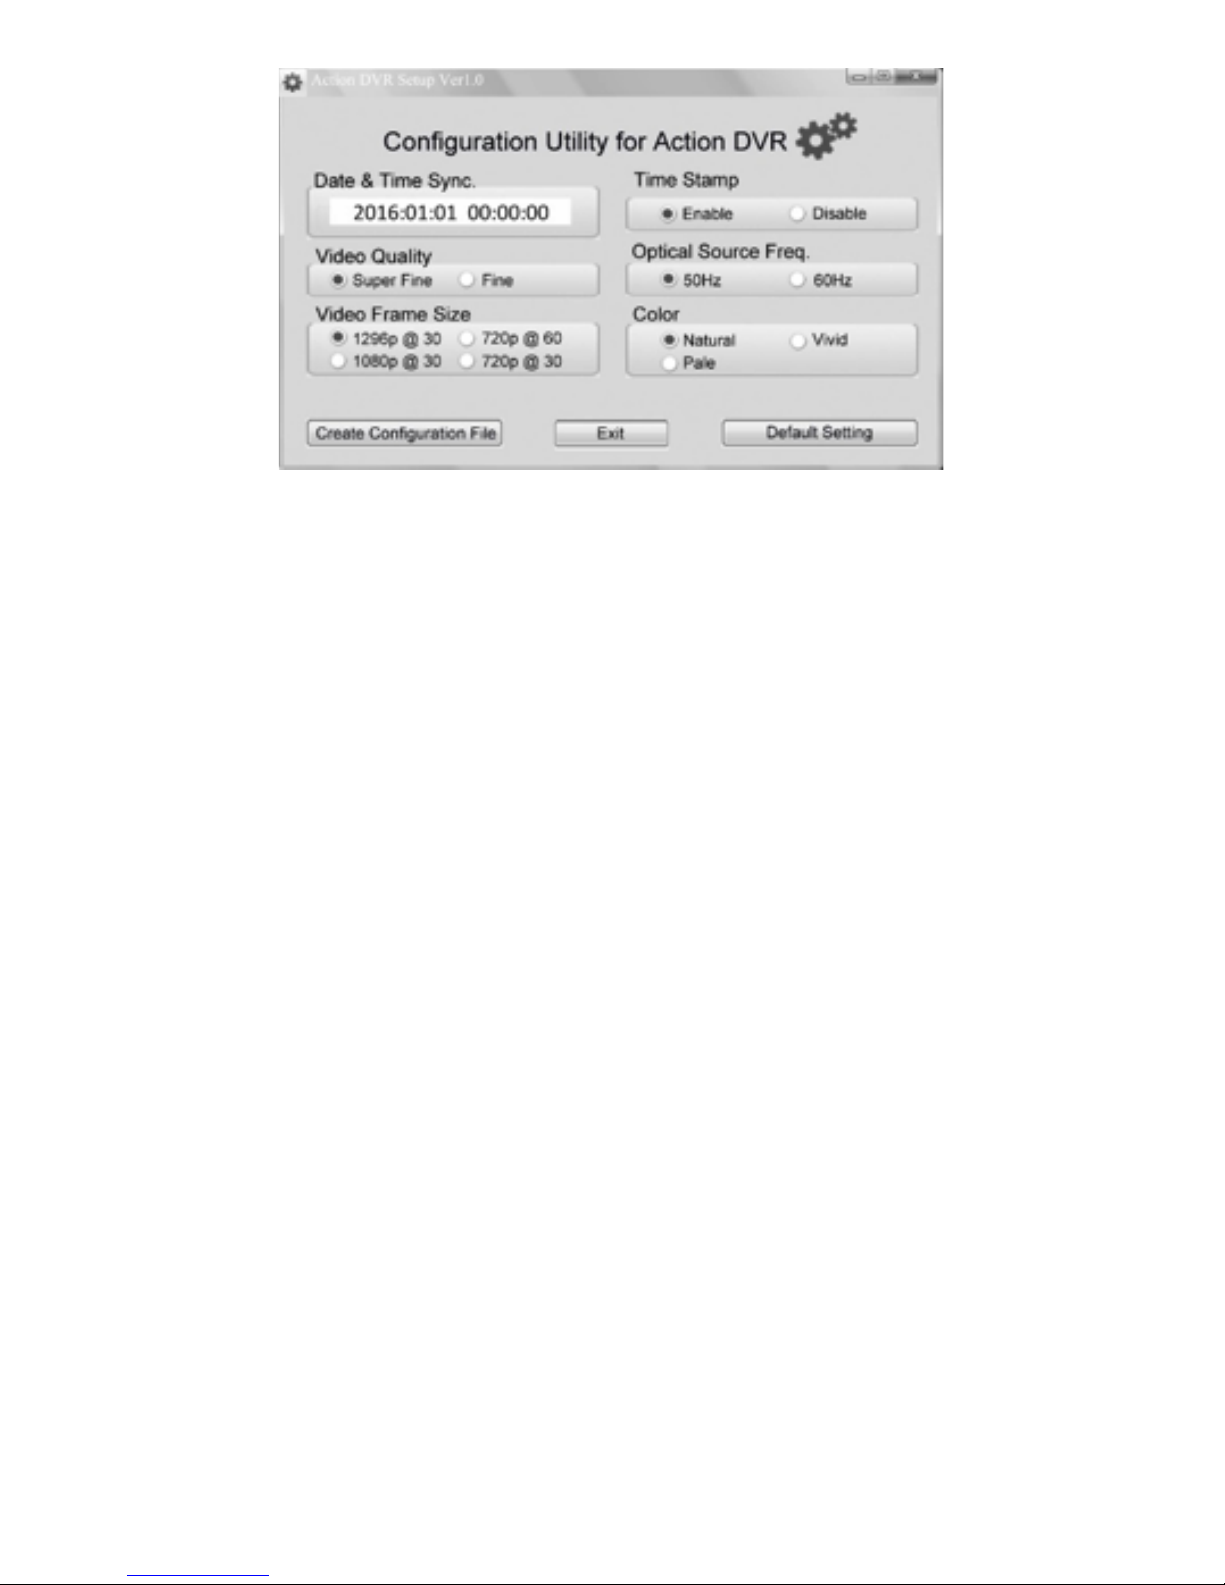
if you are a windows user, you can use the
program located in the root folder of the HD2
called “PowerCam Setup.exe” to change time/
date.
**IMPORTANT**
After inputting your desired settings, DO NOT
remove the “usercfg.txt” from the “Settings”
folder. You must copy and paste it into the root
folder. It will disappear from the root folder after
the settings take aect. We have included a le
called “usercfg(backup).txt” in case you lose the
le. We also recommend making a backup copy
and saving it to your computer.
A. CHANGE TIME/DATE USING “POWERCAM
SETUP.EXE” APPLICATION (WINDOWS ONLY):
Page 10
10
1. Connect your HD2 to the computer while the
HD2 is turned o;
2. It will mount as a removable drive;
3. Open the removable drive and open the
program called “PowerCam Setup.exe” located in
the root/main folder;
4. Change the settings to your desired time/
date, click “Create Conguration File” and close
the program;
5. Un-plug the HD2 from the computer. The
next time you record a video, the updated time/
date will take aect;
B. TURN ON/OFF TIME/DATE STAMP (MAC &
WINDOWS):
1. Connect your HD2 to the computer while the
HD2 is turned o;
2. the HD2 will automatically connect to your
computer as a removable drive;
3. Open the “Settings” folder, and open the le
named “usercfg.txt”;
4. Locate the line item “TimeStamp=” the
number after the “=“ sign indicates the setting;
5. Input a number between 0-3 for your desired
Page 11

11
setting [0:Time+Logo, 1:Time, 2:Logo, 3:None];
6. Save the changes to the “usercfg.txt” le; then
copy and paste the le into the root/main folder
of the HD2 (DO NOT remove the le from the
“Settings” folder);
7. The next time you record a video, the settings
will take aect;
C. SETTING CURRENT TIME/DATE (MAC &
WINDOWS):
1. Connect your HD2 to the computer while the
HD2 is turned o;
2. the HD2 will automatically connect to your
computer as a removable drive;
3. Open the “Settings” folder, and open the le
named “usercfg.txt”;
4. Locate the line item “DateTime=” and input
your desired date/time;
5. Save the changes to the “usercfg.txt” le; then
copy and paste the le into the root/main folder
of the HD2 (DO NOT remove the le from the
“Settings” folder);
6. The next time you record a video, the setting
will take aect;
**IMPORTANT**
After inputting your desired settings, DO NOT
remove the “usercfg.txt” from the “Settings”
folder. You must copy and paste it into the root
folder. It will disappear from the root folder after
the settings take aect. We have included a le
called “usercfg(backup).txt” in case you lose the
le. We also recommend making a backup copy
and saving it to your computer.
Page 12

12
12Change Video
Settings
NOTE: We have included universal instructions
that work for both MAC and Windows. However,
if you are a windows user, you can use the
program located in the root folder of the HD2
called “PowerCam Setup.exe” to change the
video settings. (See screen shot on page 10).
Change to your desired settings and click
“Create Conguration File” and close the
program. Unplug the HD2 from the computer
and the next time you record a video your
settings will take aect. Not all settings options
are available using the windows program.
A. CHANGE VIDEO SETTINGS (MAC &
WINDOWS):
1. Connect your HD2 to the computer while the
HD2 is turned o;
2. The HD2 will automatically connect to your
computer as a removable drive;
3. Open the “Settings” folder, and open the le
named “usercfg.txt”;
4. Input your desired settings by inputing a
number after the “=“ sign of each line item;
5. After the “;” on each line item, an explanation
is given about the settings options;
6. Save the changes to the “usercfg.txt” le; then
copy and paste the le into the root/main folder
of the HD2 (DO NOT remove the le from the
“Settings” folder);
7. The next time you record a video, the settings
will take aect;
Page 13

13
**IMPORTANT**
After inputting your desired settings, DO NOT
remove the “usercfg.txt” from the “Settings”
folder. You must copy and paste it into the root
folder. It will disappear from the root folder after
the settings take aect. We have included a le
called “usercfg(backup).txt” in case you lose the
le. We also recommend making a backup copy
and saving it to your computer.
13SETTINGS
EXPLAINED
VideoSize=
;0:2K@30,1:1080P@30, 2:720P@30, 3:720P@60
VideoQuality=
;0:Super ne, 1:ne [Min:0, Max:1]
RecordWithAudio=
;0:WITH, 1:WITHOUT [Min:0, Max:1]
EV=
;0:-2.0, 1:-1.66, 2:-1.33, 3:-1.00, 4:-0.66, 5:-0.33,
6:0, 7:+0.33, 8:+0.66, 9:+1.00, 10:+1.33, 11:+1,66,
12:+2.0 [Min:0, Max:12]
VideoClipTime=
;Video clip time, 0:OFF 1:1min, 2:3min 3:5min,
5:10min [Min:0, Max:4]
Color=0
;0:Natural, 1:Vidi, 2:Pale [Min:0, Max:2]
Page 14

14
AutoPowerO=
;Auto Power O:0:Never, 1:30sec, 2:1min,
3:2min, 4:3min, 5:5min
Flicker=
;0:50Hz, 1:60Hz [Min:0, Max:1]
TimeStamp=
;0:Time+Logo, 1:Time, 2:Logo, 3:None [Min:0,
Max:3]
MotionSensitivity=3
;0:O, 1:Low, 2:Middle, 3:High [Min:0, Max:1]
TimeStampLogoTXT=
; Input whatever you want here, i.e a police
department might want the name of the oce
to display on the video. Leave it blank if you
don’t want anything to display.
DateTime=
2016/09/29-11:04:42;
Delete=1;
Page 15

15
14Caution
15Legal Information
Here are few tips and things to watch out for
when using your pen:
A. At times, the HD2 may become hot during
recording - this is normal. To ensure cooling
avoid blocking ow of air to the HD2;
B. Keep your pen dry. Rain, humidity, and all
types of liquid or moisture can potentially cause
harm or corrosion to the internal components. If
you pen does get wet, allow it to try completely
before attempting to use;
C. Avoid dropping or rough handling. This can
break internal components;
D. Do not use hard chemicals, cleaning solvents,
or strong detergents to clean the HD2;
All jurisdictions have specic laws and
regulations relating to the use of cameras and
voice recorders. Before using any camera and/
or voice recorder for any purpose it is the buyers
responsibility to be aware of all applicable laws
and regulations that prohibit or limit the use
of cameras and voice recorders, and to comply
with the applicable laws and regulations.
Page 16

16
16Specications
View Angle 65°
Min. Illumination 1 Lux
Video Format Mov
Compress Format H.264 Advanced Version
Video Resolution 2304x1296; 1920x1080; 1280x720
Frame Rate 1296P/1080P @ 30FPS; 720P @ 30/60FPS
Photo Format JPG 4352x3264
Storage 32GB, 64GB, 128GB
USB Interface USB 2.0
Battery Charge DC 5V/1A
Battery Capacity 380mAH
Dimensions Length: 155mm Diameter: 15mm
Net Weight 50g
Page 17

17
Page 18

18
1 Year Warranty
All PenRecorderPro™ brand products are backed by
our 1 Year Warranty. For full details visit
www.penrecorderpro.com
MID: ECM-P28B
 Loading...