

Page 1

Penpower WorldocScan X
User Manual
Version: v1.1 for WDS Pro
Release: March, 2012
Page 2

Penpower Technology Ltd.
Software User License Agreement
You are licensed to legally use this software program (“the Software”) by Penpower
Technology Ltd (“Penpower”) under this license agreement (“The Agreement”). If you do
not agree with any of the provisions in this Agreement, please do not install, copy or use the
Software. By using the Software, you are deemed to fully understand and accept the provisions of this Agreement.
1. Intellectual Property
All intellectual property rights in the Software, together with all information and documents
included in the packaging for the Software (including but not limited to copyrights), are property
of Penpower, and are protected by relevant laws and regulations.
2. License to Use
You are authorized to use the Software on one (1) single computer only. You may not use the
Software on any other machines other than the said single computer.
3. Authority to Copy
The Software and all documents included with the Software, and copyright thereof, are property
of Penpower. You are licensed to make one (1) copy of the Software for your personal backup
purposes. All other acts of copying are strictly prohibited.
You may not sell, lease, dissemble, reverse engineer, copy, translate, adapt or derive the Software,
or obtain the source code of the Software by any other means. You may not use the Software for
any purposes other than those permitted under this Agreement.
4. Business Users
If you need to install or use the Software on more than one (1) computer, please contact Penpower
or our local distributor to purchase a license for the additional use.
5. Liability
You agree to indemnify Penpower against all losses, costs, debts, settlement payments or other
expenses (including but not limited to attorneys fees) arising from your breach of this Agreement,
and you agree to compensate Penpower for all of the above mentioned damages.
6. No Warranty
Effectiveness of a packaged software in handling information is closely related to its software and
hardware environment. The Software is published following careful development and product
testing by Penpower, but Penpower is not able to conduct tests based on all possible combinations
of software and hardware environment. Therefore, Penpower is unable to promise nor warrant
that there will be absolutely no risk of loss or damage of information, or any other kind of loss,
during installation and/or execution of the Software. You must be fully aware of your risks in us-
ing the Software.
Page 3

Penpower will provide you with the Software and support services in respect of the Software to
the maximum extent permitted by law. However, Penpower does not warrant that the Software
and information included in the package of the Software contain no defects or errors. Penpower is
not liable for any indirect, special or incidental loss arising from the Software, including but not
limited to loss of prots, damage to business reputation, cessation of work, hardware malfunction
or damage, or any other commercial damage or loss arising from commercial use of the Software.
7. Limitation of Liability and Damages
The maximum amount of compensation payable by Penpower, in respect of any damage incurred
by you for any reason under this Agreement, is limited to the amount you have already paid to
Penpower in respect of the Software.
Under no circumstances will Penpower be held liable for the possibility of loss, notwithstanding
Penpower may be aware of the possibility of such loss.
8. Prohibition Against Sublicense
You are prohibited to assign the license in respect of the Software granted to you under this
Agreement, or to grant a sublicense to another person.
9. Jurisdiction
With regards to any disputes arising from this Agreement, Penpower and you agree that the court
having jurisdiction over the business location of Penpower will be the court in the rst instance.
10. Miscellaneous
In the event that any provision of this Agreement is found to be invalid at law, such invalidity will
not affect the validity of any other provisions, or the legal enforceability of such other provisions.
In the event that the Software cannot be executed under conditions of normal use, due to any
damage to the original disk/s, Penpower will replace the disk/s free of charge.
Page 4

Contents
Chapter 1 Product Introduction ........................................................... 1-1
1.1 Product Features ........................................................................................1 - 1
1.2 System Requirements ................................................................................1 - 1
1.3 Scan with Scanner .....................................................................................1 - 2
Chapter 2 Getting Started ..................................................................... 2-1
2.1 Install Software .........................................................................................2 - 1
2.4 Online Help ...............................................................................................2 -7
Chapter 3 Workspace ............................................................................ 3-1
3.1 Workspace Overview.................................................................................3 - 1
3.2 Categories Pane ........................................................................................ 3 - 2
3.3 Files Pane .................................................................................................. 3 - 4
3.4 Menu ......................................................................................................... 3 - 7
Chapter 4 Add Files to WorldocScan X ............................................... 4-1
4.1 Load Scanned Images ................................................................................4 - 1
4.2 Load Image Files ....................................................................................... 4- 2
Chapter 5 View and Manage Files ........................................................ 5-1
5.1 Convert Each File to PDF Format ............................................................. 5 - 1
5.2 Merge Files to A PDF File .........................................................................5 -3
5.3 Convert to Word\Excel Files ..................................................................... 5 - 6
5.4 View Files .................................................................................................. 5 - 7
5.5 Delete Files ..............................................................................................5 - 8
5.6 View File Details ....................................................................................... 5 - 9
5.7 Copy or Move to Category ...................................................................... 5-10
5.8 Change Storage Path ............................................................................... 5- 11
Chapter 6 Other Accessible Features ................................................... 6-1
6.1 Search for Files ..........................................................................................6 - 1
6.2 Email Files................................................................................................. 6 - 2
6.3 Print Files .................................................................................................. 6 - 3
Page 5

There may be newer versions of the software that was released during or after this
product’s manufacturing date. If the content in the User Manual differs from the onscreen interface, please follow the instructions on the on-screen interface instead of
the User Manual.
Page 6

1-1
Chapter 1 Product Introduction
Chapter 1 Product Introduction
1.1 Product Features
WorldocScan X offers the best solution for document management. The program
allows you to scan paper documents or import les, convert them into PDF, JPEG, BMP
or TIFF les, and make management.
● Manage & share
WorldocScan X lets you manage and share scanned docs in the best ways possible.
● Transports data into searchable PDF
WorldocScan X converts scanned paper documents or existing les into searchable
PDF documents. All you need to do is feed, scan and search.
● Convert scanned documents into Word or Excel les
WorldocScan X converts scanned paper documents or existing les into Word or Excel les. .
● Support 190 recognition languages
Support 190 recognition languages, including English, French, German, Italian,
Spanish and more.
● Smart keyword search
Not just documents, even existing image files can be converted into the searchable PDF format. WorldocScan X not just scans, but also allows smart keyword search
through which you can nd documents using keywords.
● Windows 7 / Vista / XP
● 1G RAM or above
● 1G of available hard disk space
● CD-ROM drive
● USB port
1.2 System Requirements
Page 7
1-2
WorldocScan X
1.3 Scan with Scanner
1.3.1 Scan Directly and Ofine
WorldocScan Pro Scanner is a cordless scanner, allowing you to scan anywhere.
No computer connection is needed to scan. Simply charge it up and then insert your
documents to scan. The scanner scans the documents and save the image into the inner ash
immediately.
Note: Please disconnect the scanner to your PC when you scan the documents.
1. Insert the memory card or connect the USB ash drive if you need it.
2. Turn on the scanner power. When the scanner is ready, the status light will stop blinks.
3. Press the power button to select a scanning resolution mode of 300dpi(White) or
600dpi(Blue).
4. Insert your documents in face up, straight, aligned to the left into the Paper Feed Slot.
5. The scanner will detect, feed and scan the page automatically.
6. When scanning is completed, the scanned image will be saved to JPG format in either a
USB ash drive, memory card, or the scanner’s internal memory.
Note: The scanner will detect and use only one destination to store the scanned document. The
storage preference is USB ash drive > memory card > scanner’s internal memory.
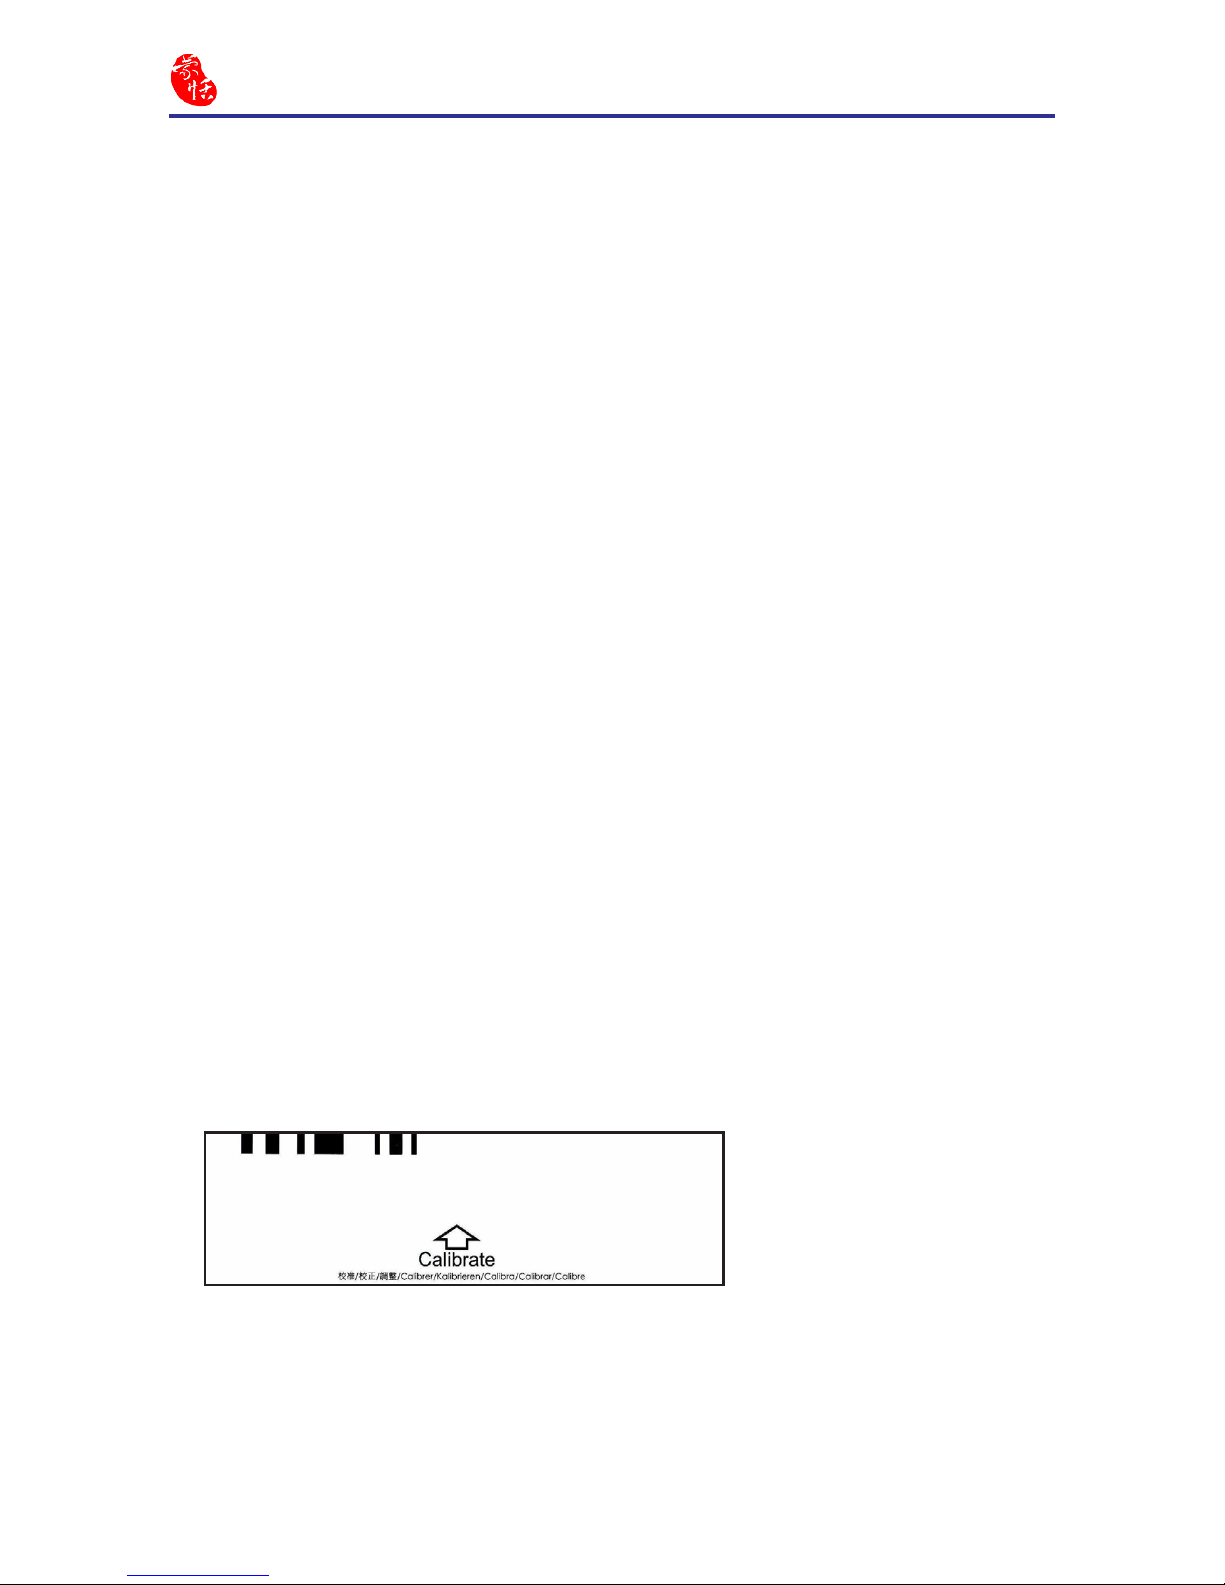
1.3.2 Calibrate the Scanner
Scanner occasionallly needs calibration to perform at its best. If the scans are showing
lines or black dots, please calibrate your scanner.
Please turn on the scanner and insert the calibration sheet (provided by Penpower) to
start automatic calibration.
1.3.3 Save Documents to WorldocScan X
Connect the scanner to your PC and load scanned images to save. Refer to Chapter 2.3
for more detailed explanation.
Page 8
2-1
Chapter 2 Getting Started
Chapter 2 Getting Started
Please follow the steps to add new documents or photos from your scanner.
1. Scan your documents or photos with the scanner.
2. Launch WorldocScan X (if it is not installed, please execute Setup.exe in the CD).
3. Connect the scanner to your PC.
4. Execute Load Scanned Images in WorldocScan X.
2.1 Install Software
2.1.1 System Requirement
• Windows 7 / Vista / XP
• 1GB RAM or above
• 1.5GB of available hard disk space
• USB Port
2.1.2 Software Installation
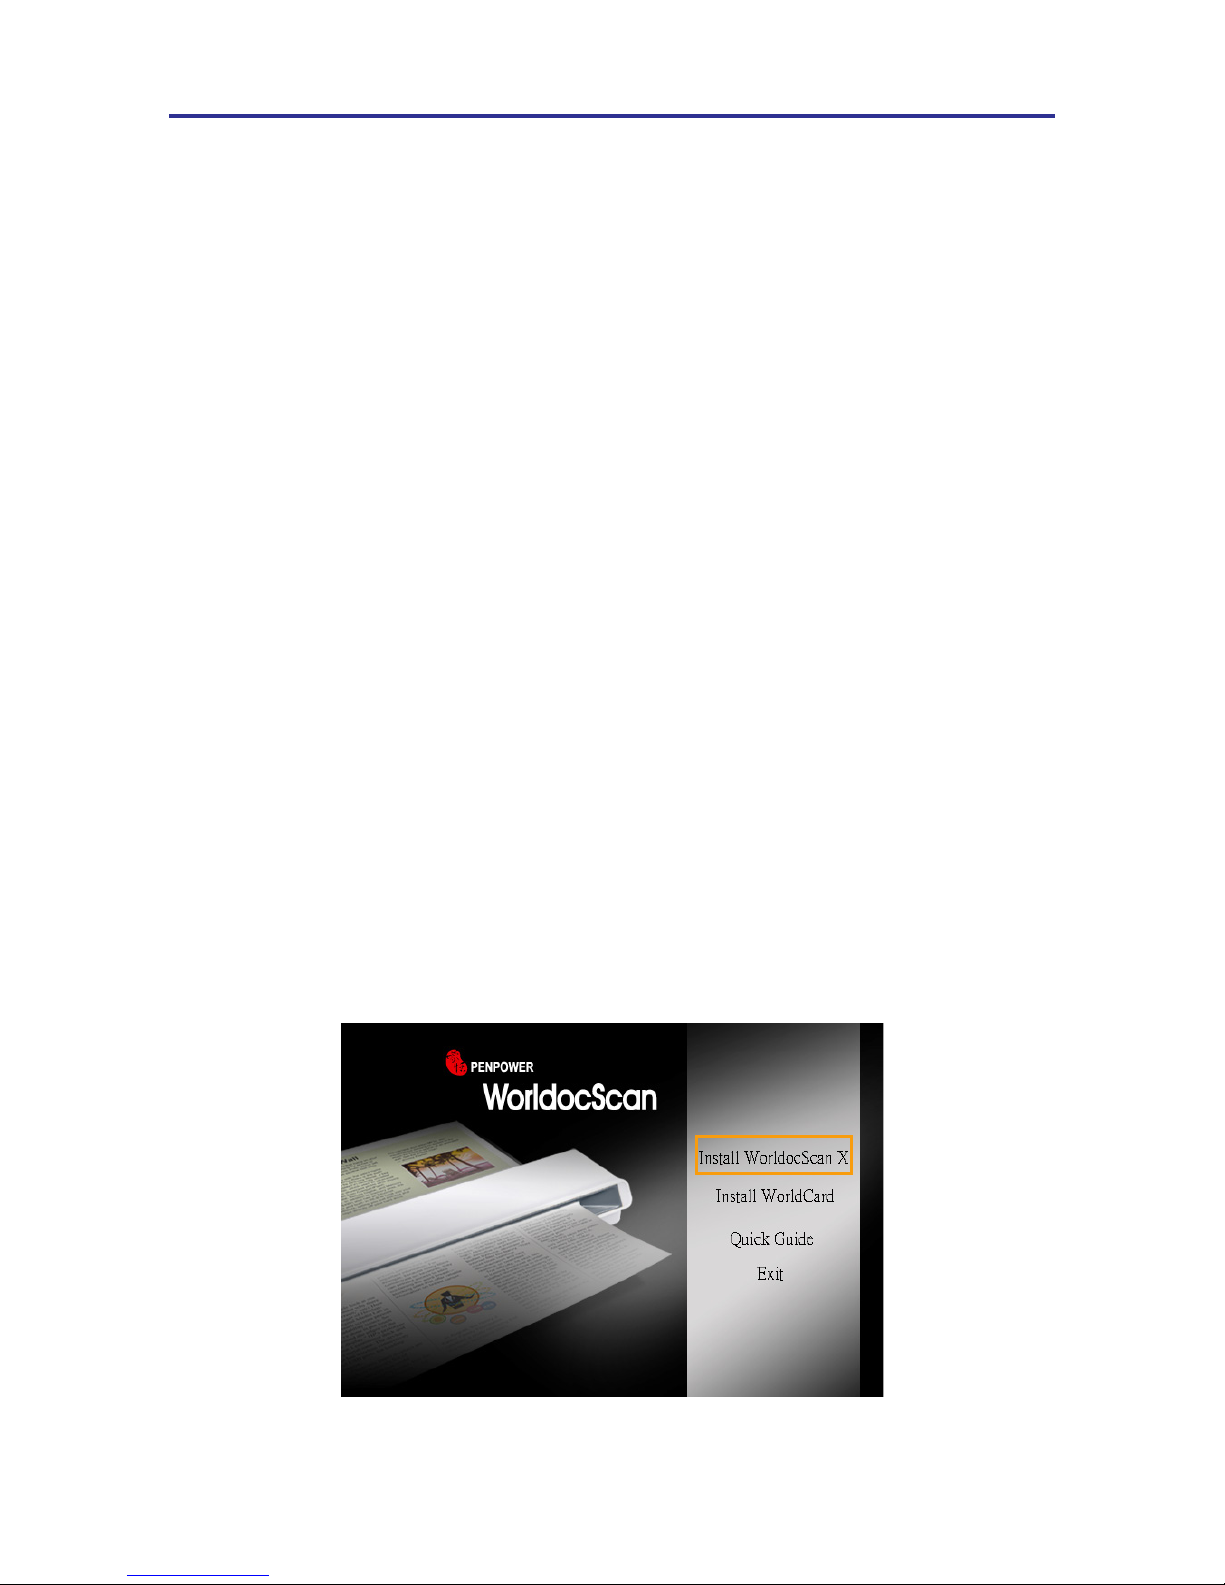
1. Place the installation CD in the CD/DVD-ROM drive and the system will
automatically run [Setup.exe]. Please click on [Install WorldocScan X] to begin the
installation process.
Page 9

2-2
WorldocScan X
2-3
3. Please read the license agreement carefully and check [I accept the terms of the
license agreement]. Then click on [Next] to continue.
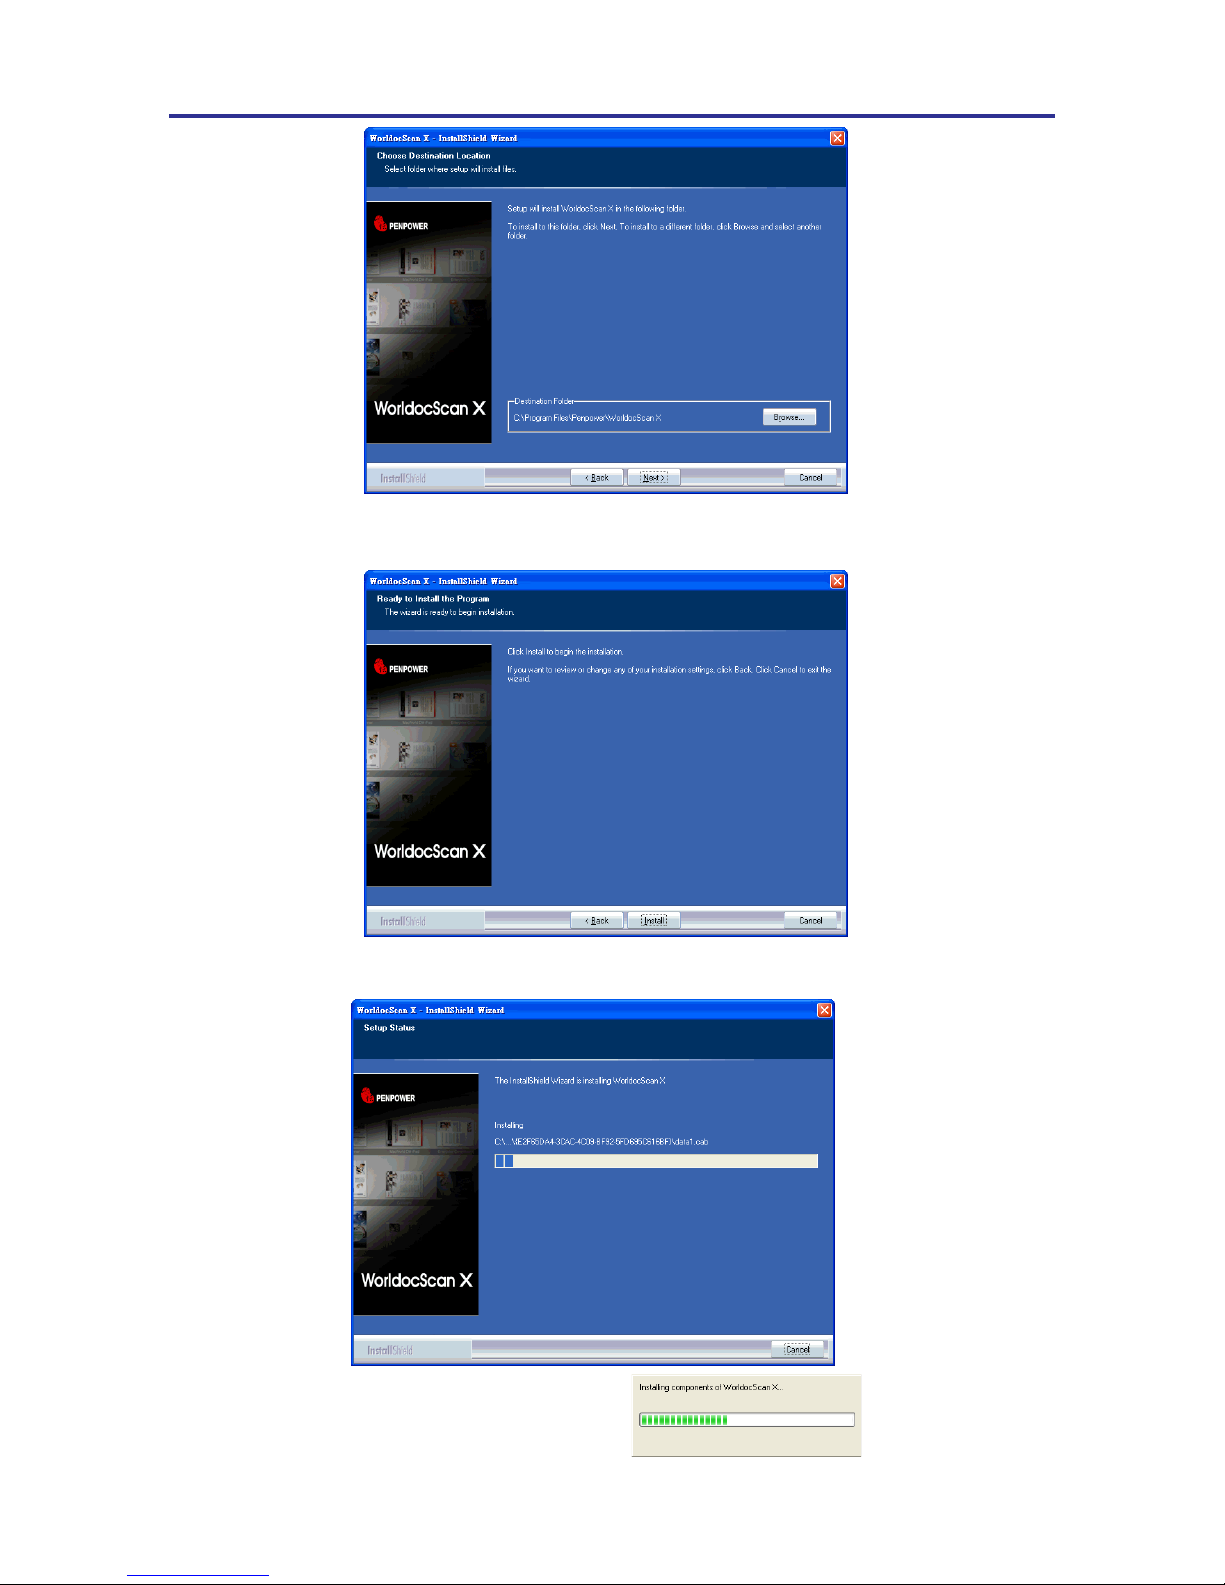
4. At the folder selection screen, you can use the system default folder or click on [Browse]
to select an installation folder. Click on [Next] to continue.
2. You will see the installation wizard on the screen. Please click [Next] to continue.
Page 10
2-3
Chapter 2 Getting Started
5. Click [Install] to begin the installation. If you want to change the storage path, please
click [Back] to return to the previous step.
6. The installation progress is displayed on screen.
Page 11

2-4
WorldocScan X
2-5
8. When the installation is completed, click [Finish] to exit.
7. After WorldocScan X is installed, please proceed to install PDF IFilter.
Please Click [Next] and follow the instructions to install PDF IFilter on your computer.
Page 12
2-5
Chapter 2 Getting Started
2.2 Launch WorldocScan X
Run WorldocScan X from [Start/All Programs/Penpower WorldocScan X/
WorldocScan X] or click the [WorldocScan X] desktop icon to launch
WorldocScan X.
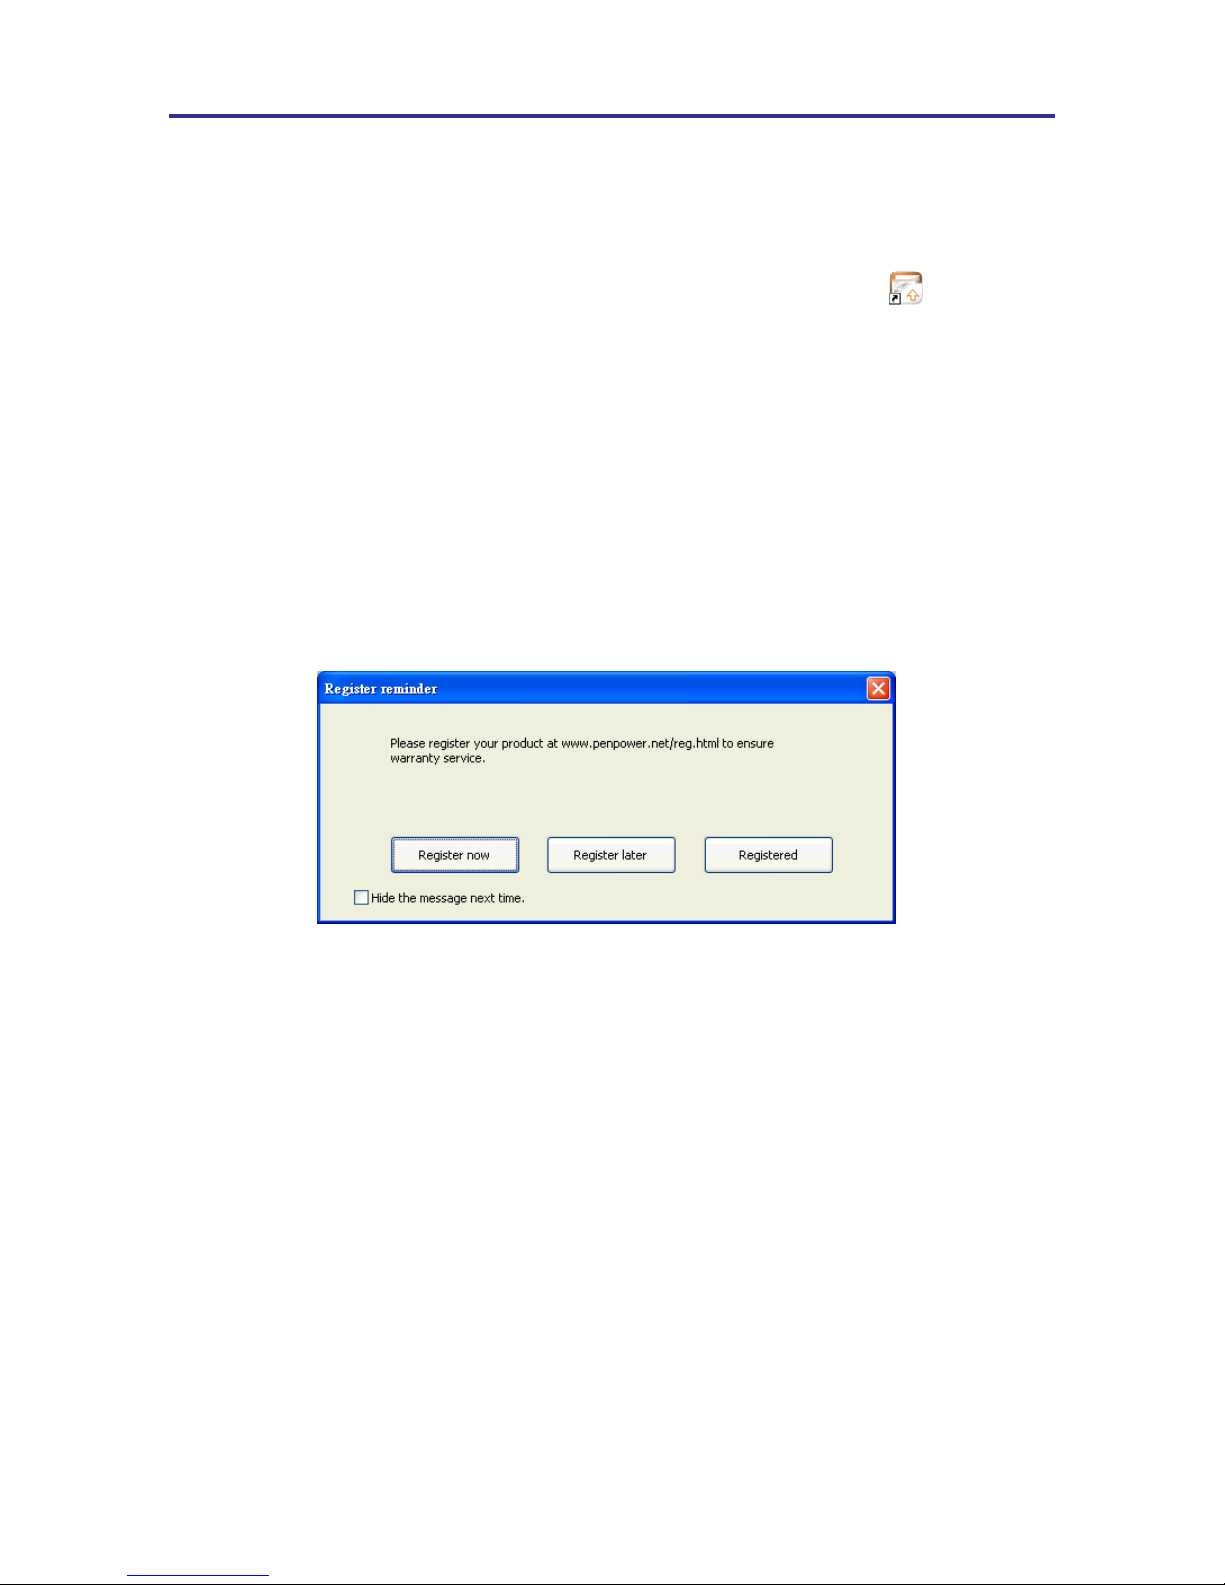
When you run WorldocScan X, you are prompted to register online. Click [Register
now] to register right away. If you click [Register later], you may go to [About
WorldocScan X] and choose [Register] when you are ready to register. If you have
registered, please click [Registered], this reminder will not display next time you launch
this application.
Note: If you did not register yet, the Register reminder might appear every time you
launch the software. Check the [Hide the message next time] option and then
the Register reminder won’t appear next time.
8
Registration
Page 13
2-6
WorldocScan X
2-7
2.3 Load Images from Scanner
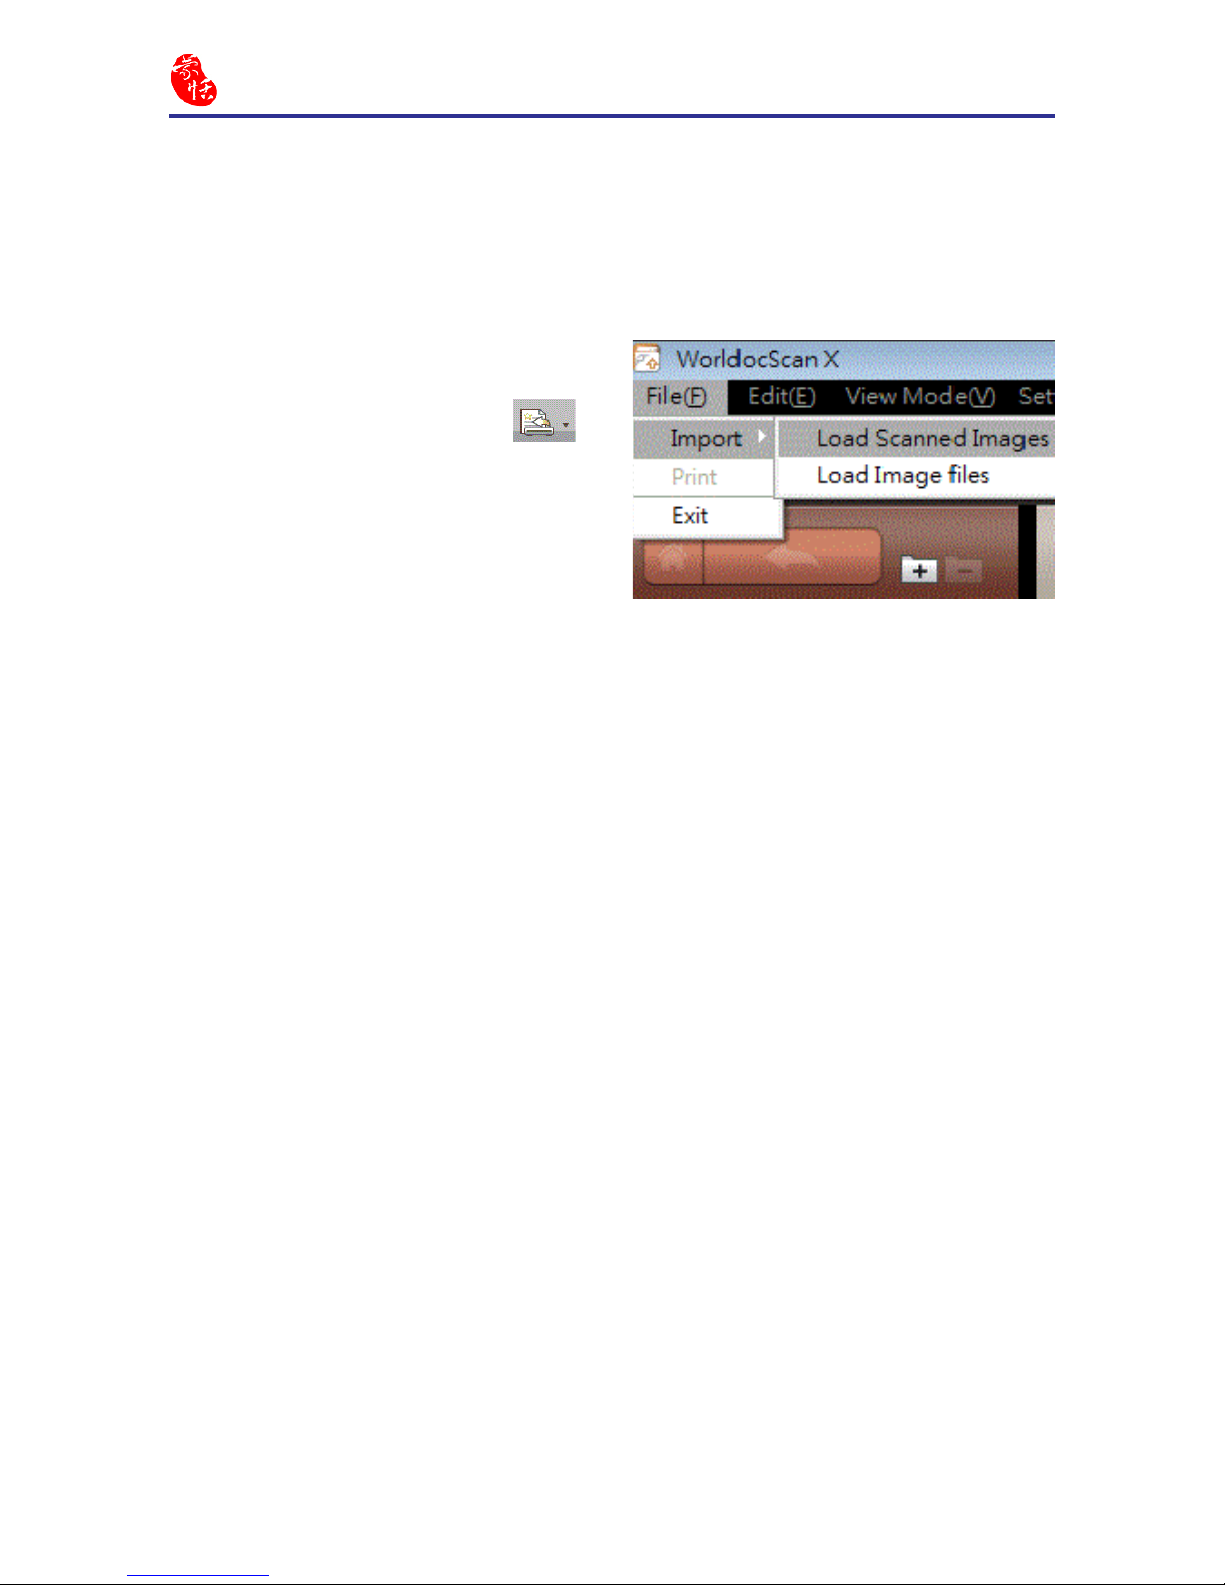
2. To load documents images in the
scanner, you can select [File/Import/
Load Scanned Images] or click
from the toolbar.
Notes : Please refer to Chapter 4 for more
detailed explanation.
1. Please turn on your scanner and connect it to your PC.
Note: You can see the info “Scanner Connected: WorldocScan Pro Scanner” in the
Status Bar on the right bottom.
Page 14
2-7
Chapter 2 Getting Started
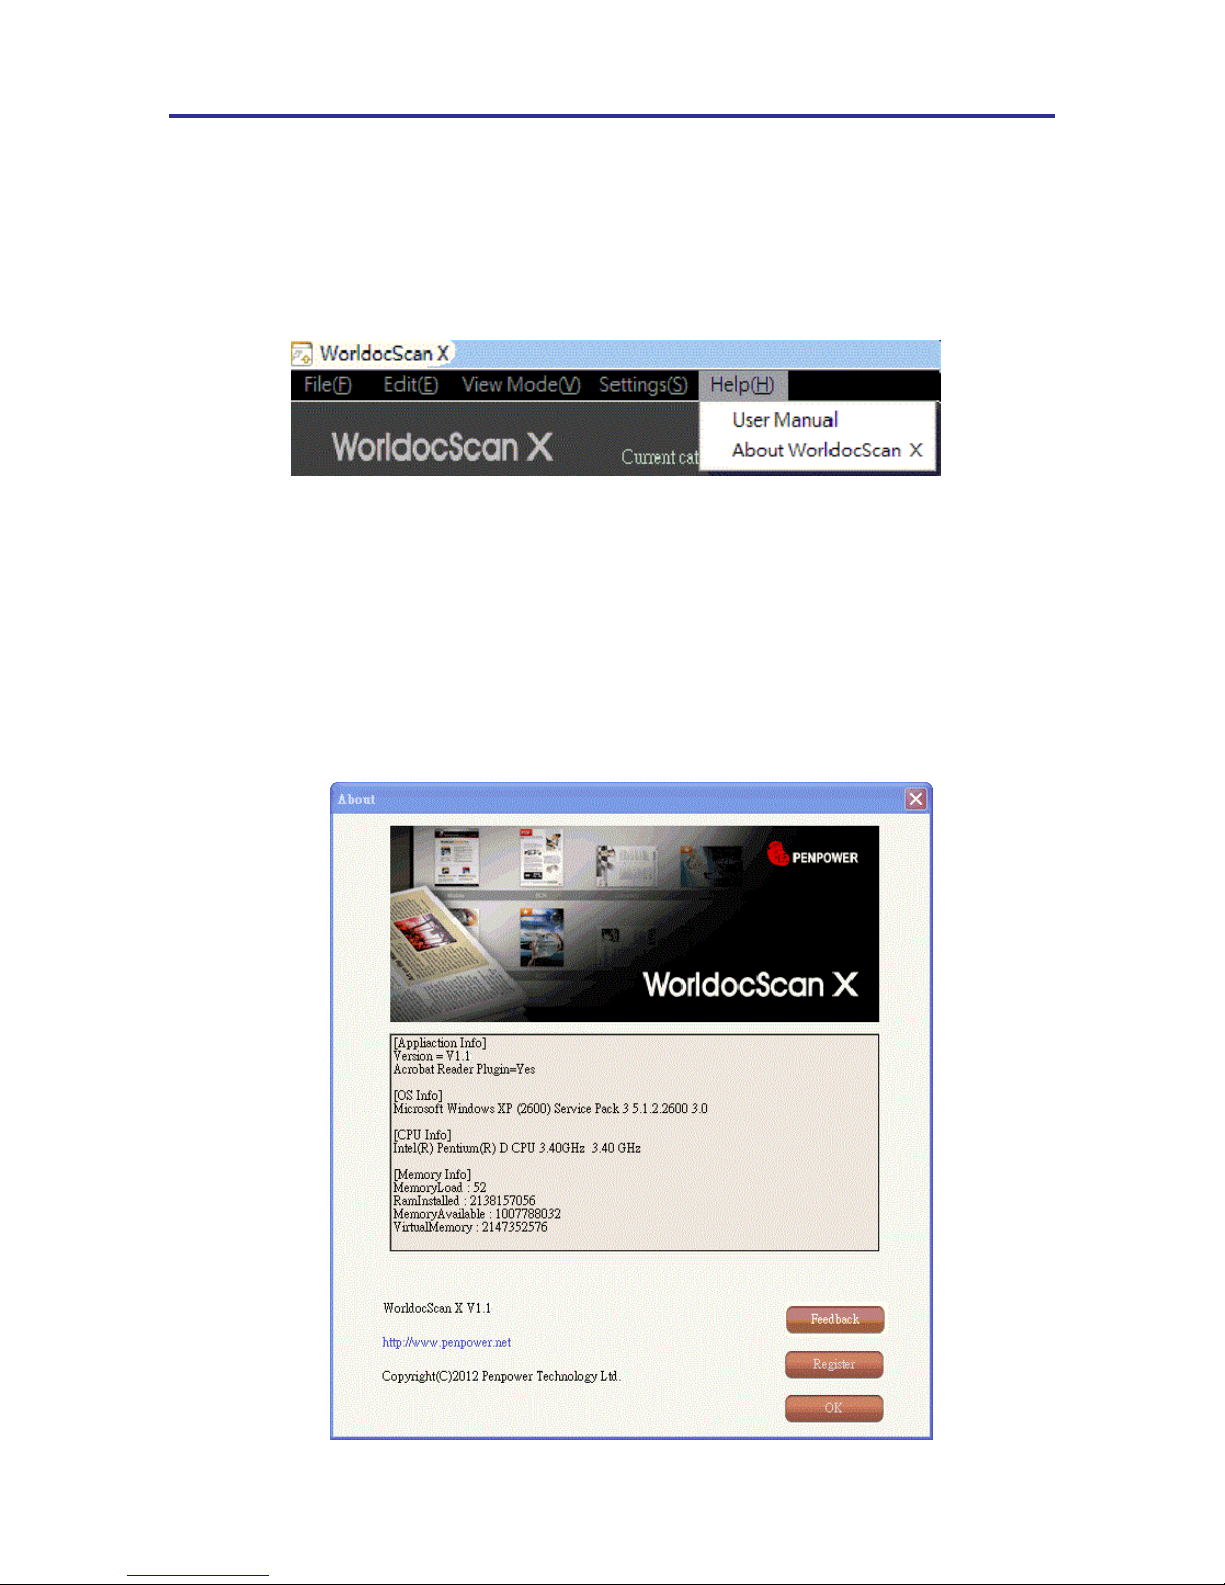
2.4 Online Help
WorldocScan X provides excellent online help info:
1. Click Help/User Manual to nd the user manual.
2. Click About WorldocScan X, you can go to Penpower Technology Ltd. ofcial
website at the left bottom to get more information.
3. Also you can send e-mail to our customer service contact by pressing Feedback at the
right bottom. It will open your email software, copy and paste hardware information
and email to us.
Page 15
3-1
Chapter 3 Workspace
Chapter 3 Workspace
With WorldocScan X, it is easy to organize and share your scans and then you can
also perform image enhancement or PDF creation, and much more functions.
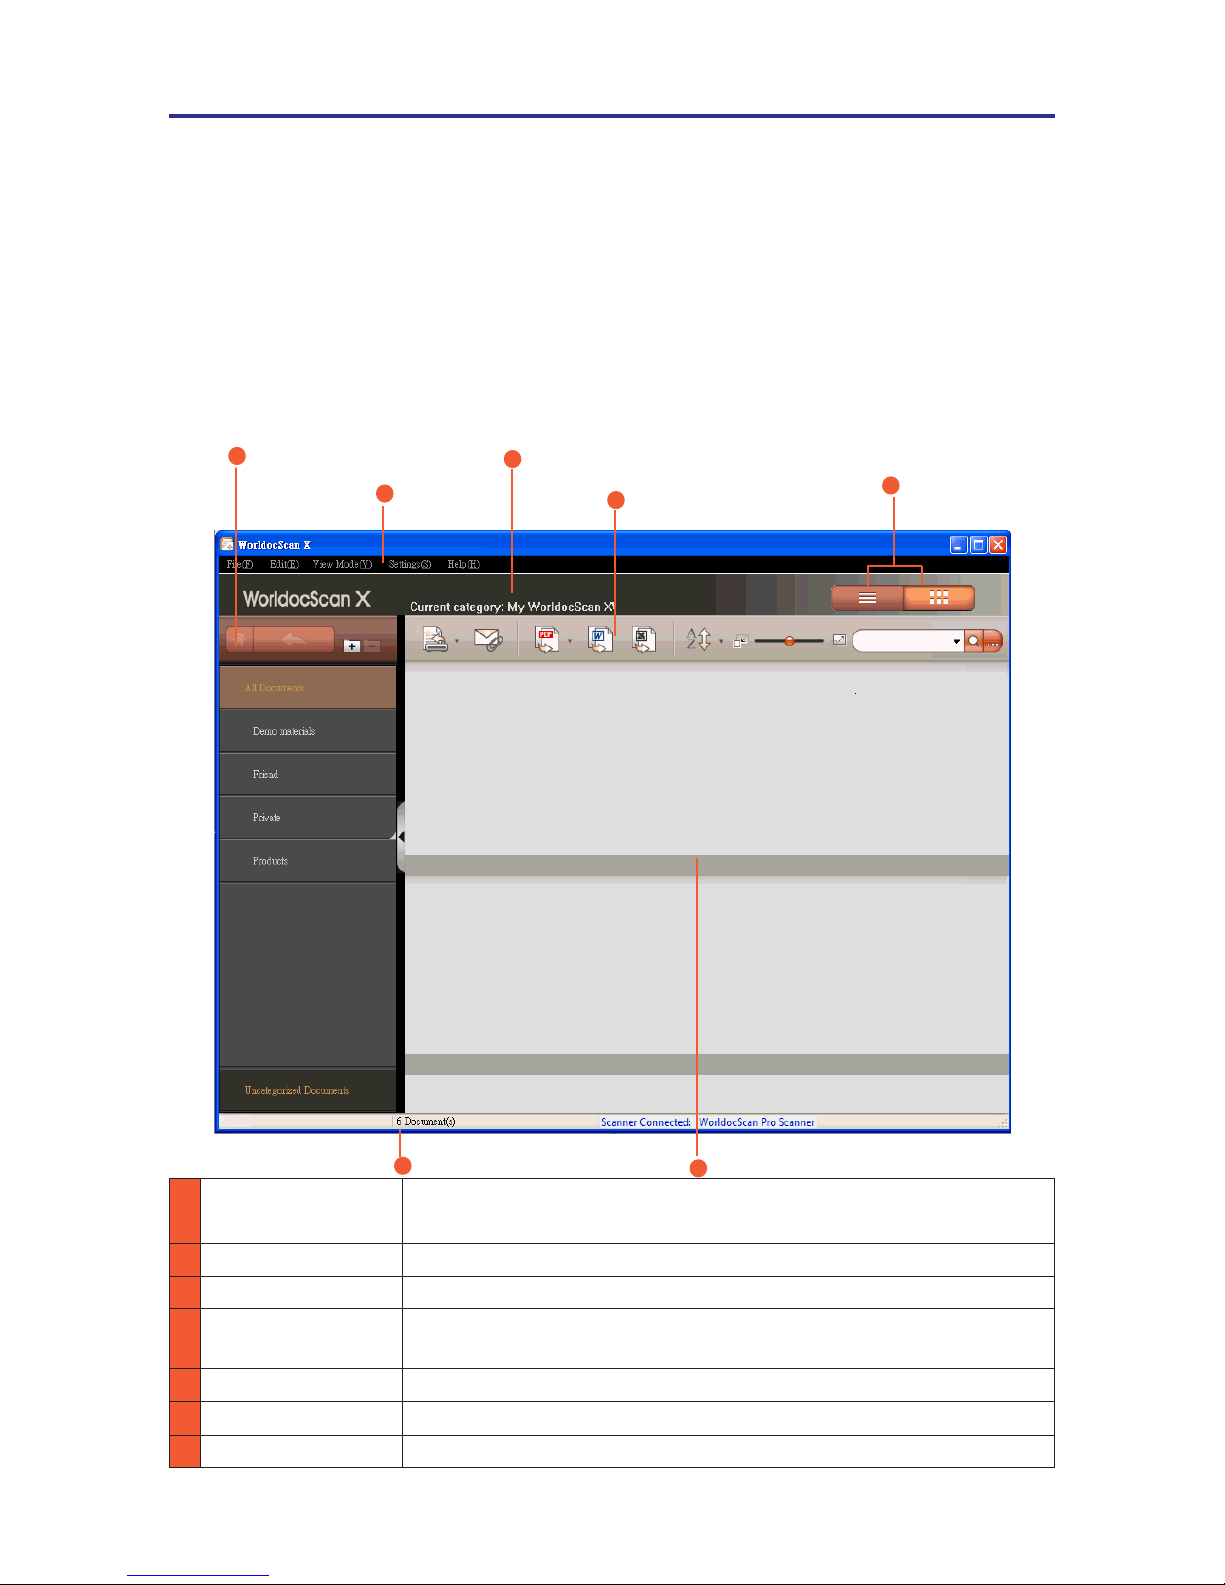
3.1 Workspace Overview
2
Menu
Switch
View Mode
1
3
Current Category
Status Bar
Files Pane
5
6
7
Categories Pane
1 Categories Pane This is where you control data. Categories can be freely created,
moved, deleted, renamed, and so on.
2 Menu File, Edit, View Mode, Settings, and Help.
3 Current Category Show which category you are currently operating.
4 Toolbar Import, E-mail, Convert to PDF/Word/Excel, Sort, Zoom In/Out,
and Search.
5 Switch View Mode Switch between Thumbnails Mode and List Mode.
6 Status bar View the total number of les and scanner connection status.
7 Files Pane Display les in the current targeted category here.
4
Toolbar
Page 16
3-2
WorldocScan X
3-3
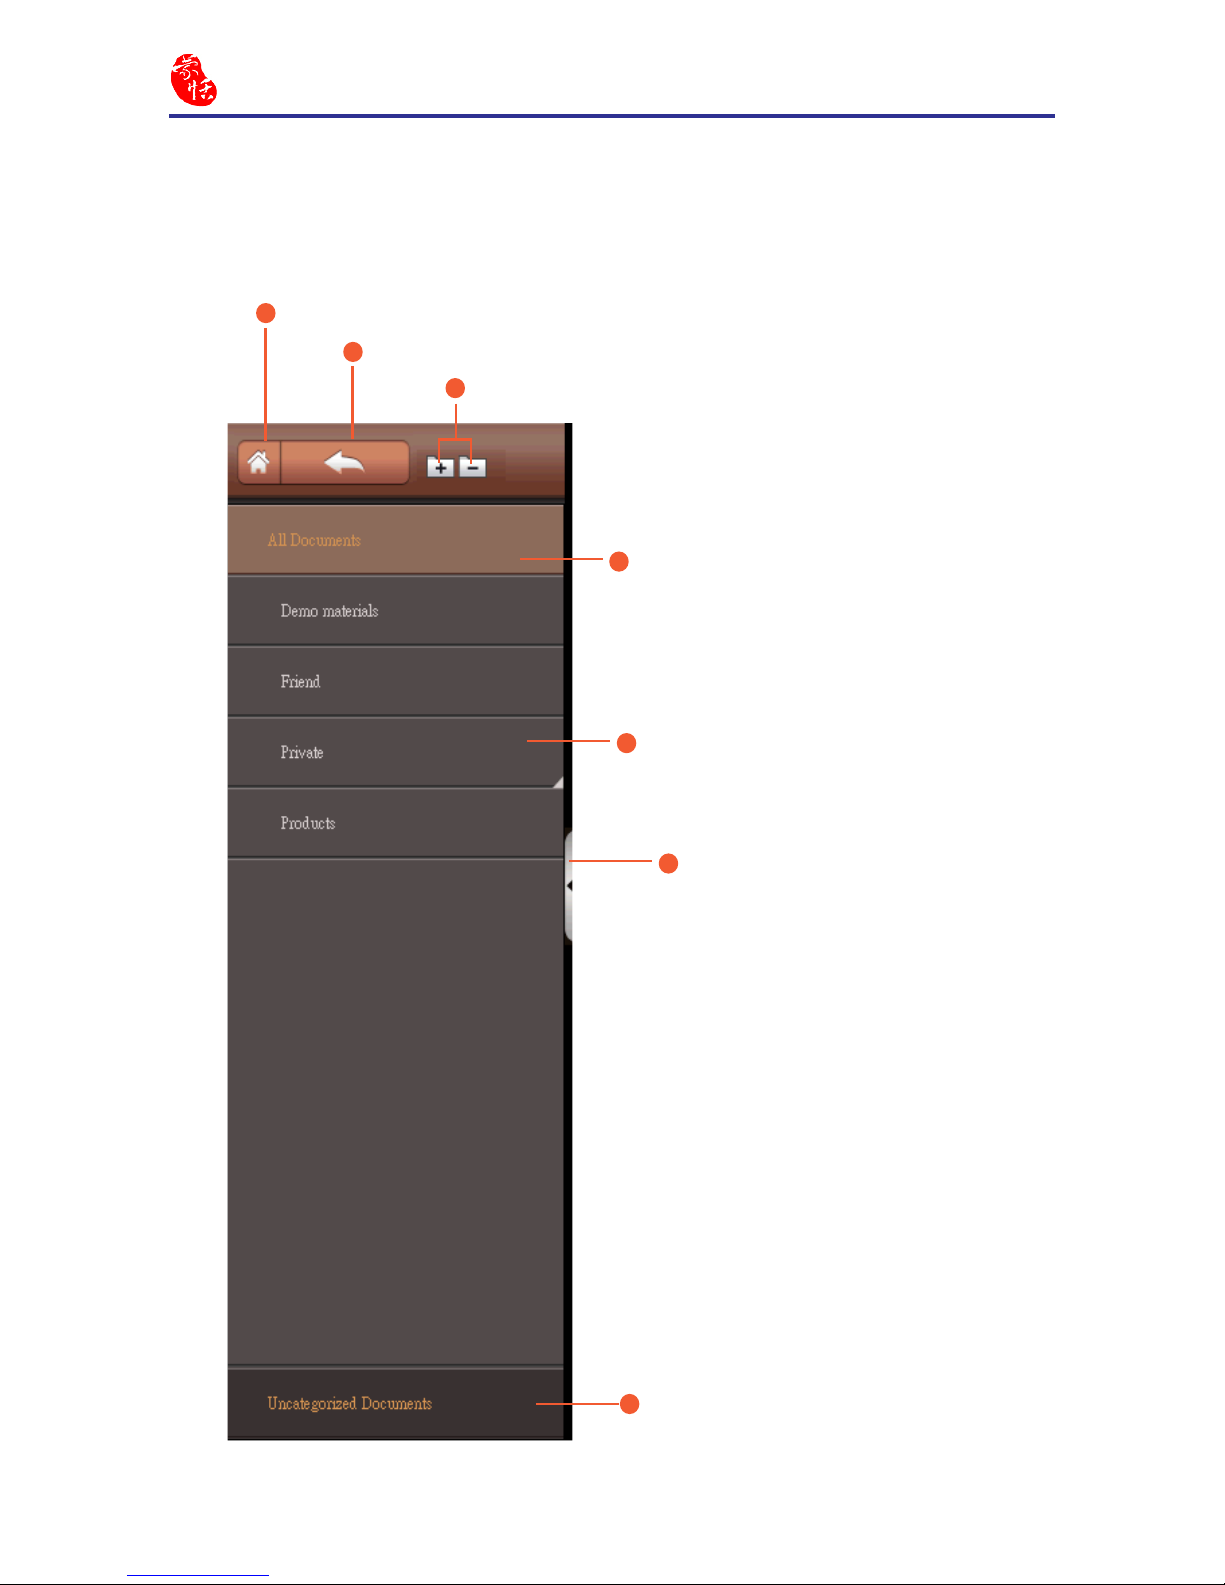
3.2 Categories Pane
1
Home Category
2
Back
Add / Delete
3
All documents
4
Categories
5
Uncategorized documents
7
Adjust Categories pane width
6
The Categories pane on the left side of the main screen provides controls over les and
categories in a more organized way.
Page 17
3-3
Chapter 3 Workspace
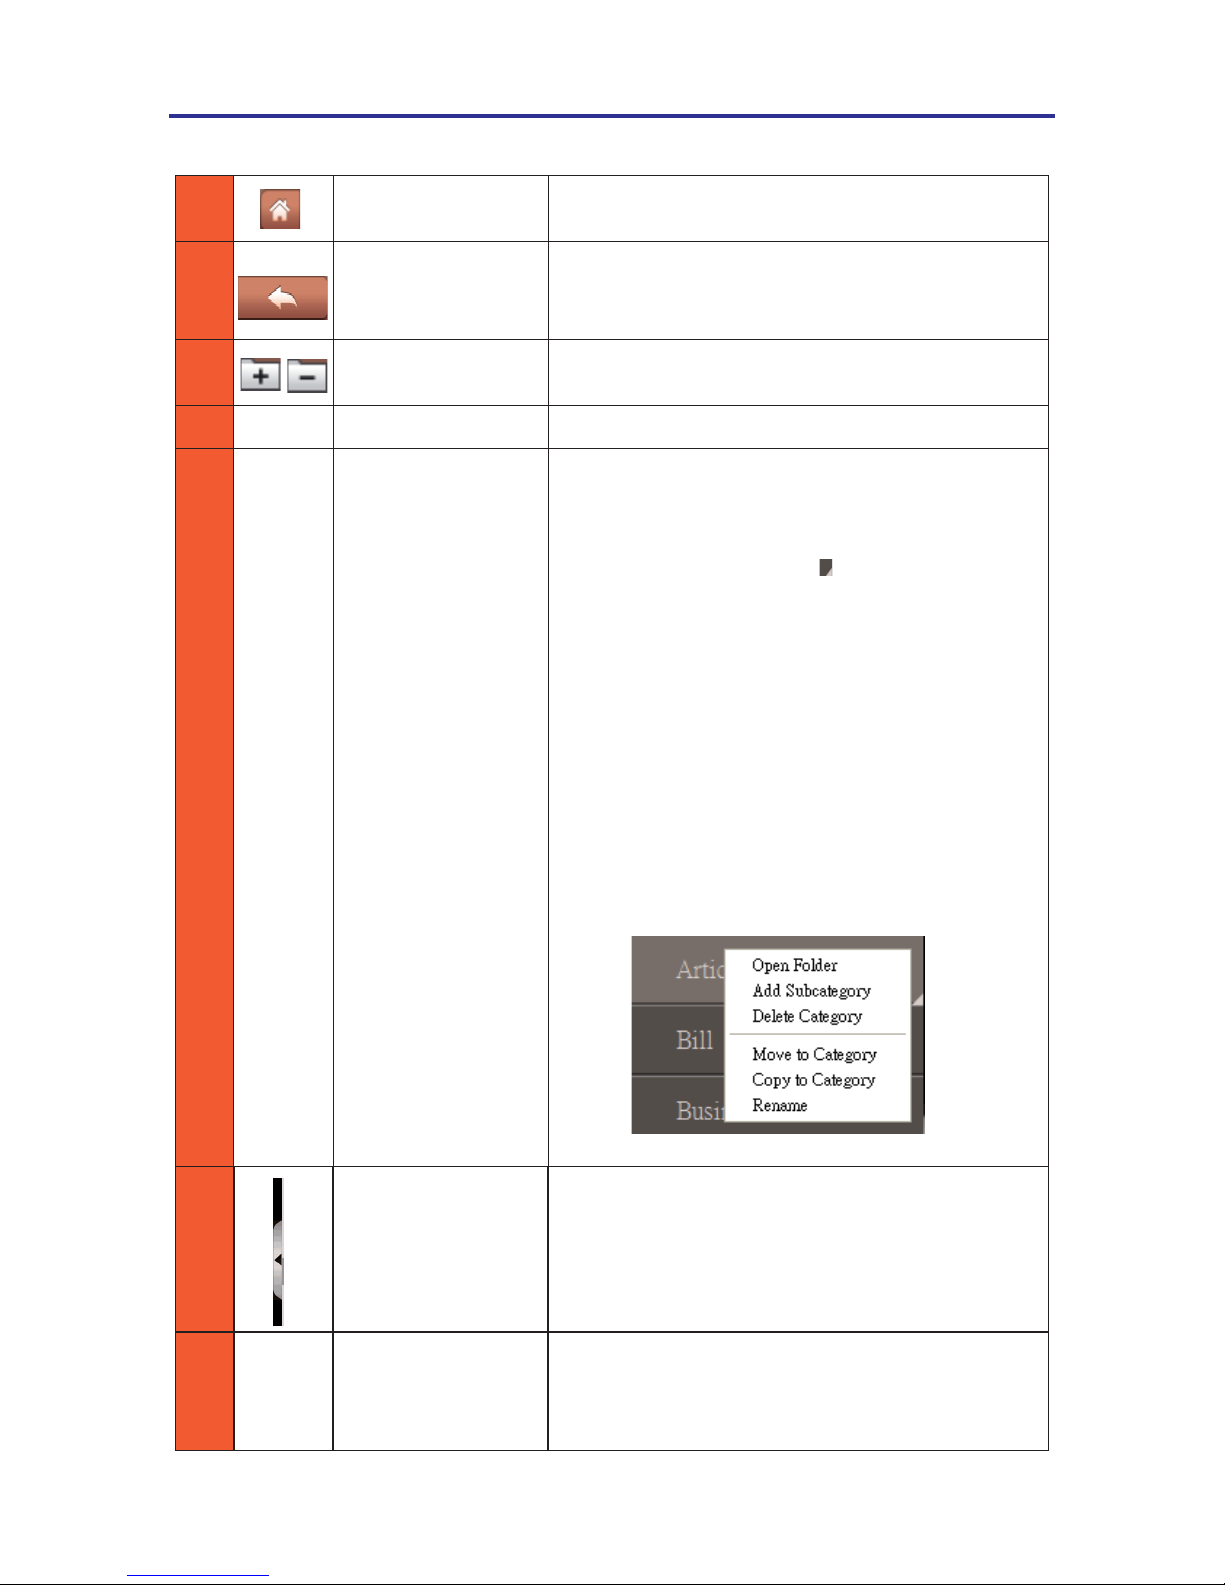
1 Home
Click this button to quickly return to All Documents.
2
Back
WorldocScan X allows multi-layer categories.
Click this button and you can return to the higher
layer category.
3 Add/Delete Add/delete a category or subcategory.
4
All Documents Click this button to display all documents.
5 Categories
WorldocScan X includes preset categories where
you can add documents. You can edit these
categories or create new categories. A category
with the little triangle icon has subcategories.
Double-click a category to display the subcategories within it.
Right-click a category and from the content
menu, you can open the folder where the category
and the les under it have saved, add a subcategory under the targeted category, delete the
targeted category, move the targeted category and
the les within it to another category, copy the
targeted category and the les within it to another
category, or rename this category.
6 Adjust Pane Width
Click the little triangle to display or hide the
Categories pane.
Drag the bar to adjust the width of the Categories
pane.
7
Uncategorized
Categories
The uncategorized documents will be stored in
this category.
Page 18
3-4
WorldocScan X
3-5
3.3 Files Pane
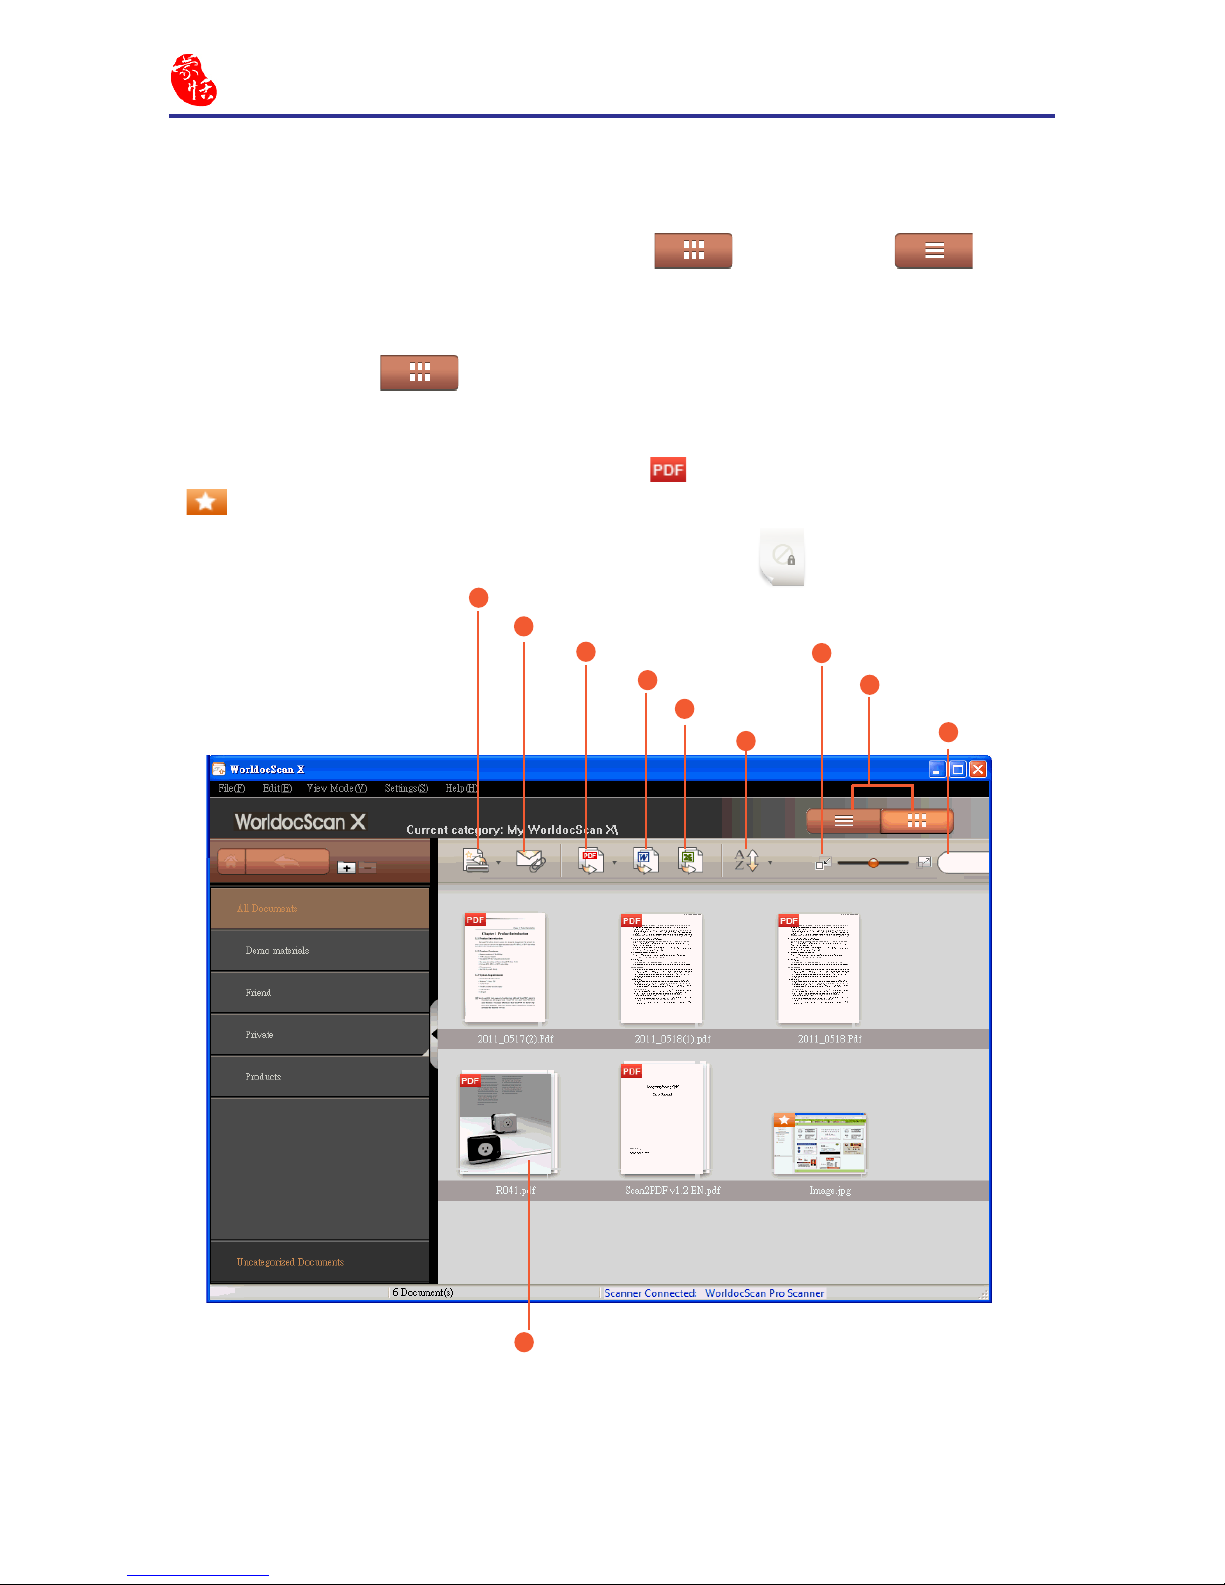
There are two view modes: Thumbnails Mode and List Mode .
8
Thumbnails Mode
10
File Thumbnails
Thumbnails Mode is the default view mode. It displays thumbnail
representations of the rst page of each document and provides easy identication of the
les. You can adjust the size of the thumbnail icons. There are three kinds of thumbnails
in the Files pane. PDF thumbnails appear with a icon. Image thumbnails appear with
a icon. Double-click a thumbnail to view this le. If you have set passwords to a
scanned PDF le, the thumbnail preview will be locked as .
Note: The le name will be abbreviated if it's too long. Put your pointer to the le name
to display the complete name.
2
E-mail
Switch View Mode
1
Import
3
4
Sort
Zoom in/out
Search
8
9
5
6
Convert to PDF
7
Convert to Excel
Convert to Word
Page 19
3-5
Chapter 3 Workspace
8
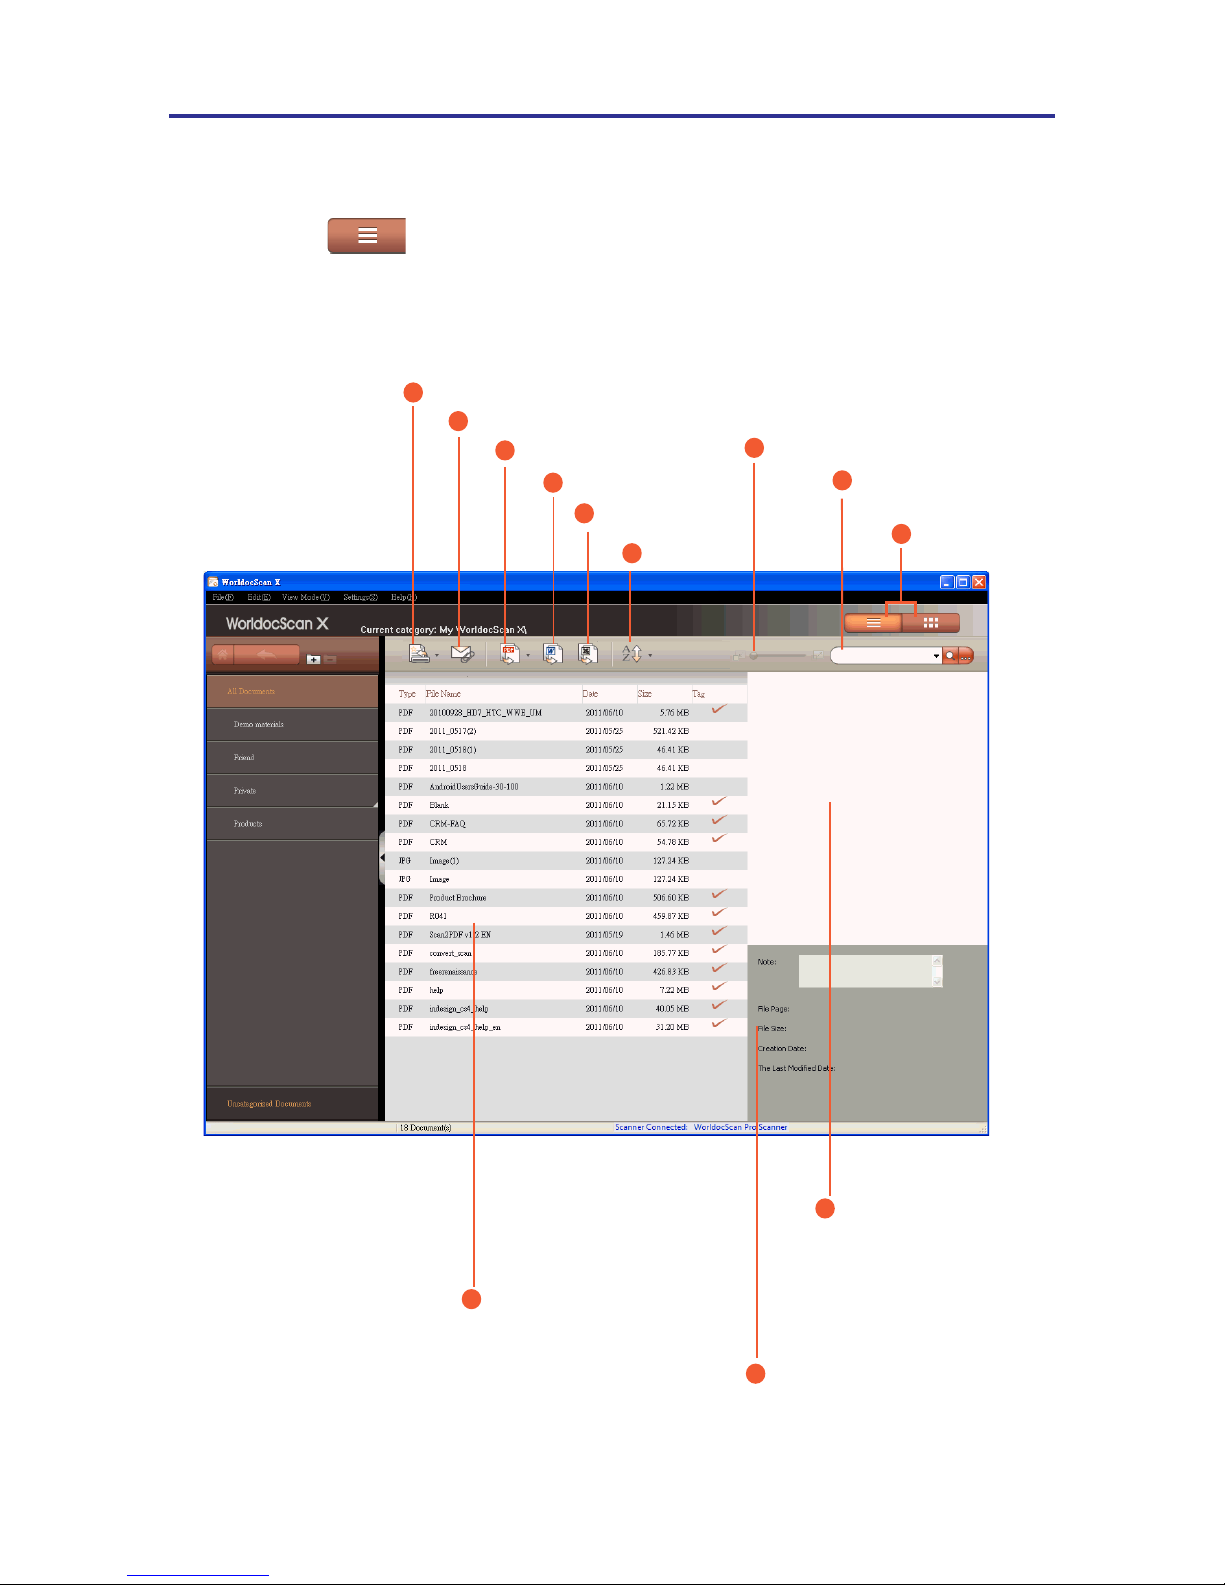
List Mode
In List Mode , your les appear in ordered rows containing information, such
as le name, type, size, creation date, and status of searchability. Double-click an item to
open it.
11
File List
2
E-mail
Switch
View Mode
1
Import
3
4
Sort
Zoom in/out
Search
9
8
5
12
File Details
6
Convert to PDF
7
Convert to Excel
Convert to Word
10
File Thumbnails
Page 20
3-6
WorldocScan X
3-7
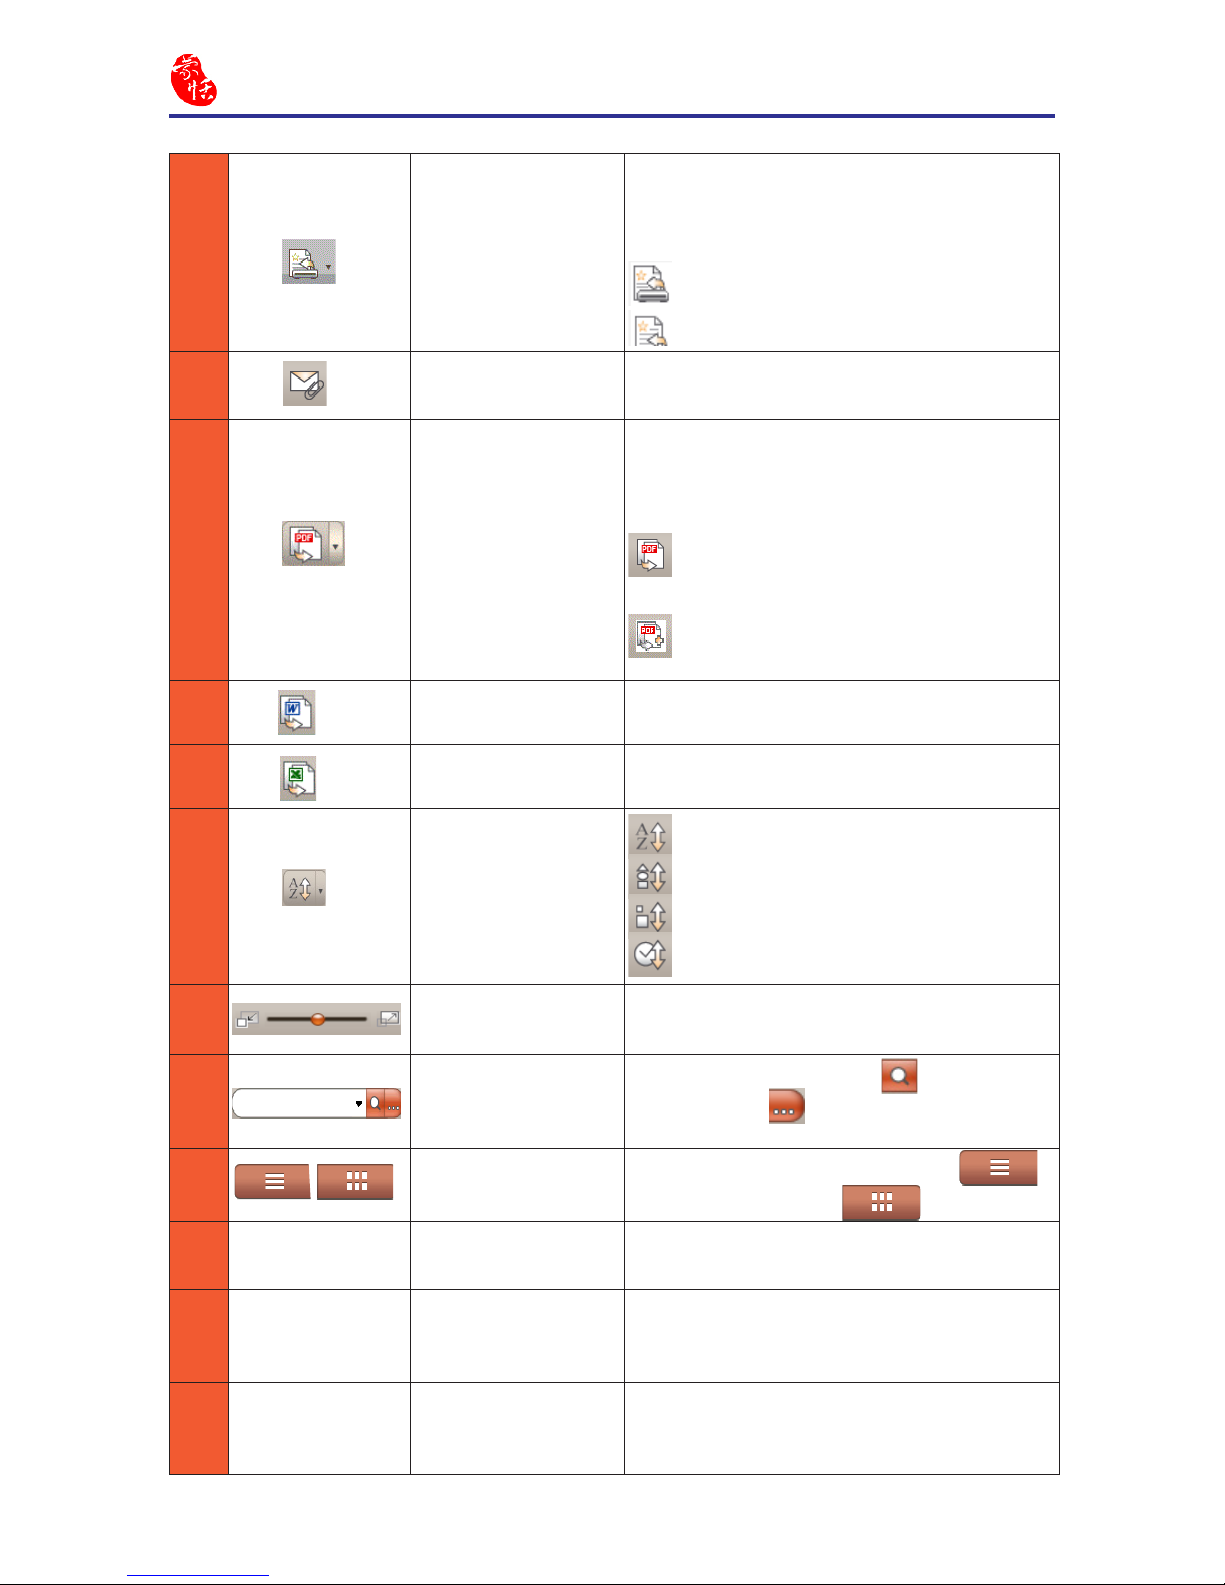
1 Import
Click and hold the arrow to the right of the
button and you can select an option from
the drop-down list.
: Load Scanned Images
: Load Image Files
2 E-mail
Send the selected le(s) as attachment(s) to
your e-mail software.
3
Convert to PDF
Click the arrow on the right of the button
and you can select an option from the
drop-down list.
: Convert each selected item to a PDF
le
: Merge all selected item(s) to a PDF
le
4 Convert to Word Convert a le to Word format
5 Convert to Excel Convert a le to Excel format
6 Sort
: Sort by le name
: Sort by le type
: Sort by le size
: Sort by le creation time
7 Zoom In or Out
Use this slider to magnify or reduce the
view of the thumbnail icons.
8 Search
Type keywords and click to search.
You can click to set advanced search
conditions.
9 Switch View Mode
Switch View Mode as List Mode
or Thumbnails Mode .
10 Thumbnail Icons
Thumbnails Mode displays les as thumbnail icons in adjustable sizes.
11 File List
Files are listed with the le type, le name,
creation date, le size, and the status of
searchability.
12 File Details
You can add or edit annotations by directly
entering texts in this eld. These texts can
be used as search criteria.
Page 21
3-7
Chapter 3 Workspace
3.4 Menu
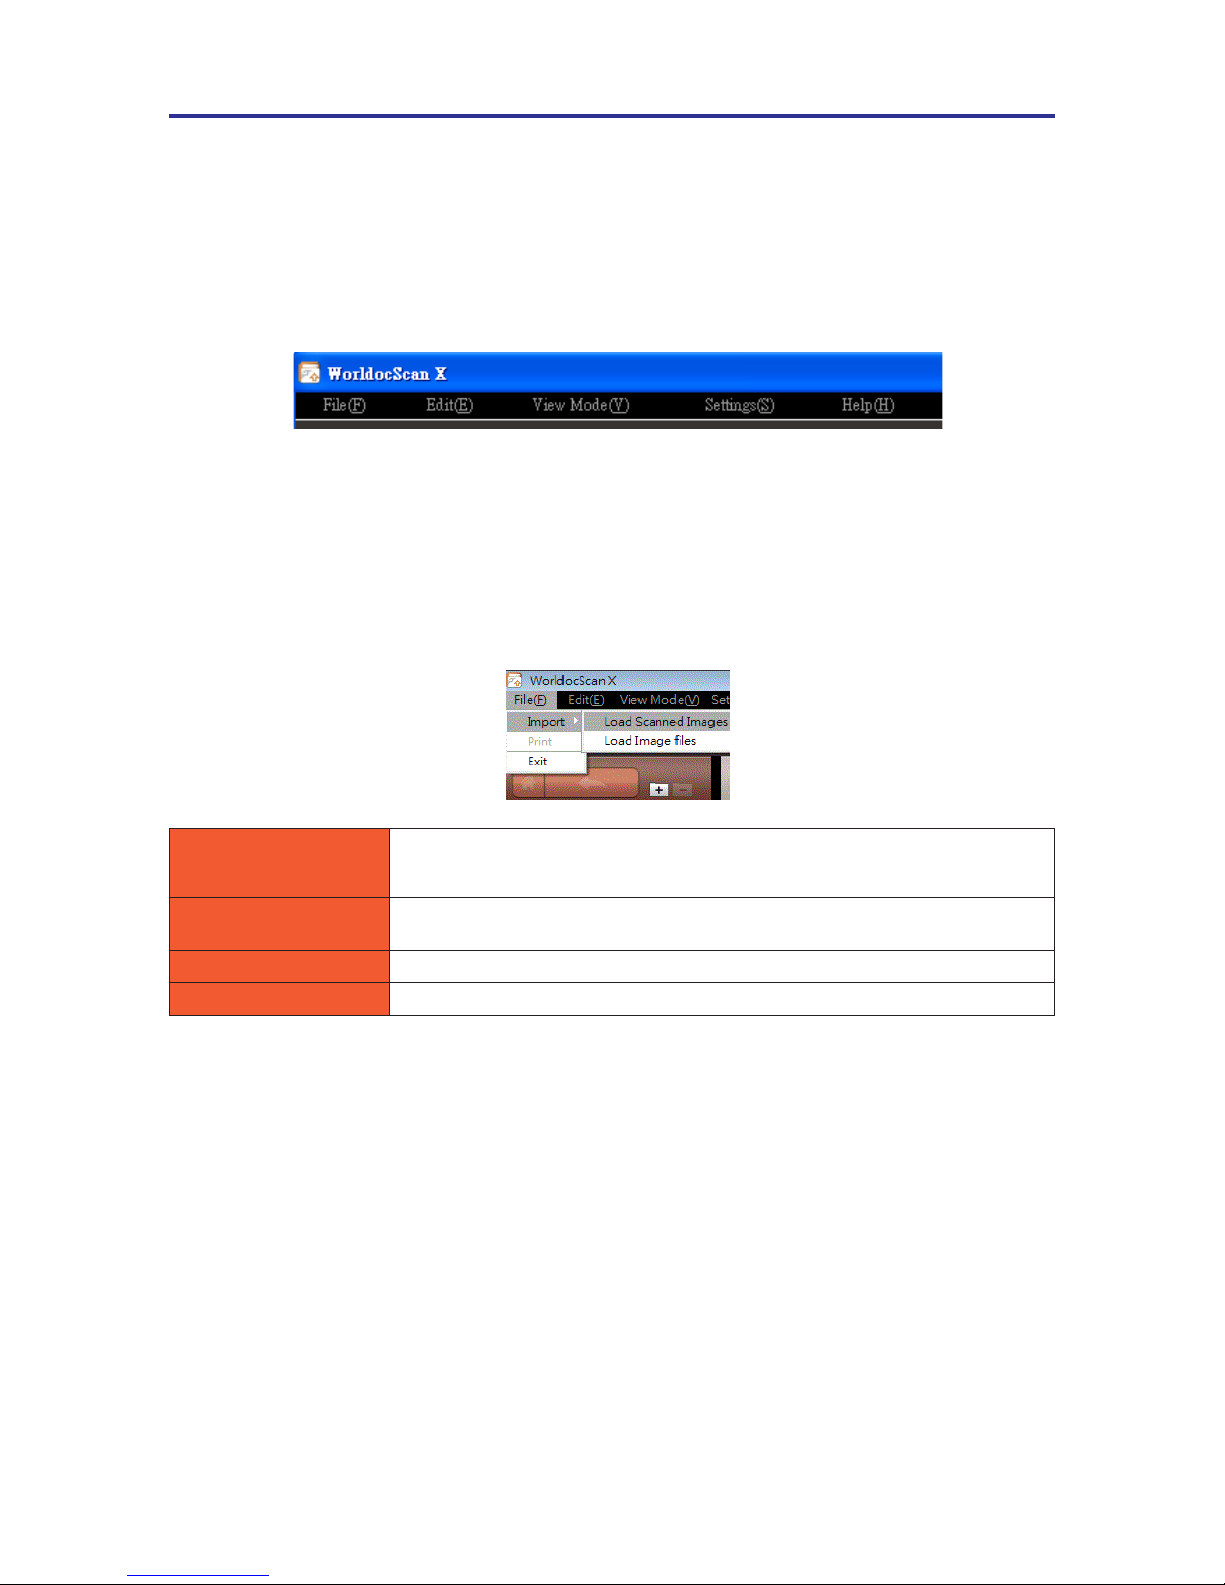
There are ve main menus, appearing at the top of the screen: [File], [Edit], [View
Mode], [Settings], and [Help].
Add les into WorldocScan X in two ways: Load Scanned Images and Load Image Files.
8
File
Load Scanned
Images
Load images in the scanner to WorldocScan X.
Load Image Files Load images in hard drives to WorldocScan X.
Print Print the selected le.
Exit Close WorldocScan X.
Page 22
3-8
WorldocScan X
3-9
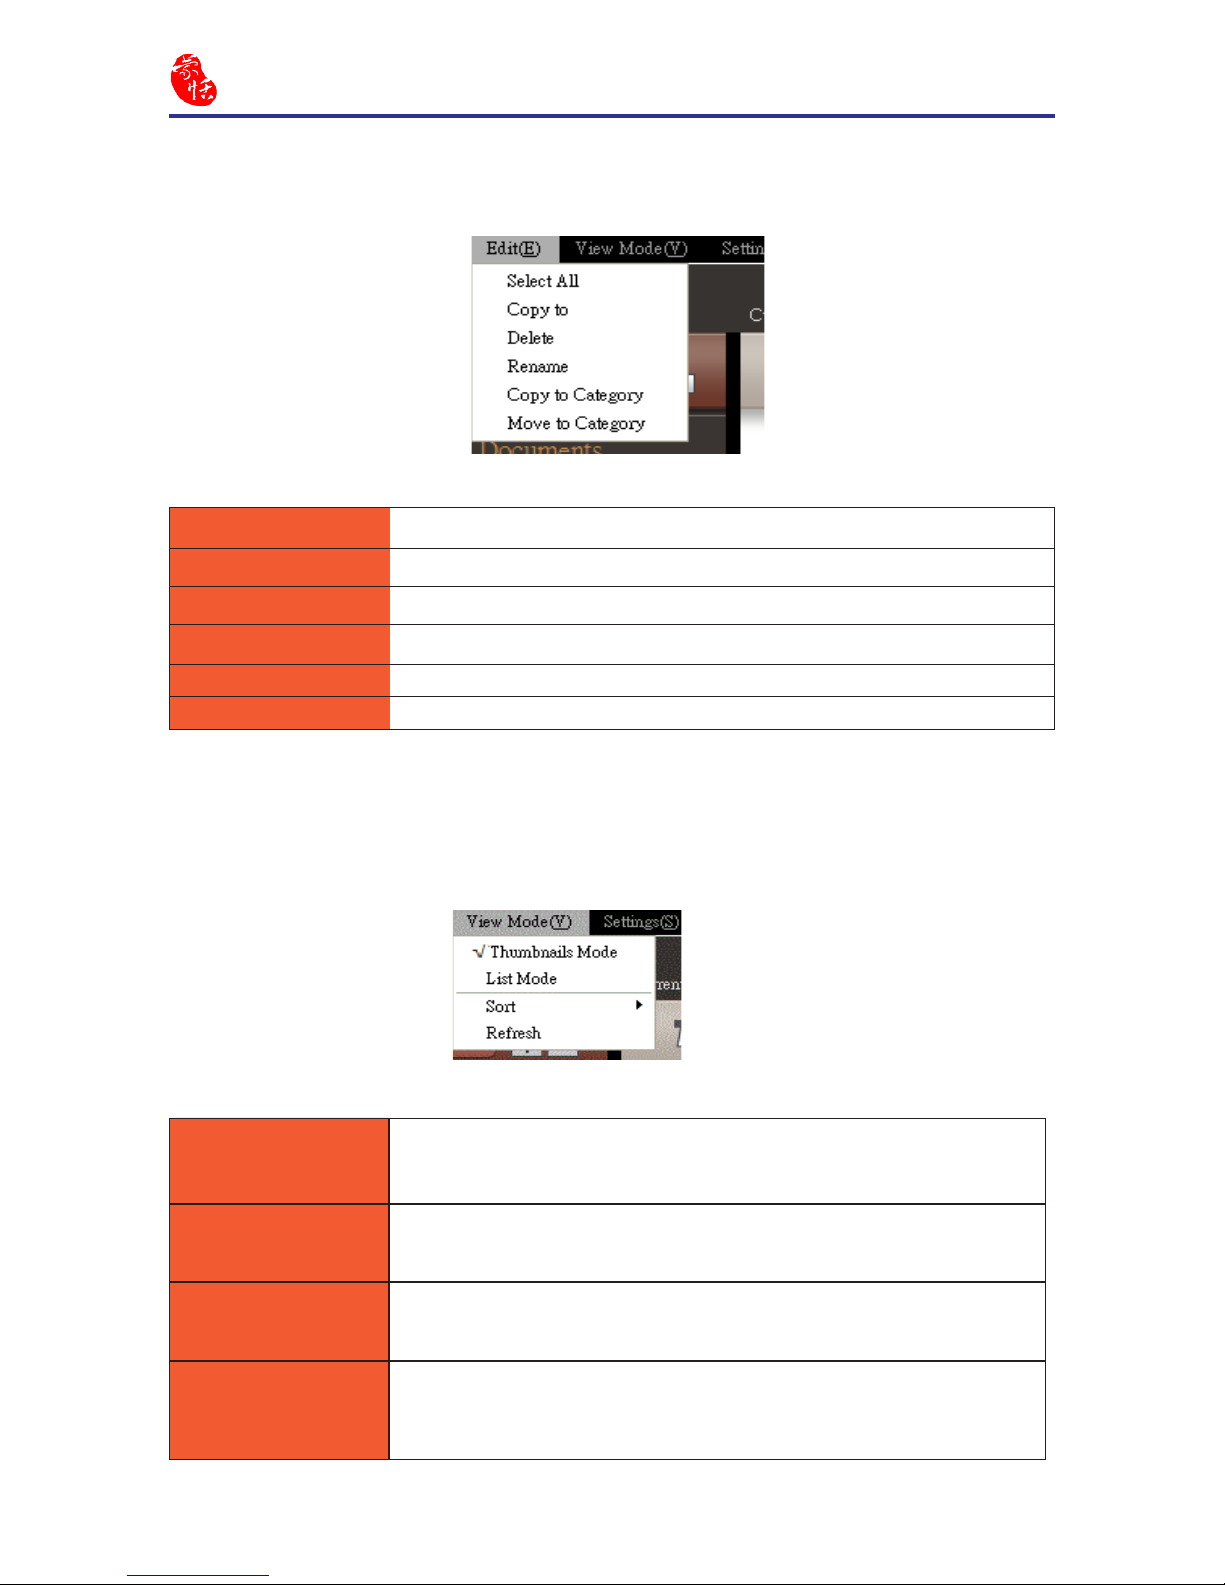
8
Edit
Select All Select all documents in the current targeted category.
Copy to Copy documents to the selected folder.
Delete Delete the selected le(s).
Rename Rename the selected le.
Copy to Category Copy the selected les to another category.
Move to Category Move the selected les to another category.
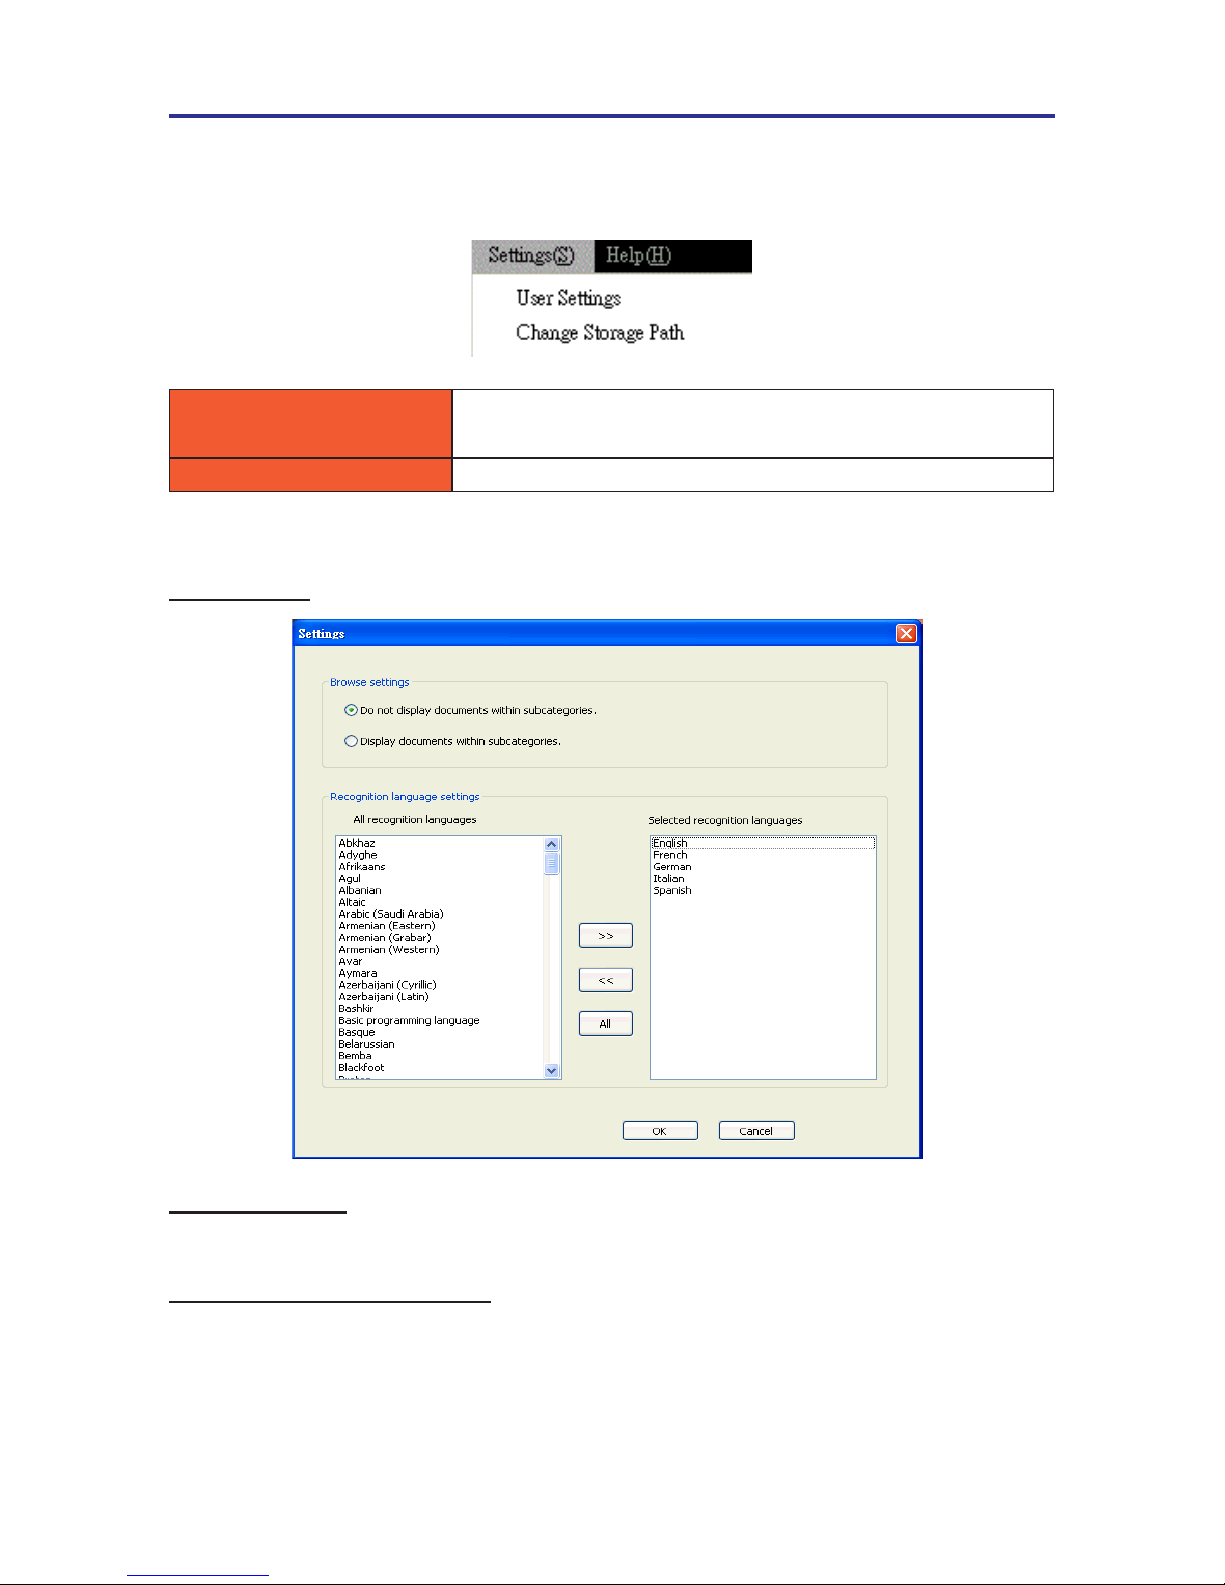
8
View Mode
Thumbnails Mode Choose Thumbnails Mode as the view mode according to your
preference.
List Mode Choose List Mode as the view mode according to your prefer-
ence.
Sort You can sort your les according to the le name, le size, le
type, and le creation date.
Refresh Once you make changes to the WorldocScan X les or categories
outside of the WorldocScan X application, you will need to click
[Refresh] or click [F5] to refresh.
Page 23
3-9
Chapter 3 Workspace
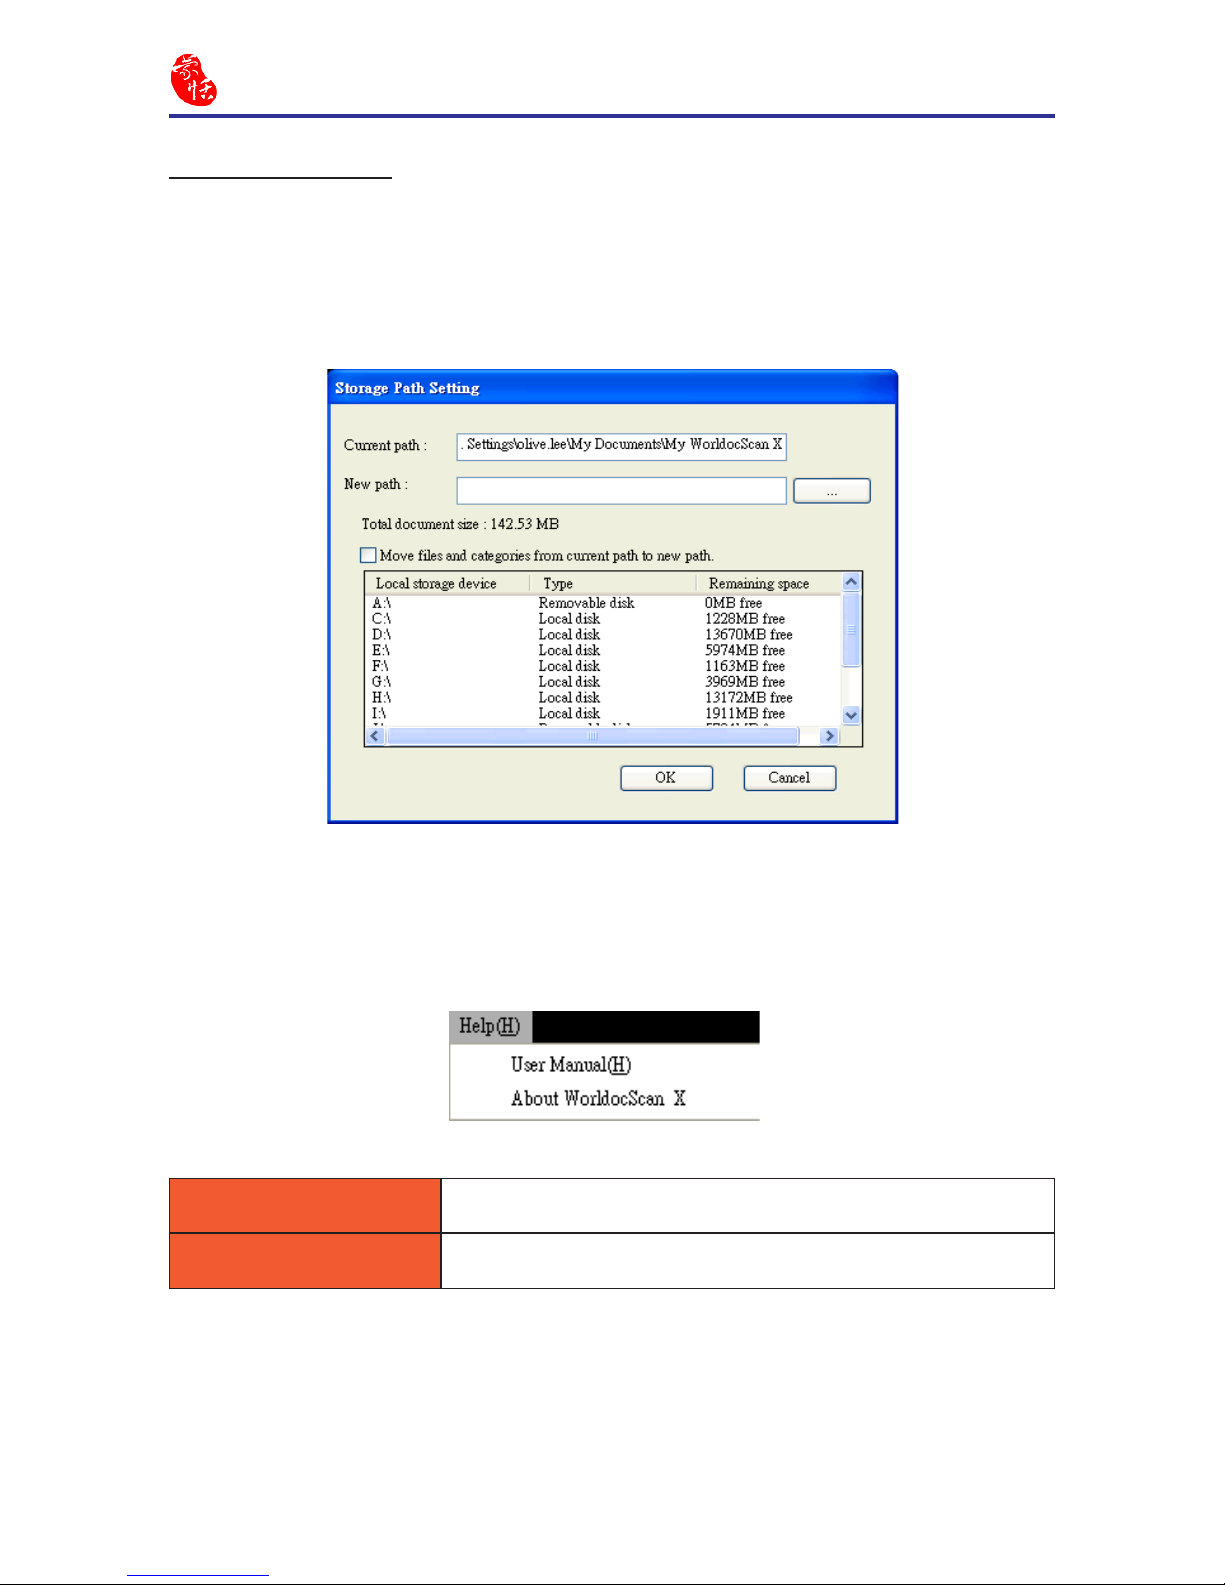
8
Settings
User Settings Click [User Settings] to change preferences of [Browse
settings] and [Recognition languages settings].
Change Storage Path Change the le storage path of WorldocScan X.
User settings
Browse settings:
Choose to display les within subcategories or not.
Recognition languages settings
WorldocScan X provides around 190 recognition languages. You can pick the languages you will frequently use from the [All recognition languages] column to [Select
recognition languages] column. The settings here will apply to the language menu in the
settings of the Convert to PDF, Word, and Excel.
Page 24
3-10
WorldocScan X
Storage Path Setting
WorldocScan X uses the path [My Documents\My WorldocScan X] as the le
storage path where all les and categories managed by WorldocScan X are located. The
le storage path can be changed if necessary. For more instructions, please refer the §5.8
Change Storage Path.
8
Help
User Manual Click User Manual to refer to the in-product Help.
About WorldocScan X See more information about WorldocScan X.
Page 25
4-1
Chapter 4 Add Files to WorldocScan X
Chapter 4 Add Files to WorldocScan X
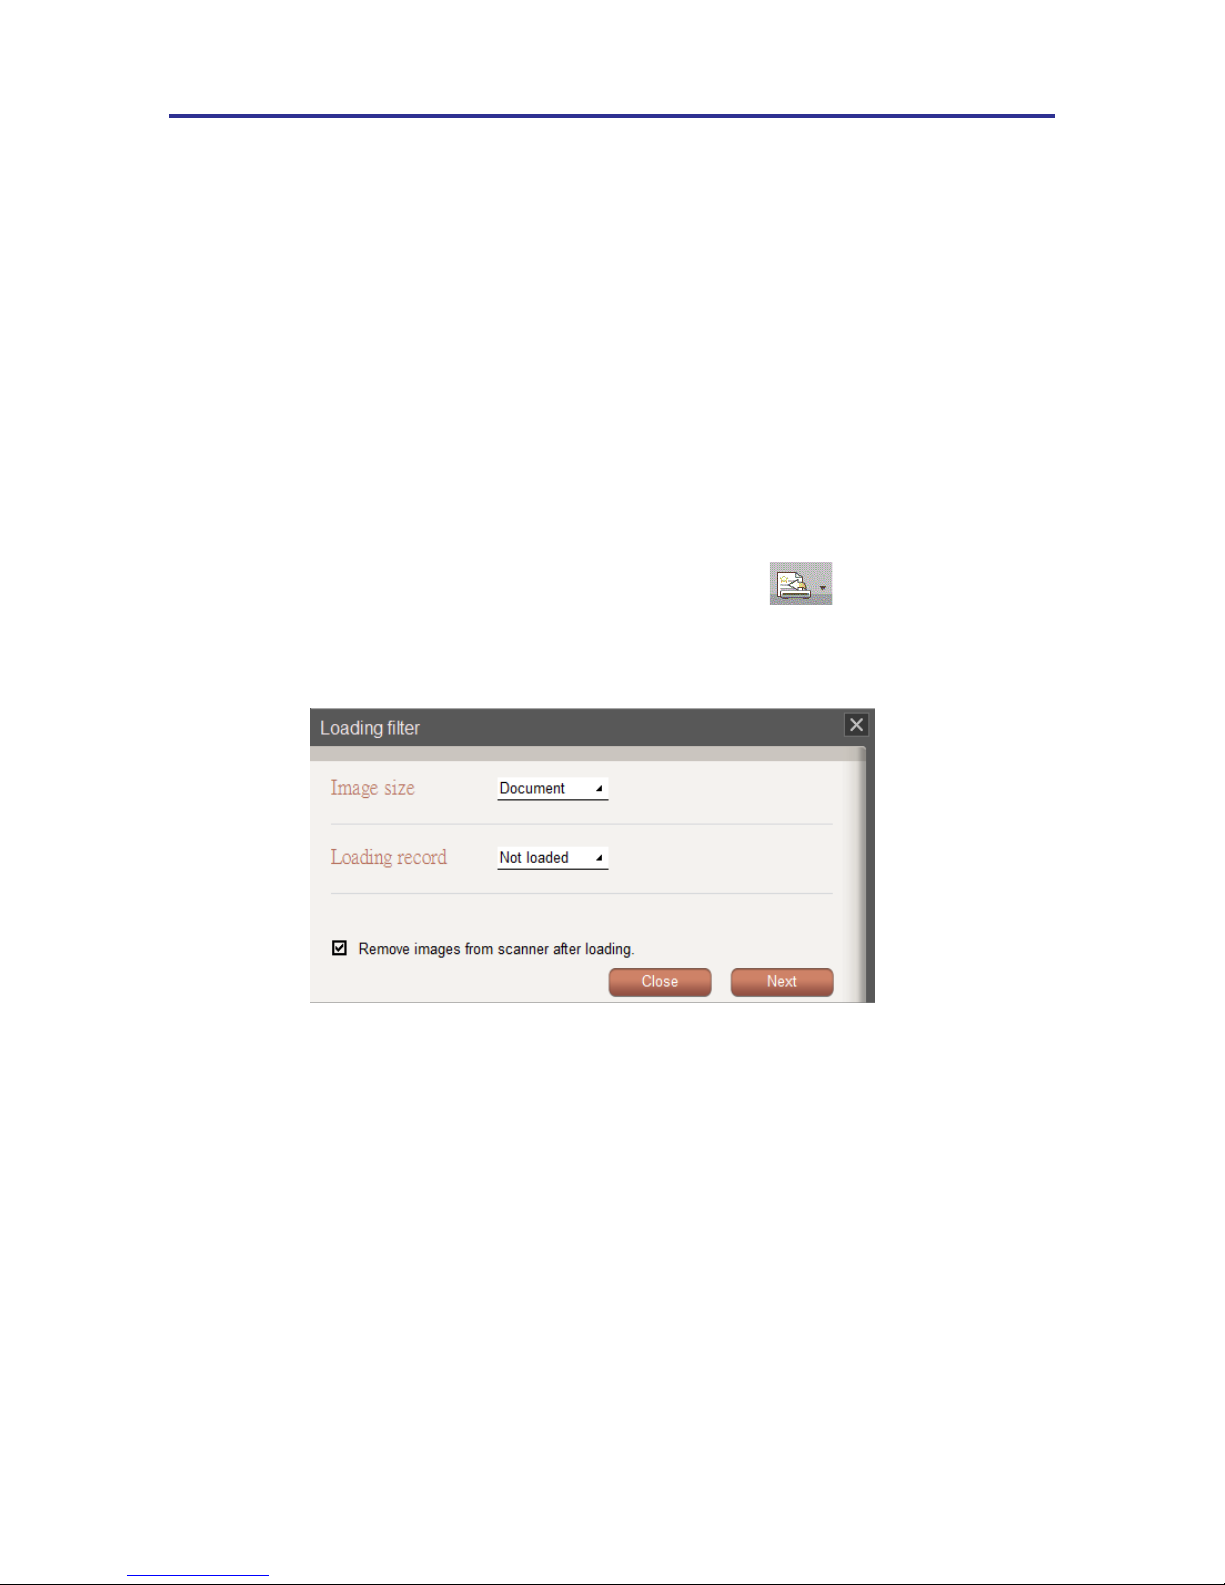
Step1. select [File/Import/Load Scanned Images] or click from the toolbar.
You can view, edit, and manage les in WorldocScan X. There are two ways to add
les into WorldocScan X.
• Scan pages, photos, business cards, and the like and then import them.
• Import JPEG, BMP, TIFF, TIF or PDF les.
4.1 Load Scanned Images
Please follow the steps below to load scans from your WorldocScan Pro sanner.
Step2.
In this dialog box, you can sift which les you want to import.
"Document" means all les except business card.
"All" means all les including business card.
8
Image size
"Not Loaded" means those les which have never been imported to WorldocScan X.
"Loaded" means those les which have been imported to WorldocScan X.
"All" means all les including “Not Loaded” and “Loaded” les.
8
Loading record
Check this item to remove images from scanner after importing them.
8
Remove images from scanner after loading
Page 26
4-2
WorldocScan X
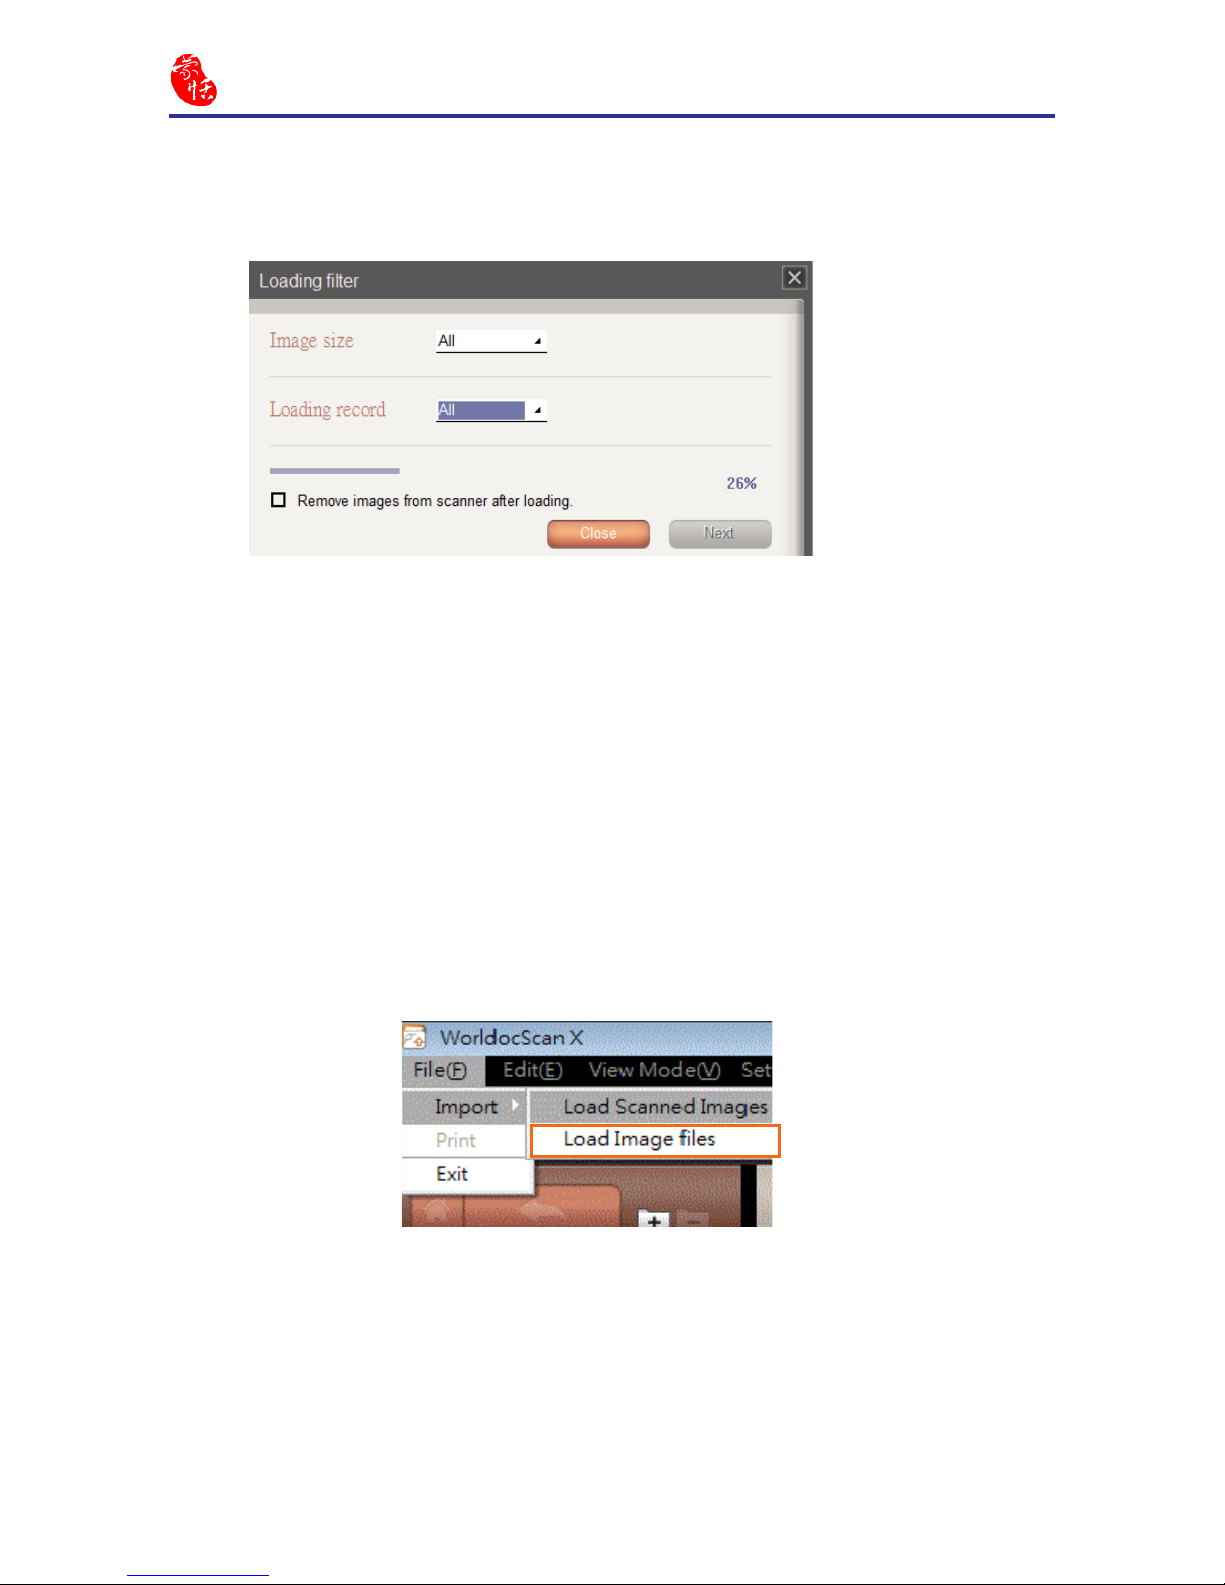
Directly import PDF, BMP, JPG, or TIFF le into WorldocScan X.
4.2 Load Image Files
Step2. Choose the le that you wish to import into WorldocScan X. The les will be
imported into WorldocScan X immediately. You can assign these les into any
category, rename these les, or so on.
Step1. Go to the [File] menu and choose [Import/Lad Image Files].
Step3. Click [Next] and wait util the importing is completed.
Page 27
5-1
Chapter 5 View and Edit Files
5.1 Convert Each File to PDF Format
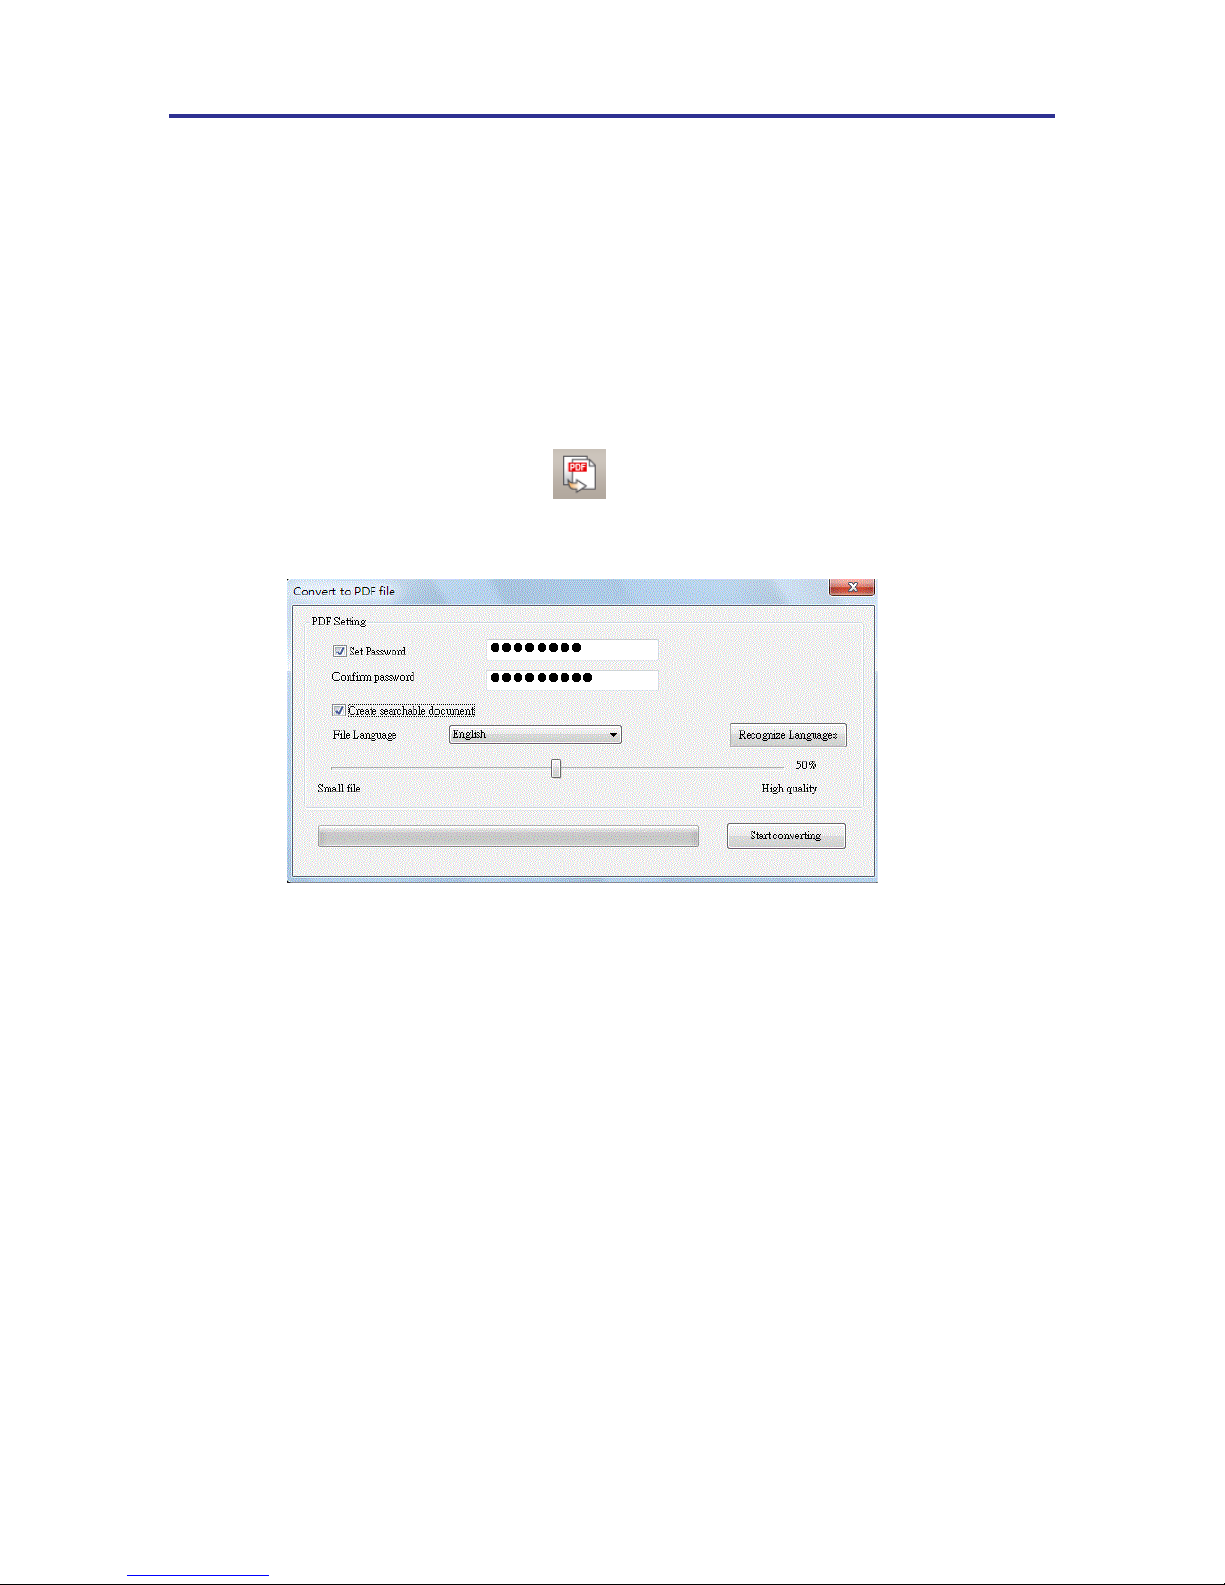
1. Tap one or more les and then click in the toolbar.
2. In this dialog box, you can set the properties of PDF le(s).
Chapter 5 View and Manage Files
WorldocScan X offers the best solution for document management. Not just convert
documents or les into searchable PDF documents, but also allow smart keyword search
through which you can nd documents using keywords.
Check this item and then input your own password. The PDF le will not be opened
without the correct password.
8
Set Password
8
Create searchable document
8
Quality
You shuould select a recognition language while checking this option. Then you
can nd those PDF les with this option by using smart keywords search function of
WorldocScan X. Please refer to Chapter 6.1.2
for more detailed explanation about
search function.
To adjust the PDF document quality by moving the sliding bar.
Tips: To add more recognition languages, please run [Settings/User Settings].
Tips: You can remove the password of a protected PDF le by unchecking
this item in Convert to PDF File feature.
Page 28
5-2
WorldocScan X
5-3
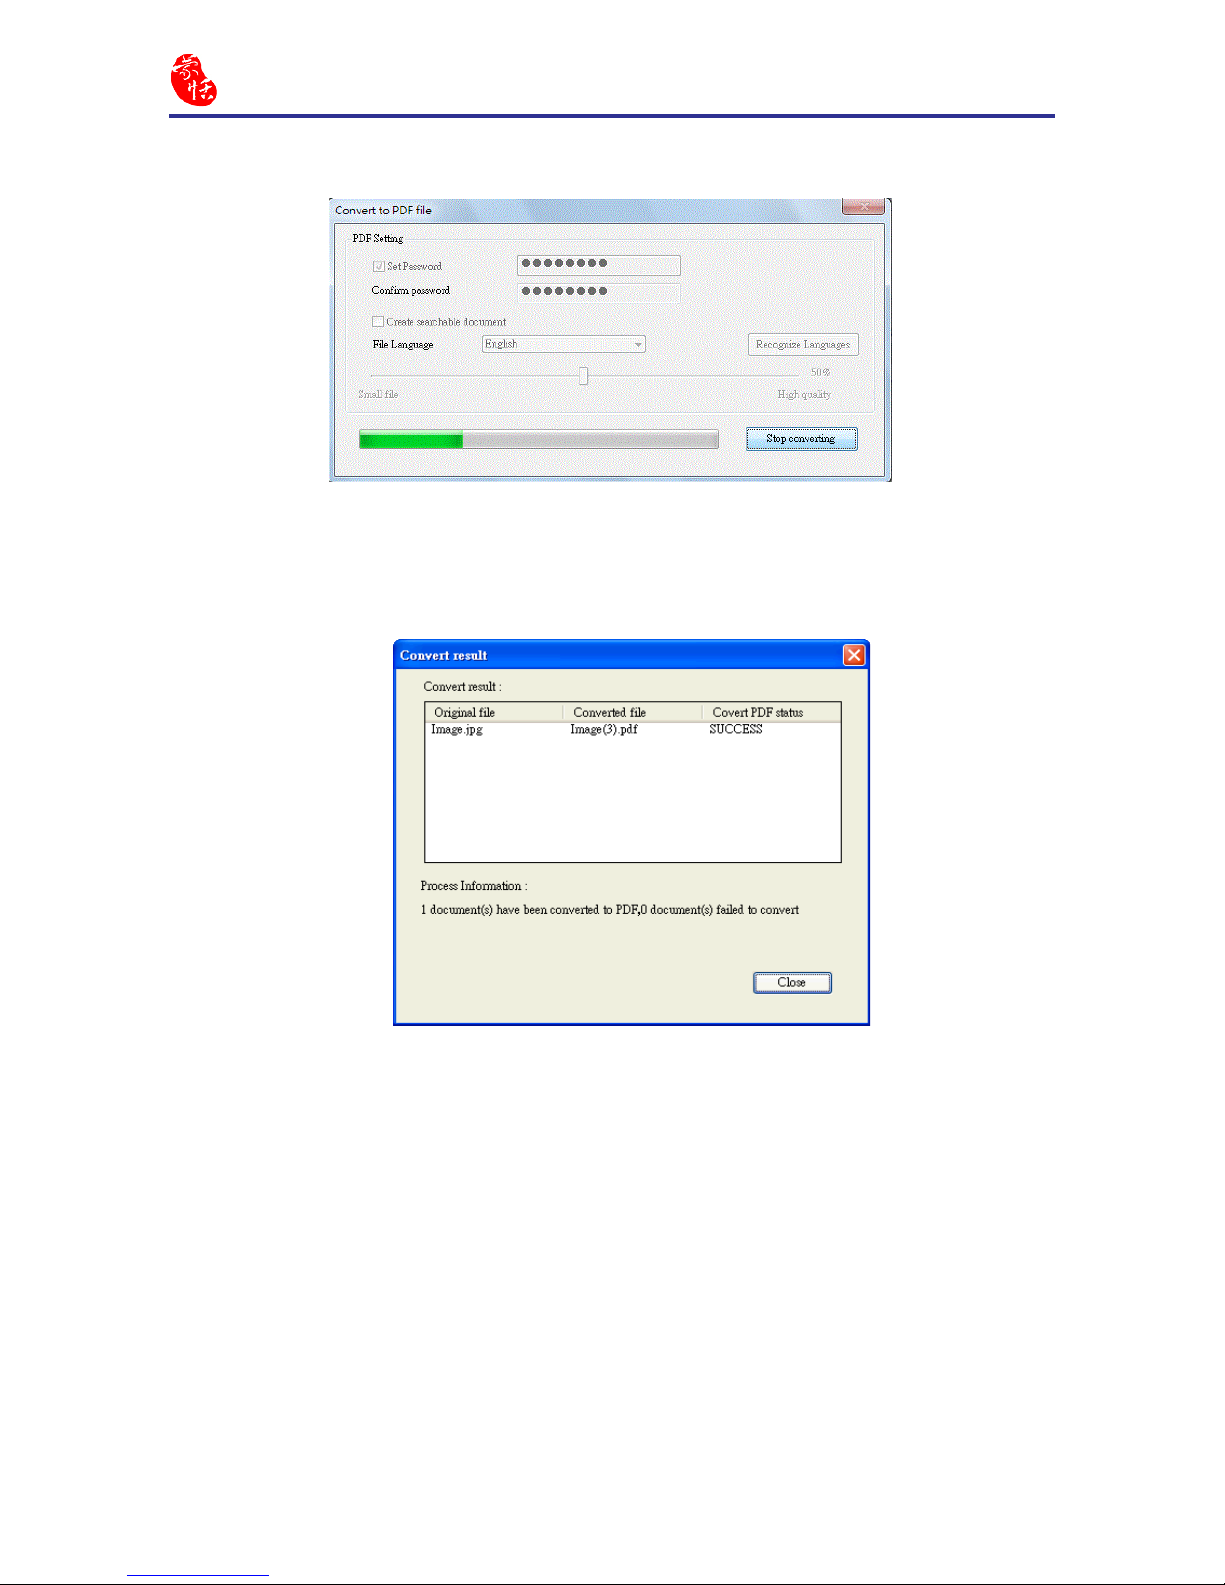
4. After the conversion is completed, you can check the conversion details and then click
[Close].
3. Click [Start Converting].
Page 29
5-3
Chapter 5 View and Edit Files
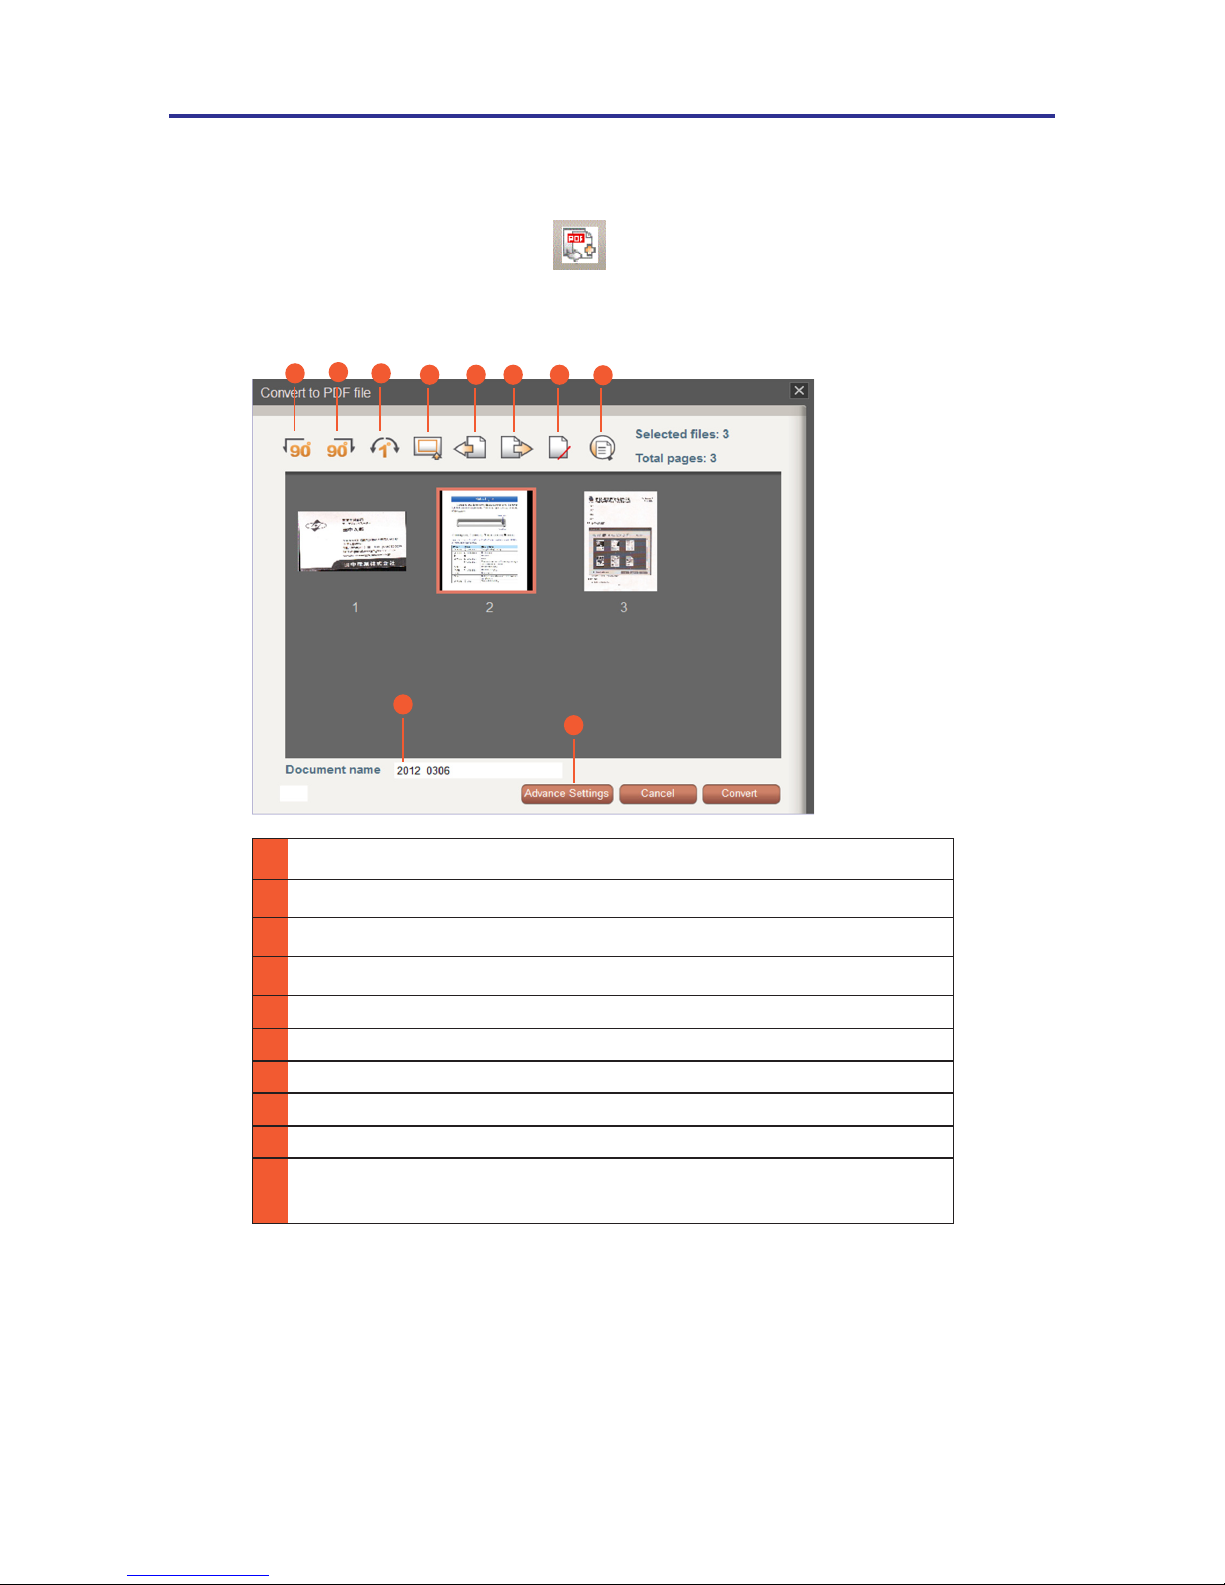
5.2 Merge Files to A PDF File
1. Tap one or more les and then click in the toolbar.
2. In the dialog screen, you can set the properties of PDF le.
1
2 3
4
5 6 7 8
9
1 Rotate the selected page counterclockwise 90 degrees.
2 Rotate the selected page clockwise 90 degrees.
3 Open the Deskewing screen.
4 Open the Boundary Adjustment screen.
5 Move the selected page forward.
6 Move the selected page forward Backward.
7 Delete the selected page.
8 Display the selected page.
9 The name of this merged le.
10 Set the properties of this merged le. Please refer to Chapter 5.1
for more detailed explanation.
10
Page 30
5-4
WorldocScan X
5-5
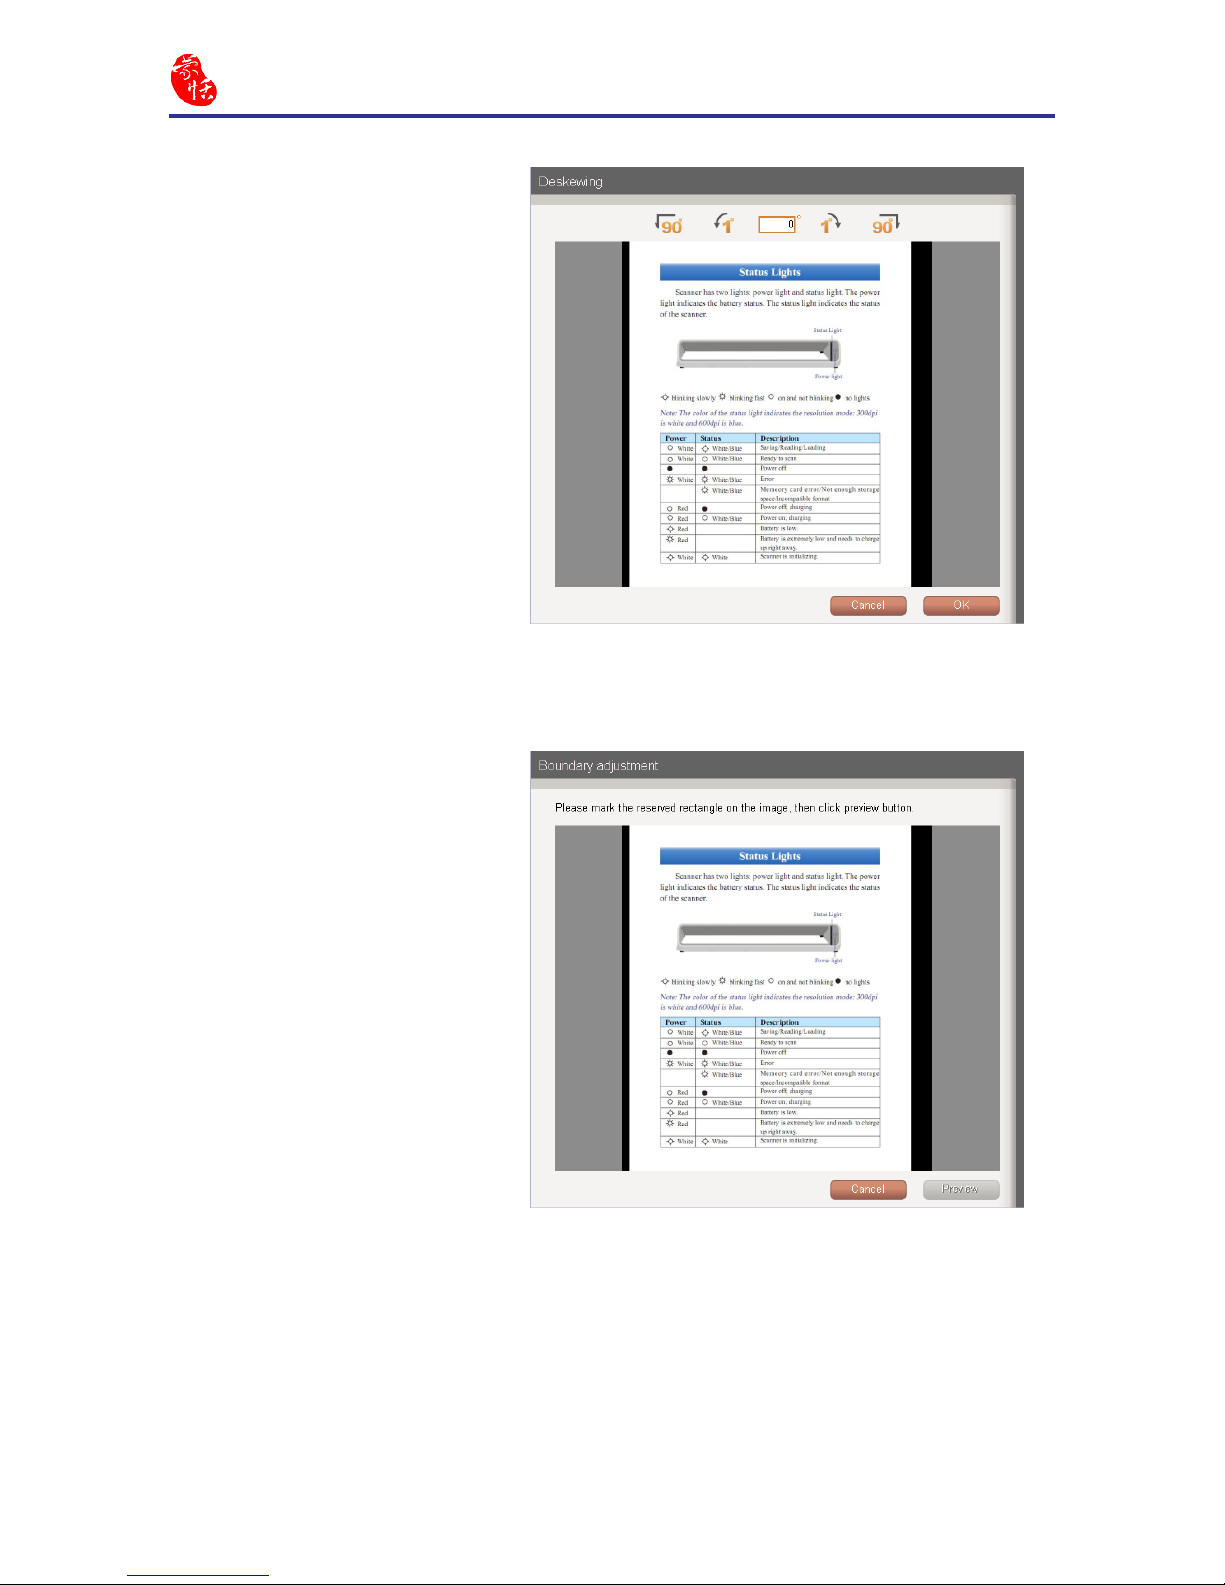
You can deskew the picture
at here. The base unit is one
degree. You can also input a
digital number from -179 to
180. Click OK to conrm your
modication.
8
Deskewing
You can crop the image
manually with this feature.
8
Boundary Adjustment
Page 31
5-5
Chapter 5 View and Edit Files
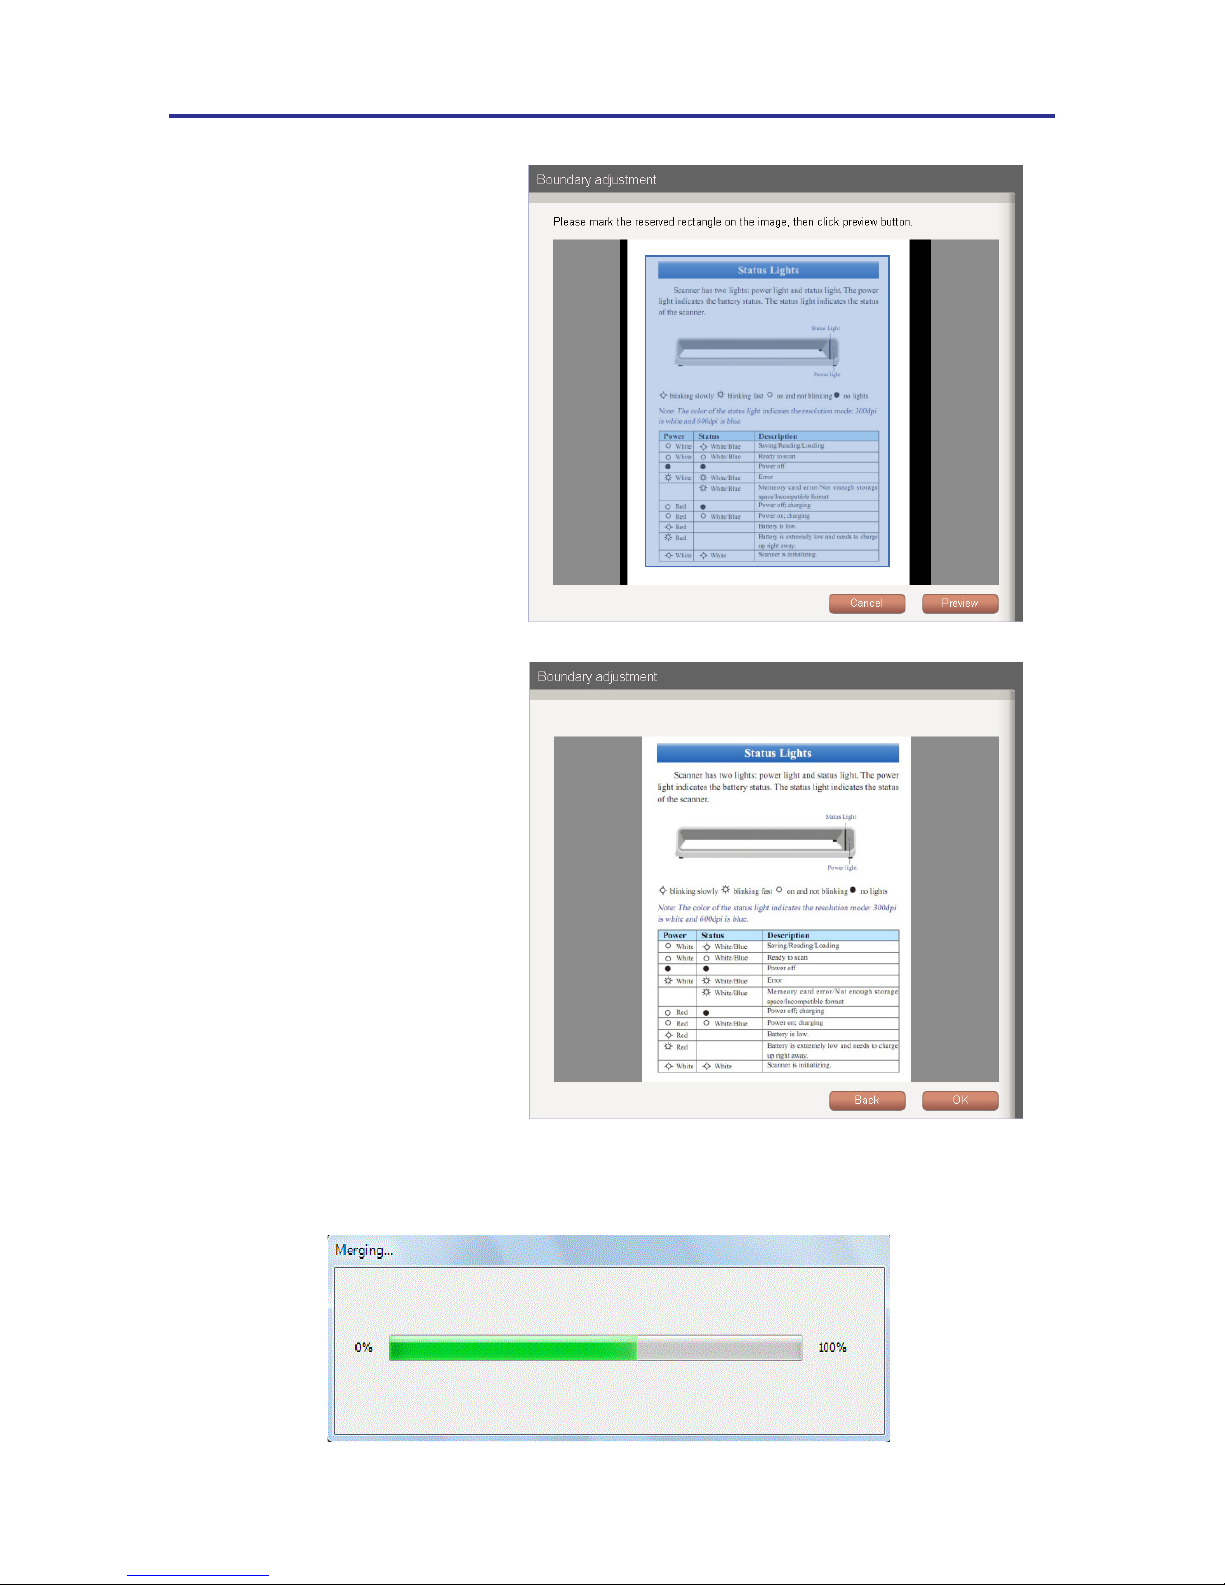
Step 1. Drag the mouse to
mark the reserved rectangle on
the image, then click Preview.
Step 2. At this previewed
image, click OK to conrm
your modication or Cancel to
redo it.
3. Click [Convert] in the right button.
Page 32
5-6
WorldocScan X
5-7
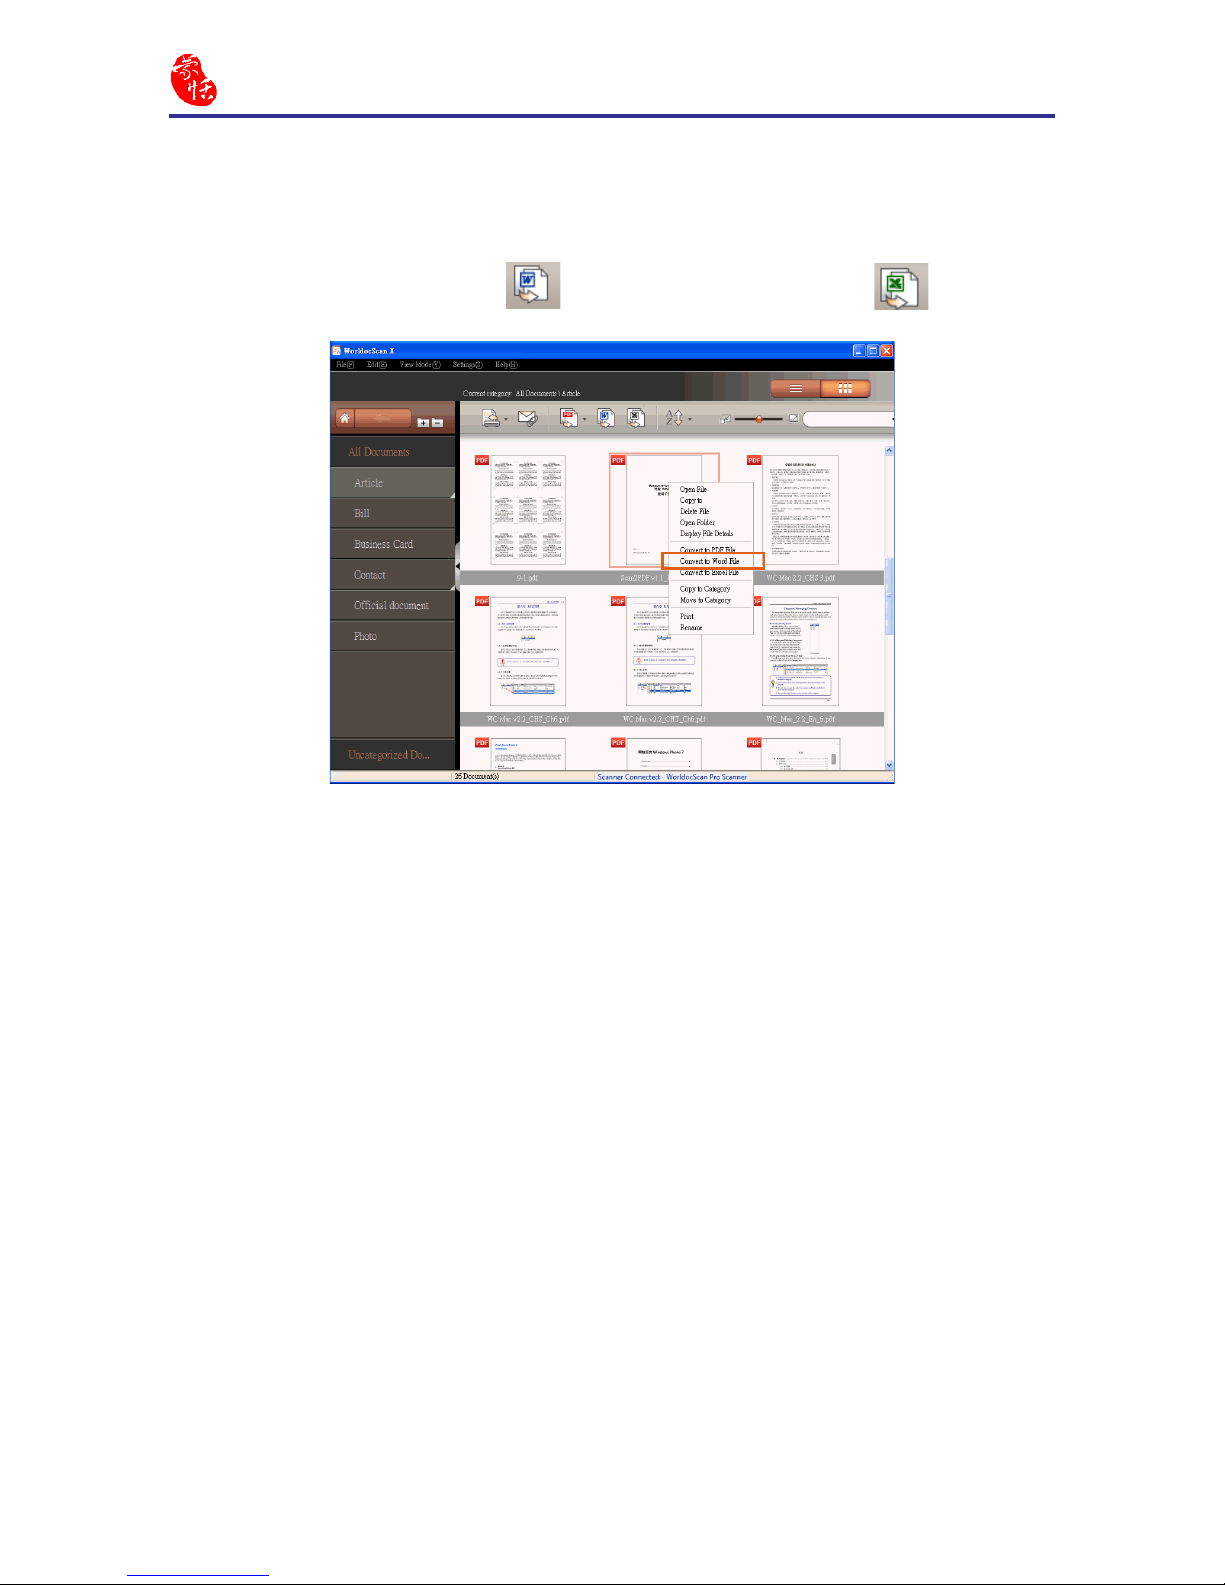
5.3 Convert to Word\Excel Files
2. Select the le storage location for the le that you are converting.
1.Right-click a le and select [Convert to Word File] or [Convert to Excel File] in the
menu. You can also click the (Convert to Word) button or (Convert to
Excel) button on the toolbar. Take Covert to Word File for example.
Tips:
1.
You can select the recognition language
of the document from the langauge menu.
2. Check the [Open Document After] option if you want to open the le immediately after
conversion.
3. After the conversion is completed, if the [Open Document After] option is checked,
you can view and edit your converted le immediately.
Page 33
5-7
Chapter 5 View and Edit Files
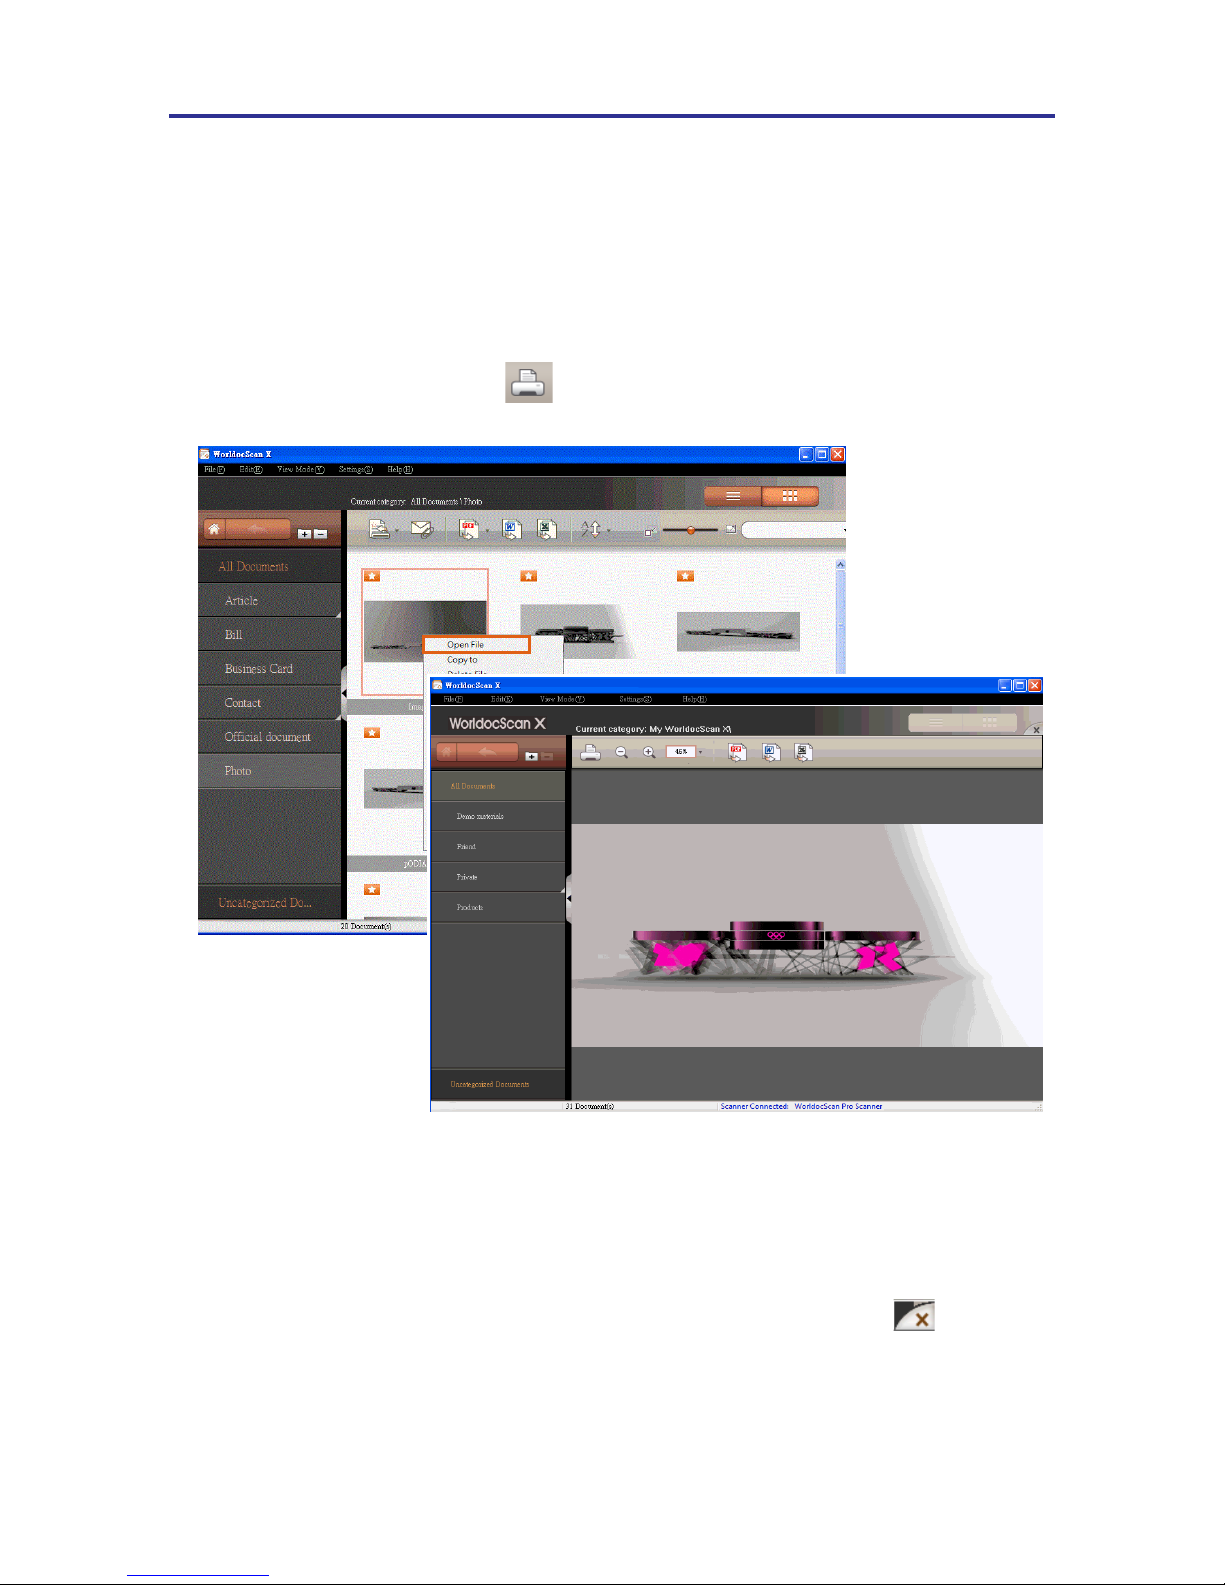
5.4 View Files
To view a le in the WorldocScan X application, please:
1. Select a le in the Files pane.
2. Double-click this le or right-click on it and select [Open File] to open this le.
3. You can click the print button in the toolbar to print out this le.
Note: If you are using Adobe Reader X, the toolbar is hidden by default. If you want
to show the toolbar, please right-click the document and then choose Page Display
Preferences from the context menu. In the left-hand column of the Preferences dialog,
please select Documents. Then deselect Allow documents to hide the menu bar, tool
bars, and window controls. You can hide the toolbar by enabling this option.
4. If you want to close the PDF reader or the image viewer, please click .
Page 34
5-8
WorldocScan X
5-9
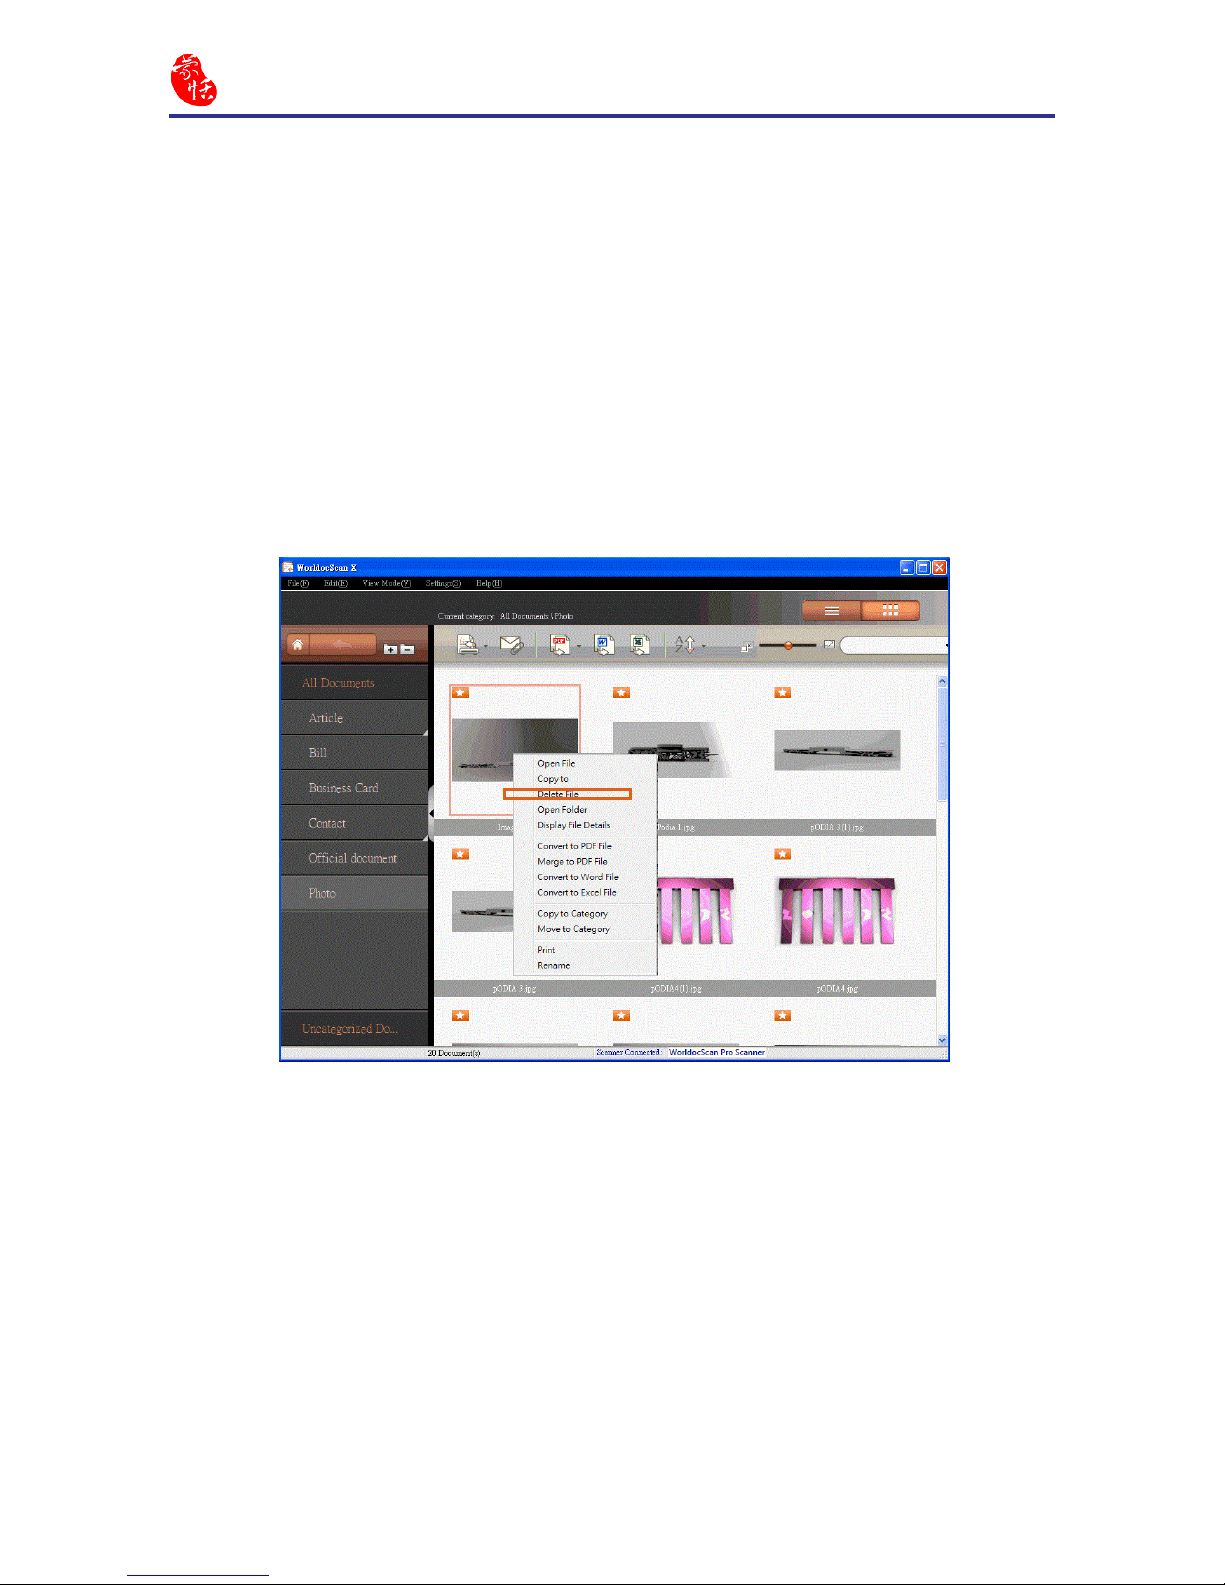
5.5 Delete Files
1. Select the les that you want to delete.
Tip: To delete all les in the target category, please right-click an empty area in the
browse window and choose [Select All] from the context menu or go to the [Edit]
menu and choose [Select All].
2. Right click this le and select [Delete File], or select [Edit\Delete] to delete the selected les.
Tip: If you delete categories or les outside of WorldocScan X, when you return to
WorldocScan X, please press the F5 key or click [View Mode\Refresh]. You will see the
deletion in WorldocScan X.
Page 35
5-9
Chapter 5 View and Edit Files
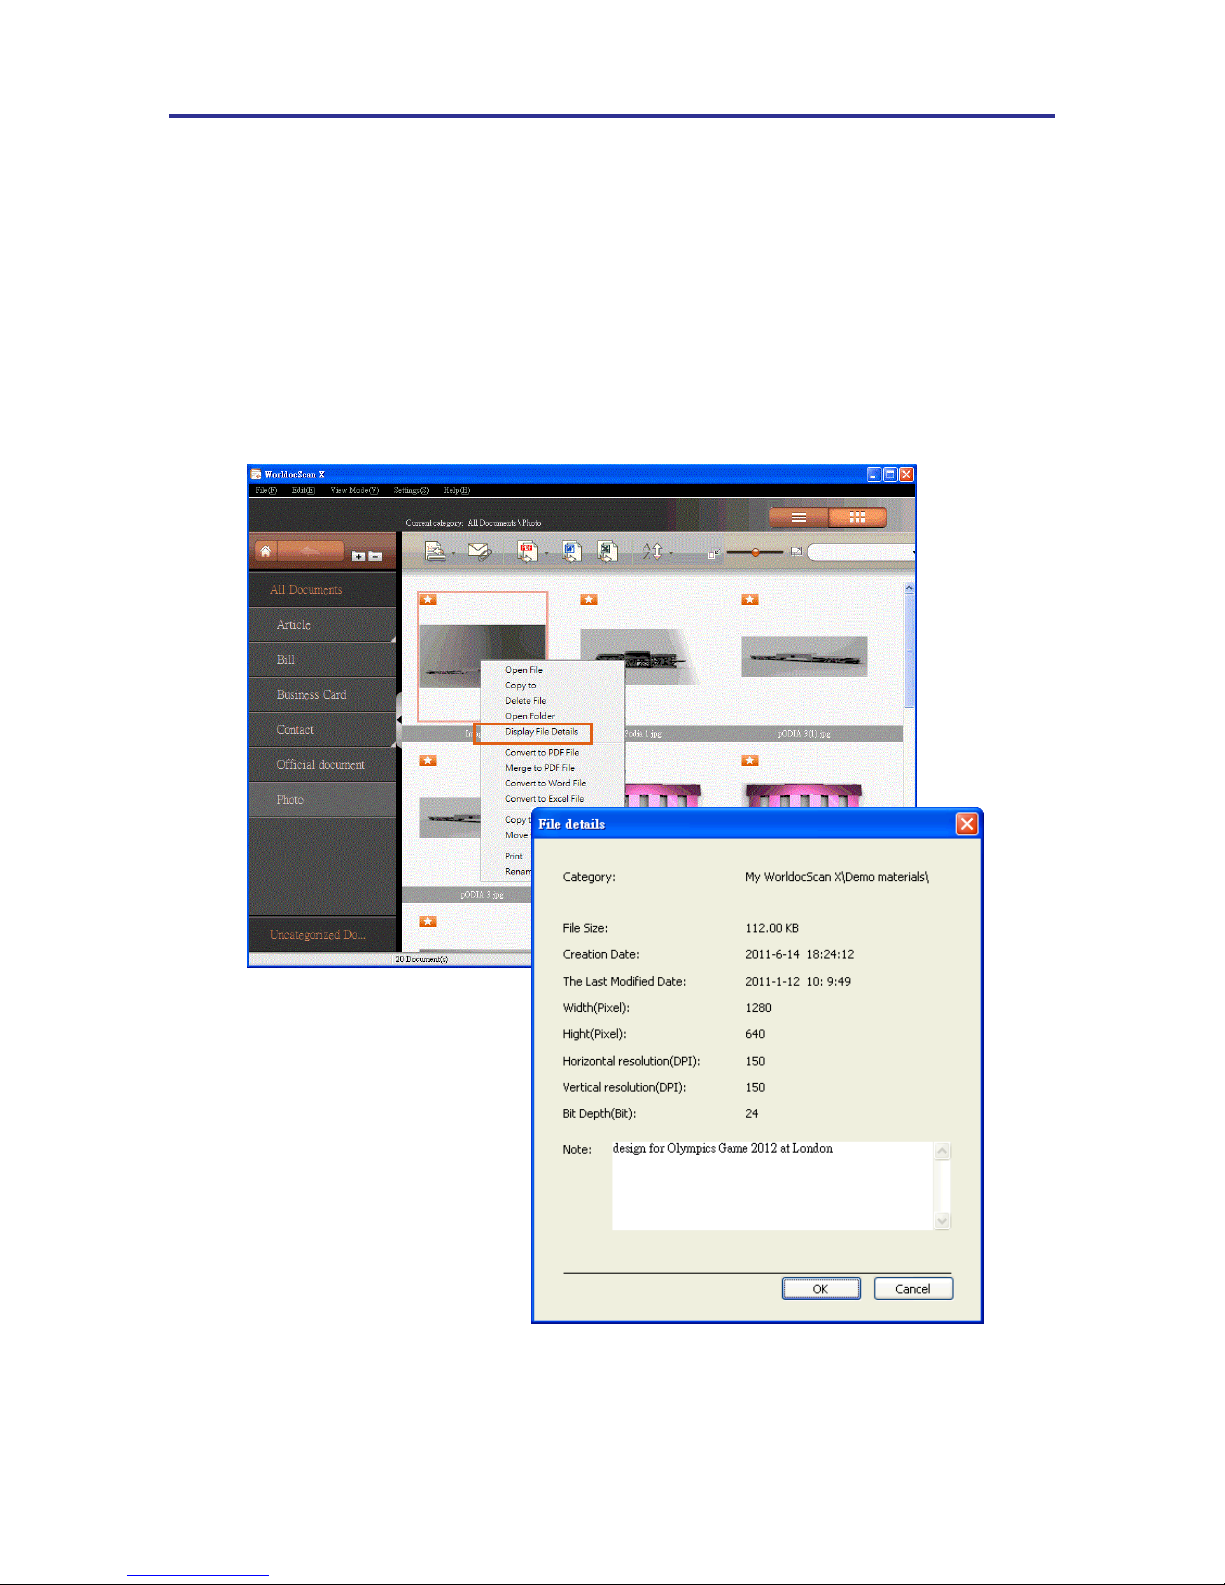
5.6 View File Details
1. Right-click a le.
2. Select [Display File Details] in the menu.
3. You can view additional file information, including note annotations, file size, file
page, creation date, and so on.
Tip: You can edit the note annotations by directly typing your note in this eld.
Page 36
5-10
WorldocScan X
5-11
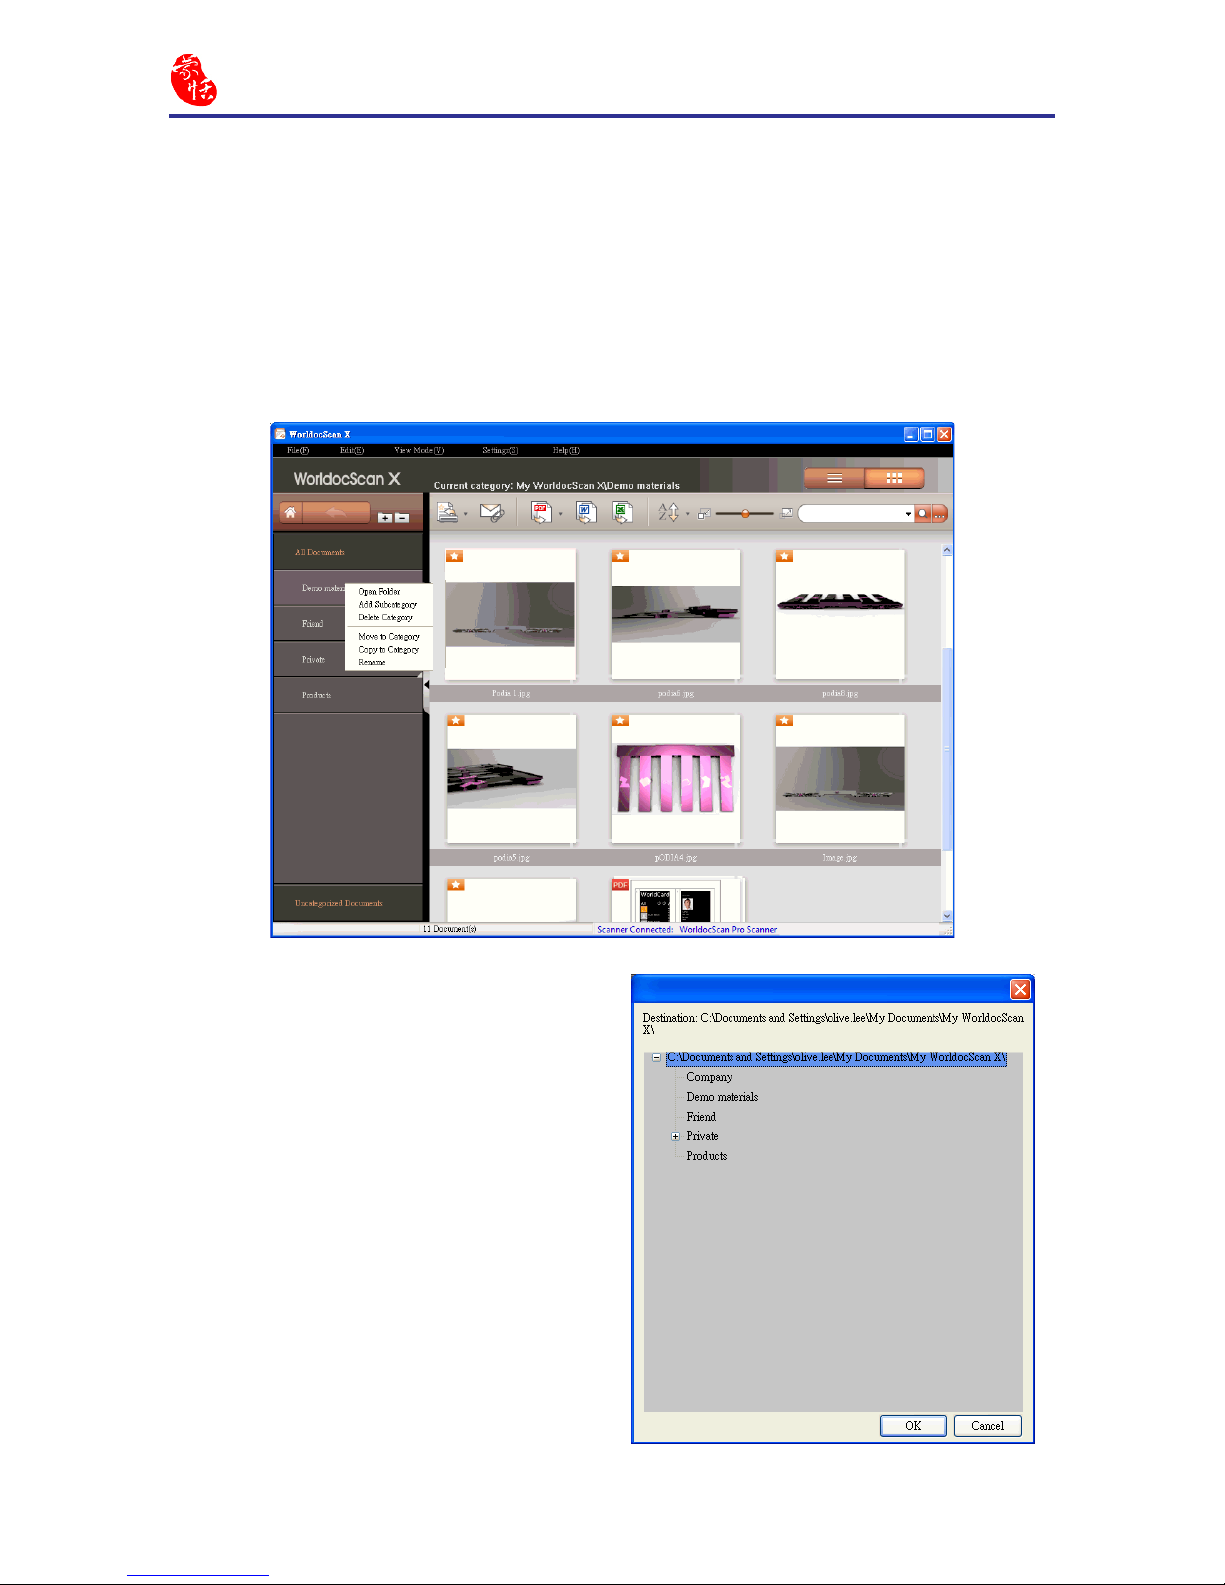
5.7 Copy or Move to Category
2. For destination, choose where you want
to copy or move the les. Click [OK].
Once the copying or moving process
is completed, you will see all the files
under the source category are moved or
copied to the destination category.
You can use the Categories pane to move or copy the current category and all les
under it to another category.
1. Right-click a category and select [Move to Category] or [Copy to Category].
Page 37
5-11
Chapter 5 View and Edit Files
5.8 Change Storage Path
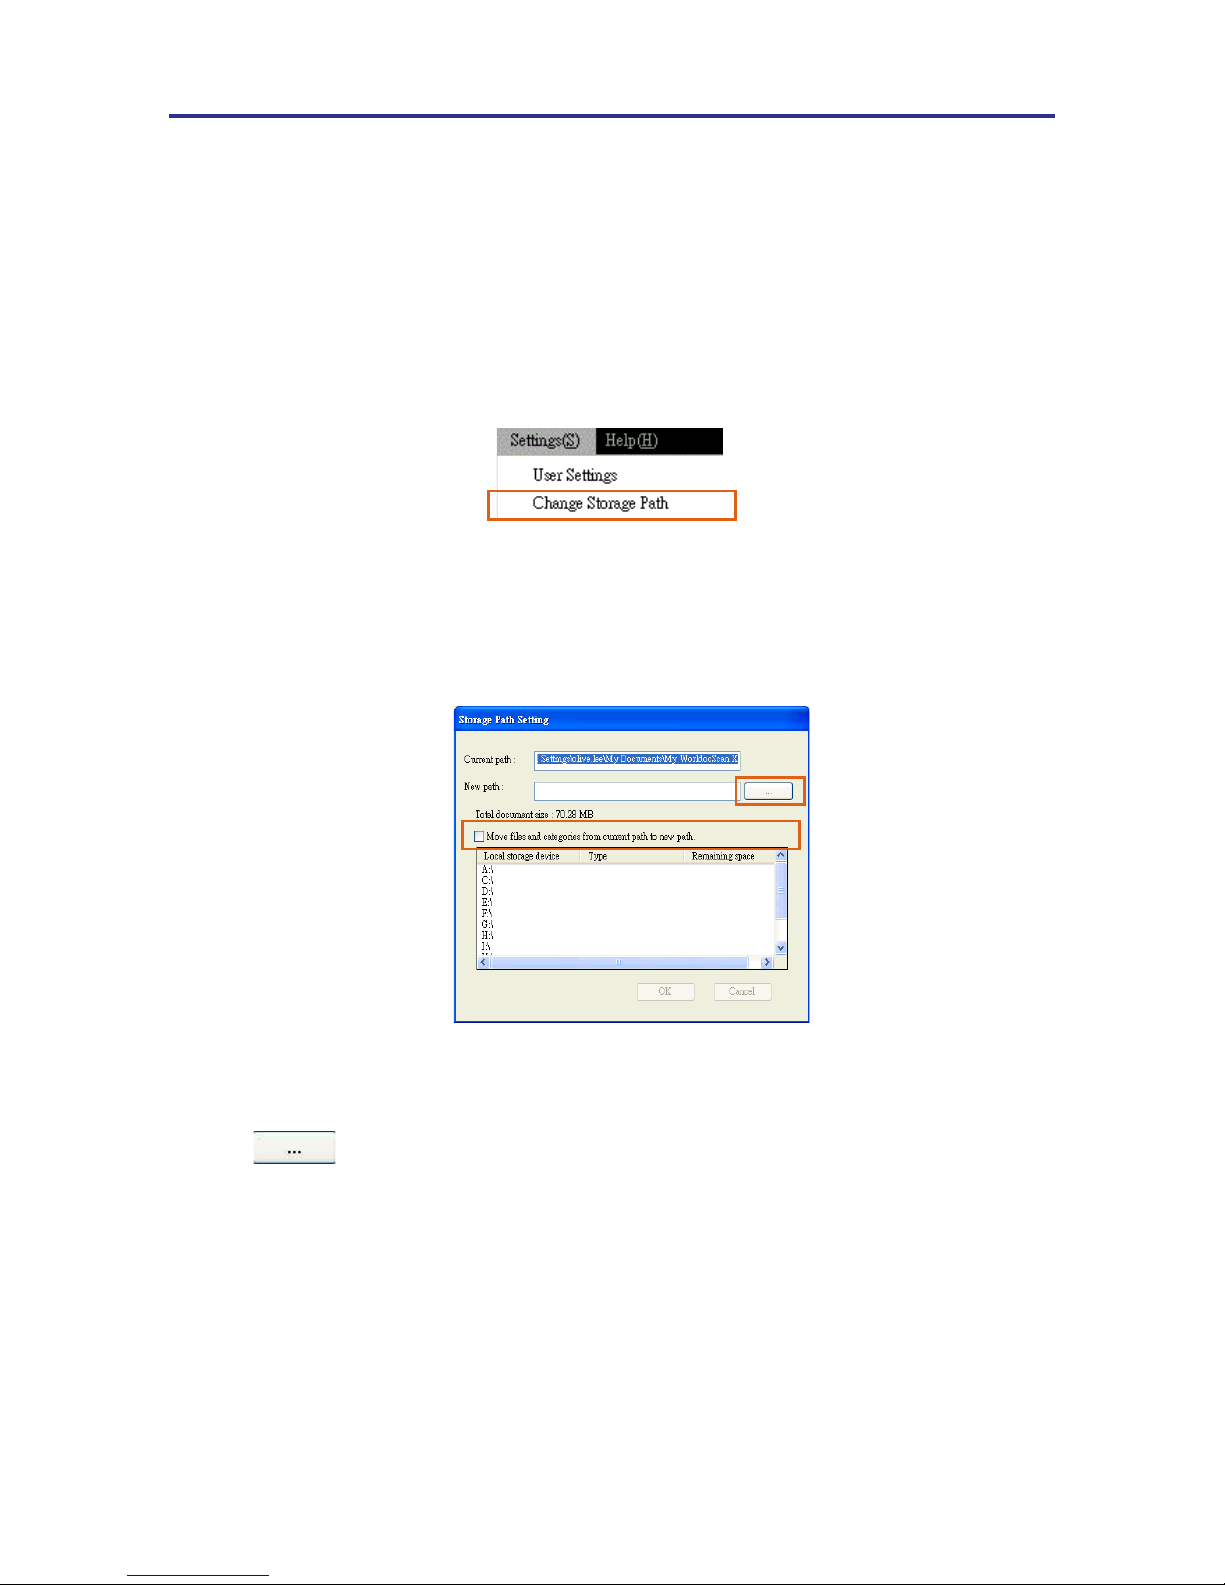
WorldocScan X installs a [My WorldocScan X] folder under the path [C:\Documents
and Settings\My Documents]. WorldocScan X stores les into this folder by default.
The le storage path can be changed if necessary.
1. Choose [Settings\Change Storage Path].
3. Click to select a new path. The new path is listed for you conrm.
4. If you also want to move all current categories and les to the new path, please check
the [Move les and folders from current path to new path] option.
5. Then click [OK] to update the modication. If you don't want to change the path,
simply click [Cancel].
2. That will bring up a [Storage Path Setting] dialog box. The current le storage path is
listed above.
Tip: To test the modication, try scanning or importing a new document to WorldocScan X to ensure the new document does go into the new storage path.
Page 38
6-1
Chapter 6 Other accessible features
Chapter 6 Other Accessible Features
6.1 Search for Files
Choose one of the following ways to nd les quickly:
• Sorting
• Keyword Search
6.1.1 Sorting
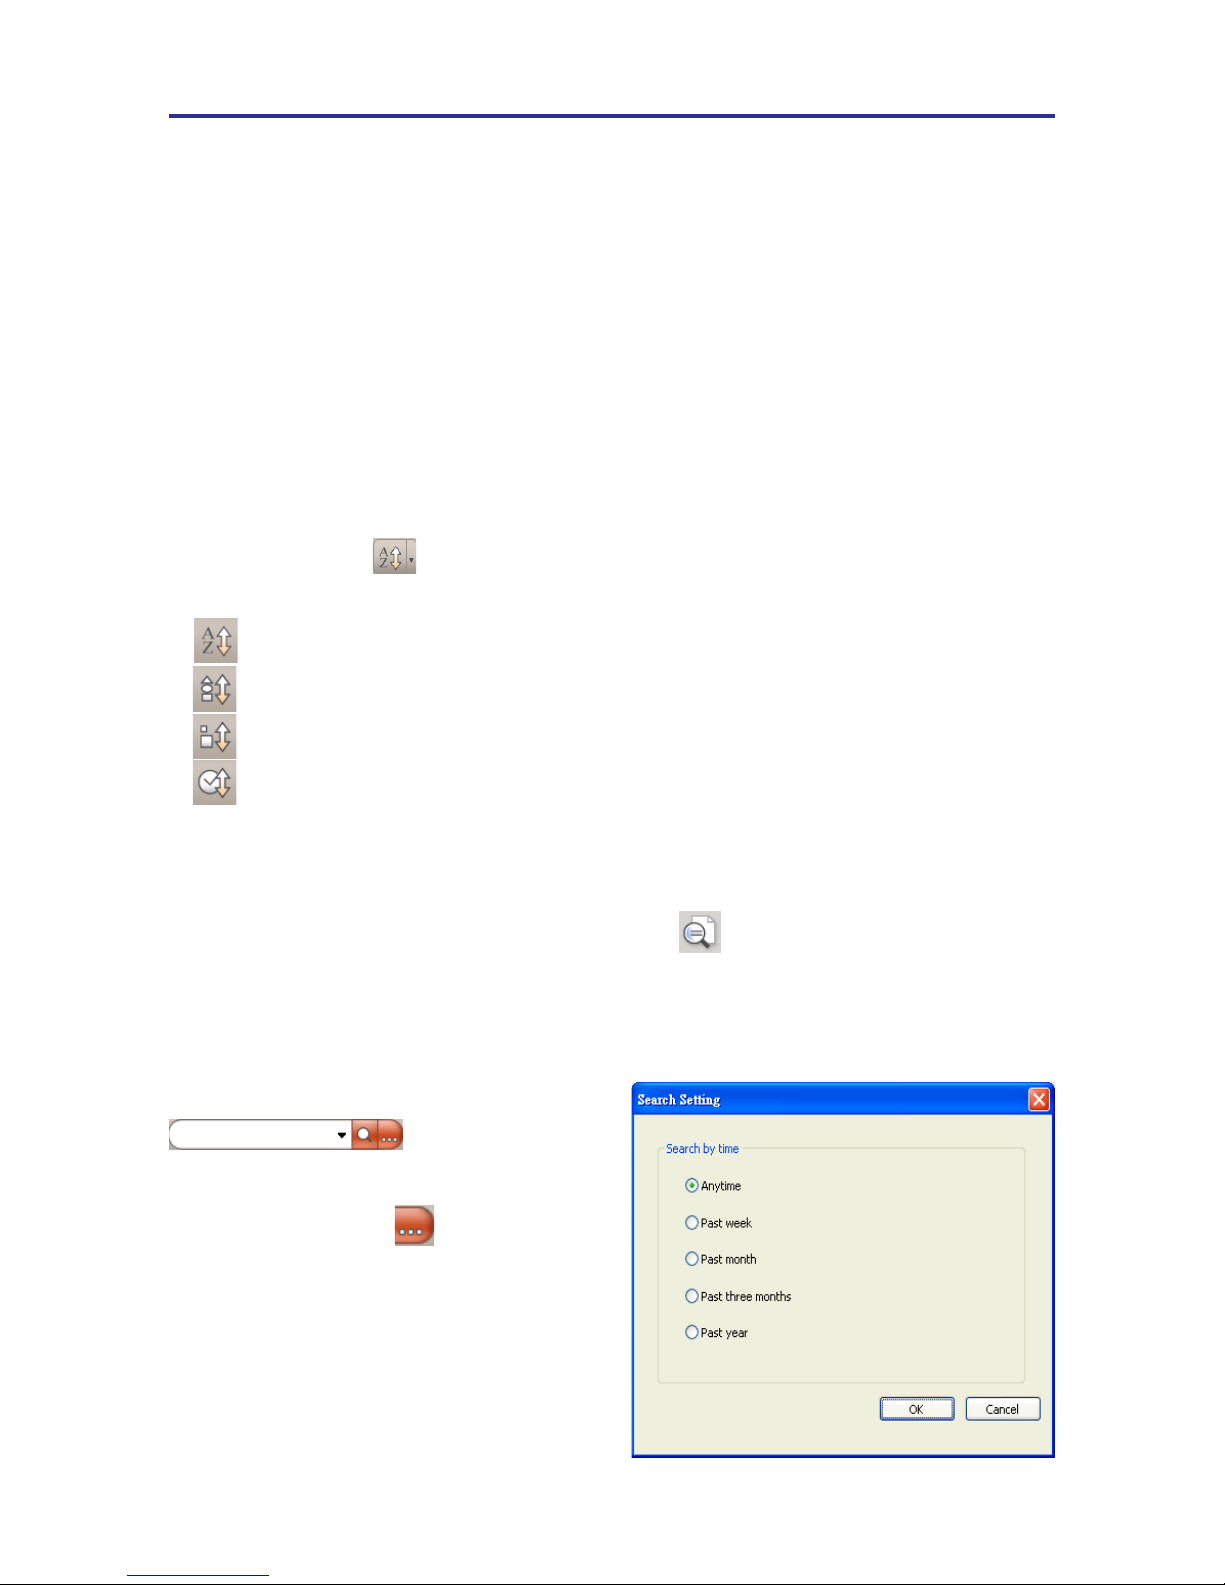
Click the Sort button on the toolbar to sort the files so that you can quick
identify the les you want. There are four sorting criteria.
: Sort by le name
: Sort by le type
: Sort by le size
: Sort by le creation time
6.1.2 Keyword Search
WorldocScan X provides the keyword search function to search le name and
the note eld in your les. Moreover, for searchable PDF les, WorldCard X can perform
full-text search. For how to convert les into the searchable PDF format, please refer to
Section 5.1.
1. Input keywords in the search eld
.
2. You can additionally set the search date
conditions by clicking .
Page 39
6-2
WorldocScan X
6-3
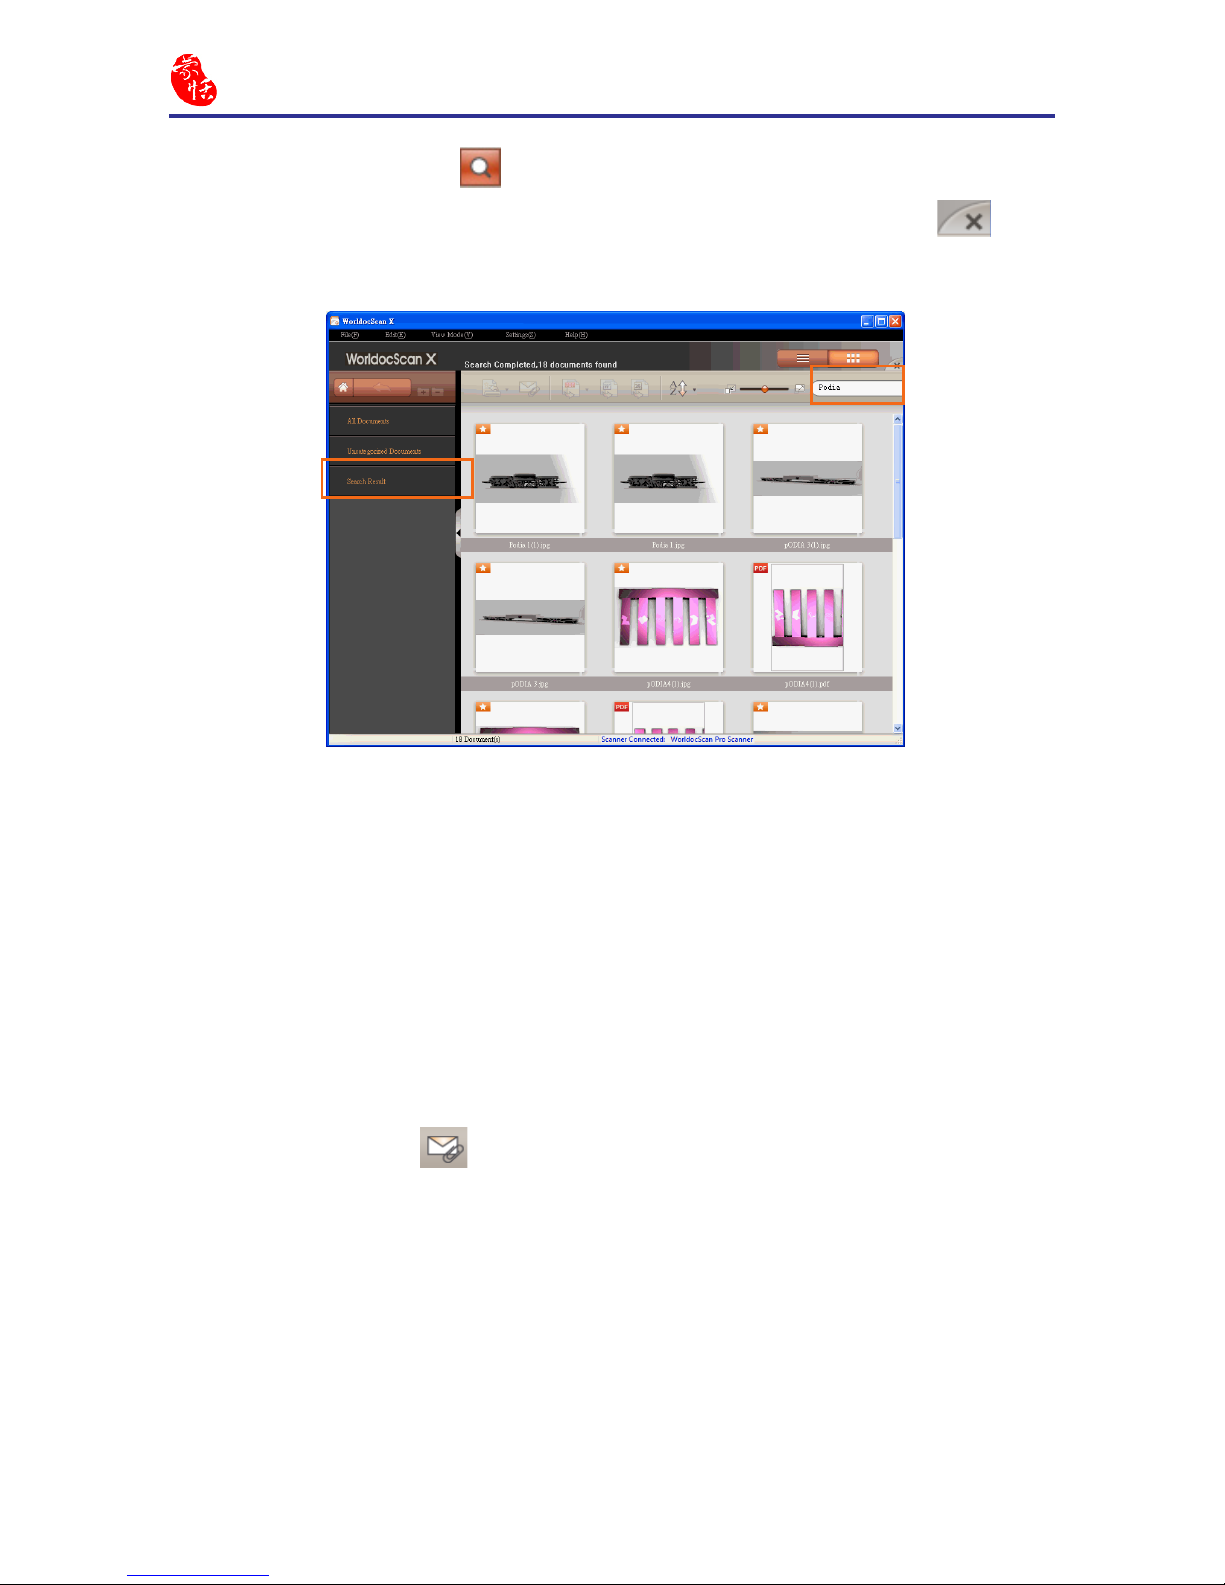
3. Click the [Search] button .
4. The search results will be displayed in the [Search Result] category. Click to
close the [Search Result]category.
6.2 Email Files
Please follow the instructions below to insert selected documents or pictures in an
email message as attachments.
Note: An Internet connection and a supported email software program are required.
1. In the document area, select the documents or images.
2. Click the email button in the toolbar.
3. Your email programs opens and the selected les are attached to an email message.
4. Use your email program to complete and send the email.
Page 40

6-3
Chapter 6 Other accessible features
6.3 Print Files
Please follow the instructions below to send the selected document to a printer.
1. In the document area, select the document that you want to print out.
2. Click the print button in the toolbar or right-click this document and select [Print]
from the menu.
3. This document will be printed on the default printer.
Note: You can only print one document at one time.
Page 41

Appendix: Recognition Languages
Abkhaz
Adyghe
Afrikaans
Agul
Albanian
Altaic
Armenian (Eastern)
Armenian (Grabar)
Armenian (Western)
Avar
Aymara
Azerbaijani (Cyrillic)
Azerbaijani (Latin)
Bashkir
Basic programming language
Basque
Belarussian
Bemba
Blackfoot
Breton
Bugotu
Bulgarian
Buryat
C/C++ programming language
Catalan
Chamorro
Chechen
Simple chemical formulas
Chukcha
Chuvash
For MICR CMC-7 text type
Cobol programming language
Corsican
Crimean Tatar
Croatian
Crow
Czech
Danish
Dargwa
Numbers
Dungan
Dutch (Netherlands)
Dutch (Belgium)
For MICR (E-13B) text type
English
Eskimo (Cyrillic)
Eskimo (Latin)
Esperanto
Estonian
Even
Evenki
Faeroese
Fijian
Finnish
Fortran programming language
French
Frisian
Friulian
Scottish Gaelic
Gagauz
Galician
Ganda
German
German (Luxembourg)
German (new spelling)
Greek
Guarani
Hani
Hausa
Hawaiian
Hungarian
Icelandic
Ido
Indonesian
Ingush
Interlingua
Irish
Page 42

Italian
Java programming language
Kabardian
Kalmyk
Karachay-Balkar
Karakalpak
Kasub
Kawa
Kazakh
Khakas
Khanty
Kikuyu
Kirghiz
Kongo
Koryak
Kpelle
Kumyk
Kurdish
Lak
Lappish (Sami)
Latin
Latvian
LatvianGothic
Lezgin
Lithuanian
Luba
Macedonian
Malagasy
Malay
Malinke
Maltese
Mansi
Maori
Mari
Maya
Miao
Minangkabau
Mohawk
Mongol
Mordvin
Nahuatl
Nenets
Nivkh
Nogay
Kabardian
NorwegianNynorsk + NorwegianBokmal
Norwegian (Bokmal)
Norwegian (Nynorsk)
Nyanja
Occidental
Ojibway
Old English
Old French
Old German
Old Italian
Old Spanish
Ossetian
Papiamento
Pascal programming language
Tok Pisin (Pidgin English)
Polish
Portuguese (Brazil)
Portuguese (Portugal)
Provencal
Quechua
Rhaeto-Romanic
Romanian
Romanian (Moldavia)
Romany
Ruanda
Rundi
Russian
Russian (old spelling)
Samoan
Selkup
Serbian (Cyrillic)
Serbian (Latin)
Shona
Sioux (Dakota)
Slovak
Page 43

Slovenian
Somali
Sorbian
Sotho
Spanish
Sunda
Swahili
Swazi
Swedish
Tabassaran
Tagalog
Tahitian
Tajik
Tatar
Tinpo (Jingpo)
Tongan
Tswana
Tun
Turkish
Turkmen
Tuvinian
Udmurt
Uighur (Cyrillic)
Uighur (Latin)
Ukrainian
Uzbek (Cyrillic)
Uzbek (Latin)
Visayan (Cebuano)
Welsh
Wolof
Xhosa
Yakut
Zapotec
Zulu
Page 44

Penpower WorldocScan X
User Manual
Manufacturer: Penpower Technology Ltd.
Version: v1.1 for WDS Pro
Release: March, 2012
 Loading...