

Page 1

PENPOWER WorldCard
User Manual
Version: 6.5
Edition: 4
Release: August, 2011
Page 2

Contents
Chapter 1 Product Introduction ............................................................ 1-1
1.1 WorldCard Series ........................................................................................ 1-1
1.1.1 WorldCard Color ............................................................................................. 1-1
1.1.2 WorldCard Ultra plus ....................................................................................... 1-2
1.1.3 WorldCard Ofce ............................................................................................. 1-3
1.2 Product Feature ........................................................................................... 1-4
Chapter 2 Getting Started ...................................................................... 2-1
2.1 System Requirements ................................................................................. 2-1
2.2 Installing Penpower WorldCard ................................................................. 2-1
2.2.1 Software and Driver Installation ...................................................................... 2-1
2.2.2 Launch WorldCard ........................................................................................... 2-3
2.2.3 Registration ...................................................................................................... 2-3
2.2.4 Connecting Hardware ...................................................................................... 2-4
2.3 Preparation for Card Scanning ................................................................... 2-4
2.3.1 Calibration ....................................................................................................... 2-4
2.3.2 Start-up Wizard ................................................................................................ 2-5
2.4 Online Help ................................................................................................ 2-6
Chapter 3 Overview ................................................................................ 3-1
3.1 User Interface ............................................................................................. 3-1
3.1.1 Toolbar ............................................................................................................. 3-2
3.1.2 Alphabet Index ................................................................................................. 3-2
3.2 Scan Business Cards ................................................................................... 3-3
3.2.1 Scan Directly ................................................................................................... 3-3
3.2.2 Scan Wizard ..................................................................................................... 3-3
3.2.3 Batch Scanning ................................................................................................ 3-4
3.4 Viewing Contacts ........................................................................................ 3-5
3.4.2 Label Mode ..................................................................................................... 3-6
3.4.3 Image Mode ..................................................................................................... 3-7
3.4.4 Dual Mode ....................................................................................................... 3-8
Page 3

3.4.5 Hide WorldCard Banner .................................................................................. 3-8
Chapter 4 Edit Cards .............................................................................. 4-1
4.1 Edit Window Overview .............................................................................. 4-1
4.2 Verify Contacts ........................................................................................... 4-1
4.3 Edit Contacts .............................................................................................. 4-3
4.3.1 Recognizing Partial Content of a Card Entry .................................................. 4-4
4.3.2 Adjusting the Separation Rate ......................................................................... 4-5
4.3.3 Reframing Command ...................................................................................... 4-6
4.3.4 Fine Rotating ................................................................................................... 4-6
4.3.5 Rotating Card ................................................................................................... 4-7
4.3.6 Rescanning Card .............................................................................................. 4-7
4.3.7 Recognizing Again .......................................................................................... 4-8
4.3.8 Exchanging Front and Back Side Card Image ................................................. 4-8
4.4 Viewing Cards ............................................................................................ 4-9
4.4.1 Saving Card Image .......................................................................................... 4-9
4.4.2 Deleting Card Image ........................................................................................ 4-9
Chapter 5 Manage Business Cards ....................................................... 5-1
5.1 Categorize Cards ........................................................................................ 5-1
5.1.1 Categorize from Management Page ................................................................ 5-1
5.1.2 Categorize from Editing Page .......................................................................... 5-2
5.1.3 Send Email by Category .................................................................................. 5-2
5.2 Merge and Separating Cards ...................................................................... 5-3
5.3 Add New Cards .......................................................................................... 5-4
5.3.1 Add an Empty Card ......................................................................................... 5-4
5.3.2 Add the Same Company Card ......................................................................... 5-4
5.4 Add Cards from Other Resources ............................................................... 5-5
5.4.1 Photo File ......................................................................................................... 5-5
5.4.2 Twain Scanner ................................................................................................. 5-5
5.4.3 Drag in the Signature Information ................................................................... 5-6
5.5 Deleting/Restoring Contacts ....................................................................... 5-6
5.6 Search Contacts .......................................................................................... 5-7
Page 4

5.6.1 Text Search ...................................................................................................... 5-7
5.6.2 Advanced Search ............................................................................................. 5-8
5.6.3 Finding Duplicate Data .................................................................................... 5-9
5.7 Safeguardi your Contacts ......................................................................... 5-10
5.7.1 Save ............................................................................................................... 5-10
5.7.2 Backup your contacts ..................................................................................... 5-10
5.7.3 File Encryption .............................................................................................. 5-10
5.8 Print Cards ............................................................................................... 5-12
5.8.1 Print Preview ................................................................................................. 5-12
5.8.2 Edit Print Templates ...................................................................................... 5-13
5.9 Exchange Contacts ................................................................................... 5-14
5.9.1 Export ............................................................................................................ 5-14
5.9.2 Import ............................................................................................................ 5-23
5.9.3 Sync ............................................................................................................... 5-27
5.9.4 WorldCard Data Exchange Compatibility List .............................................. 5-31
5.10 Settings ................................................................................................... 5-33
5.10.1 Export Option .............................................................................................. 5-33
5.10.2 Synchronize Option ..................................................................................... 5-34
5.10.3 Field Display................................................................................................ 5-35
5.10.4 User Dene Field ......................................................................................... 5-35
5.10.5 Scan Option ................................................................................................. 5-36
5.10.6 Revising the Results of Chinese Card Recognition ..................................... 5-36
5.10.7 Personal Setting ........................................................................................... 5-37
5.11 Online Map ............................................................................................. 5-39
5.12 Getting Direction .................................................................................... 5-40
5.13 WorldCard Portable Disk........................................................................ 5-41
5.13.1 Saving Card Data to a Portable Disk ........................................................... 5-41
5.13.2 Card Data Management for Portable Disk .................................................. 5-42
Chapter 6 Scan Manager ........................................................................ 6-1
6.1 Scan Contacts ............................................................................................. 6-1
6.2 Scan business cards .................................................................................... 6-2
6.2.1 Scan and Edit business cards ........................................................................... 6-2
Page 5

There may be newer versions of the software that was released during or after this product’s
manufacturing date. If the content in the User Manual differs from the on-screen interface,
please follow the instructions on the on-screen interface instead of the User Manual.
6.2.2 View business card image ................................................................................ 6-4
FAQ .................................................................................................... FAQ-1
Page 6

Penpower Technology Ltd.
Software User License Agreement
You are licensed to legally use this software program (“the Software”) by Penpower
Technology Ltd (“Penpower”) under this license agreement (“The Agreement”). If you do
not agree with any of the provisions in this Agreement, please do not install, copy or use the
Software. By using the Software, you are deemed to fully understand and accept the provisions of this Agreement.
1. Intellectual Property
All intellectual property rights in the Software, together with all information and docu-
ments included in the packaging for the Software (including but not limited to copy-
rights), are property of Penpower, and are protected by relevant laws and regulations.
2. License to Use
You are authorized to use the Software on one (1) single computer only. You may not use
the Software on any other machines other than the said single computer.
3. Authority to Copy
The Software and all documents included with the Software, and copyright thereof, are
property of Penpower. You are licensed to make one (1) copy of the Software for your
personal backup purposes. All other acts of copying are strictly prohibited.
You may not sell, lease, dissemble, reverse engineer, copy, translate, adapt or derive the
Software, or obtain the source code of the Software by any other means. You may not use
the Software for any purposes other than those permitted under this Agreement.
4. Business Users
If you need to install or use the Software on more than one (1) computer, please contact
Penpower or our local distributor to purchase a license for the additional use.
5. Liability
You agree to indemnify Penpower against all losses, costs, debts, settlement payments or
other expenses (including but not limited to attorneys fees) arising from your breach of
this Agreement, and you agree to compensate Penpower for all of the abovementioned
damages.
6. No Warranty
Effectiveness of a packaged software in handling information is closely related to its soft-
ware and hardware environment. The Software is published following careful develop-
ment and product testing by Penpower, but Penpower is not able to conduct tests based on
all possible combinations of software and hardware environment. Therefore, Penpower is
unable to promise nor warrant that there will be absolutely no risk of loss or damage of
Page 7

information, or any other kind of loss, during installation and/or execution of the Soft-
ware. You must be fully aware of your risks in using the Software.
Penpower will provide you with the Software and support services in respect of the Soft-
ware to the maximum extent permitted by law. However, Penpower does not warrant that
the Software and information included in the package of the Software contain no defects
or errors. Penpower is not liable for any indirect, special or incidental loss arising from
the Software, including but not limited to loss of prots, damage to business reputation,
cessation of work, hardware malfunction or damage, or any other commercial damage or
loss arising from commercial use of the Software.
7. Limitation of Liability and Damages
The maximum amount of compensation payable by Penpower, in respect of any damage
incurred by you for any reason under this Agreement, is limited to the amount you have
already paid to Penpower in respect of the Software.
Under no circumstances will Penpower be held liable for the possibility of loss, notwith-
standing Penpower may be aware of the possibility of such loss.
8. Prohibition Against Sublicense
You are prohibited to assign the license in respect of the Software granted to you under
this Agreement, or to grant a sublicense to another person.
9. Jurisdiction
With regards to any disputes arising from this Agreement, Penpower and you agree that
the court having jurisdiction over the business location of Penpower will be the court in
the rst instance.
10. Miscellaneous
In the event that any provision of this Agreement is found to be invalid at law, such
invalidity will not affect the validity of any other provisions, or the legal enforceability of
such other provisions.
In the event that the Software cannot be executed under conditions of normal use, due to
any damage to the original disk/s, Penpower will replace the disk/s free of charge.
Page 8
Chapter 1 Product Introduction
1-1
Chapter 1 Product Introduction
Penpower WorldCard provides a total business card management solution by integrating
card recognition, management, and printing functions in a single digitizing unit to nd your
business cards at any given time.
1.1 WorldCard Series
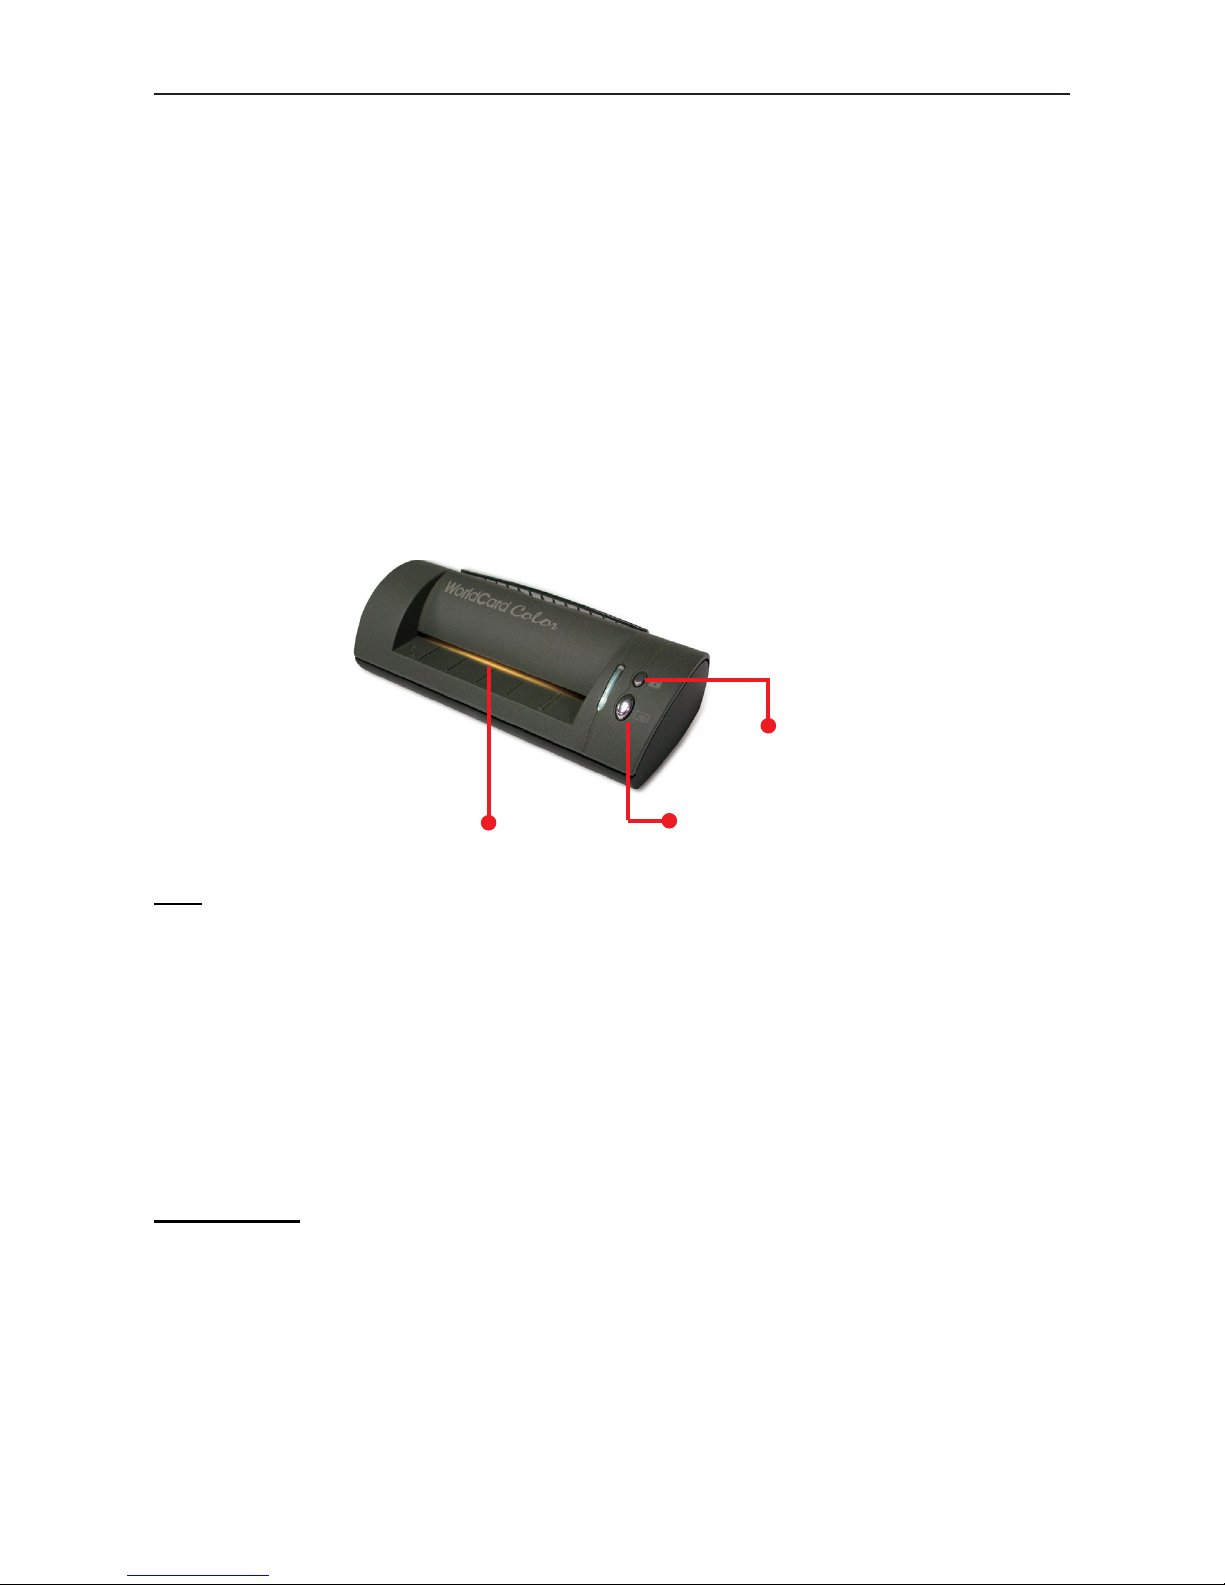
1.1.1 WorldCard Color
The A6-sized color business card scanner is supported by PENPOWER’s BCR technology to ensure quick scan and accurate recognization of information on a color business card.
It provides 600 dpi resolution and can be used as a color scanner to scan 4x6 color photos.
Tips
• Insert a Business Card Here: Insert a card with the information side facing up and
make sure the card placed against to the left-hand side.
• Business Card Scan Button: When running WorldCard software, press the Business
Card Scan button to launch the Scan Wizard. Then insert a business card and press
Business Card Scan Button again to scan it.
• Picture Scan Button: Launch the WorldCard application, press the Picture Scan button,
and insert a picture to scan it into a JPG le.
Specication
• Dimensions: 175x75x45mm
• Weight: 216g
• Resolution: 600 dpi
• Interface: USB
• Image: Color
Insert a Business Card Here
Picture Scan Button
Business Card Scan Button
Page 9
1-2
WorldCard
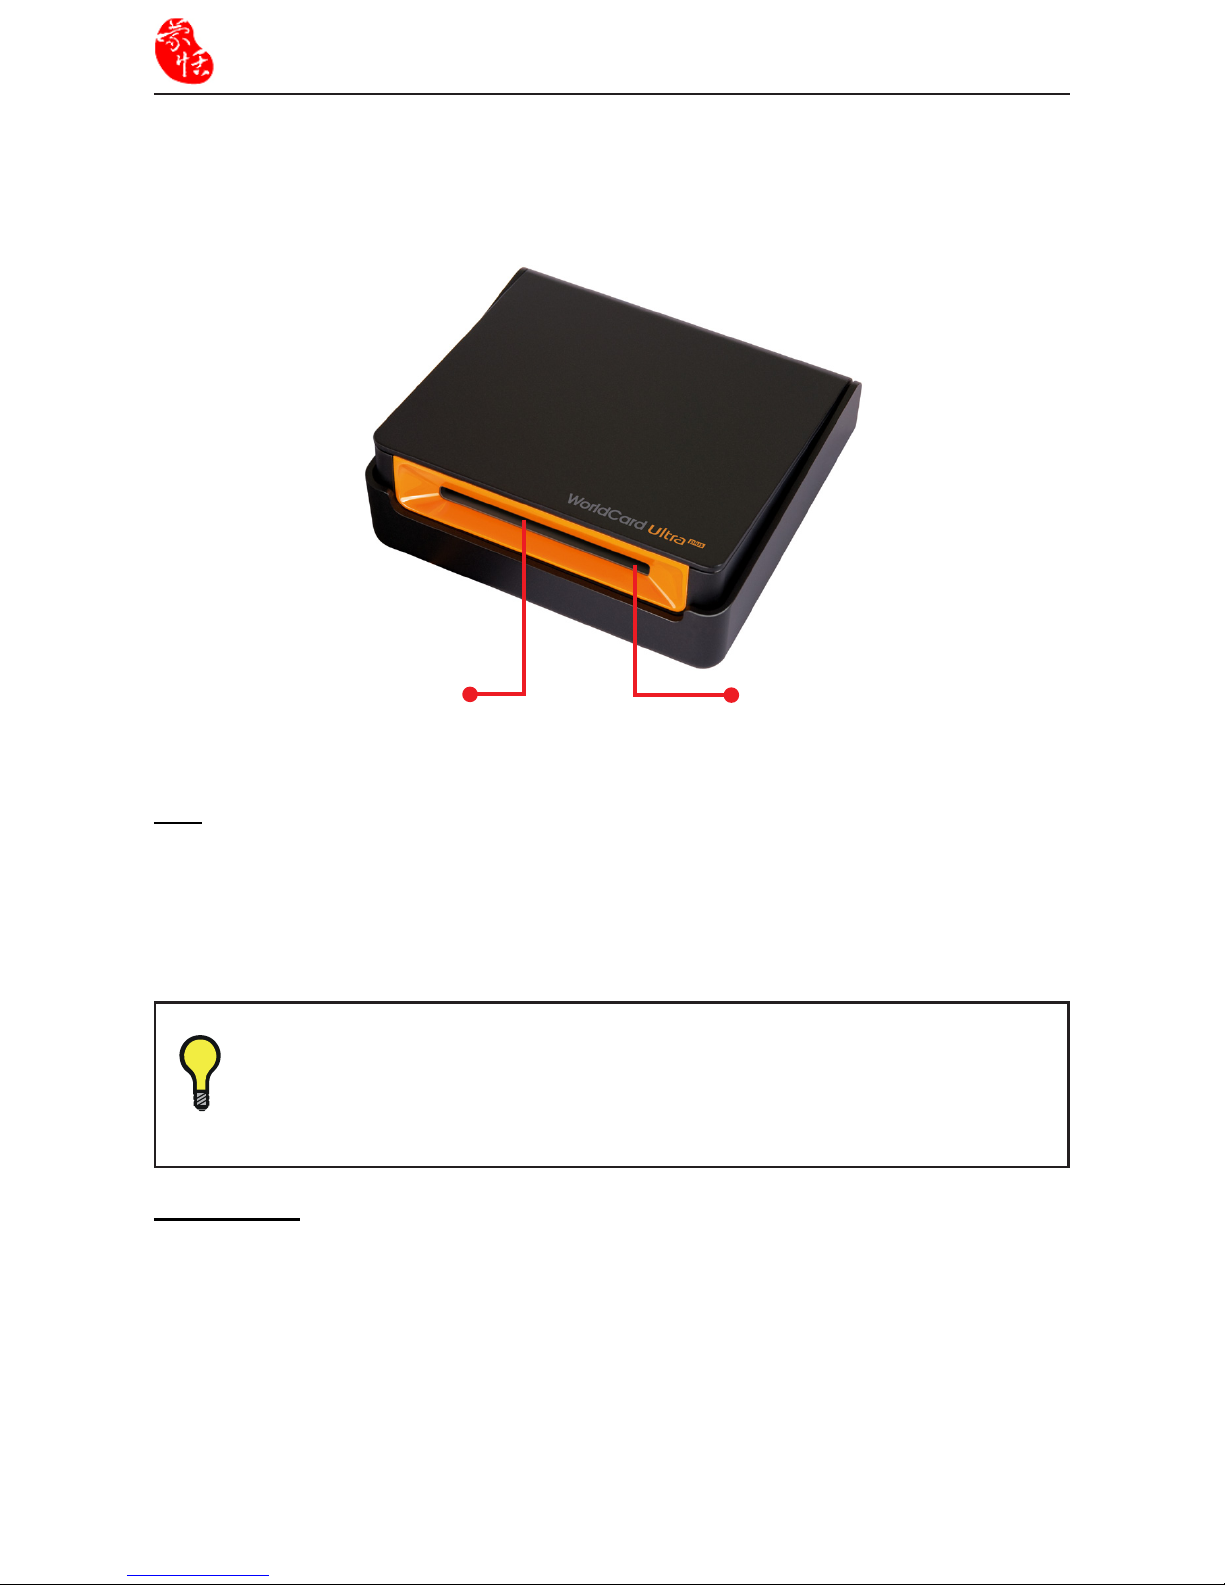
Tips
• Insert a Business Card Here: Insert a card with the information side facing up.
• Intuitive LED indicator: The LED indicator will blink when a card is inserted. It will
blink faster during scanning.
Specication
• Dimensions: 107x99x28mm
• Weight: 168g
• Resolution: 600 dpi
• Interface: USB
• Image: Color
1.1.2 WorldCard Ultra plus
Inherit the design concept of WorldCard Ultra, WorldCard Ultra plus help you scan
business card in the easiest way that you have never experienced.
Insert a Business Card Here Intuitive LED Indicator
Tip
WorldCard plus has the new open/close design. Be sure to open the WorldCard plus card scanner before you start to scan. When the scanner is not
used, please close it to avoid dust getting into it.
Page 10
Chapter 1 Product Introduction
1-3
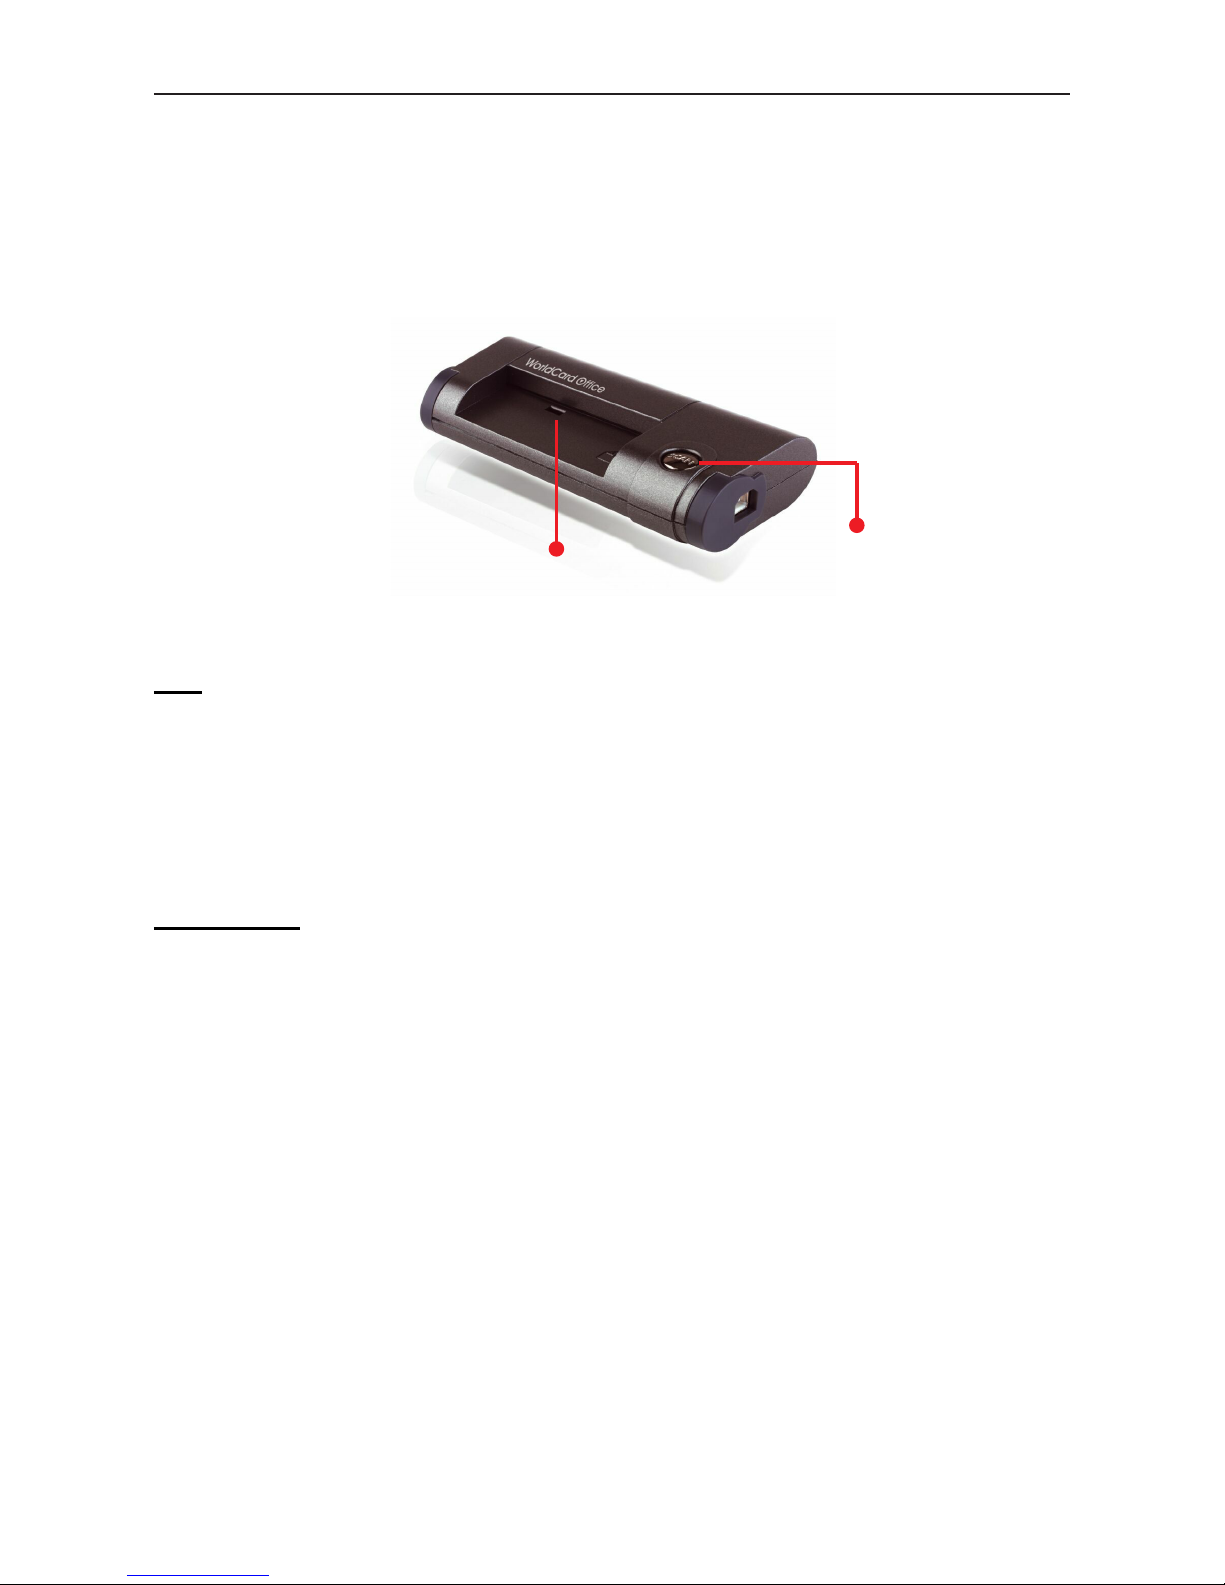
1.1.3 WorldCard Ofce
The A8-sized gray-scale business card scanner leverages PENPOWER’s kernel technology of character recognition to identiy data on a business card, inputs them into the corresponding eld, and creates les for management within 5 seconds.
Tips
• Insert a Business Card Here: Insert a card with the information side facing down and
make sure the card placed against to the right- hand side.
• Scan Button: When running the WorldCard application, press the Scan button to launch
the Scan Wizard. Then insert a business card and press Scan Button again to scan it.
Specication
• Dimensions: 106x53x27mm
• Weight: 73g
• Resolution: 600 dpi
• Interface: USB
• Image: Gray-scale
Insert a Business Card Here
Scan Button
Page 11

1-4
WorldCard
1.2 Product Feature
• Easy Card Reader
Scanning or capturing your business cards has never been quicker or easier.
• Organize Business Cards
After scanning or capturing your business cards, WorldCard software can organize, sort,
search, add and delete any entries. Also, you can easily edit and add notes to any business
card.
• Advanced Search
Full text search to nd your contacts easily and conveniently.
• Support multiple languages
Recognize business cards in different languages, including English, French, German, Italian, Dutch, Swedish, Norwegian, Danish, Finnish, Russian, Polish, Turkish, Hungarian,
Spanish(Spain and Mexico) Portuguese(Portugal and Brazil), Greek, Czech, Slovak, Traditional Chinese, Simplied Chinese, Japanese, Korean and many more to come.
• Multiple Categories and Sub-Categories
Organize card information into categories and sub-categories in anyway you want.
• Print Templates
WorldCard provides various print templates. You can also easily create your own templates and print contact information in different formats.
• Recognize Contacts from Other Sources
Recognize business card image les taken by digital cameras or advanced mobile phones.
It can also work with the atbed scanner.
• Data Exchange
Support synchronization/importing/exporting for Outlook, Outlook Express, Lotus Notes,
Palm, Windows Mobile, ACT! by Sage, Goldmine, Salesforce, PIM software, and World-
Card series, such as WorldCard Mac, or WorldCard Mobile versions (WorldCard Mobile
and WorldCard Contacs).
• Unicode
Unicode makes it possible to display various languages of business cards at the same time.
Page 12

Chapter 2 Getting Started
2-1
1. Click Next.
Chapter 2 Getting Started
2.1 System Requirements
• Pentium III 800 CPU or above
• 512MB of RAM
• 500MB of available hard disk space
• Windows 7/Vista /XP
• USB Port
2.2 Installing Penpower WorldCard
To properly use your WorldCard
1. Install the software included in the CD.
2. Connect your WorldCard scanner to your PC.
3. Scan or capture your business cards.
2.2.1 Software and Driver Installation
To save time, Penpower has combined the installation of the hardware and software
into one easy process. To start, insert the CD into your CD/DVD ROM (if the installation
program does not start automatically, please double-click the setup.exe le on the CD).
Page 13
2-2
WorldCard
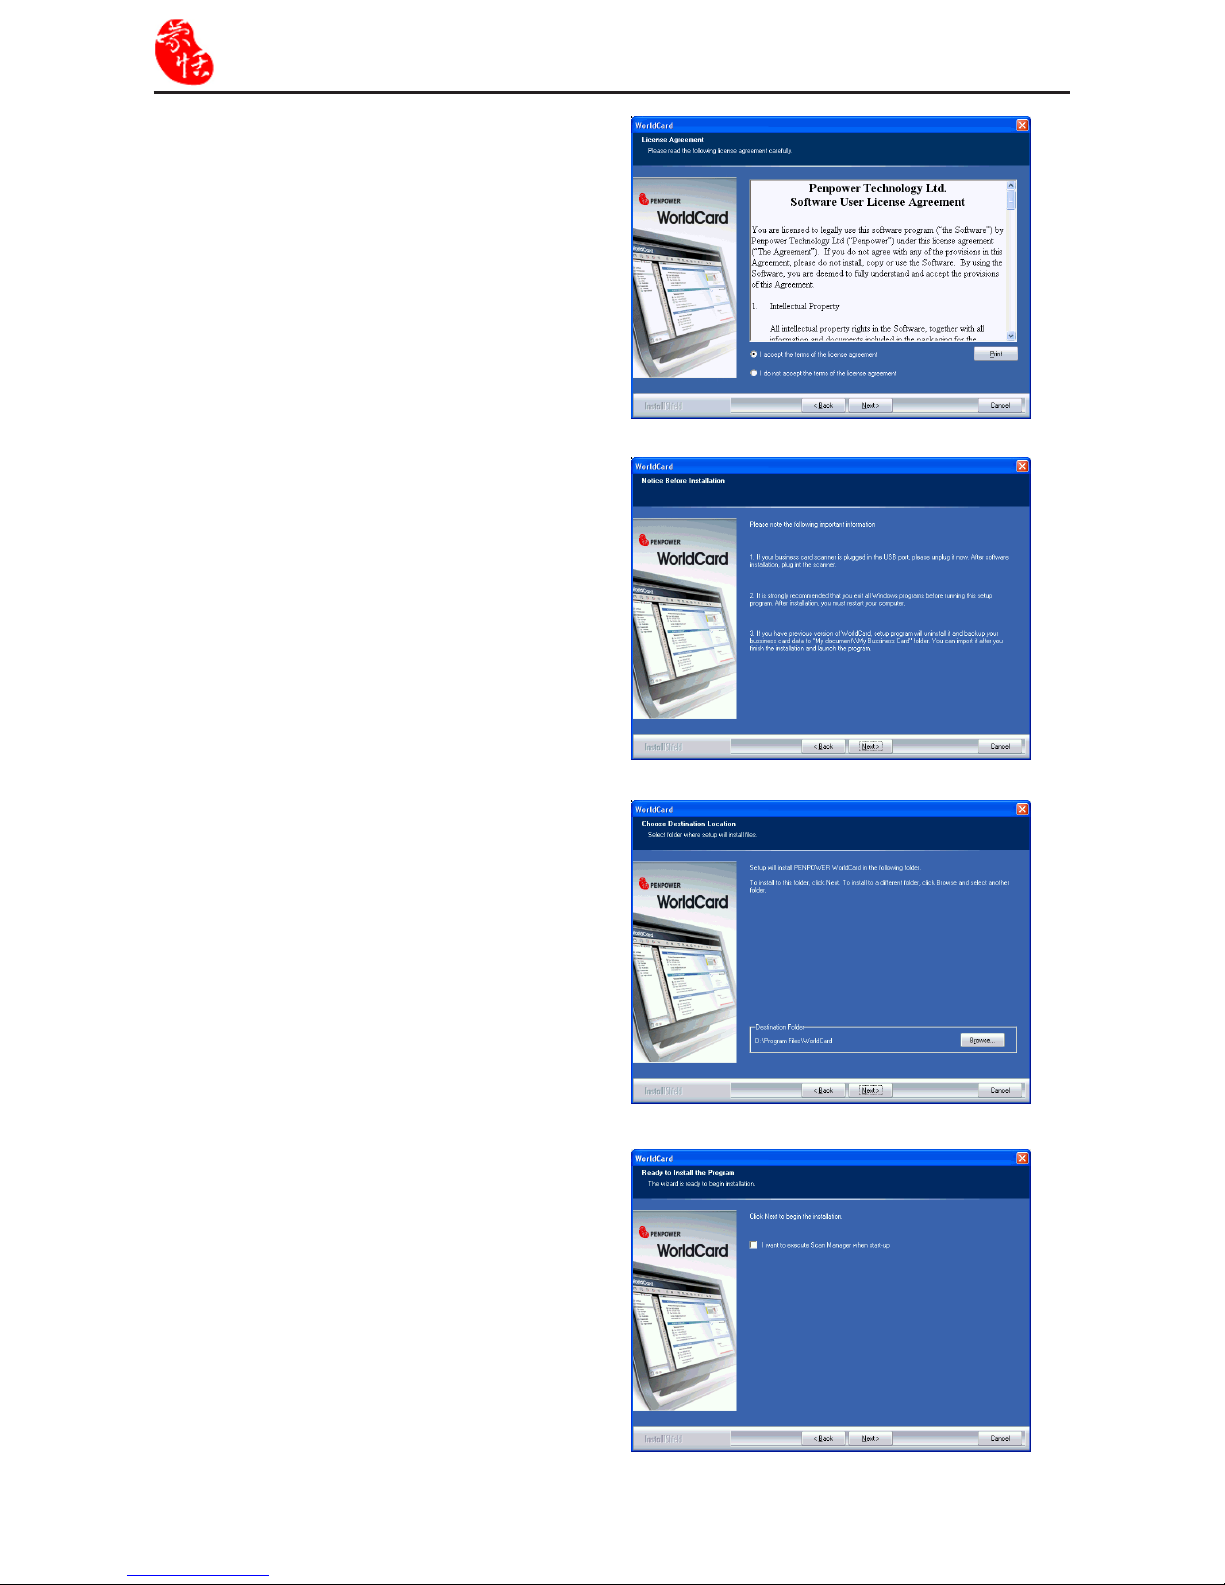
2. Select I accept the terms of the license
agreement to accept the license agree-
ment. Please read the license agreement
completely.
3. Please follow the instructions in the on-
screen notice. Click Next to continue.
4. Please select the location to install the
program. The default location is c:\
Program Files\WorldCard. Click Next to
continue.
5. If you want to run the Scan Manager
when starting up the computer for quick
scanning into Outlook, Outlook Express,
Windows Contacts or ACT! directly,
click I want to execute Scan Manager
when start-up, and then click Next to
continue.
Page 14
Chapter 2 Getting Started
2-3
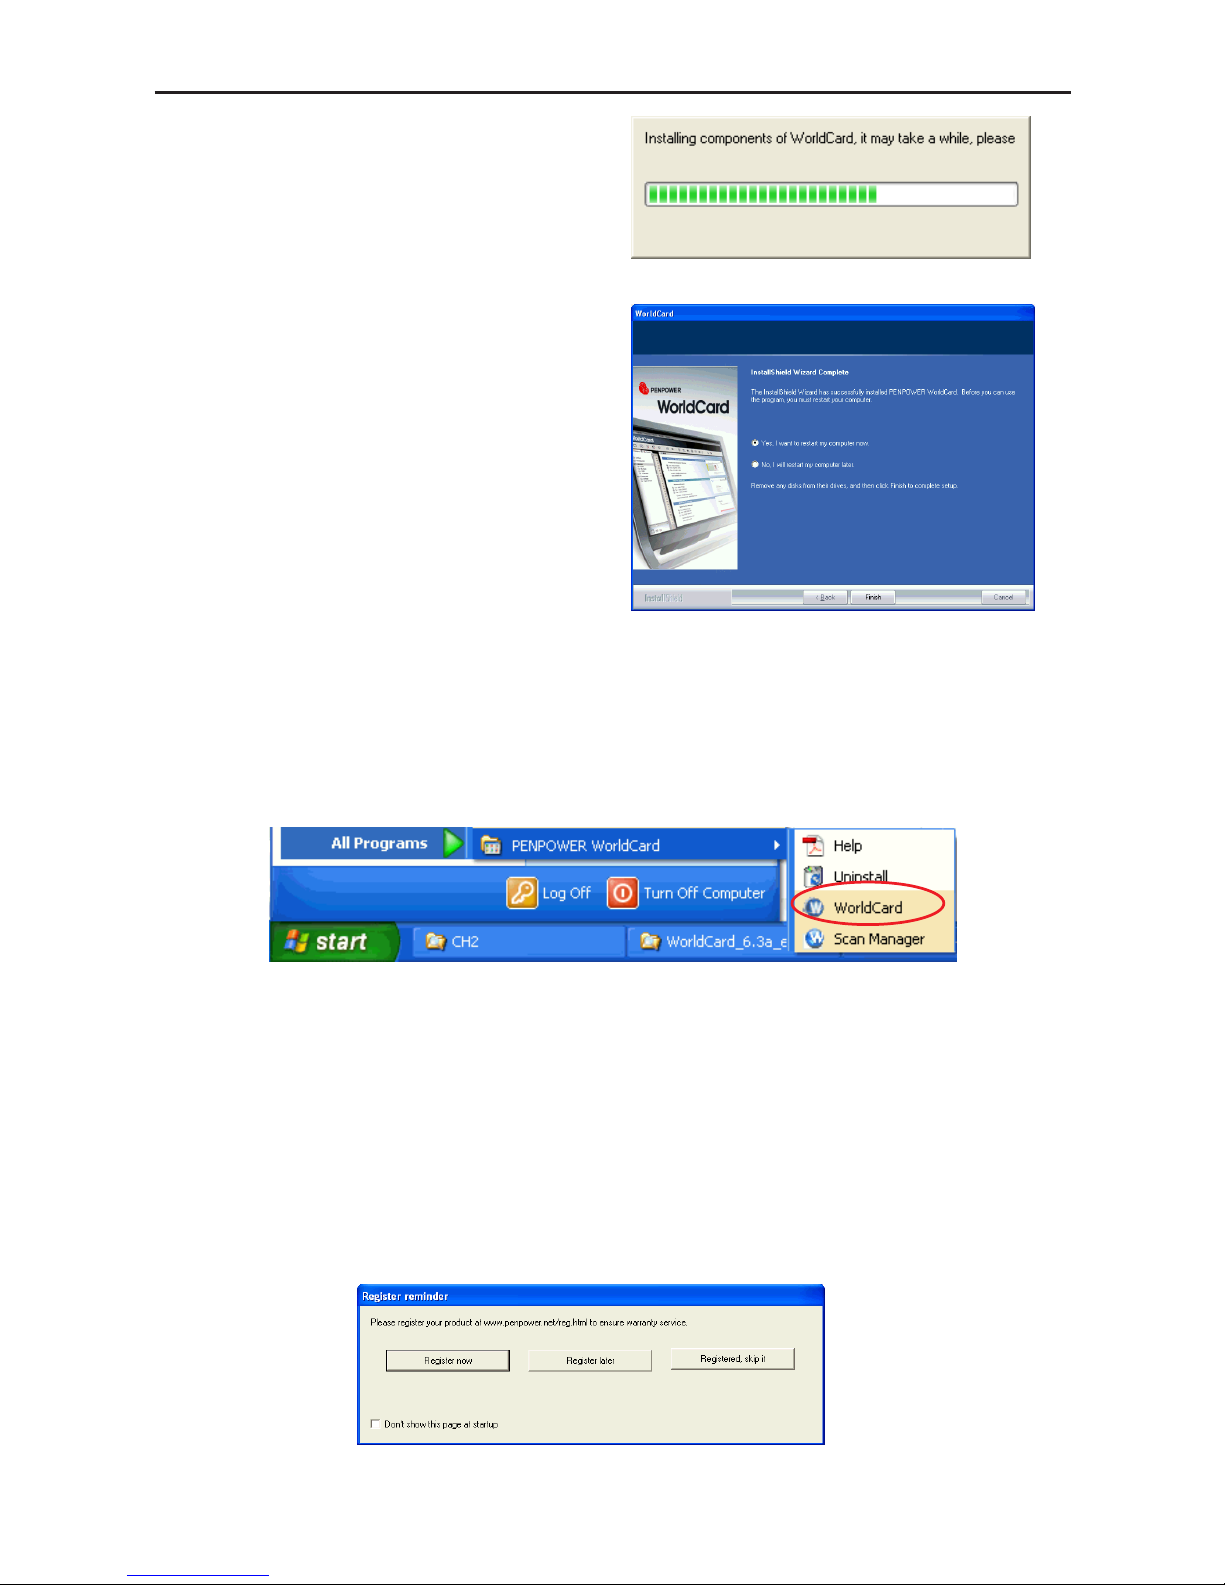
6. Click Finish to complete installation. If
you do not want to restart now, click No,
I will restart my computer later.
Note: It may take a while to install some
WorldCard components. Please wait.
2.2.2 Launch WorldCard
After installation, please launch the WorldCard application by running the application
software under Start / All Programs /PENPOWER WorldCard / WorldCard.
2.2.3 Registration
System will ask you to register for warranty at your rst run. Please click Register now
to start registration or click Register later to skip this procedure. You can register later on
from Help/Register. If you want to choose Register later and do not need to be reminded
again, you can check Don’t show this page at startup. If you have already registered,
please click Registered, skip it.
Page 15
2-4
WorldCard
2.2.4 Connecting Hardware
After installing the software, connect the USB connection of your WorldCard scanner or
business card camera to the USB port of your computer.
Note: Some computers may shut down accidentally after connection. This is due to lack of
power to support several USB devices. To avoid this problem, connect your WorldCard scanner/business card camera and other USB devices to an extra-powered
USB hub.
2.3.1 Calibration
After installing the software and driver, your WorldCard scanner must be calibrated in
order to ensure perfect scanning results.
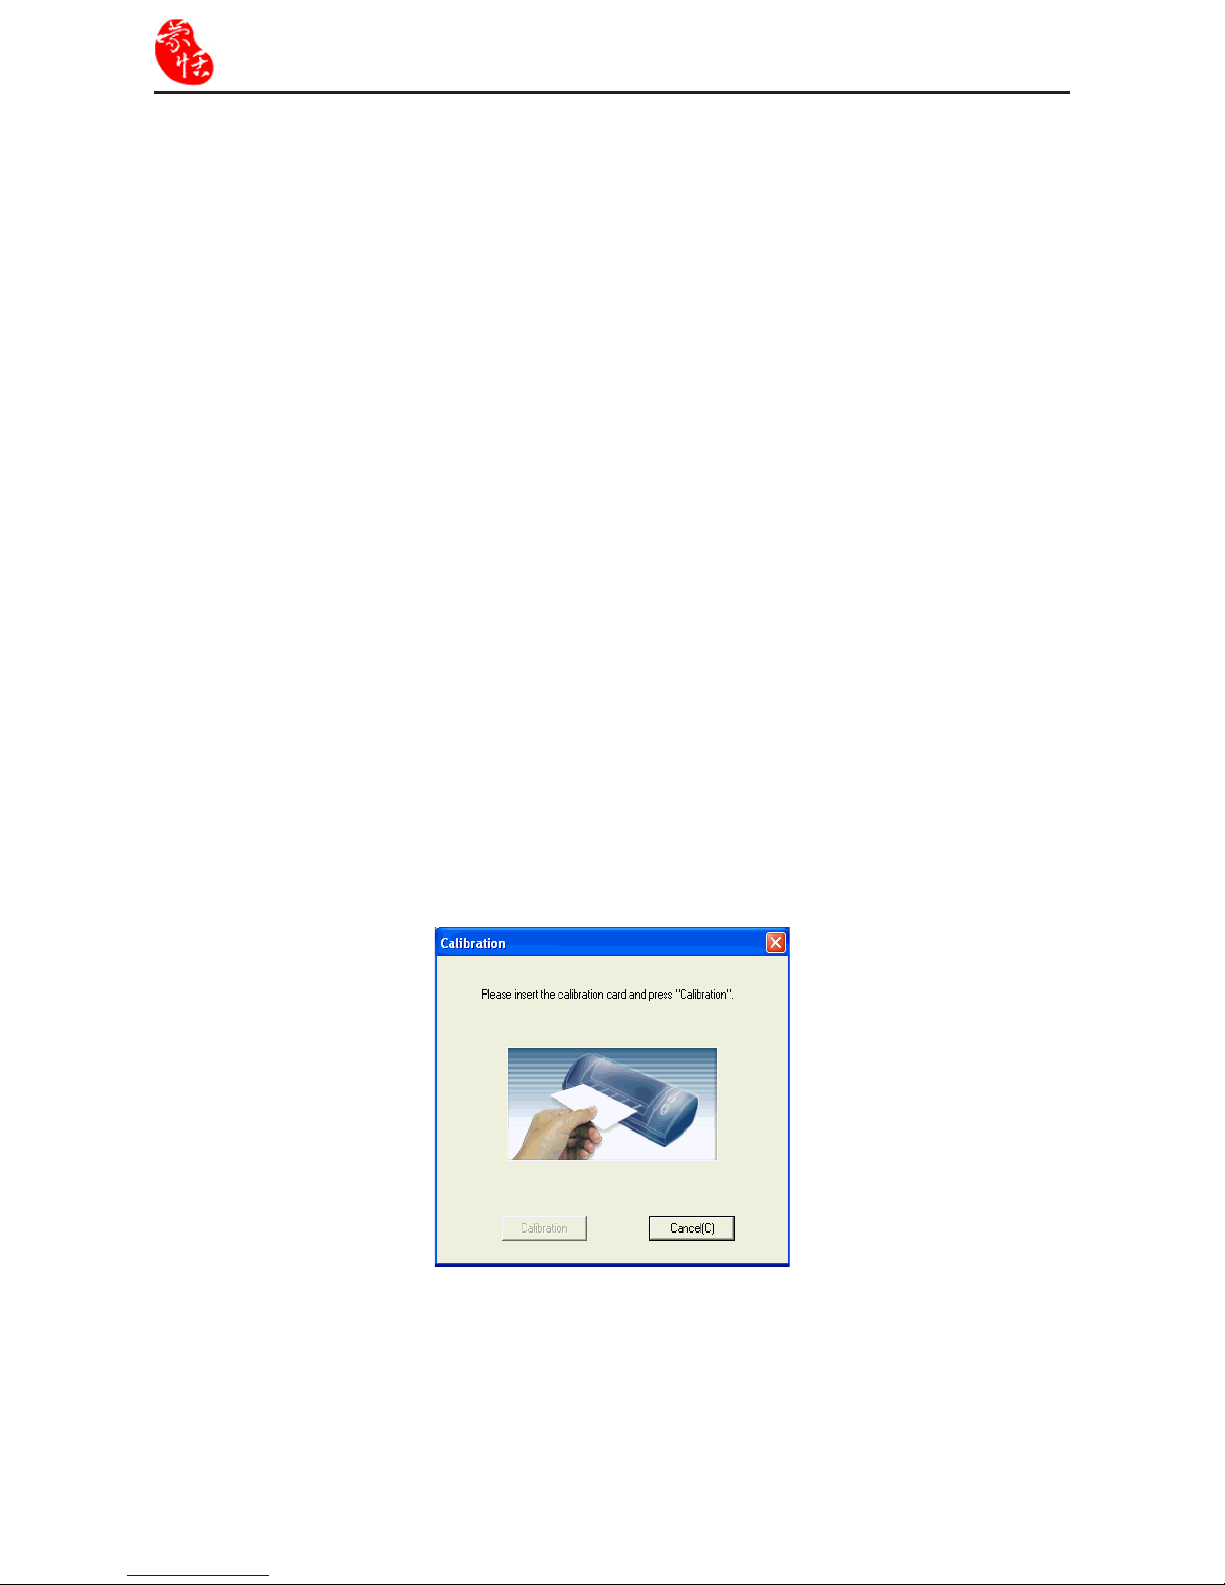
To calibrate the WorldCard Color and WorldCard Ofce scanner, please insert the blank
side of the card facing down. The WorldCard Ultra plus color scanner doesn’t need initial
calibration, but if there is any color indifference, please insert the blank side of the card facing up to calibrate it. In case the calibration card is lost, please use any same size white card
for calibration.
Tip: If there is any color indifference after scanning a card, you can calibrate the scanner
by clicking Calibration on the Tool menu.
2.3 Preparation for Card Scanning
Page 16
Chapter 2 Getting Started
2-5
2.3.2 Start-up Wizard
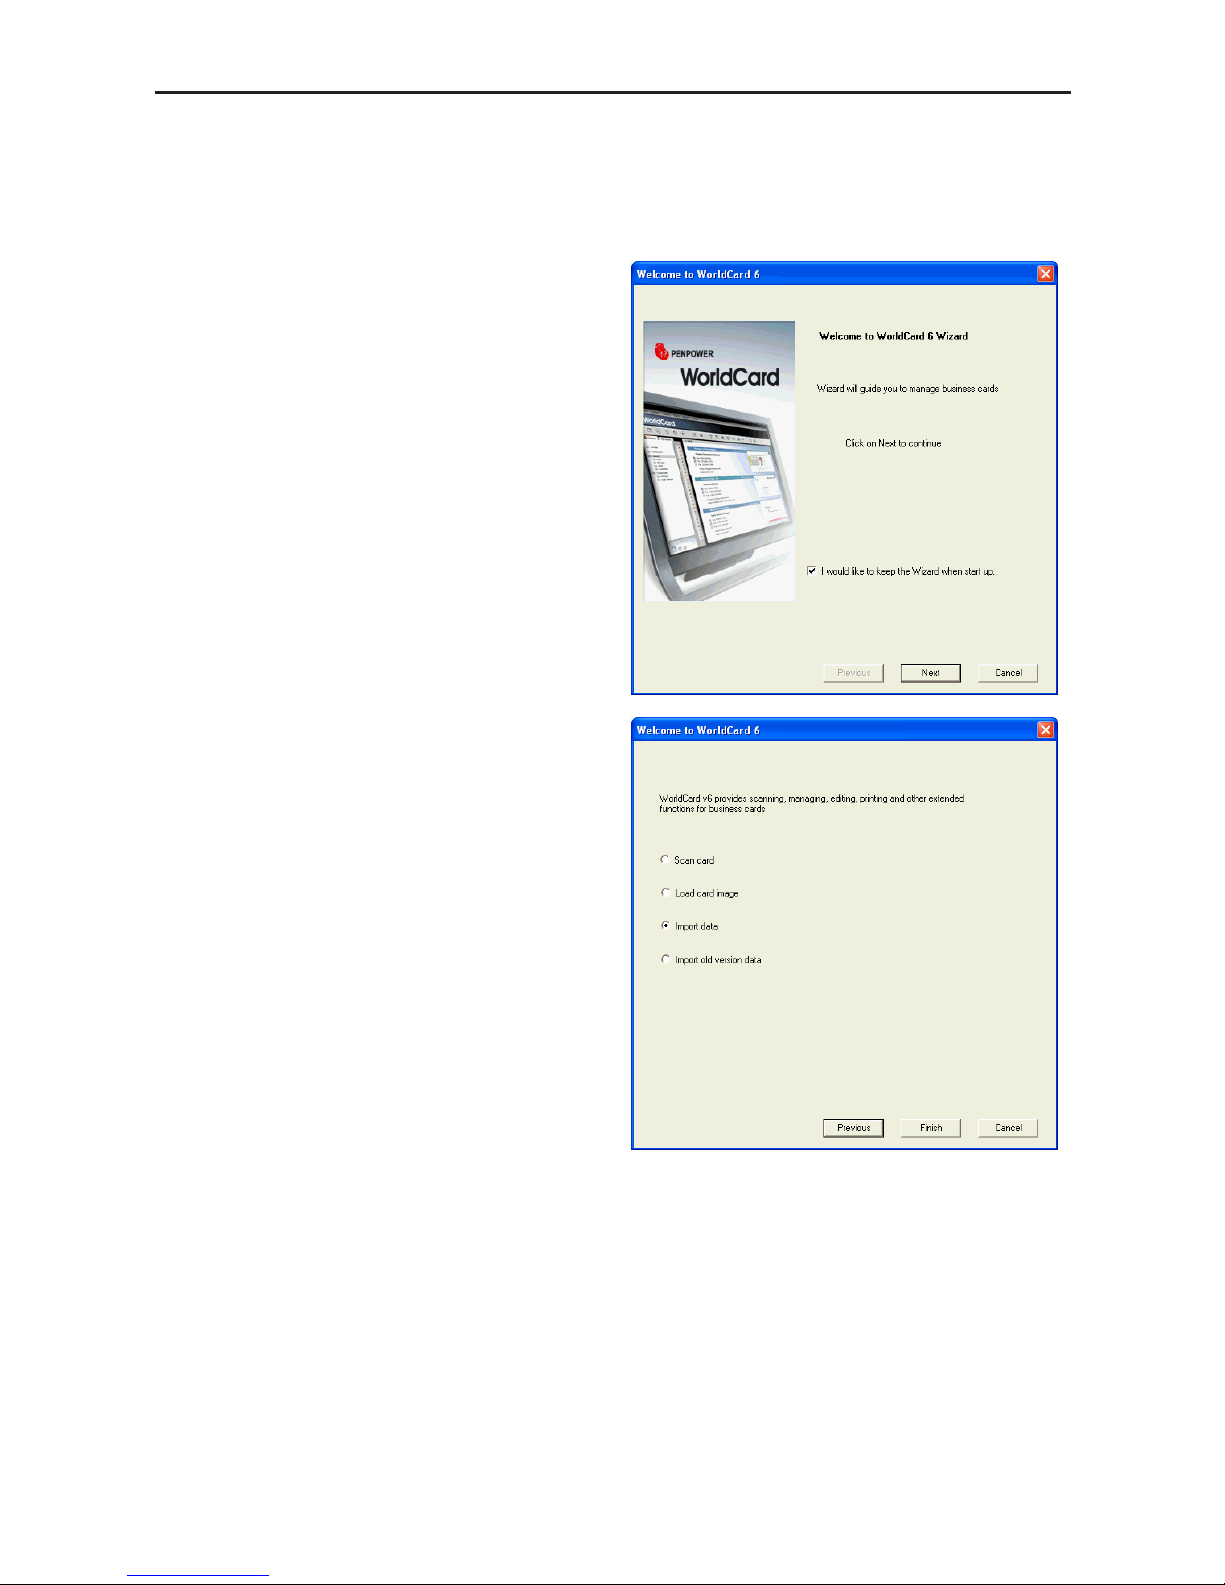
Start your WorldCard application by double-clicking the WorldCard shortcut on your
desktop. After the WorldCard application starts, the following screen will appear.
1. To start the wizard, click Next.
2. The Wizard can help you quickly choose
what you want to do:
Scan Card: Add a card to your le.
Load Card Image: Take an existing
picture of a business card and add it to
your le.
Import data: Import data from sources
such as Lotus Notes, Microsoft Outlook
and Outlook Express, PocketPC, Palm,
ACT! by Sage, Goldmine, Salesforce,
and WorldCard series, such as World-
Card windows versions, WorldCard
Mobile versions ( WorldCard Mobile and
WorldCard Contacs).
Notes: The Windows Vista version does not support importing data from Windows Con-
tacts, Pocket PC and Goldmine.
Import Old Version Data: Import the previous WorldCard le formats into your new
WorldCard File. You can select a command and click Finish to continue.
Page 17
2-6
WorldCard
2.4 Online Help
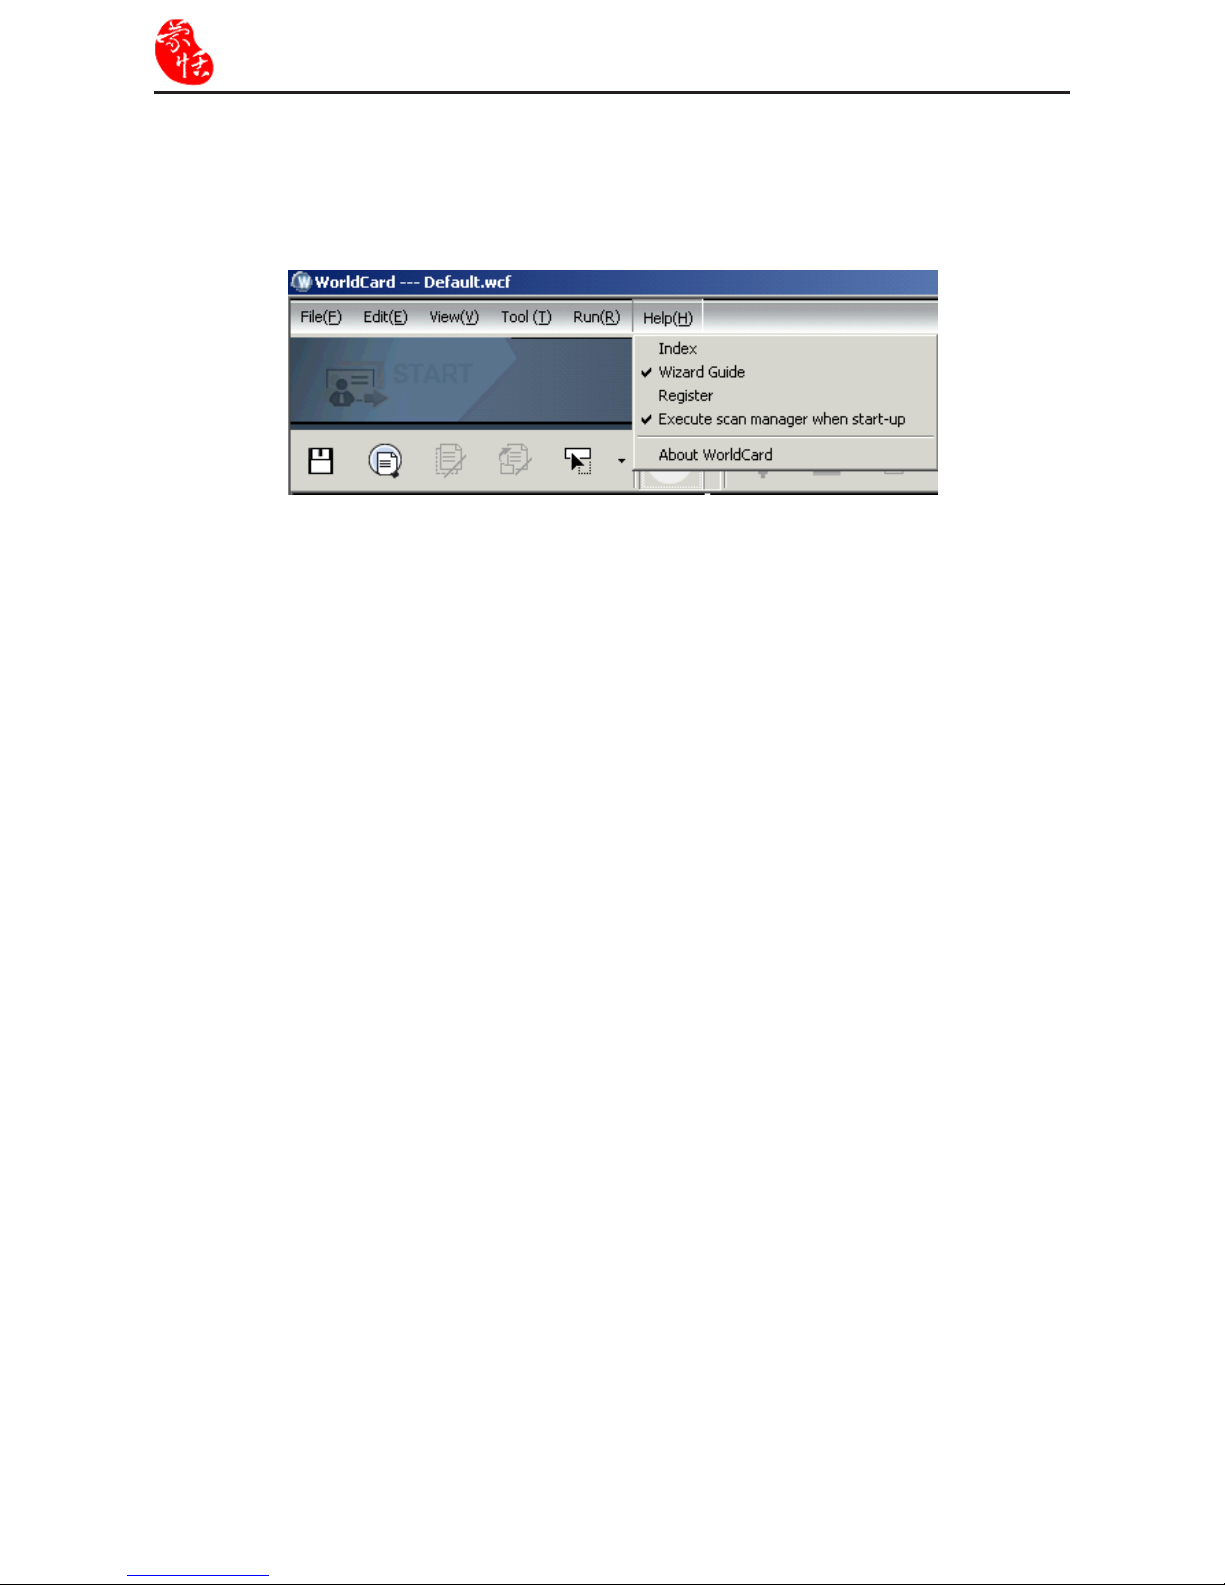
WorldCard provides excellent online help info:
1. Click Help/Index to nd the user manual.
2. Click About WorldCard, you can go to Penpower Technology Ltd. ofcial website at the
left side to get more information; the hardware information is shown at the right side.
3. Also you can send e-mail to our customer service contact by pressing Send Email at the
bottom. You can open your favorite email client, copy and paste hardware information
and email to us.
Page 18
Chapter 3 Overview
3-1
Chapter 3 Overview
3.1 User Interface
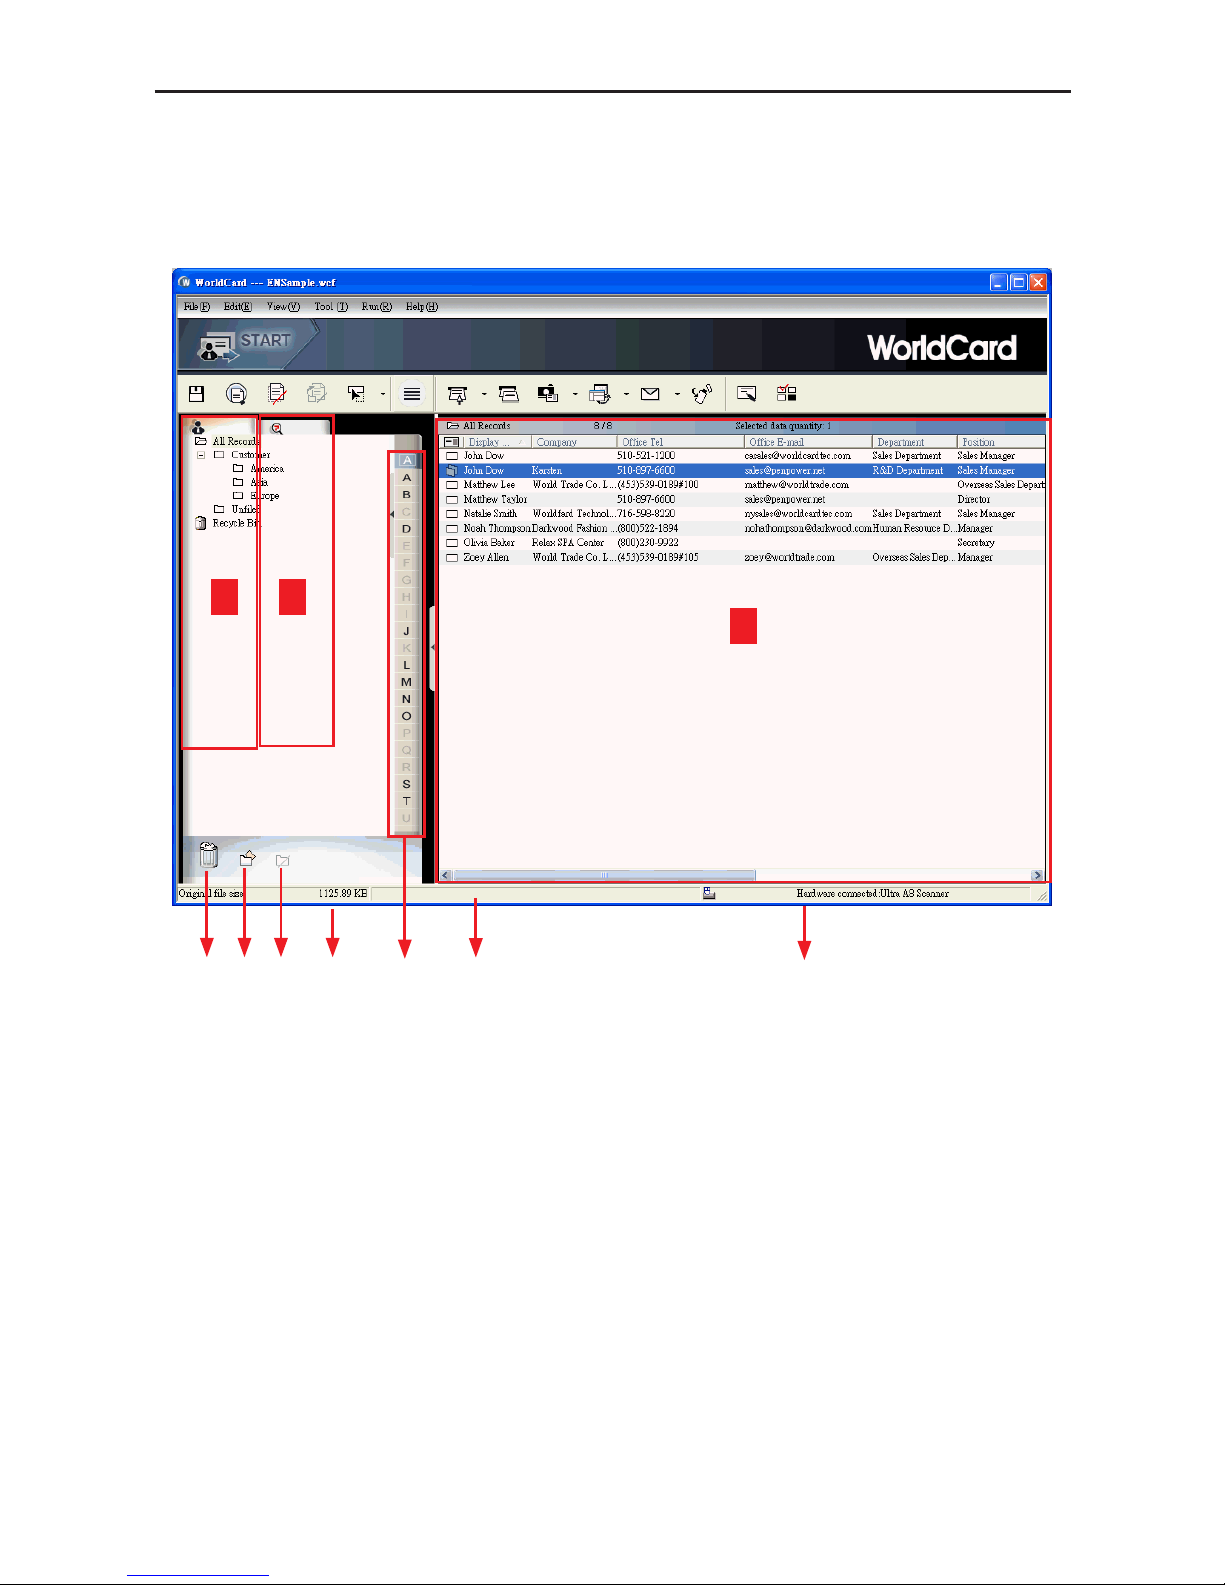
A: Category tab
B: Search tab
C: Card Window
D: Recycle bin
E: Add Category
D
E F G
A
H
J
C
B
I
F: Delete Category
G: Disk space used
H: Status
I: Alphabet Index
J: Connection status
Page 19
3-2
WorldCard
3.1.1 Toolbar
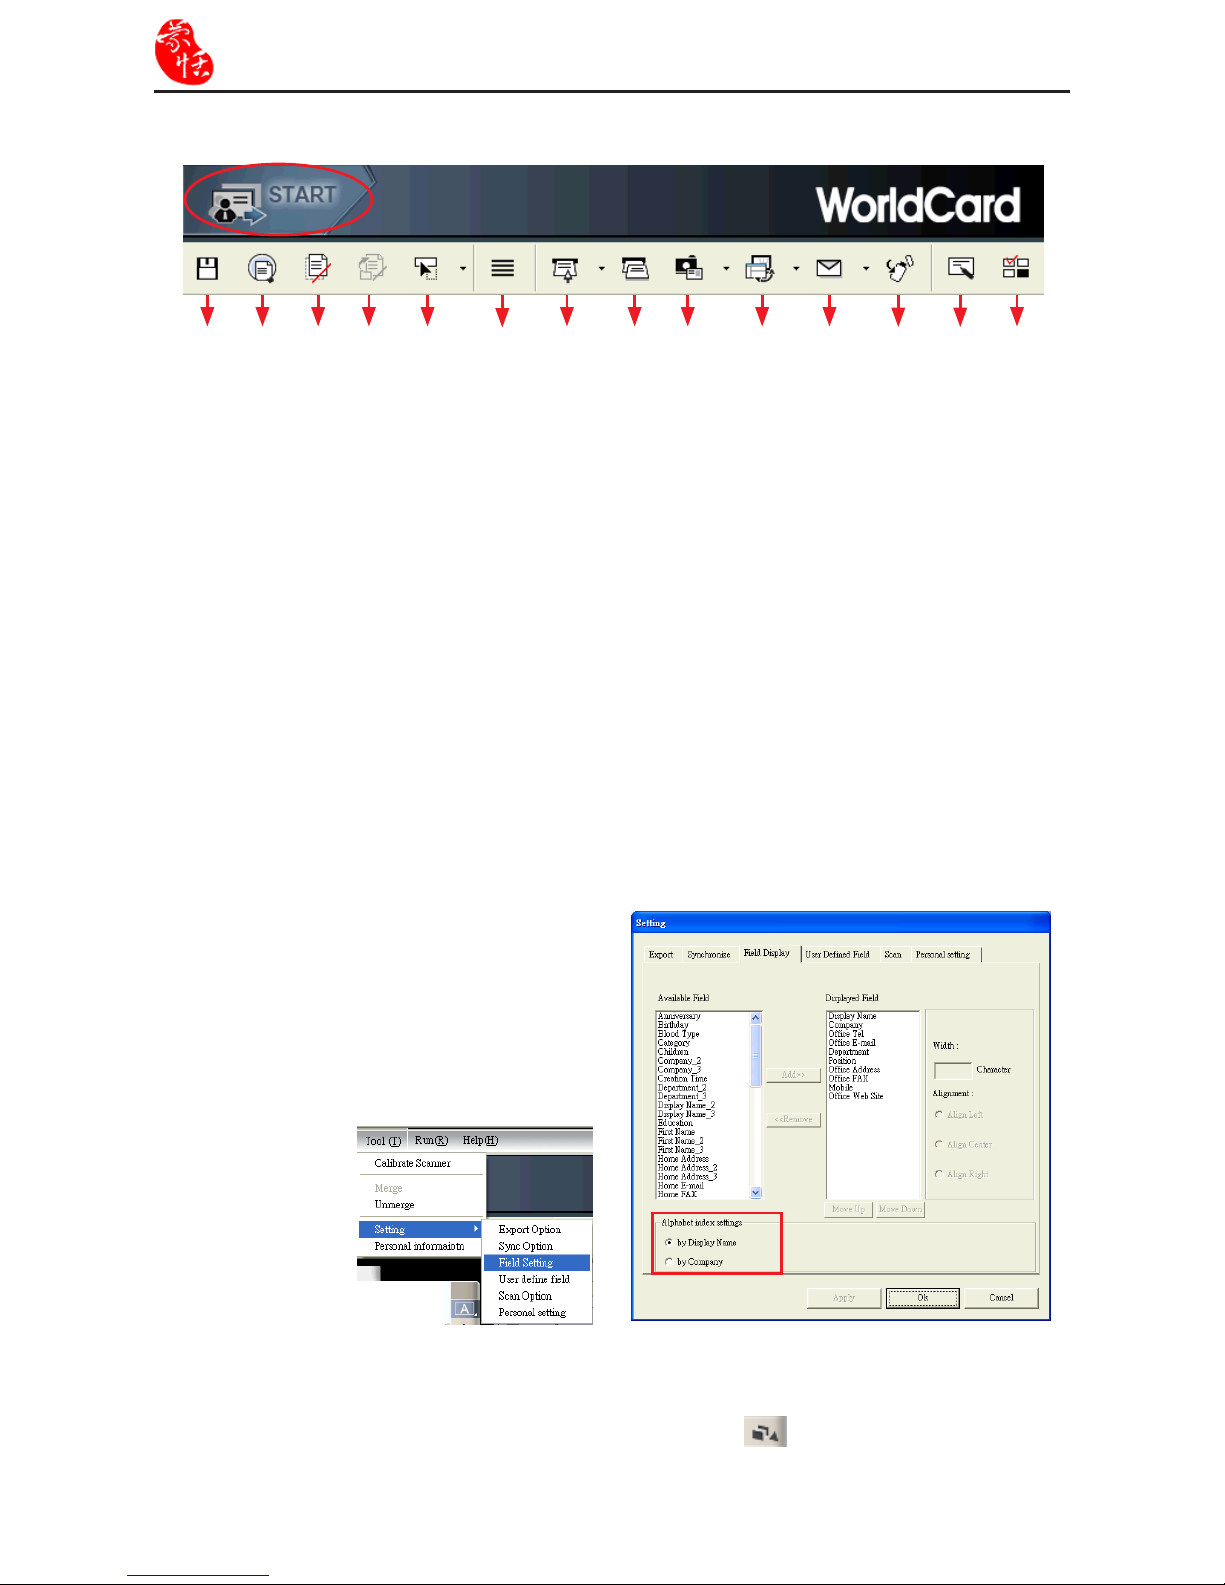
A: Save Your Card File
B: Print Preview
C: Delete Card
D: Delete Card from Category
E: Settings
F: Mode Button
G: Scan a New Business Card
H: Scan Multiple Business Cards
I: Add a New Card from Another Picture
Source
A L M NIH
G
FEDCB J K
J: Synchronize with Outlook/PDA/Palm/
Lotus notes
K: Send Email
L: Export All Your Data and the Portable
Software to the Selected Flash Disk
or Hard Drive
M: Edit Card
N: Edit Print Template
When by Display Name is selected, the contacts will be sorted by display name. When by
Company is selected, the contacts will be sorted by company name. If the display name or
company name is not English, the contact will be put in the
group.
To choose to sort contacts by Display
Name or Company, please go to Setting
on the Tool menu and select Field Setting.
In the Alphabet Index settings section, you
can choose by Display Name or Company.
3.1.2 Alphabet Index
Page 20
Chapter 3 Overview
3-3
3.2 Scan Business Cards
3.2.1 Scan Directly
To scan your business card, insert the card into your WorldCard Scanner. The scanner
scans the card immediately. The recognition result saves to the system.
Note: Insert the business card facing up into the WorldCard Color and Ultra plus scanner.
Insert the business card facing down into the WorldCard Ofce scanner. WorldCard
Color scanner has two hardware buttons. The one on the top is for scanning pictures
via the TWAIN interface, another one for scanning business cards.
Tips:
1. After scanning business cards, please check the recognition results by Editing function
for ensuring the accuracy.
2. Click the Setting arrow
and click Scan Option, or click Tool/Setting/Scan Opting
to set the recognition language. Refer to Chapter 5.10.5 for more detailed explanation.
3.2.2 Scan Wizard
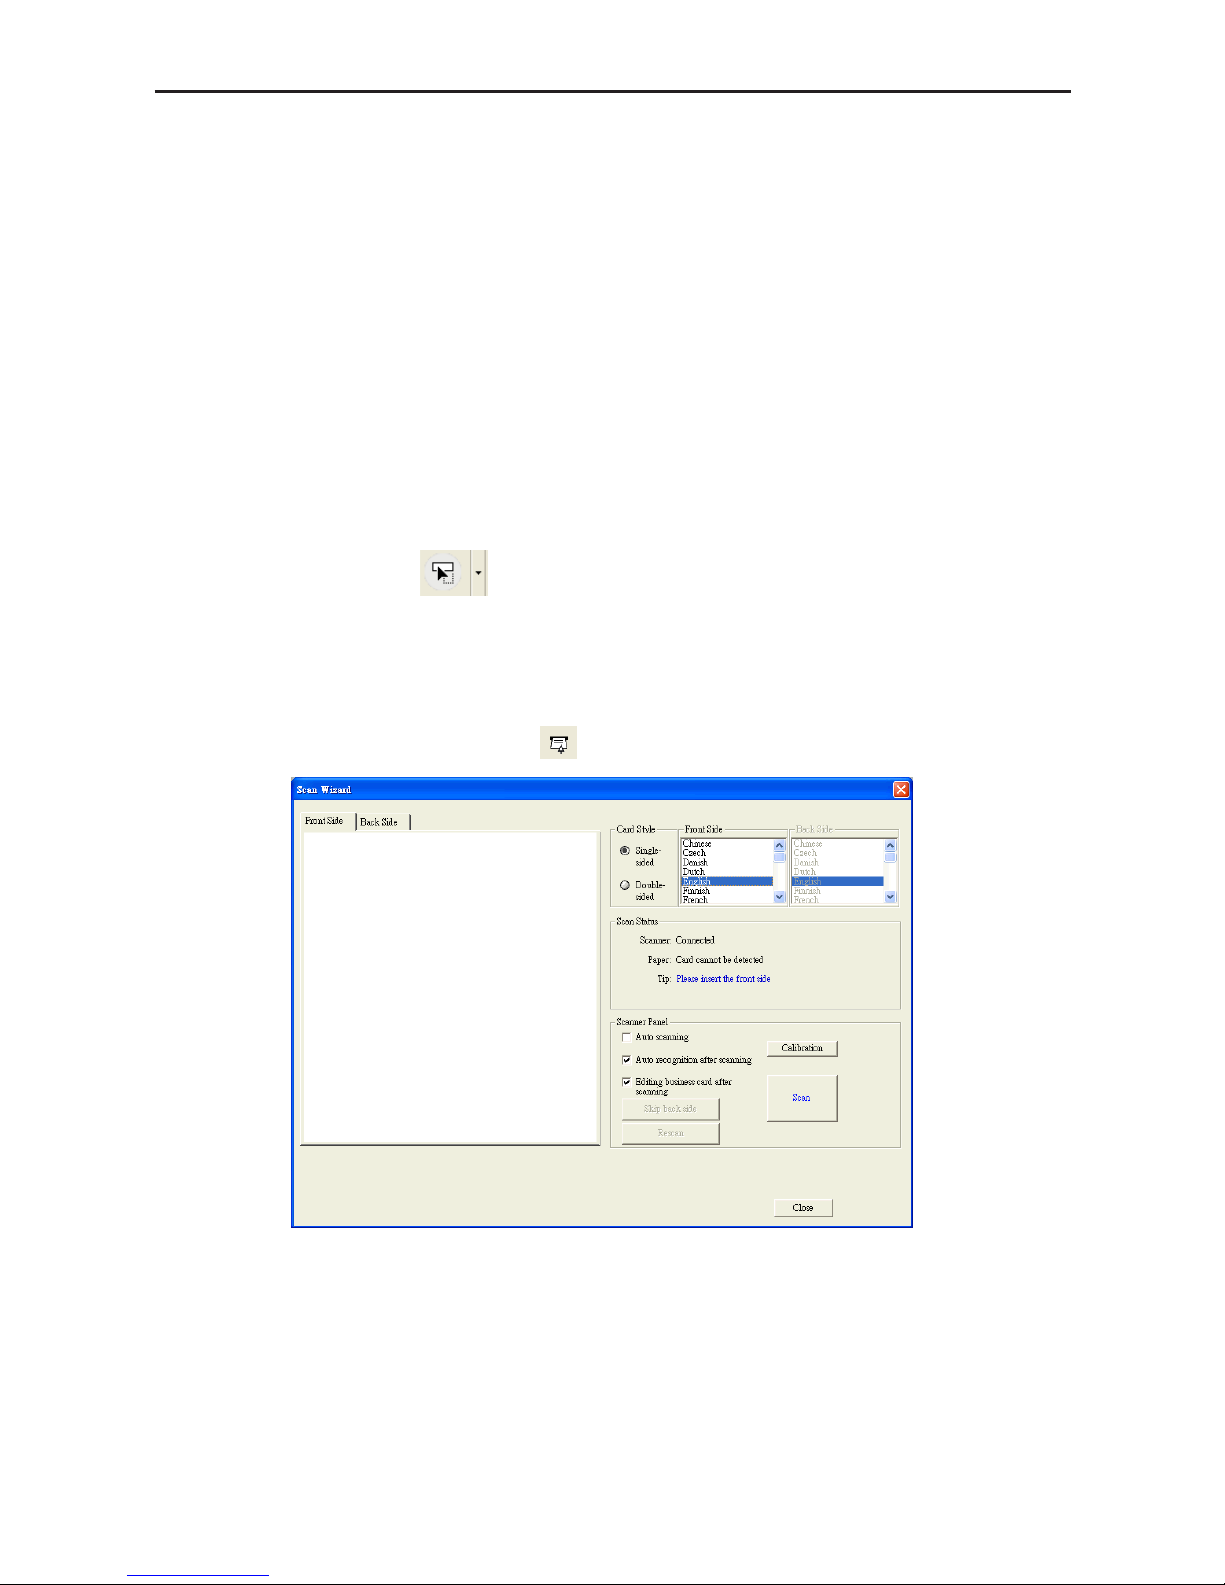
To scan business cards, select Scan to launch Scan Wizard.
1. Under Card Style, select Single-sided or Double-sided.
2. Select the language of the card. If the card is double-sided, please select the language of
the both sides.
3. Insert the card into your WorldCard Scanner and insert the card. Then the Scanner status
area should say Ready.
Page 21
3-4
WorldCard
3.2.3 Batch Scanning
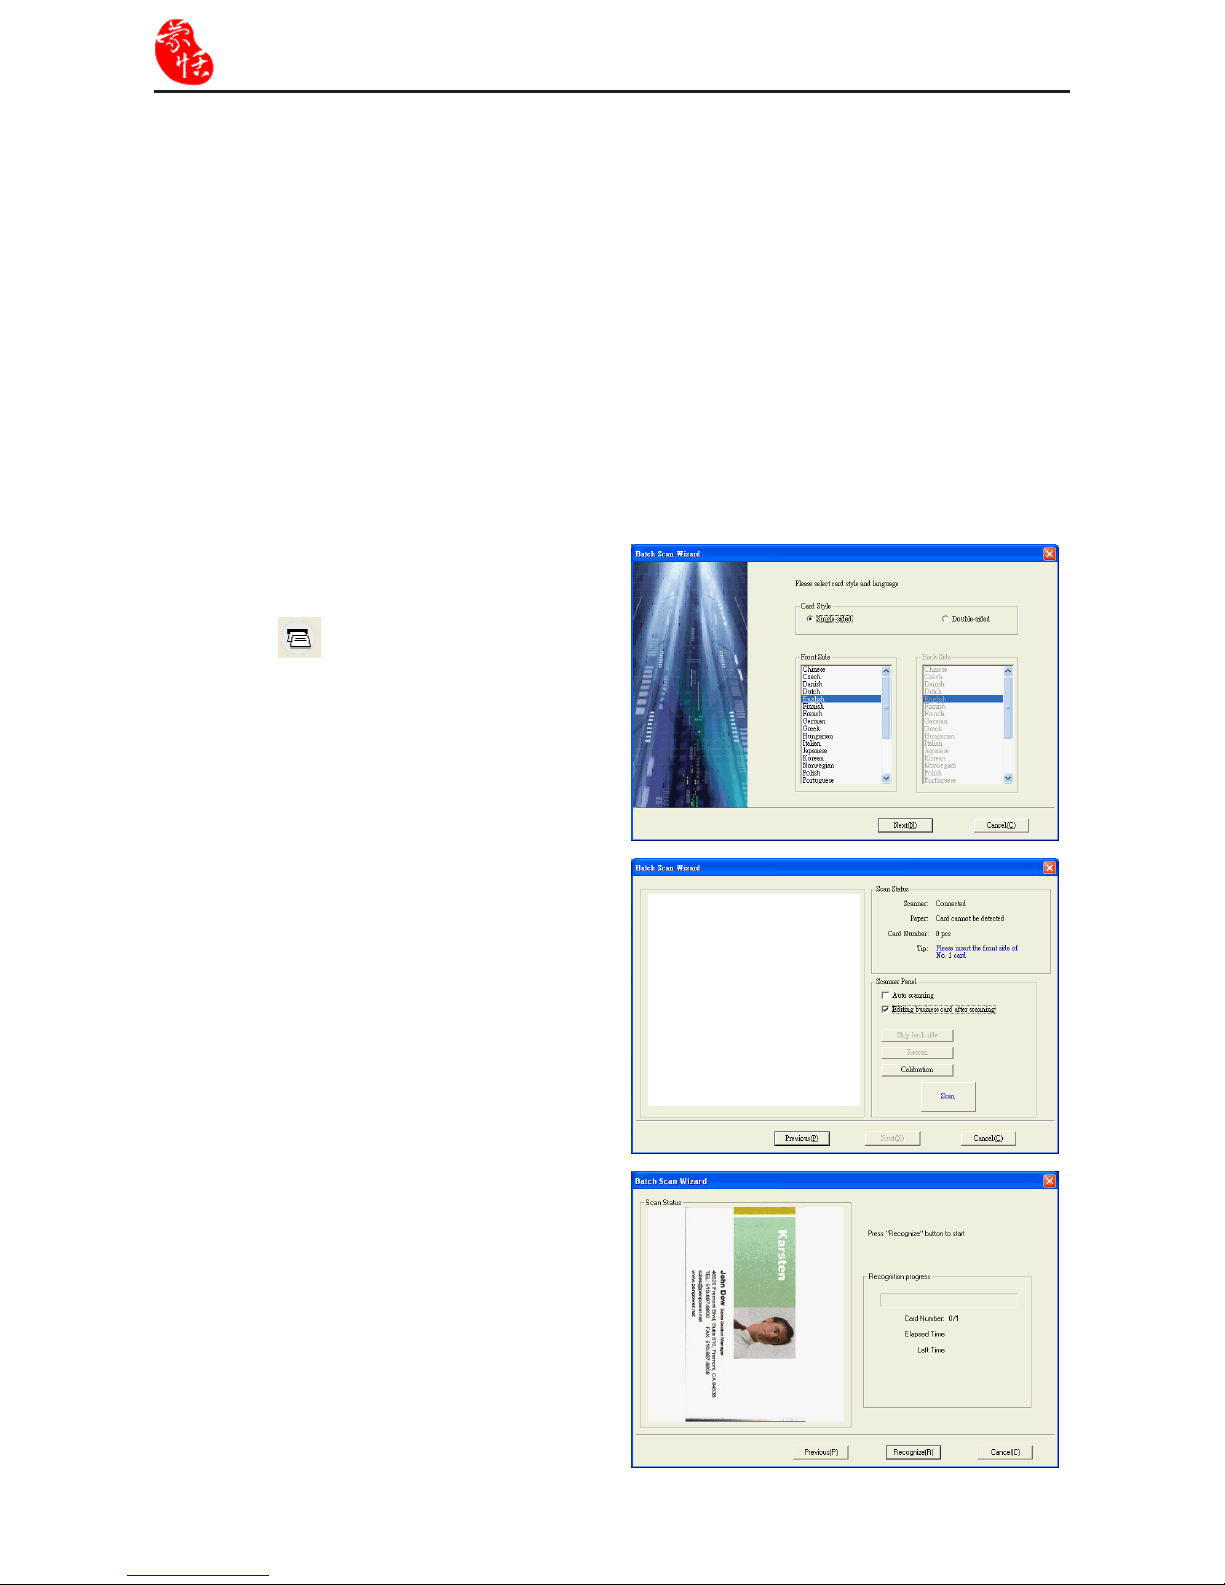
To batch-scan business cards, please select
Batch Scan
from the toolbar.
With this command, you can scan many
cards easily, preview them, and then add them
to your Card File.
1. Select single or double-sided. Next, select
the languages of each side.
Note: Only cards (single-sided or double
sided) that have the same languages
chosen for each card can be batchscanned.
2. The Scan status pane displays the status of
the scanner. Select Auto scanning if you
want the card be automatically scanned
once it is inserted. If the card does not scan
properly, click Rescan to try again. If you
want to return to the previous screen, click
Previous.
3. This screen allows you to quickly recognize
all the cards scanned during this batch.
When you are done, click Finish.
4. In the Scanner Panel area, please select:
- Auto scanning if you want the scan to automatically start when the card is inserted.
- Auto recognition after scanning if you want the card information to be automatically
added to your le. If you want to preview the scanned card image before recognition,
do not select this. If you select Double-sided, you can click Skip back side to scan
the front side only.
- Editing business card after scanning to display the Edit window when closing the
Scan Wizard.
5. After you recognize the card, the information will automatically go into the Unled category.
Page 22
Chapter 3 Overview
3-5
3.4 Viewing Contacts
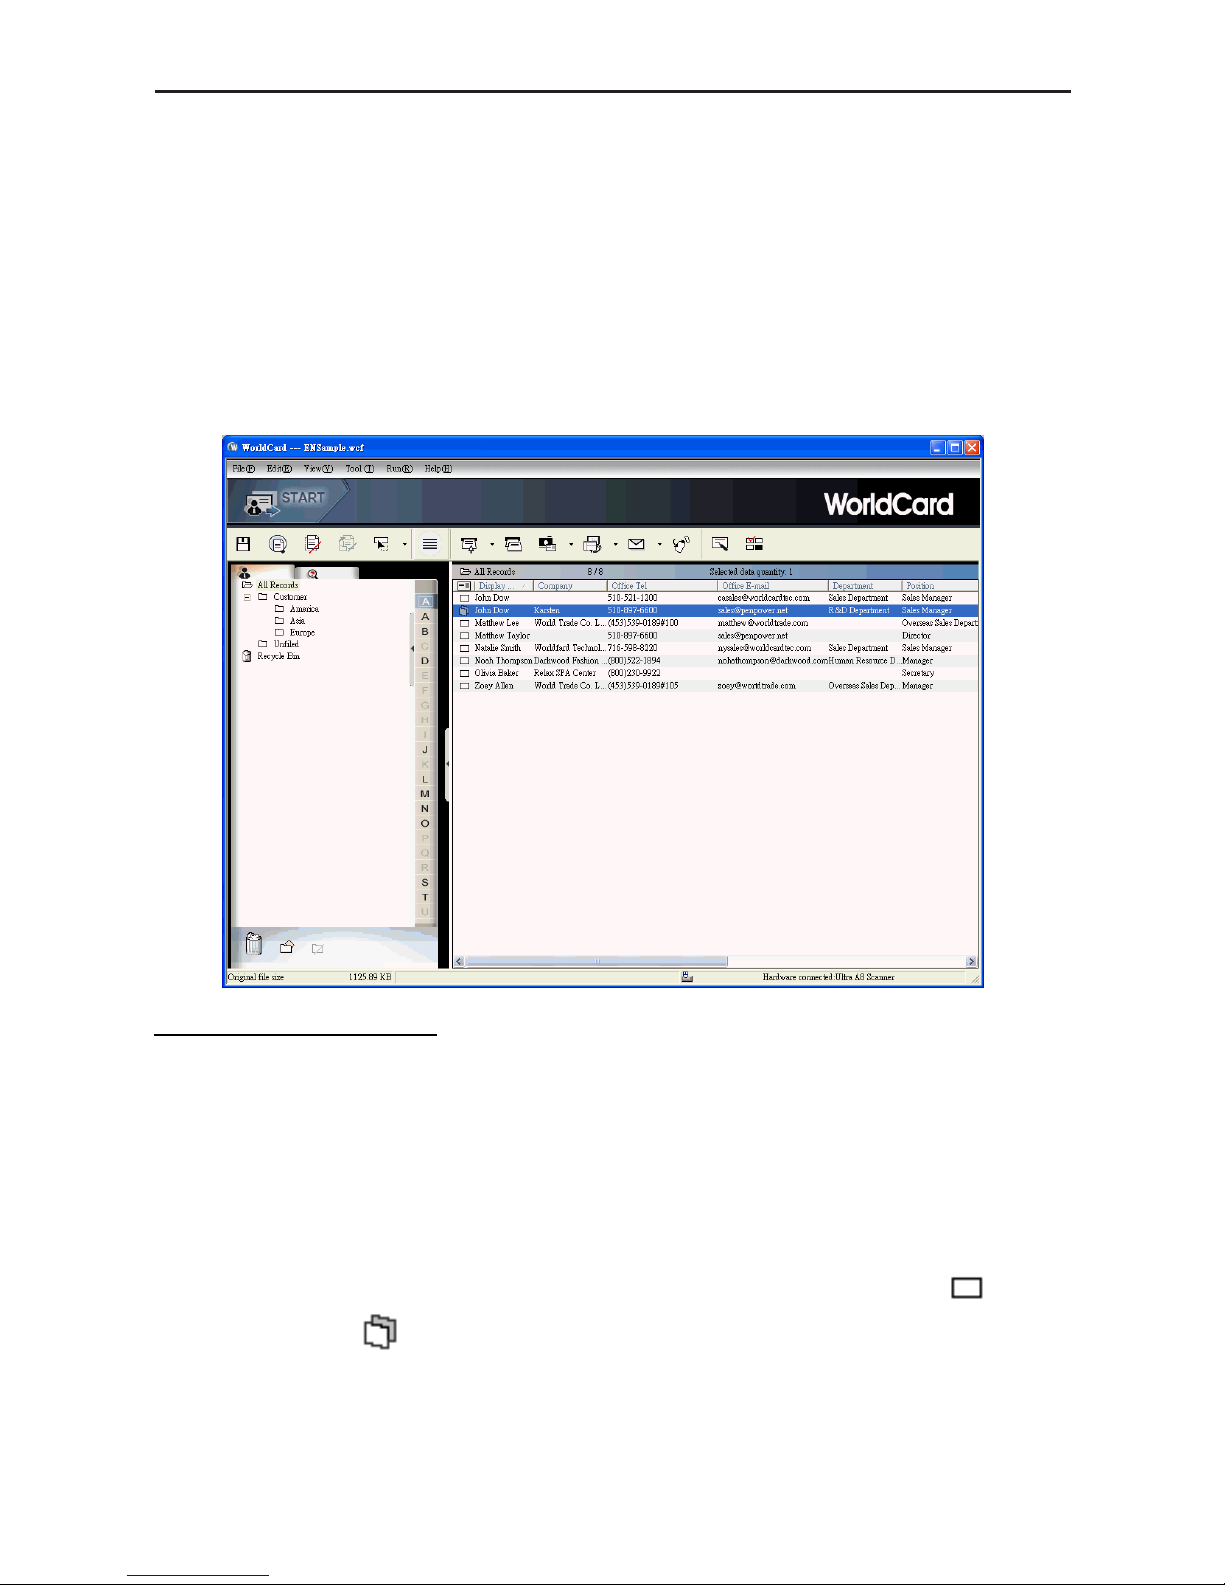
WorldCard provides several ways to view your contacts: List Mode, Label Mode, Im-
age Mode and Dual Mode. The default setting is List mode. List Mode is the default mode
view. To select a mode, please click View Mode on the View menu or click the Mode arrow
from the toolbar.
3.4.1 List Mode View
Contact Information List
After scanning business cards, you will see the scanned contact information list in the right
pane of the card window.
At the top of the pane, you can quickly see how many cards are in each category. For easy
organization, the dark-highlighted entries indicate cards that have not been edited or veried yet.
Click the eld name to sort the contact information alphabetically,
Besides the contact information, you can also quickly discriminate the single
and
double sided card
by their different icons.
Tip: You may select the displayed elds from the Tool menu by choosing Field Setting/
Setting.
Page 23
3-6
WorldCard
Category tab
You can manage your business cards by storing them into category groups. The Category
tab is in the left pane of the card window. The All Records category and the Unled category
are the preset categories. WorldCard allows you to add as many user-specied categories and
sub-categories to manage your business cards as you choose.
3.4.2 Label Mode
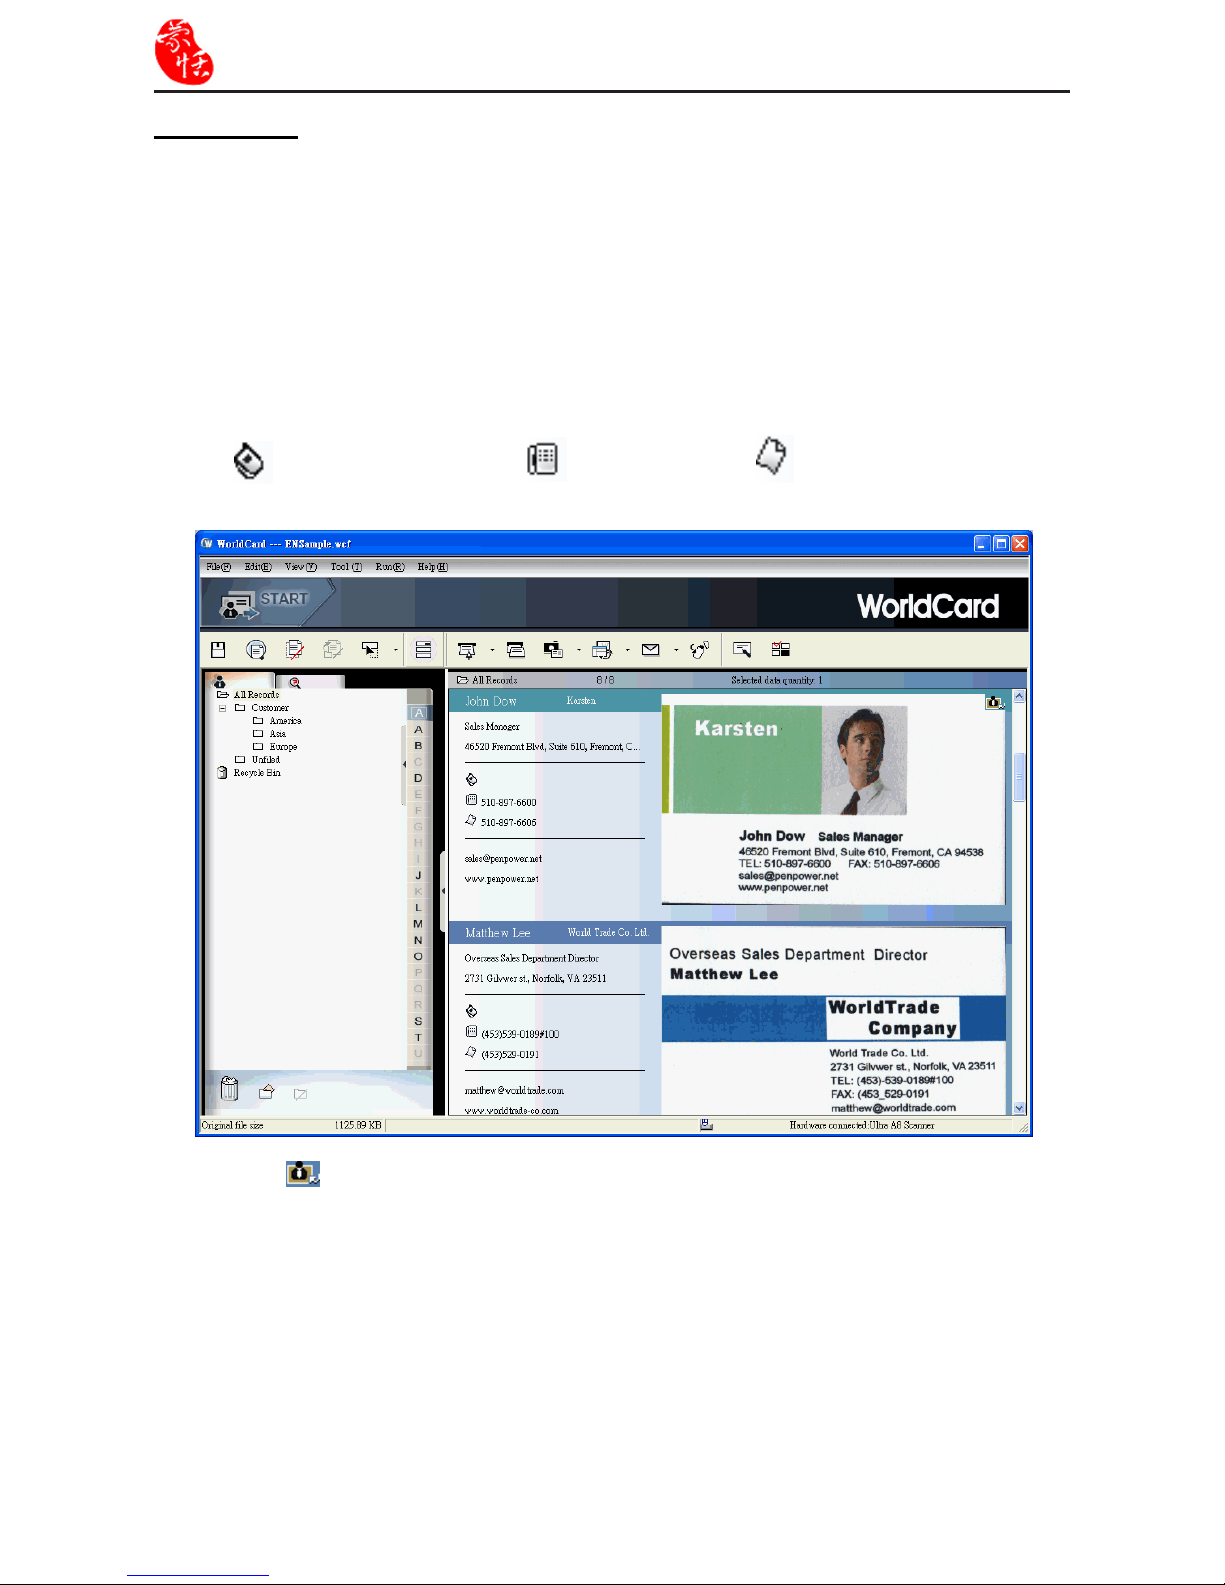
Label Mode displays contact information and business card at the same time.
The contact information shows display name, company, title, ofce address, mobile phone
number
, ofce telephone number , ofce fax number , Email address and website.
When the icon appears in the right-top corner, it means the contact has a double-sided
business card image. You can click the icon to see the other side of business card image.
Page 24
Chapter 3 Overview
3-7
3.4.3 Image Mode
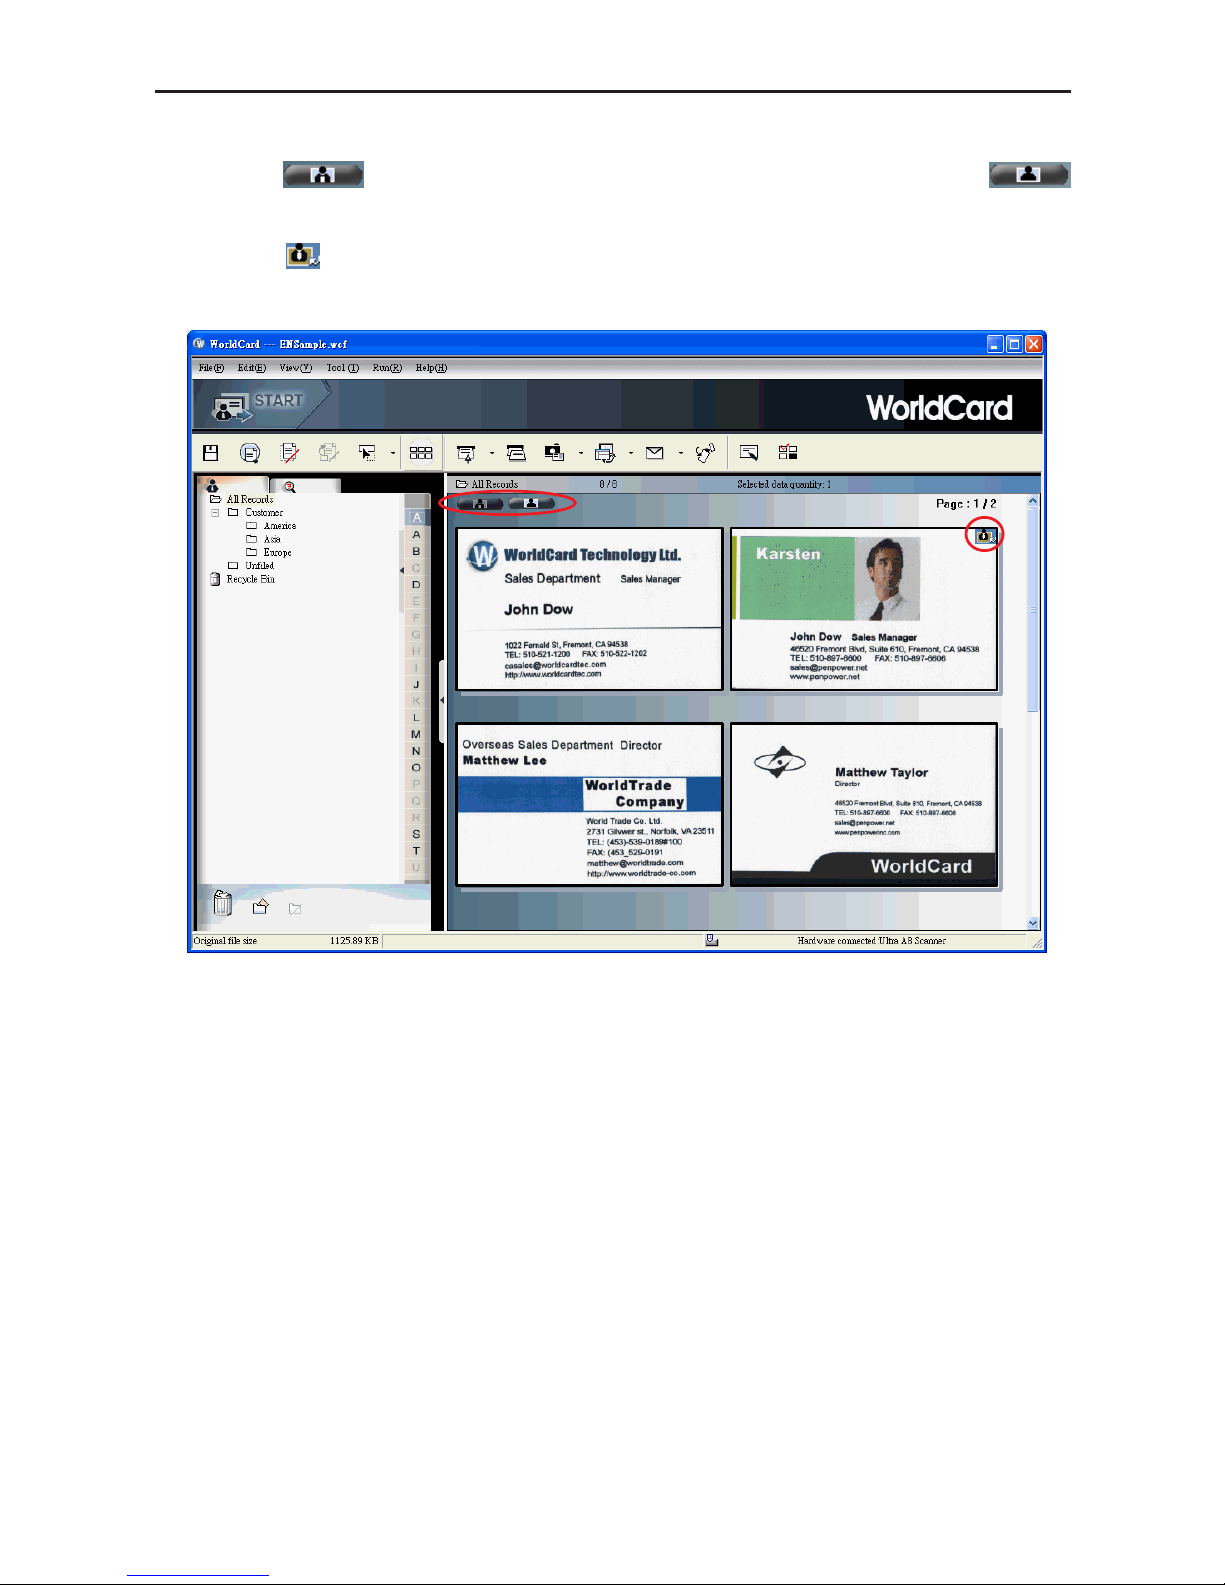
Click the button to view the front sides of all business cards. Click the
button to view the back side of all business cards.
When the
icon appears in the right-top corner, it means the contact has a double-sided
business card image. You can click the icon to see the other side of the business card image.
Page 25
3-8
WorldCard
Tip: Drag the business card image from the view modes (except List Mode) to other ap-
plications such as Microsoft Word, Excel etc.
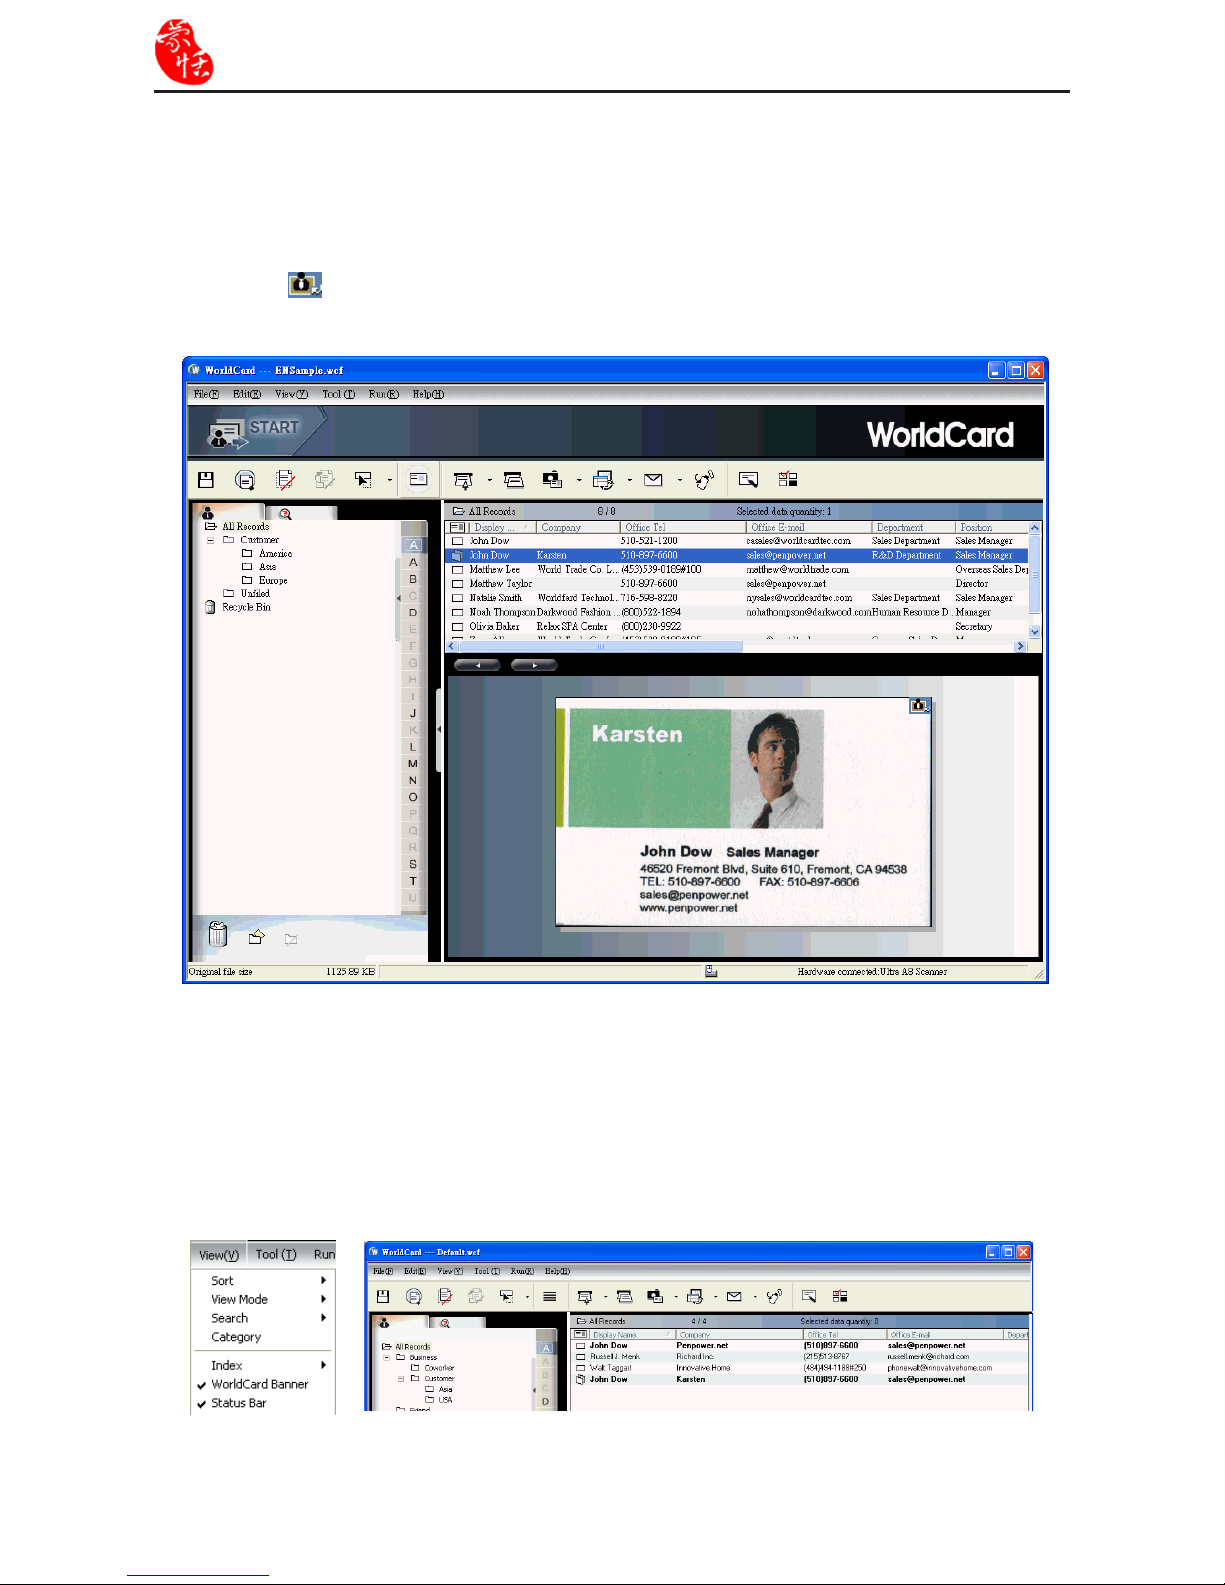
3.4.5 Hide WorldCard Banner
To hind WorldCard Banner and can extend the management area, please click View/
WorldCard Banner.
3.4.4 Dual Mode
Dual Mode lists the scanned contact information in the upper right management pane and
displays the front and back side images of the business card in the lower right pane. You can
click the front or back side icon of the card to magnify it.
When the
icon appears in the right top corner, it means the contact has double-sided
business card image. You can click the icon to see the other side of business card image.
Page 26
Chapter 4 Editing Cards
4-1
Chapter 4 Edit Cards
4.1 Edit Window Overview
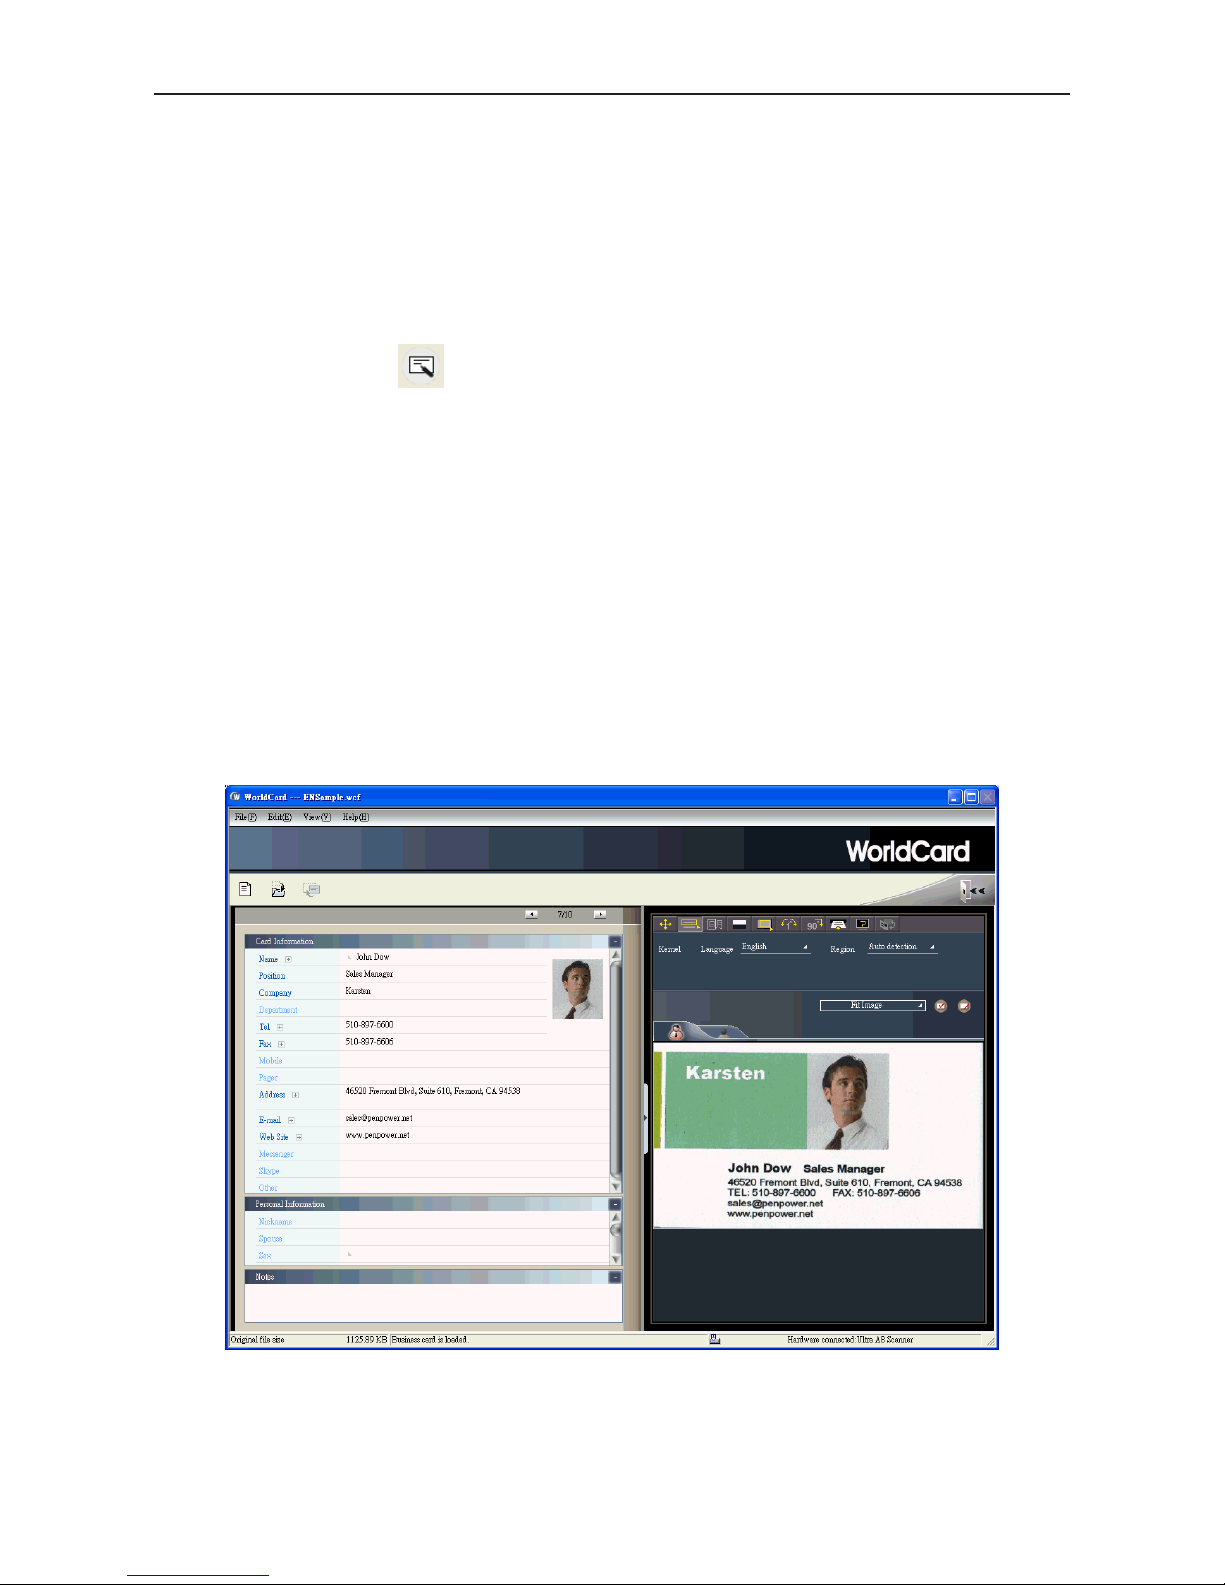
The Edit window allows you to edit the information of individual business cards.
Double-click any card record in the list menu of the management pane or click the Edit
Selected Record button
on the Edit toolbar to select the Edit window, .
You may click a record and press CTRL or SHIFT key on your keyboard, and then click
another record for multiple selection.
4.2 Verify Contacts
The Edit window allows you to verify the contact information for any specic business
card. When the editing window is open for a card, the following screen will be presented
containing information relevant to the card selected from the Management window.
The Edit window may be used to edit any information on a business card and to correct
or update information as necessary for future changes of an individual contact. The features
and functions of this window are described below
Page 27
4-2
WorldCard
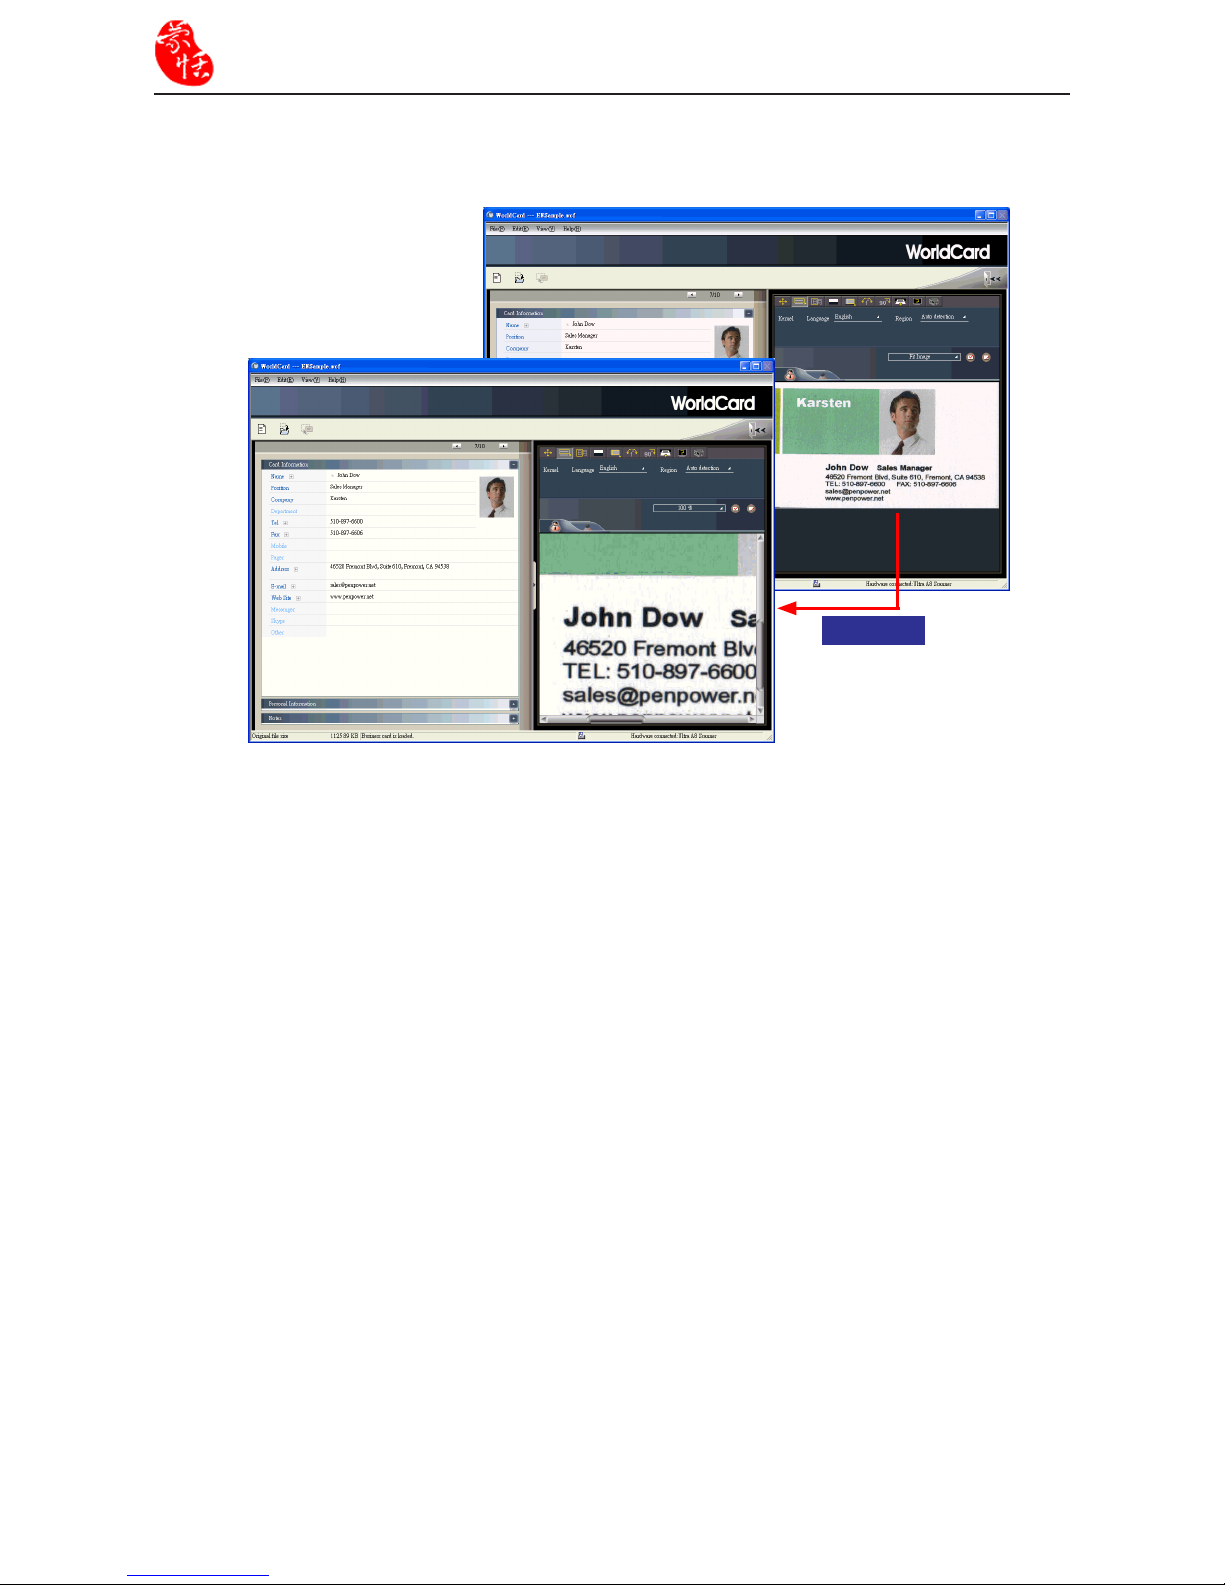
Note: You can double-click on the business card image to see a bigger image or back to
original view.
Enlarge
Page 28
Chapter 4 Editing Cards
4-3
4.3 Edit Contacts
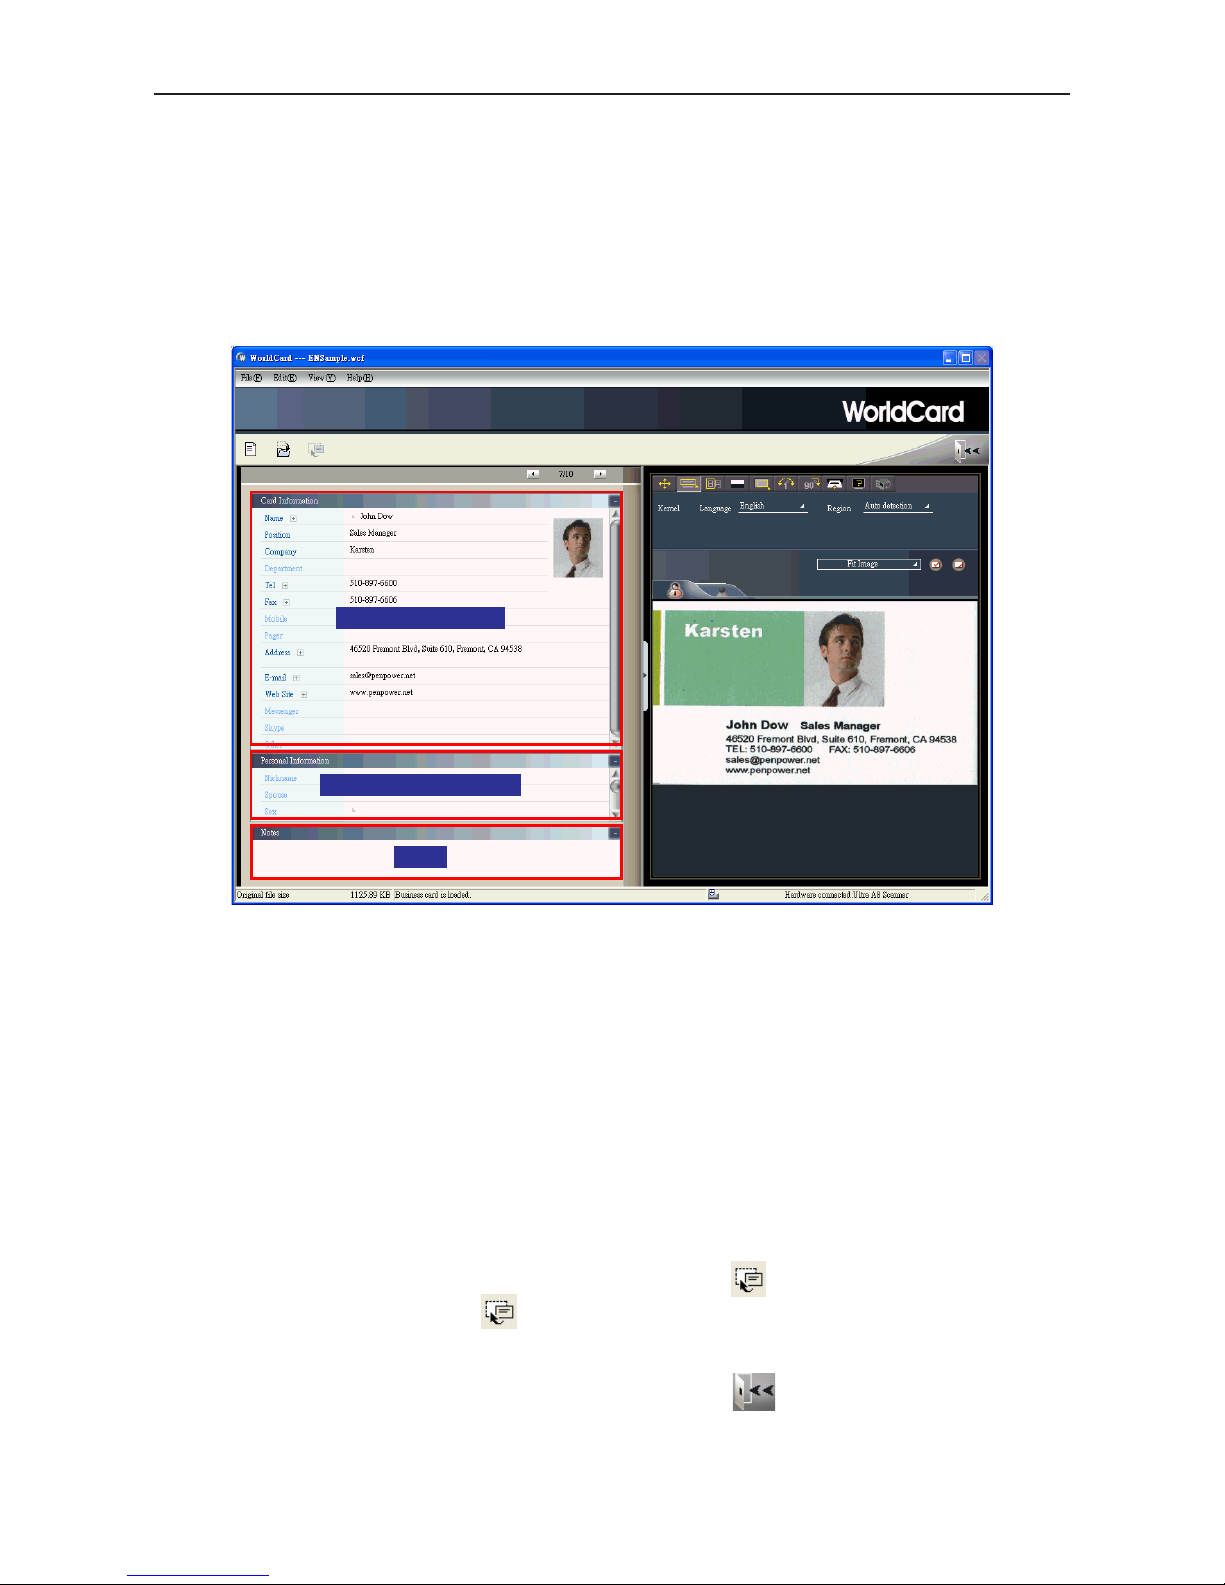
The WorldCard Edit window has three panes: the Card Information pane, the Personal
Information pane and the Notes pane. The Card Information pane displays all relevant
business card data retrieving from the card. The Card Information pane is shown in the following picture.
The information in the Card Information pane is categorized in elds such as Name,
Position, Company, Address, Telephone/Fax numbers, Email address and Web Site. Additional categories are also available.
The Personal Information pane displays personal information about your contact which
is not retrieved from your contacts business card.
The Notes pane stores/displays important data from your personal notes about your business contacts.
Note: If, at any time during the editing mode, an incorrect action is selected, you can
reverse the changes by clicking the Restore button
from the Editing window.
Clicking the Restore Icon
restore the changs of the current content of the busi-
ness card.
To exit the Edit window, right-click the Exit button
or select Exit from the File
menu of the Edit window toolbar.
Card Information
Personal Information
Notes
Page 29

4-4
WorldCard
4.3.1 Recognizing Partial Content of a Card Entry
In some cases, the information of a business card may not be completely recognized. You
may use the Partially Select and Recognize command of the Edit window. To select Par-
tially Select and Recognize, click this icon
.
After clicking the Partially Select and Recognize, you can use the mouse to select the
specic area that contains the correct data.
After selecting the area, select the appropriate eld for the information which has been
highlighted.
Besides, WorldCard allows you partial replacement to the led you want to replace at the
left pane directly. Click the eld you want to replace, select the area in the name card image,
then click Replace current eld. The replacement will be done.
1
2
3
Page 30
Chapter 4 Editing Cards
4-5
4.3.2 Adjusting the Separation Rate
The Separation Rate is the rate of separation between the color of the card background
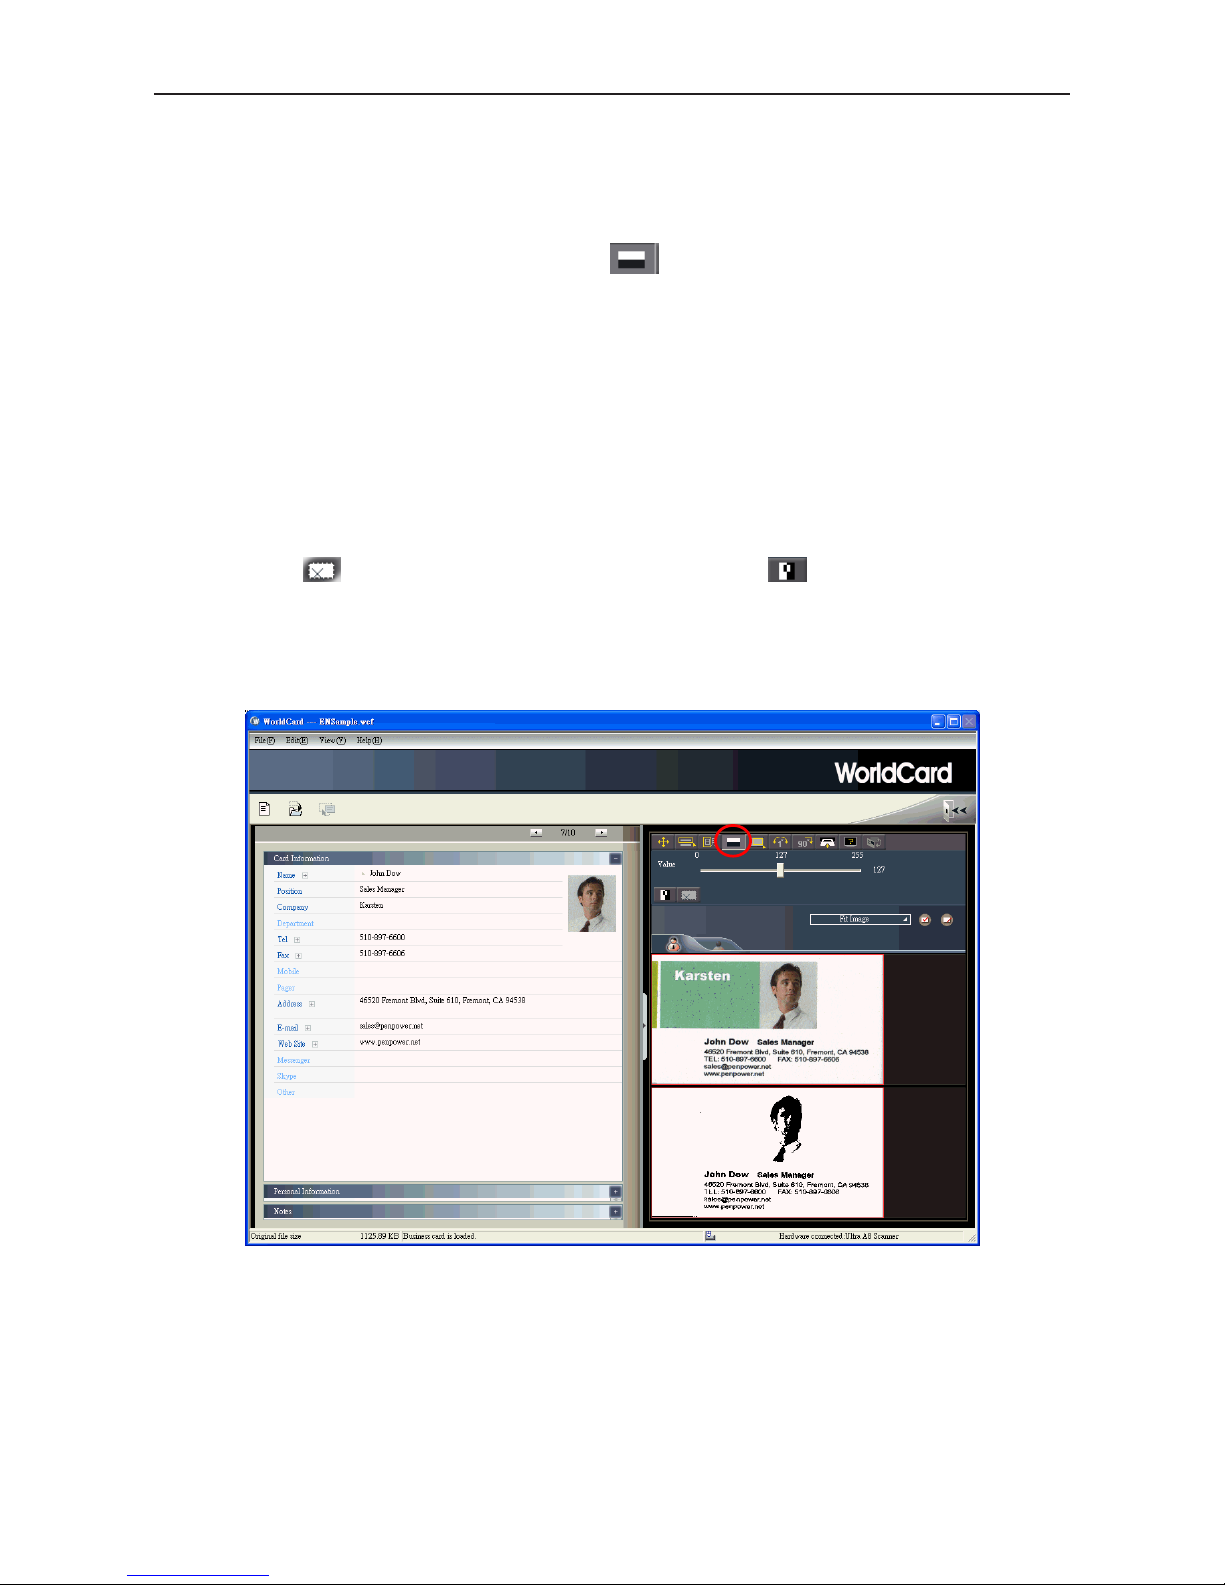
and the color of the text data contained on the business card.
After clicking the Separation Rate button
, the following window appears.
You can move the slider to achieve the clearest contrast between the background colors
of the business card and the text on the card. This adjustment is useful when the business
card image is blurred, or the contrast between the text and the background of the card is not
sufcient for correct recognition of the card information.
You may also adjust the separation rate by area. On the top business card image, select
a specic area, and move the slider to achieve the clearest contrast between the background
and text of the selected area. You can adjust multiple areas, each area with its own separation
rate. Click the
button to remove selected area. Click the button to reverse selected
area.
Page 31

4-6
WorldCard
4.3.3 Reframing Command
The Reframing Manually command allows you to select a specic area of a business card to save. After the appropriate area
is selected, a box will be drawn around the
selected data.
If the data selected to be modied is correct, click Yes in the dialog box.
The data outside of the selection box will
be changed to white.
4.3.4 Fine Rotating
The Fine Rotate command is used
to correct the horizontal positioning of a
card after it has been scanned. This is sometimes necessary if a card has been inserted
into the WorldCard scanner incorrectly and
the resulting scan is skewed in the horizontal plane. An indication of a card that has
been improperly scanned is as follows:
Page 32
Chapter 4 Editing Cards
4-7
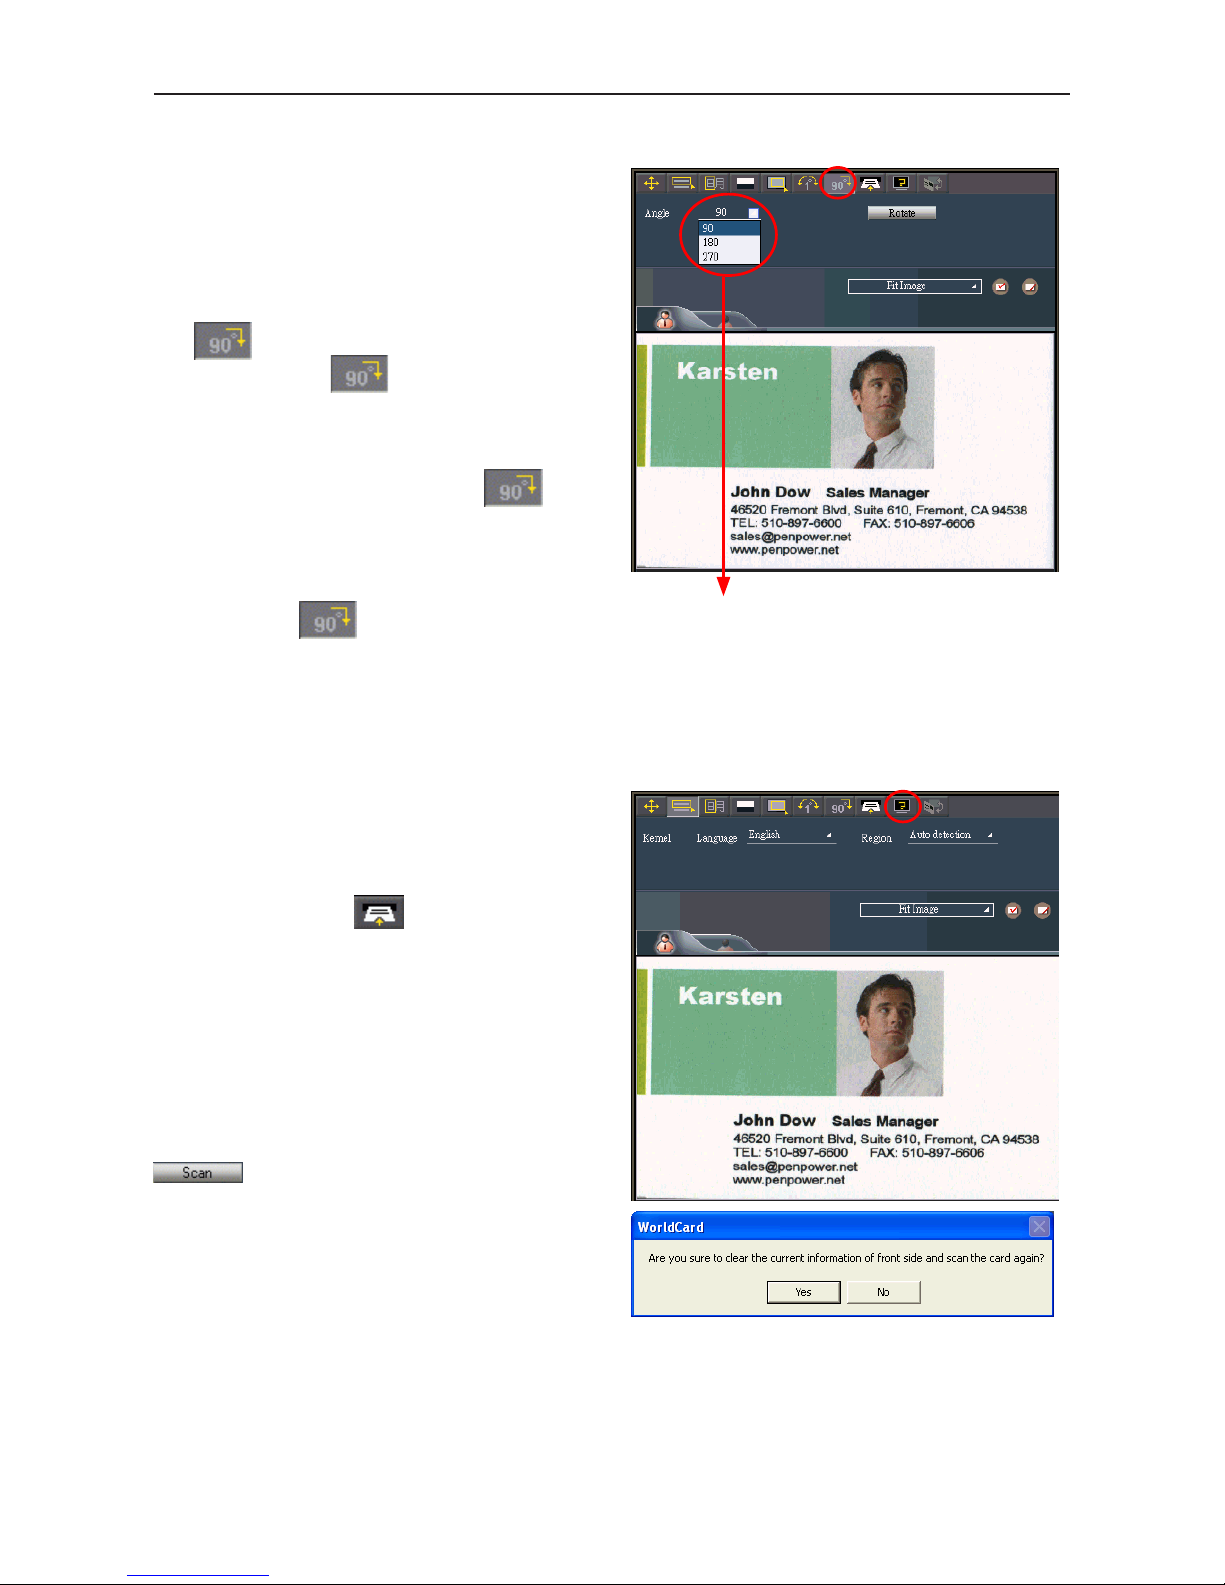
4.3.5 Rotating Card
If the card image shows an incorrect orientation, you can use the Rotate Card command of the WorldCard editor to properly
align the card orientation. To use the Rotate
Card command, click the Rotate Card but-
ton
in the Editor window. After you
click the button
, the rotation angle
options will appear.
Select the appropriate angle of rotation
and then click the Rotate button
. The
card image will then rotate to the selected
orientation. Should you need additional ne
adjustment of the card image, click the Fine
Rotate button
required.
The rotation angle is selectable
from a pulldown menu.
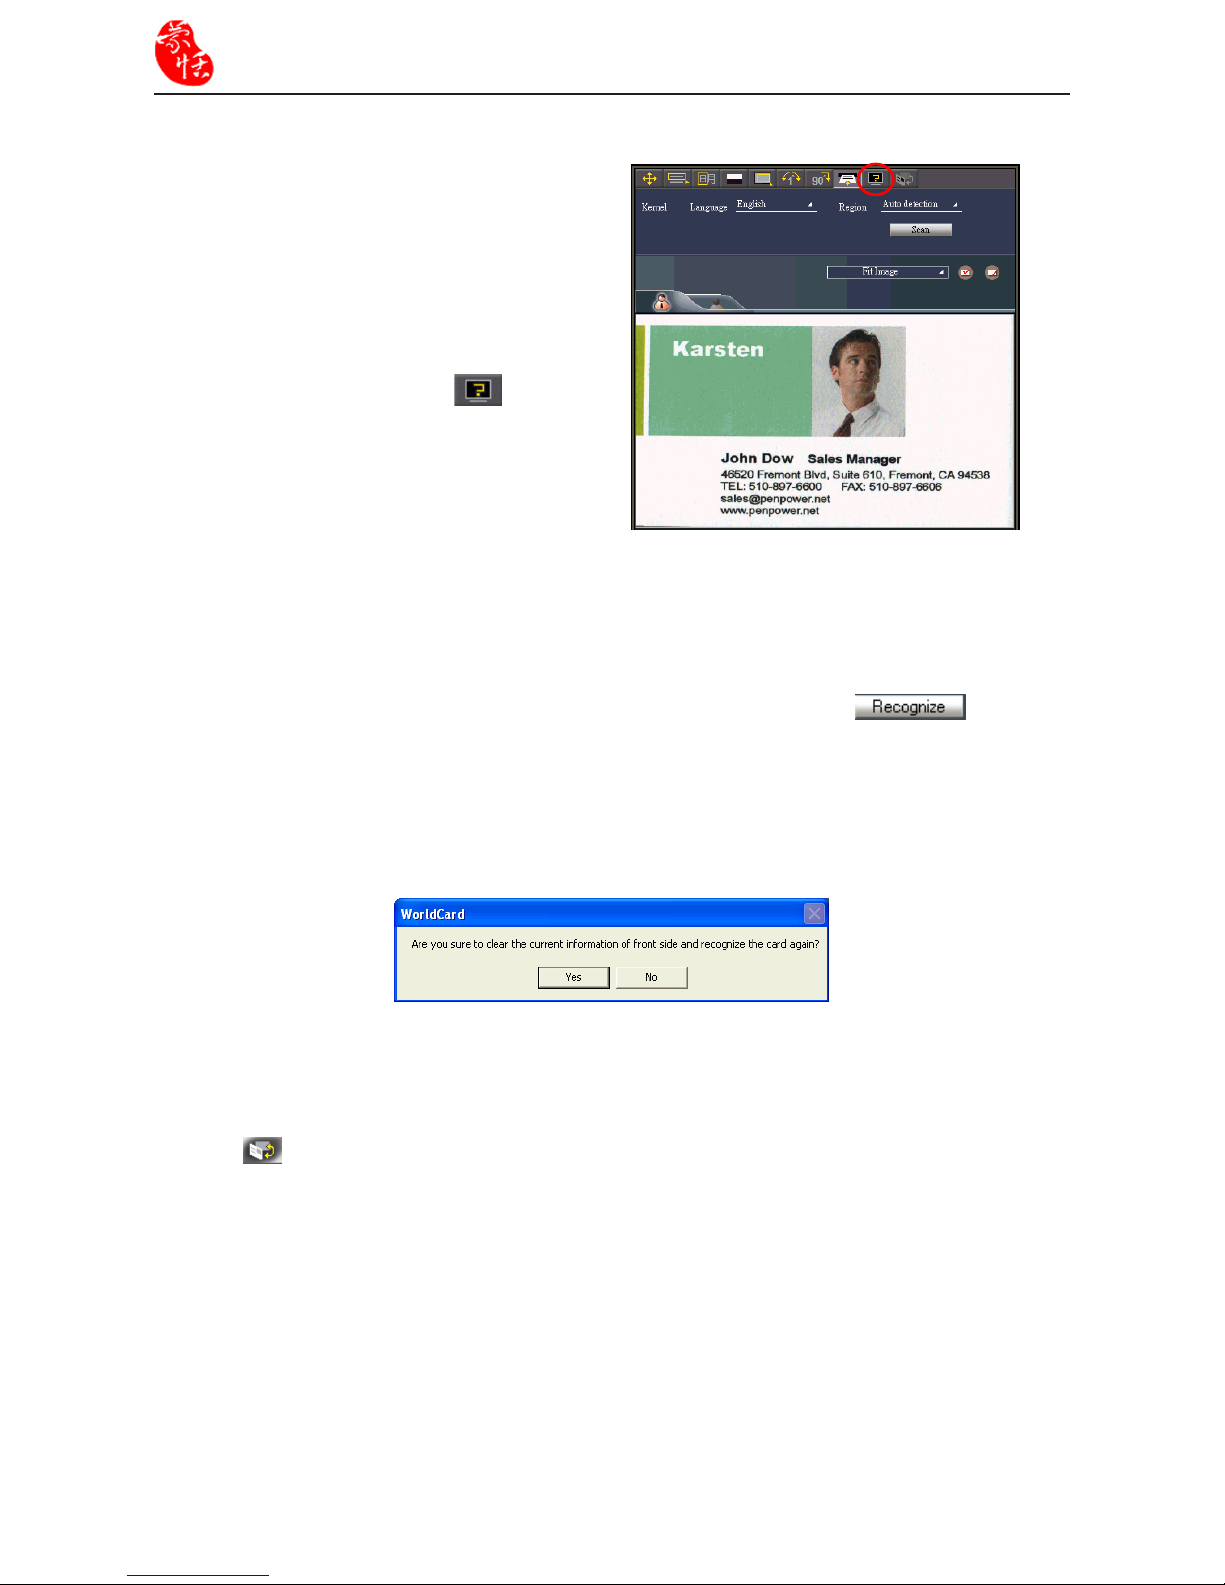
4.3.6 Rescanning Card
If a card is scanned inappropriately,
you may use the Rescanning command
of the WorldCard editor by clicking the
Rescanning button
. After clicking the
Rescanning button, the following menu appears.
You can select the appropriate languages
from the pulldown menus.
After you have selected the appropriate
language settings, you can click the Scan
icon to rescan the business card.
The card must then be inserted into the
WorldCard scanner as appropriate for the
orientation of the languages selected.
Page 33
4-8
WorldCard
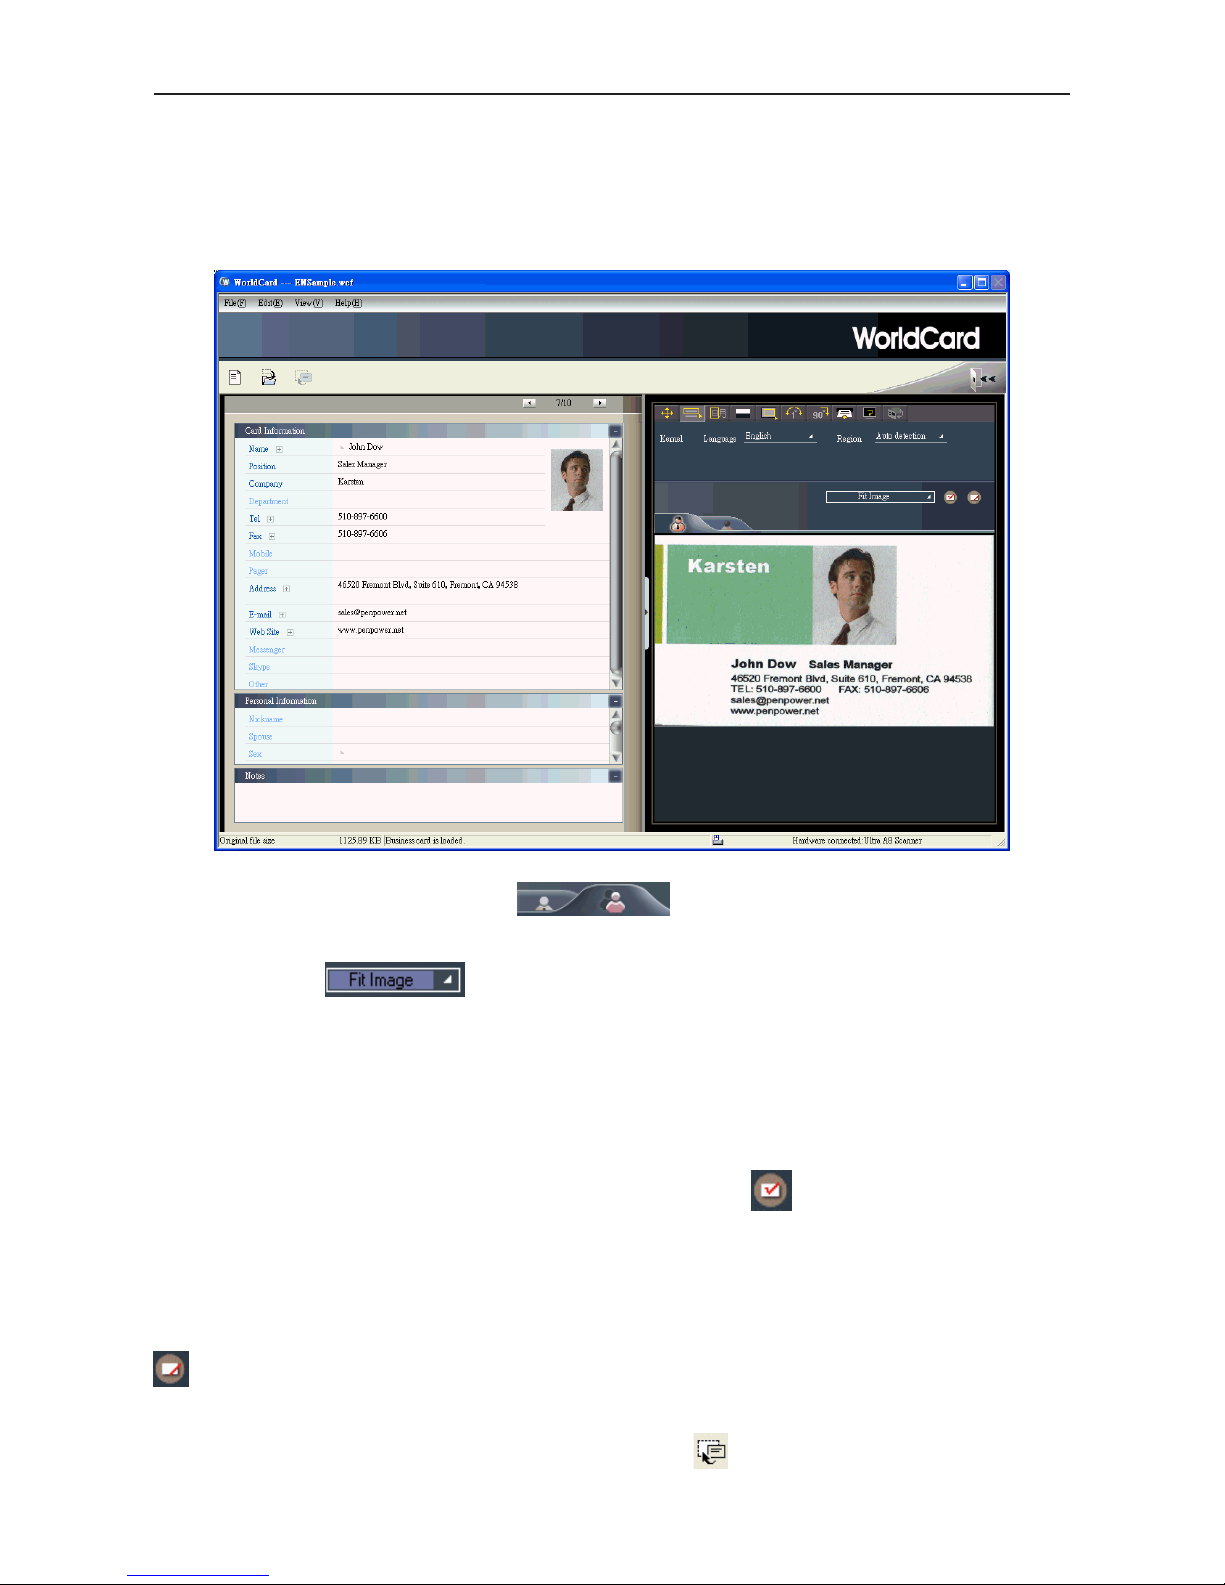
4.3.7 Recognizing Again
After adjusting a card image with any
commands of the Editing window, you can
recognize the business card again to update
the image processing of your revised card
image.
This task can be accomplished by click-
ing the Recognize again icon
from the
Editing window.
Select the appropriate language(s) for
the front and/or back side of the card. Then,
select the correct region for the language.
You may use the Auto detection feature in the geographic region selection. If the card is
double-sided, select the Both Sides command to recognize each side. You may then proceed
with the Recognize again command by clicking the Recognize button
.
After clicking the Recognize icon is selected, the following prompt appears in the Edit-
ing window.
Click Yes to begin the recognition process. Note that the card information will be cleared
when you click Yes.
4.3.8 Exchanging Front and Back Side Card Image
Click to exchange the front side and back side images of the business card.
Page 34
Chapter 4 Editing Cards
4-9
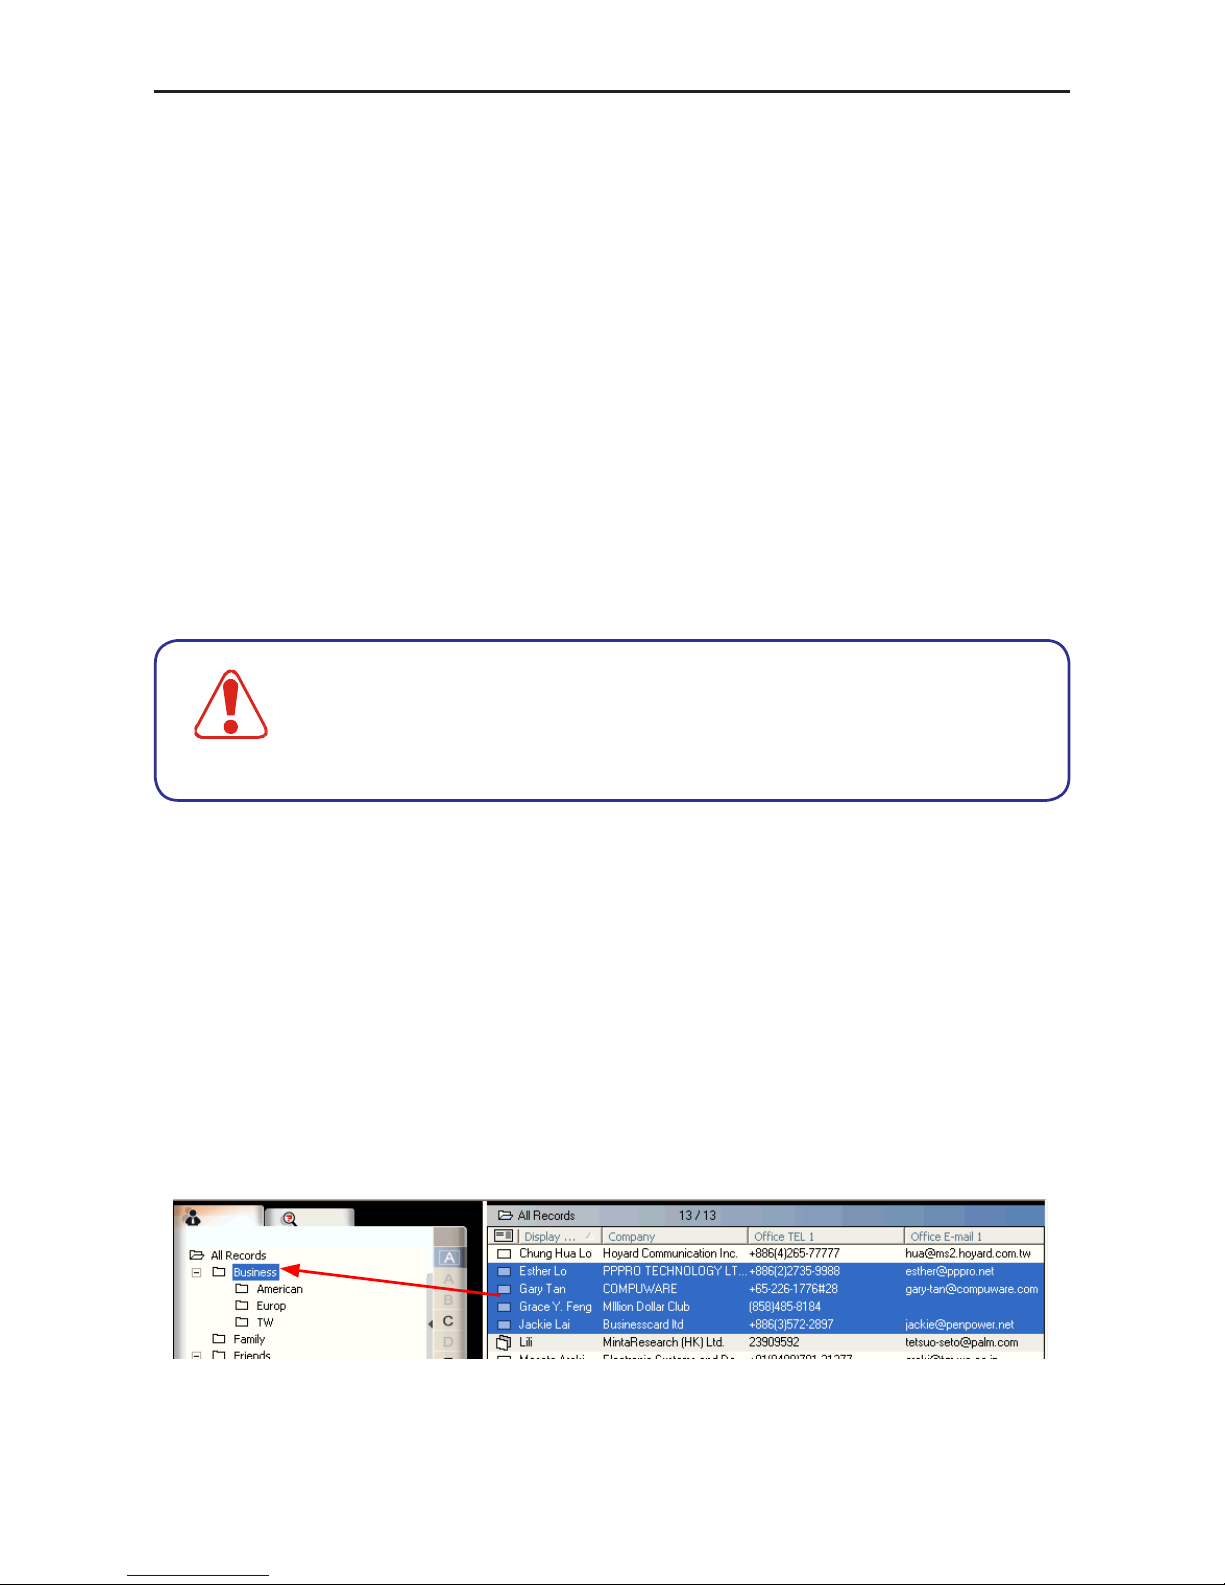
4.4 Viewing Cards
Cards are displayed in the Editing window after the scanning process. The following
window shows a typical display of a card in the Editing window.
You can click Back Side button to see the back side image of the business card.
You can click
to select the different display percentage of the business card
image.
4.4.1 Saving Card Image
If the displayed card image is clear and the information legible, the card image can be
saved as a .jpg le by clicking the Save Card Image button
.
4.4.2 Deleting Card Image
To delete a card image from the Editing window, click the Delete Card Image button
with your mouse pointer.
If you have made an error in deleting a card image, the Editing window allows you to
recover the card image by clicking the Restore button
.
Page 35

4-10
WorldCard
Page 36
Chapter 5 Managing Business Cards
5-1
Chapter 5 Manage Business Cards
The management functions of WorldCard allow you to categorize contacts, send e-mail
by contact or group functions, add new cards to a group, import cards from other sources,
search cards by various data elds, encrypt les to protect your card database, print cards,
export the database to other applications and synchronize your card information with other
software applications.
5.1 Categorize Cards
The WorldCard software allows you to manage your business cards by storing them in
the category groups. After installing your WorldCard software, you will nd two default
categories on the management page: the All Records category and Unled category. You
can add as many user-specied categories and sub-categories as you choose to manage your
business cards.
Note
WorldCard Mobile and WorldCard Contacts don't support multi-layer
category structures. If you export contacts to WorldCard Mobile or
WorldCard Contacts, only root categories will be imported. The subcategories won't be imported.
5.1.1 Categorize from Management Page
Each card, in addition to being categorized by last name, can also be categorized
with our own individual settings so that you can efficiently manage numerous cards in
your WorldCard database. From the WorldCard Management pane, highlight the card
information you want to categorize, drag it directly into a specic category type under the
Category list on the left side of the management window.
Page 37
5-2
WorldCard
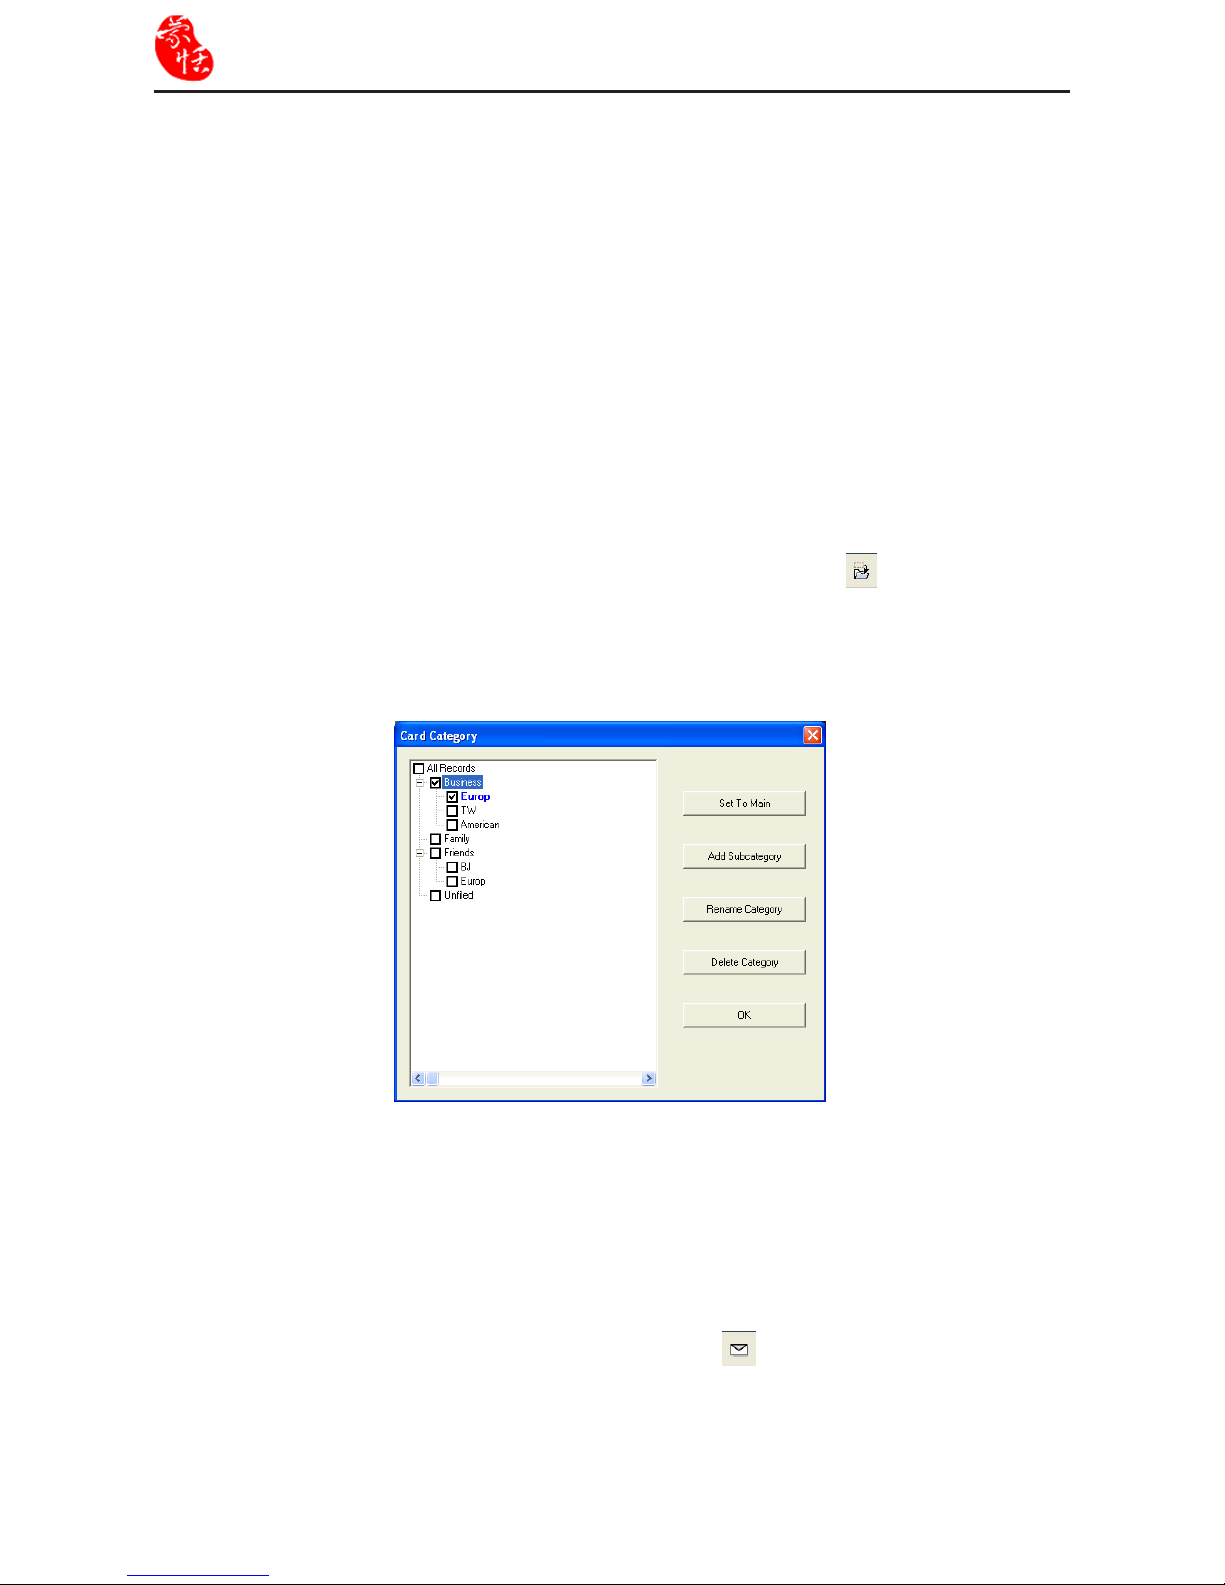
5.1.2 Categorize from Editing Page
WorldCard allows you to categorize a business card directly from the Editing pane. To
categorize a card from the editing page, click on the Set Category button . The Card
Category dialog box appears. Select the category and then click OK. You may also add a
subcategory from this window by clicking the Subcategory button.
5.1.3 Send Email by Category
To send email to a category group, select the appropriate category group from the
management page. Once selected, the category will appear in the right pane of the
Management window.
To send email to the group, click the Email button
. WordCard will add the email
addresses of the group members into your default email software. Also the Email editing
window will then open with the appropriate contact list.
Tips:
1. Cards in each category can be easily moved from one category to another by dragging.
2. Each card can belong to a main category and numerous sub-categories. For example,
Bruce is a vendor of your company and your classmate. You can drag his card into vendor category and then, drag his card into the classmate category from the All Records
category. The rst category you drag Bruce’s card to will become the main category for
his card entry.
Page 38
Chapter 5 Managing Business Cards
5-3
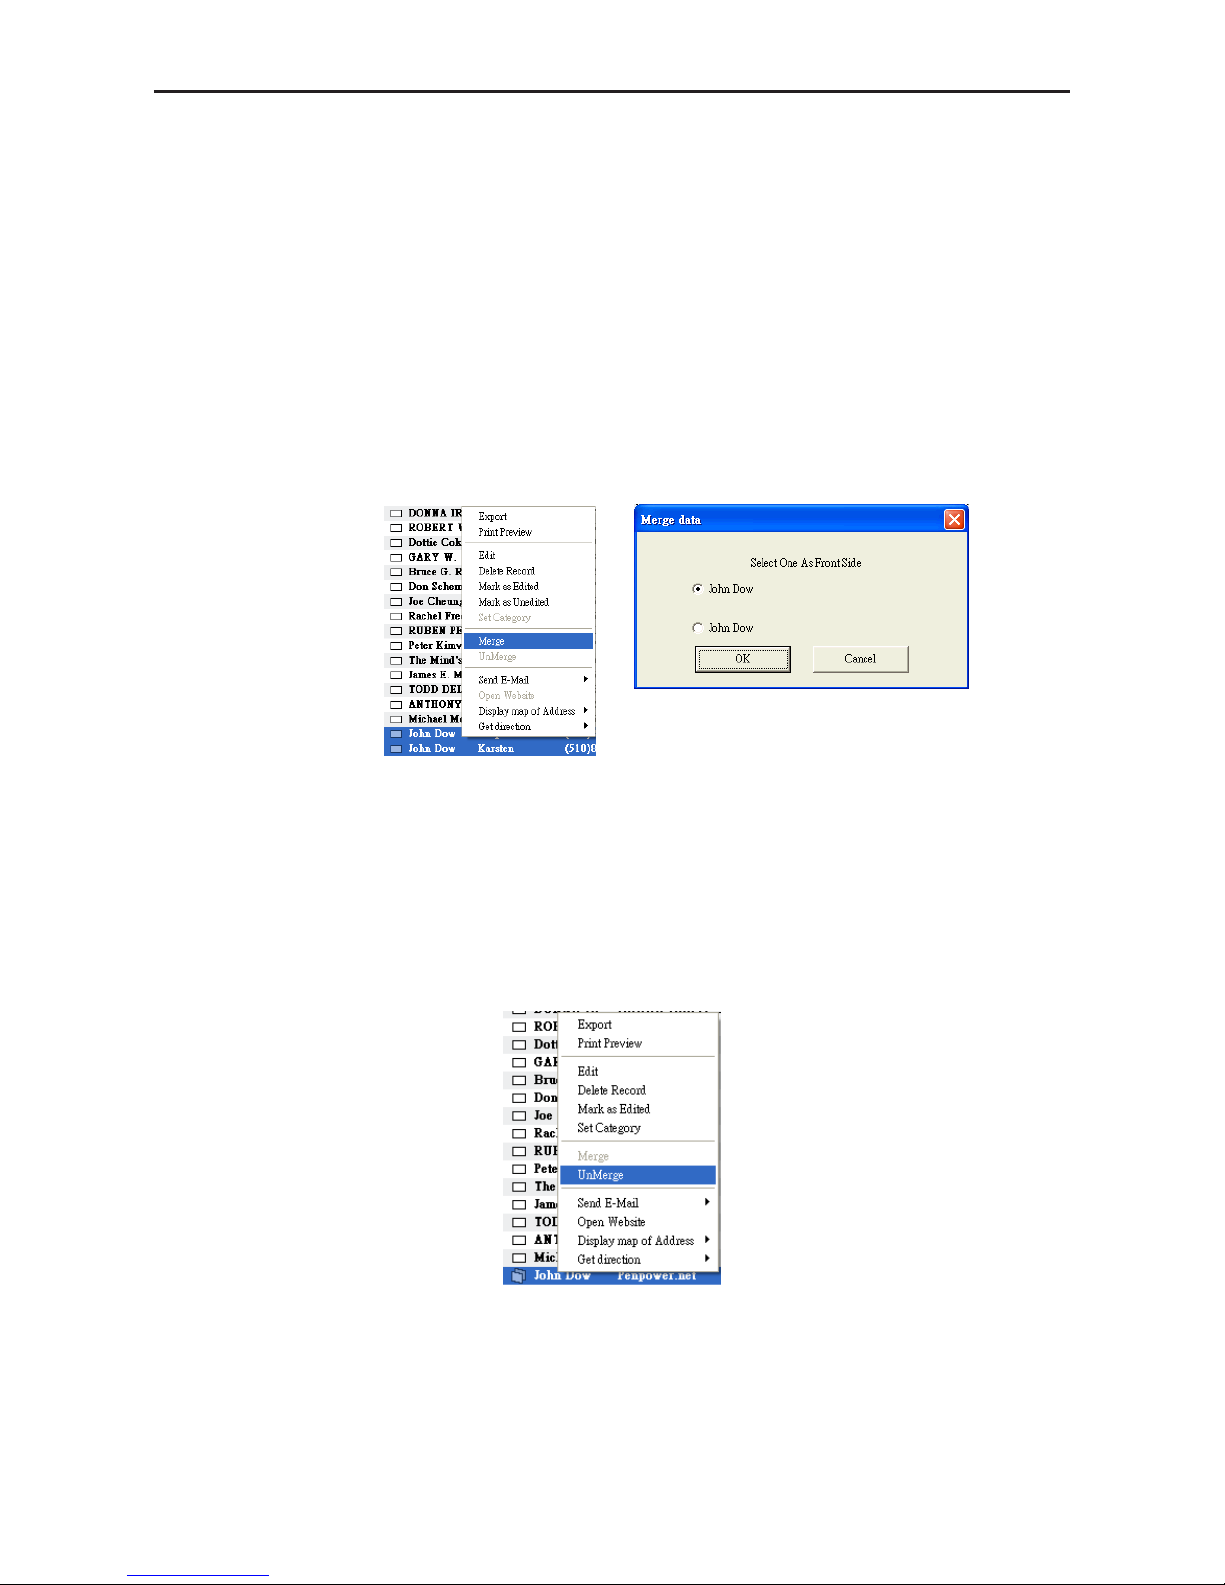
5.2 Merge and Separating Cards
WorldCard allows you to merge two business cards into one card entry. To merge two
cards into one, select two cards in the Management window.
On the Tool menu on the Editing window, click Merge and the following dialog box
appears.
Select the appropriate card as the front side of the merged card entry and press OK. This
action will merge the cards into one entry.
Separating double-sided cards into two distinct card entries can also be accomplished
with WorldCard. To separate a double-sided card into two separate entries, select the
appropriate card from the Management window. Then, on the Tool menu click UnMerge.
The double-side card is separated into two separate entries in the appropriate category.
Page 39

5-4
WorldCard
On the left side of the Editing window, the new colleague’s company information will
appear in the Card Information pane of the Management window. You can scan or type
your new contacts information into the eld.
5.3 Add New Cards
You may add contacts to your WorldCard database by scanning their business card or by
manually entering the contact information. If you do not have a card from a new contact, you
can enter the contact information of a new business contact into your WorldCard database
manually.
5.3.1 Add an Empty Card
To ent er a c ontact man ually without a busi ness card, on the Fil e men u in t he
Management window, click New Empty Card. This will open the Editing window.
In the Editing window, manually select each category for your new contact. Then, scan
or type your new contacts information into the eld.
5.3.2 Add the Same Company Card
WorldCard allows you to add contact information for a new colleague from a company
that is already in your database without scanning the actual business card. To add a new
colleague of a company already on le, in the Management window, select a card from the
new colleague’s company.
After you have selected the card of the new colleague’s coworker, on the File menu in
the Management window select the File\New Same Company Card. This will open the
Editing window.
Page 40
Chapter 5 Managing Business Cards
5-5
5.4 Add Cards from Other Resources
The WorldCard Business Card Scanner and other WorldCard recognition products are
equipped with a card scanner or camera which are used to capture a card image. However,
you may use other hardware resources in conjunction with your WorldCard software to
process card images.
5.4.1 Photo File
WorldCard can process a business card entry from a photo image in either .bmp or .jpg
format. To use this option of your WorldCard software, you must have a picture image of
the card on an accessible medium which your computer can access directly, as well as a
connected the camera or scanner. To select an alternative image source click the Image
Source icon
and select the appropriate image source, either Photo File or Twain
Scanner.
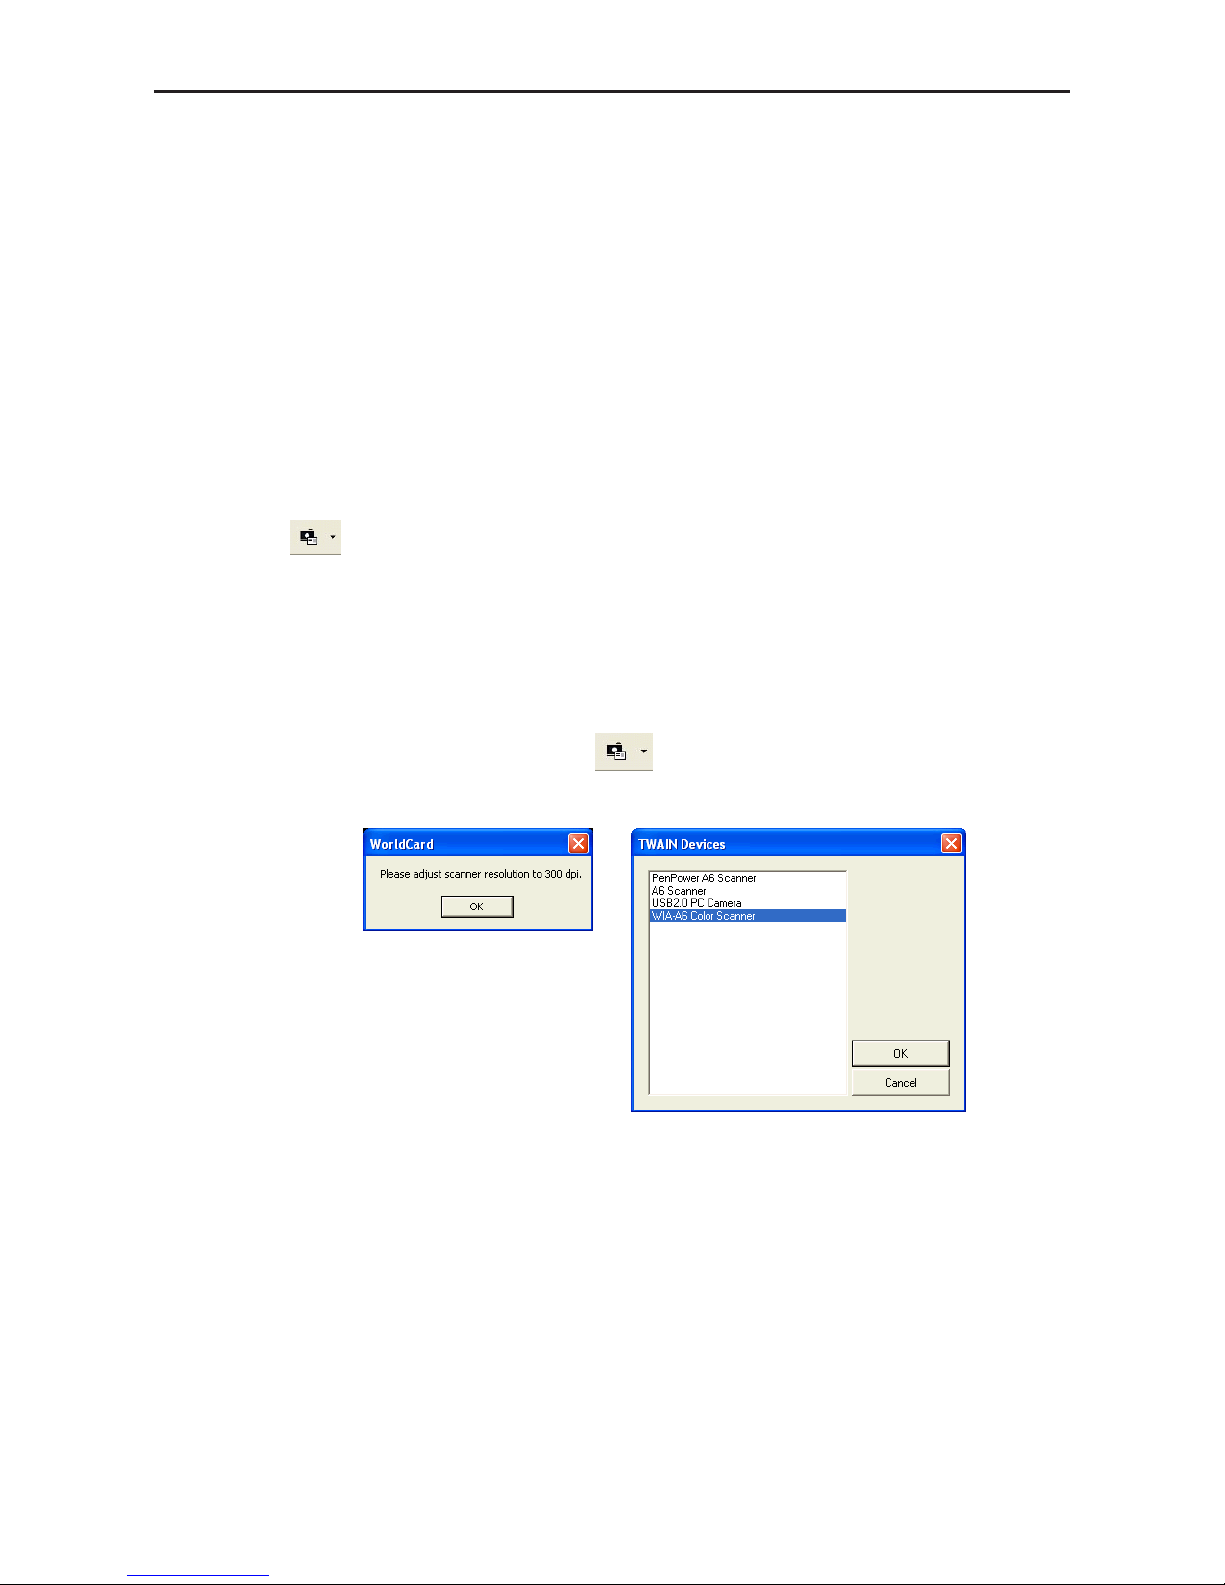
5.4.2 Twain Scanner
Card entries may also be uploaded through any TWAIN-compliant scanner. If your
scanner is connected, WorldCard software will recognize it and add the scanner to the
resource list. Click the Image Source arrow
and click Twain Scanner.
Ensure the resolution for your scanner is set to at least 300dpi and select a Twain device.
You may scan up to 8 cards at one time with an A4 size atbed scanner. Place the card on
the bed of your scanner with some separation between the card edges to clearly distinguish
each individual card. You may also use an A4-size white paper to cover the business cards
for recognizing regions of business cards properly.
When the scanning process is completed, the following TWAIN Scanner dialog box
appears.
Page 41
5-6
WorldCard
5.4.3 Drag in the Signature Information
You can add the signature information to the contacts by selecting the signature or
business card information in e-mail or a Word le. Then drag it directly to the WorldCard
Management window. WorldCard will automatically add a contact and recognize the
information into appropriate elds.
5.5 Deleting/Restoring Contacts
Right click on a contact and then select Delete from the pop-up menu or select a contact
and then click Delete button , if you want to delete the selected contact.
Click Recycle Bin button
to view the contacts which have been deleted. You can
delete the contacts permanently by clicking the Delete button or resotre the contacts by
clicking the Restore button.
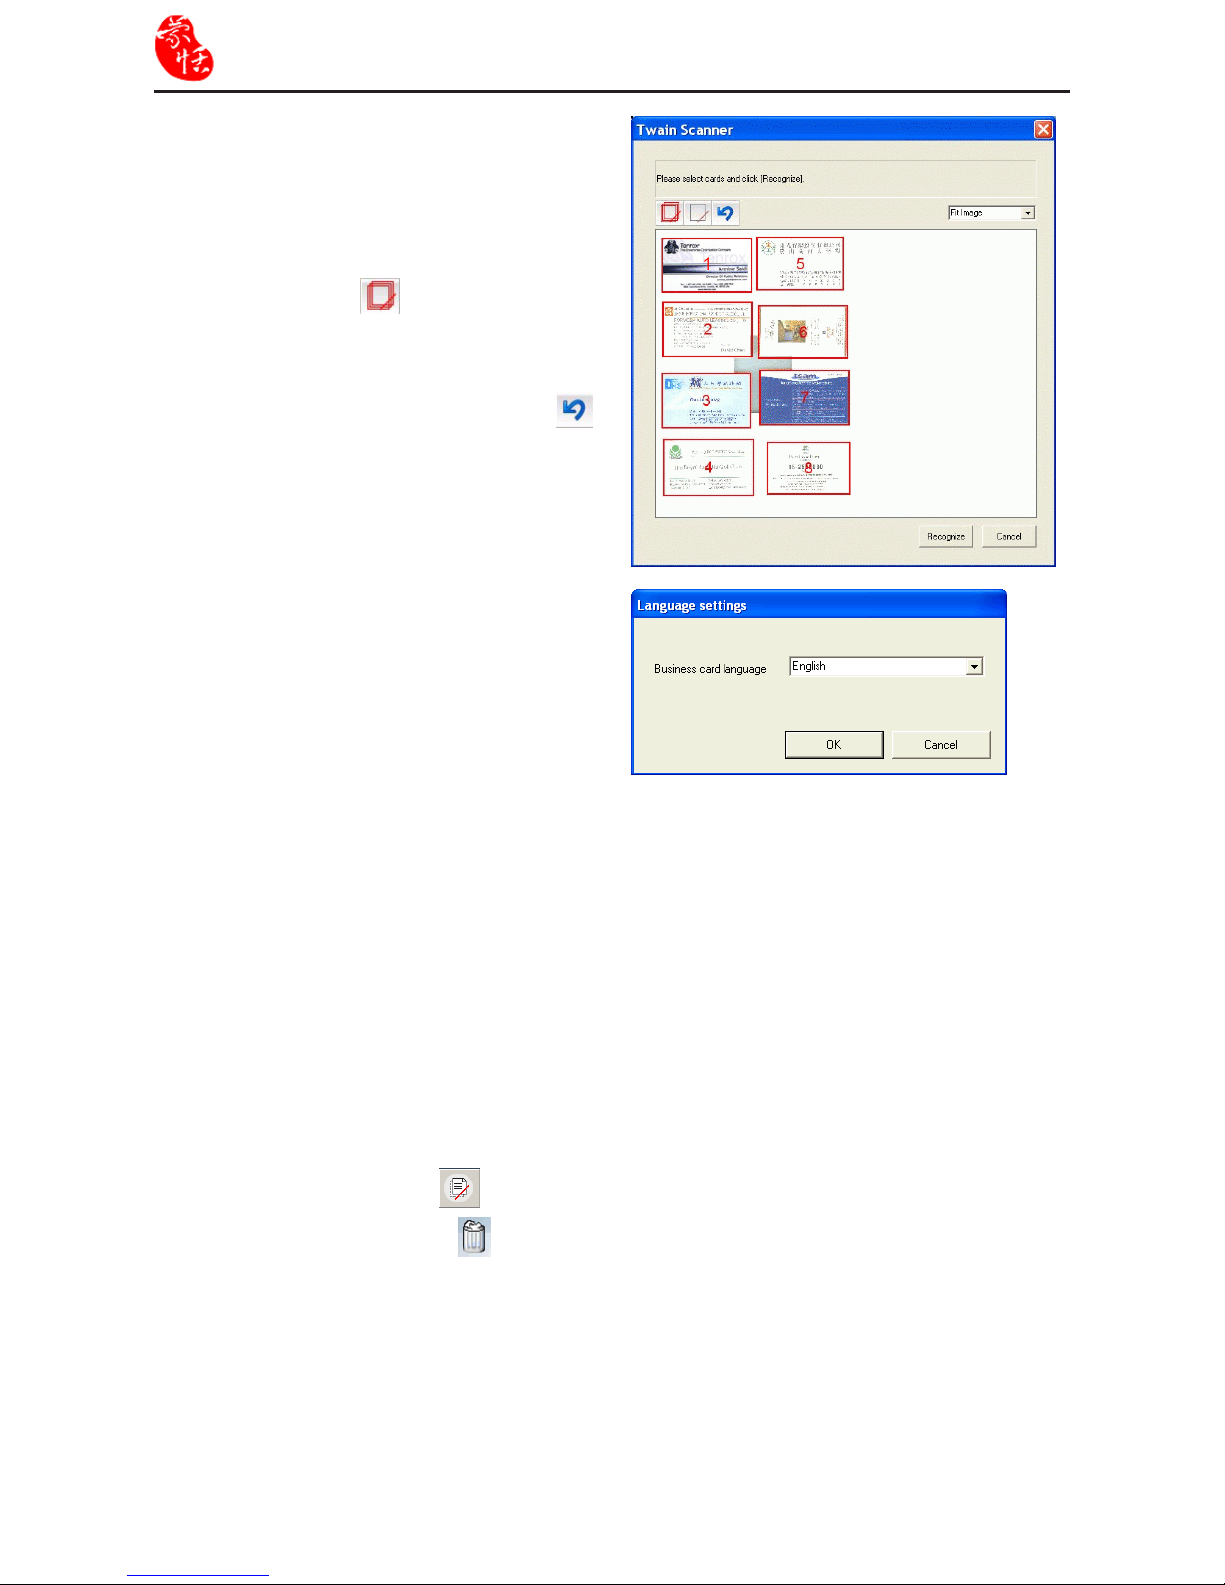
The system will identify the business
card area automatically. Recognized cards
will appear within red rectangular boxes
with their corresponding recognition number
superimposed in red. You can also click the
Clear All Regions
button to identify
the cards manually by drawing the business
card area one by one.
Cli ck the Aut o S ele ct R egi ons
button c an ident ifie the ca rds as in th e
previous display of the TWAIN Scanner
dialog box.
After the cards have been identified,
click Recognize. In the Language settings
dialog box you can select the language to
use to recognize the business cards. When
the re cogni tio n p roc ess is co mp let ed,
you will be returned to the Management
window. Your new card entries appear at the
bottom of the contacts.
Page 42
Chapter 5 Managing Business Cards
5-7
5.6 Search Contacts
You can quickly and efciently nd your contacts with WorldCard Search features.
5.6.1 Text Search
The Text Search command of the WorldCard software allows you to quickly find a
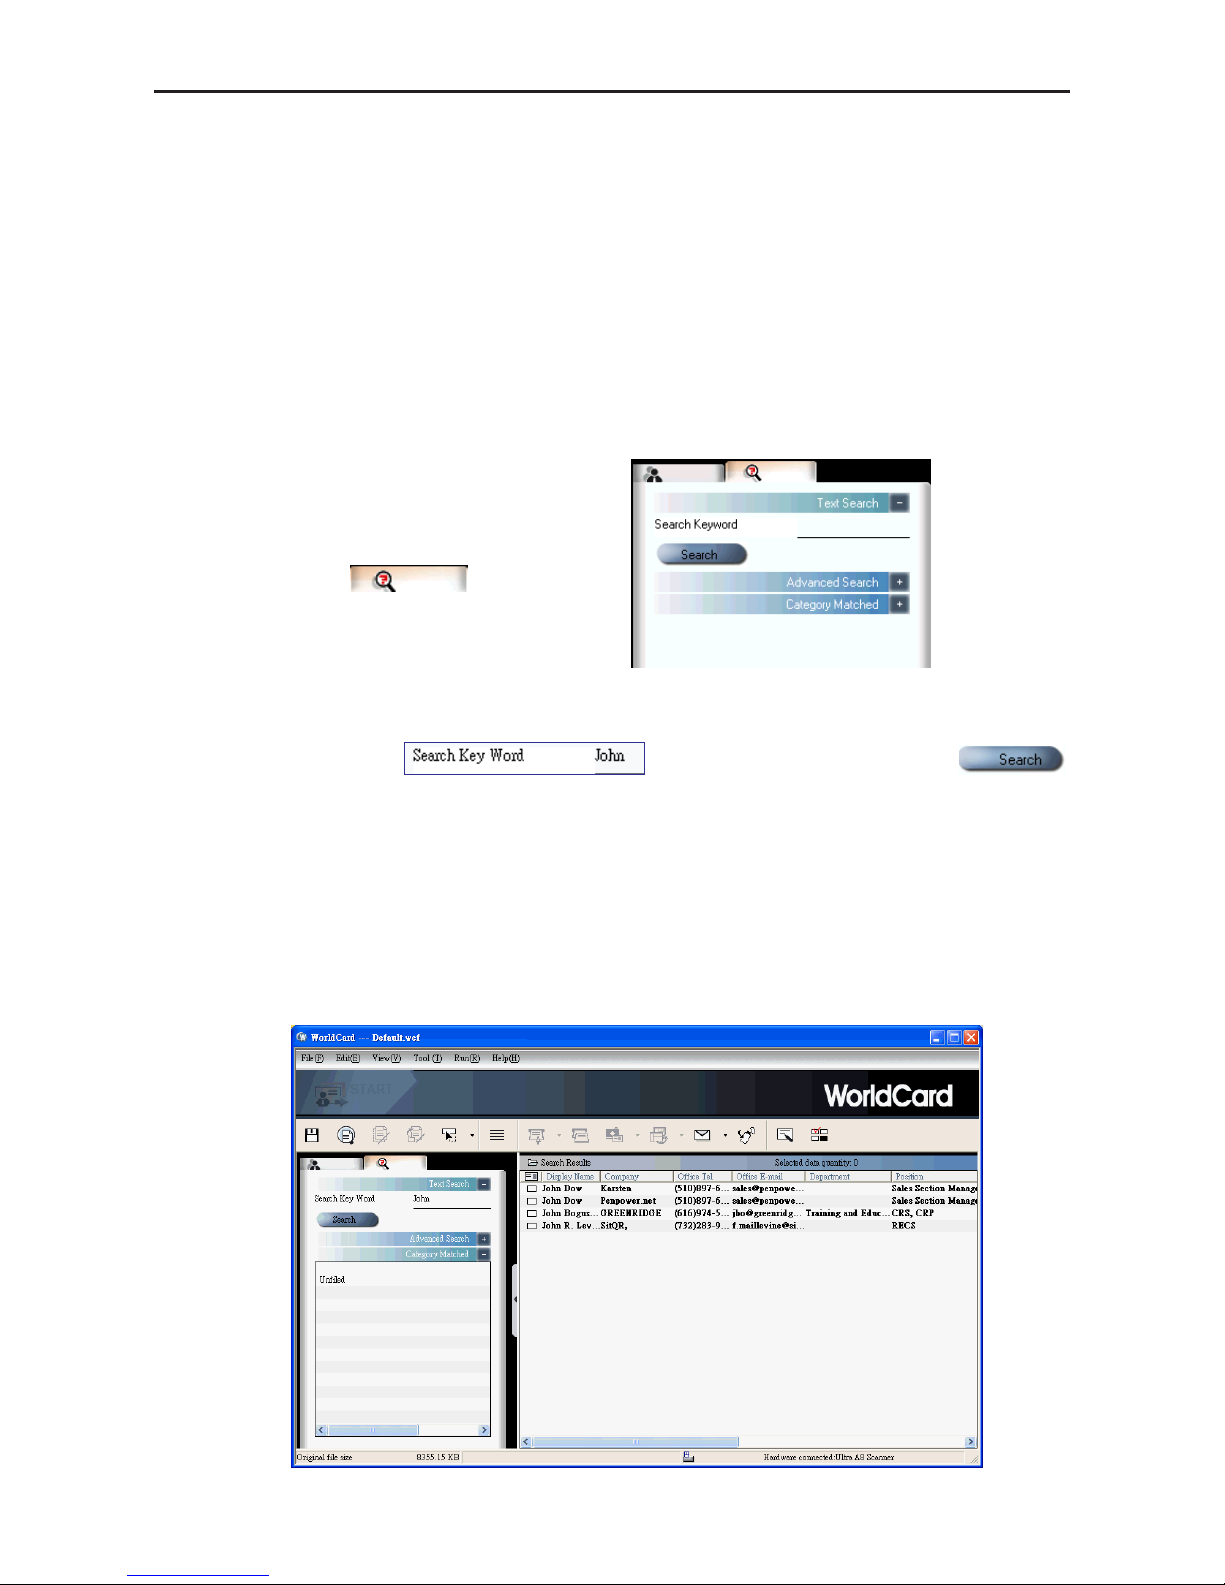
specic contact. To use Text Search in the WorldCard Management window, on the View
menu point to Search, and click Text Search.
The Text Search pane appears as follows:
In the Text Search pane, enter a key word or a group of key words separated by a blank
space in the Search box
and click the Search button .
The Search pane will update, displaying the results as in the following picture.
In the left pane, there is a list of all categories where the data from your search string was
found. The right pane shows the search results that display all of the applicable elds for the
cards stored in your WorldCard database.
You can double-click on any record displayed in the Search Results pane to open the
card in the Editing window.
Tip: You may enter the Text Search win-
dow directly from the WorldCard
Management window by clicking the
Search button
.
Page 43
5-8
WorldCard
5.6.2 Advanced Search
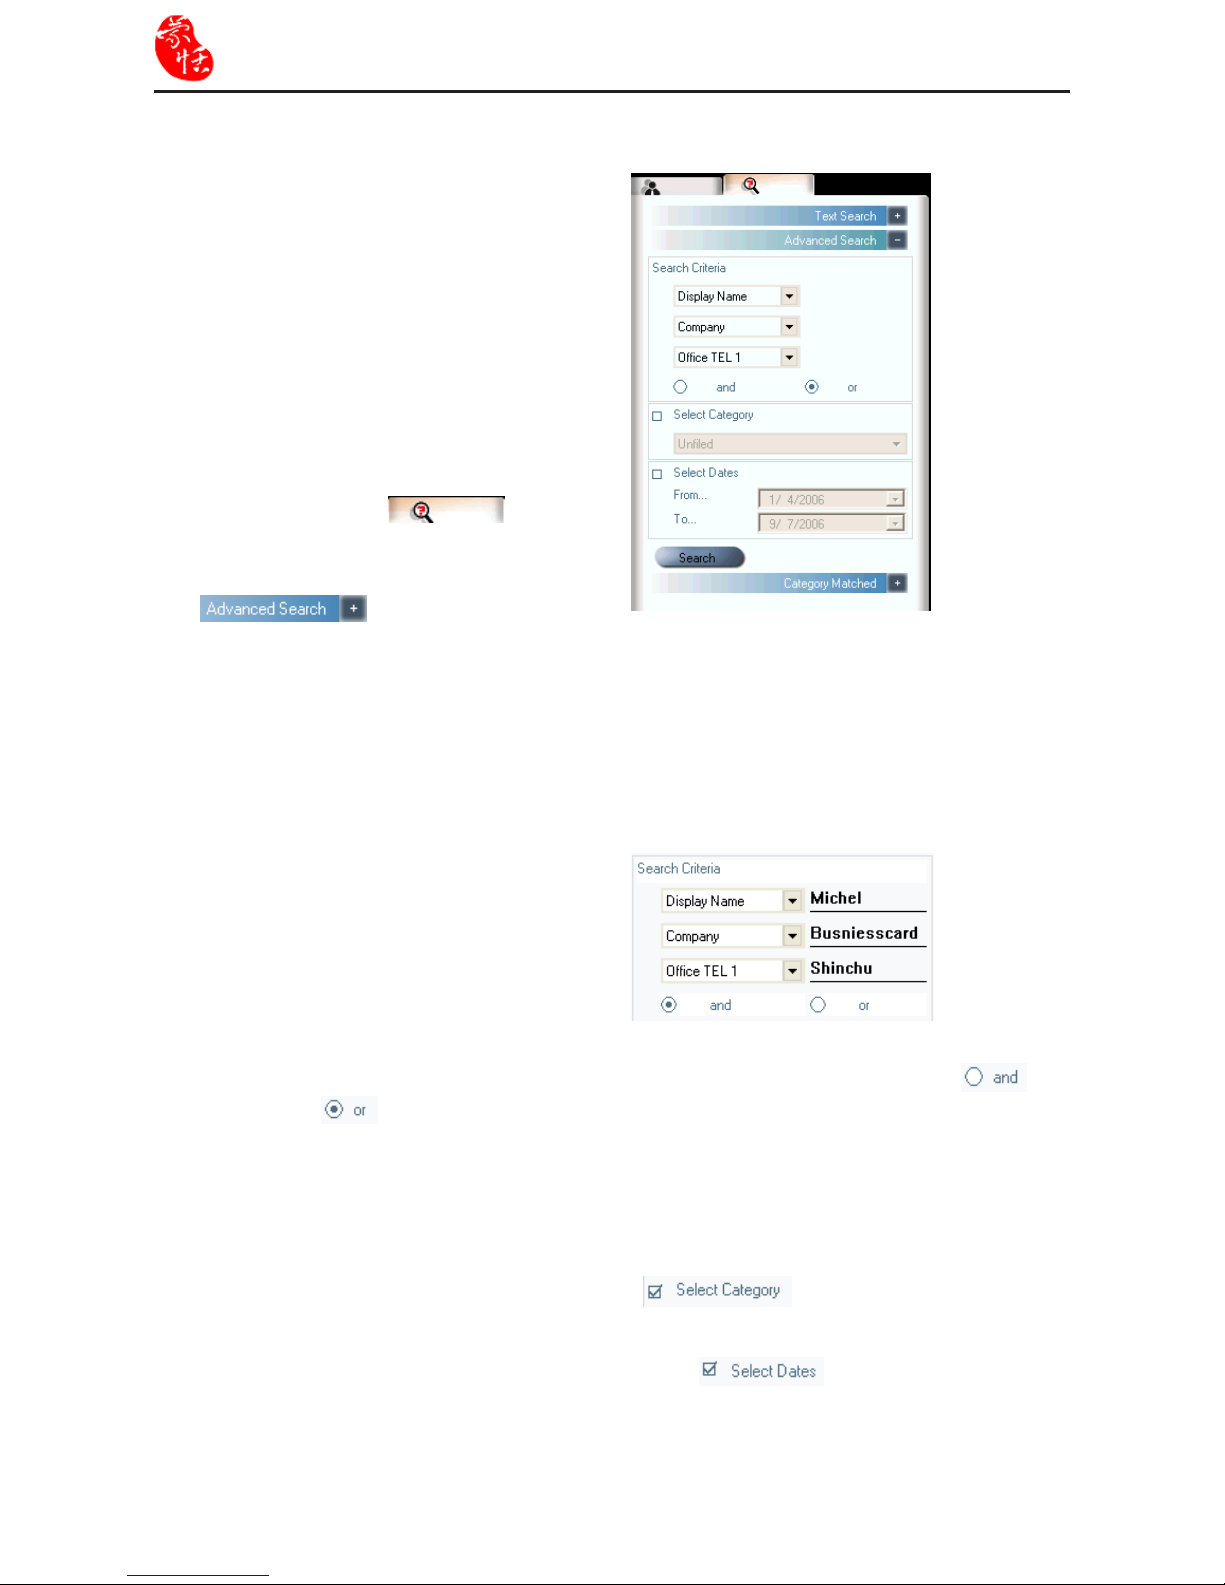
WorldCard also offers an advanced
search function. To use the advanced search
function, on the View menu, point to Search
and click Advanced Search.
The Advanced Search pane will open
and appear as right.
Tip: You may also open the Advanced
Search pane from the WorldCard
Management window by clicking
the Search button
. When
the Text Search pane appears, click
on the Advanced Search button
.
In the Advanced Search pane, you can enter your search criteria by category. You may
select from categories in any one of three option windows. If you have several cards with
similar criteria in your database, you may narrow your search further by using more than one
of the Search Criteria menus.
Please also note that the Search Criteria options include the AND operator
and
the OR operator
. You may use these operators to further dene your Advanced Search.
The AND operator defines that your search results contain the criteria listed in all three
search elds. Using the OR operator, a valid result must only match one of any of the three
elds to be a valid result.
You can further dene your Advance Search Criteria by using a specied Category. To
select a specic category, select Select Category
and specify a category.
You may also dene your Advanced Search by calendar dates. To dene a period for an
Advanced Search by Dates, select Select Dates icon
and make date selection
available.
After a Category for your Advanced
Search is selected from one or all three
Ca te g or y opt i on s, yo u ma y e nt e r an
appropriate search string in the text field
of each Category. A completed search will
appear.
Page 44
Chapter 5 Managing Business Cards
5-9
5.6.3 Finding Duplicate Data
Over a period of time, you may nd that you have received a business card from the same
individual on more than one occasion.
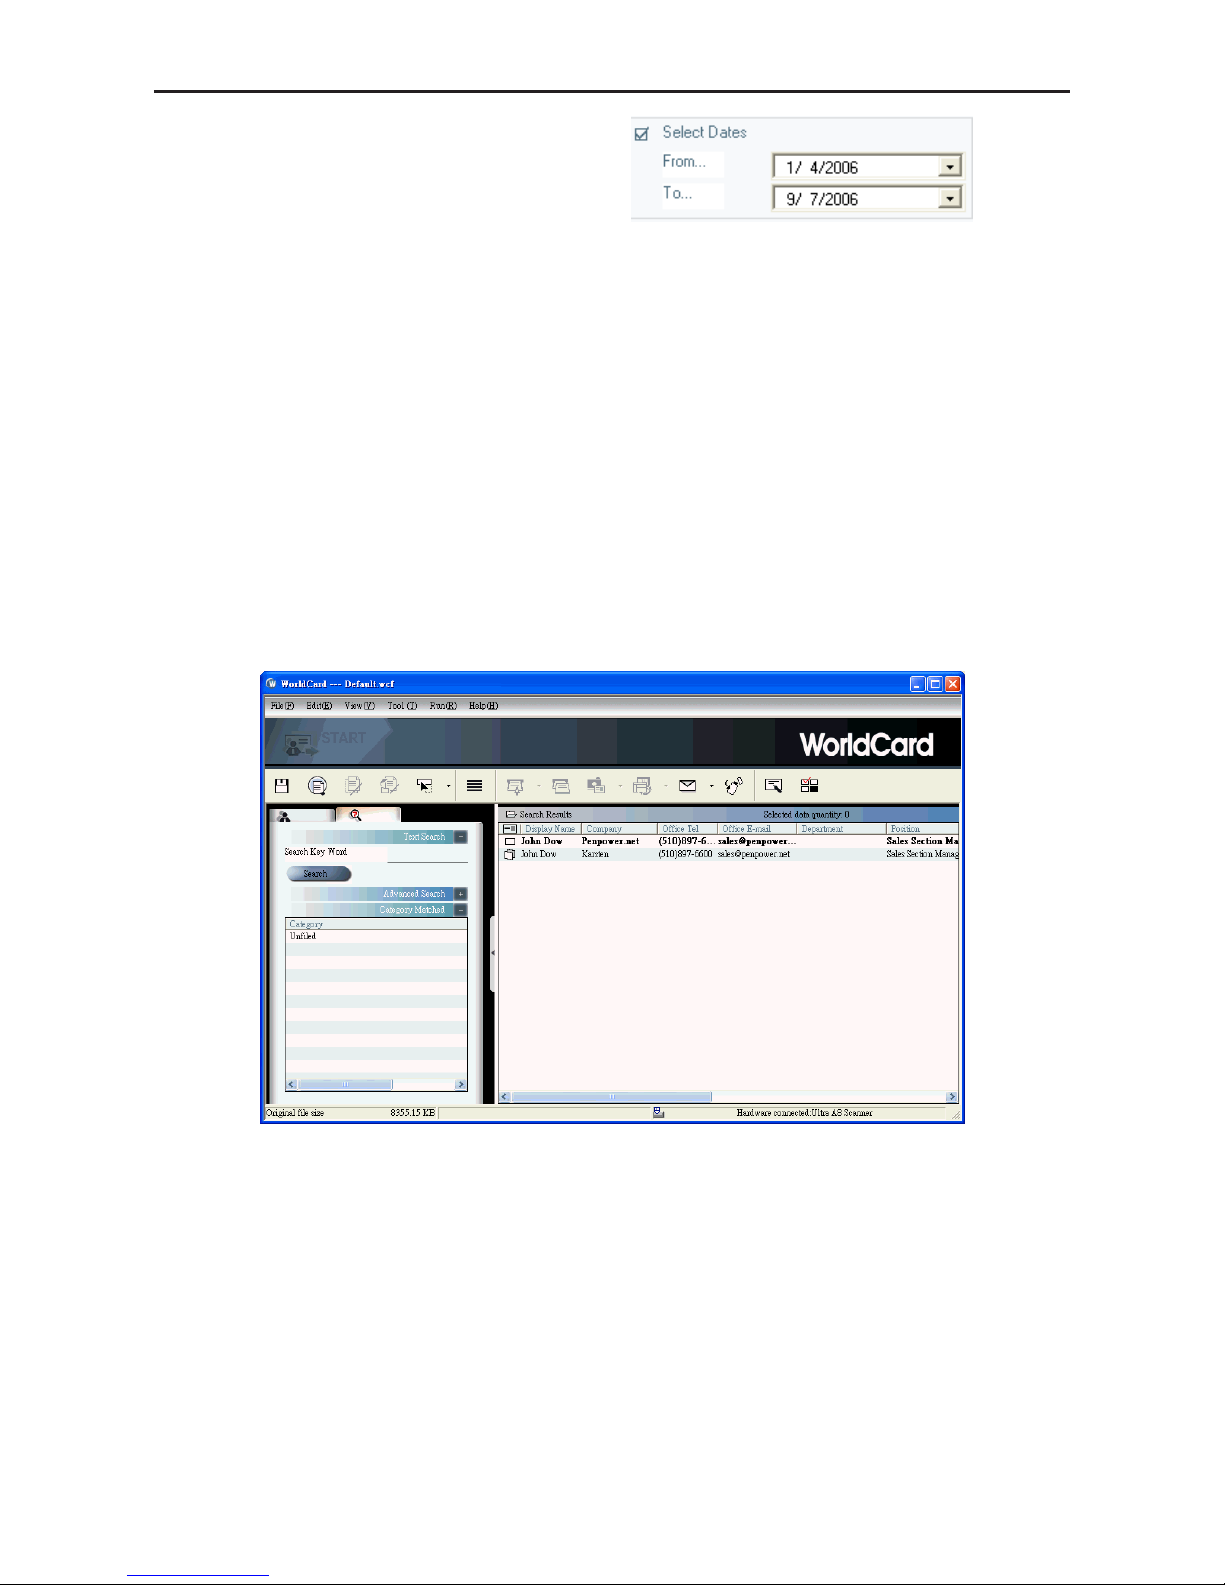
WorldCard has a built-in feature for nding duplicate data. To use Finding Duplicate
Data, click Run on the Main Menu and then Duplicates Data. A progress meter briey
displays in the middle of the Management window showing the progress of the search.
After all records have been scanned, the Search Results pane displays the same display
name entries as shown.
After selecting search by date, you may
use the From and To date options to specify
a period for your search criteria. The From
and To options appear as in the right picture.
In the pane on the left side, there is a list of all Categories where Duplicates Data was
found. In the Search Results pane on the right side, there is a list of all duplicate card
entries.
Page 45

5-10
WorldCard
5.7 Safeguardi your Contacts
Information is a valuable resource to any business. WorldCard recognizes the intangible
value of your business card contacts and has built-in features to help you safeguard that data.
5.7.1 Save
WorldCard is a business card database management system. It automatically saves all
changes when exit the system. You can manually save your card database by on the File
menu click Save.
You can also save your database by clicking the Save button
on the WorldCard
Management window.
5.7.2 Backup your contacts
You can save your database le to a specied directory for use as a backup le by using
Save as. On the File menu, click Save As.
WorldCard database files are stored in the .wcf format. No other format options are
available. After you have named your le accordingly, click Save to complete this operation.
5.7.3 File Encryption
Protecting sensitive contact information is important in the business environment. The
WorldCard software recognizes the importance of sensitive data and allows you to protect
that data from unauthorized access.
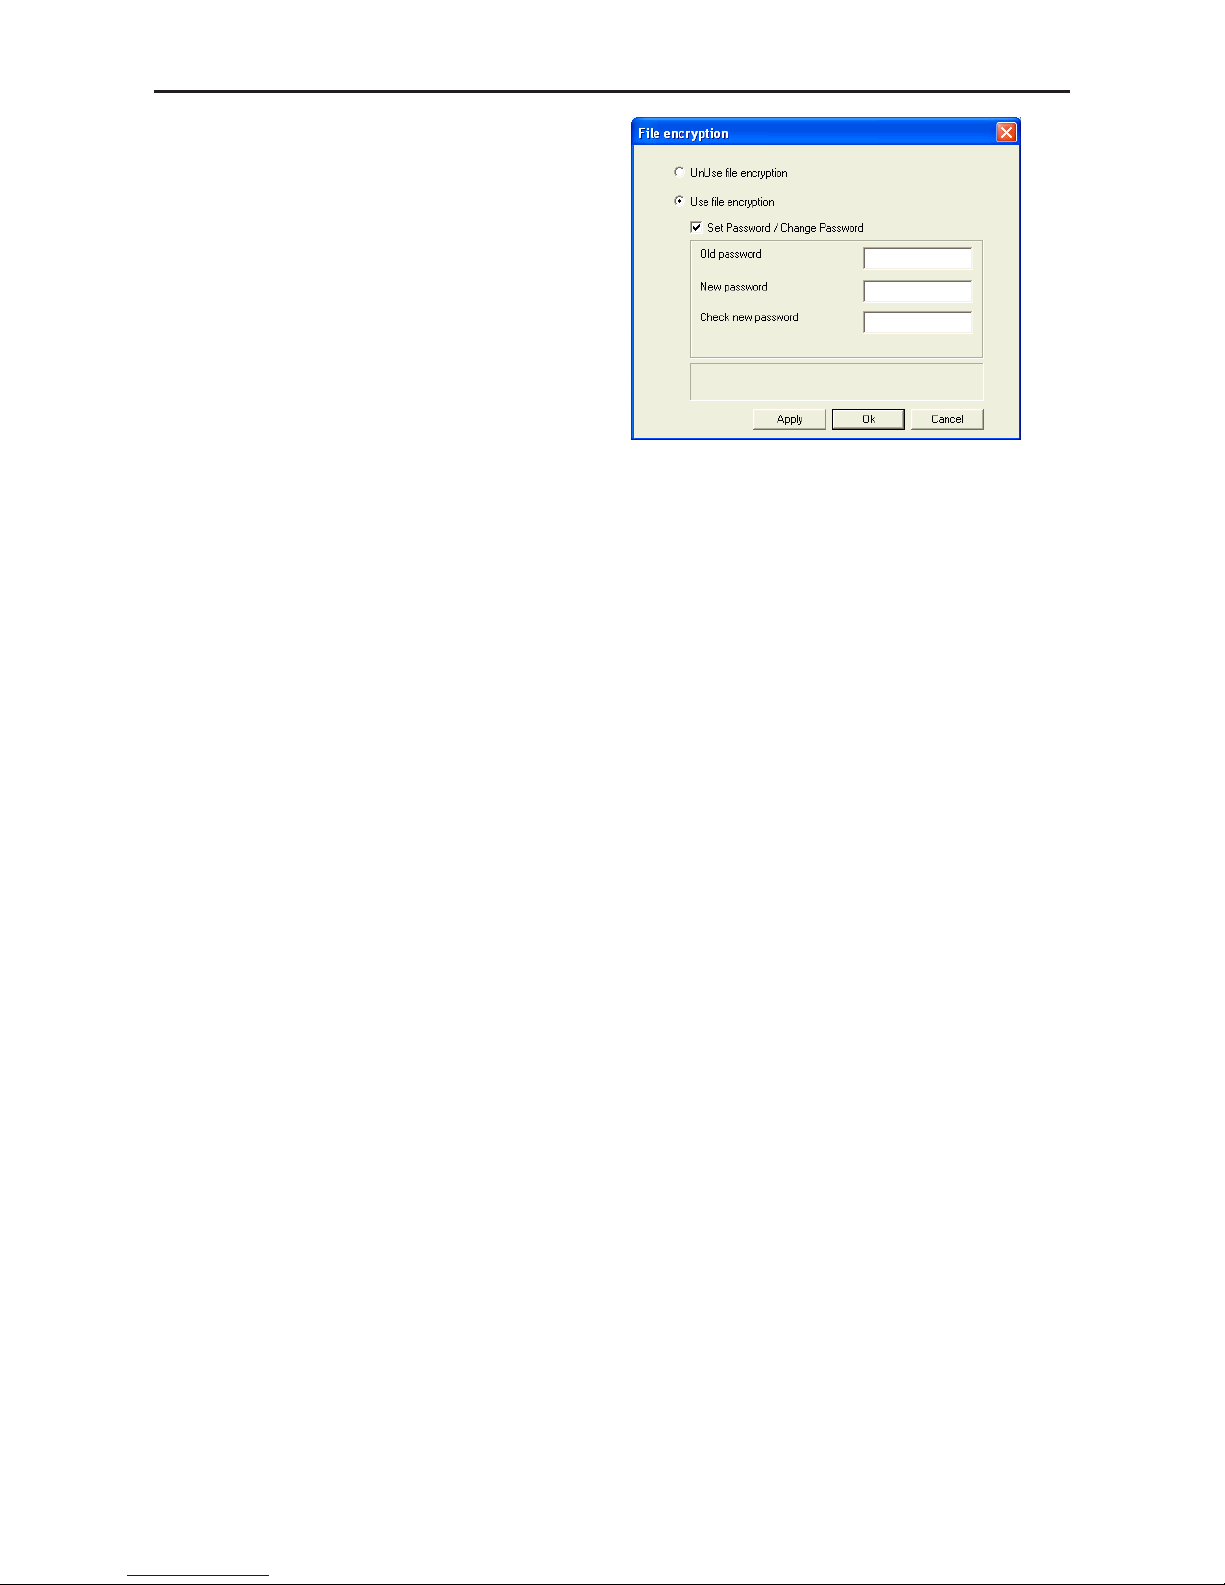
To protect your WorldCard database from unauthorized access, WorldCard offers you an
automatic le encryption with password protection. You can encrypt your WorldCard database by the following procedure.
On the File menu, click File encryption.
The File encryption dialog box appears.
If you wish to use File en crypt ion,
select Use le encryption.
Page 46
Chapter 5 Managing Business Cards
5-11
With Use file encryption selected, you
may use the File Encryption option with
password protection.
W he n th e Se t Pa s s w o r d / Ch a n g e
Password option is selected, the password
option is available for you to enter your
appropriate password options.
Note: Protect and safeguard your password. WorldCard does not offer a password recov-
ery option. If you forget your password, your database is inaccessible.
Tip: If you wish to decrypt the File encryption, place the mouse pointer over the selection
circle of the UnUse le encryption option.
Page 47
5-12
WorldCard
5.8 Print Cards
WorldCard software allows you to print card information in several usable formats. An
overview of the WorldCard printing features is presented in this chapter.
5.8.1 Print Preview
Before printing card information, WorldCard allows you to preview your information in
the appropriate format for your desired output. To use the Print Preview options of your
WorldCard software, on the File menu click Print Preview. and the Print Preview pane
appears.
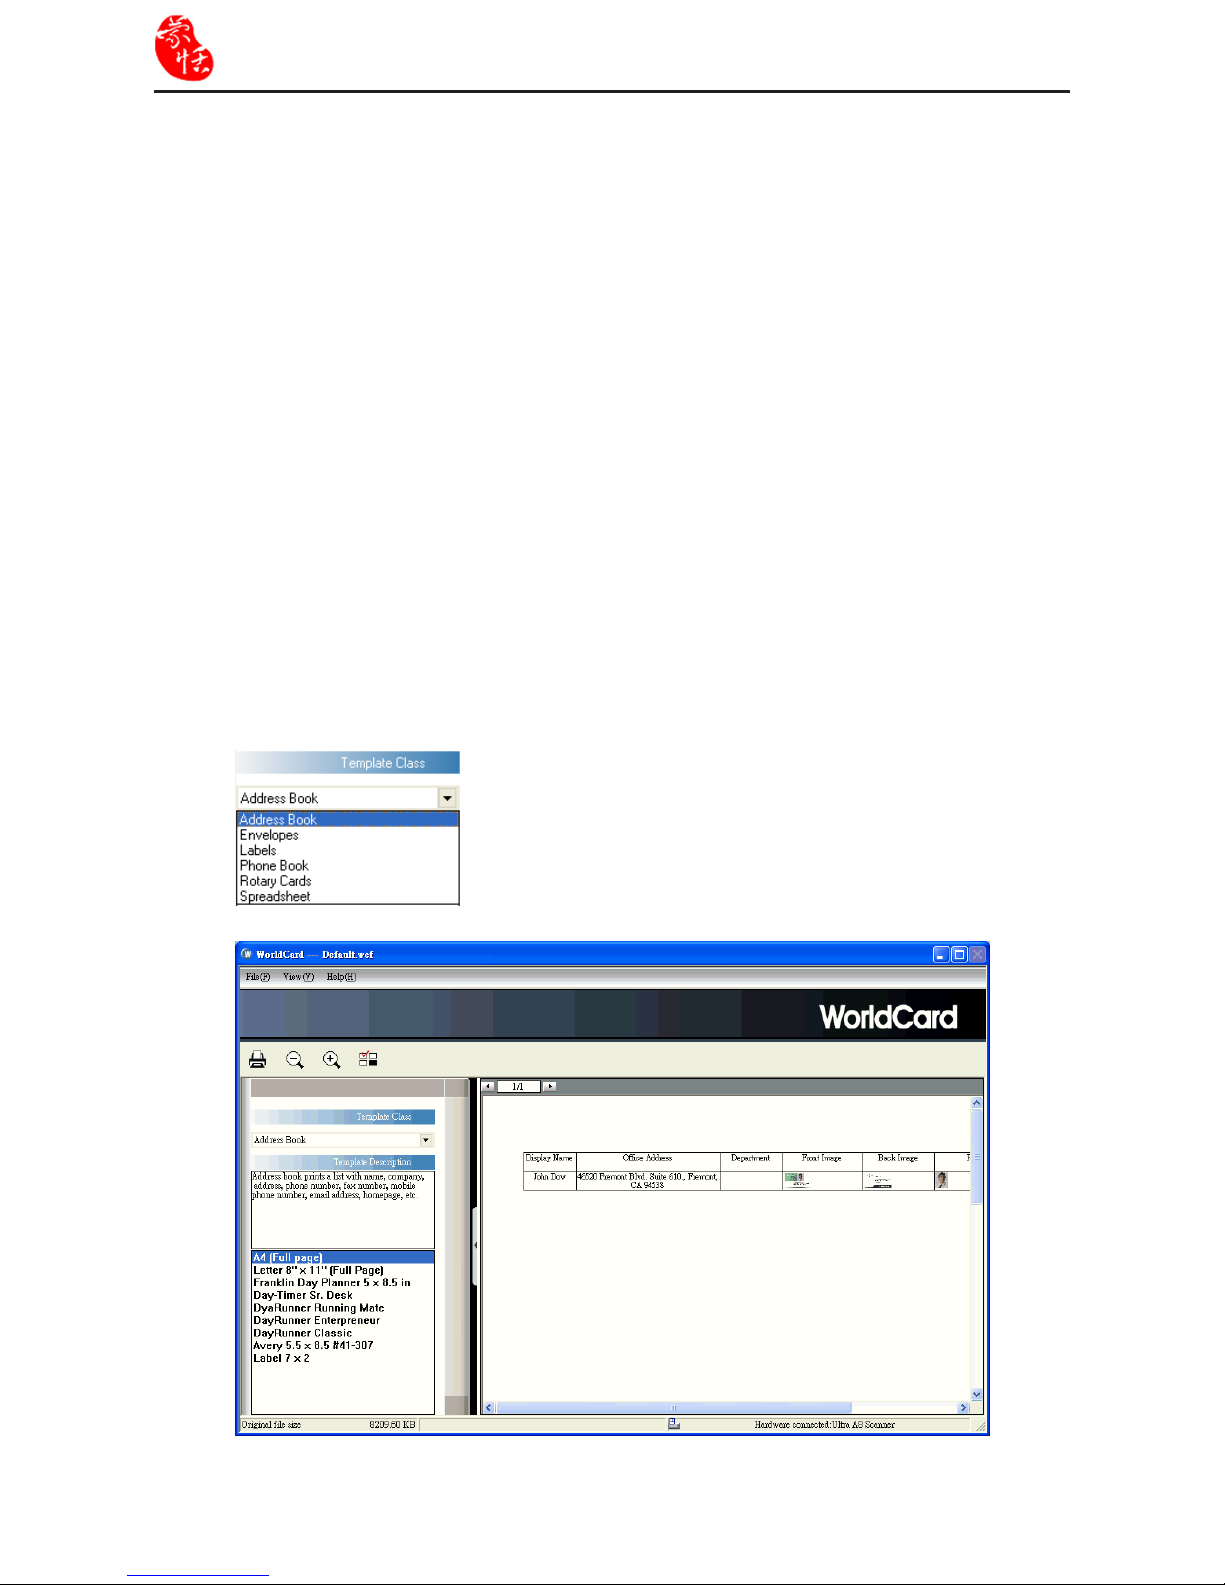
At the Print Preview pane, you can select several Print Preview Template Classes from
the Template Class menu to the left of the Print preview pane.
After the applicable Template is selected, you may further dene your printing preview
by selecting the available options in the selected Template. A similar Print Preview option
list will appear depending on your selected Template Class.
When a Preview option has been selected, the Print Preview pane reects that change
on the right side.
Page 48
Chapter 5 Managing Business Cards
5-13
5.8.2 Edit Print Templates
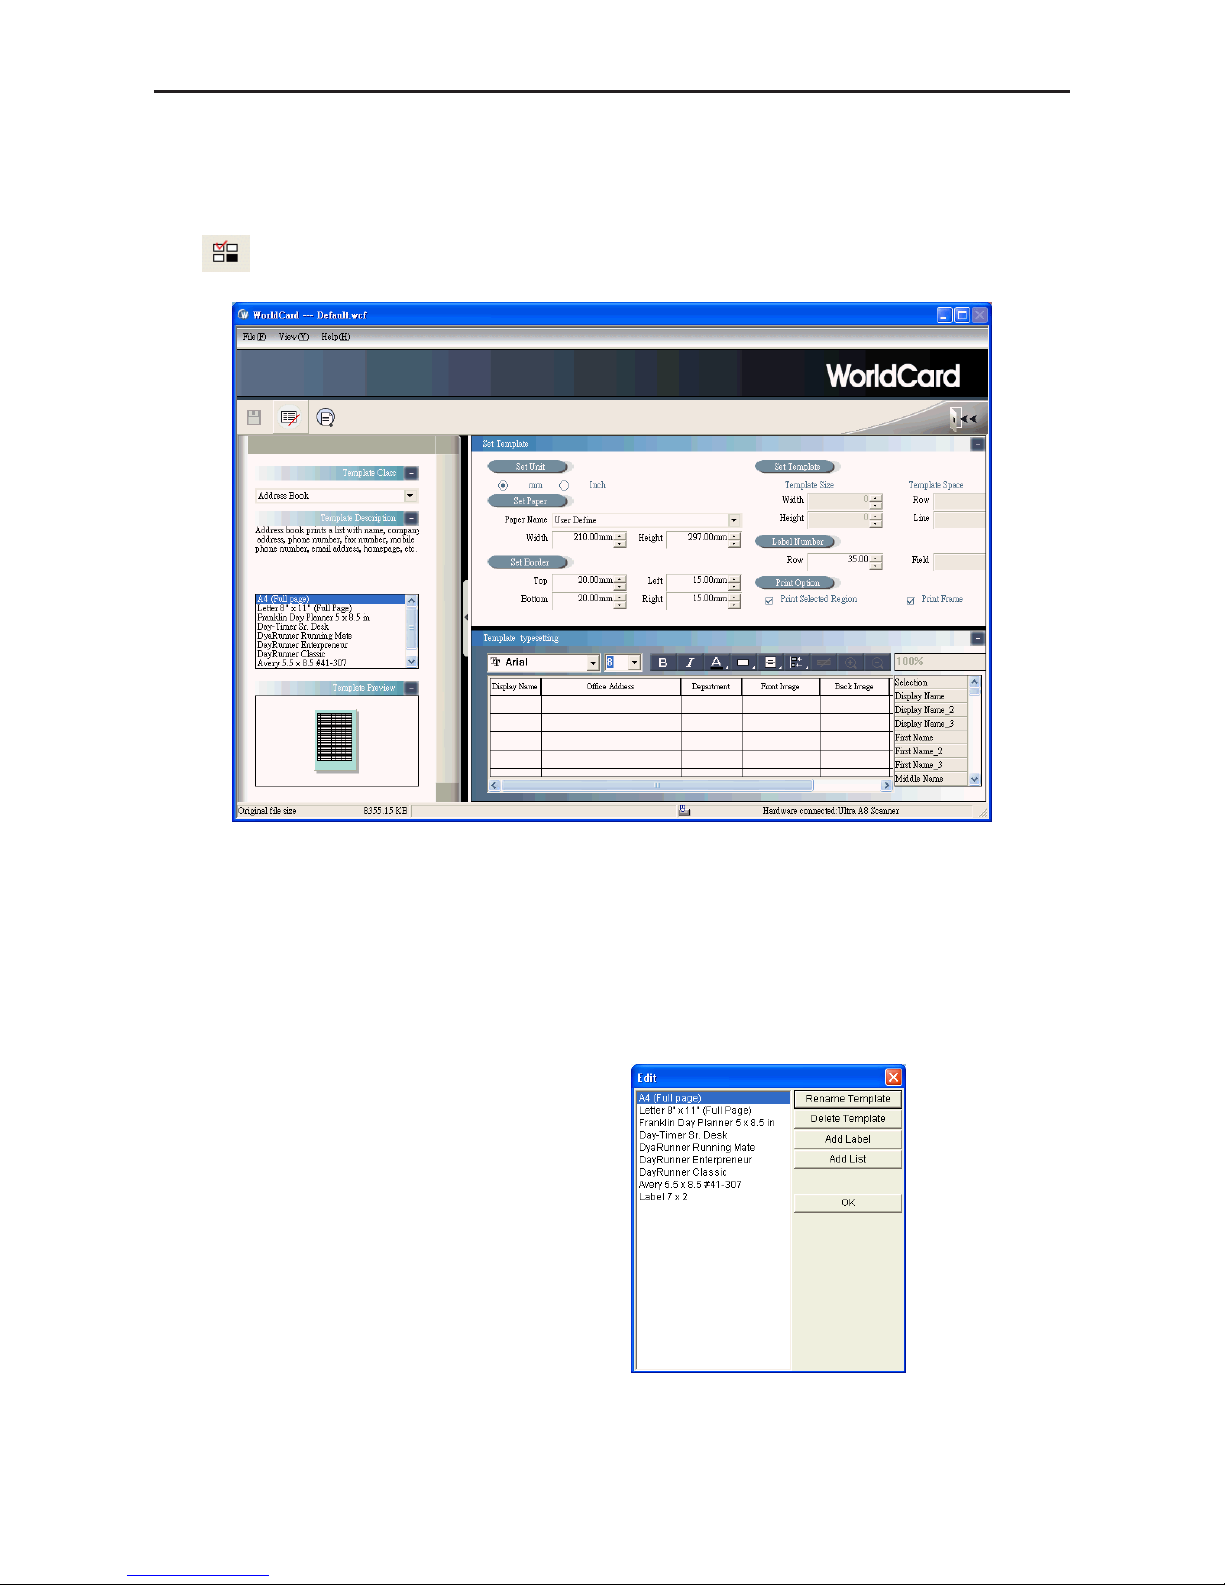
WorldCard allows you to edit templates for printing your cards. On File menu click Print
Template Edit, the following pane appears. You may also click the Edit Print Template
icon
.
To edit the Print Template, you may select a Template Class and Template from the left
pane. Then adjust the settings of the print paper from the pane on the upper right. If you wish
to choose print elds, you can drag the eld into the template editing area.
Note: WorldCard’s attentive categorizing function makes it exible on Editing Print Tem-
plates, such as you can add City, Zip Code under Address column
Note: You may also rename or delete templates with the Edit function.
WorldCard provides Add Label and
Add List template model for creating your
own temp lates. On the Templat e Class
menu, click Edit. The Edit dialog box
appears.
To add a new print template, click Add
Labe l or Add Lis t, an d th en en ter the
template name. Click OK to return to the
Print Template Edit pane for editing the
new print template.
Page 49
5-14
WorldCard
5.9 Exchange Contacts
WorldCard software allows you to exchange valuable contact information with other applications through the use of the Import, Export and Synchronize commands.
5.9.1 Export
You can export contacts from WorldCard to another application such as Microsoft
Excel, Access, Outlook, Outlook Express, Lotus Notes, PocketPC, Palm, ACT!, Goldmine,
Salesforce(Contacts), Salesforce(Leads), CSV, VCard, or WorldCard series, such as
WorldCard windows versions, WorldCard Mobile versions (WorldCard Mobile for iPhone
and WorldCard Contacts for iPhone). For the supported software, please refer 5.9.4
WorldCard Data Exchange Compatibility List.
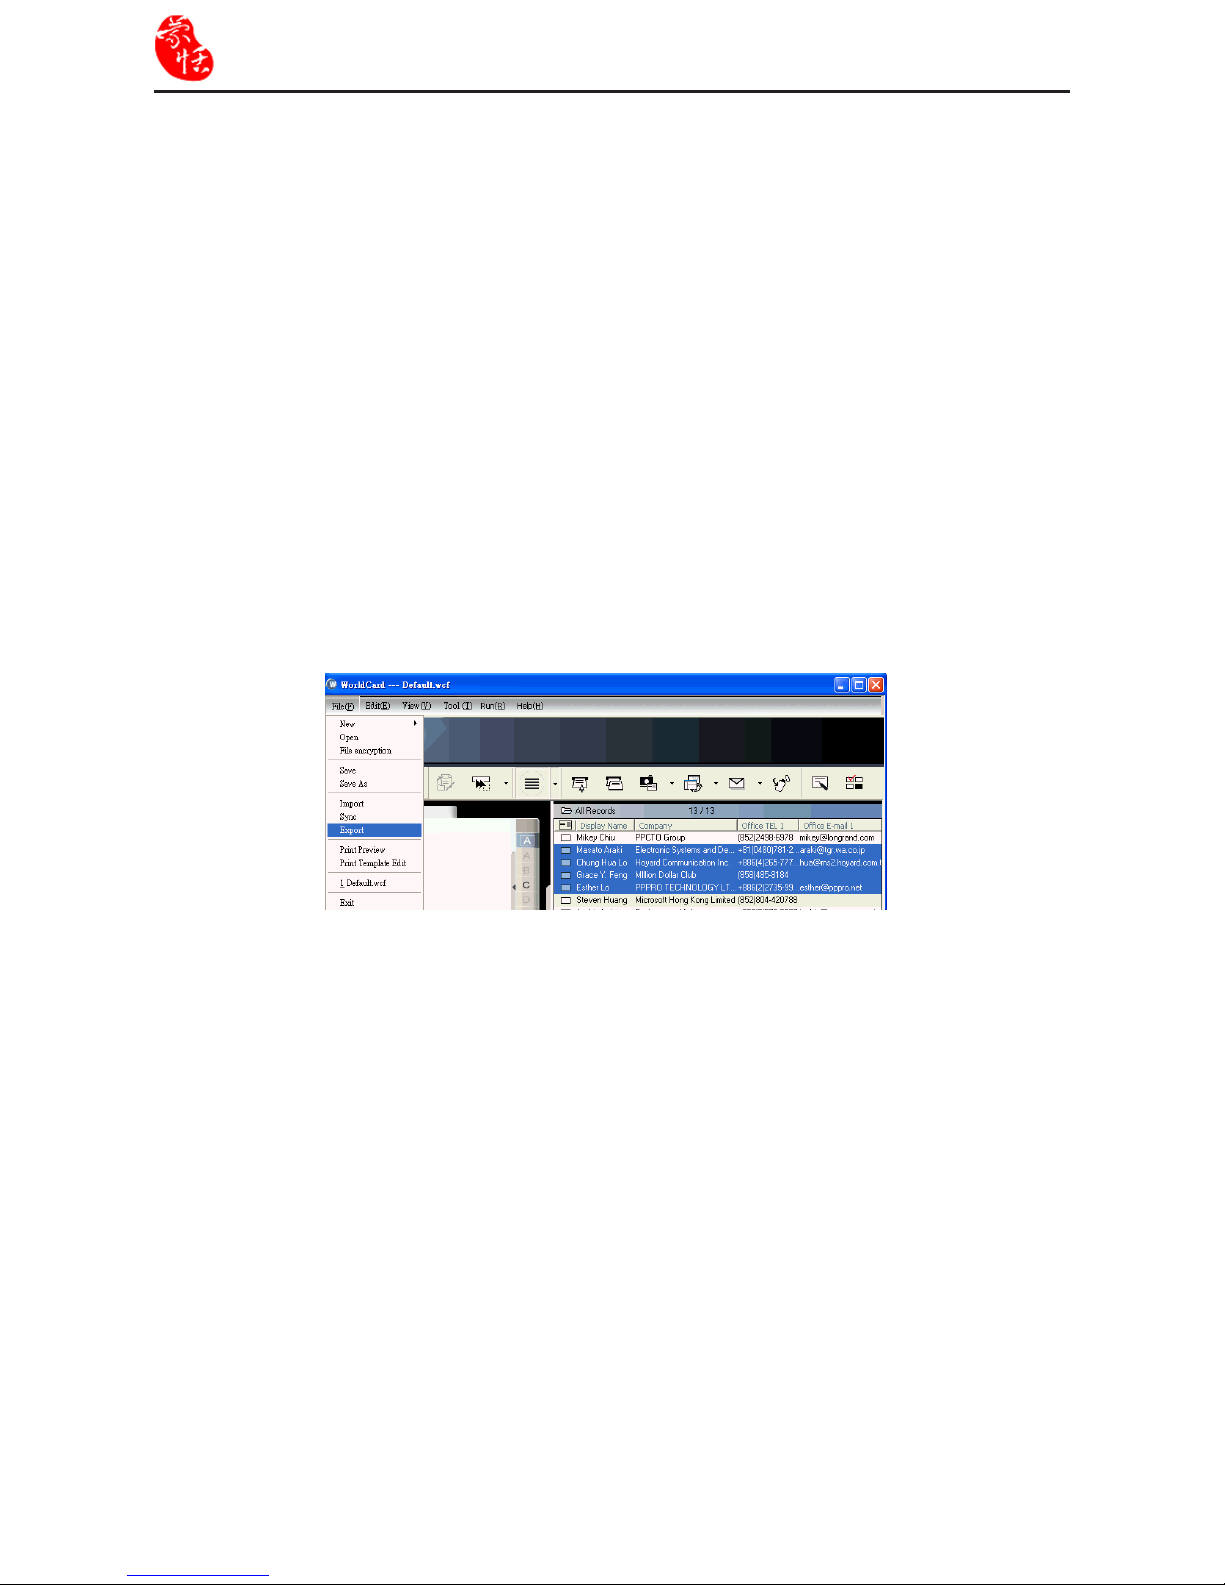
1. Select a card or a group of cards by selecting the specic card(s) in the WorldCard
Management window as shown in the following picture.
Tips:
1. Export function supports on Excel 97, Outlook 97 and Outlook Express 4.0 version and
higher.
2. Export Wizard will compress the le . It makes your ling and mailing easier by pro-
ducing a smaller le.
Warning: Because of the compliance between unicode and ANSI code, you might export
unreadable characters to Palm Desktop, CSV or vCard le in cases you export
Chinese, Japanese, Korean....from a single-byte language character based
computer (such like English, German, French and so on) to a double-byte
language character based computer (Such like Chinese, Japanese, Korean
and so on).
Page 50
Chapter 5 Managing Business Cards
5-15
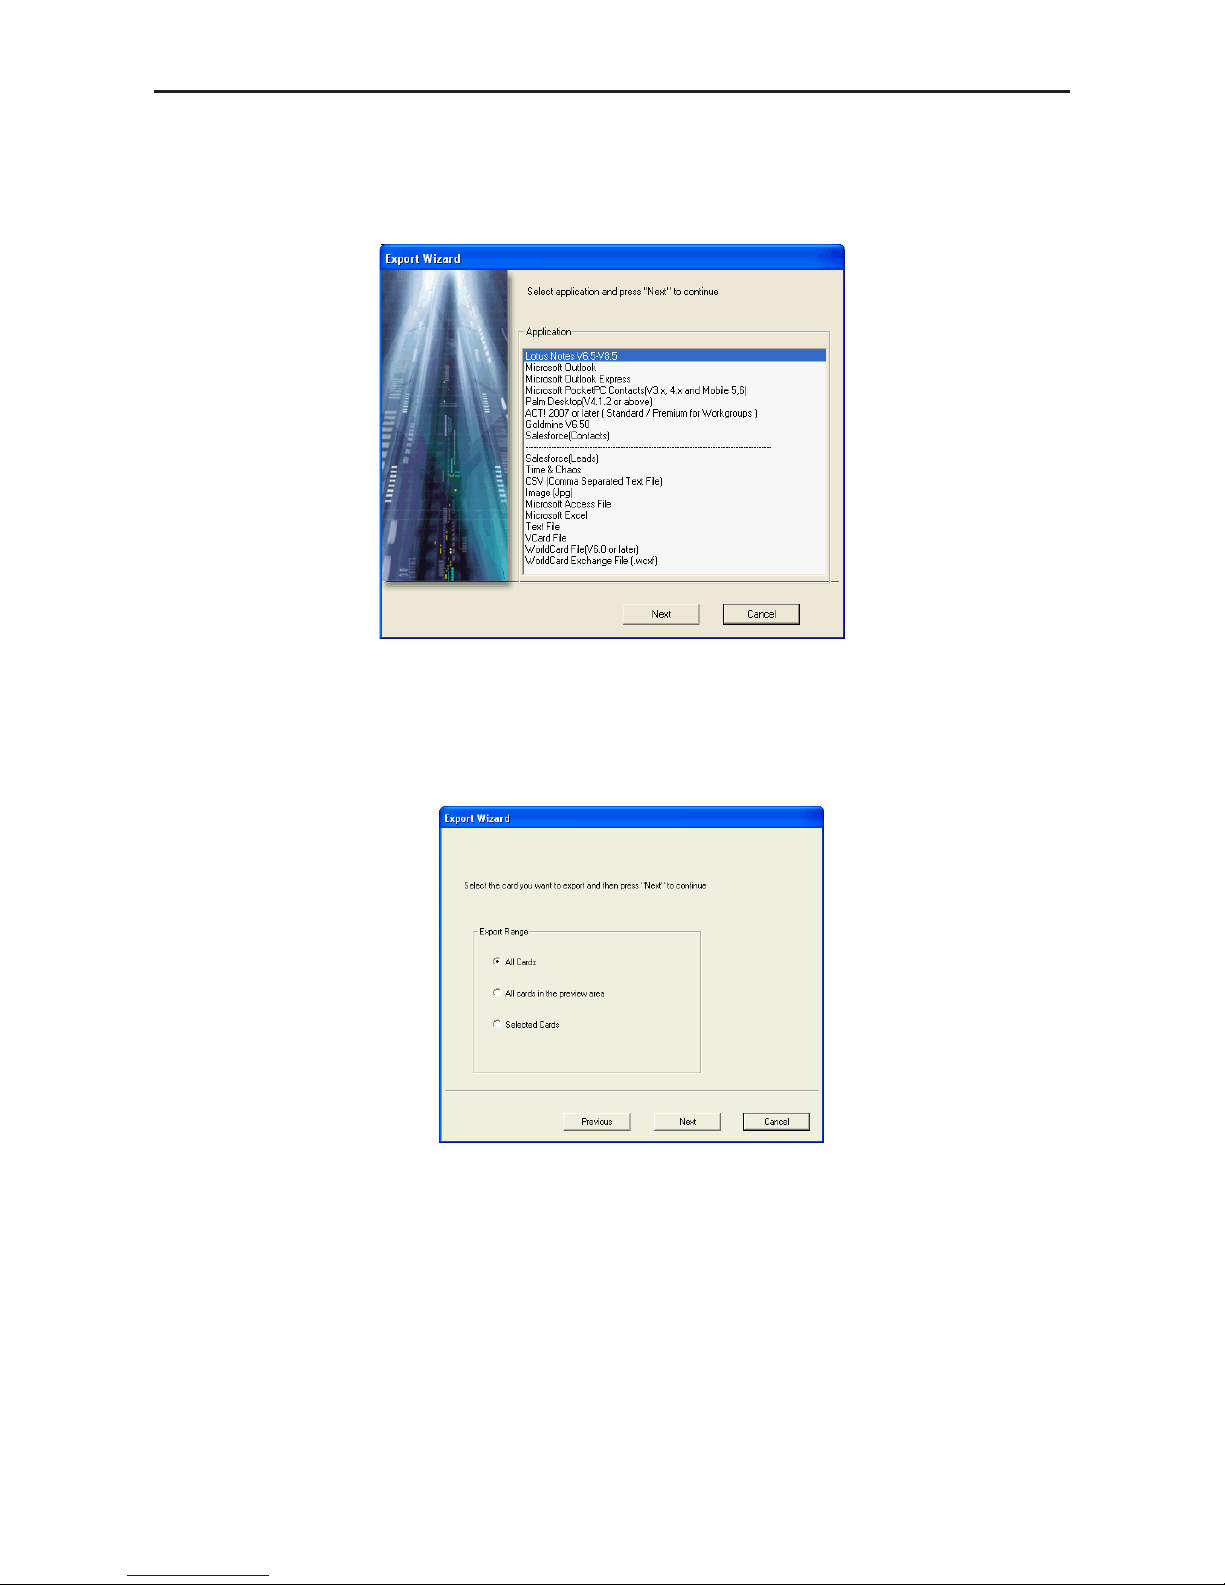
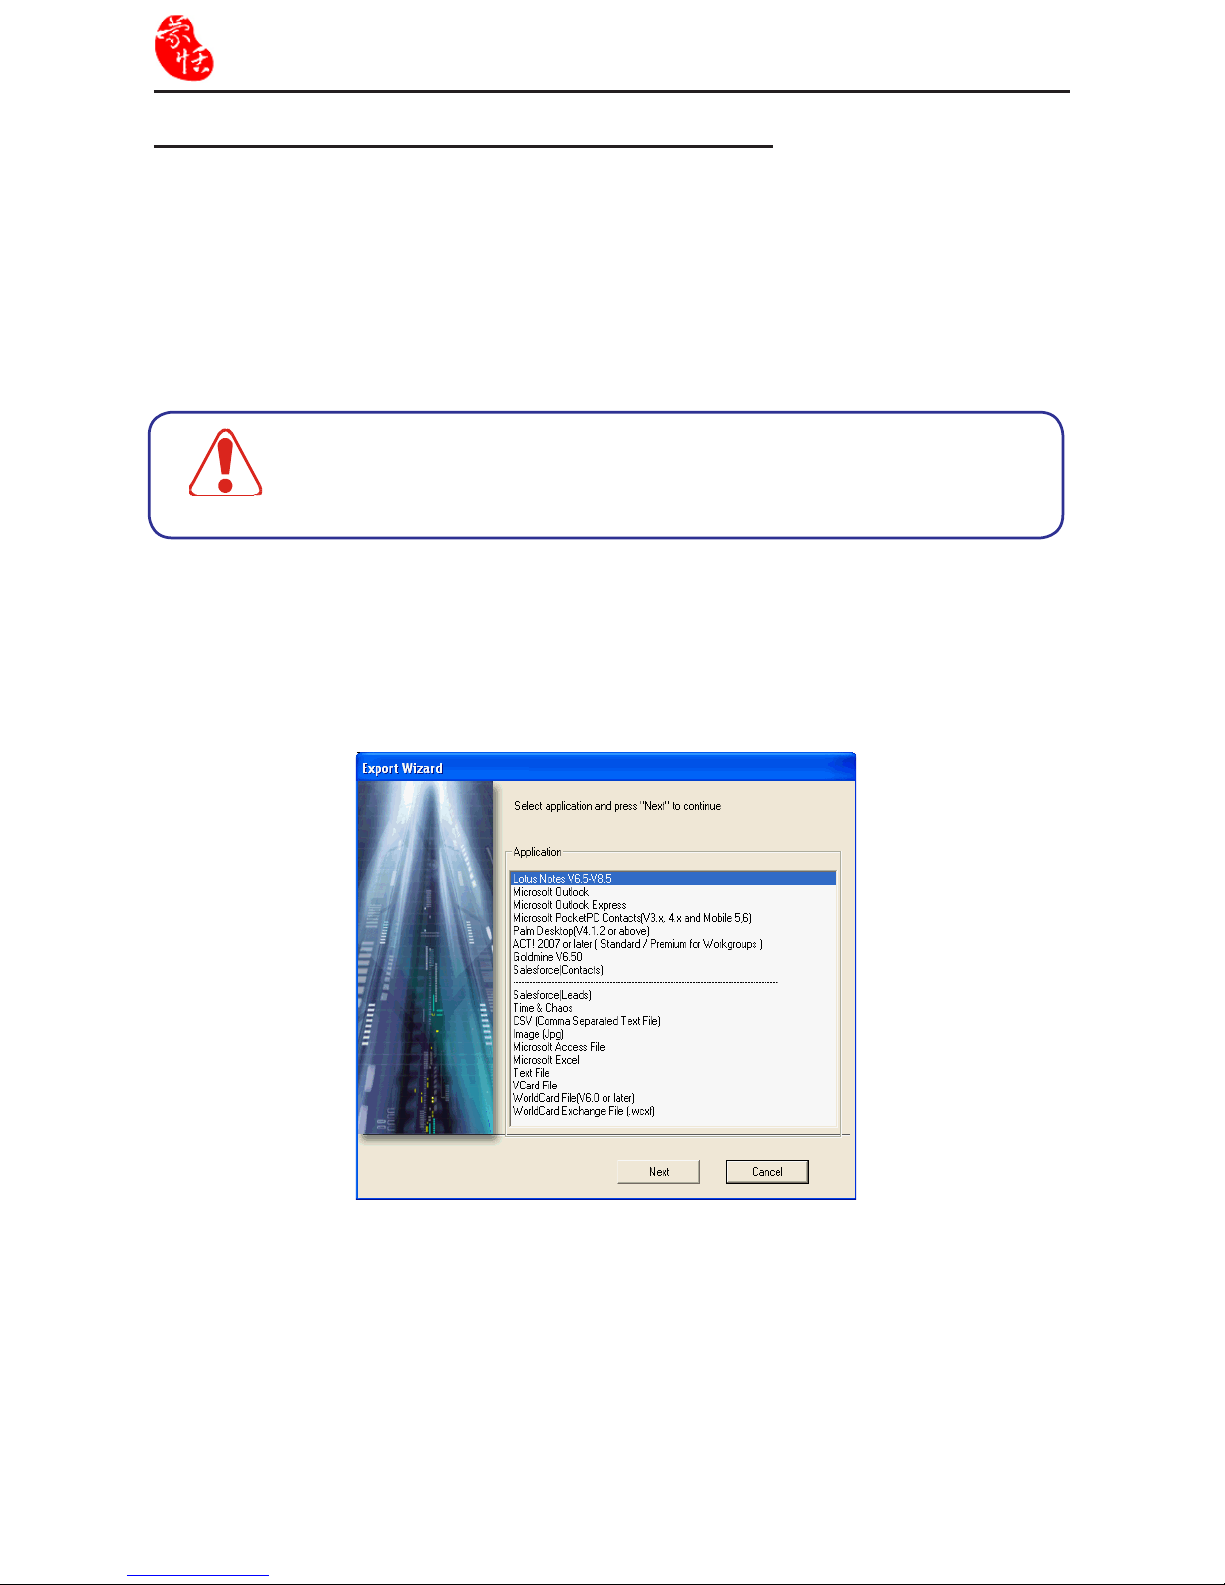
3. Follow the instructions given in the Export Wizard dialog box to select the export
domain. Then click Next.
2. On the File menu, click Export. The Export Wizard dialog box appears, as previously
displayed in the section. Take the Outlook Express application for example. Click Next.
The next step is displayed in the Export Wizard dialog box.
Page 51
5-16
WorldCard
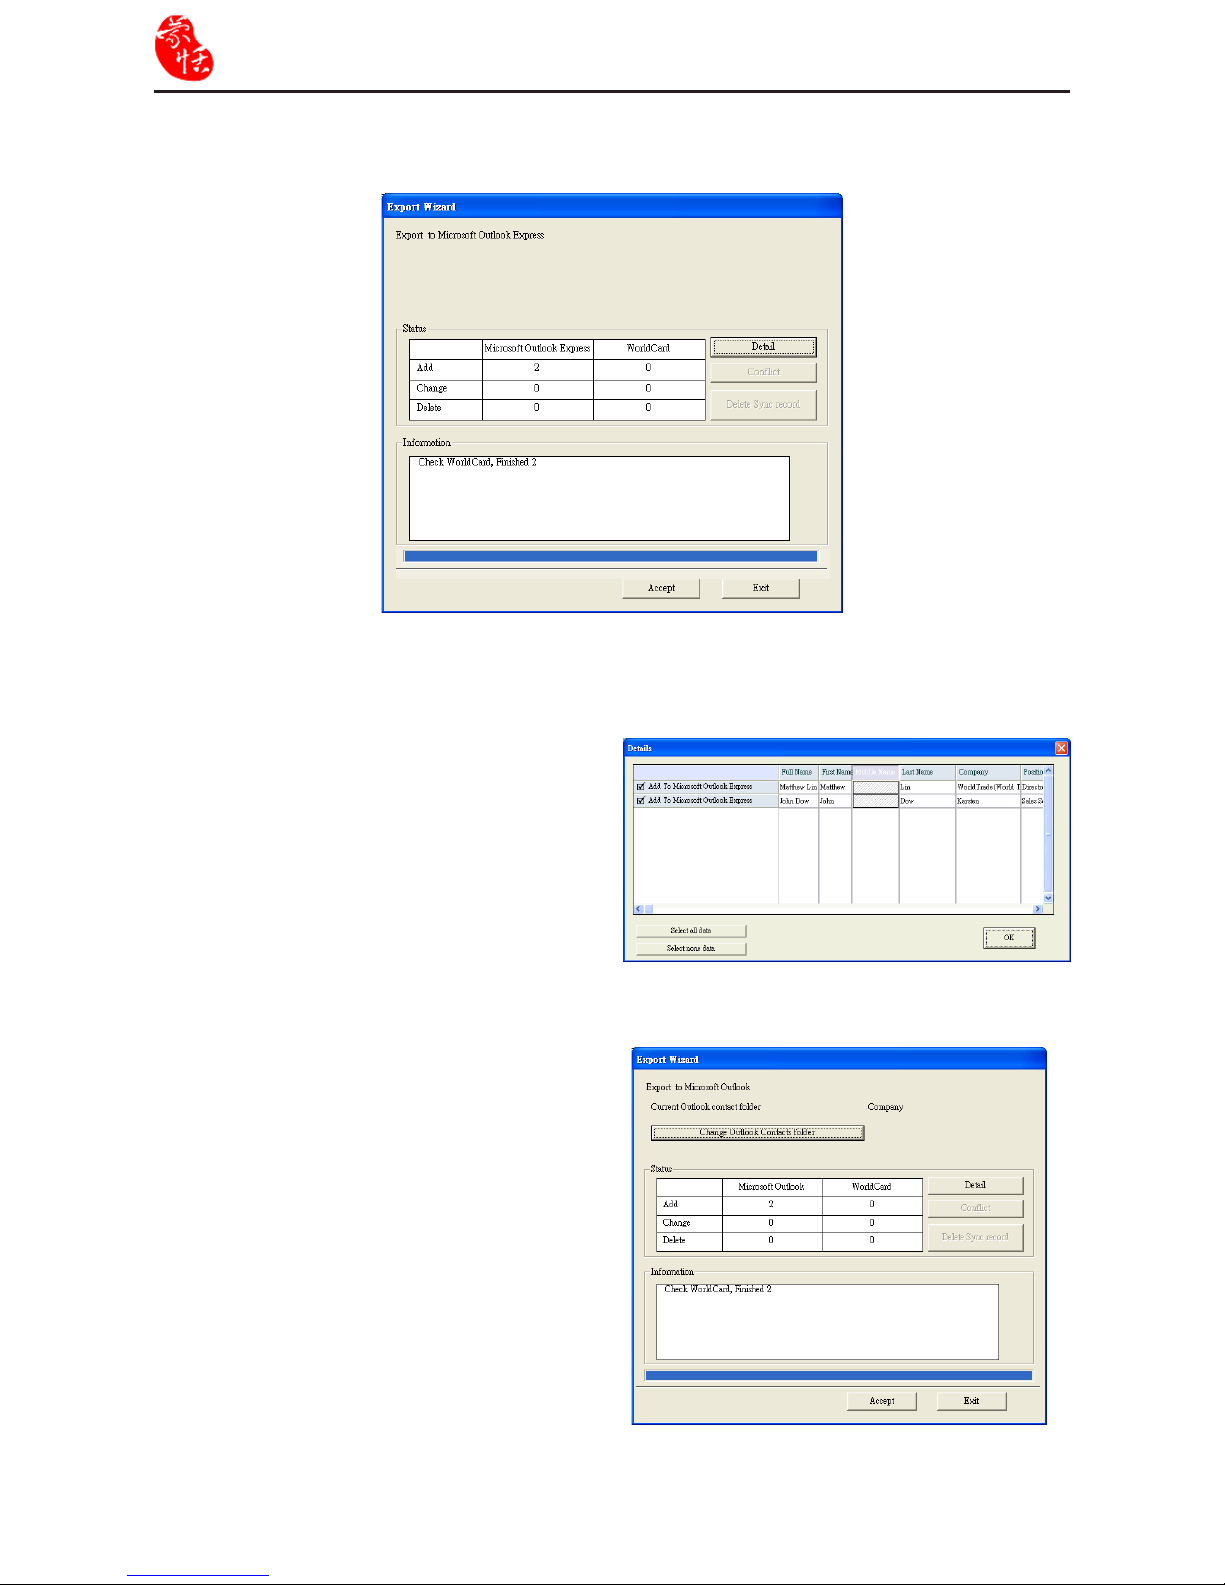
4. The following Export Wizard status dialog box appears.
Tips:
1. When the Export process is completed,
you can view the Details page as shown
in the following picture by clicking Detail.
2. If the export destination is [Microsoft
Outlook], you can click [Change Outlook Contact folder] to appoint which
contact subcategory to export to. Then
click [OK] to save the change.
Page 52
Chapter 5 Managing Business Cards
5-17
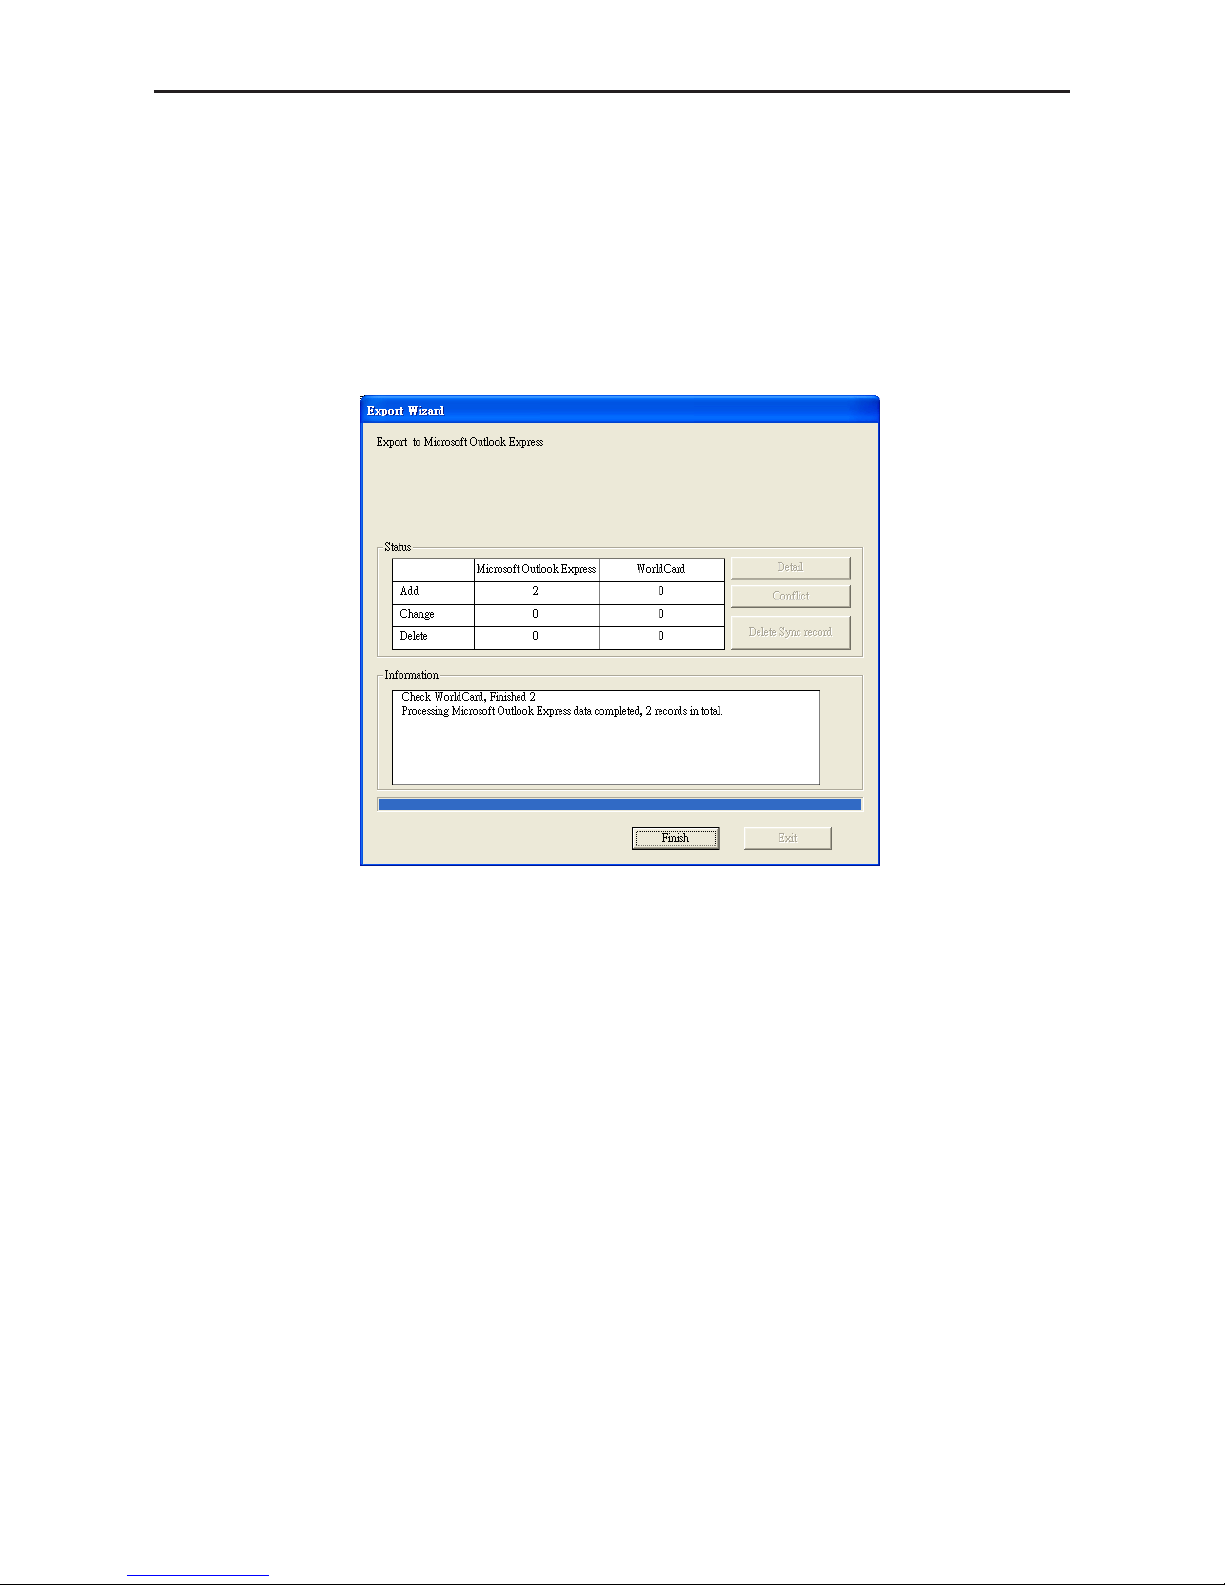
6. From the Details dialog box, you can choose to export all details of each card or none. To
close the Details dialog box, click OK. This will return you to the Export Wizard status
dialog box as seen previously in this section.
7. To complete the Export process, click Accept. You may see the export status and after the
export is nished, please click Finish to exit the Export Wizard.
Page 53
5-18
WorldCard
Export contacts to other WorldCard Series products
You need to export contacts from WorldCard rst before you share them. These contacts
will be bundled and saved as .wcxf format, which can be shared by all WorldCard Series
products via email or iTunes File Sharing.
1. Select the contacts which you want to export. Click File\Export function from the menu.
Select WorldCard Exchange File (.wcxf).
Notes
1. Only WorldCard Mobile 3.1.0 or later supports the .wcxf format.
2. Only WorldCard Contacts 2.3.0 or later supports the .wcxf format.
Page 54
Chapter 5 Managing Business Cards
5-19
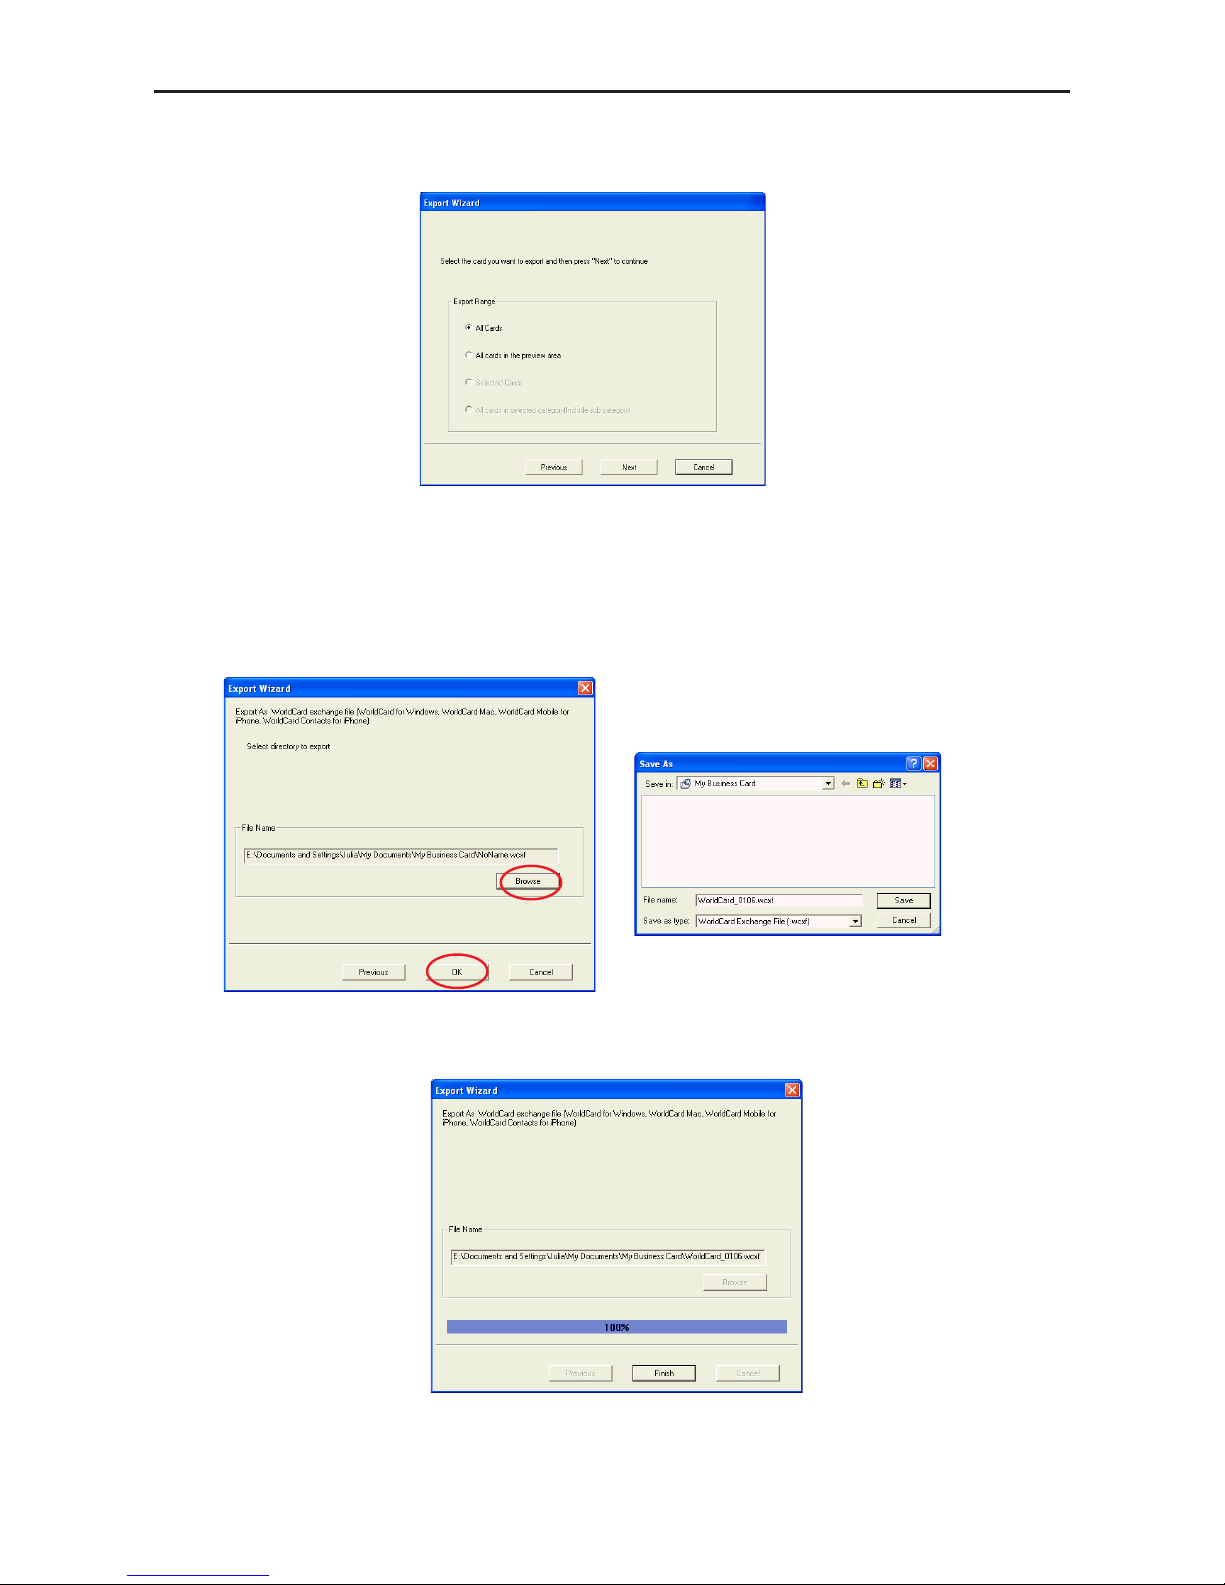
2. Follow the instructions given in the Export Wizard dialog box to select which cards you
want to export. And then click Next.
4. After exporting is completed, click Finish to close the Export Wizard dialog box.
3. If you have chosen to continue with the Export function, choose the directory to export
the les to. Click OK to export the cards. To complete exporting the les, review the
information displayed in the Export Wizard window.
Page 55
5-20
WorldCard
5. You can share the .wcxf contact le by attaching it to an email message and then share the
.wcxf le with other WorldCard series products.
To share the .wcxf le with WorldCard(PC or Mac Version), please follow the steps
below:
Step1
Open email with a .wcxf le. Then save the .wcxf le to your computer.
Step2
Lauch WorldCard.
Step3
Click the import button of on the toolbar.
Step4
Select WorldCard series data exchange les and follow the importing process to
import the .wcxf le into WorldCard.
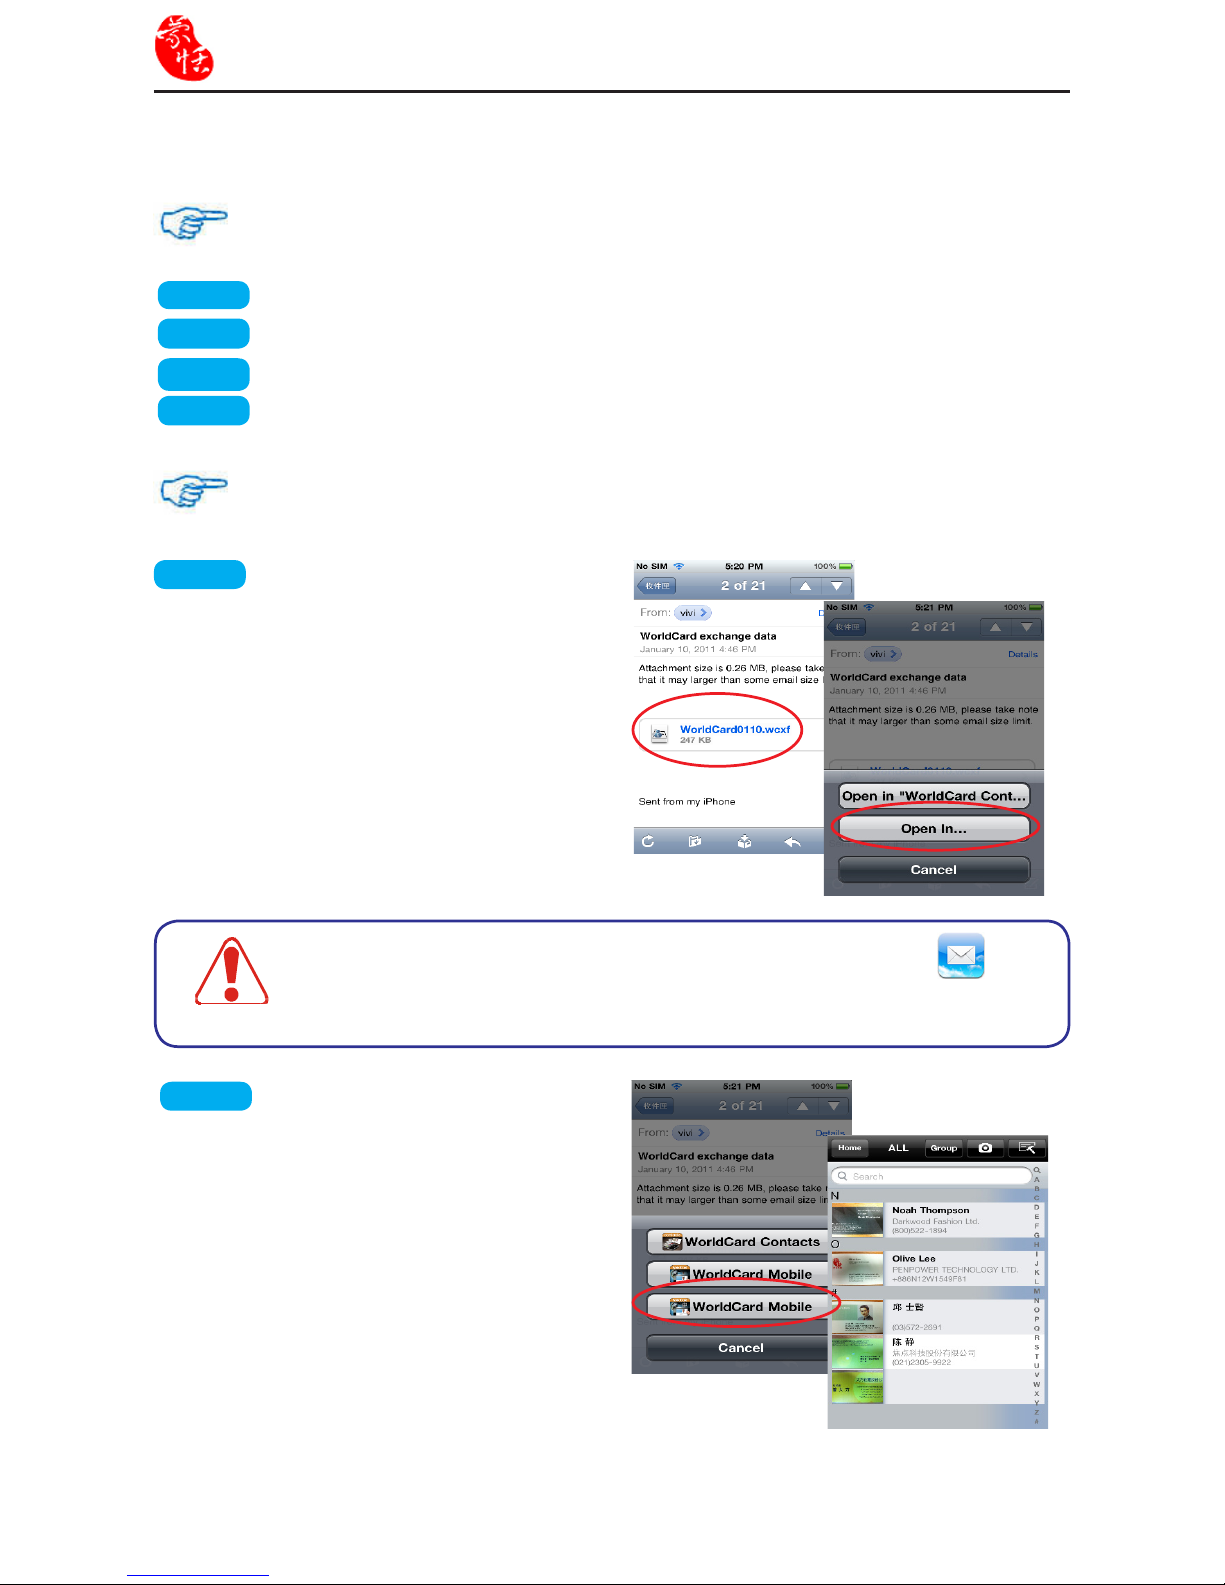
Step1
Open email with a .wcxf le and
tap the .wcxf le.
Select Open In.
Step2
Select the App that you want to
share the .wcxf with. Then contacts in the
app will open instantly and the contacts
in the .wcxf le will be imported into the
app at the same time.
To share the .wcxf le with WorldCard Mobile or WorldCard Contacts, please
follow the steps below:
Notes
Please open the .wcxf le with iPhone's built-in Mail application .
The .wcxf le cannot be opened in web-mail service.
Page 56
Chapter 5 Managing Business Cards
5-21
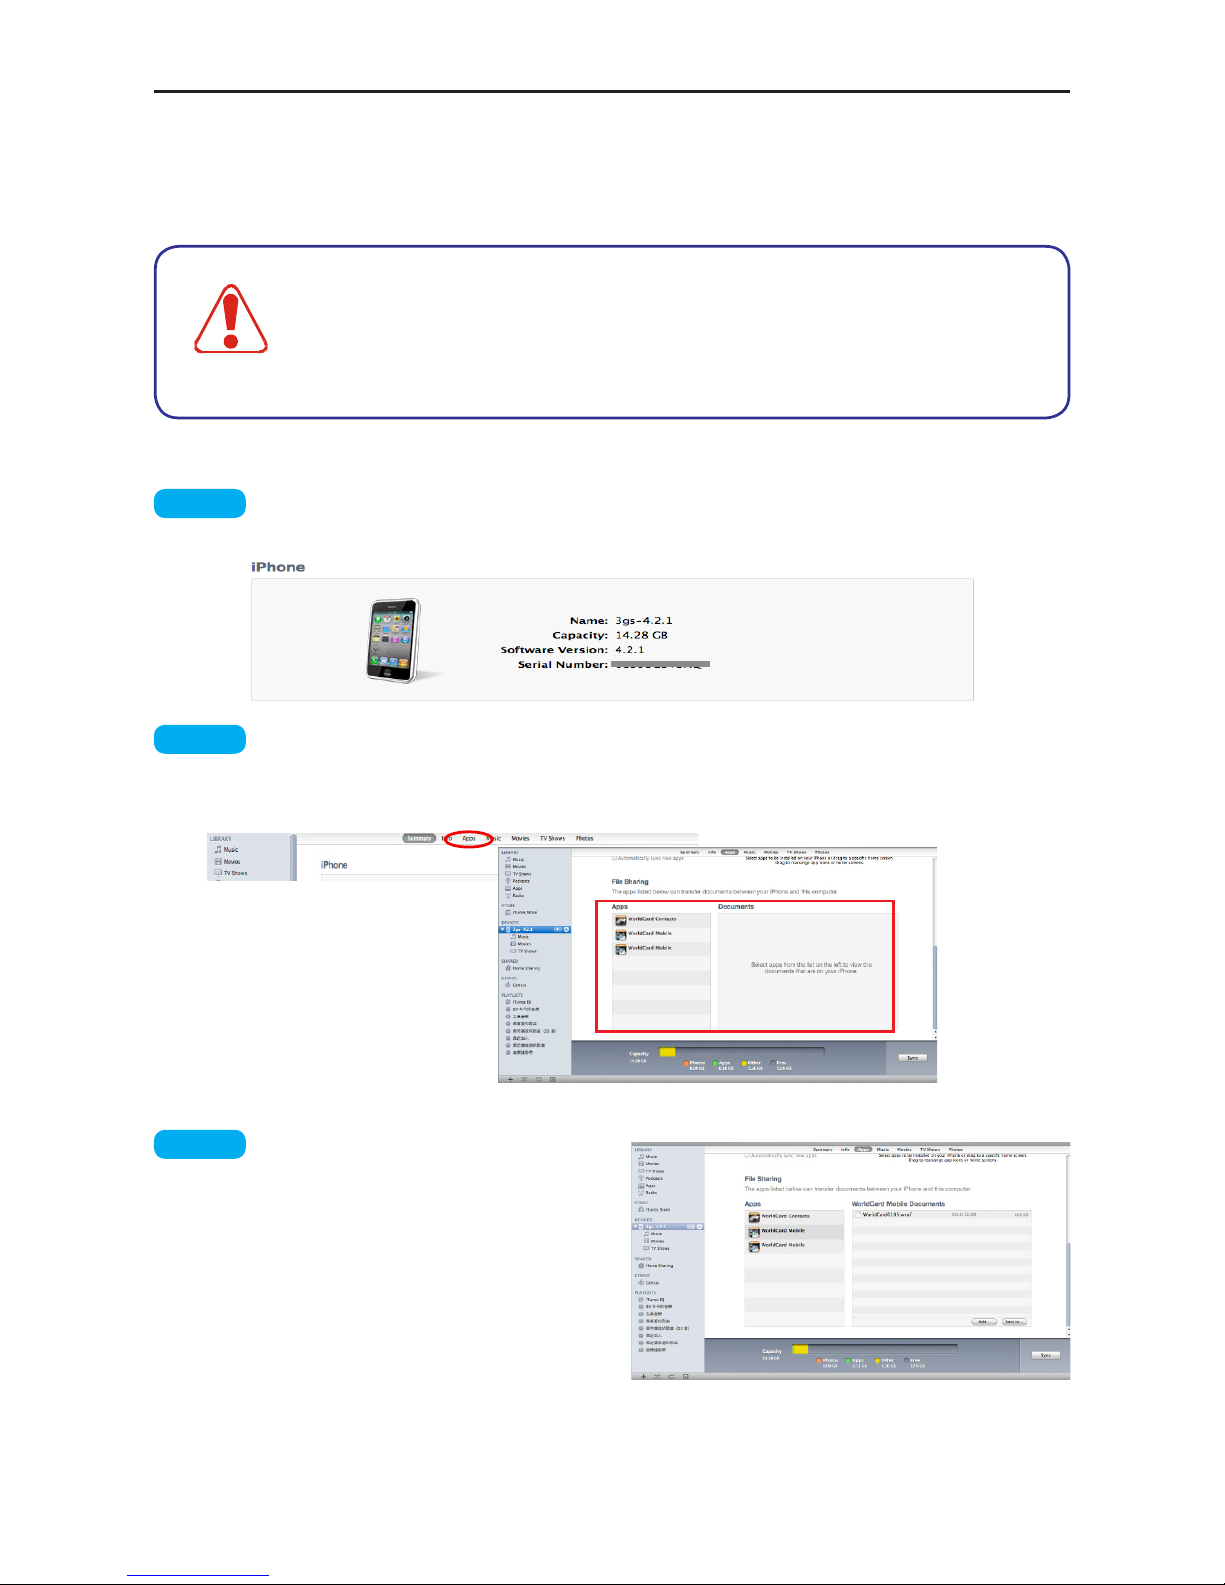
6. You can share the .wcxf contact le by attaching it to an email message or share the .wcxf
le with WorldCard Mobile or WorldCard Contacts on your iPhone via iTunes File
Sharing.
step 1
Connect your iPhone to your computer, launching iTunes on your computer, and
then selecting your iPhone from the Device section of iTunes
Notes
iTunes File Sharing requires:
1. iTunes version 9.1 or later.
2. Mac OS version 10.5.8 or later.
3. iPhone iOS version 4 or later.
step 2
Select the Apps tab and scroll down to the bottom of the page. You will see the
File Sharing section.
step 3
You will nd a list of apps that
are installed on your iPhone that supports
File Sharing function. Select the app
that you want to share the .wcxf contact
le with. Take WorldCard Mobile
for example. You will nd the right
Document area lists the le that can share
with your computer.
Page 57
5-22
WorldCard
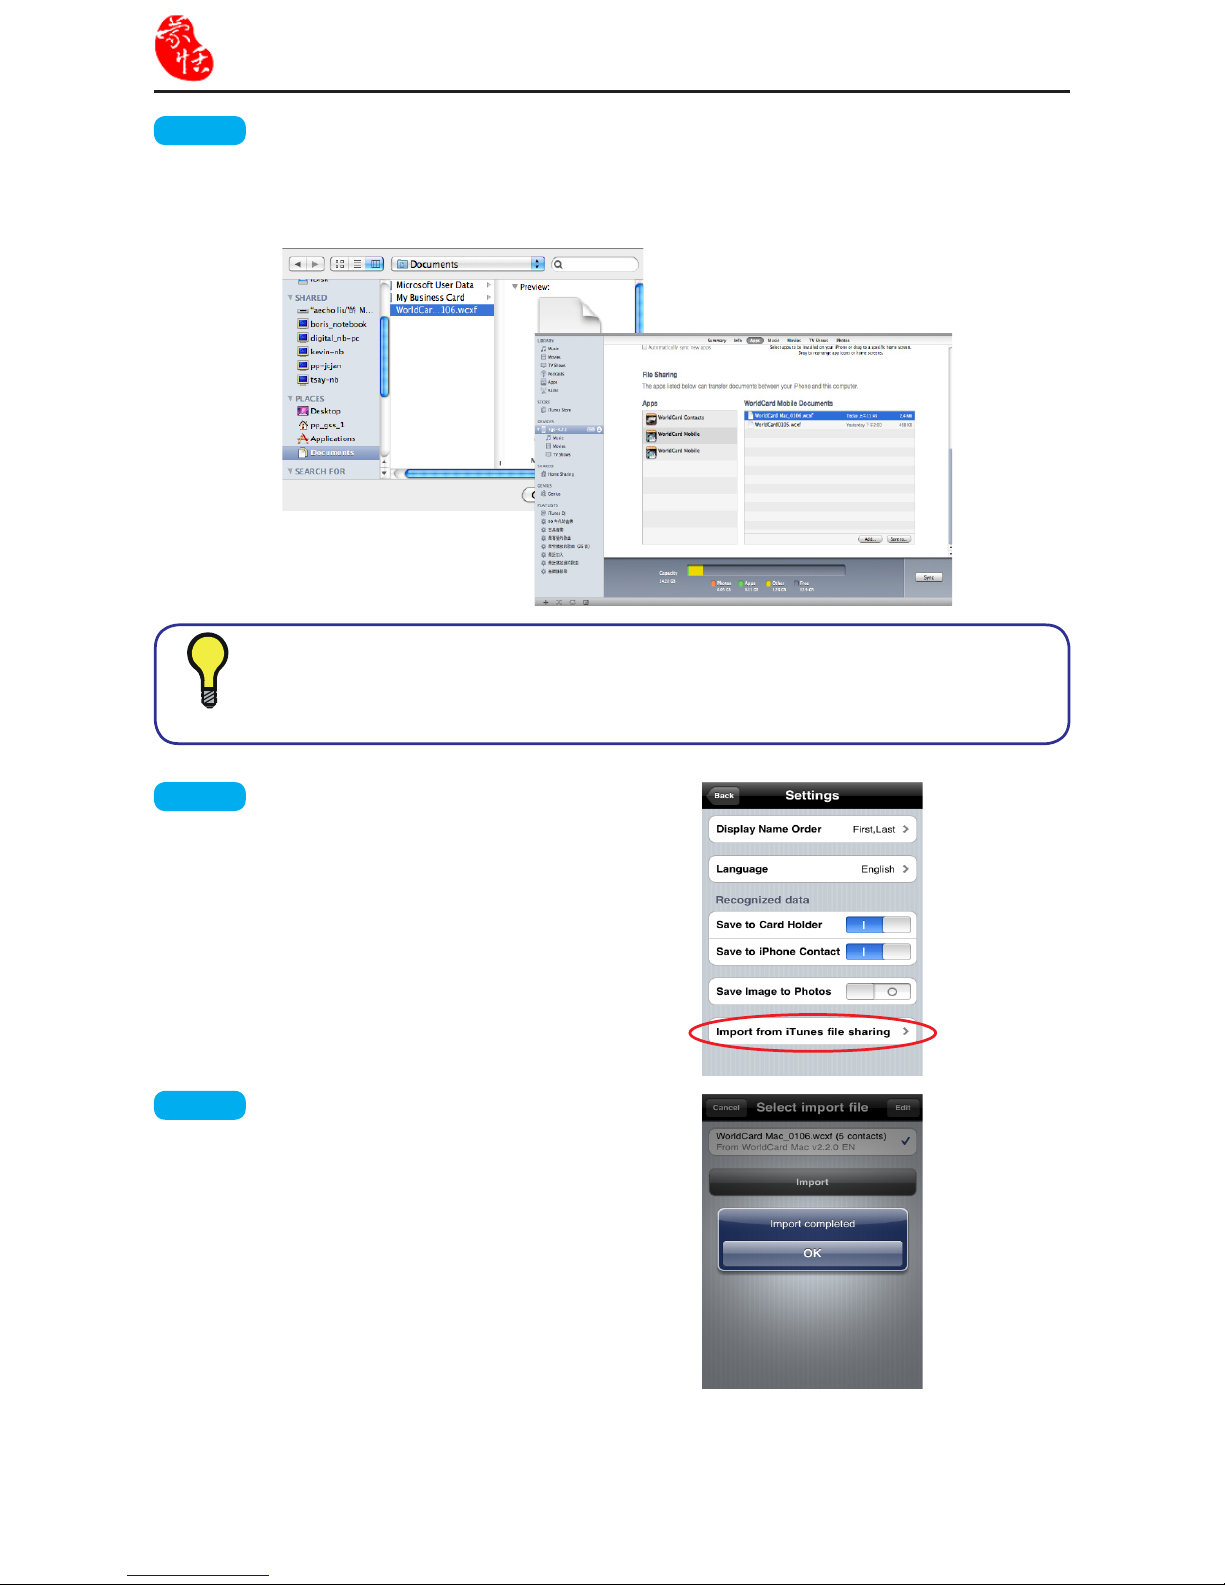
step 4
Please click Add... and locate the .wcxf le that you want to copy from your
computer and click Choose. This .wcxf le will be copied into the Documents sharing
area immediately.
step 5
Return to your iPhone. Choose
WorldCard Mobile on your iPhone and
select Settings\Import from iTunes le
sharing.
step 6
Tap .wcxf le that you want to
import into WorldCard Mobile and then
tap Import. The contacts in the .wcxf le
will then be imported into Card Holder of
WorldCard Mobile.
Tip
You can click [Save to] to save the le in the Apps to your computer.
Page 58
Chapter 5 Managing Business Cards
5-23
5.9.2 Import
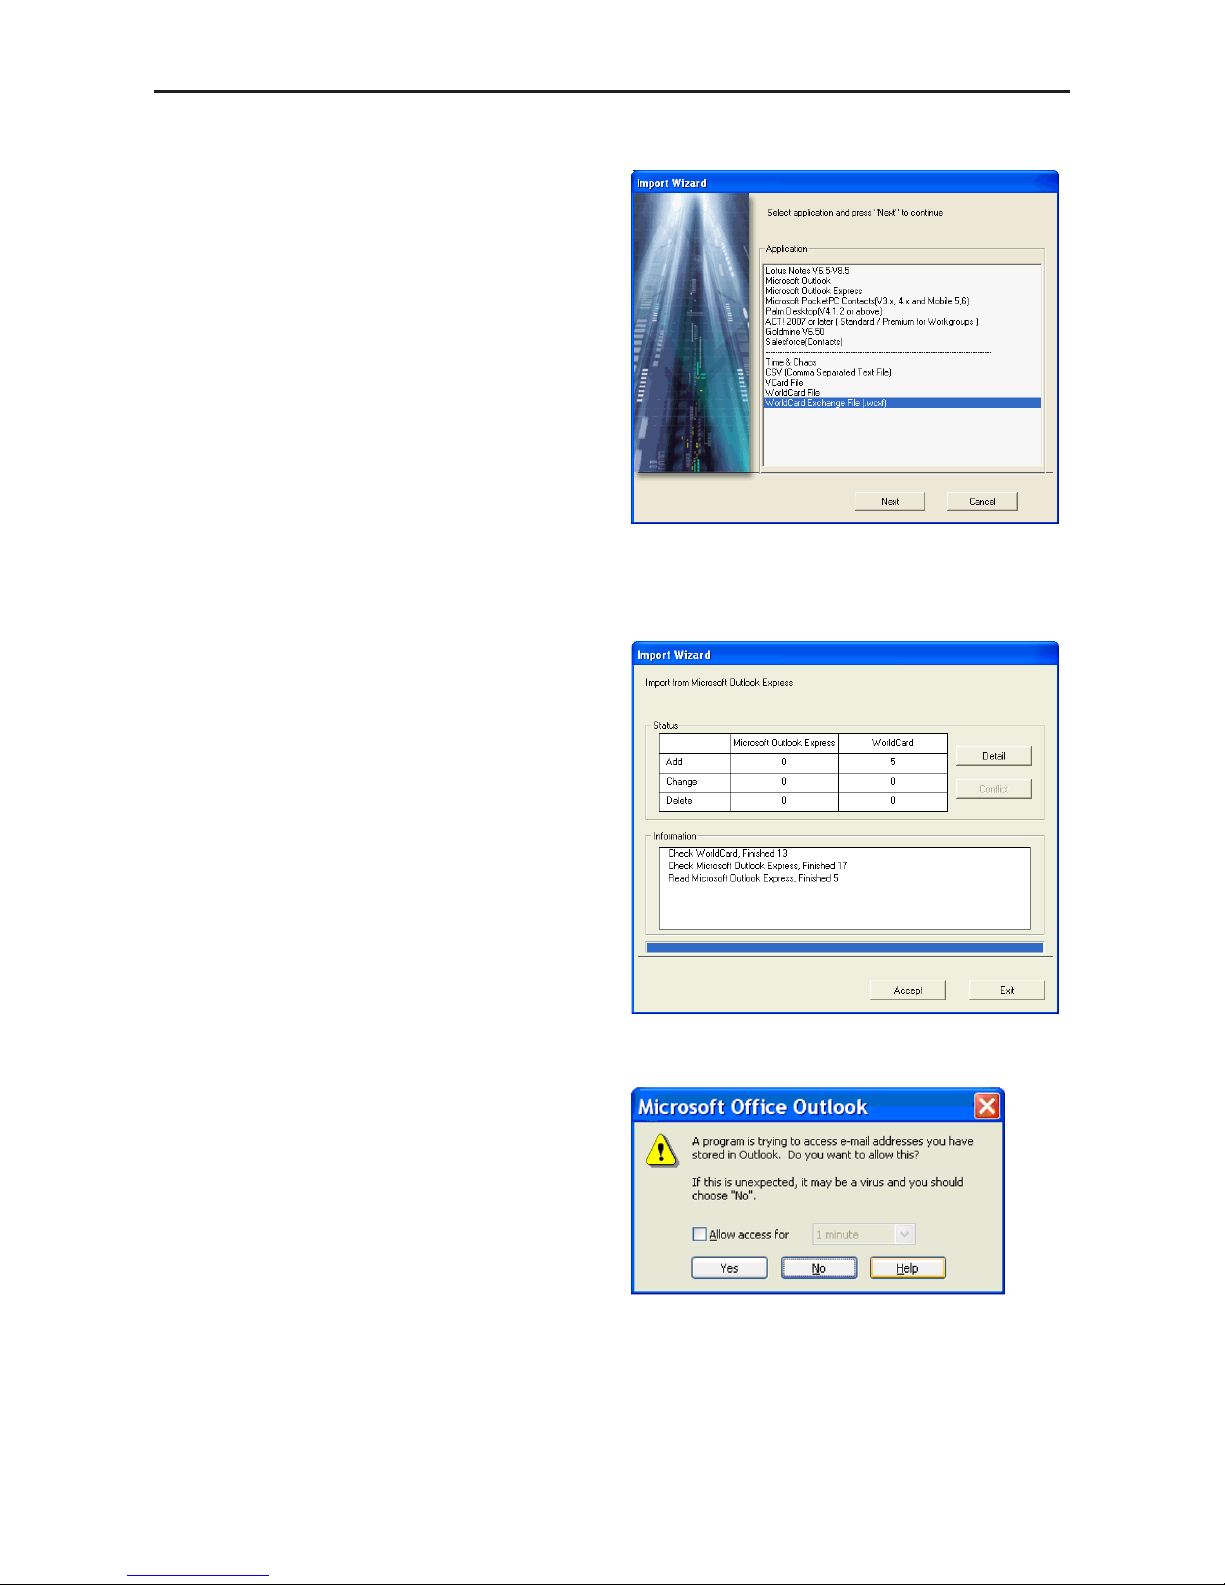
To import data into your Wor ldCard
database from another application such
as Microsoft Outlook, Outlook Express,
P o c k e t P C , Pa l m , A C T ! , Go l d mi n e ,
Salesforce(Contacts), CSV, VCard, WorldCard Mac, WorldCard Mobile for iPhone,
WorldCard Contacts for iPhone, and etc:
1. Click Import on the File menu. The
Import Wizard dialog box appears.
2. Select the type of application source to
import into your WorldCard database.
Note: The example displays import data
from Microsoft Outlook Express using Windows XP.
3. Click Next in the Import Wizard dialog
box. The next dialog box appears. For
the supported software, please refer
5.9.4 WorldCard Data Exchange
Compatibility List.
Note: When importing data from a Mi-
crosoft Ofce application such as
Microsoft Outlook, you may receive
a warning message to advise you
that a program is trying to access
email address information from the
application. This warning message
may appear similar to the following
picture depending on your version of
Microsoft Ofce. To continue, click
Yes.
Page 59
5-24
WorldCard
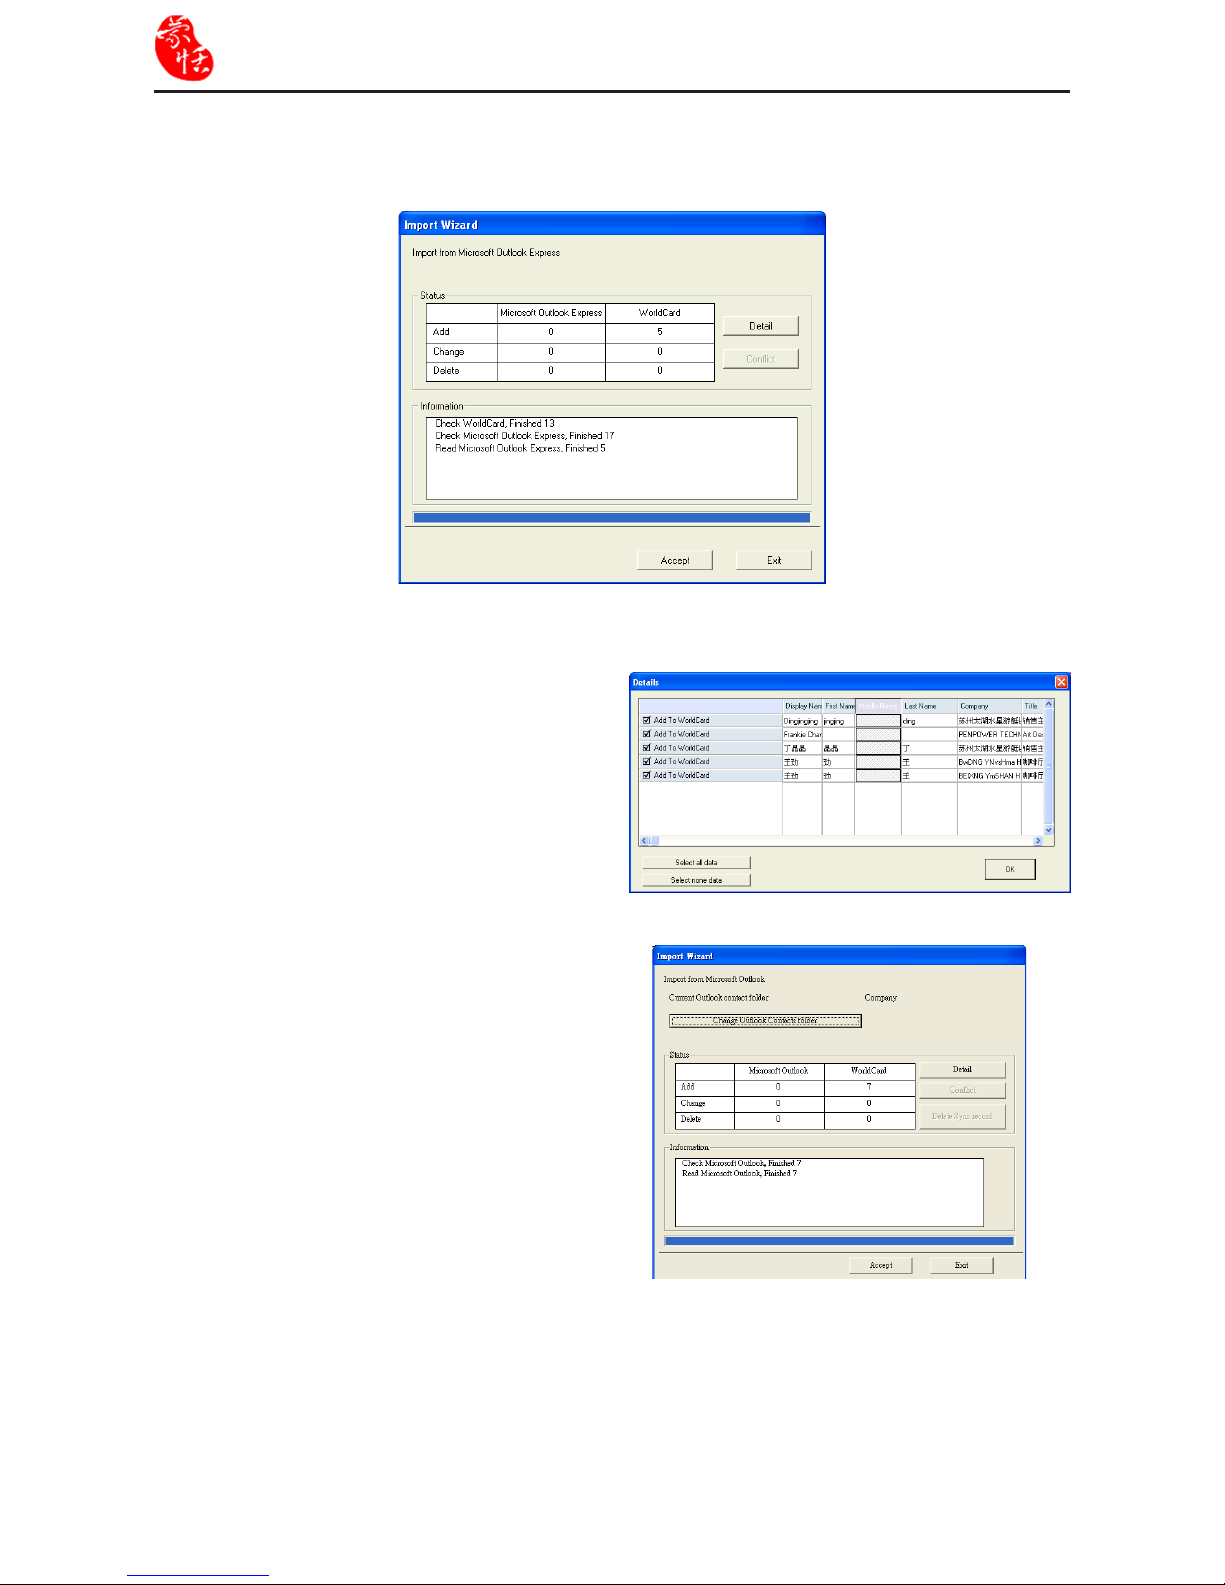
4. While your les are being imported, a blue progress bar displays. After the process is
completed, the Import Wizard dialog box displays Status and Information.
6. To complete the import process, click Accept. The Import Wizard dialog box will update
the Status and Information elds for the data accepted. When the update is completed,
click Finish to close the Import Wizard. You will nd that your imported records have
been added to the bottom of the cards listed in All Records category.
Tips:
1. When the Import process is completed,
you can view the Details page as shown
in the following picture by clicking Detail. In the Details dialog box, you can
select to import all details of each card
or none and then click OK.
2. If you are importing contacts from
[Microsoft Outlook], you can click
[Change Outlook Contacts folder] to
appoint which contact subcategory to
import from. Then click [OK] to save the
change.
Page 60
Chapter 5 Managing Business Cards
5-25
Import contacts from other WorldCard Series products
The new data exchanging function in WorldCard allows you to import contacts from
another WorldCard series product, such as WorldCard Mobile for iPhone or WorldCard
Contacts for iPhone. WorldCard will import the .wcxf le, which is compatible with all
WorldCard Series products.
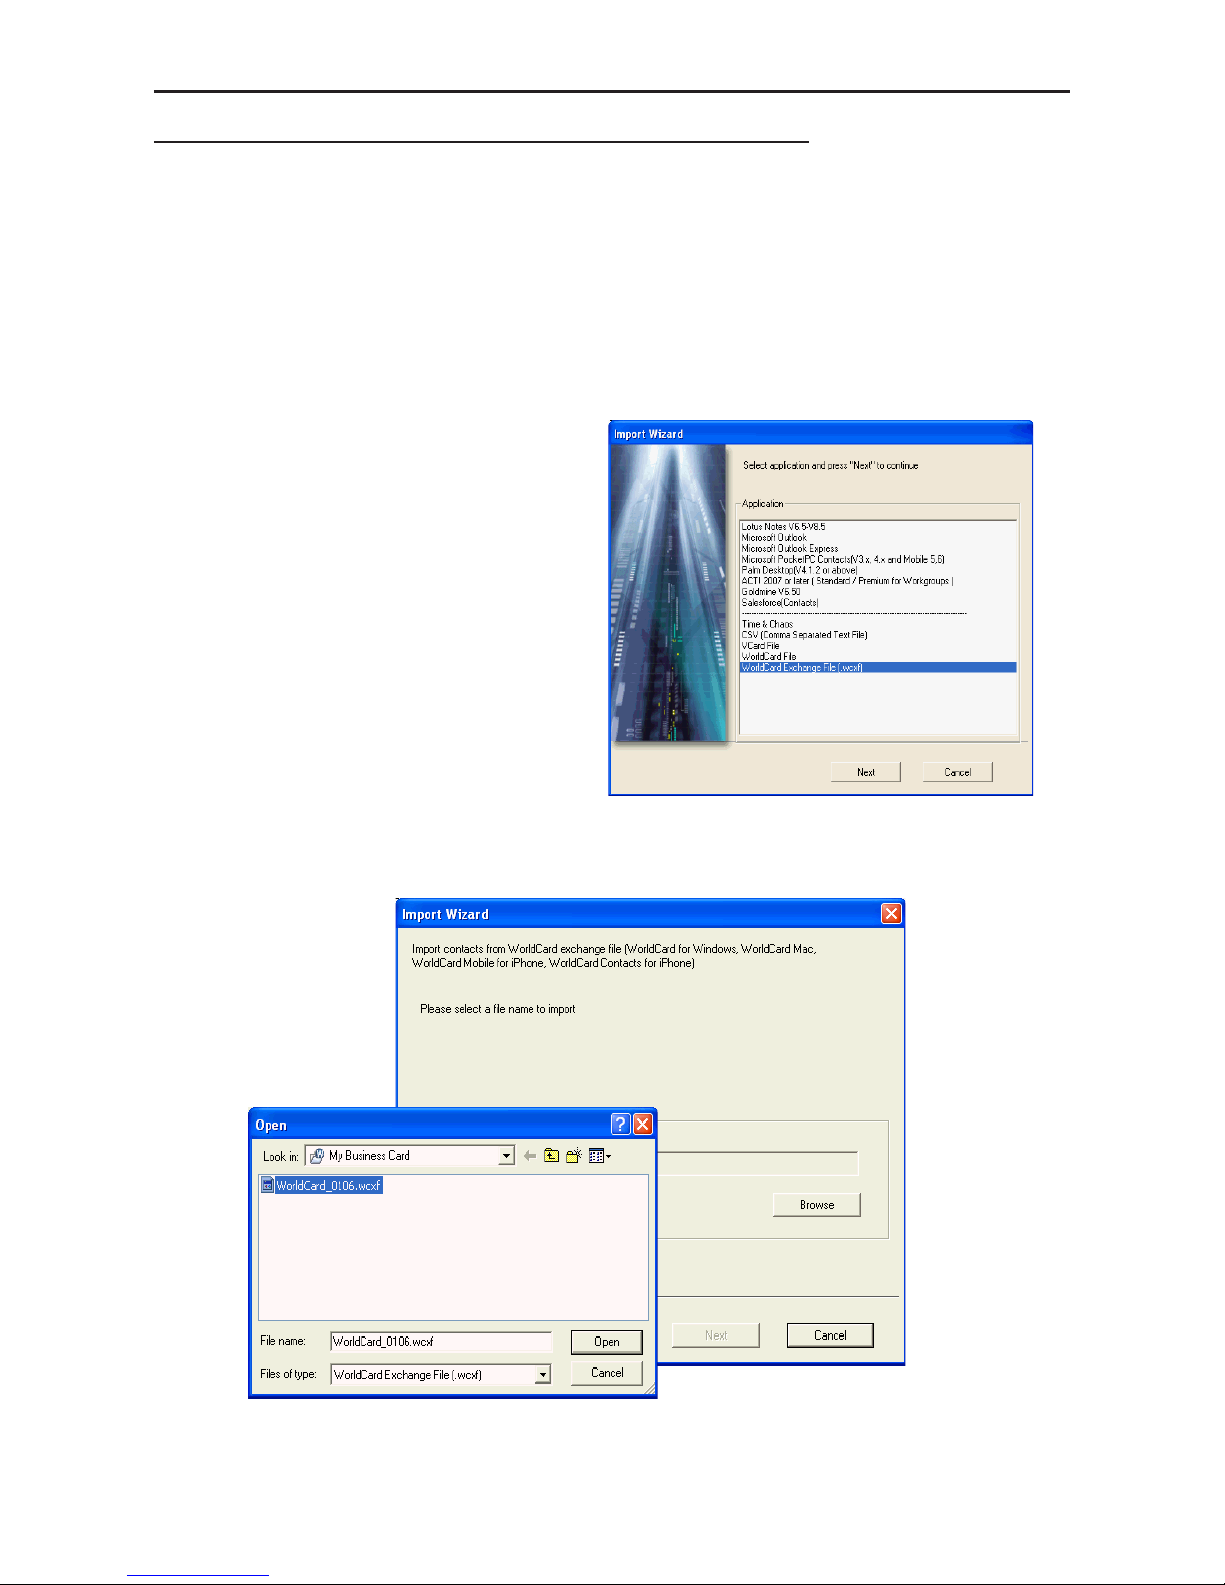
2. Click Browse to select a .wcxf le in your computer and click Next to continue the
importing process.
1. Click Import on the File menu. The
Import Wizard dialog box appears.
Select WorldCard Exchanged File.
Page 61
5-26
WorldCard
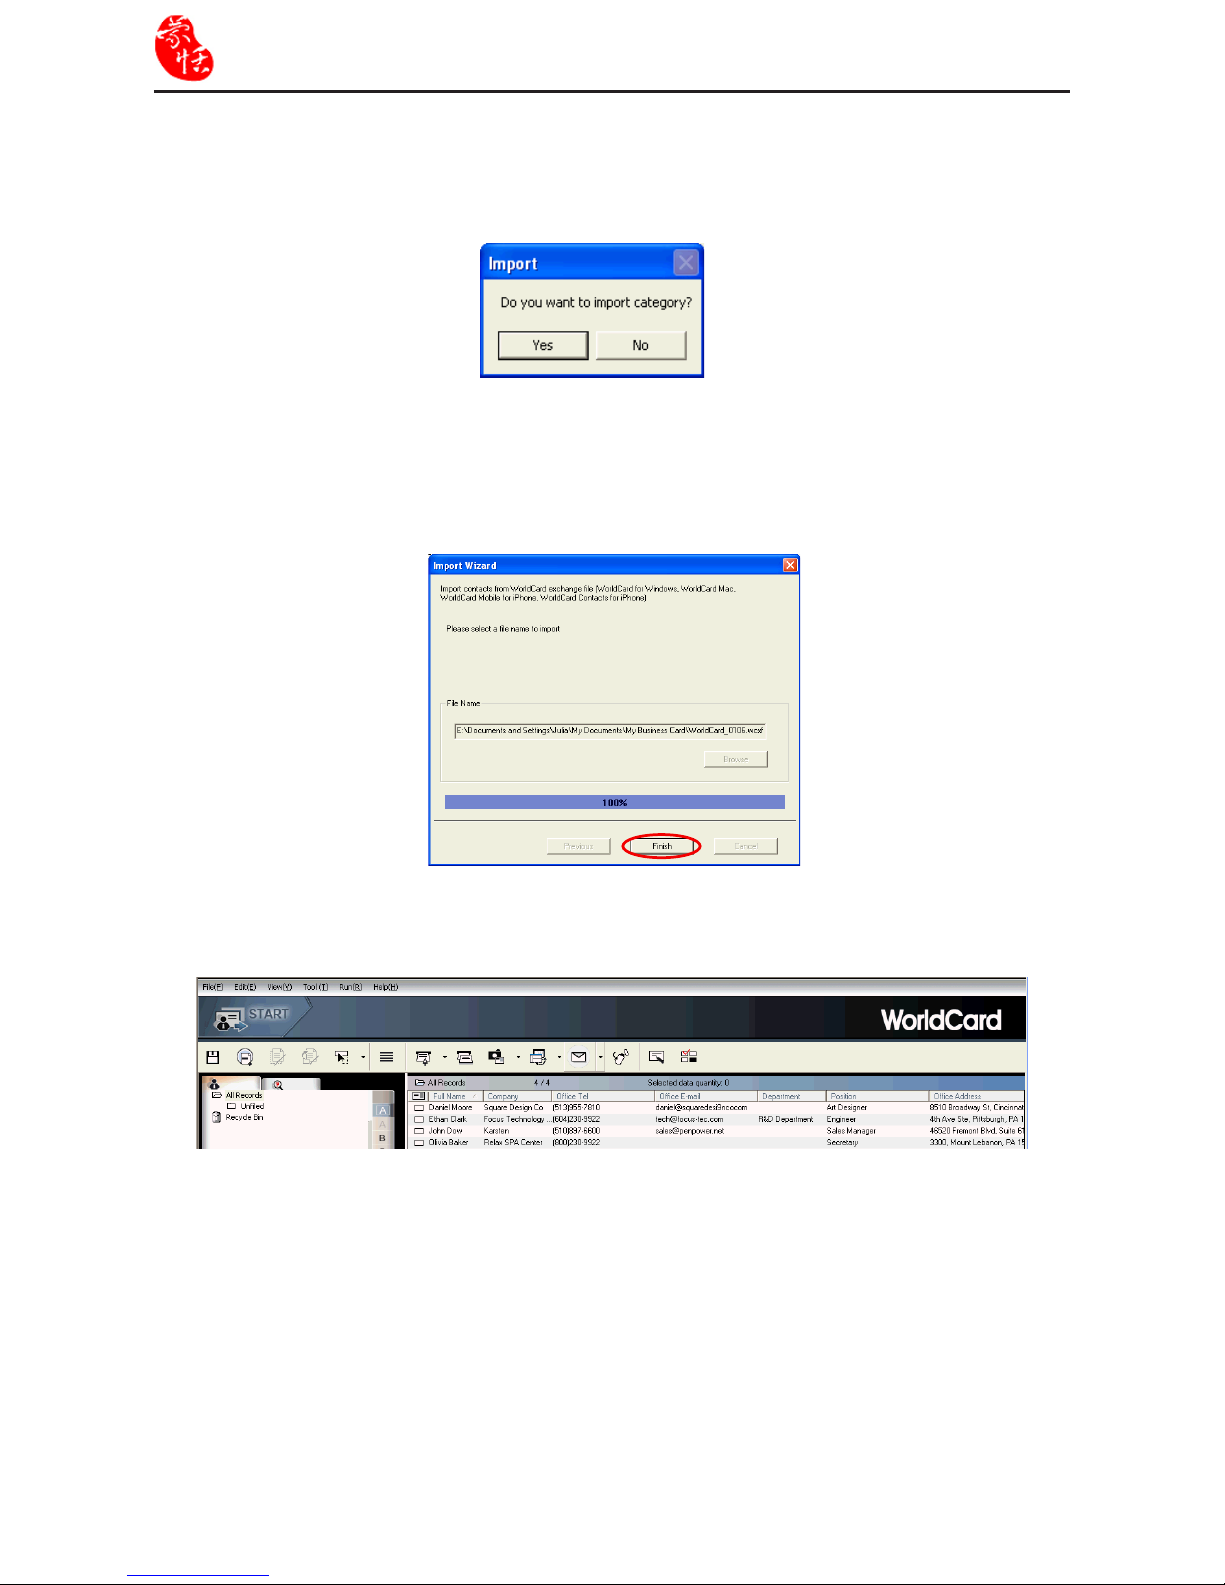
3. A note window will appear to ask whether you want to import category or not. Click Yes
to import categories or vice versa.
5. The new contacts should appear in the Browse pane.
4. Please click Finish to complete the importing process.
Page 62
Chapter 5 Managing Business Cards
5-27
5.9.3 Sync
The WorldCard Synchronize function allows you to synchronize the data between
WorldCard and other applications such as Microsoft Outlook Express, Microsoft Out-
look, Lotus Notes, PocketPC Contacts, Palm Desktop, ACT! by Sage, Goldmine and
Salesforce(Contacts).
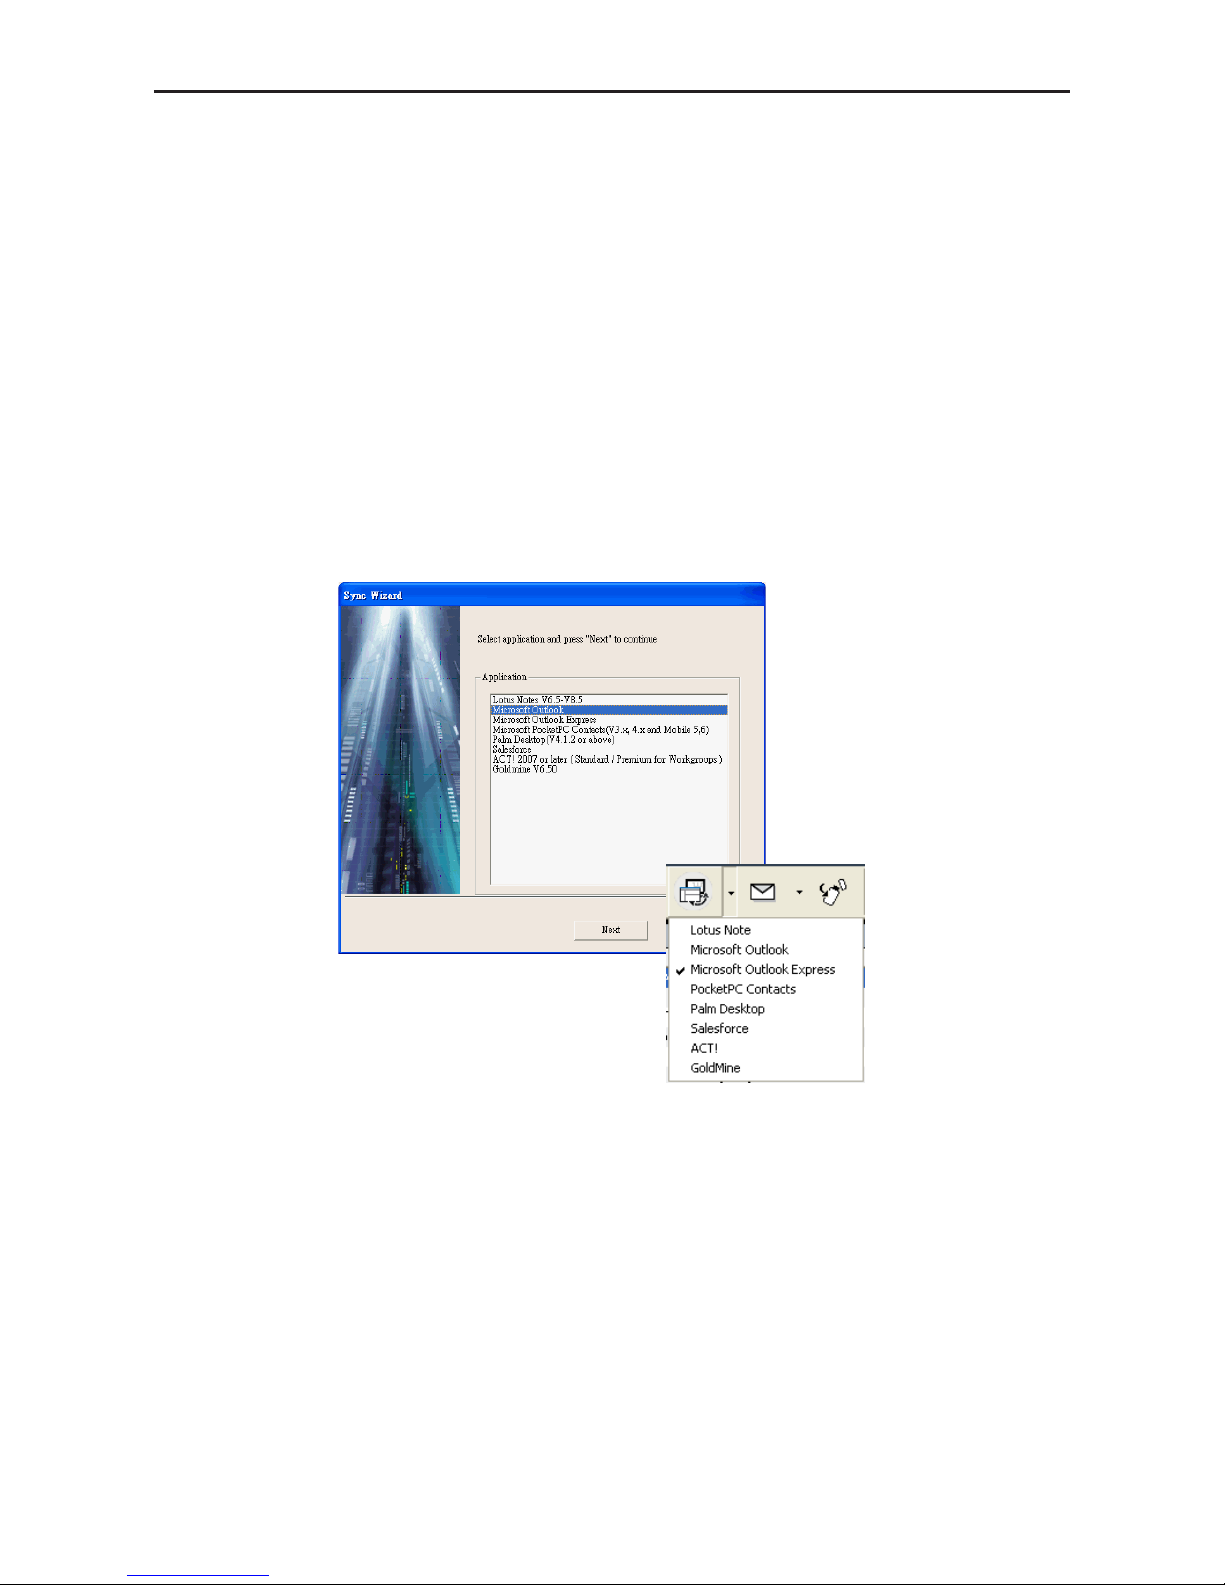
1. To use the Synchronize function, on the File menu, click Sync. The Sync Wizard dialog
box appears. For the supported software, please refer 5.9.4 WorldCard Data Exchange
Compatibility List.
2. Select the application (Take Outlook Express for example) that you desire to synchronize
with your WorldCard database by clicking Next. The Sync Wizard Status and
Information dialog box will open. At the same time WorldCard will begin to synchronize
with the selected application.
Note:
1. If you are synchronizing with Outlook Express and there are contacts whose name
elds are empty, a message dialogue will pop up to warn you that those contacts will not
be synched with. If you agree with it, then you can click Yes to continue the synchronization.
2. You can refer Section 5.10.2 to adjust the setting of synchronization.
Page 63
5-28
WorldCard
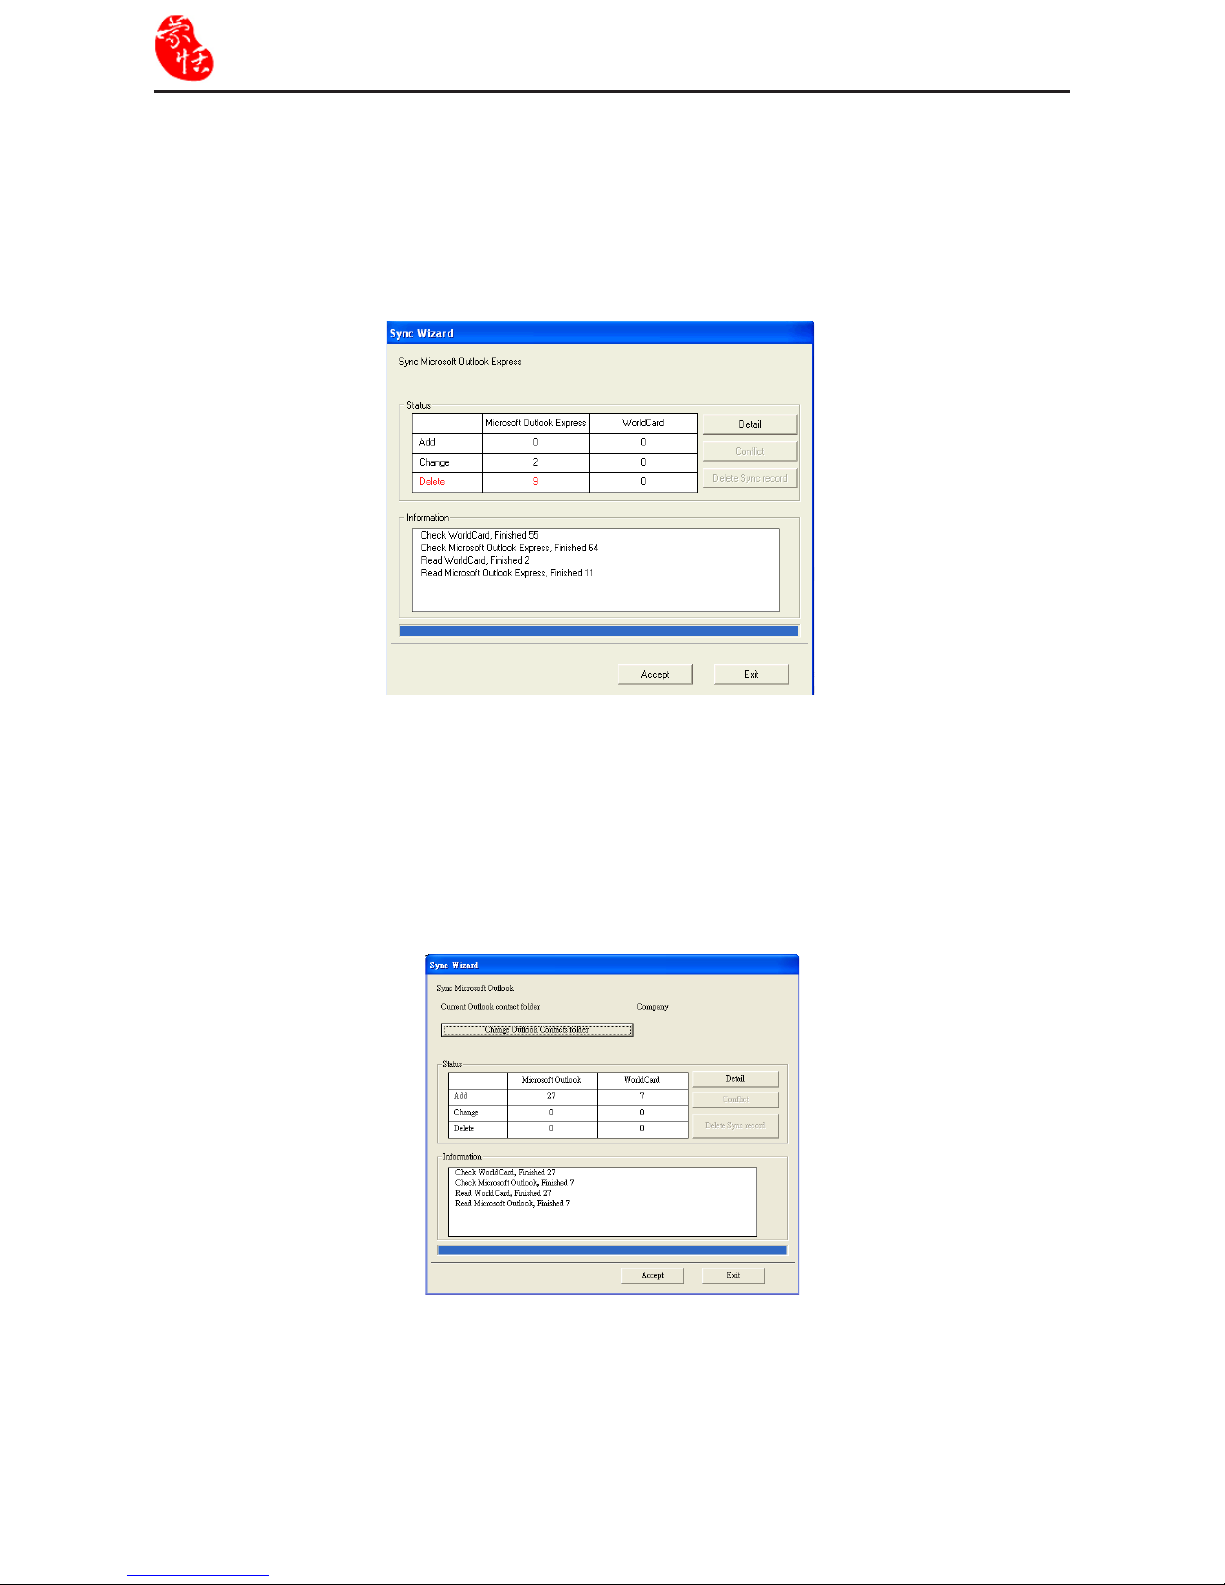
3. While synchronization occurs, a blue progress bar displays. Once the process is
completed, the Sync Wizard window will display Status and Information data about the
records you have synchronize. In the Status pane you can see that there is a difference
between the Outlook Express database and the WorldCard database. The Information
pane shows all actions that have been completed at this point.
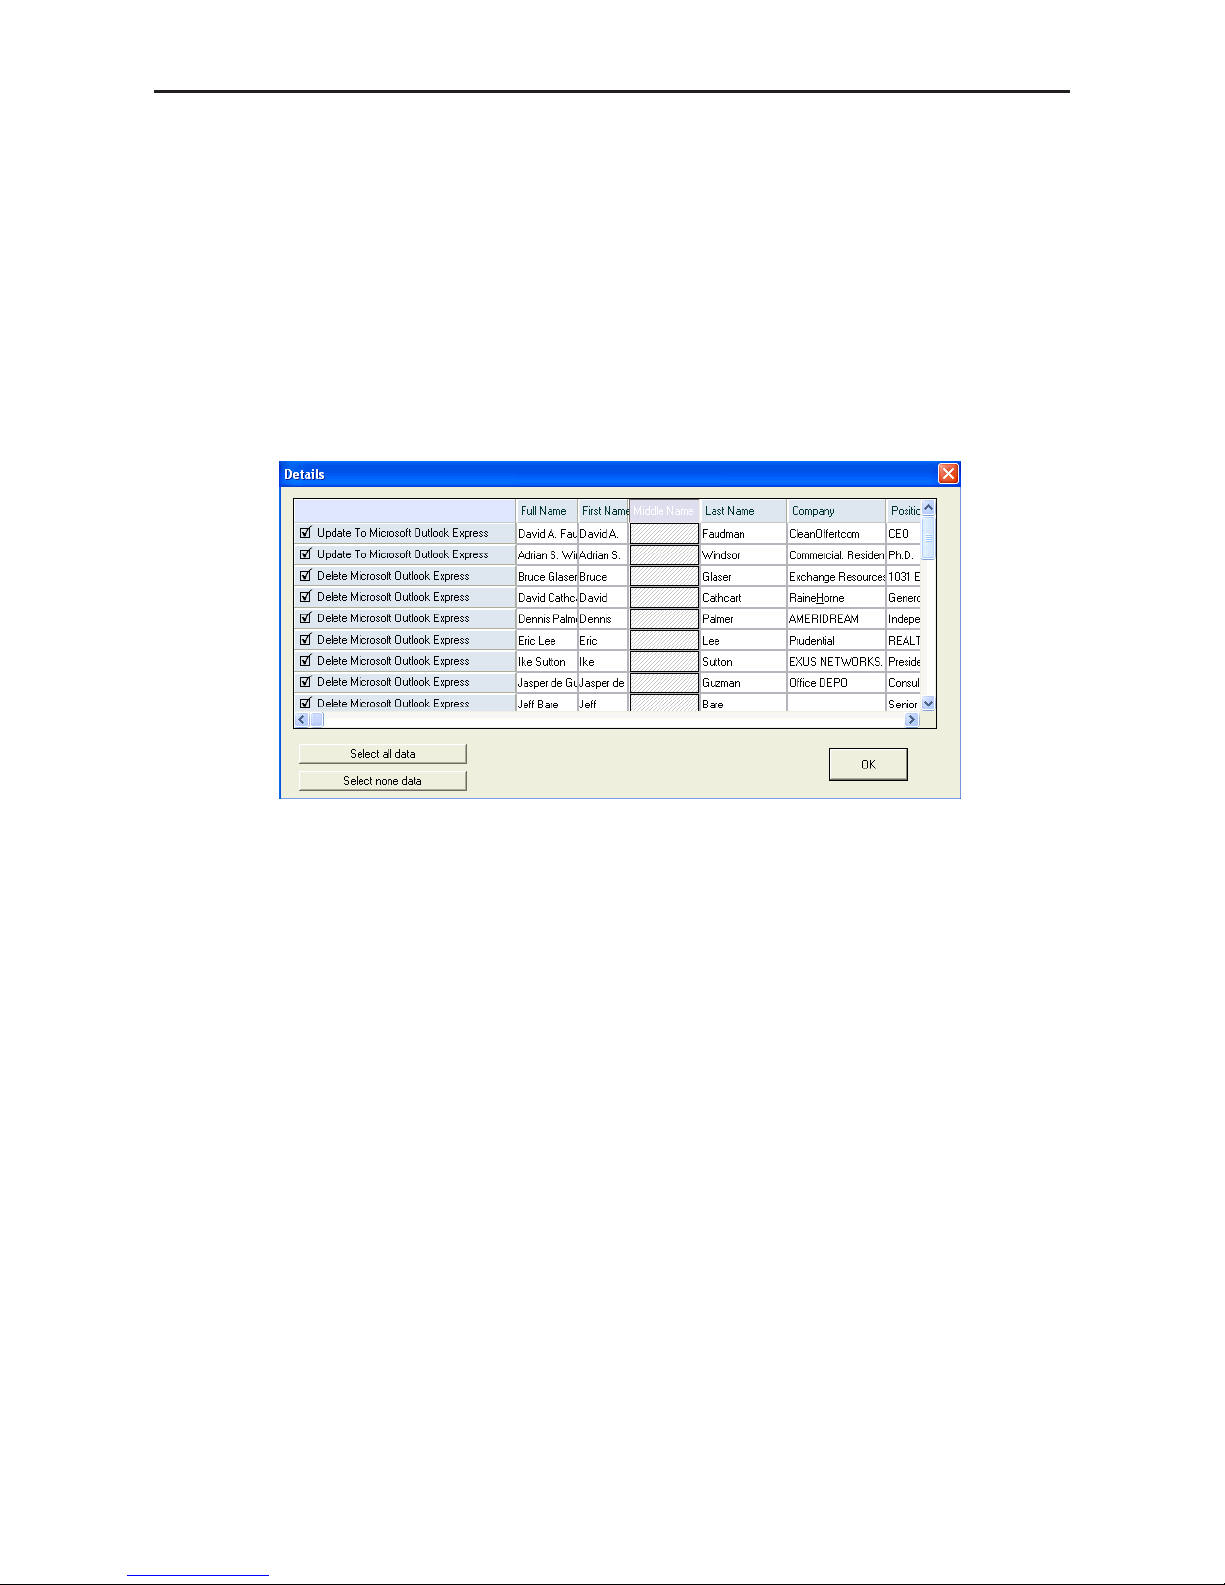
Tip: If you are synching contacts from [Microsoft Outlook], you can click [Change Out-
look Contacts folder] to appoint which contact subcategory to import from. Then click
[OK] to save the change.
Page 64
Chapter 5 Managing Business Cards
5-29
5. To accept the actions required to synchronize the two databases, click Accept. The Details
dialog box will display the updated Status and Information panes. To close the dialog
box and complete the Sync process, click Exit.
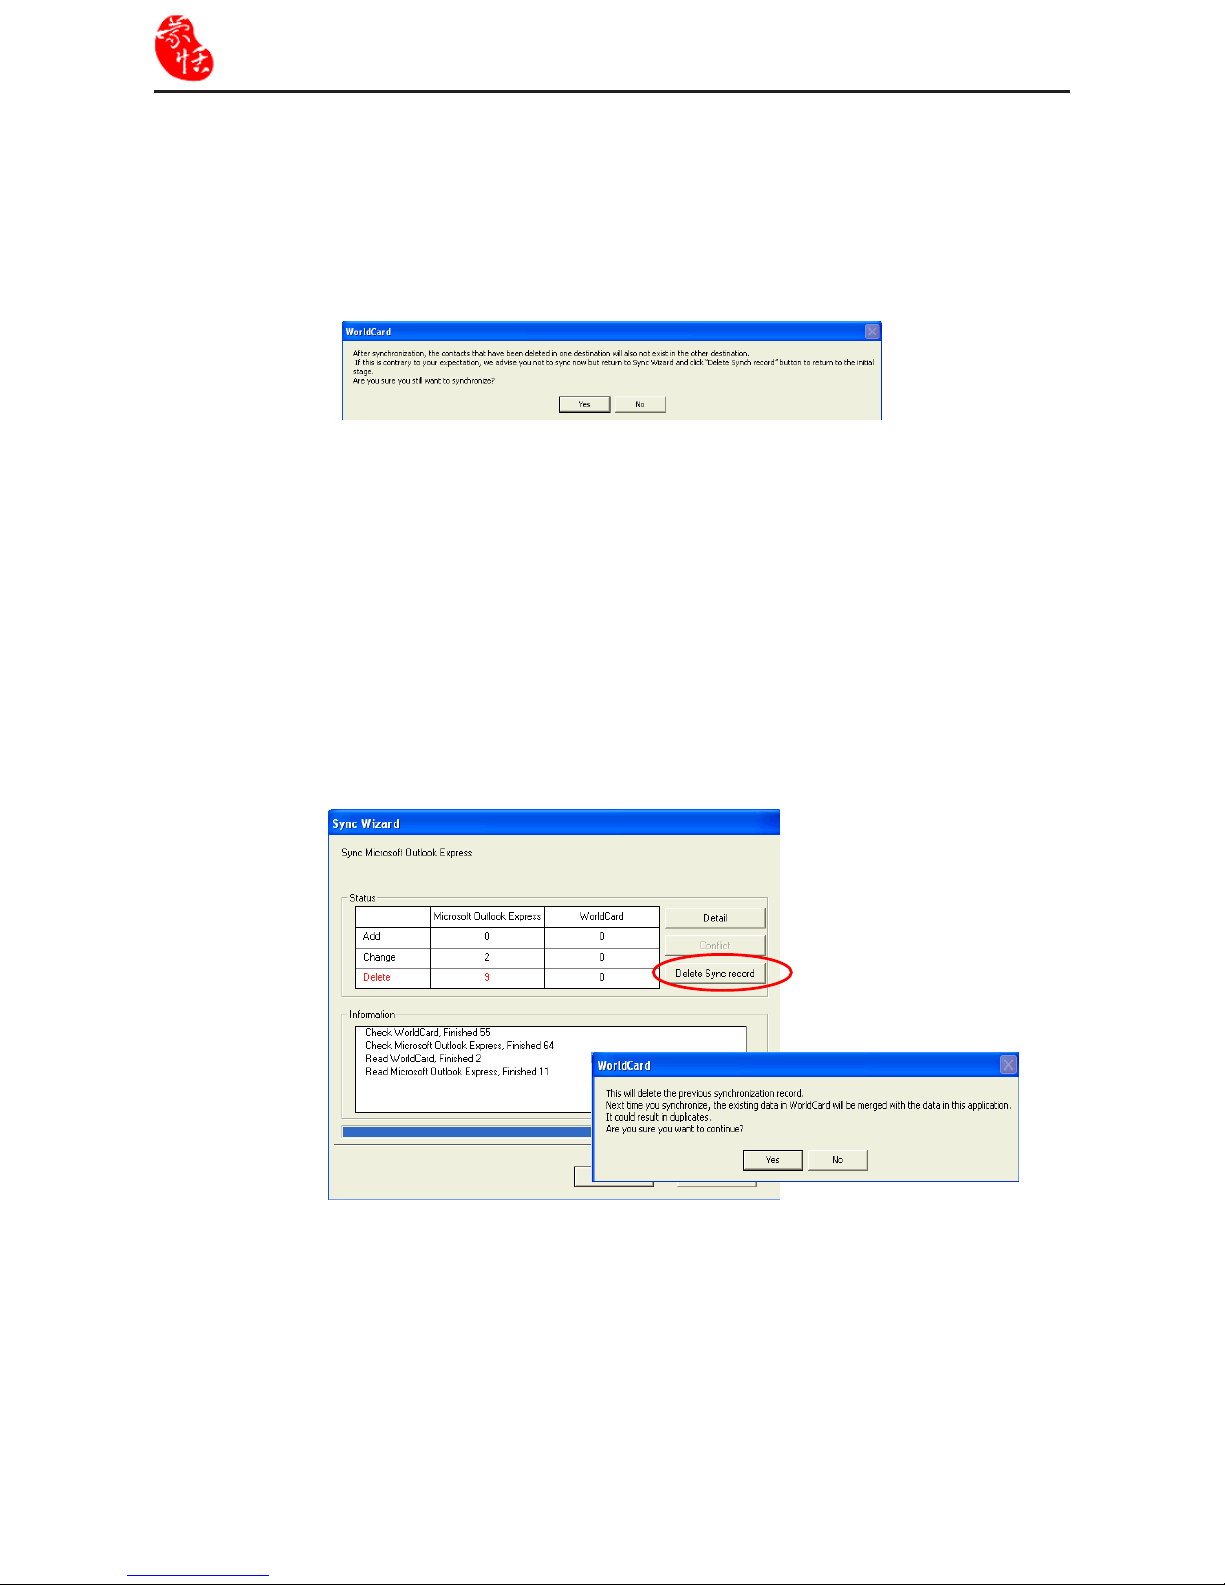
4. You can view the complete details of the actions that will be taken to synchronize the two
databases from the Details dialog box. To view the Details dialog box, click Detail. The
Details dialog box appears. From the Details dialog box, you can click Select all data to
accept all data in the list as acceptable changes.
For this item, the Sync function would DELETE the entry from Microsoft Outlook.
Alternatively, you can use the Select none data icon to clear the selection of all items in
the list. After reviewing the Detail list, you may close the Detail window by clicking OK.
Page 65
5-30
WorldCard
Note: The Sync function synchronizes the Client database with the Host database. In
other words, data in the Client database is changed to reect the data in the Host
database. After clicking Accept, the Client database is to match the Host database.
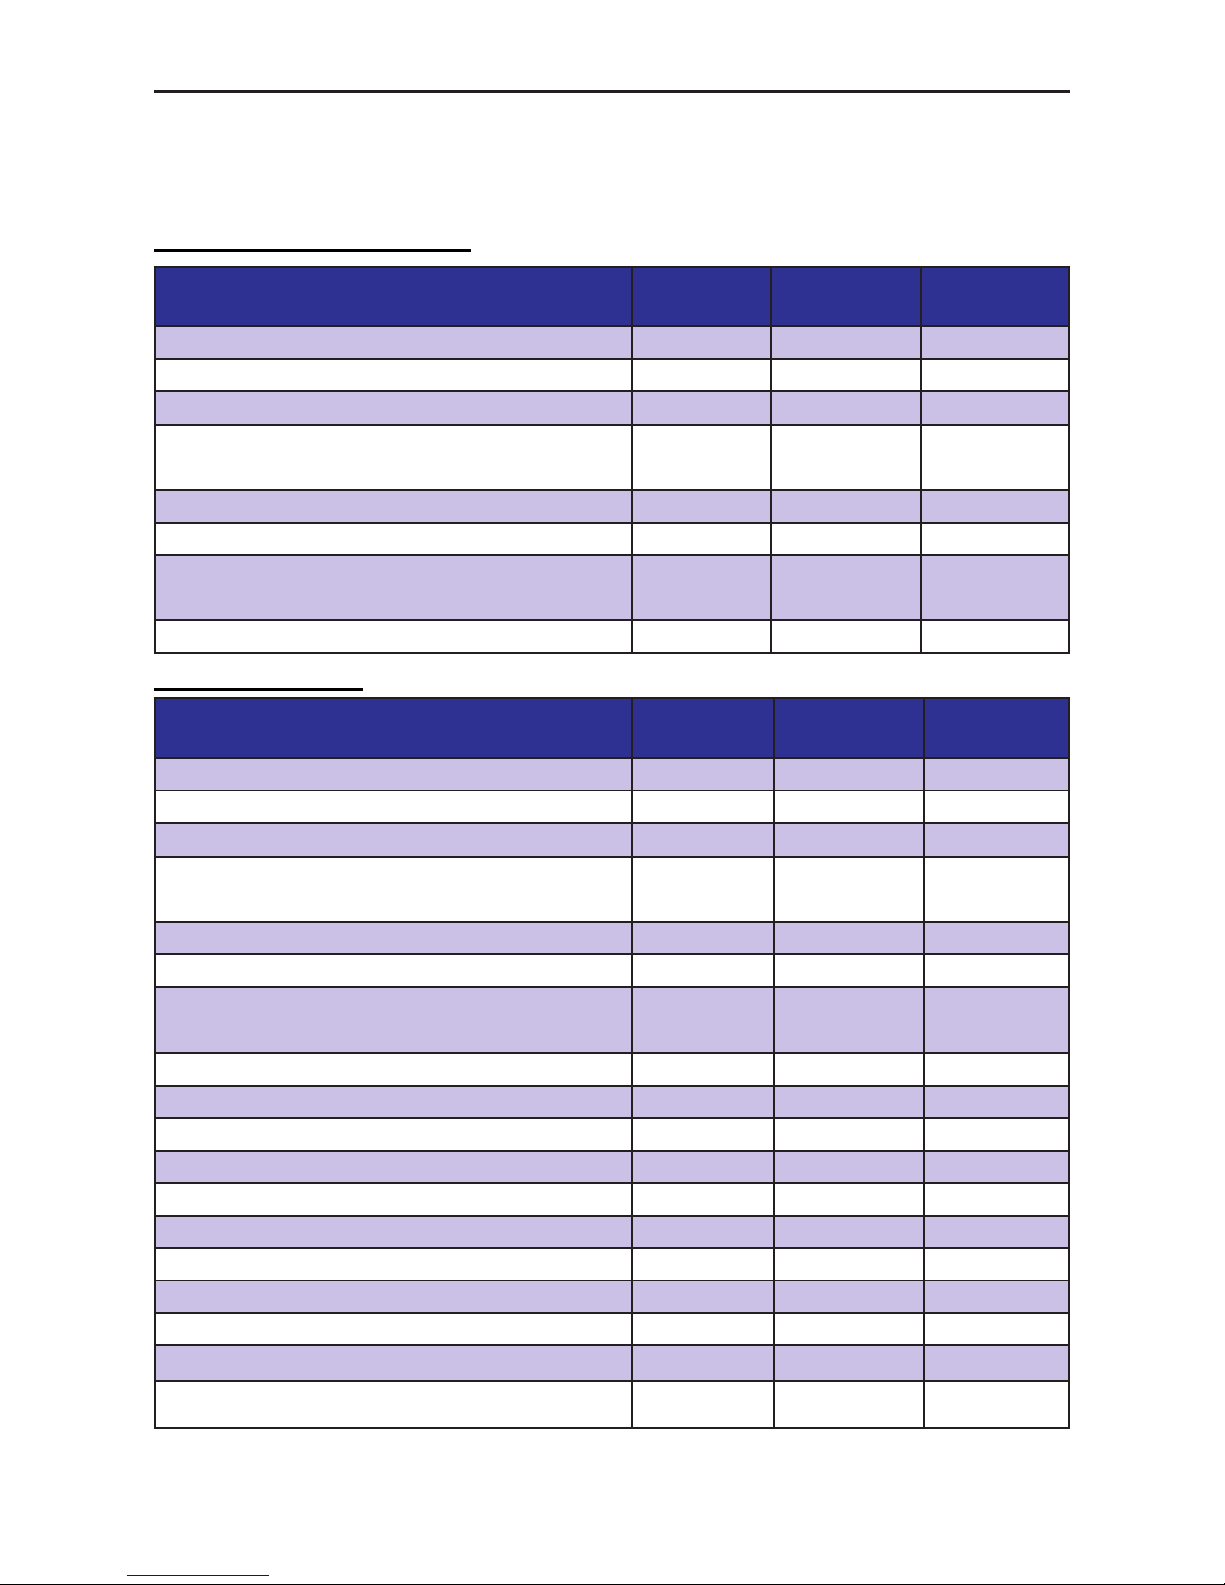
After this point you cannot reverse the process. After you click Accept, a message
window will pop up to ask you whether you are sure to synchronize now. If you are
sure to synchronize now, please click Yes.
If you want to synchronize the contacts on both side but don't want to delete contacts,
please click No to return to the Sync Wizard. In Sync Wizard, please click [Delete
Sync record]. This will delete the previous synchronization record. Next time you
synchronize, the existing data in WorldCard will be merged with the data in this
application. It could result in duplicates. If you want to continue, please click Yes.
Otherwise, simply tap No to return to the Sync Wizard.
Tip: You can refer Section 5.6.3 to apply the Finding Duplicate Data function to remove
the duplicates.
Page 66
Chapter 5 Managing Business Cards
5-31
5.9.4 WorldCard Data Exchange Compatibility List
WorldCard supports the following synchronization, exporting, importing contact
managers or personal information managers (PIMs).
WorldCard Synchronization
Item WindowsXPWindows 7/
Vista 32
Windows 7/
Vista 64
Lotus Notes v6.5-v8.5 v v v
Microsoft Outlook v v v
Microsoft Outlook Express v
Microsoft Pocket PC Contacts
(v3.x, v4.x and Mobile 5, 6)
v v
Palm Desktop v4.1.2 or later v v v
Salesforce v v v
ACT! 2007 or later
(Standard/ Premium for Workgroups)
v v ACT! 2009 or
later
Goldmine v6.50 v
WorldCard Export
Item Windows
XP
Windows 7/
Vista 32
Windows 7/
Vista 64
Lotus Notes v6.5-v8.5 v v v
Microsoft Outlook v v v
Microsoft Outlook Express v
Microsoft Pocket PC Contacts
(v3.x, v4.x and Mobile 5, 6)
v v
Palm Desktop v4.1.2 or later v v v
Salesforce v v v
ACT! 2007 or later
(Standard/ Premium for Workgroups)
v v ACT! 2009
or later
Goldmine v6.50 v
Time & Chaos v v v
CSV (Comma Separated Text File) v v v
Image (Jpg) v v v
Microsoft Access File v v v
Microsoft Excel File v v v
Microsoft Windows Contacts v v
Text File v v v
VCard File v v v
WorldCard File (v6.0 or later) v v v
WorldCard Exchange File (.wcxf) v v v
Page 67
5-32
WorldCard
WorldCard Import
Import contact data from the following products to WorldCard:
Item WindowsXPWindows 7/
Vista 32
Windows 7/
Vista 64
Lotus Notes v6.5-v8.5 v v v
Microsoft Outlook v v v
Microsoft Outlook Express v
Microsoft Pocket PC Contacts
(v3.x, v4.x and Mobile 5, 6)
v v
Palm Desktop v4.1.2 or later v v v
Salesforce v v v
ACT! 2007 or later
(Standard/ Premium for Workgroups)
v v ACT! 2009 or
later
Goldmine v6.50 v
Time & Chaos v v v
CSV (Comma Separated Text File) v v v
VCard File v v v
WorldCard File (v5.0 or later) v v v
WorldCard Exchange File (.wcxf) v v v
Page 68
Chapter 5 Managing Business Cards
5-33
5.10 Settings
WorldCard has many selectable Setting options to allow you to congure the operational
functions of Export, Synchronize, Field Display, User Dene Field, Scan and
Personal
setting
options. To set your WorldCard options, use the procedures outlined in this chapter.
On the Tool menu, point to Setting and click any of the options. Alternatively, on the
main toolbar click the Setting button
.
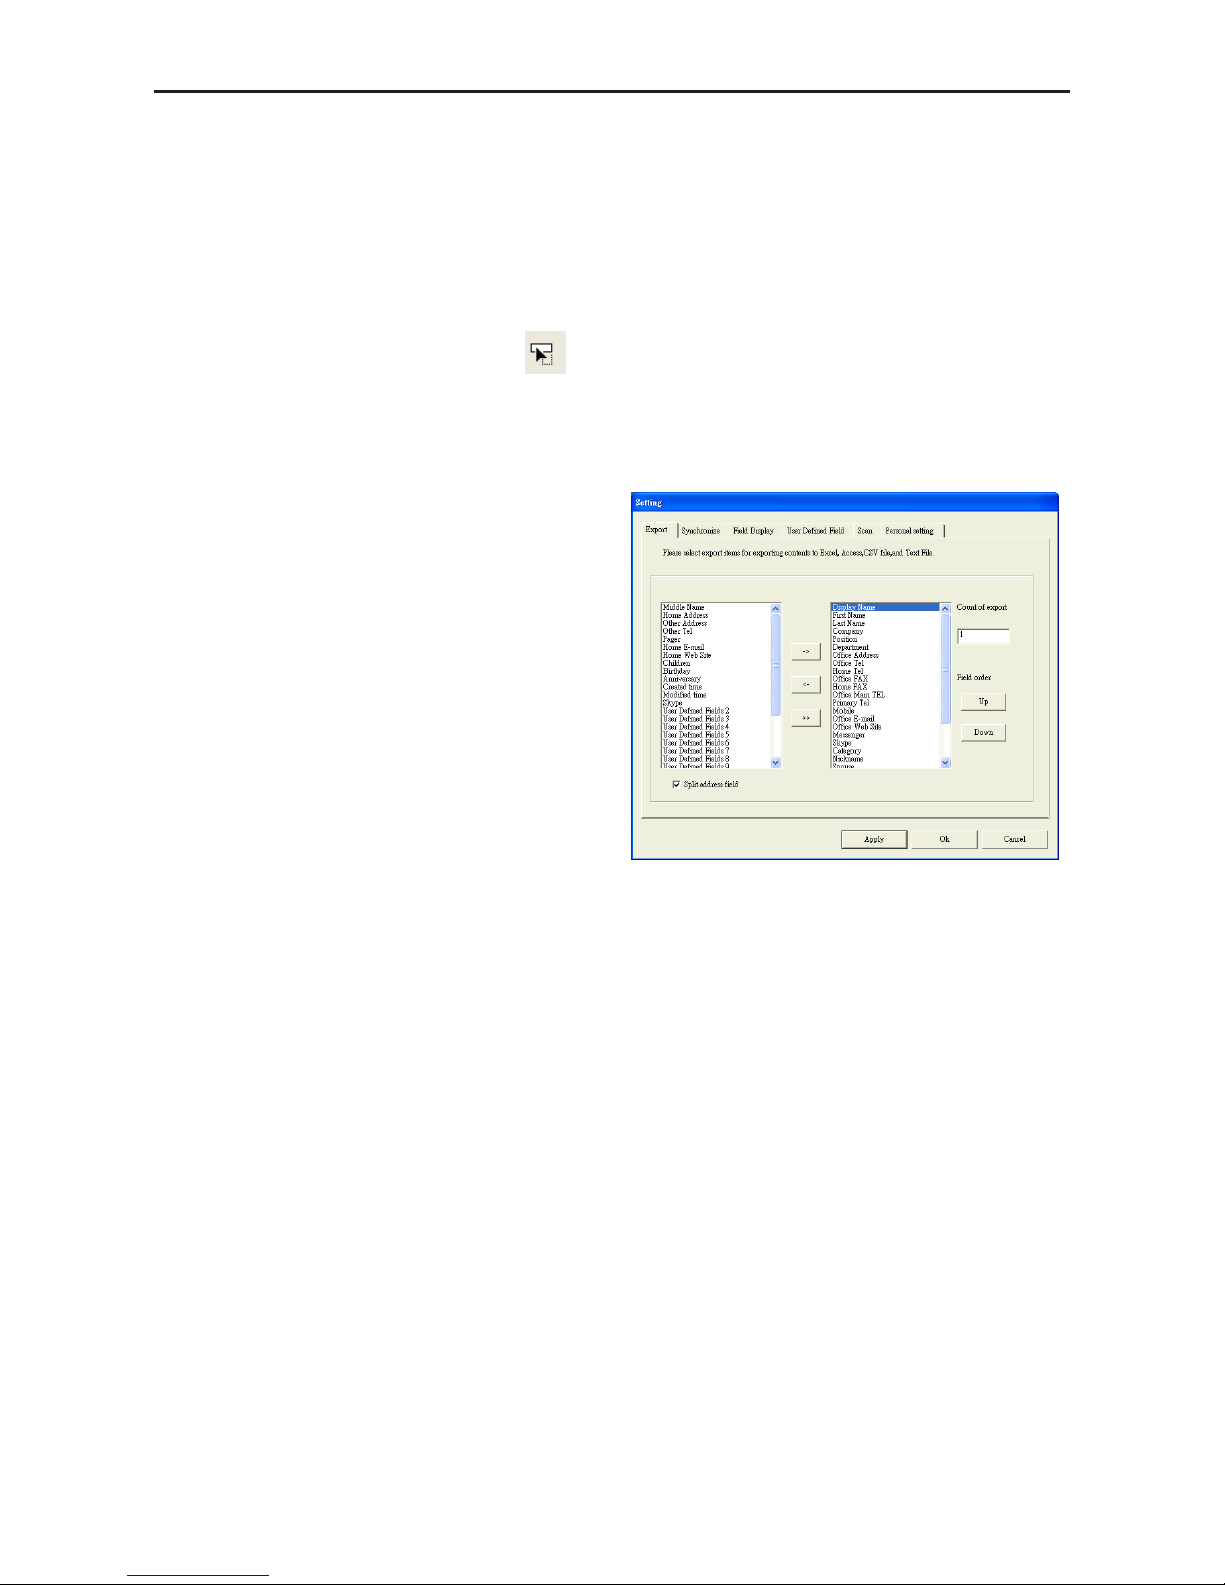
5.10.1 Export Option
To configure the Export options, open
the Setting dialog box page as described in
the preceding section of this chapter.
The Setting Export dialog box displays
with ALL options selected as a default conguration. The elds on the right will be exported to Excel, Access, CSV les and Text
le. To add another eld, select a eld from
the left side and click the [->] button. Click
[>>] button to export all elds. You can set
the number of elds with the same name to
export (up to 10 ).
Select Split address eld to export address detail to different elds. After you’ve
selected the options you want, click OK to
accept the changes.
Page 69
5-34
WorldCard
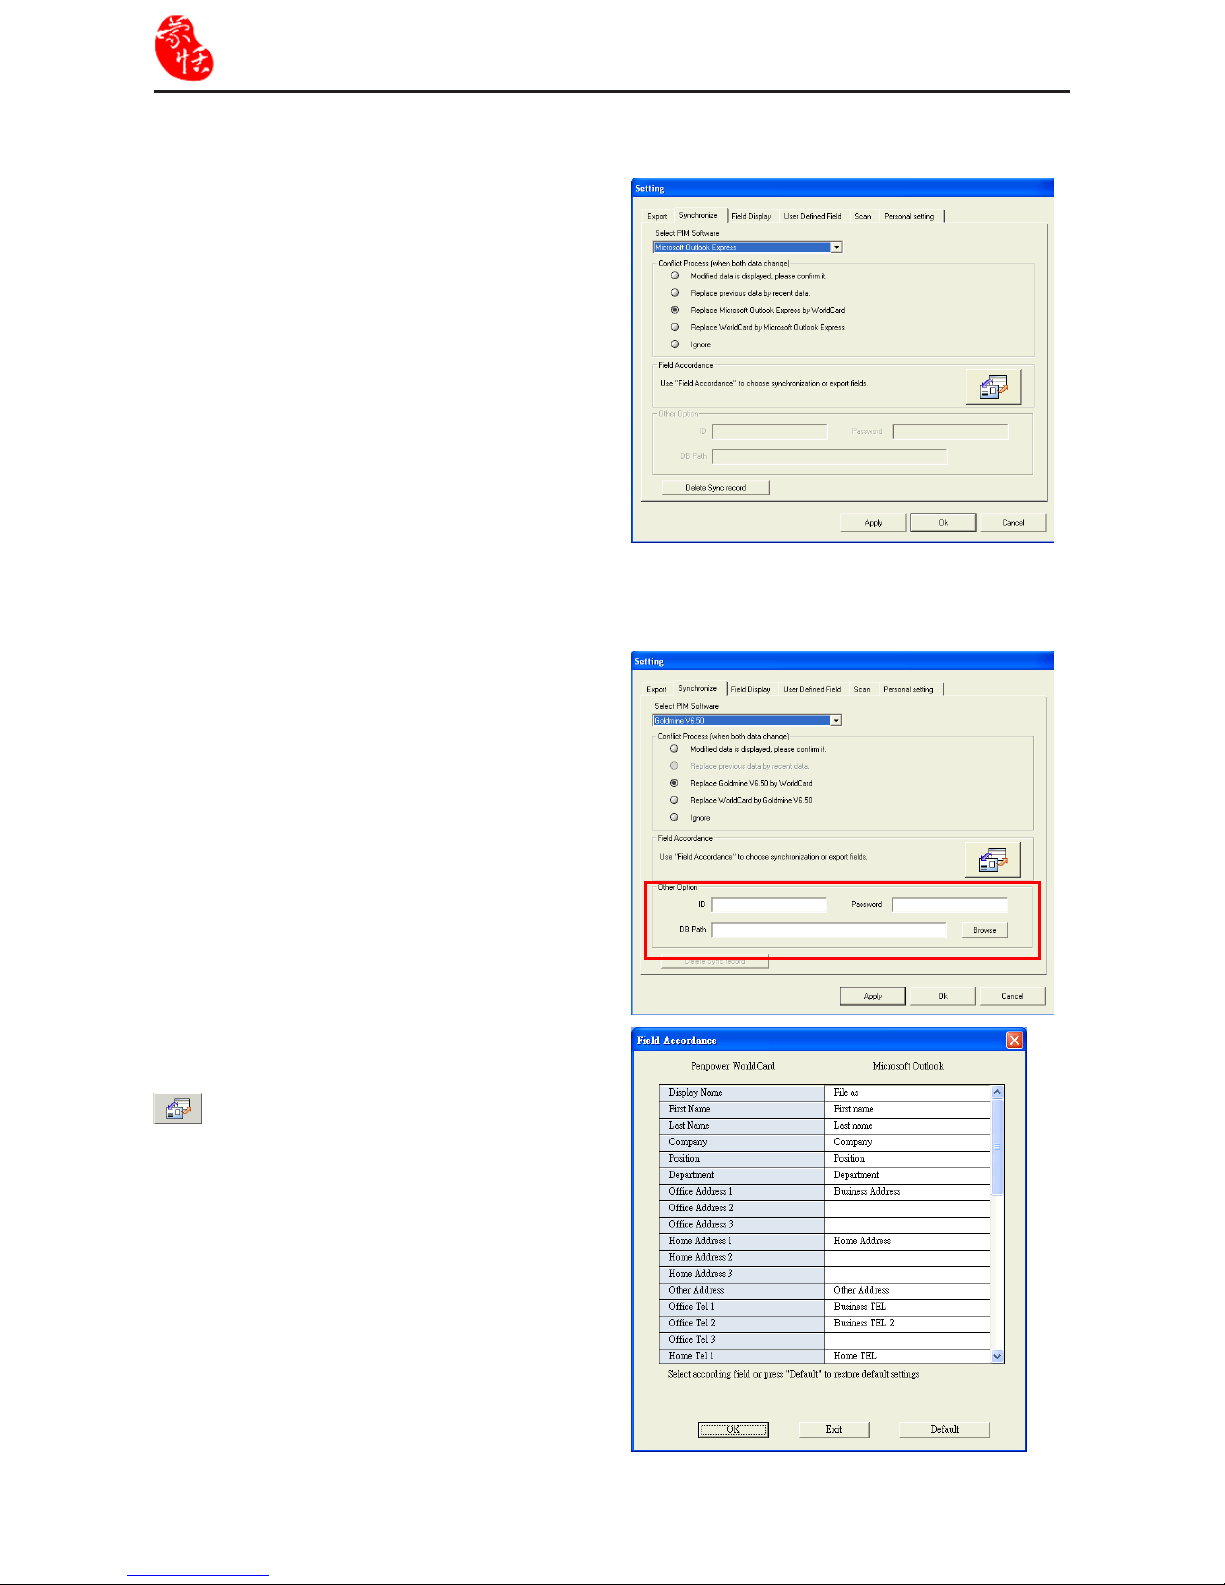
5.10.2 Synchronize Option
To set the Synchronize options, open the
Setting dialog box as described in the pre-
ceding section of this chapter.
The Sync hro nize tab o f the Sett ing
dialog box appears with Microsoft Outlook
as the selected PIM. PIM stands for Pro-
tocol Information Management software.
Change the PIM as desired. The Conflict
Process option can be set to manage any
conicts which may occur during the Sync
operation.
Under Select PIM software, you will
find Field Accorda nce. You may click
to set the field accordance between
WorldCard and PIM software for importing,
exporting and synchronizing.
Note: Conict means after previous Synchronization, the contact information has been
changed in both PIM software and WorldCard which causes Conict.
ACT! and Goldmine require a user ID,
Password and DB Path. Before synchroniz-
ing with above applications, you may input
this information into the boxes in the Other
Options area.
Salesforce requires a user ID, Password
and Security Token. Before synchronizing
with above applications, you may input this
information into the boxes in the Other Op-
tions area.
Page 70
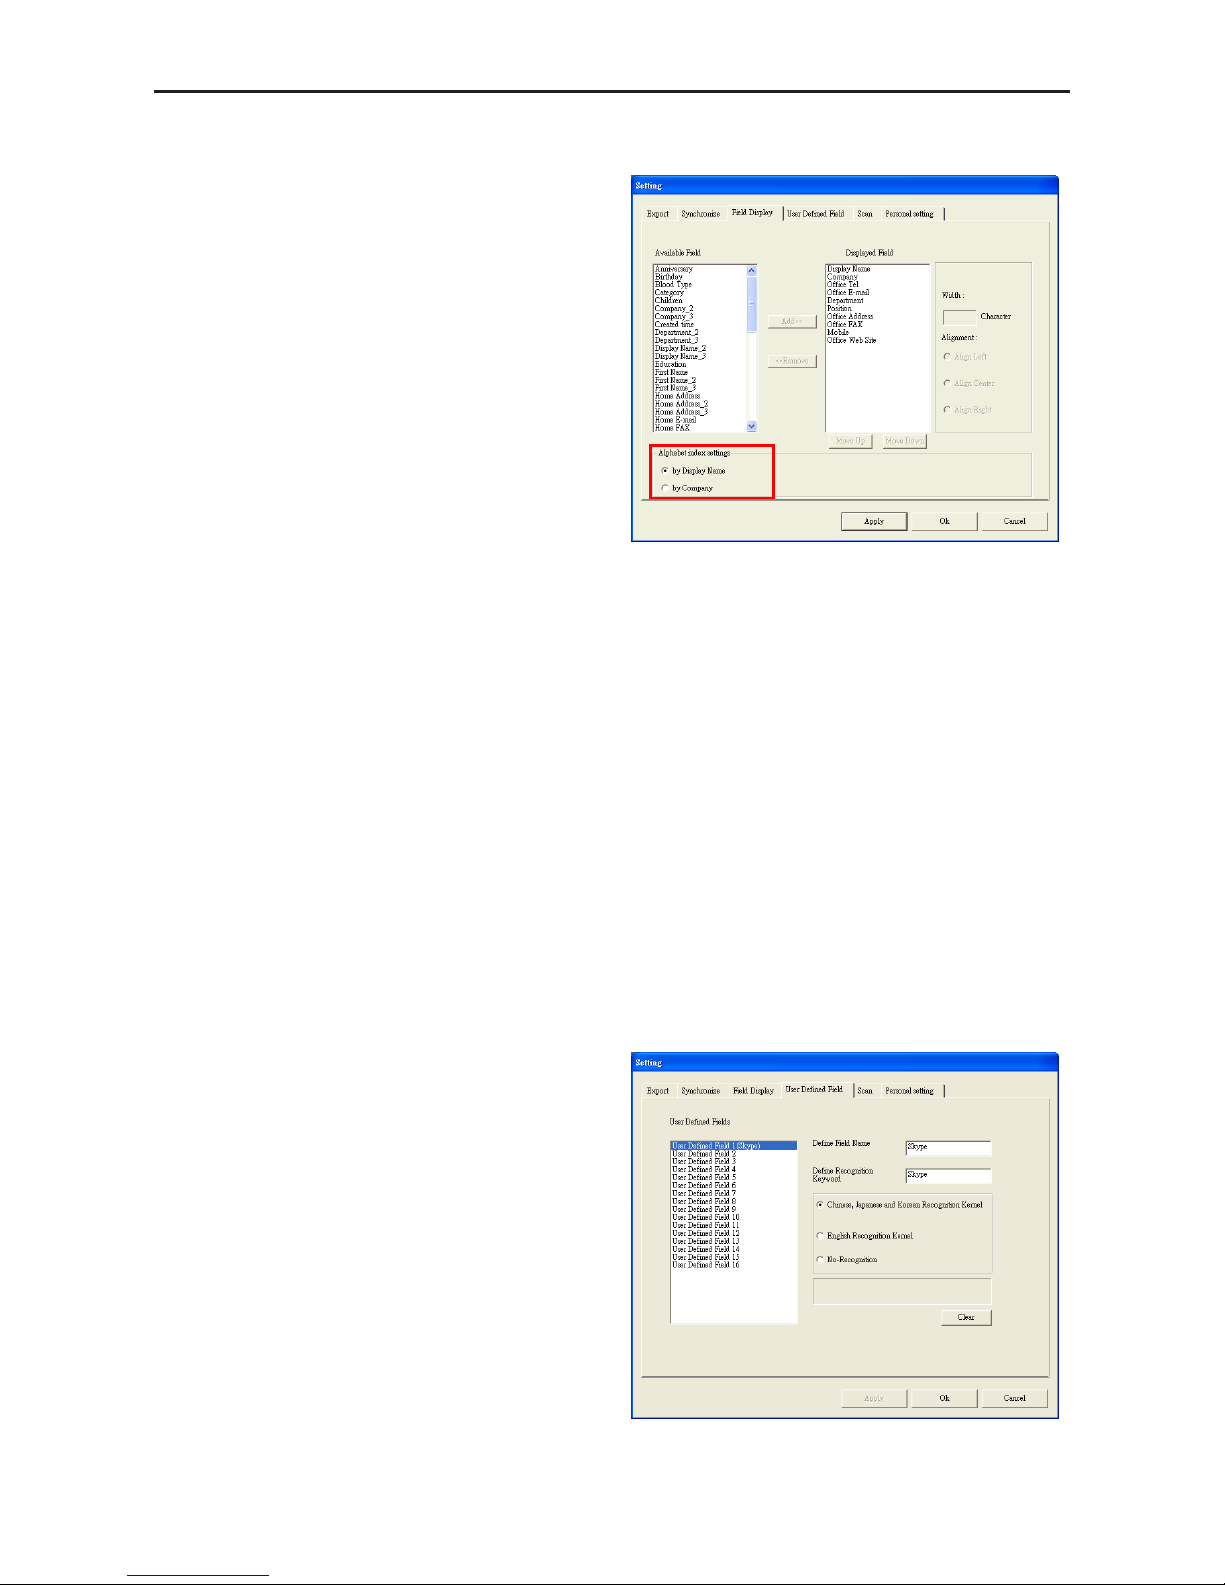
Chapter 5 Managing Business Cards
5-35
5.10.3 Field Display
To set the Field Display options of the
List Mode and Duel mode, open the Setting
dialog box as described in the preceding
section of this chapter.
The Field Display tab of the Setting dialog box appears with a default conguration
as displayed in the above window. To modify the selected options, click any available
eld from the Available Field menu on the
left side of the dialog box. After a eld is selected, click Add to add it to the Displayed
Field list. The selected eld will be added to
the applicable WorldCard screens.
To remove a eld, click the desired eld in the Displayed Field list. Then click Remove
to delete the eld from your WorldCard screen views. You may also set eld options from
the available options on the right side of the Field Display window. Once you have completed your changes, click Apply to apply any changes.
The Alphabet index can be indexed by Display Name or by Company. Please refer to
Chapter 3.1.
5.10.4 User Dene Field
To congure the User Dened Field options, open the Setting dialog box as described in
the preceding section of this chapter.
The User Defined Field tab displays
the default configuration as seen in the
preceding picture. You may define up to
ten user-specified fields to be displayed in
your WorldCard screens. To dene a eld,
select a User Dened Field from the available elds on the left side of the dialog box.
Then, assign the Dened Field Name and
Dene a Recognition Keyword in the text
box. Set the language recognition option
and click Apply.
Page 71
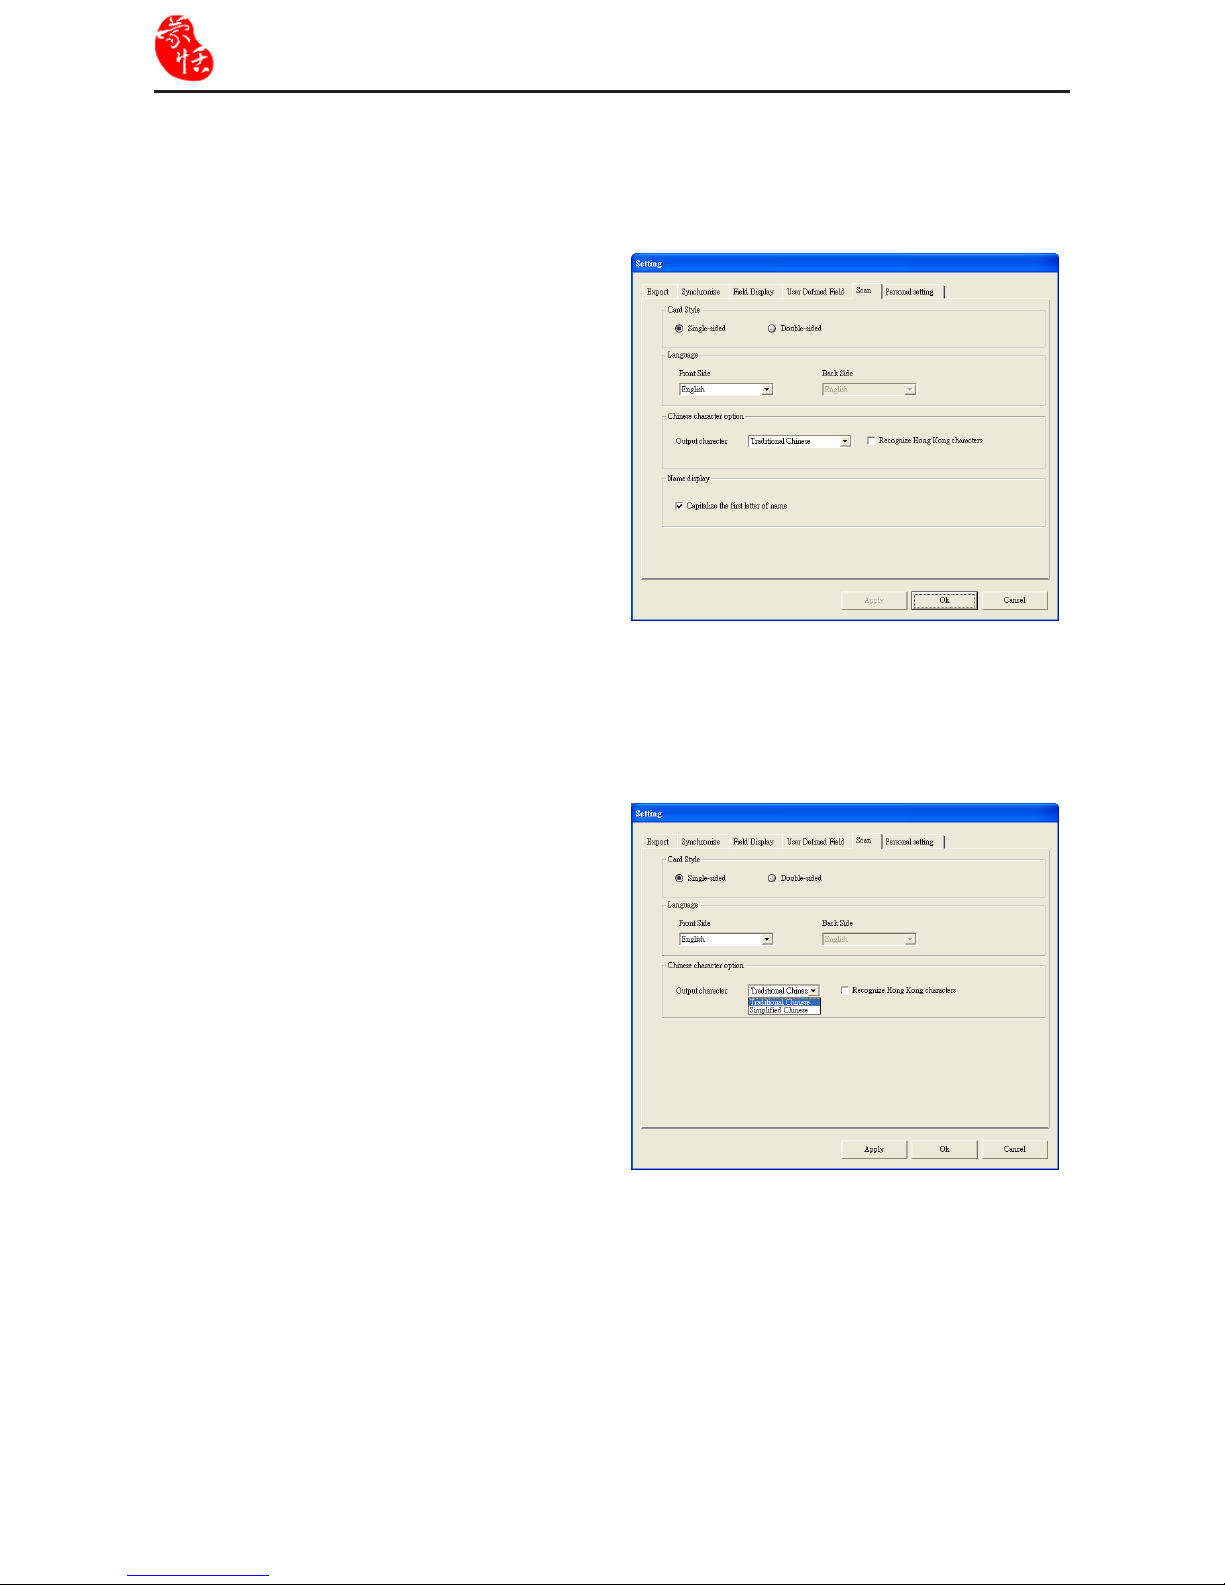
5-36
WorldCard
5.10.5 Scan Option
To congure the Scan options, open the Setting dialog box as described in the preceding
section of this chapter.
The Scan tab displays the default conguration as seen in the preceding picture. You
may dene Card Style, Language, Chinese
character options and Scanning method.
Check Capital iz e th e first letter of
name to recognize the first letter of the
contact's name to a capital letter. The other
letters of the name will be recognized to
lowercase letters.
Click Apply for the settings to take effect.
WorldCard software has optical character
recognition (OCR) capabilities designed to
work specically with Chinese characters.
To optimize the settings for recognition
of a Chinese language card, on the Scan
tab in the Chinese character option area,
select Traditional Chinese or Simplified
Chinese.
5.10.6 Revising the Results of Chinese Card Recognition
Under the Chinese character option area, you can select Recognize Hong Kong characters if you are scanning cards from Hong Kong. The character set for Hong Kong is
slightly different than the Traditional or Simplied Chinese character sets.
Page 72
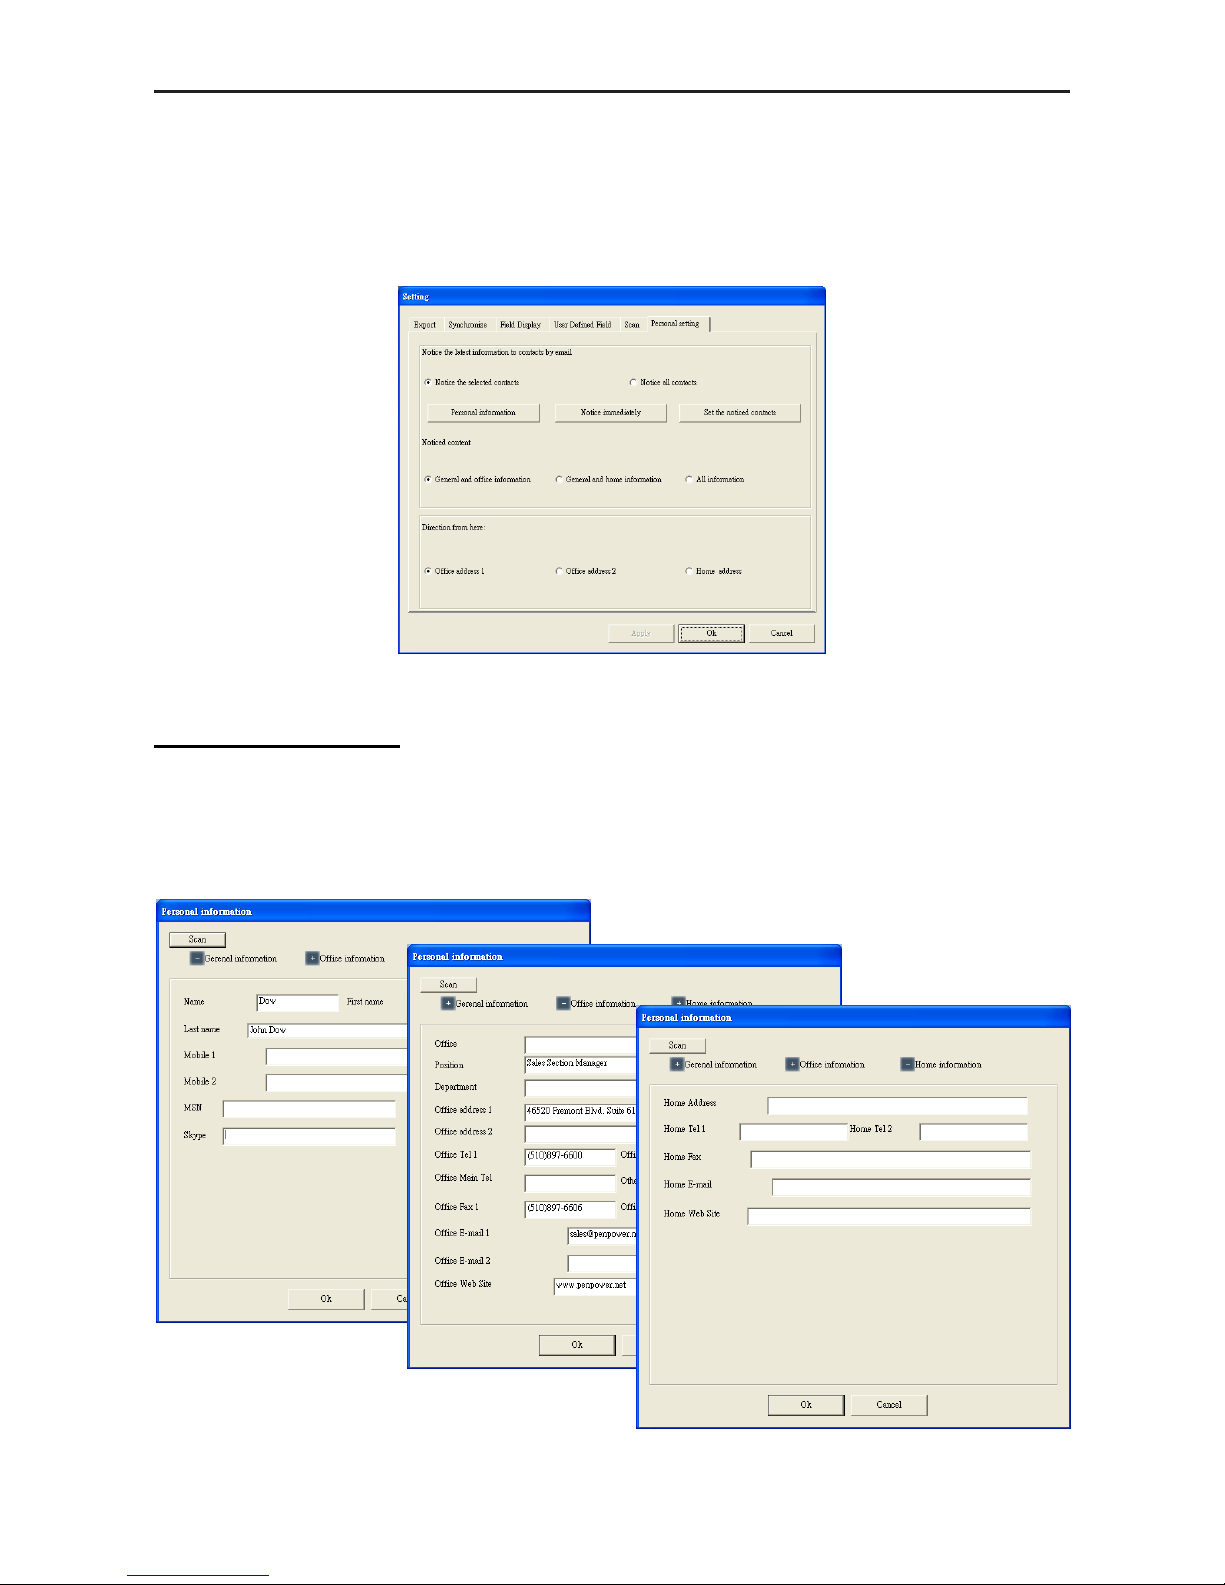
Chapter 5 Managing Business Cards
5-37
5.10.7 Personal Setting
The Presonal Setting can let you setup your presonal inforamtion, notify contacts, set
notice contacts and set the start address of the direction function. To setup the Presonal
Setting options, open the Setting dialog box, and then click the Presonal Setting tab.
Presonal Information
Click the Presonal Information button to input general Information, ofce information
and home inforamtion. You can quick ll the information by inserting your own business
card and click the Scan button to scan your business card or typing the information.
Page 73

5-38
WorldCard
Notify Immediately
After setting your personal information, you can notify related contacts immediately.
Click the Notify Immediately button to send your personal information with vCard and
html le by the default email application.
If you set the notice contacts already, the system will add the email addresses of the
contacts to the receivers.
Set the Notice Contacts
Click the Set the Notice Contacts button to select the contacts which you want to notify
your personal information. When you click the Notify Immediately button, the system will
add the email addresses of the selected contacts to the receivers.
Page 74
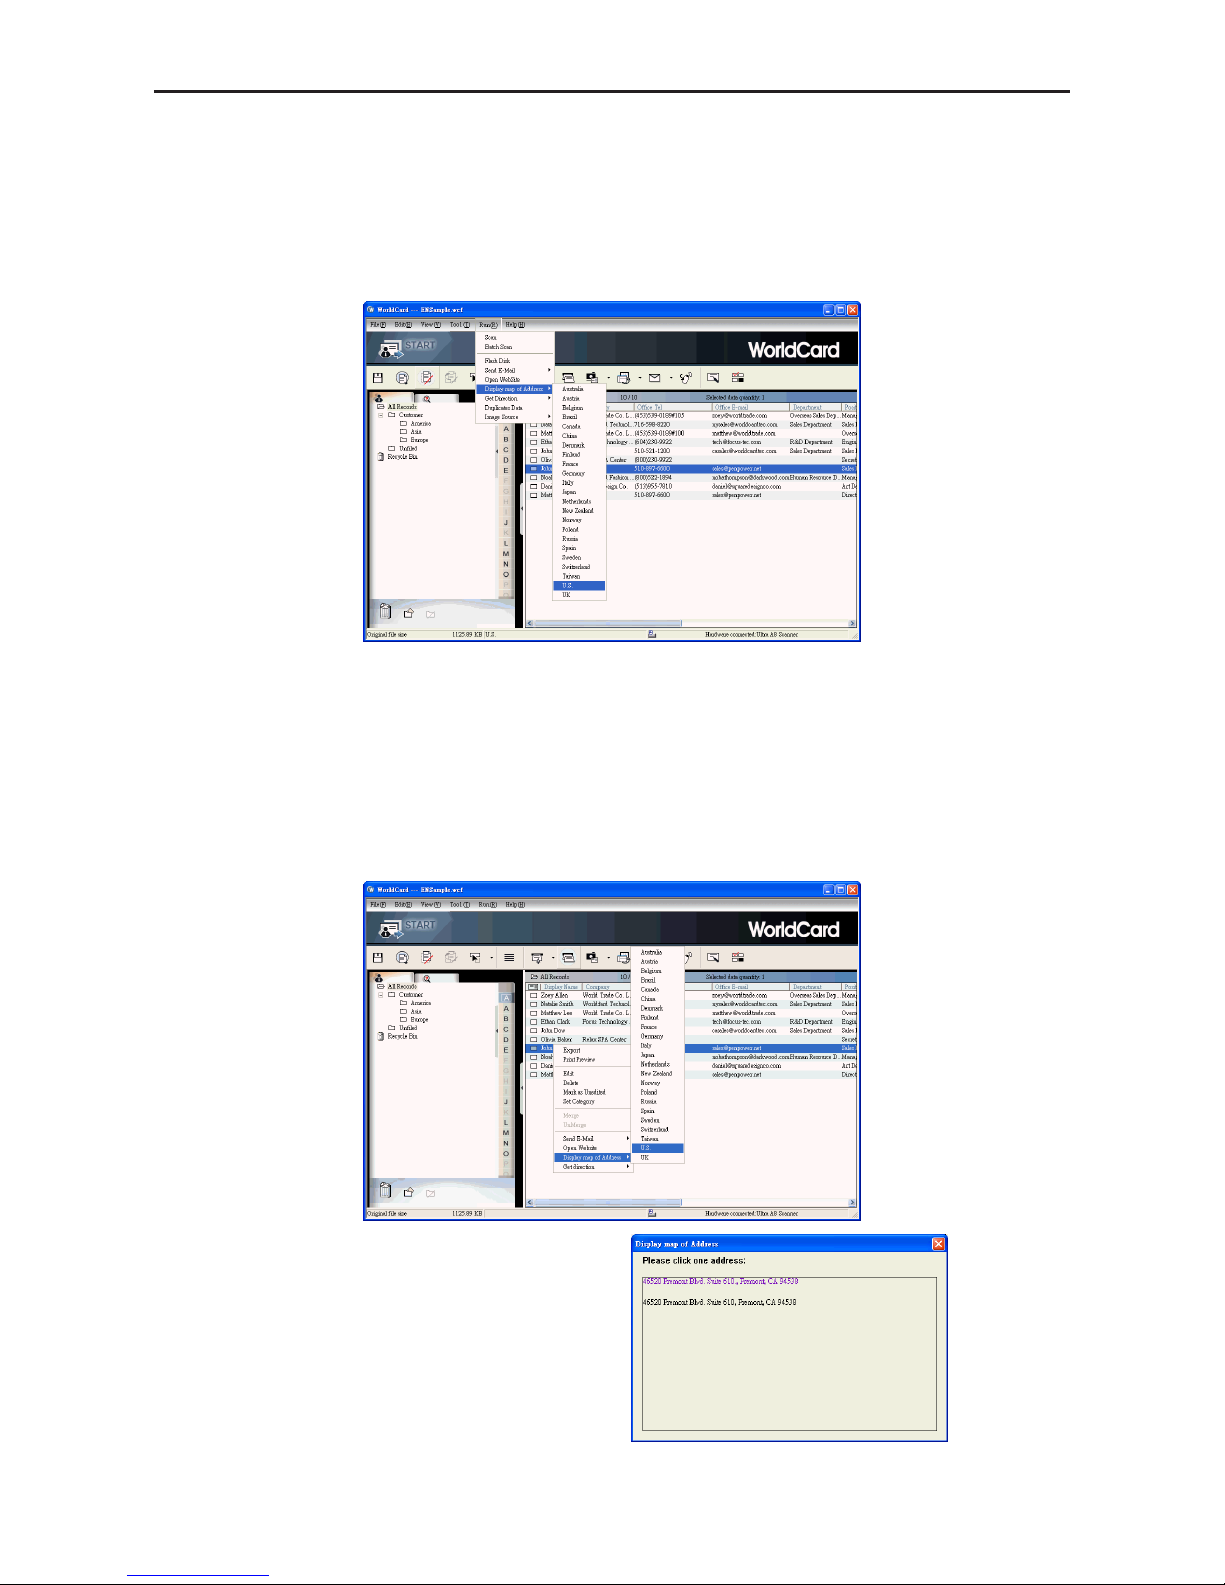
Chapter 5 Managing Business Cards
5-39
5.11 Online Map
WorldCard offers you online map with a click of your mouse.
2. You can also right-click on the contact, then click Display map of Address. Select the
country from the pull-down menu.
3. If address searching you selected is more
than one contact, the Display map of
Address menu will appear. Click on the
address you want search will lead you to
online map automatically.
1. Select the contact, then click Run / Display map of Address. You can select the country
from the pull-down menu.
Note: WorldCard offer address searching of many nations, including: Australia, Austria,
Belgium, Brazil, Canada, China, Denmark, Finland, France, Germany, Italy, Japan, Netherlands, New Zealand, Norway, Poland, Russia, Spain, Sweden, Switzerland, Taiwan, U.S., UK and many more to come.
Page 75
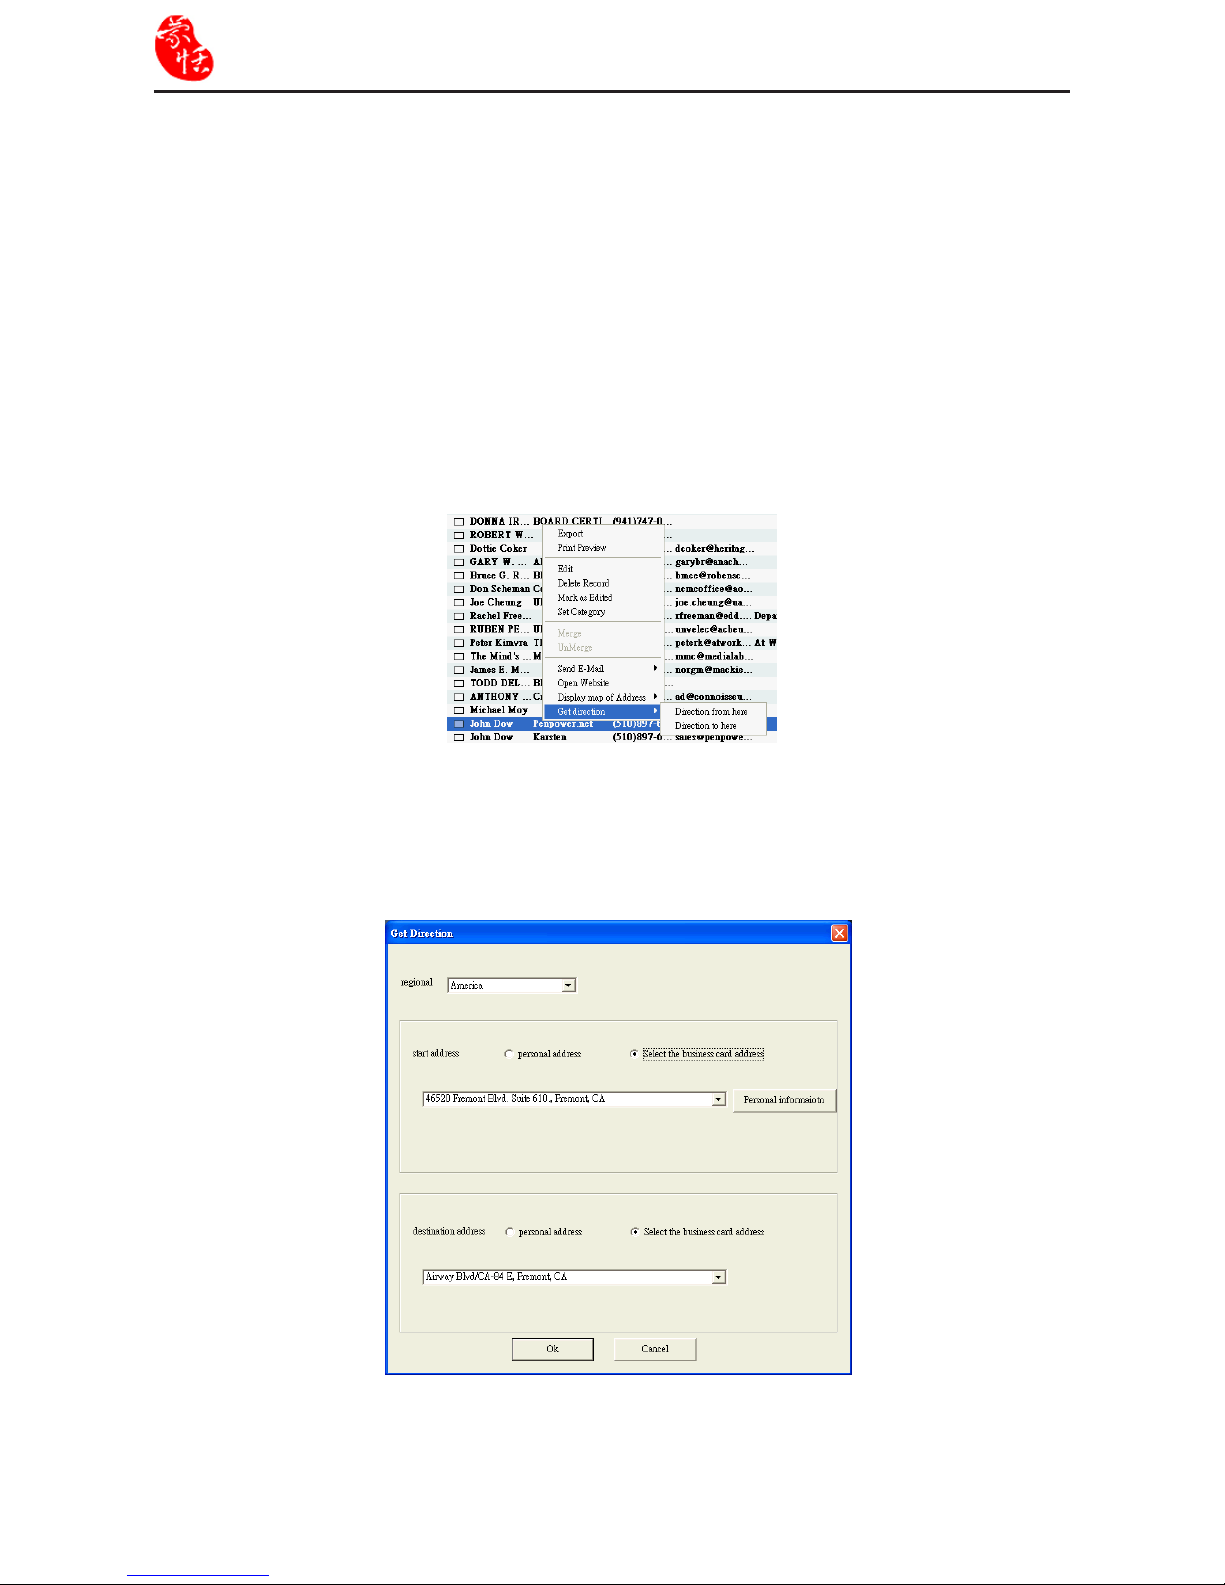
5-40
WorldCard
5.12 Getting Direction
WorldCard provides Get Direction function through internet service websites for looking
up the route between two contacts or between your location and a specic contact.
1. Right click on a contact and select Get direction/Direction from here from the pop-up
menu.
Tip: If you want to set your address as the start location, you can preset your address in
the Personal Settings and skip step 1. Please refer to 5.10.7 Personal Setting for
details.
2. Right click on another contact and select Get direction/Direction to here from the pop-
up menu.
3. After setting the Direction from here and Direction to here, a Get Direction window
will pop up. You can select the start location or destination to your personal address.
Tip: If the contact you selected has more than two addresses, you can choose an address
by clicking the pull-down menu.
Page 76
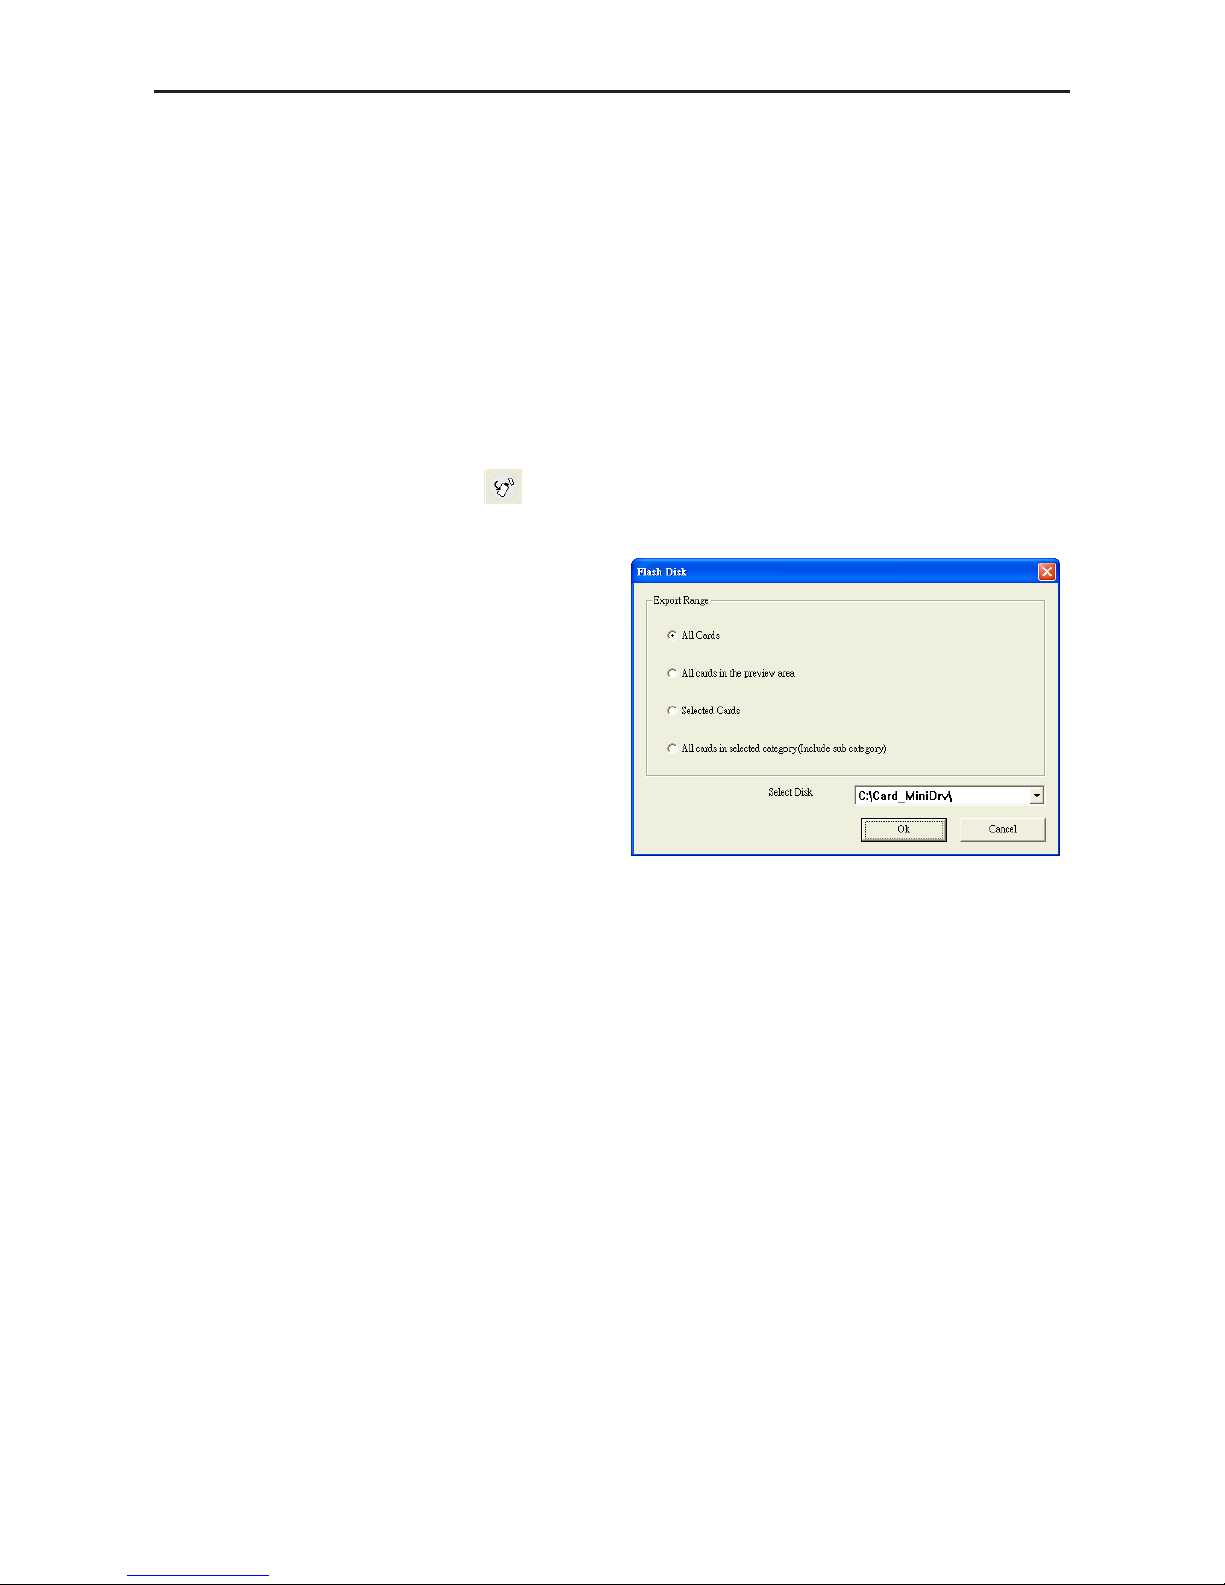
Chapter 5 Managing Business Cards
5-41
5.13 WorldCard Portable Disk
With Penpower WorldCard, you have a new traveling companion and all the exibility
you need for a successful business trip. You can quickly store your WorldCard Portable software and database on any USB ash disk and access them from the USB port of any available computer.
5.13.1 Saving Card Data to a Portable Disk
Note: WorldCard does not provide a ash disk.
To save your WorldCard database to a portable disk, at the Management window click
the Export to Flash Disk button
. The Flash Disk dialog box displays.
In the Flash Disk dialog box, select an
Export Range. Setting the range to the Selected Cards option exports only the cards
that have been selected in the Management
window.
After you have set the Export Range,
select a Flash Disk drive from the Select
Drive list for available ash drives on your
system. After you have selected the correct
ash disk drive, click OK.
Page 77
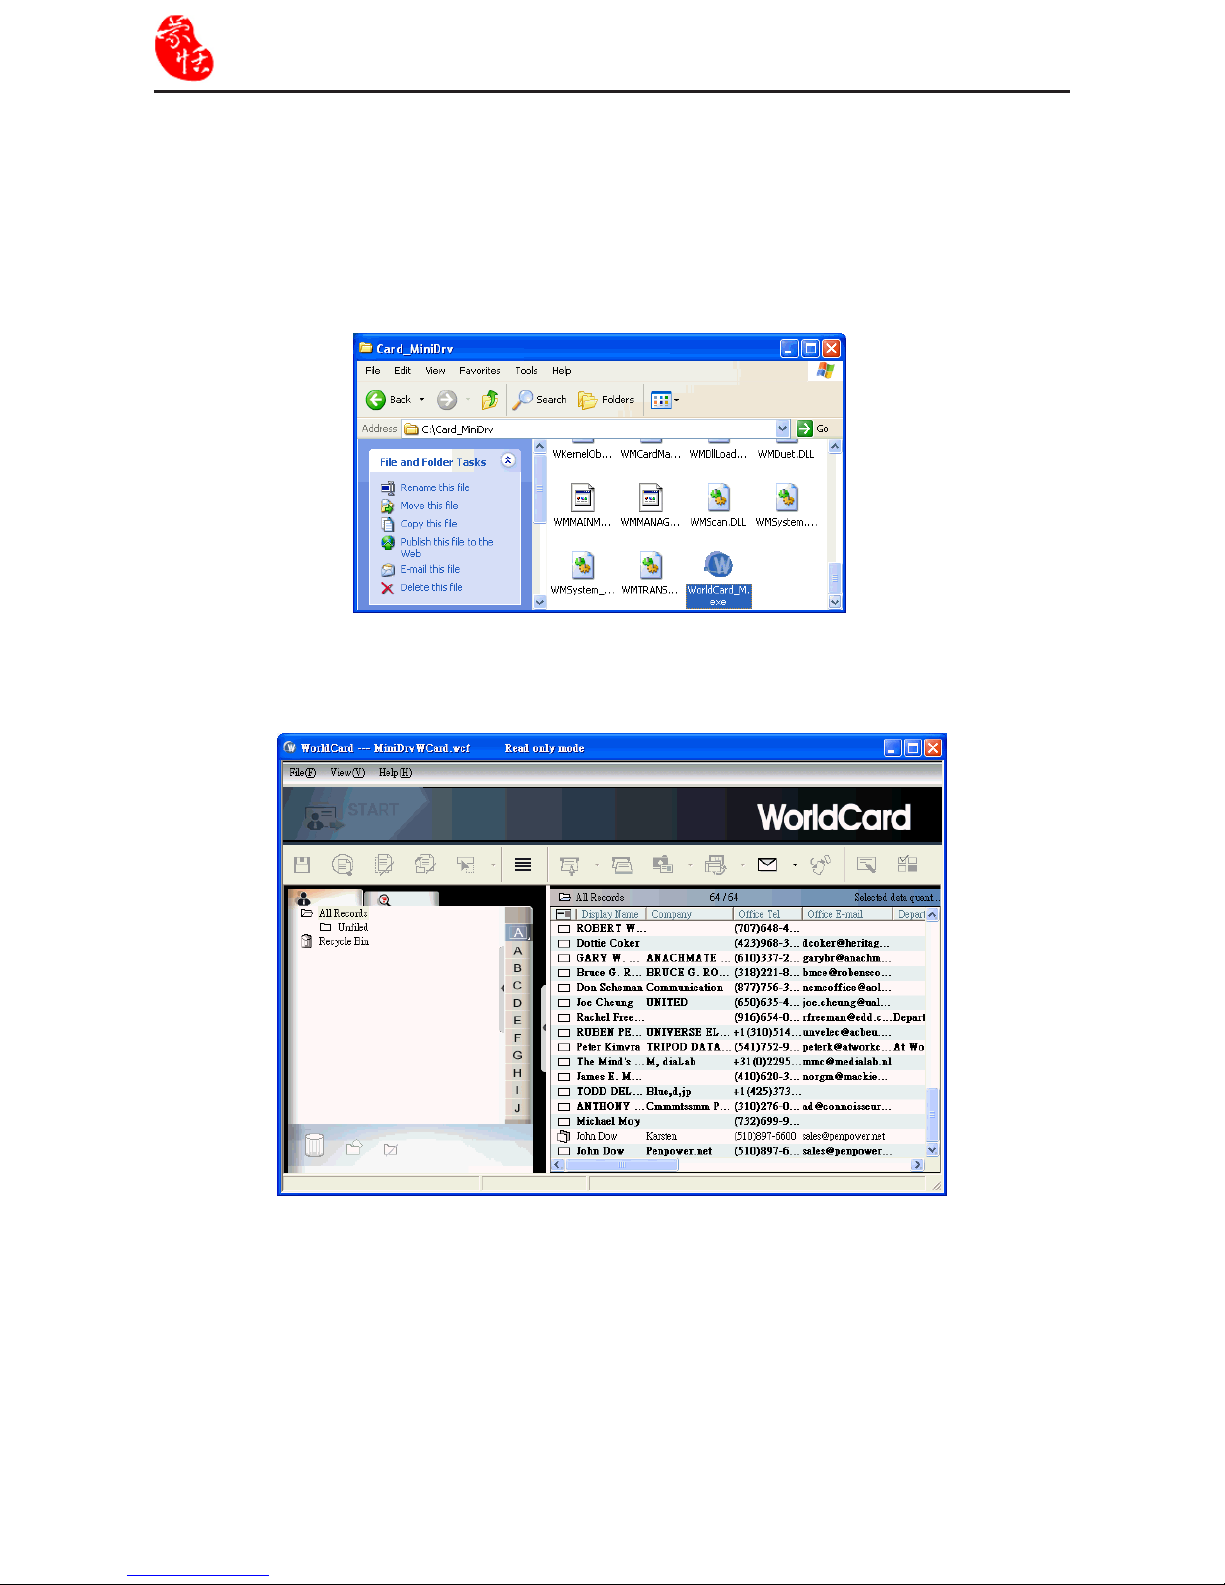
5-42
WorldCard
5.13.2 Card Data Management for Portable Disk
To use the card data stored on a ash disk, plug the ash disk into the USB port of any
computer. Using the My Computer directory of Microsoft Windows, locate the Flash Disk.
In the flash disk directory, locate the Card_MiniDrv folder. Double-click the Card_
MiniDrv folder. The following directory appears.
Double-click on the WorldCard_M application as highlighted in the above. WorldCard
will display the MiniDrvWCard.wcf Read only mode as shown in the picture below.
In the Mini_Drv mode you can view cards in List or Label mode. You can use WorldCard search functions and send email using the same procedures as the standard WorldCard
database in the ofce. For instructions on using any of these available features, see the previous sections of this manual for complete operational instructions.
Page 78
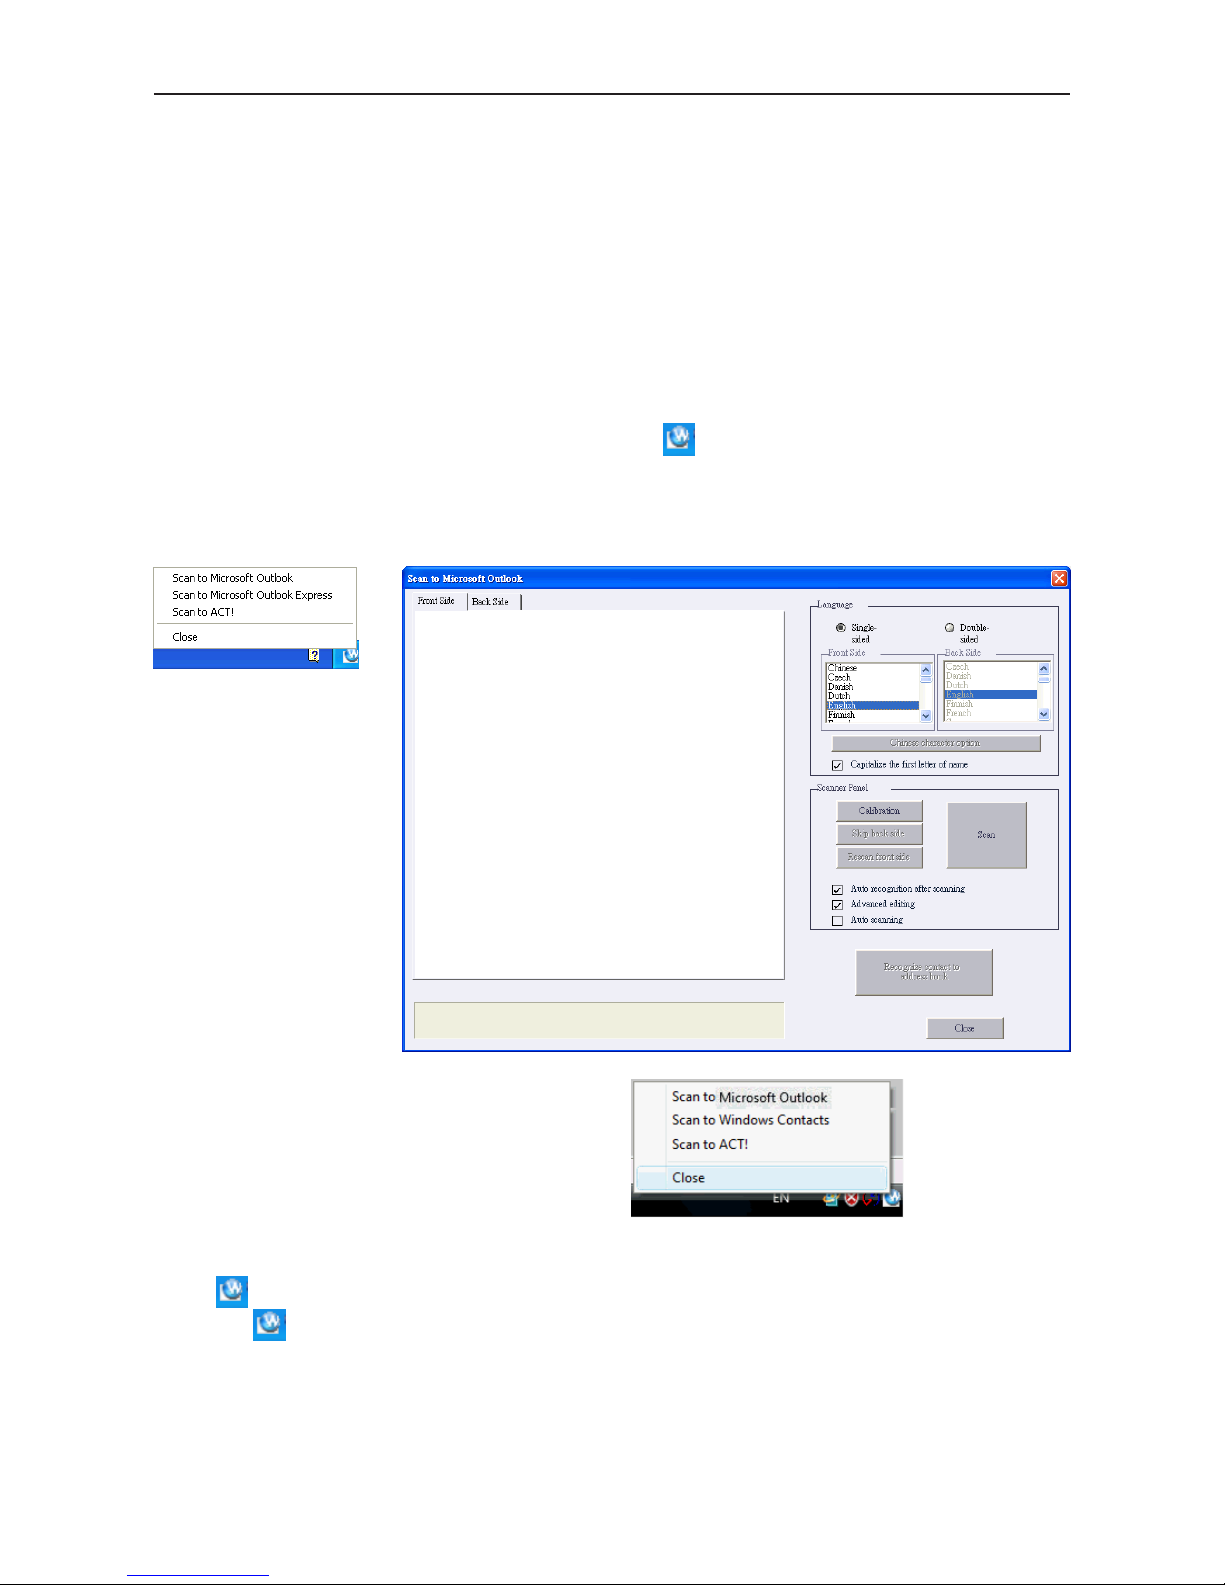
Chapter 6 Scan Manager
6-1
Chapter 6 Scan Manager
WordCard integrates with Microsoft Outlook, Microsoft Outlook Express (Windows XP),
Windows Contacts (Windows 7/Vista) and ACT!. You can scan business cards and save veried contacts into the above programs directly. You can view the original scanned business
card image in Microsoft Outlook and ACT! as well.
6.1 Scan Contacts
After installation, you’ll see the Scan Manager icon at the lower right corner on your
taskbar. Click it and select the desired software: Microsoft Outlook, Outlook Express, Win-
dows Contacts or ACT!. Whenever you click the software, WorldCard opens the scan wizard
of the indicated program.
Note: Microsoft Windows 7/Vista versions
supports scanning contacts into
Microsoft Outlook and Windows
Contacts.
Note: If your computer has installed ACT!, after installing WorldCard, you will see the
button in ACT!, you may also nd WorldCard/ACT! under the Tool menu. Click
the
button or WorldCard/ACT! from the Tool menu to start the Scan Wizard.
Page 79
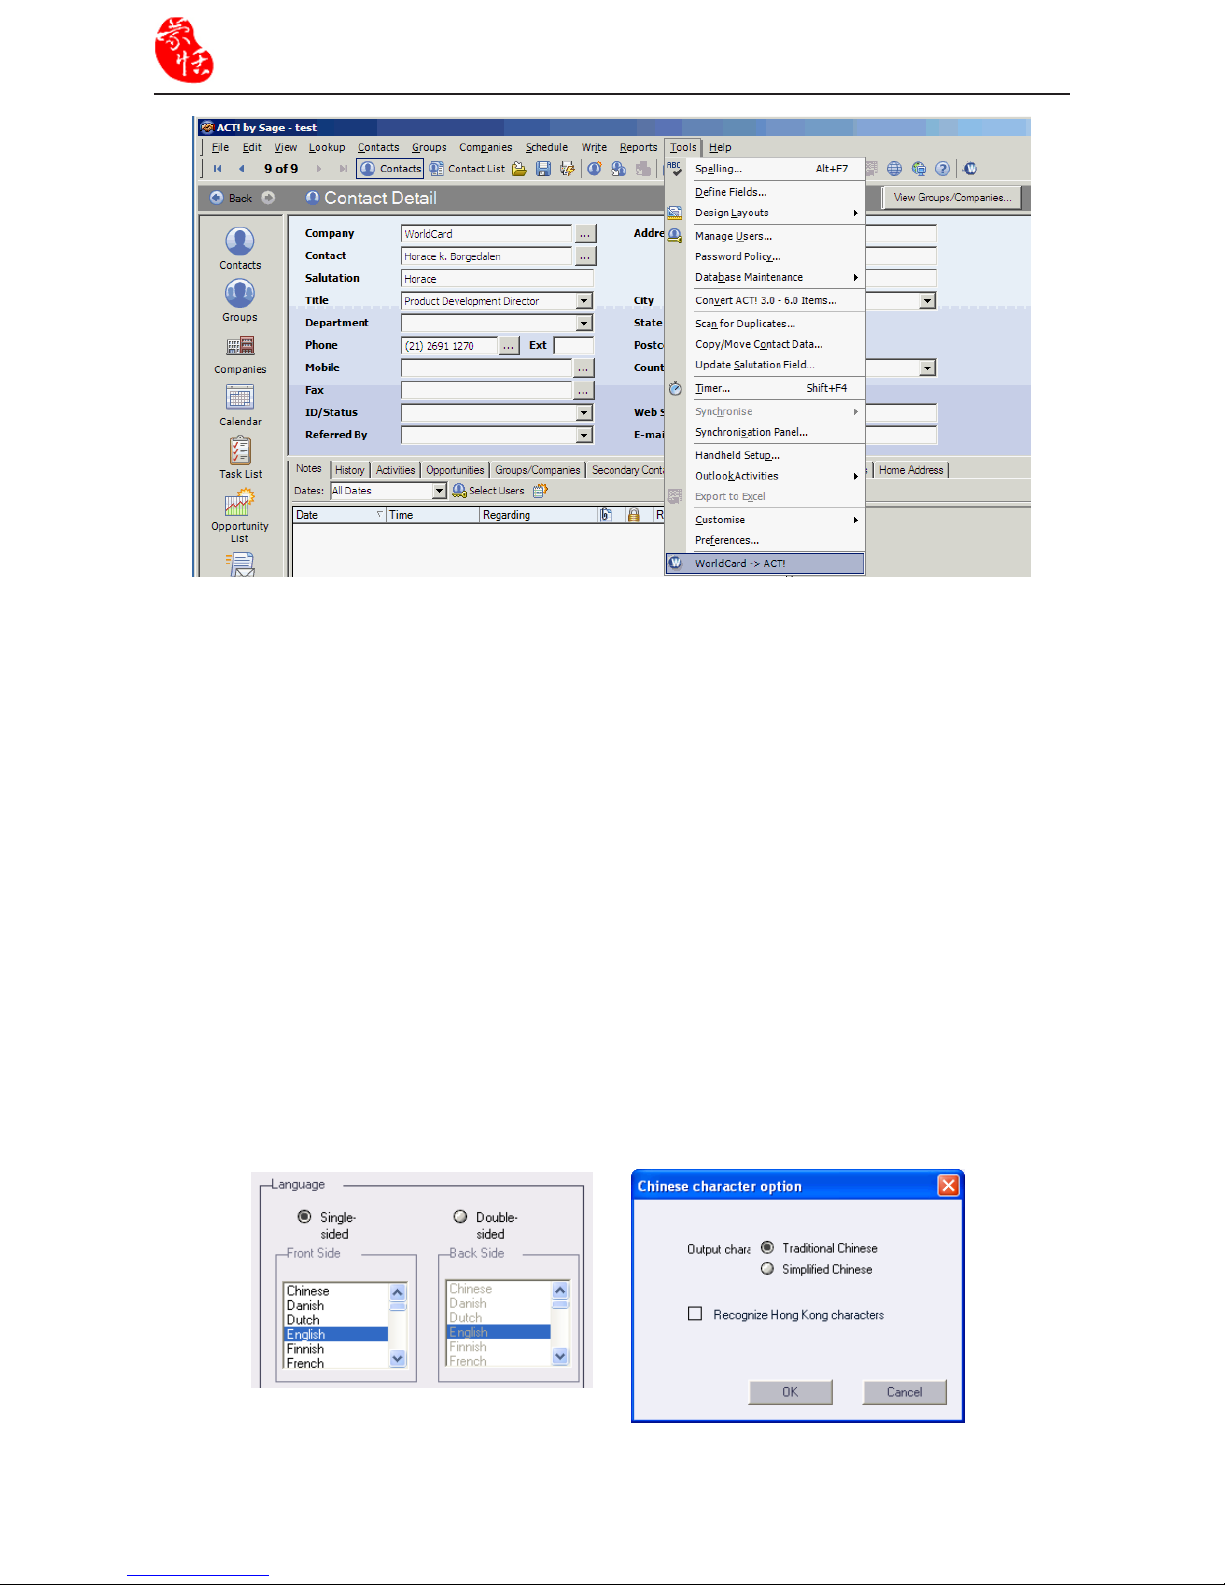
6-2
WorldCard
6.2 Scan business cards
6.2.1 Scan and Edit business cards
1. Insert a business card and click the Scan button to scan it.
Tip: The WorldCard software will require you to calibrate the scanner when you use the
scanner for the rst time. Whenever there is color difference after scanning the card,
you can calibrate the scanner by clicking Calibration.
2. Editing Recognition:
Language: Select the language of the business card.
Chinese character option: Select Traditional Chinese or Simplied Chinese for the
output characters. If the characters include Hong Kong characters, select Recognize
Hong Kong character.
Page 80

Chapter 6 Scan Manager
6-3
Capitalize the rst letter of name: Check Capitalize the rst letter of name to recog-
nize the rst letter of the contact's name to a capital letter. The other letters of the name
will be recognized to lowercase letters.
Auto recognition after scanning: Select Auto recognition after scanning to recognize
contacts after scanning. If this option is not selected, you need to click Recognize con-
tent to address book after scanning.
Advanced editing: Select Advanced editing to edit contact data before exporting them
into address book.
It is recommended that you select Advanced editing to edit contact data before exporting
contact data into address book. Regarding the editing functions, please refer to Chapter 4.
Because Microsoft Outlook Express
provides limited set of elds you may see
Card Information (Unmatched Field) on
the left pane of the Editing window. It lists
the contact data of unmatched elds. These
data will not export to the address book of
Outlook Express. You can click the eld
name to replace the eld that is unmatched.
Click Export to Address Book after con-
rming all data.
Page 81
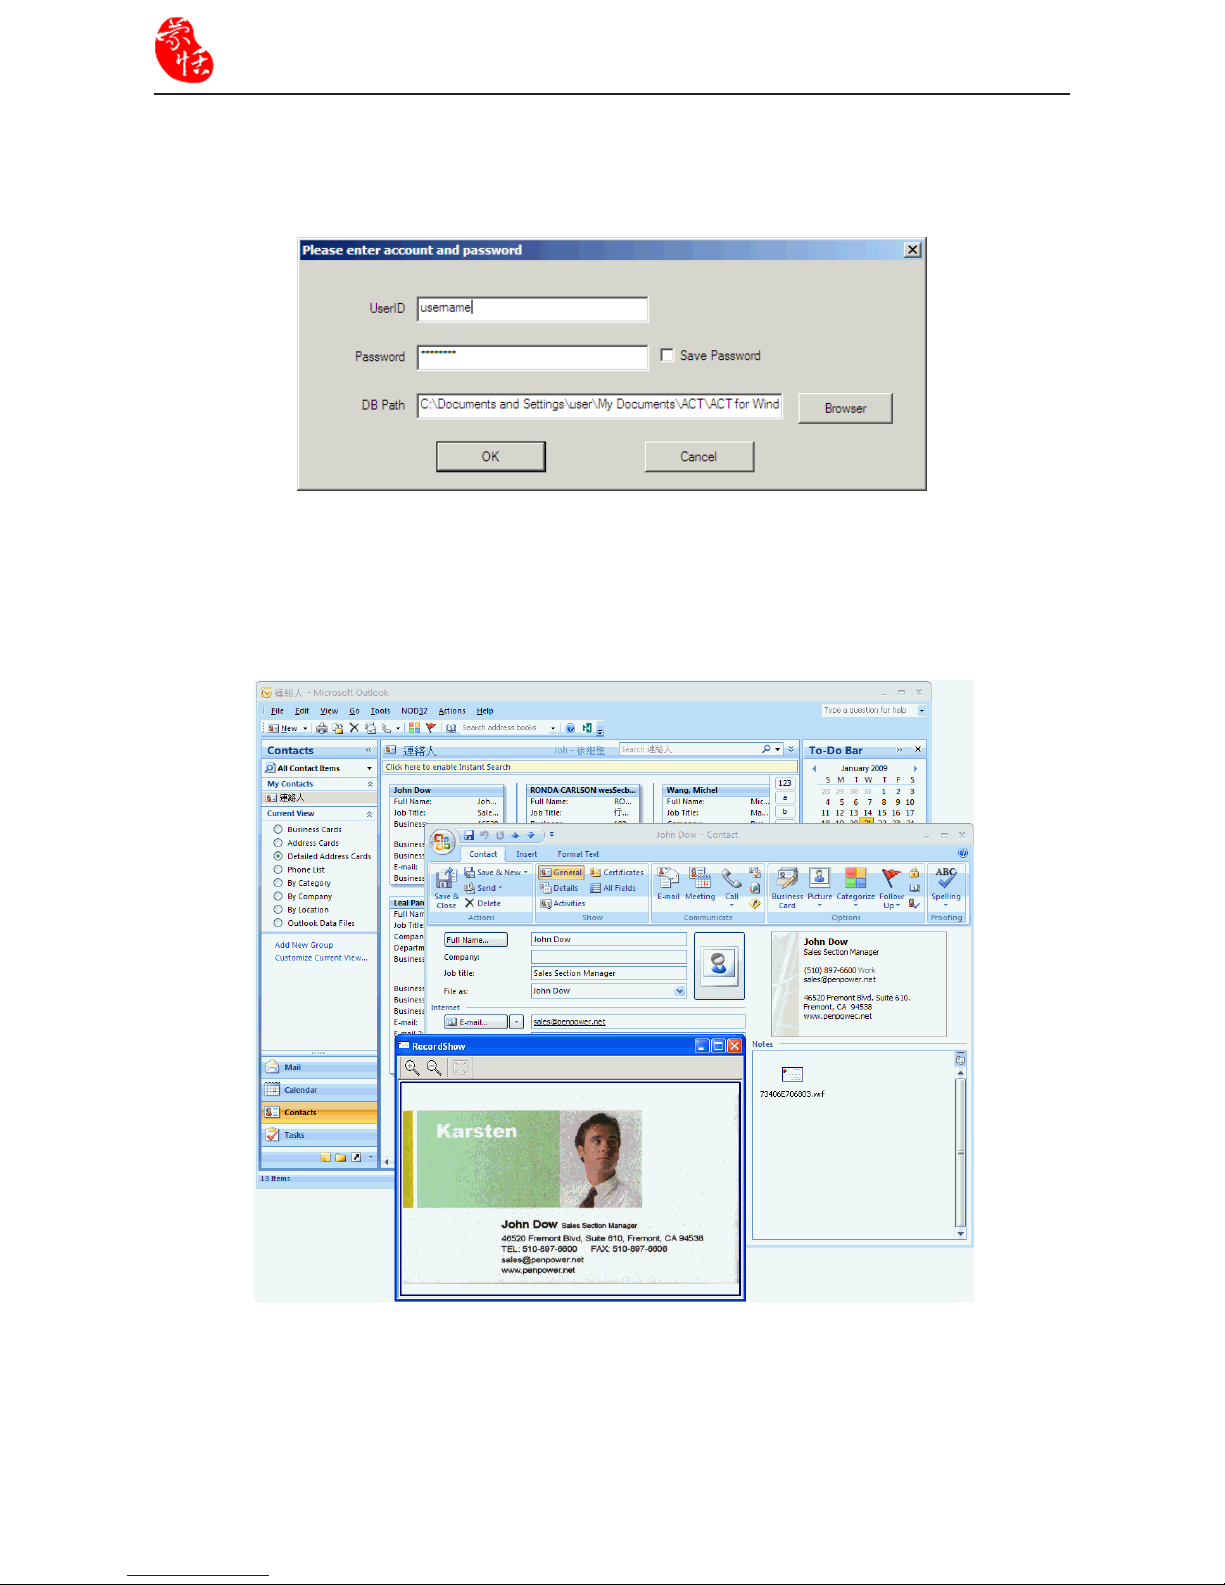
6-4
WorldCard
6.2.2 View business card image
You can view the image of the business card by just selecting the exported contact from
your address book in Microsoft Outlook, and right-click to select view attachment. You can
magnify the image of the business card.
Note: If WorldCard exports business card images into a user dened eld of ACT!, you
may congure the settings of ACT! to view the images.
Note: WorldCard does not support viewing business card images in Microsoft Outlook
Express and Windows Contacts (Windows 7/Vista).
Note: When using Scan to ACT!, you will be asked to input the User ID, Password and
DB Path after clicking Recognize contact to address book in order to save the
contacts into ACT! properly.
Page 82

FAQ
FAQ
Q: How can I convert the les in earlier version to v6.X format?
A: WorldCard v6.x can convert your v5.x version les and import them in v6.x format. (For
v3.0, v4.0 CRD format, support is not available at this moment.) On the File menu, click
Import and then WorldCard le to convert the les to v6.x format. You can also use the
Start-Up Wizard to accomplish this task.
Q: Why are there dark lines on the scanned pictures of business cards, or all scanned
pictures turn out blank?
A: Before you use WorldCard the rst time, you’ll be asked to complete Calibration. If the
problem still exists after calibrating, on the Tool menu, click Calibrate the scanner to
proceed with calibration. You can also use Calibrate the scanner in the scan wizard for
calibration.
Q: How do I backup business card les?
A: On the File menu, click Export and click WorldCard les (v6.0 or later) to back up
les.
Q: How can I protect my business card les from being opened by other persons with-
out my permission?
A: On the File menu, click File encryption to encrypt les. Other persons have to type in
your predened password to open the encrypted les.
Q: How do I combine two pieces of business card data into one?
A: Hold down CTRL and click the left mouse button to select two single-sided business card
picture les or the image-less data of the card. Then right-click, click Combine, and set
either one to be the front side of the data combined.
Q: How do I separate a single picture le with data including the business card infor-
mation of front and rear sides into two separate data les?
A: Select the data including the business card information of front and rear sides, right-click,
then click UnMerge.
Q: How do I add the signature information in e-mails to the business card les?
A: Select the signature or business card information in e-mail or a Word le. Then drag it
directly to the main management window to add a contact.
Page 83

WorldCard
Page 84

Penpower WorldCard User Manual
Manufacturer: Penpower Technology Ltd.
Version: 6.5
Edition: 4
Release: August, 2011
CE Conformity and FCC Statement
This equipment has been tested and found to comply with the limits of the European
Council Directive on the approximation of the member states relating to electromagnetic
compatibility according to EN 55022/55024 Part 15 B.
This equipment has been tested and found to comply with the limits for a Class B
digital device, pursuant to Part 15 of the FCC Rules. These limits are designed to provide
reasonable protection against harmful interference in a residential energy and, if not
installed and used in accordance with the instructions, may cause harmful interference
to radio communications. However, there is no guarantee that interference will not occur
in a particular installation. If this equipment does cause harmful interference to radio or
television reception, which can be determined by turning the equipment off and on, the user
is encouraged to try to correct the interference by one or more of the following measures:
•
Reorient the receiving antenna
•
Increase the separation between the equipment and receiver
•
Move the computer away from the receiver
•
Connect the equipment into an outlet on a circuit different from that to which the receiver
is connected
 Loading...