

Penpower Junior Silver, Junior Crystal Touch, Junior Series, Junior Steel, Junior miniCard and Carefree Pen User Manual
...Page 1

Penpower Jr. User Manual
Version: V7.1
Edition: Released in March, 2007
Page 2

Penpower Technology Ltd.,
Software User License Agreement
You are licensed to legally use this software program (“the Software”) by Penpower Technology Ltd (“Penpower”) under this license agreement (“The Agreement”). If you do not agree with any of the provisions in this Agreement, please do
not install, copy or use the Software. By using the Software, you are deemed to fully
understand and accept the provisions of this Agreement.
1. Intellectual Property
All intellectual property rights in the Software, together with all information and
documents included in the packaging for the Software (including but not limited to
copyrights), are property of Penpower, and are protected by relevant laws and regulations.
2. License to Use
You are authorized to use the Software on one (1) single computer only. You may
not use the Software on any other machines other than the said single computer.
3. Authority to Copy
The Software and all documents included with the Software, and copyright thereof, are property of Penpower. You are licensed to make one (1) copy of the Software
for your personal backup purposes. All other acts of copying are strictly prohibited.
You may not sell, lease, dissemble, reverse engineer, copy, translate, adapt or
derive the Software, or obtain the source code of the Software by any other means.
You may not use the Software for any purposes other than those permitted under this
Agreement.
4. Business Users
If you need to install or use the Software on more than one (1) computer, please
contact Penpower or our local distributor to purchase a license for the additional use.
5. Liability
You agree to indemnify Penpower against all losses, costs, debts, settlement
payments or other expenses (including but not limited to attorneys fees) arising from
your breach of this Agreement, and you agree to compensate Penpower for all of the
abovementioned damages.
Page 3

6. No Warranty
Effectiveness of a packaged software in handling information is closely related to
its software and hardware environment. The Software is published following careful
development and product testing by Penpower, but Penpower is not able to conduct
tests based on all possible combinations of software and hardware environment.
Therefore, Penpower is unable to promise nor warrant that there will be absolutely
no risk of loss or damage of information, or any other kind of loss, during installation and/or execution of the Software. You must be fully aware of your risks in using
the Software.
Penpower will provide you with the Software and support services in respect of
the Software to the maximum extent permitted by law. However, Penpower does not
warrant that the Software and information included in the package of the Software
contain no defects or errors. Penpower is not liable for any indirect, special or
incidental loss arising from the Software, including but not limited to loss of prots,
damage to business reputation, cessation of work, hardware malfunction or damage,
or any other commercial damage or loss arising from commercial use of the Software.
7. Limitation of Liability and Damages
The maximum amount of compensation payable by Penpower, in respect of
any damage incurred by you for any reason under this Agreement, is limited to the
amount you have already paid to Penpower in respect of the Software.
Under no circumstances will Penpower be held liable for the possibility of loss,
notwithstanding Penpower may be aware of the possibility of such loss.
8. Prohibition Against Sublicense
You are prohibited to assign the license in respect of the Software granted to you
under this Agreement, or to grant a sublicense to another person.
9. Jurisdiction
With regards to any disputes arising from this Agreement, Penpower and you
agree that the court having jurisdiction over the business location of Penpower will
be the court in the rst instance.
10. Miscellaneous
In the event that any provision of this Agreement is found to be invalid at law,
such invalidity will not affect the validity of any other provisions, or the legal enforceability of such other provisions.
In the event that the Software cannot be executed under conditions of normal
use, due to any damage to the original disk/s, Penpower will replace the disk/s free
of charge.
Page 4

Contents
Chapter 1 Introduction................................................................1-1
Chapter 2 Installation..................................................................2-1
2.1 System Requirement..................................................................2-1
2.2 Handwriting Software Installation.............................................2-1
2.3 USB Human Interface Device Installation.................................2-6
Chapter 3 Hardware Operation..................................................3-1
31 Calibration..................................................................................3-1
3.2 Touch-Pad Operation..................................................................3-2
Chapter 4 New Handwriting/Mouse Mode................................4-1
4.1 Run Penpower Jr. Handwriting System......................................4-1
4.2 Switching Modes.......................................................................4-2
4.3 New Handwriting/Mouse Mode...............................................4-3
4.3.1 Handwriting Mode Taskbar.............................................4-3
4.3.2 Full Screen Handwriting Mode........................................4-4
4.3.3 How to Write....................................................................4-5
4.3.4 How to quickly x errors, enter phrases and symbols......4-6
4.4 Balloon UI.................................................................................4-7
4.5 Result Correction......................................................................4-8
4.5.1 By Articial Intelligence..................................................4-8
4.5.2 By related word..............................................................4-10
4.5.3 Merge.............................................................................4-11
4.5.4 Split............................................................................4-12
4.5.5 Phrase Correction ..........................................................4-13
4.6 Homophone..............................................................................4-14
4.7 Related Phrase.........................................................................4-15
4.7.1 Input words by Related Phrase.......................................4-15
4.7.2 Update Phrase Database.................................................4-16
Page 5

4.8 Learning String........................................................................4-18
4.9 Gesture.....................................................................................4-20
4.10 Mix Traditional and Simplied Writing..................................4-20
4.11 Switch Version........................................................................4-21
4.12 Setting..............................................................................4-22
4.12.1 Recognition Setting.....................................................4-21
4.12.2 General Setting............................................................4-24
4.12.3 Writing Setting.............................................................4-25
4.13 Signature...............................................................................4-26
4.14 On-Line Translator.................................................................4-28
4.15 Useing Penpower Jr. in MSN Messenger................................4-30
Chapter 5 Traditional Mode.......................................................5-1
5.1 Run Penpower Jr. Handwriting System.....................................5-1
5.2 Writing Mode.............................................................................5-1
5.3 Full Screen Handwriting............................................................5-2
5.3.1 Balloon UI......................................................................5-2
5.4 Writing-Pad...............................................................................5-3
5.4.1 Write Input Tool...............................................................5-3
5.4.2 Phonetic Input Tool..........................................................5-4
5.4.3 Keyboard Input Tool........................................................5-4
5.4.4 Dictionary Input Tool......................................................5-5
5.4.5 Symbol Input Tool..........................................................5-5
5.5 Phrase.........................................................................................5-6
5.5.1 Use Phurase to input words..............................................5-6
5.5.2 Update Phrase Database..................................................5-7
5.6 Other Functions..........................................................................5-8
Chapter 6 Assistant Tools.............................................................6-1
6.1 Penpower VoiceReader..............................................................6-2
6.1.1 Use Penpower VoiceReader.............................................6-2
Page 6

6.1.2 Reading Setting...............................................................6-3
6.2 Penpower Translator..................................................................6-4
6.2.1 English Words..................................................................6-4
6.2.2 Chinese Characters..........................................................6-5
6.2.3 English Chinese Article Translator...................................6-6
6.2.4 Chinese English Article Translator...................................6-6
6.3 Penpower E-mail Touchpad......................................................6-9
6.3.1 Setting..............................................................................6-9
6.3.2 Accounts Management..................................................6-10
6.3.3 Email Address lter........................................................6-10
6.3.4 Connection.....................................................................6-11
6.3.5 Check email manually....................................................6-11
6.3.6 Device Test....................................................................6-11
Chapter 7 Fast User Switching....................................................7-1
Page 7

Page 8
Chapter 1 Product Overview
1-1
Chapter 1 Product Overview
Penpower Junior is available in ve models: Penpower Jr. Crystal
Touch, Penpower Jr. Silver/Steel, Penpower Jr. Diamond, Penpower Jr.
miniCard and Carefree Pen. You may choose the model most appropriate to
your personal requirements.
1.1 Penpower Junior Series Overview
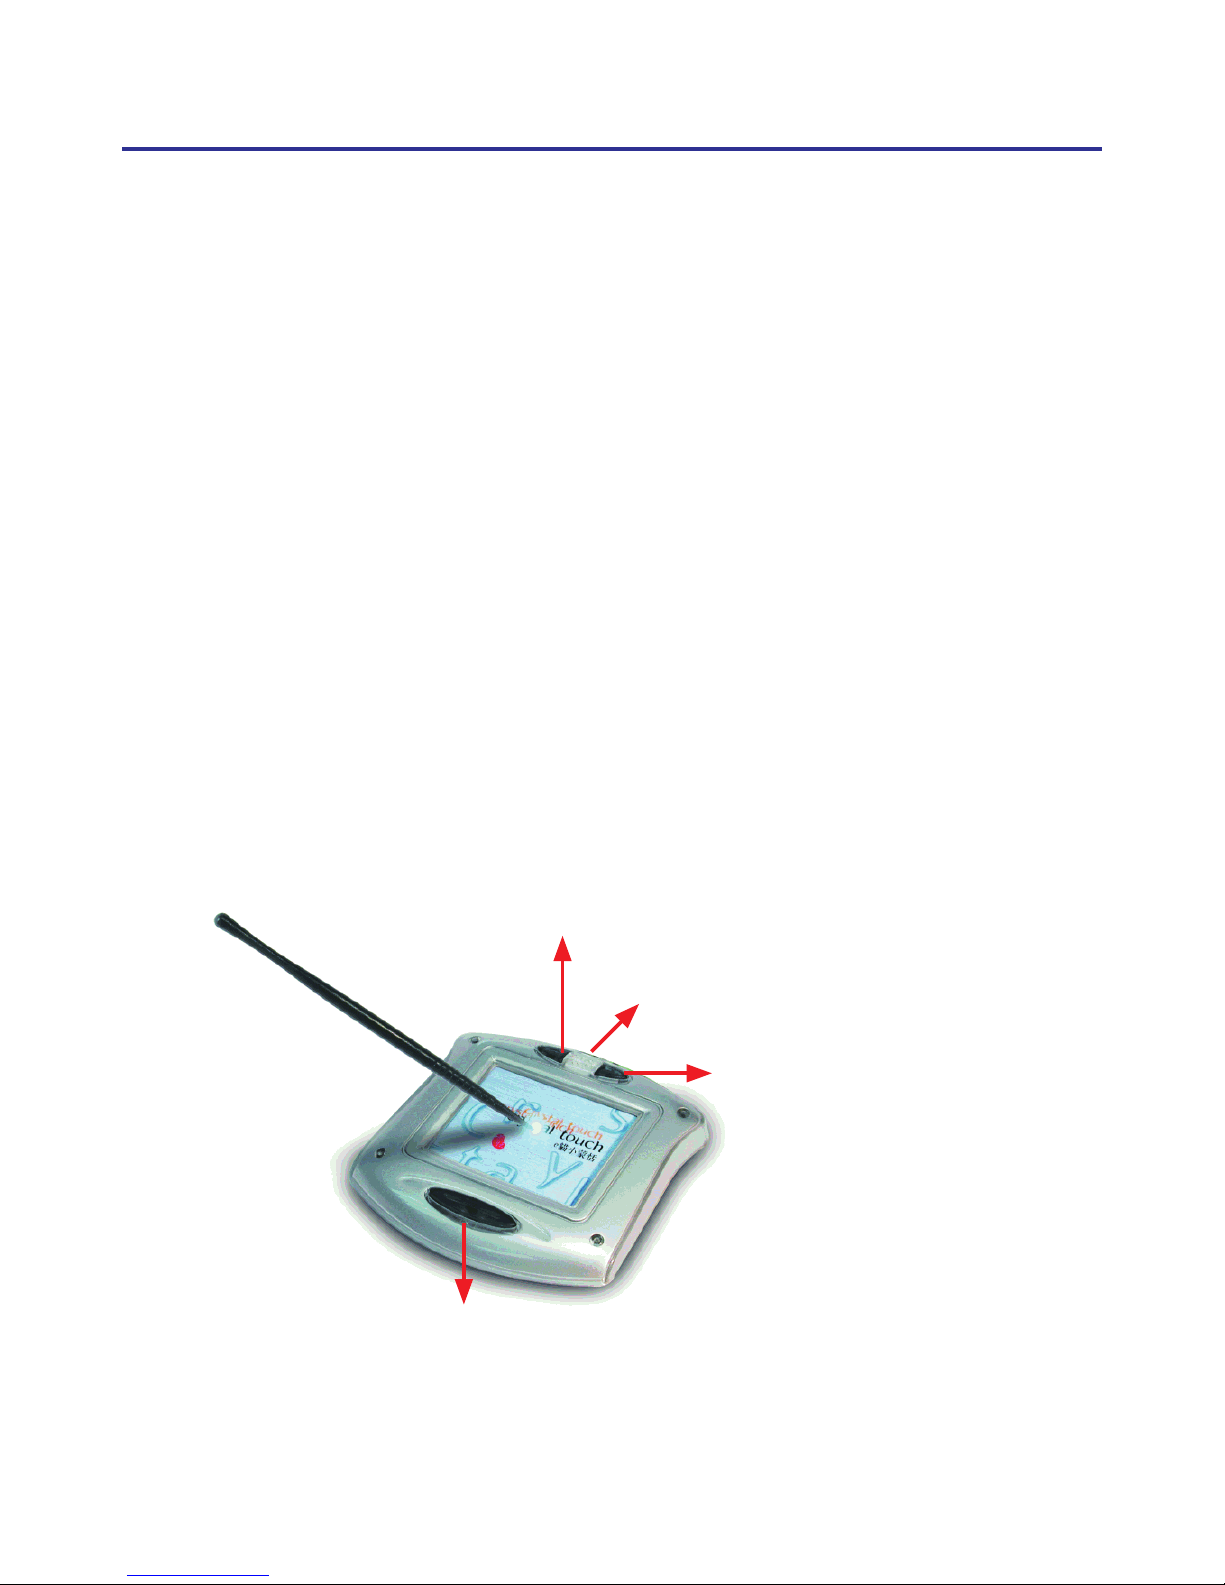
1.1.1 Penpower Jr. Crystal Touch
Equipped with a message alert function it ashes and plays music to
notify the user that there is an incoming message. The cute design makes it
suitable for young MSN users.
Active Pad Area: 2x1.5
”
Handwriting/Mouse mode button
Left mouse button
Incoming Message Indicator Light
Right mouse button
Page 9

1-2
1.1.2 Penpower Junior Silver/Steel
This innovative touch pad is not only light and compact but also combines a metallic pad with the texture of leather. Supports incoming message
alerts so when an e-mail is received it ashes.
Active Pad Area: 2x1.5”
Left mouse button
Right mouse button
Handwriting/Mouse mode button
Incoming Message
Indicator Light
Page 10
Chapter 1 Product Overview
1-3
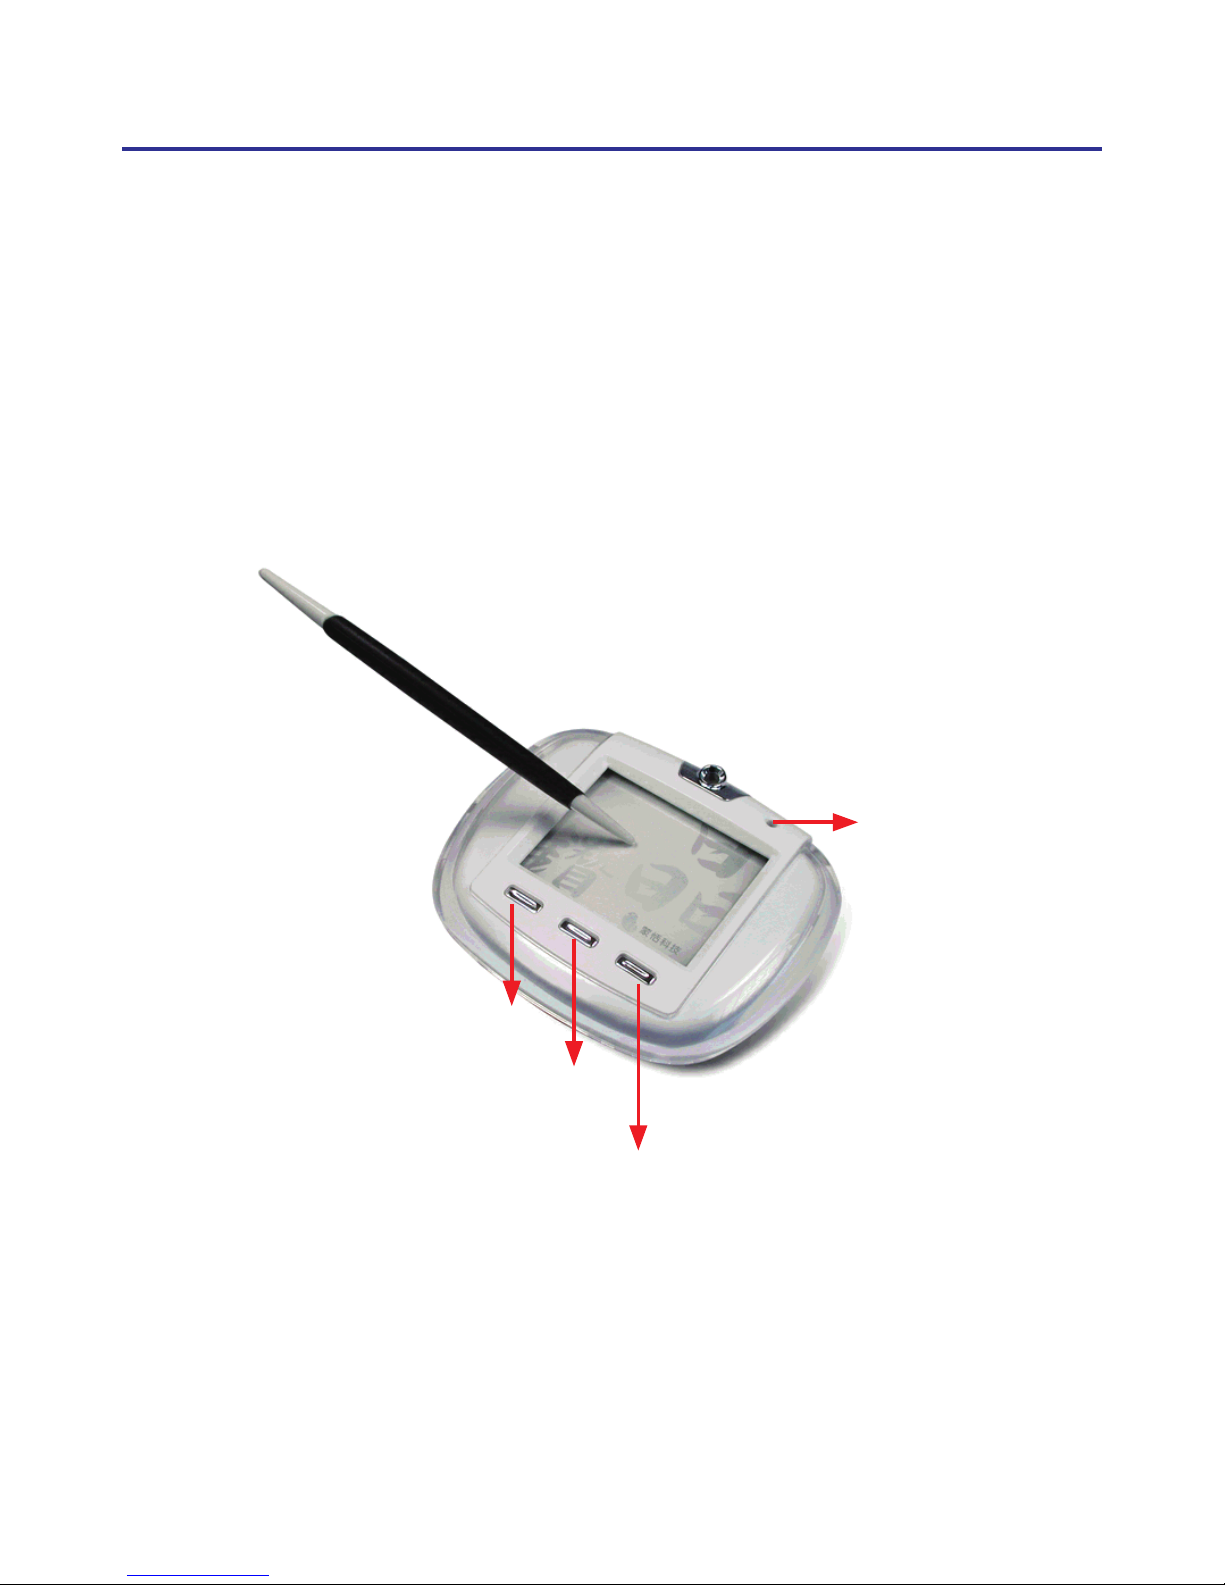
1.1.3 Penpower Junior Diamond
The eye-catching appearance makes this the new choice for the young
and trendy. Available in diamond white and diamond black. Supports
incoming message alerts so when an e-mail is received it plays music and
ashes.
Active Pad Area: 2x1.5”
Left mouse button
Right mouse button
Handwriting/Mouse mode button
Incoming Message
Indicator Light
Page 11
1-4
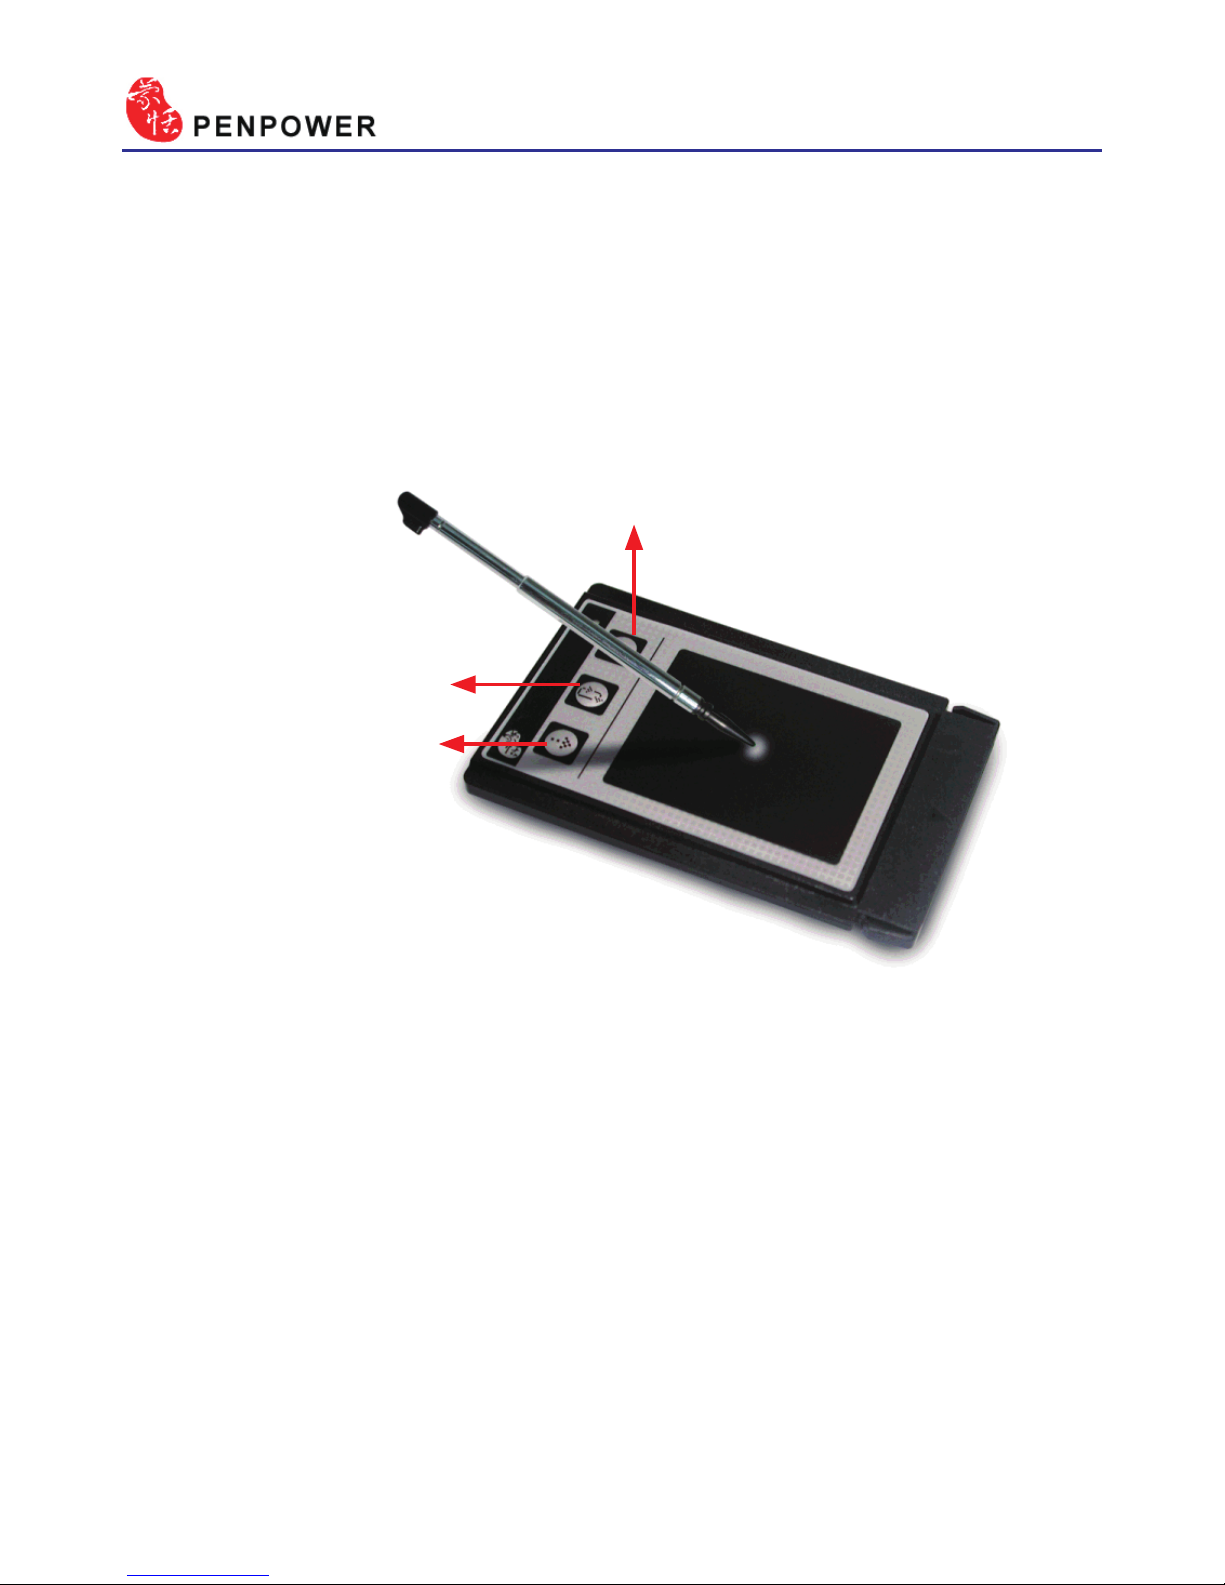
1.1.4 Penpower Junior miniCard
This mini touch pad is designed for use with notebooks. The size of a
standard PC card (PCMCIA), it can be stored away in the notebook computer’s PCMICA slot when not in use.
Active Pad Area: 1.7x1.3”
Left mouse button
Right mouse button
Handwriting/Mouse
mode button
Page 12
Chapter 1 Product Overview
1-5
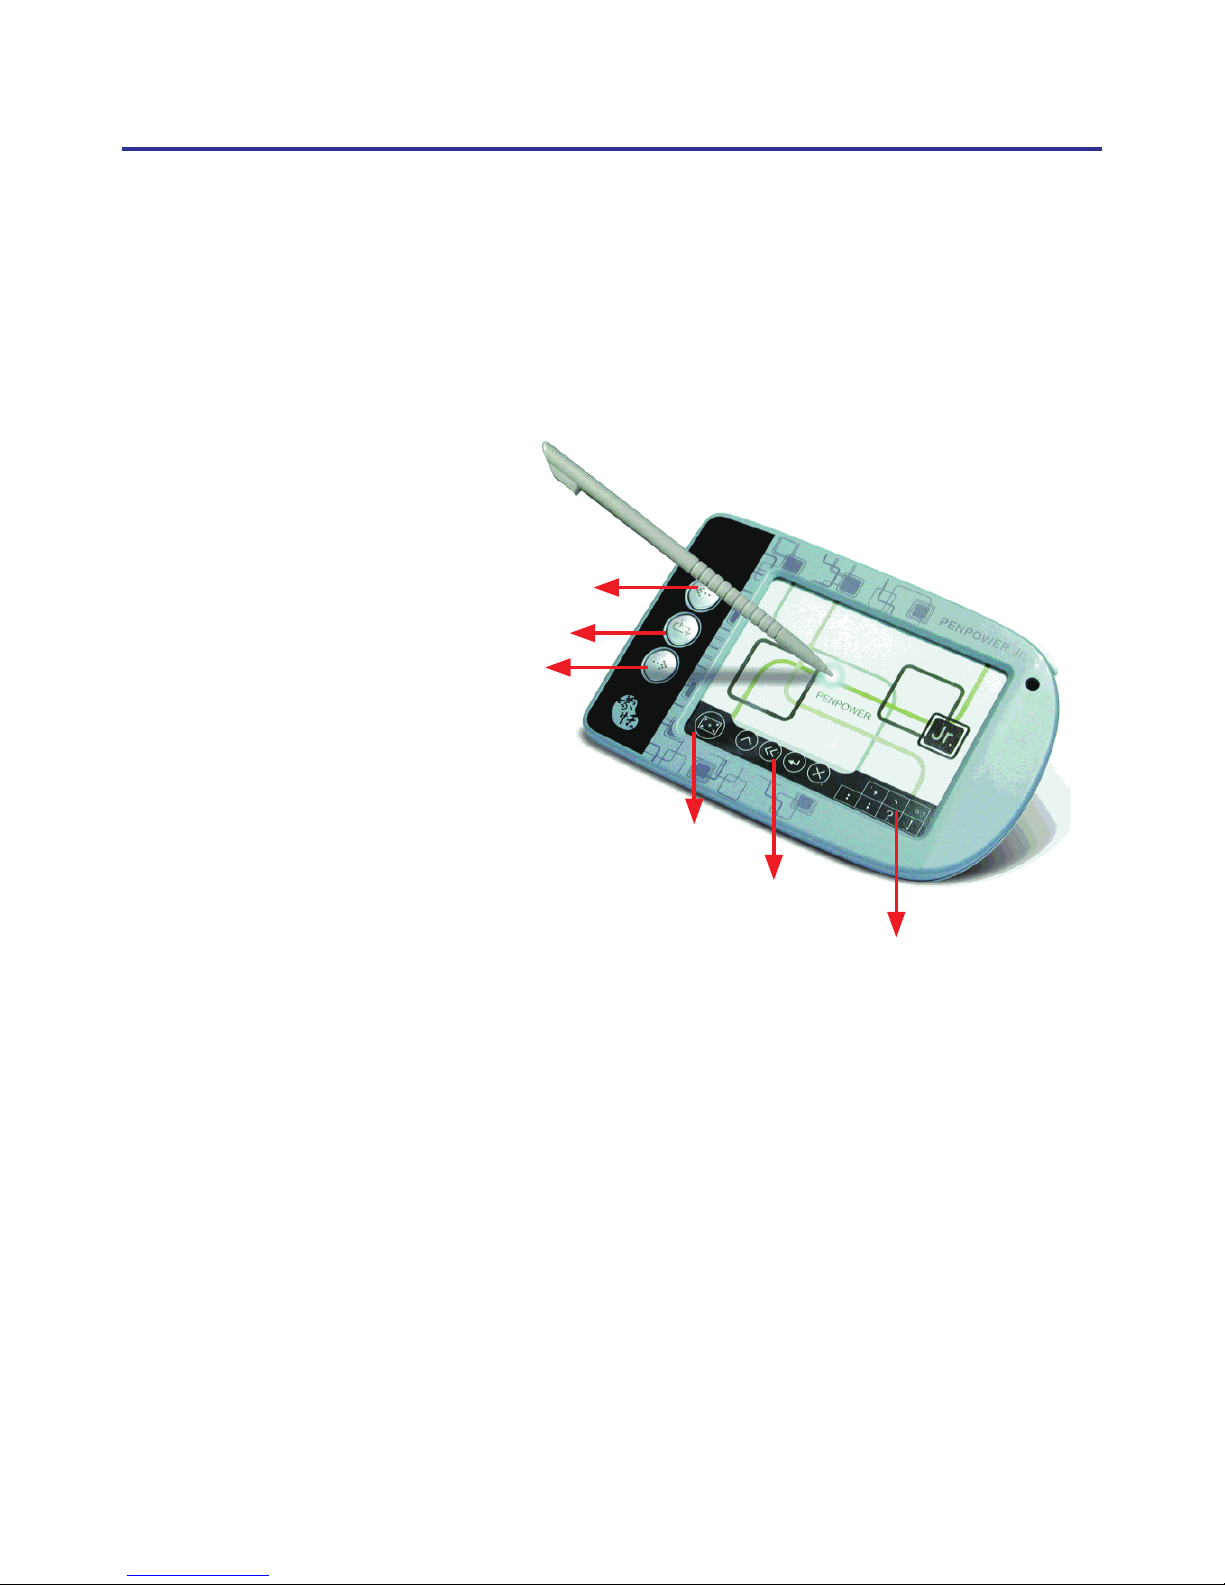
1.1.5 Carefree Pen
The user can change the picture card under the touch pad surface at any
time.
Active Pad Area: 3x2”
Mode Switching Button:
Under new handwriting/mouse mode clicking on this button switches
between the handwriting and mouse mode; in traditional mode, clicking
on this button switches between full-screen and writing pad handwriting
modes.
Shortcut Buttons:
From left to right, these are used for Insert Space, Delete Previous Character, New Line and Delete Next Character.
Frequently Used Symbols
Left mouse button
Right mouse button
Handwriting/Mouse mode button
Mode Switching Button
Shortcut Buttons
Page 13

1-6
Introduction
Unicode recognition kernel
Support unicode system to input Traditional and Simplied Chinese easily.
All in one recognition kernel of Big5 and GB
The character set can be recognized including more than 23000 Chinese
words, 4941 HongKong words, alphabet,numeric, symbol, Hiragana, and
Katakana.
Articial Intelligence recognition kernel
After you correct the recognition result from candidate or AI dialog, the
system will modify its recognition database to adapt your personal writing
style. This would improve the recognition rate for yourself.
Full screen multi-words free writing
It is allowed to handwrite multiple words before recognition at one time
based on the advanced character segmentation technology.
Free writing recognition kernel
Not only the stroke order is free, but even though the careless or illegible
continuous free writing could be recognized correctly.
Smart Handwriting/Mouse Mode:
This brand new Penpower mouse is more intuitive and easier to use. Additional symbols and symbol shortcuts are also provided for your convenience.
Page 14

Chapter 1 Product Overview
1-7
Other auxiliary function
provide many usefully functions, such as related phrase, related word,
special symbol table, homophone,dictionary, learning string, color inking
and sound effect...etc, to make input easier.
Word Learning Wizard
All new word learning wizard mode making it easy to set up and manage
learning dictionary.
Chinese-English Translation:
Online dictionary with real-time translation between Chinese and English
with 139,000 English to Chinese and 76,000 Chinese to English entries.
Penpower VoiceReader
Integrate the Text-to-Speech technology to read aloud the Chinese article
content within any window.
Transparent signature
Directly super-impose your signature at the desired area in a Word or Excel
document without disrupting the document layout. Or insert your signature
into IE, Netscape and Eudora e-mails and send it to other people.
Balloon UI
The visual user interface is hidden transparently. The function tool bar will
be popped up on the word where the cursor is.
Mail Alert (Only supported by Crystal Touch, Silver/Steel and
Diamond)
Auto receive eamil from internet and announce the user by blink or music.
Page 15

1-8
Mail account management (Only supported by Crystal Touch,
Silver/Steel and Diamond)
Support account lter and multi-account management.
Inking on MSN Messenger
If you have MSN Messenger 6.1 or above installed, you will be able to
transmit handwriting and hand-drawn graphics through MSN Messenger
for that extra personal touch.
Fast User Switching
Windows XP/Vista fast user switching supported so every user can have
access to their personal settings.
Page 16
Chapter 2 Installation
2-1
Chapter 2 Installation
2.1 System Requirement
1. Intel Pentium processor or compatible
2. 64MB RAM
3. 150MB disk space
4. Windows 2000/XP/Vista
5. USB Port
2.2 Handwriting Software Installation
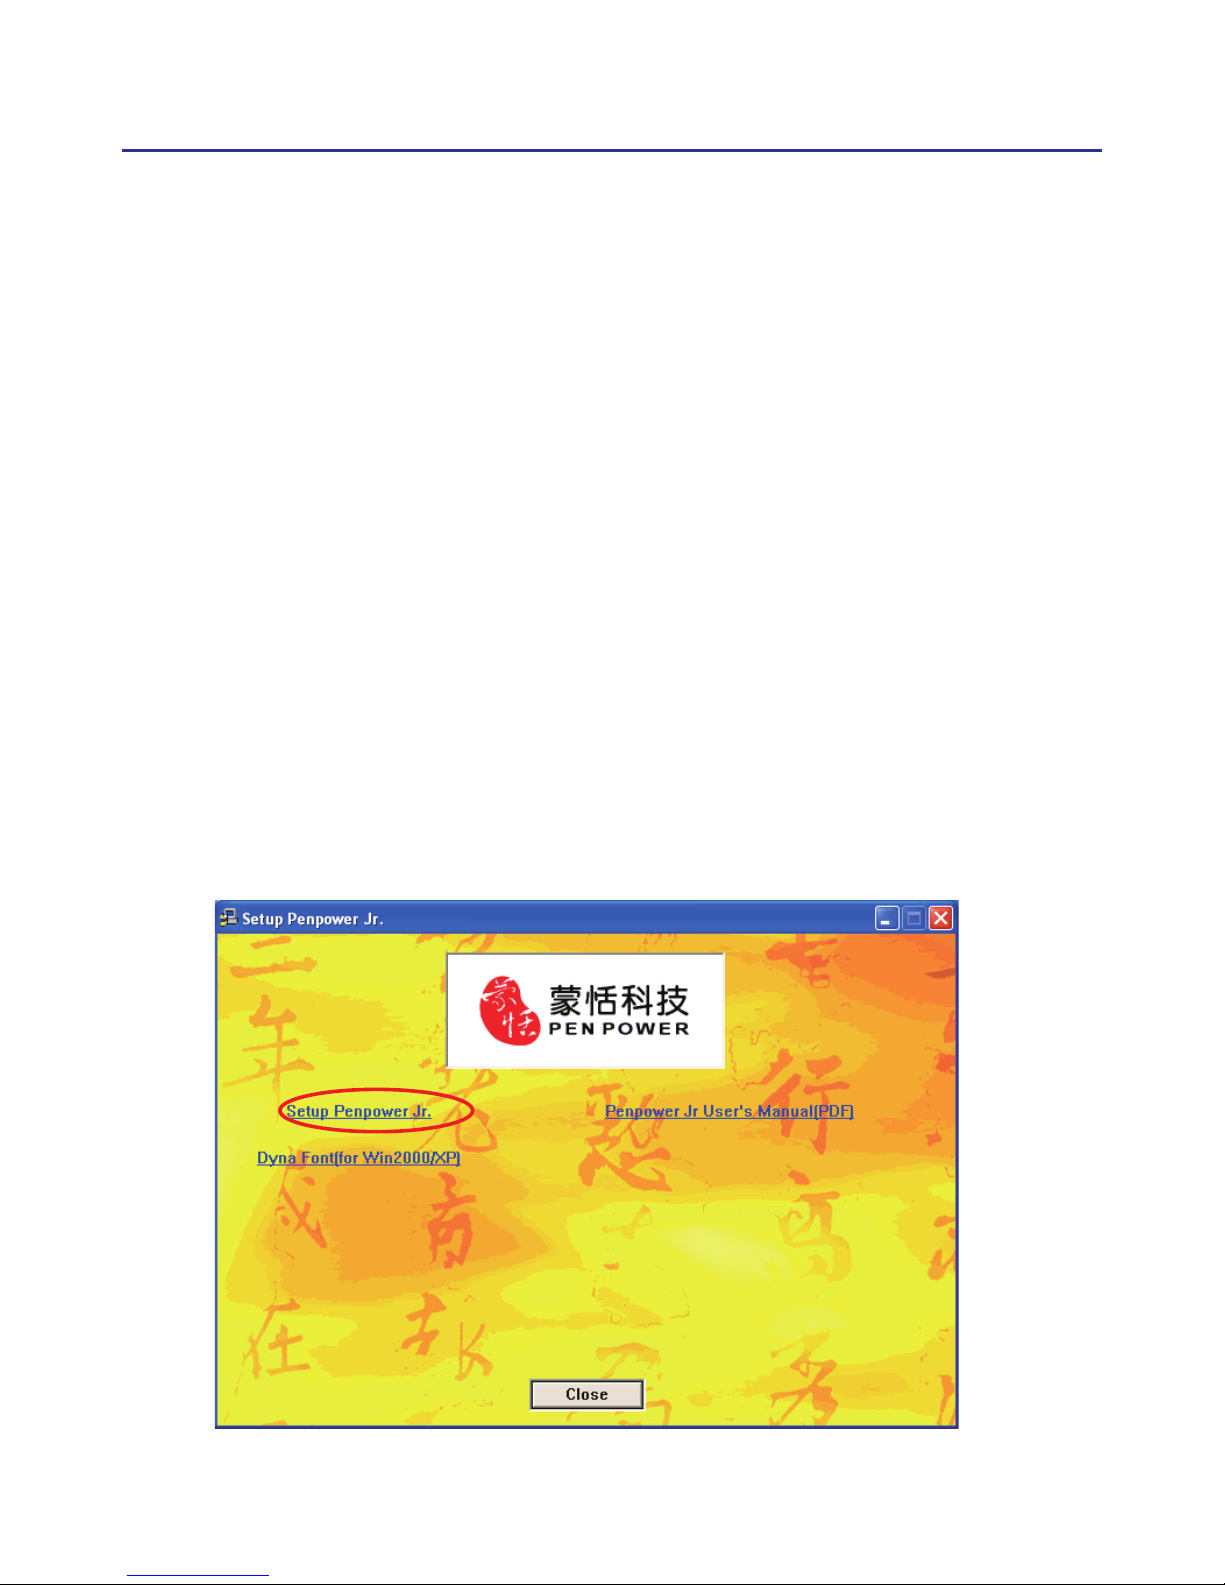
1. Please insert CD-ROM disc into the CD-ROM drive and the system will
automatically launch setup.exe. Select the “Install Penpower Jr.” option.
Page 17
2-2
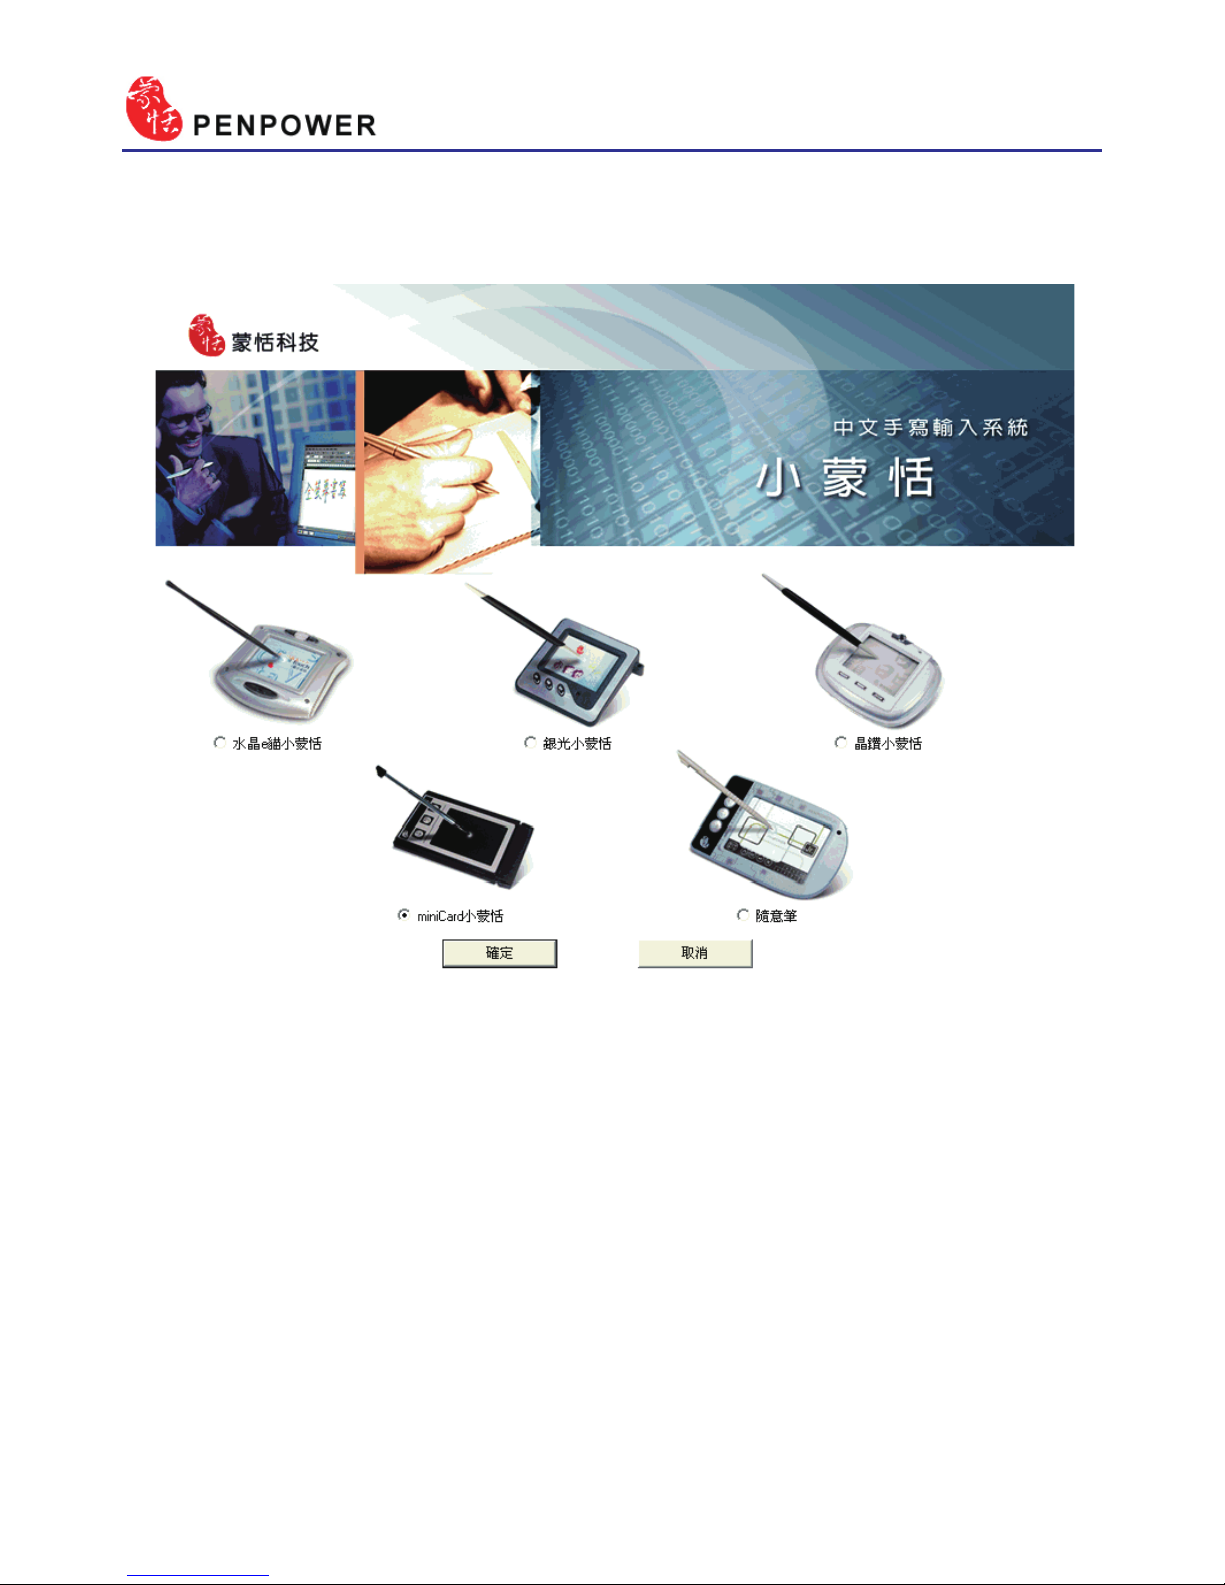
2. Please select your Penpower Junior model then press the “Conrm” but-
ton.
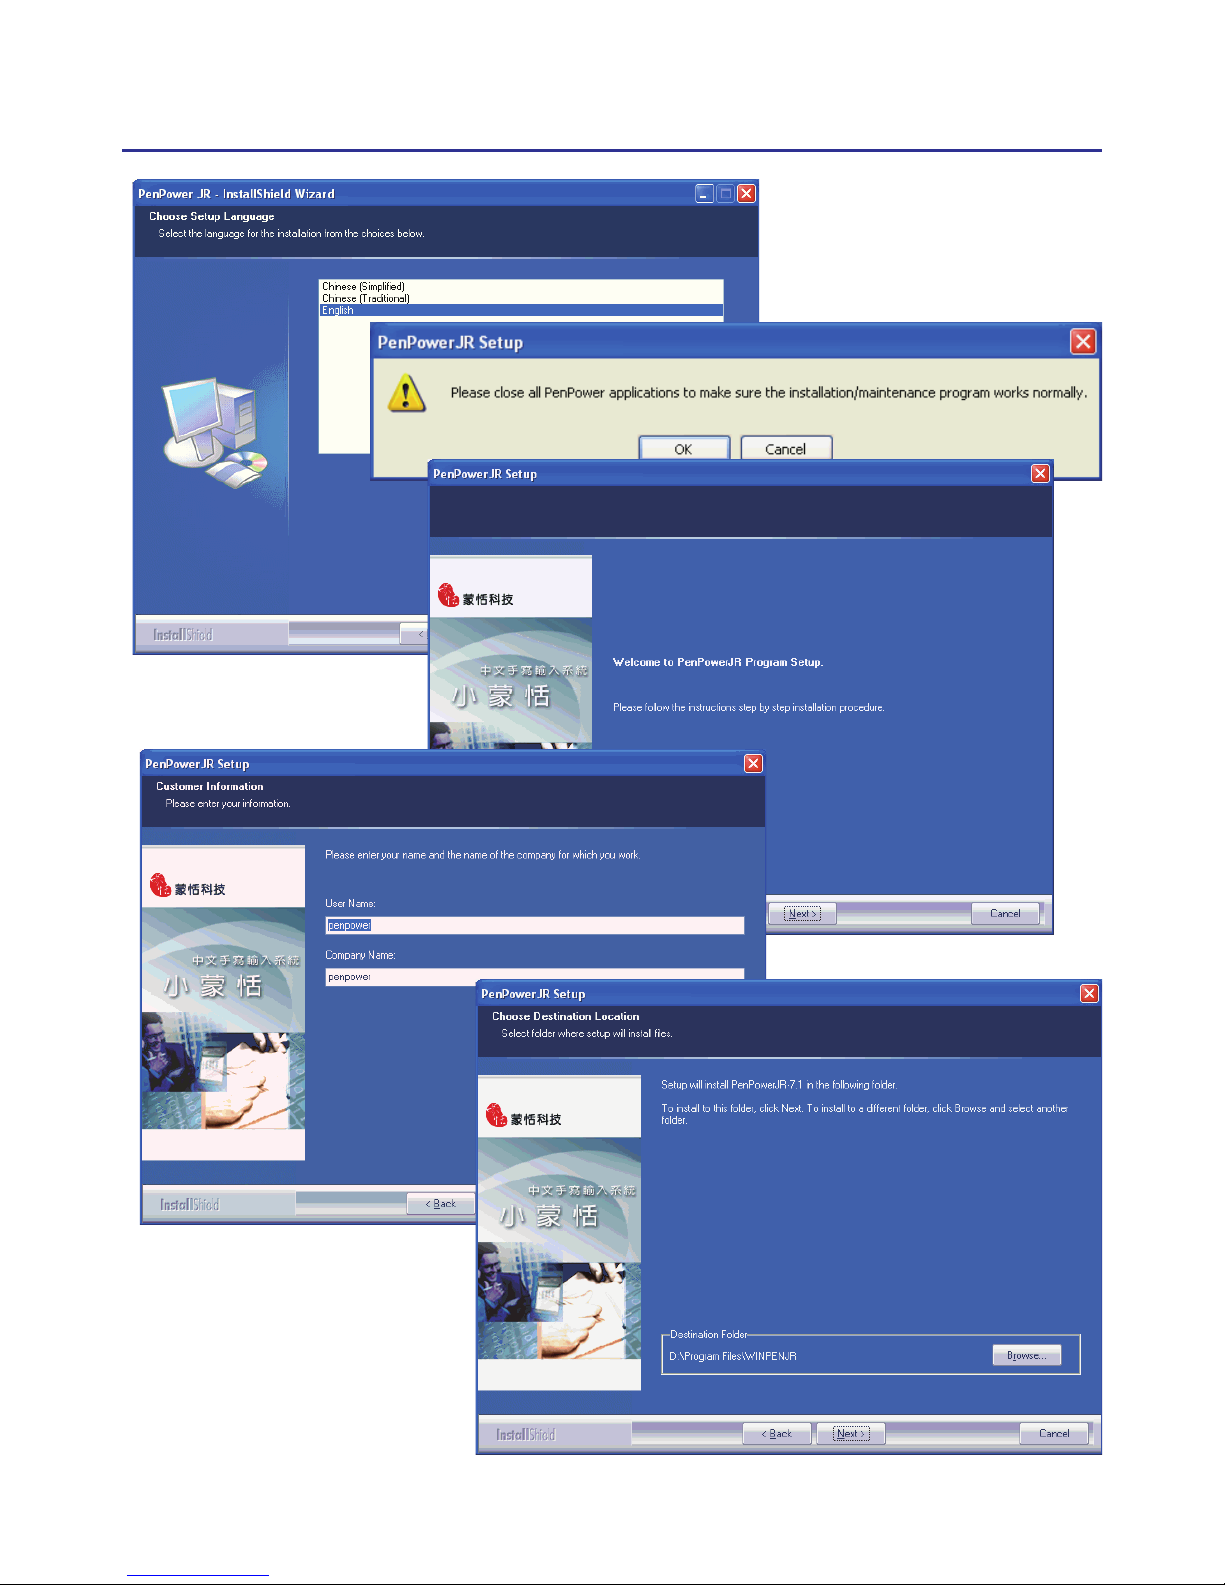
3. Please select the language version you wish to install then press “Con
-
rm”. Please close all Penpower applications to ensure that the install/
repair process will run properly. Follow the instructions on screen and
carry out the installation process as directed. When installation is complete, please restart your computer.
Page 18
Chapter 2 Installation
2-3
Page 19
2-4
Page 20
Chapter 2 Installation
2-5
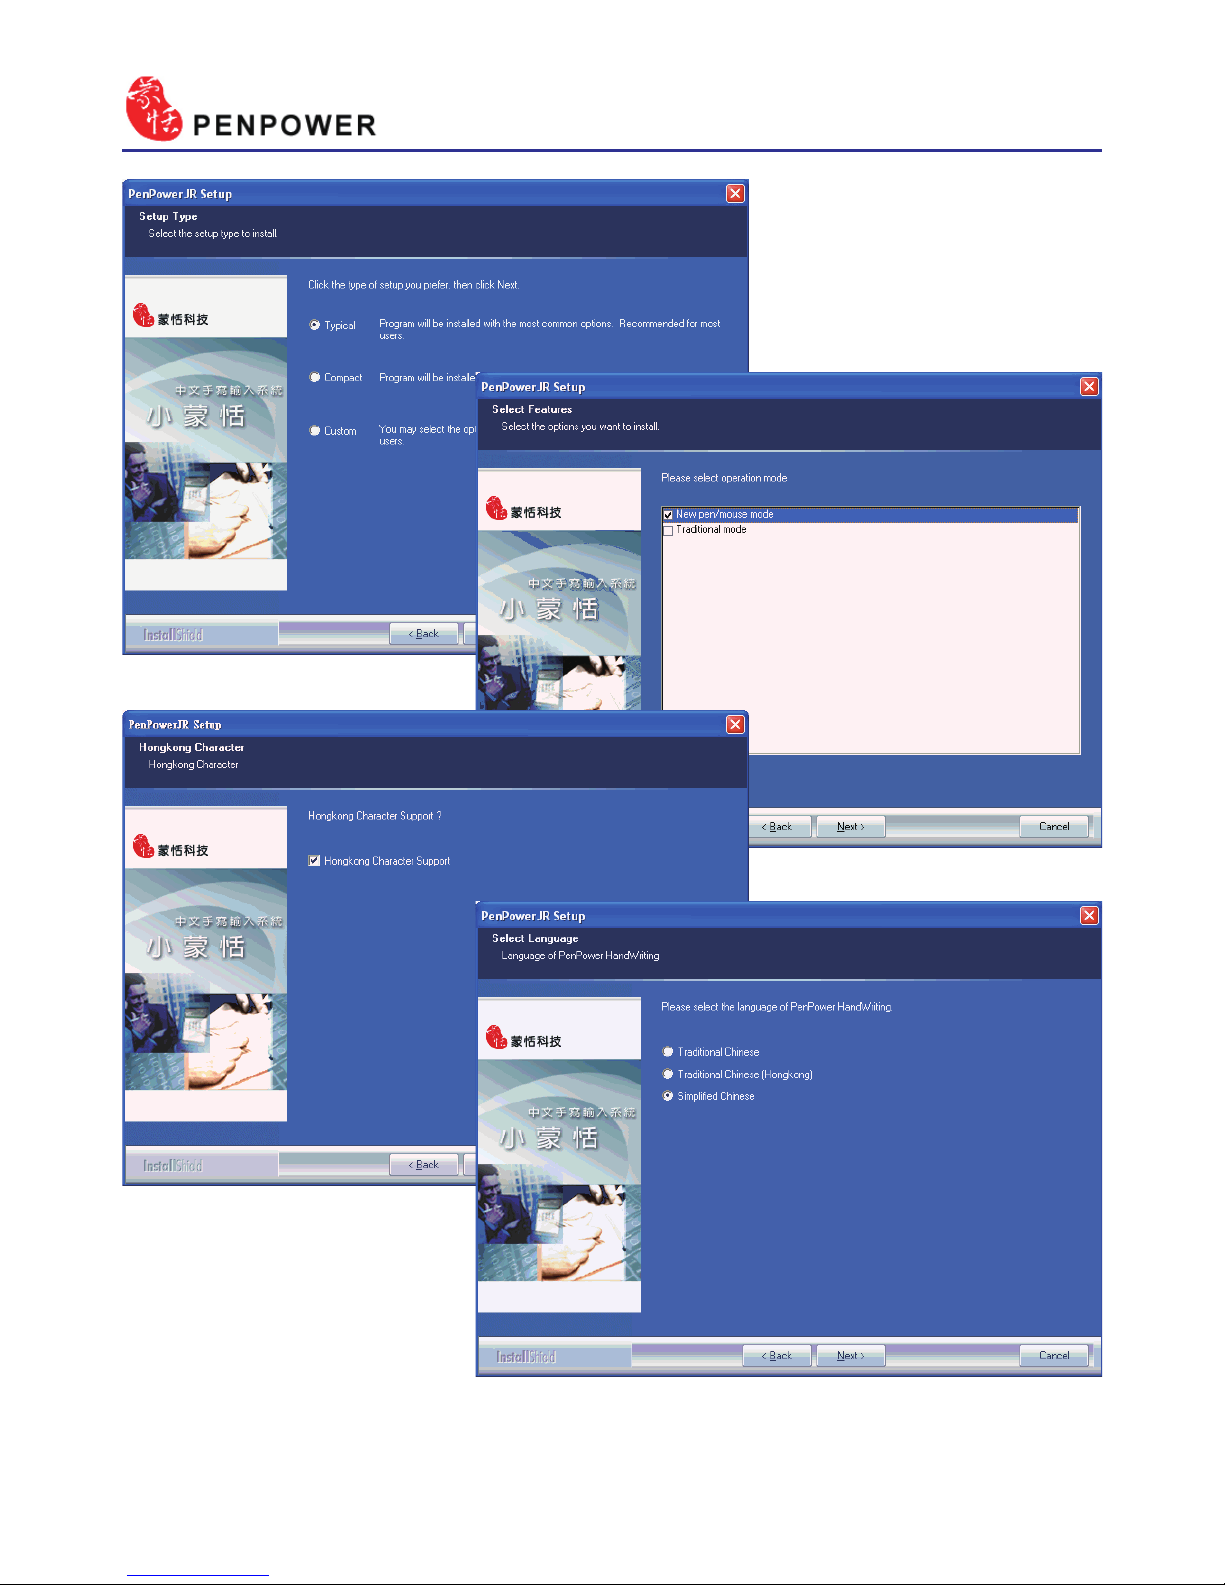
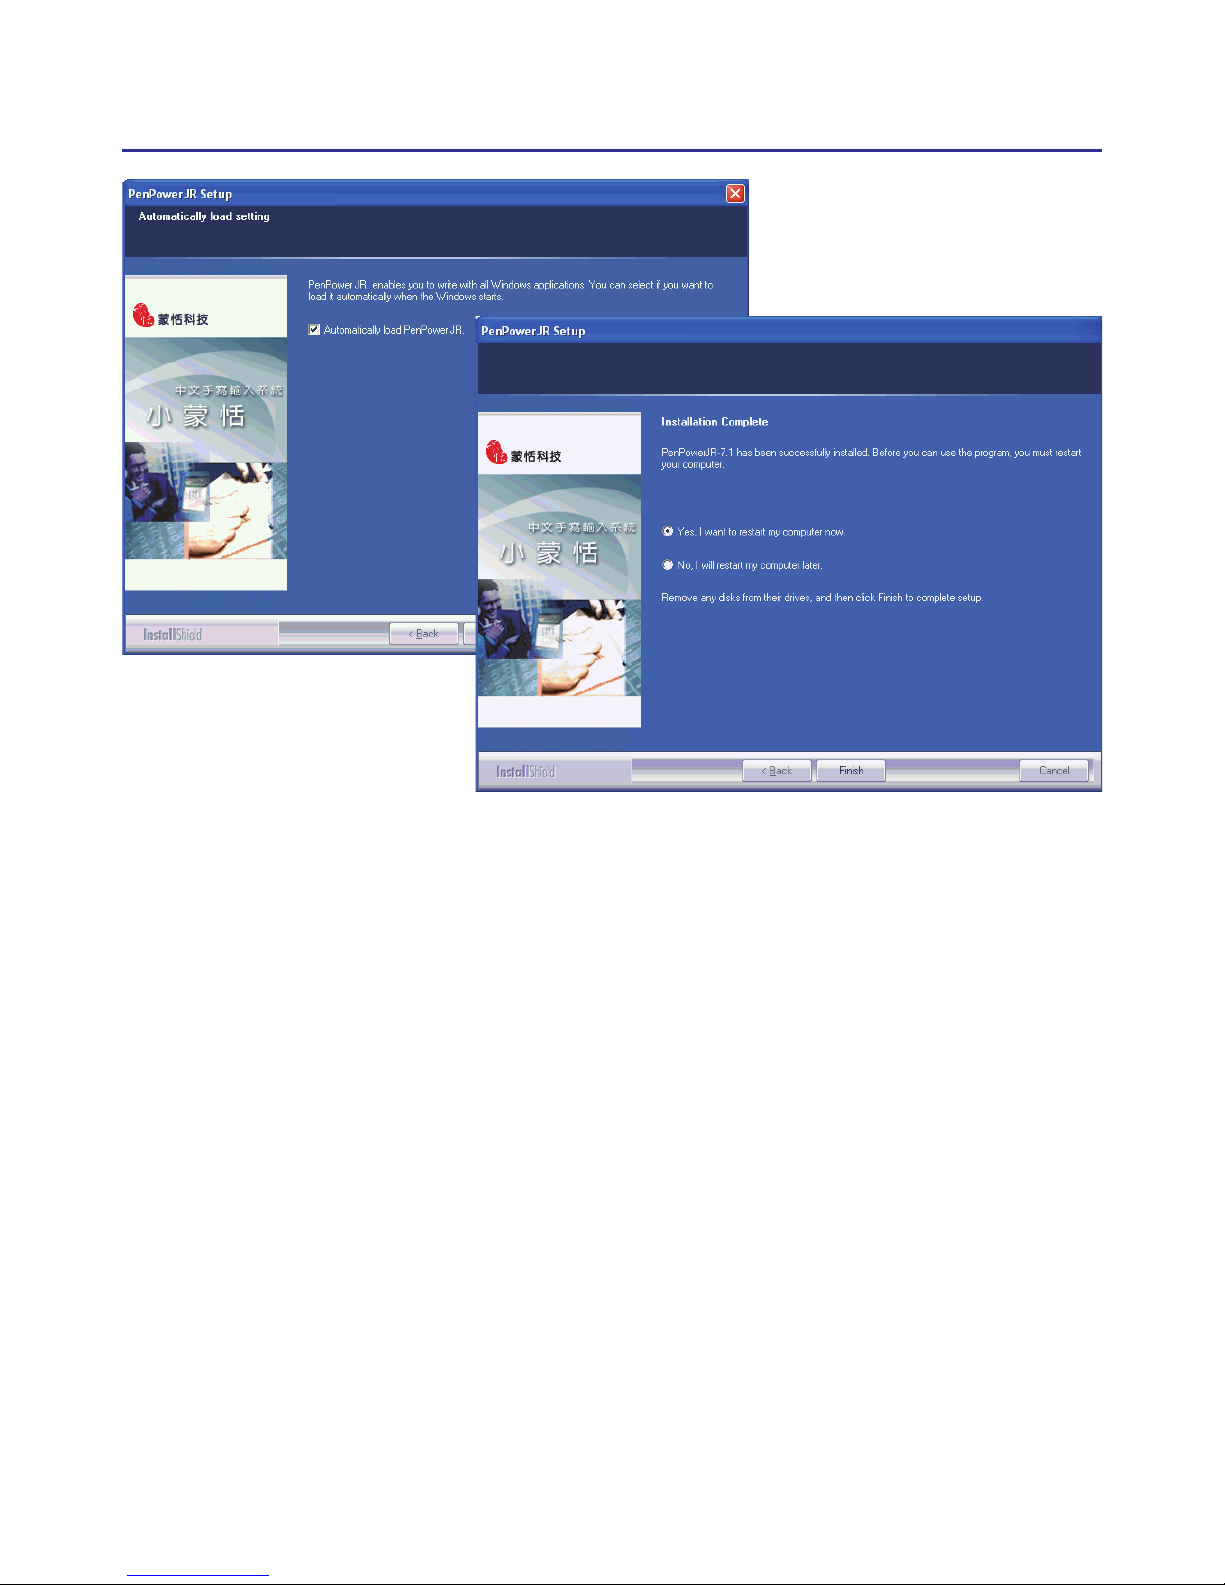
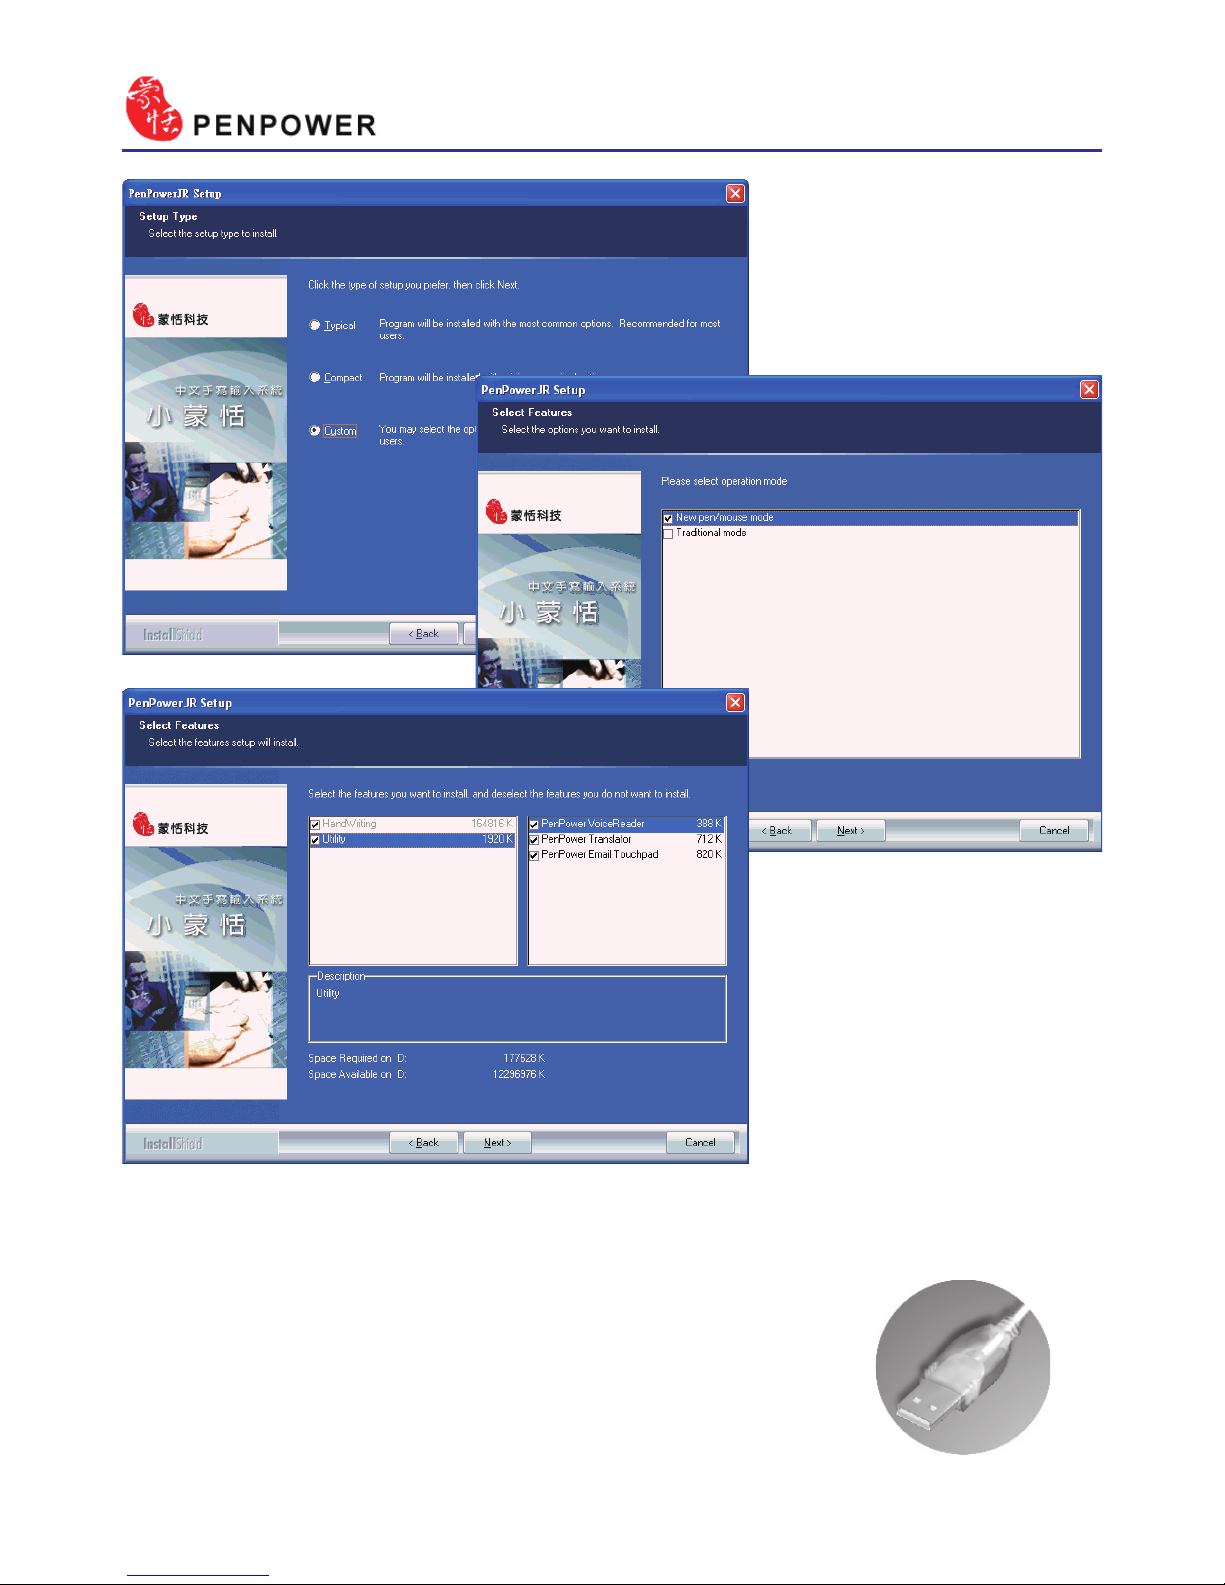
Note: You can select the setup type of typical, compact, or custom.
Note: You can select the language of handwriting recognition kernel.
Note: Enable to auto-load the handwriting software when the windows starts.
Note: Penpower Junior offers two handwriting modes: Traditional and New
Handwriting/Mouse. We recommend that you choose to install the New
Handwriting/Mouse mode. If you are an existing Penpower Junior user
and prefer to use the Traditional mode then you may choose to install the
Traditional mode instead. The two modes only differ in their interface but
have the same set of functions.
Page 21
2-6
2.3 USB Human Interface Device Installation
Connect the touch-pad with USB port on computer.
Page 22
Chapter 3 Hardware Operation
3-1
2. Please click on the four corner
spot of touch pad starting from
top-left in counterclockwise
direction.
Chapter 3 Hardware Operation
3.1 Calibration
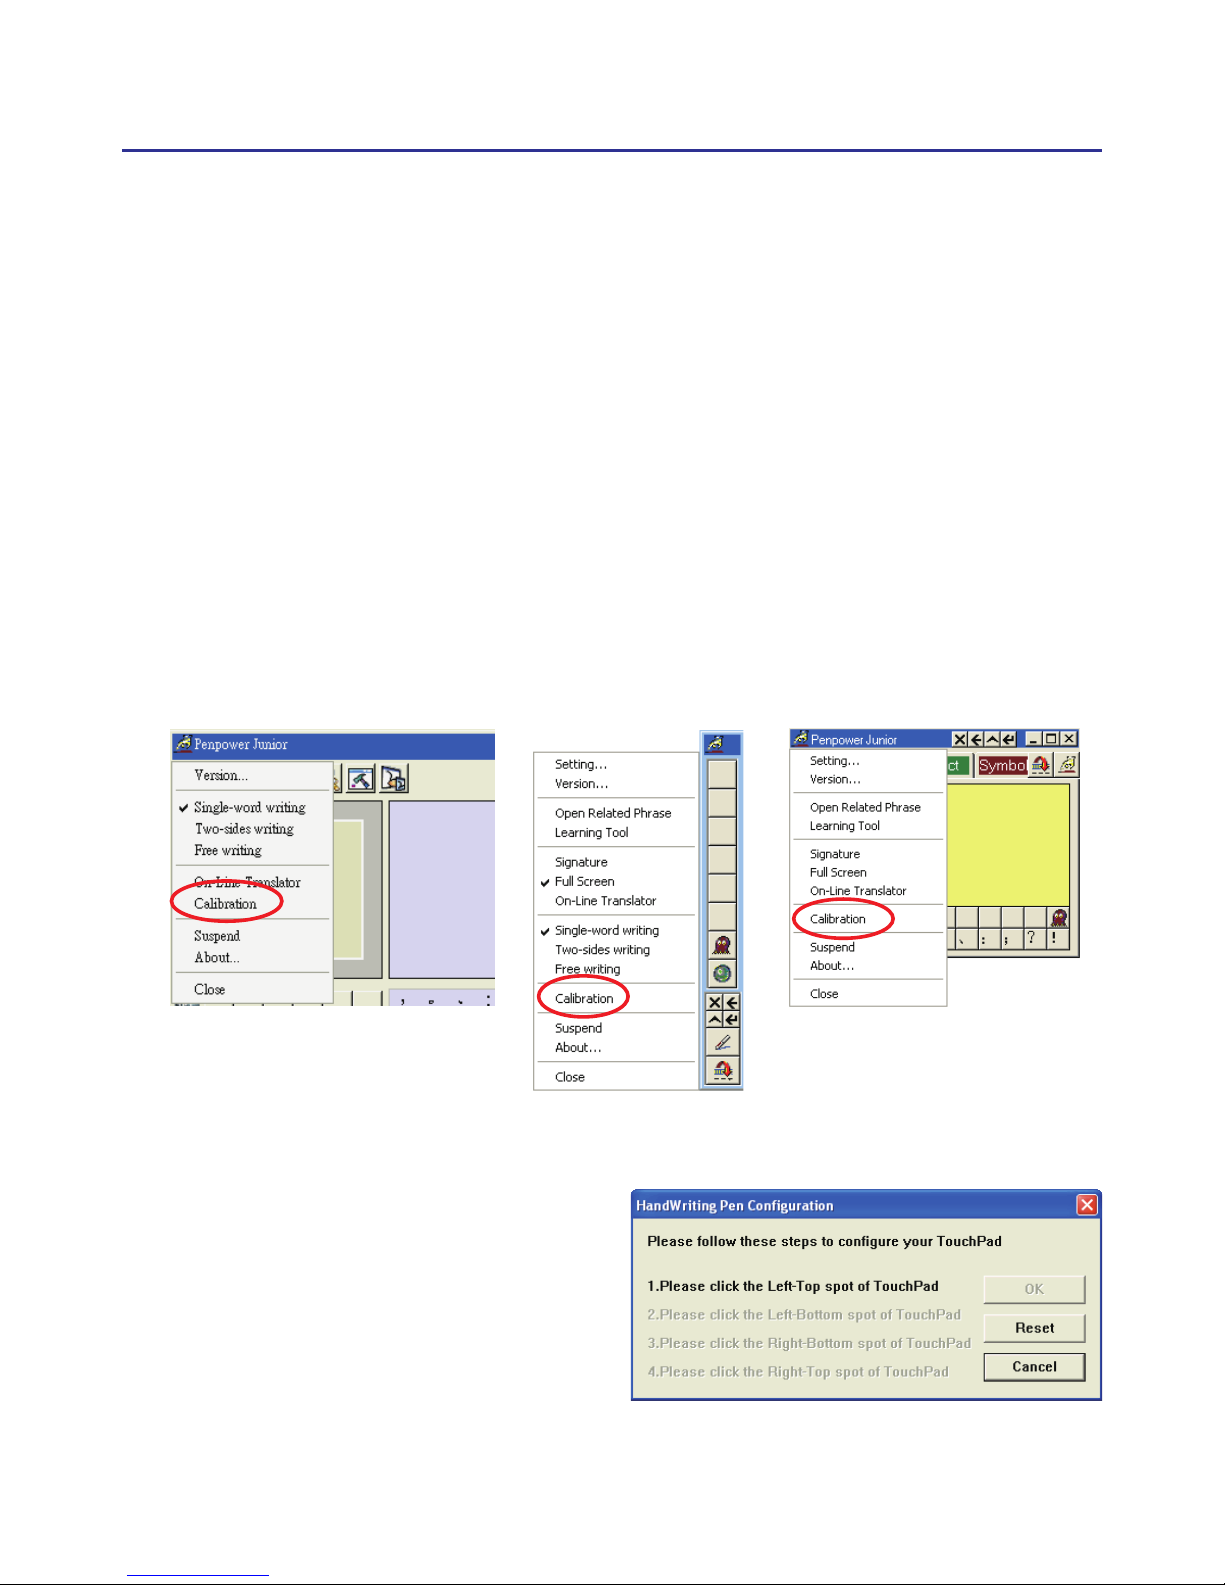
After nishing installation, you should be able to hand write right away.
If you found that the inking you wrote is not centered on screen, you need
to calibrate your touch-pad to remap the active area.
1. If you chose to install the New Handwriting/Mouse mode, please choose
the “Calibration” option from the Mouse menu to launch the touch pad
calibration program; if you chose to install the Traditional mode, please
choose the “Calibration” option from the Full Screen or Writing Pad
menu to launch the touch pad’s calibration program.
Traditional Full Screen mode
New Mouse mode
Traditional Writing
Pad mode
Page 23
3-2
2. Click: Hit the touch-pad once.
3. Dragging: Hit the touch-pad
twice quickly, and move the pen
on the panel while second pen
down.
4. Double click: it the touch-pad
twice quickly.
5. There are three buttons on the touch-pad as normal mouse functionality,
but the middle button is dened to toggle pen mode and mouse mode.
The left button would be revised for error correction on pen mode state.
While you press the left button once each time, the latest recognized
result would be replaced with the next candidate word. It lets you correct
the result quickly without switching to mouse mode.
3.2 Touch-Pad Operation
1. Moving: Put the pen on the touch-pad, and then move it on the panel
gently.
TIP : The three buttons are not on a line for some touch-pad.
The alone one is the middle button.
TIP : You can click the mode button on the window to
switch mouse mode and pen mode.
TIP : After calibration, the new conguration would take effect immediately. You
do not need reboot or reload Penpower Jr. handwriting system.
Note: When calibrating the Penpower miniCard please orient the touch pad so it’s
in landscape mode.
Page 24
Chapter 4 New Handwriting/Mouse Mode
4-1
Chapter 4 New Handwriting/Mouse Mode
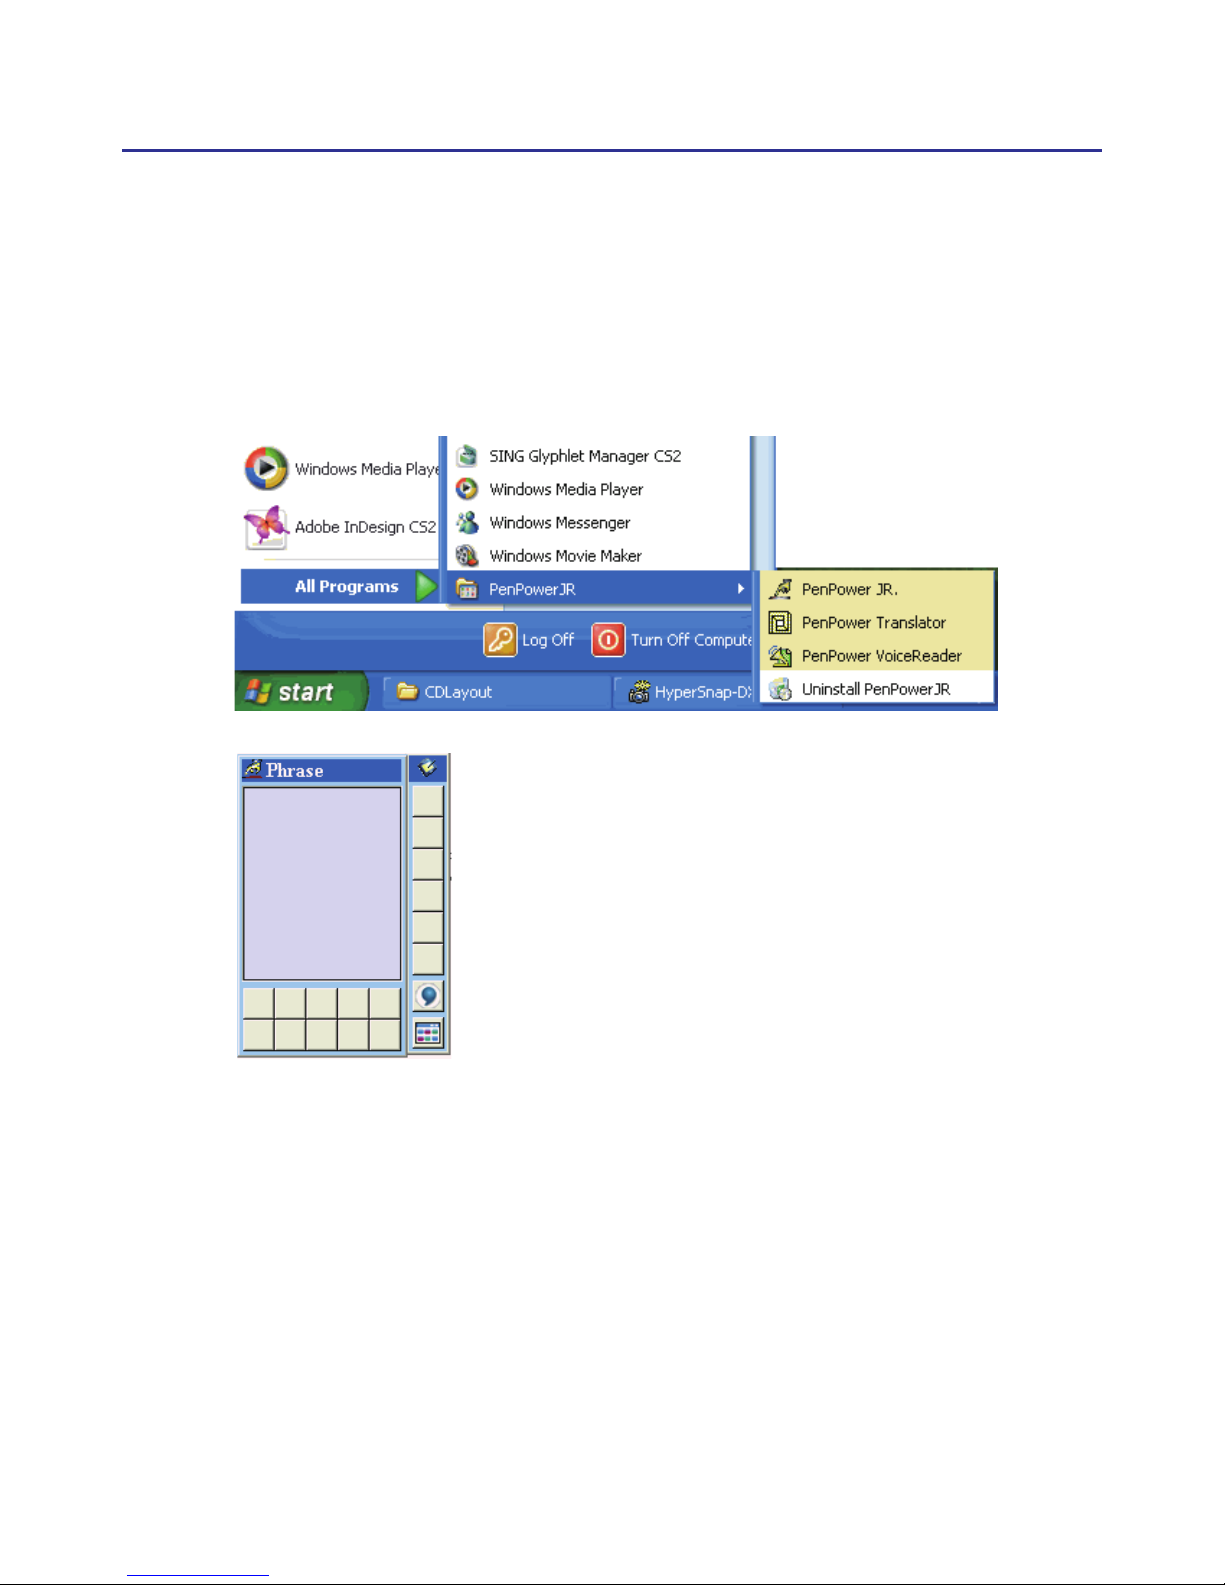
4.1 Run Penpower Jr. Handwriting System
Run “Start/All Programs/PenpowerJr/Penpower Jr.”
Page 25
4-2
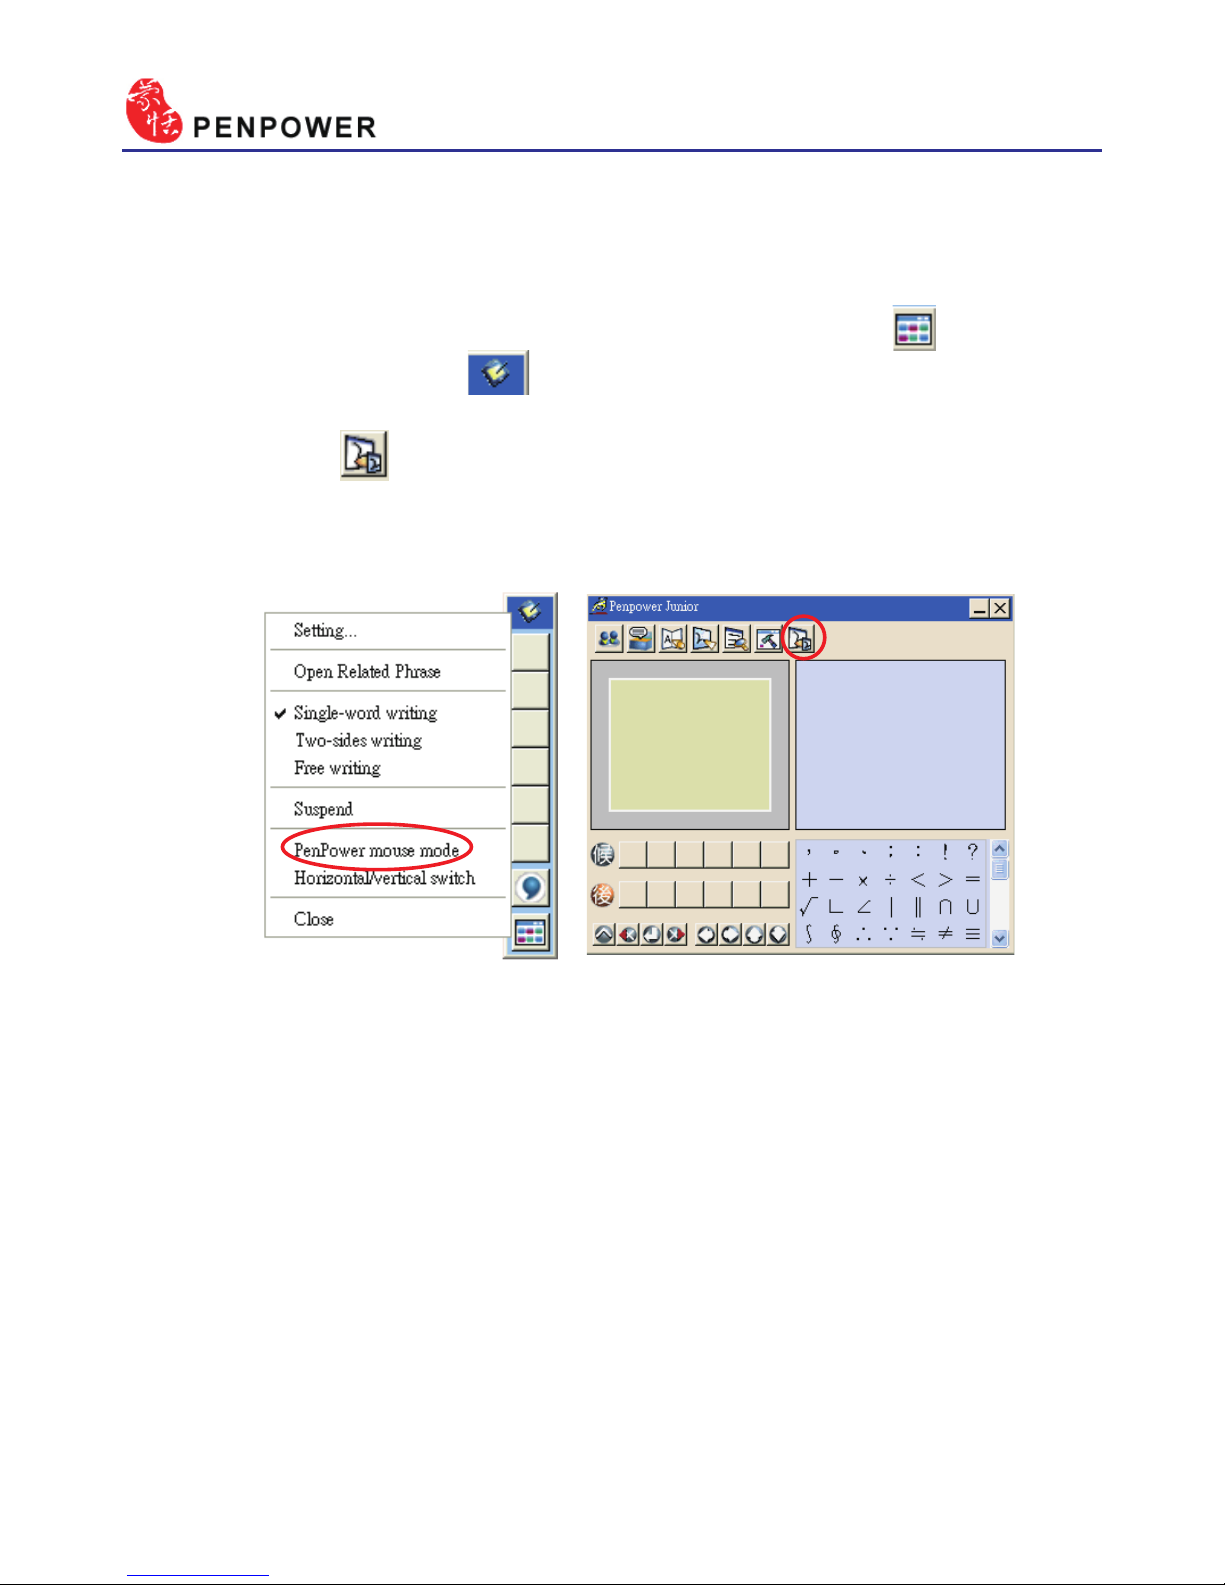
4.2 Switching Modes
When Penpower Junior is launched for the rst time it will start in the
handwriting mode. Left mouse click on the “Menu” button or right
mouse click on the toolbar to open the options menu. Select “Penpower
mouse mode” to switch to the mouse mode. In mouse mode, click on the
“Switch” button to switch back to the handwriting mode.
TIP: The middle function button on the Penpower Junior touch pad allows fast
switching between the handwriting and mouse modes.
Handwriting mode Mouse mode
Page 26
Chapter 4 New Handwriting/Mouse Mode
4-3
4.3 New Handwriting/Mouse Mode
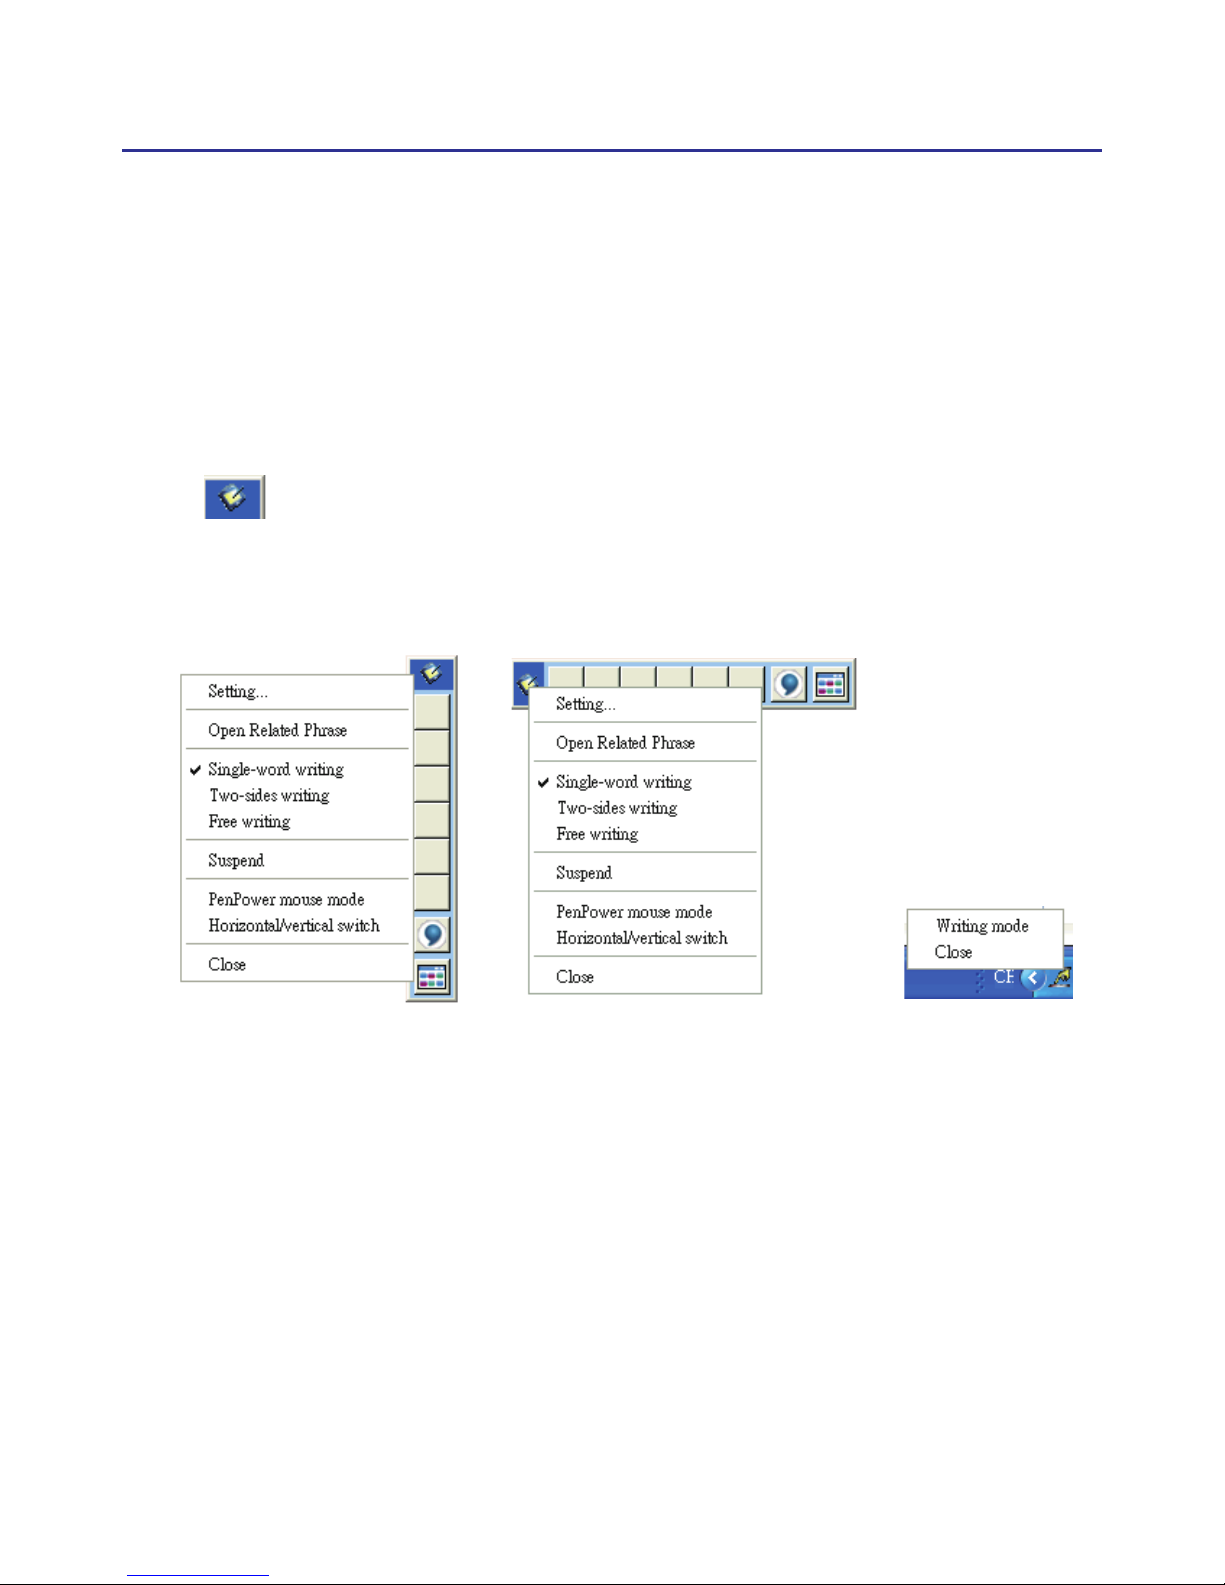
4.3.1 Handwriting Mode Taskbar
* Suspend: Temporarily close the toolbar. To reopen the toolbar go to the
Suspend and click on “Writing Mode”.
TIP: You can also minimize the handwriting mode toolbar by double clicking
.
* Horizontal/Vertical Swicth: Switch between a horizontal or vertica
layout of the toolbar.
Vertical Swicth Horizontal Swicth Suspend
Page 27
4-4
4.3.2 Full Screen Handwriting Mode
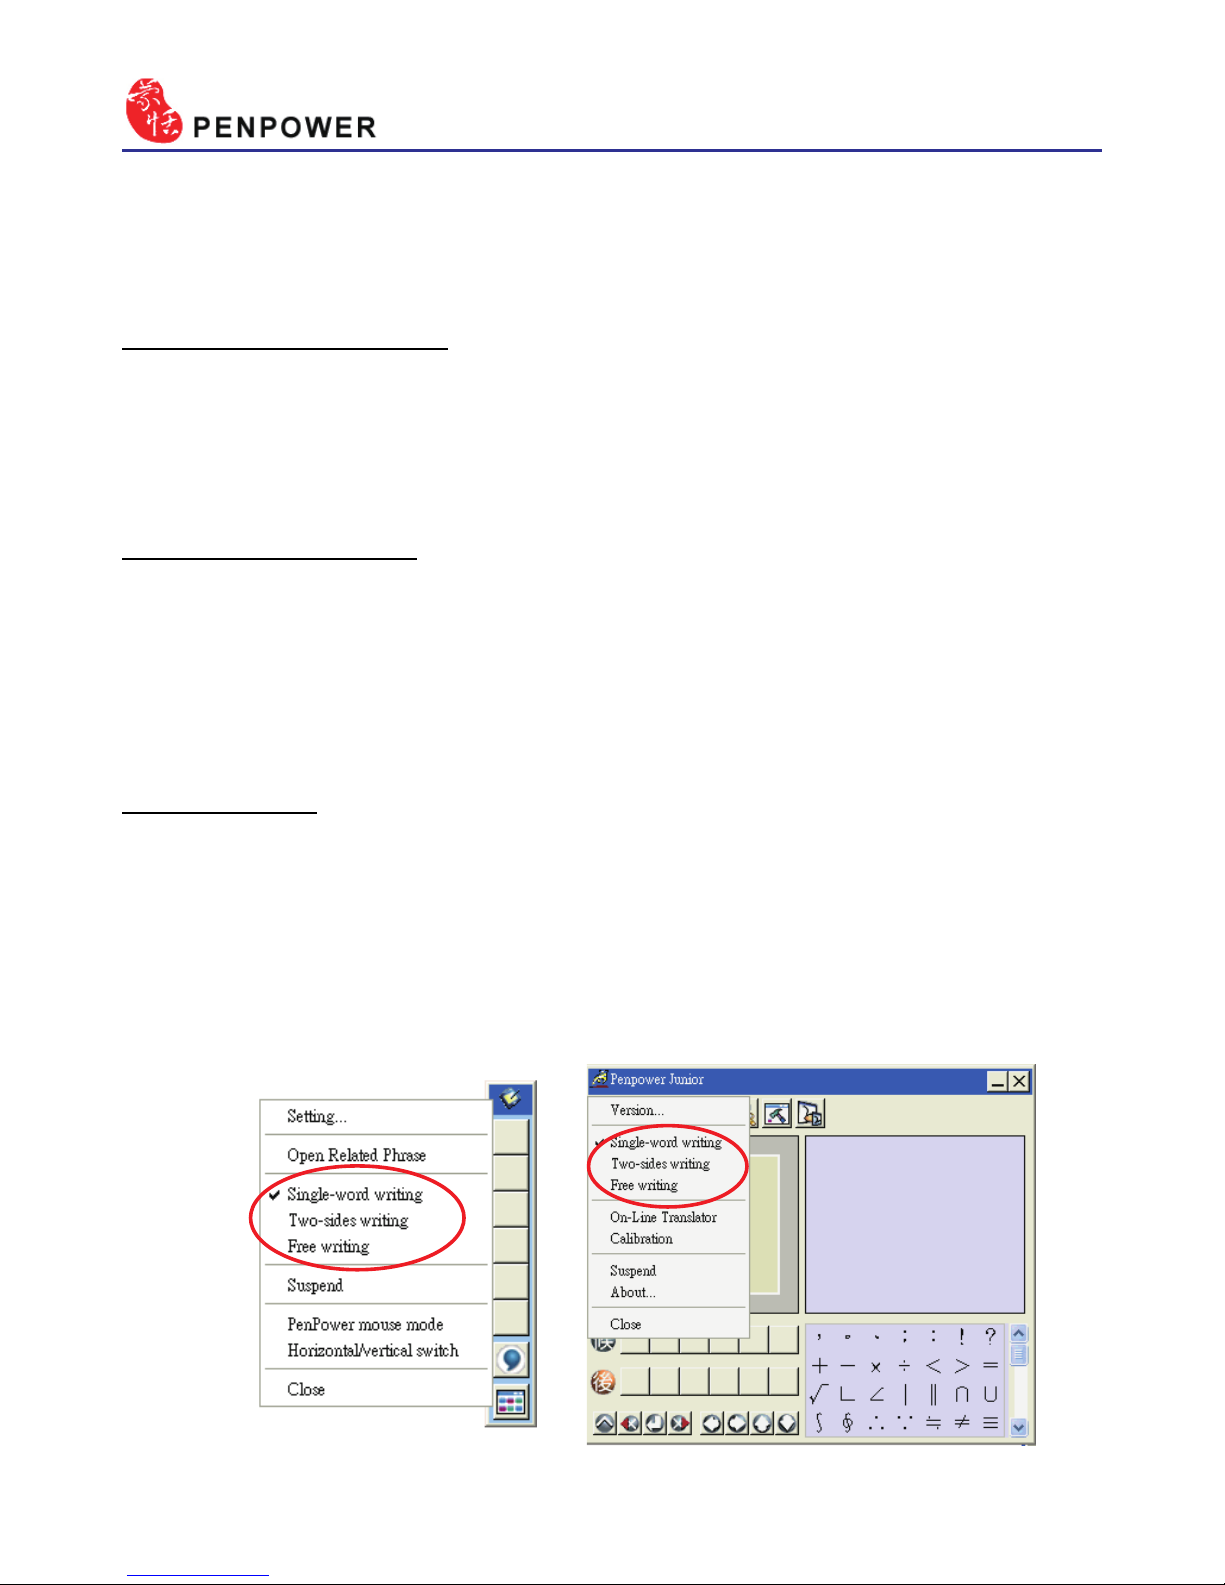
There are three different options of full screen mode in the main menu.
Single-word writing
It is allowed to handwrite one word only at one time.You can not handwrite the next word until the recognition result of current word has been
nished.
Two-sides writing
After the rst stroke is written, one vertical line would be displayed
on the center of screen. All the strokes written on the same side would be
considered as part of one word. When a new stroke is crossed to the other
side, it means that the last word is nished and the next word start to write.
Free writing
You can handwrite multiple characters before recognition at one time.
Forty one characters at most is allowed. It permits left-to-right,or top-tobottom free writing order. Remember to keep adequate distance between
two contiguous words when you write. It affects the result of character
segmentation.
Page 28
Chapter 4 New Handwriting/Mouse Mode
4-5
4.3.3 How to Write
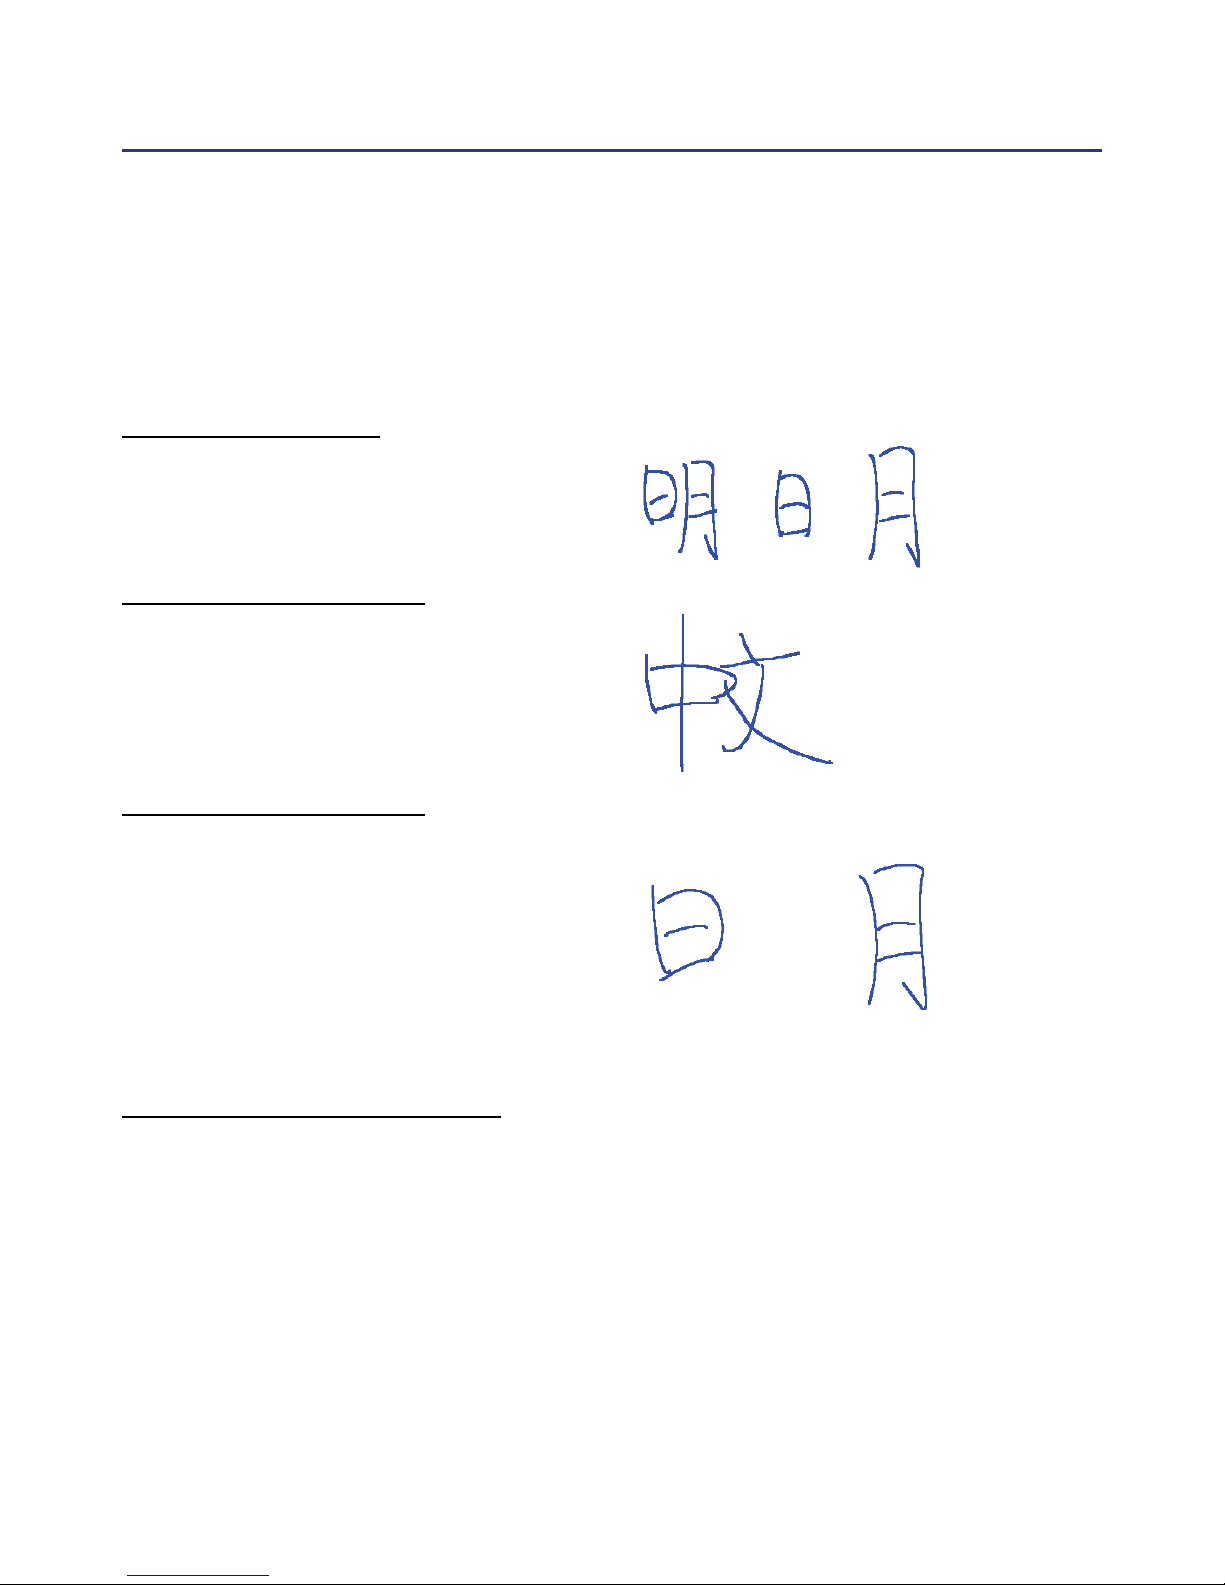
On Free writing mode, it’s better to keep strokes of the same word
closed, and keep not to overlap between words when you write. You need
to nish writing every strokes of one word.
Right example :
Write three words of
『明日
月』
.
Wrong example 1 :
Overlap between two words. All
the strokes may be recognized as
one word.
Wrong example 2 :
The two parts of one word are
written far away from each other.
All the strokes may be segmented
into two words.
Auto Phrase Correction
The system automatically proofreads on your writing content to improve
the recognition rate. For example, when you continuously write
『天下太
平』
(peace on the earth) four characters, but the character
『天』
is incor-
rectly written as
『夫』
, so they become
『夫下太平』
. Penpower uses its
internal phrase dictionary to correctly recognize your intended result
『天
下太平』
.
Page 29
4-6
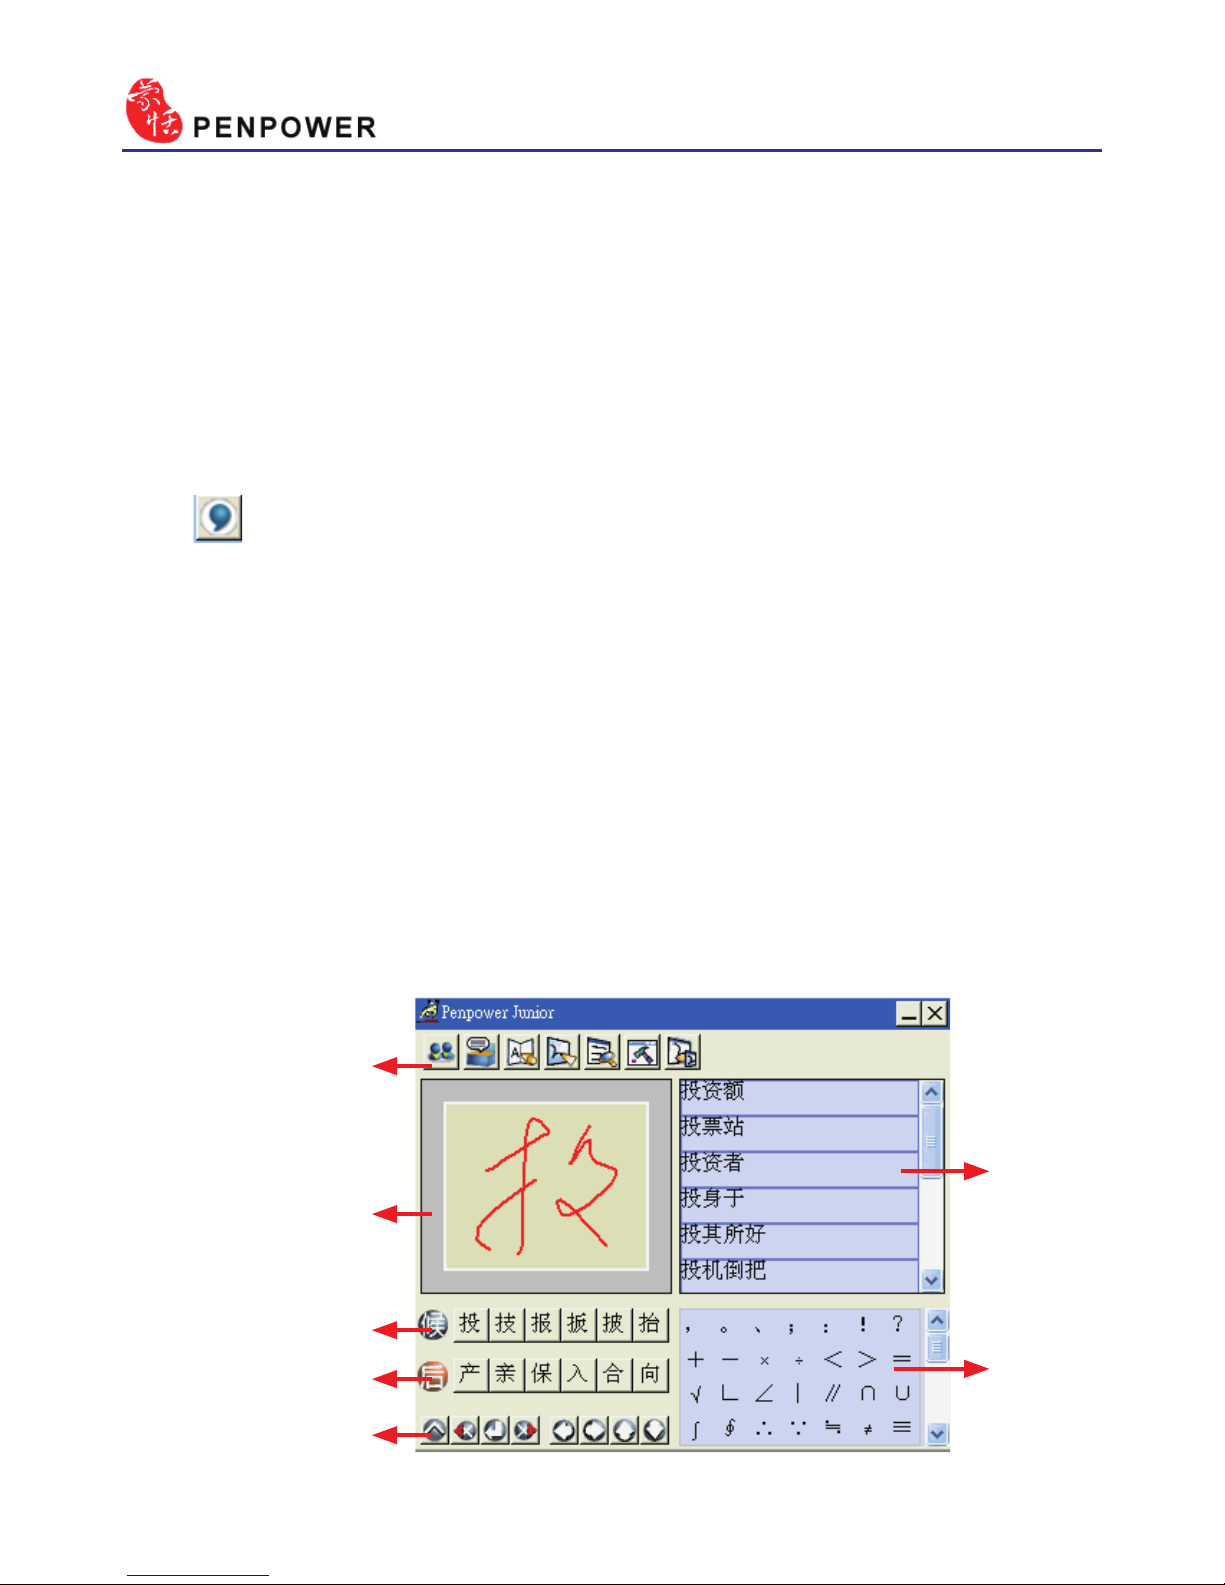
4.3.4 How to quickly x errors, enter phrases and symbols
When writing, candidate words based on the previous input will be
displayed on the handwriting toolbar. Each press of the left function button
on the touch pad will move the candidate words forward by one and also
correct the results, allowing errors to be quickly xed; the right function
button allows the input of six habitual symbols. Alternatively, select a
candidate word on the handwriting toolbar to correct it. Press the symbols
table button with the mouse to open the symbols table and enter the
corresponding punctuation symbol.
You can also press the middle function button on the touch pad to
switch to the mouse mode. In mouse mode, select the candidate word for
the candidate words, post-related word, phrase or select symbol input.
For example: In handwriting mode, the input
『蒙恬科技』
had the
character
『技』
misread as
『投』
. Here you can press the middle function
button on the touch pad to switch to the mouse mode then choose from
the candidate words eld
『技』
to correct the mistake. Once xed, press
the middle function button to switch back to the handwriting mode and
continue writing.
Function Button
Handwriting Inking
Phrase
Symbol
Candidate words
Post-related word
Symble Key
Page 30
Chapter 4 New Handwriting/Mouse Mode
4-7
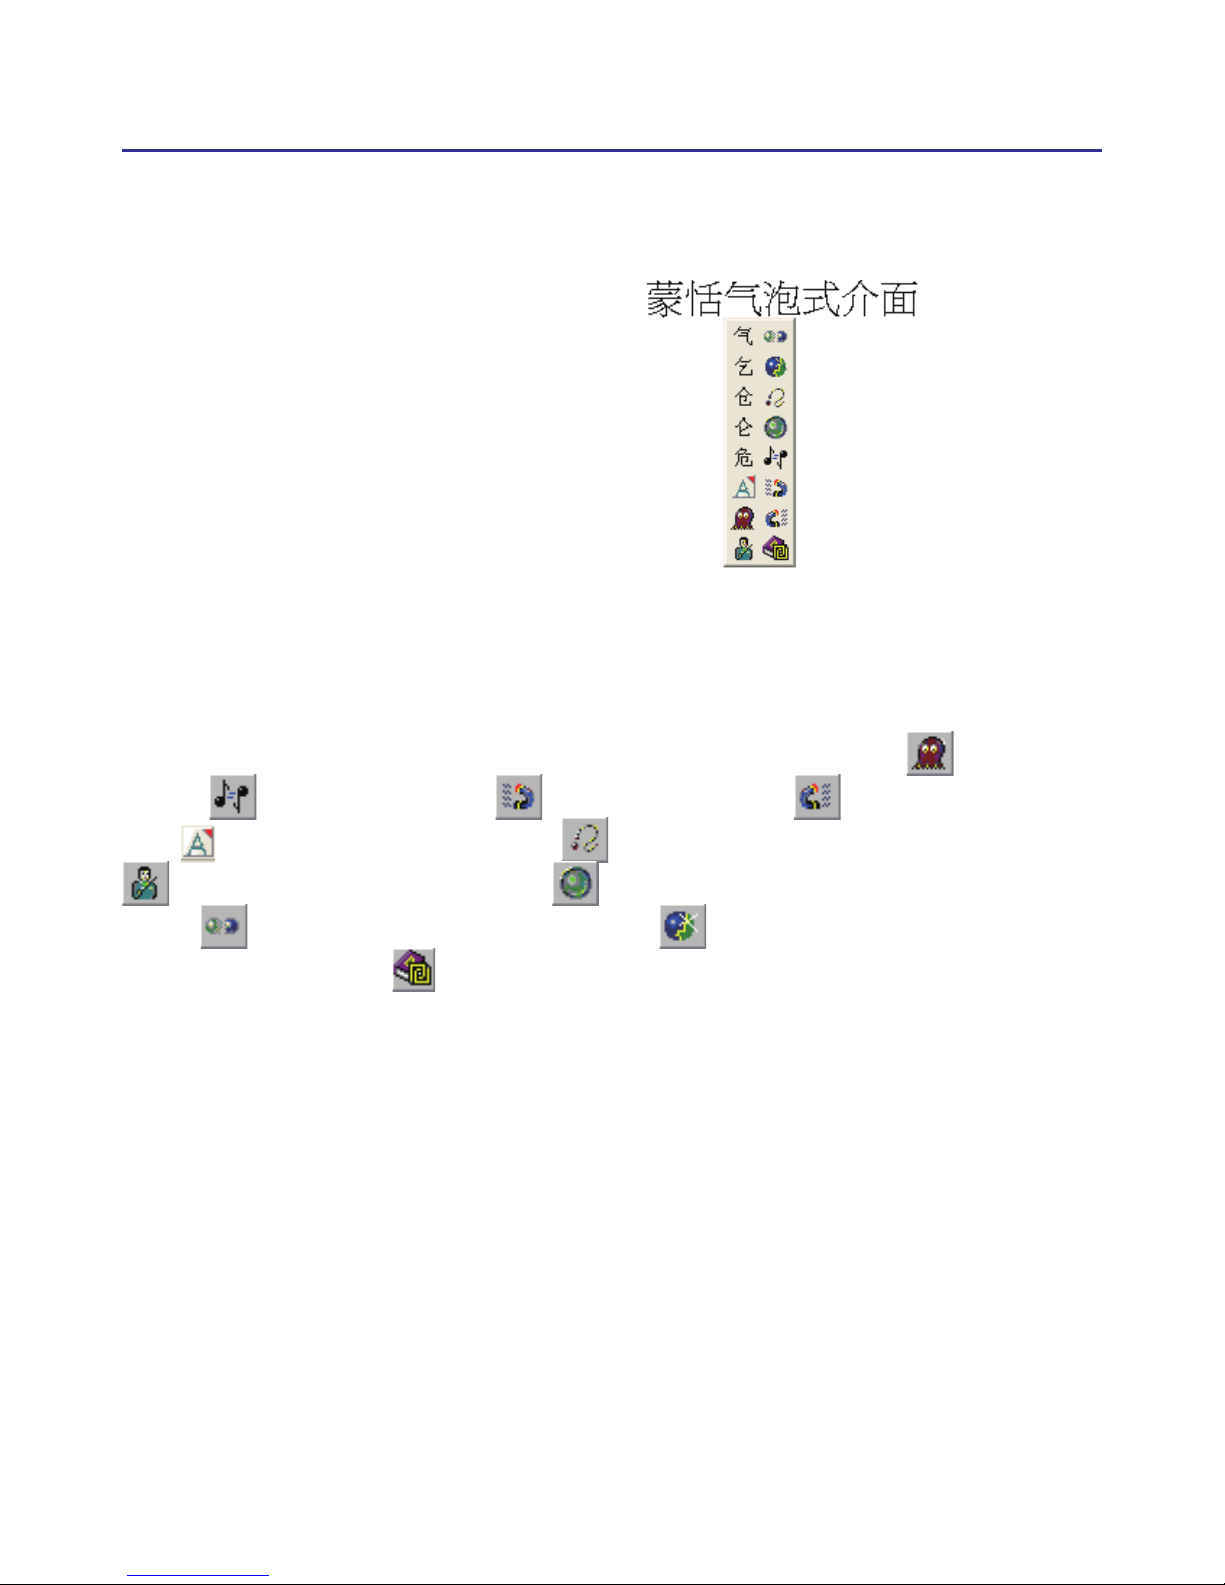
4.4 Balloon UI
This unique user interface let
you edit recognition result freely
in any application. The visual user
interface is hidden transparently.
When you want to correct some
word, just move the cursor position on this word for a while. The
function tool bar will be popped up
there where the cursor is.
TIP : You do not need to press any button after the cursor is moved on the word.
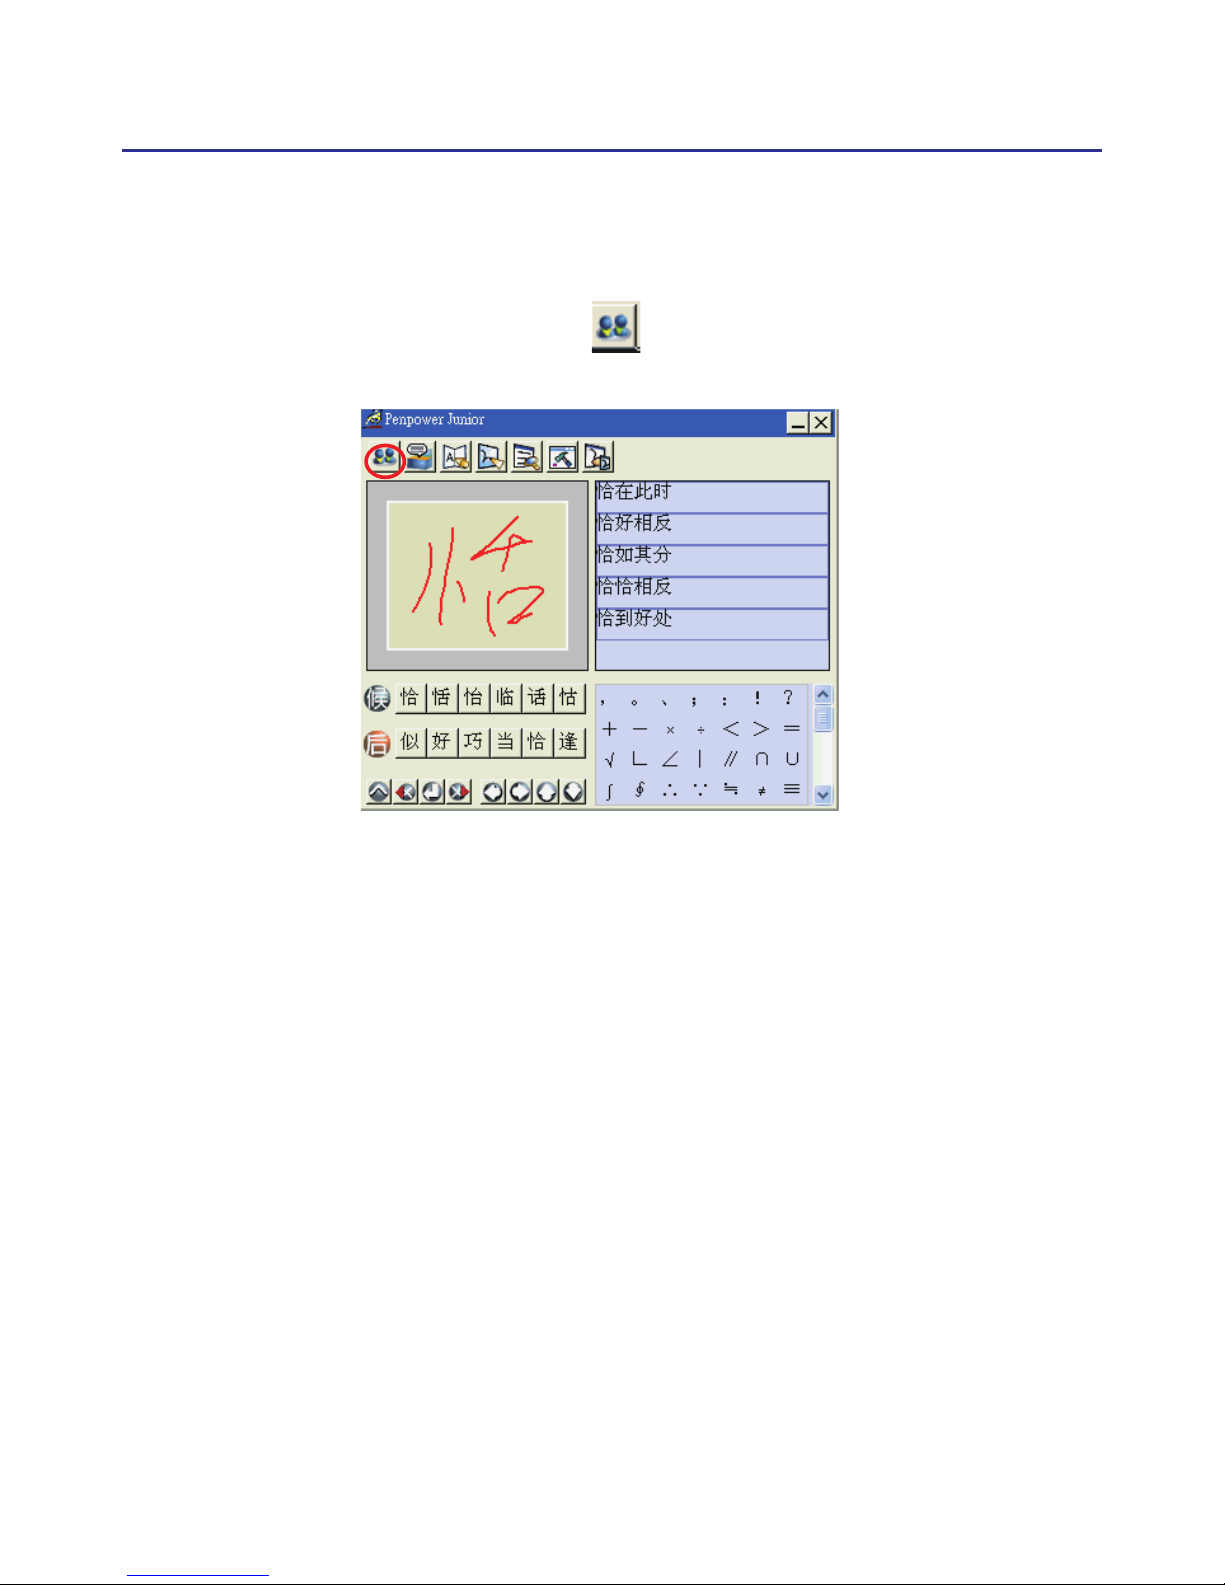
In the function tool bar, click candidate words, AI button , homophone , pre-related word , post-related word or phrase correction to correct the result. click button to see the raw inking. Click
button to see the tutor. Click button to input punctuation symbol.
Click button to split one word. Click button to merge the word
with next word. The button is for the Chinese-English translation func-
tion. Details are provided further on.
Note: In New Handwriting/Mouse mode the balloon interface functions can only
be operated with the computer mouse.
Note: Balloon Interface can be used in Ofce, IE, WordPad, but on 64 bit systerm,
it can not be used in some software, ext. note.
Page 31
4-8
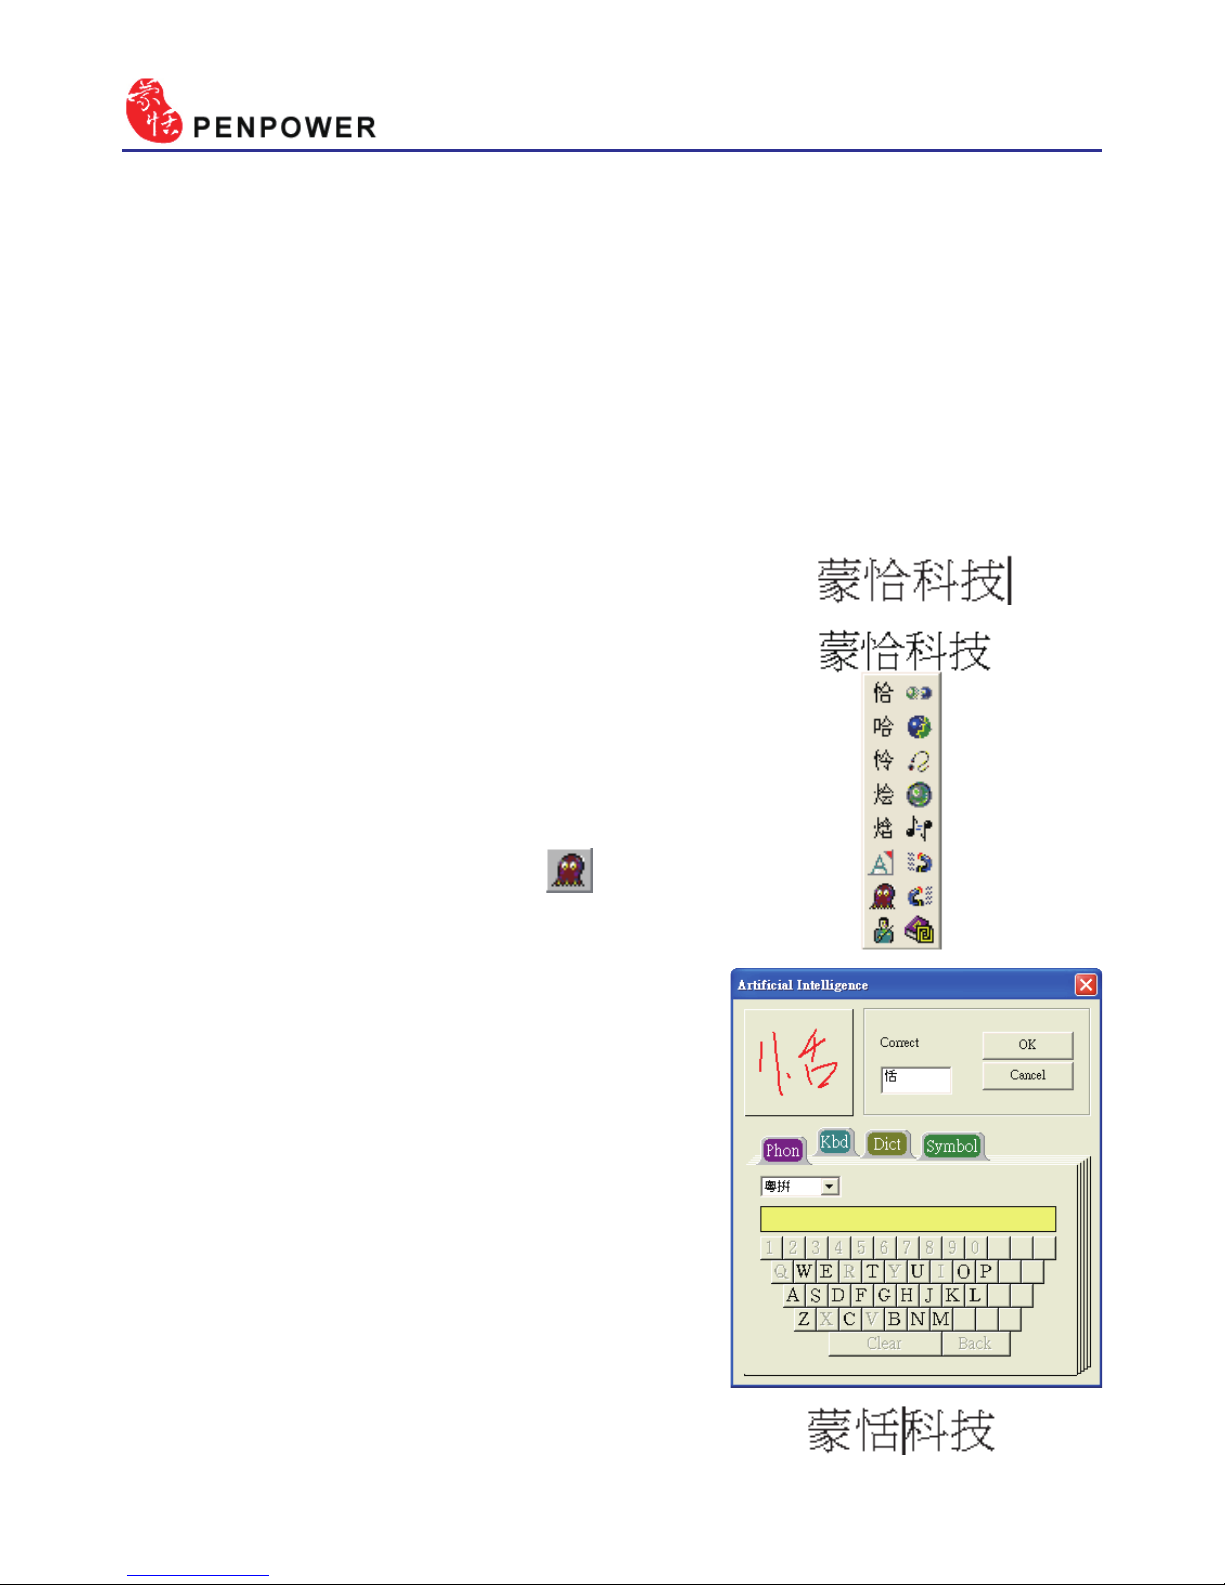
3. Move the cursor on the word
『恰』
for a while to pop up the function
tool bar.
4. Click the candidate word if the cor-
rect word is there.
5. Otherwise click the AI button to
open the AI correction dialog.
6. Input the correct word
『恬』
, and
then click “OK”.
7. You will see the wrong result
『恰』
is already updated as
『恬』
. Your
personal writing style of inking has
also been learned.
4.5 Result Correction
When you use candidate word or AI button to correct result, the system
will modify its recognition database to adapt your personal writing style.
The may improve the recognition rate.
4.5.1 By Articial Intelligence
1. Handwrite some words. The result would be sent in the caret.
2. e.g.
『恬』
is wrongly recognized as
『恰』
.
Page 32
Chapter 4 New Handwriting/Mouse Mode
4-9
TIP: You can also press the touch pad’s middle button to switch to the mouse
mode. If the correct word appears among the candidate words, simply click
on it to make the change. If the correct word is not among the candidate
words, press the “Penpower AI” button to open the AI dialogue eld to
train the software.
Page 33
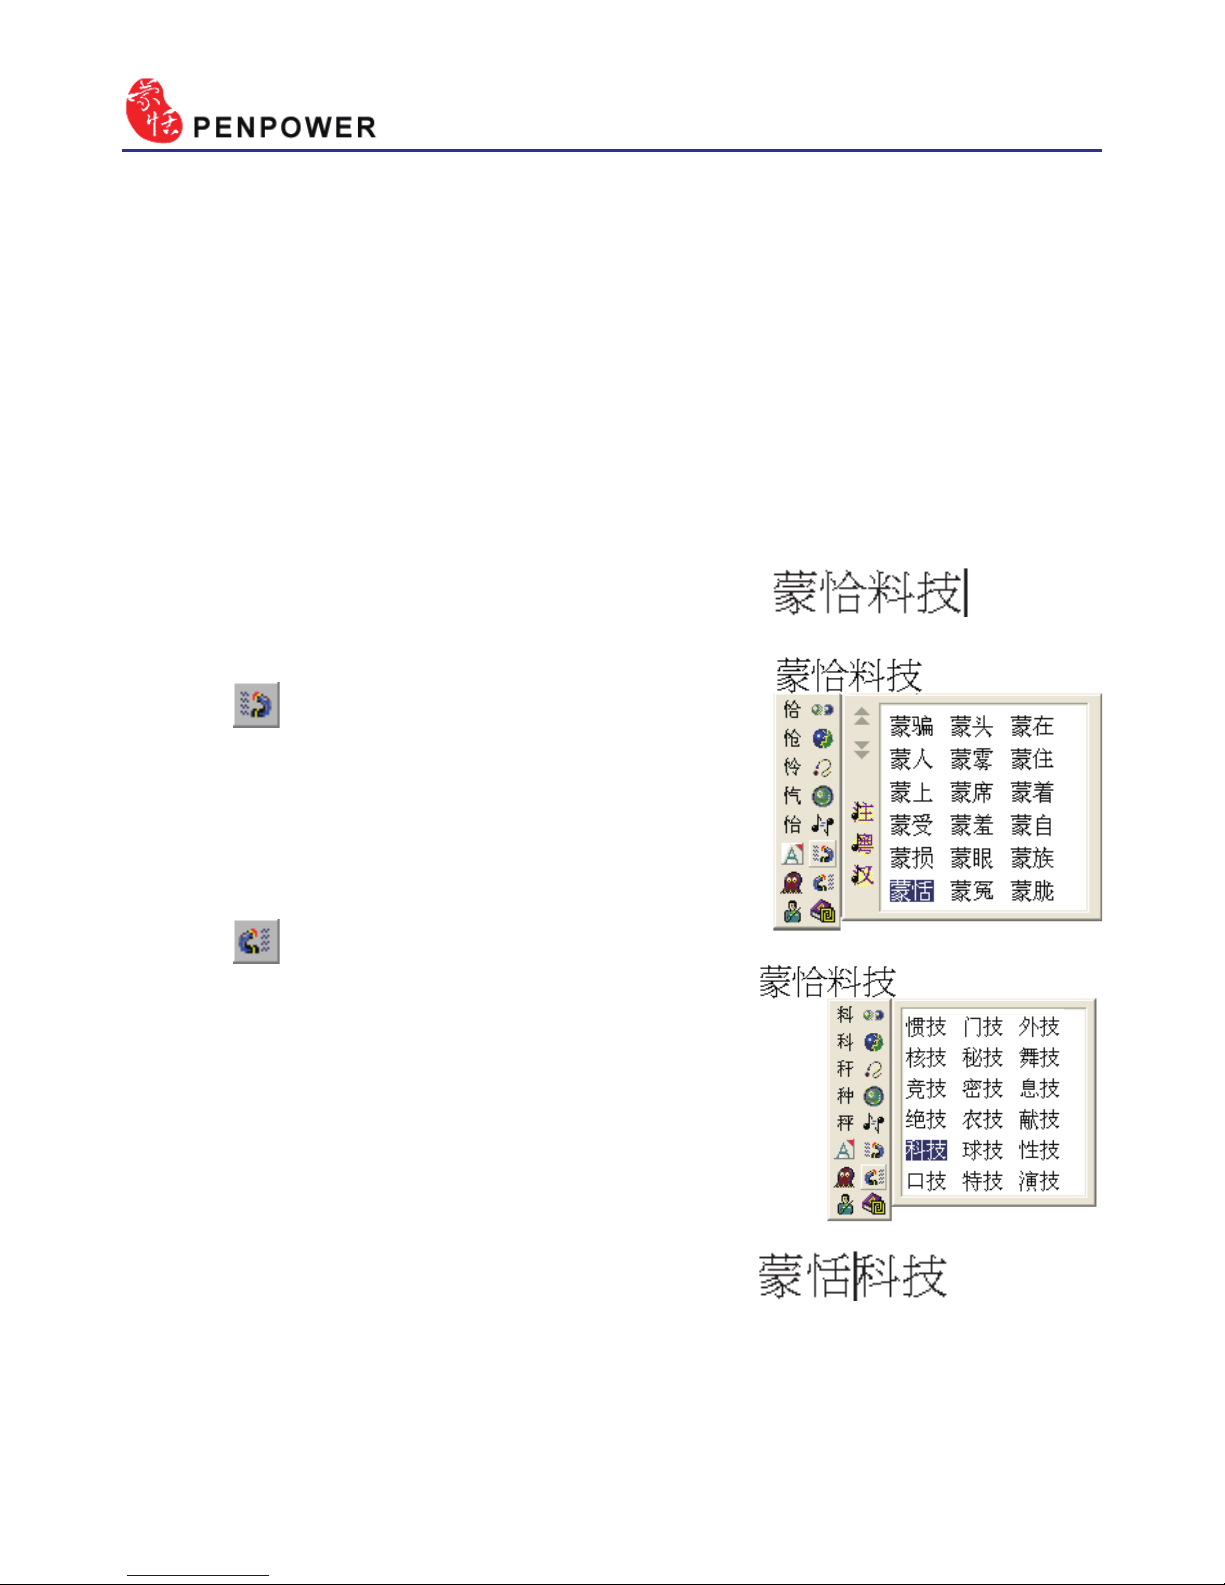
4-10
2. Move the cursor on the word
『恰』
for a
while to pop up the function tool bar.
3. Click button to open the window of pre-
related phrases. If the correct phrase
『蒙
恬』
is in the list, click it to update the result.
4. Move the cursor on the word
『料』
for a
while to pop up the function tool bar.
5. Click button to open the window of
post-related phrases. If the correct phrase
『科技』
is in the list, click it to update the
result.
6. You will see the wrong result
『蒙恰料技』
is already updated as
『蒙恬科技』
at last.
4.5.2 By related word
For any two contiguous words, the rst one is the pre-related word of
the second one. The second one is the post-related word of the rst one.
e.g.
『科技』, 『科』
is the pre-related word of
『技』
, and
『技』
is
the post-related word of
『科』
.
1. Handwrite some words. The result would be sent in the caret e.g.
『恬』
is wrongly recognized as
『恰』
, and
『科』
is wrongly recognized as
『料』
.
Page 34
Chapter 4 New Handwriting/Mouse Mode
4-11
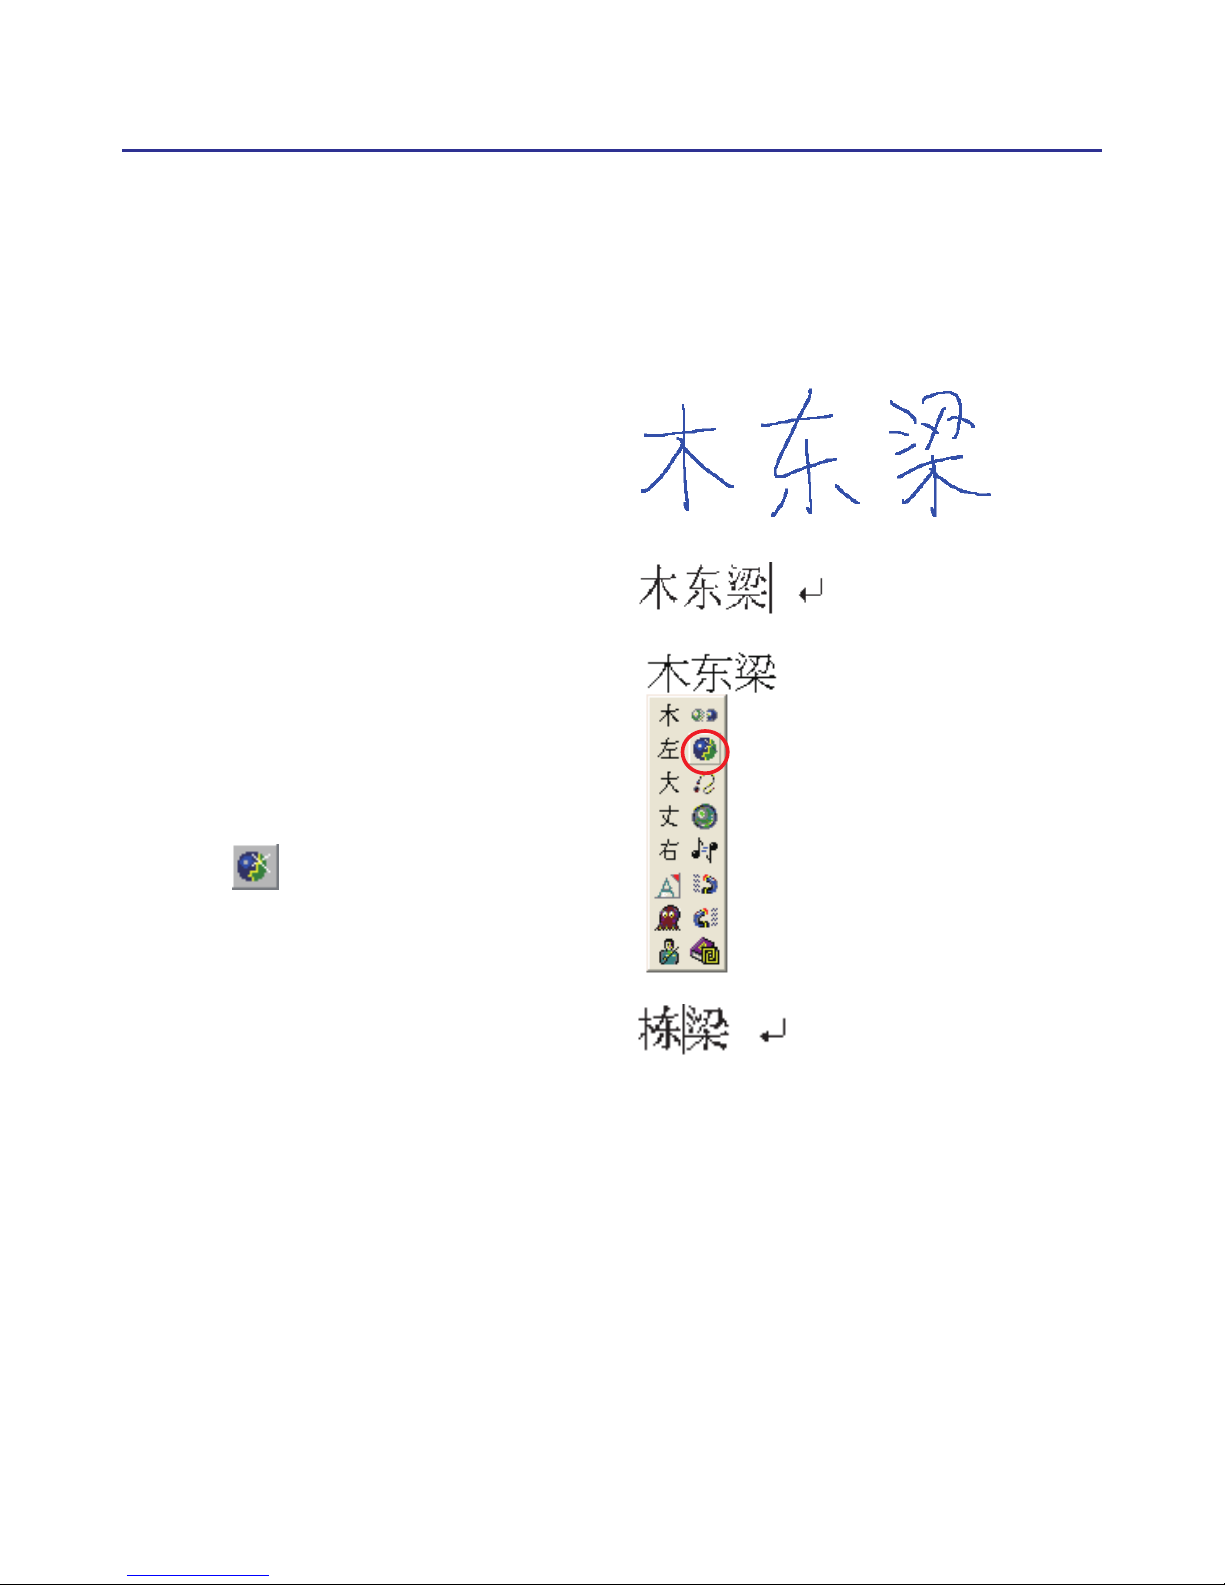
4.5.3 Merge
When some strokes of one word are written far away from each other,
they may be recognized as several words. You can use merge function to
combined them into one word.
1. Handwrite two words
『棟樑』
by free writing. The result would
be sent in the caret.
2. If
『木』
and
『東』
is written far
away from each other, you may
wrongly get three words of result
『木東樑』
.
3. Move the cursor on the rst word
『木』
for a while to pop up the
function tool bar.
4. Click button to merge
『木』
and
『東』
into
『棟』
.
Note : Only two continuous words could be merged at one time.
Page 35
4-12
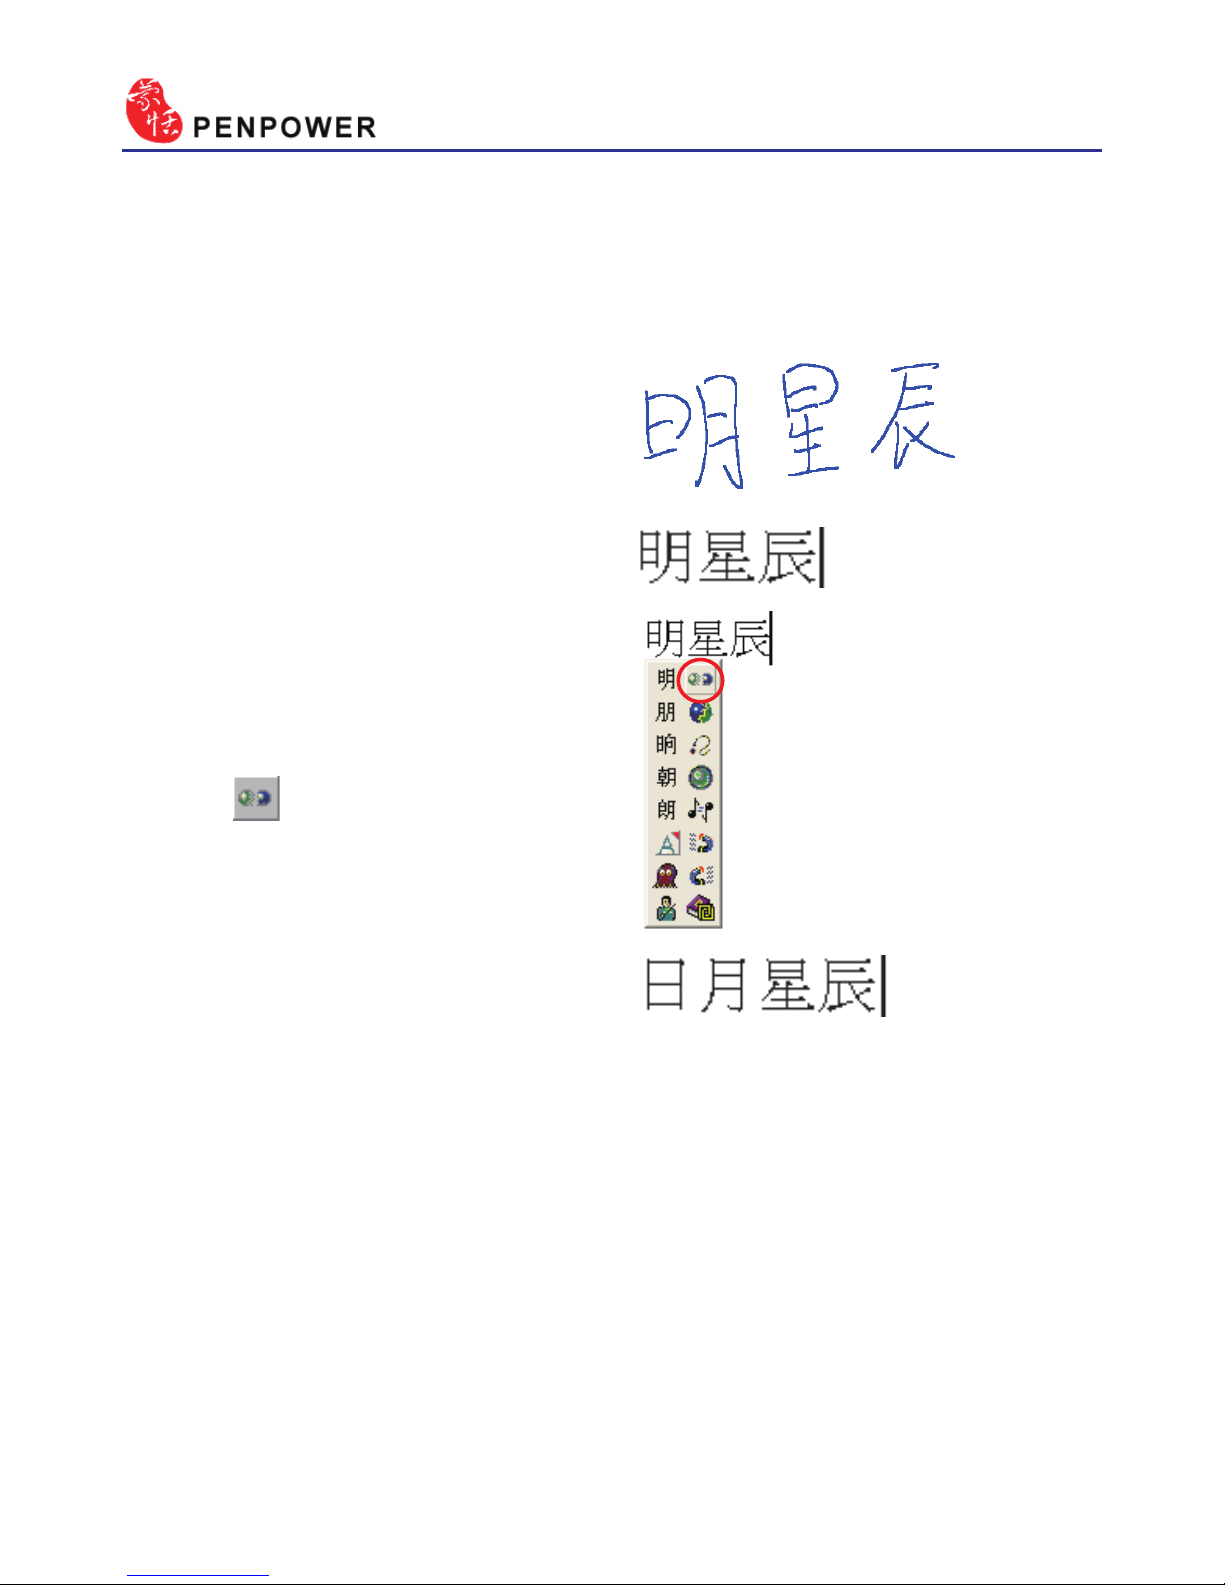
4.5.4 Split
When two words are written too close, they may be recognized as single
word. You can use split function to separate it into two words.
1. Handwrite four words
『日月星
辰』
by free writing. The result
would be sent in the caret.
2. If
『日』
and
『月』
is written too
close, you may wrongly get three
words of result
『明星辰』
.
3. Move the cursor on the word
『明』
for a while to pop up the
function tool bar.
4. Click button to separate
『明』
into
『日』
and
『月』
.
Page 36
Chapter 4 New Handwriting/Mouse Mode
4-13
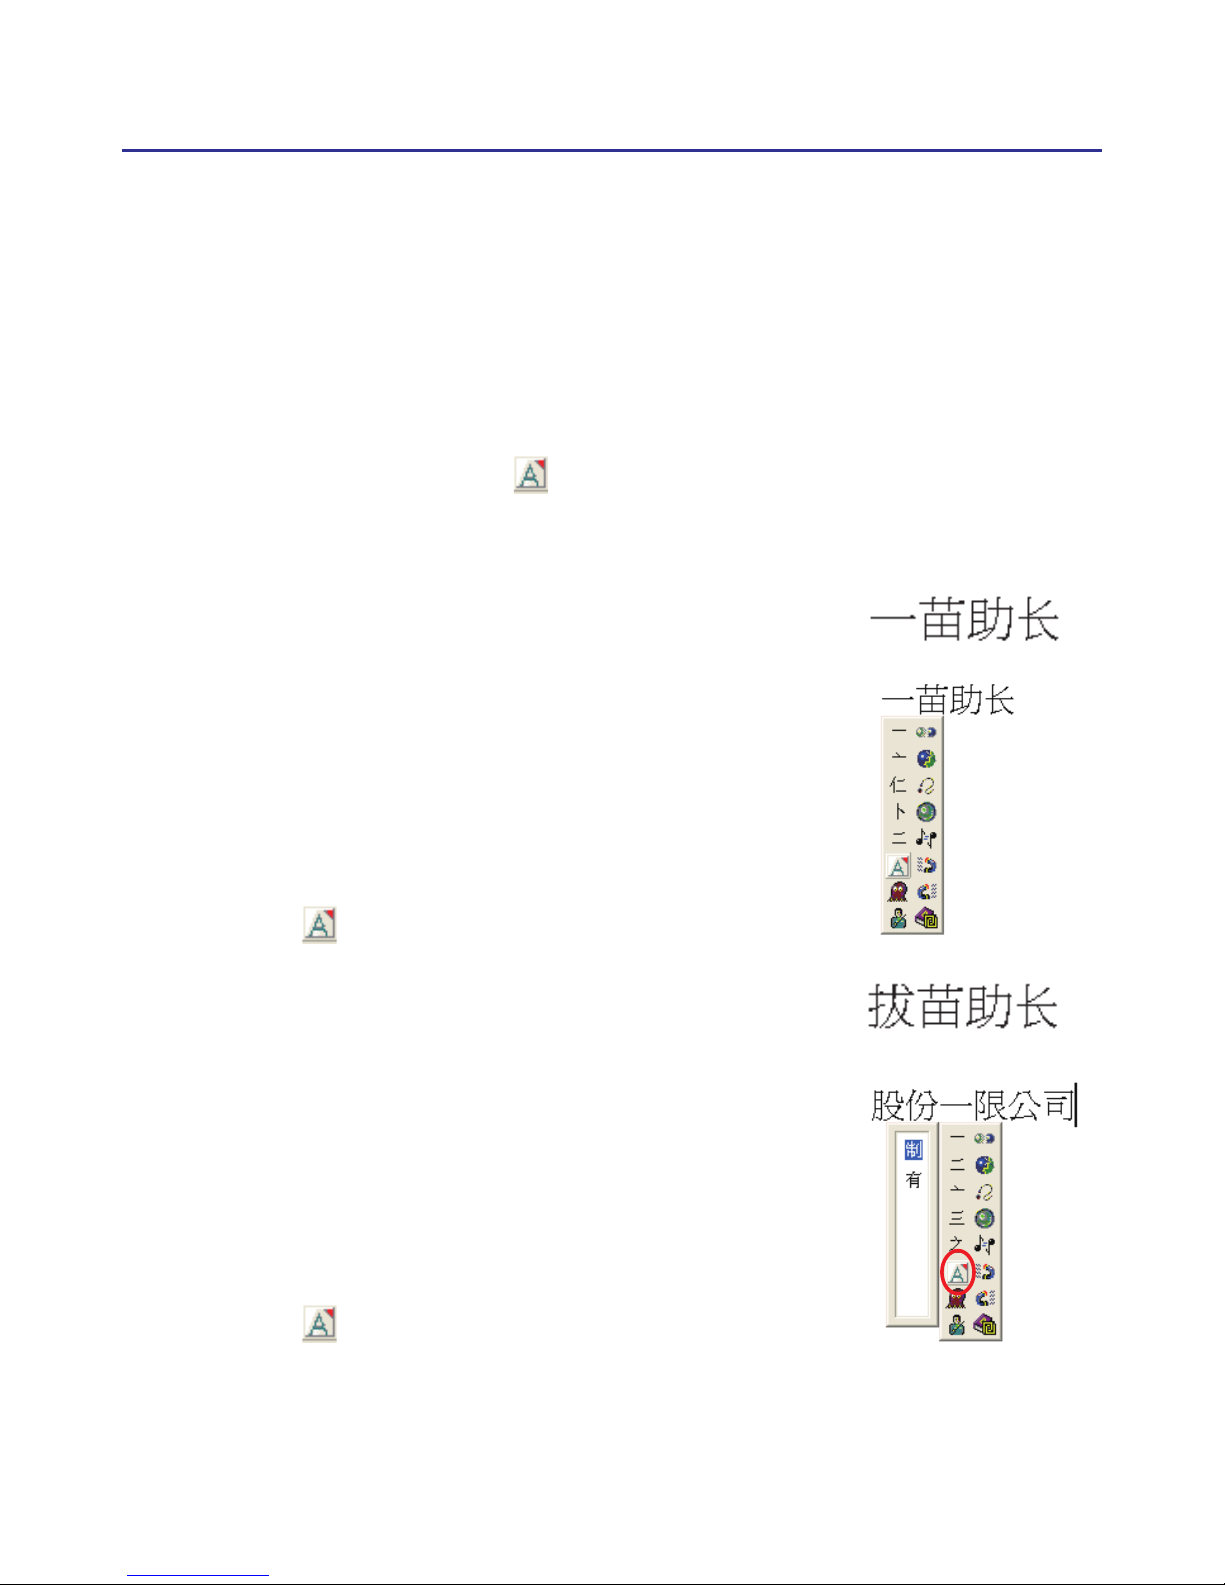
4.5.5 Phrase Correction
In Full Screen mode if you wish to enter a common phrase such as an
idiom, if you aren’t sure of how to write one of the characters you can
substitute a similar sounding character instead. If you are not sure of the
character’s pronunciation either, choose any at random. When you have nished writing the phrase, select the uncertain character with the mouse then
click on the phrase correction button. The system will examine the four
characters before or after this particular character to guess what you meant
and make the change.
1. When entering an idiom in Full Screen mode
such as
『拔苗助長』
, if you are not sure of how
to write the character
『拔』
, you can enter the
character
『一』
instead to input
『一苗助長』
.
2. Move the mouse over the character
『一』
and
pause for a moment to bring up the “Candidate
Characters Window”. Click the phrase correc-
tion button and the
『一』
character will be
changed to
『拔』
.
3. If the phrase correction function came up with
multiple candidate words, these will be shown in
the candidate words window for you to choose
from. For example, if the input was
『股份一限
公司』
when you pause the mouse cursor over the
『一』
character, this will bring up the “Candidate
Characters Window”. Pressing the phrase correc-
tion button will bring up a list of all phrase
correction candidate words for you to choose and
make the correction with.
Page 37
4-14
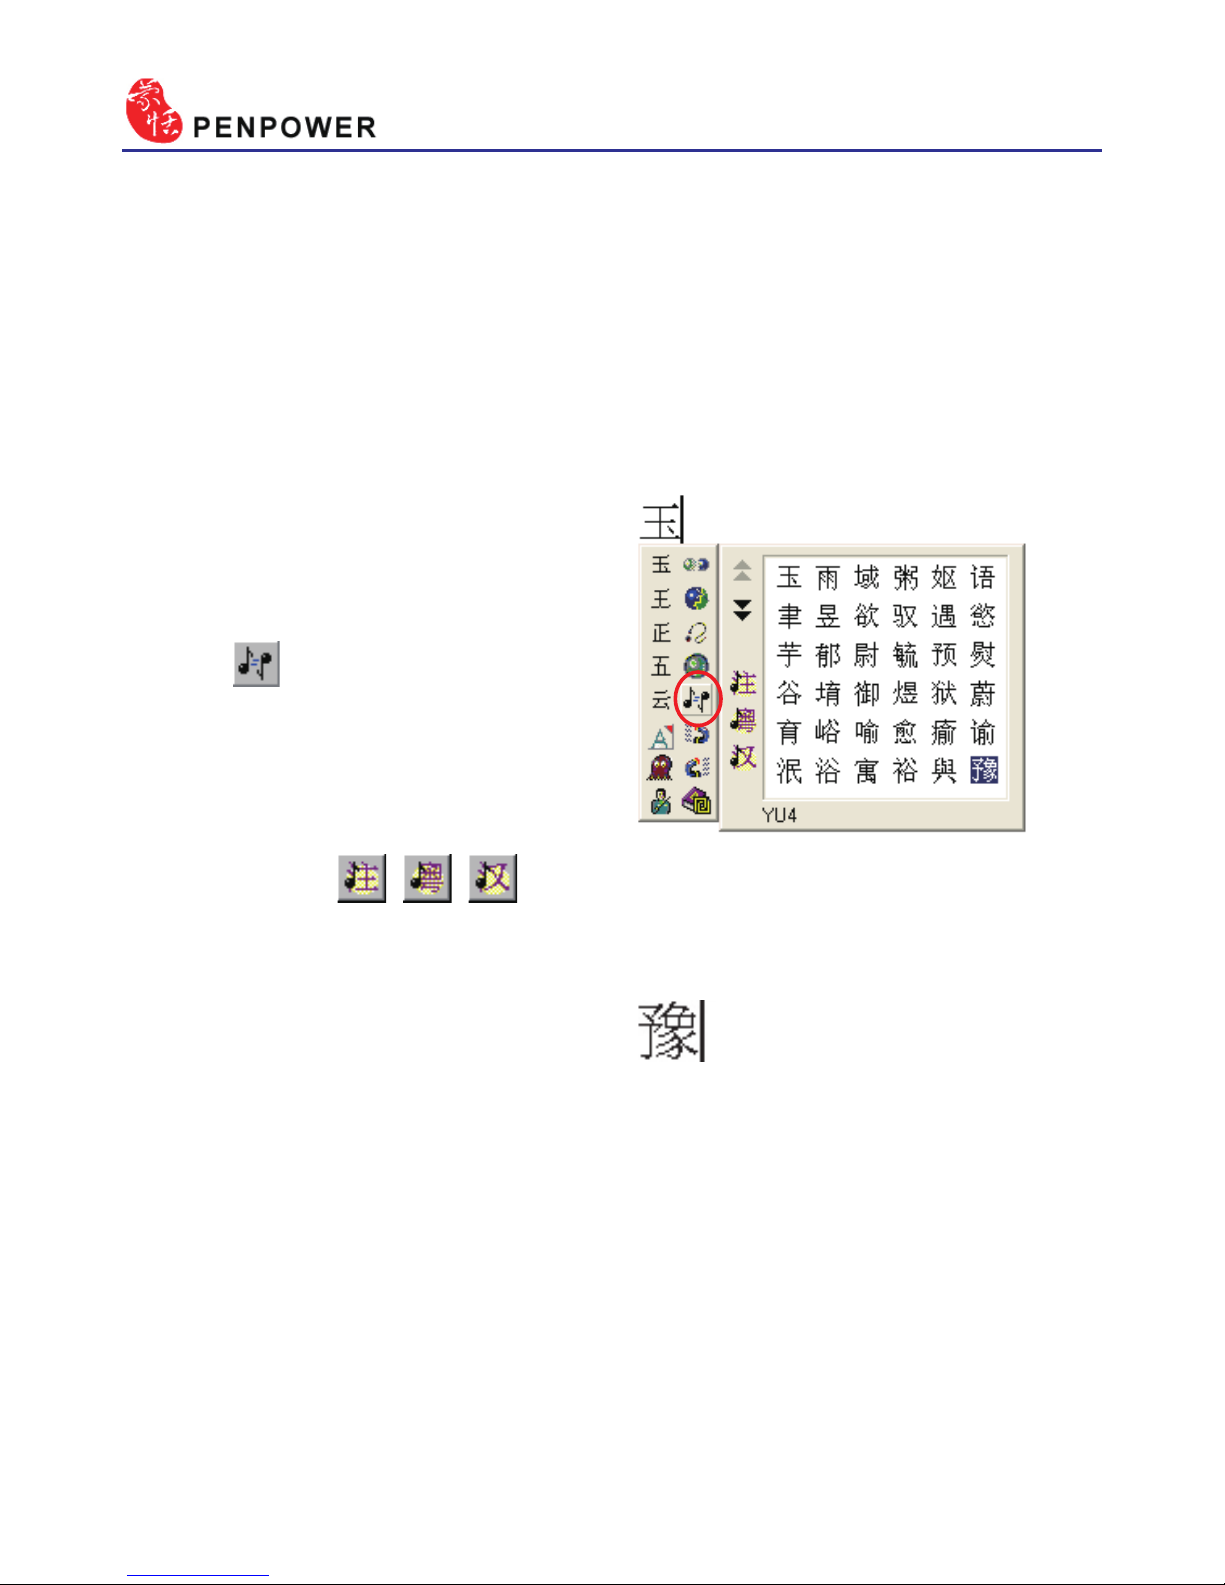
4.6 Homophone
If you forget how to write some words, or they are too complicated to
write, you can write down some other easy homophone to get the word that
you would like to input. e.g. If you want to input the word
『豫』
:
1. Write any one homophone of
『豫』
, e.g.
『玉』
. The result would be
sent in the caret.
2. Move the cursor on the rst word
『玉』
for a while to pop up the
function tool bar.
3. Click button to open the
window of homophone words.
4. You can Click / / button to toggle other BoPoMo homo-
phone/Cantonese homophone/Beijing homophone.
5. Click
『豫』
to replace
『玉』
.
Page 38
Chapter 4 New Handwriting/Mouse Mode
4-15
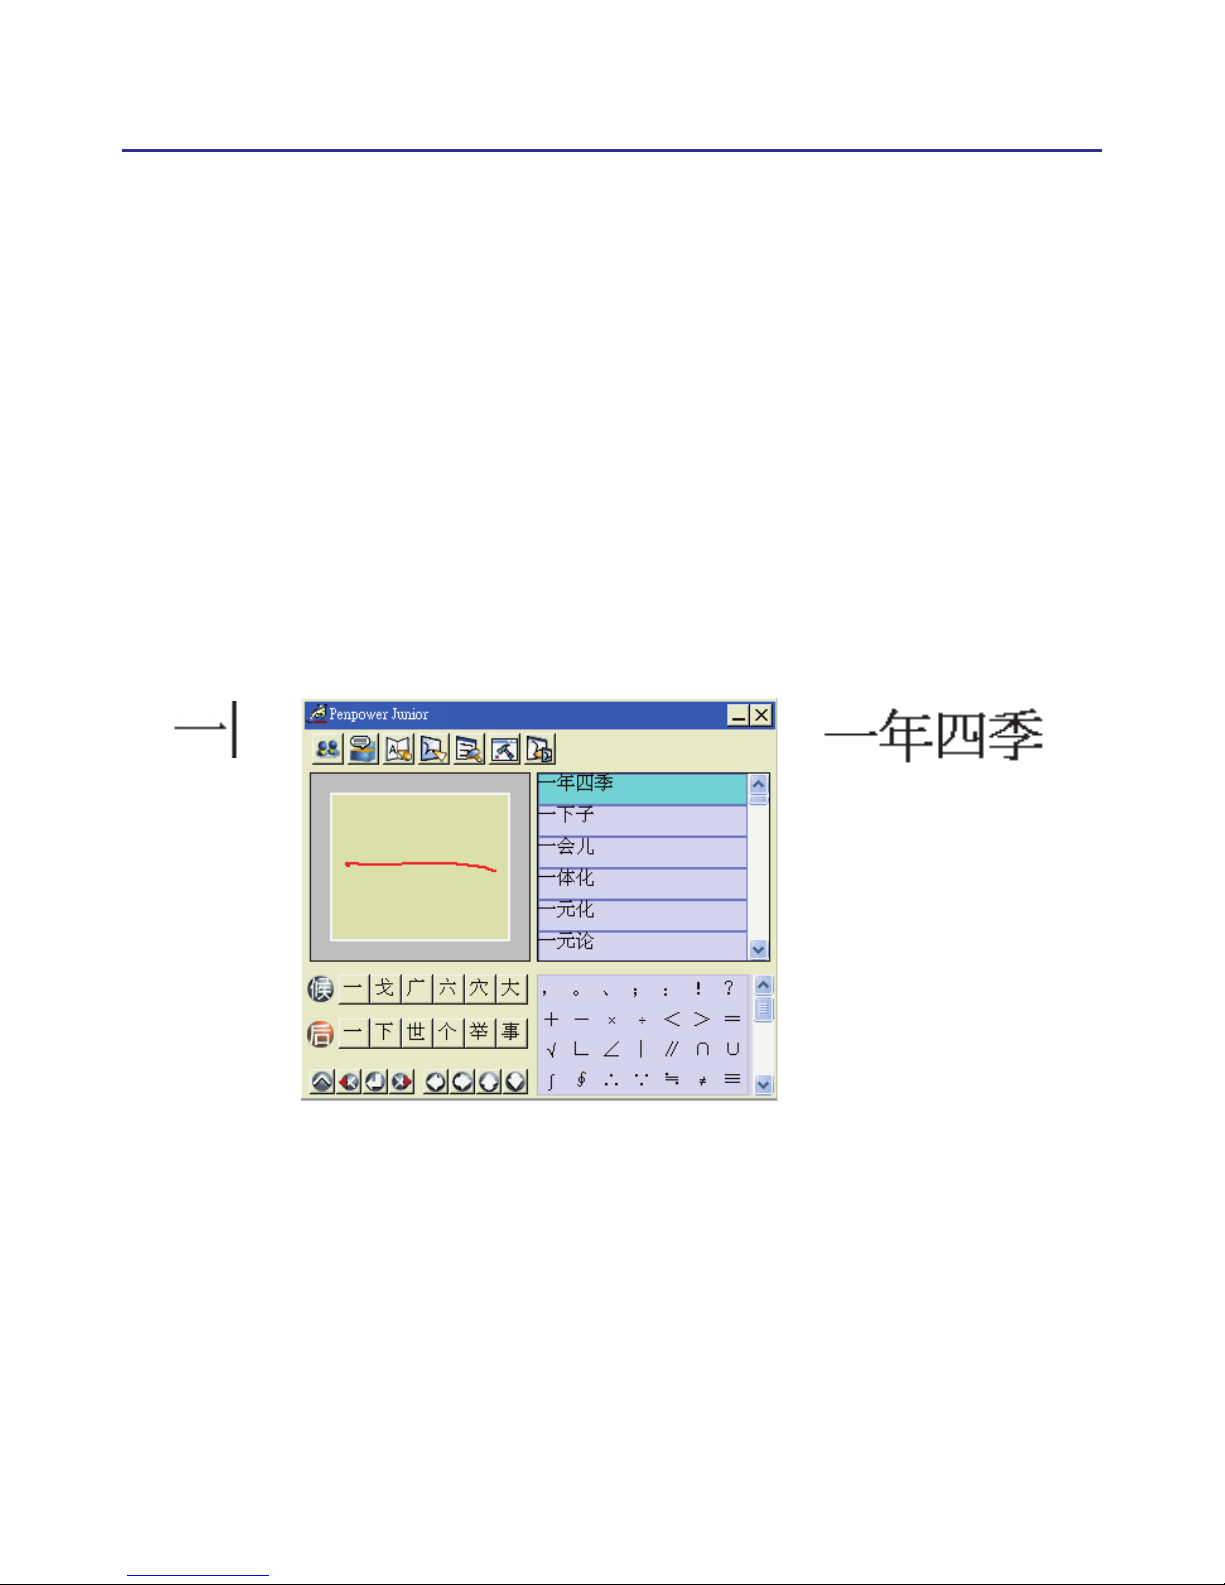
4.7 Related Phrase
4.7.1 Input words by Related Phrase
1. Write down the rst word of one phrase. e.g. If you want to input the
phrase
『一年四季』
, just write the rst word
『一』
.
2. Press the middle button on the touch pad to swicth to the Mouse mode.
All the phrases beginning with this word
『一』
will be listed on the
phrase area of the Mouse mode.
3. Click the phrase or memorized word that you want to send it into the
caret. e.g.
『一年四季』
.
Page 39
4-16
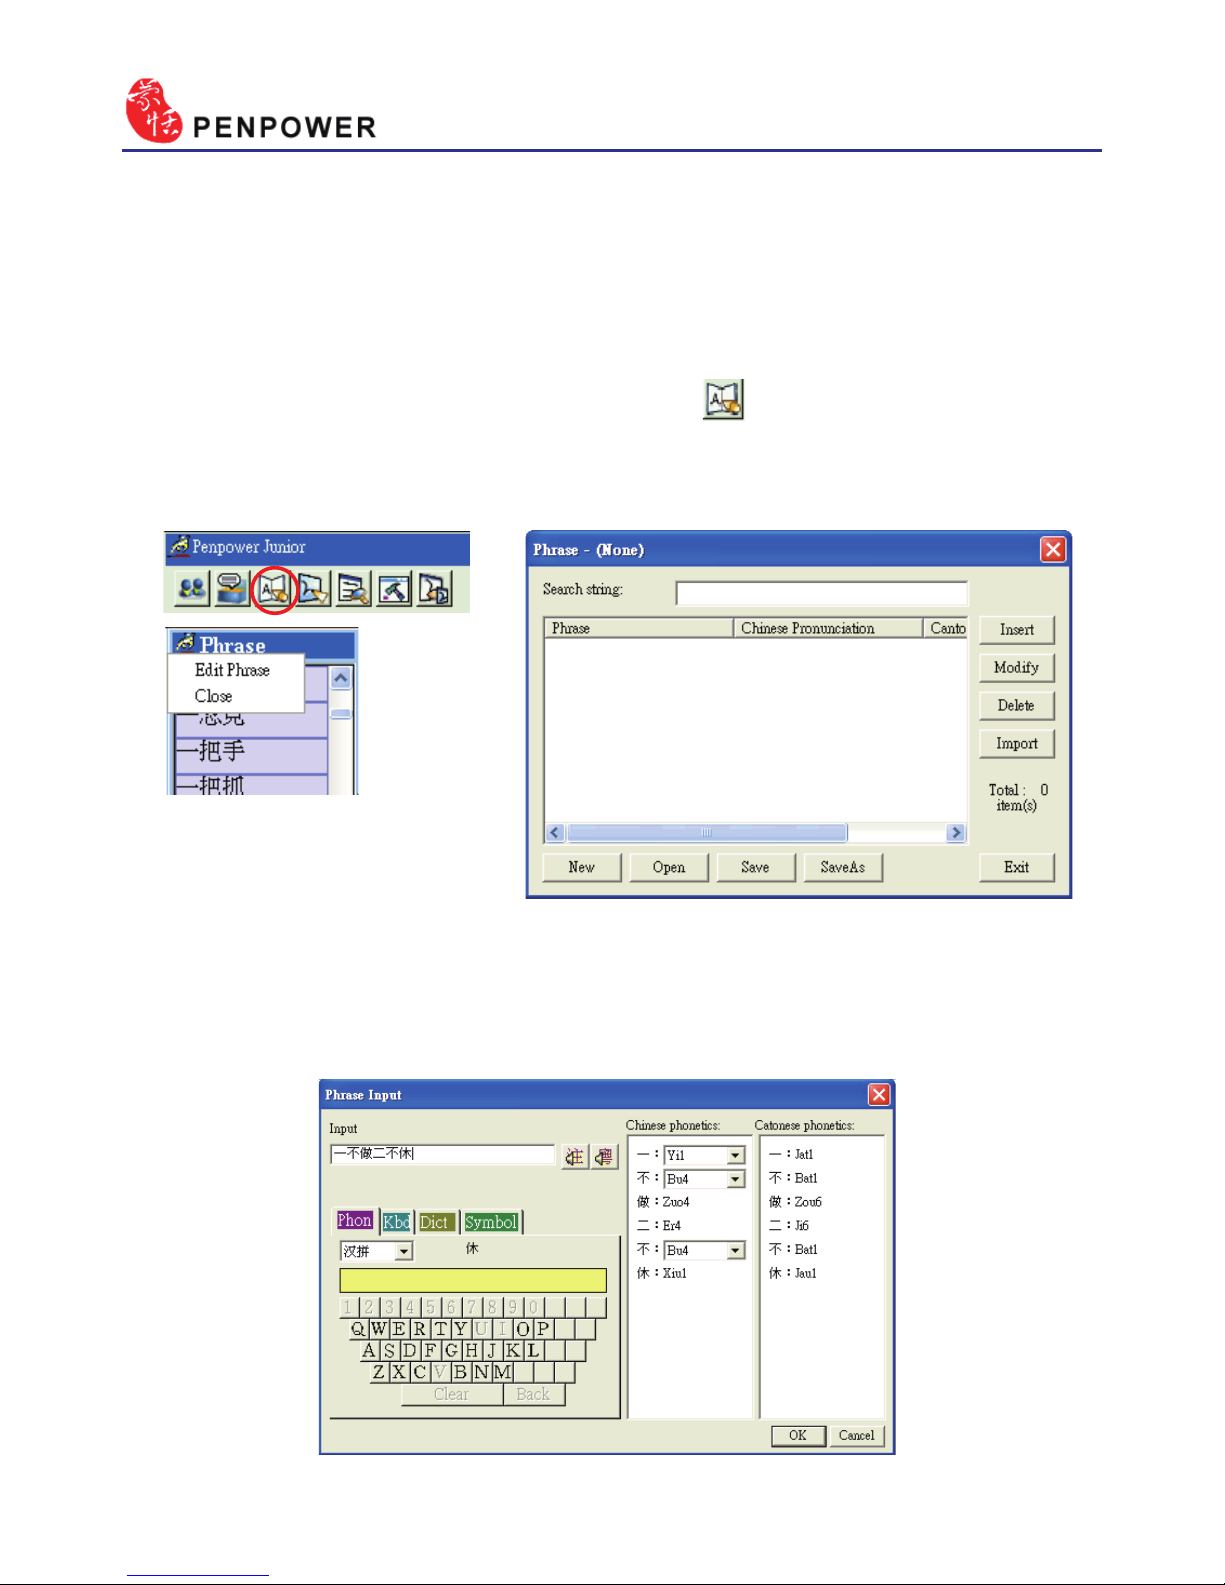
4.7.2 Update Phrase Database
There are thousands upon thousands default phrases that you can use in
the Penpower handwriting recognition. It also allows you to customize the
phrase database to meet your needs.
1. In Mouse mode press the “Phrase” button . Or in Handwriting mode
select “Edit Phrase” from the Associations Dictionary and open the
“phrase” dialogue.
2. Click “insert” to open the “Phrase Input” dialog. You can input a new
phrase here. e.g. If you want to insert
『一不做二不休』
as a phrase,
input
『一不做二不休』
.
Page 40

Chapter 4 New Handwriting/Mouse Mode
4-17
You need to update the phonetics on the right side. Click / button to hear their pronunciation and check if the one you choose is right.
Note : The maximum length of one phrase is 200 word. In fact, the phonetics is
only for VoiceReader to read text with right sound of phonetics. If you do
not care, you can skip it.
Click “OK” to nish insertion. Afterward, if you write
『一』
, then
『一
不做二不休』
would be displayed in the related phrase window. Just click
it to input.
3. Selet on phrase from the list, and then click “Modify” to update the pho-
netics of this phrase. Click “Delete” to delete this phrase from database.
4. In “Search string” eld, you can only input part of a phrase to nd this
phrase quickly.
5. You can use “New”, “Open”, “Save”, “Save As” function to manage
your phrase database (*.yib).
Note: Although you can create several phrase database, you can only choose one
at one time.
6. Import le
Click “Import” and select one phrase database(*.yib) or text le to im-
port it into current database.
The text le format must follow this rule - one phrase in each line. You
can edit it by any editor, e.g. NotePad.
Note: Every imported phrase would own phonetecs by default. Their phonetics
may be wrong. You can modify them from phrase dialog.
Page 41
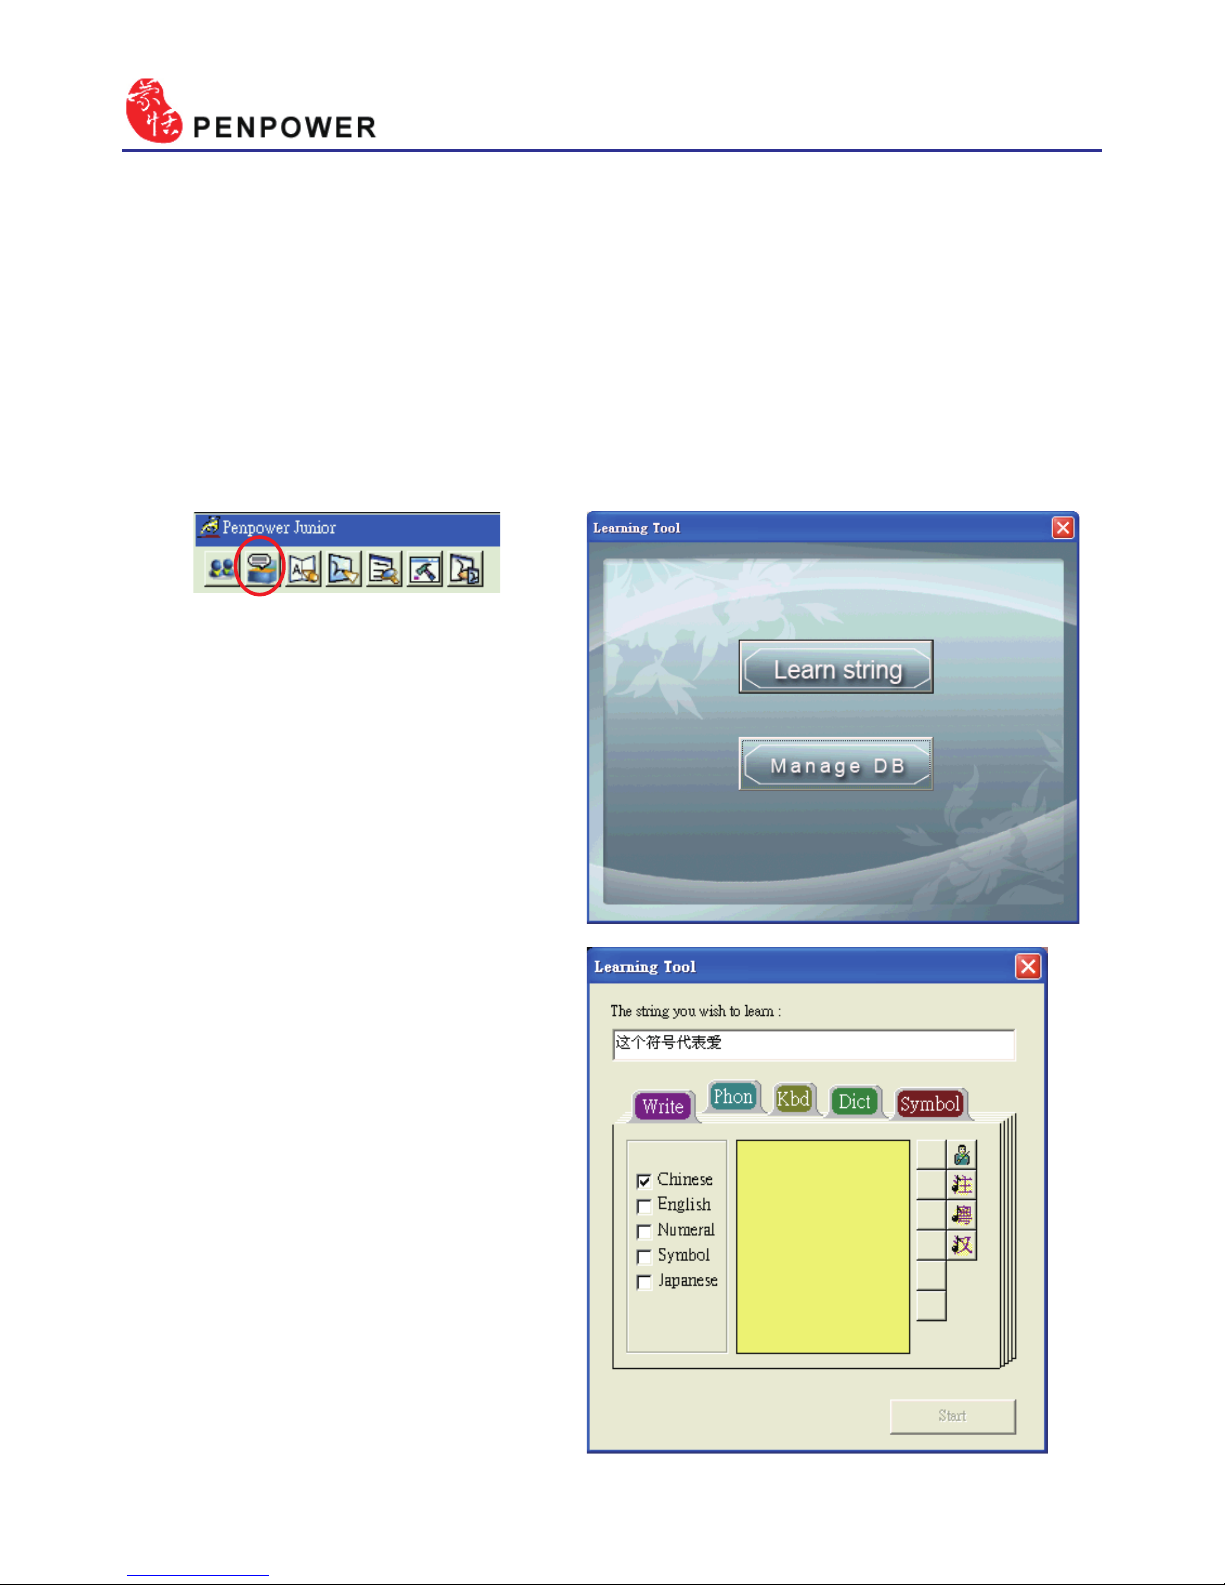
4-18
4.8 Learning String
A string is represented by an inking of symbol. So, you can handwrite
the symbol anytime and the recognition engine will recognize it as the
expanded string. It prevents you from redundant writing.
1. In Mouse mode, press the “Learning Tool” button to open the Learning
Too Window. Select “Learn String” to open the “Learning Tool” screen.
2. Input the string you want to
learn, then click on “Start”.
Page 42
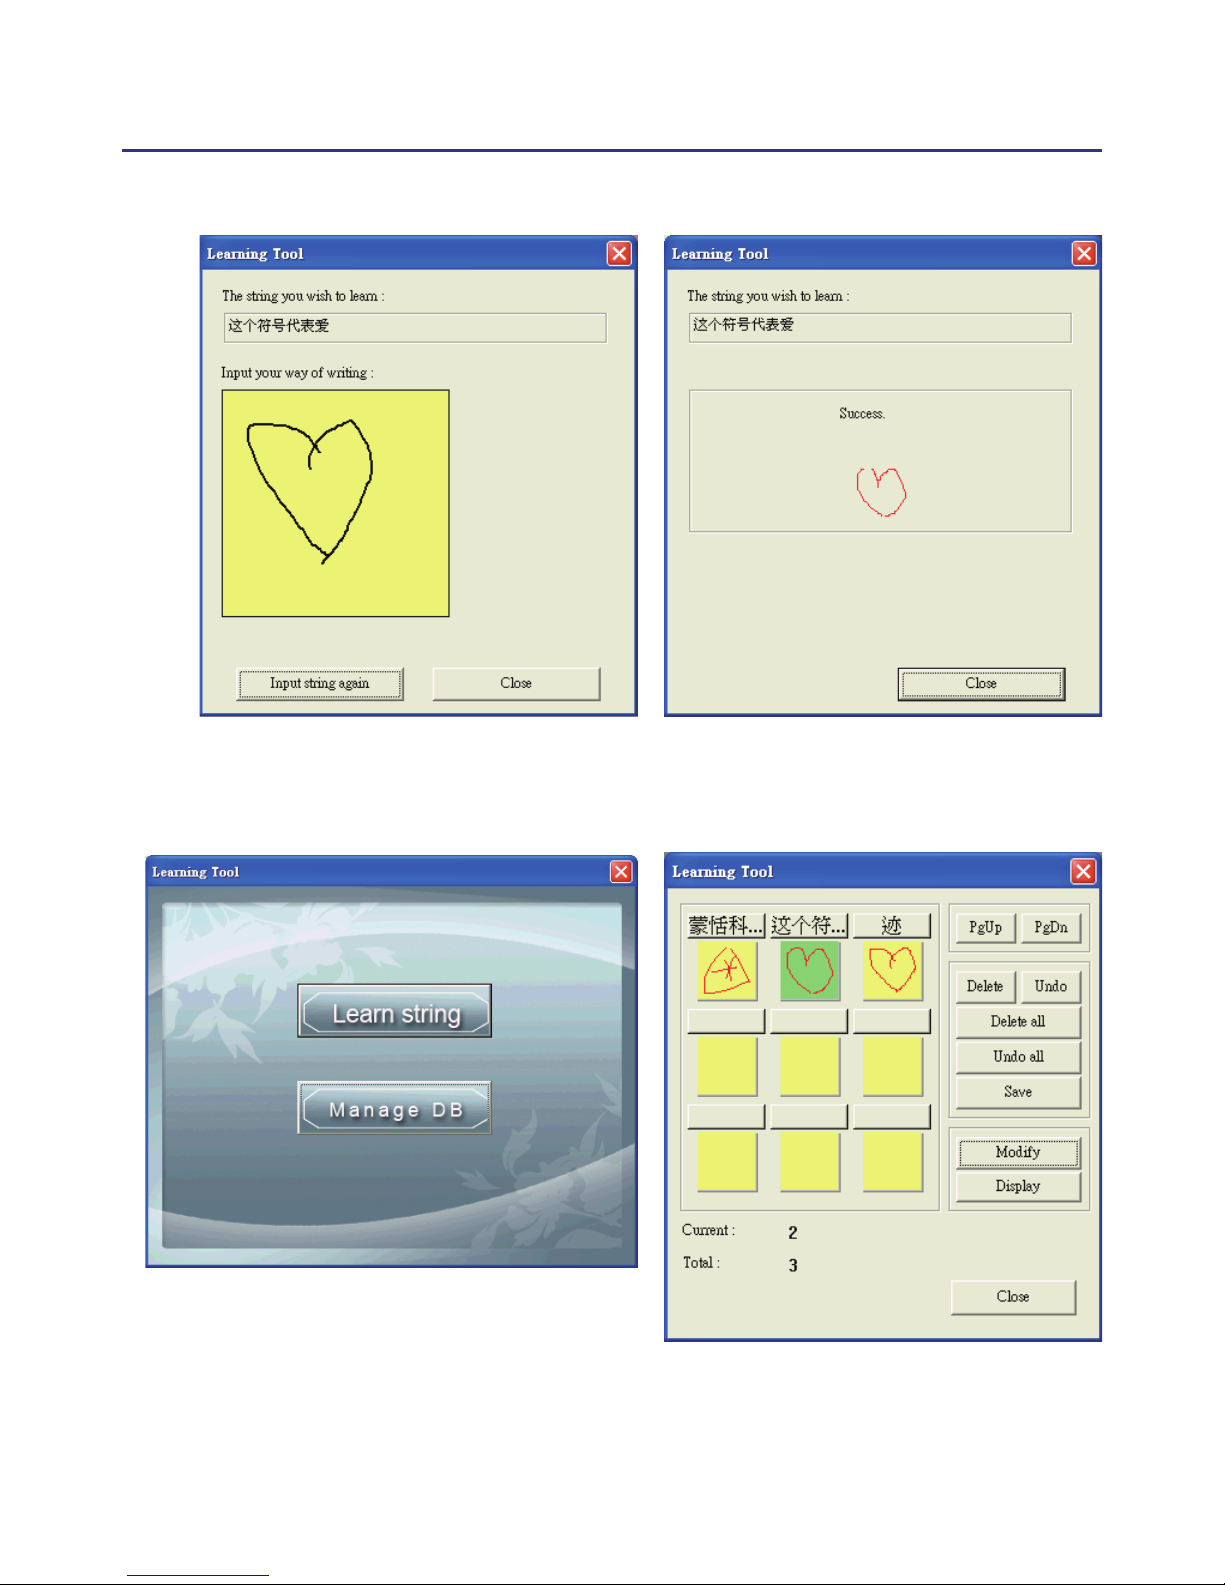
Chapter 4 New Handwriting/Mouse Mode
4-19
4. Click “Manage DB” tag, You can browse the dynamical inking or
modify the string you have ever learned here.
3. Write down your inking twice according to the hint.
Page 43
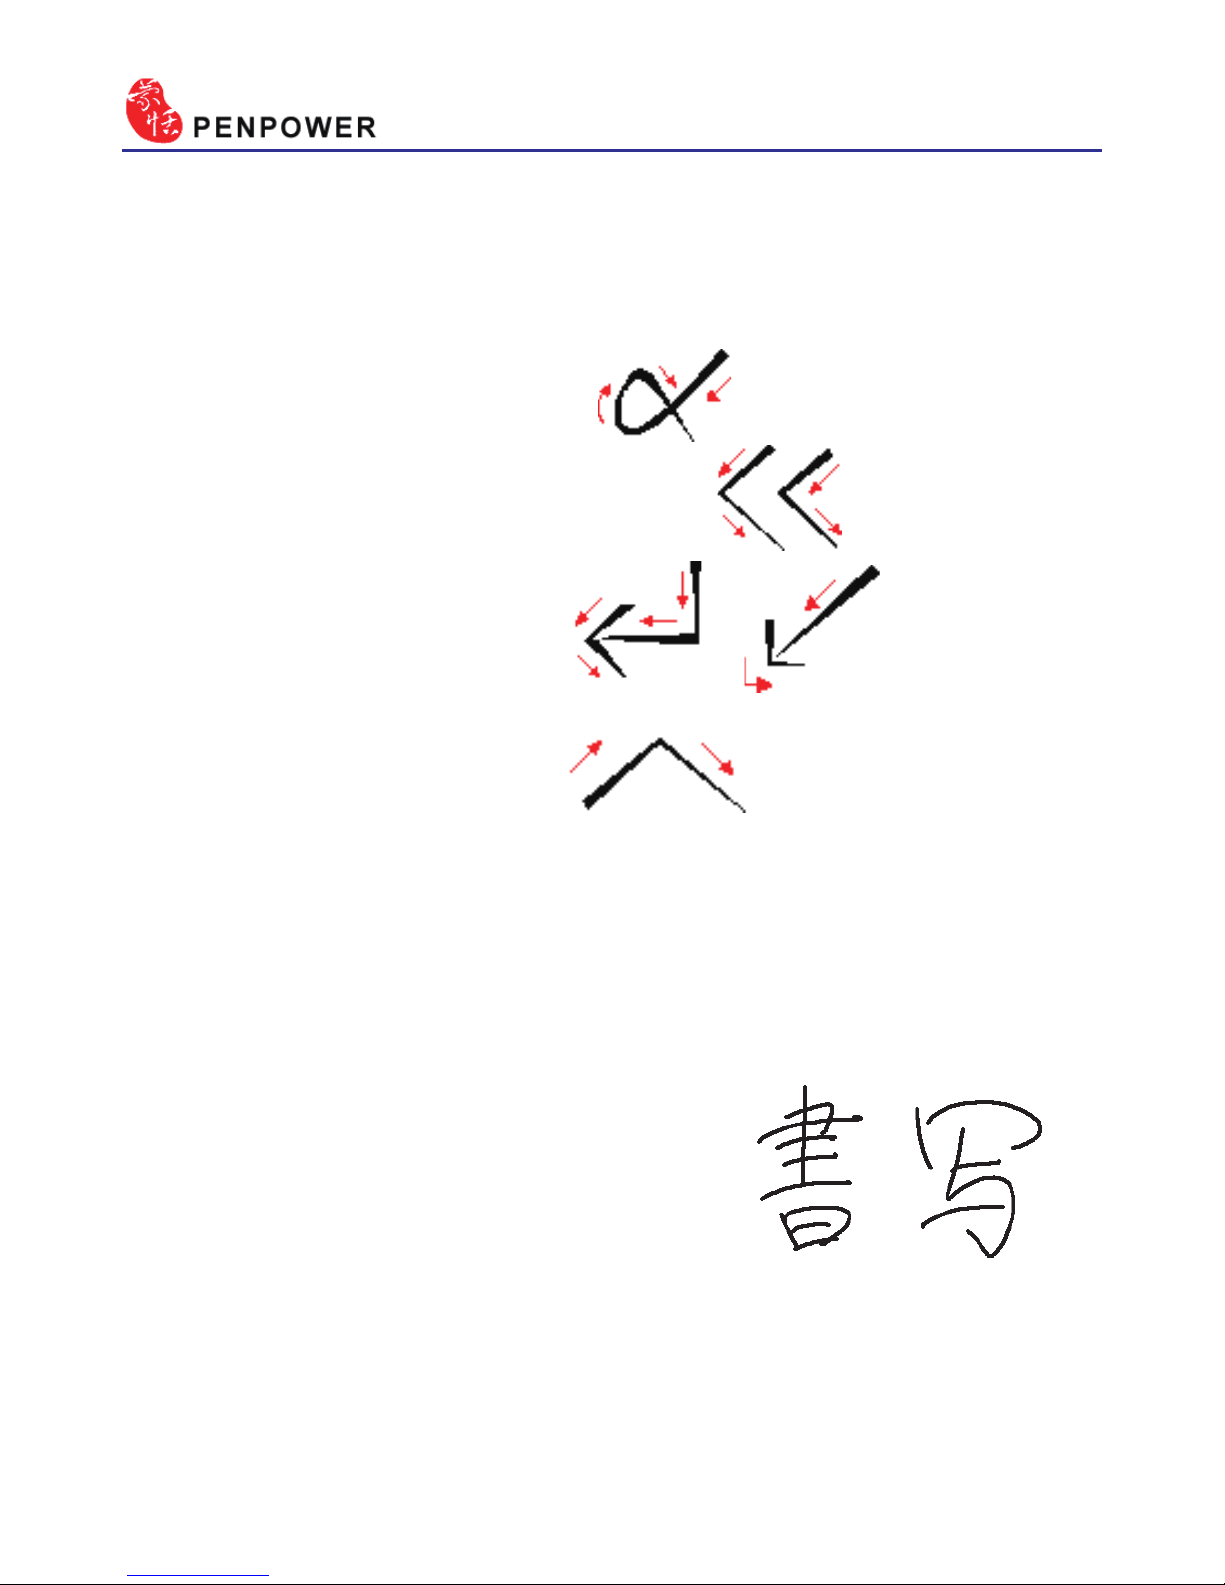
4-20
4.9 Gesture
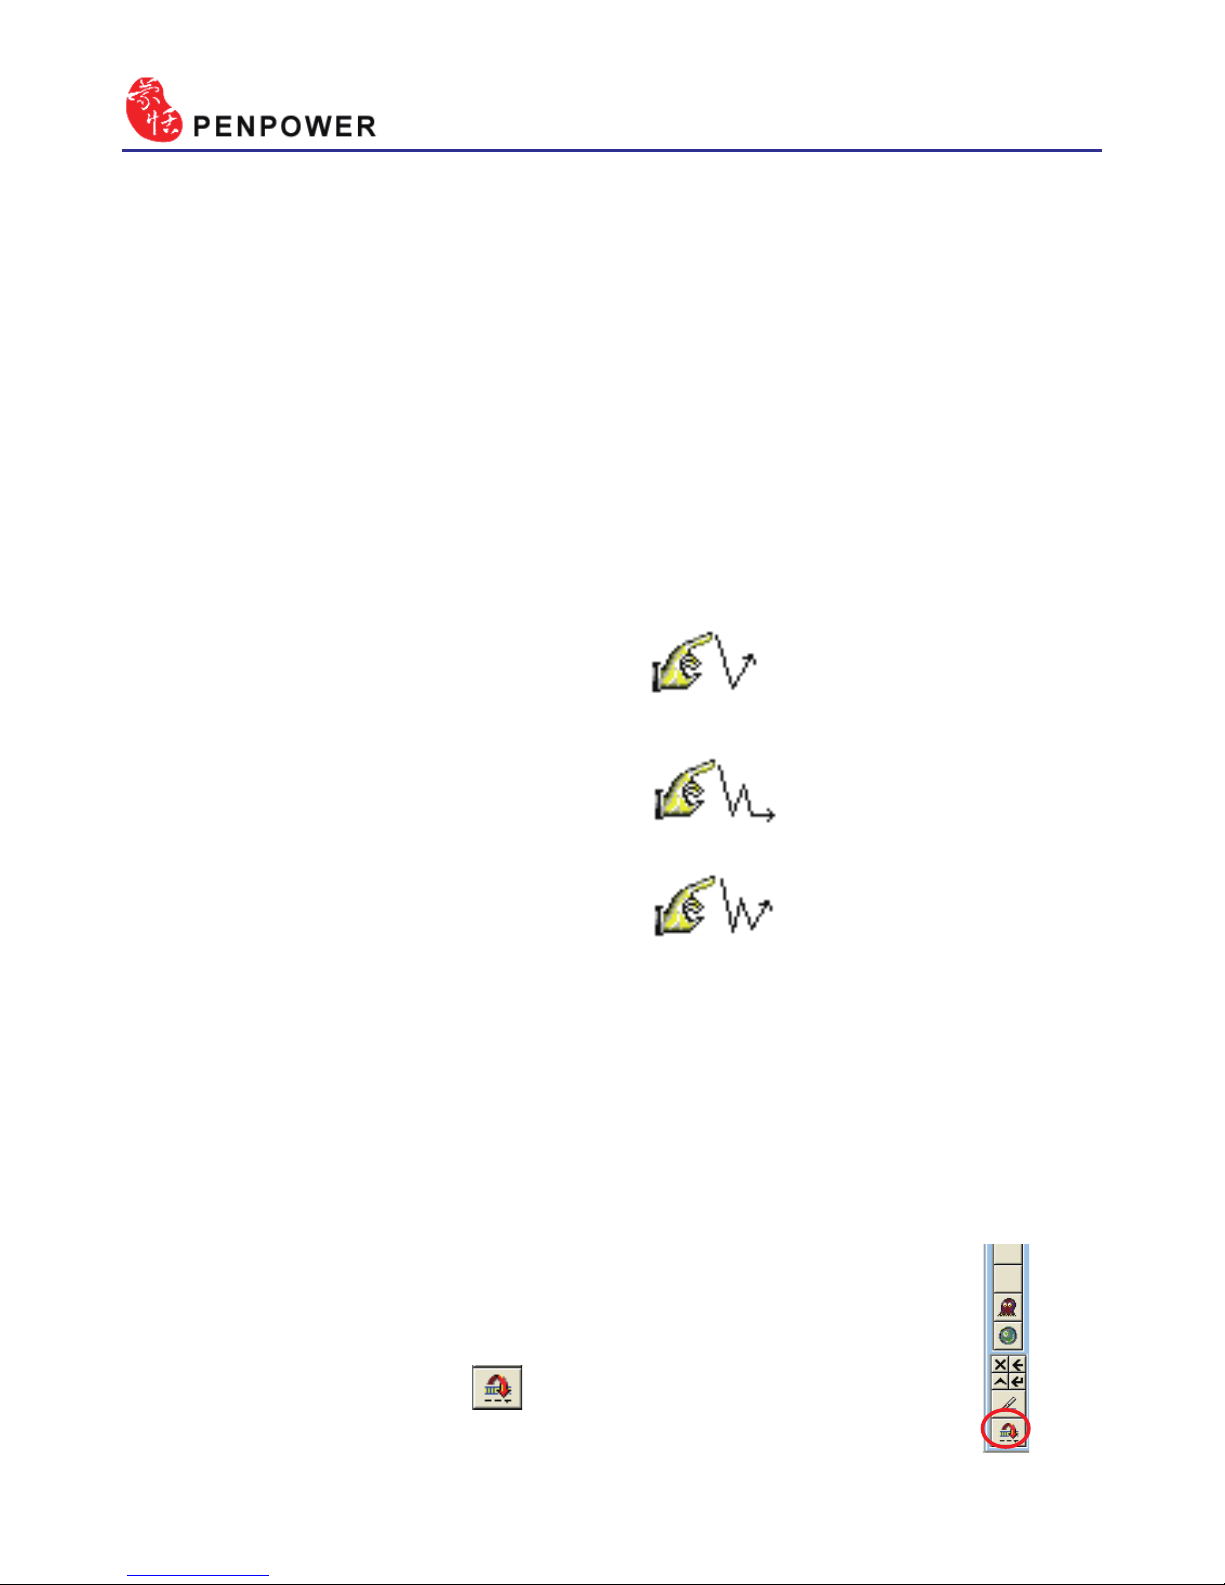
Penpower Jr. handwriting system support four standard inking gesture.
You can handwriting these gestures to simulate keyboard input.
1. Delete : simulate DELETE key.
2. Backspace : simulate BACKSPACE key.
3. Enter : simulate ENTER key. or
4. Space : simulate SPACE key.
4.10 Mix Traditional and Simplied Writing
Whatever you wrote, choose different recognition engine to decide the
results being traditional or simplied words. Please see 4.12.1 for more
details
You can mix writing traditional and
simplied Chinese words. e.g. Handwrite
two words
『書寫』
.
Page 44
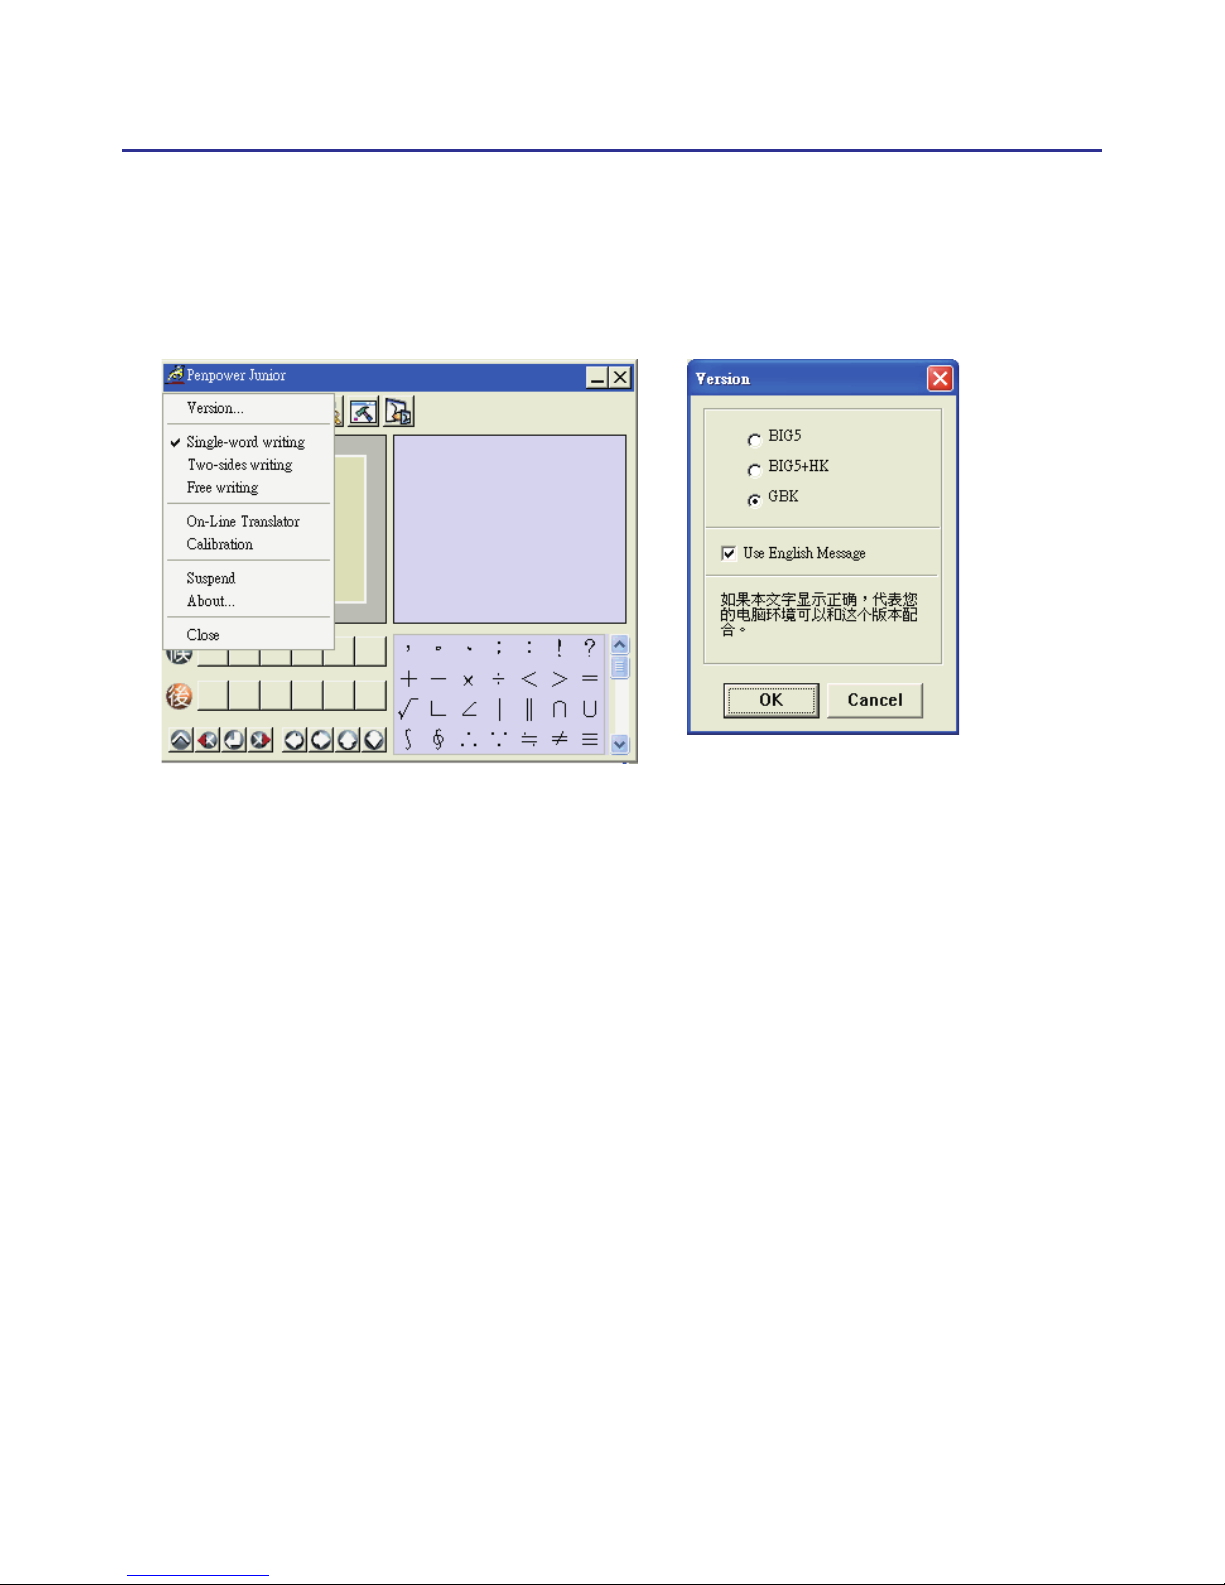
Chapter 4 New Handwriting/Mouse Mode
4-21
4.11 Switch Version
1. In Mouse mode, open the Penpower Junior options then select “Version
…”.
2. Under the Win2000/XP/Vista System for Traditional Chinese, Traditional
Chinese (Hong Kong) or Simplied Chinese the output of the handwriting recognition will always be encoded using Unicode. After switching version, if you can not see the message displayed correctly on the
bottom, it means that your Windows system may not support this version
you chose.
3. Check “Use English Message” option to display all the messages of
Penpower Jr. handwriting system in English.
Page 45
4-22
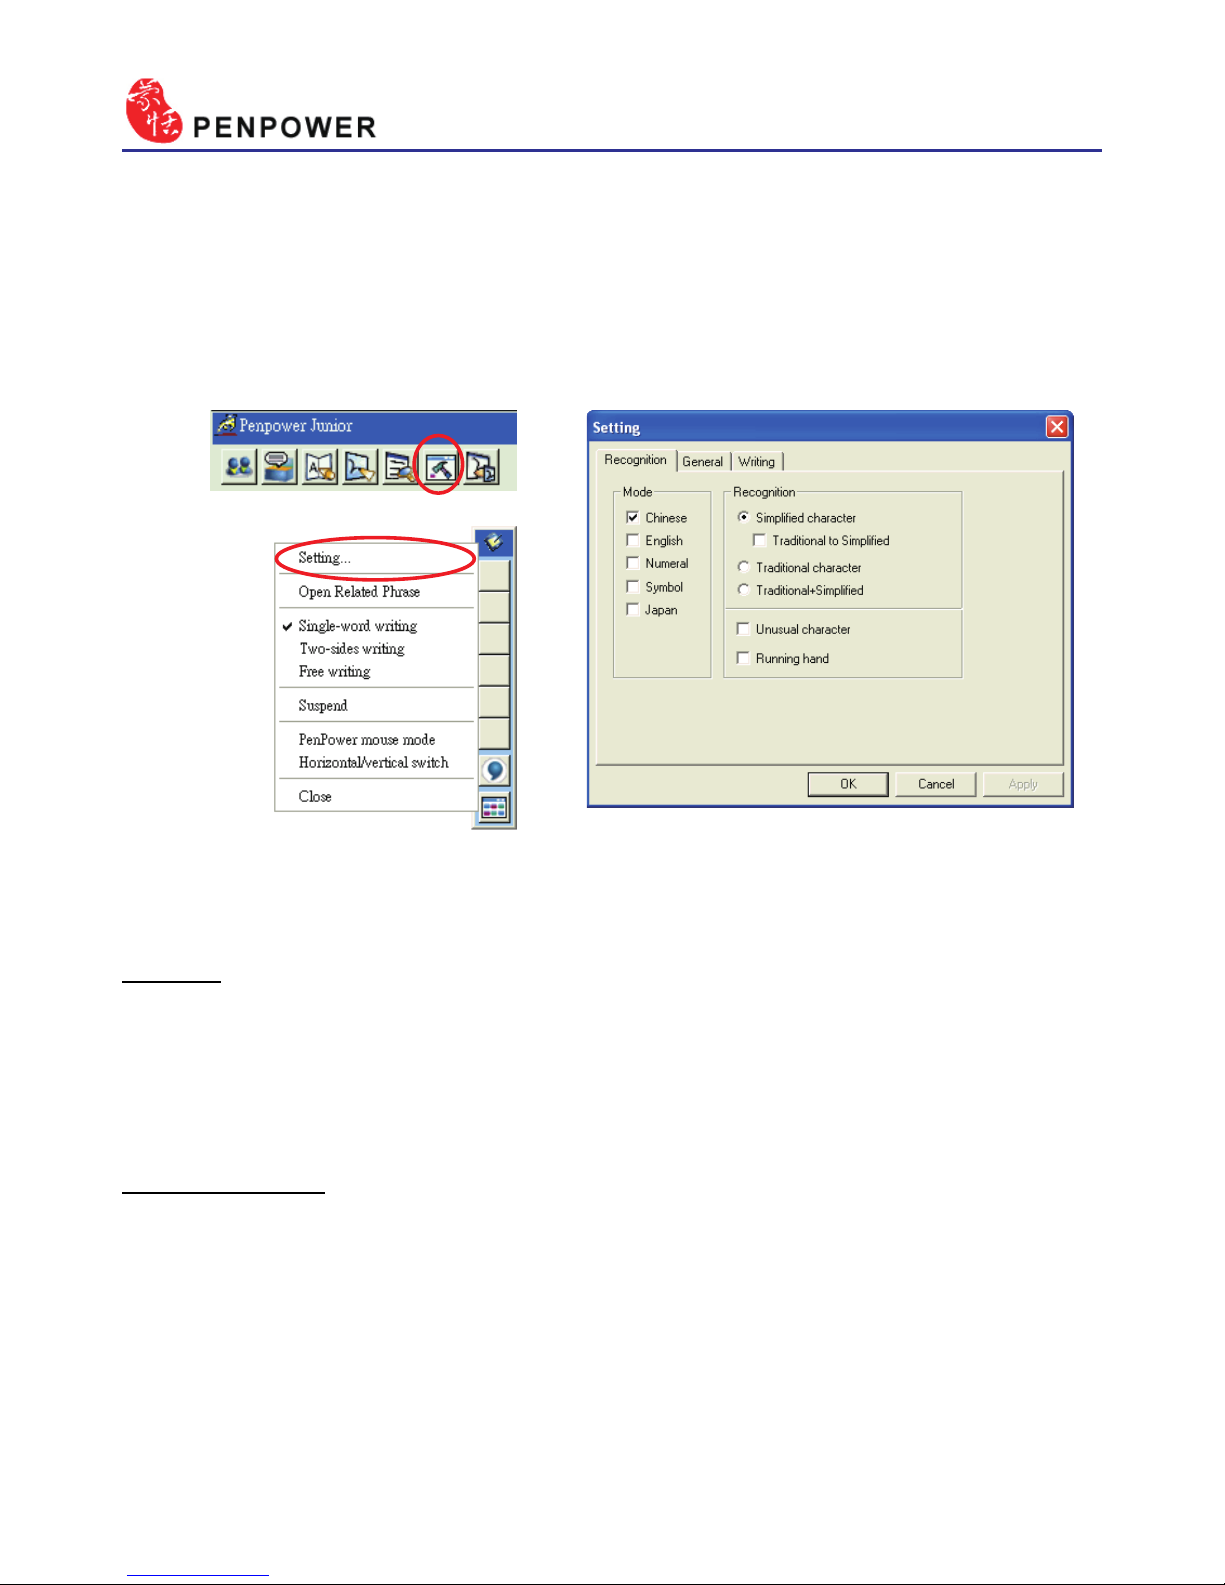
4.12.1 Recognition Setting
Mode:
The recognition mode of Chinese, English, Numeral, Symbol and Japanese could be turned on/off individually. You could turn on several modes
at the same time.
Recognition:
a. Simplied character:All the results are simplied words. If you do not
know how to write traditional words, you can turn off “Traditional to
Simplied” option to disable the traditional writing.
Note : “Traditional to Simplied” option is available only when you switch to
simplied version.
4.12 Setting
In Mouse mode click on the “Setting” button or in Handwriting mode
choose the “Setting…” from the menu to open the settings page. You can
congure the recognition engine, output format or writing inkings here.
Page 46
Chapter 4 New Handwriting/Mouse Mode
4-23
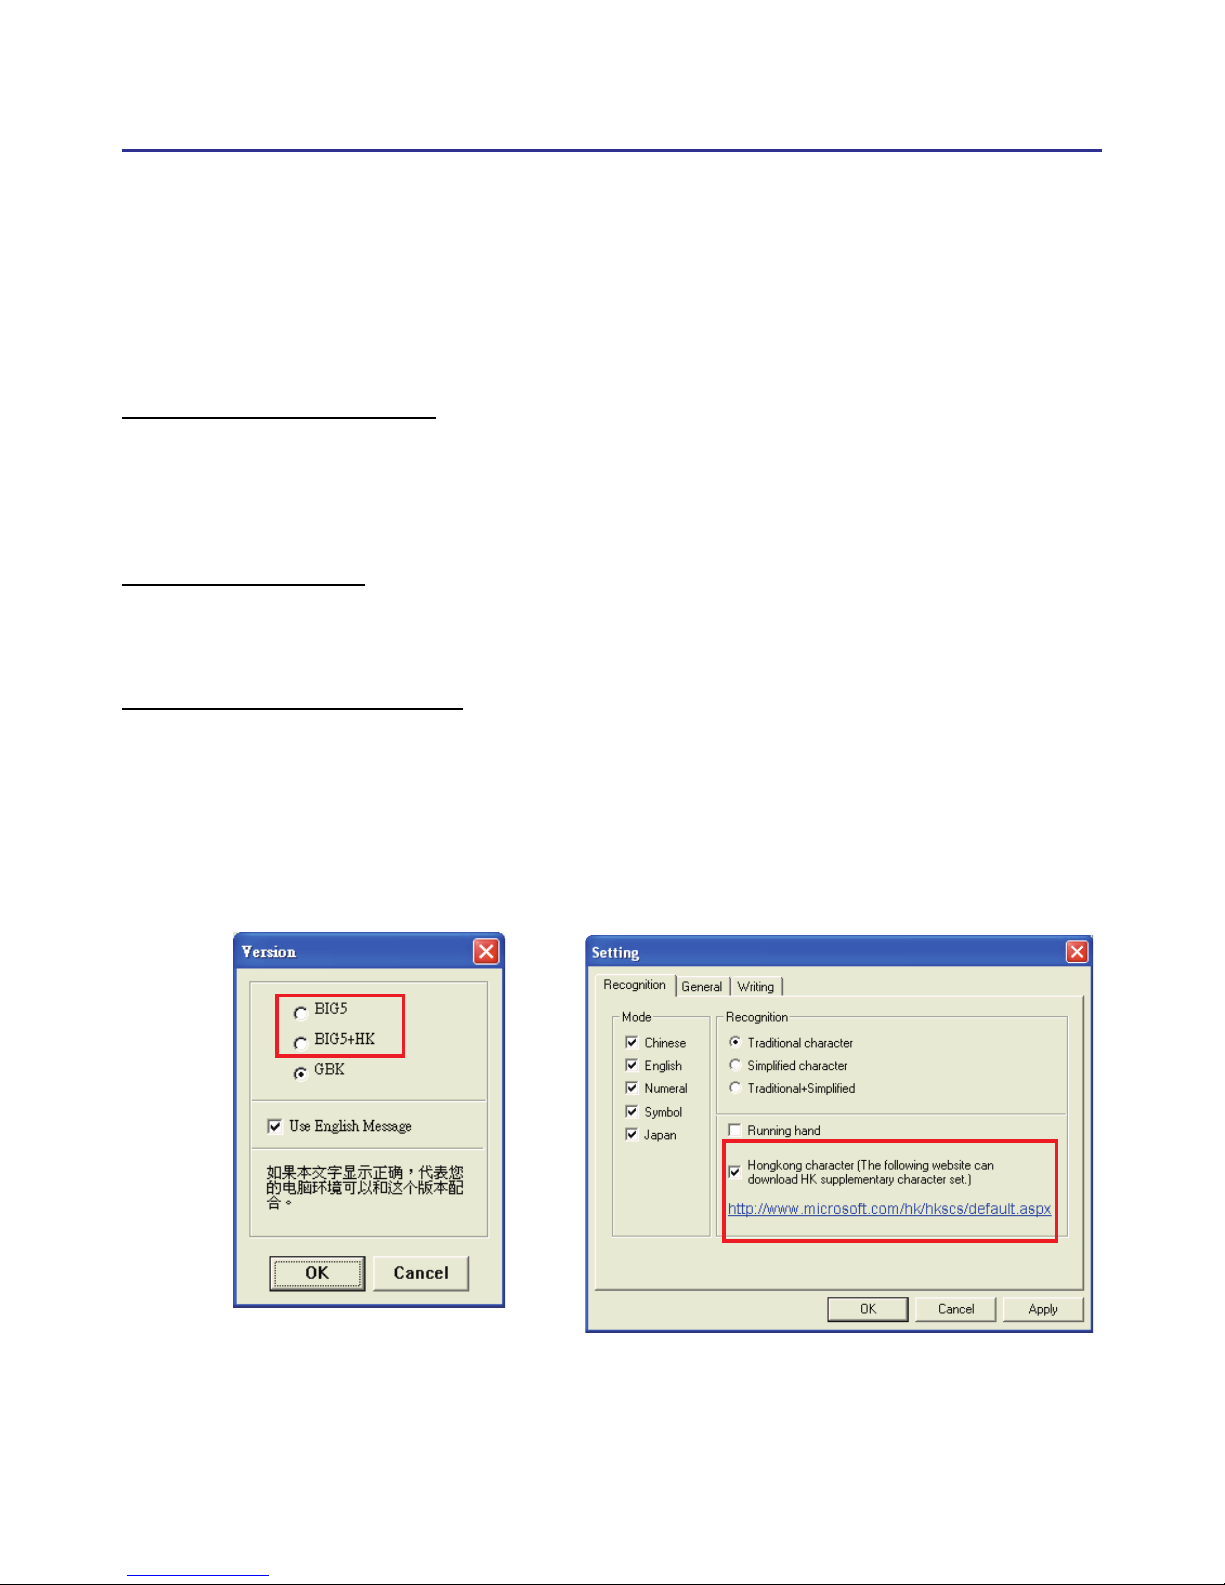
b. Traditional character:All the results are traditional words.
c. Traditional+Simplied:You will get traditional words while using
traditional writing, and get simplied words while using simplied writ-
ing.
Unusual character:
The system will recognize some unusual words only when you turn on
“Unusual character” option.
Running Hand:
Check this option to have the software recognize run-on cursive.
Hongkong Character:
This recognition mode is only available when the Penpower Junior is
set to the Traditional Chinese (BIG5) or Traditional Chinese (Hongkong)
(BIG5+HK) version. You can connect to Http://www.microsoft.com/hk/hkscs/default.aspx to check the Hongkong characters list.
Page 47
4-24
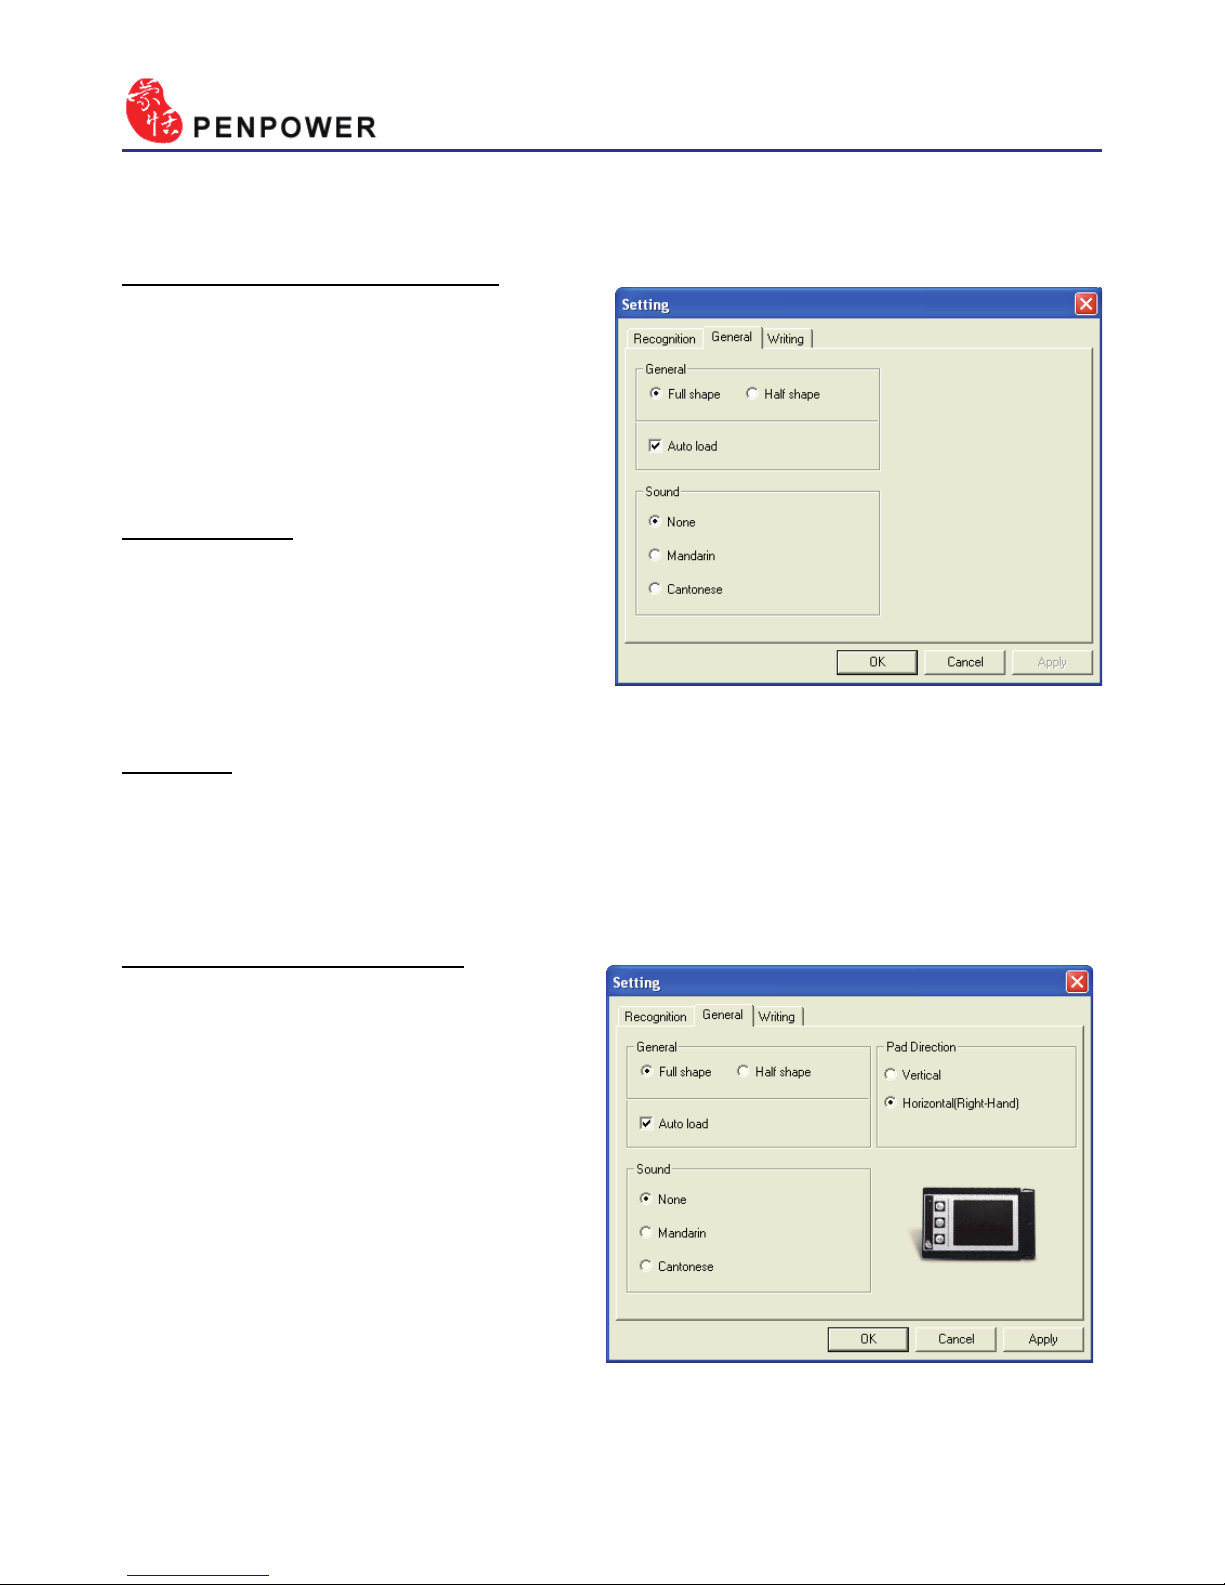
4.12.2 General Setting
Half shape/Full shape :
To decide whether the handwriting result of alphanumeric is
recognized as one-byte ASCII code
or double-bytes code.
Auto load:
Auto execute Penpower Jr.
handwriting system when windows
start-up.
Sound:
Pronounce the character in Mandarin or Cantonese immediately after
recognition.
Touch Pad Direction:
If you are using Penpower
Junior miniCard, you can use this
feature to set the orientation of the
touch pad as Horizontal or Vertical.
By default the touch pad is set to
Horizontal (Right-Hand) but you
can use this setting to change it to
portrait.
Page 48
Chapter 4 New Handwriting/Mouse Mode
4-25
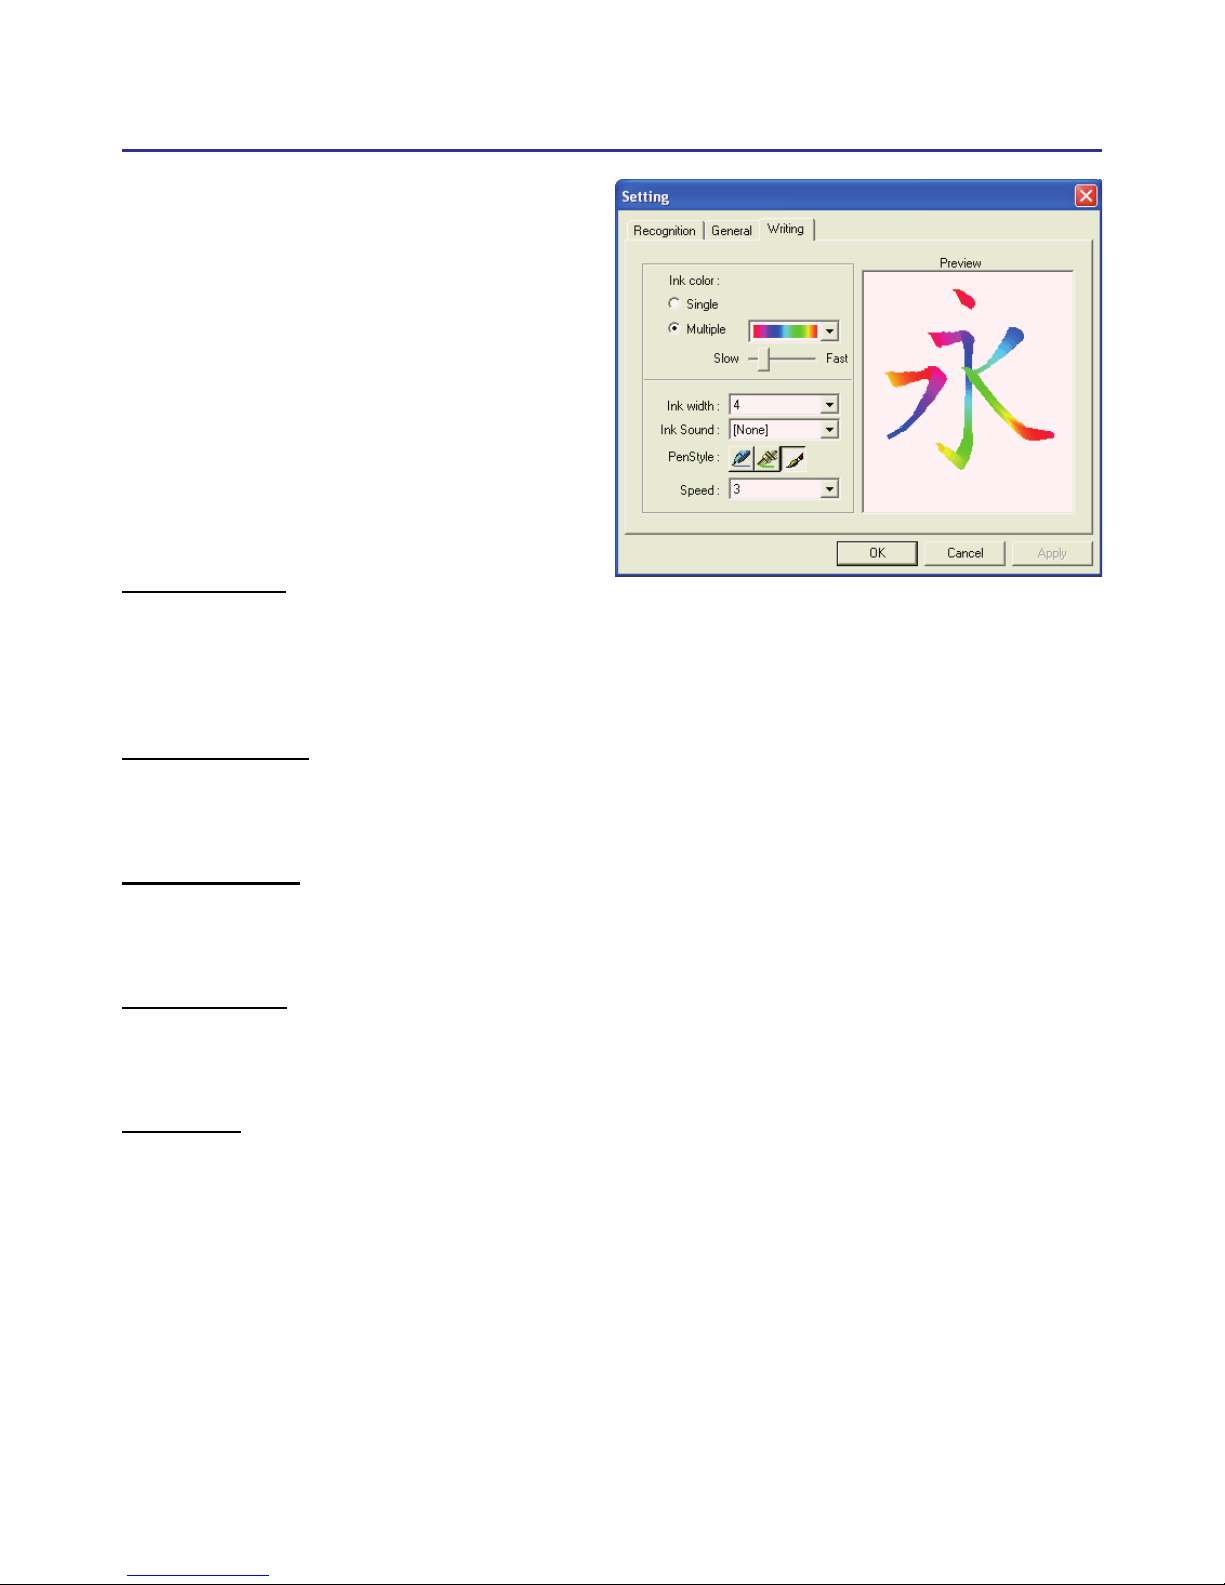
4.12.3 Writing Setting
Ink color :
Change the color of inking. You can adjust the smoothness of color
degree for “Multiple” option.
Ink width :
Change the thickness of inking.
Ink sound :
Change the sound effect while writing.
Pen style :
There three kind of pen style to choose.
Speed :
There are several levels of writing speed you can set. After you stop
writing, the less the relative value is, the shorter the timeout waiting for
recognition is.
Page 49
4-26
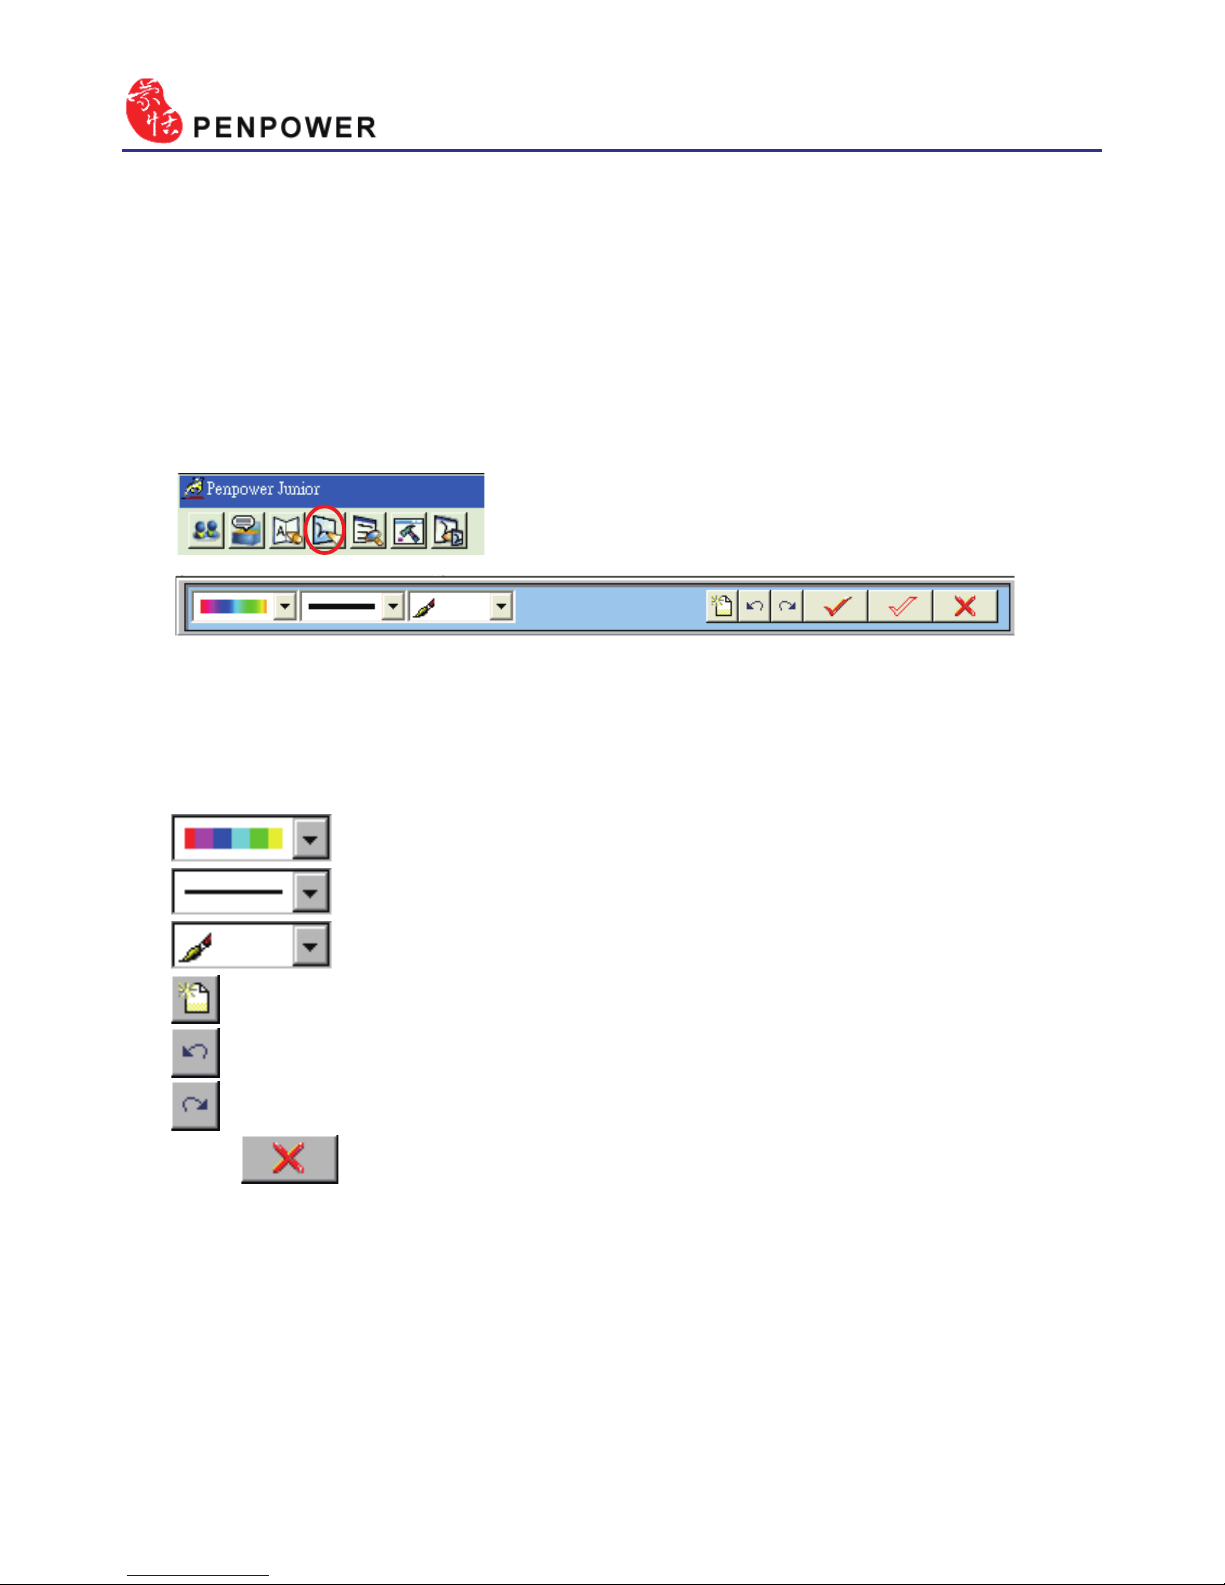
4.13 Signature
1. Move the caret to where the signature will be.
2. Open the Mouse mode and press the “Signature” button. The “Welcome
to Penpower Signature Tool” screen will be shown and you are now in
the signature mode.
3. In signature mode, the right button is dened to toggle pen mode and
mouse mode. You must switch to pen mode before start to sign your
signature. The left button is dened to change color.
: Change the color of inking.
: Change the thickness of inking.
: There three kind of pen style to change.
: Clear all.
: Undo one stroke.
: redo one stroke.
4. Click button to cancel signature.
Page 50
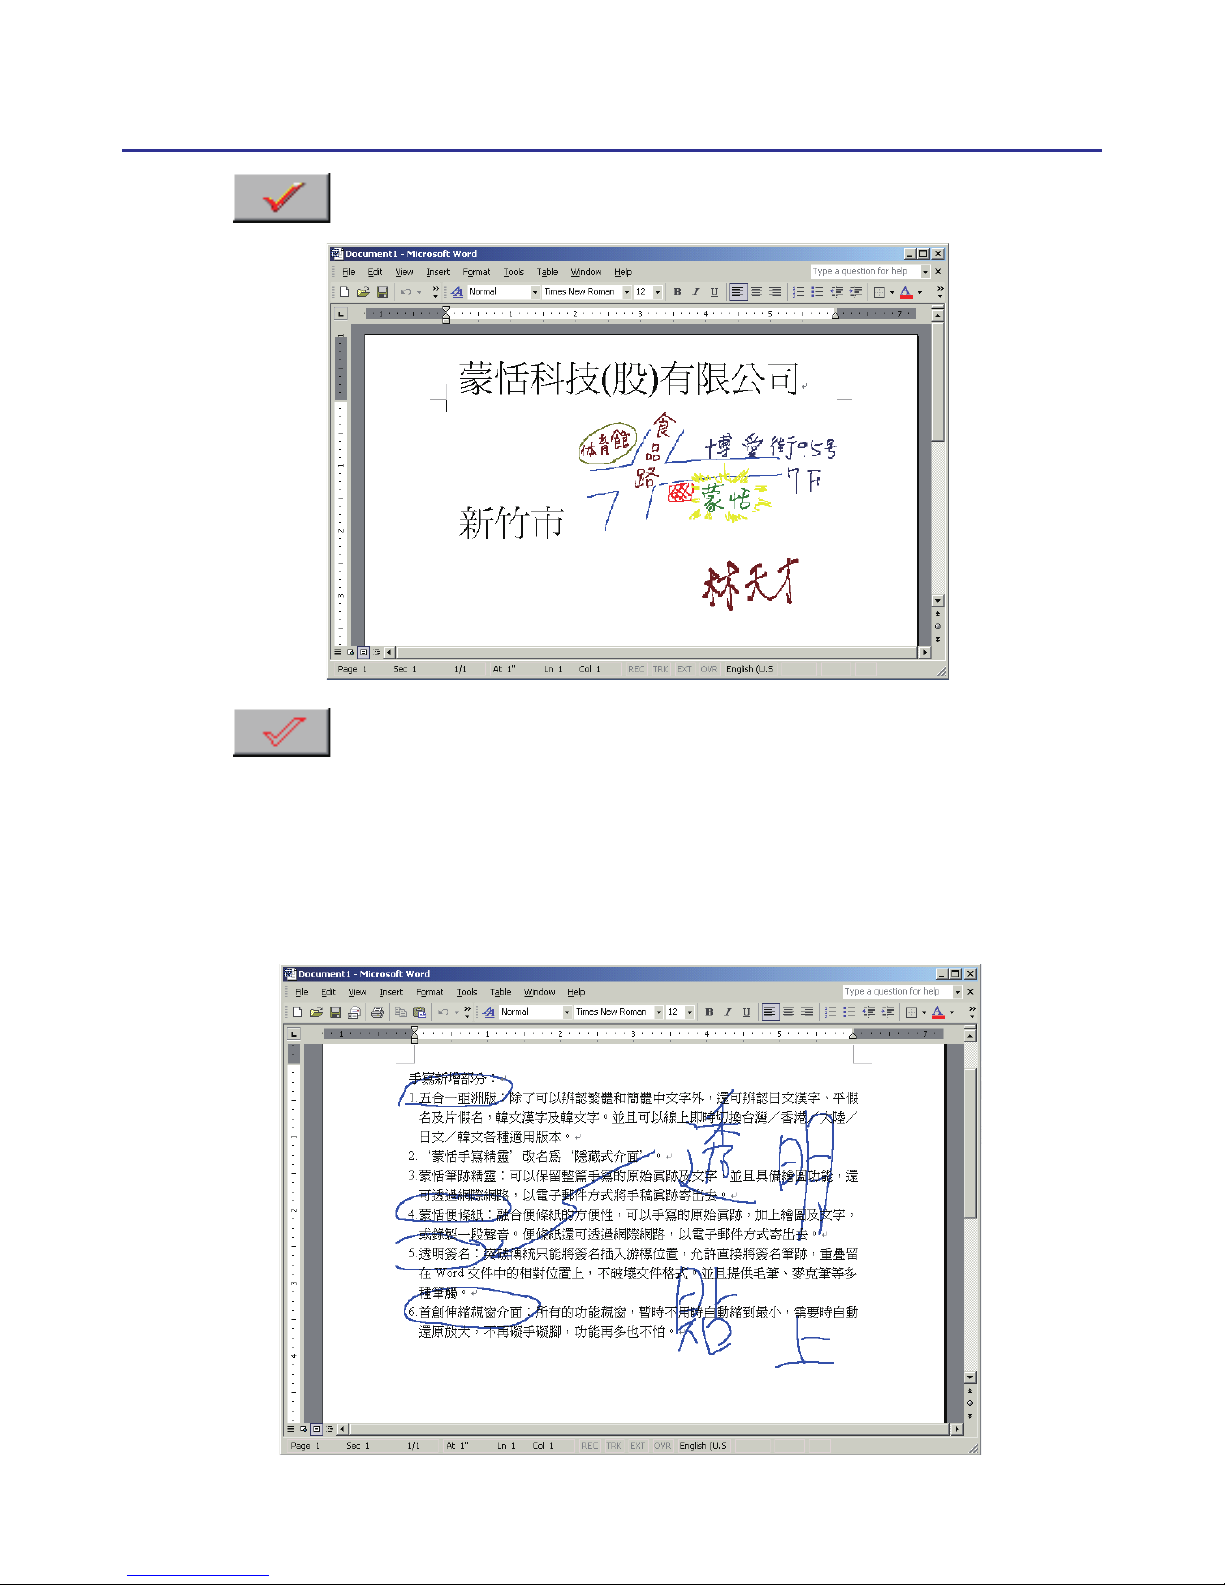
Chapter 4 New Handwriting/Mouse Mode
4-27
5. Click button to insert your signature in the caret.
6. Click button to overlap your transparent signature with WORD
or EXCEL document.
Note: You can use the transparent signature in the latest Word and Excel, but Of-
ce 2007 not support this function. You may make notes and commentary
by using transparent signature function.
Page 51
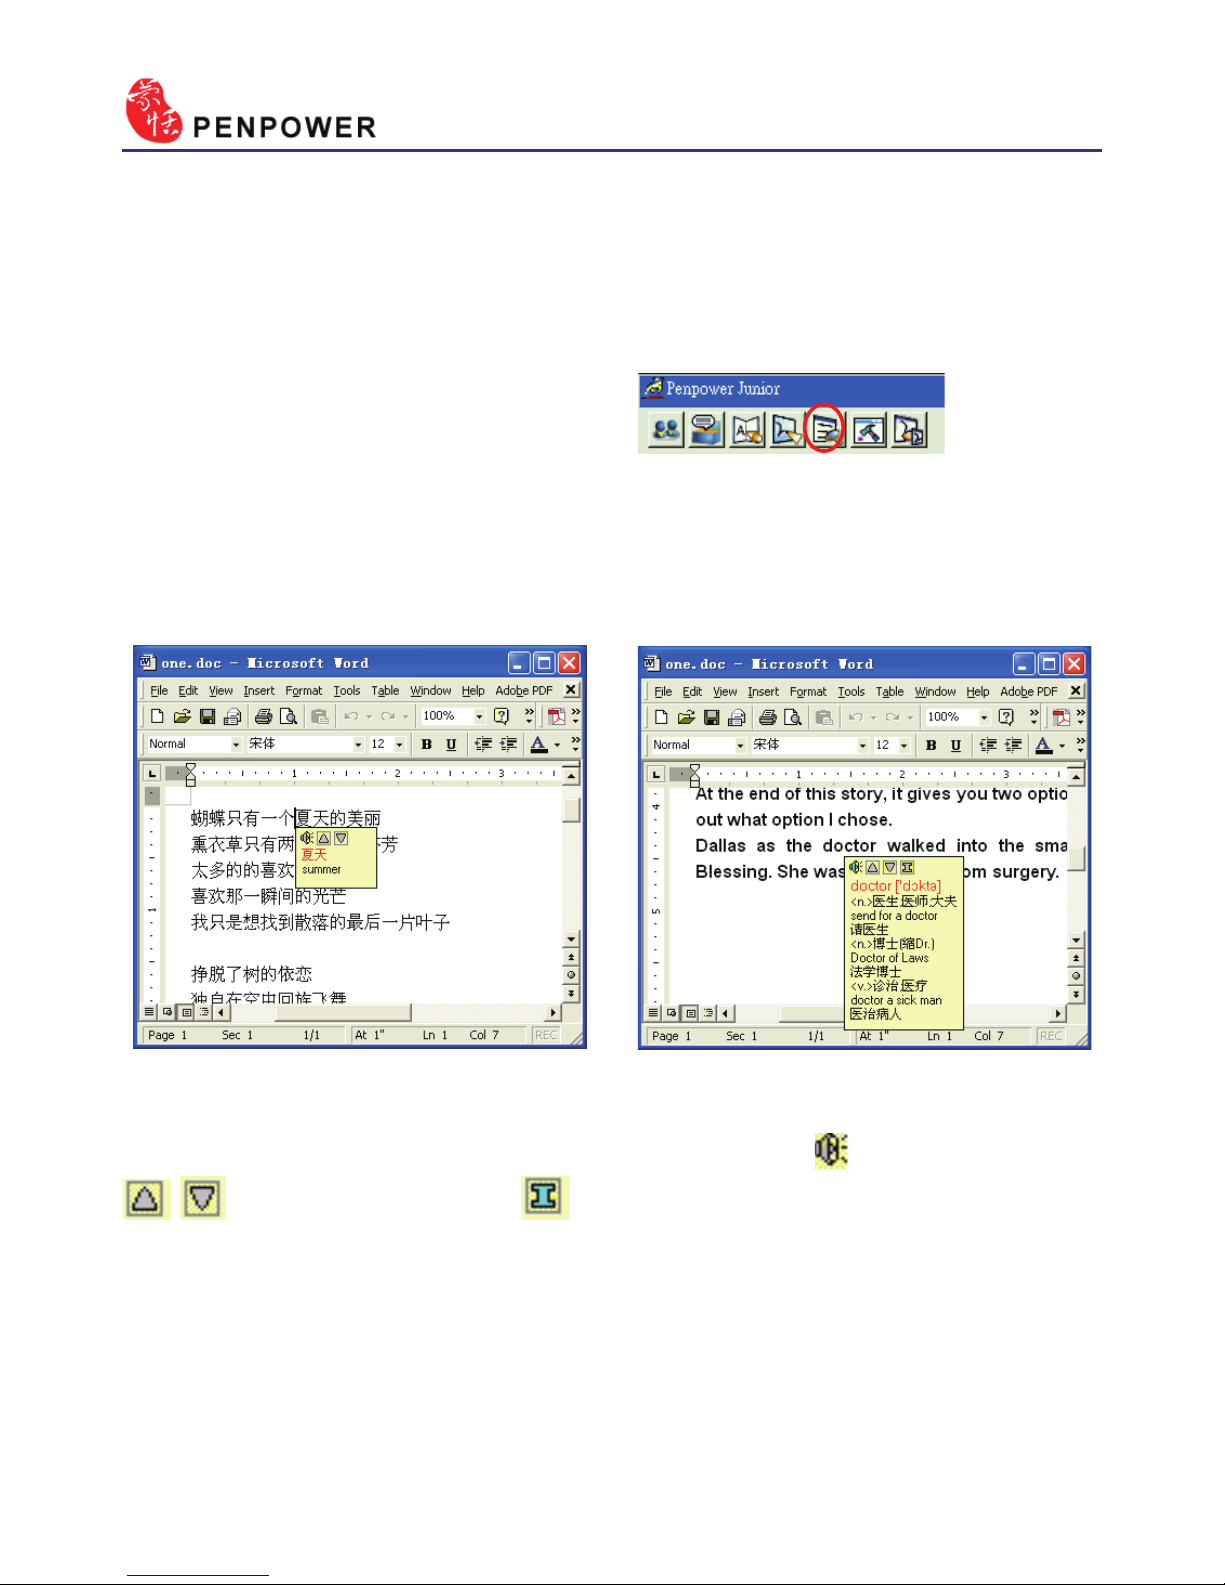
4-28
4.14 On-Line Translator
1. Open the Mouse mode and press the “On-Line Translator” button to
open the On-Line Translator function. Press the button again to close the
function.
When reading English or Chinese articles, if you encounter unknown
characters or phrases, move the cursor over the characters, and a translation
window pops up to explain them for you.
When you move the cursor outside the interactive scope, the window
will disappear. In the window, you can press the play button or character
/ or phrase explanation buttons.
Page 52
Chapter 4 New Handwriting/Mouse Mode
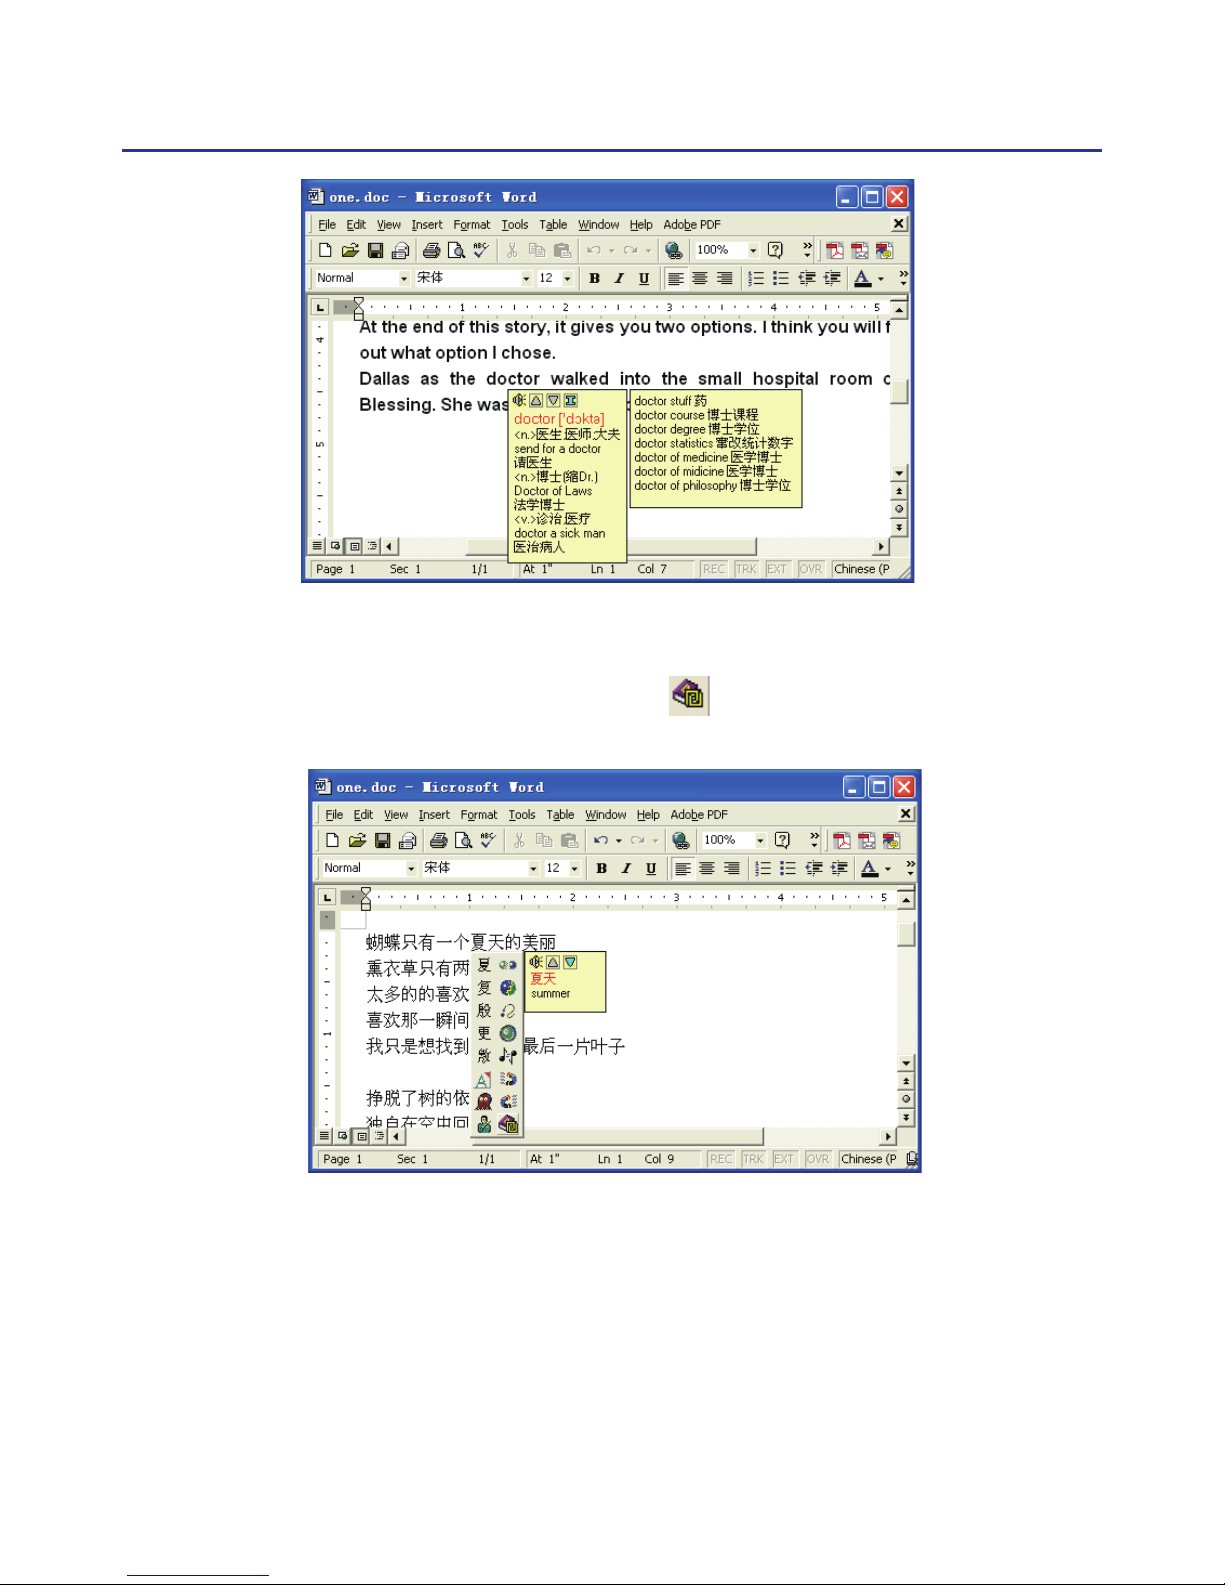
4-29
The online translation is used in the balloon interface. When you want
to look up a character’s translation, select button from the candidate
window.
Page 53
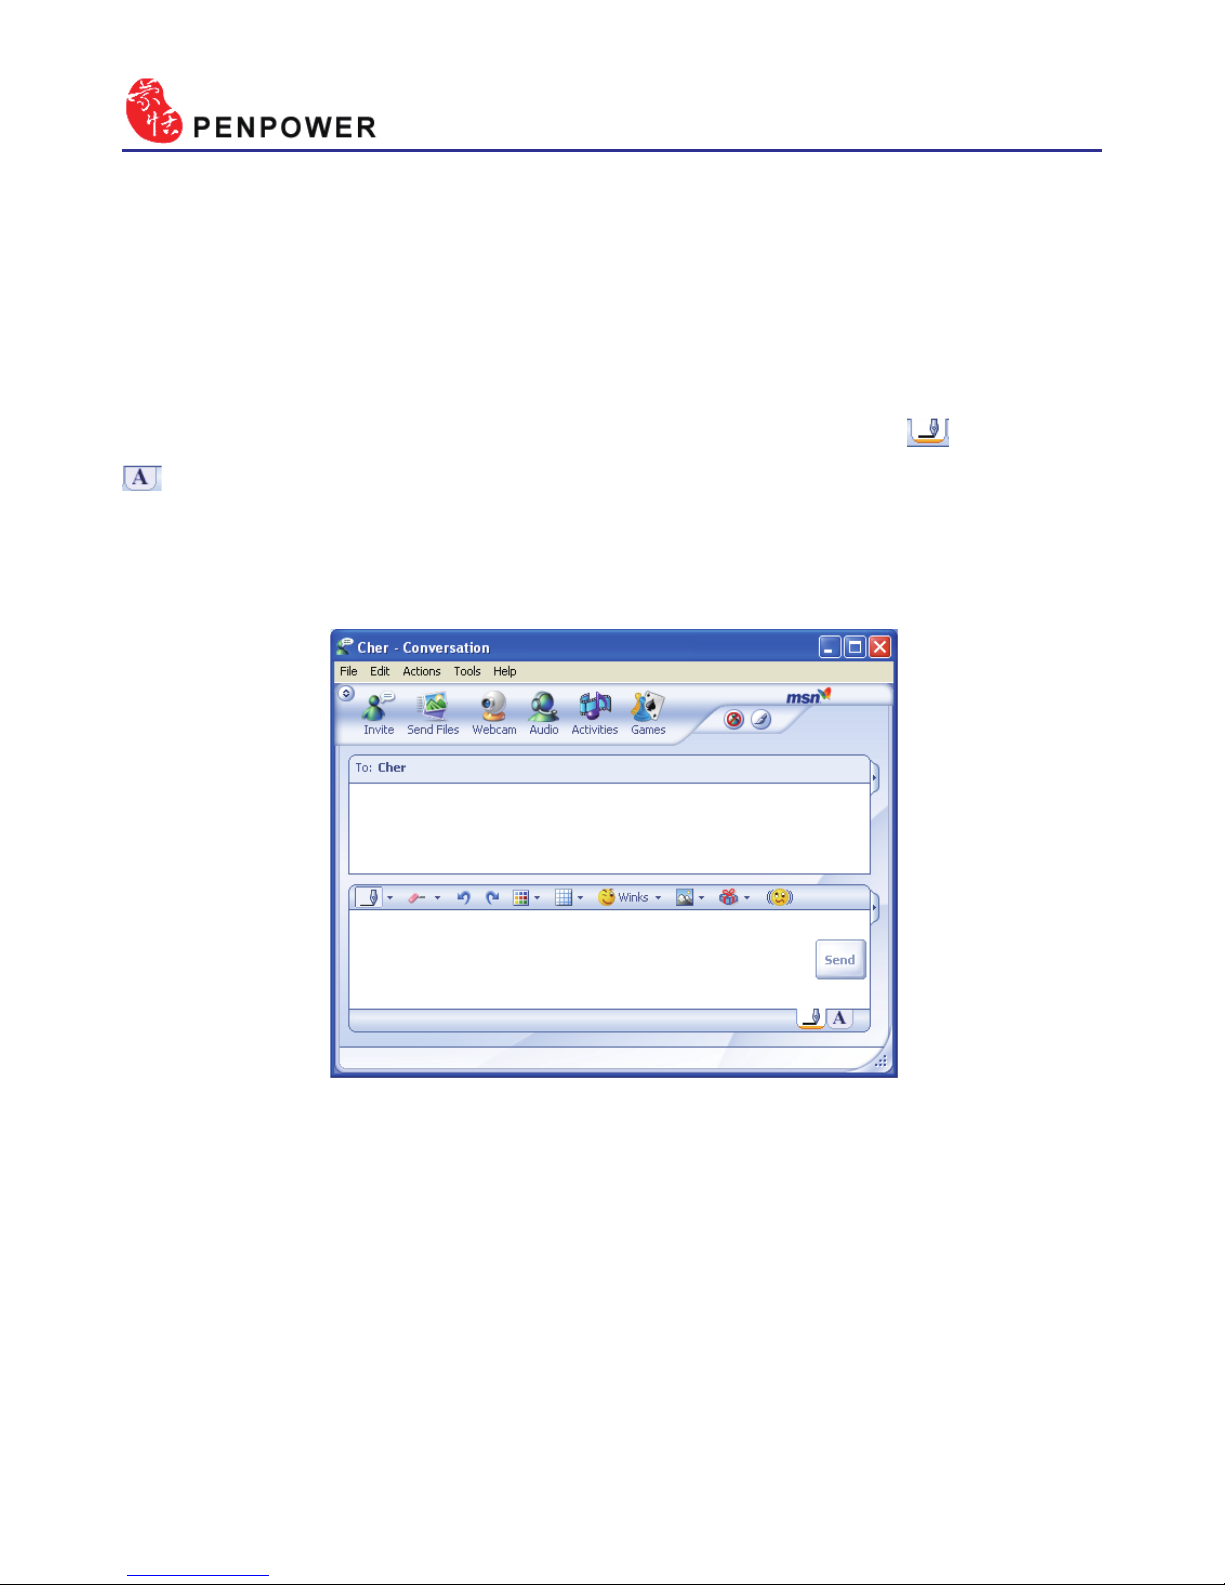
4-30
4.15 Using Penpower Jr. in MSN Messenger
Note: You have to install MSN Messenger version 6.1 or higher.
After you have signed in to the MSN Messenger, double click on the
person’s name to begin the conversation box. Below this conversation box,
there are two modes for you to select, including “Handwrite” and “Type”
. You can switch between the input modes as you like.
Note: If you can’t activate the handwriting mode, please visit the Microsoft website
and install the necessary handwriting components.
In the Handwrite mode, you can select the font size and font color from
the scroll bar menu provided. After the setting has been done, you can write
on the tablet and the words will appear as what you have previously set.
If you want to clear the words you have written, you can select and use
the eraser shown in the scroll bar.
After you have input your message, you can click on “send” to send
your handwritten message.
Page 54
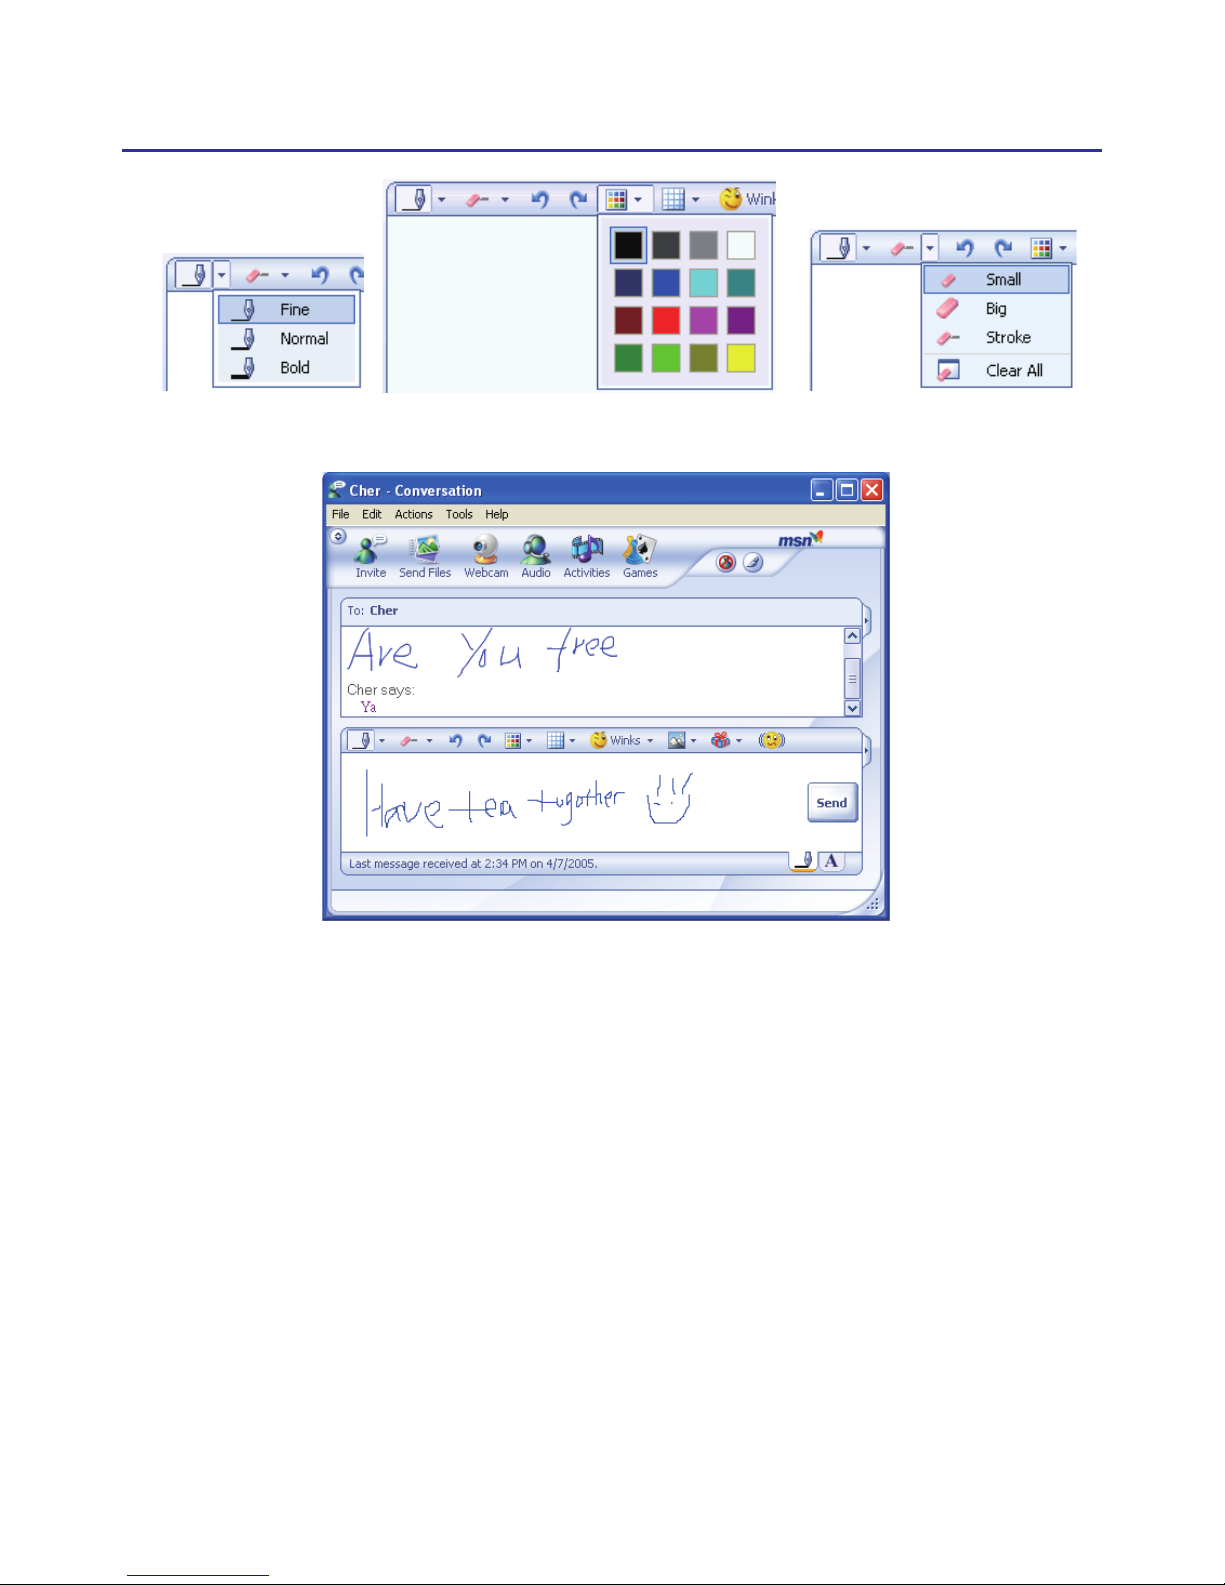
Chapter 4 New Handwriting/Mouse Mode
4-31
set ink width set ink color set the rubber
Page 55

4-32
Page 56

Chapter 5 Traditional Mode
5-1
Chapter 5 Traditional Mode
5.1 Run Penpower Jr. Handwriting System
Run “Start/All Programs/Penpower Jr/Penpower Jr.”.
5.2 Writing Mode
There are two kind of writing modes. One is “Full-Screen” mode, the
other one is “Writing-Pad” mode. You can click the button to toggle
these two writing mode.
Page 57
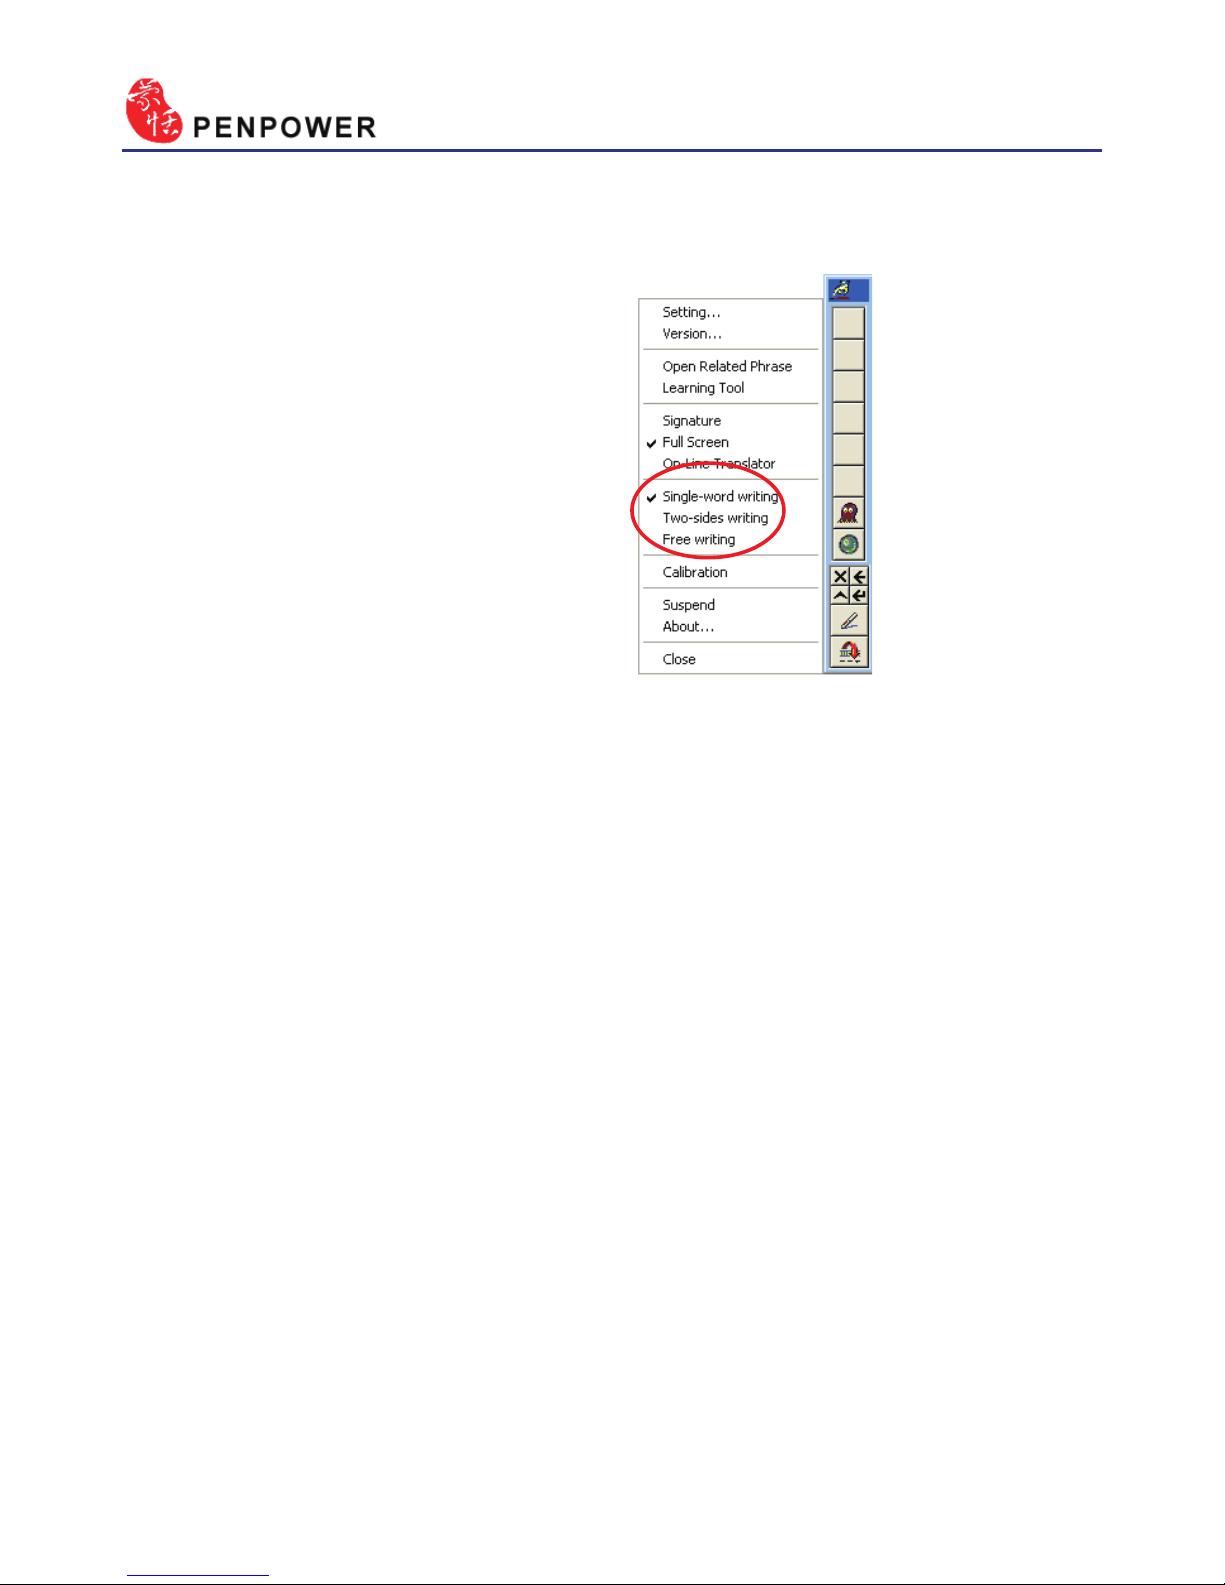
5-2
There are three different options
of full screen mode in the main
menu, Single-word writing, Twosides writing and Free writing.
Please see Chapter 4.3 for more
details.
5.3 Full Screen Handwriting
5.3.1 Balloon UI
This unique user interface let you edit recognition result freely in any
application. The visual user interface is hidden transparently.
When you want to correct some word, just move the cursor position on
this word for a while. The function tool bar will be popped up there where
the cursor is.
Please refer to Chapter 4.4-4.6 for more details.
Page 58
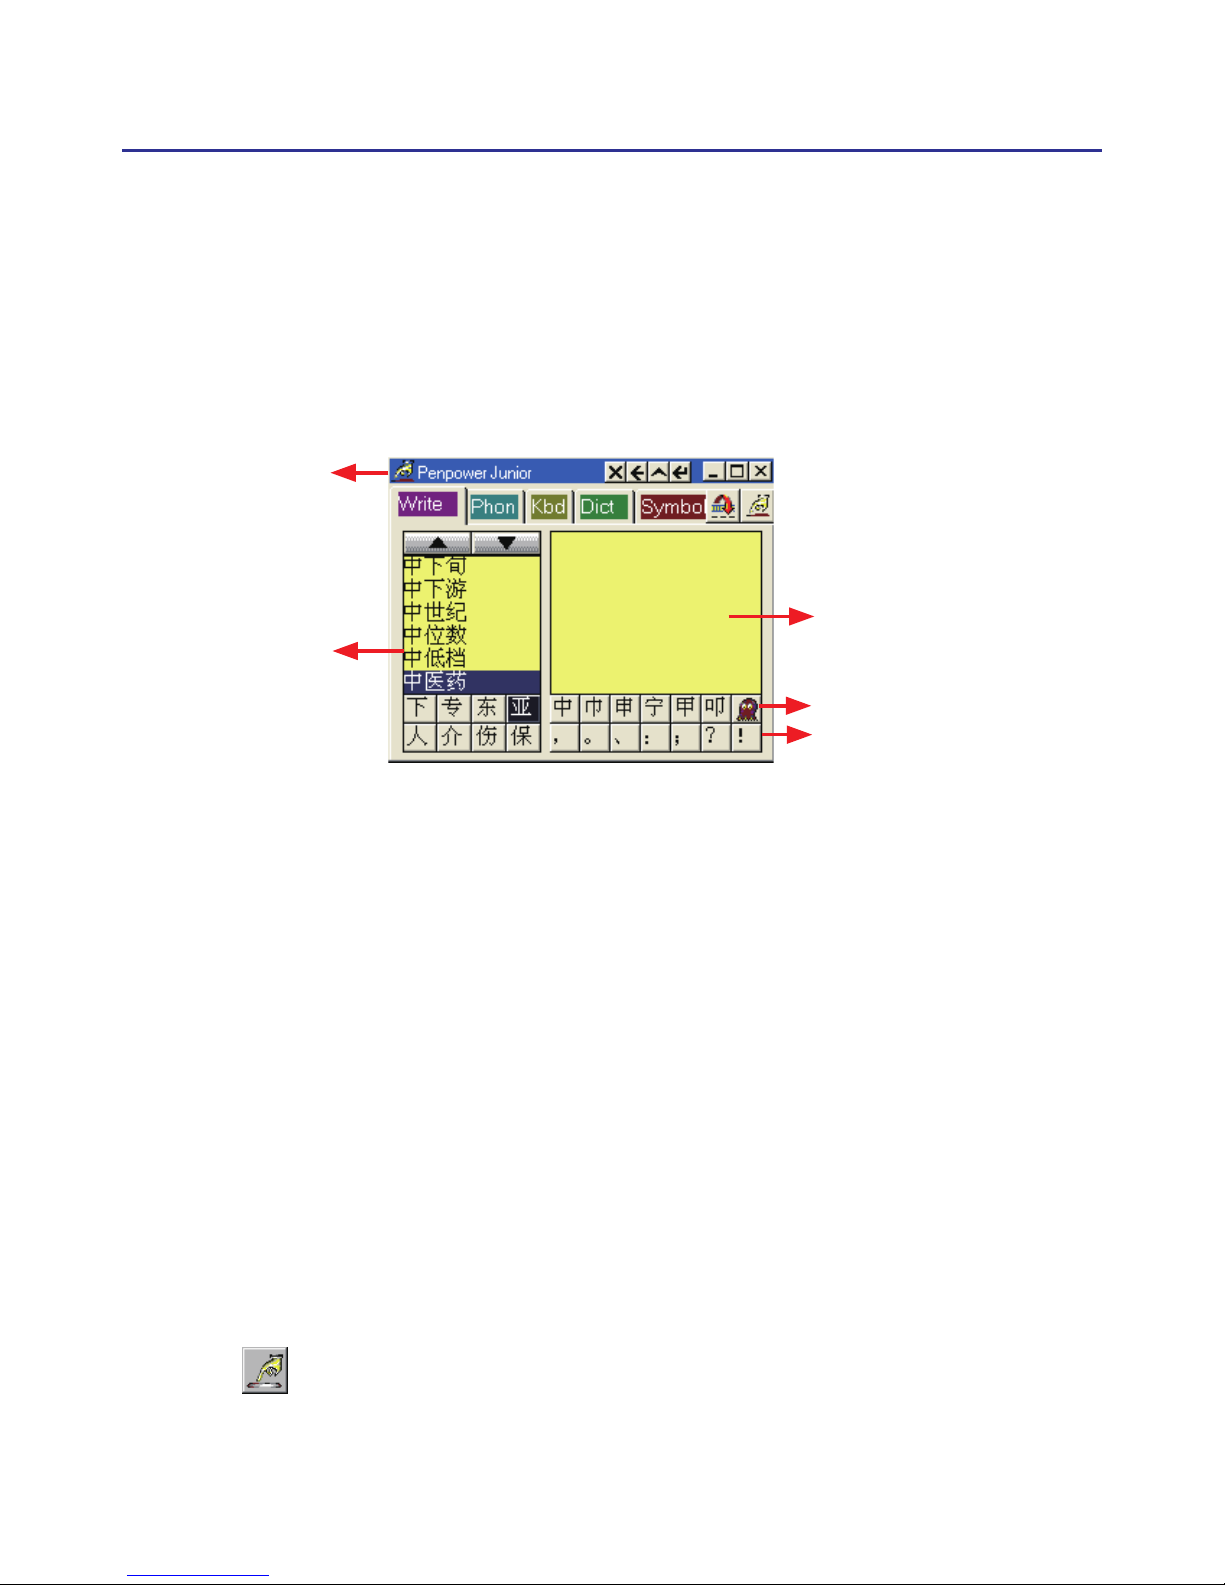
Chapter 5 Traditional Mode
5-3
You need to click the middle button or click on the writing area
switching into pen mode before you start writing. The color of writing area
will change from gray into yellow.
The left button would be revised for error correction on pen mode.
While you press the left button once each time, the latest recognized result
would be replaced with the next candidate word. It lets you correct the
result quickly without switching to mouse mode.
Click the middle button or click on the writing area again to switch into
mouse mode. The color of writing area will change from yellow into gray.
TIP : The writing-pad adopts shrink-expand user interface. It would expand into
normal size when the cursor move on it. Otherwise it will shrink as an small
icon to avoid occupying the screen.
5.4 Writing-Pad
There are ve input tools in Writing-Pad: Write, Phonetic, Keyboard,
Dictionary and Symbol.
5.4.1 Write Input Tool
Writing Area
Symbol
Candidate
Related Phrase
Title bar
Page 59
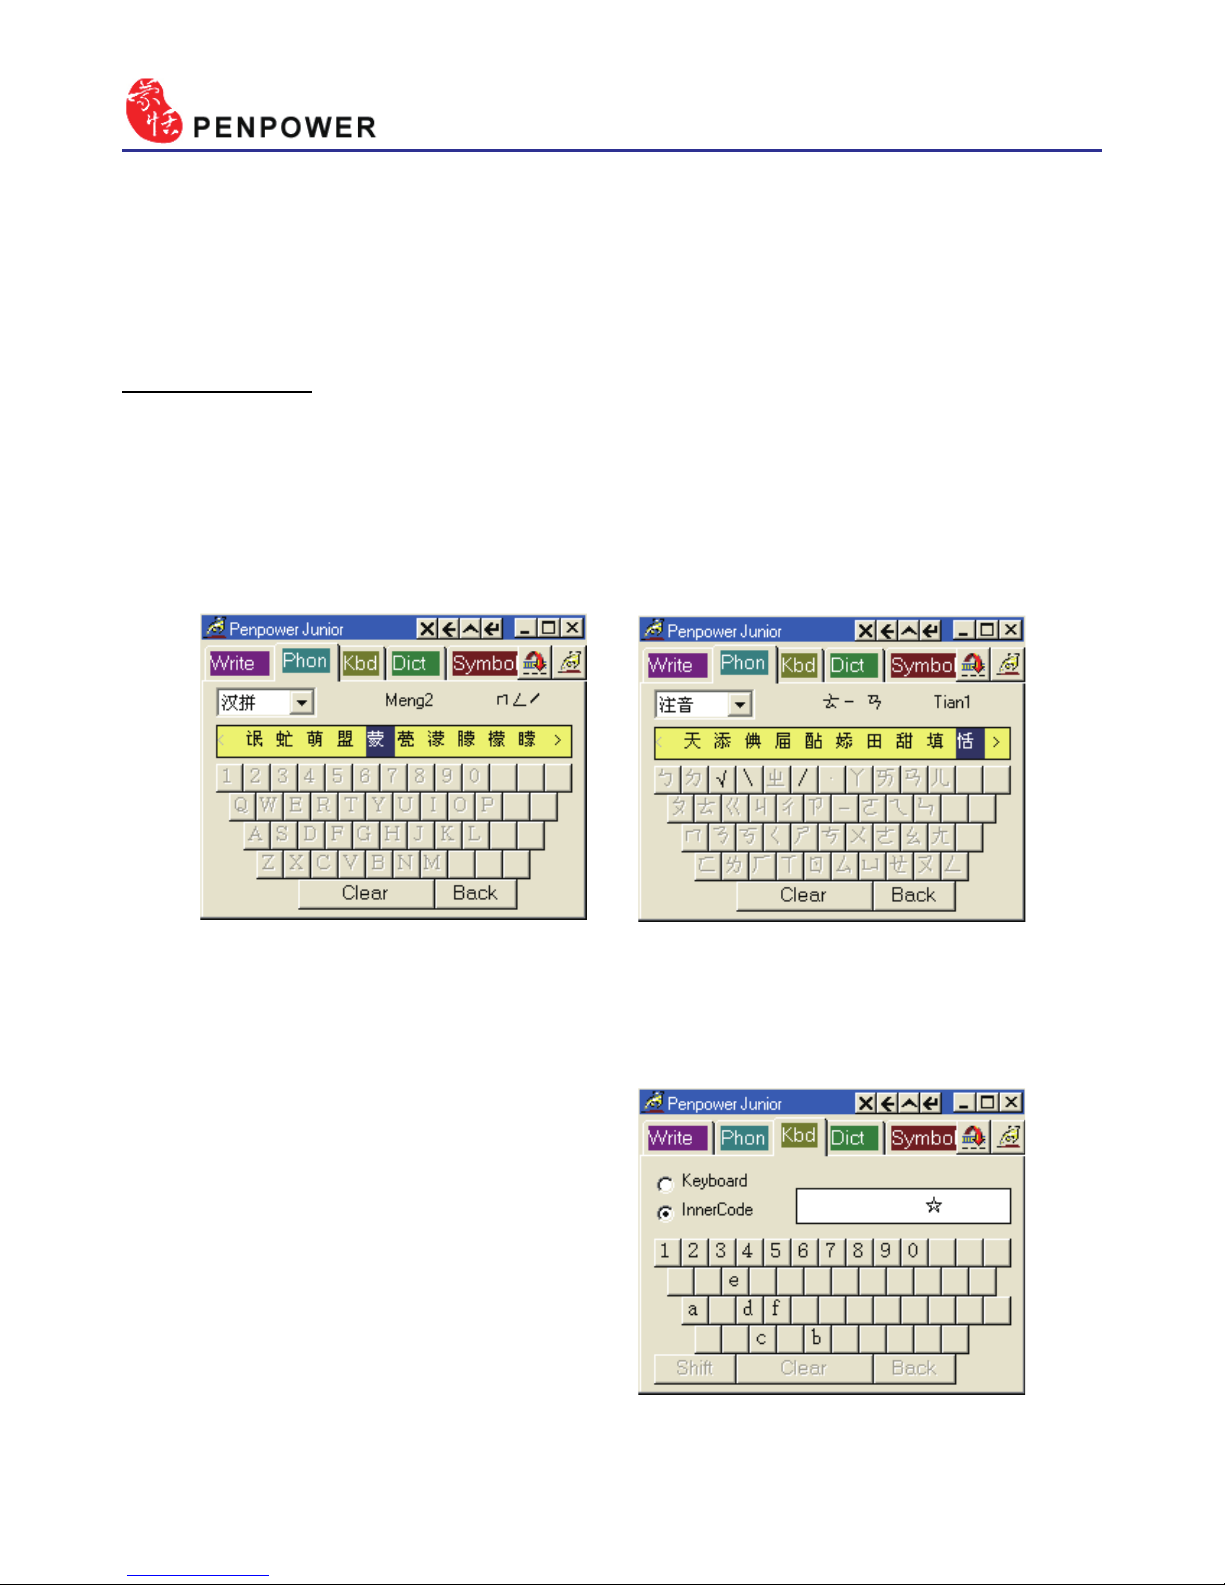
5-4
5.4.2 Phonetic Input Tool
There are three types of phonetic input tool, BoPoMo, Cantonese and
Beijing by default. You can create your own phonetic input tool.
How to Use
1. Select one phonetic input tool of BoPoMo, Cantonese, Beijing or others.
2. Click the phonetic button one by one in order.
3. The converted candidate character would be listed in the text buffer.
5.4.3 Keyboard Input Tool
Keyboard : Simulated software
keyboard.
Inner Code : e.g. The inner code
of [☆] in hexidecimal is A1EE.
Click [A],[1],[E],[E] button one
by one in order,and then get [☆].
Page 60
Chapter 5 Traditional Mode
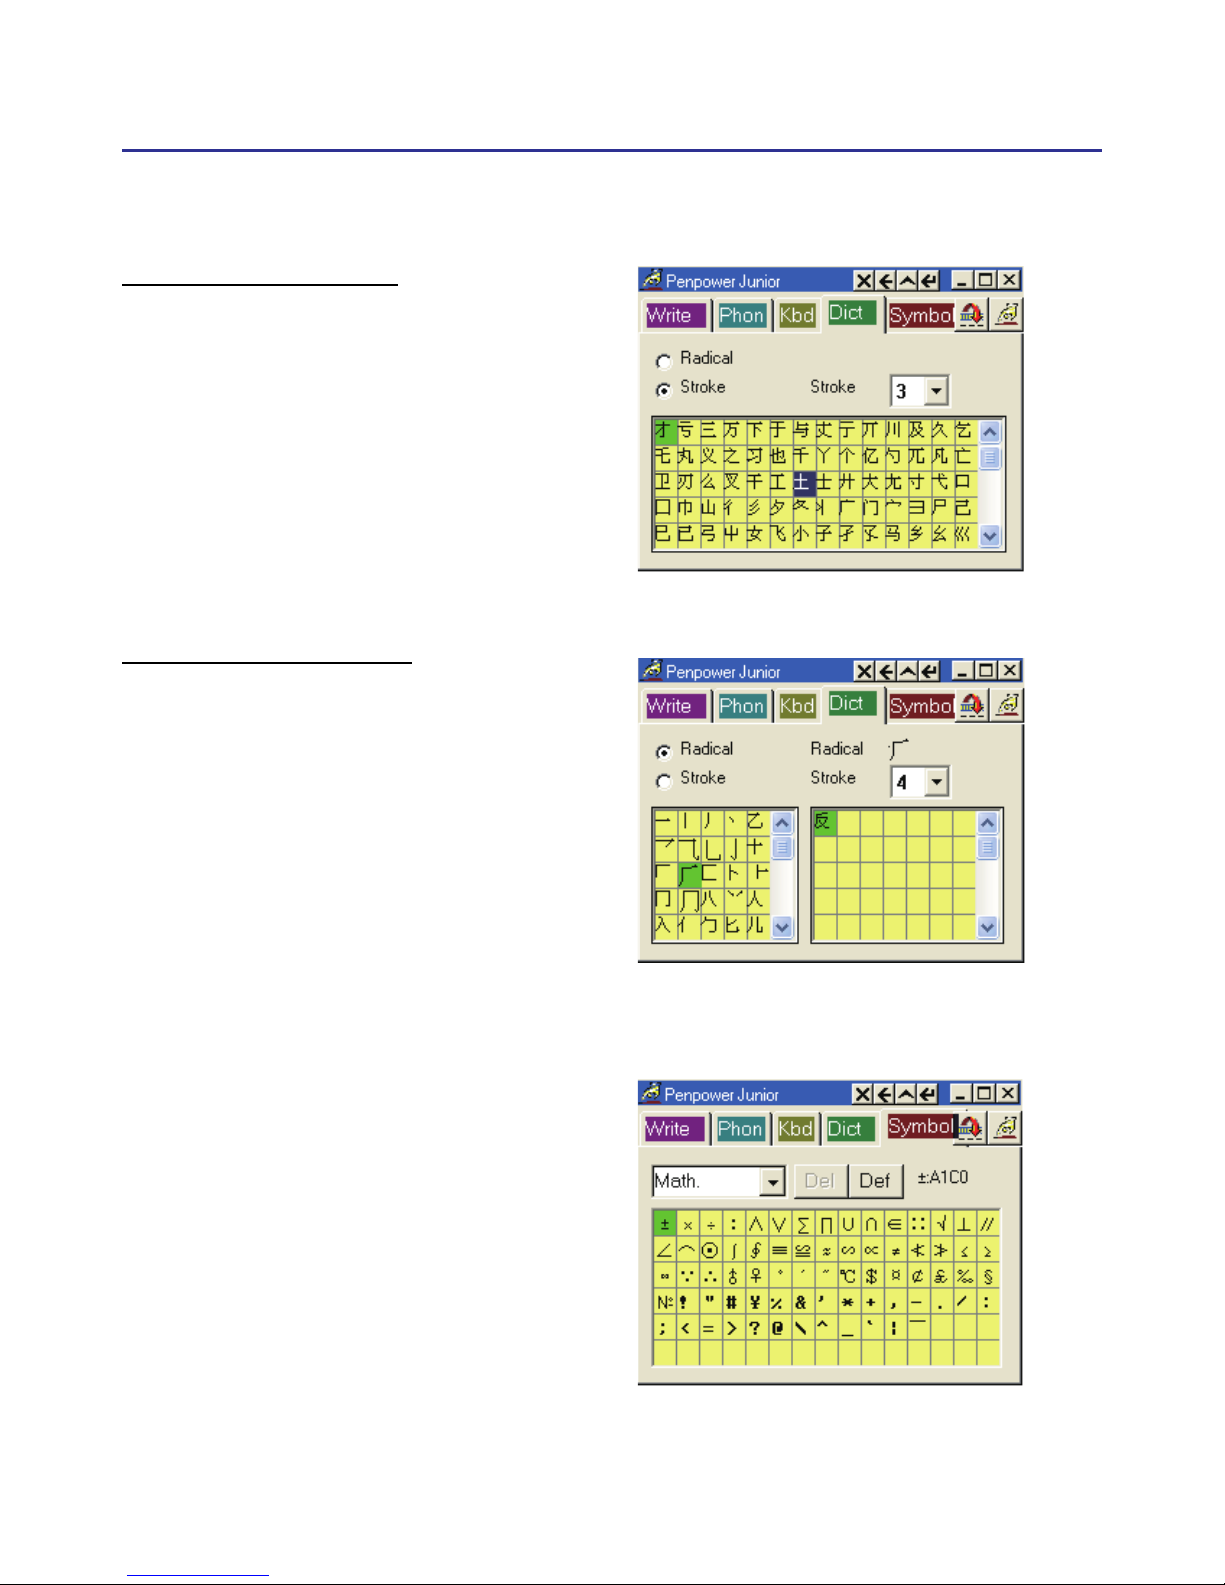
5-5
5.4.5 Symbol Input Tool
The special symbols are grouped
into multiple pages of table. Select
the suitable table and click the
symbol what you want to get. It
allows you to customize the symbol
tables.
5.4.4 Dictionary Input Tool
Query by stroke :
Query by radical :
Page 61

5-6
2. Write down the rst word of one phrase. e.g. If you want to input the
phrase
『一方面』
, just write the rst word
『一』
.
3. All the phrases beginning with this word
『一』
will be listed on the top.
4. All the memorized words you have ever written
right following this word
『一』
will be listed on
the bottom.
5. Click the phrase or memorized word that you want
to send it into the caret. e.g.
『一方面』
.
5.5 Phrase
5.5.1 Use Phurase to input words
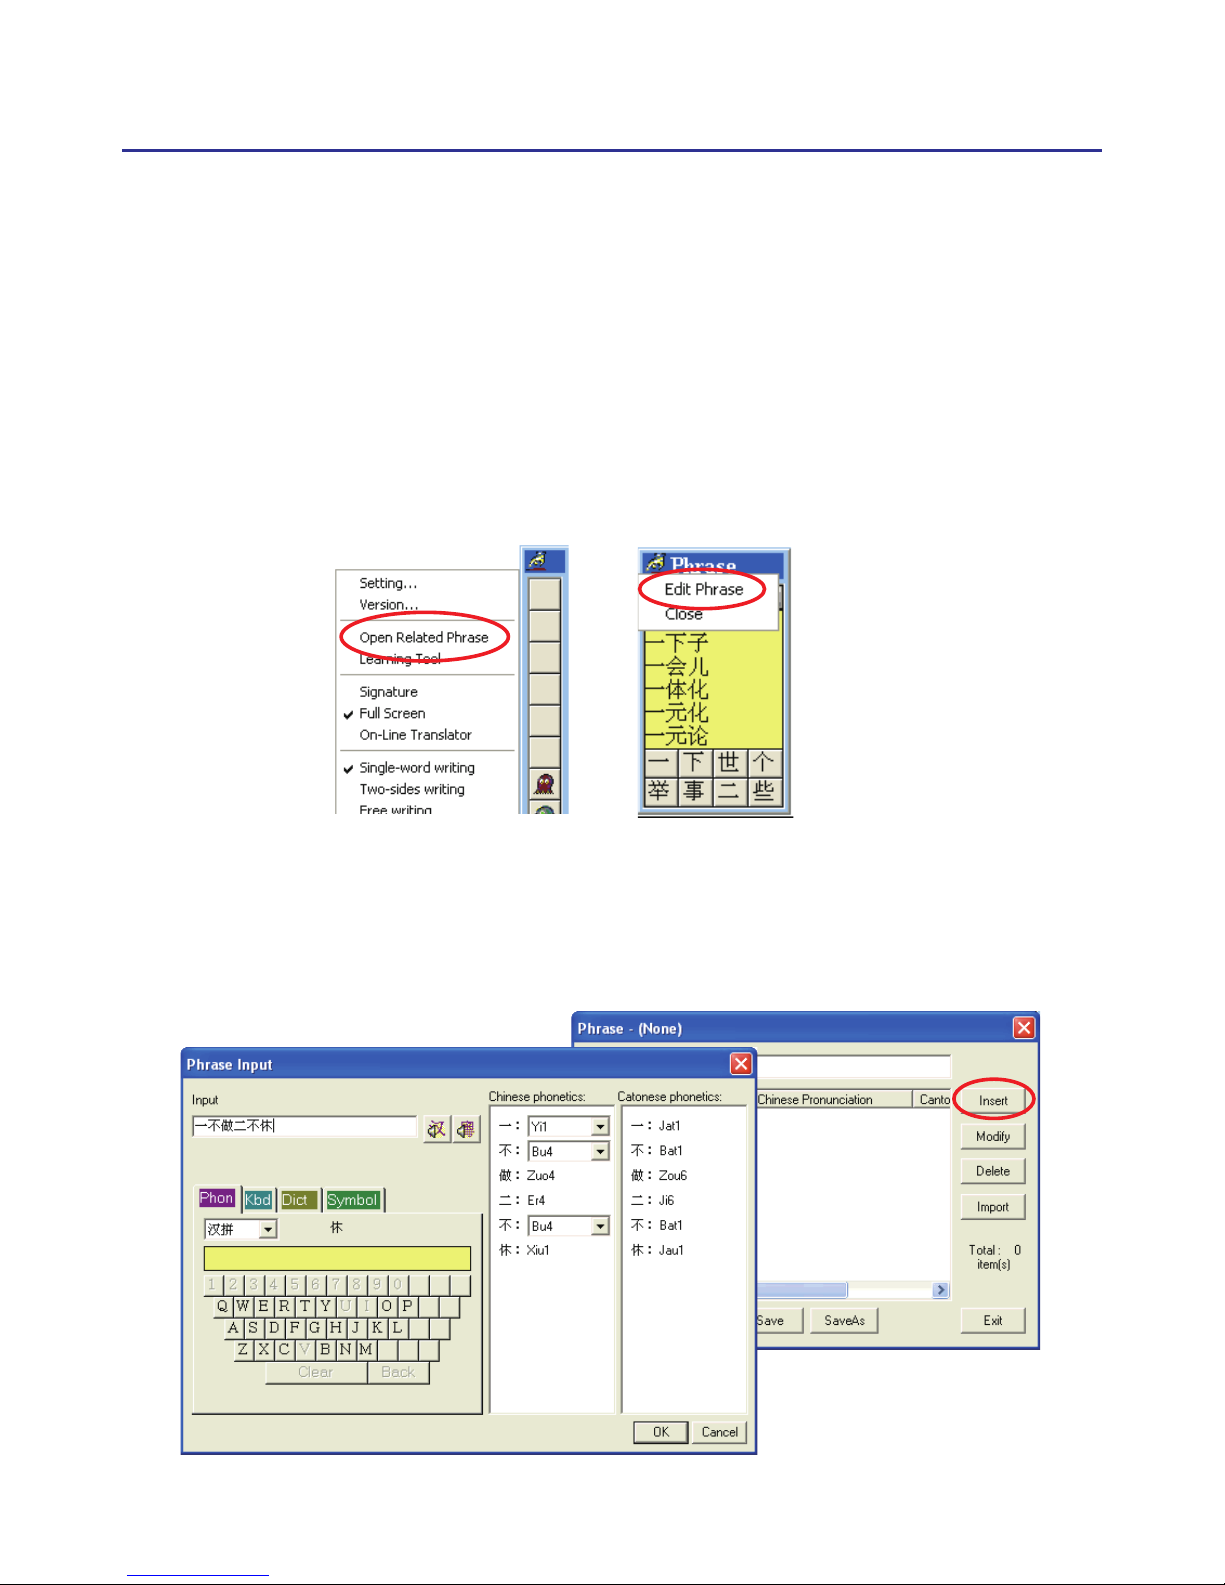
1. In both the Full Screen and Writing-Pad modes the Associations diction-
ary window will always be displayed.
Note: In Full Screen Handwriting mode, if the Associations dictionary is closed,
select “Open Related Phrase” from the menu to reopen it.
Page 62
Chapter 5 Traditional Mode
5-7
5.5.2 Update Phrase Database
There are thousands upon thousands default phrases that you can use in
the Penpower handwriting recognition. It also allows you to customize the
phrase database to meet your needs.
1. Open the PenPower Junior main menu and select “Open Related
Phrase”. Then select “Edit Phrase” from the Phrase menu to open the “Edit
Phrase” diolague to edit the dictionary.
2. Click “Insert” to open the phrase input dialog. You can input a new
phrase here.
Please see Chapter 4.7.2 for more details.
Page 63
5-8
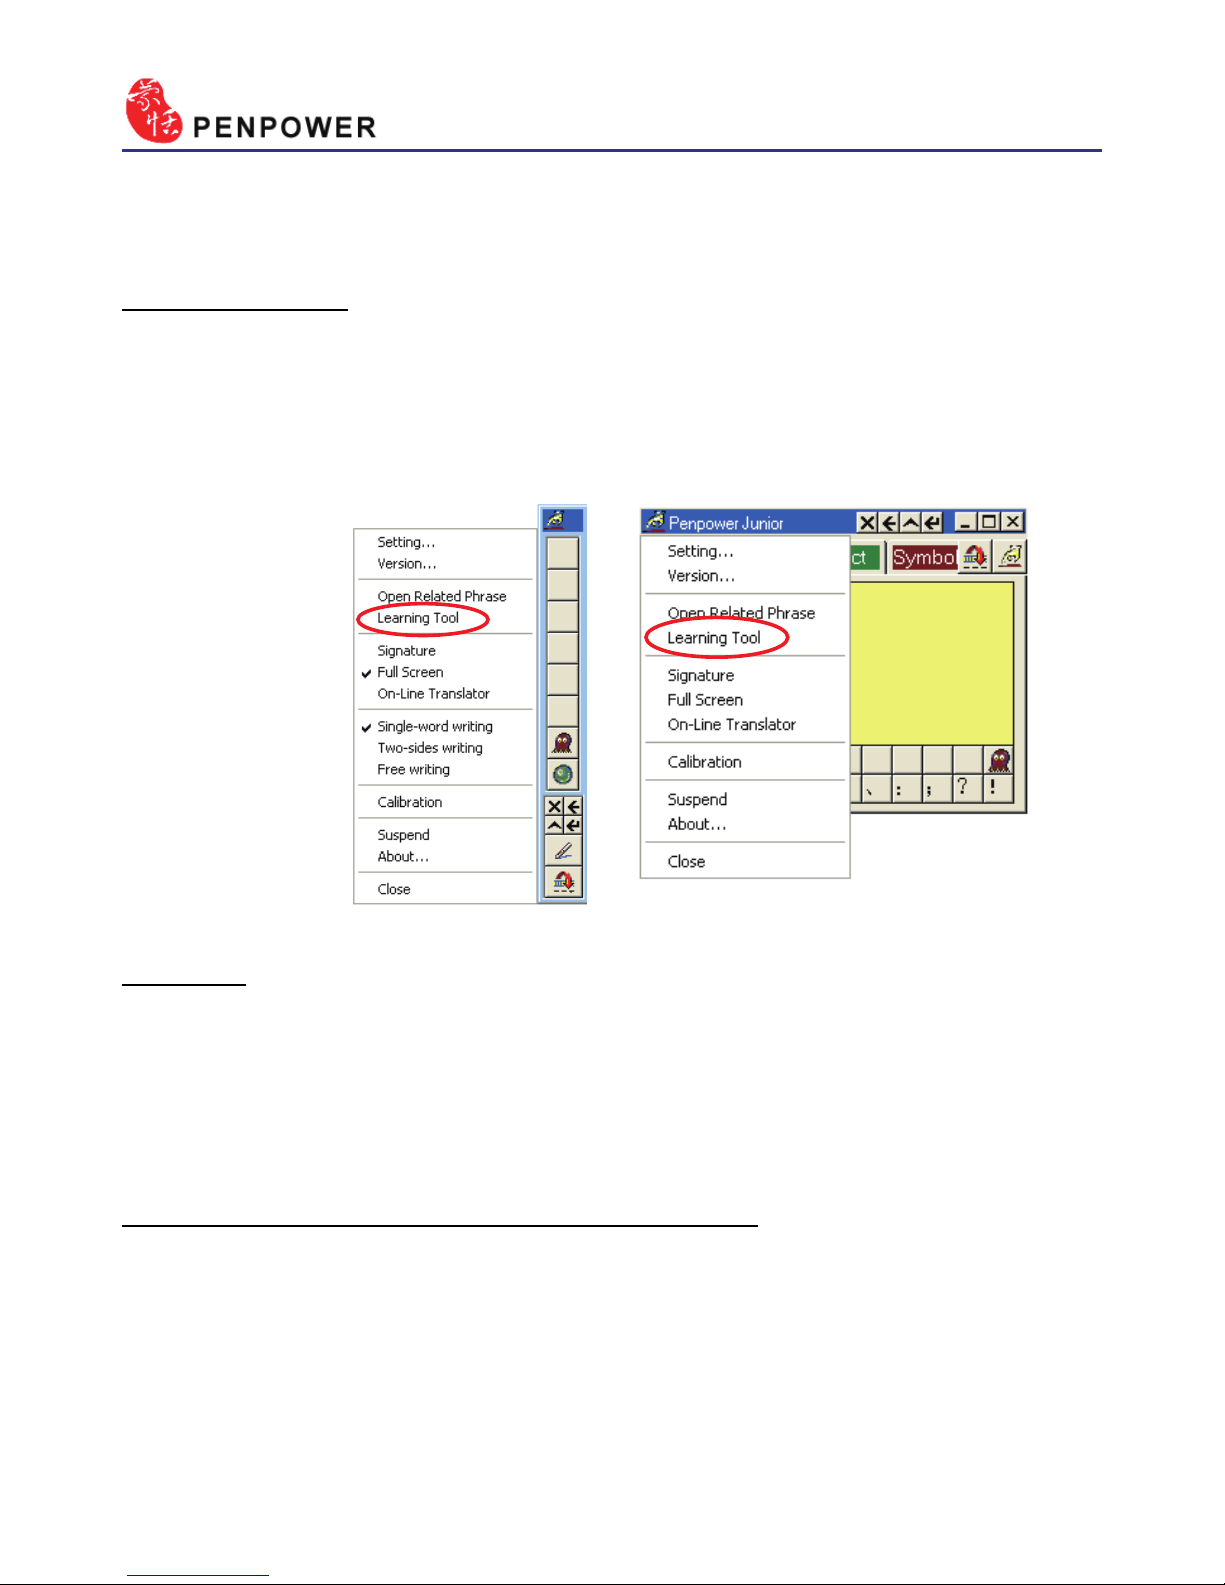
5.6 Other Functions
Learning Tool
Select the “Learning Tool” from the main menu to open the Learning
Tool diolague.
Please see Chapter 4.8 for more details.
Gesture
Penpower Jr. handwriting system support four standard inking gesture.
You can handwriting these gestures to simulate keyboard input.
Please see Chapter 4.9 for more details.
Mix Traditional and Simplied Writing
You can mix writing traditional and simplied Chinese words. Whatever
you wrote, choose different recognition engine to decide the results being
traditional or simplied words.
Please see Chapter 4.10 for more details.
Page 64
Chapter 5 Traditional Mode
5-9
Switch Version
Open the main menu. Select “Version...”. There are three Versions for
Choose. Please see Chapter 4.11 for more details.
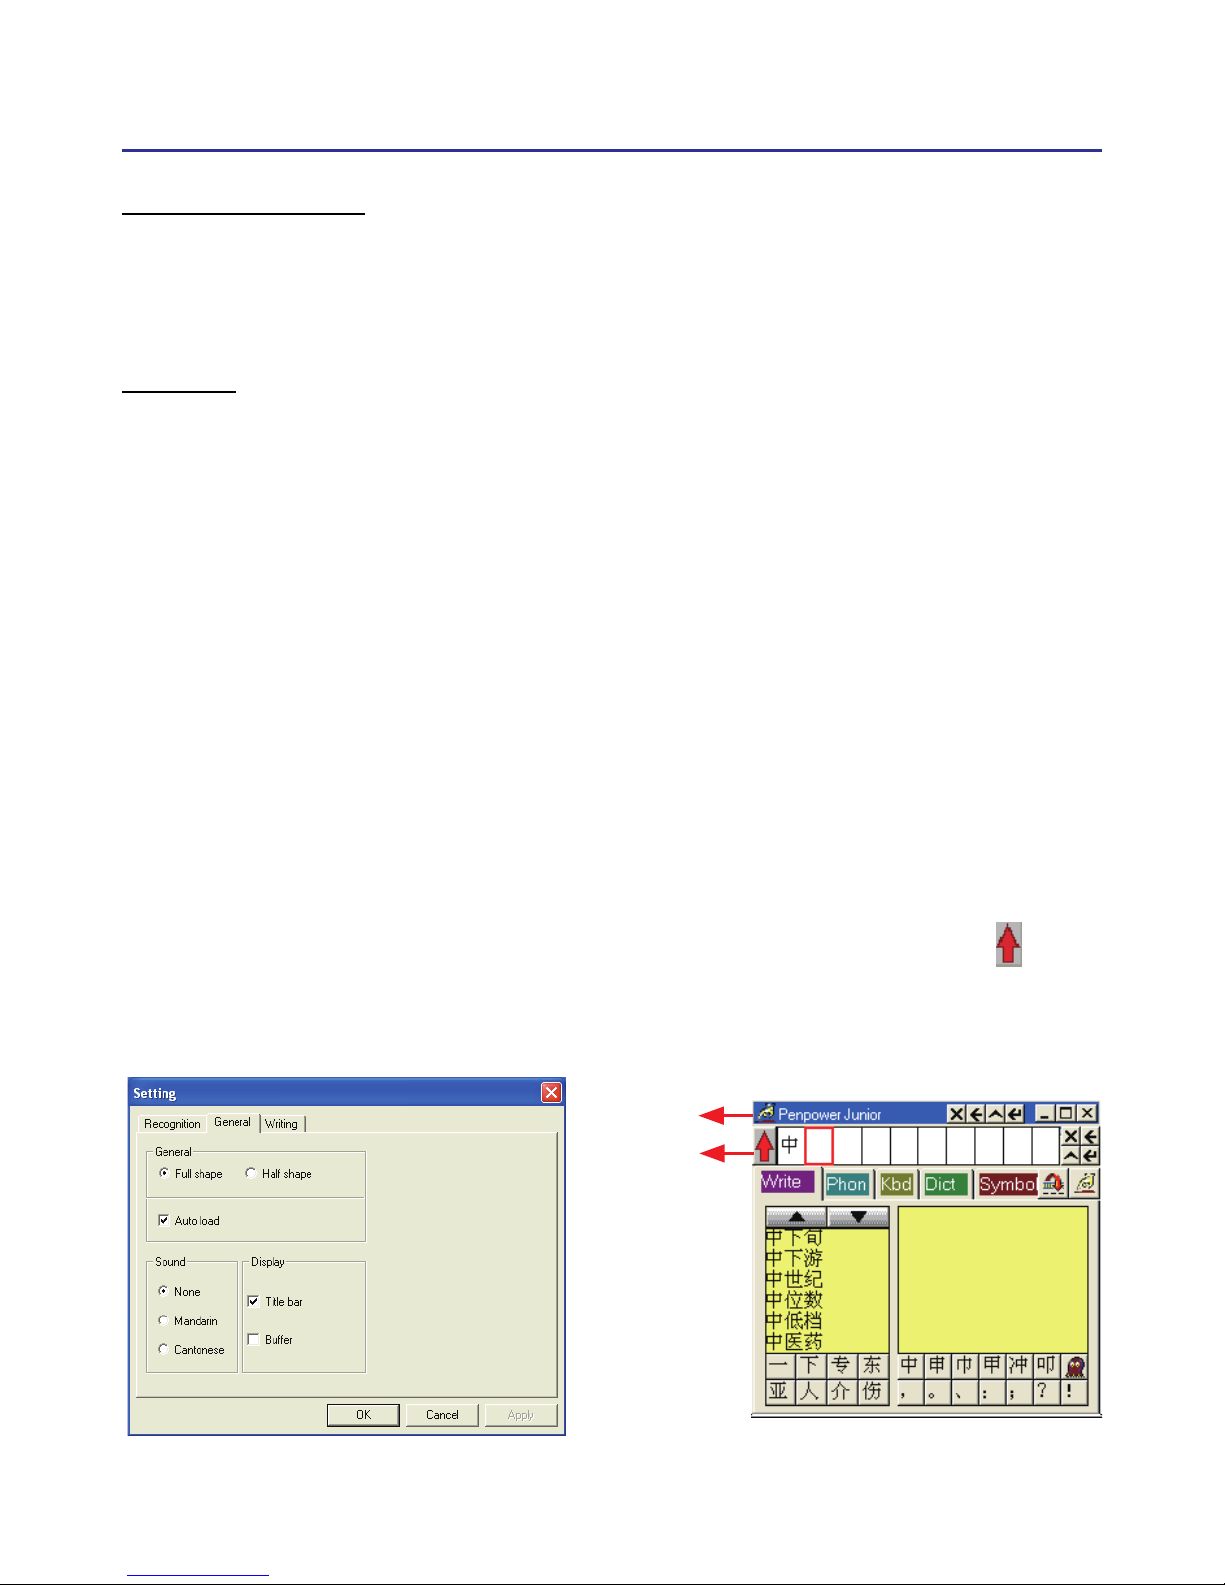
Setting
In PenPower Junior’s options menu select “Settings” to open the set-
tings page. You can congure the recognition engine, output format or
writing tracks here. For more details on PenPower settings please refer to
the explanation provided in Chapter 4.12. The only difference is that in
Traditional mode the writing pad display can be congured here.
Please switch to the “General” setting page and in the “Display” area
you can choose whether to display the window title and the buffer area.
Title bar : Show/hide the caption of writing-pad.
Buffer: Show/hide the text buffer of Writing-pad. If the buffer is displayed,
all the recognition result would be put here. After the buffer is full, the
rst word would be popped out into the caret. You can also click button to force all the result popped out and clear the buffer anytime. If the
buffer is hidden, the recognition result will be send to the caret directly.
Title bar
Buffer
Title bar
Buffer
Page 65

5-10
Signature
Move the caret to where the signature will be. Then select “Signature”
from the main menu to open the “Welcom to Penpower Signature Tool”
screen, and enter in signature mode.
Please refer to Chapter 4.13 for more details.
On-Line Translator
Select “On-Line Translat” from the main menu to open the On-Line
Translat function. Select again to close the function.
Please refer to Chapter 4.14 for more details.
Using Penpower Jr. in MSN Messenger
If you have to install MSN Messenger version 6.1 or higher and Penpower Jr., you can use Penpower Jr. touch pad to input or draw in MSN.
Please refer to Chapter 4.15 for more details.
Page 66
Chapter 6 Assistant Tools
6-1
Chapter 6 Assistant Tools
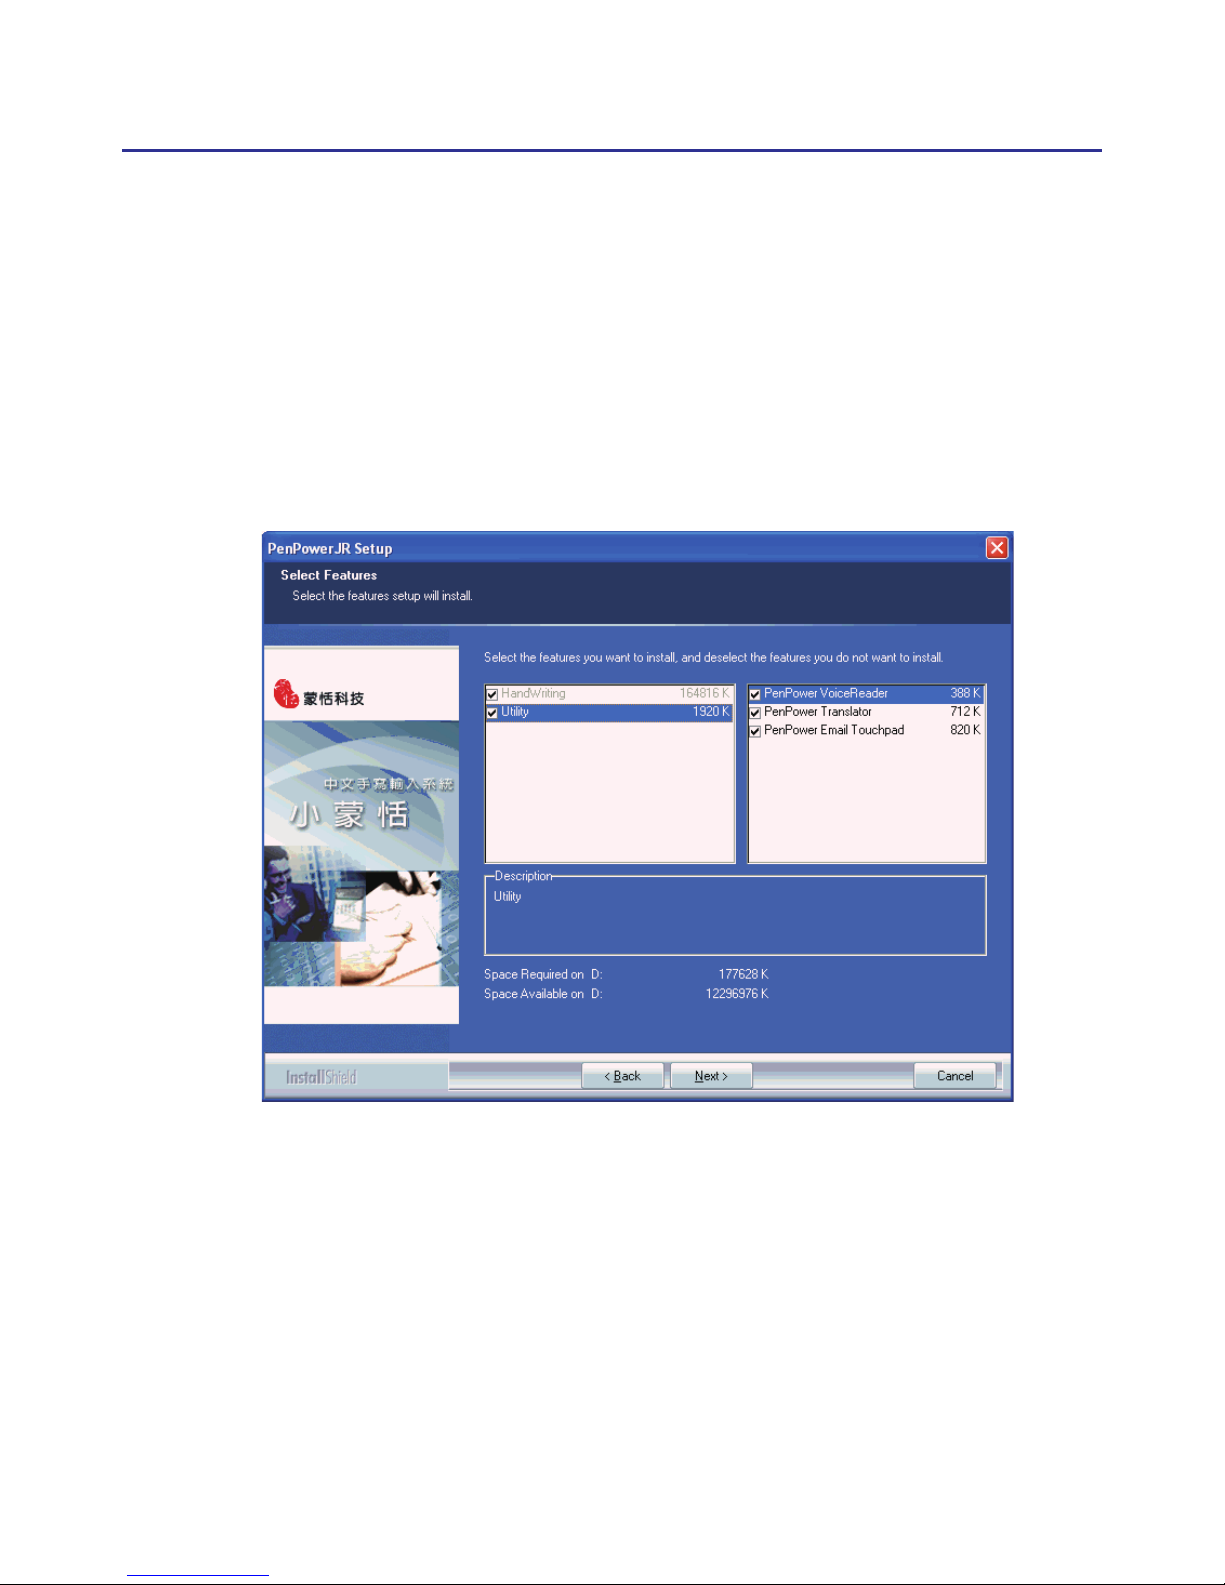
When you install Penpower Jr. handwriting software, you can choose
custom installation to install the Assistant Tool: Penpower VoiceReader,
Penpower Email Touchpad and Penpower Translator.
Note: The “Penpower E-mail Function” is only available with the Crystal Touch,
Silver/Steel and Diamond models.
Page 67
6-2
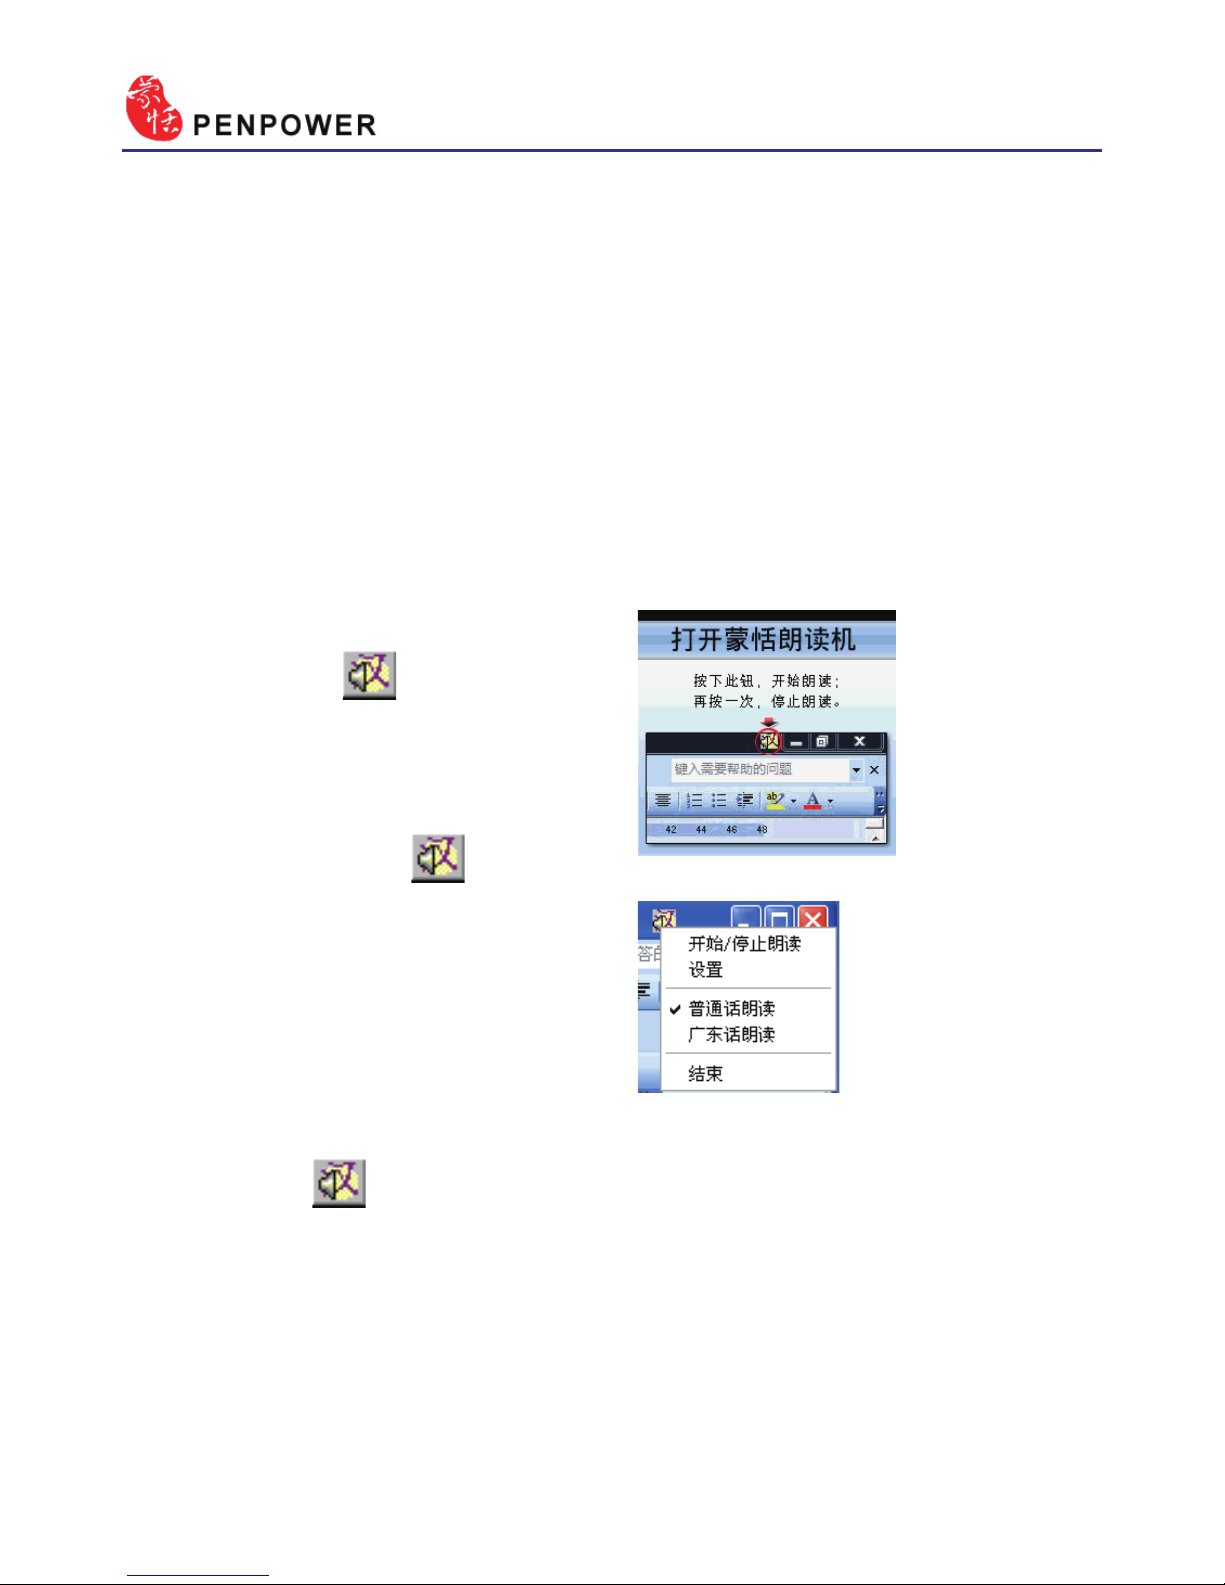
4. If you click without selection, then select “
開始/停止朗讀
”. The
text would be read aloud from caret location.
Note: The Windows Vista 64bit edition does not support the direct text-to-speech
function. You must select a section of text before you can use the text-to-
speech function.
2. After VoiceReader is executed,
the small icon would be
displayed on the right top corner
of any application.
3. If you select one paragraph of
text rst, then click , and
select “
開始/停止朗讀
”. The
selected text will be read aloud.
You can choose Mandarin or
Cantonese tone pronunciation
from the menu.
6.1 Penpower VoiceReader
Integrate the Text to Speech (TTS) technology to read aloud the Chinese
article content within any window.
6.1.1 Use Penpower VoiceReader
1. Run “Start/All Programs/Penpower Jr/Penpower VoiceReader”.
Note: Before run Penpower VoiceReader, please launch Penpower Junior rst or
the system will prompt you to do so.
Page 68
Chapter 6 Assistant Tools
6-3
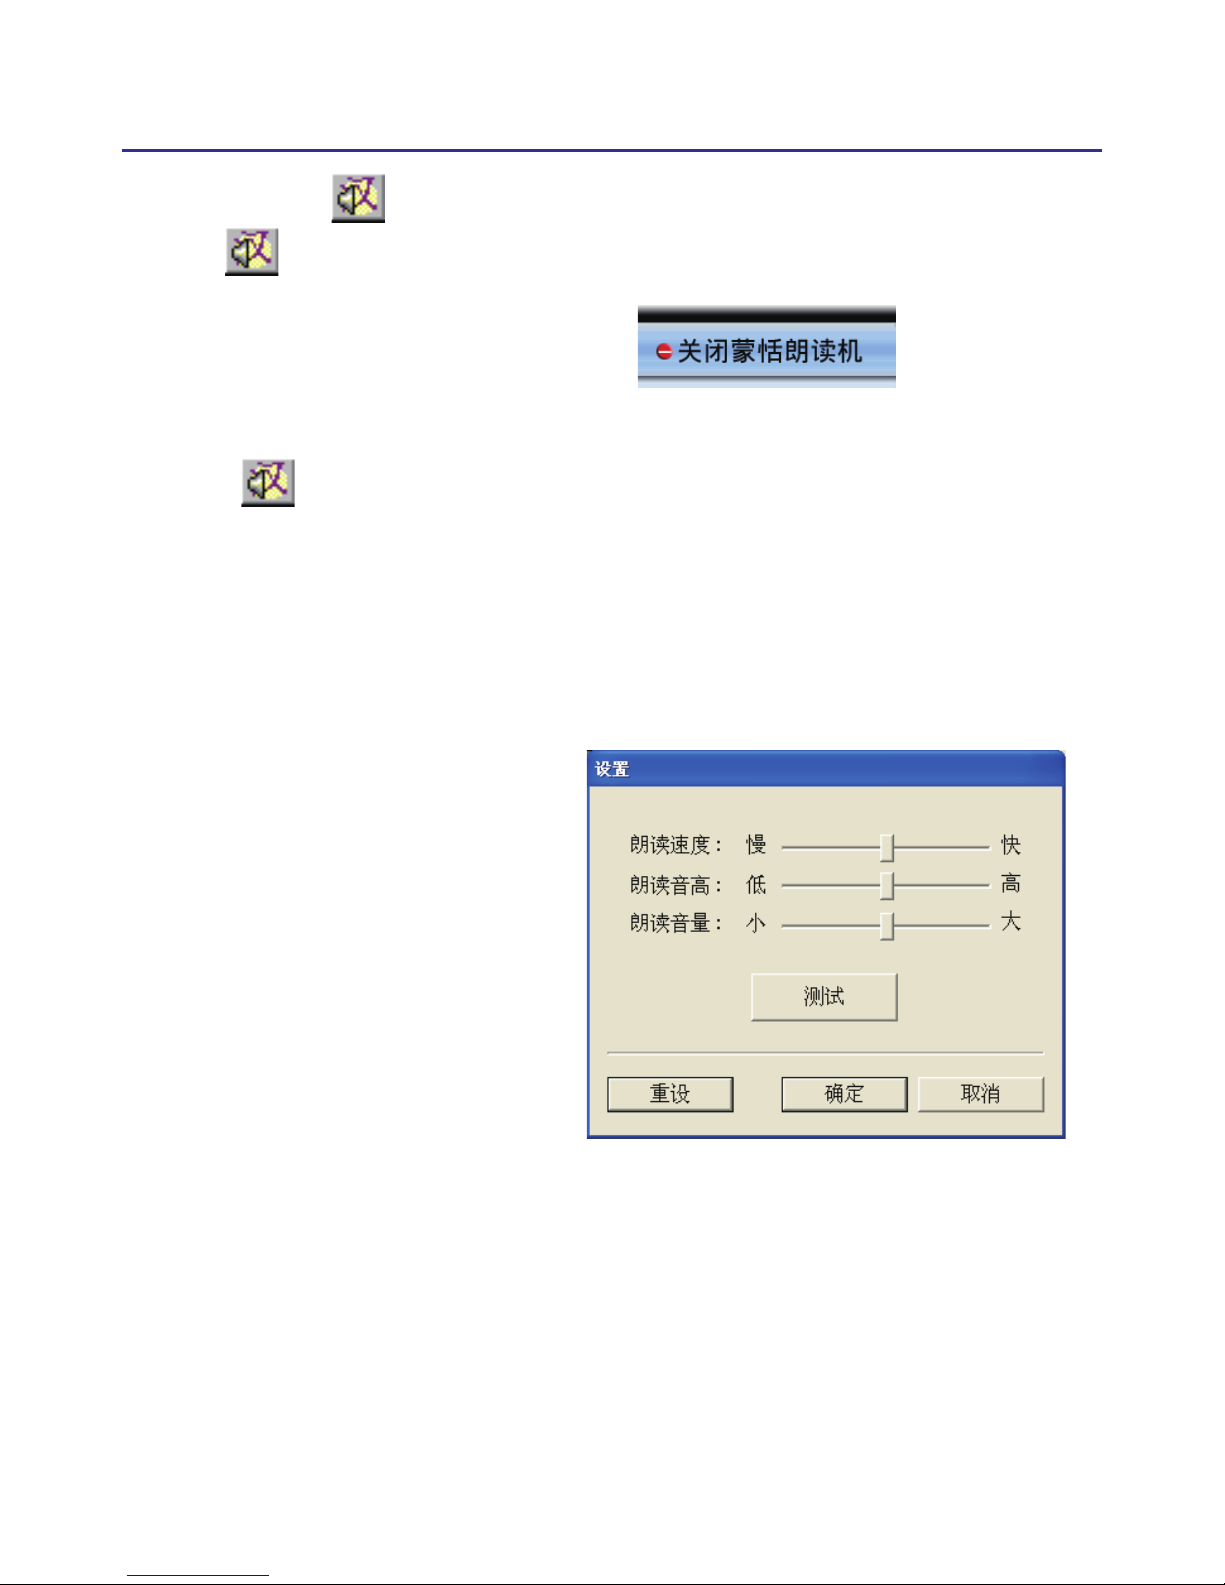
5.You can click , and select “
開始/停止朗讀
” again to stop reading.
6.Click , select “
結束
” to exit the Penpower VoiceReader.
6.1.2 Reading Setting
1. Click , select “
設置
” to open the setting dialog.
朗讀速度
: Adjust the speed of reading.
朗讀音高
: Adjust the tone of reading.
朗讀音量
: Adjust the volume of reading.
Page 69
6-4
6.2 Penpower Translator
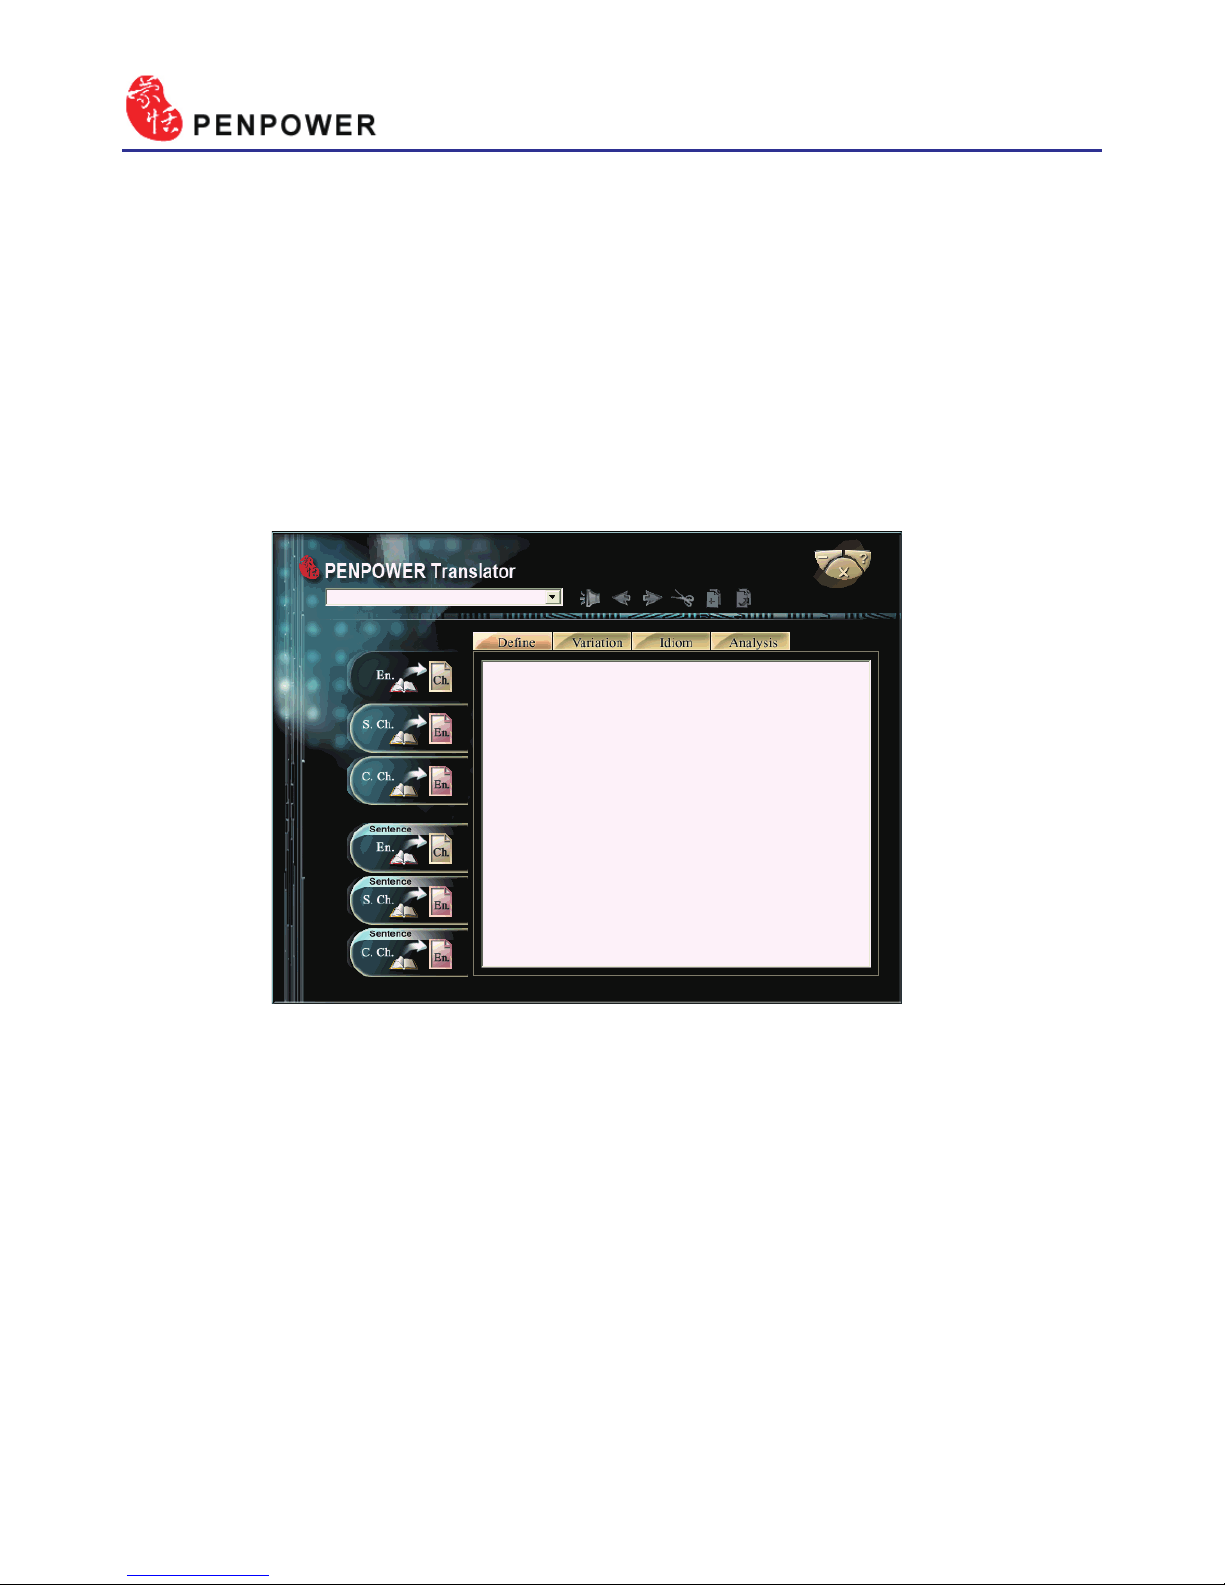
This is a word translator of Chinese to English or English to Chinese,
and sentence translator of English to Chinese.
Run “Start/All Programs/Penpower Jr/Penpower Translator”.
Note: Before run Penpower Translator, please launch Penpower Junior rst or the
system will prompt you to do so.
6.2.1 English Words
1. Click the button “En. Ch.” on the left.
2. In the input frame on the upper left corner, enter an English word, hit
Enter to see all the Chinese explanation.
3. Choose different tabs to look up English word Dene, Variation, Idiom
and Analysis.
Page 70
Chapter 6 Assistant Tools
6-5
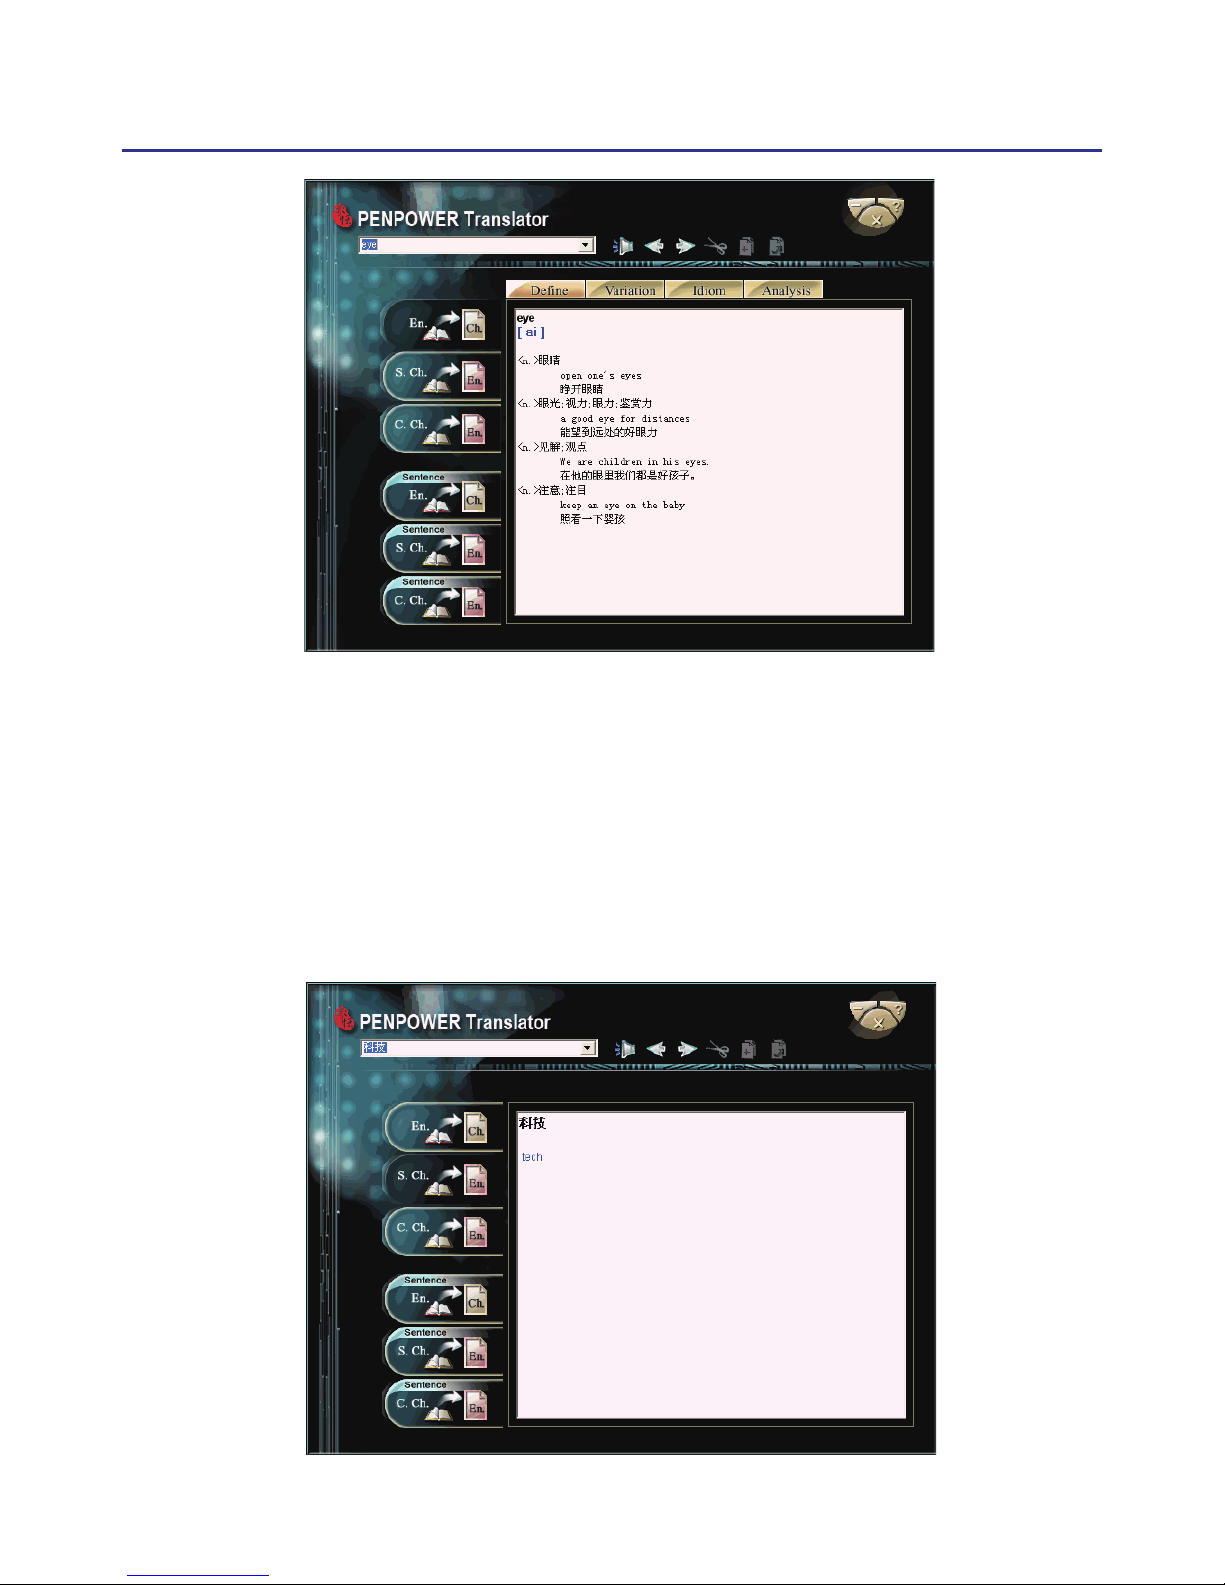
6.2.2 Chinese Characters
1. Click the button “S.Ch. En.” on the left.
2. In the input frame on the upper left corner, input a Chinese character or
phrase, and then hit Enter to see the English explanation.
Tip: If the Chinese word you wish to look up is Traditional Chinese, please
select the “ C. Ch. En.” translation option.
Page 71
6-6
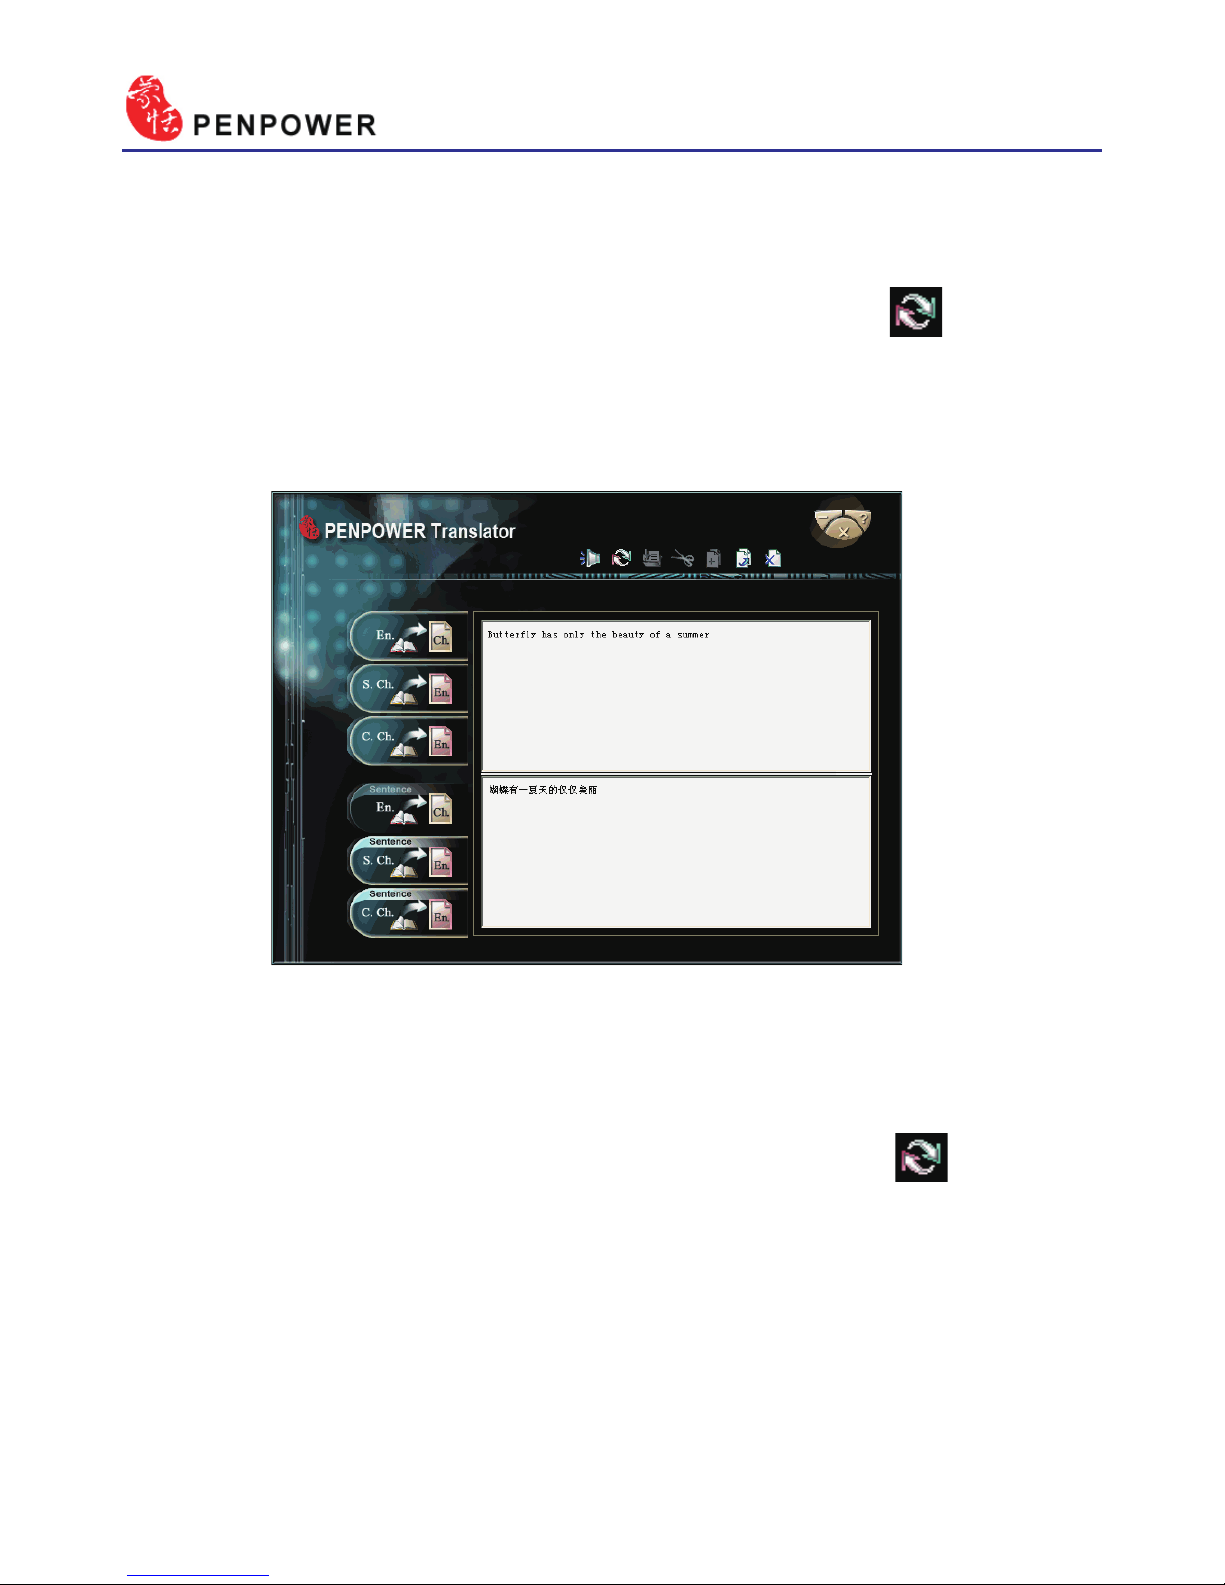
6.2.3 English Chinese Article Translator
1. Click the button “Sentence En. Ch.” translation on the left.
2. In the top input frame, input an English article, click the button to
start translation. The translation result is shown in the lower input frame.
Tip: When you translate a whole article, make sure there’s a period mark at the
end of each sentence. It will increase the accuracy of translation.
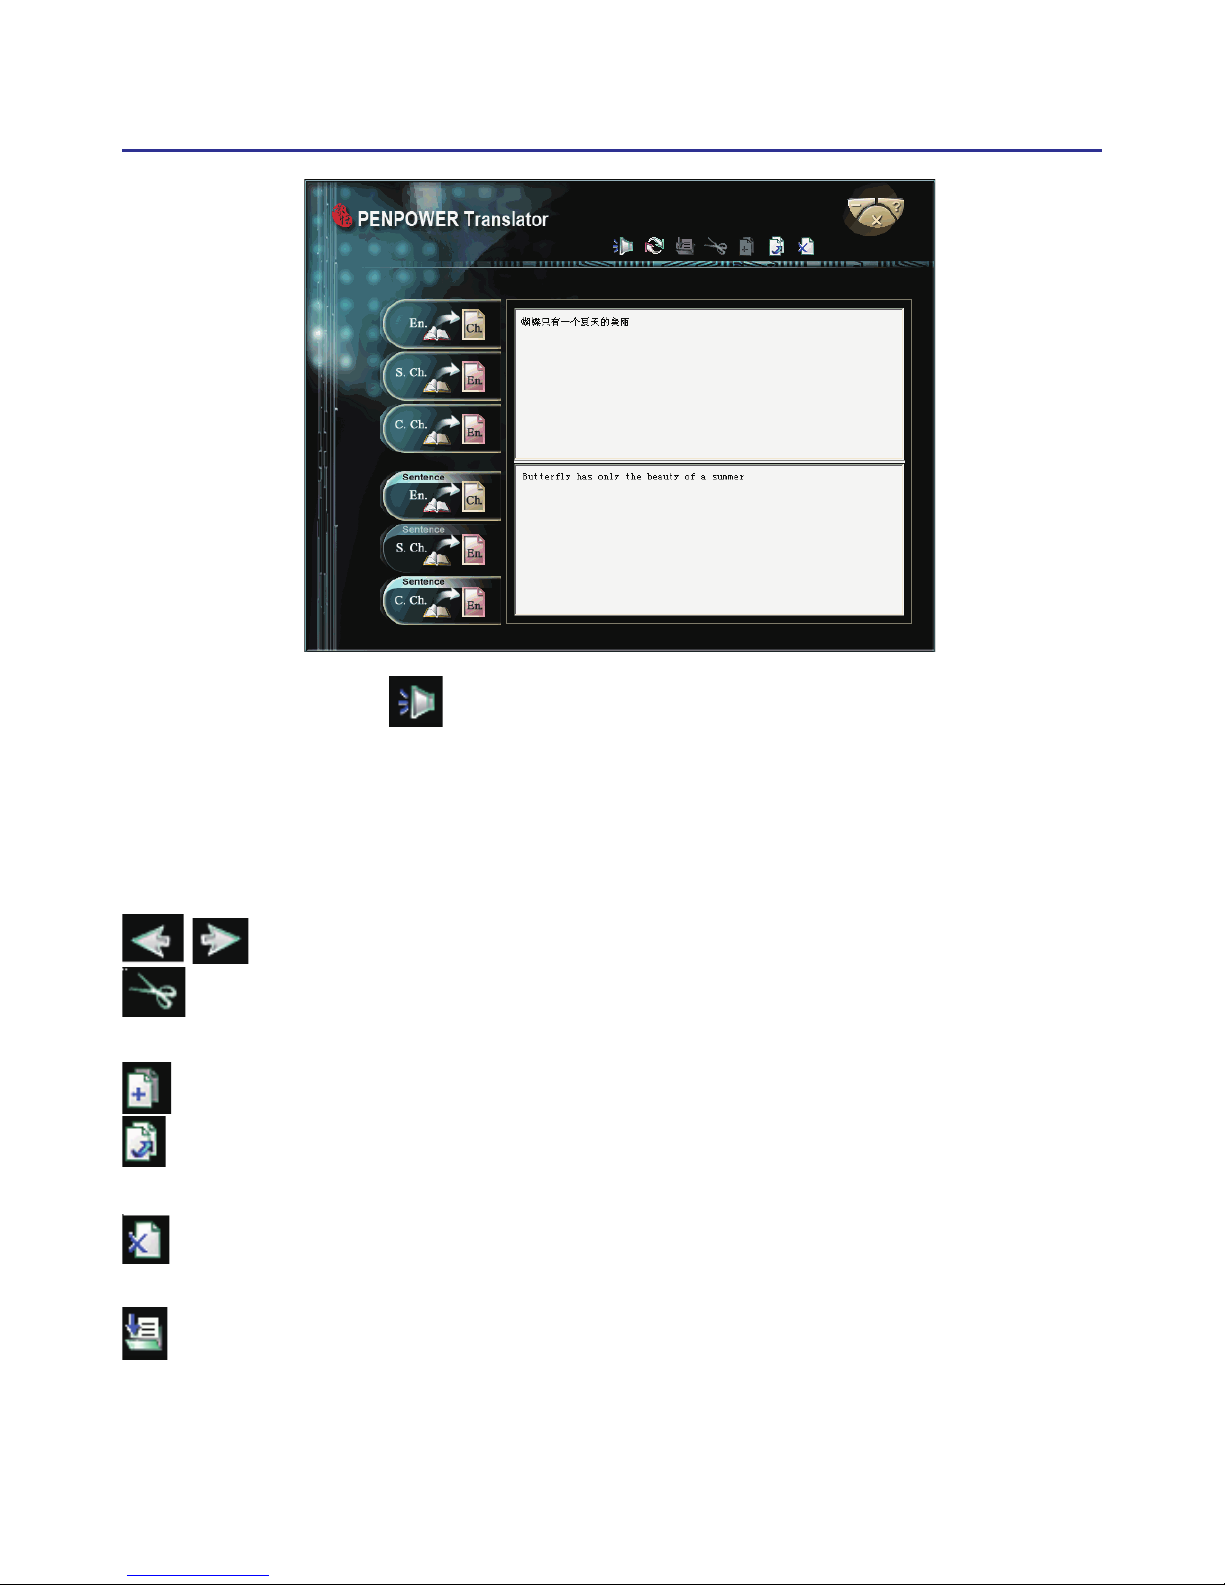
6.2.4 Chinese English Article Translator
1. Click the button “Sentence S. Ch.En.” translation on the left.
2. In the top input frame, input an Chinese article, click the button to
start translation. The translation result is shown in the lower input frame.
Tip: If the Chinese sentence you wish to look up is Traditional Chinese, please
select the “ Sentence C. Ch. En.” translation option.
Page 72
Chapter 6 Assistant Tools
6-7
Press the Speech button. If looking up a single character or word,
the system will provide its Chinese or English pronunciation. If translating
the entire text, it will read all of the content in the current input window.
The other buttons on the translator interface have the following func-
tions:
/ : Previous/Next: look up the denitions for nearby words.
: Cut: cut the selected content. (Only available when translating an
entire sentence)
: Copy: copy the selected content.
: Paste: paste the cut or copied content. (Only available when translating
an entire sentence)
: Delete: delete all input and translation content. (Only available when
translating an entire sentence)
: Save: press this button to open the “Save as…” dialogue window. This
will save all of the input and translated content into a new *.txt format
le. (Only available when translating an entire sentence.)
Page 73
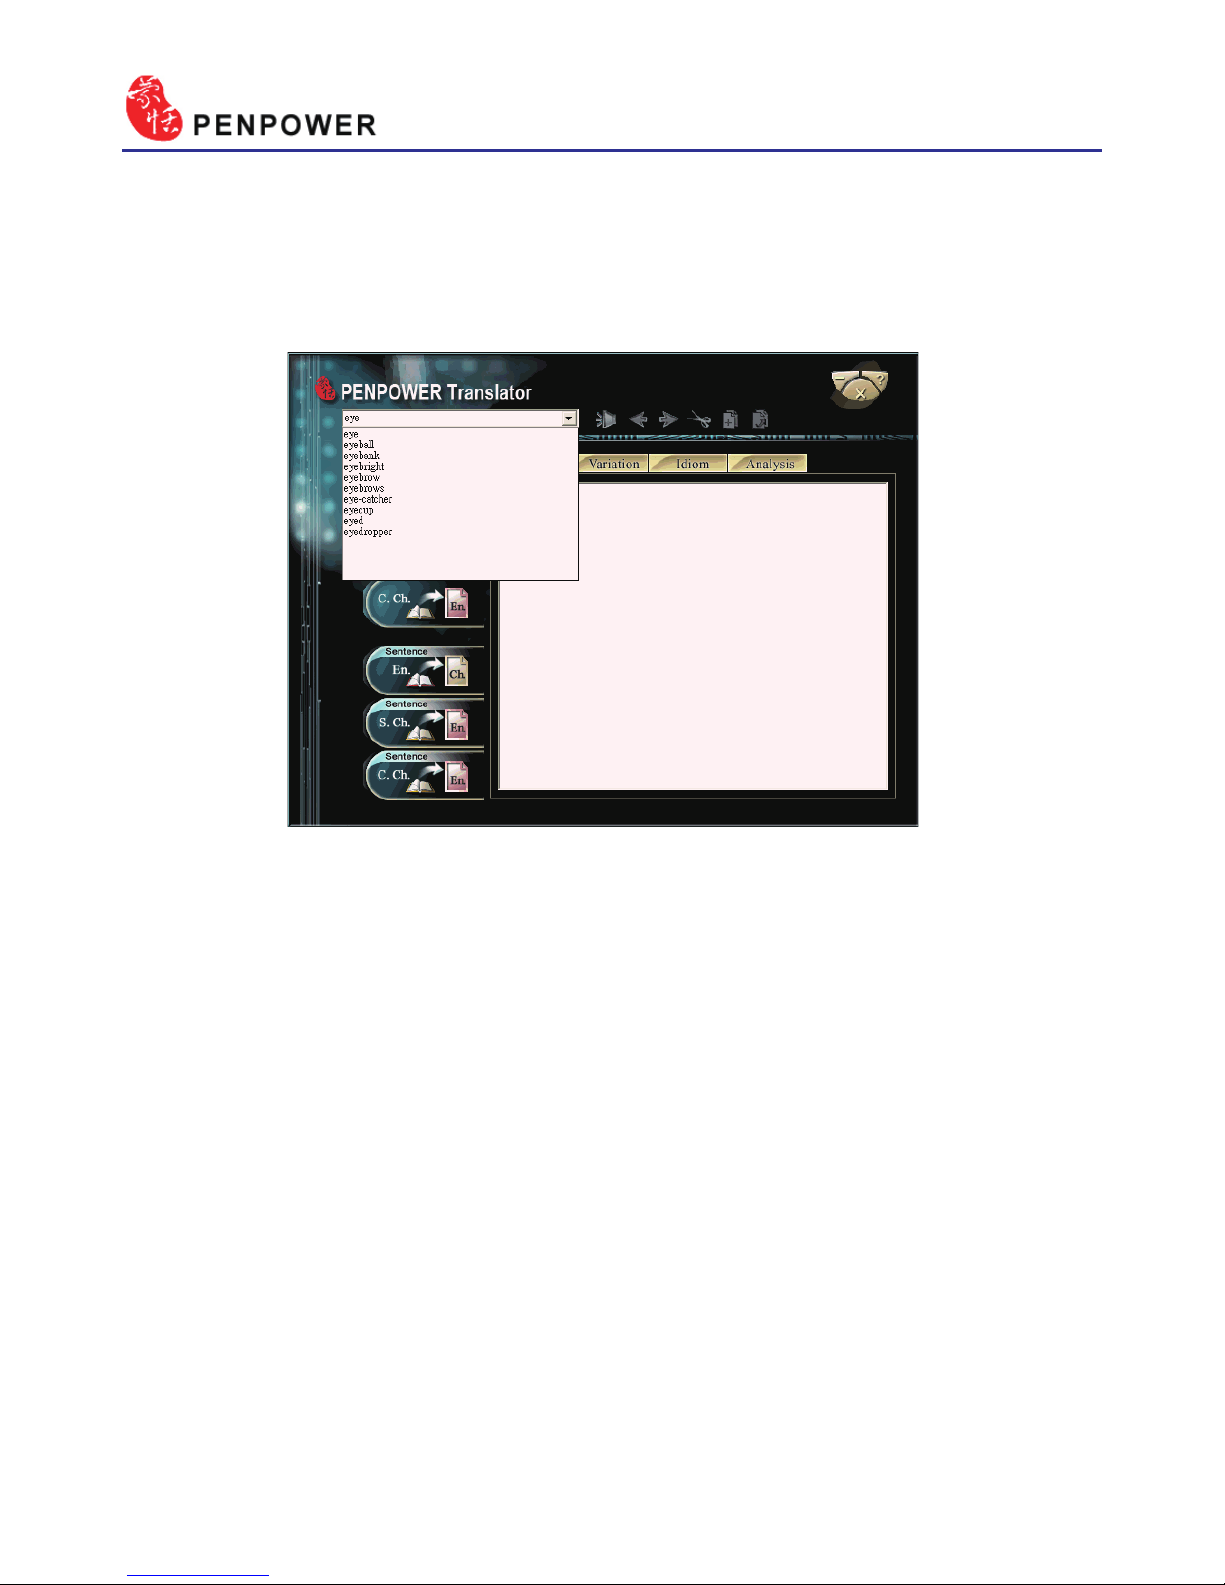
6-8
When looking up a single word you do not need to enter the entire text
string. If the word you wish to look up shows up in the list, use the direction keys to select that word as the input then press Enter to look up that
word.
Page 74
Chapter 6 Assistant Tools
6-9
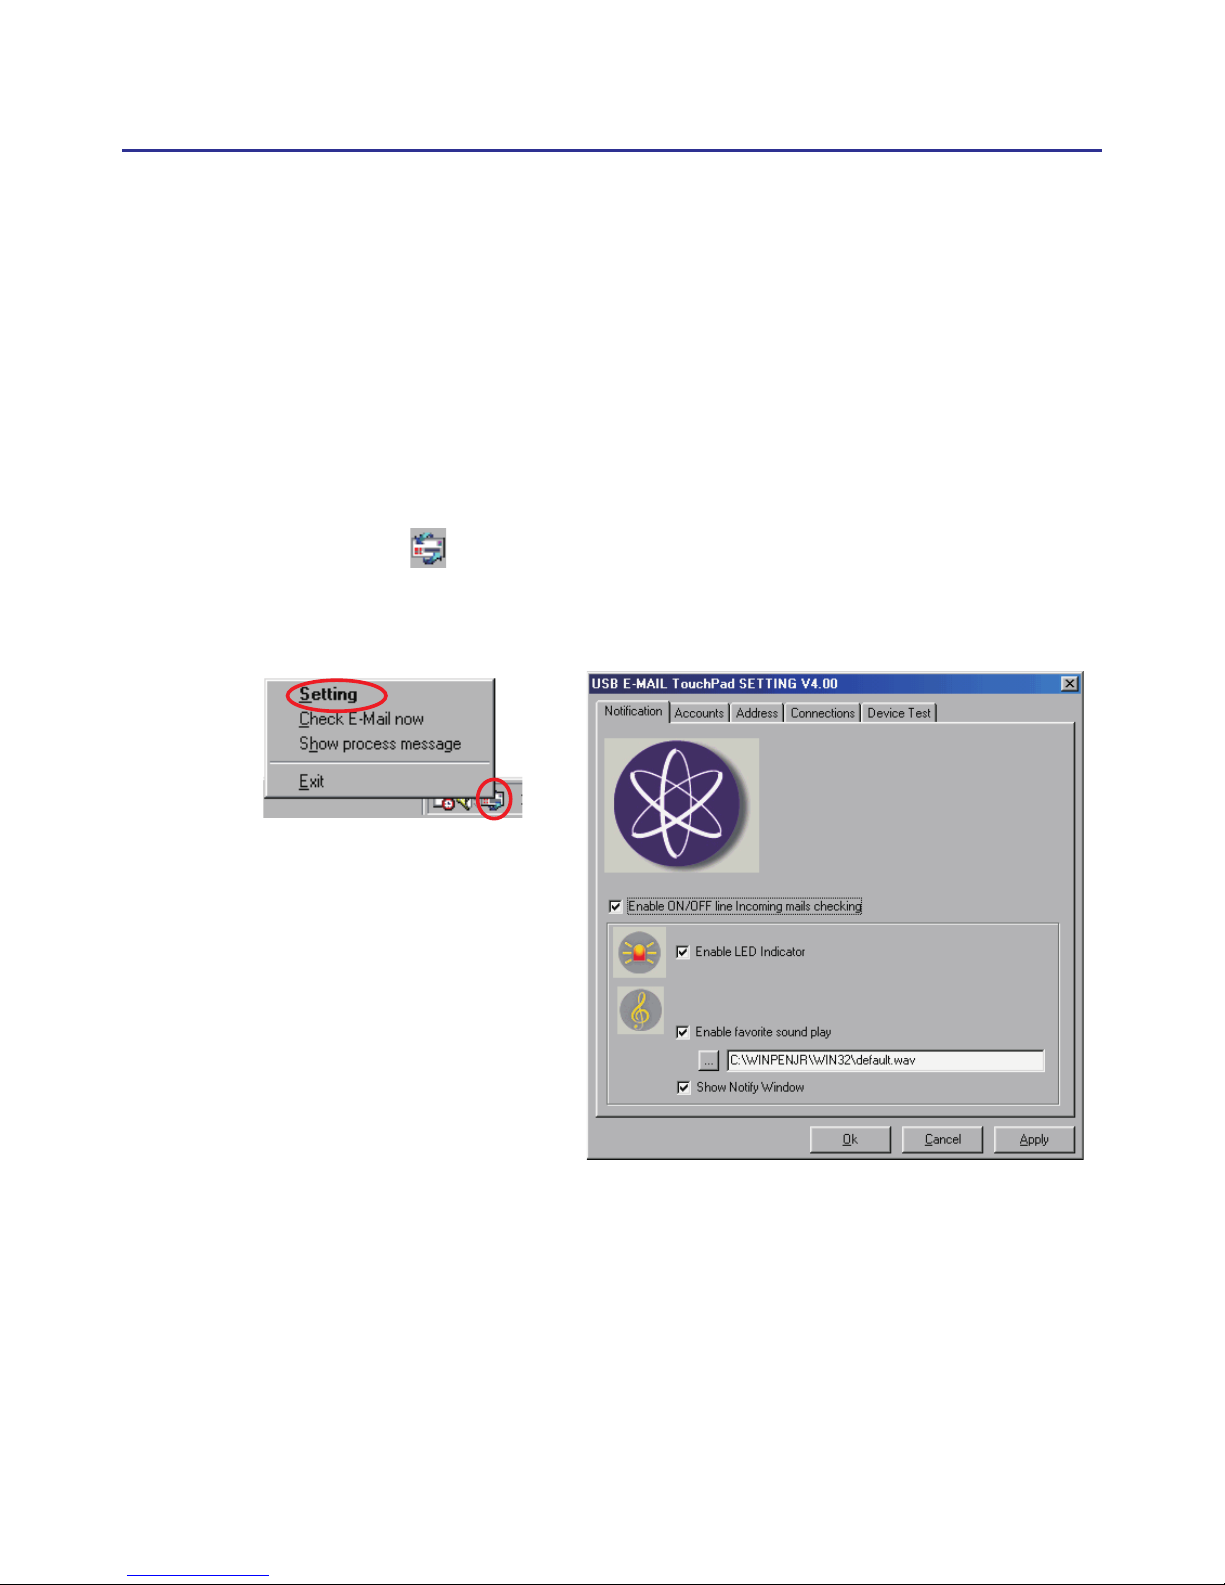
Enable LED Indicator : Blink the LED of touch-pad to hint the incoming
emails.
Enable Favorite Sound Play : Change the wav le of music to hint the
incoming emails.
Show Notiy Window: Show pop-up window to hint the incoming emails.
6.3 Penpower E-mail Touchpad
Note: The Penpower E-mail function is only supported for Penpower Junior
Crystal Touch, Penpower Junior Silver/Steel and Penpower Junior
Diamond.
6.3.1 Setting
If you have custom-installed the “Penpower Email Touchpad” com-
ponent, the email icon would be displayed on the task bar when the
windows start-up. Double-click the icon or right-click the icon to open the
menu, and then select “setting”. It will invoke the setting dialog.
Enable ON/OFF line incoming
mails checking : Enable/disable the function of auto
mails checking.
Page 75
6-10
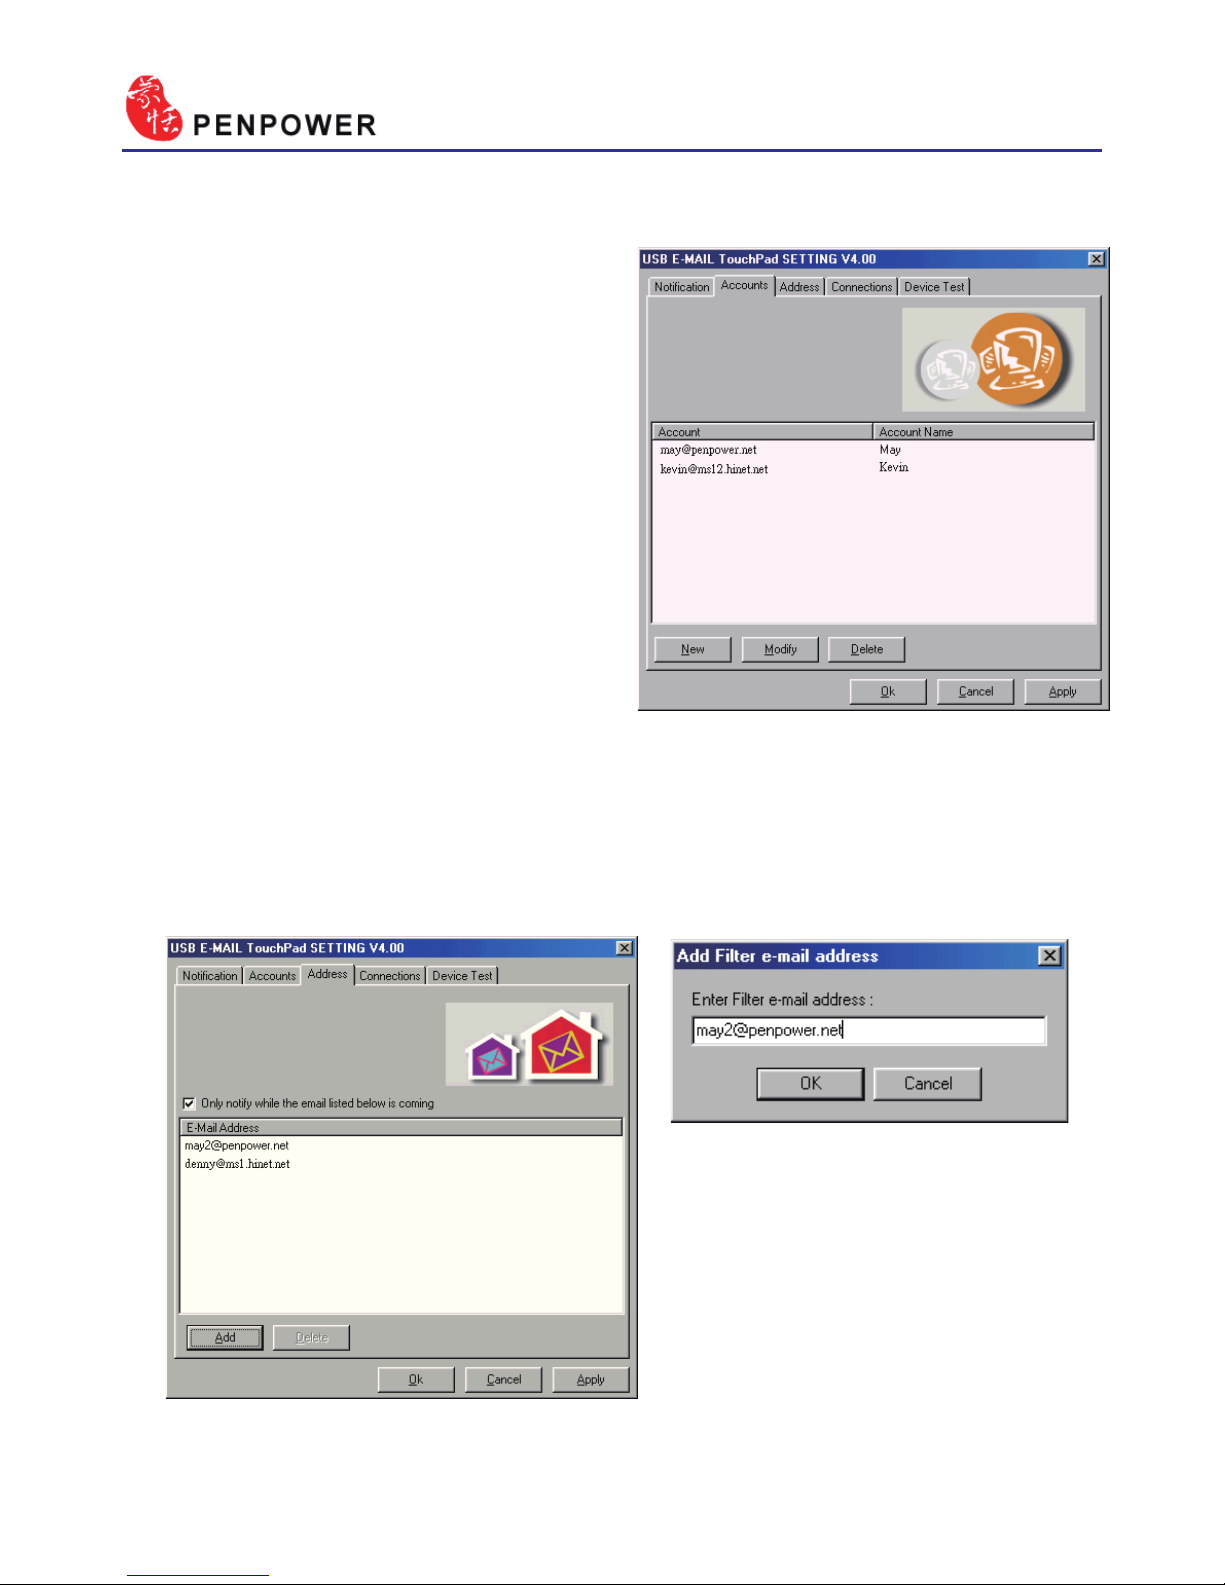
6.3.2 Accounts Management
You can manage multiple accounts to receive all the emails at
once.
6.3.3 Email Address lter
You can lter your unnecessary emails. Check this option to notify you
only when the listed email is coming.
Page 76
Chapter 6 Assistant Tools
6-11
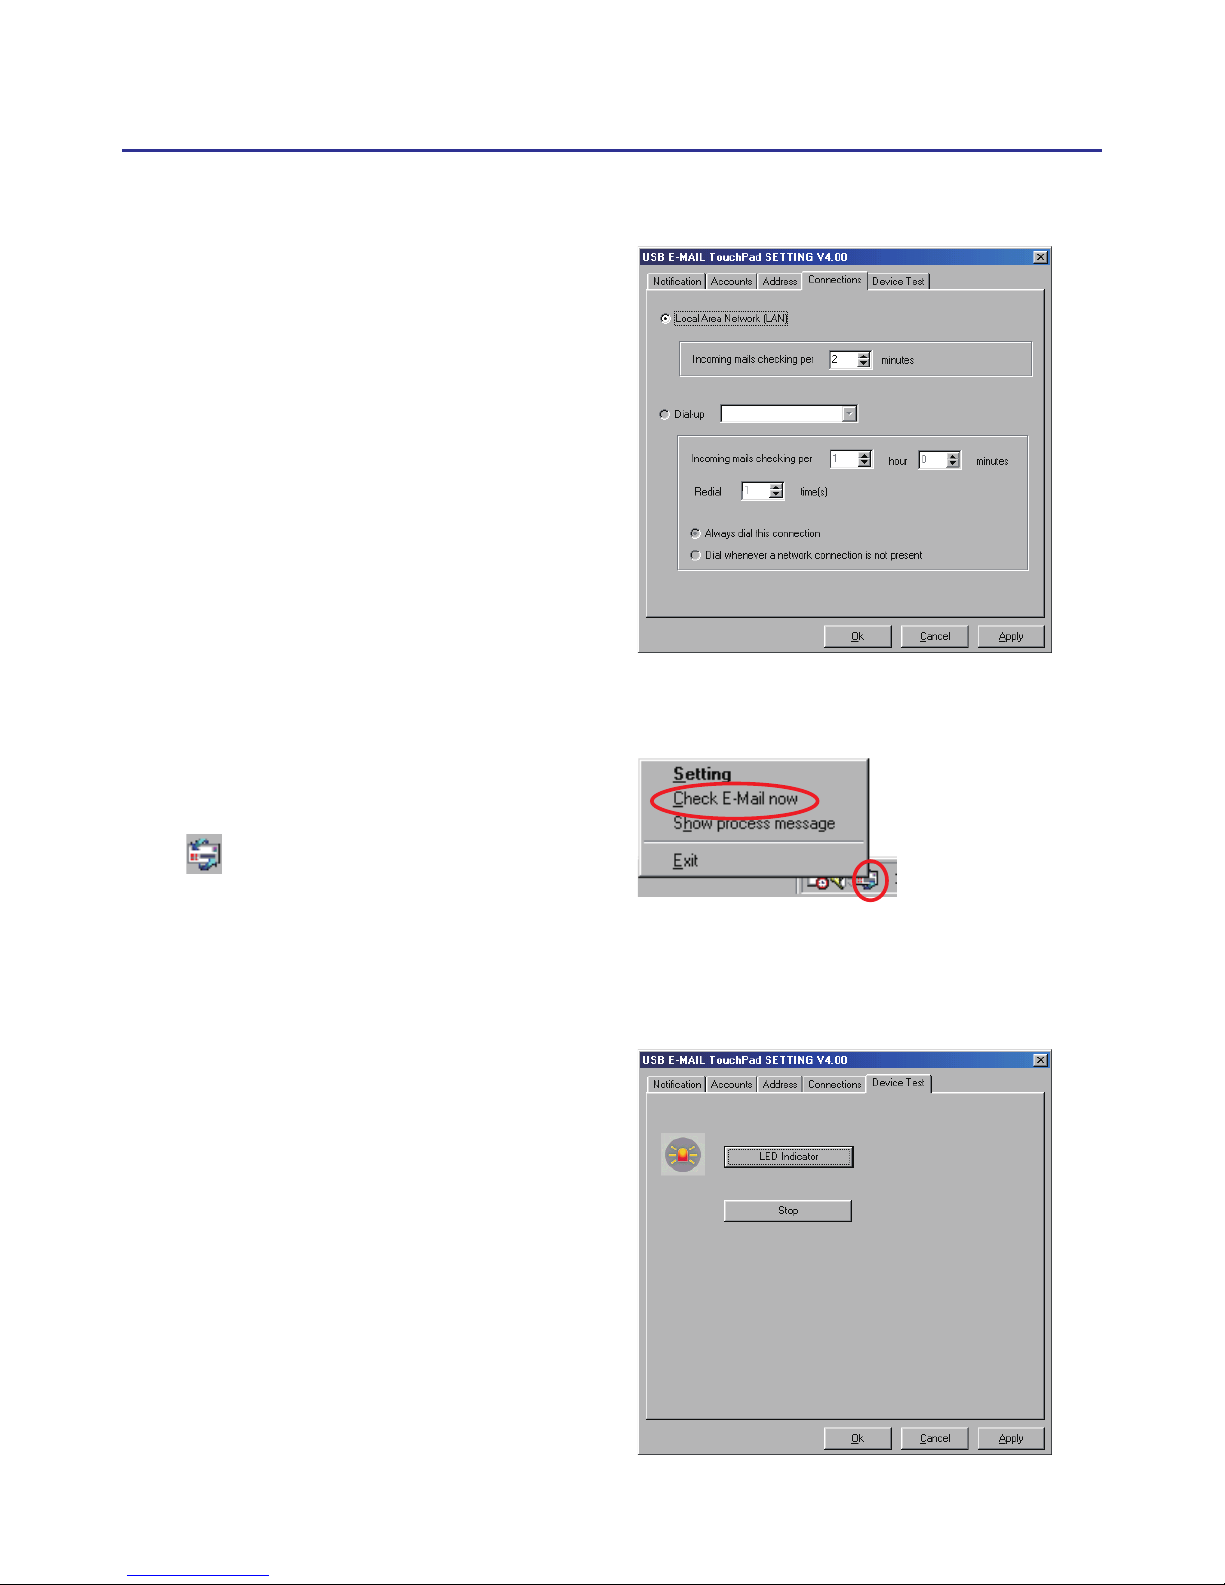
6.3.4 Connection
You can choose to check email
through local area network (LAN)
or dial-up internet. You can also set
the period time to check email. If
your system is ofine, after dial-up
and check email, it will be disconnected automatically.
6.3.5 Check email manually
If you want to check email
manually, right-click the email
icon to open the menu, and then
select “Check Email now”.
6.3.6 Device Test
You can click “LED Indicator”
button to test if the LED of touchpad is normal.
Page 77

6-12
Page 78
Chapter 7 Fast User Switching
7-1
Chapter 7 Fast User Switching
Penpower Jr. supports Fast User Switching capability when you have
more than one user account in Windows XP/Vista. That allow all the users
can use Penpower Jr. without reinstalling in each account.
Settings
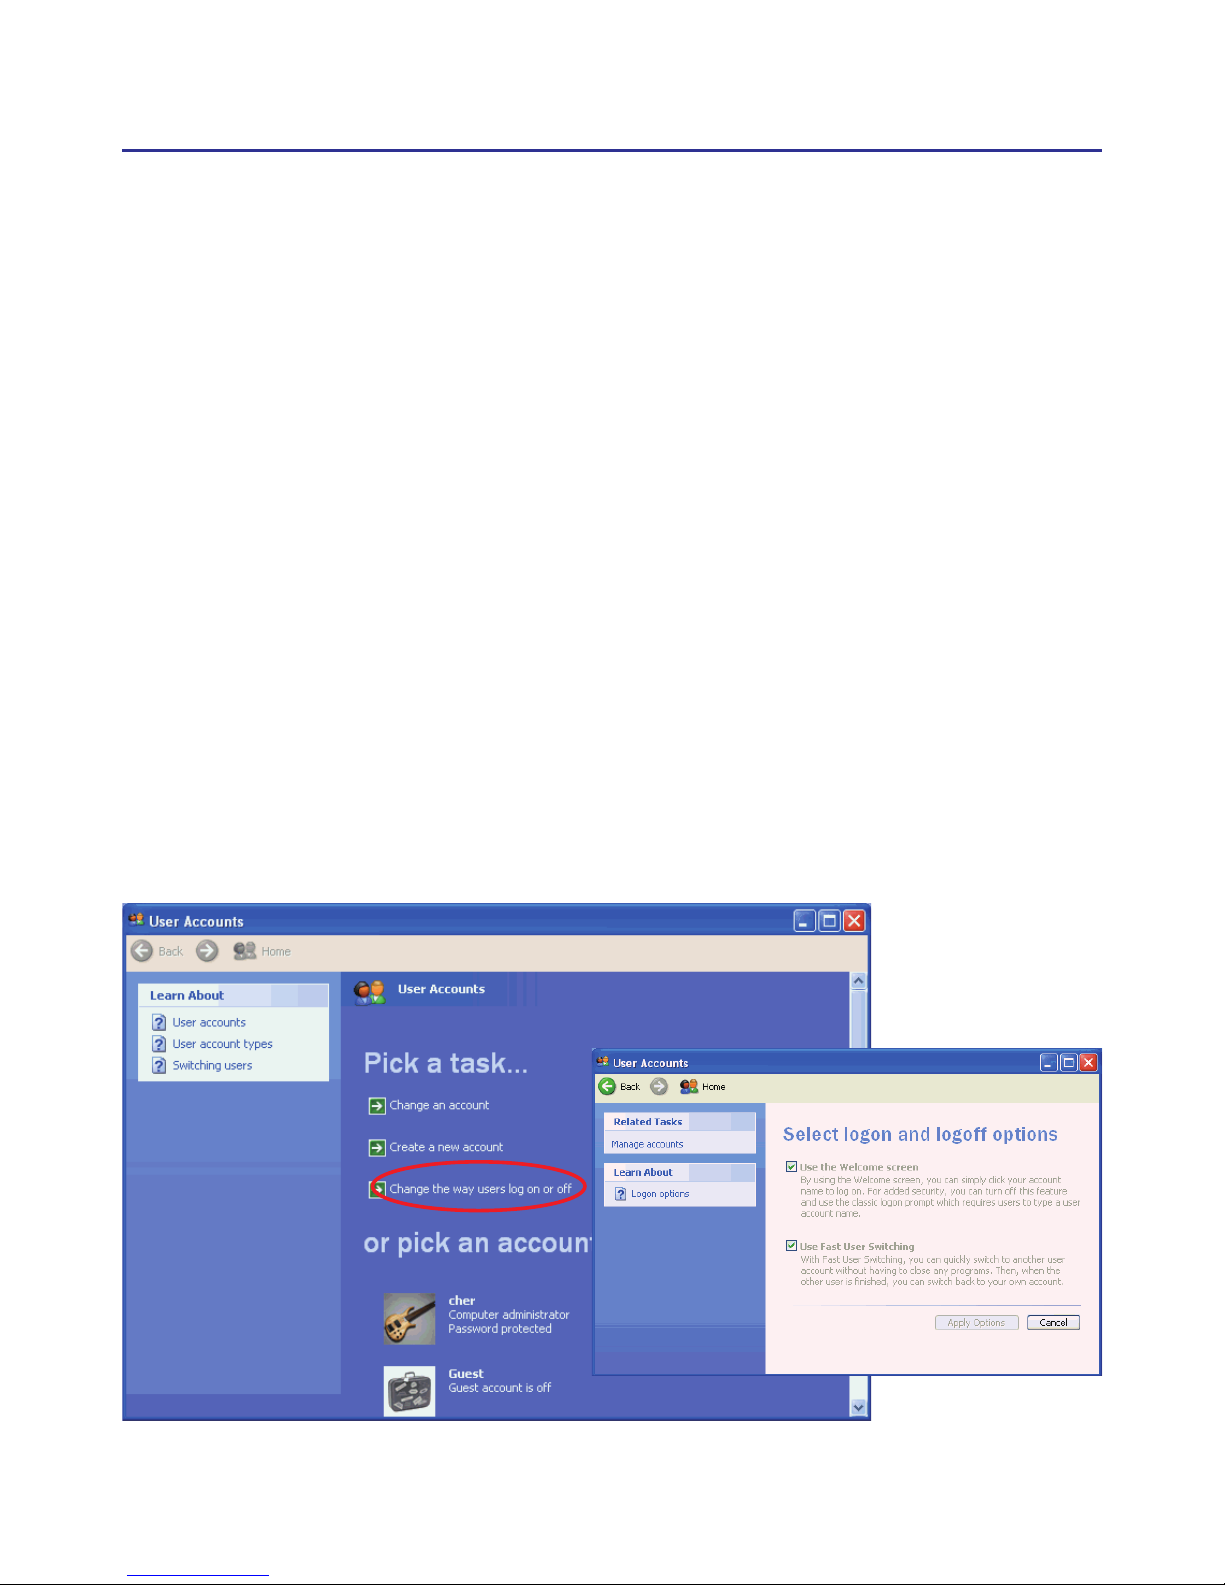
Open user account manager page from “Start/ Settings/Control Panel/
User Accounts”. Click on “Change the way users log on or off” to open the
“Select logon and logoff options” page.
Please select “User the Welcome screen” and “Use Fast User Switching” options, then click “Apply Options”.
Whatever account is used to login the functions of Penpower Jr. would
work.
Page 79

7-2
Page 80

Penpower Jr. V7.1 User Manual
Penpower Technology LTD.,
Edition: Released in March, 2007
Page 81

 Loading...