

Page 1
Step 1 - Cut Wood Blanks
From 1/2" to 5/8" square stock, cut blanks to the
length of the tube plus 1/16". Grain should run lengthwise.
Step 2 - Drill The Wood Blanks
Drill a 7mm centered hole lengthwise through each
blank. Excessive pressure will cause the drill bit to
wander and/or split the blank. Slow the feed rate and
back the bit out repeatedly for chip removal.
Step 3 - Glue The Tubes Into The Blanks
Use epoxy or a gap filling cyanoacrylate. Spread the
glue on the tube. Insert into the blank with a twisting
motion to spread the glue evenly inside. Center each
tube lengthwise in the blank. Allow it to dry.
Step 4 - Square The Ends
With a 7mm barrel trimmer #PK-TRIM or other sanding
device, square the ends of the blanks 90 degrees flush
to the ends of the brass tubes.
Step 5 - Turning The Blanks
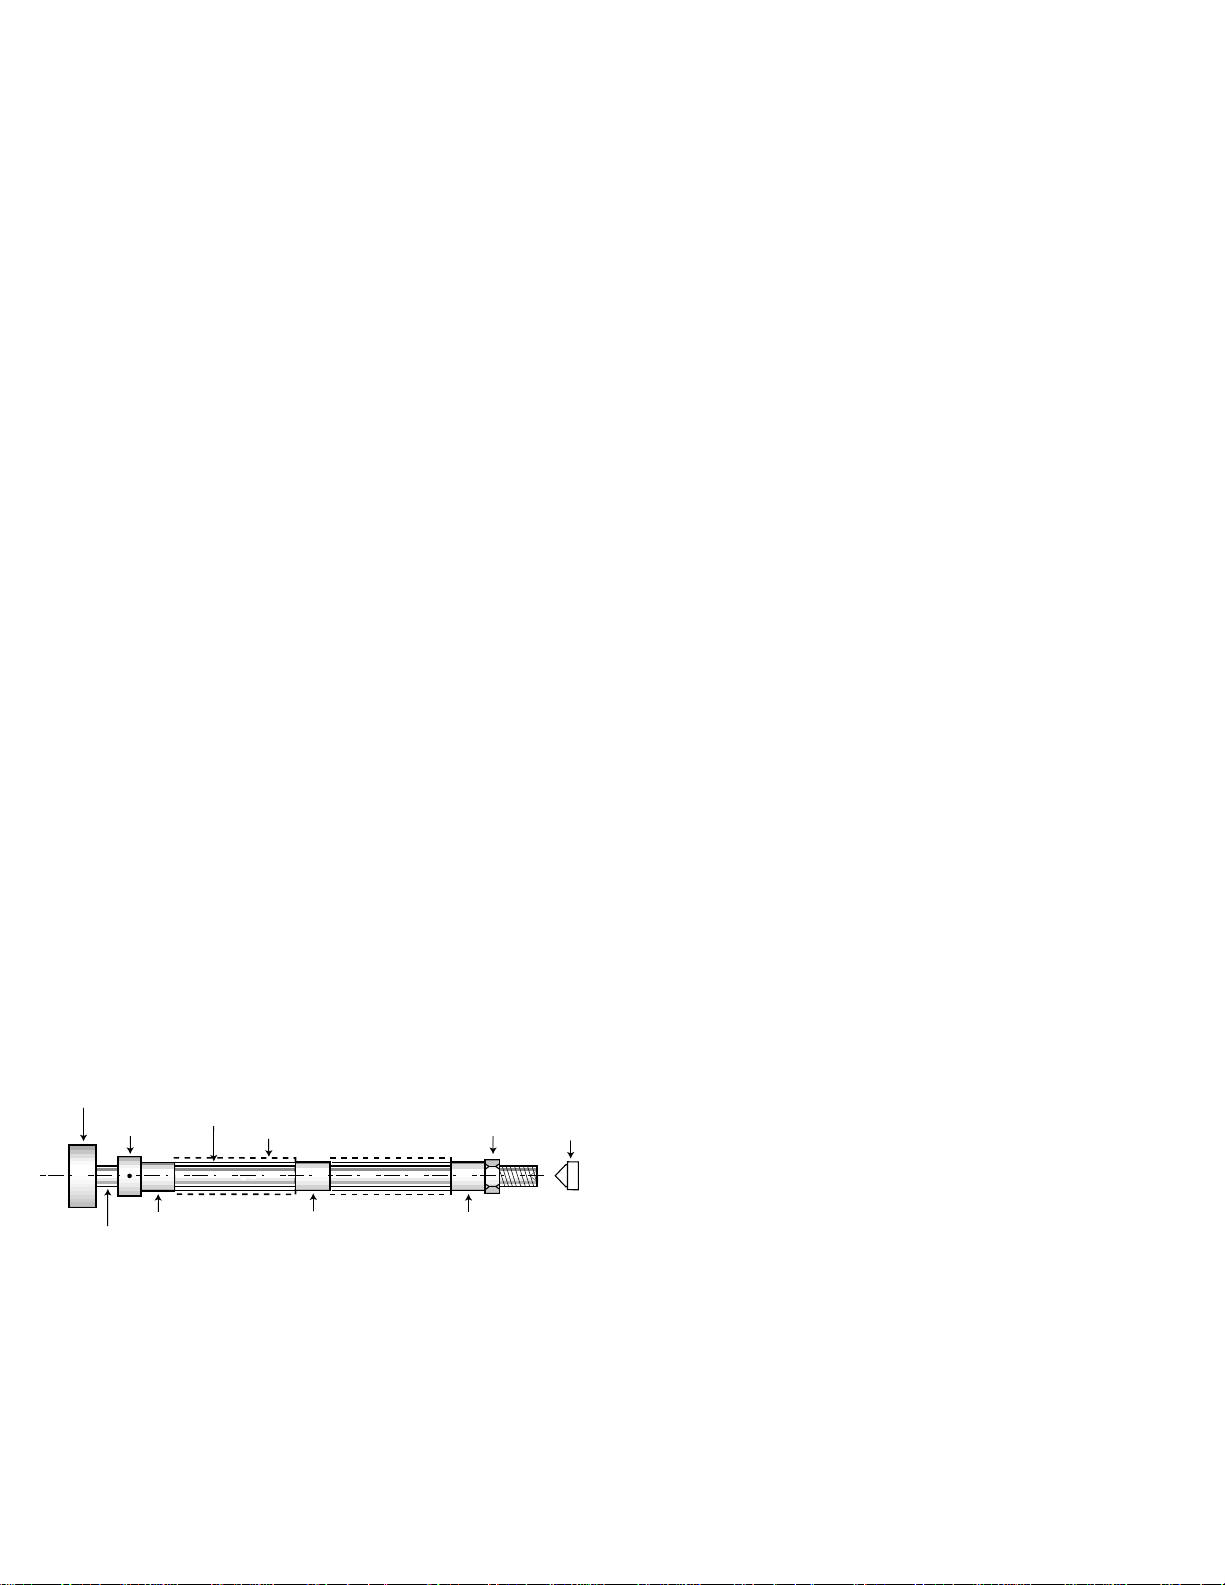
Place the stop bushing onto the mandrel hand tight.
Next, place one of the other bushings onto the man-
drel. Next, slide on either blank, then another bushing.
Follow with the second blank then the last bushing.
Thread on the lock nut hand tight. Bring the tail stock
snug with the mandrel (do not over tighten, it could
damage the mandrel) slide the stop bushing toward
the blank. Adjust to remove the space then tighten set
screw and lock nut.
Turn the blanks down to a diameter slightly larger than
the bushings (about 11/32" O.D.). As you approach the
final size be careful since the wood is only about 1/32"
thick.
Step 6 - Sand
As with any sanding, progress through a range of grits.
The type of wood used and the quality of the beginning surface will dictate your selection:
• 80-100 grit if a rough surface or additional shaping is
needed (overly thick)
• 120-150 grit if fairly smooth and straight
• 220-240 for final finish with most domestic woods
• 320-400 especially on dense or oily exotic woods
Scotch Brite® is helpful and doesn’t tend to scratch.
Sand with blank spinning. Finally sand with the grain
(lathe off). For initial shaping, stick some sandpaper on
a board 2" wide to remove any hills or valleys. The
center ring is 21/64" in dia. The final size for a flush
finish is between 5/16" & 11/32". For a little heavier
look, just form a little thicker barrel.
Step 7 - Finish
Try a finish of your choice but be careful if brushing on
a poly, etc. You can stick the tube, bushings, and
mandrel together. PSI Liquid Friction Polish
#PKFRICT1 or #PKFRICT2 works well on most woods.
Shake before using. Apply with a rag or paper towel to
the spinning barrel. Apply two coats. You could also
use Hut Perfect Pen Polish #PK-PF1 or #PK-PF2.
Step 8 - Touch Up
With tubes off mandrel, lay them end to end to decide
which sets will look best when assembled. Remember,
they will be 5/32” apart (due to center ring) so minor
differences won’t show. If necessary, a light sanding of
the ends on a block will square the ends and improve
the fit during assembly. Then repeat step 7.
Assembly instructions are on other side.
ITEM #PKPEN and PK-PCL
“Slimline” Pen & Pencil Kit Assembly Instructions
KIT FEATURES
• Heavy 24kt Gold Plating with Epoxy Coating.
• Both products are designed to match as a set.
• Simplified construction, uses same tube lengths for
both kits. (2-1/32" long).
• Pen Features a New Locking Mechanism.
• Pencil Features a New Trouble Free 0.7mm Lead
Mechanism
• A Variety of Clip and Band Styles are Available
(see PSI catalog).
• Overall Length: Pen= 5-1/8", Pencil= 5-5/8"
REQUIRED ACCESSORIES
• 7mm Long Mandrel.
• 3 Piece Bushing Set #PKM-BUSH3.
• 7mm Drill Bit #PK-7MM.
• 7mm Barrel Trimmer #PK-TRIM (optional)
• 2 Part Epoxy Glue or Insta-Cure (cyanoacrylate).
Diagram A - Turning The Blanks
Head Stock
Mandrel
Stop
Bushing
Bushing
Finished
Barrel
Blank
Bushing
Bushing
Lock
Nut
Live Center
Page 2
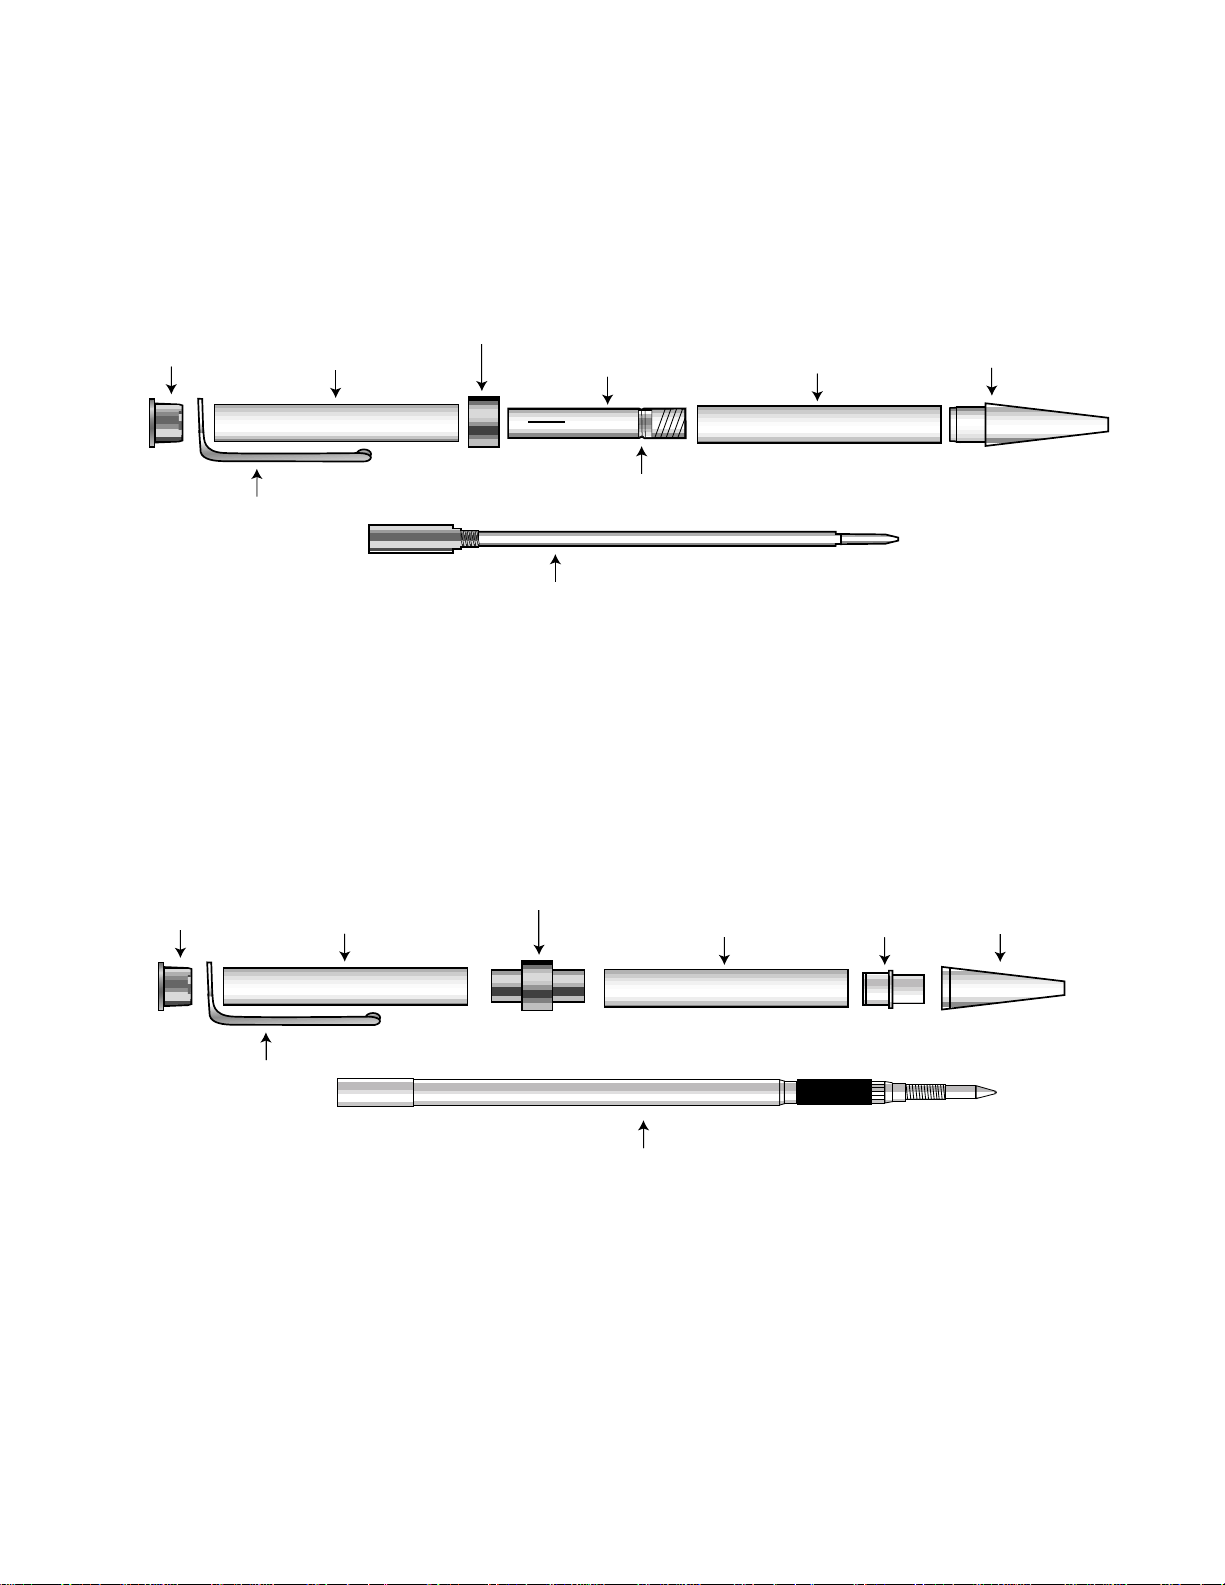
Diagram B - Assembly of Pen
Note: Line up parts according to layout below.
Diagram C - Assembly of Pencil
Note: Line up parts according to layout below.
© 1997 PSI Woodworking Products,9900 Global Rd., Philadelphia, PA 19115
A. Press the tip into the front tube.
B. Press the twist mechanism (brass end first) into
opposite end of same tube (usually to the indenta-
tion mark). Don’t press too far in!
C. Slide band over the exposed mechanism.
D. Press cap into the clip then onto the rear tube (clip
can be left off if desired).
E. Push the two halves together aligning grain as
desired. Pen is operated by twisting the halves in
opposite directions to extend or retract point. Test
the extension with the refill inserted. Uses Cross®
type refills.
Cap
Pencil Mechanism
Rear Tube Front Tube
Tip
Clip
Sleeve
Band
T
Cap
Refill
Rear Tube
Band
wist Mechanism
Front Tube
Tip
Clip
(Indentation Mark)
General Assembly Hints:
• Use a clamp or vise to press parts together.
• Front and rear tubes are identical on both pen and
pencil kits and may be mixed and matched.
• 7mm Pen Disassembler Kit, #PKDISPEN is available.
A. Press the sleeve, recessed end first into the end of
the front barrel until it hits the shoulder.
B. Press the band into the opposite end of the barrel.
C. Press the rear barrel onto the band.
D. Press cap into the clip then onto the rear tube (clip
can be left off if desired).
E. Insert mechanism through the cap and out the
opposite end.
F. Screw the tip tightly onto the threaded end of the
mechanism.
G. The pencil operates by pushing down on the
plunger. This clicks the lead out. The eraser and
extra lead is located under the gold cap on the
mechanism. Use 0.7mm lead.
Note: If lead does not advance properly or retracts when writing, gently pull
exposed short piece of lead out of mechanism. Continue to pump pencil
plunger until a new piece of lead is exposed.
 Loading...