

Page 1
#PKFP55XX • #PKFP56XX
The Vertex Supreme
Roller & Fountain Pen Kit
PKFP5500 • PKFP5510 • PKFP5540
PKFP5610 • PKFP5640
Kit Features:
• Matching Fountain Pen and Rollerball
• Easy to turn with straight tubes
• Minimum parts - easy to assemble
• Available in multiple nishes
• Overall Length: 5-5/8” Long
• Vertex Hex Styling
• Magnetic posting front & rear
• Uses Quality Rollerball rell
• Fountain nib made in Germany.
•
PKFP5600 •
PSI Woodworking Products
Required Accessories:
• 7mm, Pen Mandrel
• Drill Bit(s) 10.5 mm #PK105mm and 12.5mm #PKPLI-DB
• #PKGRAD2BU Bushing set(3 pc)
• 7mm Barrel Trimmer #PKTRIM7 w/ Barrel Trimming sleeve #PKMAJJRBTS
• Live Tailstock Center
• 2 Part Epoxy Glue or Insta Cure (Cyanoacrylate) Glue
• Pen Blank: Minimum Size - 3/4” x 4-3/4”
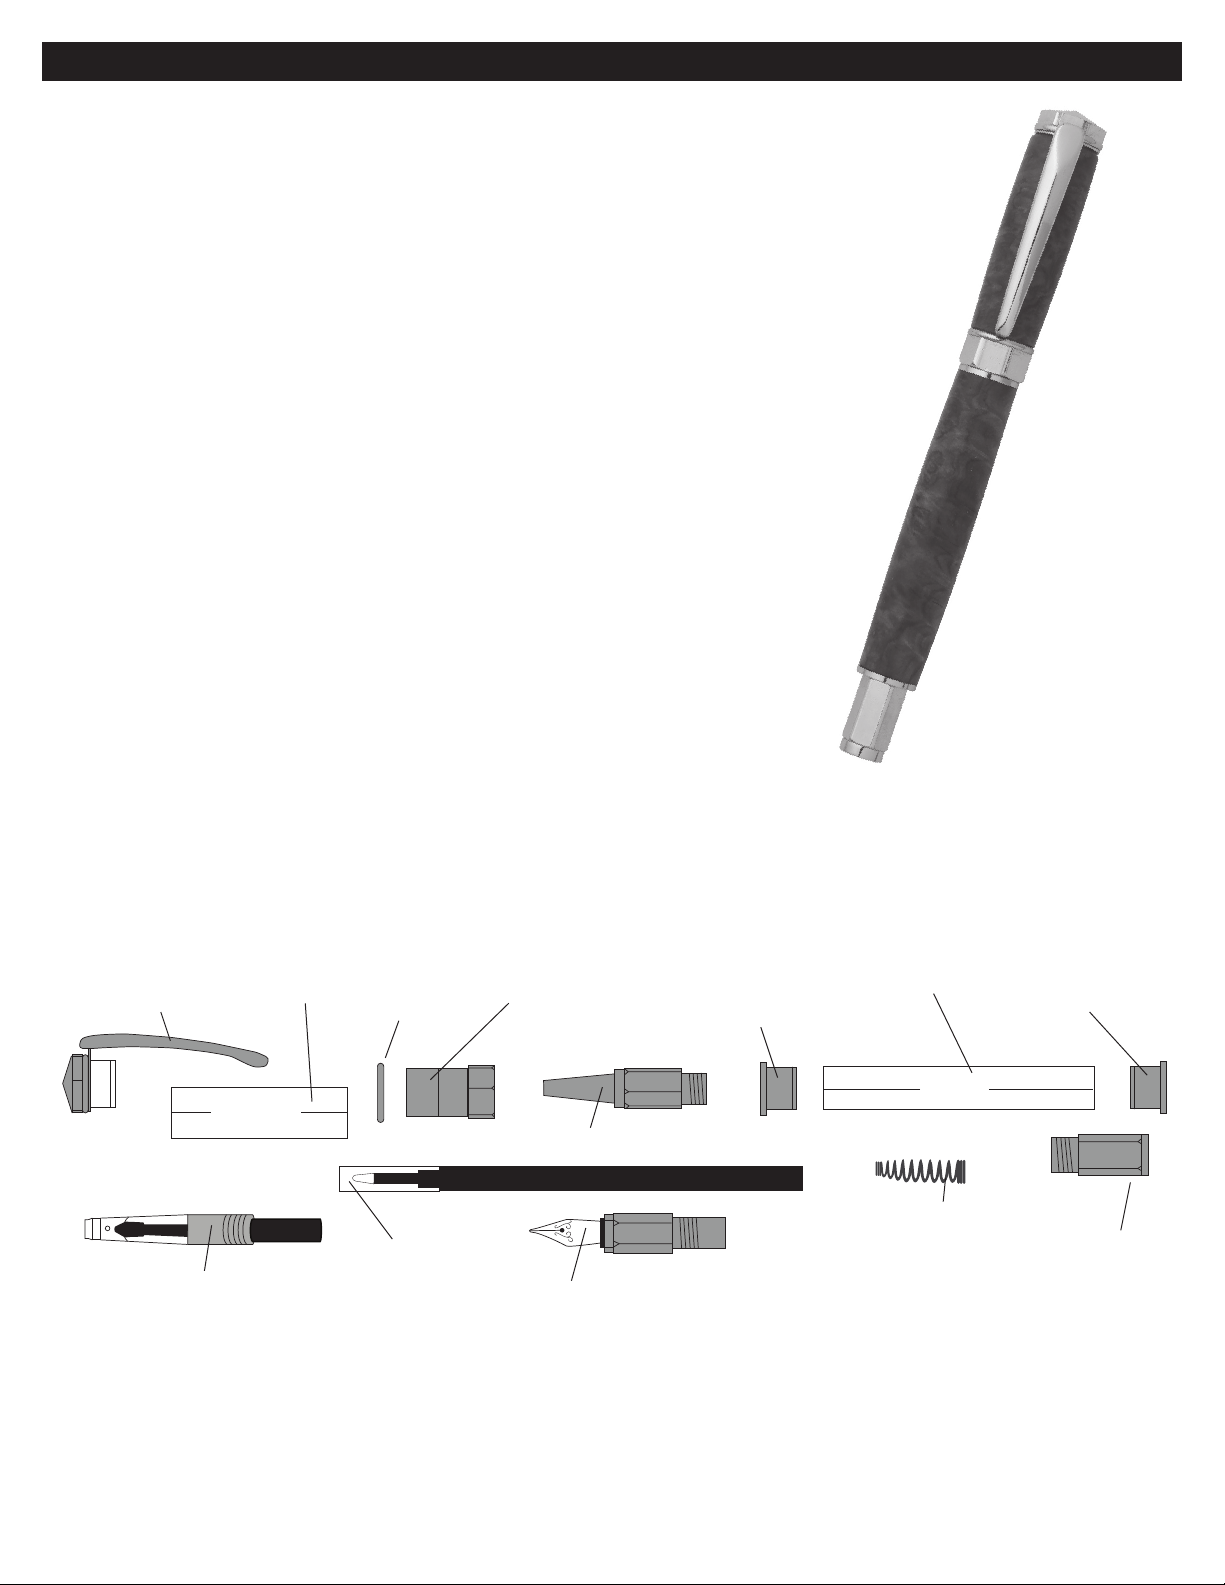
DIAGRAM A / PARTS LAYOUT
Lower Tube/
Barrel
Coupler
Clip Assembly
Upper Tube/
Barrel
Decor
Ring
Magnetic
Band
Coupler
2-5/8”
1-11/16”
Roller Tip
Rell
Ink Pump
Tip Protector
Fountain Nib
Spring
Lower
Cap
Preparing the Blank:
• Cut 2, 3/4” blanks to length of the tube(s) and add 1/16” for squaring off.
• Drill holes lengthwise through the blanks. (12.5mm Upper blank, 10.5mm for lower blank)
• Spread glue over the tube(s), insert each tube with a twisting motion to spread the glue evenly inside.
Center the tubes lengthwise inside the blanks.
• When the glue is dry, square the ends of the blanks. You can use a 7mm barrel trimmer with the proper sleeve,
or a universal pen blank squaring jig with a power disc sander. Take the excess material down ush with the
ends of the brass tube. (Do not trim beyond the length of the tube since this may interfere with
operation of the mechanism and assembly).
Page 2
#PKFP5XXX
Head Stock
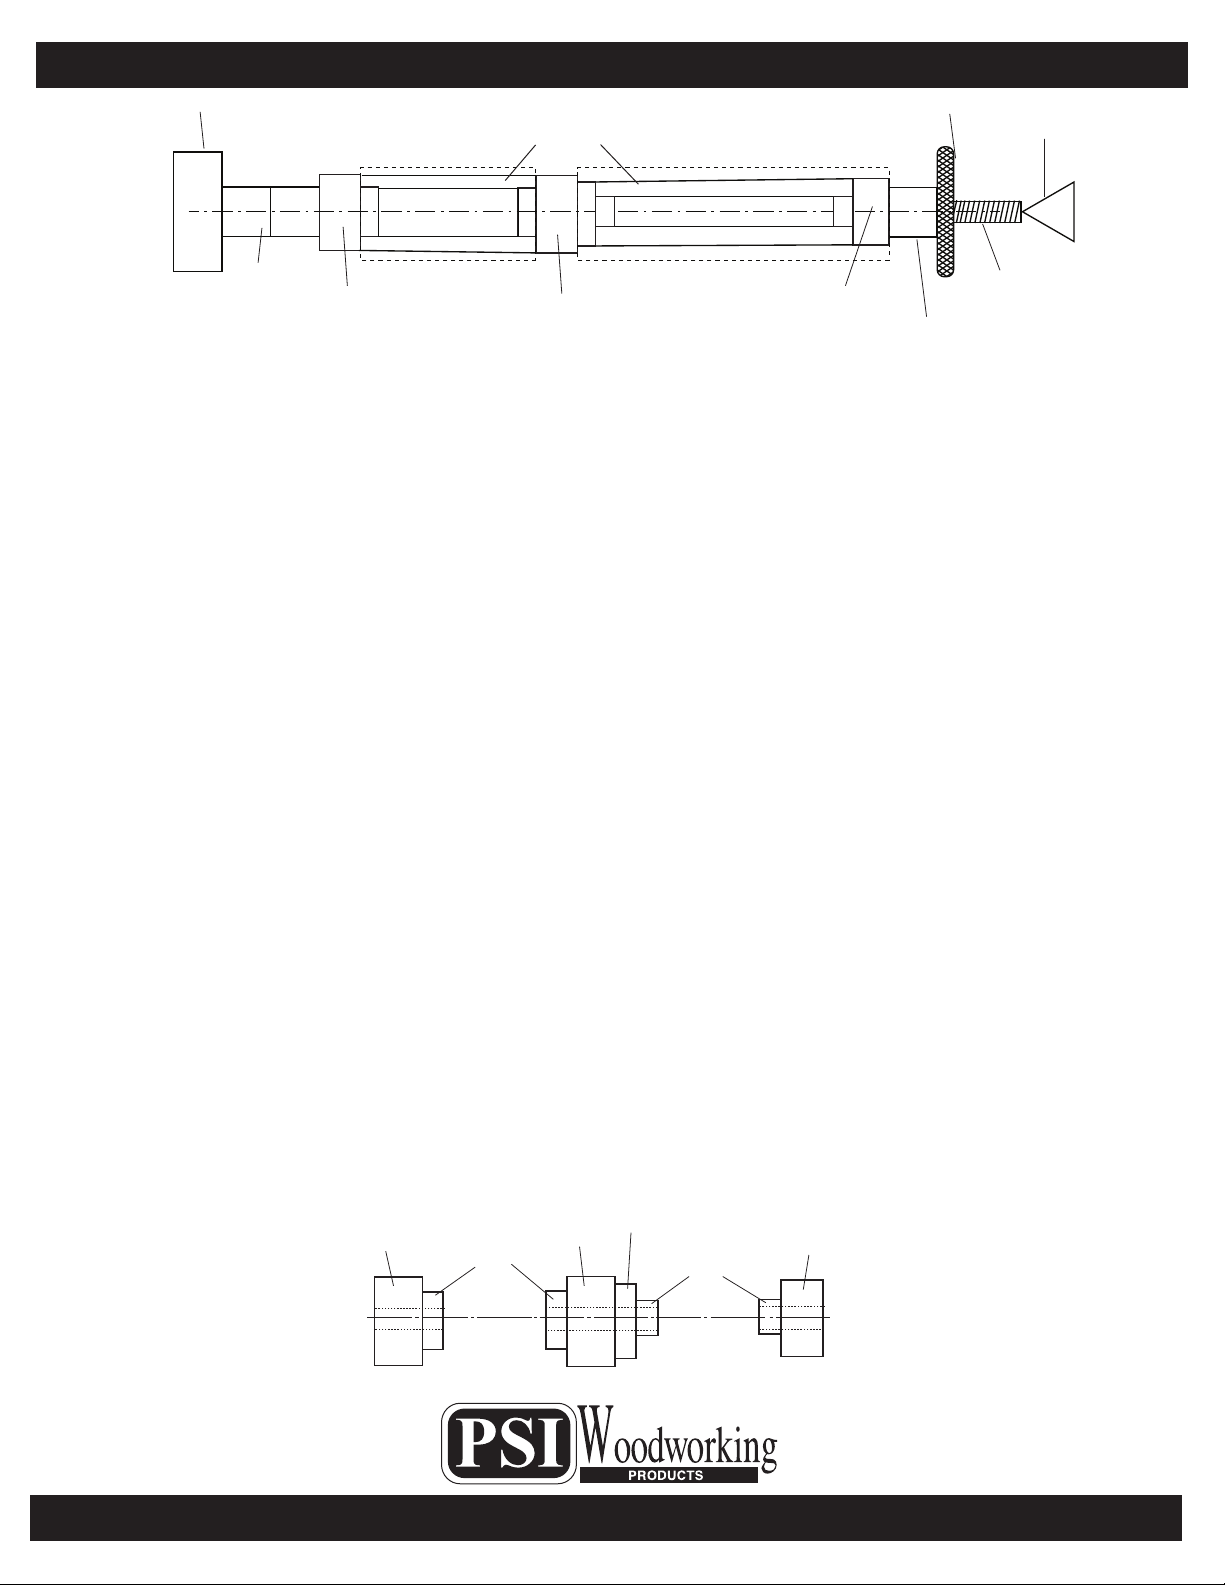
DIAGRAM B / TURNING THE BLANKS
Final Prole
PSI Woodworking Products
Knurled Nut
Live Center
7mm Spacer
Bushings
Turning the Blank
Cap Bushing (larger)
Center Bushing
Tip Bushing (smaller)
7mm Spacer
Bushings
Mandrel
• Mount the bushings and blanks according to diagram B.
• Thread on the knurled nut and hand tighten to hold all components in place.
• Slide the tailstock up snugly against the mandrel shaft inserting the live center point into the mandrel
dimple, lock in place.
• Hand tighten the quill adjustment to rm up the mandrel. (DO NOT overtighten, it could damage the
mandrel).
• Using sharp tools, turn the blank down close to the bushing diameter. Turn the barrel (straight or to a
prole of your choice)
• Sand the blank down to be ush with the bushings gradually increasing the sandpaper grits.
• Finish the barrel with your choice of polish. Allow sufcient time for the polish to cure.
- refer to polish instructions.
Assembly
• Layout parts according to diagram A.
• Press clip assembly into the smaller diameter of the upper barrel (shorter). Slide decor ring onto
magnetic band.
• Insert and press the magnetic band into the opposite end of the upper barrel.
• Insert each coupler into the ends of the lower barrel. Press in.
• Screw in the lower cap into either end of the lower barrel.
• For Rollerball Pen: Drop the spring. Wide end in rst into the opening at the lower barrel.
Remove the tip protector and drop the rell in, blunt end rst. Screw the Roller tip into the
coupler over the rell tip.
• For Fountain Pen: Attach either the ink cartridge or the rell pump into the back end of the nib.
Screw into the coupler at the lower barrel. To use the pump you will need a ink bottle.
Turn the knob counter clockwise until the piston inside the pump is at the bottom. Insert the
nib into the bottle. Turn the knob clockwise. The ink will be drawn into the container
of the pump.
• For either pen, engage the ends of the pen. The magnet closure will keep the pen closed.
When writing, the cap will post over the lower barrel.
Diagram C / Bushings #PKGRAD2BU
.551”
.458”
Cap
.575”
Center
.516”
.516”
.377”
.248 Holes through
Tip
© 2012 PSI Woodworking Philadelphia PA 19115 - v2/16
 Loading...