

Page 1
#PKEL2Rx & #PKEL2Fx PSI Woodworking Products
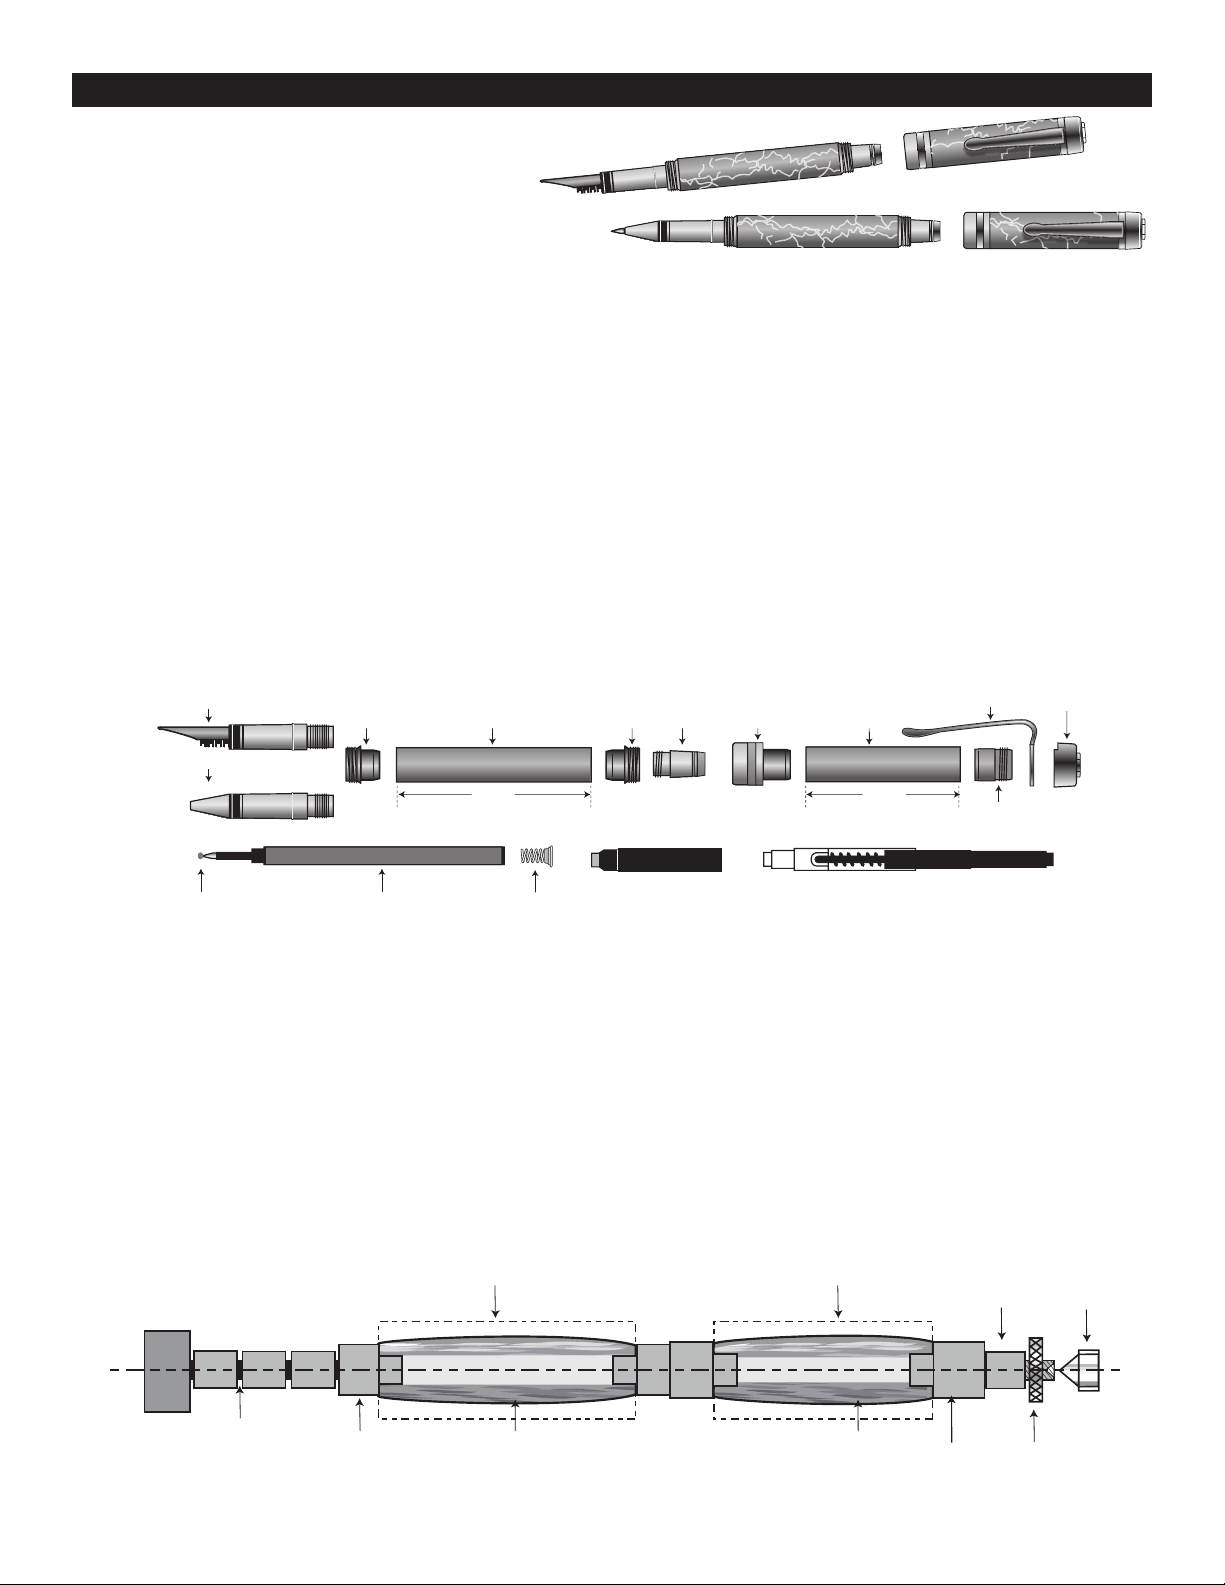
Roller Gel RellNote: Protective Cover
Fountain Ink Cartridge Convertible Cartridge (optional)
Rell Spring
(Roller)
Upper Cap
Cap Nut
Lower Tube Upper Tube Coupler Coupler Lower Cap Center Band
Roller Ball Tip
Fountain Pen Nib Assembly
15/8"29/32"
Clip
CLASSIC ELITE 2 PEN KIT
KIT FEATURES
• Heavy plating with either PKEL1 Gold & Chrome
or PKEL2 Gold & Gun Metal finishes.
• Elegant, contemporary design with contrasted styling.
• 1/4 turn attaches the cap to either ends of the pen body.
• Fountain pen uses quality iridium tipped nib, made in Germany –
convertible cartridge available
• Rollerball contains black gel refill for a smooth writing experience.
• Overall length: 5-1/8” (closed)
REQUIRED ACCESSORIES:
• 7mm, long pen mandrel
• 3 pc bushing set #PKPAR10-B2
• 10mm drill bit #PK10-10
• 10mm barrel trimmer from #PKTRIMKIT
• 2 part epoxy glue or insta-cure (cyanoacrylate) glue
PREPARING THE BLANK
• Cut 3/4” to 5/8” square blanks to the length of the brass
tubes (add 1/16” for squaring off).
• Drill a 10mm center hole lengthwise through each blank.
DIAGRAM A / Parts list
TURNING THE BLANK
• Refer to Diagram B - Insert 3-4, 7mm spacer bushings
onto the mandrel shaft. Place the tip bushing (smaller diameter) wide-end in first. Slide on the lower blank (longer), place
the center bushing narrow-end first on the mandrel.
• Next, slide the upper blank (shorter) and follow with the larger
diameter cap bushing, narrow diameter on first. Use 7mm spacer
bushings to fill the space to the thread. Thread on the lock nut
and hand-tighten.
DIAGRAM B / Turning the Blank
• Spread glue over tube. Insert into blank with twisting motion
to spread the glue evenly inside. Center tube lengthwise in the
blanks.
• When the glue dries, square the ends of the blanks. Use a
10mm barrel trimmer or belt/disc sander to trim the wood
down flush to the end of the brass tubes.
• Bring the tail stock snug with the mandrel hand tighten the lock
nut (do not overtighten – it will damage the mandrel).
• Turn the wood down, flush with the bushings using a lathe
chisel and gradual higher grits of sandpaper.
• Sand both blanks, then finish the blanks with your choice
of polish and waxes.
Headstock
Mandrel
7mm Spacer
Bushings
Tip
Bushing
(smaller dia)
Lower Blank (longer)
Finished Barrel
Upper Blank (shorter)
Finished Barrel
Spacer
Bushing
Cap
Bushing
(larger dia)
Live
Center
Lock
Nut
Page 2
( )
g g
#PKEL2Rx & #PKEL2Fx PSI Woodworking Products
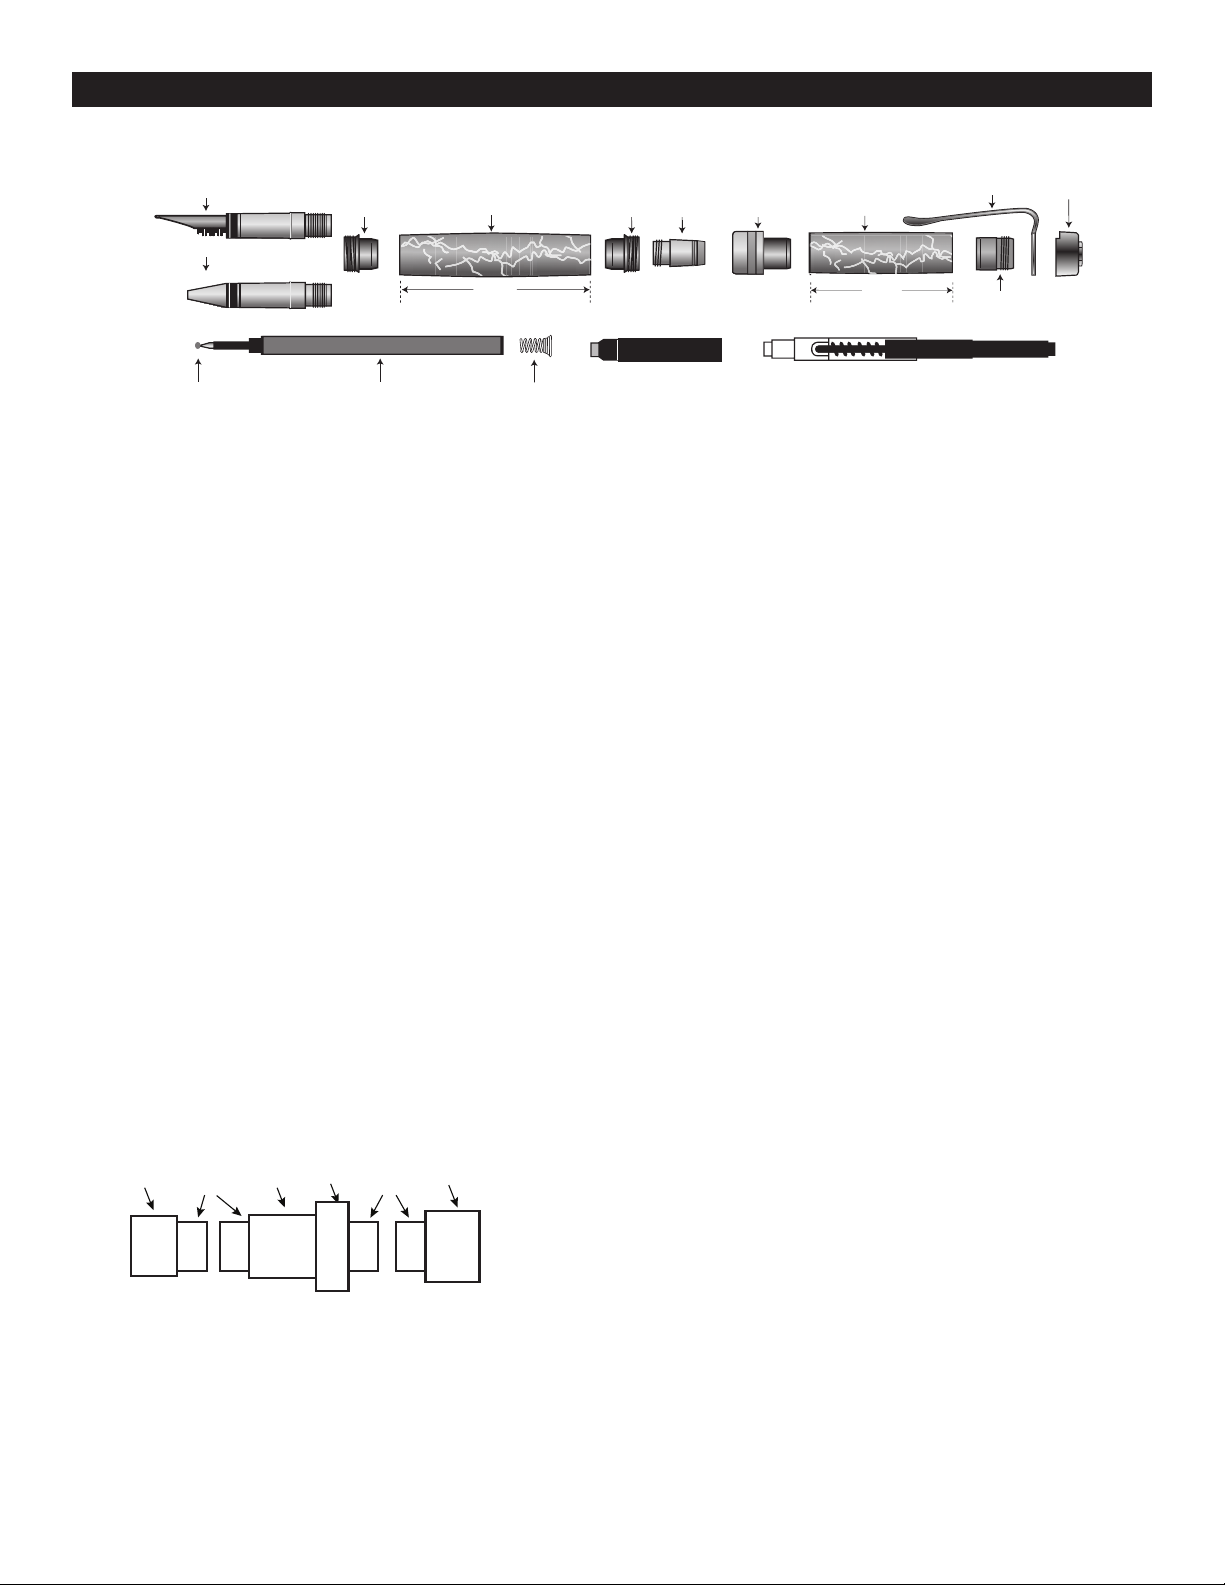
DIAGRAM C / Pen assembly
Clip
Fountain Pen Nib Assembly
Roller Ball Tip
Coupler Coupler Lower Cap Center Band
Lower Barrel
Upper Barrel
Upper Cap
29/32"
Roller Gel RellNote: Protective Cover
Rell Spring
(Roller)
ASSEMBLY TIPS
• Line up finished parts according to Diagram C.
• To press parts in, use a pen vise or a vice with covered
jaws.
• Press parts slowly to avoid scratching and damaging the
gold plated parts.
ASSEMBLY OF BODY BARREL:
• Press a coupler into each end of the Lower barrel.
• Screw in the lower cap into either end of the barrel.
• Choose appropriate pen style for final assembly;
ASSEMBLY OF CAP BARREL:
• Press the center band, narrow diameter in first into the
opening at either end of the barrel.
• Insert and press the cap nut, recessed end in first into
the opposite end of the barrel. Stop at the shoulder.
• Place the clip over the threads , mount and screw in the
upper cap, while aligning the clip rim into the slot in the
cap. Tighten cap.
15/8"
Fountain Ink Cartridge Convertible Cartridge (optional)
Cap Nut
FOUNTAIN PEN ASSEMBLY:
• Push the ink cartridge (narrow end first) into the open
end of the nib assembly to the end to cut an opening and
allow the ink to flow. Screw this assembly into the barrel.
Tip: Stroke the pen nib from the small hole to the
tip with a damp paper to help start the ink ow.
• OR – when using the refillable convertable cartridge,
push the clear end of the cartridge into the opening of
the nib assembly until it clicks. Screw the inner shaft
counter clockwise all the way down inside the cartridge.
Now, dip the nib into an ink bottle and slowly turn the
shaft upwards (clockwise) to draw ink in, until the
reservoir is filled. Screw the nib assembly back into the
barrel.
ROLLERBALL PEN ASSEMBLY:
• Drop the refill spring into the opening of the lower barrel
wide end first. Remove the protective cover of the refill.
Insert into the barrel rear end first.
• Screw the roller ball tip over the refill. Rollerball is
ready to operate.
DIAGRAM F • #PKPAR10-B2
ø
.443”
ø
.359”
Tip End Cap End
ø
.443”
OPERATING THE PEN:
• A quick 1/4 turn will screw the ends together.When
ø
.495”
ø
.359”
ø
.492”
ø
.248” Hole
Through
© 2010 PSI Woodworking Philadelphia PA 19115 - v12/10
using the pen, screw the cap over the body end. Always
keep the nib covered when not in use to avoid ink from
drying up.
 Loading...