

Page 1
Valor™ 4000W Series
Instruction Manual
Serie Valor™ 4000W
Manual de instrucciones
Série Valor™ 4000W
Manuel d’instructions
Valor™ 4000W Serie
Bedienungsanleitung
Serie Valor™ 4000W
Manuale di istruzioni
Page 2

Page 3
Valor™ 4000W Series EN-1
Scale
Stainless Steel Pan
Power Adapter & Plug
Instruction Manual
Warranty Card
Capacity Label
1. INTRODUCTION
This manual contains installation, operation and maintenance instructions for the
Valor™ 4000W Series. Please read the manual completely before using the scale.
1.1 Safety Precautions
Please follow these safety precautions:
Verify that the AC Adapter input voltage matches the local AC power supply.
Do not drop loads on the platform.
Do not place the scale upside down on the platform.
Disconnect the scale from power supply when cleaning.
Operate the scale only under ambient conditions specified in these
instructions.
Service should be performed only by authorized personnel.
Only use weights within the scale’s capacity as specified in these instructions.
Do not operate the scale in hostile environments.
Do not carry the scale by the pan or sub-platform. Use the handholds on the
side of the scale housing.
2. INSTALLATION
2.1 Package Contents
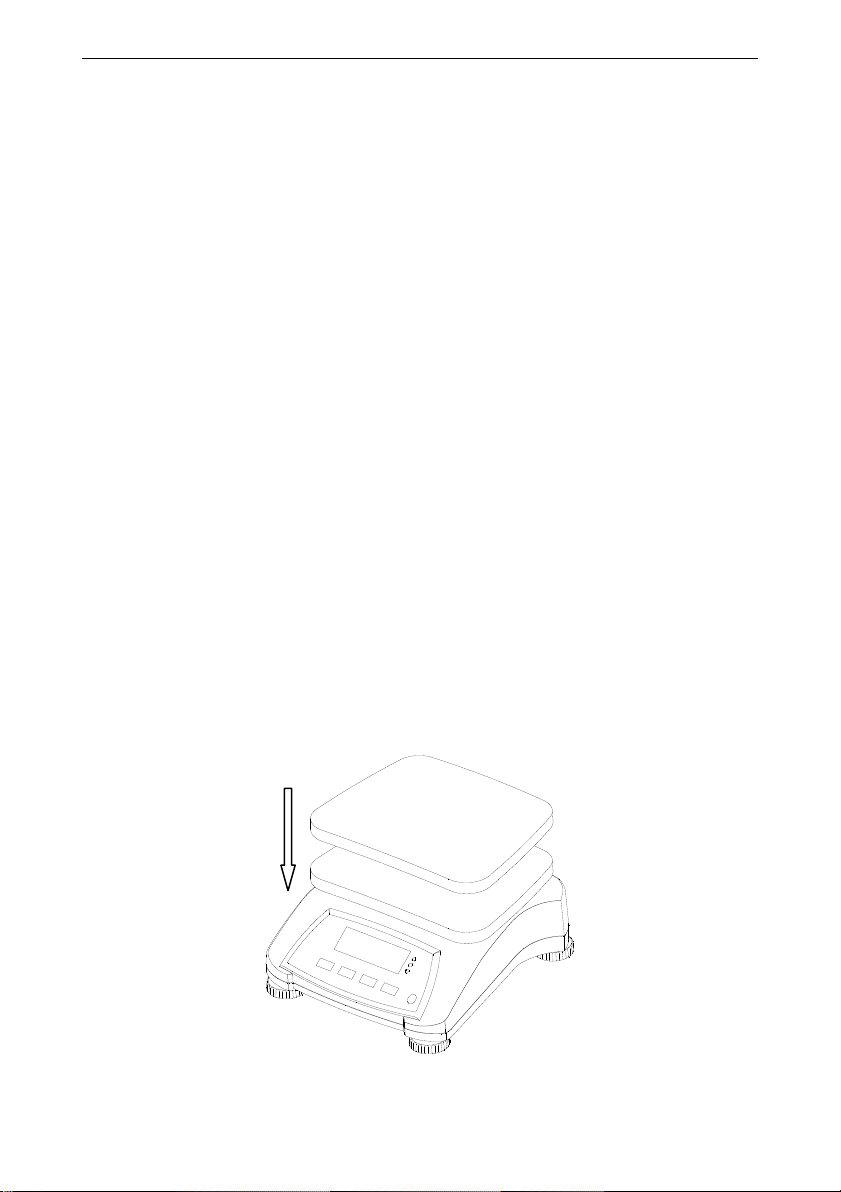
2.2 Installing Components
Place the stainless steel pan onto the weighing platform before turning the scale on.
Figure 2-1. Install the Stainless Steel Pan onto the weighing platform
Page 4
EN-2 Valor™ 4000W Series
Level Bubble
Adjustable Feet
2.3 Selecting the Location
Use the scale on a clean, firm and flat surface. Avoid locations with excessive air
current, vibrations, heat sources, or rapid temperature changes.
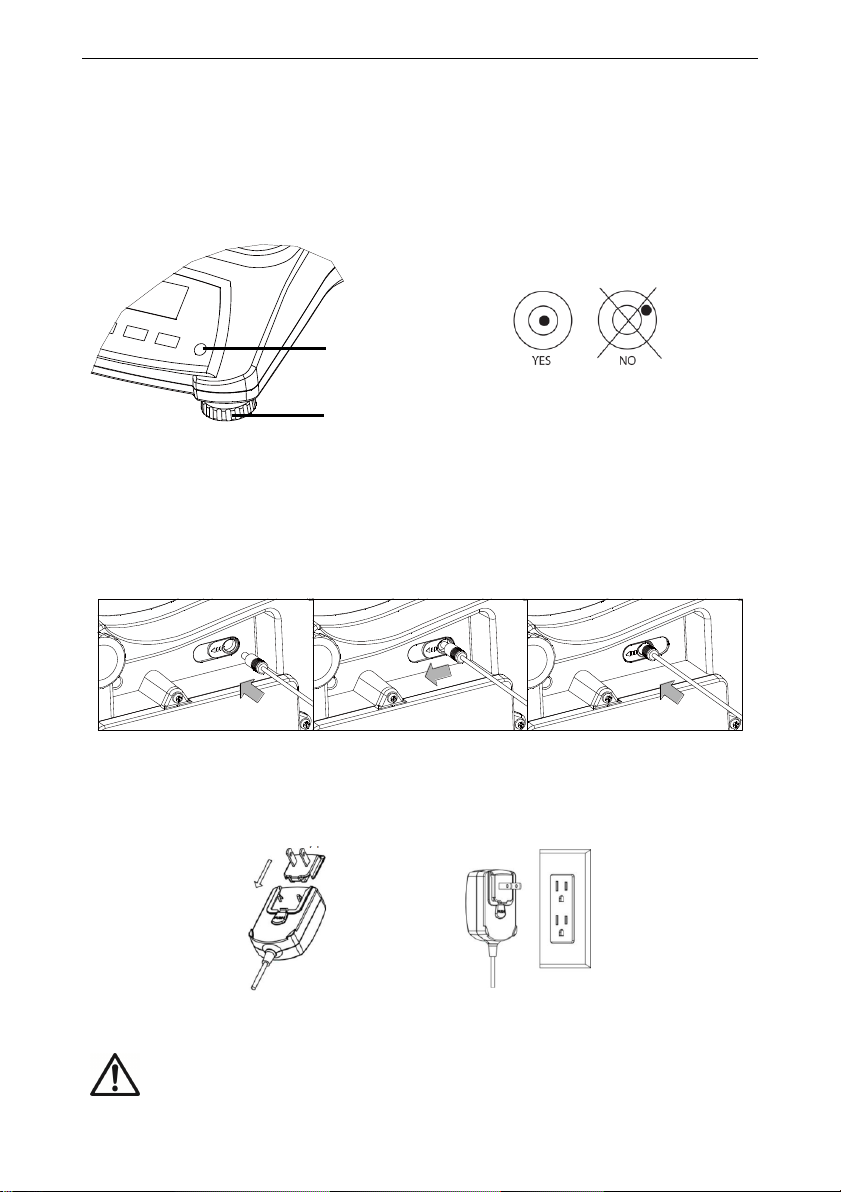
2.4 Leveling the Equipment
Adjust the leveling feet so the bubble is centered in the circle. Be sure the
equipment is level each time its location is changed.
Figure 2-2. Level Indicator
2.5 Power
The AC Adapter is used to power the scale when battery power is not needed.
First connect the AC Adapter plug to the scale input jack located at the bottom of
the scale according to the description below.
Then connect the AC adapter to the proper AC supply.
Figure 2-3. Slide to plug in
Figure 2-4. Connecting the AC adapter to AC supply
Caution: The scale can only be used in a dry environment when
powered by the AC adapter.
Page 5

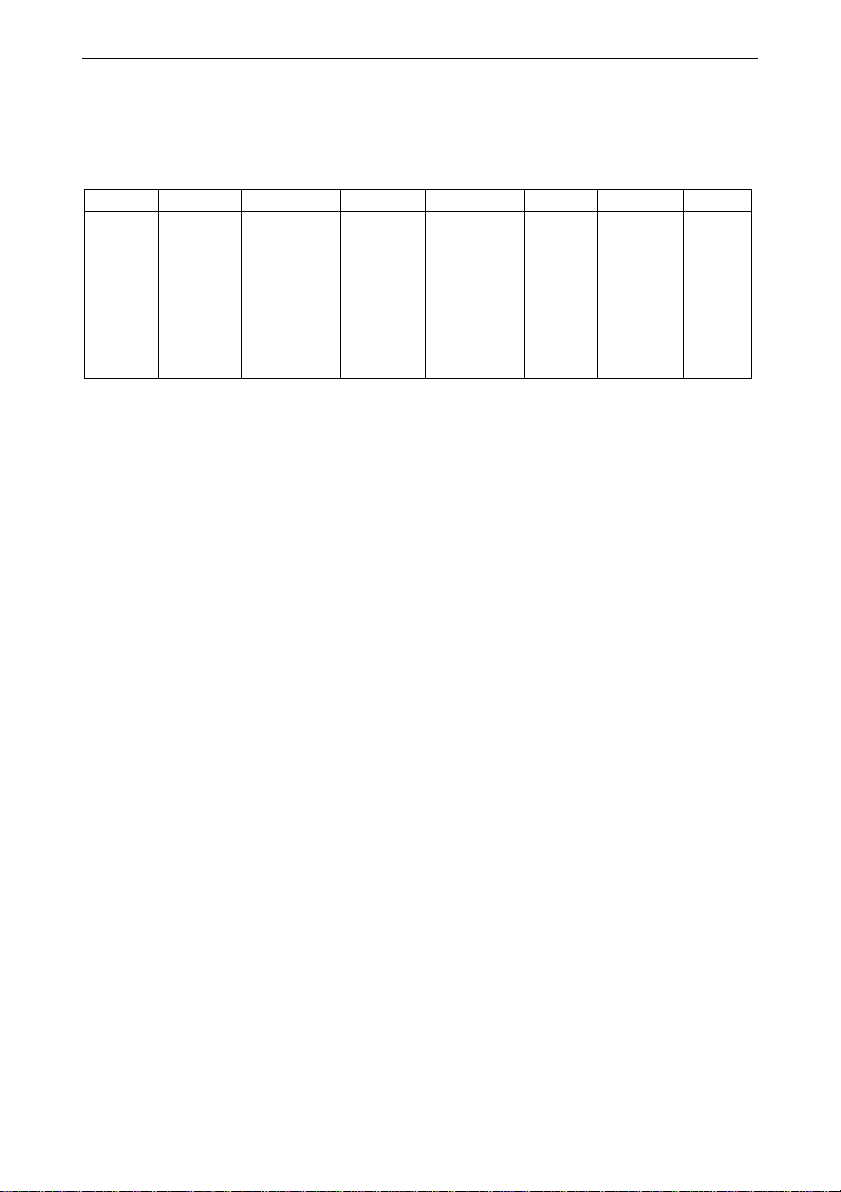
Valor™ 4000W Series EN-3
Symbol
Charge Level
Battery in use:
Symbol displayed
2.5.1 Battery Power:
The scale can be used on AC power immediately. Allow the battery to charge
for 12 hours before using the scale on battery power. The scale will
automatically switch to battery operation if there is a power failure or the power
cord is removed. With AC power, the scale is constantly charging, so the
battery charge indicator (see item 11 in table 3-2) will remain lit. The scale can
be operated during charging, and the battery is protected against overcharging.
For maximum operating time, the battery should be charged at room
temperature.
During battery operation, the battery symbol indicates the battery charging
status. When charging, the symbol will blink slowly and when fully charged the
symbol will stop blinking.
TABLE 2-1
Notes:
When battery symbol blinks fast, approximately 30 minutes working time is left.
When [Lo.bAt] is displayed, the scale will shut off.
Charging the scale must be performed in a dry environment.
CAUTION: Battery is to be replaced only by an authorized
OHAUS service dealer. Risk of explosion can occur if the
rechargeable battery is replaced with the wrong type or if it is
not properly connected. Dispose of the lead acid battery
according to local laws and regulations.
Page 6

EN-4 Valor™ 4000W Series
Button
Functions
Short Press1 (when on): Sets display to zero
Short Press (when off): Turns scale on
Long Press2 (when on): Turns the scale off
Short Press (in Menu): Selects / accepts displayed setting
Short Press: Accumulates the weight or displays the
accumulated information at 0 load.
Long Press: Toggles through active Units
Short Press (in Menu): Toggles through available settings
Short Press: Initiates an application mode specific response
Long Press: Selects active Mode
Short Press (in Menu): returns to previous settings
Short Press: Enter / clear a Tare value
Long Press: Enters User Menu
Short Press (in Menu): Quickly exit User Menu
IR Sensor3 can be programmed to act as “touchless” button.
See the User Menu section 4.3 for the available settings.
3. OPERATION
3.1 Controls
Figure 3-1. Front Control Panel Valor 4000W with display
TABLE 3-1
Notes:
1
Short Press: Press less than 2.5 seconds.
2
Long Press: Press and hold for more than 2.5 seconds.
3
The IR sensor can be activated by a hand or other object that is placed at a specified height (see
section 4.3) from the sensor. The sensor activation distance will vary based on the reflective nature
of the object. If unwanted activations occur due to unique situations the sensor can be turned off.
Page 7

Valor™ 4000W Series EN-5
Item
Description
Item
Description
1
NET symbol
9
Calibration / Menu Mode symbol
2
Center of Zero symbol
10
Dynamic symbol*
3
Negative symbol
11
Battery charge symbol
4
Stable weight symbol
12
Pound, Ounce, Pound:Ounce symbol
5
Preset Tare symbol*
13
Gram, Kilogram symbols
6
Pointer symbols
14
Pieces symbol*
7
IR Sensor symbol
15
Percent symbol
8
Accumulation symbol
(Red) Loads > Upper limit
(Green) Loads ≥ Lower limit and ≤ Upper limit
(Yellow) Loads < Lower limit
1
1
IR Sensor
Figure 3-2. Valor 4000W Display
1
2
1
3
1
4
1
5
1
6
1
7
1
8
1
9
1
10
1
11
1
12
1
13
1
14
1
15
LED Indicators
Display
TABLE 3-2 Display Symbols
Note: * Not Used
Figure 3-3. Valor 4000W Rear display.
The colored LED indicators on the right side of the control panels are used in
Checkweigh mode (section 3.6) and will light up according to the following rules:
Page 8

EN-6 Valor™ 4000W Series
Required Span Calibration Mass (sold separately)
Max
Mass
1
Max
Mass
1
1500g
1.5kg / 3lb
6000g
6kg / 15lb
3000g
3kg / 6lb
15000g
15kg / 30lb
3.2 Turning Scale On/Off
To turn the scale on, press the On/Zero Off button. The scale performs a display
test, momentarily displays the software version, and then enters the active weighing
mode.
To turn the scale off, press and hold the On/Zero Off button until OFF is displayed.
3.3 Initial Calibration
When the scale is first installed it should be calibrated to ensure accurate results.
Before performing the calibration, be sure to have the appropriate calibration
weights as listed in table 3-3.
Press and hold Menu until [mMeNU] (Menu) is displayed. When the button is released,
the display will display [C.A.L]. Press Yes to accept, [SpaN] will then be shown. Press
Yes again to begin the span calibration. [--C--] blinks while zero reading is stored.
Next, the display shows the calibration weight value. Place the specified calibration
mass on the pan and press Yes. [--C--] blinks while the reading is stored. The scale
returns to the previous application mode and is ready for use.
The message [Err 3.0 CAl] will be displayed if these calibration steps were not
followed or if the wrong weight was used.
The calibration process can be aborted by turning the scale off.
TABLE 3-3
1
Note:
Pound masses are used when calibrating in the lb unit.
3.4 Weigh Mode
1. Press and hold Mode until [wJeIGH] (Weigh) is displayed.
2. If required, place an empty container on the pan and press Tare.
3. Add sample to the pan or container. The display shows the weight of the
sample.
Page 9

Valor™ 4000W Series EN-7
3.5 Percent Mode
This mode measures the weight of a sample as a percentage of a reference weight.
1. Press and hold Mode until [PerCNt] is displayed. [Clr.ref] (clear reference) will
then display.
Notes: Press Function to view the current reference weight.
If there is no reference data stored, [Set.ref] is displayed. Press Yes to
set reference data.
2. Press No to use the stored reference weight and proceed to step 6.
3. If required, place an empty container on the pan and press Tare. Press Yes to
establish a new reference. Scale will now display [PUt.ref].
4. Add the desired reference material to the container. Press Yes to store the
reference weight. The display shows 100%.
5. Remove the reference material. If required, place an empty container on the
pan and press Tare.
6. Add the sample material. The display shows the percentage of the sample
compared to reference weight.
7. To clear the stored reference data press and hold Mode until [PerCNt] is
displayed. Press Yes when [Clr.ref] is displayed.
3.6 Checkweigh Mode
This mode sets low and high weight limits for portion control processes.
1. Press and hold Mode until [CHeCk] (Check) is displayed. [CLr.ref] (clear
references) will then display.
Notes: Press Function to view the low and high reference weight limits.
If there is no reference data stored, [Set.ref] is displayed. Press Yes to
set reference data.
2. Press No to use the stored reference weight limits and proceed to step 5.
3. Press Yes to establish new reference values. The scale will then display [Set.
LO]. Press Yes to view the “Low” limit value. Press Yes to accept or No to edit
the “Low” limit value. The stored value then displays with the first digit
highlighted [000.000 kg]. Repeatedly press No until the desired number
appears. Press Yes to accept and highlight the next digit. Repeat until all the
digits are correct. Press Yes to accept the “low” limit value, [Set. HI] will be
displayed.
4. Repeat the same procedure to accept or edit the “high” value.
5. If required, place an empty container on the pan and press Tare. Place
sample material on the pan or in the container. If the sample weight is under
the target weight range, the yellow LED will light. If the sample is within the
target weight range, the green LED will light. If the sample is over the target
weight range, the red LED will light.
6. To clear the stored reference values press and hold Mode until [CHeCk] is
displayed. Press Yes when [Clr.ref] is displayed.
Page 10

EN-8 Valor™ 4000W Series
In weighing mode; sub menu ACCUmM setting, select mMaNU:
If required, place an empty container on the pan and press
Tare.
Step i. Put the weight (0.04 kg) on the pan and press M+
key. The Σ icon indicator will keep flashing until
the weight is removed.
Step ii. Remove the weight from the pan. Put another
weight (0.03 kg) and press M+ key:
Step iii. Remove the weight from the pan:
Step iv. Press M+ key to display the statistical information:
Step v. If required, follow step 3 above to clear the
accumulation data.
N 2
tOtal
0.070 kg
mMIN
0.030 kg
mMax
0.040 kg
mMaNU
*
0.040 kg
*
0.030 kg
*
0.000 kg
3.7 Accumulation
Accumulation works together with each application mode. This function allows the
user to store the total of a series of weight measurements.
1. Press the M+ key to add the weight to the accumulation data. The Σ icon will
keep flashing until the weight is removed.
Note: When Accumulate is set to AUTO in the setup menu, it is not
necessary to press the M+ key.
2. When the pan is cleared, press the M+ key to display the statistical information
of the accumulation data.
3. To clear the accumulation data press the Tare key when the display is
showing the statistical information of the accumulation data. The display
shows [Clr.aCC]. Press the Yes key to clear the stored data and return to
current mode.
Notes:
Only stable weights are stored to accumulation total.
To prevent the same load from being added to the total multiple times, the load on
the pan must be returned to 0 before the next load can be added.
When Legal for Trade is OFF, the display must return to 0 gross, 0 net or a negative
net value; when Legal for Trade is ON, the display must return to 0 gross.
Otherwise, the Σ icon will continue flashing.
Gross loads and net loads cannot be added to the same total. If the first load is a
gross weight, future loads must also be gross weights. If the first load is a net
weight, future loads must also be net weights.
The max of accumulation times is 9999.
Changing the mode will clear the accumulation data.
Accumulation Example:
Page 11
Menu:
C.A.L
S.E.t.U.P
r.E.A.d
M.O.d.E
U.n.i.t
L.O.C.k
E.n.d
Menu
Items:
Span
Lin
GEO
End
Reset
Pwr.Un
A.Tare
Ir.Func
Ir.Adj
Accum
End
Reset
Stable
Filter
AZT
Light
Sleep
A.Off
End
Reset
Percnt
Check
End
kg
g
oz
lb
lb:oz
End
Reset
L.Cal
L.Setup
L.Read
L.Mode
L.Unit
End
Valor™ 4000W Series EN-9
4. MENU SETTINGS
The User Menu allows the customizing of scale settings.
4.1 Menu Navigation
User Menu:
Notes:
Some Units/Modes may not be available in all models.
When LEGAL FOR TRADE is set to ON (see section 4.9), the menu settings are
affected.
To Enter the Menu Mode
Press and hold Menu until [mMeNU] (Menu) is displayed. When released the first submenu [C.a.l] (Cal) will be shown.
Press Yes to enter the displayed sub-menu or press No to advance to the next.
Selecting a sub-menu will display the first menu item. Press Yes to view the menu
item setting or press No to move to the next menu item. When viewing the setting,
press Yes to accept the setting, or press No to change the setting. When [End] is
displayed, press Yes to return to the sub-menu selections or No to return to the first
item in the current menu. Bold indicates factory default setting.
Note: The Calibration / Menu Mode indicator is displayed when in the Menu Mode.
4.2 Cal Menu
Enter this menu to perform calibrations.
Span [SpaN] (yes, no)
Initiates a span calibration procedure (zero and span).
Lin [LIN] (yes, no)
Initiates a linearity calibration procedure (zero, mid-point and span).
GEO [GEO]
Geographical Adjustment Factor (GEO) is used to adjust the calibration
based on the current location. Settings from 0 to 31 are available with 12
being the default. Refer to table 4-1 to determine the GEO factor that
corresponds to your location.
End Cal [End]
Advance to the next menu or return to the top of the current menu.
Page 12

EN-10 Valor™ 4000W Series
4.3 Setup Menu
Enter this menu to set scale parameters.
Reset [reset] (no, yes)
Reset the Setup menu to factory defaults.
Power on unit [pwWr.UN] (auto, kg, g, lb, oz, lb:oz)
Set the unit of measure displayed at startup
Auto Tare [A.tArE] (off, on, on-acc)
Set the automatic tare functionality. If “on” is selected the first stable gross
weight is tared. If “on-acc” is selected, stable gross loads within the accept
limits are tared (in Checkweigh mode)
IR Function [Ir.FUNC] (off, tare)
Set the IR sensor functionality.
IR Adj [Ir.adj] (hi, low)
Set the detecting level for the IR sensor.
(For reference: Hi: ~ 100 mm / 4 inches; Low: ~ 50mm / 2 inches)
Accumulation [aCCUmM] (off, auto, manu)
Set the accumulation functionality.
End Setup [End]
Advance to the next menu or return to the top of the current menu.
4.4 Read Menu
Enter this menu to set user preferences.
Reset [reset] (no, yes)
Reset the Read menu to factory defaults.
Stable Range [Stable] (0.5, 1, 2, 5)
Set the amount the reading can vary while the stability symbol remains on.
Filter [FILtEr] (low, medium, high)
Set the amount of signal filtering.
Auto-Zero Tracking [AZt] (off, 0.5, 1, 3)
Set the automatic zero tracking functionality.
Light [LIGHt] (hi, med, low)
Sets backlight functionality.
Sleep [SLEEP] (off, on)
Set the display shut off time.
Auto off [A.OFF] (off, 1, 5, 10)
Set the automatic shut off functionality.
End Readout [End]
Advance to the next menu or return to the top of the current menu.
Page 13

Valor™ 4000W Series EN-11
4.5 Mode Menu
Enter this menu to activate modes so they will be available for use with the Mode
button. Weigh mode is always active by default.
Reset [reset] (no, yes)
Reset the Mode menu to factory defaults.
Percent [PerCNt] (off, on)
Set the status.
Check [CHECk] (off, on)
Set the sub-mode.
End Mode [End]
Advance to the next menu or return to the top of the current menu.
4.6 Unit Menu
Enter this menu to activate units so they will be accessible with the Units button.
The units in the menu must be turned “on” to be active.
Note: Available units vary by model and local regulations.
4.7 Lock Menu
The Lock Menu is a software controlled option which can lock Menu settings to
prevent tampering.
Reset [reset] (no, yes)
Reset the Lock menu to factory defaults.
Lock Cal [l.CAL] (off, on)
Set the status.
Lock Setup [l.SEtUP] (off, on)
Set the status.
Lock Read [l.rEAD] (off, on)
Set the status.
Lock Mode [l.mMOdE] (off, on)
Set the status.
Lock Unit [l.UNIt] (off, on)
Set the status.
End Lock [End]
Advance to the next menu or return to the top of the current menu.
4.8 End Menu
Press ‘Yes’ to advance to the Calibration menu. Press ‘No’ to exit the menu and
return to the current application mode.
Page 14

EN-12 Valor™ 4000W Series
0 325 650 975 1300 1625 1950 2275 2600 2925 3250
325 650 975 1300 1625 1950 2275 2600 2925 3250 3575
0 1060 2130 3200 4260 5330 6400 7460 8530 9600 10660
1060 2130 3200 4260 5330 6400 7460 8530 9600 10660 11730
0°00' 5°46' 5 4 4 3 3 2 2 1 1 0 0
5°46' 9°52' 5 5 4 4 3 3 2 2 1 1 0
9°52' 12°44' 6 5 5 4 4 3 3 2 2 1 1
12°44' 15°06' 6 6 5 5 4 4 3 3 2 2 1
15°06' 17°10' 7 6 6 5 5 4 4 3 3 2 2
17°10' 19°02' 7 7 6 6 5 5 4 4 3 3 2
19°02' 20°45' 8 7 7 6 6 5 5 4 4 3 3
20°45' 22°22' 8 8 7 7 6 6 5 5 4 4 3
22°22' 23°54' 9 8 8 7 7 6 6 5 5 4 4
23°54' 25°21' 9 9 8 8 7 7 6 6 5 5 4
25°21' 26°45' 10 9 9 8 8 7 7 6 6 5 5
26°45' 28°06' 10 10 9 9 8 8 7 7 6 6 5
28°06' 29°25' 11 10 10 9 9 8 8 7 7 6 6
29°25' 30°41' 11 11 10 10 9 9 8 8 7 7 6
30°41' 31°56' 12 11 11 10 10 9 9 8 8 7 7
31°56' 33°09' 12 12 11 11 10 10 9 9 8 8 7
33°09' 34°21' 13 12 12 11 11 10 10 9 9 8 8
34°21' 35°31' 13 13 12 12 11 11 10 10 9 9 8
35°31' 36°41' 14 13 13 12 12 11 11 10 10 9 9
36°41' 37°50' 14 14 13 13 12 12 11 11 10 10 9
37°50' 38°58' 15 14 14 13 13 12 12 11 11 10 10
38°58' 40°05' 15 15 14 14 13 13 12 12 11 11 10
40°05' 41°12' 16 15 15 14 14 13 13 12 12 11 11
41°12' 42°19' 16 16 15 15 14 14 13 13 12 12 11
42°19' 43°26' 17 16 16 15 15 14 14 13 13 12 12
43°26' 44°32' 17 17 16 16 15 15 14 14 13 13 12
44°32' 45°38' 18 17 17 16 16 15 15 14 14 13 13
45°38' 46°45' 18 18 17 17 16 16 15 15 14 14 13
46°45' 47°51' 19 18 18 17 17 16 16 15 15 14 14
47°51' 48°58' 19 19 18 18 17 17 16 16 15 15 14
48°58' 50°06' 20 19 19 18 18 17 17 16 16 15 15
50°06' 51°13' 20 20 19 19 18 18 17 17 16 16 15
51°13' 52°22' 21 20 20 19 19 18 18 17 17 16 16
52°22' 53°31' 21 21 20 20 19 19 18 18 17 17 16
53°31' 54°41' 22 21 21 20 20 19 19 18 18 17 17
54°41' 55°52' 22 22 21 21 20 20 19 19 18 18 17
55°52' 57°04' 23 22 22 21 21 20 20 19 19 18 18
57°04' 58°17' 23 23 22 22 21 21 20 20 19 19 18
58°17' 59°32' 24 23 23 22 22 21 21 20 20 19 19
59°32' 60°49' 24 24 23 23 22 22 21 21 20 20 19
60°49' 62°90' 25 24 24 23 23 22 22 21 21 20 20
62°90' 63°30' 25 25 24 24 23 23 22 22 21 21 20
63°30' 64°55' 26 25 25 24 24 23 23 22 22 21 21
64°55' 66°24' 26 26 25 25 24 24 23 23 22 22 21
66°24' 67°57' 27 26 26 25 25 24 24 23 23 22 22
67°57' 69°35' 27 27 26 26 25 25 24 24 23 23 22
69°35' 71°21' 28 27 27 26 26 25 25 24 24 23 23
71°21' 73°16' 28 28 27 27 26 26 25 25 24 24 23
73°16' 75°24' 29 28 28 27 27 26 26 25 25 24 24
75°24' 77°52' 29 29 28 28 27 27 26 26 25 25 24
77°52' 80°56' 30 29 29 28 28 27 27 26 26 25 25
80°56' 85°45' 30 30 29 29 28 28 27 27 26 26 25
85°45' 90°00' 31 30 30 29 29 28 28 27 27 26 26
Elevation in meters
Elevation in feet
GEO value
Latitude
TABLE 4-1. GEO CODES
Page 15

Valor™ 4000W Series EN-13
Capacity Label
Figure 4-2. LFT pins.
4.9 Legal For Trade
When the scale is used in trade or a legally controlled application it must be set up,
verified and sealed in accordance with local weights and measures regulations. It is
the responsibility of the purchaser to ensure that all pertinent legal requirements are
met.
4.9.1 Capacity Label
A label showing the capacity and readability of the scale must be installed near
each display. If the Capacity Labels were installed prior to delivery, no further action
is needed. If the Capacity Labels were not installed, they have been placed in the
packaging material. Affix the labels above the displays as shown in Figure 4-1.
Note: The Capacity Labels will be destroyed upon removal, so only attempt to
install them once.
Figure 4-1. Front and rear display capacity label locations
4.9.2 Settings
Before verification and sealing, perform the following steps:
1. Set Legal For Trade to OFF.
2. Verify that the menu settings meet the local weights and measures regulations.
3. Perform a calibration as explained in Section 3.3.
4. Set Legal For Trade to ON.
To change the scale’s Legal For Trade (LFT) setting, follow this procedure:
Caution: When accessing the bottom of the scale, avoid placing the scale
upside down on the pan or sub-platform. Place the scale on its side.
1. Turn the scale OFF.
2. Remove the Security Cover under the scale to access
the two pins located in a slot (see figure 4-2). Short these
pins (a slotted screwdriver may be used), while powering
the scale ON. The scale will perform the start-up
procedure, and then the display will show the current
status [lft OFF] (LFT OFF, unlocked) or [lft ON] (LFT
ON, locked); press the ‘No’ key to change this setting, or
press the ‘Yes’ key to confirm it.
Note: When Legal For Trade is set to On, the menu settings are affected as follows:
Calibration (C.A.L) menu is not accessible
IR Function, Filter and Unit menus are locked at the current settings.
Stable Range setting is locked at 1d
Auto-Zero Tracking setting is locked at 0.5d
3. Replace the Security Cover.
Page 16

EN-14 Valor™ 4000W Series
Wire Seal
Paper Seal
Security Cover
4.9.3 Verification and Sealing
The local weights and measures official or authorized service agent must perform
the verification procedure.
4.9.3.1 Physical Seals
For jurisdictions that use the physical sealing method, the local weights and
measures official or authorized service agent must apply a security seal to prevent
tampering with the settings. Refer to the illustrations below for sealing methods.
Unlocked Locked
Figure 4-3. Sealing
4.9.3.2 Audit Trail Seal (USA and Canada only)
For jurisdictions that use the audit trail sealing method, the local weights and
measures official or authorized service agent must record the current configuration
and calibration event counter values at the time of sealing. These values will be
compared to values found during a future inspection.
Note: A change to an event counter value is equivalent to breaking a physical seal.
The audit trail uses two event counters to record changes to configuration and
calibration settings.
The configuration event counter (CFG) will index by 1 under the following
conditions:
- When the LFT setting is changed from ON to OFF.
- When exiting the menu if one or more of the following menu settings
are changed: Stable Range, Auto Zero Tracking (AZT), Filter, IR
Function and Units (kg, g, oz, lb or lb:oz).
The calibration event counter (CAL) will index by 1 when exiting the menu
if a Span Calibration or GEO setting change is made.
Note: The counter only indexes once, even if several settings are changed.
The event counters can be viewed by pressing and holding the MENU button.
While the button is held, the display will show MENU followed by Audit.
Release the button when Audit is displayed to view the audit trail information.
Page 17

Valor™ 4000W Series EN-15
6
3
1
2
4
5
The audit trail information is displayed in the format CFGxxx and CALxxx.
The scale then returns to normal operation.
5. MAINTENANCE
5.1 Cleaning
The housing may be cleaned with a cloth dampened with a mild detergent if
necessary. Do not use solvents, chemicals, alcohol, ammonia or abrasives to clean
the housing or control panels.
5.2 Cleaning the Plastic Pan
5.2.1 Uninstalling and cleaning the plastic pan
Please follow the steps below to clean the plastic pan:
1. Remove the stainless steel pan
2. Remove the four thumb screws holding the battery cover.
3. Unplug the two battery clips and remove the battery.
4. Using a Phillips screwdriver, remove the two screws located at the bottom of the
battery compartment.
5. Remove the plastic pan.
6. Clean the plastic pan.
Figure 5-1. Pan cleaning
5.2.2 Reinstalling the pan after cleaning
Please follow the steps below to reinstall the plastic pan (see also the steps in figure
5-1, in reversed order):
1. Using a Phillips screwdriver, attach the plastic pan to the housing with the
two screws.
2. Place the battery in the battery compartment and attach the two battery clips.
Attach the red wire to the positive (red) battery terminal and the black wire to
the negative (black) battery terminal.
3. Attach the battery cover with the four thumb screws.
4. Place the scale upright and install the stainless steel pan.
Caution: Risk of explosion can occur if the battery is not properly
connected.
Page 18

EN-16 Valor™ 4000W Series
Symptom
Possible Cause
Remedy
Cannot turn on
No power to scale
Battery discharged
Verify connections, power source
and battery charge status.
Poor accuracy
Improper calibration
Unstable environment
Perform calibration
Move scale to suitable location
Cannot calibrate
Unstable environment
Incorrect calibration weight
Move the scale to suitable location
Use correct calibration weight
Cannot access mode
Mode not enabled
Enter menu and enable mode
Cannot access unit
Unit not enabled
Enter menu and enable unit
LO ref
Reference weight is too low
Increase reference weight.
Err 3.0 Cal
Incorrect calibration weight
See table 3-3 for correct weights
Err 8.1 ˉLOadˉ
Power on zero range exceeded
Clear pan
Err 8.2 _LOad_
Power on zero under range
Install pan
Err 8.3 ˉLOadˉ
Overload
Load exceeds scale maximum
capacity
Err 8.4 _LOad_
Under load
Reading below min. range - Reinstall pan.
Err 8.5 ˉtareˉ
Tare out of range
Tare value exceeds maximum.
Err 9 Data
Internal data error.
Contact an authorized service agent
Err13 mMEmM
Fail to write EEPROM.
Contact an authorized service agent
Err 53 C.SUmM
Invalid checksum data
Contact an authorized service agent
Lo.Bat
Battery is discharged
Connect the power and charge the
battery
NO.ACC
Gross and net weights cannot be
accumulated together
Accumulate only gross or net
weights.
Battery fails to charge
fully
Battery is defective
Have battery replaced by OHAUS
authorized service dealer.
5.3 Troubleshooting
The following table lists common problems and possible causes and remedies.
If the problem persists, contact OHAUS or your authorized dealer.
TABLE 5-1
5.4 Service Information
If the troubleshooting section does not resolve or describe your problem, contact
your authorized OHAUS service agent. Please visit our web site, www.ohaus.com
to locate the OHAUS office nearest you. An OHAUS product service specialist will
be available to provide assistance.
6. TECHNICAL DATA
The technical data is valid under the following ambient conditions:
Indoor use only
Operating temperature: -10ºC (14ºF) to 40ºC (104ºF)
Relative humidity: 10% to 90% relative humidity, non-condensing
Altitude: Up to 2000 m
Power: AC Adapter (supplied) - 12 VDC 0.84 A output, internal rechargeable sealed
lead-acid battery
Mains supply voltage fluctuations: up to ±10% of the nominal voltage
Installation Category: II
Pollution Degree: 2
Page 19

Valor™ 4000W Series EN-17
MODEL
V41PWE1501T
V41XWE1501T
V41PWE3T
V41XWE3T
V41PWE6T
V41XWE6T
V41PWE15T
V41XWE15T
Capacity x Readability
(Max x d non-approved)
1.5 kg x 0.0002 kg
1500 g x 0.2 g
3 lb x 0.0005 lb
48 oz x 0.01 oz
3 kg x 0.0005 kg
3000 g x 0.5 g
6 lb x 0.001 lb
96 oz x 0.02 oz
6 kg x 0.001 kg
6000 g x 1 g
15 lb x 0.002 lb
240 oz x 0.05 oz
15 kg x 0.002 kg
15000 g x 2 g
30 lb x 0.005 lb
480 oz x 0.1 oz
Maximum Displayed Resolution
7500
6000
6000
7500
Capacity X Readability
(Max x e approved)
1.5 kg x 0.0005 kg
1500 g x 0.5 g
3 lb x 0.001 lb
48 oz x 0.02 oz
3 kg x 0.001 kg
3000 g x 1 g
6 lb x 0.002 lb
96 oz x 0.05 oz
6 kg x 0.002 kg
6000 g x 2 g
15 lb x 0.005 lb
240 oz x 0.1 oz
15 kg x 0.005 kg
15000 g x 5 g
30 lb x 0.01 lb
480 oz x 0.2 oz
Approved Resolution
3000
3000
3000
3000
Repeatability
0.0005 kg
0.001 kg
0.002 kg
0.005 kg
Linearity
± 0.0005kg
± 0.001kg
± 0.002kg
± 0.005kg
Weighing Units*
Non-Approved models: g, kg, lb, oz, lb:oz
EC and OIML Approved models: g, kg
Measurement Canada and NTEP Approved models: g, kg, lb, oz
Tare Range
To capacity by subtraction
Stabilization Time
≤ 0.5 seconds
Safe Overload Protection
150 % of scale capacity
Weight Display
2 x Red LED (front and rear)
6-digit 7-segment, 20.5 mm / 0.8 in characters
Keyboard
Four buttons
Application Modes
Weighing, Percent, Check Weighing (each with Accumulate function)
Battery Operating Time (at 20º C)
Typically 50 hours with 12-hour full charge
Construction
V41PW: ABS housing with 304 Stainless Steel Platform
V41XW: ABS bottom housing with 304 stainless steel top housing and platform
Ingress Protection
IPX8
Pan Dimensions
190 x 242 mm / 7.5 x 9.5 in
Approval Class
III
Net Weight
V41PW: 3.0 kg / 6.6 lb; V41XW: 3.9 kg / 8.6 lb
Shipping Weight
V41PW: 4.0 kg / 8.8 lb; V41XW: 4.9 kg / 10.8 lb
Shipping Dimensions
410 x 370 x 220 mm / 16.1 x 14.6 x 8.7 in
V41PW
A
256 mm / 10.1 in.
B
280 mm / 11.0 in.
C
121 mm / 4.8 in.
V41XW
A
256 mm / 10.1 in.
B
288 mm / 11.3 in.
C
124 mm / 4.9 in.
A
C
B
TABLE 6-2
Figure 6-1. Dimensions
6.1 Specifications
TABLE 6-1
Note: Turn off lb:oz unit with LFT ON
6.2 Drawings and Dimensions
Page 20

EN-18 Valor™ 4000W Series
Mark
Standard
This product conforms to the EMC Directive 2004/108/EC, the Low
Voltage Directive 2006/95/EC and the Non-Automatic Weighing
Instrument Directive 2009/23/EC. The Declaration of Conformity is
available online at
europe.ohaus.com/europe/en/home/support/compliance.aspx.
AS/NZS CISPR 11
CAN/CSA-C22.2 No. 61010-1-12
UL Std. No. 61010-1 (3rd edition)
NSF/ANSI 169–2009
NSF/ANSI/3-A 14159-1-2010
Weighing Instruments verified at the place of manufacture bear one
of the preceding marks on the packing label and the green ‘M’
(metrology) sticker on the descriptive data plate. They may be put into
service immediately.
Weighing Instruments to be verified in two stages have no green ‘M’
(metrology) on the descriptive data plate and bear one of the
preceding identification marks on the packing label. The second
stage of the initial verification must be carried out by an authorized
and certified service organization established within the European
Community or by the National Notified Body.
The first stage of the initial verification has been carried out at the manufacturers
work. It comprises all tests according to the adopted European standard EN
45501:1992, paragraph 8.2.2.
If national regulations limit the validity period of the verification, the user of the
weighing instrument must strictly observe the re-verification period and inform the
respective weights and measures authorities.
6.3 Compliance
Compliance to the following standards is indicated by the corresponding mark on
the product.
Important notice for verified weighing instruments
Page 21

Valor™ 4000W Series EN-19
Disposal
In conformance with the European Directive 2002/96/EC on Waste
Electrical and Electronic Equipment (WEEE) this device may not be
disposed of in domestic waste. This also applies to countries outside
the EU, per their specific requirements.
The Batteries Directive 2006/66/EC introduces new requirements
from September 2008 on removability of batteries from waste
equipment in EU Member States. To comply with this Directive, this
device has been designed for safe removal of the batteries at end-oflife by a waste treatment facility.
Please dispose of this product in accordance with local regulations at the collecting
point specified for electrical and electronic equipment. If you have any questions,
please contact the responsible authority or the distributor from which you
purchased this device.
Should this device be passed on to other parties (for private or professional use),
the content of this regulation must also be related.
Disposal instructions in Europe are available online at
europe.ohaus.com/europe/en/home/support/weee.aspx.
Thank you for your contribution to environmental protection.
FCC Note
This equipment has been tested and found to comply with the limits for a Class B
digital device, pursuant to Part 15 of the FCC Rules. These limits are designed to
provide reasonable protection against harmful interference when the equipment is
operated in a commercial environment. This equipment generates, uses, and can
radiate radio frequency energy and, if not installed and used in accordance with the
instruction manual, may cause harmful interference to radio communications.
Operation of this equipment in a residential area is likely to cause harmful
interference in which case the user will be required to correct the interference at his
own expense.
Industry Canada Note
This Class B digital apparatus complies with Canadian ICES-003.
ISO 9001 Registration
In 1994, OHAUS Corporation, USA, was awarded a certificate of registration to ISO
9001 by Bureau Veritus Quality International (BVQI), confirming that the OHAUS
quality management system is compliant with the ISO 9001 standard’s
requirements. On June 21, 2012, OHAUS Corporation, USA, was re-registered to
the ISO 9001:2008 standard.
Product Registration
Protect your investment. Register your product with your local OHAUS dealer or
online at www.ohaus.com.
Page 22

EN-20 Valor™ 4000W Series
Limited Warranty
OHAUS products are warranted against defects in materials and workmanship from
the date of delivery through the duration of the warranty period. During the warranty
period OHAUS will repair, or, at its option, replace any component(s) that proves to
be defective at no charge, provided that the product is returned, freight prepaid, to
OHAUS. This warranty does not apply if the product has been damaged by accident
or misuse, exposed to radioactive or corrosive materials, has foreign material
penetrating to the inside of the product, or as a result of service or modification by
other than OHAUS. In lieu of a properly returned warranty registration card, the
warranty period shall begin on the date of shipment to the authorized dealer. No
other express or implied warranty is given by OHAUS Corporation. OHAUS
Corporation shall not be liable for any consequential damages.
As warranty legislation differs from state to state and country to country, please
contact OHAUS or your local OHAUS dealer for further details.
Page 23

Serie Valor™ 4000W ES-1
Báscula
Plato de acero inoxidable
Tarjeta de garantía
Adaptador de corriente y conector
Manual de instrucciones
Etiqueta de capacidad
1. INTRODUCCIÓN
Este manual contiene instrucciones de instalación, funcionamiento y mantenimiento
de las series Valor™ 4000W. Por favor lea completamente el manual antes de usar
la báscula.
1.1 Precauciones de seguridad
Por favor siga estas precauciones de seguridad:
Verifique que el voltaje de entrada del adaptador de corriente alterna (CA)
coincida con el voltaje del suministro eléctrico de corriente alterna local.
No deje caer objetos en la plataforma.
No coloque la báscula al revés sobre la plataforma.
Desconecte la báscula de la fuente de corriente cuando la esté limpiando.
Utilice la báscula sólo en las condiciones ambientales especificadas en estas
instrucciones.
El mantenimiento debe realizarse solamente por el personal autorizado.
Utilice sólo pesos dentro de la capacidad de la báscula como se especifica en
estas instrucciones.
No use la báscula en ambientes hostiles.
No transporte la báscula por el plato o la subplataforma. Utilice los asideros
de sujeción que se encuentran en el lateral de la caja de la báscula.
2. INSTALACIÓN
2.1 Contenido del paquete
2.2 Instalación de componentes
Coloque el plato de acero inoxidable en la plataforma de pesaje antes de encender
la báscula.
Figura 2-1. Instalación del plato de acero inoxidable en la plataforma de pesaje
Page 24

ES-2 Serie Valor™ 4000W
Burbuja de nivel
Pata niveladora
Sí No
2.3 Selección de la ubicación
Use la báscula en una superficie limpia, firme y segura. Evite lugares con corrientes
de aire excesivas, vibraciones, fuentes de calor o cambios bruscos de temperatura.
2.4 Nivelación del equipo
Ajuste las patas niveladoras para que la burbuja esté centrada en el círculo.
Asegúrese de que el equipo esté nivelado cada vez que cambia su ubicación.
Figura 2-2 Indicador de nivel
2.5 Alimentación
El adaptador de corriente alterna se utiliza para dar corriente a la báscula cuando
la alimentación por baterías no es necesaria. Primero conecte el adaptador de
corriente alterna al enchufe de entrada de la báscula ubicado en la parte inferior
de la báscula como se describe a continuación.
Después conecte el adaptador de corriente alterna a la alimentación de
corriente alterna adecuada.
Figura 2-4. Conexión del adaptador de corriente alterna a la alimentación de
Figura 2-3. Deslizar para conectar
corriente alterna
Precaución: Sólo se puede utilizar la báscula en un ambiente seco
cuando está alimentada por el adaptador de corriente alterna.
Page 25

Serie Valor™ 4000W ES-3
Símbolo
Nivel de carga
Batería en uso:
Símbolo mostrado
2.5.1 Alimentación por baterías:
La báscula se puede utilizar de forma inmediata si se conecta a la corriente
alterna. Antes de utilizar la báscula alimentada por baterías, deje cargar la
batería durante 12 horas. La báscula cambiará automáticamente a
funcionamiento por batería si hay un fallo de corriente o si se quita el cable de
corriente. Con corriente alterna, la báscula está cargando constantemente, por
lo que el indicador de carga de la batería (consulte el elemento 11 en la tabla
3-2) permanecerá encendido. La báscula puede usarse durante la carga, y la
batería estará protegida contra sobrecarga.
Para un tiempo de funcionamiento máximo, la batería debe cargarse a
temperatura ambiente.
Durante el funcionamiento de la batería, el símbolo de batería indica el estado
de carga de la batería. Cuando esté cargando, el símbolo parpadeará
lentamente y cuando esté totalmente cargado, el símbolo dejará de parpadear.
TABLA 2-1
Notas:
Cuando el símbolo de batería parpadea rápidamente, queda
aproximadamente 30 minutos de tiempo de trabajo.
Cuando se muestre [Lo.bAt] , la báscula se apagará.
La carga de la báscula debe realizarse en un ambiente seco.
PRECAUCIÓN: La batería sólo debe ser reemplazada por un
distribuidor de OHAUS autorizado. Puede existir riesgo de
explosión si la batería recargable se reemplaza por el tipo
incorrecto o si no está correctamente conectada. El desecho
de la batería ácida de plomo debe hacerse de acuerdo a las
leyes y normativas locales.
Page 26

ES-4 Serie Valor™ 4000W
Botón
Funciones
Pulsación corta1 (cuando está encendida): Puesta a cero de la
pantalla
Pulsación corta (cuando está apagada): Enciende la báscula
Pulsación larga2 (cuando está encendida): Apaga la báscula
Pulsación corta (en Menú): Selecciona/acepta la configuración que
se muestra en pantalla
Pulsación corta: Acumula un peso o muestra la información
acumulada a carga 0.
Pulsación larga: Alterna entre unidades activas
Pulsación corta (en Menú): Alterna entre las configuraciones
disponibles
Pulsación corta: Inicia una respuesta específica del modo de
aplicación
Pulsación larga: Selecciona el modo activo
Pulsación corta (en Menú): Vuelve a la configuración anterior
Pulsación corta: Introduce/borra un valor de tara
Pulsación larga: Accede al Menú usuario
Pulsación corta (en Menú): Sale rápidamente del Menú usuario
El sensor IR3 se puede programar para actuar como botones "sin
contacto". Consulte la sección 4.3 del menú de usuario para
consultar las configuraciones disponibles.
3. FUNCIONAMIENTO
3.1 Controles
Figura 3-1. Panel de control de la Valor 4000W con pantalla
TABLA 3-1
Notas:
1
Pulsación corta: Pulsar menos de 2,5 segundos.
2
Pulsación larga: Mantener pulsado más de 2,5 segundos.
3
El sensor IR se pueden activar con una mano u otro objeto que esté colocado a una altura
especificada (consulte la sección 4.3) desde el sensor.. La distancia de activación del sensor variará
la naturaleza reflectora del objeto. Si se produce una activación no deseada debido a situaciones
únicas el sensor se puede apagar.
Page 27

Serie Valor™ 4000W ES-5
Elemento
Descripción
Elemento
Descripción
1
Símbolo de NET
9
Símbolo de Modo
calibración/menú
2
Símbolo de Centro de
cero
10
Símbolo de Dinámico*
3
Símbolo de Negativo
11
Símbolo de Cargador de batería
4
Símbolo de Peso estable
12
Símbolo de Libra, Onza,
Libra:Onza
5
Símbolo de Tara
preseleccionada*
13
Símbolos de gramo, kilogramo
6
Símbolos de Puntero
14
Símbolo de Piezas*
7
Símbolo de sensor IR
15
Símbolo de Porcentaje
8
Símbolo de Acumulación
(Rojo) Cargas > límite superior
(Verde) Cargas > límite inferior y ≤ límite superior
(Amarillo) Cargas < Límite inferior
1
1
Sensores
Figura 3-2. Pantalla de la Valor 4000W
1
2
1
3
1
4
1
5
1
6
1
7
1
8
1
9
1
10
1
11
1
12
1
13
1
14
1
15
Indicadores LED
Pantalla
TABLA 3-2 Símbolos de la pantalla
Nota: * no se utiliza
Figura 3-3: Pantalla trasera de la Valor 4000W.
Los indicadores LED coloreados de la parte derecha de los paneles de control se
utilizan en modo control de peso (sección 3.6) y se encienden según las siguientes
normas:
Page 28

ES-6 Serie Valor™ 4000W
Masa de calibración de extensión necesario
(se vende por separado)
Máx.
Masa
1
Máx.
Masa
1
1.500 g
1,5 kg / 3 lb
6.000 g
6 kg / 15 lb
3.000 g
3 kg / 6 lb
15.000 g
15 kg / 30 lb
3.2 Apagado y encendido de la báscula
Para encender la báscula, presione el botón On/Zero Off. La báscula realiza una
prueba de pantalla, muestra momentáneamente la versión del software y después
entra al modo de pesaje activo.
Para apagar la báscula, mantenga pulsado el botón On/Zero Off hasta que se
muestre OFF.
3.3 Calibración inicial
Cuando la báscula se instala por primera vez, se debe calibrar para asegurar que
se van a lograr resultados precisos. Antes de realizar la calibración, asegúrese de
tener los pesos de calibración adecuados como se indican en la tabla 3-3.
Mantenga pulsado Menú hasta que se muestre en pantalla [mMeNU] . Cuando suelte
el botón, la pantalla mostrará [C.A.L]. Pulse Yes para aceptar y se mostrará [SpaN].
Pulse Yes de nuevo para comenzar la calibración de extensión. Mientras se
almacena la lectura cero parpadeará [--C--] . Después, la pantalla mostrará el valor
del peso de calibración. Coloque la masa de calibración especificada en el plato y
pulse Yes. Mientras se almacena la lectura parpadeará [--C--] . La báscula vuelve
al modo de aplicación anterior y estará lista para usar.
Se mostrará el mensaje [Err 3.0 CAl] si no se siguen estos pasos de calibración o
si se utilizó el peso incorrecto.
Se puede interrumpir el proceso de calibración apagando la báscula.
TABLA 3-3
Nota: 1 Las masas de libra se utilizan cuando se calibra en la unidad
de libra.
3.4 Modo de pesaje
1. Mantenga pulsado Mode hasta que se muestre en pantalla [wJeIGH].
2. Si fuera necesario, coloque un recipiente vacío en el plato y pulse Tare.
3. Añada una muestra al plato o contenedor. La pantalla muestra el peso de la
muestra.
Page 29

Serie Valor™ 4000W ES-7
3.5 Modo de porcentaje
Este modo mide el peso de una muestra como porcentaje de un peso de
referencia.
1. Mantenga pulsado Mode hasta que se muestre en pantalla [PerCNt]. Se
mostrará en la pantalla [Clr.ref].
Notas: Pulse Function para visualizar el peso de referencia actual.
Si no hubiera almacenado ningún dato de referencia, se mostrará [Set.ref].
Pulse Yes para establecer datos de referencia.
2. Pulse No para almacenar el peso de referencia y continúe con el paso 6.
3. Si fuera necesario, coloque un recipiente vacío en el plato y pulse Tare. Pulse
Yes para establecer una nueva referencia. La báscula mostrará ahora en la
pantalla [PUt.ref].
4. Añada el material de referencia deseado al contenedor. Pulse Yes para
almacenar el peso de referencia. La pantalla muestra 100%.
5. Retire el material de referencia. Si fuera necesario, coloque un recipiente vacío
en el plato y pulse Tare.
6. Añada el material de muestra. La pantalla mostrará el porcentaje de la muestra
comparado con el peso de referencia.
7. Para borrar la referencia almacenada mantenga pulsado Mode hasta que se
muestre [PerCNt] en la pantalla. Pulse Yes cuando [Clr.ref] se muestre en la
pantalla.
3.6 Modo Control de peso
Este modo fija los limites alto y bajo de peso para los procesos de control de la
porción.
1. Mantenga pulsado Mode hasta que se muestre en pantalla [CHeCk]. Se mostrará
en la pantalla [CLr.ref].
Notas: Pulse Function para visualizar los límites de referencia bajo y alto.
Si no hubiera almacenado ningún dato de referencia, se mostrará
[Set.ref]. Pulse Yes para establecer datos de referencia.
2. Pulse No para almacenar los límites del peso de referencia y continúe con el
paso 5.
3. Pulse Yes para establecer unos nuevos valores de referencia. La báscula
mostrará en la pantalla [Set. LO]. Pulse Yes para visualizar el valor límite "Bajo".
Pulse Yes para aceptar o No para editar el valor límite "Bajo". El valor
almacenado se mostrará entonces en la pantalla con el primer dígito resaltado
[000.000 kg]. Pulse repetidamente No hasta que aparezca el número deseado.
Pulse Yes para aceptar y resaltar el dígito siguiente. Repita hasta que todos los
dígitos sean correctos. Pulse Yes para aceptar el valor límite "bajo", se
mostrará en la pantalla [Set. HI].
4. Repita el mismo procedimiento para aceptar o editar el valor "alto".
5. Si fuera necesario, coloque un recipiente vacío en el plato y pulse Tare.
Coloque el material de muestra en el plato o en el contenedor. Si el peso de
muestra se encuentra por debajo del rango de peso objetivo, se encenderá el
LED amarillo. Si la muestra se encuentra dentro del rango de peso objetivo, se
encenderá el LED verde. Si la muestra se encuentra por encima del rango de
peso objetivo, se encenderá el LED rojo.
Page 30

ES-8 Serie Valor™ 4000W
En modo pesaje, submenú ajuste ACCUmM, seleccione mMaNU:
Si fuera necesario, Coloque un recipiente vacío en el plato y
pulse Tare.
Paso i. Coloque el peso (0,04 kg) en el plato y pulse la tecla
M+. El icono Σ seguirá parpadeando hasta que
se retire el peso.
Paso ii. Retire el peso del plato. Coloque otro
peso (0,03 kg) y pulse la tecla M+:
Paso iii. Retire el peso del plato:
Paso iv. Pulse la tecla M+ para mostrar en la pantalla la
información estadística:
Paso v.
Si fuera necesario, siga el paso 3 indicado anteriormente para
borrar los datos acumulados.
N 2
tOtal
0.070 kg
mMIN
0,030 kg
mMax
0.040 kg
mMaNU
*
0,040 kg
*
0,030 kg
*
0,000 kg
6. Para borrar los valores de referencia almacenada mantenga pulsado Mode
hasta que se muestre [CHeCk] en la pantalla. Pulse Yes cuando [Clr.ref] se
muestre en la pantalla.
3.7 Acumulación
La acumulación funciona junto con cada modo de aplicación. Esta función permite
al usuario almacenar el total de una serie de mediciones de peso.
1. Pulse la tecla M+ para añadir el peso a los datos acumulados. El icono Σ
seguirá parpadeando hasta que se retire el peso.
Nota: Si se pone a AUTO la opción Acumular en el menú de configuración,
no es necesario pulsar la tecla M+.
2. Cuando el plato esté libre, pulse la tecla M+ para mostrar en la pantalla la
información estadística de los datos acumulados.
3. Para borrar los datos acumulados, pulse la tecla Tare cuando la pantalla
muestre la información estadística de los datos acumulados. La pantalla
muestra [Clr.aCC]. Pulse la tecla Yes para limpiar los datos almacenados y
volver al modo actual.
Notas:
Sólo se almacenan con los datos de acumulación total los pesos estables.
Para evitar añadir la misma carga varias veces al total, debe devolver 0 a la carga
del plato antes de que se pueda añadir la siguiente carga.
Cuando Legal for Trade (Comercio legal) esté OFF (APAGADO), la pantalla debe
mostrar el peso bruto 0, el peso neto 0 o un valor neto negativo, cuando Legal for
Trade (Comercio legal) esté ON (ENCENDIDO), la pantalla debe mostrar el valor
bruto 0. De lo contrario, la imagen Σ continuará parpadeando.
Las cargas brutas y las cargas netas no se pueden añadir al mismo total. Si la
primera carga es un peso bruto, las cargas futuras también deben ser pesos brutos.
Si la primera carga es un peso neto, las cargas futuras también deben ser pesos
netos.
El número máx. de veces que se puede acumular es 9999.
El cambio de modo borrará los datos acumulados.
Ejemplo de acumulación:
Page 31

Menú:
C.A.L
S.E.t.U.P
r.E.A.d
M.O.d.E
U.n.i.t
L.O.C.k
E.n.d
Elementos
del menú:
Span
Lin
GEO
End
Reset
Pwr.Un
A.Tare
Ir.Func
Ir.Adj
Accum
End
Reset
Stable
Filter
AZT
Light
Sleep
A.Off
End
Reset
Percnt
Check
End
kg
g
oz
lb
lb:oz
End
Reset
L.Cal
L.Setup
L.Read
L.Mode
L.Unit
End
Serie Valor™ 4000W ES-9
4. CONFIGURACIONES DE MENÚ
El menú de usuario permite personalizar las configuraciones de la báscula.
4.1 Menú de navegación
Menú de usuario:
Notas:
Puede que algunas unidades o modos no estén disponibles en todos los modelos.
Cuando LEGAL PARA EL COMERCIO esté configurado a ON (consulte la sección
4.9), las configuraciones de menú se ven a afectadas.
Para acceder al Modo menú
Mantenga pulsado Menú hasta que se muestre en pantalla [mMeNU]. Cuando suelte
la tecla, se mostrará el primer submenú [C.a.l].
Pulse Yes para entrar al submenú mostrado o pulse No para avanzar al siguiente
menú.
Al seleccionar un submenú se mostrará el primer elemento del menú. Presione Yes
para ver la configuración del elemento del menú o pulse No para avanzar al
siguiente artículo del menú. Cuando consulte la configuración, pulse Yes para
aceptar la configuración, o pulse No para cambiar la configuración. Cuando se
muestre [End], pulse Yes para volver a las secciones del submenú o No para volver
al primer elemento del menú actual. Las negritas indican la configuración por
defecto de fábrica.
Nota: El indicador del modo calibración/menú, se muestra cuando se encuentra en
el modo menú.
4.2 Menú de calibración
La entrada a este menú se efectúa para realizar calibraciones.
Span (Ampliar) [SpaN] (yes, no)
Inicia un procedimiento de calibración de extensión (cero y extensión).
Lin (Linealidad) [LIN] (yes, no)
Inicia un procedimiento de calibración de linealidad (cero, punto medio y
extensión).
Page 32

ES-10 Serie Valor™ 4000W
GEO (Coeficiente de adaptación geográfica) [GEO]
El Coeficiente de Adaptación Geográfica (GEO) se utiliza para ajustar la
calibración basándose en la ubicación actual. Las configuraciones de 0 a 31
están disponibles, siendo 12 el ajuste predeterminado. Consulte la tabla 4-1
para determinar el coeficiente GEO que corresponda con su ubicación.
End Cal (Fin de la calibración) [End]
Pasa al siguiente menú o vuelve al principio del menú actual.
4.3 Menú de configuración
Introduzca este menú para configurar los parámetros de la báscula.
Reset (Reestablecer)[ reset] (no, yes)
Reestablece el menú de configuración a los valores predeterminados de
fábrica.
Power on unit (Potencia en unidad) [pwWr.UN] (auto, kg, g, lb, oz,
lb:oz)
Ajusta la unidad de medida visualizada al inicio
Auto Tare (Tara automática) [A.tArE] (off, on, on-acc)
Configura la funcionalidad de tara automática. Si está seleccionado "on" se
tara el primer peso bruto estable. Si está seleccionado “on-acc”, Se taran las
cargas de peso bruto dentro de los límites de aceptación (en el modo Control
de Peso)
IR Function (Función IR) [Ir.FUNC] (off, tare)
Establece la funcionalidad del sensor de IR.
IR Adj (Ajuste IR) [Ir.adj] (hi, low)
Ajusta el nivel de detección del sensor de IR.
(Como referencia: Alto: ~ 100 mm / 4 pulgadas; Bajo: ~ 50mm / 2 pulgadas)
Accumulation (Acumulación) [aCCUmM] (off, auto, manu)
Configura la funcionalidad de acumulación.
End Setup (Fin de Configuración) [End]
Pasa al siguiente menú o vuelve al principio del menú actual.
4.4 Menú de lectura
Introduzca este menú para configurar las preferencias de usuario.
Reset (Reestablecer) [reset] (no, yes)
Reestablece el menú de lectura a los valores predeterminados de fábrica.
Stable Range (Rango estable) [Stable] (0,5, 1, 2, 5)
Configura el valor de variación de la lectura mientras que el símbolo de
estabilidad permanece activado.
Filter (Filtro) [FILtEr] (low, medium, high)
Configura la cantidad de filtrado de señales.
Auto-Zero Tracking (Seguimiento de autocero) [AZt] (off, 0,5, 1, 3)
Configura la funcionalidad de seguimiento de la puesta a cero automática.
Light (Luz) [LIGHt] (hi, med, low)
Configura la funcionalidad de luz de fondo.
Page 33

Serie Valor™ 4000W ES-11
Sleep (Hibernación) [SLEEP] (off, on)
Configura el tiempo de apagado de la pantalla.
Auto off (Apagado automático) [A.OFF] (off, 1, 5, 10)
Configura la funcionalidad de apagado automático.
End Readout (Fin de Lectura) [End]
Avanza al siguiente menú o vuelve al principio del menú actual.
4.5 Menú de modo
Acceda a este menú para activar los modos para que estén disponibles para
utilizarlos con el botón Mode. El modo peso predeterminado siempre está activo.
Reset (Reestablecer) [reset] (no, yes)
Reestablece el menú Modo a los valores predeterminados de fábrica.
Percent (Porcentaje) [PerCNt] (off, on)
Configura el estado.
Check (Comprobar) [CHECk] (off, on)
Configura el submodo
End Mode (Fin de modo) [End]
Pasa al siguiente menú o vuelve al principio del menú actual.
4.6 Menú de unidades
Acceda a este menú para activar las unidades para que sean accesibles con el
botón Units. Las unidades en el menú deben cambiar a “on” para estar activas.
Nota: Las unidades disponibles varían según el modelo y las normativas locales.
4.7 Menú de bloqueo
El menú de bloqueo es una opción de software controlada que puede bloquear las
configuraciones de menú para evitar la manipulación.
Reset (Reestablecer) [reset] (no, yes)
Reestablece el menú de bloqueo a los valores predeterminados de fábrica.
Lock Cal (Bloqueo de la Calibración) [l.CAL]
Configura el estado.
Lock Setup (Bloqueo de la configuración) [l.SEtUP] (off, on)
Configura el estado.
Lock Read (Bloqueo de la lectura) [l.rEAD] (off, on)
Configura el estado.
Lock Mode (Bloqueo de modo) [l.mMOdE] (off, on)
Configura el estado.
Lock Unit (Bloqueo de unidad) [l.UNIt]
Configura el estado.
End Lock (Fin de bloqueo) [End]
Avanza al siguiente menú o vuelve al principio del menú actual.
4.8 Fin de menú
Pulse ‘Yes’ (Sí) para pasar al menú de calibración. Pulse ‘No’ (No) para salir del
menú y volver al modo de aplicación actual.
Page 34

ES-12 Serie Valor™ 4000W
0 325 650 975 1300 1625 1950 2275 2600 2925 3250
325 650 975 1300 1625 1950 2275 2600 2925 3250 3575
0 1060 2130 3200 4260 5330 6400 7460 8530 9600 10660
1060 2130 3200 4260 5330 6400 7460 8530 9600 10660 11730
0°00' 5°46' 5 4 4 3 3 2 2 1 1 0 0
5°46' 9°52' 5 5 4 4 3 3 2 2 1 1 0
9°52' 12°44' 6 5 5 4 4 3 3 2 2 1 1
12°44' 15°06' 6 6 5 5 4 4 3 3 2 2 1
15°06' 17°10' 7 6 6 5 5 4 4 3 3 2 2
17°10' 19°02' 7 7 6 6 5 5 4 4 3 3 2
19°02' 20°45' 8 7 7 6 6 5 5 4 4 3 3
20°45' 22°22' 8 8 7 7 6 6 5 5 4 4 3
22°22' 23°54' 9 8 8 7 7 6 6 5 5 4 4
23°54' 25°21' 9 9 8 8 7 7 6 6 5 5 4
25°21' 26°45' 10 9 9 8 8 7 7 6 6 5 5
26°45' 28°06' 10 10 9 9 8 8 7 7 6 6 5
28°06' 29°25' 11 10 10 9 9 8 8 7 7 6 6
29°25' 30°41' 11 11 10 10 9 9 8 8 7 7 6
30°41' 31°56' 12 11 11 10 10 9 9 8 8 7 7
31°56' 33°09' 12 12 11 11 10 10 9 9 8 8 7
33°09' 34°21' 13 12 12 11 11 10 10 9 9 8 8
34°21' 35°31' 13 13 12 12 11 11 10 10 9 9 8
35°31' 36°41' 14 13 13 12 12 11 11 10 10 9 9
36°41' 37°50' 14 14 13 13 12 12 11 11 10 10 9
37°50' 38°58' 15 14 14 13 13 12 12 11 11 10 10
38°58' 40°05' 15 15 14 14 13 13 12 12 11 11 10
40°05' 41°12' 16 15 15 14 14 13 13 12 12 11 11
41°12' 42°19' 16 16 15 15 14 14 13 13 12 12 11
42°19' 43°26' 17 16 16 15 15 14 14 13 13 12 12
43°26' 44°32' 17 17 16 16 15 15 14 14 13 13 12
44°32' 45°38' 18 17 17 16 16 15 15 14 14 13 13
45°38' 46°45' 18 18 17 17 16 16 15 15 14 14 13
46°45' 47°51' 19 18 18 17 17 16 16 15 15 14 14
47°51' 48°58' 19 19 18 18 17 17 16 16 15 15 14
48°58' 50°06' 20 19 19 18 18 17 17 16 16 15 15
50°06' 51°13' 20 20 19 19 18 18 17 17 16 16 15
51°13' 52°22' 21 20 20 19 19 18 18 17 17 16 16
52°22' 53°31' 21 21 20 20 19 19 18 18 17 17 16
53°31' 54°41' 22 21 21 20 20 19 19 18 18 17 17
54°41' 55°52' 22 22 21 21 20 20 19 19 18 18 17
55°52' 57°04' 23 22 22 21 21 20 20 19 19 18 18
57°04' 58°17' 23 23 22 22 21 21 20 20 19 19 18
58°17' 59°32' 24 23 23 22 22 21 21 20 20 19 19
59°32' 60°49' 24 24 23 23 22 22 21 21 20 20 19
60°49' 62°90' 25 24 24 23 23 22 22 21 21 20 20
62°90' 63°30' 25 25 24 24 23 23 22 22 21 21 20
63°30' 64°55' 26 25 25 24 24 23 23 22 22 21 21
64°55' 66°24' 26 26 25 25 24 24 23 23 22 22 21
66°24' 67°57' 27 26 26 25 25 24 24 23 23 22 22
67°57' 69°35' 27 27 26 26 25 25 24 24 23 23 22
69°35' 71°21' 28 27 27 26 26 25 25 24 24 23 23
71°21' 73°16' 28 28 27 27 26 26 25 25 24 24 23
73°16' 75°24' 29 28 28 27 27 26 26 25 25 24 24
75°24' 77°52' 29 29 28 28 27 27 26 26 25 25 24
77°52' 80°56' 30 29 29 28 28 27 27 26 26 25 25
80°56' 85°45' 30 30 29 29 28 28 27 27 26 26 25
85°45' 90°00' 31 30 30 29 29 28 28 27 27 26 26
Elevación en metros
Elevación en pies
Valor GEO
Latitud
TABLA 4-1. CÓDIGOS DEL COEFICIENTE DE ADAPTACIÓN GEOGRÁFICA
Page 35

Serie Valor™ 4000W ES-13
Etiqueta de capacidad
Figura 4-2. Pines LFT
4.9 Comercio legal
Si la báscula se utiliza en el comercio o una aplicación controlada legalmente, se
debe ajustar, verificar y sellar según las normas de medición y pesaje locales.
Es responsabilidad del comprador garantizar que se cumplan todos los requisitos
legales pertinentes.
4.9.1 Etiqueta de capacidad
Debe colocarse cerca de cada pantalla una etiqueta que muestre la capacidad y
sensibilidad de la báscula. Si antes de la entrega se colocaron las etiquetas de
capacidad, no es necesario realizar ninguna acción. Si no se hubieran colocado las
etiquetas de capacidad, éstas se encuentran entre el material de embalaje. Ponga
las etiquetas encima de las pantallas como se muestra en la Figura 4-1.
Nota: Las etiquetas de capacidad se rompen al despegarlas, por lo que intente
colocarlas sólo una vez.
Figura 4-1. Localización de la etiqueta de capacidad
en la pantalla delantera y trasera
4.9.2 Configuración
Antes de la verificación y sellado, realice los siguientes pasos:
1. Ponga el comercio legal a OFF.
2. Compruebe que la configuración del menú cumple con las normativas locales de
pesos y medidas.
3. Realice una calibración según se explica en la sección 3.3.
4. Ponga el comercio legal a ON.
Para cambiar la configuración del comercio legal (LFT) de la báscula, siga este
procedimiento:
Precaución: Cuando acceda a la parte inferior de la báscula, evite poner
la báscula al revés sobre la bandeja de pesaje o la subplataforma. Ponga la
báscula de lado.
1. Apague la báscula.
2. Retire la cubierta de seguridad que se encuentra en la parte
inferior de la báscula para acceder a las dos patillas que
están ubicadas en una ranura (consulte la figura 4-2).
Cortocircuite estas patillas (puede utilizar un destornillador
de hoja plana mientras enciende la báscula. La báscula
realizará el procedimiento de puesta en funcionamiento y
después mostrará el estado actual [lft OFF] (LFT OFF, unlocked) o [lft ON]
(LFT OFF, locked), pulse la tecla ‘No’ para cambiar esta configuración, o pulse
la tecla ‘Yes’ para confirmarla.
Page 36

ES-14 Serie Valor™ 4000W
Sello de alambre
Sello de papel
Cubierta de seguridad
Nota: Si se ajusta comercio legal en On, la configuración del menú se ve afectada
de la siguiente manera:
El menú calibración (C.A.L) no está accesible.
Los menús IR Function (Función IR), Filter (Filtro) y Unit (Unidad) están
bloqueados en las configuraciones actuales.
La configuración de rango estable está bloqueada en 1d.
La configuración de seguimiento de cero automática está bloqueada en 0,5d.
3. Vuelva a colocar la cubierta de seguridad.
4.9.3 Verificación y sellado
El personal autorizado de pesos y medidas locales o un agente de mantenimiento
autorizado debe realizar el procedimiento de verificación.
4.9.3.1 Sellos físicos
Para las jurisdicciones que utilicen el método de sellado físico, el personal
autorizado de pesos y medidas locales o un agente de mantenimiento autorizado
debe aplicar un sello de seguridad para evitar la manipulación de las
configuraciones. Consulte la ilustración que aparece a continuación para conocer
los métodos de sellado.
Desbloqueado Bloqueado
4.9.3.2 Sello de la pista de auditoría (sólo EE.UU y Canadá)
Para las jurisdicciones que utilicen el sello de pista de auditoría, el personal
autorizado de pesos y medidas locales o un agente de mantenimiento autorizado
debe registrar los valores de contador de eventos de la configuración y la
calibración actual en el momento del sellado. Estos valores se compararán a los
valores encontrados durante una futura inspección.
Nota: Un cambio en un valor de contador de evento es equivalente a romper el
sello físico.
La pista de auditoría utiliza dos contadores de eventos para registrar los cambios
de los ajustes de configuración y calibración.
El contador de eventos de la configuración (CFG) indexará en 1 bajo las
siguientes condiciones:
- Cuando la configuración LFT cambie de ON (Encendido) a OFF
(Apagado).
- Al salir del menú siempre que una o más de las siguientes
configuraciones haya cambiado: Stable Range (Rango estable), Auto
Zero Tracking (seguimiento de cero automático) [AZT], Filter, IR
Function, Units (Unidades) (kg, g, oz, lb o lb:oz).
Figura 4-3. Sellado
Page 37

Serie Valor™ 4000W ES-15
El contador de eventos de la calibración (CAL) indexará en 1 al salir del
menú si se realiza un cambio en una calibración de extensión o una
configuración GEO.
Nota: El contador sólo indexa una vez, incluso han cambiado si varias
configuraciones.
Los contadores de eventos pueden verse manteniendo pulsado el botón MENÚ.
Cuando se mantiene el botón, la pantalla mostrará MENU seguido por Audit.
Para visualizar la información de la pista de auditoria, suelte el botón cuando se
muestre en pantalla Audit.
La información de la pista de auditoría se mostrará en el formato CFGxxx y
CALxxx.
Entonces, la báscula vuelve al funcionamiento normal.
Page 38

ES-16 Serie Valor™ 4000W
6
3
1
2
4
5
5. MANTENIMIENTO
5.1 Limpieza
La carcasa puede limpiarse con un paño humedecido con un detergente suave si
es necesario. No use disolventes, productos químicos, alcohol, amoniaco o
sustancias abrasivas para limpiar la carcasa o los paneles de control.
5.2 Limpieza del plato de plástico
5.2.1 Desmontaje y limpieza del plato de plástico
Siga los pasos siguientes para la limpieza del plato de plástico:
1. Quite el plato de acero inoxidable
2. Quite los cuatro tornillos manuales mientras sujeta la cubierta de la batería.
3. Desenchufe los dos clips de la batería y quite la batería.
4. Con un destornillador Phillips, quite los dos tornillos que se encuentran en la
parte inferior del compartimento de la batería.
5. Quite el plato de plástico.
6. Limpie el plato de plástico.
Figura 5-1. Limpieza del plato
5.2.2 Montaje del plato después de su limpieza
Siga los pasos que aparecen a continuación para volver a montar el plato (consulte
también los pasos en la figura 5-1, en orden inverso):
1. Con un destornillador Phillips, atornille el plato de plástico a la carcasa
mediante dos tornillos.
2. Coloque la batería en el compartimento de la batería y coloque los dos clips
de la batería. Coloque el cable rojo al terminal positivo de la batería (rojo) y
el cable negro al terminal negativo de la batería (negro).
3. Coloque la cubierta de la batería con los cuatro tornillos manuales.
4. Coloque la báscula en posición vertical e instale el plato de acero inoxidable.
Precaución: puede existir riesgo de explosión si la batería no seconecta
correctamente.
Page 39

Serie Valor™ 4000W ES-17
Síntoma
Causa posible
Solución
No se enciende
A la báscula no le llega corriente
La batería está descargada
Verifique las conexiones, la fuente de
alimentación y el estado de carga de la
batería.
Exactitud baja
Calibración incorrecta
Entorno inestable
Realice una calibración
Mueva la báscula a una ubicación
apropiada.
No se puede calibrar
Entorno inestable
Peso de calibración incorrecto
Mueva la báscula a una ubicación
apropiada
Use un peso de calibración correcto
No se puede acceder al modo
Modo sin habilitar
Acceda al menú y habilite el modo
No se puede acceder a la
unidad
Unidad sin habilitar
Acceda al menú y habilite la unidad
LO ref
El peso de referencia es muy
bajo
Aumente el peso de referencia.
Err 3.0 Cal
Peso de calibración incorrecto
Consulte la tabla 3-3 para conocer los
pesos correctos
Err 8.1 ˉLOadˉ
Rango de cero de encendido
superado
Limpie el plato
Err 8.2 _LOad_
Rango inferior de cero de
encendido
Instale en plato
Err 8.3 ˉLOadˉ
Sobrecarga
La carga supera la capacidad máxima de
la báscula
Err 8.4 _LOad_
Carga inferior
La lectura está por debajo del rango
mínimo. Vuelva a instalar el plato.
Err 8.5 ˉtareˉ
Tara fuera de rango
El valor de la tara supera el máximo.
Err 9 Data
Error de datos interno.
Póngase en contacto con un agente de
mantenimiento autorizado.
Err13 mMEmM
Error al escribir la EEPROM.
Póngase en contacto con un agente de
mantenimiento autorizado.
Err 53 C.SUmM
Datos de la suma de control no
válidos
Póngase en contacto con un agente de
mantenimiento autorizado.
Lo.Bat
La batería está descargada
Conecte a la red eléctrica y cargue la
batería
NO.ACC
Los pesos brutos y netos no se
pueden acumular juntos
Acumule únicamente el peso bruto o el
peso neto
La batería no se carga
completamente
La batería está defectuosa
Sustituya la batería en un centro de
servicio técnico autorizado de OHAUS.
5.3 Solución de problemas
La tabla siguiente muestra los problemas comunes, así como sus posibles causas y
soluciones. Si el problema persiste, póngase en contacto con OHAUS o con su
distribuidor autorizado.
TABLA 5-1
5.4 Información de mantenimiento
Si la sección de solución de problemas no resuelve o describe su problema,
póngase en contacto con su servicio técnico OHAUS autorizado. Por favor visite
nuestra página Web, www.ohaus.com, para localizar la oficina de OHAUS más
cercana a usted. Un técnico especialista de productos Ohaus estará a su
disposición para ofrecerle asistencia.
Page 40

ES-18 Valor™ 4000W Series
MODELO
V41PWE1501T
V41XWE1501T
V41PWE3T
V41XWE3T
V41PWE6T
V41XWE6T
V41PWE15T
V41XWE15T
Capacidad x Resolució n
(Má x x d no aprobado)
1,5 kg x 0,0002 kg
1.500 g x 0,2 g
3 lb x 0.0005 lb
48 oz x 0.01 oz
3 kg x 0,0005 kg
3.000 g x 0,5 g
6 lb x 0.001 lb
96 oz x 0.02 oz
6 kg x 0,001 kg
6.000 g x 1 g
15 lb x 0.002 lb
240 oz x 0.05 oz
15 kg x 0,002 kg
15.000 g x 2 g
30 lb x 0.005 lb
480 oz x 0.1 oz
Resolució n mostrada má xima
7500
6000
6000
7500
Capacidad x Resolució n
(Má x x e aprobado)
1,5 kg x 0,0005 kg
1.500 g x 0,5 g
3 lb x 0.001 lb
48 oz x 0.02 oz
3 kg x 0,001 kg
3.000 g x 1 g
6 lb x 0.002 lb
96 oz x 0.05 oz
6 kg x 0,002 kg
6.000 g x 2 g
15 lb x 0.005 lb
240 oz x 0.1 oz
15 kg x 0,005 kg
15.000 g x 5 g
30 lb x 0.01 lb
480 oz x 0.2 oz
Resolució n aprobada
3.000
3.000
3.000
3.000
Repetibilidad
0,0005 kg
0,001 kg
0,002 kg
0,005 kg
Linealidad
± 0,0005kg
± 0,001kg
± 0,002kg
± 0,005kg
Unidades de pesaje*
Modelos no aprobados: g, kg, lb, oz, lb:oz
Modelos aprobados con EC y OIML: g, kg
Modelos aprobados por las normas canadienses de medició n y por la NTEP: g, kg, lb, oz
Rango de tara
Hasta la capacidad por sustracció n
Tiempo de estabilizació n
≤ 0,5 segundos
Protecció n de sobrecarga segura
150% de capacidad de la bá scula
Indicació n del peso
2x LED rojos (frontal y posterior)
6-dígitos 7-segmentos, caracteres de 20,5 mm/0,8 pulgadas
Teclado
Cuatro botones
Modos de aplicació n
Peso, Porcentaje, Control de peso (cada uno con la funció n acumular)
Tiempo de funcionamiento de la
batería (a 20ºC)
Típicamente 50 horas con carga completa de 12 horas
Construcció n
V41PW: Caja ABS con plataforma de acero inoxidables 304
V41XW: Alojamiento inferior 304 ABS con tapa y la plataforma de acero inoxidable
Protecció n de acceso
IPX8
Dimensiones del plato
190 x 242 mm / 7,5 x 9,5 pulgadas
Clase de aprobació n
III
Peso neto
V41PW: 3,0 kg / 6,6 lb; V41XW: 3,9 kg / 8,6 lb
Peso de envío
V41PW: 4,0 kg / 8,8 lb; V41XW: 4,9 kg / 10,8 lb
Dimensiones de envío
410 x 370 x 220 mm / 16.1 x 14.6 x 8.7 pulgadas
6. DATOS TÉCNICOS
Los datos técnicos son válidos bajo las siguientes condiciones ambientales:
Solo para uso en interiores
Temperatura de funcionamiento: de -10 ºC (14 ºF) a 40 ºC (104 ºF)
Humedad relativa: del 10% al 90% de humedad relativa, sin condensación
Altitud: hasta 2000 m
Energía eléctrica: adaptador de CA (incluido) - salida de 2 V, CC; 0,84 A, batería
recargable interna de plomo-ácido sellada.
Fluctuaciones en el voltaje de la alimentación eléctrica: hasta ±10% del voltaje
nominal
Categoría de instalación: II
Grado de contaminación: 2
6.1 Especificaciones
TABLA 6-1
Nota: Apague lb: oz unidad con LFT
Page 41

Serie Valor™ 4000W ES-19
V41PW
A
256 mm (10,1 pulgadas)
B
280 mm (11,0 pulgadas)
C
121 mm (4,8 pulgadas)
V41XW
A
256 mm (10,1 pulgadas)
B
288 mm (11,3 pulgadas)
C
124 mm (4,9 pulgadas)
A
C
B
TABLE 6-2
6.2 Dibujos y dimensiones
Figura 6-1. Dimensiones
Page 42

ES-20 Serie Valor™ 4000W
Marca
Estándar
Este producto cumple con la directiva EMC 2004/108/EC, la directiva
de baja tensión 2006/95/EC y la directiva de instrumento de pesaje no
automático 2009/23/EC.
La declaración de conformidad está disponible a través de Internet en
europe.ohaus.com/europe/en/home/support/weee.aspx.
AS/NZS CISPR 11
CAN/CSA-C22.2 No. 61010-1-12, UL Std. No. 61010-1 (tercera
edición)
NSF/ANSI 169–2009
NSF/ANSI/3-A 14159-1-2010
Los instrumentos de pesaje verificados en el lugar de fabricación
presentan una de las marcas anteriores en la etiqueta de empaquetado
y la etiqueta ‘M’ (metrología) en la placa de datos descriptivos. Se
pueden poner en funcionamiento inmediatamente.
Los instrumentos de pesaje que se deben verificar en dos etapas no
tienen la ‘M’ (metrología) verde en la placa de los datos descriptivos y
presentan unas marcas de identificación anteriores en la etiqueta del
empaquetado. La segunda etapa en la verificación inicial la debe realizar
una organización autorizada y de servicio certificado establecida dentro
de la Comunidad Europea o dentro del Cuerpo Nacional de Notificación.
La primera etapa de verificación inicial ha de realizarse en el centro de trabajo del
fabricante. Incluye todas las pruebas según la norma europea adoptada EN 45501:1992,
párrafo 8.2.2.
Si las normativas nacionales limitan el periodo de validez de la verificación, el usuario
del instrumento de pesaje debe comprobar el periodo de una nueva verificación e
informar a las autoridades de pesos y medidas respectivas.
6.3 Cumplimiento
La conformidad con las siguientes normas se indica con la marca correspondiente
en el producto.
Aviso importante para instrumentos de pesaje verificados
Page 43

Serie Valor™ 4000W ES-21
Eliminación
En cumplimiento con la Directiva europea 2002/96/CE sobre
residuos de aparatos eléctricos y electrónicos (WEEE), este
dispositivo no se puede eliminar como residuo doméstico. También
se aplica en países fuera de la UE, según sus requisitos específicos.
La directiva de baterías 2006/66/EC presenta nuevos requisitos
desde septiembre de 2008 sobre la desmontabilidad de las baterías
de los residuos de aparatos en los estados miembros de la UE. Para
cumplir esta directiva, se ha diseñado este dispositivo para retirar las
baterías de manera segura al final de su vida mediante una planta de
tratamiento de residuos.
Elimine este producto según las normativas locales en el punto de recolección
especificado para equipos eléctricos y electrónicos. Si tiene alguna pregunta,
póngase en contacto con la autoridad responsable o el distribuidor del que adquirió
este dispositivo.
En caso de que este dispositivo se entregara a un tercero (para uso privado o
profesional), se debe hacer referencia al contenido de esta regulación.
Las instrucciones de eliminación para Europa están disponibles a través de Internet
en europe.ohaus.com/europe/en/home/support/weee.aspx.
Gracias por su contribución a la protección del medioambiente.
Nota sobre FCC
Este equipo ha sido sometido a pruebas y ha demostrado cumplir con los límites para
dispositivos digitales de clase B, según la Parte 15 de las normas de la FCC. Estos
límites están diseñados para proporcionar una protección razonable frente a
interferencias perjudiciales cuando se utiliza el equipo en un entorno comercial.
Este equipo genera, utiliza y puede emitir energía de radiofrecuencia y, si no se
instala y utiliza según las instrucciones del manual, puede provocar interferencias
perjudiciales a las comunicaciones por radio. La utilización de este equipo en un área
residencial puede provocar interferencias perjudiciales. En este caso, el usuario
deberá corregir la interferencia por su cuenta.
Nota sobre la Industry Canada
Este aparato digital de clase B cumple con la norma canadiense ICES-003.
Registro en ISO 9001
En 1994, OHAUS Corporation, EE.UU., recibió el certificado de registro en la ISO
9001 del Bureau Veritus Quality International (BVQI), confirmando que el sistema
de gestión de calidad de OHAUS cumple con los requisitos de la norma ISO 9001.
El 21 de junio de 2012, OHAUS Corporation, EE.UU., se registró nuevamente en la
norma ISO 9001:2008.
Page 44

ES-22 Serie Valor™ 4000W
GARANTÍA LIMITADA
Los productos de OHAUS están en garantía por defectos en los materiales o de
construcción desde la fecha de entrega hasta la duración del periodo de la
garantía. Durante el periodo de validez de la garantía, OHAUS reparará o, según
su criterio, sustituirá cualquier componente que sea defectuoso sin cargo adicional
siempre que el producto se entregue, con flete pago, a OHAUS. Esta garantía no
aplica si el producto ha recibido daños por accidentes o mal uso, ha sido expuesto
a materiales radioactivos o corrosivos, o ha recibido materiales extraños en su
interior o como resultado del servicio o modificación por un tercero que no sea
OHAUS. En lugar de una tarjeta de registro de garantía debidamente devuelta, el
periodo de la garantía se iniciará en la fecha de envío al distribuidor autorizado.
OHAUS Corporation no entrega otro tipo de garantía expresa o implícita. OHAUS
Corporation no es responsable de daños indirectos.
Puesto que la legislación sobre garantías difiere de un estado a otro y de un país a
otro, póngase en contacto con OHAUS o con su distribuidor loca de OHAUS para
obtener más información.
Page 45

Série Valor™ 4000W FR-1
Balance
Plateau en acier inoxydable
Carte de garantie
Adaptateurd’alimentation
Manuel d’instructions
Capacité des étiquettes
1. INTRODUCTION
Ce manuel contient des instructions d'installation, de fonctionnement et de
maintenance des balances de la série Valor™ 4000W. Veuillez lire intégralement ce
manuel avant d’utiliser la balance.
1.1 Précautions de sécurité
Veuillez respecter les consignes de sécurité suivantes :
Assurez-vous que la tension d'entrée de l’adaptateur CA correspond à celle
du secteur local.
Ne laissez pas tomber de charges sur la plate-forme.
Ne posez pas la balance à l’envers sur la plate-forme.
Déconnectez la balance de son alimentation pour la nettoyer.
Faites uniquement fonctionner la balance dans les conditions ambiantes
spécifiées dans ces instructions.
L'entretien doit être exclusivement exécuté par un personnel agréé.
N'utilisez que des poids correspondant à la capacité de la balance
conformément à ces spécifications.
N'utilisez pas la balance dans des environnements difficiles.
Ne portez pas la balance par le plateau ou la sous-plateforme. Utilisez les
poignées sur le côté de l'enceinte de la balance.
2. INSTALLATION
2.1 Contenu de l’emballage
2.2 Installation des composants
Positionnez le plateau en acier inoxydable sur la plate-forme de pesée avant de
mettre la balance sous tension.
Figure 2-1. Installez le plateau en acier inoxydable sur la plate-forme de pesée
Page 46

FR-2 Série Valor™ 4000W
Bulle de niveau
Pieds réglables
Oui Non
2.3 Sélection de l'emplacement
Utilisez la balance sur une surface propre, solide et stable. Évitez les
emplacements avec des courants d'air, des vibrations, des sources de chaleur
excessive ou avec des changements brusques de température.
2.4 Mise de niveau de l'équipement
Réglez les pieds de mise de niveau pour que la bulle soit au centre du cercle.
Assurez-vous que l'équipement est de niveau lors de chaque changement
d'emplacement.
Figure 2-2. Indicateur de niveau
2.5 Alimentation
L'adaptateur CA est utilisé pour alimenter la balance lorsque l'alimentation sur
batterie n'est pas nécessaire. Veuillez d'abord connecter la fiche de l'adaptateur
CA sur la prise d'entrée située en partie inférieure de la balance conformément à
la description ci-dessous.
Connectez ensuite l'adaptateur CA sur l'alimentation secteur adéquate.
Figure 2-3. Faites glisser pour le branchement
Figure 2-4. Connexion de l’adaptateur d'alimentation CA
Attention : La balance ne peut être utilisée que dans un
environnement sec lorsqu'elle est alimentée par l'adaptateur CA.
Page 47

Série Valor™ 4000W FR-3
Symbole
Niveau de charge
Batterie en utilisation :
Symbole affiché
2.5.1 Alimentation par batterie :
La balance peut être immédiatement utilisée sur le secteur. Laissez la batterie
se charger pendant 12 heures avant d'utiliser la balance sur la batterie. La
balance passe automatiquement en mode batterie en cas de coupure secteur
ou si le cordon d'alimentation est enlevé. Avec l'alimentation CA, la balance est
constamment sous tension et le voyant de charge (élément 11 du tableau 3-2)
reste allumé. La balance peut être utilisée pendant la charge et la batterie est
protégée contre les surcharges.
Pour une durée maximum de fonctionnement, la batterie doit être chargée à la
température ambiante.
Au cours du fonctionnement sur batterie, le symbole de charge des batteries
indique leur état. Pendant la charge, le symbole clignotera lentement et
s'éteindra dès que la batterie est complètement chargée.
TABLEAU 2-1
Remarques :
Lorsque le symbole de la batterie clignote rapidement, il reste environ 30
minutes de travail possible.
Si s'affiche, la balance passe hors tension.
Le chargement de la balance doit s'effectuer dans un environnement sec.
ATTENTION : Seul un technicien agréé Ohaus est autorisé à
changer la batterie. La batterie risque d'exploser si elle est
remplacée par un type inapproprié ou si elle n'est pas
correctement connectée. Mettez au rebut la batterie au plomb
usagée en respectant les lois et réglementations en vigueur.
Page 48

FR-4 Série Valor™ 4000W
Bouton
Fonctions
Appuyez rapidement1 (si en fonctionnement) : Définit l'affichage à zéro
Appuyez rapidement (si à l'arrêt) : Met la balance sous tension
Appuyez longuement2 (si en fonctionnement) : Met la balance hors
tension
Appuyez rapidement (dans le menu) : Sélectionne/accepte le réglage
affiché
Appuyez rapidement : Accumule le poids ou affiche les informations
accumulées lorsque la charge équivaut à 0.
Appuyez longuement : Commutation parmi les unités actives
Appuyez rapidement (dans le menu) : Commutation parmi les réglages
disponibles
Appuyez rapidement : Déclenche une réponse spécifique au mode
d'application
Appuyez longuement : Sélectionne le mode actif
Appuyez rapidement (dans le menu) : retour aux réglages précédents
Appuyez rapidement : Introduction/Effacement d'une valeur de tare
Appuyez longuement : Entre dans le menu Utilisateur
Courte pression (dans le menu) : Sortie rapide du menu Utilisateur
Le capteur IR3 peut être programmé pour agir en tant que boutons
« sans effleurement ». Reportez-vous à la section du menu Utilisateur
pour les réglages disponibles.
3. FONCTIONNEMENT
3.1 Contrôles
Figure 3-1. Panneau avant de contrôle de la Valor 4000W avec affichage
TABLEAU 3-1
Remarques :
1
Appuyez rapidement : Appuyez moins de 2,5 secondes.
2
Appuyez longuement : Maintenez appuyé plus de 2,5 secondes.
3
Le capteur IR peut être activé manuellement ou par un autre objet placé à une hauteur spécifiée
(consultez la section 4.3) du capteur. La distance d'activation du capteur variera en fonction de la
nature réfléchissante de l'objet. Si une activation non désirée se produit en raison d'un
emplacement spécifique, le capteur peut être mis hors tension.
Page 49

Série Valor™ 4000W FR-5
Article
Description
Article
Description
1
Symbole NET
9
Étalonnage/Symbole du mode Menu
2
Symbole du centre du zéro
10
Symbole dynamique *
3
Symbole négatif
11
Symbole de charge de la batterie
4
Symbole de pesée stable
12
Symbole de Livre, Once, Livre:Once
5
Symbole* de tare prédéfinie
13
Symbole du gramme
6
Symboles de pointeur
14
Symbole des pièces*
7
Symbole du capteur IR
15
Symbole du pourcentage
8
Symbole de l'accumulation
(Rouge) Charges > limite supérieure
(Vert) Charges ≥ limite inférieure et ≤ limite supérieure
(Jaune) Charges < limite inférieure
1
1
Capteur IR
Figure 3-2. Affichage de la Valor 4000W
1
2
1
3
1
4
1
5
1
6
1
7
1
8
1
9
1
10
1
11
1
12
1
13
1
14
1
15
Voyants DEL
Affichage
TABLEAU 3-2 Symboles de l'affichage
Remarque : * Non utilisé
Figure 3-3. Affichage arrière de la Valor 4000W
Les voyants colorés à DEL sur la gauche du panneau de contrôle sont utilisés en
mode de Vérification du poids (section 3.6) et s'allument conformément aux règles
suivantes :
Page 50

FR-6 Série Valor™ 4000W
Poids d'étalonnage d'intervalle nécessaires
(vendus séparément)
Max
Masse 1
Max
Masse 1
1500 g
1,5 kg/3lb
6000g
6kg/15lb
3000g
3 kg (6 lb)
15000g
15 kg/30 lb
3.2 Mise sous/hors tension de la balance
Pour mettre la balance sous tension, appuyez le bouton On/Zero Off. La balance
effectue un test d'affichage, inscrit momentanément la version du logiciel et passe
ensuite en mode de pesée active.
Pour mettre la balance hors tension, maintenez appuyé le bouton On/Zero Off
jusqu'à ce qu'ARRÊT s'affiche.
3.3 Étalonnage initial
Lorsque la balance est installée pour la première fois, elle doit être étalonnée afin
d'assurer des résultats précis. Avant de réaliser un étalonnage, assurez-vous
d'avoir les poids d'étalonnage appropriés, tels que répertoriés au tableau 3-3.
Maintenez appuyé Menu jusqu'à ce que [mMeNU] (Menu) s'affiche. Lorsque le bouton
est relâché, [C.A.L.] s'inscrit sur l'afficheur. Appuyez sur Yes pour accepter, [SpaN]
s'affichera alors. Appuyez sur Yes à nouveau pour commencer l'étalonnage
d'intervalle.[--C--] clignote pendant que la mesure du zéro est mémorisée. Ensuite,
l'affichage présente la valeur de la pesée d'étalonnage. Placez le poids
d'étalonnage spécifié sur le plateau et appuyez sur Yes. [--C--] clignote pendant
que la mesure est mémorisée. La balance revient au mode de l'application
précédente et est prête à être utilisée.
Le message [Err 3.0 Cal] s'affichera si ces étapes d'étalonnage ne sont pas suivies
ou si un poids incorrect a été utilisé.
Le processus d'étalonnage peut être interrompu en mettant la balance hors tension.
TABLEAU 3-3
Remarque :
1
Les poids en livres sont utilisés lors d'un étalonnage en livres.
3.4 Mode de pesée
1. Maintenez appuyé Mode jusqu'à ce que [wJeIGH] (Poids) s'affiche.
2. Au besoin, placez un récipient vide sur le plateau et appuyez sur Tare.
3. Ajoutez l'article sur le plateau ou dans le récipient. L'affichage présente le
poids de l'article.
Page 51

Série Valor™ 4000W FR-7
3.5 Mode Pourcentage
Ce mode mesure le poids d'un échantillon en tant que pourcentage d'un poids de
référence.
1. Maintenir appuyé Mode jusqu'à ce que s'affiche.
[Clr.ref] (effacement référence) s'affichera alors.
Remarques : Appuyez sur Function pour visualiser le poids de référence en
cours.
Si aucune donnée de référence n'est mémorisée, [Set.ref] s'affichera
Appuyez sur Yes pour définir les données de référence.
2. Appuyez sur No pour utiliser le poids de référence en mémoire et passez à
l'étape 6.
3. Au besoin, placez un récipient vide sur le plateau et appuyez sur Tare.
Appuyez sur Yes pour établir une nouvelle référence. La balance affichera
alors [Put.ref].
4. Ajoutez l'objet de référence retenu au récipient. Appuyez sur Yes pour stocker
le poids de référence. L’écran affiche 100 %.
5. Retirez le matériau de référence. Au besoin, placez un récipient vide sur le
plateau et appuyez sur Tare.
6. Ajoutez l'article. L'affichage présente le pourcentage de l'article comparé au
poids de référence.
7. Pour effacer les données référence en mémoire, maintenez appuyé Mode
jusqu'à ce que soit affiché. Appuyez sur Yes lorsque [Clr.ref] s'affiche.
3.6 Mode Pesage de contrôle
Ce mode définit les limites de poids inférieures et supérieures pour les processus
de contrôle des portions.
1. Maintenez appuyé Mode jusqu'à ce que [CHeCk] (vérification) s'affiche.
[CLr.ref] (effacement référence) s'affichera alors.
Remarques : Appuyez sur Function pour visualiser les limites inférieures et
supérieures des poids de référence.
Si aucune donnée de référence n'est mémorisée, [Set.ref] s'affichera
Appuyez sur Yes pour définir les données de référence.
2. Appuyez sur No pour utiliser les limites de poids de référence en mémoire et
passez à l'étape 5.
3. Appuyez sur Yes pour établir de nouvelles valeurs de référence. La balance
affichera alors [Set. LO]. Appuyez sur Yes pour visualiser la valeur limite
« basse ». Appuyez sur Yes pour accepter ou sur No pour modifier la valeur
limite « inférieure ». La valeur mémorisée s'affiche alors avec le premier
chiffre en surbrillance . Appuyez plusieurs fois sur No jusqu'à ce que le chiffre
désiré apparaisse. Appuyez sur Yes pour accepter et mettre en surbrillance le
chiffre suivant. Répétez jusqu'à ce que tous les chiffres soient corrects.
Appuyez sur Yes pour accepter la valeur de limite inférieure, [Set. Hi]
s'affichera.
4. Répétez la même procédure pour accepter ou modifier la valeur supérieure.
5. Au besoin, placez un récipient vide sur le plateau et appuyez sur Tare. Placez
l'article sur le plateau ou dans le récipient. Si le poids de l'article se trouve
sous la plage de la pesée cible, la DEL jaune s'allumera. Si l'article se trouve
dans la plage de pesée cible, la DEL verte s'allumera. Si l'article se trouve audelà de la plage de la pesée cible, la DEL rouge s'allumera.
Page 52

FR-8 Série Valor™ 4000W
En mode de pesage, pour régler le sous-menu ACCUmM ,
sélectionnez mMaNU:
Au besoin, placez un récipient vide sur le plateau et appuyez
sur Tare.
Étape i : Placez le poids (0,04 kg) sur le plateau et appuyez
sur la touche
M+. L'icône Σ continuera de clignoter
jusqu'au retrait du poids.
Étape ii : Retirez le poids du plateau. Placez un autre
poids (0,03 kg) et appuyez sur la touche M+ :
Étape iii : Retirez le poids du plateau :
Étape iv : Appuyez sur la touche M+ pour afficher les
informations statistiques :
Étape v : Au besoin, suivez l'étape 3 ci-dessus pour effacer
les données d'accumulation.
N 2
tOtal
0,070 kg
mMIN
0,030 kg
mMax
0,040 kg
mMaNU
*
0.040 kg
*
0.030 kg
*
0,000 kg
6. Pour effacer les valeurs de référence en mémoire, maintenez appuyé Mode
jusqu'à ce que [CHeCk] soit affiché. Appuyez sur Yes lorsque [Clr.ref]
s'affiche.
3.7 Accumulation
L'accumulation fonctionne conjointement à chaque mode d'application. Cette
fonction permet à l'utilisateur de mémoriser le total d’une série de mesures du
poids.
1. Appuyez sur la touche M+ pour ajouter le poids aux données d'accumulation.
L'icône Σ continuera de clignoter jusqu'au retrait du poids.
Remarque : Lorsque Accumulation est réglé sur AUTOMATIQUE dans le
menu de configuration, il n'est pas nécessaire d'appuyer sur la touche M+.
2. Lorsque le plateau est vide, appuyez sur la touche M+ pour afficher les i
nformations statistiques des données d'accumulation.
3. Pour effacer les données d'accumulation, appuyez sur le bouton Tare pendant
l'affichage des informations statistiques des données d'accumulation. L’écran
affiche [Clr.aCC]. Appuyez sur la touche Yes pour effacer les données
enregistrées et revenir au mode en cours.
Remarques : Seuls les poids stables sont stockés vers le total d'accumulation.
Pour éviter qu'une même charge ne soit ajoutée au total plusieurs fois, la charge
sur le plateau doit être retirée et la plage stable revenir à 0 avant de pouvoir ajouter
la charge suivante.
Lorsque Métrologie légale est sur ARRÊT, l'affichage doit revenir sur 0 brut, sur 0
net ou sur une valeur négative nette ; lorsque Métrologie légale est sur MARCHE,
l'affichage doit revenir sur 0 brut. Sinon, l'icône Σ continuera à clignoter.
Les charges brutes et les charges nettes ne peuvent être additionnées sur le même
total. Si la première charge est exprimée en poids brut, les charges ultérieures
devront aussi l'être en poids brut. Si la première charge est exprimée en poids net,
les charges ultérieures devront aussi l'être en poids net.
Le nombre maximum d'accumulations est de 9999.
Le changement de mode effacera les données d'accumulation.
Exemple d'accumulation :
Page 53

Menu :
C.A.L
S.E.t.U.P
r.E.A.d
M.O.d.E
U.n.i.t
L.O.C.k
E.n.d
Menu Items:
Span
Lin
GEO
End
Reset
Pwr.Un
A.Tare
Ir.Func
Ir.Adj
Accum
End
Reset
Stable
Filter
AZT
Light
Sleep
A.Off
End
Reset
Percnt
Check
End
kg
g
oz
lb
lb:oz
End
Reset
L.Cal
L.Setup
L.Read
L.Mode
L.Unit
End
Série Valor™ 4000W FR-9
4. PARAMÈTRES DU MENU
Le menu Utilisateur permet de personnaliser les réglages de la balance.
4.1 Navigation dans le menu
Menu Utilisateur :
Remarques :
Certaines unités/certains modes peuvent ne pas être disponibles sur tous les
modèles.
Lorsque l'option de métrologie légale est activée (consultez la session 4.9), les
paramètres du menu sont affectés.
Pour entrer dans le Mode Menu
Maintenez appuyé Menu jusqu'à ce que [mMeNU] (Menu) s'affiche. Une fois libéré, le
premier sous-menu (étalonnage) s'affichera.
Appuyez sur Yes pour entrer dans le sous-menu affiché ou sur No pour avancer
jusqu'au suivant.
La sélection d'un sous-menu affichera le premier élément du menu. Appuyez sur
Yes pour visualiser le réglage de l'élément du menu ou sur No pour passer à
l'élément de menu suivant. Lorsque vous consultez le réglage, appuyez sur Yes
pour l'accepter ou sur No pour le modifier. Lorsque s'affiche, appuyez sur Yes pour
revenir aux sélections du sous-menu ou sur No pour revenir au premier élément du
menu en cours. Caractères gras indique les paramètres usine par défaut.
Remarque : Le voyant Calibration / Menu Mode s'affiche en Mode Menu.
4.2 Menu d'étalonnage
Entrez dans ce menu pour réaliser des étalonnages.
Span (Intervalle) [SpaN] (yes, no)
Initialise la procédure d'étalonnage d'intervalle (zéro et général).
Lin [LIN] (yes, no)
Initialise une procédure d'étalonnage linéaire (zéro, point milieu et intervalle).
GÉO [GEO]
Le facteur de réglage géographique (GEO) est utilisé pour ajuster l'étalonnage
en fonction de l'emplacement en cours. Des réglages de 0 à 31 sont
disponibles, avec 12 étant la valeur par défaut. Reportez-vous au tableau 4-1
pour déterminer le facteur GEO correspondant à votre emplacement
géographique.
End Cal (Étalonnage de fin) [End]
Avancez jusqu'au menu suivant ou revenez en haut du menu en cours.
Page 54

FR-10 Série Valor™ 4000W
4.3 Menu Configuration
Entrez dans ce menu pour définir les paramètres de la balance.
Reset (Réinitialisation) [reset] (no, yes)
Réinitialisation sur les paramètres usine par défaut.
Power on unit (Unité alimentée) [pwWr.UN] (auto, kg, g, lb, oz, lb:oz)
Définissez l'unité de mesure affichée au démarrage.
Auto Tare[A.tArE]( off, on, on-acc)
Définissez la fonctionnalité de tare automatique. Si «on » est sélectionné, le
premier poids brut stable est taré. Si « on-acc » est sélectionné, les charges
brutes stables dans les limites acceptées
sont tarées (en mode de pesage de vérification).
IR Function (Fonction IR) [Ir.FUNC] (off, tare)
Définissez la fonctionnalité du capteur IR.
IR Adj (Réglage IR) [Ir.adj] (hi, low)
Définissez le niveau de détection du capteur IR.
(À titre de référence : Élevé : ~ 100 mm/4 po ; faible : ~ 50mm/2 po)
Accumulation [aCCUmM] (off, auto, manu)
Définissez la fonctionnalité d'accumulation.
End Setup (Configuration de fin) [End]
Avancez jusqu'au menu suivant ou revenez en haut du menu en cours.
4.4 Menu Mesures
Entrez dans ce menu pour définir les préférences de l'utilisateur.
Reset (Réinitialisation) [reset] (no, yes)
Réinitialisation du menu Mesures sur les paramètres d'usine par défaut.
Stable Range (Plage de stabilité) [Stable](0.5, 1, 2, 5)
Définissez le niveau de variation des mesures pendant que le symbole de
stabilité est activé.
Filter (Filtre) [FILtEr]( low, medium, high)
Définissez le niveau de filtrage du signal.
Auto-Zero Tracking (Suivi du zéro automatique) [AZt](off, 0,5, 1, 3)
Définissez la fonctionnalité de suivi automatique du zéro.
Light (Éclairage) [LIGHt]( hi, med, low)
Définition de la fonctionnalité de rétroéclairage.
Sleep (Veille) [SLEEP] (off, on)
Définissez l'heure d'extinction de l'affichage.
Auto off (Arrêt automatique) [A.OFF] (off, 1, 5, 10)
Définissez la fonctionnalité d'arrêt automatique.
End Readout (Affichage de fin) [End]
Avancez jusqu'au menu suivant ou revenez en haut du menu en cours.
Page 55

Série Valor™ 4000W FR-11
4.5 Menu Mode
Entrez dans ce menu pour activer des modes afin qu'ils soient disponibles à
l'utilisation avec le bouton Mode. Le mode Pesée est toujours actif par défaut.
Reset (Réinitialisation) [reset] (no, yes)
Réinitialisation du menu Mode sur les paramètres d'usine par défaut.
Percent (Pourcentage) [PerCNt] (off, on)
Définissez l'état.
Check (Vérification) [CHECk] (off, on)
Définissez le sous-mode.
End Mode (Mode Fin) [End]
Avancez jusqu'au menu suivant ou revenez en haut du menu en cours.
4.6 Menu Unités
Entrez dans ce menu pour activer les unités afin qu'elles soient accessibles avec le
bouton Units. Les unités dans ce menu doivent être sur « on » pour être actives.
Remarque : Les unités disponibles varient selon le modèle et les réglementations
locales.
4.7 Menu Verrouillage
Le menu verrouillage correspond à une option contrôlée par logiciel qui peut
verrouiller les réglages du menu afin d'éviter des modifications intempestives.
Reset (Réinitialisation) [reset] (no, yes)
Réinitialisation du menu Verrouillage sur les paramètres d'usine par défaut.
Lock Cal (Étalonnage verrouillage) [l.CAL ]( off, on)
Définissez l'état.
Lock Setup (Configuration verrouillage) [l.SEtUP] (off, on)
Définissez l'état.
Lock Read (Mesure verrouillage) [l.rEAD] (off, on)
Définissez l'état.
Lock Mode (Mode de verrouillage) [l.mMOdE] (off, on)
Définissez l'état.
Lock Unit (Unité verrouillée) [l.UNIt ]( off, on)
Définissez l'état.
End Lock (Verrouillage fin) [End]
Avancez jusqu'au menu suivant ou revenez en haut du menu en cours.
4.8 Menu Fin
Appuyez sur Yes pour entrer dans le menu Étalonnage. Appuyez sur No pour
quitter le menu et revenir au mode d'application en cours.
Page 56

FR-12 Série Valor™ 4000W
0 325 650 975 1300 1625 1950 2275 2600 2925 3250
325 650 975 1300 1625 1950 2275 2600 2925 3250 3575
0 1060 2130 3200 4260 5330 6400 7460 8530 9600 10660
1060 2130 3200 4260 5330 6400 7460 8530 9600 10660 11730
0°00' 5°46' 5 4 4 3 3 2 2 1 1 0 0
5°46' 9°52' 5 5 4 4 3 3 2 2 1 1 0
9°52' 12°44' 6 5 5 4 4 3 3 2 2 1 1
12°44' 15°06' 6 6 5 5 4 4 3 3 2 2 1
15°06' 17°10' 7 6 6 5 5 4 4 3 3 2 2
17°10' 19°02' 7 7 6 6 5 5 4 4 3 3 2
19°02' 20°45' 8 7 7 6 6 5 5 4 4 3 3
20°45' 22°22' 8 8 7 7 6 6 5 5 4 4 3
22°22' 23°54' 9 8 8 7 7 6 6 5 5 4 4
23°54' 25°21' 9 9 8 8 7 7 6 6 5 5 4
25°21' 26°45' 10 9 9 8 8 7 7 6 6 5 5
26°45' 28°06' 10 10 9 9 8 8 7 7 6 6 5
28°06' 29°25' 11 10 10 9 9 8 8 7 7 6 6
29°25' 30°41' 11 11 10 10 9 9 8 8 7 7 6
30°41' 31°56' 12 11 11 10 10 9 9 8 8 7 7
31°56' 33°09' 12 12 11 11 10 10 9 9 8 8 7
33°09' 34°21' 13 12 12 11 11 10 10 9 9 8 8
34°21' 35°31' 13 13 12 12 11 11 10 10 9 9 8
35°31' 36°41' 14 13 13 12 12 11 11 10 10 9 9
36°41' 37°50' 14 14 13 13 12 12 11 11 10 10 9
37°50' 38°58' 15 14 14 13 13 12 12 11 11 10 10
38°58' 40°05' 15 15 14 14 13 13 12 12 11 11 10
40°05' 41°12' 16 15 15 14 14 13 13 12 12 11 11
41°12' 42°19' 16 16 15 15 14 14 13 13 12 12 11
42°19' 43°26' 17 16 16 15 15 14 14 13 13 12 12
43°26' 44°32' 17 17 16 16 15 15 14 14 13 13 12
44°32' 45°38' 18 17 17 16 16 15 15 14 14 13 13
45°38' 46°45' 18 18 17 17 16 16 15 15 14 14 13
46°45' 47°51' 19 18 18 17 17 16 16 15 15 14 14
47°51' 48°58' 19 19 18 18 17 17 16 16 15 15 14
48°58' 50°06' 20 19 19 18 18 17 17 16 16 15 15
50°06' 51°13' 20 20 19 19 18 18 17 17 16 16 15
51°13' 52°22' 21 20 20 19 19 18 18 17 17 16 16
52°22' 53°31' 21 21 20 20 19 19 18 18 17 17 16
53°31' 54°41' 22 21 21 20 20 19 19 18 18 17 17
54°41' 55°52' 22 22 21 21 20 20 19 19 18 18 17
55°52' 57°04' 23 22 22 21 21 20 20 19 19 18 18
57°04' 58°17' 23 23 22 22 21 21 20 20 19 19 18
58°17' 59°32' 24 23 23 22 22 21 21 20 20 19 19
59°32' 60°49' 24 24 23 23 22 22 21 21 20 20 19
60°49' 62°90' 25 24 24 23 23 22 22 21 21 20 20
62°90' 63°30' 25 25 24 24 23 23 22 22 21 21 20
63°30' 64°55' 26 25 25 24 24 23 23 22 22 21 21
64°55' 66°24' 26 26 25 25 24 24 23 23 22 22 21
66°24' 67°57' 27 26 26 25 25 24 24 23 23 22 22
67°57' 69°35' 27 27 26 26 25 25 24 24 23 23 22
69°35' 71°21' 28 27 27 26 26 25 25 24 24 23 23
71°21' 73°16' 28 28 27 27 26 26 25 25 24 24 23
73°16' 75°24' 29 28 28 27 27 26 26 25 25 24 24
75°24' 77°52' 29 29 28 28 27 27 26 26 25 25 24
77°52' 80°56' 30 29 29 28 28 27 27 26 26 25 25
80°56' 85°45' 30 30 29 29 28 28 27 27 26 26 25
85°45' 90°00' 31 30 30 29 29 28 28 27 27 26 26
Elevation in meters
Elevation in feet
GEO value
Latitude
Hauteur en mètres
Hauteur en pieds
Valeur GEO
Latitude
TABLEAU 4-1. CODES GEO
Page 57

Série Valor™ 4000W FR-13
Étiquette de
capacité
Figure 4-2. Broches LFT.
4.9 Métrologie légale
Lorsque la balance est utilisée dans une application commerciale ou légalement
contrôlée, elle doit être configurée, inspectée et scellée conformément à la
réglementation locale des poids et mesures. Il incombe à l'acheteur de s'assurer
que toutes les conditions légales pertinentes sont satisfaites.
4.9.1 Étiquette de capacité
Une étiquette affichant la capacité et la précision des mesures par la balance doit
être apposée à côté de chaque affichage. Si des étiquettes de capacité ont été
installées avant la livraison, aucune autre action n'est nécessaire. Si aucune
étiquette de capacité n'a été installée, elles se trouvent parmi le matériel dans
l'emballage. Collez les étiquettes au-dessus des affichages comme sur la Figure 4-1.
Remarque : Les étiquettes de capacité seront détruites lors de leur retrait,
n'essayez pas de les installer une deuxième fois.
Figure 4-1. Emplacements avant et arrière des étiquettes de capacité
4.9.2 Paramètres
Avant de procéder à l'inspection et à l'apposition d'un sceau, réalisez les étapes
suivantes :
1. Définissez la Métrologie légale sur OFF.
2. Vérifiez que les paramètres du menu satisfont à la réglementation locale des
poids et mesures.
3. Effectuez un étalonnage conformément à la section 3.3.
4. Définissez la Métrologie légale sur ON.
Pour modifier le réglage de la Métrologie légale (LFT) de la balance, veuillez
appliquer la procédure suivante :
Attention : En accédant à la partie inférieure de la balance, évitez de la
placer à l'envers sur le plateau ou sur la sous-plateforme. Placez-la sur son côté.
1. Mettez la balance OFF.
2. Démontez le couvercle de sécurité sous la balance afin
d'accéder aux deux broches situées dans un logement
(reportez-vous à la figure 4-2). Raccourcissez ces
broches (un tournevis plat peut être utilisé), tout en
mettant la balance ON. La balance effectuera une
procédure de démarrage et l'affichage présentera ensuite
l'état en cours [lft OFF] (LFT ARRÊT, déverrouillé) ou (LFT MARCHE,
verrouillé) ; appuyez sur la touche No pour modifier ce réglage
ou sur la touche Yes pour le confirmer.
Page 58

FR-14 Série Valor™ 4000W
Sceau par fil
Sceau en papier
Couvercle de sécurité
Remarque : Lorsque l'option de métrologie légale est réglée sur Marche, les
paramètres du menu sont ainsi affectés :
Le menu Étalonnage (C.A.L) n'est pas accessible
Les menus IR Function, Filter et Unit sont verrouillés sur leurs réglages en
cours.
Le réglage de la Stable Range est verrouillé sur 1d
Le réglage du AZT est verrouillé sur 0,5d
3. Remettez en place le couvercle de sécurité.
4.9.3 Vérification et apposition d'un sceau
L'agent de service agréé ou l'agent officiel responsable localement des poids et
mesures doit exécuter les procédures de vérification.
4.9.3.1 Sceaux matériels
Dans les juridictions employant la méthode d'apposition matérielle d'un sceau,
l'agent de service agréé ou l'agent officiel responsable localement des poids et
mesures doit apposer un sceau de sécurité afin d'empêcher des modifications
intempestives des réglages. Consultez les méthodes d'apposition d'un sceau
illustrées ci-dessous.
Déverrouillé Verrouillé
4.9.3.2 Sceau de journal d'audit (États-Unis et Canada uniquement)
Pour les juridictions se servant de la méthode d'apposition d'un sceau pour les
journaux d'audit, l'agent de service agréé ou officiel du service local des poids et
mesures doit enregistrer les valeurs d'étalonnage du compteur d'événements et de
la configuration en cours lors de l'apposition d'un sceau. Ces valeurs seront
comparées à celles qui auront été trouvées au cours d'une inspection ultérieure.
Remarque : Un changement apporté à une valeur du compteur d'événements
revient à briser le sceau matériel.
Le journal d'audit utilise deux compteurs d'événements pour enregistrer les
changements apportés aux réglages de la configuration et de l'étalonnage.
Le compteur d'événements de configuration (CFG) s'indexera d'une unité
lors de la sortie du menu si un ou plusieurs parmi les paramètres suivants
sont changés :
- Lorsque le réglage LFT est modifié de ON sur OFF.
- Lors de la sortie du menu si un ou plusieurs parmi les paramètres
Le compteur d'événements d'étalonnage (CAL) s'indexera d'une unité lors
de la sortie du menu si une modification de l'étalonnage d'intervalle ou du
réglage de GEO est apportée.
Figure 4-3. Apposition d'un sceau
suivants du menu sont changés : Plage stable, suivi du zéro
automatique (AZT), Filter, IR Function et unités (kg, g, oz, lb ou lb:oz).
Page 59

Série Valor™ 4000W FR-15
Remarque : Le compteur ne s'indexe qu'une seule fois, même si plusieurs
Les compteurs d'événements sont visibles en maintenant appuyé le bouton MENU.
Pendant que le bouton est enfoncé, l'écran affichera MENU suivi par Audit.
Relâchez le bouton si Audit s'affiche pour visualiser les informations des journaux
d'audit.
Les informations des journaux d'audit s'affichent au format CFGxxx et CALxxx.
La balance revient ensuite à un fonctionnement normal.
paramètres ont été changés.
Page 60

FR-16 Série Valor™ 4000W
6
3
1
2
4
5
5. MAINTENANCE
5.1 Nettoyage
Vous pouvez nettoyer l'enceinte avec un chiffon humide et un détergent doux, si
nécessaire. N'utilisez pas de solvants, produits chimiques, alcool, ammoniaque ou
produits abrasifs pour nettoyer le boîtier ou les panneaux de contrôle.
5.2 Nettoyage du plateau en plastique
5.2.1 Démontage et nettoyage du plateau en plastique
Veuillez suivre les étapes ci-dessous afin de nettoyer le plateau en plastique :
1. Démontez le plateau en acier inoxydable.
2. Retirez les quatre vis à ailettes du couvercle du compartiment des batteries.
3. Déconnectez les deux brides de batterie et enlevez la batterie.
4. Avec un tournevis Phillips, dévissez les deux vis en partie inférieure du
compartiment des batteries.
5. Retirez le plateau en plastique.
6. Nettoyez-le.
Figure 5-1. Nettoyage du plateau
5.2.2 Réinstallation du plateau après nettoyage
Suivez les étapes ci-dessous pour réinstaller le plateau en plastique (reportez-vous
aussi aux étapes de la figure 5-1, dans l'ordre inverse) :
1. Avec un tournevis Phillips, fixez le plateau en plastique sur l'enceinte avec
les deux vis.
2. Placez la batterie dans son compartiment et attachez les deux brides de
batterie. Connectez le câble rouge sur la borne positive (rouge) et le câble
noir sur la borne négative (noire) de la batterie.
3. Fixez le couvercle de la batterie avec les quatre vis à ailettes.
4. Remettez la balance droite et installez le plateau en acier inoxydable.
Attention : La batterie risque d'exploser si elle n'est pas correctement
connectée.
Page 61

Série Valor™ 4000W FR-17
Symptômes
Cause possible
Solution
Mise sous tension impossible
Balance non alimentée
Batterie déchargée
Vérifiez les connexions, la source
d'alimentation et l'état de charge de la
batterie
Précision médiocre
Étalonnage incorrect
Environnement instable
Effectuez un étalonnage
Placez la balance sur un emplacement
adéquat
Étalonnage impossible
Environnement instable
Poids d'étalonnage incorrect
Placez la balance sur un emplacement
adéquat
Utilisez un poids d'étalonnage approprié
Impossible d'accéder au mode
Mode non activé
Entrez dans le menu et activez le mode
Impossible d'accéder à l'unité
Unité non activée
Entrez dans le menu et activez l'unité
Lo ref (poids de référence
faible)
Poids de référence trop faible
Augmentez le poids de référence
Err 3.0 Étalonnage
Poids d'étalonnage incorrect
Reportez-vous à la TABLEAU 3-3 pour
des poids corrects
Err 8.1 ˉLOadˉ
Alimentation sur la plage du zéro
dépassée
Nettoyez le plateau
Err 8.2 _LOad_
Alimentation avec le zéro sous la
plage
Installez le plateau
Err 8.3 ˉLOadˉ
Surcharge
La charge dépasse la capacité maximum
de la balance
Err 8.4 _LOad_
Charge réduite
Mesures sous la plage minimum Installez à nouveau le plateau
Err 8.5 ˉtareˉ
Tare hors limite
La valeur de la tare dépasse le maximum
Err 9 Data
Erreur de données internes
Veuillez contacter un agent de
maintenance agréé
Err 13 mMEmM
Impossible d'écrire sur
l'EEPROM
Veuillez contacter un agent de
maintenance agréé
Err 53 C.SUmM
Données de somme de contrôle
invalides
Veuillez contacter un agent de
maintenance agréé
Lo.Bat (batterie faible)
Batterie déchargée
Connectez l'alimentation et chargez la
batterie
NO.ACC
Les poids bruts et les poids nets
ne peuvent pas être accumulés
ensemble
Accumulez seulement des poids bruts ou
des poids nets.
La batterie ne se charge pas
complètement
Batterie défectueuse
Faites remplacer la batterie par un
revendeur OHAUS agréé
5.3 Dépannage
Le tableau suivant répertorie les problèmes communs, les causes possibles et les
solutions. Si le problème persiste, contactez OHAUS ou votre revendeur agréé.
TABLEAU 5-1
5.4 Informations d'entretien
Si la section de dépannage ne résout ni ne décrit votre problème, contactez un
technicien d'entretien agréé Ohaus. Veuillez rendre visite à notre site Web sur
www.ohaus.com pour localiser le bureau Ohaus le plus près de chez vous. Un
spécialiste de l'entretien des produits Ohaus est à disposition pour fournir de
l'assistance.
Page 62

FR-18 Série Valor™ 4000W
MODÈ LE
V41PWE1501T
V41XWE1501T
V41PWE3T
V41XWE3T
V41PWE6T
V41XWE6T
V41PWE15T
V41XWE15T
Capacité x Précision d’affichage
(Max x d non approuvé )
1,5 kg x 0,0002 kg
1500 g x 0,2 g
3 lb x 0,0005 lb
48 oz x 0,01 oz
3 kg x 0,0005 kg
3000 g x 0,5 g
6 lb x 0,001 lb
96 oz x 0,02 oz
6 kg x 0,001 kg
6000 g x 1 g
15 lb x 0,002 lb
240 oz x 0,05 oz
15 kg x 0,002 kg
15 000 g x 2 g
30 lb x 0,005 lb
480 oz x 0,1 oz
Ré solution maximum affiché e
7500
6000
6000
7500
Capacité X Précision d’affichage
(Max x e approuvé )
1,5 kg x 0,0005 kg
1500 g x 0,5 g
3 lb x 0,001 lb
48 oz x 0,02 oz
3 kg x 0,001 kg
3000 g x 1 g
6 lb x 0,002 lb
96 oz x 0,05 oz
6 kg x 0,002 kg
6000 g x 2 g
15 lb x 0,005 lb
240 oz x 0,1 oz
15 kg x 0,005 kg
15 000 g x 5 g
30 lb x 0,01 lb
480 oz x 0,2 oz
Ré solution approuvé e
3000
3000
3000
3000
Reproductibilité
0,0005 kg
0,001 kg
0,002 kg
0,005 kg
Liné arité
± 0,0005 kg
± 0,001 kg
± 0,002 kg
± 0,005 kg
Unité s de pesage*
Modè les non approuvé s : g, kg, lb, oz, lb:oz
Modè les approuvé s EC et OIML : g, kg
Modè les de mesurage approuvé s Canada et NTEP : g, kg, lb, oz
Plage de tare
À capacité par soustraction
Duré e de stabilisation
≤ 0,5 seconde
Protection contre les surcharges sé curitaire
150% de la capacité de la balance
Affichage du poids
2 DEL rouges (avant et arriè re)
6 chiffres, 7 segments, 20,5 mm/0,8 po pour les caractè res
Clavier
Quatre boutons
Modes d’application
Pesage, Pourcentage, Pesage de vé rification (chacun avec une fonction
d'accumulation)
Duré e de fonctionnement de la batterie (à 20 ° C)
Gé né ralement de 50 heures avec une charge complè te de 12 heures.
Construction
V41PW : Enceinte en ABS avec plateforme en acier inoxydable 304
V41XW : Logement infé rieur ABS avec 304 logements de haut en acier
inoxydable et de la plateforme
Protection contre la pé né tration
IPX 8
Dimensions du plateau
190 mm x 242 mm (7,5 x 9,5 po)
Classe d'approbation
III
Poids net
V41PW : 3 kg/6,6 lb ; V41XW : 3,9 kg/8,6 lb
Poids à l'expé dition
V41PW : 4 kg/8,8 lb 4,9 kg/10,8 lb
Dimensions à l'expé dition
410 x 370 x 220 mm / 16.1 x 14.6 x 8.7 po
6. DONNÉES TECHNIQUES
Les données techniques sont valides dans les conditions ambiantes suivantes :
Utilisation en intérieur seulement
Température de fonctionnement : -10 ºC (14 ºF) à 40 ºC (104 ºF)
Humidité relative : 10 % à 90 % d'humidité relative, sans condensation
Altitude : Jusqu'à 2000 m
Alimentation : Adaptateur CA (fourni) - sortie 12 V CC 0,84 A, batterie interne acideplomb, étanche et rechargeable
Variations secteur de ± 10 % de la tension nominale.
Catégorie d'installation : II
Degré de pollution : 2
6.1 Spécifications
TABLEAU 6-1
Remarque: * Coupez lb: oz Unit avec LFT ON
Page 63

Série Valor™ 4000W FR-19
V41PW
A
256 mm/10,1 po
B
280 mm/11 po
C
121 mm/4,8 po
V41XW
A
256 mm/10,1 po
B
288 mm/11,3 po
C
124 mm/4,9 po
A
C
B
TABLEAU 6-2
6.2 Schémas et dimensions
Figure 6-1. Dimensions
Page 64

FR-20 Série Valor™ 4000W
Repère
Normes
Ce produit est conforme à la directive EMC 2004/108/EC, à la
directive de basse tension 2006/95/EC et à la directive des
instruments de pesée non automatique 90/384/EEC.
La déclaration de conformité est disponible en ligne sur
europe.ohaus.com/europe/en/home/support/compliance.aspx.
AS/NZS CISPR 11
CAN/CSA-C22.2 61010-1-12, UL Std. N° 61010-1 (3e édition)
NSF/ANSI 169–2009
NSF/ANSI/3-A 14159-1-2010
Les instruments de pesage vérifiés sur le site de fabrication portent
l’une des marques précédentes sur l’étiquette de l’emballage avec un
autocollant M (Métrolologie) vert sur la plaque descriptive. Ils peuvent
être immédiatement mis en service.
Les instruments de pesage à vérifier en deux étapes ne portent pas
d’autocollant M (pour Métrolologie) en vert sur la plaque descriptive et
portent l’une des marques d'identification précédentes sur l’étiquette de
l’emballage. La deuxième étape de la vérification initiale doit être
exécutée par l’organisation de service homologuée et certifiée du
représentant établi au sein de la CE ou par les autorités nationales
notifiées.
La première étape de la vérification initiale a été exécutée sur le site du fabricant.
Elle se compose des tests requis par la norme européenne EN 45501:1992,
paragraphe 8.2.2.
Si des règlements nationaux limitent la durée de validité de la vérification, il incombe
à l’utilisateur de l'instrument de mesure de respecter strictement la période de
revérification et d'informer les autorités respectives des poids et mesures.
6.3 Conformité
La conformité aux normes suivantes est indiquée par le marquage correspondant
sur le produit.
Avis important pour les instruments de pesage vérifiés
Page 65

Série Valor™ 4000W FR-21
Mise au rebut
Conformément à la directive européenne 2002/96/CE sur les
déchets d’équipements électriques et électroniques (WEEE),
cet appareil peut ne pas être mis au rebut comme des ordures
ménagères. Ceci est également valable pour les pays en dehors
de l’UE, selon leurs impératifs spécifiques.
La directive 2006/66/EC sur les batteries introduit de nouveaux
impératifs à partir de septembre 2008 sur le retrait des batteries
d'un équipement destiné au rebut dans tous les États membres de
l'Union européenne. Pour être conforme à cette directive, cet
appareila été conçu pour un retrait sans danger des batteries
aussitôt sa fin d'utilisation par une installation de traitement des
déchets.
Veuillez mettre au rebut ce produit conformément à la réglementation locale au point
de collecte spécifié pour les équipements électriques et électroniques. Pour de plus
amples informations, contacter l’autorité responsable ou le distributeur auprès duquel
vous avez acheté cet appareil.
Si cet appareil change de propriétaire (pour des raisons personnelles ou
professionnelles), cette consigne doit lui être communiquée.
Les instructions de mise au rebut en Europe sont disponibles en ligne sur
europe.ohaus.com/europe/en/home/support/weee.aspx.
Nous vous remercions de votre contribution à la protection de l’environnement.
Remarque FCC
Cet équipement a été testé et est conforme aux limites établies pour les dispositifs
numériques de classe B, conformément à la partie 15 des règlements de la FCC.
Ces limites ont pour objectif de fournir une protection raisonnable contre des
interférences dangereuses lorsque l'équipement est utilisé dans un environnement
commercial. Cet équipement génère, utilise et peut rayonner des hautes fréquences
et s'il n'est pas installé et utilisé conformément au guide d'utilisateur, il peut générer
des interférences préjudiciables aux communications radio. L'utilisation de cet
équipement dans une zone résidentielle risque de générer des brouillages
préjudiciables, auquel cas l'utilisateur se verra dans l'obligation de rectifier la
situation à ses frais.
Remarque d’Industrie Canada
Cet appareil numérique de classe B est conforme à la norme canadienne ICES-
003.
Enregistrement ISO 9001
En 1994, le Bureau Veritus Quality International (BVQI) a octroyé la certification
d'enregistrement ISO 9001 à OHAUS Corporation, États-Unis d'Amérique,
confirmant que le système de gestion de la qualité d'OHAUS était conforme aux
conditions normalisées de l'ISO 9001. Le 21 juin 2012, OHAUS Corporation, USA,
a été ré-enregistré à la norme ISO 9001:2008.
Page 66

FR-22 Série Valor™ 4000W
GARANTIE LIMITÉE
Ohaus garantit que ses produits sont exempts de défauts matériels et de fabrication
à compter de la date de livraison et pendant toute la durée de la garantie. Selon les
termes de cette garantie, OHAUS s'engage, sans frais de votre part, à réparer ou à
sa discrétion, à remplacer toutes les pièces déterminées défectueuses, sous
réserve que le produit soit retourné, fret payé d'avance, à OHAUS. Cette garantie
ne s'applique pas si le produit a subi des dommages suite à un accident ou un
mésusage, a été exposé à des matériaux radioactifs ou corrosifs, contient des
matériaux étrangers ayant pénétré à l'intérieur ou après une maintenance ou une
modification apportée par des techniciens autres que ceux d’OHAUS. En l’absence
d’une carte d'enregistrement de garantie dûment remplie, la période de garantie
commence à la date de l'expédition au revendeur agréé. Aucune autre garantie
expresse ou implicite n'est offerte par OHAUS Corporation. En aucun cas, OHAUS
Corporation ne peut être tenu responsable des dommages indirects.
Dans la mesure où les lois régissant les garanties varient d'un état ou d'un pays à
un autre, veuillez contacter OHAUS ou votre revendeur local agréé OHAUS pour de
plus amples informations.
Page 67

Valor™ 4000W Serie DE-1
Waage
Edelstahlwägeplatte
Netzteil & Stecker
Bedienungsanleitung
Garantiekarte
Schild mit Kapazitätsangabe
1. EINLEITUNG
Dieses Handbuch enthält Anweisungen zum Aufbau, zum Betrieb und zur Wartung
der Valor™ 4000W-Serie. Lesen Sie das Handbuch vor Verwendung der Waage
vollständig durch.
1.1 Sicherheitsmaßnahmen
Führen Sie folgende Sicherheitsmaßnahmen durch:
Prüfen Sie, dass die Eingangsspannung des Netzteils mit der Netzspannung
vor Ort übereinstimmt.
Lassen Sie keine Last auf die Plattform fallen.
Stellen Sie die Waage nicht umgekehrt auf die Plattform.
Trennen Sie die Waage vor dem Reinigen von der Stromversorgung.
Verwenden Sie die Waage nur unter den in der Anleitung angegebenen
Umgebungsbedingungen.
Die Waage darf nur von autorisierten Mitarbeitern gewartet und repariert
werden.
Verwenden Sie nur Gewichte innerhalb des Wägebereichs der Waage, der in
dieser Anleitung angegeben ist.
Verwenden Sie die Waage nicht unter extremen Bedingungen.
Halten Sie die Waage beim Transport nicht an der Wägeplattform oder an der
Unterplattform fest. Verwenden Sie stattdessen die Griffe an der Seite des
Waagengehäuses.
2. INSTALLATION
2.1 Verpackungsinhalt
2.2 Aufbau der Komponenten
Legen Sie die Edelstahlwägeplatte auf die Wägeplattform, bevor Sie die Waage
einschalten.
Abbildung 2-1. Edelstahlwägeplatte auf Wägeplattform legen
Page 68

DE-2 Valor™ 4000W Serie
Nivellierlibelle
Verstellbarer Fuß
Ja Nein
2.3 Auswahl des Standortes
Stellen Sie die Waage auf eine saubere, stabile und ebene Fläche. Vermeiden Sie
Standorte mit starken Luftströmungen, Schwingungen, Wärmequellen oder
schnellen Temperaturwechseln.
2.4 Nivellieren der Waage
Um die Waage zu nivellieren, stellen Sie die Füße so ein, dass die Nivellierlibelle
genau in der Kreismitte liegt. Nivellieren Sie das Gerät nach jedem
Standortwechsel.
Abbildung 2-2. Nivellieranzeige
2.5 Stromversorgung
Die Waage wird mit einem Netzteil betrieben, wenn keine Batterieversorgung
notwendig ist. Verbinden Sie zuerst den Netzteilstecker mit der Eingangsbuchse
auf der Unterseite der Waage entsprechend der folgenden Abbildung.
Stecken Sie dann das Netzteil in eine geeignete Steckdose.
Abbildung 2-3. Erst schieben, dann einstecken
Abbildung 2-4. Netzteil in Steckdose stecken
Achtung: Die Waage darf nur in einer trockenen Umgebung mit dem
Netzteil verwendet werden.
Page 69

Valor™ 4000W Serie DE-3
Symbol
Ladestand
Batterie wird
verwendet: Symbol
angezeigt
2.5.1 Batteriebetrieb:
Die Waage ist mit Netzstrom sofort einsatzbereit. Die Batterie muss erst 12
Stunden aufgeladen werden, bevor Sie die Waage mit der Batterie verwenden
können. Die Waage schaltet automatisch auf Batteriebetrieb um, wenn die
Stromversorgung unterbrochen oder das Netzkabel entfernt wird. Bei
angeschlossener Waage wird die Batterie ständig geladen, sodass die
Batterieladeanzeige (siehe Pos. 11 in Tabelle 3-2) immer leuchtet. Die Waage
kann während des Ladens verwendet werden; die Batterie ist vor Überladen
geschützt.
Die Batterie sollte bei Raumtemperatur geladen werden, um die maximale
Betriebszeit zu erreichen.
Während des Batteriebetriebs zeigt das Batteriesymbol den Batterieladestatus
an. Beim Ladevorgang blinkt das Symbol langsam; ist die Batterie vollständig
geladen, blinkt das Symbol nicht mehr.
Hinweise:
Wenn das Batteriesymbol schnell blinkt, können Sie noch ca. 30 Minuten mit
der Waage arbeiten.
Erscheint [Lo.bAt] auf der Anzeige, schaltet sich die Waage aus.
Die Waage muss in einem trockenen Raum aufgeladen werden.
Gesetzen und Vorschriften.
TABELLE 2-1
ACHTUNG: Die Batterie darf nur von einem autorisierten
Ohaus-Servicehändler gewechselt werden. Es besteht
Explosionsgefahr, wenn die aufladbare Batterie durch eine
falsche Batterie ersetzt oder die Batterie nicht
ordnungsgemäß eingelegt wird. Entsorgen Sie die BleiSäure-Batterie entsprechend den vor Ort geltenden
Page 70

DE-4 Valor™ 4000W Serie
Taste
Funktionen
Kurzes Drücken1 (eingeschaltet): Display wird auf null gestellt.
Kurzes Drücken (ausgeschaltet): Schaltet die Waage ein.
Langes Drücken2 (eingeschaltet): Schaltet die Waage aus
Kurzes Drücken (im Menü): Wählt die angezeigte Einstellung
aus/übernimmt sie.
Kurzes Drücken: Summiert das Gewicht und zeigt das summierte
Gewicht bei einer Last von 0 an.
Langes Drücken: Schaltet zwischen den aktiven Einheiten um.
Kurzes Drücken (im Menü): Schaltet zwischen den verfügbaren
Einstellungen um.
Kurzes Drücken: Startet eine Reaktion des jeweiligen
Anwendungsmodus.
Langes Drücken: Wählt den aktiven Modus.
Kurzes Drücken (im Menü): Kehrt zur vorherigen Einstellung zurück.
Kurzes Drücken: Gibt einen Tarawert ein oder löscht diesen.
Langes Drücken: Öffnet das Benutzermenü.
Kurzes Drücken (im Menü): Verlässt das Benutzermenü sofort.
Der IR-Sensor3 kann als „berührungslose“ Taste programmiert
werden. Die möglichen Einstellungen finden Sie im Abschnitt 4.3
zum Benutzermenü.
3. BETRIEB
3.1 Bedienelemente
Abbildung 3-1. Vorderes Bedienfeld mit Display der Valor 4000W-Waage
TABELLE 3-1
Hinweise:
1
Kurzes Drücken = weniger als 2,5 Sekunden drücken.
2
Langes Drücken = länger als 2,5 Sekunden gedrückt halten.
3
Der IR-Sensor kann mit der Hand oder einem anderen Gegenstand aktiviert werden, der in
bestimmter Höhe vom der Sensor (siehe Abschnitt 4.3). Der für die Aktivierung notwendige Abstand
hängt von den Reflexionseigenschaften des Gegenstands ab. Falls der Sensor in bestimmten
Situationen unbeabsichtigt aktiviert wird, kann dieser ausgeschaltet werden.
Page 71

Valor™ 4000W Serie DE-5
Pos.
Beschreibung
Pos.
Beschreibung
1
NETTO-Symbol
9
Symbol für Justierungs-/Menümodus
2
Nullmitten-Symbol
10
Dynamisches Symbol*
3
Minussymbol
11
Batterieladesymbol
4
Symbol für stabiles Gewicht
12
Symbol für Pound, Ounce und
Pound:Ounce
5
Symbol für voreingestellten
Tarawert*
13
Symbole für Gramm, Kilogramm
6
Pfeilsymbole
14
Stücksymbol*
7
Symbol für IR-Sensor
15
Prozentsymbol
8
Summensymbol
(Rot) Last > oberer Grenzwert
(Grün) Last ≥ unterer Grenzwert und ≤ oberer Grenzwert
(Gelb) Last < unterer Grenzwert
1
1
IR-Sensor
Abbildung 3-2. Valor 4000W-Display
1
2
1
3
1
4
1
5
1
6
1
7
1
8
1
9
1
10
1
11
1
12
1
13
1
14
1
15
LED-Anzeigen
Display
TABELLE 3-2 Displaysymbole
Hinweis: * Nicht verwendet
Abbildung 3-3. Hinteres Valor 4000W-Display
Die farbigen LED-Anzeigen auf der rechten Seite der Bedienfelder werden im
Kontrollmodus (Abschnitt 3.6) verwendet und leuchten nach folgenden Regeln auf:
3.2 Ein- und Ausschalten der Waage
Zum Einschalten der Waage drücken Sie die Taste On/Zero Off (Ein/Null Aus). Die
Waage führt einen Displaytest durch und zeigt kurz die Softwareversion an. Danach
öffnet sie den aktiven Wägemodus.
Zum Ausschalten der Waage halten Sie die Taste On/Zero Off (Ein/Null Aus)
solange gedrückt, bis OFF (Aus) auf dem Display erscheint.
Page 72

DE-6 Valor™ 4000W Serie
Erforderliches Messspannenjustiergewicht
(separat erhältlich)
Max.
Gewicht
1
Max.
Gewicht
1
1500 g
1,5 kg/3 lb
6000 g
6 kg/15 lb
3000 g
3 kg/6 lb
15000 g
15 kg/30 lb
3.3 Erstjustierung
Bei der ersten Installation wird eine Justierung der Waage empfohlen, um genaue
Wägeergebnisse zu garantieren. Vor der Justierung müssen Sie die geeigneten
Justiergewichte aus Tabelle 3-3 bereitstellen.
Halten Sie Menu (Menü) gedrückt, bis [mMeNU] (Menü) auf dem Display erscheint.
Wenn Sie die Taste loslassen, erscheint [C.A.L] auf dem Display. Drücken Sie zur
Bestätigung auf Yes (Ja). Danach erscheint [SpaN] auf dem Display. Drücken Sie
erneut auf Yes (Ja), um mit der Messspannenjustierung zu beginnen. Auf dem
Display blinkt [--C--], während der Nullmesswert gespeichert wird. Danach
erscheint der Justiergewichtswert auf dem Display. Legen Sie das vorgegebene
Justiergewicht auf die Wägeplattform und drücken Sie auf Yes (Ja). Auf dem
Display blinkt [--C--], während der Messwert gespeichert wird. Die Waage kehrt
zum ursprünglichen Anwendungsmodus zurück und ist einsatzbereit.
Bei Nichteinhaltung der Justierungsschritte oder bei Verwendung eines falschen
Gewichts erscheint auf dem Display die Meldung [Err 3.0 CAl].
Die Justierung kann durch Ausschalten der Waage abgebrochen werden.
TABELLE 3-3
Hinweis: 1 Pound-Gewichte werden für die Kalibrierung in der lb-Einheit
verwendet.
3.4 Wägemodus
1. Halten Sie die Taste Mode (Modus) gedrückt, bis [wJeIGH] (Wägen) auf dem
Display erscheint.
2. Stellen Sie ggf. einen leeren Behälter auf die Wägeplattform und drücken Sie
auf Tare (Tara).
3. Geben Sie die Probe auf die Wägeplattform oder in den Behälter. Das Display
zeigt das Gewicht der Probe an.
3.5 Prozentmodus
Dieser Modus misst das Gewicht einer Probe als Prozentwert eines
Referenzgewichts.
1. Halten Sie die Taste Mode (Modus) solange gedrückt, bis [PerCNt] (Prozent)
auf dem Display erscheint. Danach steht [Clr.ref] (Referenz löschen) auf dem
Display.
Anmerkungen: Drücken Sie auf die Taste Function (Funktion), um das
aktuelle Referenzgewicht anzuzeigen.
Sind keine Referenzdaten gespeichert, erscheint [ Set.ref] auf dem
Display. Drücken Sie auf Yes (Ja), um die Referenzdaten einzugeben.
2. Drücken Sie auf No (Nein), um das gespeicherte Referenzgewicht zu
verwenden und mit Schritt 6 fortzusetzen.
Page 73

Valor™ 4000W Serie DE-7
3. Stellen Sie gegebenenfalls einen leeren Behälter auf die Wägeplattform und
drücken Sie auf Tare (Tara). Drücken Sie auf Yes (Ja), um ein neues
Referenzgewicht einzugeben. Auf der Waage erscheint nun [PUt.ref]
(Referenz eingeben).
4. Geben Sie das gewünschte Referenzmaterial in den Behälter. Drücken Sie
auf Yes (Ja), um das Referenzgewicht zu speichern. Auf dem Display steht
100%.
5. Entfernen Sie das Referenzmaterial. Stellen Sie gegebenenfalls einen leeren
Behälter auf die Wägeplattform und drücken Sie auf Tare (Tara).
6. Legen Sie das Probenmaterial auf die Waage. Auf dem Display erscheint der
Prozentwert der Probe im Vergleich zum Referenzgewicht.
7. Um das gespeicherte Referenzgewicht zu löschen, halten Sie die Taste Mode
(Modus) solange gedrückt, bis auf dem Display [PerCNt] (Prozent) erscheint.
Drücken Sie auf Yes (Ja), wenn [Clr.ref] angezeigt wird.
3.6 Kontrollmodus
In diesem Modus können Sie die unteren und oberen Gewichtsgrenzwerte für
Kontrollprozesse einstellen.
1. Halten Sie die Taste Mode (Modus) gedrückt, bis [CHeCk] (Kontrolle) auf dem
Display erscheint. Danach steht [Clr.ref] (Referenzwerte löschen) auf dem
Display.
Hinweis: Drücken Sie auf Function (Funktion), um die unteren und oberen
Referenzgrenzwerte anzuzeigen.
Sind keine Referenzdaten gespeichert, erscheint [ Set.ref] auf dem
Display. Drücken Sie auf Yes (Ja), um die Referenzdaten einzugeben.
2. Drücken Sie auf No (Nein), um die gespeicherten
Referenzgewichtsgrenzwerte zu verwenden und mit Schritt 5 fortzusetzen.
3. Drücken Sie auf Yes (Ja), um neue Referenzgewichte einzugeben. Auf dem
Waagendisplay erscheint nun [Set. LO]. Drücken Sie auf Yes (Ja), um den
„unteren“ Grenzwert anzuzeigen. Drücken Sie auf Yes (Ja), um diesen Wert
zu übernehmen, oder auf No (Nein), um den „unteren“ Grenzwert zu
bearbeiten. Danach wird der gespeicherte Wert angezeigt, wobei die erste
Ziffer hervorgehoben ist [000.000 kg]. Drücken Sie wiederholt auf No (Nein),
bis die gewünschte Ziffer erscheint. Drücken Sie auf Yes (Ja), um diesen Wert
zu übernehmen und die nächste Ziffer hervorzuheben. Wiederholen Sie diese
Schritte, bis alle Ziffern korrekt sind. Drücken Sie auf Yes (Ja), um den
„unteren“ Grenzwert zu übernehmen; auf dem Display erscheint [Set. HI].
4. Wiederholen Sie diese Schritte, um den „oberen“ Grenzwert zu übernehmen
bzw. zu bearbeiten.
5. Stellen Sie ggf. einen leeren Behälter auf die Wägeplattform und drücken Sie
auf Tare (Tara). Legen Sie das Probenmaterial auf die Wägeplattform bzw. in
den Behälter. Liegt das Probengewicht unter dem Sollgewichtsbereich,
leuchtet die gelbe LED. Liegt das Probengewicht im Sollgewichtsbereich,
leuchtet die grüne LED. Liegt das Probengewicht über dem
Sollgewichtsbereich, leuchtet die rote LED.
6. Um die gespeicherten Referenzgewichte zu löschen, halten Sie die Taste
Mode (Modus) solange gedrückt, bis auf dem Display [CHeCk] erscheint.
Drücken Sie auf Yes (Ja), wenn [Clr.ref] angezeigt wird.
Page 74

DE-8 Valor™ 4000W Serie
Wählen Sie im Wägemodus im Untermenü ACCUmM die Option
mMaNU.
Stellen Sie gegebenenfalls einen leeren Behälter auf die
Wägeplattform und drücken Sie auf Tare (Tara).
Schritt i. Legen Sie das Gewicht (0,04 kg) auf die
Wägeplattform und drücken Sie die Taste M+. Das Symbol ∑
blinkt solange, bis das Gewicht wieder entfernt wird.
Schritt ii. Entfernen Sie das Gewicht von der Wägeplattform.
Legen Sie ein weiteres Gewicht (0,03 kg) auf die
Wägeplattform und drücken Sie die Taste M+.
Schritt iii. Entfernen Sie das Gewicht von der Wägeplattform.
Schritt iv. Drücken Sie die Taste M+, um die statistischen
Daten anzuzeigen.
Schritt v. Wiederholen Sie bei Bedarf Schritt 3, um die
Summierungsdaten zu löschen.
N 2
tOtal
0.070 kg
mMIN
0.030 kg
mMax
0.040 kg
mMaNU
*
0.040 kg
*
0.030 kg
*
0.000 kg
3.7 Summierung
Die Summierungsfunktion kann in jedem Anwendungsmodus verwendet werden.
Mit dieser Funktion kann der Benutzer den Gesamtwert mehrerer Gewichtsmessungen speichern.
1. Drücken Sie auf die Taste M+, um das Gewicht zu den Summierungsdaten
hinzuzufügen. Auf der Anzeige blinkt das Symbol ∑, bis das Gewicht wieder
entfernt wird.
Hinweis: Wenn die Summierungsfunktion im Setup-Menü auf AUTO
(Automatisch) eingestellt ist, müssen Sie die Taste M+ nicht drücken.
2. Wenn die Wägeplattform geleert ist, drücken Sie die Taste M+, um die
statistischen Informationen der Summierungsdaten anzuzeigen.
3. Zum Löschen der Akkumulierungsdaten drücken Sie die Taste Tare (Tara),
wenn die statistischen Informationen der Summierungsdaten auf dem Display
angezeigt werden. Auf dem Display erscheint [Clr.aCC]. Drücken Sie auf Yes
(Ja), um die gespeicherten Daten zu löschen und zum aktuellen Modus
zurückzukehren.
Hinweise: In den Summierungsdaten werden nur stabile Gewichte gespeichert.
Damit nicht die gleiche Last mehrmals hinzugefügt wird, muss die Wägeplattform
innerhalb von 0 zurückgesetzt werden, bevor die nächste Last auf die Waage gelegt
werden kann.
Wenn die Option EICHPFLICHTIG deaktiviert ist, muss auf dem Display ein
Bruttowert von 0, ein Nettowert von 0 oder ein negativer Nettowert stehen; ist die
Option EICHPFLICHTIG aktiviert, muss auf dem Display ein Bruttowert von 0
stehen. Anderenfalls blinkt das Symbol Σ weiter.
Bruttogewichte und Nettogewichte können nicht zur gleichen Gesamtsumme addiert
werden. Wenn die erste Last ein Bruttogewicht ist, müssen die weiteren Lasten
ebenfalls Bruttogewichte sein. Wenn die erste Last ein Nettogewicht ist, müssen die
weiteren Lasten ebenfalls Nettogewichte sein.
Maximal können 9999 Gewichtswerte summiert werden.
Wenn Sie den Modus wechseln, löschen Sie dadurch die Summierungsdaten.
Beispiel für eine Summierung:
Page 75

Valor™ 4000W Serie DE-9
Menü:
C.A.L
S.E.t.U.P
r.E.A.d
M.O.d.E
U.n.i.t
L.O.C.k
E.n.d
Menüeinträge:
Span
Lin
GEO
End
Reset
Pwr.Un
A.Tare
Ir.Func
Ir.Adj
Accum
End
Reset
Stable
Filter
AZT
Light
Sleep
A.Off
End
Reset
Percnt
Check
End
kg
g
oz
lb
lb:oz
End
Reset
L.Cal
L.Setup
L.Read
L.Mode
L.Unit
End
4. MENÜEINSTELLUNGEN
Im Benutzermenü können Sie die Waageneinstellungen anpassen.
4.1 Menünavigation
Benutzermenü:
Hinweise:
Einige Einheiten/Modi können in einigen Modellen fehlen.
Wenn die Option EICHPFLICHTIG aktiviert ist (siehe Abschnitt 4.9), werden die
Menüeinstellungen wie geändert.
Zum Aufrufen des Menümodus
Halten Sie Menu (Menü) gedrückt, bis [mMeNU] (Menü) auf dem Display erscheint.
Beim Loslassen erscheint das erste Untermenü [C.a.l] (Justierung).
Drücken Sie auf Yes (Ja), um das angezeigte Untermenü zu öffnen, oder auf No
(Nein), um zum nächsten Eintrag zu gehen.
Nach der Auswahl eines Untermenüs wird der erste Menüeintrag angezeigt.
Drücken Sie auf Yes (Ja), um die Einstellung des Menüeintrags anzuzeigen, oder
auf No (Nein), um zum nächsten Menüeintrag zu gehen. Wenn die Einstellung
angezeigt wird, können Sie die Einstellung mit Yes (Ja) bestätigen oder mit No
(Nein) ändern. Wenn auf dem Display [End] (Beenden) erscheint, drücken Sie auf
Yes (Ja), um zu den Optionen des Untermenüs zurückzukehren, oder auf No
(Nein), um zum ersten Menüeintrag im aktuellen Menü zurückzukehren. Fett
markierte Werte sind werkseingestellte Standardwerte.
Hinweis: Das Symbol für den Justierungs-/Menümodus erscheint im Menümodus
auf dem Display.
Page 76

DE-10 Valor™ 4000W Serie
4.2 Justierungsmenü
Wenn Sie dieses Menü aufrufen, können Sie Justierungen durchführen.
Messspanne [SpaN] (yes, no)
Initiiert eine Messspannenjustierung (Nullpunkt und Messspanne).
Linearität [LIN] (yes, no)
Initiiert eine Linearitätsjustierung (Nullpunkt, Mittelpunkt und Messspanne).
Geografische Anpassung [GEO]
Der geografische Einstellungsfaktor (GEO) wird verwendet, um die Justierung
an den aktuellen Standort anzupassen. Es sind Einstellungen von 0 bis 31
möglich, 12 ist der Standardwert. In Tabelle 4-1 finden Sie den GEO-Faktor,
der Ihrem Standort entspricht.
Justierung beenden [End]
Springt zum nächsten Menü oder kehrt an die oberste Stelle des aktuellen
Menüs zurück.
4.3 Setup-Menü
In diesem Menü können Sie die Waagenparameter einstellen.
Zurücksetzen [reset] (no, yes)
Setzt das Setup-Menü auf die Werkseinstellungen zurück.
Einheit beim Einschalten [pwWr.UN] (auto, kg, g, lb, oz, lb:oz)
Legt die Maßeinheit fest, die beim Einschalten angezeigt wird.
Automatisches Tarieren [A.tArE] (off, on, on-acc)
Stellt die automatische Tarafunktion ein. Bei Auswahl von „on“ (ein) wird der
erste stabile Bruttogewichtswert tariert. Bei Auswahl der Option „on-acc“ (einakzeptabel) werden stabile Bruttolasten innerhalb der akzeptablen Grenzwerte tariert (im Kontrollwägemodus).
IR-Funktion [Ir.FUNC] (off, tare)
Stellt die IR-Sensor-Funktion ein.
IR-Anpassung [Ir.adj] (hi, low)
Stellt den Erkennungsabstand für den IR-Sensor ein.
(Referenz: Hi: ~ 100 mm; Low: ~ 50 mm)
Summierung [aCCUmM] (off, auto, manu)
Stellt die Summierungsfunktion ein.
Setup beenden [End]
Springt zum nächsten Menü oder kehrt an die oberste Stelle des aktuellen
Menüs zurück.
4.4 Anzeigemenü
Öffnen Sie dieses Menü, um die Benutzervoreinstellungen festzulegen.
Zurücksetzen [reset] (no, yes)
Setzt das Anzeigemenü auf die Werkseinstellungen zurück.
Stabiler Bereich [Stable] (0,5, 1, 2, 5)
Legt fest, wie sehr der Messwert schwanken darf, wenn das Stabilitätssymbol
angezeigt wird.
Filter [FILtEr] (low, medium, high)
Legt die Höhe der Signalfilterung fest.
Page 77

Valor™ 4000W Serie DE-11
Automatische Nullpunktnachführung [AZt] (off, 0,5, 1, 3)
Stellt die automatische Nullpunktnachführungsfunktion ein.
Beleuchtung [LIGHt] (hi, med, low)
Stellt die Hintergrundbeleuchtung ein.
Schlafmodus [SLEEP] (off, on)
Stellt die Ausschaltzeit für das Display ein.
Automatisches Abschalten [A.OFF] (OFF, 1, 5, 10)
Stellt die automatische Abschaltfunktion ein.
Anzeigemenü beenden [End]
Springt zum nächsten Menü oder kehrt an die oberste Stelle des aktuellen
Menüs zurück.
4.5 Modusmenü
In diesem Menü aktivieren Sie die verschiedenen Modi, um sie mit der Taste
„Mode“ (Modus) zu verwenden. Standardmäßig ist immer der Wägemodus aktiv.
Zurücksetzen [reset] (no, yes)
Setzt das Modusmenü auf die Werkseinstellungen zurück.
Prozentmodus [PerCNt] (off, on)
Legt den Status fest.
Kontrollmodus [CHECk] (off, on)
Legt den Teilmodus fest.
Modusmenü beenden [End]
Springt zum nächsten Menü oder kehrt an die oberste Stelle des aktuellen
Menüs zurück.
4.6 Einheitenmenü
In diesem Menü aktivieren Sie die Einheiten, die dann mit der Taste Units
(Einheiten) aufrufbar sind. Die Einheiten im Menü müssen aktiviert werden, damit
sie verwendet werden können.
Hinweis: Verfügbare Einheiten variieren von Modell zu Modell und entsprechend
den lokalen Vorgaben.
4.7 Verriegelungsmenü
Das Verriegelungsmenü ist eine softwaregesteuerte Funktion, mit der Sie
Menüeinstellungen sperren können, damit diese nicht verändert werden.
Zurücksetzen [reset] (no, yes)
Setzt das Verriegelungsmenü auf die Werkseinstellungen zurück.
Justierungsmenü sperren [l.CAL] (off, on)
Legt den Status fest.
Setup-Menü sperren [l.SEtUP] (off, on)
Legt den Status fest.
Anzeigemenü sperren [l.rEAD] (off, on)
Legt den Status fest.
Modusmenü sperren [l.mMOdE] (off, on)
Legt den Status fest.
Einheitenmenü sperren [l.UNIt] (off, on)
Legt den Status fest.
Page 78

DE-12 Valor™ 4000W Serie
0 325 650 975 1300 1625 1950 2275 2600 2925 3250
325 650 975 1300 1625 1950 2275 2600 2925 3250 3575
0 1060 2130 3200 4260 5330 6400 7460 8530 9600 10660
1060 2130 3200 4260 5330 6400 7460 8530 9600 10660 11730
0°00' 5°46' 5 4 4 3 3 2 2 1 1 0 0
5°46' 9°52' 5 5 4 4 3 3 2 2 1 1 0
9°52' 12°44' 6 5 5 4 4 3 3 2 2 1 1
12°44' 15°06' 6 6 5 5 4 4 3 3 2 2 1
15°06' 17°10' 7 6 6 5 5 4 4 3 3 2 2
17°10' 19°02' 7 7 6 6 5 5 4 4 3 3 2
19°02' 20°45' 8 7 7 6 6 5 5 4 4 3 3
20°45' 22°22' 8 8 7 7 6 6 5 5 4 4 3
22°22' 23°54' 9 8 8 7 7 6 6 5 5 4 4
23°54' 25°21' 9 9 8 8 7 7 6 6 5 5 4
25°21' 26°45' 10 9 9 8 8 7 7 6 6 5 5
26°45' 28°06' 10 10 9 9 8 8 7 7 6 6 5
28°06' 29°25' 11 10 10 9 9 8 8 7 7 6 6
29°25' 30°41' 11 11 10 10 9 9 8 8 7 7 6
30°41' 31°56' 12 11 11 10 10 9 9 8 8 7 7
31°56' 33°09' 12 12 11 11 10 10 9 9 8 8 7
33°09' 34°21' 13 12 12 11 11 10 10 9 9 8 8
34°21' 35°31' 13 13 12 12 11 11 10 10 9 9 8
35°31' 36°41' 14 13 13 12 12 11 11 10 10 9 9
36°41' 37°50' 14 14 13 13 12 12 11 11 10 10 9
37°50' 38°58' 15 14 14 13 13 12 12 11 11 10 10
38°58' 40°05' 15 15 14 14 13 13 12 12 11 11 10
40°05' 41°12' 16 15 15 14 14 13 13 12 12 11 11
41°12' 42°19' 16 16 15 15 14 14 13 13 12 12 11
42°19' 43°26' 17 16 16 15 15 14 14 13 13 12 12
43°26' 44°32' 17 17 16 16 15 15 14 14 13 13 12
44°32' 45°38' 18 17 17 16 16 15 15 14 14 13 13
45°38' 46°45' 18 18 17 17 16 16 15 15 14 14 13
46°45' 47°51' 19 18 18 17 17 16 16 15 15 14 14
47°51' 48°58' 19 19 18 18 17 17 16 16 15 15 14
48°58' 50°06' 20 19 19 18 18 17 17 16 16 15 15
50°06' 51°13' 20 20 19 19 18 18 17 17 16 16 15
51°13' 52°22' 21 20 20 19 19 18 18 17 17 16 16
52°22' 53°31' 21 21 20 20 19 19 18 18 17 17 16
53°31' 54°41' 22 21 21 20 20 19 19 18 18 17 17
54°41' 55°52' 22 22 21 21 20 20 19 19 18 18 17
55°52' 57°04' 23 22 22 21 21 20 20 19 19 18 18
57°04' 58°17' 23 23 22 22 21 21 20 20 19 19 18
58°17' 59°32' 24 23 23 22 22 21 21 20 20 19 19
59°32' 60°49' 24 24 23 23 22 22 21 21 20 20 19
60°49' 62°90' 25 24 24 23 23 22 22 21 21 20 20
62°90' 63°30' 25 25 24 24 23 23 22 22 21 21 20
63°30' 64°55' 26 25 25 24 24 23 23 22 22 21 21
64°55' 66°24' 26 26 25 25 24 24 23 23 22 22 21
66°24' 67°57' 27 26 26 25 25 24 24 23 23 22 22
67°57' 69°35' 27 27 26 26 25 25 24 24 23 23 22
69°35' 71°21' 28 27 27 26 26 25 25 24 24 23 23
71°21' 73°16' 28 28 27 27 26 26 25 25 24 24 23
73°16' 75°24' 29 28 28 27 27 26 26 25 25 24 24
75°24' 77°52' 29 29 28 28 27 27 26 26 25 25 24
77°52' 80°56' 30 29 29 28 28 27 27 26 26 25 25
80°56' 85°45' 30 30 29 29 28 28 27 27 26 26 25
85°45' 90°00' 31 30 30 29 29 28 28 27 27 26 26
Höhe in Meter
Höhe in Fuß
GEO-Wert
Breitengrad
Verriegelungsmenü beenden [End]
Springt zum nächsten Menü oder kehrt an die oberste Stelle des aktuellen
Menüs zurück.
4.8 Menü beenden
Drücken Sie auf „Ja“, um zum Justierungsmenü zu gehen. Drücken Sie auf „Nein“,
um das Menü zu beenden und zum aktuellen Anwendungsmodus zurückzukehren.
TABELLE 4-1. GEO-CODES
Page 79

Valor™ 4000W Serie DE-13
Schild mit Kapazitätsangabe
Abbildung 4-2. LFT-Stifte
4.9 EICHUNG
Wenn die Waage für eichpflichtige Anwendungen eingesetzt wird, muss diese
entsprechend der vor Ort geltenden Eichordnung konfiguriert, überprüft und
versiegelt sein. Der Käufer muss sicherstellen, dass alle geltenden rechtlichen
Vorschriften eingehalten werden.
4.9.1. Schild mit Kapazitätsangabe
In der Nähe der Displays muss ein Schild angebracht werden, das die Kapazität
und Ablesbarkeit der Waage angibt. Wenn diese Schilder mit Kapazitätsangabe vor
der Lieferung angebracht wurden, müssen Sie nichts tun. Wenn diese nicht
angebracht wurden, befinden sie sich im Verpackungsmaterial. Bringen Sie die
Schilder über den Displays entsprechend Abbildung 4-1 an.
Hinweis: Die Schilder mit Kapazitätsangabe gehen beim Entfernen kaputt, sodass
Sie sie nur einmal anbringen können.
Abbildung 4-1. Positionen für die Schilder mit Kapazitätsangabe über
dem vorderen bzw. hinteren Display
4.9.2 Einstellungen
Führen Sie vor der Überprüfung und Versiegelung folgende Schritte durch:
1. Deaktivieren Sie die Option EICHPFLICHTIG.
2. Prüfen Sie, ob die Menüeinstellungen der vor Ort geltenden Eichordnung
entsprechen.
3. Führen Sie eine Justierung durch, wie in Abschnitt 3.3 beschrieben.
4. Aktivieren Sie die Option EICHPFLICHTIG.
Um die LFT-Einstellung (Eichpflichtig) der Waage zu ändern, gehen Sie wie folgt vor:
Achtung: Beim Öffnen der Unterseite der Waage dürfen Sie die Waage
nicht umgekehrt auf die Wägeplattform oder Unterplattform stellen. Legen
Sie die Waage auf die Seite.
1. Schalten Sie die Waage aus.
2. Entfernen Sie die Sicherheitsabdeckung auf der
Unterseite der Waage, um die beiden Stifte in der
Aussparung zu sehen (siehe Abbildung 4-2). Schließen
Sie diese Stifte beim Einschalten der Waage (z. B. mit
einem Schlitzschraubendreher) kurz. Die Waage führt
das Einschaltverfahren durch, und auf dem Display
erscheint der aktuelle Status [lft OFF] (Eichung deaktiviert,
nicht verriegelt) oder [lft ON] (Eichung aktiviert, verriegelt). Drücken Sie auf die
Taste „No“ (Nein), um diese Einstellung zu ändern oder auf „Yes“ (Ja), um die
Einstellung zu übernehmen.
Page 80

DE-14 Valor™ 4000W Serie
Drahtplombe
Papiersiegel
Sicherheitsabdeckung
Hinweis: Wenn die Option EICHPFLICHTIG aktiviert ist, werden die
Menüeinstellungen wie folgt geändert:
Das Justierungsmenü (C.A.L) kann nicht aufgerufen werden.
Die Menüs „IR Function“ (IR-Funktion), „Filter“ und „Unit“ (Einheit) sind in
den aktuellen Einstellungen verriegelt.
Die Einstellung für den stabilen Bereich ist bei 1d verriegelt.
Die Einstellung für die automatische Nullpunktnachführung ist bei 0,5d
verriegelt.
3. Bringen Sie die Sicherheitsabdeckung wieder an.
4.9.3 Verifizierung und Versiegelung
Der Mitarbeiter der lokalen Eichbehörde oder ein autorisierter Servicevertreter muss
die Verifizierung durchführen.
4.9.3.1 Physische Versiegelung
In Gebieten, in denen physische Siegel verwendet werden, muss der Mitarbeiter der
lokalen Eichbehörde oder ein autorisierter Servicevertreter ein Eichsiegel
anbringen, damit die Einstellungen nicht geändert werden können. In der folgenden
Abbildung finden Sie einige Versiegelungsoptionen.
Entriegelt Verriegelt
4.9.3.2 Audit-Trail-Siegel (nur USA und Kanada)
In Gebieten mit der Audit-Trail-Versiegelung muss der Mitarbeiter der lokalen
Eichbehörde oder ein autorisierter Servicevertreter die aktuelle Konfiguration und
den Wert des Justierereigniszählers zum Zeitpunkt der Versiegelung protokollieren.
Diese Werte werden mit den Werten verglichen, die bei einer späteren Inspektion
erfasst werden.
Hinweis: Eine Änderung des Ereigniszählerwerts entspricht dem Brechen eines
Siegels.
Diese Audit-Trail-Option verwendet zwei Ereigniszähler, um Veränderungen an der
Konfiguration und den Justiereinstellungen zu erfassen.
Der Konfigurationsereigniszähler (CFG) wird unter folgenden Bedingungen
um 1 erhöht:
- Wenn die LFT-Einstellung von EIN auf AUS gestellt wird.
- Wenn Sie das Menü verlassen und eine der folgenden
Abbildung 4-3. Versiegelung
Menüeinstellungen geändert wurde: stabiler Bereich, automatische
Nullpunktnachführung (AZT), Filter, IR Function und Einheiten (kg, g,
oz, lb oder lb:oz).
Page 81

Valor™ 4000W Serie DE-15
Der Justierereigniszähler (CAL) wird beim Verlassen des Menüs um 1
erhöht, wenn eine Messspannenjustierung durchgeführt oder eine GEOEinstellung verändert wurde.
Hinweis: Der Zähler wird nur einmal erhöht, selbst wenn mehrere Einstellungen
vorgenommen werden.
Die Ereigniszähler können durch Gedrückthalten der Taste MENU (MENÜ)
angezeigt werden.
Wenn Sie die Taste gedrückt halten, erscheint auf der Anzeige zunächst MENU
(MENÜ) und dann AUDIT.
Lassen Sie die Taste los, wenn AUDIT auf dem Display erscheint, um die AuditTrail-Informationen anzuzeigen.
Die Audit-Trail-Informationen werden im Format CFGxxx und CALxxx angezeigt.
Die Waage kehrt danach zum normalen Betriebsmodus
zurück.
5. WARTUNG
5.1 Reinigung
Das Gehäuse kann bei Bedarf mit einem feuchten Tuch und einem milden
Reinigungsmittel gereinigt werden. Lösungsmittel, Chemikalien und Alkohol,
Ammoniak oder Scheuermittel dürfen nicht für die Reinigung von Gehäuse und
Bedienfelder verwendet werden.
5.2 Reinigung der Kunststoffwägeplattform
5.2.1 Ausbau und Reinigung der Kunststoffwägeplattform
Gehen Sie wie folgt vor, um die Kunststoffwägeplattform zu reinigen:
1. Nehmen Sie die Edelstahlwägeplatte ab.
2. Drehen Sie die vier Flügelschrauben der Batterieabdeckung heraus.
3. Trennen Sie die Batterieklemmen und nehmen Sie die Batterie heraus.
4. Drehen Sie die beiden Schrauben auf der Unterseite des Batteriefachs
mit einem Kreuzschlitzschraubendreher heraus.
5. Nehmen Sie die Kunststoffwägeplattform ab.
6. Reinigen Sie die Kunststoffwägeplattform.
Page 82

DE-16 Valor™ 4000W
6
3
1
2
4
5
Abbildung 5-1. Wägeplattform reinigen
5.2.2 Wiedereinbau der Wägeplattform nach der Reinigung
Gehen Sie wie folgt vor, um die Kunststoffwägeplattform wieder einzubauen (siehe
auch die Schritte in Abbildung 5-1 in umgekehrter Reihenfolge):
1. Befestigen Sie die Wägeplattform mit einem Kreuzschlitzschraubendreher
und den beiden Schrauben am Gehäuse.
2. Legen Sie die Batterie in das Batteriefach und bringen Sie die beiden
Batterieklemmen an. Befestigen Sie den roten Draht am positiven (roten)
Batterieende und den schwarzen Draht am negativen (schwarzen)
Batterieende.
3. Bringen Sie die Batterieabdeckung mit den vier Flügelschrauben an.
4. Stellen Sie die Waage richtig hin und befestigen Sie die Edelstahlplatte.
Achtung: Bei falsch angeschlossener Batterie besteht Explosionsgefahr.
Page 83

Valor™ 4000W Serie DE-17
Problem
Mögliche Ursache
Abhilfe
Kann nicht eingeschaltet
werden.
Waage wird nicht mit Strom
versorgt.
Batterie entladen
Anschlüsse, Stromversorgung und
Ladestatus der Batterie prüfen.
Ungenaue Messwerte
Unsachgemäße Justierung
Instabile Umgebung
Justierung durchführen.
Waage an einen geeigneten Ort
stellen.
Justierung nicht möglich
Instabile Umgebung
Falsches Justiergewicht
Waage an einen geeigneten Ort
stellen.
Korrektes Justiergewicht
verwenden.
Modus nicht aufrufbar
Modus nicht aktiviert
Menü aufrufen und Modus
aktivieren.
Einheit nicht aufrufbar
Einheit nicht aktiviert
Menü aufrufen und Einheit
aktivieren.
LO ref
Referenzgewicht ist zu
niedrig.
Referenzgewicht erhöhen.
Err 3.0 Cal
Falsches Justiergewicht
Die korrekten Gewichte finden Sie
in Tabelle 3-3.
Err 8.1 ˉLOadˉ
Nullbereich beim Einschalten
überschritten
Wägeplattform leeren.
Err 8.2 _LOad_
Nullbereich beim Einschalten
unterschritten
Wägeplattform aufsetzen.
Err 8.3 ˉLOadˉ
Überlast
Last überschreitet die maximale
Kapazität der Waage.
Err 8.4 _LOad_
Unterlast
Messwert liegt unter dem
Mindestwert. Wägeplattform neu
aufsetzen.
Err 8.5 ˉtareˉ
Tara außerhalb des Bereichs
Tarawert ist größer als der
Maximalwert.
Err 9 Data
Interner Datenfehler
Einen autorisierten
Servicemitarbeiter kontaktieren.
Err13 mMEmM
Fehler beim Schreiben in
EEPROM
Einen autorisierten
Servicemitarbeiter kontaktieren.
Err 53 C.SUmM
Ungültige Prüfsummendaten
Einen autorisierten
Servicemitarbeiter kontaktieren.
Lo.Bat
Batterie entladen
Netzteil verwenden und Batterie
laden.
NO.ACC
Brutto- und Nettogewichte
können nicht zusammen
addiert werden.
Akkumulieren Sie entweder nur
Bruttogewichte oder nur
Nettogewichte.
Batterie kann nicht
vollständig geladen
werden.
Batterie ist defekt.
Batterie von einem autorisierten
Ohaus-Händler ersetzen lassen.
5.3 Fehlerbehebung
Die folgende Tabelle enthält häufige Probleme sowie mögliche Ursachen und
Abhilfemaßnahmen.
Wenn das Problem weiterhin besteht, wenden Sie sich an OHAUS oder Ihren
autorisierten Händler.
TABELLE 5-1
Page 84

DE-18 Valor™ 4000W Serie
MODELL
V41PWE1501T
V41XWE1501T
V41PWE3T
V41XWE3T
V41PWE6T
V41XWE6T
V41PWE15T
V41XWE15T
Wä gebereich x Ablesbarkeit
(Max x d nicht zugelassen)
1,5 kg x 0,0002 kg
1500 g x 0,2 g
3 lb x 0,0005 lb
48 oz x 0,01 oz
3 kg x 0,0005 kg
3000 g x 0,5 g
6 lb x 0,001 lb
96 oz x 0,02 oz
6 kg x 0,001 kg
6000 g x 1 g
15 lb x 0,002 lb
240 oz x 0,05 oz
15 kg x 0,002 kg
15000 g x 2 g
30 lb x 0,005 lb
480 oz x 0,1 oz
Maximal angezeigte Auflö sung
7500
6000
6000
7500
Wä gebereich x Ablesbarkeit
(Max x e zugelassen)
1,5 kg x 0,0005 kg
1500 g x 0,5 g
3 lb x 0,001 lb
48 oz x 0,02 oz
3 kg x 0,001 kg
3000 g x 1 g
6 lb x 0,002 lb
96 oz x 0,05 oz
6 kg x 0,002 kg
6000 g x 2 g
15 lb x 0,005 lb
240 oz x 0,1 oz
15 kg x 0,005 kg
15000 g x 5 g
30 lb x 0,01 lb
480 oz x 0,2 oz
Zugelassene Auflö sung
3000
3000
3000
3000
Wiederholbarkeit
0,0005 kg
0,001 kg
0,002 kg
0,005 kg
Linearitä t
± 0,0005 kg
± 0,001 kg
± 0,002 kg
± 0,005 kg
Wä geeinheiten*
Nicht zugelassene Modelle: g, kg, lb, oz, lb:oz
EG- und OIML-zugelassene Modelle: g, kg
In Kanada und NTEP-zugelassene Modelle: g, kg, lb, oz
Tarabereich
Bis Wä gebereich durch Subtraktion
Stabilisierungszeit
≤ 0,5 Sekunden
Sicherer Ü berlastschutz
150% der Skala Kapazitä t
Gewichtsanzeige
2 x rote LED (vorn und hinten)
6-stellig, 7 Segmente, 20,5 mm/0,8" Zeichenhö he
Tastatur
Vier Tasten
Anwendungsmodi
Wä gemodus, Prozentmodus, Kontrollmodus (jeweils mit Summierungsfunktion)
Batteriebetriebszeit (bei 20 ºC)
Typisch 50 Stunden mit 12-Stunden-volle Ladung
Konstruktion
V41PW: ABS-Gehä use mit Plattform aus Edelstahl 304
V41XW: ABS Gehä use-Unterteil mit Edelstahl 304 Top Gehä use und Plattform
Schutzart
IPX8
Abmessungen der Wä geplattform
190 x 242 mm
Zulassungsklasse
III
Nettogewicht
V41PW: 3,0 kg; V41XW: 3,9 kg
Versandgewicht
V41PW: 4,0 kg; V41XW: 4,9 kg
Abmessungen der Versand
410 x 370 x 220 mm / 16.1 x 14.6 x 8.7 "
Hinweis: Schalten Sie lb: oz Einheit mit LFT ON
5.4 Serviceinformationen
Wenn Sie Ihr Problem mit dem Abschnitt zur Fehlerbehebung nicht lösen konnten,
wenden Sie sich an Ihren autorisierten OHAUS-Servicemitarbeiter. Besuchen Sie
unsere Website unter www.ohaus.com, um eine OHAUS-Niederlassung in Ihrer
Nähe zu suchen. Ein OHAUS-Produktservicespezialist steht Ihnen zur Seite.
6. TECHNISCHE DATEN
Die technischen Daten gelten unter folgenden Umgebungsbedingungen:
Verwendung nur in Räumen
Betriebstemperatur: -10 °C bis 40 ºC
Relative Luftfeuchtigkeit: 10% bis 90% relative Luftfeuchtigkeit, nicht kondensierend
Höhe: bis 2000 m
Stromversorgung: Netzteil (mitgeliefert) – 12 V–, 0,84 A, interne aufladbare
versiegelte Blei-Säure-Batterie
Netzspannungsschwankungen: bis ± 10 % der Nennspannung
Installationskategorie: II
Verschmutzungsgrad: 2
6.1 Spezifikationen
TABELLE 6-1
Page 85

Valor™ 4000W Serie DE-19
V41PW
A
256 mm
B
280 mm
C
121 mm
V41XW
A
256 mm
B
288 mm
C
124 mm
A
C
B
TABELLE 6-2
6.2 Zeichnungen und Abmessungen
Abbildung 6-1. Abmessungen
Page 86

DE-20 Valor™ 4000W Series
Kennzeichnung
Norm
Dieses Produkt entspricht der EMV-Richtlinie 2004/108/EG, der
Niederspannungsrichtlinie 2006/95/EG und der Richtlinie über
nichtselbsttätige Waagen 2009/23/EG.
Die Konformitätserklärung finden Sie online unter
europe.ohaus.com/europe/en/home/support/compliance.aspx.
AS/NZS CISPR 11
CAN/CSA-C22.2 No. 61010-1-12, UL Std. No. 61010-1 (3.
Auflage)
NSF/ANSI 169–2009
NSF/ANSI/3-A 14159-1-2010
Bei Waagen, die am Herstellungsort verifiziert werden, ist eine der oben
erwähnten Kennzeichnungen auf dem Verpackungsetikett aufgedruckt,
und der grüne Aufkleber „M“ (Messtechnik) befindet sich auf dem
beschreibenden Typenschild. Sie können sofort verwendet werden.
Noch zu verifizierende Waagen besitzen kein grünes „M“
(für Messtechnik) auf dem beschreibenden Typenschild und keine
der oben erwähnten Kennzeichnungen auf dem Verpackungsetikett.
Die zweite Stufe der ersten Verifizierung muss von einer autorisierten
und zertifizierten Behörde durchgeführt werden, die innerhalb der
Europäischen Gemeinschaft oder von einer nationalen benannten
Stelle anerkannt ist.
Die erste Stufe der Verifizierung erfolgte im Herstellerwerk. Sie umfasst alle
Prüfungen entsprechend der übernommenen Europäischen Norm EN 45501:1992,
Absatz 8.2.2.
Wenn nationale Vorschriften den Gültigkeitszeitraum der Verifizierung begrenzen,
muss der Benutzer der Waage den Zeitraum für die erneute Verifizierung genau
einhalten und die entsprechende Eichbehörde informieren.
6.3 Einhaltung
Die Einhaltung folgender Normen ist durch eine entsprechende Kennzeichnung auf
dem Produkt vermerkt.
Wichtige Mitteilung für verifizierte Waagen
Page 87

Valor™ 4000W Series DE-21
Entsorgung
Entsprechend der Europäischen Richtlinie 2002/96/EG über
Elektro- und Elektronik-Altgeräte (WEEE) darf dieses Gerät nicht
im Hausmüll entsorgt werden. Dies gilt auch für Länder außerhalb
der EU entsprechend den jeweiligen Vorschriften.
Gemäß der Batterierichtlinie 2006/66/EG gibt es seit September
2008 neue Anforderungen zur Entnahme von Batterien in Altgeräten
in den EU-Mitgliedsstaaten. In Übereinstimmung mit der Richtlinie
wurde das Gerät so gestaltet, dass die Batterien am Ende der
Nutzungsdauer von einem Entsorgungsunternehmen sicher
entfernt werden können.
Entsorgen Sie dieses Produkt entsprechend den lokalen Vorschriften an der
Sammelstelle für Elektro- und Elektronikgeräte. Bei Fragen wenden Sie sich bitte
an die entsprechende Behörde oder an den Händler, von dem Sie das Gerät
erworben haben.
Wenn Sie das Gerät an andere weitergeben (zur privaten oder beruflichen Nutzung),
muss der Inhalt dieser Vorschriften ebenfalls weitergeben werden.
Anweisungen zur Entsorgung in Europa finden Sie online unter
europe.ohaus.com/europe/en/home/support/weee.aspx.
Vielen Dank für Ihren Beitrag zum Umweltschutz.
FCC-Hinweis
Jedes Gerät wurde geprüft und entspricht den Grenzwerten für Digitalgeräte der
Klasse B gemäß Abschnitt 15 der FCC-Vorschriften. Diese Bestimmungen dienen
dazu, in kommerziellen Umgebungen einen angemessenen Schutz gegen
Funkstörungen zu gewährleisten. Dieses Gerät erzeugt und verwendet HF-Energie
und strahlt diese u. U. auch ab; wird es nicht entsprechend der Anweisung installiert
und verwendet, kann eine Funkstörung auftreten. Bei Betrieb des Geräts in
Wohngebieten ist die Wahrscheinlichkeit solcher Störungen hoch, und der Benutzer
ist verpflichtet, diese Störungen auf eigene Kosten zu beheben.
Industry Canada-Hinweis
Das Digitalgerät der Klasse B entspricht den kanadischen Vorschriften ICES-003.
ISO 9001-Registrierung
OHAUS Corporation erhielt seine erste registrierte Zertifizierung gemäß ISO 9001
im Jahr 1994 durch die akkreditierte Registrierstelle Bureau Veritus Quality
International (BVQI). Damit erfüllt das OHAUS-Qualitätsmanagementsystem die
Anforderungen der Norm ISO 9001. Am 21. Juni 2012 wurde OHAUS Corporation,
USA, erneut gemäß der Norm ISO 9001:2008 registriert.
Page 88

DE-22 Valor™ 4000W Series
BESCHRÄNKTE GARANTIE
Auf OHAUS-Produkte wird ab dem Datum der Auslieferung und über dem
Garantiezeitraum hinweg eine Garantie auf Materialmängel und Herstellungsfehler
gegeben. Während des Garantiezeitraums wird Ohaus alle defekten Komponenten
kostenlos reparieren oder nach eigenem Ermessen ersetzen, vorausgesetzt das
Produkt wird bei Vorauszahlung der Frachtkosten an OHAUS zurückgeschickt.
Diese Garantie gilt nicht, wenn das Produkt durch Unfall oder Missbrauch
beschädigt wurde, radioaktiven oder korrosiven Materialien ausgesetzt wurde,
Fremdkörper in das Innere des Produkts eingedrungen sind oder wenn eine
Reparatur oder Änderung erfolgte, die nicht von OHAUS durchgeführt wurde. Wenn
die Garantiekarte nicht ordnungsgemäß zurückgeschickt wurde, beginnt der
Garantiezeitraum am Datum des Versands an den autorisierten Händler. OHAUS
Corporation gibt keine weiteren ausdrücklichen oder stillschweigenden Garantien.
OHAUS Corporation ist für keinerlei Folgeschäden haftbar.
Da die Gesetzgebung zu Garantieleistungen von Bundesstaat zu Bundesstaat und
von Land zu Land anders ist, wenden Sie sich bitte an OHAUS oder Ihren OHAUSHändler vor Ort, wenn Sie weitere Einzelheiten benötigen.
Page 89

Valor™ Serie 4000W IT-1
Bilancia
Vassoio di pesa in acciaio inossidabile
Scheda di garanzia
Adattatore di rete e presa
Manuale di istruzioni
Etichetta di capacità
1. INTRODUZIONE
Questo manuale illustra l'installazione, il funzionamento e la manutenzione delle
bilance della serie Valor 4000W. Leggere il manuale interamente, prima di utilizzare
la bilancia.
1.1 Precauzioni di sicurezza
Seguire le precauzioni di sicurezza riportate di seguito:
Verificare che la tensione d'ingresso dell’adattatore CA corrisponda alla
tensione di rete.
Non far cadere pesi sulla piattaforma.
Non capovolgere la bilancia con la piattaforma rivolta verso il basso.
Prima di effettuare la pulizia della bilancia, scollegare l'alimentazione elettrica.
Utilizzare la bilancia solo nelle condizioni ambientali specificate in queste
istruzioni.
Fare eseguire la manutenzione solo da personale autorizzato.
Utilizzare esclusivamente pesi che rientrino nella portata della bilancia,
indicata in queste istruzioni.
Non utilizzare la bilancia in ambienti difficili.
Non trasportare la bilancia tenendola per il vassoio o per la piattaforma
inferiore. Utilizzare le maniglie laterali.
2. INSTALLAZIONE
2.1 Contenuto della confezione
2.2 Installazione dei componenti
Posizionare il vassoio in acciaio inossidabile sulla piattaforma di pesa prima di
accendere la bilancia.
Figura 2-1. Installazione del vassoio di pesa in acciaio inox sulla piattaforma di pesa
Page 90

IT-2 Valor™ Serie 4000W
Indicatore di livello
Piedini regolabili
Sì No
2.3 Scelta dell'ubicazione
Utilizzare la bilancia su una superficie piatta e ferma. Evitare luoghi in cui siano
presenti correnti d'aria, vibrazioni, fonti di calore eccessive o brusche variazioni di
temperatura.
2.4 Messa a livello dell'apparecchiatura
Regolare i piedini fino a quando la bolla di livello non si trova al centro del cerchio.
Accertarsi che l'apparecchiatura sia livellata ogni volta che la sua posizione viene
modificata.
Figura 2-2. Indicatore di livello
2.5 Alimentazione
Quando l'alimentazione a batteria non è necessaria, per avviare la bilancia è
possibile utilizzare l'adattatore CA. Innanzitutto inserire la presa dell'adattatore
nello spinotto di ingresso situato nella parte inferiore della bilancia secondo la
descrizione fornita di seguito.
Quindi collegare l'adattatore CA alla rete CA appropriata.
Figura 2-3. Inserimento della presa
Figura 2-4. Collegamento dell'adattatore CA alla rete CA
Attenzione: quando alimentata mediante l'adattatore CA, la bilancia
può essere utilizzata solo in ambienti asciutti.
Page 91

Valor™ Serie 4000W IT-3
Simbolo
Livello di carica
Batteria in uso:
Simbolo visualizzato
2.5.1 Alimentazione a batteria
La bilancia può essere utilizzata immediatamente ad alimentazione elettrica.
Lasciar caricare la batteria per 12 ore prima di utilizzare la bilancia con
l'alimentazione a batteria. La bilancia passa automaticamente al
funzionamento a batteria in caso di guasto di alimentazione o di rimozione del
cavo di alimentazione. Con l'alimentazione elettrica, la bilancia è
costantemente in carica, di conseguenza l'indicatore di carica della batteria
(vedere voce 11 nella tabella 3-2) rimane acceso. È possibile utilizzare la
bilancia durante il processo di carica e la batteria è protetta contro la carica
eccessiva.
Per massimizzare il tempo di funzionamento, la batteria deve essere caricata a
temperatura ambiente.
Durante il funzionamento a batteria, il simbolo della batteria indica il relativo
stato di carica. Il simbolo lampeggia lentamente durante il processo di carica e
si spegne quando la carica è completa.
TABELLA 2-1
Note:
Quando il simbolo della batteria lampeggia velocemente indica un tempo di
funzionamento residuo di circa 30 minuti.
Quando viene visualizzato il simbolo [Lo.bAt] , la bilancia si spegne.
Caricamento della bilancia in un ambiente asciutto.
ATTENZIONE: la batteria va sostituita solo da un rivenditore
OHAUS autorizzato all'assistenza. La sostituzione della batteria
con un'altra di tipo errato o il collegamento non corretto
possono causare esplosioni. Smaltire la batteria al piombo in
base alle prescrizioni delle leggi e delle normative locali.
Page 92

IT-4 Valor™ Serie 4000W
Pulsante
Funzioni
Pressione breve1 (quando accesa): azzera il display
Pressione breve (quando spenta): accende la bilancia
Pressione lunga2 (quando accesa): spegne la bilancia
Pressione breve (in Menu): seleziona/accetta l'impostazione
visualizzata
Pressione breve: accumula il peso o visualizza le informazioni
accumulate a carico 0.
Pressione lunga: passa tra le unità attive
Pressione breve (in Menu): passa tra le impostazioni disponibili
Pressione breve: avvia una risposta specifica della modalità di
applicazione
Pressione lunga: seleziona la modalità attiva
Pressione breve (in Menu): ritorna alle impostazioni precedenti
Pressione breve: immette/elimina un valore di tara
Pressione lunga: accede al menu User (Utente)
Pressione breve (in Menu): esce rapidamente dal menu User
(Utente)
È possibile programmare il sensore IR3 come pulsante
“touchless”. Per le impostazioni disponibili, consultare la sezione
4.3 relativa al menu User (Utente).
3. FUNZIONAMENTO
3.1 Comandi
Figura 3-1. Pannello di controllo anteriore della Valor 4000W con display
TABELLA 3-1
Note:
1
Pressione breve: premere per meno di 2,5 secondi.
2
Pressione lunga: tenere premuto per più di 2,5 secondi.
3
Per attivare il sensore IR è possibile utilizzare le mani o un alto oggetto collocato a una specifica
altezza (vedere la sezione 4.3) dal sensore. La distanza di attivazione del sensore varia in
base alla natura riflettente dell'oggetto. In caso di attivazione involontaria legata a particolari
situazioni, il sensore può essere spento.
Page 93

Valor™ Serie 4000W IT-5
Elemento
Descrizione
Elemento
Descrizione
1
Simbolo NET
9
Simbolo taratura/menu Mode
2
Simbolo Centro di zero
10
Simbolo pesa dinamica*
3
Simbolo valori negativi
11
Simbolo stato di carica batteria
4
Simbolo peso stabile
12
Simbolo libbre, once, libbre:once
5
Simbolo tara predefinita*
13
Simboli grammi, chilogrammi
6
Simboli puntatore
14
Simbolo pezzi*
7
Simbolo sensore IR
15
Simbolo percentuale
8
Simbolo accumulazione
(Rosso) Carichi > limite massimo
(Verde) Carichi ≥ limite minimo e ≤ limite massimo
(Giallo) Carichi < limite minimo
Sensore IR
Figura 3-2. Display della Valor 4000W
Indicatori LED
1
2
1
3
1
4
1
5
1
6
1
7
1
8
1
9
1
10
1
11
1
12
1
13
1
14
1
15
Display
TABELLA 3-2 Simboli del display
Nota: * non utilizzato
Figura 3-3. Display posteriore della Valor 4000W
Gli indicatori LED colorati posti sul lato destro del pannello di controllo vengono
utilizzati in modalità di controllo peso (sezione 3.6) e si illuminano come illustrato di
seguito:
Page 94

IT-6 Valor™ Serie 4000W
Massa necessaria per la taratura a intervallo
(venduta separatamente)
Max
Massa
1
Max
Massa
1
1500g
1,5kg/3lb
6000g
6kg/15lb
3000g
3kg/6lb
15000g
15kg/30lb
3.2 Accensione/spegnimento della bilancia
Per accendere la bilancia tenere premere il tasto On/Zero Off. La bilancia effettua
un test del display, che visualizza per un attimo la versione del software e quindi
accede alla modalità di pesa attiva.
Per spegnere la bilancia, tenere premuto il pulsante On/Zero Off fino a che non
viene visualizzata la scritta OFF.
3.3 Taratura iniziale
Per ottenere risultati precisi, è necessario tarare la bilancia al primo utilizzo. Prima
di eseguire l’operazione, accertarsi di disporre del peso di taratura adatto, in base a
quanto indicato nella tabella 3-3.
Tenere premuto Menu fino a quando non viene visualizzato [mMeNU] (Menu).
Quando il pulsante viene rilasciato, sul display viene visualizzato [C.A.L]. Premere
Yes (Sì) per accettare, viene quindi visualizzato [SpaN]. Premere nuovamente Yes
(Sì) per avviare la taratura a intervallo. Mentre viene memorizzata la lettura dello
zero [--C--] lampeggia. Quindi, sul display viene visualizzato il valore del peso della
taratura. Disporre la massa specificata per la taratura sul vassoio e premere Yes
(Sì). Mentre viene memorizzata la lettura [--C--] lampeggia. La bilancia ritorna alla
modalità di applicazione precedente ed è pronta per l’uso.
Nel caso in cui il procedimento di taratura non sia stato eseguito correttamente
oppure in caso di utilizzo del peso sbagliato viene visualizzato il messaggio [Err 3.0
CAl].
Il processo di taratura può essere interrotto spegnendo la bilancia.
TABELLA 3-3
1
Nota:
le masse in libbre sono utilizzate per la taratura dell'unità in lb.
3.4 Modalità di pesa
1. Tenere premuto Mode (Modalità) fino a quando non viene visualizzato
[wJeIGH] (Peso).
2. Se necessario, disporre un contenitore vuoto sul vassoio e premere Tare
(Tara).
3. Aggiungere un campione sul vassoio o nel contenitore. Sul display viene
visualizzato il peso del campione.
Page 95

Valor™ Serie 4000W IT-7
3.5 Modalità Percentuale
Questa modalità misura il peso di un campione come percentuale di un peso di
riferimento.
1. Tenere premuto Mode (Modalità) fino a quando non viene visualizzato [PerCNt]
(Percentuale). Viene quindi visualizzato [Clr.ref] (Eliminare riferimento).
Note: premere Function (Funzione) per visualizzare il peso di riferimento
corrente.
Se non sono memorizzati dati di riferimento, viene visualizzato, [Set.ref]
(Impostare riferimento). Premere Yes (Sì) per impostare i dati di riferimento.
2. Premere No per utilizzare il peso di riferimento memorizzato e passare alla
fase 6.
3. Se necessario, disporre un contenitore vuoto sul vassoio e premere Tare
(Tara). Premere Yes (Sì) per stabilire un nuovo riferimento. Sulla bilancia
viene visualizzato [Put.ref] (Mettere riferimento).
4. Aggiungere il materiale di riferimento desiderato nel contenitore. Premere Yes
(Sì) per memorizzare il peso di riferimento. Sul display viene visualizzato 100%.
5. Rimuovere il materiale di riferimento. Se necessario, disporre un contenitore
vuoto sul vassoio e premere Tare (Tara).
6. Aggiungere il materiale campione. Sul display viene visualizzata la
percentuale del campione confrontata con il peso di riferimento.
7. Per cancellare i dati di riferimento memorizzati, tenere premuto Mode
(Modalità) fino a quando non viene visualizzato [PerCNt]. Premere Yes (Sì)
quando viene visualizzato [Clr.ref].
3.6 Modalità di controllo peso
Questa modalità stabilisce i limiti superiore e inferiore di peso per le procedure di
controllo porzione.
1. Tenere premuto Mode (Modalità) fino a quando non viene visualizzato [CHeCk]
(Controllo). Viene quindi visualizzato [Clr.ref] (Eliminare riferimento).
Note:premere Function (Funzione) per visualizzare i limiti superiore e
inferiore del peso di riferimento.
Se non sono memorizzati dati di riferimento, viene visualizzato , [Set.ref]
(Impostare riferimento). Premere Yes (Sì) per impostare i dati di riferimento.
2. Premere No per utilizzare i limiti del peso di riferimento memorizzato e
passare alla fase 5.
3. Premere Yes (Sì) per stabilire nuovi valori di riferimento. Sulla bilancia viene
quindi visualizzato [Set. LO] (Imposta inferiore). Premere Yes (Sì) per
visualizzare il valore del limite "inferiore". Premere Yes (Sì) per accettare o No
per modificare il valore del limite "inferiore". Viene quindi visualizzato il valore
memorizzato con la prima cifra evidenziata [000.000 kg]. Premere ripetutamente
No fino a quando non viene visualizzato il numero desiderato. Premere Yes
(Sì) per accettare ed evidenziare la cifra successiva. Ripetere fino a quando
tutte le cifre non sono corrette. Premere Yes (Sì) per accettare il valore del
limite "inferiore", viene visualizzato [Set. HI] (Imposta superiore).
4. Ripetere la stessa procedura per accettare o modificare il valore "superiore".
5. Se necessario, disporre un contenitore vuoto sul vassoio e premere Tare
(Tara). Disporre il materiale campione sul vassoio o nel contenitore. Se il peso
del campione è inferiore al limite minimo dell'intervallo di peso di destinazione,
Page 96

IT-8 Valor™ Serie 4000W
si accende il LED giallo. Se il campione rientra nell'intervallo di peso di
destinazione, si accende il LED verde. Se il campione è superiore al limite
massimo dell'intervallo di peso di destinazione, si accende il LED rosso.
6. Per cancellare i dati di riferimento memorizzati, tenere premuto Mode
(Modalità) fino a quando non viene visualizzato [CHeCk] (Controllo). Premere
Yes (Sì) quando viene viene visualizzato [Clr.ref] (Cancellare riferimento).
3.7 Accumulazione
L'accumulazione può essere utilizzata in combinazione con ciascuna modalità di
applicazione. Questa funzione consente di memorizzare il totale di una serie di
misurazioni di peso.
1. Premere il tasto M+ per aggiungere il peso ai dati di accumulazione. L'icona ∑
continua a lampeggiare finché il peso non viene rimosso.
Nota: quando l'accumulazione è impostata su AUTO nel menu di
impostazione, non è necessario premere il tasto M+.
2. Una volta liberato il vassoio, premere il tasto M+ per visualizzare le
informazioni statistiche dei dati di accumulazione.
3. Per cancellare i dati di accumulazione, premere il tasto Tare (Tara) mentre
sono visualizzate le informazioni statistiche dei dati di accumulazione. Sul
display viene visualizzato [Clr.aCC]. Premere il tasto Yes (Sì) per eliminare i
dati memorizzati e tornare alla modalità corrente.
Note: nel totale di accumulazione vengono memorizzati solo i pesi stabili.
Per impedire che al totale venga aggiunto più volte lo stesso peso,
è necessario reimpostare il carico sul vassoio su un valore entro 0
prima di poter aggiungere il carico successivo.
Quando l'opzione Legale per il commercio è disattiva, il display deve
restituire un valore 0 come lordo, un valore 0 o un valore negativo
come netto; quando l'opzione Legale per il commercio è attiva, il
display deve ritornare a 0 come lordo. Altrimenti, l'icona Σ continua a
lampeggiare.
I carichi lordo e netto non possono essere sommati tra loro. Se il primo
carico è un peso lordo, anche i carichi successivi devono essere pesi
lordi. Se il primo carico è un peso netto, anche i carichi successivi
devono essere pesi netti.
Il numero massimo di accumulazioni è 9999.
Modificando la modalità, i dati accumulati vengono eliminati.
Page 97

Valor™ Serie 4000W IT-9
In modalità di pesa; impostazione sottomenu ACCUmM,
selezionare mMaNU:
Se necessario, disporre un contenitore vuoto sul vassoio e
premere Tare (Tara).
Fase i. Mettere il peso (0,04 kg) sul vassoio e premere il tasto
M+
Fase i. L'icona ∑ continua a lampeggiare finché
il peso non viene rimosso.
Fase ii. Rimuovere il peso dal vassoio. Mettere un altro
peso (0,03 kg) e premere il tasto M+:
Fase iii. Rimuovere il peso dal vassoio:
Fase iv. Premere il tasto M+ per visualizzare le informazioni
statistiche:
Fase v. Se necessario eseguire la fase 3 per cancellare i
i dati di accumulazione.
Menu
C.A.L
S.E.t.U.P
r.E.A.d
M.O.d.E
U.n.i.t
L.O.C.k
E.n.d
Voci
del
menu:
Span
Lin
GEO
End
Reset
Pwr.Un
A.Tare
Ir.Func
Ir.Adj
Accum
End
Reset
Stable
Filter
AZT
Light
Sleep
A.Off
End
Reset
Percnt
Check
End
kg
g
oz
lb
lb:oz
End
Reset
L.Cal
L.Setup
L.Read
L.Mode
L.Unit
End
N 2
tOtal
0,070 kg
mMIN
0,030 kg
mMax
0,040 kg
mMaNU
*
0,040 kg
*
0,030 kg
*
0,000 kg
Esempio di accumulazione:
4. IMPOSTAZIONI DI MENU
Il menu User (Utente) consente di personalizzare le impostazioni della bilancia.
4.1 Navigazione nei menu
Menu User (Utente):
Note:
Alcune unità/modalità potrebbero non essere disponibili su tutti i modelli.
L'attivazione della funzione LEGAL FOR TRADE (Omologazione per transazioni
commerciali) (vedere la sezione 4.9) ha effetto di menu.
Page 98

IT-10 Valor™ Serie 4000W
Per accedere alla modalità Menu
Tenere premuto Menu fino a quando non viene visualizzato [mMeNU] (Menu).
Quando viene rilasciato, verrà visualizzato il primo sottomenu, [C.a.l] .
Premere Yes (Sì) per accedere al sottomenu visualizzato, oppure No per avanzare
al successivo.
Se si seleziona un sottomenu viene visualizzata la prima voce del menu. Premere
Yes (Sì) per visualizzare l'impostazione della voce del menu o No per avanzare alla
voce successiva del menu. Durante la visualizzazione delle impostazioni, premere
Yes (Sì) per accettarle o No per modificarle. Quando viene visualizzato [End] (Fine),
premere Yes (Sì) per tornare al sottomenu successivo o No per tornare alla prima
voce del menu corrente. Le impostazioni in grassetto sono quelle predefinite.
Nota: in modalità Menu è visualizzato l'indicatore della modalità di taratura/menu.
4.2 Menu Cal (Taratura)
Accedere a questo menu per eseguire le tarature.
Span [SpaN] (yes, no)
Avvia una procedura di taratura a intervallo (zero e intervallo).
Lin [LIN] (yes, no)
Avvia la procedura di taratura lineare (zero, a punto centrale e a intervallo).
GEO [GEO]
Il fattore di regolazione in base all'area geografica di appartenenza (GEO)
viene impiegato per regolare la taratura in base alla località in cui si è
attualmente. Le impostazioni consentite sono da 0 a 31, 12 è l'impostazione
predefinita. Fare riferimento alla tabella 4-1 per determinare il fattore GEO
corrispondente alla propria area geografica.
End Cal [End]
Passa al menu successivo o ritorna all'inizio del menu corrente.
4.3 Menu Setup (Impostazione)
Accedere a questo menu per definire i parametri della bilancia.
Reset [reset] (no, yes)
Ripristina le impostazioni di fabbrica del menu di impostazione.
Power on unit (Unità di misura all'accensione) [pwWr.UN] (auto, kg, g,
lb, oz, lb:oz)
Imposta l’unità di misura visualizzata all’avvio
Auto Tare (Tara automatica) [A.tArE] (off, on, on-acc)
Imposta la funzionalità di tara automatica. Se è selezionato “on”, ovvero la
funzionalità è attivata, il primo peso lordo stabile
sarà la tara. Se è selezionato “on-acc”, vengono tarati i carichi lordi stabili
entro i limiti di accettazione (in modalità di controllo peso)
IR Function [Ir.FUNC] (off, tare)
Imposta la funzionalità del sensore IR.
IR Adj [Ir.adj] (hi, low)
Imposta il livello di rilevamento del sensore IR.
(Per riferimento: Hi (alto): ~ 100 mm / 4 in; Low (basso): ~ 50mm / 2 in)
Accumulation [aCCUmM] (off, auto, manu)
Imposta la funzionalità di accumulazione.
Page 99

Valor™ Serie 4000W IT-11
End Setup [End]
Passa al menu successivo o ritorna all'inizio del menu corrente.
4.4 Menu Read (Lettura)
Accedere a questo menu per impostare le preferenze dell'utente.
Reset [reset] (no, yes)
Ripristina le impostazioni di fabbrica del menu di lettura.
Stable Range [Stable] (0.5, 1, 2, 5)
Imposta l’intervallo di variazione della lettura prima della scomparsa del
simbolo di stabilità.
Filter [FILtEr] (low, medium, high)
Imposta il valore di filtraggio del segnale.
Auto-Zero Tracking [AZt] (off, 0.5, 1, 3)
Imposta la funzionalità di controllo automatico dello zero.
Light [LIGHt] (hi, med, low)
Imposta la funzionalità di retroilluminazione.
Sleep [SLEEP] (off, on)
Imposta il tempo di spegnimento automatico del display.
Auto off [A.OFF] (off, 1, 5, 10)
Imposta la funzionalità di spegnimento automatico.
End Readout [End]
Passa al menu successivo o ritorna all'inizio del menu corrente.
4.5 Menu Mode (Modalità)
Accedere a questo menu per attivare le modalità in modo da renderle disponibili
tramite il pulsante Mode (Modalità). La modalità di peso è sempre attiva per
impostazione predefinita.
Reset [reset] (no, yes)
Ripristina le impostazioni di fabbrica del menu Mode.
Percent [PerCNt] (off, on)
Imposta lo stato.
Check [CHECk] (off, on)
Imposta la sotto-modalità.
End Mode [End]
Passa al menu successivo o ritorna all'inizio del menu corrente.
4.6 Menu Unit (Unità di misura)
Questo menu attiva le unità di misura in modo che siano disponibili tramite il
pulsante Units (Unità di misura). Per essere attive, le unità di misura nel menu
vanno impostate su "on".
Nota: le unità disponibili possono variare a seconda del modello e delle normative
locali.
Page 100

IT-12 Valor™ Serie 4000W
4.7 Menu Lock (Blocco)
Il menu di blocco è un'opzione software che consente di bloccare le impostazioni
del menu per evitare che vengano alterate.
Reset [reset] (no, yes)
Ripristina le impostazioni di fabbrica del menu di blocco.
Lock Cal [l.CAL] (off, on)
Imposta lo stato.
Lock Setup [l.SEtUP] (off, on)
Imposta lo stato.
Lock Read [l.rEAD] (off, on)
Imposta lo stato.
Lock Mode [l.mMOdE] (off, on)
Imposta lo stato.
Lock Unit [l.UNIt] (off, on)
Imposta lo stato.
End Lock [End]
Passa al menu successivo o ritorna all'inizio del menu corrente.
4.8 Menu End (Fine)
Premere Yes (sì) per passare al menu di taratura. Premere ‘No’ per uscire dal menu
e tornare alla modalità di applicazione corrente.
 Loading...