

Page 1

Catapult 1000 Series
TM
Instruction Manual
Serie Catapult 1000
TM
Manual de instrucciones
Catapult série 1000
TM
Manuel d’instructions
Catapult 1000-Serie
TM
Bedienungsanleitung
Serie Catapult 1000
TM
Manuale di istruzioni
Page 2

Page 3

EN-1Catapult 1000 Series Scales
1. INTRODUCTION
This manual contains installation, operation and maintenance instructions for the
Catapult 1000 Series Scales. Please read the manual completely before using the
scale.
TM
1.1 Safety Precautions
Please follow these safety precautions:
• Verify that the AC Adapter input voltage matches the local AC power supply.
• Do not immerse the scale in water or other liquids.
• Do not operate the scale in hostile environments.
• Do not drop loads on the platform.
• Do not place the scale upside down on the pan.
• Service should only be performed by authorized personnel
• Disconnect the scale from the power supply when cleaning
1.2 Controls
Figure 1-1. Controls.
Page 4

EN-2 Catapult 1000 Series Scales
TABLE 1-1. CONTROL FUNCTIONS.
Button
Primary Function
(Short Press)
Secondary
Function
(Long Press)
Turns scale ON.
If scale is On:
Sets zero.
Simulates a tare operation.
Turns scale off.
ON/ZERO
Off
UNITS
Changes the weighing unit.
Enters Dynamic Weighing
Mode.
Initiates countdown in
Dynamic Weighing mode.
Cal
Initiates calibration process.
1.2 Display Window
1.2.1 Large 7-Segment Numeric Characters:
Weight (mass) values are shown using 4 digits including negative sign and decimal
places. Prompts for calibration and possible error conditions are also shown using
these digits.
1.2.2 Stable Reading Indication:
A * will appear in the lower left corner of the display to indicate when the reading is
stable.
1.2.3 Weighing Unit Indication:
The weighing unit selected appears on the right side of the display
1.2.3 Dynamic Weighing Mode Indication:
A • will flash next to the selected unit during this mode.
1.2.3 Low Battery Indication:
The battery symbol on the left side of the display indicates a low battery
condition. When first displayed, approximately 12 hours of operation remain.
When the battery is fully depleted, the scale will momentarily display “Lo bAt” and
shut off.
Page 5
EN-3Catapult 1000 Series Scales
2. INSTALLATION
2.1 Package Contents
• Scale
• Power Adapter
• Instruction Manual
• Warranty Card
2.2 Location
Use the scale on a firm, steady surface. Avoid locations with excessive air current,
vibrations, heat sources, or rapid temperature changes.
2.3 Power
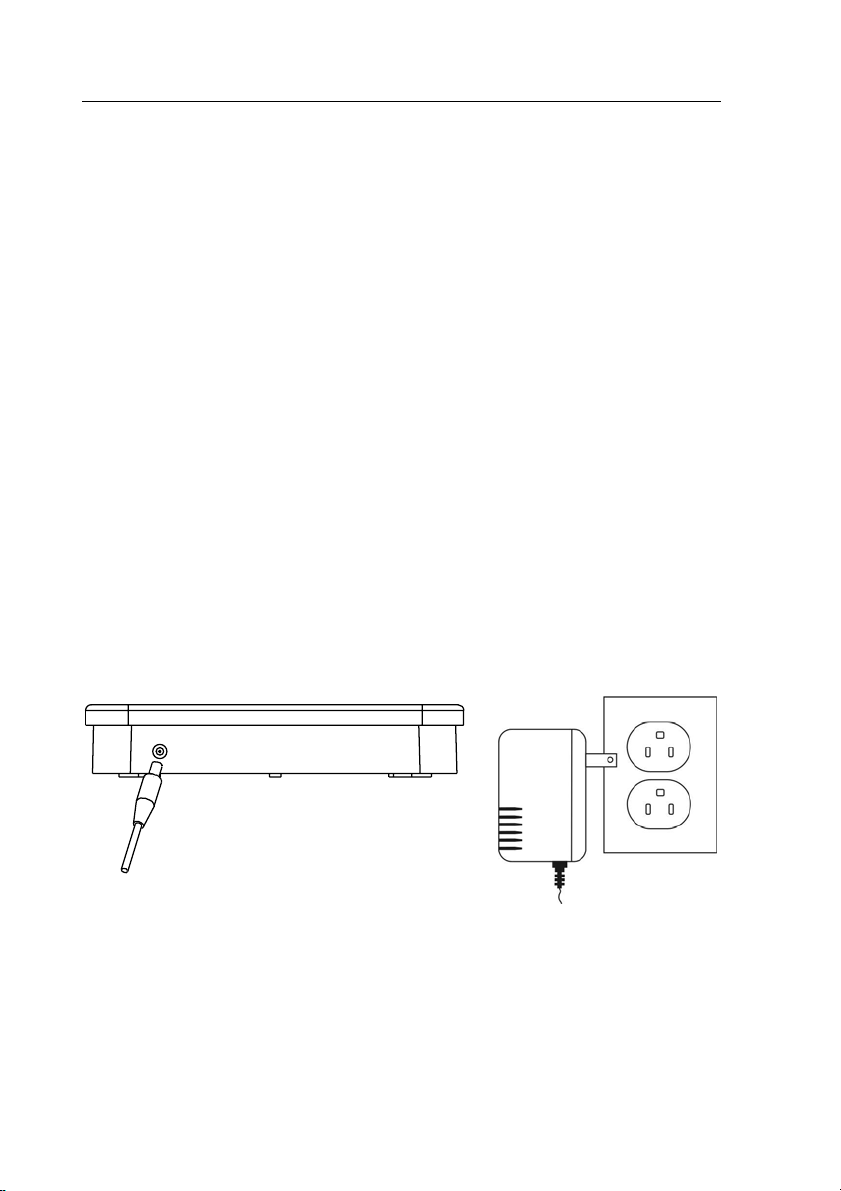
2.3.1 AC Power
The AC adapter (included) may be used to power the scale when battery power is
not available. Connect the AC adapter plug to the input jack. Then plug the AC
adapter into a properly grounded power outlet.
Figure 2-1. Power Connection.
Page 6
EN-4 Catapult 1000 Series Scales
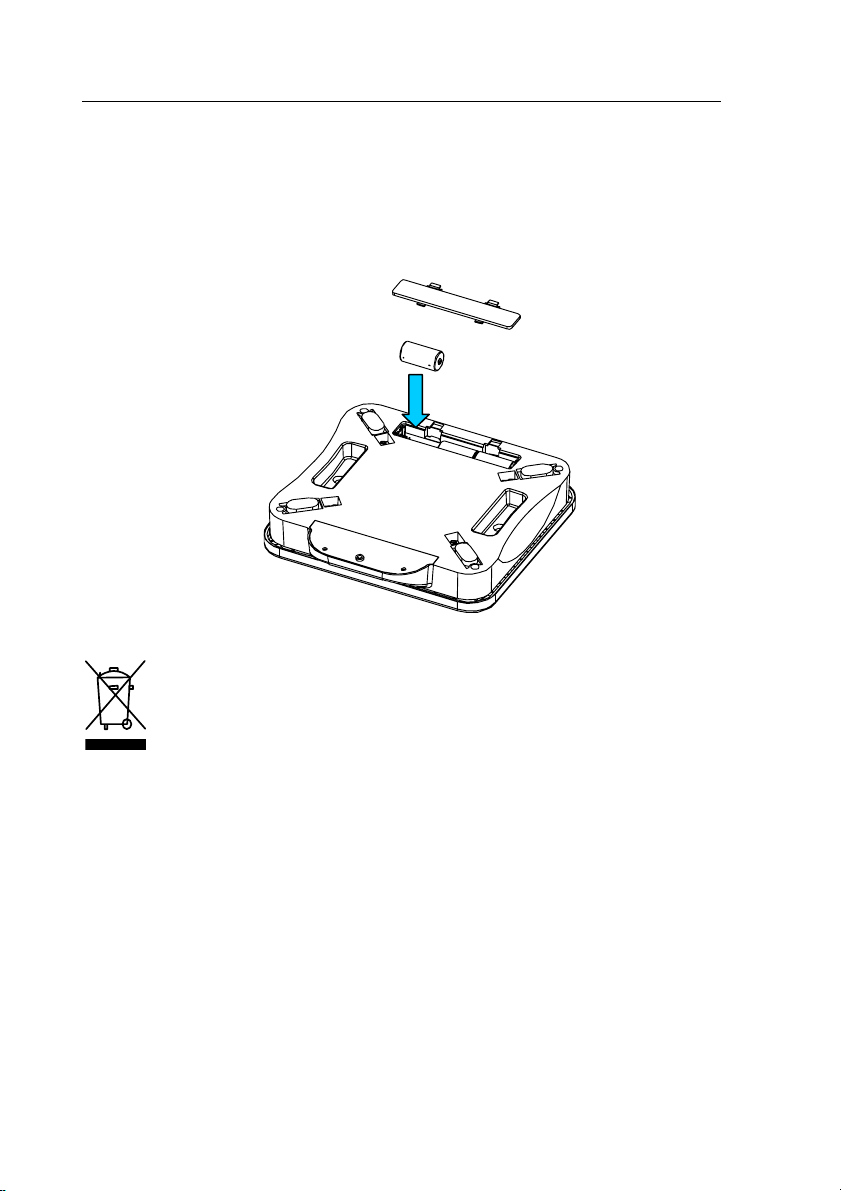
2.3.2 Battery Installation (Optional)
Open the battery cover on the bottom of the scale and install three “C” size (LR14)
alkaline or rechargeable batteries into the compartment. Orient the batteries as
shown on the inside of the compartment. Close the battery cover.
NOTE: Batteries are not included.
Figure 2-2. Battery Installation.
CAUTION: Do not dispose of used batteries in domestic waste. Follow the
proper disposal or recycling requirements in accordance with local laws
and regulations.
3. OPERATION
3.1 Turning Scale On/Off
To turn the scale on, press the ON/ZERO
test, momentarily displays the model/software version, and then enters the active
weighing mode.
To turn the scale off, press and hold ON/ZERO
3.2 Zero Operation
By pressing the ON/ZERO
additional mass, the ON/ZERO
capacity of the scale is reached. When a container is used, the ON/ZERO
may be used to simulate a Tare function. Additional mass may then be added as a
Off
button, the scale display returns to zero. When adding
Off
Off
button. The scale performs a display
Off
button until OFF is displayed.
Button may be used repeatedly until the full
Off
button
Page 7

EN-5Catapult 1000 Series Scales
NET weight. When removing both the sample and container from the scale, a
negative value may be displayed. Zero the scale again before subsequent usage.
NOTE: The ON/ZERO
displayed values are within
full capacity by subtraction.
Off
button will perform a true zero setting function when
+2% of full capacity. Above 2%, the range is limited to
3.3 Changing Units of Measure
Press the UNITS
Cal
button to display the next available measuring unit.
3.4 Auto Shut-Off
To extend battery life, the scale will automatically turn off after approximately four
minutes of inactivity. This feature is only active during battery operation.
3.5 Dynamic Weighing
With the platform empty, short press the UNITS
to cycle through the units. Dynamic mode is active when
the indicator • is flashing.
Place a mass on the platform. The scale will show “-A-”.
NOTE: If using a container, press ON/ZERO
weight and return to zero.
With a mass on the platform or container, a short press of
Cal
UNITS
seconds.
The averaged weight is then displayed. The indicator •
stops flashing when the process is complete.
The display will hold until a button is pressed.
To repeat the process press UNITS
platform or container.
To Exit, remove the mass from the platform or container and
press UNITS
will start the averaging countdown from 5
Cal
with a mass on the
Cal
.
Cal
Off
to tare the
button
Page 8

EN-6 Catapult 1000 Series Scales
4. CALIBRATION
For best results, calibrate the scale at regular intervals. (Calibration weights are not
supplied with the scale.)
CAUTION
USE EXTREME CARE WHEN HANDLING CALIBRATION WEIGHTS
AS THEY ARE VERY HEAVY. IMPROPER LIFTING METHODS OR
MISUSE OF CALIBRATION WEIGHTS MAY RESULT IN PERSONAL
INJURY. MULTIPLE WEIGHTS MAY BE USED TO EQUAL THE
REQUIRED CALIBRATION WEIGHT
NOTE:
• Ensure the appropriate calibration masses are available before beginning
calibration (see Table 4-1).
• Ensure that the scale is level and stable during the entire calibration
process.
• Calibration is unavailable in Dynamic Weighing Mode.
• Allow the scale to warm up for at least 2 minutes after stabilizing
to room temperature.
• To abort calibration, press UNITS
TABLE 4-1. CALIBRATION WEIGHTS.
Model Calibration weight (kg/lb)
C11P9 9 / 20
C11P20 20 / 40
C11P75 50 / 100
4.1 Span Calibration
Span Calibration uses two points to adjust the scale. The first point is the zero value
where there is no weight on the scale. The second point is the Span value where a
calibration mass is placed on the scale.
To select the weighing unit to be used for calibration,
Cal
press the UNITS
displayed.
Press and hold the UNITS
displayed.
button until the correct unit is
Cal
Cal
, or power off the scale.
button until “CAL” is
Page 9

EN-7Catapult 1000 Series Scales
With the platform empty, press the ON/ZERO
capture the scale zero. The display will show “-C-”.
After the zero is captured, the required span calibration
weight in the selected unit is displayed.
Place the calibration weight on the platform and press
Off
ON/ZERO
button. The display will again show “-C-”.
Off
button to
After span capture, the display will return to the normal
weighing mode.
NOTE: The message “CAL E” will appear if an incorrect calibration weight was
applied. Repeat the procedure using the correct calibration weight.
4.2 Calibration Locking
By use of an internal switch, the calibration function may be locked (disabled), and
unauthorized recalibration prevented.
With the scale powered off, remove the cover under the indicator by unscrewing the
two screws at the bottom.
Slide the switch on the PCB (marked SW3) to the position marked “CAL LOCK”.
Reassemble the cover.
If required, place tamper evident sealing labels over the screw holes or over the
housing edges.
If later recalibration is required, the cover will need to be reopened and the lock
switch returned to the original position.
NOTE: When the lock switch is set to the CAL LOCK position, the power-on zero
range is reduced to 10% of full capacity.
Page 10

EN-8 Catapult 1000 Series Scales
5. MAINTENANCE
Caution: before cleaning, turn off the scale, and remove the AC adapter.
5.1 Cleaning
The housing may be cleaned with a cloth dampened with a mild detergent if
necessary.
Do not use solvents, chemicals, alcohol, ammonia or abrasives to clean the
housing or control panels.
5.2 Troubleshooting
The following table lists common problems and possible causes and remedies. If
the problem persists, contact Ohaus or your authorized dealer.
TABLE 5.1. TROUBLESHOOTING.
Symptom Possible Cause(s) Remedy
Scale will not turn on No power to scale
Battery power used up
Poor accuracy Improper calibration. Unstable
environment
Unable to calibrate CAL LOCK set to ON
Unstable environment
Incorrect calibration mass
Scale displays “Lo
bAt”
Scale displays “Lo
Line”
Scale displays “E” Weight on pan exceeds
Scale displays “CALE” Incorrect Calbiration weight on
Scale displays “UnSt” Scale is unstable at power up. Relocate scale to a more stable
Battery is discharged Connect power or change the
Low Line voltage Verify source voltage
capacity
pan
Verify connections and voltage.
Verify battery polarity
Perform calibration. Move scale to
suitable location
Set CAL LOCK to OFF (see section
4.2)
Move the scale to suitable location
Use correct calibration mass
batteries
Remove weight from the pan
Use correct calibration weight
environment
Page 11

EN-9Catapult 1000 Series Scales
5.3 Service Information
If the troubleshooting section does not resolve or describe your problem, contact
your authorized Ohaus service agent. For service assistance or technical support in
the United States call toll-free 1-800-526-0659 between 8.00 AM and 5:00 PM
EST. An Ohaus product service specialist will be available to provide assistance.
Outside the USA, please visit our web site,
www.ohaus.com to locate the Ohaus
office nearest you.
6. TECHNICAL DATA
The technical data is valid under the following ambient conditions:
Ambient temperature: 5°C to 40°C / 41° to 104° F
Relative humidity: 10% to 80% relative humidity, non-condensing
6.1 Specifications
TABLE 6-1. SPECIFICATIONS.
Model C11P9 C11P20 C11P75
Capacity x Readability
Weighing Units kg, lb
Modes Simple Weighing, Dynamic Weighing
Keypad 2-button mechanical keys
Calibration Weights 9 kg / 20 lb 20 kg / 40 lb 50 kg / 100 lb
Display 4-digit 7-segment, 20mm / 0.8 in characters
Display Indicators Stability, weighing unit, dynamic weighing, battery status
Tare range To capacity by subtraction
Stabilization Time
Maximum Overload 150%
Operating temperature/humidity
range
Power Requirements
Auto Shut-Off 4 minutes no activity (battery operation only)
Typical Battery life 300 hours
Scale Dimensions (mm / in) 316 x 316 x 60/ 12.4 x 12.4 x 2.36
9 kg x 0.005 kg
20 lb x 0.01 lb
5° to 40°C / 41° to 104°F at 10% to 80% relative humidity,
9-12 VDC 100mA AC Adapter (supplied)
3 “C” Alkaline or rechargeable batteries (LR14) optional
20 kg x 0.01 kg
44 lb x 0.02 lb
≤ 3 seconds
non-condensing
75 kg x 0.05 kg
165 lb x 0.1 lb
Page 12

EN-10 Catapult 1000 Series Scales
6.2. Drawings and Dimensions
Figure 6-1. Catapult 1000 Series Overall Dimensions.
Page 13

EN-11Catapult 1000 Series Scales
6.3. Compliance
Compliance to the following standards is indicated by the corresponding mark on the product
Mark Standard
This product conforms to the EMC directive 2004/108/EC and the
Low Voltage Directive 2006/95/EC. The complete declaration of
Conformity is available from Ohaus Corporation
AS/NZS4251.1 Emission; AS/NZS4252.1 Immunity
Disposal
In conformance with the European Directive 2002/96 EC on Waste Electrical
and Electronic Equipment (WEEE) this device may not be disposed of in
domestic waste. This also applies to countries outside the EU, per their
specific requirements.
.
Please dispose of this product in accordance with local regulations at the
collecting point specified for electrical and electronic equipment.
If you have any questions, please contact the responsible authority or the
distributor from which you purchased this device.
Should this device be passed on to other parties (for private or professional
use), the content of this regulation must also be related.
Thank you for your contribution to environmental protection.
Page 14

EN-12 Catapult 1000 Series Scales
FCC Note
This equipment has been tested and found to comply with the limits for a Class B digital
device, pursuant to Part 15 of the FCC Rules. These limits are designed to provide reasonable
protection against harmful interference when the equipment is operated in a commercial
environment. This equipment generates, uses, and can radiate radio frequency energy and, if
not installed and used in accordance with the instruction manual, may cause harmful
interference to radio communications. Operation of this equipment in a residential area is
likely to cause harmful interference in which case the user will be required to correct the
interference at his own expense.
Industry Canada Note
This Class B digital apparatus complies with Canadian ICES-003.
ISO 9001 Registration
In 1994, Ohaus Corporation, USA, was awarded a certificate of registration to ISO 9001 by
Bureau Veritus Quality International (BVQI), confirming that the Ohaus quality management
system is compliant with the ISO 9001 standard’s requirements. On May 15, 2003, Ohaus
Corporation, USA, was re-registered to the ISO 9001:2000 standard.
LIMITED WARRANTY
Ohaus products are warranted against defects in materials and workmanship from
the date of delivery through the duration of the warranty period. During the warranty
period Ohaus will repair, or, at its option, replace any component(s) that proves to
be defective at no charge, provided that the product is returned, freight prepaid, to
Ohaus. This warranty does not apply if the product has been damaged by accident
or misuse, exposed to radioactive or corrosive materials, has foreign material
penetrating to the inside of the product, or as a result of service or modification by
other than Ohaus. In lieu of a properly returned warranty registration card, the
warranty period shall begin on the date of shipment to the authorized dealer. No
other express or implied warranty is given by Ohaus Corporation. Ohaus Corporation
shall not be liable for any consequential damages.
As warranty legislation differs from state to state and country to country, please
contact Ohaus or your local Ohaus dealer for further details.
Page 15

ES-1Básculas serie Catapult 1000
1. INTRODUCCIÓN
Este manual contiene instrucciones de instalación, operación y mantenimiento para
las básculas de la serie Catapult 1000. Por favor lea completamente el manual
antes de usar la báscula.
1.1 Precauciones de seguridad
Por favor siga estas precauciones de seguridad:
• Verifique que el voltaje de entrada del adaptador de corriente alterna (CA) coincida con el
voltaje del suministro de eléctrico CA local.
• No sumerja la báscula en agua u otros líquidos.
• No opere la báscula en ambientes hostiles.
• No deje caer objetos en la plataforma.
• No coloque la báscula al revés sobre el plato de pesaje.
• El mantenimiento debe ser realizado solamente por personal autorizado.
• Desconecte la báscula de la fuente de alimentación cuando la esté limpiando.
1.2 Controles
TM
Figura 1-1. Controles.
Page 16

ES-2 Básculas serie Catapult 1000
TABLA 1-1. FUNCIONES DE CONTROL.
Botón
Función primaria
(Pulsación corta)
Función
secundaria
(Pulsación larga)
Enciende la báscula.
Si la báscula está encendida:
Establece cero.
Para simular una función de
Tara.
Apaga la báscula.
ON/ZERO
Off
UNITS (UNIDADES)
Cambia la unidad de peso.
Entra en modo de pasaje
dinámico. Inicia cuenta
descediente en modo de
pasaje dinámico.
Cal
Inicia el proceso de
calibracion.
1.2 Ventana de visualización
1.2.1 Caracteres numéricos grandes de 7 segmentos:
Los valores de peso (masa) son mostrados utilizando cuatro dígitos incluyendo el
signo negativo y los lugares decimales. Los avisos para calibración y condiciones
posibles de error también se muestran utilizando estos dígitos.
1.2.2 Indicación de lectura estable:
En la esquina inferior izquierda de la pantalla aparecerá un * para indicar que la
lectura es estable.
1.2.3 Indicación de unidad de pesaje:
La unidad de pesaje seleccionada aparece en el lado derecho de la pantalla
1.2.4 Indicación de modo de pesaje dinámico:
A • destellará en este modo al lado de la unidad seleccionada.
1.2.5 Indicación de batería baja:
El símbolo de batería en el lado izquierdo de la pantalla indica una condición
de batería baja. Cuando primero están exhibidas, sigue habiendo aproximadamente
12 horas de la operación. Cuando la batería esté totalmente agotada, la báscula
mostrará momentáneamente “Lo bAt” y se apagará.
Page 17

ES-3Básculas serie Catapult 1000
2. INSTALACIÓN
2.1 Contenido del paquete
• Báscula
Adaptador de corriente
•
•
Manual de instrucciones
•
Tarjeta de garantía
2.2 Ubicación
Use la báscula en una superficie firme y segura. Evite lugares con corrientes de aire
excesivas, vibraciones, fuentes de calor o cambios bruscos de temperatura.
2.3 Alimentación
2.3.1 Corriente CA
El adaptador de corriente (incluido) puede usarse para alimentar la báscula cuando
la energía de la batería no esté disponible.
al enchufe de entrada.
energía con conexión a tierra.
Después conecte el adaptador de corriente a una salida de
Conecte el adaptador de corriente alterna
Figura 2-1. Conexión de corriente.
Page 18

ES-4 Básculas serie Catapult 1000
2.3.2 Instalación de la batería (opcional)
Abra la cubierta de baterías que está debajo de la báscula e instale tres baterías
alcalinas o recargables de tamaño "C" (LR14) en el compartimiento. Coloque las
baterías como se muestra en la parte interior del compartimiento. Cierre la cubierta
de baterías.
NOTA: Las baterías no están incluidas
PRECAUCIÓN: no desechar las baterías con la basura del domestic. Siga
los requerimientos de desecho y reciclaje de acuerdo a las leyes y normas
locales.
Figura 2-2. Instalación de baterías.
3. OPERACIÓN
3.1 Apagado y encendido de la báscula
Para encender la báscula, presione el botón ON/ZERO
prueba de pantalla, muestra momentáneamente el modelo y la versión del software,
después entra al modo de pesaje activo.
Para apagar la báscula, presione el botón ON/ZERO
3.2 Función de cero
Presionando el botón ON/ZERO
Cuando se agrega masa adicional, el botón ON/ZERO
repetidamente hasta que se alcance la capacidad total de la báscula. Cuando se
utiliza un recipiente, el botón ON/ZERO
de Tara. Entonces puede adicionarse masa como un peso NETO. Cuando se quiten
Off
, la pantalla de la báscula regresa a cero.
Off
puede utilizarse para simular una función
Off
. La báscula realiza una
Off
hasta que se muestre OFF.
Off
puede utilizarse
Page 19

ES-5Básculas serie Catapult 1000
la muestra y el recipiente de la báscula, puede aparecer un valor negativo. Ponga
en cero la báscula antes de continuar utilizándola.
: El botón ON/ZERO
NOTA
verdadero cuando los valores mostrados estén dentro del
total. Por encima del 2%, la gama es limitada a la capacidad completa por la
substracción.
Off
realizará una función de configuración de cero
+2% de la capacidad
3.3 Cambio de unidades de medida
Presione el botón UNITS
Cal
para mostrar la siguiente unidad de medida disponible.
3.4 Apagado automático
Para aumentar la vida de las baterías, la báscula se apagará automáticamente
después de aproximadamente cuatro minutos de inactividad. Esta característica está
activa únicamente durante la operación con baterías
3.5 Pesaje dinámico
Con la plataforma vacía, presione brevemente el botón
Cal
UNITS
dinámico está activo cuando el indicador • está
parpadeando.
para avanzar por todas las unidades. El modo
Ponga una masa en la plataforma. La báscula mostrará “-A-”.
NOTA: Si está usando un recipiente, presione ON/ZERO
para tarar el peso y regresar al cero.
Con una masa en la plataforma o recipiente, una pulsación
Cal
corta de UNITS
desde 5 segundos.
El peso promediado se muestra a continuación. El indicador •
deja de destellar cuando el proceso se ha completado.
La pantalla se mantendrá hasta que se presione un botón.
Para repetir el proceso presione UNITS
en la plataforma o recipiente.
Para salir, retire la masa de la plataforma o recipiente y
presione UNITS
iniciará el conteo regresivo de promedio
Cal
.
Cal
con una masa
Off
Page 20

ES-6 Básculas serie Catapult 1000
4. CALIBRACIÓN
Para mejores resultados, calibre la báscula a intervalos regulares. (Los pesos de
calibración no se suministran con la báscula.)
PRECAUCIÓN
TENGA MUCHO CUIDADO CUANDO MANIPULE LOS PESOS DE
CALIBRACIÓN, YA QUE SON MUY PESADOS. LOS MÉTODOS
INADECUADOS DE LEVANTAMIENTO O EL MAL USO DE LOS
PESOS DE CALIBRACIÓN PUEDEN RESULTAR EN LESIONES
PERSONALES. PUEDEN UTILIZARSE MÚLTIPLES PESOS PARA
IGUALAR EL PESO DE CALIBRACIÓN REQUERIDO.
NOTA:
•
Asegúrese de tener disponibles las masas de calibración correctas antes de empezar
la calibración (consulte la tabla 4-1).
• Asegúrese de que la báscula esté nivelada y estable durante todo el proceso de
calibración.
• La calibración no está disponible en el modo de pesaje dinámico.
• Permita que la báscula se caliente durante aproximadamente 5 minutos después de
estabilizarse a la temperatura ambiente.
• Para cancelar la calibración, presione UNITS
TABLA 4-1. PESOS DE CALIBRACIÓN.
Modelo Peso de calibración (kg)
C11P9 9 / 20
C11P20 20 / 40
C11P75 50 / 100
4.1 Calibración de rango
La calibración de rango usa dos puntos para ajustar la báscula. El primer punto es
el valor cero donde no hay peso en la báscula. El segundo punto es el valor de
rango donde se coloca una masa de calibración en la báscula.
Para seleccionar la unidad de pesaje a ser utilizada para la
calibración, presione el botón UNITS
muestre en pantalla la unidad correcta.
Presionen sostenido el botón UNITS
en pantalla “CAL”.
Cal
Cal
Cal
, o apague la báscula.
hasta que se
hasta que se muestre
Page 21

ES-7Básculas serie Catapult 1000
Con la plataforma vacía, presione el botón ON/ZERO
capturar el cero de la báscula. La pantalla mostrará “-C-”.
Después de capturar el cero, aparece en pantalla el peso
requerido para el intervalo de calibración en la unidad
seleccionada.
Coloque el peso de calibración sobre la plataforma y
Off
presione el botón ON/ZERO
nuevamente “-C-”.
. La pantalla mostrará
Después de la captura del intervalo, la pantalla volverá al
modo de pesaje normal.
NOTA: El mensaje “CAL E” aparecerá si se aplica un peso de calibración incorrecto.
Repita el procedimiento usando el peso correcto de la calibración.
Off
para
4.2 Bloqueo de la calibración
Utilizando un interruptor interno se puede bloquear la función de calibración
(inhabilitada) y así puede prevenirse una nueva calibración no autorizada.
Con la báscula apagada, remueva la cubierta debajo del indicator desatornillando
los dos tornillos en la parte inferior.
Deslice el interruptor en la PCB (señalado como SW3) a la posición marcada como
“CAL LOCK”.
Reensamble la cubierta.
Si lo requiere, coloque sellos de seguridad contra abertura no autorizada sobre los
hoyos de los tornillos o sobre los bordes de la caja.
Si se necesita una nueva calibración, tendrá que abrir nuevamente la caja y regresar
el interruptor de bloqueo a la posición original.
NOTA: Cuando el interruptor esté colocado en la posición CAL LOCK, el rango de
encendido en cero se reduce al 10% de la capacidad total.
Page 22

ES-8 Básculas serie Catapult 1000
5. MANTENIMIENTO
Precaución: antes de limpiarla, apague la báscula, retire el adaptador de corriente.
5.1 Limpieza
La carcasa puede limpiarse con un paño humedecido con un detergente suave si es
necesario. No use disolventes, productos químicos, alcohol, amoniaco o sustancias
abrasivas para limpiar la carcasa o los paneles de control.
5.2 Solución de problemas
La tabla siguiente muestra problemas comunes, así como sus posibles causas y soluciones.
Si el problema persiste, póngase en contacto con Ohaus o con su distribuidor autorizado.
TABLA 5-1. SOLUCIÓN DE PROBLEMAS.
Síntoma Posible causa Solución
La báscula no
enciende
Exactitud pobre Calibración incorrecta.
No se puede
calibrar
La báscula
muestra Lo bAt
La báscula
muestra “Lo
Line”
La báscula
muestra “E”
La báscula
muestra “CALE”
La báscula
muestra “UnSt”
A la báscula no le llega
corriente
La energía de la batería es
baja
Entorno inestable
El CAL LOCK está en ON
Entorno inestable
Masa de calibración incorrecta
La batería está descargada Conecte a la energía eléctrica o cambie las
Apagado por baja tensión de
línea (adaptador de corriente)
El peso en la bandeja excede
la capacidad
Peso de calibración incorrecto
en la bandeja
La báscula está instable en el
encendido
Verifique las conexiones y el voltaje.
Revise la polaridad de las baterías
Realice una calibración. Mueva la báscula a
una ubicación apropiada.
Establezca el CAL LOCK en OFF (consulte la
sección 4.2) Mueva la báscula a una
ubicación apropiada. Utilice la masa de
calibración correcta
baterías
Revise el voltaje de la fuente
Retire peso de la bandeja
Utilice un peso de calibración correcto
Reubique la báscula en un entorno más estable
Page 23

ES-9Básculas serie Catapult 1000
5.3 Información de servicio
Si la sección de solución de problemas no resuelve o describe su problema, contacte a
su agente de servicio Ohaus autorizado. Para obtener servicio de asistencia o soporte
técnico en los Estados Unidos llame gratis al 1-800-526-0659 entre 8:00 am y 5:00
pm hora del este. Un especialista en servicio de productos Ohaus estará disponible para
proporcionar asistencia. Fuera de los Estados Unidos, por favor visite nuestro sitio web,
www.ohaus.com, para localizar la oficina de Ohaus más cercana a usted.
6. DATOS TÉCNICOS
Los datos técnicos son válidos bajo las siguientes condiciones de ambiente:
Temperatura del ambiente: 5°C a 40°C / 41°F to 104°F
Humedad relativa: 10% a 80% de humedad relativa, no condensante
6.1 Especificaciones
TABLA 6-1. ESPECIFICACIONES.
Modelo C11P9 C11P20 C11P75
Capacidad x Sensibilidad
Unidades de peso kg, lb
Modos Pesaje simple, Pesaje dinámico
Teclado Teclas mecánicas de 2 botones
Pesos de calibración 9 kg / 20 lb 20 kg / 40 lb 50 kg / 100 lb
Pantalla 4 dígitos, LCD, alto de 0.8”/20 mm
Indicadores en pantalla
Rango de tara A capacidad por sustracción
Tiempo de estabilización
Sobrecarga máxima 150%
Rango de temperatura / humedad
operativa
Requerimientos de energía
Apagado automático 4 minutos sin actividad (sólo con operación con baterías)
Duración típica de la batería 300 horas
Dimensiones de la báscula (mm / in) 316 x 316 x 60/ 12.4 x 12.4 x 2.36
9 kg x 0.005 kg
20 lb x 0.01 lb
Estabilidad, pesando la unidad, el pesar dinámico, estado de la
41° a 104° F / 5° a 40° C a una humedad relativa del 10% al
Adaptador CA 9-12 VDC 0,1A (suministrado)
3 baterías alcalinas “C” (LR14) o baterías recargables
20 kg x 0.01 kg
44 lb x 0.02 lb
batería
≤ 3 segundos
80% sin condensación
75 kg x 0.05 kg
165 lb x 0.1 lb
Page 24

ES-10 Básculas serie Catapult 1000
6.2. Dibujos y dimensiones
Figura 6-1. Dimensiones generales de la serie Catapult 1000.
Page 25

ES-11Básculas serie Catapult 1000
6.3. Conformidad
La conformidad a los estándares siguientes es indicada por la marca correspondiente en el
producto
Marqca Estándar
Este producto se conforma con el EMC 2004/108/EC directivo y la baja
tensión 2006/95/EC directivo. El declaración completo de la conformidad
está disponible de Ohaus Corporation
AS/NZS4251.1 Emission; AS/NZS4252.1 Immunity
Eliminación de residuos
De conformidad con las exigencias de la directiva europea 2002/96 CE
sobre residuos de aparatos eléctricos y electrónicos (RAEE), este equipo
no puede eliminarse como basura doméstica. Esta prohibición es
asimismo válida para los países que no pertenecen a la UE cuyas
normativas nacionales en vigor así lo reflejan.
Elimine este producto, según las disposiciones locales, mediante el
sistema de recogida selectiva de aparatos eléctricos y electrónicos.
Si tiene alguna pregunta al respecto, diríjase a las autoridades
responsables o al distribuidor que le proporcionó el equipo.
Si transfiere este equipo (por ejemplo, para la continuación de su uso con
fines privados, comerciales o industriales), deberá transferir con él esta
disposición.
Muchas gracias por su contribución a la conservación medioambiental.
Page 26

ES-12 Básculas serie Catapult 1000
Registro ISO 9001
En 1994, Bureau Veritus Quality International (BVQI) le otorgó a Ohaus Corporation, EE.UU.,
un certificado de registro ISO 9001 el cual confirma que el sistema administrativo de calidad
de Ohaus cumple con los requerimientos del estándar ISO 9001. En mayo 15 del 2003,
Ohaus Corporation, EE.UU., fue registrada nuevamente al estándar ISO 9001:2000.
GARANTÍA LIMITADA
Los productos de Ohaus están garantizados contra defectos de materiales y
fabricación desde la fecha de entrega y durante el tiempo que dure la garantía.
Durante el periodo de garantía Ohaus reparará, o, a su discreción, reemplazará
cualquier componente(s) que se compruebe que está defectuoso, sin costo alguno,
con la condición de que el producto sea devuelto, flete pagado, a Ohaus.
Esta garantía no es válida si el producto ha sufrido daños por accidente o mal uso,
expuesto a materiales radioactivos o corrosivos, presenta materiales extraños
penetrando al interior del producto, o si ha sido objeto de modificaciones por parte
de personas que no sean de Ohaus. En lugar de una tarjeta de registro de garantía
devuelta debidamente, el periodo de garantía comenzará en la fecha de envío al
distribuidor autorizado. Ohaus Corporation no otorga ninguna otra garantía expresa
o implícita. Ohaus Corporation no se hace responsable de cualquier daño fortuito.
Puesto que la legislación sobre garantías difiere de un estado a otro así como de un
país a otro, comuníquese con su distribuidor local de Ohaus para mayor
información.
Page 27

FR-1Balances série Catapult 1000
1. INTRODUCTION
Ce guide contient des instructions d'installation, de fonctionnement et d'entretien des
balances Valor de la série 2000. Veuillez lire toutes ces instructions avant
d’utiliser la balance.
TM
1.1 Consignes de sécurité
Prière de respecter ces consignes de sécurité.
• Vérifiez que la tension d'entrée de l’adaptateur CA correspond à l'alimentation CA
locale.
• Ne plongez pas la balance dans l'eau, ni dans d'autres liquides.
• N'utilisez pas la balance dans des environnements hostiles.
• Ne faites pas tomber de charge sur la plate-forme.
• Ne posez pas la balance à l’envers sur la plate-forme.
• L'entretien doit être exécuté exclusivement par un personnel autorisé.
• Déconnectez la balance de l'alimentation électrique pour la nettoyer.
1.2 Commandes
Figure 1-1. Commandes
Page 28

FR-2 Balances série Catapult 1000
TABLEAU 1-1. FONCTIONS DE COMMANDE.
Bouton
Fonction principale
(Appuyez
rapidement)
Fonction
secondaire
(Appuyez longtemps)
Met la balance sous tension.
Si la balance est sous
tension:
Définit le zéro. Simuler une
opération de tare.
Met la balance hors tension.
ON/ZERO
Off
UNITS
Permet de changer l'unité de
pesée. Entre le mode pesage
dynamique.
Lance le compte à rebours en
mode pesage dynamique.
Cal
Lancer le processus du
calibrage.
1.2 Fenêtre d’affichage
1.2.1 Caractères numériques larges à 7 segments
Les valeurs du poids (de la masse) sont indiquées à l’aide de 4 chiffres, y compris
le signe moins et les décimales. Des invites de calibration et les états d’erreur
possibles sont également indiqués à l’aide de ces chiffres.
1.2.2 Indication de lecture stable
Un astérisque * s’affiche en bas à gauche de l’affichage pour indiquer à quel
moment la lecture est stable.
1.2.3 Indication de l’unité de pesage
L’unité de pesage sélectionnée apparaît à droite de l’affichage.
1.2.3 Indication Mode de pesage dynamique
A • clignote près de l'unité sélectionnée pendant ce mode
1.2.3 Indication du niveau bas des piles:
Le symbole d’une pile à gauche de l’écran indique un niveau bas des piles.
Une fois d’abord montrées, approximativement 12 heures d’opération demeurent.
Lorsque les piles sont totalement usées, la balance affiche temporairement « Lo bAt
» (Niveau bas pile) et s’arrête.
Page 29

FR-3Balances série Catapult 1000
2. INSTALLATION
2.1 Contenu de l’emballage
• Échelle
• Adaptateur alimentation
• Manuel d’instructions
• Carte de garantie
2.2 Lieu
Utilisez la balance sur une surface solide et stable. Évitez les emplacements avec
courant d'air, vibrations, sources de chaleur excessifs ou changements de
température brusques.
2.3 Alimentation
2.3.1 Alimentation CA
L’adaptateur CA (inclus) peut être utilisé pour alimenter la balance lorsque les
batteries ne sont pas disponibles. Branchez ensuite l’adaptateur CA dans une prise
correctement mise à la terre.
Figure 2-1. Connexion à l’alimentation.
Page 30

FR-4 Balances série Catapult 1000
2.3.2 Installation des piles (optionnelle)
Ouvrez le couvercle de la pile situé en bas de la balance et installez trois piles
alcalines de taille C (LR14) ou des piles rechargeables dans le compartiment.
Orientez lespiles selon l’illustration à l’intérieur du compartiment. Fermez le
couvercle des piles.
ATTENTION: Ne pas éliminer les batteries usées dans une perte de domestique.
Respecter les conditions d’élimination ou de recyclage conformément aux lois et
règlements locaux en vigueur.
REMARQUE: Les piles ne sont pas incluses.
Figure 2-2. Installation des piles.
3. FONCTIONNEMENT
3.1 Activation/désactivation de la balance
Pour mettre la balance sous tension, appuyez sur le bouton ON/ZERO
effectue un test de l'affichage, indiquant pendant quelques instants le modèle/la version
du logiciel et passe ensuite en mode de pesée actif. Pour mettre la balance hors tension,
appuyez sur le bouton
OFF s'affiche.
ON/ZERO
Off
et maintenez-le enfoncé jusqu'à ce que l'option
3.2 Fonction du zero
Appuyez sur le bouton ON/ZERO
Lorsque vous ajoutez une masse supplémentaire, appuyez plusieurs fois sur le bouton
Off
ON/ZERO
utilisez un conteneur, appuyez sur le bouton
jusqu’à ce que la capacité totale de la balance soit atteinte. Lorsque vous
Off
pour remettre l’affichage de la balance à zéro.
ON/ZERO
Off
pour simuler la fonction Tare.
Off
. La balance
Page 31

FR-5Balances série Catapult 1000
Vous pouvez ensuite ajouter une masse additionnelle comme poids NET. Lorsque vous
enlevez l’échantillon et le conteneur de la balance, une valeur négative peut s’afficher.
Remettez la balance à zéro avant toute utilisation.
REMARQUE
à zéro lorsque les valeurs affichées sont dans les
dessus de 2%, la gamme est limitée à la pleine capacité par soustraction.
: Le bouton ON/ZERO
Off
permet d’effectuer une véritable fonction de remise
+2 % de la capacité totale. Au-
3.3 Changement d'unités de mesure
Appuyez sur le bouton UNITS
Cal
pour afficher la prochaine unité de mesure disponible.
3.4 Arrêt automatique
Pour prolonger la vie de la pile, la balance s’arrête automatiquement après quatre
minutes d’inactivité. Cette fonction est uniquement active pendant le fonctionnement sur
pile.
3.5 Pesage dynamique
Lorsque la plate-forme est vide, appuyez rapidement sur le
bouton
UNITS
Cal
pour faire défiler les unités. Le mode
Dynamique est activé lorsque l’indicateur • clignote.
Placez une masse sur la plate-forme. La balance affiche
« -A- ». REMARQUE:
ON/ZERO
sur
Avec une masse sur la plate-forme ou le conteneur,
appuyez rapidement sur UNITS
rebours de la moyenne dans les 5 secondes.
Le poids moyen s'affiche. Le symbole • cesse de clignoter
lorsque le processus est terminé.
L'affichage est conservé jusqu'à ce que vous appuyiuez sur
le bouton.
Pour répéter le processus, appuyez sur UNITS
masse sur la plate-forme ou le conteneur. Pour quitter,
enlevez la masse de la plate-forme ou le conteneur et
appuyez sur UNITS
Off
Si vous utilisez un conteneur, appuyez
pour tarer le poids et revenir à zéro.
Cal
pour lancer le compte à
Cal
avec une
Cal
.
Page 32

FR-6 Balances série Catapult 1000
4. CALIBRAGE
Pour obtenir les meilleurs résultats, calibrez la balance à des intervalles réguliers.
(Les poids de calibrage ne sont pas fournis avec la balance).
ATTENTION
MANIPULER LES POIDS DE CALIBRAGE AVEC SOIN. CES POIDS
SONT EFFECTIVEMENT TRÈS LOURDS. TOUTE MÉTHODE DE LEVAGE
INCORRECTE OU TOUTE UTILISATION INAPPROPRIÉE
DES POIDS DE CALIBRAGE PEUT ENTRAÎNER DES BLESSURES.
PLUSIEURS POIDS PEUVENT ÊTRE UTILISÉS POUR OBTENIR LE
POIDS DE CALIBRAGE REQUIS.
REMARQUE:
• Vous devez disposer des poids de calibrage appropriés avant de procéder au
calibrage (voir le Tableau 4-1).
• Assurez-vous que la balance est à niveau et qu'elle est stable pendant tout le
processus du calibrage.
• Le calibrage n'est pas disponible en mode de pesage dynamique.
• Attendez que la balance se soit réchauffée pendant 5 minutes après la stabilisation à
la température ambiante.
UNITS
Cal
• Pour annuler le calibrage, appuyez sur
TABLEAU 4-1. POIDS DU CALIBRAGE.
Modèle Poids du Calibrage (kg/lb)
C11P9 9 / 20
C11P20 20 / 40
C11P75 50 / 100
4.1 Calibrage de portée
Le calibrage de la portée se base sur deux points permettant de régler la balance. Le
premier point est la valeur de zéro lorsqu'il n'y a pas de poids sur la balance. Le
deuxième point est la valeur de la portée lorsqu’une masse de calibrage est placée sur la
balance.
Pour sélectionner l’unité de pesage à utiliser pour le
calibrage, appuyez sur le bouton UNITS
que l’unité appropriée s’affiche.
Appuyez sur le bouton UNITS
enfoncé jusqu’à ce que le message CAL s’affiche.
Cal
Cal
que vous maintenez
, ou mettez la balance hors tension.
jusqu’à ce
Page 33

FR-7Balances série Catapult 1000
Lorsque la plate-forme est vide, appuyez sur le bouton
Off
ON/ZERO
L’affichage indique « -C- ».
Après avoir capturé le zéro, le poids de calibrage de la
portée requise s’affiche dans l’unité sélectionnée.
pour capturer le zéro de la balance.
Placez le poids de calibrage sur la plate-forme et
Off
appuyez ensuite sur ON/ZERO
nouveau « -C- ».
. L’affichage indique à
Après la capture de la portée, l’affichage revient au mode
de pesage normal.
REMARQUE: Le message « CAL E » s’affiche si un poids de calibrage incorrect a été
appliqué. Répétez le procédé en utilisant le poids correct de calibrage.
4.2 Verrouillage du calibrage
Vous pouvez verrouiller la fonction de calibrage (la désactiver) à l’aide de
l’interrupteur interne pour empêcher tout recalibrage non autorisé.
Une fois la balance hors tension, enlevez le couverture sous l’indicateur en dévissant
les deux vis en bas.
Placez l’interrupteur sur le PCB (marqué SW3) en position CAL LOCK.
Réassemblez le couverture.
Si besoin, placez des étiquettes inviolables sur les trous des vis ou sur les bords du
couverture.
Si un recalibrage ultérieur est requis, le boîtier doit être rouvert et l’interrupteur de
verrouillage remis en position initiale.
REMARQUE: Lorsque l’interrupteur de verrouillage est en position CAL LOCK, la plage
de zéro de la mise sous tension est réduite à 10 % de la capacité totale.
Page 34

FR-8 Balances série Catapult 1000
5. MAINTENANCE
Attention: avant de procéder au nettoyage, mettre la balance hors tension, enlever
l'adaptateur CA.
5.1 Nettoyage
Vous pouvez nettoyer le boîtier avec un chiffon humide et un détergent doux, si nécessaire.
N’utilisez pas de dissolvants, produits chimiques, alcool, amoniaque ou produits abrasifs
pour nettoyer le boîtier ou les panneaux de commande.
5.2 Dépannage
Le tableau suivant présente les problèmes communs, les causes possibles et les solutions. Si
le problème persiste, contactez Ohaus ou votre revendeur Ohaus agréé.
TABLEAU 5-1. DÉPANNAGE.
Symptôme Cause(s) possible(s) Solution
La balance ne se met pas
en marche
Précision de qualité
médiocre
Impossible de calibrer CAL LOCK défini sur ON
La balance affiche Lo bAt La batterie est déchargée Connecter l'alimentation ou changez
La balance affiche “Lo
Line”
La balance affiche “E” Le poids sur la plate-forme
La balance affiche “CALE” Poids de calibrage incorrect sur
La balance affiche “UnSt” Balance instable à la mise
La balance n’est pas alimentée
La batterie est vide.
Calibrage incorrect
Environnement instable
Environnement instable
Masse de calibrage incorrecte
Low Line voltage Vérifier la tension source
dépasse la capacité
la plate-forme
sous tension.
Vérifier la connexion et la tension.
Vérfier la polarité de la pile
Effectuer le calibrage • Déplacer la
balance vers un emplacement
approprié
Définir le CAL LOCK sur OFF (voir la
Section 4.2). Placer la balance dans
un environnement stable. Utiliser la
masse de calibrage appropriée
les piles
Enlever le poids de la plate-forme
Utiliser la masse de calibrage
appropriée
Placer la balance dans un
environnement plus stable
Page 35

FR-9Balances série Catapult 1000
6.3 Informations sur le service
Si la section de dépannage ne vous aide pas à résoudre votre problème ou ne le décrit pas,
contactez un technicien agréé Ohaus. Pour toute assistance relative au service ou tout support
technique, appelez le 1-800-526-0659 aux États-Unis entre 8h00 et 17h00 (heure de New
York). Un spécialiste des produits Ohaus se tient à votre disposition pour répondre à vos
questions. En dehors des États-Unis, visitez le site Web à l’adresse suivante :
www.ohaus.com pour localiser le bureau Ohaus le plus près de chez vous.
6. DONNÉES TECHNIQUES
Les données techniques sont valides dans les conditions ambiantes suivantes.
Température ambiante : 5 °C à 40 °C / 41° to 104° F
Humidité relative : 10 % à 80 % d'humidité relative, non condensée
6.1 Spécifications
TABLEAU 6-1.SPÉCIFICATIONS.
Modèle C11P9 C11P20 C11P75
Capacité x Précision
Unités de pesage kg, lb
Modes Pesage simple, Pesage dynamique
Clavier 2 touches mécaniques tactiles
Poids de calibrage 9 kg / 20 lb 20 kg / 40 lb 50 kg / 100 lb
Affichage 4 chiffres, LCD, 0,8 po./20 mm de hauteur
Indicateurs de l’écran Stabilité, pesant l'unité, peser dynamique, statut de batterie
Plage de zéro À la capacité par soustraction.
Temps de stabilisation
Surcharge maximum 150%
Plage de la temperature /
d’humidité de fonctionnement
Alimentation
Arrêt automatique
Vie utile type de la batterie 300 heures
Dimensions de la balance (mm /
in)
9 kg x 0.005 kg
20 lb x 0.01 lb
5° à 40°C / 41° to 104°F d’humidité relative 10 % à 80%,
Adaptateur CA, 9-12 VCC, 100mA (fourni)
3 piles alcalines C (LR14) ou batteries rechargeables (optional)
4 minutes sans activité (fonctionnement
316 x 316 x 60/ 12.4 x 12.4 x 2.36
20 kg x 0.01 kg
44 lb x 0.02 lb
≤ 3 secondes
sans condensation
sur pile uniquement)
75 kg x 0.05 kg
165 lb x 0.1 lb
Page 36

FR-10 Balances série Catapult 1000
6.2 Schémas et dimensions
Figure 6-1. Dimensions hors-tout de Catapult série 1000
Page 37

FR-11Balances série Catapult 1000
6.3 Conformité
La conformité aux normes suivantes est indiquée par la marque correspondante sur le produit
Mark Standard
Ce produit se conforme à l'EMC 2004/108/EC directif et la basse tension
2006/95/EC directif. La déclaration complète de la conformité est fournie
par Ohaus Corporation.
AS/NZS4251.1 Emission; AS/NZS4252.1 Immunity
Elimination
En conformité avec les exigences de la directive européenne 2002/96 CE
relative aux déchets d‘équipements électriques et électroniques (DEEE), cet
appareil ne doit pas être éliminé avec les déchets ménagers. Logiquement,
ceci est aussi valable pour les pays en dehors de l’UE conformément aux
règlementations nationales en vigueur.
Veuillez éliminer cet appareil conformément aux prescriptions locales dans
un conteneur séparé pour appareils électriques et électroniques.
Pour toute question, adressez-vous aux autorités compétentes ou au
revendeur chez qui vous avez acheté cet appareil.
En cas de remise de cet appareil (p. ex. pour une utilisation privée ou
artisanale/industrielle), cette prescription doit être transmise en substance.
Merci pour votre contribution à la protection de l’environnement.
Page 38

FR-12 Balances série Catapult 1000
Remarque d’Industrie Canada
Cet appareil numérique de la classe B est conforme à la norme NMB-003 du Canada.
Enregistrement ISO 9001
En 1994, le Bureau Veritus Quality International (BVQI) a octroyé la certification
d’enregistrement ISO 9001 à Ohaus Corporation, États-Unis d’Amérique, confirmant que le
système de gestion de la qualité Ohaus était conforme aux conditions normalisées de l’ISO
9001. Le 15 mai 2003, Ohaus Corporation, États-Unis d’Amérique, a été ré-enregistrée à la
norme ISO 9001:2000
GARANTIE LIMITÉE
Ohaus garantit que ses produits sont exempts de défauts matériels et de fabrication
à compter de la date de livraison pendant toute la durée de la garantie. Selon les
termes de cette garantie, Ohaus s’engage, sans frais de votre part, à réparer ou,
selon son choix, remplacer toutes les pièces déterminées défectueuses, sous réserve
que le produit soit retourné, frais payés d’avance, à Ohaus.
Cette garantie n’entre pas en vigueur si le produit a subi des dommages suite à un
accident ou une utilisation erronée, a été exposé à des matériaux radioactifs ou
corrosifs, contient des matériaux étrangers ayant pénétré à l’intérieur ou suite à un
service ou une modification apportée par des techniciens autres que ceux d’Ohaus.
En l’absence d’une carte d’enregistrement de garantie dûment remplie, la période de
garantie commence à la date de l’expédition au revendeur agréé. Aucune autre
garantie expresse ou implicite n’est offerte par Ohaus
Corporation. En aucun cas, Ohaus Corporation ne peut être tenu responsable des
dommages indirects.
Dans la mesure où les lois régissant les garanties varient d’un État à l’autre et d’un
pays à l’autre, veuillez contacter Ohaus ou votre représentant local agréé Ohaus
pour de plus amples informations.
Page 39

DE-1Tischwaage der Catapult 1000-Serie
1. EINLEITUNG
Dieses Handbuch enthält Anweisungen zur Installation, zum Betrieb und zur
Wartung der Waagen der Valor 2000-Serie. Bitte lesen Sie das Handbuch ganz
durch, bevor Sie die Waage in Betrieb nehmen.
1.1 Sicherheitsvorkehrungen
Bitte beachten Sie die folgenden Sicherheitsmaßnahmen:
• Stellen Sie sicher, dass die Eingangsspannung des Netzadapters der örtlichen
Netzspannung entspricht.
• Die Waage nicht in Wasser oder sonstige Flüssigkeiten eintauchen.
• Die Waage nicht unter widrigen Umgebungsbedingungen betreiben.
• Keine Lasten auf die Plattform fallen lassen.
• Die Waage nicht kopfüber auf die Schale stellen.
• Reparaturen sollten nur von dazu befugtem Personal durchgeführt werden.
• Während der Reinigung muss die Waage vom Netzteil abgetrennt werden.
1.2 Bedienelemente
TM
Abbildung 1-1. Bedienelemente.
Page 40

DE-2 Tischwaage der Catapult 1000-Serie
TABELLE 1-1. BEDIENELEMENTFUNKTIONEN.
Taste
Primäre Funktion
(Kurzes
Drücken)
Sekundäre
Funktion
(Langes Drücken)
Schaltet die Waage EIN.
Bei eingeschalteter Waage:
Stellt die Waage auf Null. Zum
Simulieren der Tarafunktion.
Schaltet die Waage aus.
ON/ZERO
Off
UNITS
Ändert die Wägeeinheit.
Dynamisches Wägen Modus
vorwählen. Es beginnt den
Countdown im Dynamisches
Wägen Modus.
Cal
Beginnt Kalibrierung Prozeß.
1.2 Anzeigefenster
1.2.1 Große numerische Zeichen mit 7 Segmenten:
Die Gewichtswerte werden mithilfe von 4 Ziffern einschließlich Minuszeichen und
Dezimalstellen angezeigt. Außerdem werden mit diesen Ziffern
Eingabeaufforderungen für die Kalibrierung und mögliche Fehlerzustände angezeigt.
1.2.2 Stabile Messwertanzeige:
In der unteren linken Ecke der Anzeige erscheint ein * und zeigt an, wann ein
Messwert stabil ist.
1.2.3 Gewichtseinheitsanzeige:
Die gewählte Gewichtseinheit erscheint auf der rechten Seite der Anzeige.
1.2.4 Anzeige des dynamischen Wägemodus:
Während dieses Modus blinkt ein • neben der ausgewählten Einheit.
1.2.5 Niedrige Batterieanzeige:
Das Batteriesymbol auf der linken Seite der Anzeige zeigt einen niedrigen
Batteriezustand an. Wenn sie zuerst angezeigt werden, bleiben ungefähr 12 Stunden
des Betriebes. Wenn die Batterie ganz leer ist, wird auf der Waage kurz die Meldung „Lo
bAt“ (Niedriger Batteriestand) eingeblendet, und die Waage schaltet sich aus.
Page 41

DE-3Tischwaage der Catapult 1000-Serie
2. INSTALLATION
2.1 Paketinhalt
• Waage
•
Stromadapter
•
Bedienungsanleitung
•
Garantiekarte
2.2 Standort
Verwenden Sie die Waage auf einer festen, stabilen Oberfläche. Vermeiden Sie
Standorte mit zu starken Luftströmungen, Vibrationen, Wärmequellen oder schnellen
Temperaturschwankungen.
2.3 Strom
2.3.1 Wechselstrom
Der Netzadapter (im Lieferumfang enthalten) kann zum Betreiben der Waage
verwendet werden, wenn kein Batteriestrom zur Verfügung steht. Schließen Sie den
Netzadapterstecker an die Eingangsbuchse an. Stecken Sie den Netzadapter dann in
eine ordnungsgemäße Steckdose ein.
Abbildung 2-1. Stromanschluss.
Page 42

DE-4 Tischwaage der Catapult 1000-Serie
2.3.2 Installation der Batterien (optional)
Öffnen Sie die Batterieabdeckung auf der Unterseite der Waage und legen Sie drei
Alkalibatterien der Größe „C“ (LR14) oder wieder aufladbare Batterien in das Fach ein.
Richten Sie die Batterien so wie auf der Innenseite des Fachs gezeigt aus. Schließen Sie
die Batterieabdeckung.
HINWEIS: Batterien sind nicht im Lieferumfang enthalten.
Abbildung 2-2. Einlegen der Batterien.
VORSICHT: Entledigen Sie sich nicht benutzte Batterien in der
Hausangestelltvergeudung. Folgen Sie der korrekten Beseitigung oder
Wiederverwertung Anforderungen in Übereinstimmung mit lokalen
Gesetzen und Regelungen.
3. BETRIEB
3.1 Waage ein-/ausschalten
Um die Waage einzuschalten, drücken Sie die Taste ON/ZERO
einen Anzeigetest aus, zeigt kurz die Modell-/Softwareversion an und ruft dann den
aktiven Wägemodus auf. Zum Ausschalten der Waage wird die Taste ON/ZERO
gedrückt, bis OFF (Aus) erscheint.
3.2 Nullfunktion
Durch das Drücken auf ON/ZERO
Hinzufügen von zusätzlichen Gewichten kann die Taste
verwendet werden, bis die volle Kapazität der Waage erreicht ist. Wenn ein Behälter
verwendet wird, kann die Taste ON/ZERO
verwendet werden. Zusätzliche Gewichte können dann als NET (Netto) -Gewicht
hinzugefügt werden. Wenn sowohl die Probe als auch der Behälter von der Waage
Off
kehrt die Waagenanzeige auf Null zurück. Beim
ON/ZERO
Off
zum Simulieren der Tarafunktion
Off
. Die Waage führt
Off
wiederholt
Off
Page 43

DE-5Tischwaage der Catapult 1000-Serie
abgenommen werden, wird eventuell ein negativer Wert angezeigt. Stellen Sie die Waage
vor einer erneuten Verwendung wieder auf Null
HINWEIS: Die Taste ON/ZERO
Anzeigewerte innerhalb von +2 % der vollen Kapazität liegen. Über 2% wird die
Strecke auf die volle Kapazität durch Abzug begrenzt.
Off
führt eine echte Nulleinstellungsfunktion aus, wenn
3.3 Maßeinheiten ändern
Die Taste UNITS
Cal
drücken, um die nächste verfügbare Maßeinheit anzuzeigen
3.4 Automatisches Ausschalten
Zum Verlängern der Lebensdauer der Batterien schaltet sich die Waage nach ca. vier
Minuten ohne Aktivität automatisch aus. Diese Funktion ist nur im Batteriebetrieb aktiv.
3.5 Dynamisches Wägen
Drücken Sie bei geleerter Plattform kurz auf die Taste UNITS
Cal
, um die Einheiten zu durchlaufen. Der dynamische Modus
ist aktiv, wenn der Indikator • blinkt.
Legen Sie ein Gewicht auf die Plattform. Auf der Anzeige
erscheint „-A-“.
HINWEIS:Drücken SIe bei Verwendung eines Behälters auf
Off
ON/ZERO
zurückzukehren.
Während sich ein Gewicht auf der Plattform bzw. im Behälter
befindet, wird durch kurzes Drücken auf
Countdown von 5 Sekunden für die Mittelung gestartet
Dann wird das gemittelte Gewicht angezeigt. Der Indikator •
hört zu blinken auf, wenn der Vorgang abgeschlossen ist.
Die Wert wird so lange angezeigt, bis eine Taste gedrückt wird.
Zum Wiederholen des Vorgangs drücken Sie auf UNITS
während sich ein Gewicht auf der Plattform oder im Behälter
befindet.
Zum Beenden nehmen Sie das Gewicht von der Plattform oder
aus dem Behälter und drücken
, um das Gewicht zu tarieren und zu Null
UNITS
UNITS
Cal
.
Cal
ein
.
Cal
,
Page 44

DE-6 Tischwaage der Catapult 1000-Serie
4. KALIBRIERUNG
Zur Erzielung der besten Ergebnisse muss die Waage in regelmäßigen Abständen
kalibriert werden. (Es sind keine Kalibriergewichte im Lieferumfang der Waage
enthalten.)
VORSICHT
BEIM UMGANG MIT KALIBRIERGEWICHTEN MUSS EXTREM
VORSICHTIG VORGEGANGEN WERDEN, DA SIE SEHR SCHWER
SIND. FALSCHE HEBEMETHODEN ODER DER MISSBRAUCH
VON KALIBRIERGEWICHTEN KANN ZU VERLETZUNGEN FÜHREN.
UM DAS ERFORDERLICHE KALIBRIERGEWICHT ZU ERREICHEN,
KÖNNEN MEHRERE GEWICHTE VERWENDET WERDEN.
HINWEIS:
• Stellen Sie sicher, dass die richtigen Kalibriergewichte zur Verfügung stehen, bevor
Sie mit der Kalibrierung beginnen (siehe Tabelle 4-1).
• Stellen Sie sicher, dass die Waage während des gesamten Kalibrierverfahrens
gerade steht und stabil ist.
• Im dynamischen Wägemodus steht keine Kalibrierung zur Verfügung.
• Warten Sie nach dem Stabilisieren ca. 5 Minuten lang, damit sich die Waage
auf Zimmertemperatur erwärmen kann.
• Schalten Sie die Waage aus oder drücken UNITS
abzubrechen.
TABELLE 4-1. KALIBRIERGEWICHTE.
Model Kalibriergewichte (kg/lb)
C11P9 9 / 20
C11P20 20 / 40
C11P75 50 / 100
4.1 Messspannenkalibrierung
Die Messspannenkalibrierung verwendet zwei Punkte zum Einstellen der Waage.
Der erste Punkt ist der Nullwert, wobei sich auf der Waage kein Gewicht befindet.
Der zweite Punkt ist der Messspannenwert, wobei ein Kalibriergewicht auf die Waage
gelegt wird.
Zur Auswahl der für die Kalibrierung zu verwendenden
Wägeeinheit drücken Sie die Taste UNITS
Einheit angezeigt wird.
Drücken und halten Sie die Taste UNITS
„CAL“ eingeblendet wird .
Cal
Cal
gedrückt, bis
Cal
, um die Kalibrierung
, bis die richtige
Page 45

DE-7Tischwaage der Catapult 1000-Serie
Drücken Sie die Taste ON/ZERO
Waagennullwert zu erfassen. Auf der Anzeige erscheint „-C-“.
Nach Erfassung der Null wird das erforderliche MessspannenKalibriergewicht in der ausgewählten Einheit angezeigt.
Legen Sie das Kalibriergewicht auf die Plattform und drücken
Sie die Taste ON/ZERO
C-“.
Nach der Messspannenerfassung kehrt die Anzeige zum
normalen Wägemodus zurück.
HINWEIS:
aufgelegt wurde. Wiederholen Sie das Verfahren mit dem korrekten Kalibrierung Gewicht.
Die Meldung „CAL E“ wird eingeblendet, wenn ein falsches Kalibriergewicht
Off
Off
bei leerer Plattform, um den
. Auf der Anzeige erscheint erneut „-
4.2 Kalibrierungsverriegelung
Die Kalibrierfunktion kann mithilfe eines internen Schalter verriegelt (deaktiviert)
werden, sodass eine unbefugte Kalibrierung verhindert wird
Bauen Sie bei ausgeschalteter Waage den Teil des Indikatorkappe aus, indem Sie
die zwei Schrauben an der Unterseite herausschrauben.
Schieben Sie den Schalter auf der Platine (mit der Markierung SW3) in die Position
mit der Markierung „CAL LOCK“.
Bauen Sie das Gehäuse wieder zusammen.
Kleben Sie nach Bedarf manipulationssichere Etiketten über die Schraubenlöcher
oder die Gehäusekanten
Wenn später eine erneute Kalibrierung erforderlich ist, muss das Gehäuse wieder
geöffnet und der Sperrschalter muss wieder in die ursprüngliche Position gebracht
werden
HINWEIS: Wird der Sperrschalter in die Position CAL LOCK gestellt, dann wird der
Nullbereich beim Einschalten auf 10 % der vollen Kapazität reduziert.
Page 46

DE-8 Tischwaage der Catapult 1000-Serie
5. WARTUNG
Vorsicht: Vor dem Reinigen die Waage ausschalten, und den Netzadapter entfernen.
5.1 Reinigen
Das Gehäuse kann gegebenenfalls mit einem Tuch, das mit einem milden Reinigungsmittel
angefeuchtet wurde, gereinigt werden. Zur Reinigung des Gehäuses bzw. der Bedienfelder
dürfen keine Lösungsmittel, Chemikalien, scheuernden Materialien, kein Ammoniak bzw. kein
Alkohol verwendet werden.
5.2 Fehlersuche
In der folgenden Tabelle sind häufig vorkommende Probleme, ihre möglichen Ursachen und
Abhilfemaßnahmen aufgeführt. Falls das Problem weiterhin auftritt, wenden Sie sich an
Ohaus oder Ihren Vertragshändler.
TABELLE 5-1. FEHLERSUCHE.
Symptom Mögliche Ursache(n) Abhilfemaßnahme
Die Waage schaltet
sich nicht ein.
Schlechte
Genauigkeit
Gerät kann nicht
kalibriert werden.
Auf der Waage wird
„Lo bAt“ angezeigt.
Auf der Waage wird
„Lo Line” angezeigt.
Auf der Waage wird
„E” angezeigt.
Auf der Waage wird
„CALE” angezeigt.
Auf der Waage wird
„UnSt” angezeigt.
Keine Stromzufuhr zur Waage
Der Batteriestrom ist verbraucht.
Falsche Kalibrierung. Instabile
Umgebung
Das CAL LOCK ist eingeschaltet
Instabile Umgebung
Falsche Kalibriergewichte
Batterie ist leer. An das Stromnetz anschließen oder
Niedriger Leitungsspannung
(Netzadapter)
Gewicht auf Schale überschreitet
Kapazität.
Falsches Kalibriergewicht auf der
Schale
Waage ist beim Einschalten
instabil.
Anschlüsse und Spannung
überprüfen.
Polarität der Batterie überprüfen.
Kalibrierung durchführen. Waage an
geeigneten Standort bringen
CAL LOCK ausschalten (siehe
Abschnitt 4.2).
Waage an einen geeigneten Standort
verlegen. Korrektes Kalibriergewicht
verwenden
die Batterien auswechseln.
Die Spannung der Stromquelle
überprüfen.
Gewicht von der Schale abnehmen.
Korrektes Kalibriergewicht
verwenden.
Waage in einer stabileren Umgebung
aufstellen.
Page 47

DE-9Tischwaage der Catapult 1000-Serie
5.3 Wartungsinformationen
Wenn Ihr Problem im Abschnitt „Fehlersuche“ nicht gelöst oder beschrieben wird, wenden Sie
sich an Ihren zugelassenen Service-Vertreter von Ohaus. Wenn Sie in den Vereinigten Staaten
Hilfe oder technischen Support benötigen, rufen Sie zwischen 8.00 und 17.00 Uhr
amerikanischer Ostküstenzeit bitte die (in den USA) gebührenfreie Nummer 1-800-526-0659
an. Ein Produktservice-Spezialist von Ohaus wird Ihnen dann weiterhelfen. Außerhalb der USA
besuchen Sie unsere Website www.ohaus.com, um die für Sie am nächsten gelegene OhausGeschäftsstelle zu finden.
6. TECHNISCHE DATEN
Die technischen Daten gelten bei folgenden Umgebungsbedingungen:
Umgebungstemperatur: 5 °C bis 40 °C / 41° to 104° F
Relative Feuchte: 10 % bis 80 % relative Feuchtigkeit, nicht kondensierend
6.1 Spezifikationen
TABELLE 6-1. SPEZIFIKATIONEN.
Modell C11P9 C11P20 C11P75
Kapazität x Ablesbarkeit
Wägeeinheiten kg, lb
Modi Einfaches Wägen, dynamisches Wägen
Tastenfeld 2-Tasten, mechanisch
Calibration Weights 9 kg / 20 lb 20 kg / 40 lb 50 kg / 100 lb
Anzeige 4-stellig, LCD, 0,8”/20 mm hoch
Anzeigeindikatoren
Nullbereich Zur Kapazität durch Abzug.
Stabilisierungszeit Innerhalb von 3 Sekunden
Maximale Überlast 150%
Betriebstemperaturbereich / Feuchte
Stromvoraussetzungen
Automatisches Ausschalten 4 Minuten ohne Aktivität (nur Batteriebetrieb)
Typische Batterielebensdauer 300 Stunden
Waagenabmessungen (mm / in) 316 x 316 x 60/ 12.4 x 12.4 x 2.36
9 kg x 0.005 kg
20 lb x 0.01 lb
Stabilität, Maßeinheit, dynamisches Wiegen, Batteriestatus
41 ° bis 104 °F / 5 ° bis 40 °C bei 10 % bis 80 % relativer
9-12 VDC 100mA AC Adapter (supplied)
3 “C” Alkaline or rechargeable batteries (LR14) optional
20 kg x 0.01 kg
44 lb x 0.02 lb
wiegend
Feuchte, nicht kondensierend
75 kg x 0.05 kg
165 lb x 0.1 lb
Page 48

DE-10 Tischwaage der Catapult 1000-Serie
6.2. Drawings and Dimensions
Abbildung 6-1. Gesamtabmessungen der Catapult 1000-Serie.
Page 49

DE-11Tischwaage der Catapult 1000-Serie
6.3. Befolgung
Befolgung zu den folgenden Standards wird durch die entsprechende Markierung auf
dem Produkt angezeigt
Markierung Sie Standard
Dieses Produkt paßt sich an das EMC richtungweisendes 2004/108/EC und die
Niederspannung richtungweisendes 2006/95/EC an. Die komplette Erklärung der
Übereinstimmung ist von Ohaus Corporation vorhanden
AS/NZS4251.1 Emission; AS/NZS4252.1 Immunity
Entsorgung
In Übereinstimmung mit den Anforderungen der Europäischen Richtlinie
2002/96 EG über Elektro- und Elektronik-Altgeräte (WEEE) darf dieses Gerät
nicht mit dem Hausmüll entsorgt werden. Sinngemäss gilt dies auch für
Länder ausserhalb der EU entsprechend den geltenden nationalen
Regelungen.
Bitte entsorgen Sie dieses Produkt gemäss den örtlichen Bestimmungen in
einer getrennten Sammlung für Elektro- und Elektronikgeräte.
Bei allfälligen Fragen wenden Sie sich bitte an die zuständige Behörde oder
den Händler, bei dem Sie dieses Gerät erworben haben.
Bei Weitergabe dieses Gerätes (z.B. für private oder gewerbliche/industrielle
Weiternutzung) ist diese Bestimmung sinngemäss weiterzugeben.
Vielen Dank für Ihren Beitrag zum Schutz der Umwelt.
Page 50

DE-12 Tischwaage der Catapult 1000-Serie
ISO 9001 Registration
In 1994, Ohaus Corporation, USA, was awarded a certificate of registration to ISO 9001 by
Bureau Veritus Quality International (BVQI), confirming that the Ohaus quality management
system is compliant with the ISO 9001 standard’s requirements. On May 15, 2003, Ohaus
Corporation, USA, was re-registered to the ISO 9001:2000 standard.
BESCHRÄNKTE GARANTIE
Auf Ohaus-Produkte wird ab Datum der Auslieferung über die Dauer des
Garantiezeitraums hinweg eine Garantie gegen Material- und Herstellungsmängel
gegeben. Während des Garantiezeitraums wird Ohaus kostenlos jegliche
Komponente(n), die sich als defekt erweist (erweisen), reparieren oder nach
eigenem Ermessen ersetzen, wenn das Produkt bei Vorauszahlung der ersandkosten
an Ohaus zurückgeschickt wird.
Die Garantie gilt nicht, wenn das Produkt durch einen Unfall oder durch Missbrauch
beschädigt wurde, wenn es radioaktiven oder korrodierenden Materialien ausgesetzt
wurde, wenn Fremdkörper das Innere des Produkts durchdrungen haben oder wenn
es auf Grund einer Reparatur oder Modifikation beschädigt wurde, die nicht von
Ohaus durchgeführt wurde. Wenn keine ordnungsgemäß zurückgeschickte
Garantieregistrierungskarte vorliegt, beginnt der Garantiezeitraum am Datum der
Lieferung an den Vertragshändler. Die Ohaus Corporation gibt keine sonstige
ausdrückliche oder stillschweigende Garantie. Die Ohaus Corporation ist nicht für
irgendwelche Folgeschäden haftbar.
Da die Gesetzgebung in Bezug auf Garantien von Bundesstaat zu Bundesstaat und
von Land zu Land unterschiedlich ist, wenden Sie sich bitte an Ohaus oder Ihren
örtlichen Ohaus-Händler, wenn Sie weitere Einzelheiten erfahren wollen.
Page 51

IT-1Bilance serie Catapult 1000
1. INTRODUZIONE
Questo manuale illustra l'installazione, il funzionamento e la manutenzione delle
serie di bilance Catapult 1000. Leggere il manuale completamente, prima di
utilizzare la bilancia.
TM
1.1 Precauzioni di sicurezza
Seguire le precauzioni di sicurezza riportate di seguito:
• Verificare che la tensione d'ingresso dell’adattatore CA corrisponda alla tensione di rete.
• Non immergere la bilancia in acqua o in altri liquidi.
• Non utilizzare la bilancia in ambienti difficili.
• Non lasciar cadere pesi sulla piattaforma.
• Non capovolgere la bilancia con il vassoio rivolto verso il basso.
• La manutenzione deve essere eseguita soltanto da personale autorizzato.
• Prima di effettuare la pulizia della bilancia, scollegare l'alimentazione elettrica.
1.2 Comandi
Figura 1-1. Controlli.
Page 52

IT-2 Bilance serie Catapult 1000
TABLE 1-1. CONTROL FUNCTIONS.
Pulsante
Funzione
principale
(pressione breve)
Funzione
secondaria
(pressione lunga)
Accende la bilancia.
Se la bilancia è accesa:
Imposta lo zero.
Per simulare una funzione di
tara
Spegne la bilancia.
ON/ZERO
Off
UNITS
Modifica l’unità di misura.
Entra nel modo di pesa
dinamica.
Inizia il conto alla rovescia nel
modo di pesa dinamica.
Cal
Inizia il processo di taratura.
1.2 Finestra del display
1.2.1 Caratteri numerici grandi a 7 segmenti:
i valori del peso (massa) vengono visualizzati utilizzando 4 cifre incluso il segno
negativo e le cifre decimali. Anche i prompt per la taratura e possibili condizioni di
errore vengono visualizzati utilizzando queste cifre.
1.2.2 Indicazione di lettura stabile:
per indicare quando la lettura è stabile, viene visualizzato un * nell’angolo in basso
a sinistra del display.
1.2.3 Indicazione di unità di peso:
l’unità di peso selezionata viene visualizzata sul lato destro del display.
1.2.3 Indicazione modalità Pesa dinamica:
In questa modalità lampeggia un • accanto all’unità di misura selezionata.
1.2.3 Indicatore di batteria in esaurimento:
il simbolo della batteria sul lato sinistro del display indica una condizione di
batteria in esaurimento. Una volta in primo luogo visualizzate, circa 12 ore del
funzionamento rimangono. Quando la batteria è completamente scarica, la bilancia
visualizza momentaneamente il messaggio “Lo bAt” (Batteria in esaurimento) e si
spegne.
Page 53

IT-3Bilance serie Catapult 1000
2. INSTALLAZIONE
2.1 Contenuto della confezione
• Bilancia
• Alimentatore di rete
• Manuale di istruzioni
• Scheda di garanzia
2.2 Ubicazione
Utilizzare la bilancia su una superficie solida e ferma. Evitare luoghi con correnti
d'aria, vibrazioni, fonti di calore eccessive o brusche variazioni di temperatura.
2.3 Alimentazione
2.3.1 Alimentazione CA
Quando l'alimentazione a batteria non è disponibile, per avviare la bilancia è
possibile utilizzare l'alimentatore di rete (in dotazione). Collegare la presa
dell’alimentatore di rete allo spinotto di ingresso. Inserire l'alimentatore di rete in una
presa di alimentazione correttamente messa a terra.
Figura 2-1. Collegamento dell’alimentazione.
Page 54

IT-4 Bilance serie Catapult 1000
2.3.2 Installazione della batteria (opzionale)
Aprire il coperchio della batteria nella parte inferiore della bilancia e installare le tre
batterie alcaline "C" (LR14) o le batterie ricaricabili nel compartimento. Orientare le
batterie come illustrato sulla parte interna del compartimento. Chiudere il coperchio della
batteria.
NOTA: le batterie non sono incluse.
Figure 2-2. Installazione delle batterie.
ATTENZIONE: non disfarsi delle batterie usate nei contenitori per la raccolta dei
rifiuti normali. Attenersi ai requisiti di smaltimento riciclaggio corretto in conformità
con le norme e le disposizioni locali.
3. FUNZIONAMENTO
3.1 Accensione/Spegnimento della bilancia
Per accendere la bilancia, premere il pulsante ON/ZERO
del display, che momentaneamente visualizza informazioni sul modello/software e
accede alla modalità di pesa attiva. Per spegnere la bilancia, tenere premuto il pulsante
ON/ZERO
Off
fino a visualizzare OFF.
3.2 Funzione Zero
premendo il pulsante ON/ZERO
ritorna a zero. Quando si aggiunge una massa addizionale, è possibile utilizzare il
Off
pulsante ON/ZERO
piena capacità della bilancia. Quando si utilizza un contenitore, per simulare una
funzione di tara è possibile utilizzare il pulsante ON/ZERO
spento
)
. È possibile aggiungere un’ulteriore massa come peso NETTO. Quando si
rimuovono sia il campione che il contenitore dalla bilancia, potrebbe essere
(Acceso/Zero spento) ripetutamente fino a raggiungere la
Off
(Acceso/Zero spento), il display della bilancia
Off
. La bilancia effettua un test
Off
(Acceso/Zero
Page 55

IT-5Bilance serie Catapult 1000
visualizzato un valore negativo. Prima del successivo uso, azzerare nuovamente la
bilancia.
: il pulsante ON/ZERO
NOTA
impostazione zero quando i valori visualizzati sono entro il +
capacità. Superiore a 2%, la gamma è limitata a capienza completa da sottrazione.
Off
(Acceso/Zero spento) eseguirà una vera funzione di
2% della piena
3.3 Modifica dell’unità di misura
Premere il pulsante UNITS
di misura disponibile.
Cal
(Unità / Taratura) per visualizzare la prossima unità
3.4 Spegnimento automatico
per allungare la durata della batteria, la bilancia si spegne automaticamente dopo
circa quattro minuti di inattività. Questa funzione è attiva solo durante il
funzionamento della batteria.
3.5 Pesa dinamica
Con la piattaforma vuota, premere il pulsante UNITS
(Unità / Taratura) per passare tra le unità. La modalità
dinamica è attiva quando l’indicatore • lampeggia.
Posizionare una massa sulla piattaforma. La bilancia
visualizzerà "-A-".
ON/ZERO
allo zero.
Con una massa sulla piattaforma o sul contenitore, premendo
il tasto UNITS
rovescia di media da 5 secondi.
Viene quindi visualizzato il peso medio. L’indicatore • smette
di lampeggiare quando il processo è completo.
Il display lo visualizza fino a quando non si preme un pulsante.
Per ripetere il processo premere UNITS
con una massa sul piattaforma o nel contenitore.
Per uscire, rimuovere la massa dalla piattaforma o dal
contenitore e premere UNITS
Off
NOTA: Se si utilizza un contenitore, premere
(Acceso/Zero spento) per tarare il peso e tornare
Cal
(Unità / Taratura) si avvia il conteggio alla
Cal
(Unità / Taratura)
Cal
(Unità / Taratura).
Cal
Page 56

IT-6 Bilance serie Catapult 1000
4. TARATURA
Per risultati ottimali, tarare la bilancia a intervalli regolari (i pesi di taratura non
vengono forniti con la bilancia).
ATTENZIONE
PRESTARE LA MASSIMA ATTENZIONE DURANTE LA GESTIONE
DEI PESI DI TARATURA, DAL MOMENTO CHE SONO MOLTO
PESANTI. METODI DI SOLLEVAMENTO IMPROPRI DEI PESI DI
TARATURA POSSONO CAUSARE LESIONI PERSONALI. PER
OTTENERE IL PESO DI TARATURA RICHIESTO, È POSSIBILE
UTILIZZARE PIÙ PESI.
NOTA:
•
Prima di avviare la taratura, accertarsi che siano disponibili le masse di taratura
adeguate (vedere la Tabella 4-1).
• Per tutta la durata della procedura di taratura, accertarsi che la bilancia sia a livello e
in una posizione stabile.
• La taratura non è disponibile nella modalità di pesa dinamica.
• La taratura non è disponibile se è attivo LFT (approvato per il commercio).
Attendere il riscaldamento della bilancia per circa 5 minuti dopo l’assestamento
alla temperatura ambiente.
• Per interrompere la taratura, premere UNITS
bilancia.
TABELLA 4-1. PESI DI TARATURA.
Modello Pesi per taratura (kg/lb)
C11P9 9 / 20
C11P20 20 / 40
C11P75 50 / 100
4.1 Taratura a intervallo
La taratura a intervallo utilizza due punti per regolare la bilancia. Il primo punto è
costituito dal valore zero, quando sulla bilancia non è presente alcun peso; il secondo
punto è il valore di intervallo quando sulla bilancia viene collocato una massa di
taratura.
Per selezionare l’unità di pesa da utilizzare per la
taratura, premere il pulsante UNITS
Taratura) finché non viene visualizzata la corretta unità.
Tenere premuto il pulsante UNITS
fino a quando non viene visualizzato il messaggio “CAL”
(Taratura).
Cal
Cal
(Unità / Taratura)
Cal
(Unità /
(Unità / Taratura), o spegnere la
Page 57

IT-7Bilance serie Catapult 1000
Con la piattaforma vuota, premere il pulsante ON/ZERO
Off
(Acceso/Zero spento) per catturare lo zero della
bilancia. Il display visualizzerà “-C-”.
Una volta catturato lo zero, viene visualizzato il peso di
taratura dell’intervallo richiesto con l’unità selezionata.
Posizionare il peso di taratura sulla piattaforma e premere
)
il pulsante ON/ZERO Off (Acceso/Zero spento
visualizzerà di nuovo “-C-”.
. Il display
Dopo aver catturato l’intervallo, il display tornerà alla
normale modalità di pesa.
NOTA: se è stato applicato un peso di taratura non corretto, verrà visualizzato il
messaggio “CAL E”. Ripeti la procedura usando il peso corretto di calibratura.
4.2 Blocco della taratura
mediante un interruttore interno, è possibile bloccare (disabilitare) la funzione di
taratura e impedire una ritaratura non autorizzata.
Con la bilancia accesa, rimuovere la copertura sotto l'indicatore svitando le due viti
nella parte inferiore.
Far scorrere l’interruttore sul PCB (contrassegnato con SW3) alla posizione
contrassegnata con “CAL LOCK” (Blocco taratura).
Rimontare la copertura.
Se richiesto, posizionare le evidenti etichette sigillanti del pestello sopra i fori della
vite o sopra i margini dell’alloggiamento.
Se è necessaria una ritaratura successiva, sarà necessario riaprire l’alloggiamento e
rimettere l’interruttore di blocco in posizione originale.
NOTA: quando l’interruttore di blocco è impostato nella posizione CAL LOCK (Blocco
taratura), l’intervallo zero di accensione è ridotto al 10% della piena capacità.
Page 58

IT-8 Bilance serie Catapult 1000
5. MANUTENZIONE
Attenzione: prima di effettuare la pulizia, spegnere la bilancia, e scollegare
l’alimentatore di rete.
5.1 Pulizia
Il pannello può essere pulito con un panno inumidito con un detergente delicato.
Non utilizzare solventi, prodotti chimici, alcol, ammoniaca o abrasivi per pulire il telaio o
i pannelli di controllo.
5.2 Individuazione guasti
La tabella seguente elenca alcuni problemi comuni, le loro cause possibili e le varie
soluzioni. Se il problema persiste, contattare Ohaus o un rivenditore autorizzato.
TABLE 5-1. RISOLUZIONE DEI PROBLEMI.
Sintomo Cause possibili Soluzione
Scale will not turn
on
Poor accuracy Taratura impropria . Ambiente non
Impossibile
effettuare la
taratura
La bilancia
visualizza Lo bAt
La bilancia
visualizza “Lo
Line”
La bilancia
visualizza “E”
La bilancia
visualizza “CALE”
La bilancia
visualizza “UnSt”
Bilancia non alimentata
Batteria scarica
stabile.
CAL LOCK attivato
Ambiente non stabile
Massa di taratura sbagliata
La batteria è scarica Collegare l’alimentazione o cambiare le
bassa tensione di linea
(alimentazione di rete)
Peso sul vassoio che supera la
capacità
Peso di taratura non corretto sul
vassoio
La bilancia è instabile
all’accensione.
Verificare connessioni e tensione
Verificare polarità delle batteria.
Eseguire taratura. Spostare la bilancia in
una posizione adatta
Disattivare CAL LOCK (see section 4.2)
Spostare la bilancia in una posizione
adatta. Utilizzare una massa di taratura
corretta
batterie
Verificare tensione di fonte
Rimuovere il peso dal vassoio
Usare il peso corretto di taratura
Riassegnare bilancia ad un ambiente più
stabile
Page 59

IT-9Bilance serie Catapult 1000
5.3 Informazioni relative all'assistenza
Se la sezione Individuazione guasti non risolve o non descrive il problema
incontrato, contattare l’assistenza tecnica autorizzata Ohaus. Per l'assistenza negli
Stati Uniti, chiamare il numero verde USA 800-526-0659 tra le 8.00 e le 17.00 EST
(ora della costa orientale degli Stati Uniti). Il personale specializzato addetto alla
manutenzione sarà disponibile per l'assistenza. Fuori dagli Stati Uniti, consultare il
nostro sito Web,
www.ohaus.com, per individuare l'ufficio Ohaus più vicino.
6. DATI TECNICI
I dati tecnici sono validi per le seguenti condizioni ambientali:
Temperatura ambiente: da 5 °C a 40 °C / 41° to 104° F
Umidità relativa: dal 10% al 80% di umidità relativa, senza condensa
6.1 Specifiche tecniche
TABELLA 6-1. SPECIFICHE.
Modello C11P9 C11P20 C11P75
Capacità x Leggibilità
Unità di misura kg, lb
Modalità Pesare semplice, pesare dinamico
Tastierino 2 pulsanti meccanici:
Pesi di taratura 9 kg / 20 lb 20 kg / 40 lb 50 kg / 100 lb
Display 4 cifre, LCD, altezza 20 mm/0,8”
Indicatori del display Stabilità, pesante unità, pesare dinamico, condizione della batteria
Intervallo Tara A capienza da sottrazione.
Tempo di stabilizzazione
Sovraccarico massimo 150%
Temperatura / umidità di
funzionamento
Requisiti di alimentazione
Spegnimento automatico 4 minuti senza attività (solo funzionamento a batteria)
Durata media della batteria 300 ore
Dimensioni della bilancia (mm /
in)
9 kg x 0.005 kg
20 lb x 0.01 lb
da 5 a 40 ºC (da 41 a 104 ºF) dal 10% al 80% di umidità
9-12 VCC 100mA alimentatore di rete (in dotazione)
3 batterie alcaline "C" (LR14) o le batterie ricaricabili (opzionale)
316 x 316 x 60/ 12.4 x 12.4 x 2.36
20 kg x 0.01 kg
44 lb x 0.02 lb
≤ 3 secondi
relativa, senza condensa
75 kg x 0.05 kg
165 lb x 0.1 lb
Page 60

IT-10 Bilance serie Catapult 1000
6.2. Drawings and Dimensions
Figura 6-1. Dimensioni complessive serie Catapult 1000.
Page 61

IT-11Bilance serie Catapult 1000
6.3. Conformità
La conformità ai seguenti campioni è indicata dal contrassegno corrispondente sul prodotto.
Mark Standard
Questo prodotto è conforme al EMC 2004/108/EC direttivo e la bassa
tensione 2006/95/EC direttivo. La dichiarazione completa di conformità è
disponibile da Ohaus Corporation
AS/NZS4251.1 Emission; AS/NZS4252.1 Immunity
Smaltimento
In conformità a quanto stabilito dalla Direttiva Europea 2002/96 CE in
materia di apparecchi elettrici ed elettronici (RAEE), questo strumento non
può essere smaltito come i normali rifiuti. Tale presupposto resta valido
anche per i Paesi al di fuori dei confini della UE, conformemente alle norme
nazionali in vigore.
Si prega quindi di smaltire questo prodotto separatamente e in modo
specifico secondo le disposizioni locali relative alle apparecchiature elettriche
ed elettroniche.
Per qualsiasi chiarimento, rivolgersi agli enti preposti o al rivenditore
dell‘apparecchiatura stessa.
In caso di cessione dello strumento (per es. per ulteriore utilizzo privato o
aziendale/industriale), si prega di comunicare anche questa disposizione.
Si ringrazia per il contributo alla tutela dell‘ambiente.
Page 62

IT-12 Bilance serie Catapult 1000
Registrazione ISO 9001
Nel 1994, Ohaus Corporation, USA, ha ricevuto il certificato di registrazione ISO 9001 da
Bureau Veritus Quality International (BVQI), come conferma che il sistema di gestione della
qualità Ohaus risponde alle caratteristiche standard di ISO 9001. Il 15 Maggio 2003, Ohaus
Corporation, USA, è stata riregistrata per la normativa ISO 9001:2000.
GARANZIA LIMITATA
I prodotti Ohaus sono garantiti contro difetti nei materiali e nella lavorazione dalla
data di consegna per tutta la durata del periodo di garanzia. Durante il periodo di
garanzia Ohaus riparerà o, a sua scelta, sostituirà tutti i componenti che siano
difettosi senza costo alcuno, purché il prodotto venga rinviato, con spese prepagate,
alla Ohaus.
Questa garanzia non è valida se il prodotto è stato danneggiato o trattato con poca
cura, esposto a materiali radioattivi o corrosivi, se vi siano penetrati materiali
estranei o in seguito ad assistenza eseguita da personale non Ohaus. In assenza di
una scheda di garanzia rinviata insieme al prodotto, il periodo di garanzia avrà
inizio dal momento della spedizione del prodotto al rivenditore autorizzato. Non
viene rilasciata nessun’altra garanzia espressa o implicita da parte della Ohaus
Corporation. Ohaus Corporation non sarà responsabile per qualsiasi danno indiretto.
Vista la diversità di normativa tra i vari Stati in termini di garanzia, contattare
direttamente la Ohaus o il rivenditore locale Ohaus per ulteriori dettagli.
Page 63

Page 64

Ohaus Corporation
19A Chapin Road
P.O. Box 2033
Pine Brook, NJ 07058-2033, USA
Tel: (973) 377-9000
Fax: (973) 944-7177
With offices worldwide / Con oficinas alrededor del mundo / Avec des bureaux dans le monde
entier / Weltweite Geshäftsstellen / Con uffici in tutto il mondo.
www.ohaus.com
*80250426*
P/N 80250426 B © 2008 Ohaus Corporation, all rights reserved / todos los derechos
reservados / tous droits réservés / Alle Rechte vorbehalten / tutti i diritti riservati.
Printed in China / Impreso en la China / Imprimé en Chine / Gedruckt in China / Stampato in
Cina
 Loading...