


APPROVED
- CONFORMING TO EN13240:2001 and
HELIOS 8
MULTI FUEL STOVE
INSTALLATION AND OPERATING INSTRUCTIONS
STOVES MUST BE FITTED BY APPROVED, QUALIFIED AND
COMPETENT INSTALLERS
PLEASE LEAVE THIS BOOKLET WITH THE HOUSEHOLDER
Penman Stoves operate at very high temperatures. All persons
including children and the infirm should be warned of this and not
allowed to touch any surfaces whilst in use. The operator must use
the glove provided.
www.penmancollection.com
EN13240 A2:2004
HELIOS 8 INSTRUCTIONS – REV. 0 – JULY 2016
1

CONTENTS
STOVE CONTROLS, OUTPUT & EFFICIENCY PAGE 03
COMPONENT PARTS PAGE 04
INSTALLATION PAGE 05
OPERATION PAGE 10
GENRAL MAINTENANCE PAGE 16
SAFETY NOTES & TROUBLESHOOTING PAGE 18
STOVE ACCESSORIES PAGE 21
2
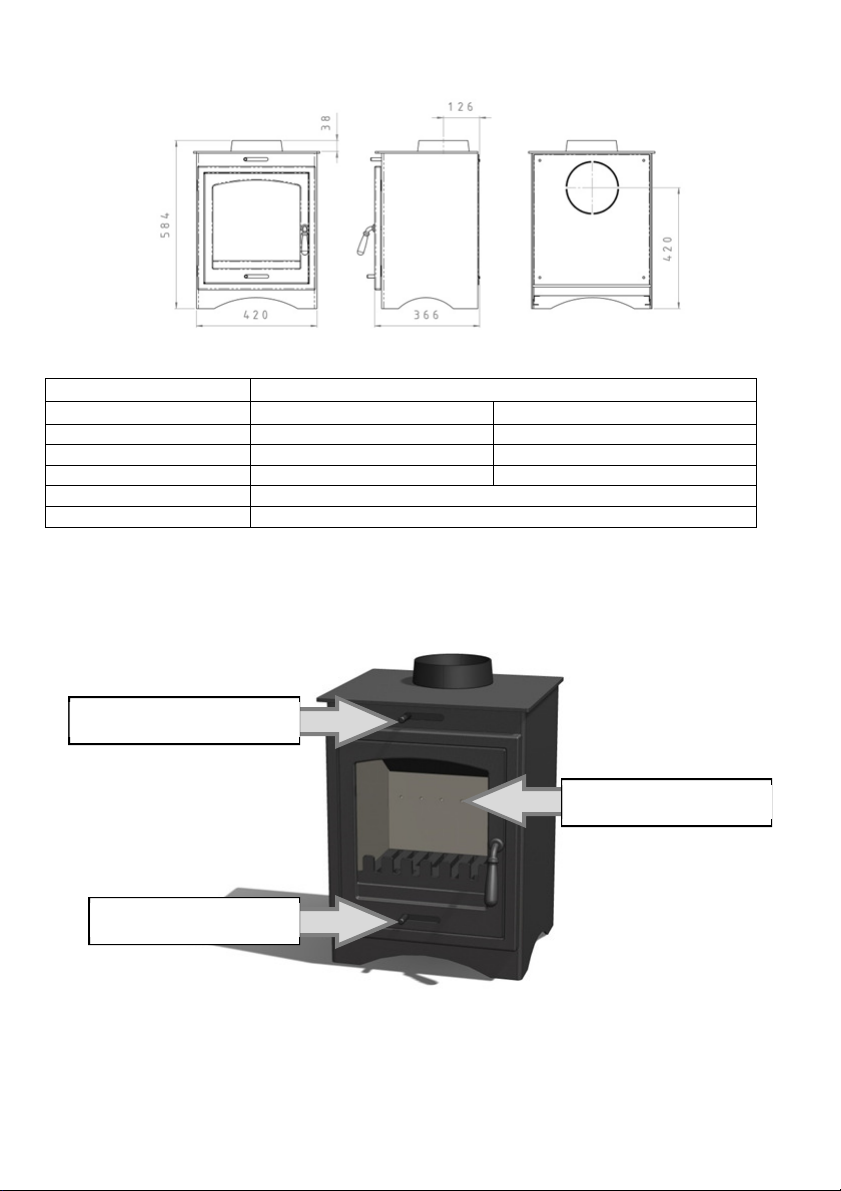
YOUR STOVE: OPERATING CONTROLS, OUTPUT AND EFFICIENCY
FUEL
Secondary
Air Control
Primary Air Control
Tertiary Air Holes
HELIOS 8
WOOD ANTHRACITE
EFFICIENCY 80% 81.2%
FLUE GAS TEMPERATURE 309 ˚C 287˚C
EMISSION OF CO @ 13% O2 0.33% 0.08%
RATED OUTPUT 8.3kW
WEIGHT 70kg
Outputs stated are under ideal test conditions carried out at SGS Environmental Services in the
Netherlands. Variations may occur due to installation, atmospheric conditions and fuel quality.
3
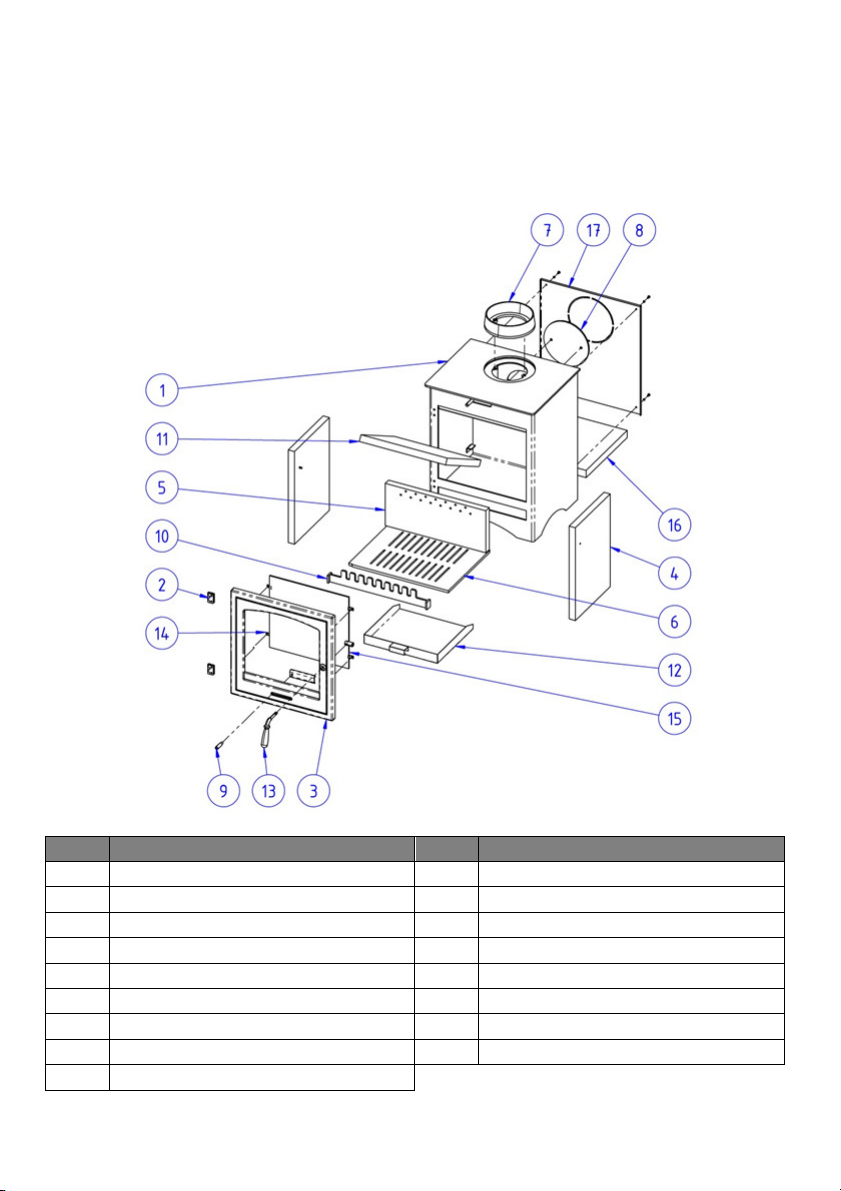
COMPONENT PARTS
Many spare parts are stocked – please refer to your retailer or supplier if you
require any replacement parts.
Please only use components made specifically for your stove.
ITEM DESCRIPTION ITEM DESCRIPTION
1 Stove body 8 Flue blanking plate
2 Hinge set 9 Primary air slide assembly
3 Door casting 10 Fuel retaining bar
4 Side brick 11 Baffle plate
5 Rear brick 12 Ash Pan
6 Grate 13 Handle/latch assembly
7 Flue collar 14 Door glass retaining clip
15 Door glass 16 Bottom brick
17 Heat shield
4

INSTALLATION, OPERATION AND MAINTENANCE
IMPORTANT: THIS APPLIANCE MUST BE INSTALLED BY A COMPETENT PERSON AND THE
INSTALLATION MUST COMPLY WITH BS8303 – CODE OF PRACTICE FOR INSTALLATION OF
DOMESTIC HEATING AND COOKING APPLIANCES BURNING SOLID MINERAL FUEL, NATIONAL
BUILDING REGULATIONS, LOCAL BY-LAWS AND STANDARDS AND THE REQUIREMENTS OF THE
HEALTH AND SAFETY AT WORK ACT - IN PARTICULAR:
HANDLING – ADEQUATE FACILITIES MUST BE AVAILABLE FOR LOADING, UNLOADING AND SITE
HANDLING.
FIRE CEMENT – SOME TYPES ARE CAUSTIC AND SHOULD NOT BE ALLOWED TO COME INTO
CONTACT WITH THE SKIN. IN CASE OF CONTACT WASH IMMEDIATELY WITH PLENTY OF WATER.
ASBESTOS – THESE STOVES CONTAIN NO ASBESTOS. IF THERE IS A POSSIBILITY OF DISTURBING
ANY ASBESTOS IN THE COURSE OF INSTALLATION THEN PLEASE SEEK THE GUIDANCE OF A
SPECIALIST AND USE APPROPRIATE PROTECTIVE EQUIPMENT.
METAL PARTS – WHEN INSTALLING OR SERVICING THIS STOVE CARE SHOULD BE TAKEN TO AVOID
THE POSSIBILITY OF PERSONAL INJURY
UNLESS THE INSTALLER IS QUALIFIED TO APPROVE INSTALLATION THEN APPROVAL MUST BE
SOUGHT FROM YOUR LOCAL BUILDING CONTROL DEPARTMENT. THE SUPPLIERS ACCEPT NO
RESPONSIBILITY IF THIS ADVICE IS NOT FOLLOWED. THIS APPLIANCE HAS BEEN EXTENSIVELY
TESTED FOR SAFETY AND EFFICIENCY, DO NOT ATTEMPT TO MODIFY IT. ALWAYS USE GENUINE
REPLACEMENT PARTS AS RECOMMENDED BY YOUR SUPPLIER. FAILURE TO ADHERE TO THIS
ADVICE WILL INVALIDATE YOUR GUARANTEE.
TRY TO AVOID FITTING AN EXTRACTOR FAN IN THE SAME ROOM AS THIS STOVE. IF THIS IS
UNAVOIDABLE THEN SEEK SPECIALIST ADVICE TO ENSURE THAT THE INSTALLATION IS TESTED
FOR SAFETY. A SUITABLE TEST COMPRISES CHECKING FOR SPILLAGE IF THE ROOM WHERE THE
APPLIANCE IS FITTED IS SUBJECTED TO THE GREATEST POSSIBLE DEPRESSURISATION. THIS
MEANS FIRING THE APPLIANCE WITH ALL THE EXTRACT FANS IN THE BUILDING OPERATING AT
THEIR MAXIMUM AND WITH ALL DOORS, ADJUSTABLE VENTILATORS AND WINDOWS CLOSED.
IF SPILLAGE OCCURS THEN ADDITIONAL PERMANENT VENTILATION DIRECT FROM OUTSIDE WILL
BE REQUIRED. ONCE THE ADDITIONAL VENTILATION IS FITTED, RETEST AS NOTED ABOVE,
IT IS ESSENTIAL AND REQUIRED BY BUILDING REGULATIONS THAT A CARBON MONOXIDE (CO)
ALARM IS INSTALLED IN THE SAME ROOM AS THIS STOVE.
THIS STOVE MUST HAVE ITS OWN CHIMNEY AND MUST NOT SHARE A CHIMNEY WITH ANOTHER
APPLIANCE.
THIS STOVE IS FOR INTERMITTENT USE ONLY AND SHOULD BE SHUT DOWN OVERNIGHT.
VENTILATION MAY BE REQUIRED INTO YOUR ROOM, PLEASE SEE PAGE 9.
5

INSTALLATION
Once the installation is complete, the installer must advise the householder on
the correct use of the stove and warn them to use only the recommended fuels
listed in this document. The installer must also advise the householder on the
actions to be taken should smoke or fumes be emitted from the stove.
Your Penman stove must not share a chimney with any other appliance
Where the chimney is believed to have previously served an open fire
installation it is possible that the higher flue gas temperature from a closed
appliance may loosen deposits that were previously firmly adhered, with the
consequent risk of flue blockage. It is therefore recommended that the chimney
be swept a second time within a month of regular use after installation.
Check the chimney is in good condition, dry, and free of cracks, leaks and
obstructions. The diameter of the flue should not be less than 150mm and not
more than 230mm. If any of these requirements are not met, the chimney
should be lined by a suitable method.
When installing your Helios stove, a 150mm flue liner may be used in
accordance with the Building Regulations. The chimney and connecting flue pipe
should not be less than the size of the outlet socket (collar) of the stove at any
point.
The chimney height and the position of the chimney terminal must conform to
Building Regulations and the latest edition of BS EN 15287-1:2007, Design,
Installation and Commissioning of Chimneys should be followed.
A flue draught of 12-15 Pascals is ideal for good appliance performance. The
flue draught should be checked under fire at high output. A flue draught
exceeding 15Pa will result in an over-firing stove with excessive fuel
consumption and could cause a chimney fire. A draught stabiliser may be
required so that the rate of burning can be controlled. Over-firing can cause
irreversible damage to your stove.
If you have any doubts about the suitability of your chimney, consult your local
dealer/stockist. They will also be able to provide advice about the possible need
for a specialist cowl.
6

The chimney must be swept before connection to the stove and it is
recommended that it should be swept every twelve months thereafter. If used
regularly, it is recommended that your chimney is swept every six months.
An existing fireplace opening can be modified to accommodate the stove. The
following pages identify some typical installation scenarios and provides the
necessary specific installation information for your new stove. Always consult
your stove supplier for a detailed survey of your particular circumstances.
To make it easier to handle the stove on installation, remove the baffle plates,
bricks and door. Place in a secure place to avoid damage. Refit after
installation.
Upon completion of installation, the appliance should be checked under fire for
soundness of joints and seals, and also that all smoke and fumes are taken from
the appliance, up the chimney and emitted safely by measuring and noting the
flue draught value in Pascals.
Typical Installation for Inglenook Fireplaces – top flue
Inglenook fireplaces can have very
large bore chimneys. Check with
your installer – you are likely to
require a stainless steel flexible liner
for solid fuel if your chimney is
larger than 230mm x 230mm. A
closure plate with access for
cleaning may also be required
together with a short length of flue
pipe of the same diameter as the
stove flue collar.
7

Typical Installation for Inglenook Typical Installation Into In-filled
Fireplaces – rear flue – Side View Masonry Fireplaces
SPECIFIC INSTALLATION INFORMATION
Clearances
If the stoves are to be installed adjacent to materials that can catch fire like
wood then the following clearances must be adhered to:
STOVE TOP/BACK (mm) SIDES (mm)
Helios 550 550
The stove can be recessed into a suitably sized fireplace built from noncombustible materials, but a permanent free air gap of at least 100mm should
be left around the sides and top to obtain maximum heat output and for access
to the rear of the stove.
It is possible to fit the stove with less clearance around it – down to 50mm, but
the non-combustible material around it must be at least 150mm thick. This is
normally achieved when installing into a standard brick-built chimney breast
with double thickness walls to the rear and sides of the builder’s opening. Take
care that the wall finish is suitable to withstand temperatures of up to 200oC.
8

Hearths
Allow an apron of at least 225mm at the front of the stove and 150mm on either
side. Care should be taken to level the stove and secure the hearth. If existing
floors do not have adequate load bearing capacity then suitable modifications
must be adopted. All other standard thickness hearths are suitable too.
When the stove is in the desired position, fix the brackets provided to the back
feet and level the stove using the levelling screws, then mark the hearth through
the holes, remove the stove, and drill and plug the hearth for securing the stove.
Ventilation into a Room for Combustion Air is an Essential Requirement.
Any apertures provided for this purpose must not be restricted or blocked.
Flues Without a Flue Draft Stabiliser
When installing without a flue draft stabiliser into houses built before 2008, at
least 2200mm2 additional means of permanent ventilation direct-to-outside is
required. For houses built after 2008, at least 4950mm2 additional means of
permanent ventilation direct-to-outside is required. Penman Vents should be
used for this.
Flues With a Flue Draft Stabiliser
When installing with a flue draft stabiliser into houses built before 2008, at least
4900mm2 additional means of permanent ventilation direct-to-outside is
required. For houses built after 2008, at least 7650mm2 additional means of
permanent ventilation direct-to-outside is required. Penman Vents should be
used for this.
Top or Rear Flue
Remove the collar and accessory pack from the stove.
The stove will arrive with the blanking plate fitted to the
rear. This can be removed if required allowing the collar
to be fitted for rear flue installations.
Remove the circular cut out for rear flue installations.
9

Remember to fit the blanking plate to the unused flue position if it has been
removed.
OPERATION
ALWAYS OPEN THE STOVE DOOR SLOWLY AND ALWAYS USE THE GLOVE
Primary Air - controllable
Primary air is controlled via the sliding vent in the bottom of the door. This
provides an air draught through the grate to the bed of the fire. Slide right to
open and left to close. Open this when you start a fire, and to regulate solid fuels
other than wood. It should be closed when a wood fire is established for the
best efficiency but can be used to give a wood fire a boost when it is dying out.
Secondary Air - controllable
Secondary air is controlled via the sliding vent above the door, it is this ‘airwash’
that keeps a clean and uninterrupted view of the fire, and also aids good
secondary combustion of fuel; thus reducing emissions in the chimney and out
to the environment. Slide to the right to open and to the left to close. Use this
to control wood fires. It should be closed when burning solid fuels other than
wood for the best efficiency after the fire is established.
Tertiary Air – not controlled (fixed supply)
The Tertiary Air Supply is bled into the stove from the rear panel. Its function is
to ignite unburned gasses helping provide a clean burn. It is advisable to clear
these holes from time to time with a brush, especially when the stove is being
serviced or after long periods of burning.
ONLY CARRY OUT THIS AND ALL SERVICING PROCEDURES WHEN THE STOVE IS
COLD. This tertiary air supply is permanently open and allows a small amount of
air into the stove. Operation with air controls open can cause excess smoke.
These stoves must not be operated with air controls left open except as directed
in these instructions.
Lighting the Stove
It is essential that you have three or four small fires before you operate the
stove to its maximum heat output. This is to allow the paint to cure and to
10

“temper” your cast iron stove. We recommend this ‘running-in’ procedure after
long shutdowns to preserve the life of stove. During the curing of the paint you
may notice an unpleasant smell. It is not toxic, but for your comfort we would
suggest that during this period you leave doors and windows open.
First, load the fire with starting fuel i.e. paper, dry kindling timber (about the
thickness of your thumb) and/or firelighters in the mode chosen, either wood or
coal products. It is normal to see smoke come from the open stove door at this
stage.
Light the fire at base leaving all air controls open. Allow the fuel to reach a
steady glow and build up the fire gradually. Once you have a good fire
established across the fire bed, further fuel can be added as required.
When your fire is well established you can start to restrict the primary air intake.
If you are burning only wood, the primary air control can be fully closed. If you
are burning solid fuel you will require some primary air. Your stove is burning
with maximum efficiency when a bright fire is achieved using minimum air inlet
and the Penman Stove Thermometer (purchased separately) registers within the
“Best Burn” range.
Wood Burning
Wood burns best on a bed of ash and it is therefore only necessary to remove
surplus ash from the grate occasionally. Burn only kiln dried or well-seasoned
wood, which should have been cut, split and stacked under cover for at least 36
months, with free air movement around the sides of the stack to enable it to dry
out. Burning wet or unseasoned wood will create tar deposits in the stove and
chimney and will reduce heat output. Tar deposits, if allowed to build up, are a
major cause of chimney fires. This tar also is the main cause of blackened stove
windows. A Penman wood moisture meter is a handy device to have.
Once established and for the best results from your stove, load about 1.3kg of
good quality dry wood per hour with the primary air control fully closed and the
secondary air control 37mm open (86% fully open). Logs can be up to 300mm
(12”) long. Do not overload.
Of course, best burning depends on the quality of wood, draft and stove
settings, so please do experiment to find your own best settings and the best
position on your Stove Thermometer.
11

Other Solid Fuel Burning
Always clean out the ash pan before refuelling and do not let the ash build up to
the underside of the grate bars – this will severely reduce the life of the grate
and prevent efficient burning. Solid fuel produces ash, which if allowed to build
up, will stifle the air flow through the grate and eventually cause the fire to die.
Caution – only empty the ash pan when the stove is cool.
With some solid fuels a residue of burnt fuel or clinker will accumulate on the
grate, allow the fire to go out periodically to remove this.
Once established and for the best results, load 0.55 kg of anthracite or
equivalent per hour with the primary air control about 50-75% open and the
secondary air control fully closed. Do not overload.
When loading fuel, ensure that the series of tertiary air holes on the rear
chamber brick are not covered by the fuel.
Of course best burning depends on the type of fuel being burnt, draft and stove
settings, so please do experiment to find your own best settings.
De-ashing
During stove use, whilst burning anthracite or a mix of wood and anthracite,
from time to time the fire must be agitated with a poker to remove ash ensuring
airflow through the fire bed and allowing the fire to burn over the whole grate.
Ensure you use the glove provided.
Recommended Fuels
Please note that HETAS Ltd Appliance Approval only covers the use of wood logs
and approved smokeless fuels on this appliance. HETAS Ltd. Approval does not
cover the use of other fuels either alone or mixed with the recommended fuels
listed above, nor does it cover instructions for the use of other fuels
Wood - Only kiln-dried or well-seasoned wood with a moisture content reading
of less than 18% is recommended. A Penman moisture meter is a handy device
to have and is available from your supplier. As a rule-of-thumb, wood seasons at
12

about 1” (25mm) per year, so a log split such that along its length no dimension
is greater than 3” (75mm), it would take about 3 years to dry. A dry log will
produce up to four and a half times more heat output than a freshly cut log.
Wet logs take heat to dry.
Other Solid Fuel – “Authorised” fuels include anthracite large nuts, briquettes
smokeless fuel, ie. Ancit, Phurnacite, Taybrite, Homefire Ovals suitable for closed
appliances. Bituminous coals can cause tar deposits and burn very hot, so mix
with other fuels and use sparingly.
Unauthorised Fuels
DO NOT burn Wildfire, Housecoal, household coal, petroleum cokes or
household waste. If in doubt consult your merchant or the Solid Fuel
Association.
Please note that when refuelling with solid fuel, do not pile fuel higher than 30
degrees from the front bar rearwards – over-fuelling can cause excess smoke
and produce temperatures beyond the designed rating of the appliance causing
damage to internal parts.
This appliance is designed to be operated with the door closed, except for
refuelling. Not only is it unsafe to operate with the door open but the appliance
efficiency will be significantly reduced and excess smoke can occur.
The stove is designed to operate intermittently and must not be used as an
overnight burner.
Clean Burn - The Clean Air Act 1993 and Smoke Control Areas
Local authorities may declare the whole or part of their zone to be a smoke
control area. It is an offence to emit smoke from a chimney of a building if
located in a designated smoke control area. It is also an offence to acquire an
"unauthorised fuel" for use within a smoke control area unless it is used in an
"exempt" appliance.
The Secretary of State for Environment, Food and Rural Affairs has powers to
authorise smokeless fuels or exempt appliances for use in smoke control areas in
England. In Scotland and Wales this power rests with Ministers in the devolved
administrations for those countries. Separate legislation, the Clean Air
(Northern Ireland) Order 1981, applies in Northern Ireland. Therefore it is a
requirement that fuels burnt or obtained for use in smoke control areas have
13

been "authorised" and that appliances used to burn solid fuel in those areas
(other than "authorised" fuels) have been exempted for each area of
administration. Further information on the requirements of the Clean Air Act
can be found here: http://smokecontrol.defra.gov.uk/
This stove has been recommended as suitable for use in smoke control areas
when burning dry wood and the “authorised” smoke free solid fuels.
The “authorised” solid fuels you are permitted to burn in a smoke control zone
include: anthracite (this is naturally occurring smokeless fuel and is the test fuel
normally used and recommended), Ecoal 50, Homefire, Homefire ovals,
Phurnacite, Taybrite and Multiheat.
Refuelling Onto a Low Fire Bed
If the fire bed is not sufficient to light a new fuel charge, excessive smoke
emission can occur. Refuelling must be carried out onto a bed of glowing
embers and ash such that the new fuel ignites in a reasonable period. If there
are too few embers in the fire bed, add kindling to prevent excessive smoke.
Fuel overloading
The maximum amount of fuel specified in this manual should not be exceeded,
overloading can cause excess smoke.
Operation with door left open
Operation with the door open can cause excess smoke and will reduce the
efficiency of the stove by up to 50% (as well as presenting an obvious fire risk).
The appliance must not be operated with the appliance door left open except as
directed in the instructions.
Dampers left open
Operation with the air controls or appliance dampers open can cause excess
smoke. The appliance must not be operated with air controls, appliance
dampers or door left open except as directed in the instructions.
GENERAL MAINTENANCE (o
The following elements of maintenance may be carried out by the householder.
Any structural repairs, e.g. panel, collar or stove pipe replacement must be
carried out by a suitably qualified installer.
nly ever carry out maintenance when the stove is cold).
14

Baffle Plate Removal and Replacement
Note the position before removal. To remove baffle plate, firmly push the baffle
plate upwards then bring forwards so that the back edge of the baffle plate
drops down from the rear fire brick that it was resting upon. The plate can now
be withdrawn through the open doorway of the stove.
To replace, place the baffle plate inside the stove in the correct alignment.
Angle the plate so that the front edge is higher than the back edge and lift high
into the stove so that the front edge locates on the steel ledge at the top of the
stove and the back edge of the plate can be re-positioned on top of the rear fire
brick. Please ensure the baffle plate has been pushed firmly to the back of the
stove prior to using the stove; this enables the hot gases to leave the stove
safely as intended.
Sweeping the Chimney
Your chimney should be cleaned each year before starting to use your stove for
the winter. Birds may have nested in the chimney or the masonry may have
cracked. Both chimney and flue pipe must be swept at least once a year. It is
recommended that you have your chimney swept every six months. It may be
necessary to sweep more frequently when damp wood is burnt regularly.
The chimney can be swept through your stove with the baffle plate removed. It
is advisable to remove the bricks too in order to avoid accidental damage.
Grate Removal and Replacement
Remove the ash pan, baffle, side bricks and rear brick before finally removing
the grate. Replacement is in the reverse order.
Stove Body
The stove is finished with a heat-resistant paint and this can be cleaned with a
soft brush. Do not clean whilst the stove is hot – wait until it has cooled down.
The finish can be renovated with Penman Stove Paint available from your
supplier.
Glass Panels
Clean the glass panels when cool with Penman Glass Cleaner. Highly abrasive
substances should be avoided as these can scratch the glass and make
subsequent cleaning more difficult. Wet logs on heated glass, a badly aimed
poker or heavy slamming of doors could crack the glass panels. The glass will
not fracture from heat.
15

Should a glass panel require replacement, then remove the four screws and clips
retaining the glass frame, carefully remove the broken glass and replace the
panel with the correct stove glass from your supplier. Ensure you use new glass
fibre seal around its edge, and use the steel frame, clips and screws to retain it
in position.
Seasonal Maintenance
If your stove is be unused for any length of time, e.g. summer months, then it is
recommended that it is cleaned out thoroughly. Air slides should be lightly oiled
with WD40 or similar and left partially open to allow air circulation (DO NOT
SPRAY ANY AEROSOL PRODUCT ONTO A HOT STOVE). Regular monitoring of the
inside components will identify condensation or water ingress. If these
problems occur, then your stove needs to be dried and the cause of the problem
rectified. After a shut-down, and before reuse, the appliance should be cleaned
again and the chimney swept, it is essential to have the chimney swept at least
once annually and it is recommended that it is swept twice a year.
Safety Notes and Troubleshooting
IT IS ESSENTIAL AND REQUIRED BY BUILDING REGULATIONS THAT A CO2
ALARM IS INSTALLED IN THE SAME ROOM AS THIS APPLIANCE
Fires Can Be Dangerous
Always use a fire guard to BS 8423:2002, Fireguards for Use With Solid Fuel
Appliances, in the presence of children, the elderly or the infirm. Inform all
persons of the dangers of high temperatures during operation of appliance
including the stove pipe.
Do not use this stove as an overnight burner, when finished for the evening,
leave the air controls open to allow the remainder of the fuel to burn out.
Use the glove provided to open the door and never empty the ash pan when it is
hot.
16

Do Not Over-Fire
It is possible to fire the stove beyond its design capacity, this could damage the
stove, so watch for signs of over-firing – if any part of the stove starts to glow
red, the fire is in an over fire situation, and the controls should be adjusted
accordingly. Never leave the stove unattended for long periods without
adjusting the controls to a safe setting – careful air supply control should be
exercised at all times and only add the recommended quantity of fuels.
Smoke and Fumes Entering the Room
When properly installed and operated, this appliance will not emit fumes into
the room. Occasional fumes from de-ashing and refuelling may occur and is
normal. Persistent fume emission with closed doors must not be tolerated.
If fume emission does persist, then the following immediate action should be
taken:
1. Evacuate the room, opening doors and windows on your exit to
ventilate the room.
2. Let the fire go out, or eject and safely dispose of fuel from the appliance.
3. Check for a flue blockage and clean if required.
Do not attempt to relight the fire until the cause has been identified and
corrected. If necessary, seek professional advice.
These situations are very dangerous and must NOT be tolerated. A list of
Qualified Engineers is available from
UK Solid Fuel Association R. o. I.
7 Swanwick Court Irish National Fireplace Organisation
Alfreton 162 Chapel Street
Derbyshire Dublin
DE55 7AS Ireland
Tel. 0845 601 4406 Tel. 01 801 5959
Chimney Fire
Identified by loud roaring sounds, dense smoke and sparks exiting chimney.
Shut down all air supply to stove by closing air vents, ensure the stove door fully
17

closed, call the Fire Brigade immediately. Regular chimney maintenance will
prevent chimney fires. Seek advice from a qualified chimney sweep. Chimneys
must be checked at least annually or more often when poor quality fuels that
are not recommended are burnt.
Poor Heat Output
Stove too small for room
Seek advice from a qualified heating engineer as to (kW) output required for
room size. As a guideline the volume of the room in cubic feet divided by 500
i.e. room 15’ x 15’ x 8’ would require 3.6kW approx.
Chimney and / or flue pipe restricted, room ventilation restricted.
On Installation these will have been checked but regular maintenance is
necessary as conditions can change i.e. soot build up, birds nesting, masonry fall,
dust build up or furniture blocking vents.
Poor quality fuel.
Only burn dry seasoned timber, soft woods have a lower heat output than hard
woods. Use the Penman Moisture Meter. Solid fuels vary in heat value, check
with your coal merchant as to suitability.
Dirty Glass
Nearly always caused by poor fuel quality – check the moisture content of the
wood you are burning with a Penman moisture meter.
Fire burning too low, open the air vents on the stove to create a hot fire, this
may ‘burn’ the glass clean.
If glass requires cleaning use Penman glass cleaner from your supplier, only use
glass cleaner on cold glass. DO NOT USE abrasives or scrapers; these will scratch
the glass making tar build up harder to remove. NEVER spray aerosols near the
appliance when it is alight.
Un-burnt Fuel
Insufficient air reaching fuel - Adjust the air controls to supply combustion air to
burn fuel fully. Check if the ash pan is full, empty if required. Front bar/fret may
18

be blocked, de-ash. Check for jammed clinker or nails in grate when the fire is
out and cold.
STOVE ACCESSORIES
The following is a list of stove accessories your retailer will be able to supply:
• Penman matching graphite high temperature paint
• Stove Glass Cleaner
• Spare Rope
• Rope Seal Adhesive
• CO Detector
• Penman Stove Fan
• Penman Stove Thermometer
• Wood Moisture Meter
• Spare Glove
• Permanent Ventilators
• Purpose-built Ash Vacuum Cleaner
• Penman Ash Carrier
• Penman Fire Screens
• Penman Companion Sets
• Penman Log Baskets
• Penman Soot Box
19

Brought to you by Percy Doughty & Co
20
Imperial Point, Express Trading Estate, Stone Hill Road,
Farnworth, Bolton. BL4 9TN
01204 868 550
www.penmancollection.co.uk
 Loading...