


Smart Sheet and Smart Pen
User Manual
Version : BFW200
ILS Communications Inc.

Table of Contents
1. About Product
2. Installing Product
3. Using Product
4. Using Smart Pen
5. Maintenance
6. Product Warranty
Please read this User Manual carefully before using the product.
We will not compensate for any damage caused by the use other than specified in the User Manual.
Please keep the User Manual and Product Warranty in a safe place.

Package Content
The beam projector and PC are not included in the package. To use the smart sheet, you need them.
If you need to purchase a new beam projector, Please refer to Chapter 2. Installing Product: Selecting
Beam Projector.
The Bluetooth dongle may not be provided depending on the product. One or two smart pens are
included with the product.
To purchase the dedicated paper, which is not included, please contact your sales representative or our
head office.
The design and specifications of the parts may be changed without prior notice to improve product
performance.
Chapter 1. About Product
1
Package Content
Smart Pen Pen Cap
Bluetooth
Dongle
Software CD USB Charging Cable
Dedicated Paper
(Sold Separately)
Smart Sheet
Three Replacement
Pen Tips
Product Specifications
Chapter 1. About Product
2
Product Specifications
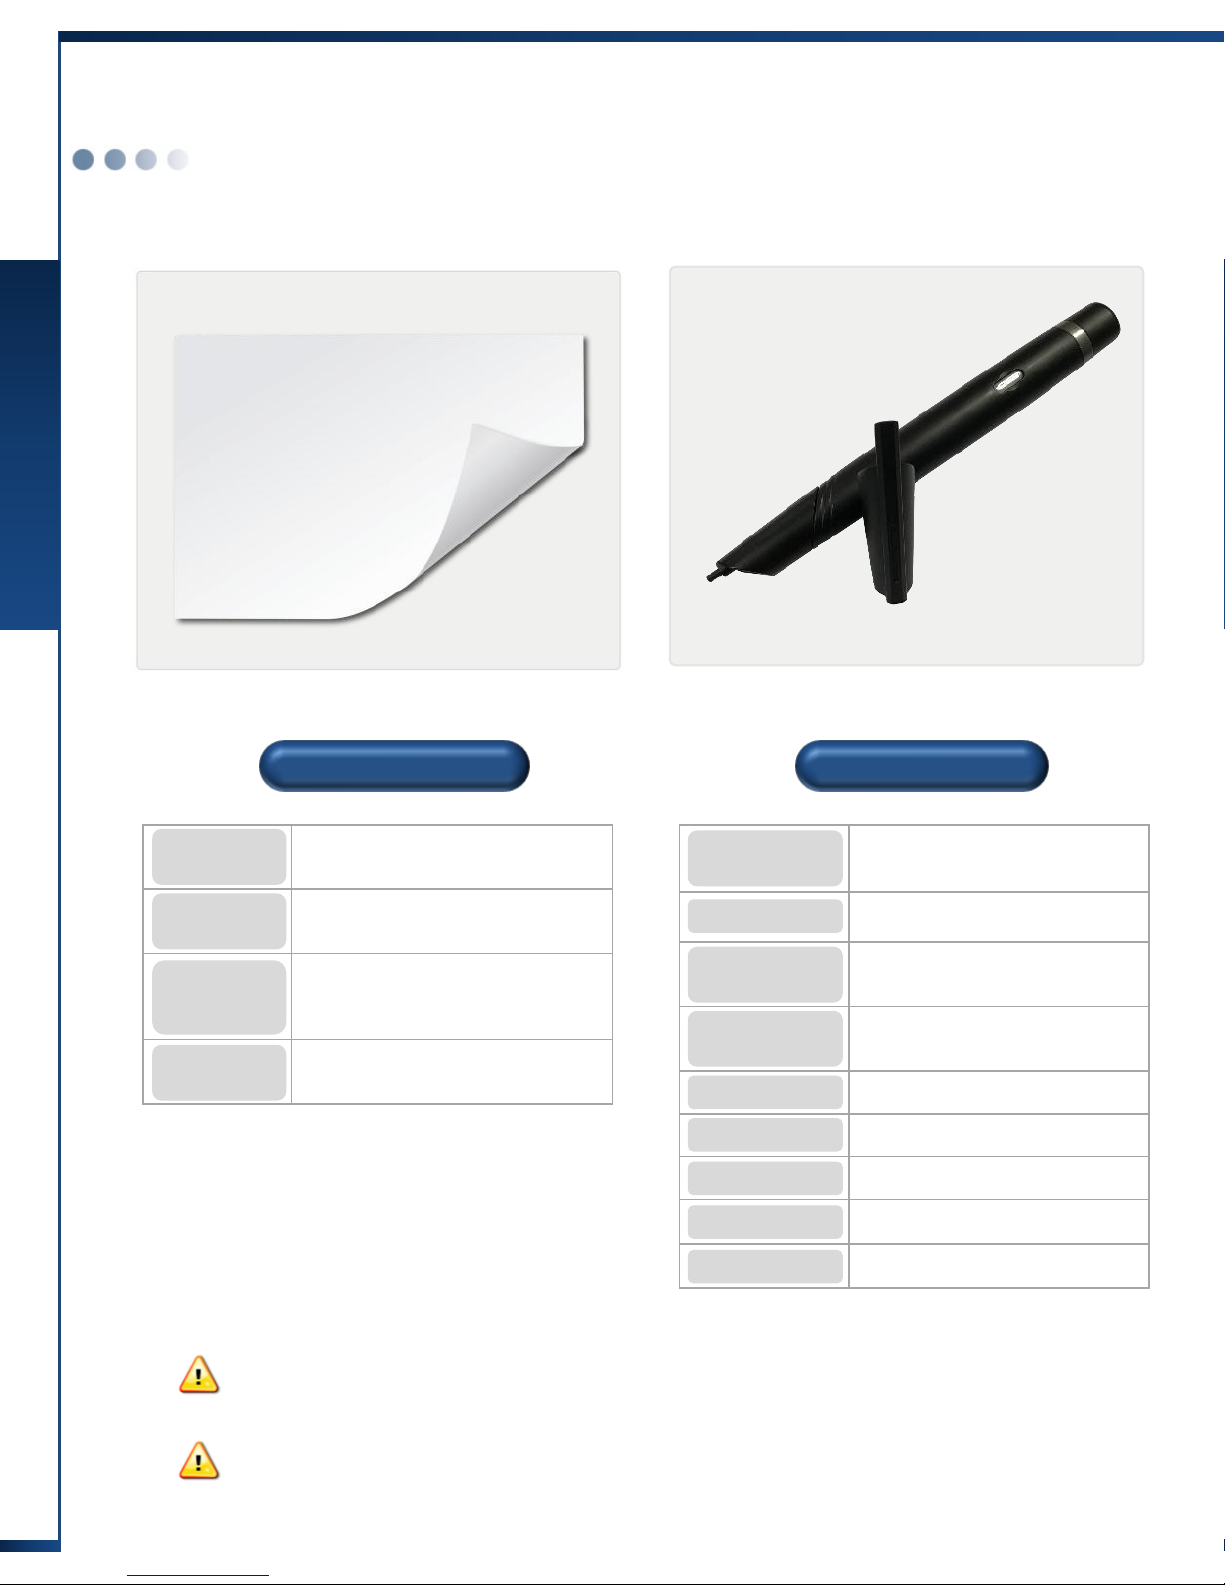
Smart Sheet
Specifications
Smart Pen
Specifications
Interactive SmartSheet
(PWS-92W / PWS-150W )
PWS-92W : 2000 (W) x 1200 (H)
PWS-150W: 3600 (W) x 1200 (H)
High-strength non-gloss surface
treatment
(reflection coefficient of 12 or less)
Power consumption : 0W
SmartPen Blue
600 DPI
Consecutive use : 3 hours
Standby : 10 hours (Power ON)
Ver 2.0 / Class2
Frequency : 2.4 GHz
10 m or less
3.7 V Lithium Polymer Battery
2 hours or less (USB charging)
158 (L) x 20 (H) x 18.5 (W)
33
Product
name
Product
size (mm)
Product
surface
Remark
Product
name
Resolution
Usage
duration
Bluetooth
specifications
Usage
distance
Power
Charging
time
Size (mm)
Weight (g)
You can use the provided smart pen to write or draw on the sheet. Do not use the oilbased marker pen for whiteboard, as it damages the surface of the product.
If this product is supplied to/installed in classrooms, the smart sheet specifications may
be changed.

Operating Principles
Chapter 1. About Product
3
Operating Principles
For lectures or presentations, you can project a PC screen to the smart sheet using a beam projector.
If you use the smart pen to control the program or write or draw on the smart sheet to which the PC
screen is projected, the information is sent to the PC via the Bluetooth wireless communication.
Then, the information is processed by the PC and projected to the smart sheet by the beam projector
again.
As a result, the content you wrote using the smart pen or the program control data is reflected on the
smart sheet again.
The main technologies of this product are the micro-code for location recognition printed on the
surface of the smart sheet and the wireless smart pen that recognizes and transmits the location
information.
This product supports all functions provided by a general smart sheet, allowing you to control various
programs as well as write the content you want. It also supports various functions of a tablet.
This product is a smart sheet solution of a new concept that operates based on the principle
completely different from the existing digital whiteboard.
Therefore, writing or screen control using your hand or a stylus pen is not allowed.
This product is not operated by hand touch. To use this product as a digital board, you
must use the smart pen.
To use this product, a beam projector and PC (laptop or netbook) are required in addition
to the smart sheet and smart pen included in the package.

Installing the Smart Sheet
Chapter 2. Installing Product
4
Installing the Smart Sheet
Step 1
Designate the smart sheet
installation area.
Use a beam projector to project the PC screen to
the wall to mark the location where the smart sheet
should be installed.
This process marks the location for
installing the sheet. Keep in mind the screen
height as you need to write on the sheet.
Step 2
Check the direction of sheet
Make sure that the logo is located on the top left
of the sheet.
Installation Procedure
Step 3
Remove the adhesive paper
Remove the adhesive paper of back.

Installing the Smart Sheet
Chapter 2. Installing Product
5
Installing the Smart Sheet
Step 4
Fix the edge
After the sheet is tailored so that the horizontal,
and Fix the edges of smart sheet.
Be careful that air bubbles are occured.
▶ Make sure that the smart sheet is level before attaching the sheet.
▶ Install the smart sheet as closely to the wall as possible.
Step 5
Attach whole area.
Attach slowly outward from the center.

Installing the Smart Sheet
Chapter 2. Installing Product
6
Installing the Smart Sheet
Selecting Beam Projector
Brightness
(ANSI lm)
Resolution
Screen Size
Focus
Contrast
This indicates the brightness of the projected screen. The higher the
brightness, the better the projector.
1000 ANSI : Brightness at which you can view the image from the projector
under average lighting conditions in the indoors environment
2000 ANSI : Brightness at which you can view the image from the projector
under the better-than-average lighting conditions
3000 ANSI : Brightness at which you can view the image from the projector
in large conference rooms or auditoriums
In general, XGA (1024X768) or higher is sufficient.
If you want to use wide images, the screen should be WXGA (1280X800) or
higher.
The larger the provided screen size is, the clearer the projected screen is on
the smart sheet. But to have a larger screen size, the distance between the
smart sheet and the beam projector should be longer.
Besides, if the screen is larger, the screen brightness becomes darker.
This indicates the difference in luminance. Higher the value, the clearer the
screen.
If the focal distance is shorter, the beam projector can be installed closer to
the smart sheet, reducing blocking of the screen as well as light reflection. A
short throw beam projector has a shorter focal distance than general beam
projectors.
Lamp Lifespan The longer the lamp lifespan is, the longer you can use the projector.
To use the smart sheet efficiently, it is important to select a suitable beam projector.
To select a suitable beam project, refer to the following:
(Note) If you use a short throw beam projector, you can minimize the blocking of the screen
due to the user.

Installing Drivers and PenlabMgr Program
Chapter 2. Installing Product
7
Installing Drivers and PenlabMgr Program
To use this product, you need to install the drivers and the PenlabMgr program first.
If you install them for the first time, Microsoft .NET Framework and Windows Installer may
be installed.
After installing PenlabMgr, be sure to read this User Manual before using the smart sheet.
(Note) PenlabMgr is a pen control program for using the smart sheet and smart pen. It is
different from applications that use the smart sheet and smart pen.
Minimum Specifications
Recommended Specifications
• Intel Pentium 4 2.0 GHz or higher
• 1 GB or larger memory
• Windows XP(SP2) or later
• Intel Core 2 Duo 2.0 GHz or higher
• 2 GB or larger memory
• Windows Vista/7
Content of the Installation CD
The Installation CD includes the following:
Re-installing PenlabMgr
If you want to re-install PenlabMgr on a PC where the program was installed before, please be sure
to go to Control Panel - Add/Remove Programs and delete the previously installed program.
For details on how to delete the program, refer to "Deleting Drivers and PenlabMgr" on the page 10.
Folder Name
Content
Manual
It includes the user manuals for the"PenlabMgr" and
"SmartClass" programs.
PenlabMgr
It includes the installation files for"PenlabMgr".
SmartClass
It includes the installation files for"SmartClass", a writing
program.
(Note) This User Manual does not include the content about SmartClass.
For information on SmartClass, refer to the user manual of SmartClass.

Installing Drivers and PenlabMgr
Chapter 2. Installing Product
8
Installing Drivers and PenlabMgr
Step 1
Connect the Bluetooth dongle.
As shown in the figure, connect the provided Bluetooth dongle
to a USB port of the PC.
If you install them for the first time, Microsoft .NET Framework
and Windows Installer may be installed.
Step 2
Start installing the program.
Insert the installation CD to start the installation program
automatically as shown in the figure.
If it does not start automatically, find and run
PenlabInstallSolution.exe in the CD.
Click ”PenlabMgr Installation" to start installation.
Make sure that the Bluetooth dongle is connected to
a USB port before installation as described in Step 1.
Be sure to connect the Bluetooth dongle before starting installation.
If you don't connect the Bluetooth dongle, the necessary drivers are
not installed.
Depending on the user environment, a message may
appear to prompt you to select a device driver. But
ignore the message as the necessary drivers are
installed later during installation.
Click [Next] to continue installation. Click [Next] to continue installation.

Installing Drivers and PenlabMgr
Chapter 2. Installing Product
9
Installing Drivers and PenlabMgr
Step 3
Select the installation folder.
Select a folder where you want to install the program.
If possible, do not change the folder and click [Next] to
continue.
During program installation, a message appears to
confirm driver installation as shown in the figure.
Be sure to select "Install this driver software
anyway”.
The installation confirmation window may differ
depending on your computer environment.
Select [Allow installation] or [Continue installation]
depending on your computer environment.
Step 4
Perform installation until the
program installation is complete.
Click [Next] to continue installation.
If the completion window opens, click [Close] to finish
installation.
When the PenlabMgr program installation is complete, a
shortcut icon is created on Desktop.

Deleting Drivers and PenlabMgr
Chapter 2. Installing Product
10
Deleting Drivers and PenlabMgr
Delete the drivers and PenlabMgr in the same way as you delete other programs.
You can delete them by using Uninstall a program in Control Panel.
If PenlabMgr is running, exit the program before deleting it.
Go to Control Panel and select [Uninstall a
program].
From the program list, select
"PenlabMgr"under the Penlab menu and
click [Uninstall] to delete the program.
If PenlabMgr is running, exit it first.
The screen may differ depending on the Windows version installed in your PC.
You can delete the program by selecting Control Panel - Add/Delete Programs
regardless of the Windows version

Configuring the Smart sheet for the First Time
Chapter 3. Using Product
11 Configuring the Smart sheet for the First Time
If you use the smart sheet for the first time, you must carry out initialization such
as screen settings and Bluetooth connection. Please check the following to see
how to configure the initial settings.
The provided smart pen and Bluetooth dongle always work in a pair.
If you install the product on another PC or move it to another place, make sure that you carry
both of them.
The smart pen does not work with the Bluetooth dongle sold on the market or the Bluetooth
dongle built in the laptop.
Make sure that you use the provided Bluetooth dongle.
Configure the initial settings of the smart sheet as shown below.
Turn on the PC and
beam projector.
Connect the
Bluetooth
dongle.
Run
PenlabMgr.
Turn on the
smart pen and
configure the
settings.
Step 1 Step 2
Step 3
Step 4
Step 1
Turn on the PC and beam projector.
Turn on the computer and beam projector.
Step 2
Connect the Bluetooth dongle.
Connect the Bluetooth dongle to a USB port.
Step 3
Run PenlabMgr
Click the PenlabMgr icon on Desktop to run the program.
If it runs successfully, a pen-shaped icon appears in red at
the bottom right of the screen (system tray).
If you do not connect the Bluetooth
dongle, PenlabMgr does not run.
(A message appears to tell you to
connect the Bluetooth dongle and run
the program again.)
Configuring the Smart Sheet for the First Time
Chapter 3. Using Product
12 Configuring the Smart sheet for the First Time
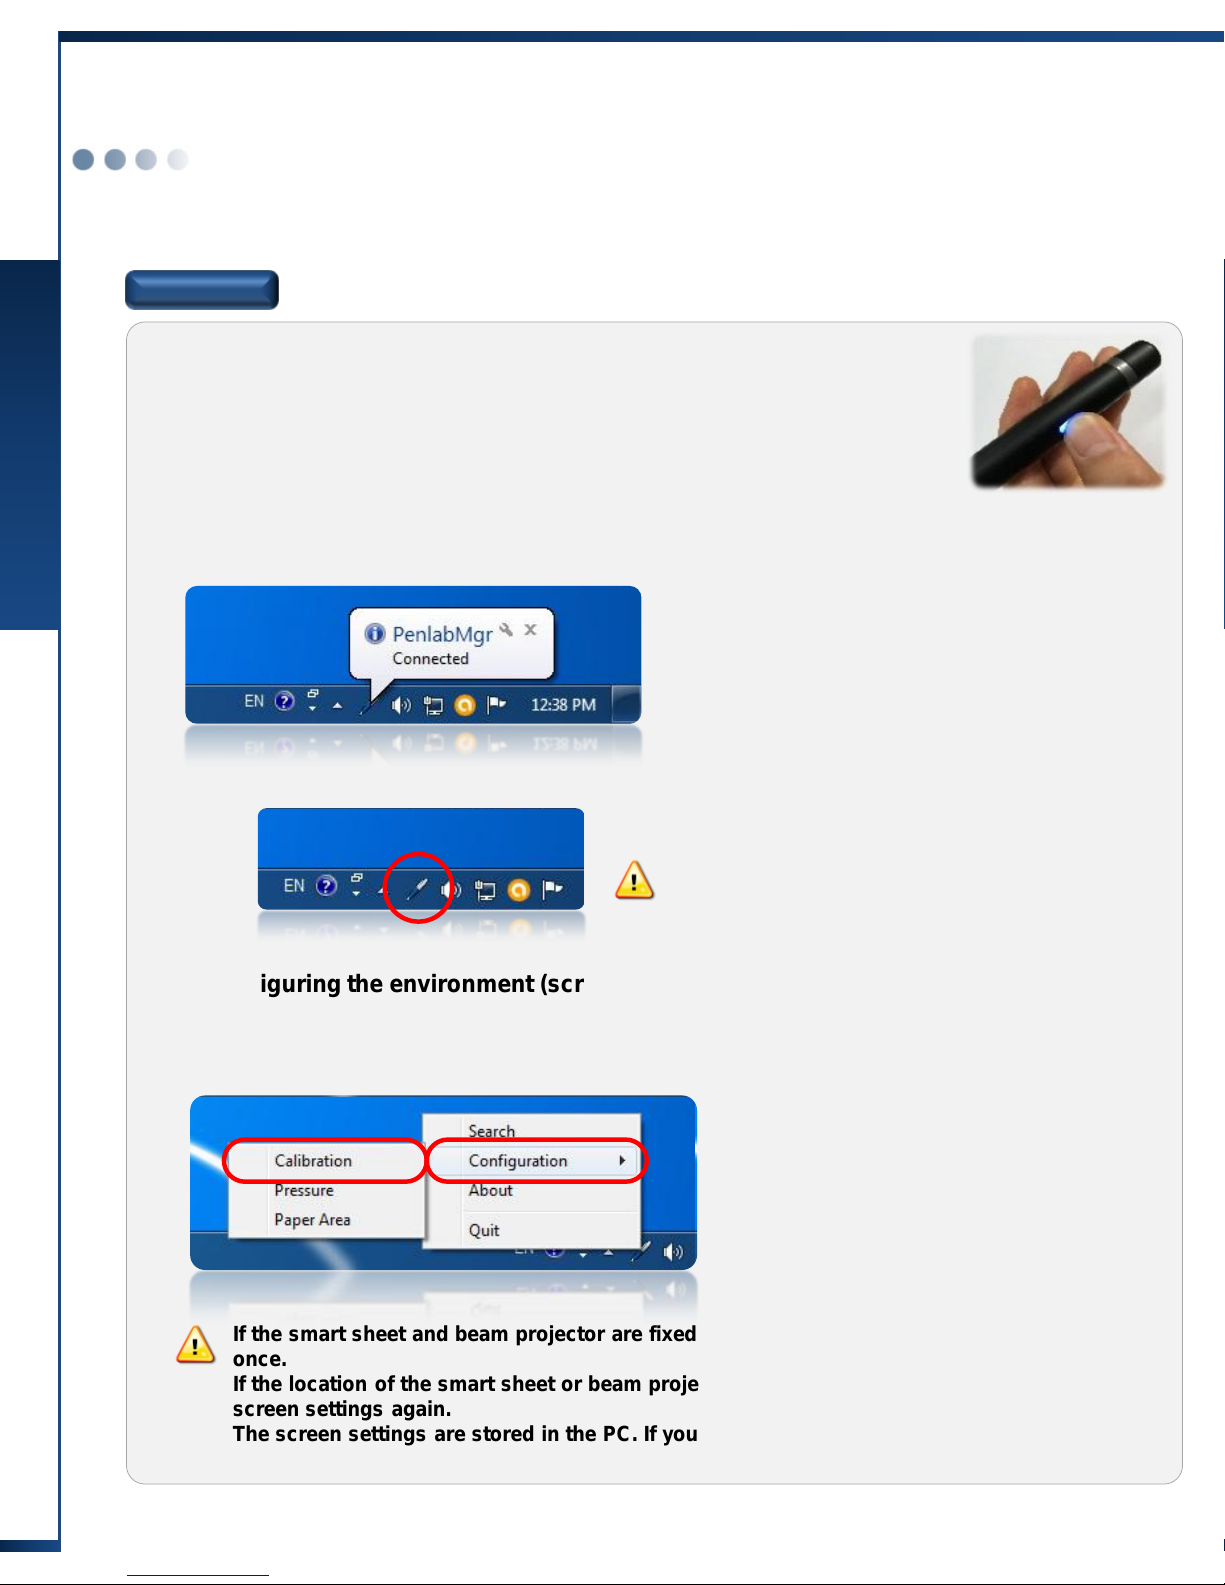
Step 4
Turn on the smart pen and configure the settings.
Configuring the environment (screen settings)
If the smart sheet and beam projector are fixed, you may configure the screen settings only
once.
If the location of the smart sheet or beam projector is changed, you should configure the
screen settings again.
The screen settings are stored in the PC. If you change the PC, you should configure the
screen settings again.
Run PenlabMgr and press and hold the power button of the smart pen for
three seconds to turn on the pen. (Refer to the figure to the right.)
When the pen is turned on, the vibration motor operates for a brief moment.
Then, the pen enters the connection standby mode after the status LED
flickers red and blue alternately.
Turning on the smart pen and connecting it to the PC automatically
If you wait for a while in the connection standby
mode, the pen connects to the PC automatically and
all LEDs turn off except the black LED, which flickers
periodically.
The PC shows a message saying "The pen is
connected" and the pen icon on the system tray
turns blue.
The Bluetooth dongle and smart pen are shipped in a
pair to ensure that they can be connected automatically.
If they are not automatically connected, perform "Smart
Pen Pairing" on the page 17.
Click the pen icon on the system tray and select
[Configuration] → [Calibration].
To match the location to which the smart pen points with the coordinates of the location on the screen,
you need to configure the screen settings.

Configuring the Smart Sheet for the First Time
Chapter 3. Using Product
13 Configuring the Smart sheet for the First Time
Configuring the environment (screen settings) [Continued]
The screen settings window may differ depending on the program version.
Proceed according to the instructions of the program.
Connect the smart pen first as you can configure the screen settings only after the smart
pen is connected.
① ② ④
⑤
⑨
⑥
⑧
⑩ ⑫
When authentication is completed, a red
cross mark appears automatically at the
location ① on the translucent screen as
shown in the figure.
Use the smart pen to click the center of
the cross mark. Each time you click a
cross, the next cross is displayed. You
need to click 12 points in total.
Once you click all points successfully, a
window opens so that you can check if
the screen settings are configured
properly.
The left screen appears when the screen
settings are configured successfully.
Click [Yes] to finish the screen settings.
③
⑦
⑪
Screen settings
configured successfully
Using the Smart sheet
Chapter 3. Using Product
14 Using the Smart sheet
Starting the Smart Sheet
Turn on the computer and beam projector first and project the PC screen to the smart sheet.
Connect the Bluetooth dongle to a USB port and run PenlabMgr.
Then turn on the smart pen to connect it to the computer automatically.
Finally, run an application to use the smart sheet.
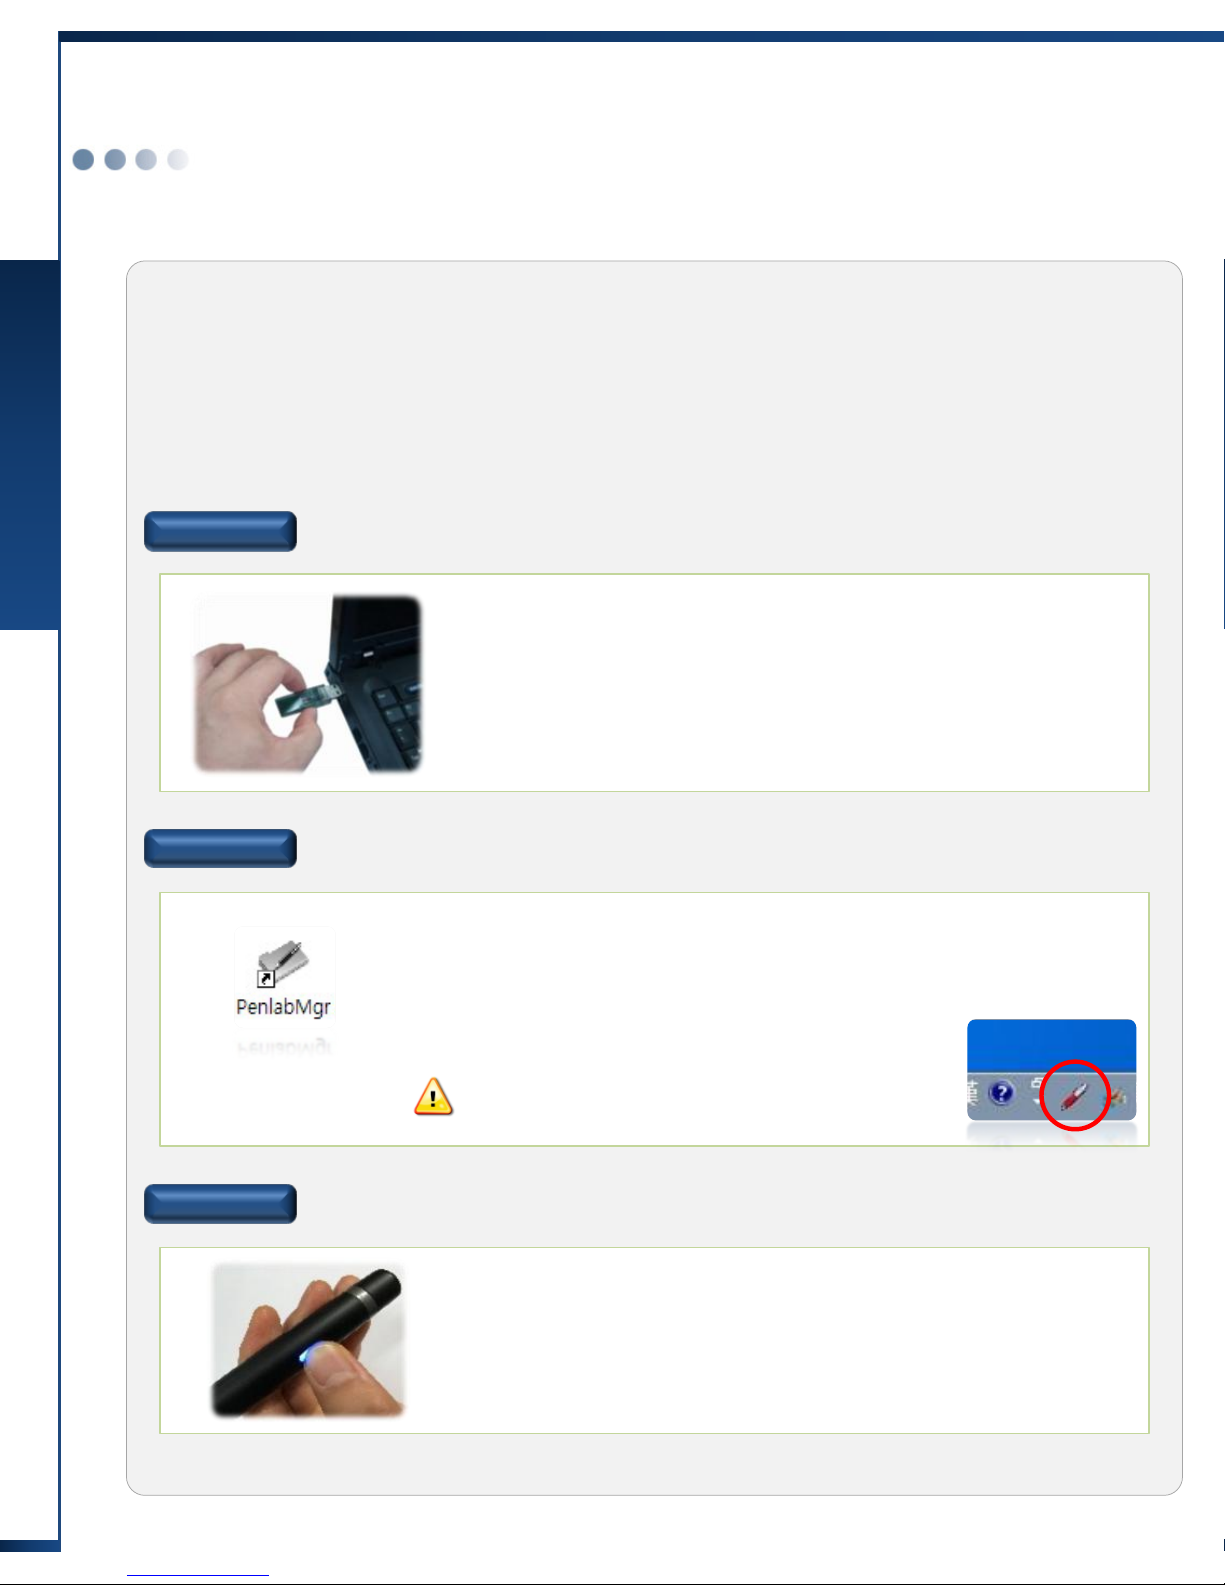
Step 1
Connect the Bluetooth dongle.
Step 2
Run PenlabMgr.
Connect the Bluetooth dongle to a USB port.
Click the icon on Desktop to run PenlabMgr.
If it runs successfully, a pen-shaped icon appears in red at the bottom
right of the screen (system tray).
Be sure to connect the Bluetooth dongle
before running PenlabMgr.
Step 3
Turning on the smart pen and connecting it to the PC automatically
Run PenlabMgr and press and hold the power button of the smart
pen for three seconds to turn on the pen.
When the pen is turned on, the vibration motor operates for a brief
moment. Then, the pen enters the connection standby mode after
the status LED flickers red and blue alternately.

Using the Smart sheet
Chapter 3. Using Product
15 Using the Smart sheet
Step 4
Check if the smart pen is connected.
If you wait for a while in the connection
standby mode, the pen connects to the PC
automatically and all LEDs turn off except the
black LED, which flickers periodically.
The PC shows a message saying "The pen is
connected."
And the pen icon on the system tray turns
blue.
It doesn't matter whether you turn off the pen
first or exit PenlabMgr first.
Step 5
Run an application.
If the pen icon on the system tray turns blue, it mean that the pen is successfully connected to the
PC. Now you can use the smart pen to control the PC on the sheet screen.
In addition, you can use a writing program (e.g. Microsoft PowerPoint) to use the sheet as a digital
whiteboard. Some examples of use are provided on the next page.
Exiting the Smart Sheet
To exit the smart sheet, turn off the pen and exit PenlabMgr.
If you turn off the pen, A message saying "The pen
is disconnected" appears on the PC and the pen
icon turns red.
Click the pen icon and select “Quit" to end
PenlabMgr.

Using the Smart Sheet
Chapter 3. Using Product
16 Using the Smart Sheet
Examples of Using the Smart Pen and Smart Sheet
Controlling the PC
You can use the smart pen and smart sheet to control all functions of the PC.
You can run programs and select menus in the PC using the pen and sheet.
PowerPoint Presentation
You can use the product for lectures and presentations.
You can use the writing function of PowerPoint to not only navigate between pages but also
enter the text on a slide show.
The writing function of
PowerPoint
The writing function is found at the bottom left of the PowerPoint slide show screen.
Select a pen to enter the text on the slide show.
You can use the PowerPoint paper (dedicated paper sold separately) to control the
PowerPoint program more conveniently.

Using the Smart Sheet
Chapter 3. Using Product
17 Using the Smart Sheet
Smart Pen Paring (for Automatic Connection)
The Bluetooth dongle and smart pen are shipped in a pair to ensure that they can be connected
automatically.
If the smart pen is not automatically connected to the PC as shown in the "Starting the Smart Sheet "
section, connect the smart pen as follows:
If you run PenlabMgr and turn on the smart pen but
the pen is not automatically connected to the PC,
click the pen icon on the system tray to display the
"Search " window.
With the smart pen turned on, run [Search] to open a
search window as shown to the left.
Click [Start scan] to search for available smart pens.
When you connect the smart pen, the smart pen should be in the
connection standby mode where the status LED flickers red and
blue alternately. Refer to the Components of Smart Pen and Its
Operating Statuses on the page 18.
When the search results are shown on the screen,
select a device and click "Connect" to connect to the
smart pen.
If the smart pen is not in the search results, check the
smart pen again and put it into the connection standby
mode. Then, execute the search again.
Once connected, the pen icon turns blue and a
message appears, saying “Connected".
Perform this procedure only when the automatic
connection fails.
Once connected, the smart pen and Bluetooth
dongle do not need additional configuration.

Using the Dedicated Paper
Chapter 3. Using Product
18
Using the Dedicated Paper
Using the Dedicated Paper (Optional)
You can use the smart pen on the dedicated paper as well as the smart sheet.
There are two types of dedicated paper as shown below.
Dedicated A4
paper
Dedicated
PowerPoint paper
You can use the paper dedicated for smart pen to perform writing or control the PC.
Especially, the paper dedicated for PowerPoint has additional functions usable on the PowerPoint
slide show for lectures and presentations.
Configuring the dedicated paper area
The paper dedicated for smart pen is sold separately.
The instructions on how to use the paper dedicated for PowerPoint are provided separately.
The whole page of a dedicated paper
matches the screen of the PC monitor at 1:1.
If you want to use a certain area of the
dedicated paper, you should use the “Paper
Area" option to match the certain area with
the screen of the PC monitor.
Click the pen icon on the system tray and
select [Configuration] → [Paper Area].
When a window appears as shown to the
left, select the corners of the area you want
to use in the order as shown in the figure.
Click [OK] to complete the setting.
(The settings are automatically stored.)
Run [Reset] to use the whole area of the
dedicated paper again.
①
②

Using the Smart Sheet
Chapter 3. Using Product
19
Using the Smart Sheet
PenlabMgr menu.
Click the PenlabMgr icon on the system tray to open the menu as shown in the figure.
The main functions of the menu are as follows:
Search devices to connect a smart pen.
Configure the user environment.
(Screen setting, pressure setting, and
area setting)
Exit the program.
Check the
program version.
Configure the smart
sheet screen.
Configure the smart
pen pressure.
Configure the
dedicated paper area
System tray icons
You can recognize the pen connection and operation statuses from the system tray icons.
Red : The smart pen is not connected. Turn on the smart pen to connect it automatically.
Blue : The smart pen is connected and available for use.
Grey : The Bluetooth dongle is not connected to the PC.
Connect the provided Bluetooth dongle to the PC to change the color to red and
use the smart pen.

Usage Precautions
Chapter 3. Using Product
20
Usage Precautions
Proper posture to use the smart pen
The position recognition function of the smart pen may be affected by how you grab the pen,
as the smart sheet and smart pen use the optical position recognition method.
Refer to the following figure to find a proper way of grabbing the pen. It is recommended that
you grab the pen as you grab a fountain pen.
Proper grabbing Do not tilt the smart pen too low.
If you use the other end of the
smart pen, it does not work.
The optical sensor of the smart pen faces upwards.
(You grabbed it in a wrong direction.)
If you grab the pen improperly, recognition errors may occur.
If the smart pen fails to recognize the sheet, vibration occurs.
If vibration occurs, refer to the above figures to grab the pen correctly.

Components of Smart Pen and Its Operating Statuses
Chapter 4. Using Smart Pen
21
Components of Smart Pen and Its Operating Statuses
Certification No.: PEN-PB-100-0810
※ This device is not secure and subject to radio interference.
▶ If the battery is discharged, you cannot turn on the power.
▶ You can use the pen while charging through the USB port.
Turning on the pen
Turning off the pen
LED color and pen status (StatusLED)
Flickering blue
and red
alternatively
Waiting for Bluetooth connection
Purple
The Bluetooth connection is not established for two
minutes or longer.
Blue
The Bluetooth is connected and available for use.
Red
Battery shortage warning
Press and hold the power button for two to three
seconds until the status LED turns off.
Press and hold the power button for two to three
seconds.
Vibration occurs and the status LED flickers to
indicate that the pen has entered the connection
standby mode.
LED color and charging status
(Charging LED)
Red
Charging (normal)
Blue
Charging completed
Charging Port
Status LED
Power Button
Optical Sensor
Pen Tip
Pen Clip
Pen Cap

Charging the Smart Pen and Replacing the Pen Tip
Chapter 4. Using Smart Pen
22
Charging the Smart Pen and Replacing the Pen Tip
Charging
You can use a USB port of the computer to charge the smart pen.
During charging, the charging LED turns blue. When charging is finished, the charging LED turns off.
Charging using a USB port : Turn on the computer and use the USB charging cable to connect
the pen to the PC as shown below:
Connect the USB
charging cable.
Connect the cable to
a USB port.
• The pen is automatically charged when it is connected to the computer. You can still use the pen while charging it.
• Do not use other USB charging cables except the provided one. It may cause malfunction or failure.
• If the computer switches to the sleep mode, the pen may not be charged.
• If the charging LED turns red, reconnect the USB charging cable.
If the symptom continues, contact the customer service center.
• Charge or store the pen at the room temperature. If it is too hot or too cold, charging may take longer or the pen may
not be charged.
• The built-in battery is a consumable item and its lifespan becomes shorter with usage. (The warranty for the built-in
battery lasts 6 months.)
• It takes about two hours until a discharged battery is full charged. (The actual time may differ depending on the
charging environment.)

Charging the Smart Pen and Replacing the Pen Tip
Chapter 4. Using Smart Pen
23
Charging the Smart Pen and Replacing the Pen Tip
Replacing the Pen Tip
If the plastic pen tip of the smart pen is too worn, the performance of the pen may be affected. if the ballpoint pen tip has no ink, you can replace the pen tip as shown below:
(Notice) There are two types of pen tips: a plastic tip for the smart sheet and a ball-point pen tip for the
dedicated paper.
1) Hold the end of the pen tip and draw it in the direction of the arrow
to remove it as shown in the figure.
(To remove the pen tip, use the pliers or other tool.)
2) Insert a new pen tip and push it into the pen.
3) Place the tip on a hard surface and push it down until it is fixed
completely.
Mounting/Unmounting the Pen Cap
If you don't use the smart pen or if you are carrying it, keep the pen cap on the pen.
You can mount or unmount the pen cap as shown below:
1) Mounting the pen cap : Align the pen cap's clip with the pen tip
and put the pen cap onto the pen.
To mount the pen cap, keep the clip of the pen cap facing
upwards as shown in the figure.
If you don't, you cannot mount the pen cap.
2) Unmounting the pen cap : Hold and draw the pen cap from the
smart pen.

If the pen is not connected to the PC for a long time after it is turned on, the pen switches to the power
saving mode.
Turn off and on the pen to put the pen into the connection standby mode and try to connect the pen to
the PC again.
Check if the battery is discharged. If discharged, use the USB charging cable to charge the pen.
Troubleshooting
Chapter 5. Maintenance
24
Troubleshooting
Power is not turned on.
Check if the USB charging cable is properly connected. You cannot use a general USB cable.
Check if the power is supplied to the PC's USB port.
(If the PC is in the sleep mode or turned off, no power is supplied.)
The pen is not charged even if it is connected to the power.
Check if the Bluetooth dongle is connected to the PC.
Check if the pen control program, PenlabMgr, is running. (Refer to how to use on the page 14.)
The pen is turned on but not connected to the PC and the LED keeps flickering.
The pen's operating status LEDs are all turned on (in purple) and the pen does not work.
Check if you are using the pen on the dedicated paper with printed patterns or on the smart sheet.
Check if you are tilting the pen within the effective operation angle. Make yourself familiar with the pen
usage method.
The pen does not operate even if the status LED is turned on properly.
Check if you are using the pen on the dedicated paper with printed patterns.
If the pen has a recognition error continuously, the vibration motor operates.
Make yourself familiar with the pen usage method.
The pen keeps vibrating.
This symptom occurs when the Bluetooth communication is disconnected.
Turn off and on the pen to try to establish the Bluetooth connection (or automatic connection to the PC).
LED starts to flicker suddenly when I use the pen.

If a child sucks or bites the product or swallows part of it, it may cause suffocation, explosion, electric
shock, or exposure to electromagnetic wave. Make yourself familiar with the usage method.
Using the Product Safely
Chapter 5. Maintenance
25
Using the Product Safely
Keep the product away from children or pets.
If the charging cable or battery charging port is contaminated with foreign substances, the battery may
not be charged. Wipe the product with soft cloth. Do not use chemicals (alcohol, benzene, or thinner) as
it may cause fire.
Keep the product clean.
If you store the product in a hot place (inside the car during the summer, in a closed area with direct
sunlight, or near a fire source), the product may deform, catch fire or explode. If you store it in a too hot
or too cold area, the product may malfunction or its lifespan may be reduced. Use or keep the product
always at room temperature.
Use and store the product at room temperature.
Use authorized products provided by the manufacturer. If you use an unauthorized charger, etc., the
product's lifespan or performance may be reduced, and we cannot guarantee the safety of the user.
Be sure to use a genuine product.
If the product or charging cable is wet or used in a humid environment, it may cause electric shock or
failure due to damage of its parts or circuits. Also, a failure due to discoloration of the product is not
covered by the warranty.
Avoid moisture and humidity.
If you use a microwave, heating stove, hair dryer or other heat source to dry the wet product, a failure,
deformation or explosion of the product may occur and we cannot guarantee the safety of the user. If the
product is wet, do not turn on the product, and contact your service center.
Do not use a heat source to dry the product even if it is wet.
Airplanes and hospitals use high-frequency equipment, and, if you use the product in these places, an
accident may occur due to interference. Be sure to follow the instructions of the relevant organizations
(the same applies to places with inflammable substances or with the possibility of explosion).
Do not use the product where its use is prohibited, such as in an airplane or hospital.
It may cause product deformation, explosion or fire.
Do not place the pen and the charging cable near or inside heat sources (such as a
heater or microwave).
Applying impact to the product or dropping it may case a failure or explosion. If you disassemble or
modify the product arbitrarily, the warranty will no longer apply.
Do not modify, disassemble, or repair the product arbitrarily.
As the product uses the same bandwidth as them, it may malfunction or generate noise.
Do not use the product near a microwave or WLAN.

Product inquiry and customer service: 82-2-2026-3914
Customer Service
Chapter 5. Maintenance
26
Customer Service
To use the product, you need to connect it to your PC or smartphone using the Bluetooth
wireless communication.
We provide customer service regarding product damage or malfunction that occurs while the
product is connected through the Bluetooth wireless communication. But we cannot provide
customer service regarding Bluetooth connection errors on any device, including your PC, to
which the pen is connected.
Please contact us through the phone before sending the product to us.
When you send the product to us, put it in a cushioned package so that it is not affected by
impact.
Please send your name, contact information, address, and symptoms with the product.
If the warranty has not expired, the delivery cost will be borne by us.
Even if the warranty has not expired, any failure caused by improper use of the product is
not covered by the warranty and you will be charged a certain fee.
Our address:
Room 1309, C-dong, Woolim Lion's Valley, 371-28, Gasan-dong, Geumcheongu, Seoul, Republic of Korea
Customer Service, ILS Communications Inc.

Product Warranty
Product Warranty
27
Product Warranty
Product Warranty
This product went thorough strict quality management and
inspection.
Please fill in the product warranty and keep it in a safe place.
Free
Service
1. If the product is found defective or has a failure under general usage conditions within the
warranty period, you can have the product repaired or replaced.
2. If the product is used for sales purpose, the warranty period is shortened to half the
original period.
3. You can receive the warranty service if a product failure occurs under normal usage
conditions within one year of purchase (warranty period).
4 . The warranty period for the built-in battery is 6 months.
Paid
Service
1. The product is used under abnormal usage conditions or beyond its specifications.
2. The failure is caused by the user's faults, accidents, repairs, or tests that do not consider
product characteristics.
3 . The failure is caused by a natural disaster.
4. The lifespan of a consumable part has expired.
Product Name
Smart sheet and smart pen
Model
Smart Board
PWS-92W / PWS-150W
Smart Pen
SmartPen Blue (PB-100)
Warranty Period
One year
Date of Purchase
Place of Purchase
Customer Service and Technical
Support
02) 2026 – 3914 http://www.penlab.co.kr
Customer
Address
Name
Contact
ILS Communications Inc.
Room 1309, C-dong, Woolim Lion's Valley, 371-28, Gasan-dong, Geumcheongu, Seoul, Republic of Korea
 Loading...