

Page 1

SecurePenDrive
User Manual
Ver 1.00 - B
Page 1
Page 2

Table of Contents
New Features••••••••••••••••••••••
1
Important Notice•••••••• •••••••••••••
2
Main Screen••••••••••••••••••••••
3
Setup password•••••••••••••••••••••
4
Change password••••••••••••••••••••
5
Disable / Remove password••••••••••••••••
6
3
3
4
5
7
8
Unlock device•••••••••••••••••••••
7
Password hint•••••••••••••••••••••
8
Format••••••••••••••••••••••••
9
9
10
11
Page 2
Page 3

New Features
1. Allows user to set own password. (maximum 16 characters)
2. Allows user to enter “Password Hint”, in case user forgot about their
password
3. Automatically format the “Protected” part of the USB Disk Pro when enter
wrong password 6 times.
4. New “Format” function, allows user to define the capacity of the protected
area.
IMPORTANT
1. When using USB Disk Pro with the security application program, only ONE USB
Disk Pro is allowed at once. DO NOT PLUG IN TWO OR MORE USB DISK PRO
AT THE SAME TIME.
Windows 2000 Users Only
2. Since Windows 2000 only can support ONE removable disk drive, theref ore user can
only see the “Protected” area in Windows 2000 environment. Hence, please copy the
security application program to the Windows desktop and access the AP from desktop.
Mac OS Users Only
3. There is NO Security Application Program available for Mac OS’s yet. Will provide
the Security AP for Mac soon.
4. Mac OS 8.6 ~ 10.1.1 These operating systems can only support ONE removable
drive. So, when you will only see the “protected” area in
these Mac OS’s.
5. Mac OS 10.1.2 From Mac OS 10.1.2 onward, Mac OS can support multi
and/or later removable drives, so you will see two drives as you will in
any of the Windows operating system
Page 3
Page 4
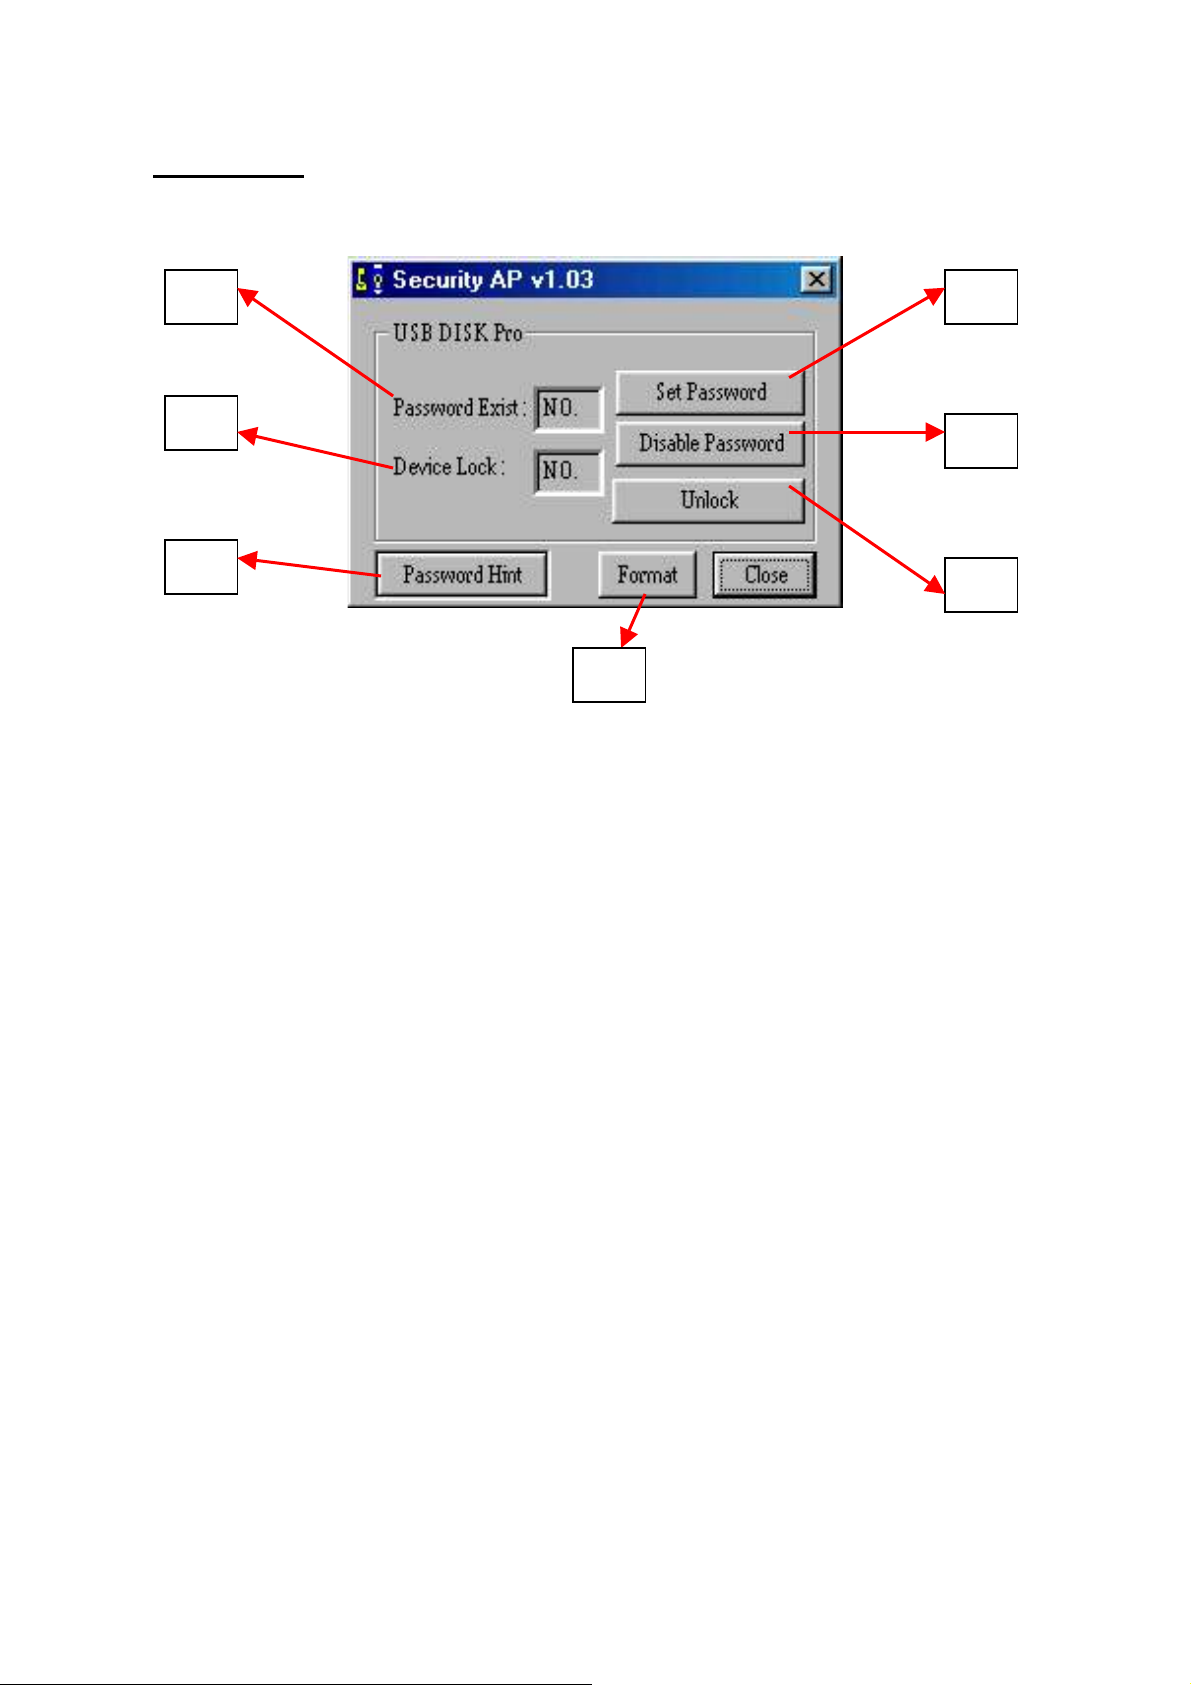
Main Screen
D
E
F
A Set up / Change password
B Disable / Remove password
G
A
B
C
C Unlock Device
D Password Exist Status – tells you whether a password has been set up or not
E Device Lock Status – tells you whether the device is locked or not
F Forgot Password ? – don’t worry, let password hint remind you
G Format – allow user to set the capacity of the “protected” area
Page 4
Page 5
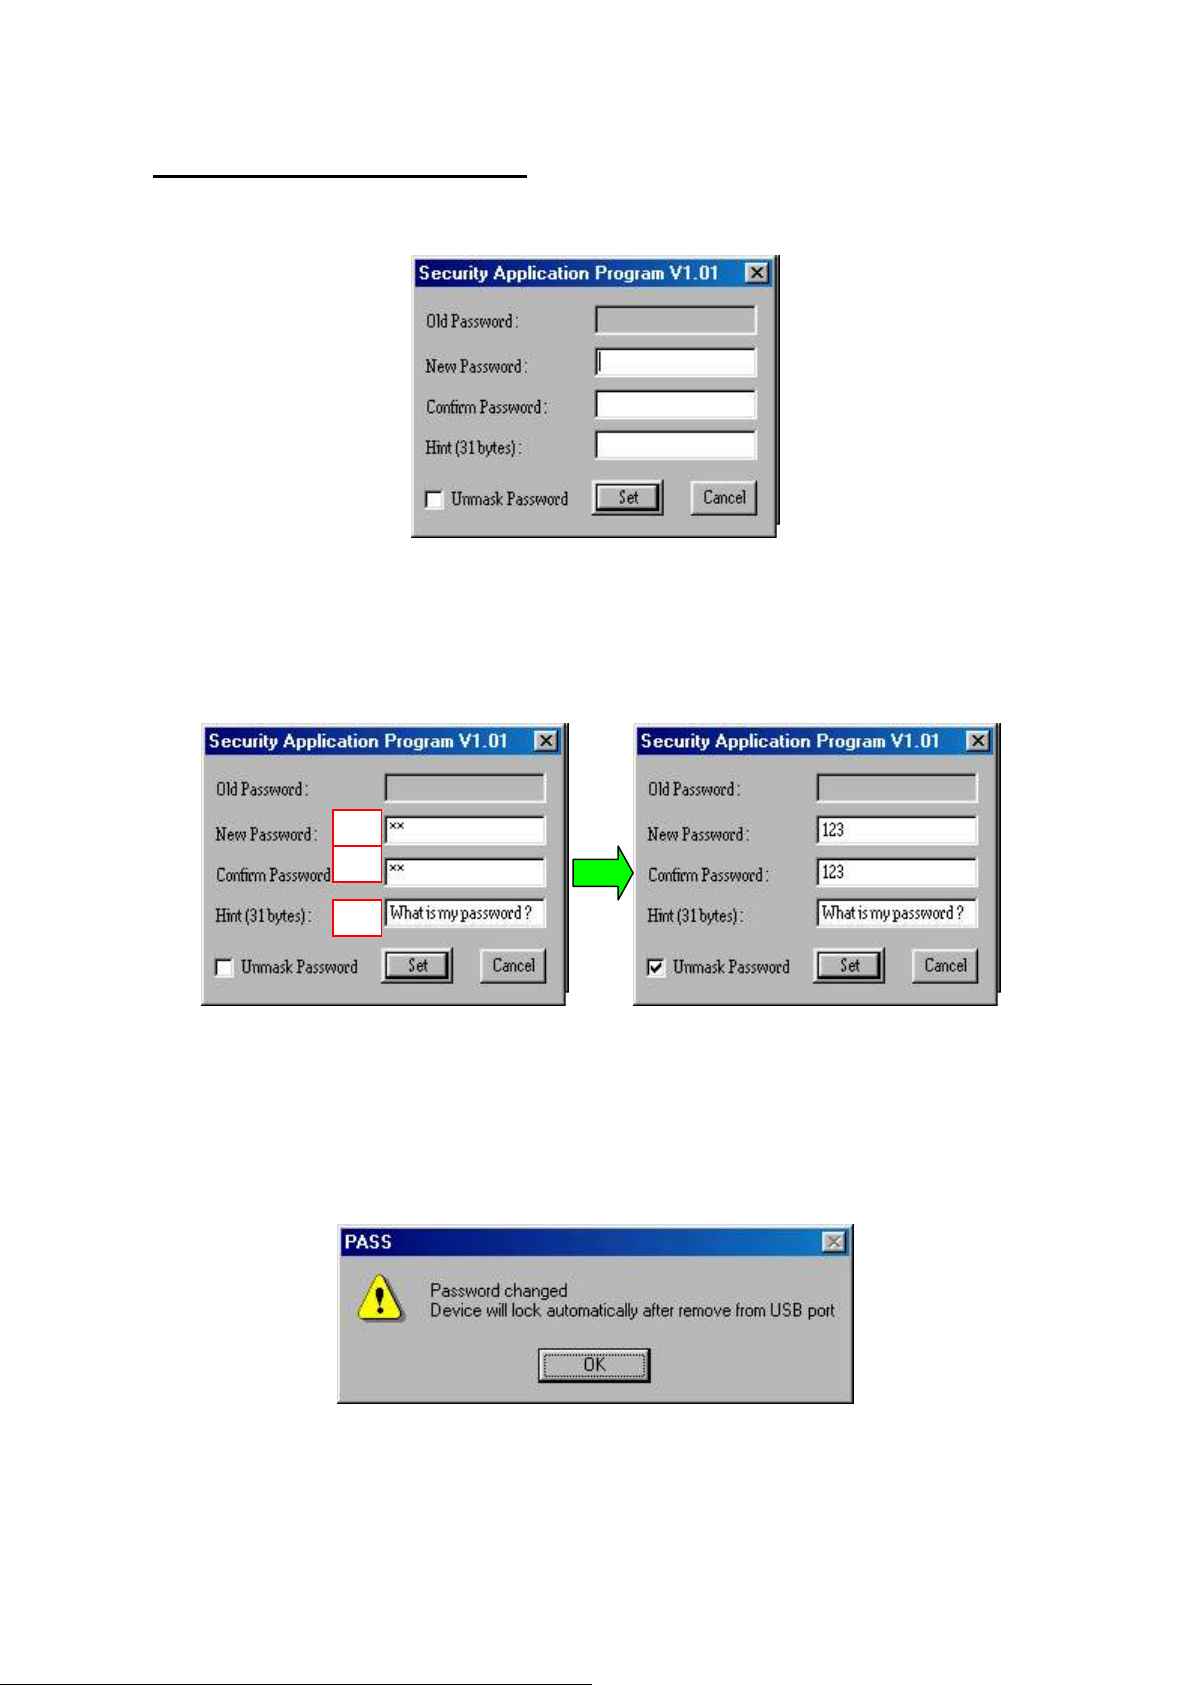
Apparatus A – Setup Password
(1) Press “Set Password” to setup password, you will see the following screen
(2) Enter a password of your choice. (maximum 16 characters long)
(3) Confirm password by re-enter the password you set in (2).
(4) Enter a hint of your own, in case you forget your password. You can enter anything
you want within 31 characters.
PS : Tick “Unmask Password” box to see what are you typing or what you have
entered
(5) Press “Set” to confirm changes. You will see the following message window pop up.
This message window tells you, that the device will be automatically locked after you
remove the device from USB port.
Page 5
Page 6
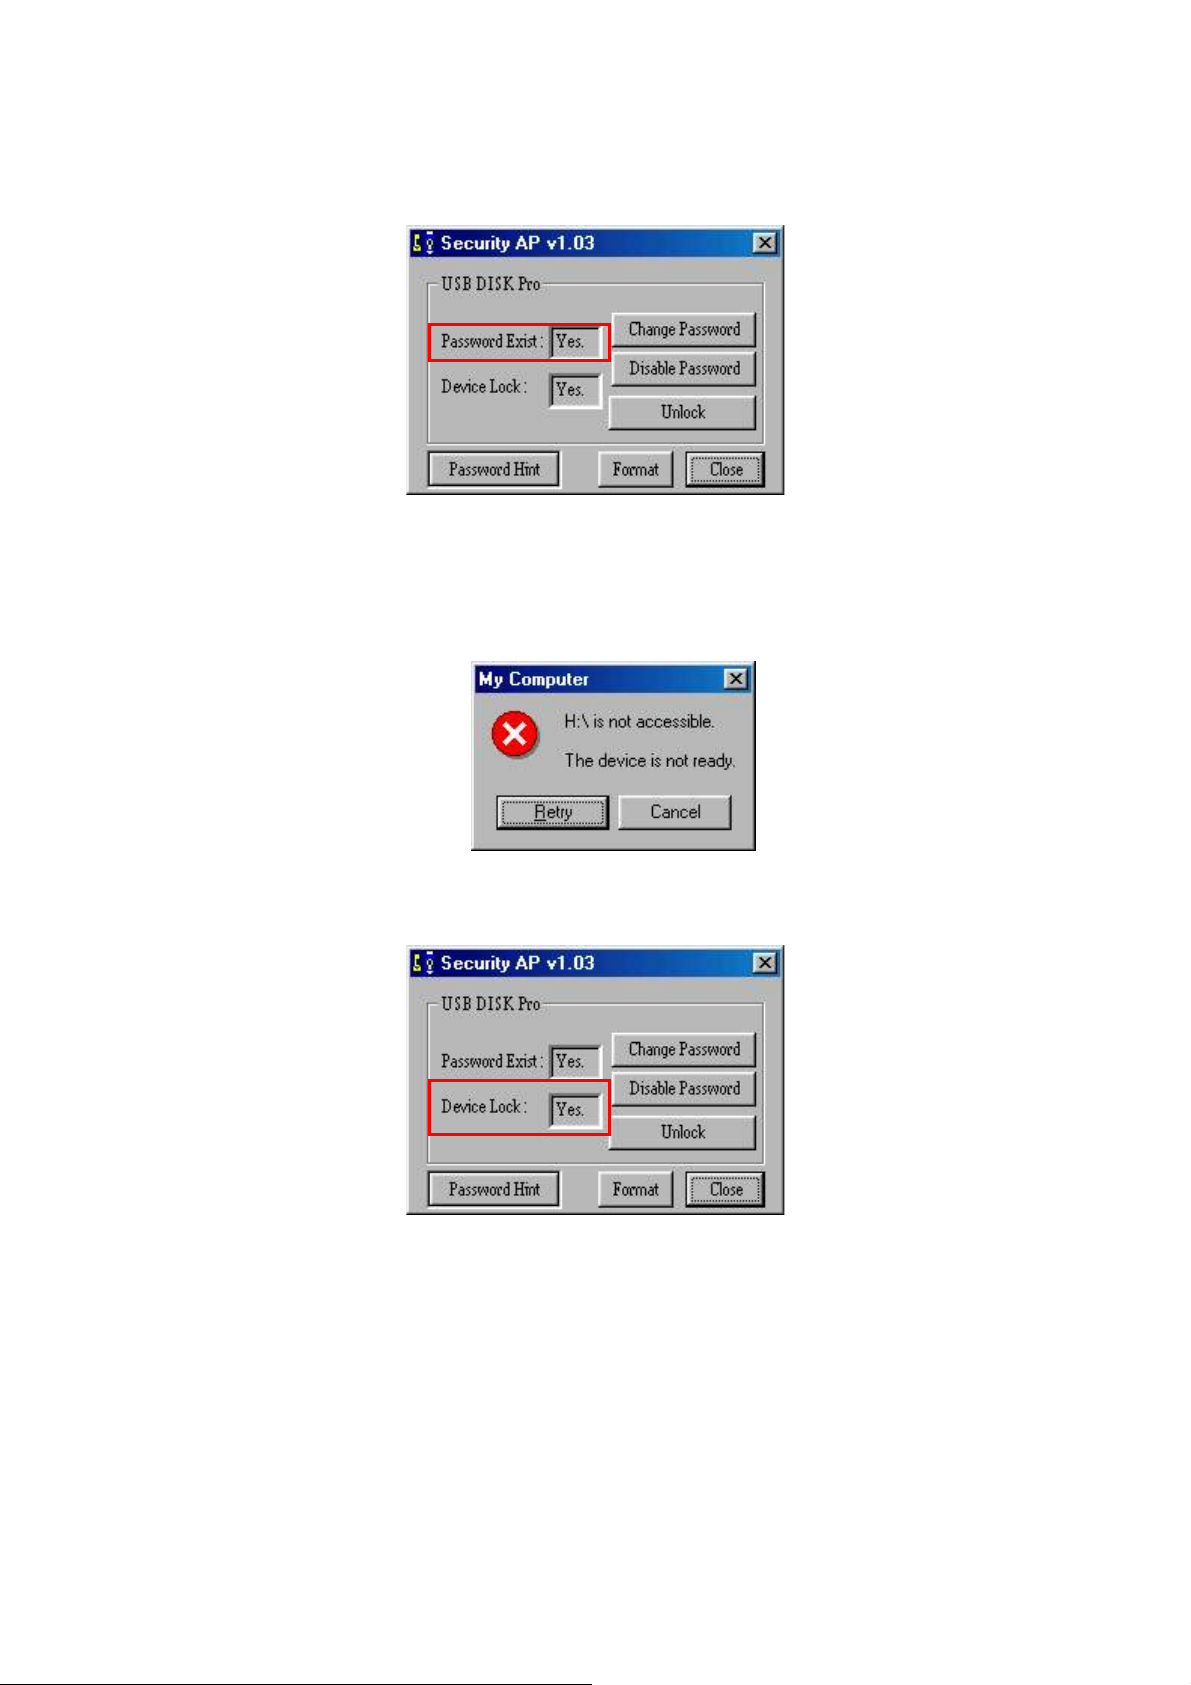
(6) Once you have set up the password correctly, you will notice the change in “Password
Exist” Status.
NOTE: When you remove the device from USB port and re-insert it again, the device
will automatically be locked. If you try to access it, it will reply with some error
message. (depending on the operating system, the error message will be different)
If you execute the Security AP, you will see that the device is LOCKED.
Page 6
Page 7
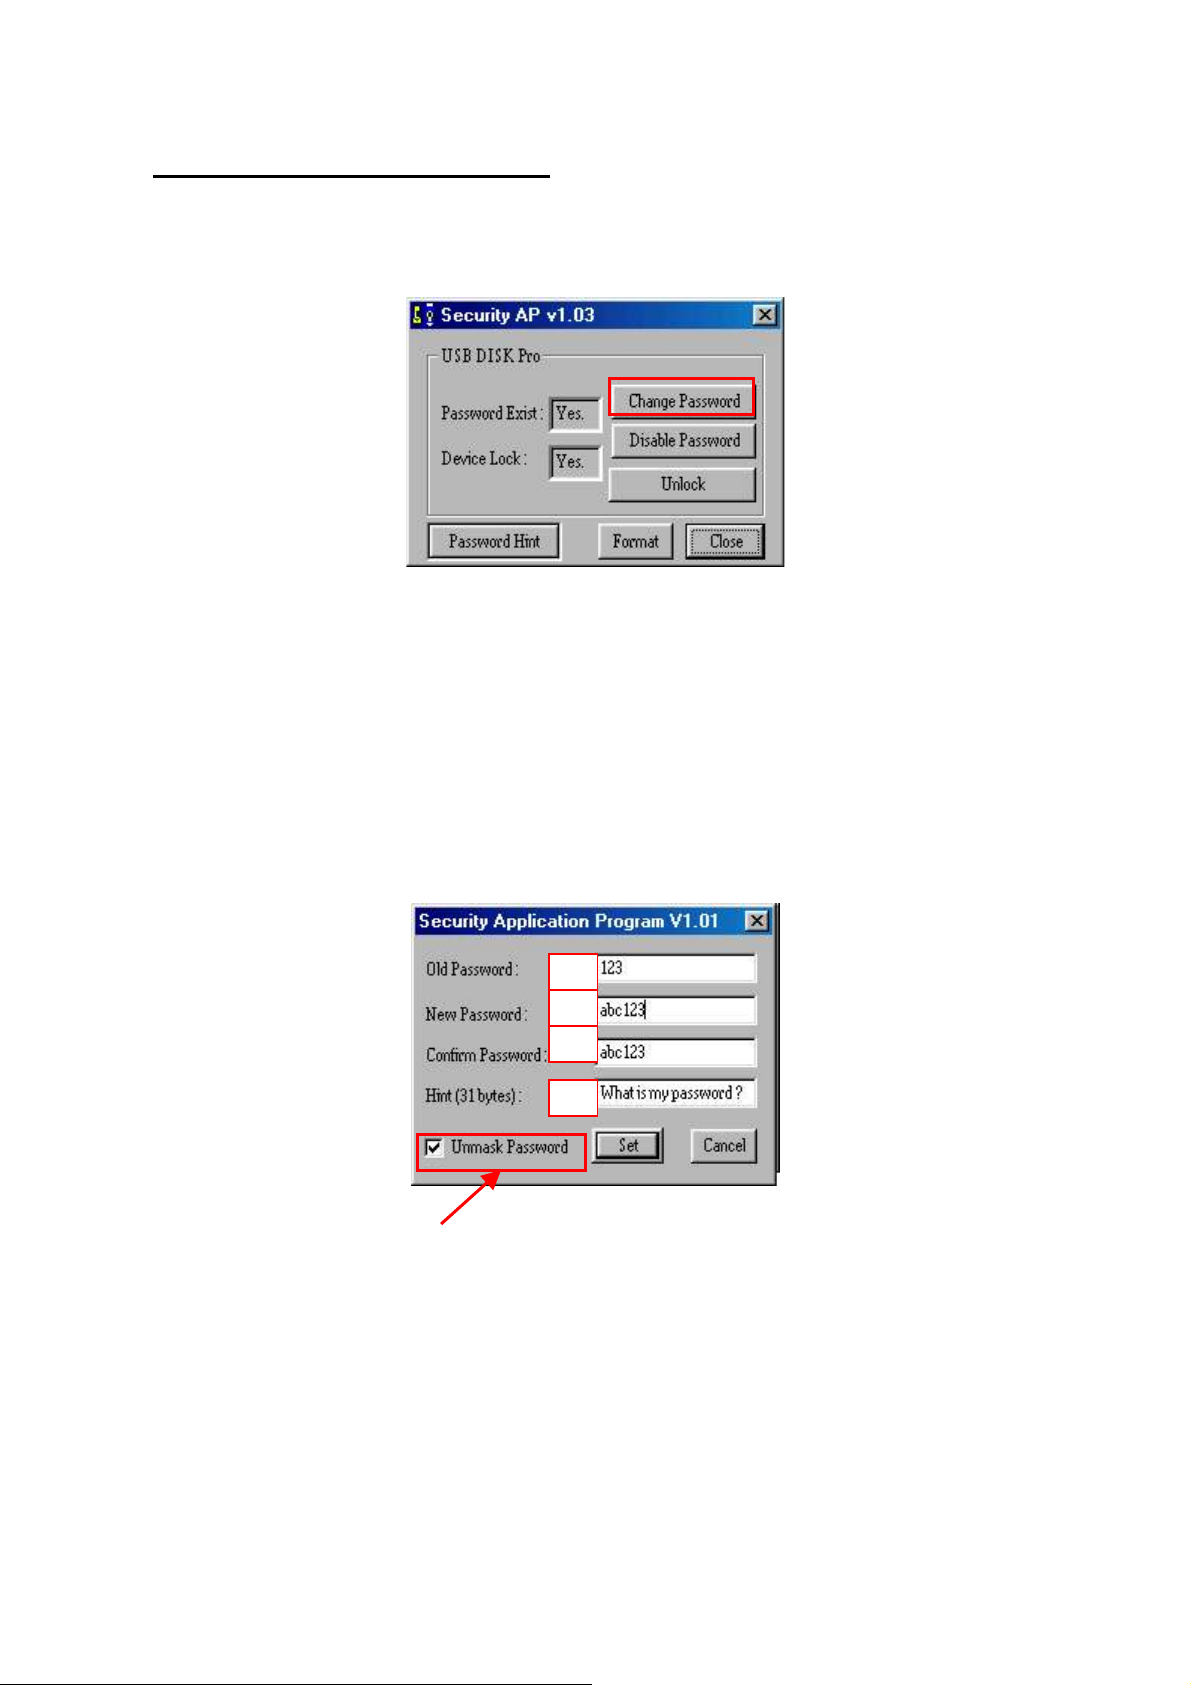
Apparatus A – Change Password
(1) If you have already setup a password before, you can change the password you set.
Click “Change Password” to change.
(2) Enter your old password
(3) Enter new password of your choice
(4) Confirm the new password by re-enter
(5) Change password hint if you wish.
PS : (i) Password Hint does not have to enter/change, if you don’t want to use it or
You want to use the old hint.
(ii) Password Hint can only be edit with new password.
ie : Password Hint can not be edit/change without change of password.
(iii) Use “Unmask Password” to see what you have typed.
Page 7
Page 8
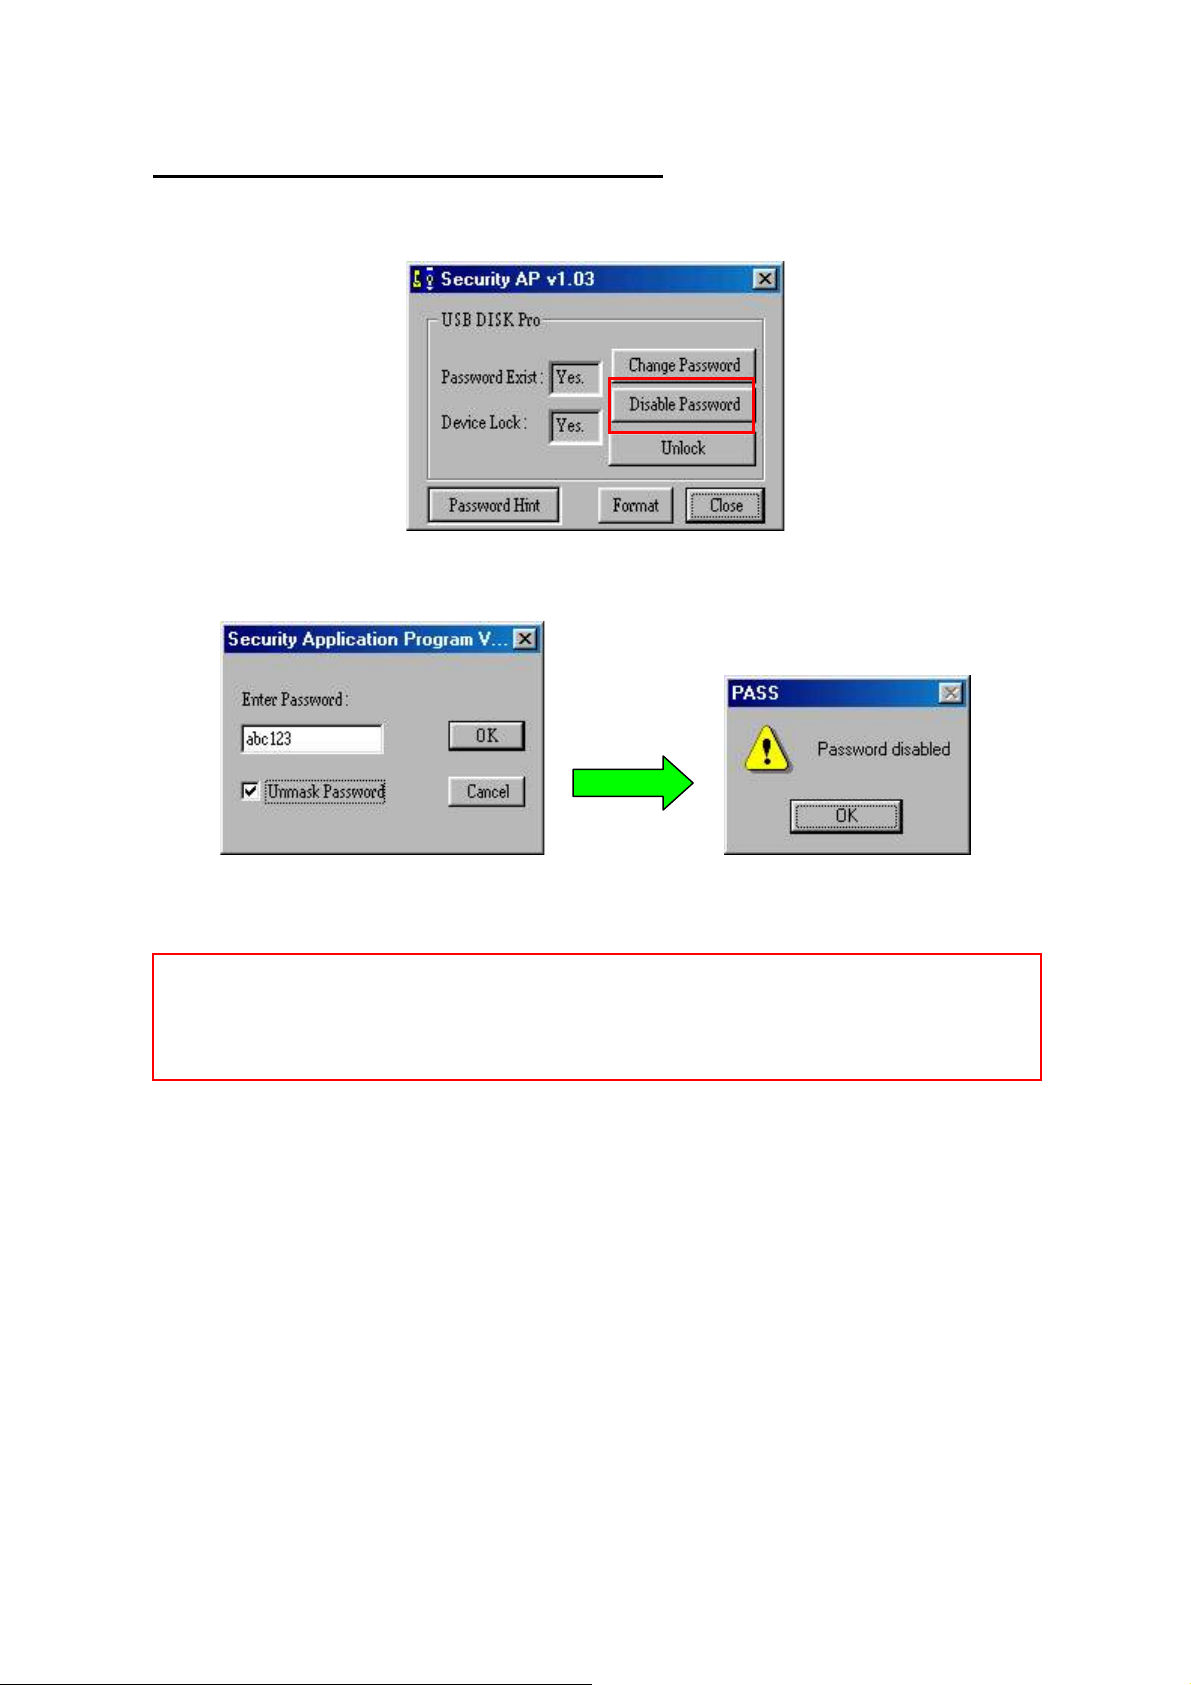
Apparatus B – Disable / Remove Password
(1) If you no longer want to use the password, select “Disable Password” to remove it.
(2) Enter your password.
You only have SIX chances to enter password correctly. If you enter wrong
password six times, it will automatically FORMAT the “protected” area of your
SecurePenDrive. (All data will be lost)
Page 8
Page 9
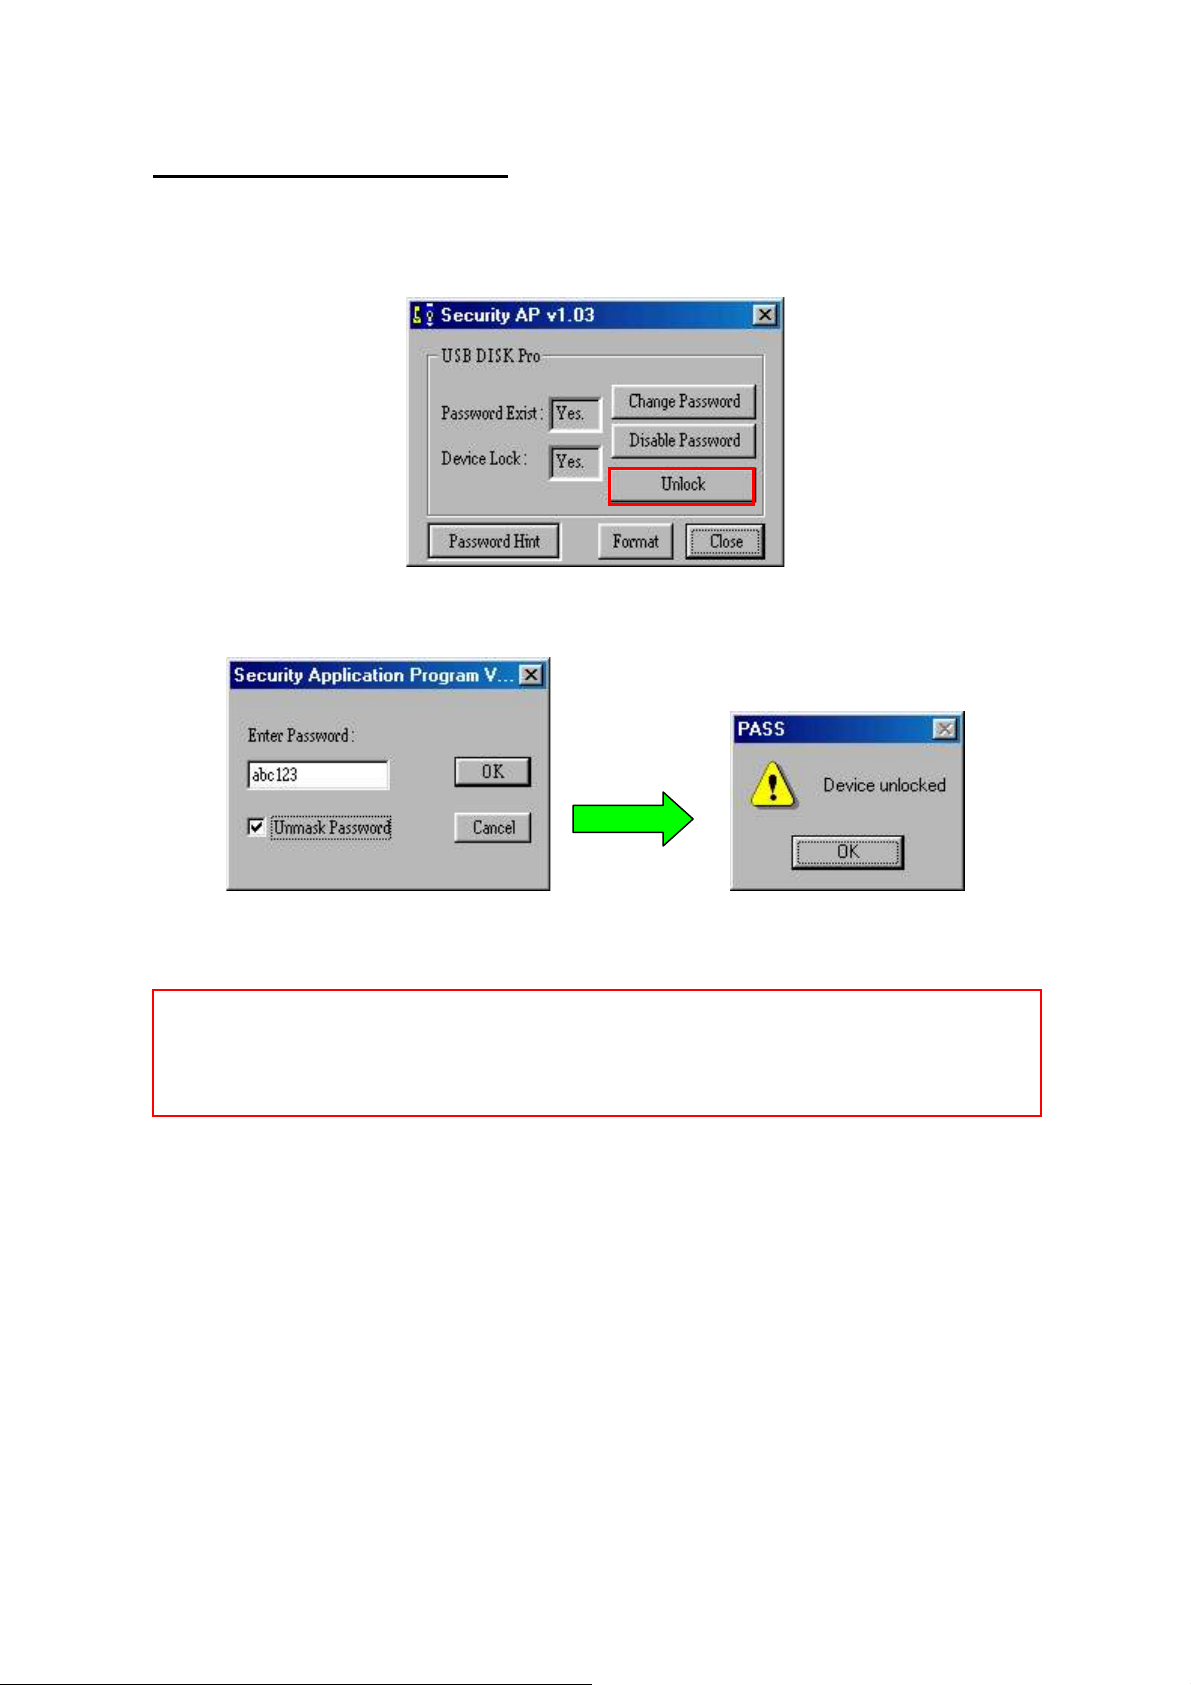
Apparatus C – Unlock Device
(1) If you have setup a password, before you can access the data on the protected area,
you must “Unlock” first. (enter password) Select “Unlock” to enter password.
(2) Enter your password.
You only have SIX chances to enter password correctly. If you enter wrong
password six times, it will automatically FORMAT the “protected” area of your
SecurePenDrive. (All data will be lost)
Page 9
Page 10
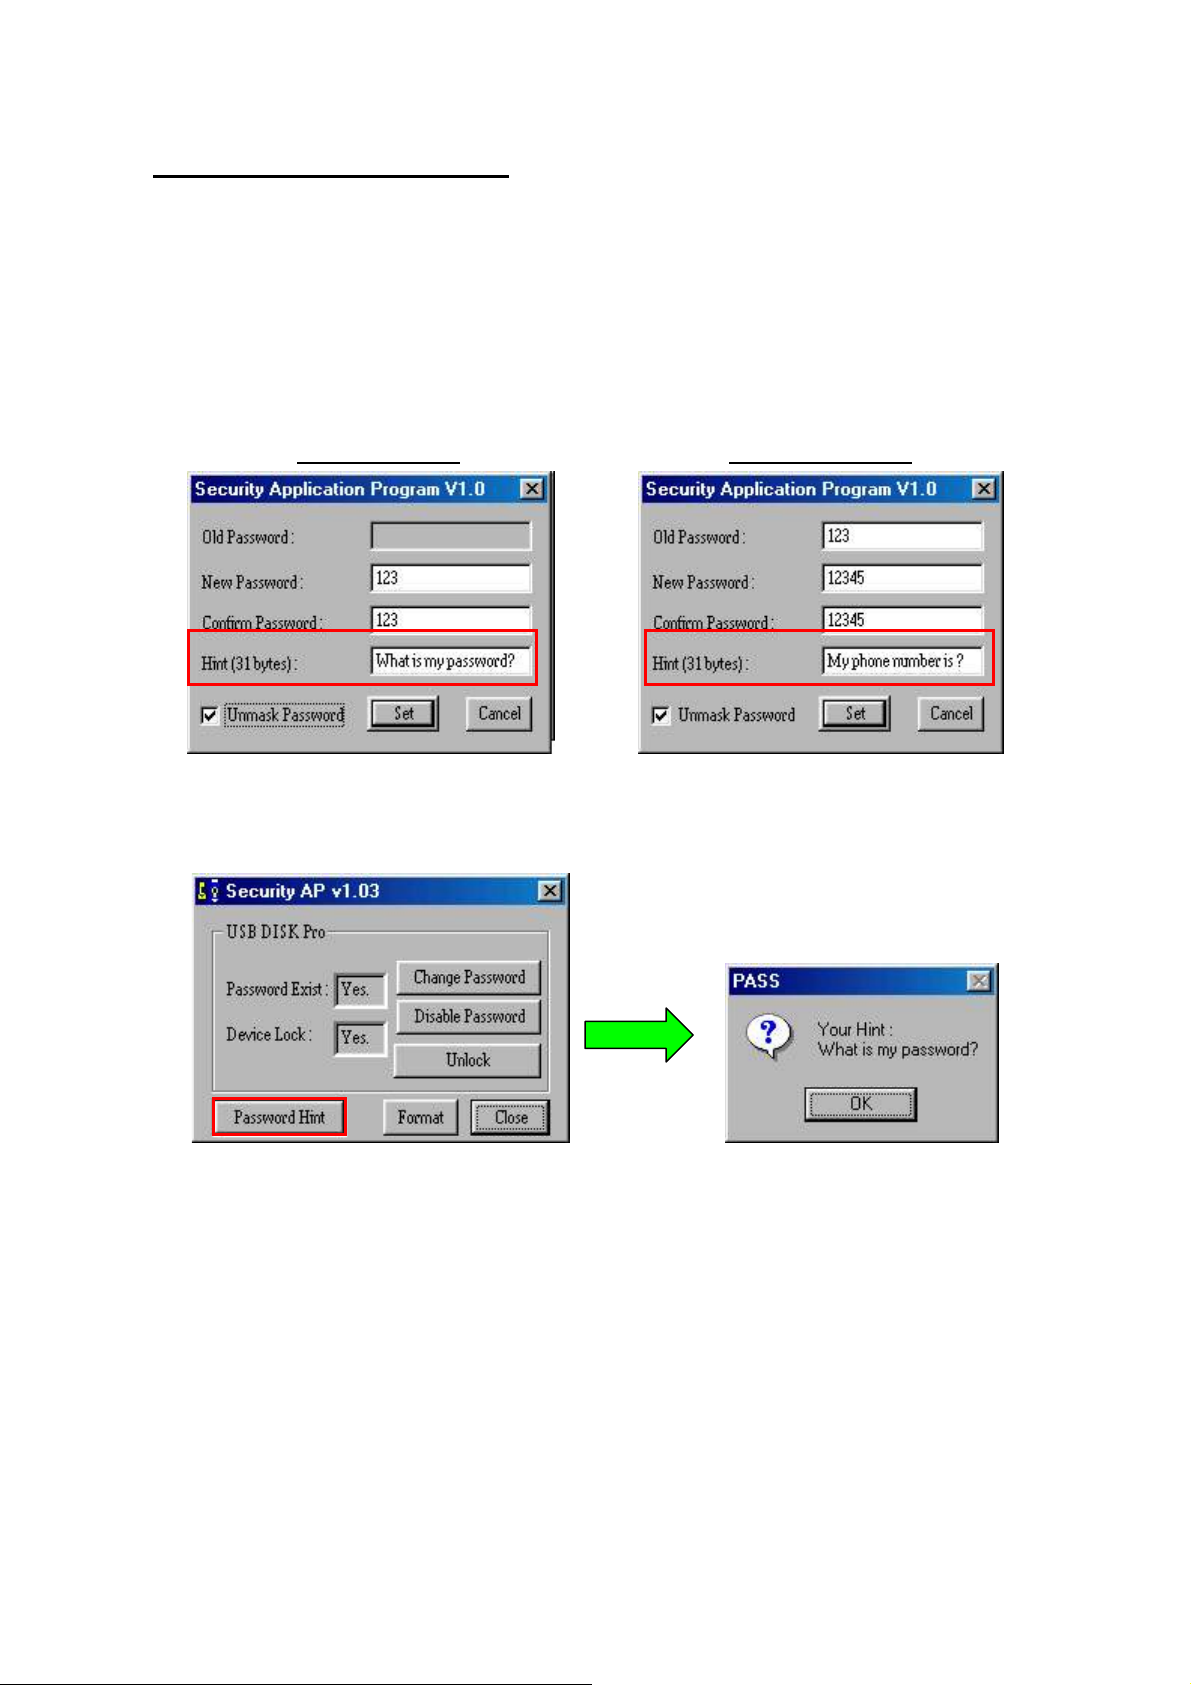
Apparatus F – Password Hint
As a human being, we all forget things from time to time. So when you setup/change your
password, you can also edit a “Reminder” of your choice, in case you forget your password.
(1) Enter a hint of your choice. (maximum 31 characters long)
You can edit the hint only when you
Setup Password Change Password
OR
(2) Press “Password Hint” any time to get your reminder.
Page 10
Page 11
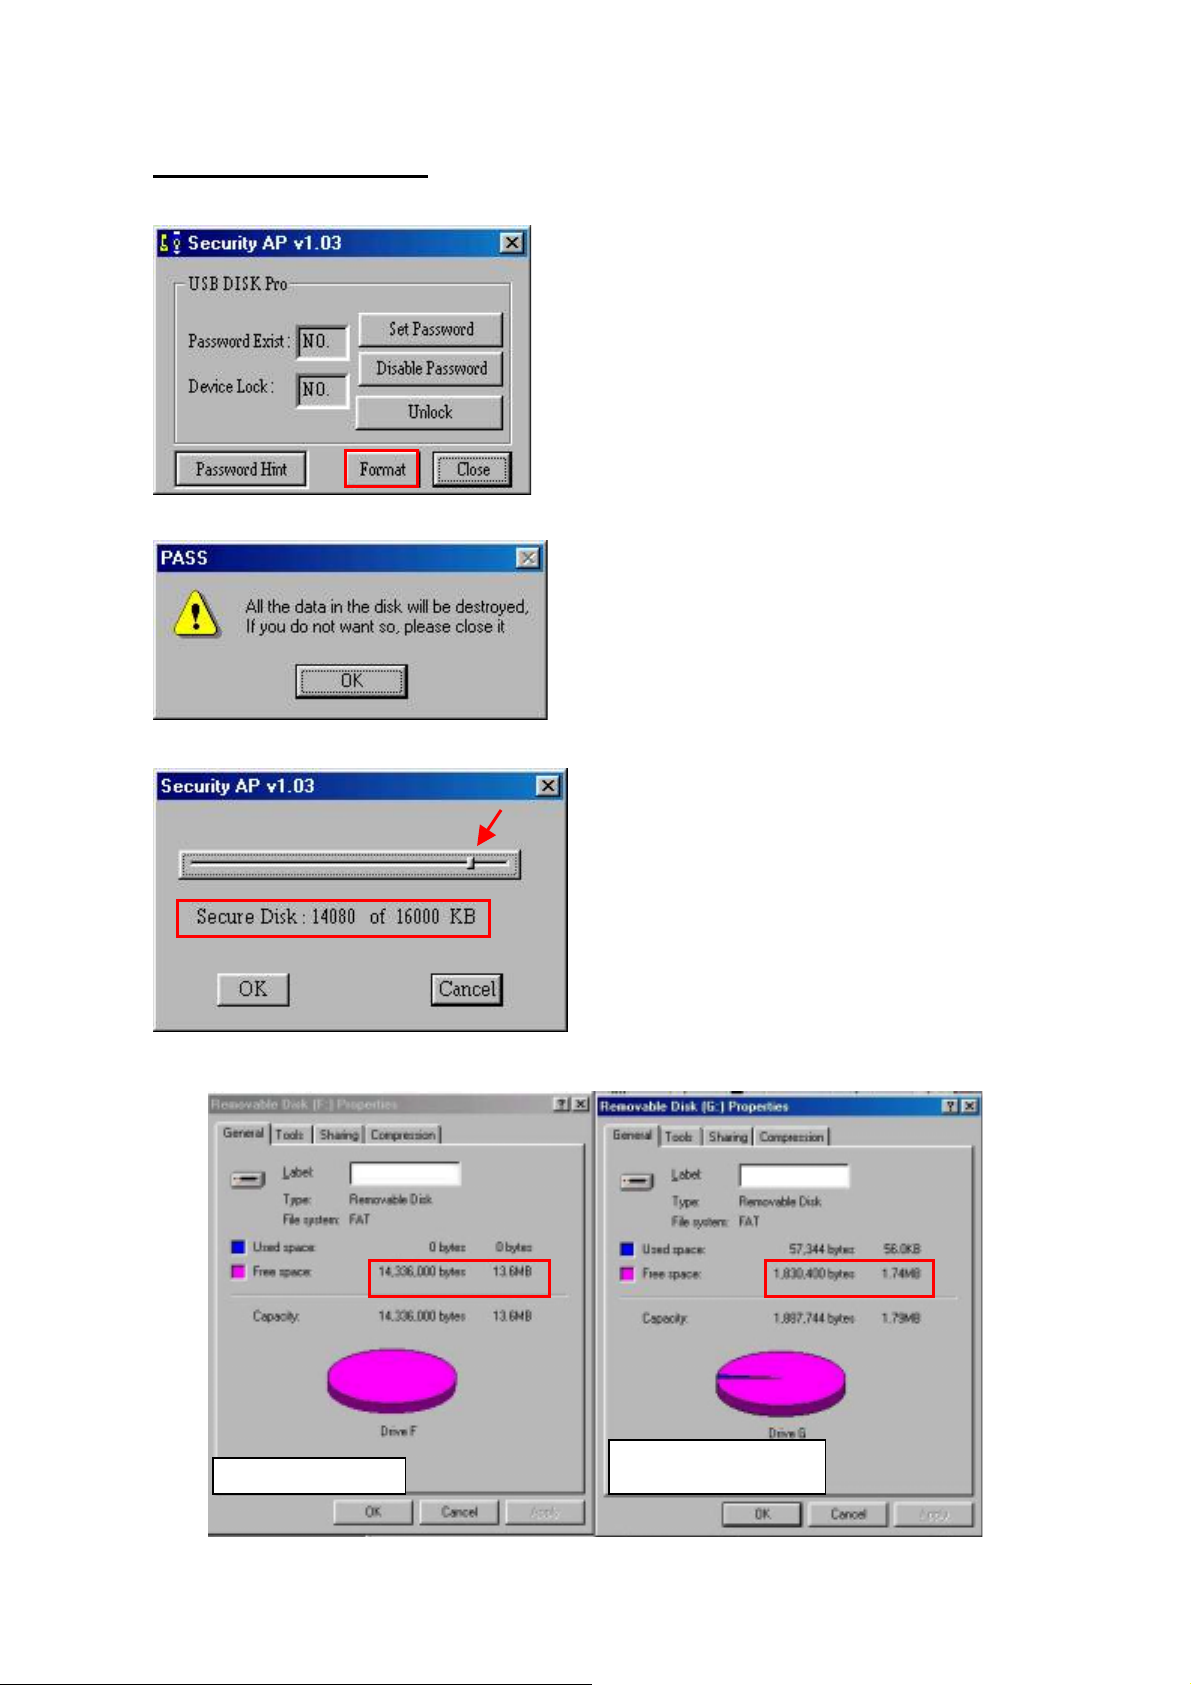
Apparatus G – Format
(1) Press “Format” to adjust the
capacities of the SecurePenDrive.
(2) A warning message will show,
telling user that if you proceed with
formatting, any data on the
SecurePenDrive will be lose.
(3) Drag the bar to adjust the capacity
of the “Protected” area.
eg: In this case, the protected area
is a bit over 14MB and the
unprotected area will be what ever
is left. (as shown below)
Page 11
Unprotected Area
 Loading...