

Page 1
Page 2

User Manual
●
Keep the device and all accessories out of the reach of small children.
●
Keep the device way from wet areas and objects, and do not use the device
with wet hands.
●
Do not use or store the device in dusty, hot, cold, electric, chemical, or
magnec areas.
●
Do not drop, shake or knock the device. Rough handling can break the
device.
●
Do not leave the device into a car with all windows closed.
●
Do not leave the device into a bed when charging.
●
Please adjust the speaker at approximate volume to avoid harm to your ears.
●
Do not disassembly the device without professional guidance. Do not change
any part of the device.
●
Please use the proper power adapters provided by manufacturer to charge
the device.
- 1 -
Page 3

CONTENTS
Assembling...... ..... ... ..... ..... ... ..... - 3 -
Unpack.................................................. ...................... .......................................... ............... - 3 -
Charge the battery.................. ................................ ................................... ...........................- 3 -
Install the memory card.. .......................................... ...................................... .....................- 3 -
Getting started.... ... ..... ... ..... ..... ... ...... ..... ..... ... ..... ..... ... ...... ..... ... ..... ... ..... .. - 3 -
Tur n your device on and off...............................................................................- 3 -
Switch to flight mode......................................................... ............................... - 4 -
Device layout. .................................................................................................- 4 -
Home screen .................. ..................................................................................- 5 -
Add items to the home screen.............................................................................- 5 -
Task bar................ .................................. .................................. .......................- 6 -
Notification & status bar .................. ..................................................................- 6 -
Auto rotation.................................. .................................. ................................- 7 -
Lock & unlock the screen .................. .................................. ..............................- 7 -
Text input................. .......................................................................................- 7 -
Customize your device .................. .................................. ..................................- 8 -
Manage applications .................. .................................. .......................................- 8 -
Security........................................................................................................... - 8 -
Reset tablet.................. .................................. ...................................................- 8 -
Web... ... ..... ..... ... ..... ... ..... ..... ... ..... ..... ... ..... ... ..... ..... ... ..... ..... ... ..... ... ..... ..... ... ..... ..... - 9 -
Email
.................. ............................................................................................
- 9 -
Gmail....................................................... .................................. ...................- 10 -
Browser.................................................................................... .....................- 11 -
Play Store................................................................................ .......................- 11 -
Entertainment..... ..... ... ..... ... ..... ..... ... ..... ..... ... ..... ... ..... ..... ... ..... ..... ... ..... ........ .....- 12 -
Gallery................................. .................................. .................................. ......- 13 -
Play music............................. .................................. .......................................- 13 -
Camera...........................................................................................................- 14 -
Tools .. ... ..... ... ..... ..... ... ..... ..... ... ..... ... ..... ..... ... ..... ..... ... ..... ... ..... ..... ... ..... ..... ... ..... ..- 16 -
Calendar.........................................................................................................- 16 -
Alarm................. .................................. ..........................................................- 16 -
File Manager..................................................................................................- 16 -
Sound Recorder...............................................................................................- 17 -
Calculator.......... .................................. .................................. .........................- 17 -
Connectivity.. ..... ... ..... ... ..... ..... ... ..... ..... ... ..... ... ..... ..... ... ..... ..... ... ..... ... ..... ..... ... ...- 17 -
USB Connection..............................................................................................- 17 -
Wi-Fi .................. ..........................................................................................- 17 -
VPN .............................................................................................................- 18 -
Wireless display......................................... .................................. ...................- 18 -
Safety Precautions... ..... ... ..... ..... ... ..... ... ..... ..... ... ..... ..... ... ..... ... ..... ..... ... ..... ..... ..- 19 -
Care & Maintenance.... ..... ... ..... ... ..... ..... ... ..... ..... ... ..... ... ..... ..... ... ..... ..... ... ..... ... . - 20 -
.. ..... ... ..... ... ..... ..... ... ... ..... ... ..... ... ..... ..... ... .
.. ..... ... ..... ... ..... ..... ... .
.. ..... ... ..... ... ..... ..
- 2 -
Page 4

Assembling
Unpack
Check your product box for the following items.
Tablet
User manual
Adapter
OTG Cable
USB Cable
You can purchase additional accessories from your local ret ailer.
Charge the battery
Before using the device f or the fir st time , you must charge the battery.
1. You can charge the device with proper adapter or by connectin g the dev ice to a PC
with a USB cable.
2. Ba ttery f ulliconis shown when finished if your device is off.
Warning:Use only original batteries and chargers. Unapproved chargers or cables ca n
causebatteries to explode or damage your device.
Install the memory card
To store additional multimedia files, you need to i nsert a m emory c ard.
1. Insert a memory card with t he gold c ontac ts faci ng downwards.
2. Push the memory card into t he slot u ntil it c licks.
Notice: Our company uses a pprov ed indu stry standards for memory cards, but some
brands may not be fully com patib le w ith you r device.
Getting started
Turn your device on and off
To turn on your device, press a nd hold t he powe r key.
- 3 -
Page 5
- 4 -
To turn off y our device, press and hold the power key, and then tap Power offOK .
Switch to Airplane mode
To use only your devic e’s non-network servi ces, switch to Airplanemode.Please follo w
the instructions below to t urn on flight mode:
Tap Settin gsWIRELESS & NETWORKSMor eAirpla ne mode from applica tion list
to create a checkmark.
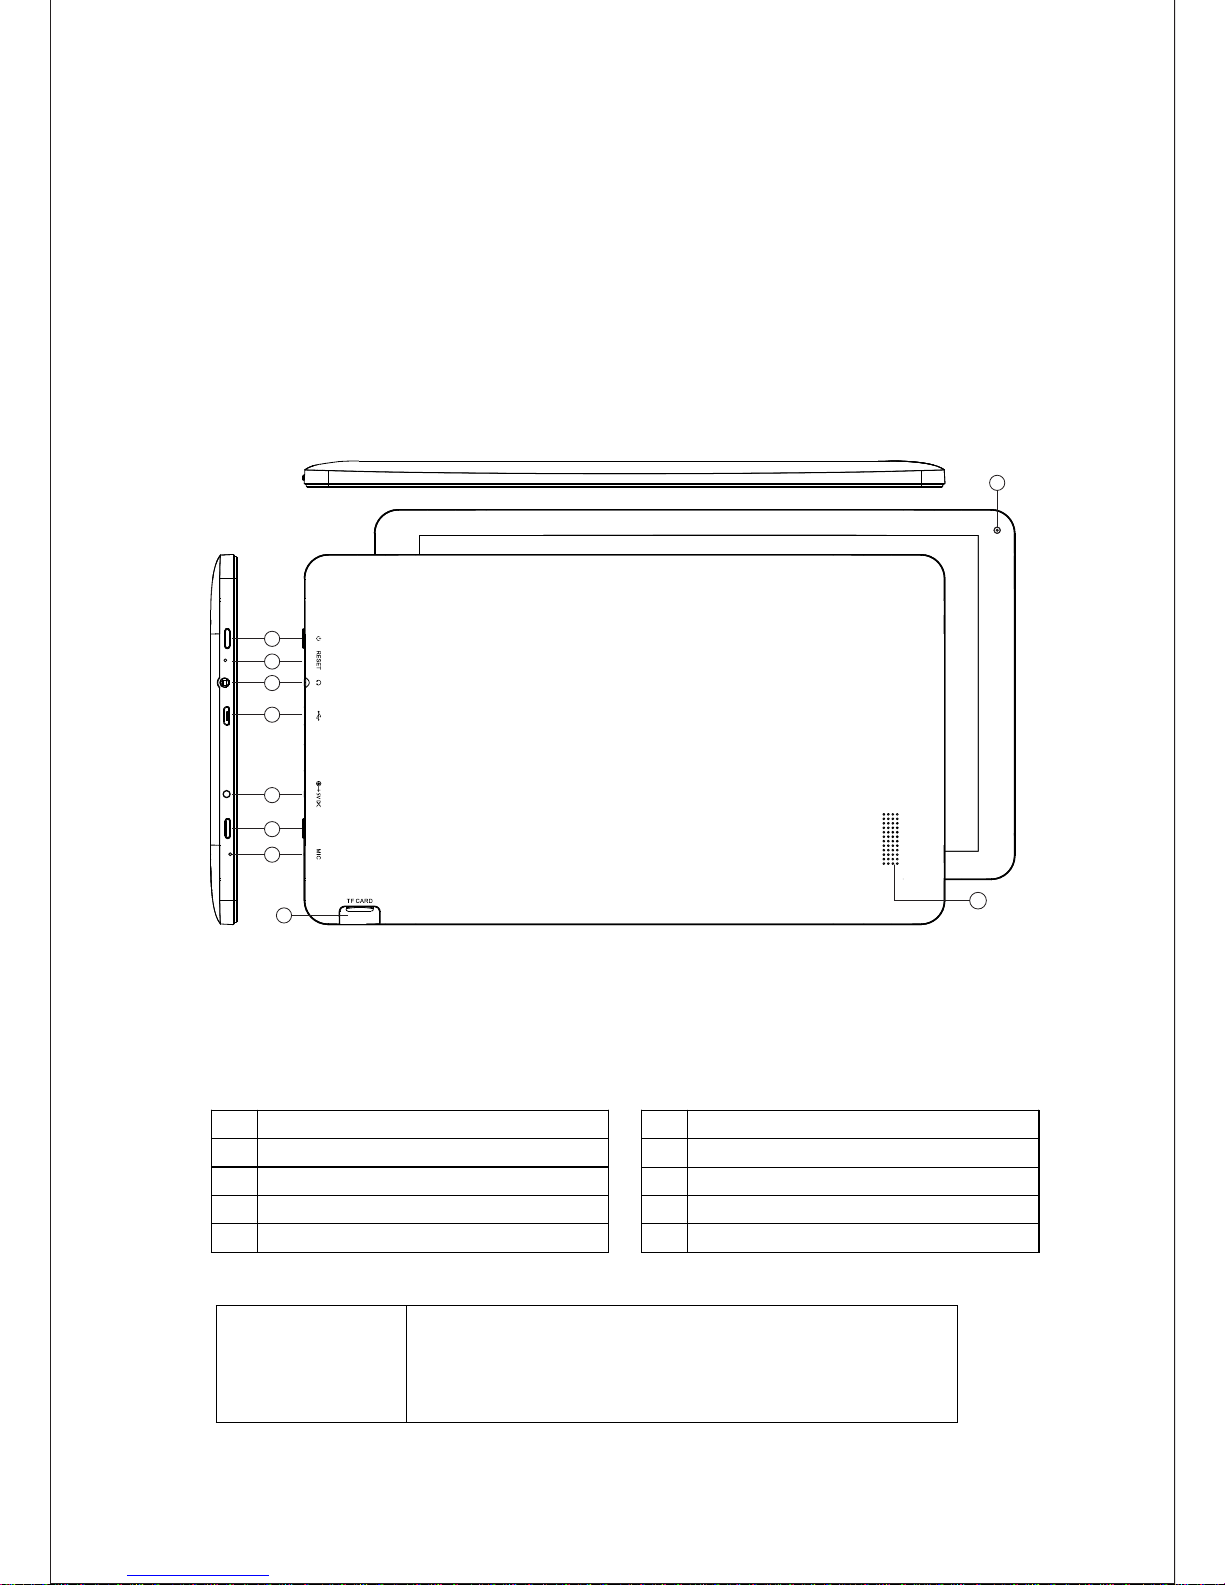
Device layout
Power /Lock/Res et Press and hold for 2 se conds to turn on or turn off the device.
Press to lock the devic e.
Press and hold for 6 seco nds to re set the device.
1 Power on/off
2 Reset
3 Headpho ne
4 Micro USB
5 DC Power jack
6 Back Key
7 Microphone
8 Webca m
9 Micro SD card read er
10 Speaker
BACK
3
2
1
4
5
6
7
9
8
10
Page 6
- 5 -
Home screen
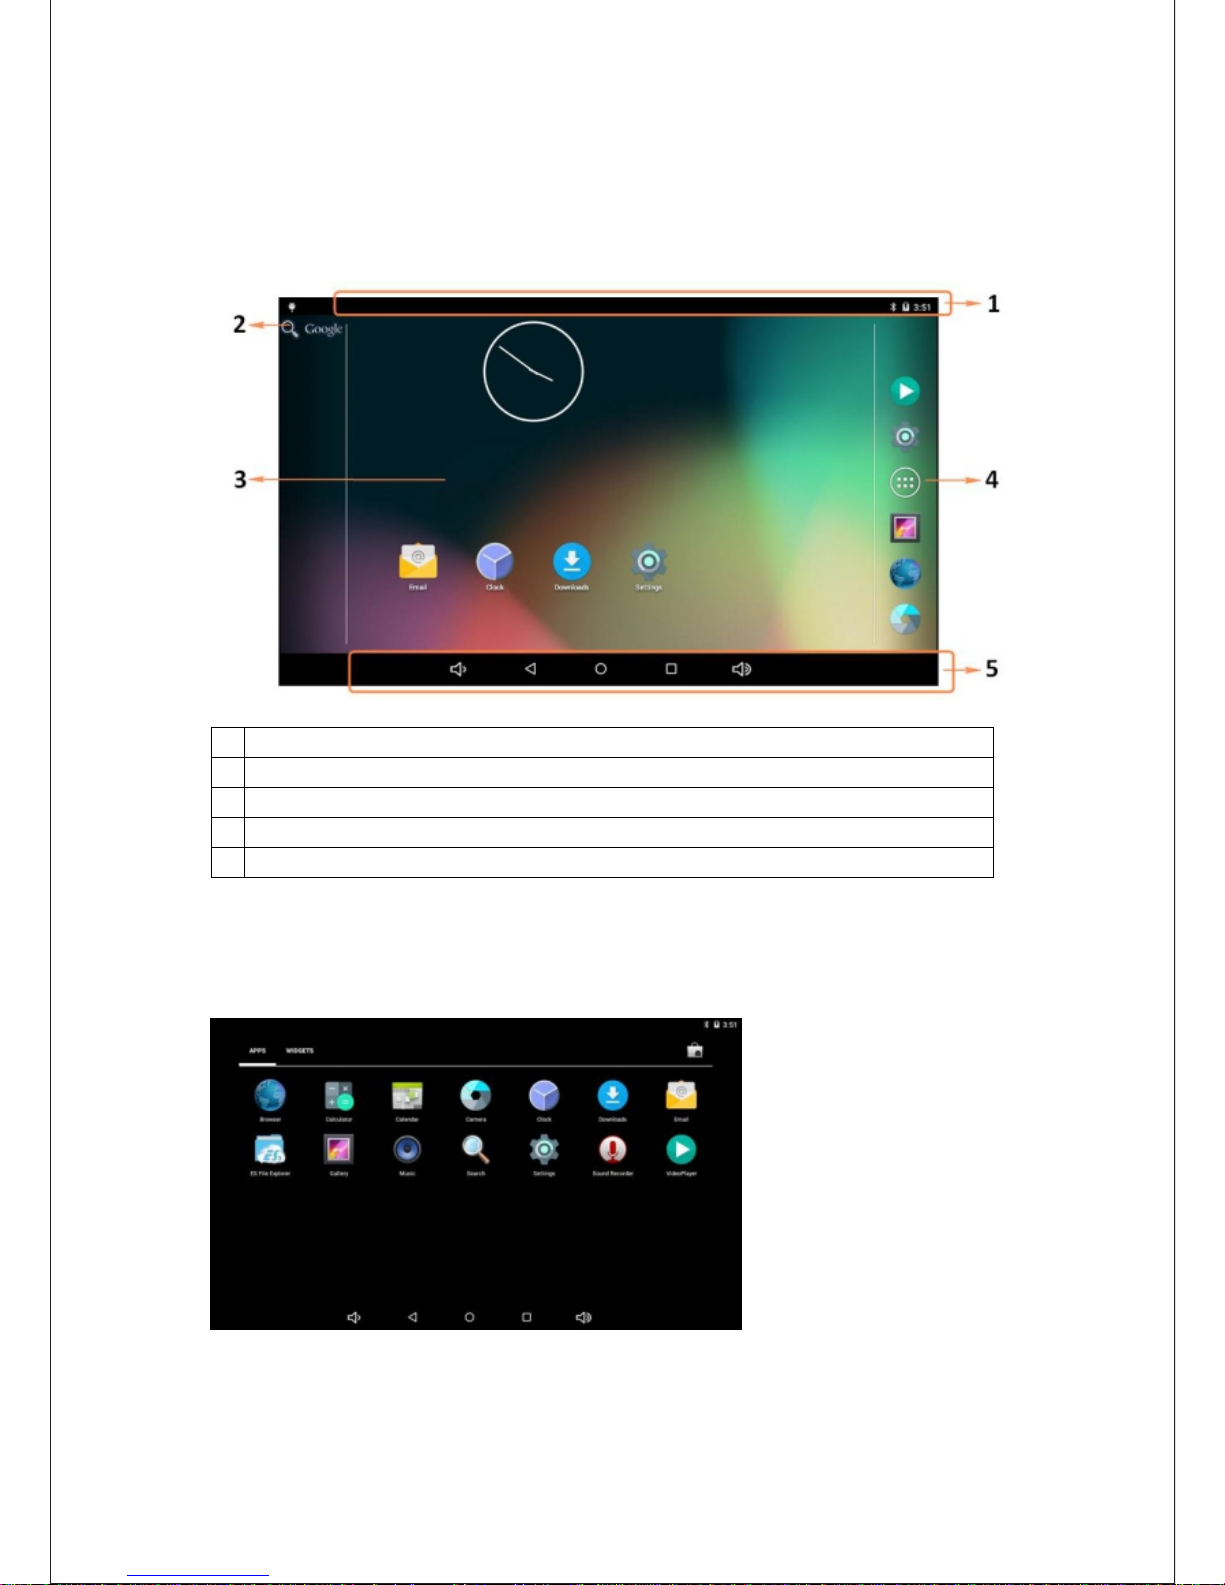
The home screen has mul tiple p anels. Scroll left or righ t to the pa nels on the home screen,
you can view indicator i cons, w idgets, shortcuts to app licat ions, and other items.
1
Indicator icons
2
Open the se arch bar
3
Scroll le ft or right to the other panels
4
Access th e application list and widget screen
5
Task bar
Add items to the home screen
Tap the ap plication icon to access the application list s hown below from home screen.
Scroll le ft or rig ht to view more items. To add items to the home s creen, tap and hold an
item, then drag th e item to a new location.
Page 7
- 6 -
To remove items from the home screen, tap and hold an it em, the n drag th e item to t he X
area at the top of the home screen.
Task bar
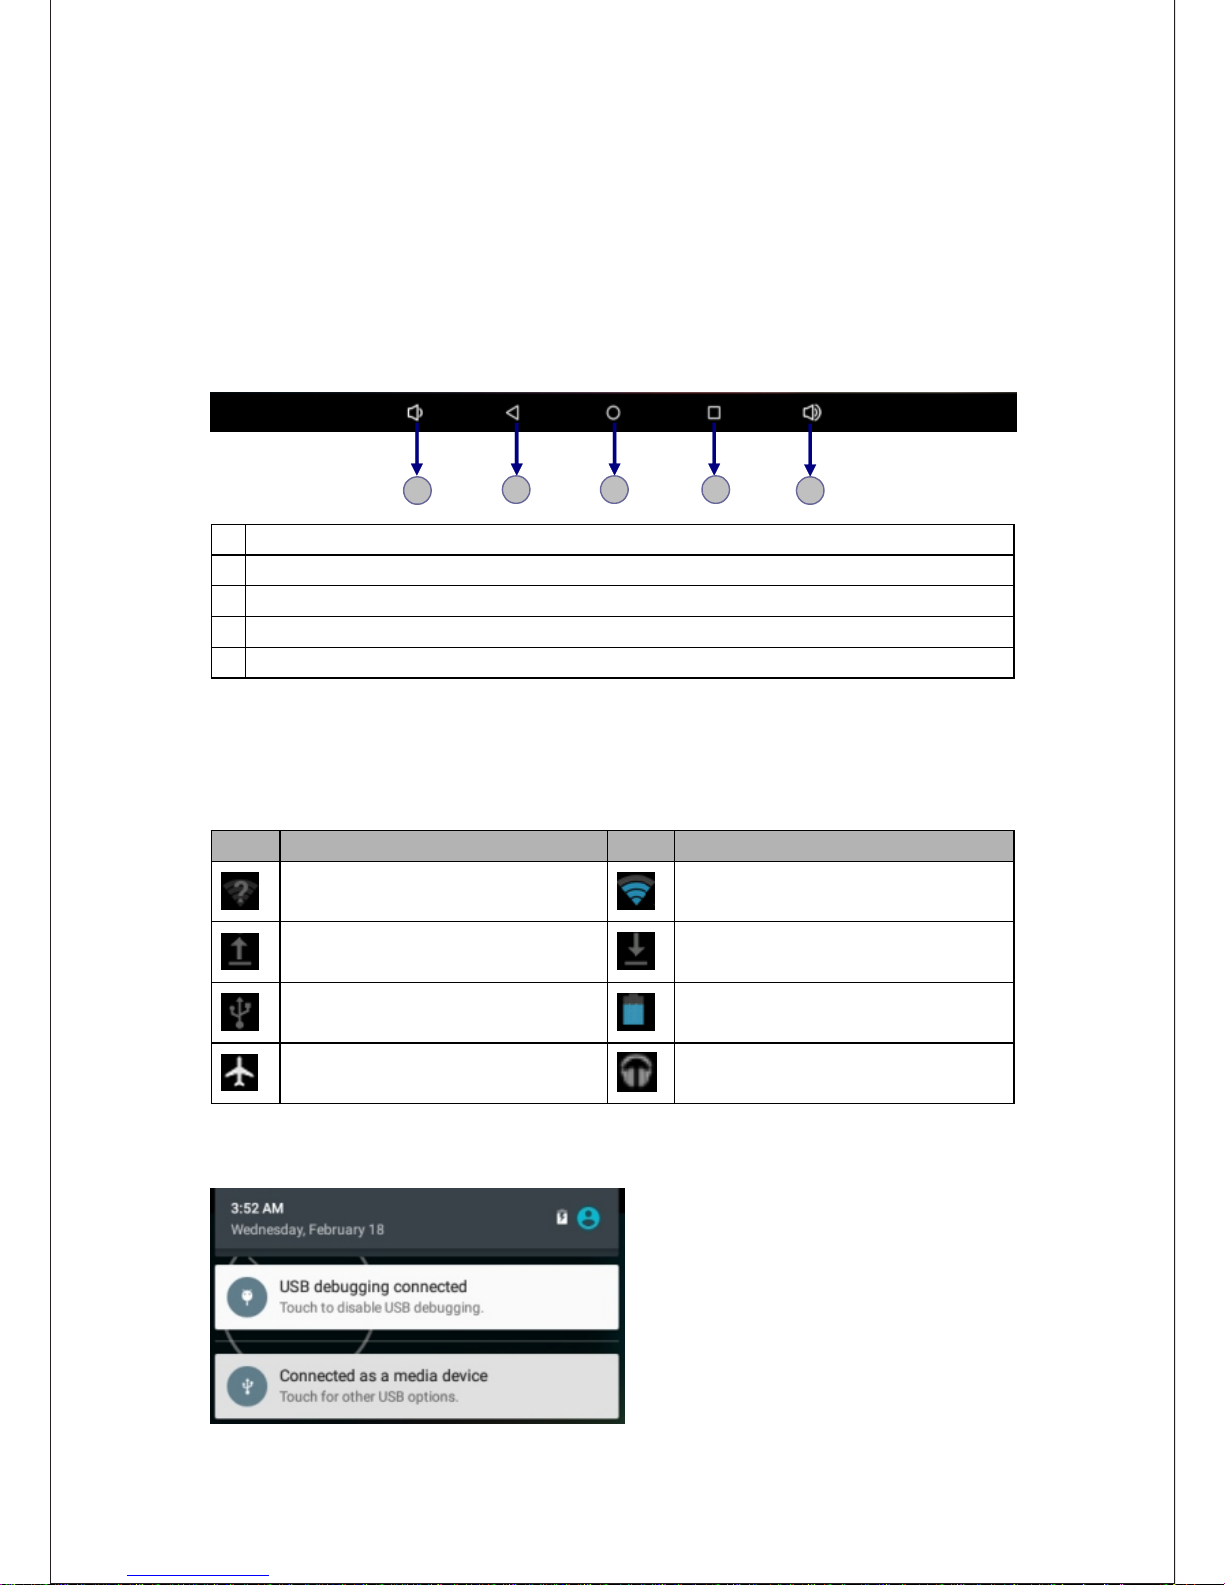
The task bar is shown at the bottom of t he scre en. It di splay s commo nly used option
buttons.
1
2 3 4
5
1
Adjust the device volume to lower.
2
Return to previous screen
3
Return to home screen.
4
View the applications you h ave accessed recently.
5
Adjust the device volume to hig her.
Notification & status bar
It is located at the top of the scre en. It displays battery p ower level,wifi signal strengt h,
time, and so on .
Icon Definition
Icon Definition
Open Wi-Fi available
Wi-Fi connected
Uploading data
Downloading data
Connected to PC Battery power level
Flight mode activated Music being played
To show a pull-dow n list of t he recent notifications, dragthe left area of the no tifica tion ba r
downward.
Page 8
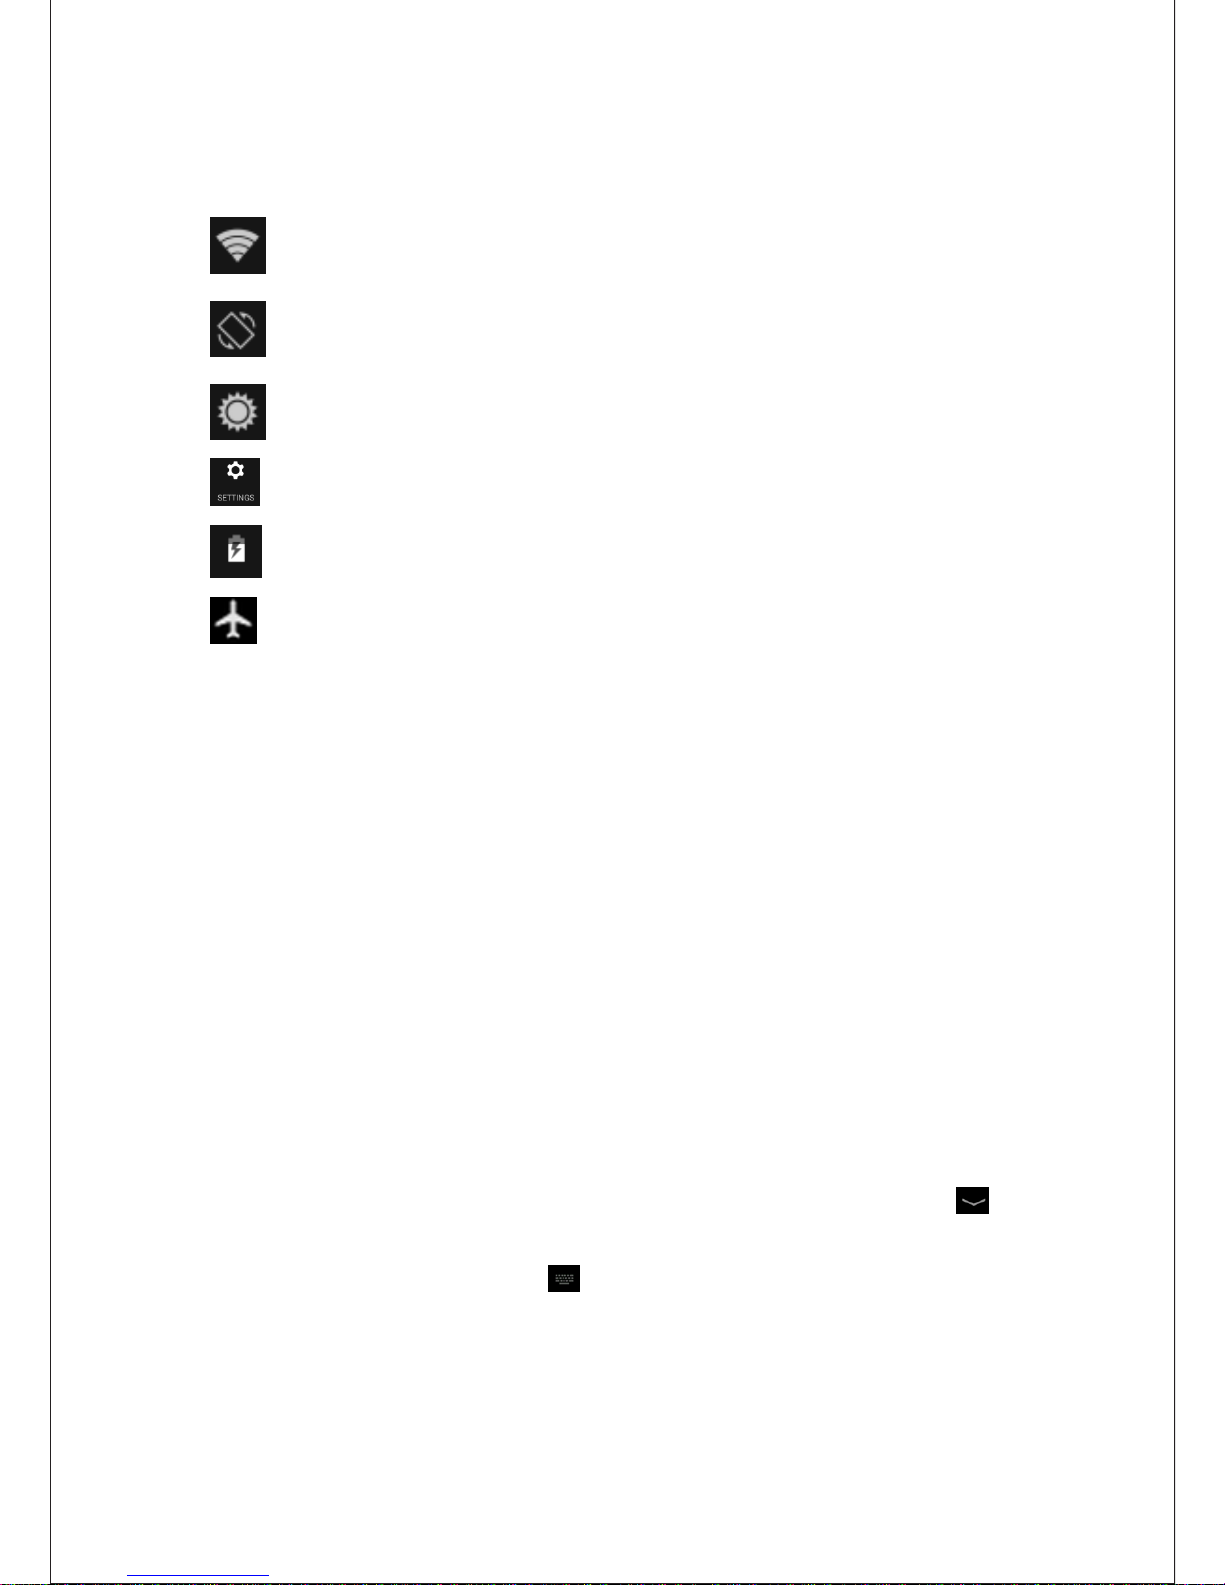
To show a pull-down l ist of th e shortcut settings, drag
downward.
:Activate or deactivate the W i-Fi connection.
:Activate or deactivate the a uto rot a tion feature.
:Adjust the basic brightness level o f the dis play to lighter or darker.
:Access Settings application.
:Check the battery status.
:Activate or deactivate the flight mode.
Auto rotation
If you rotate the device while it’s being used, the in
To prevent the interface from ro tatin g, drag the right area of the status bar downwa rd
the right area of the status bar
terface will automatical ly rota te as wel l.
and
then deact ivate the auto rotation feature.
Lock & unlock the screen
To unlock the screen, tap and hold the lock i con, th en d rag it to t he unlo ck area where the
unlock icon is.
To lock the screen manually, press Power key.
Text input
You can enter text by se lecti ng char acter s on the vi rtual k eyboa rd.
Tap the text input field to display t he virt ual key board.To hide the keyboard, tap at
the task bar.
To change the text input method, t ap at the task bar.
From a text field, you can use the co py and paste feature for fast inp uttin g.
- 7 -
Page 9

Customize your device
To customize your devic e accor ding to your preferences, tap Settings from applicatio n list
or notification pane l.
Manage applications
To manage the applicati ons ins talled on your device, tap S ettingsApps.
1. To uninstall an applica tion, select DOWNLOADED, then select an i tem and t ap
Uninstall , tap O K to confirm.
2. To stop or change the settings of an appl icati on, select RU NNING or ALL, then select
an item and tap the optio n you nee d.
Security
You can prote ct your d evice and data by setting a screen lock or encryp ting yo ur tablet.
Set a screen lock
To set a screen lock, tap Sett ingsSecurity S creen lock from application l ist.
None:D eactivate the screen loc k.
Slide:Slide to unlock the screen.
PIN:
Enter a numeric PIN to un lock. W hen prompted, enter the PIN to unlo ck
the screen.
Pattern: Draw a pattern to unloc k. Foll ow the instructi ons to draw your lock
pattern. Whe n promp ted, draw the pattern to unlock the screen.
Password:Enter a passcode tounlock. When promp ted, en ter the passcode
to unlock the screen.
Screen time - ou t
Select SettingsD isplaySleep from applicat ion lis t, youcan set the ti me before the
screen times out an d goes into lock mod e.( you have not en tered a ny characters or made
other selections) .
Reset tablet
You can reset system and desktop set tings t o their o rigin al valu es by the f ollow ing ste ps:
- 8 -
Page 10

- 9 -
1. Select SettingsBacku p & reset from application list .
2. Tap Factory data reset.
3. If you want to erase all data on your tablet, such as music, pictures and any other data
tap Eras e SD card checkbox to create a checkmark.
4. TapReset tablet .
The device resets to the factory default settings a utoma tical ly.
Warning!: Fact ory dat a reset will er ase all d ata fro m your de vice and SD card, including
your google account, system anda pplic ation data and settings and any other d ownlo aded
applications.
Page 11
- 10 -
Web
Email
To receive and send mail, you must have a remote mailbox service. This service may be
offer ed by a ser vice provider. Your device is compliant with applicable internet standards
for POP3/ IMAP/Exchange.
Before you can send or receive mail on your device, you need to set up an ema il acco unt
and define the email settings correctly. You can define more t han 1 mai lbox.
Set up your email
1. Tap Em ailfrom ap plica tion li st.
2. You can use mailbox guide to set up your mailbox, tap Nextuntil it’s do ne.
3. If you ne ed to add a nothe r email a ccoun t, tap the option button at the upper
right S ettin gsADD ACCOU NT, then set up the email account with the
mailbox guide.
When you are finished setting up the email account, the email messag es will be
downloaded to your device. If you have created more than two accoun ts, you c an
switch between email accounts. Select an acco unt nam e at the to p left of t he screen
and select the one you want to retrieve messages from.
Create and send email
1. Open Email application.
2. Tap .
3. In To field, enter the re cipie nt’s email addresses manually and separate them with a
comma. Add more recipients by tapping Cc/Bcc.
4. To insert attachments,tap the option button at the upper right and select Attach file.
5. Enter the subject and the text.
6. Tap SEND to send the ema il.
Gmail
You can retrieve new email messages from the Google Mail webmail service to your inbox .
Before you can send or receive mail on your device, you need to set up a Gm ail acc ount.
Page 12

Create a Gmail account
If you don’t have a Goo gle Account, tap New, please follo w the on-screen instructions to
create a new one.
Set up a Gmail account
If you want to add an existing account, tap Existing, enter your email address and
password, and then select Next, when you are finished setting up the email acc ount,
the email messages are downloaded to your device.
View em ail mes sages
1. When you open the email account, t he amou nt of unread email messages i s displayed
at the title bar and the unread email messages are displayed in bold.
2. To view an ema il mess age, tap it.
3. To mark an important email message, tap the star icon below thedate. To cance l the
mark, tap the s tar icon agai n.
Create and send an email
1. Tap .
2. In To field, enter the recipient’s email addresses manually and separate them with a
comma. Add more recipients by tappingCc/Bcc.
3. To insert attachments, tap the option button at the u pper rightand sele ct A ttach fi le.
4. Enter the subject and the text.
5. Tap SEN D to send the email.
Browser
Tap Browser from application list to access to the web.
Browser webpages
1. Select Browser to launch a specified homepage.
2. To access a specific webpage, select the URL input field, enter the web address
of the webpage, and select
Go.
3. To zoom in, place two fingers on the screen and spread them apa rt. To z oom out ,
move your fingers closer together.You can also double-tap the screen.
Add windows
You can have multiple windo wsopen at one time.
- 11 -
Page 13
- 12 -
1. To add a n ew wind ow, tap a t the tit le bar.
2. To open up a window, tap t he title of the window.
3. To close the window, tap at the ti tle bar.
Set homepage
1. Tap the option button at the upper right.
2. Select SettingsGe neral Set homepage.
3. Enter the web address of the desired webpage.
Add bookmarks
While navigating a website, tap to add currentURL to your bookmark list and easily
access it later.
View bookmarks and histo ry
Tap to open the bookmark list and the recent history. Tap a bookmark or any
entry to display the webpage.
Custo mize the bro wser
To make adjustments in your browser settings, tap the option button
and then select Settings.
Play Store
Play Store allows you to easily download an abundance of applications directly to your
device. Before using the Play Store, you must have a Google Account.
1. From the application list, tap Play Store.
2. Sign in to your Google Account.
3. Search for and download applications as desired.
4. Follow the on-screen instructions.
Note
All app li catio ns offered
by Play Store are developed by third party. To get the
information about t he developers, you can read the descriptio ns of eac h
application.
Our company is not liable for performance issues caused by third -party
applications.
Page 14
- 13 -
Entertainment
Gallery
To view or organize images, video clips, edit, send yo ur files t o other d evice s and se t
pictures as wallpapers, se lect Gallery from ap plica tion li st.
Note: It takes a few m ore minut es to enter this application if you store more files.
Supported file formats
Type Format
Image
JPEG、 GIF、B MP、PNG
Video
AVI、RM、RMV B、M OV、FLV、3G P、MP4
Note: Some files ma y not pla y prope rly dep endin g on how th ey are encoded.
View a picture
1. Select a folder.
2. Select a picture to view. To view more pictures, scroll left or righ t.
3. To zoom in, place two fingers on the screen and spread th em apar t. To zoom out ,
move fingers closer together. You can also double-tap t he scre en.
4. To start a slideshow, tap the option button an d then select Slides how.
5. To view the details of a file, ta p the option butto n, then s elect De tails .
6. To share a picture with others via Email, tap at the title bar.
7.
To set a picture as wallpaper, tap the option button at the upper right select Set
picture as Wal lpape r Zoom in or out to set wallpape r effect , then tap SET
WALLPAP ER .
8. To set a picture as a caller ID, tap the option button at the upper right select Set
picture asConta ct phot oContactscreate a new contact o r selec t an
existing contact drag the slides of the crop box to create the c rop are a.
Edit a picture
1. To crop the image, tap the option button at th e upper r ight , th en sele ct Crop .
To move the crop box, tap an d hold the crop box and drag it to the desired
location.
Page 15
- 14 -
To add or subtract from the selection b order o f the cro p box, dr ag the cr op
box to the desired size.
When you are finished, t ap S ave.
2. To edit pictures and apply various effe cts, ta p the opt ion button at the upper right,
then select Edit.
To apply a color eff ect, tap .
To apply a photo frame effect, tap .
To crop, straighte n, rota te or flip the i mage, t ap .
To adjust contrast, tap .
Play a video
1. Select a folder.
2. Select a vi deo to pl ay.
3. Control playback w ith the v irtua l keys.
Play music
On the application list screen , tap Play music to access.
Note: Some files may not play properly depending on how they ar e encod ed.
Start by transferring files to your device or memory card.
Add music files to your device
Start by transferring files to your device or memory card.
Play music
1. Select a music file.
2. Control playback with the virtual keys.
The current list of songs are randomly shuffled for playback.
Replays the current list when the list ends.
Repeats the current playing song.
Create a playlist
1. Tap the MENU b utton n ext to th e music fi le.
2. Se lect A dd to pla ylist.
Page 16
- 15 -
3. Select New .
4. Enter a name.
5. Tap Save.
Delete a playlist
1. Tap the music button on the upper left and then select Playlist s.
2. Tap the MENU button next to the playlist y ou want to delete and s elect Delet e.
More features
Tap the MENU button on the upper right Settings Google account and then
follow the on -screen instructions to add an account. With the account, you can enjoy
more features of Play Music, such as synch roniz ing mus ic and so o n.
Camera
With the camera function, you can take pictures and record v ideos .
Take a picture
1. Open the ap plication list and select Camera.
2. Before t aking a p icture, you need to make some adjust ments .
Place two fingers on the screen and spread them apart or move fingers clo ser
together to zoom in or zoom out
.
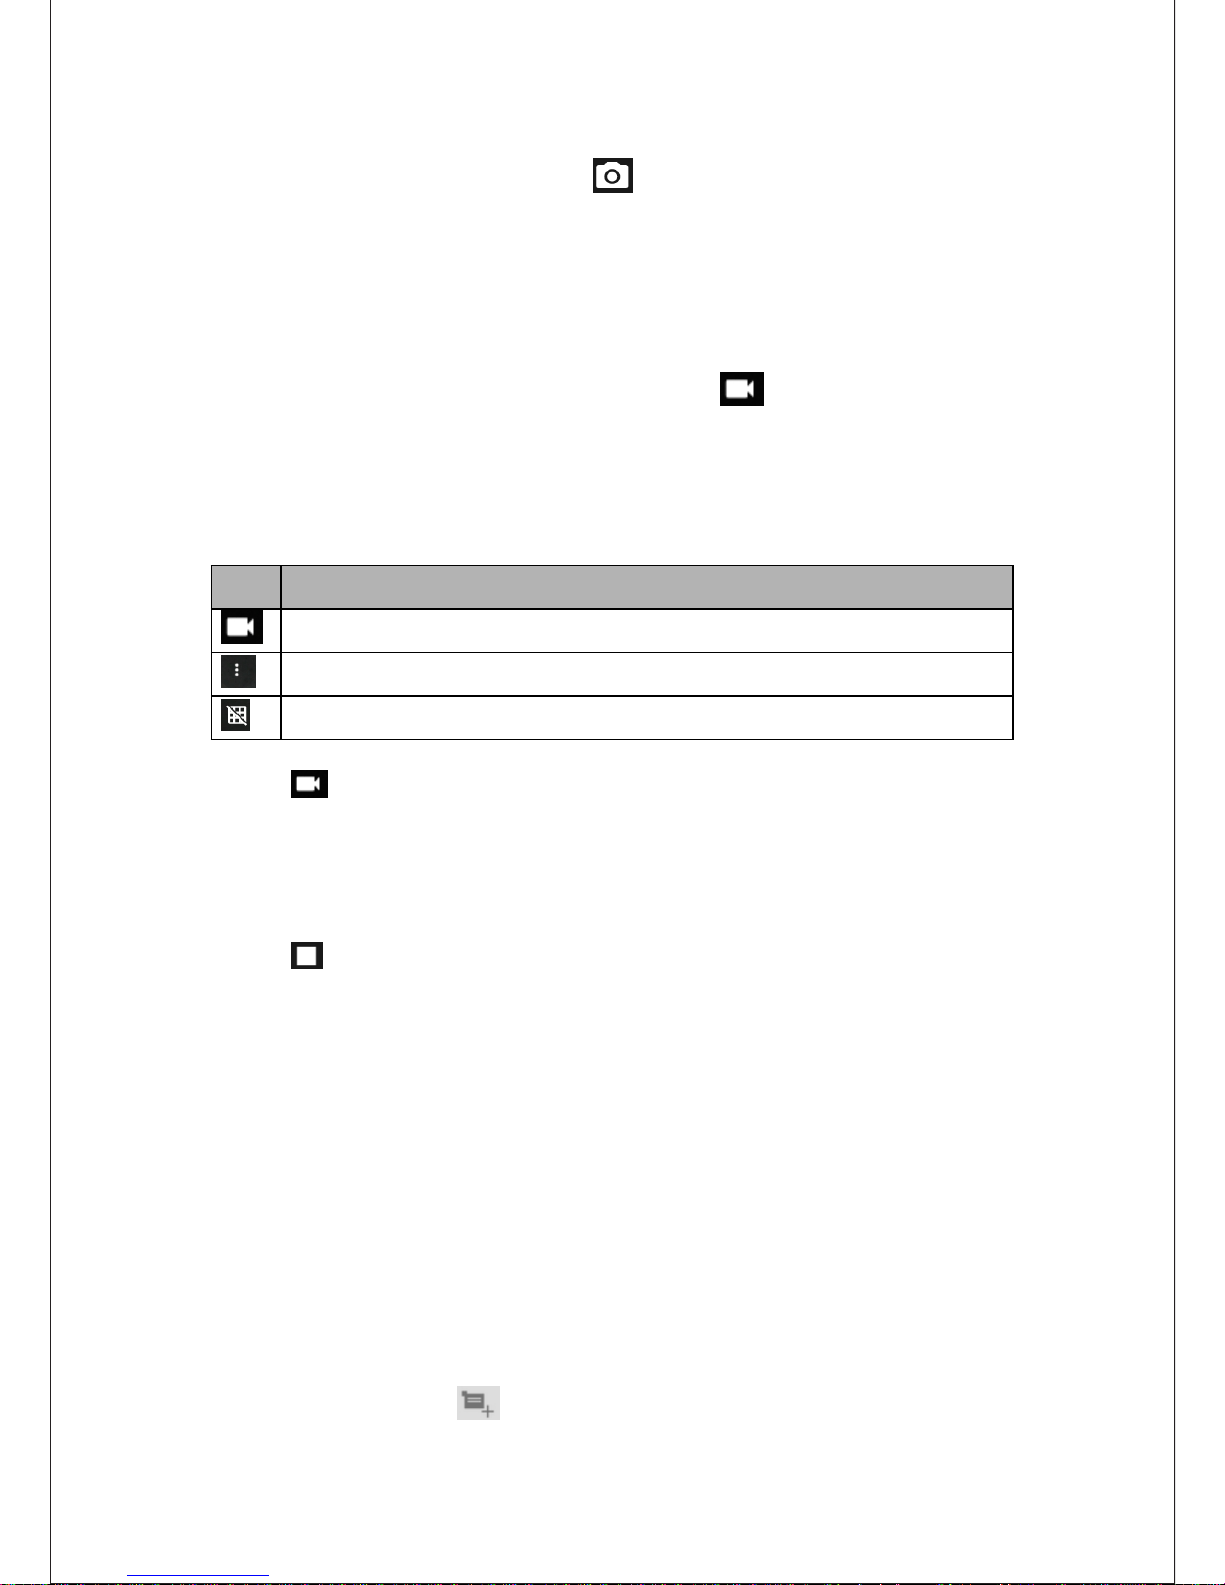
Icon
Defini tion
Photo graph mode. Tab the ic on to swit ch.
Video reco rding mod e. Tab th e icon to switch.
Menu
Tap to open or close gridli ne.
Tab to set or c ancel timin g be fore ta king photo
Page 17
- 16 -
3. Aim the lens at the subject and tap
to take a photo. The photo is saved
automatically to the folder DCIM.
4. Slide from left edge of the frame to switch photographing and video r ecord ing
mode. Slide from right edge of the frame to view the pictures.
Record a video
1. Open the application list and select Camera. Tap
to change to video mode.
2. Befor e recording a video, you need to make some adjustments. Pla ce two fin gers
on the screen and spread them apart or move fingers closer together to z oom in
or zoom out .
Icon
Defini tion
Video recordi ng mode. Tab the icon to sw itc h.
Menu
Tap to op en or close gridli ne.
3.
Tap to start recording. The length of the video recording is restricted by t he
available space on your storage
.
4.
During recording a video, tab the frame to ta ke a pict ure, which does not stop the
video recording.
5.
Tap to sto p recording. The vi deo is sa ved aut omati cally to the folder DCIM.
6.
Slide from left edge of the frame to switch photographing and video r ecord ing
mode. Slide from right edge of the frame to view the pictures.
Tools
Calendar
With the Calendar feature, you can consult the calendar by day, week, or month, create
events, and set an alarm to act as a reminder, if necessary.
To access the calendar, tap Cale ndar from application l ist.
1. To create an event, tap .
Page 18
- 17 -
Fill in the fields, and set category, date, time & an alarm.
After you fini sh, sel ect DONE.
2. You can view calendar in different views, D ay, Week, Month and All.
3. To delete an entry,tap the even t to open i t, and th en select OK.
Alarm
From application list, tap Clock, and th en sele ct .
1. Tap to add a larm.
Tap the numeric pad to set alarm time, w hen you are finished, tap OK.
Tap set alarm details, when you are finished, tap .
Tap the time to ch ange al arm tim e.
To activate a preset alarm, set the alarm to ON .
To cancel an alarm, set the alarm to OFF.
2. Wh en the alarm sounds, to stop the alarm, drag the alarm icon to . To re peat
the alarm after a specified length of time,
drag the alarm icon to .
3. To del ete an alarm, tap .
File Manager
Many features of the device, such as images, videos, documents, r eceiv ed atta chmen ts
and dow nload ed files o r appli catio ns, use m emory to store data. With File manager apps
(such as ES File E xplorer ) , you c an store and browse files and folders in your device, or
edit, move, copy files; you can send files to compatible devices as wel l.
Note:
1. So me files formats are not supported depending on the softw are of th e devic e.
2. So me files may not play properly depending on how they are encoded.
Sound Recorder
With Recorder, you ca n recor d a voice m emo. Fr om appl ication list, tap Recorder.
1. To record a voice me mo, tap .
2. To pause the recording, tap .
3. To listen to a voice recording that you just record ed, tap .
Calculator
With this feature, you can use the device as a calculator. The calculator provides the basic
Page 19

- 18 -
arithmetic functions.
Tap the virtual numeric and calculation keys to perform a calculation
.
Connectivity
USB
Connection
You can connect
your device to a PC and use it as a removable disk, which allows you
access the file directory.
1. If you want to transfer files from or to a memory card, insert a mem ory card into
the device.
2. With a USB cable, connect your device to a PC.
3. Open the folder on PC to view files.
4. Copy files from the PC to the memory card.
Wi- Fi
With Wi-Fi, you c an connect to the internet or other network devices anywhere an access
point or wireless hotspot is available.
Activate the Wi-Fi feature
1. From application list, tap Setti ngs.
2. In the field of WIRELESS & NETWORKS, tur n on the Wi-Fi feature .
Find and connect to Wi-Fi
1.
Once the Wi-Fi fe ature i s activ ated, t he devi ce automatically search for available
Wi-Fi c onnec tion.
2. Select a network.
3. Enter a password for the network (if necess ary).
4. Select Connect .
VPN
You can create virtual private networ ks and connect to yo ur private network securely
through a public network, such as the internet.
Note:You need to se t a lock screen PIN or p assword before you can use VPN.
Page 20

- 19 -
Set up VP N connections
1. Ope n the app licat ion lis t and sel ect SettingsMoreVPN.
2. Select + and customize the connection information. (Available options may vary
depending on the VPN type.)
3. Tap Save when you are finished.
Connect to a private network
1. Select SettingsMoreVPN.
2. Select a private network to connect.
3. Enter the user name and password and select Con nect.
Wireless display
On the application screen, tap SettingsDisp layCast screen.
Use this feature to connect your tablet to a large screen with a m iraca st dong le and th en
share your contents.
Note:
-So me files m ay be buffered during playback dependi ng on the n etwor k.
-To sav e energ y, deactivate this feature when no t in use.
-To pla y v ideos or game on a TV, select an appropriate TV mode to get the best
experience.
Follow the procedures below to activate this feature.
1. Connect your tablet to a large screen with a miracast dongle.
2. Select an ap propr iate TV mode.
3. Act ivate t he Wi-Fi feature
4.
On the ap plication screen, tap Settings Display Cast screen , activate wireless
display feature, then start searching by tapping SEARCH FOR DISPLAYS.
5. Select a dev ice sho wed on th e scree n, then t ap Connect.
6.
When finished, open or play a file an d then control the display with the keys
on
your device .
Page 21

- 20 -
Safety Precautions
Read these simple guidelines before using your device. Not following t hem may b e
dangerous or illegal.
Aircraft
Switch off in ai rcraft and follow any restrictions. Wireless devices can cause
i
nterference in aircraft.
Vehicles
Never use your device while d riving. Place it in a safe place.
Posit ion you r devic e withi n easy re ach.B e ab le to a cc ess y ou r devic e witho ut
removing your eyes from the road.
Do not leave the device inside a stopped car in hot days, because the env ironm ent
temperature inside the car could be very high!
Electronic devices
In some circumstances your device may cause interferen ce with o ther de vices .
Potentially explosive environments
Switch off you r device when in any area with a potentially explosive atmosphere, and
obey all signs and instructions. Sparks in such areas could cause a n explo sion or fi re
resulting in bodily injury or even death.
Pacemakers and oth er medi cal dev ices
Pacemaker man ufact urers recommend tha t a minimum separation of 8 inches be
maintained between a wireless device and a pacemaker to avoid potentia l inter feren ce
with the pacemaker.
Operation of any radio transmitting equipment , i nclud ing wire less phones may
interfere wit h the fun ctionality of inadequately pro tecte d medical devi ces. Consult a
physician o r the manu facturer of the medical device to determine if t hey a re
adequately shielded from external RF energy or if you have any ques tions .
Switch off your device in heath care faci litie s when any regulations poste d in these
areas instruct you to do so.
Operating e nviro nment
When c onnecting to other device, read its user guide for deta iled safety instructions.
Do not con nect incompatible prod ucts.
Do not place your device in the air bag deployment area.
Use the d evice only in its normal operating positions as ex plain ed in the product
documentation.
Always sw itch off your device when i ts use is pro hibit ed or when it may c ause
interference a nd danger.
Areas with po sted re gulat ions
Switch off your device when any regulations post ed in these areas inst ruct you to do
so.
Page 22

- 21 -
Care & Maintenance
Use only manufacturer-approved accessories. Use general a ccess ories m ay shor ten
the life of your device or cause device to malfunction.
Keep your device dry. Humidity and all types of liquids may damage device part s o r
electronic circuits.
Do not use or store the device in dusty, dirty areas.
Do not store the device in hot or cold areas.
Do not store your device near magnetic fields.
Do not store your device with such metal objects as coins, keys and nec klace s.
Do n ot drop your device or cause any impacts to your device.
Page 23
- 22 -
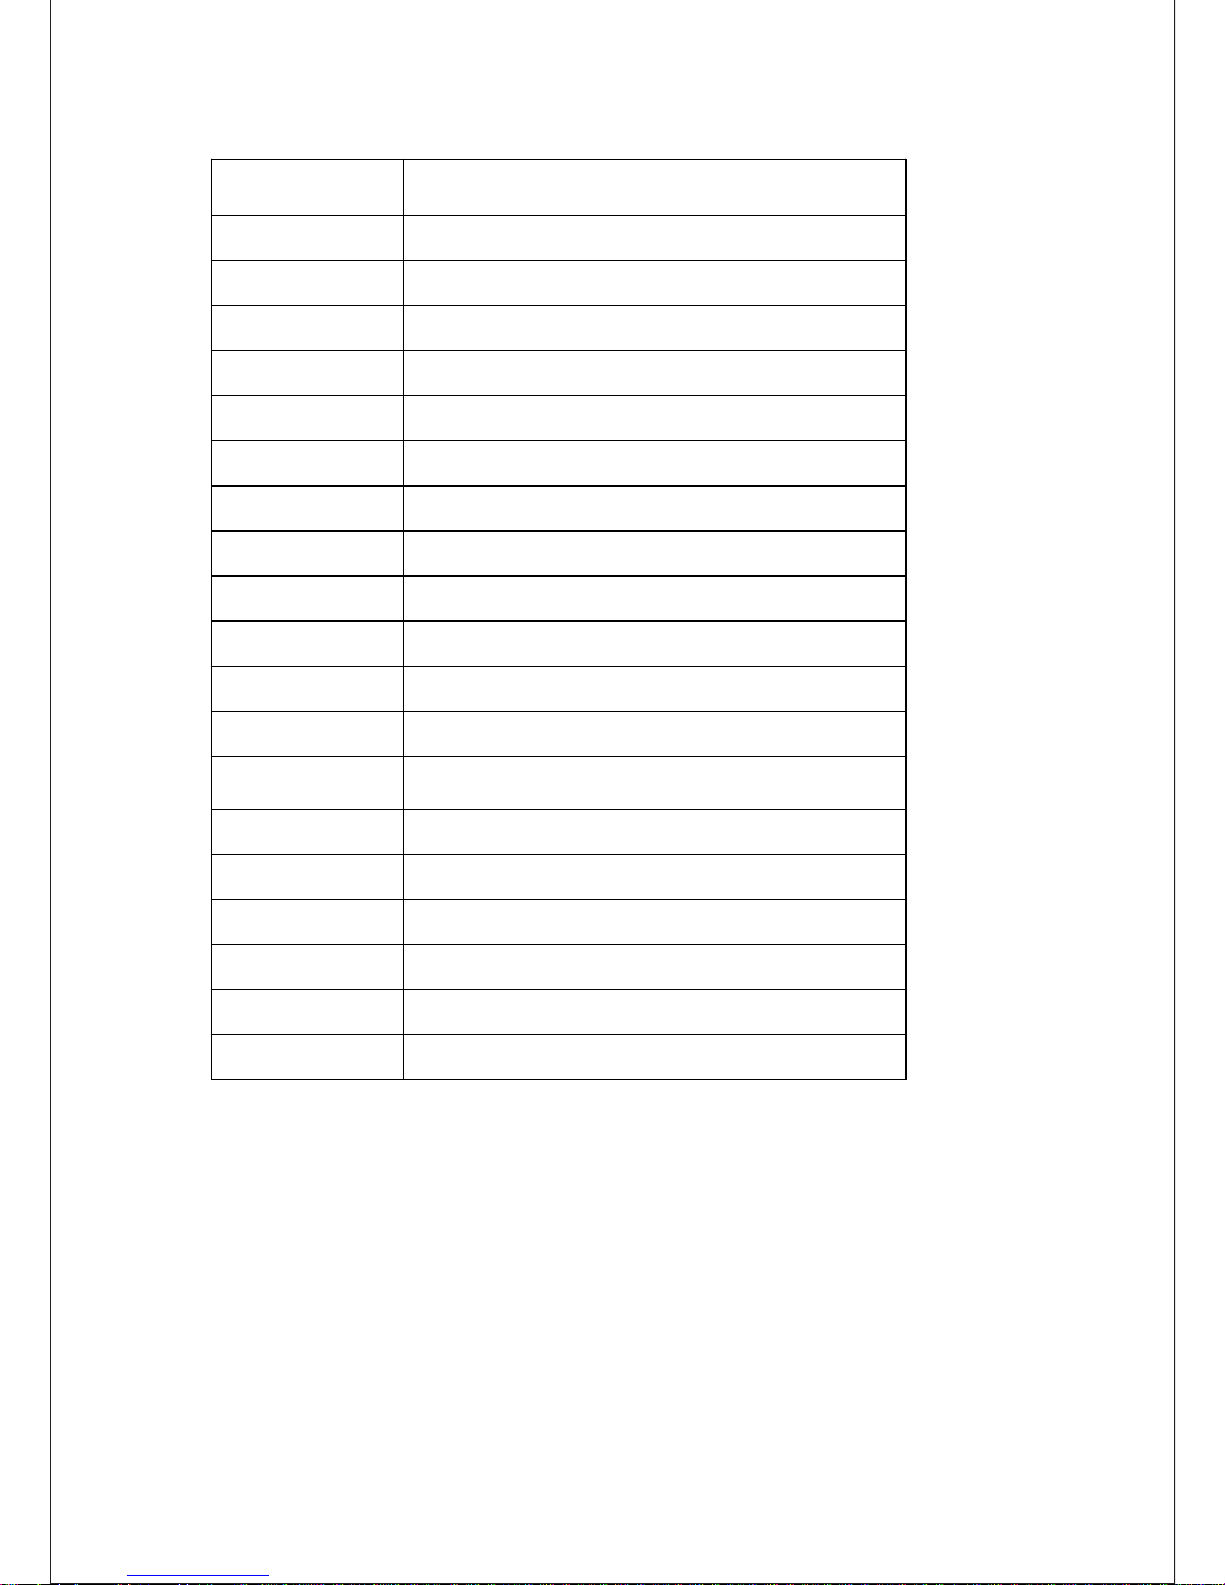
Specification
OS
Android 5.1
CPU
Allwinne r A33,Cortex-A7 Q [email protected]
SDRAM
DDR3 1 GB
Display
10.1" 1024 *600 Capacitive touch panel
Multi-touchscree n Yes : 5 point multi-t ouch
Storage
16 GB
Audio port
3.5ø earph ones
USB port
1 x 5pin micro U SB port (support USB h ost and OTG)
Micro SD Micro SD car d
OTG port Same wi th USB port
Button Power, back, reset,
Speaker 1.0W, Fre quency response : 20Hz – 20k Hz, N/S : >85%
G-sensor Yes
Camera 0.3 M pixel (fro nt)
Wi-Fi 802.11b/g/n
Bluetoot h Supported
Power Adaptor 5V - 2A
Battery 3.7V / 5000mAh Li-Po lymer
Dimension
258 x 150x 10. 2mm
Page 24

 Loading...