

Page 1
1
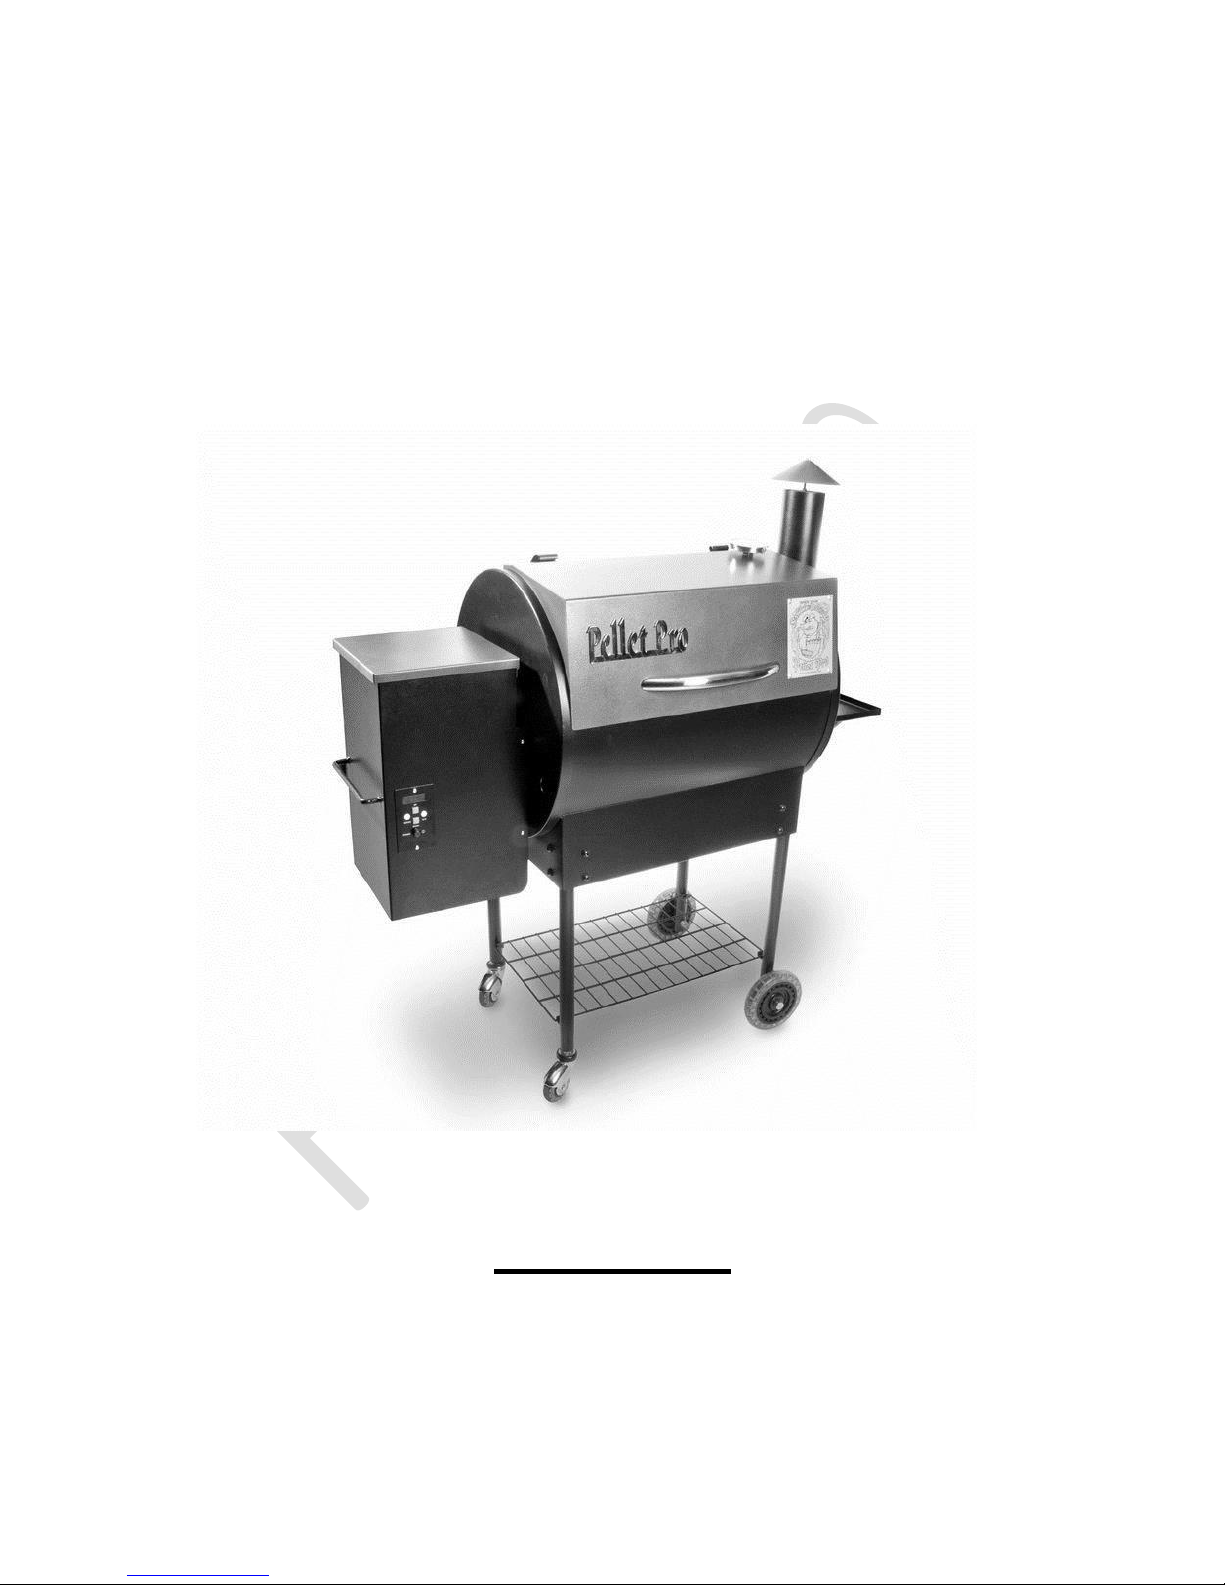
PELLET PRO® – 627, 969
OPERATION MANUAL
FOR OUTDOOR USE ONLY
MAKE SURE NO ONE IS NEAR COMBUSTIBLE
MATERIALS WHEN USING THIS PRODUCT!
WARNING:
Page 2
2
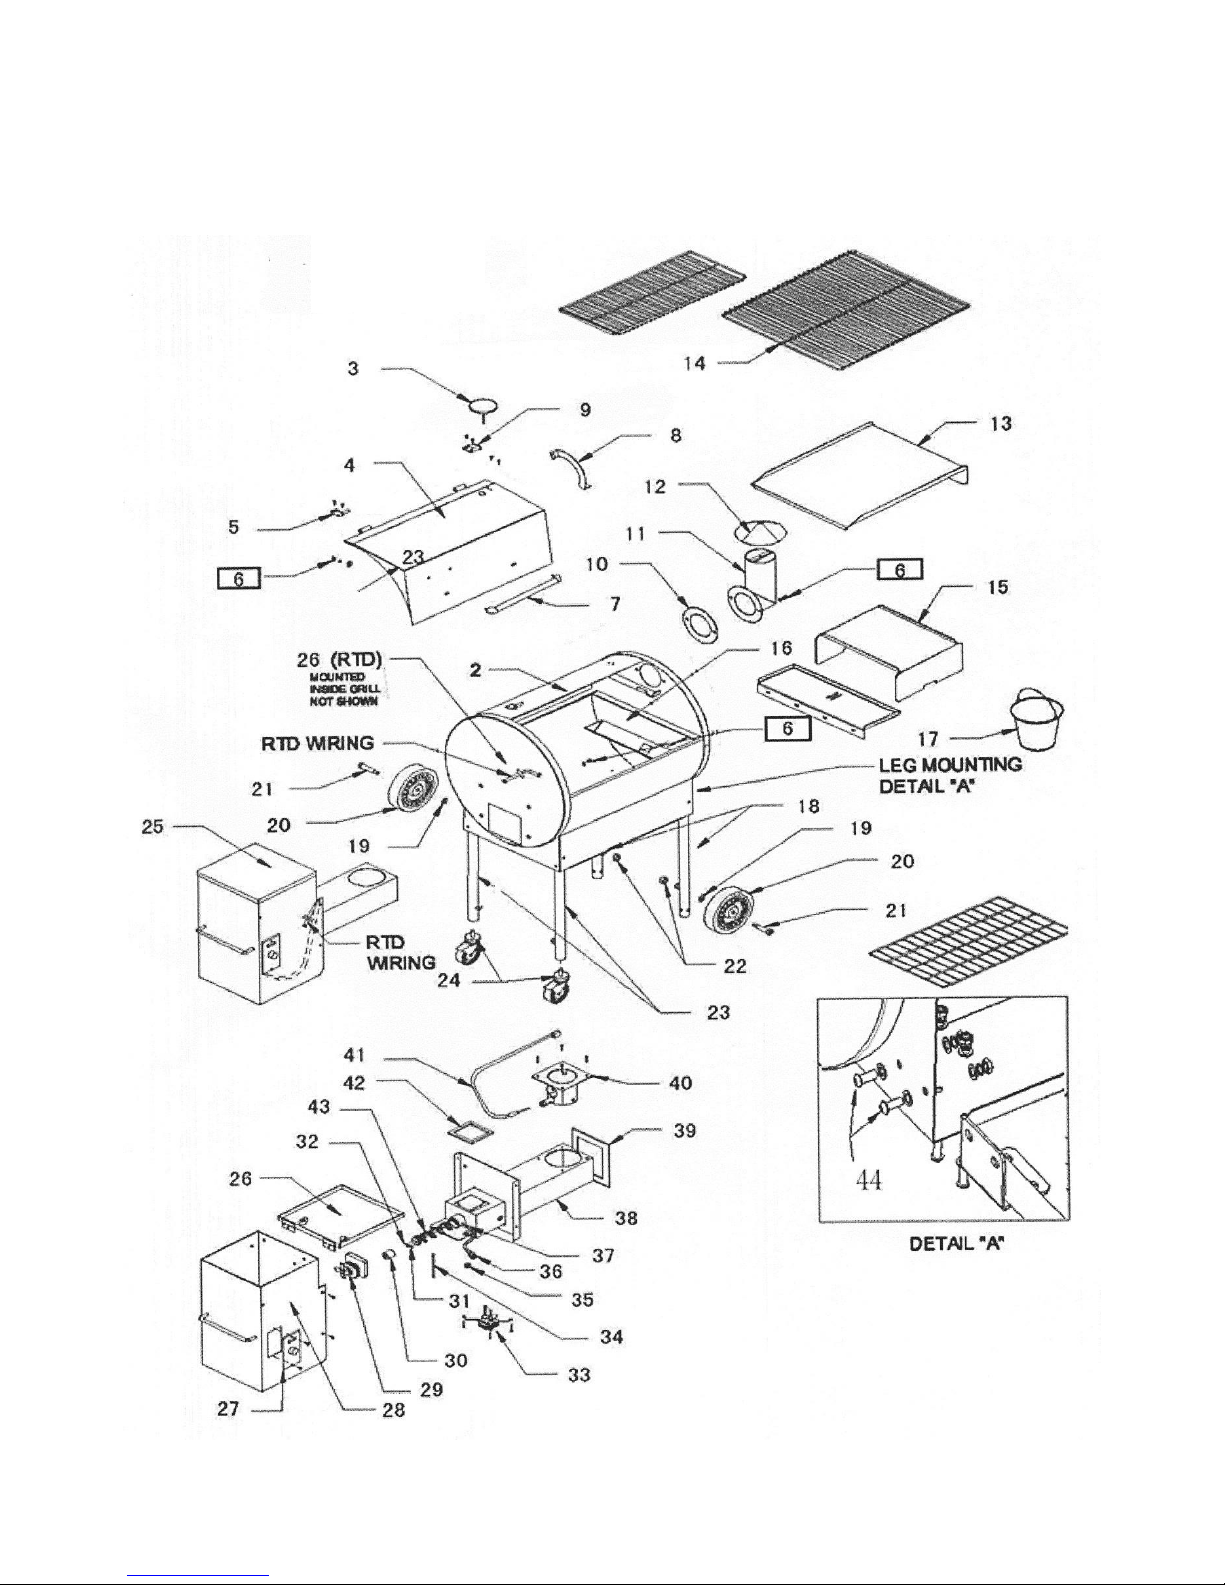
627, 969 COMPONENT DIAGRAM
Page 3

3
INTRODUCTION
Thanks and congratulations on your purchase of the Pellet Pro® Grill. With proper setup, operation and maintenance, this grill will provide you with delicious food and years
of cooking enjoyment.
Parts packed are as listed
Grill (2)
Hardware Kit (6)
Chrome Door Handle (7)
Smoke Stack (11)
Chimney Cap Assembly (12)
Grease Drain Pan (13)
Porcelain Grill (14)
Heat Baffle (15)
Grease Bucket (17)
Wheel Legs (18)
Caster Legs (23)
Hopper / Burner Assembly (25)
DIY assembly includes the following:
1) Mounting the caster legs (23) and wheel legs (18) to the grill.
2) Installing the hopper / burner assembly (25).
3) Attaching the chrome door handle (7) to the door (4).
4) Mounting the thermometer (in the box) to the right side hole of the door (4).
5) Attaching the smoke stack (11) to the grill.
6) Mounting the chimney cap assembly (12).
7) Positioning the heat baffle (15) over the fire pot (40).
8) Positioning the grease drain pan (13) over the heat baffle (15).
9) Positioning the porcelain grill (14) on the grill supports.
10) Hanging the grease bucket (17).
SUPPLY TOOLS FOR ASSEMBLY
(1) Open end wrench *2
(2) Allen Wrenc
Page 4
4
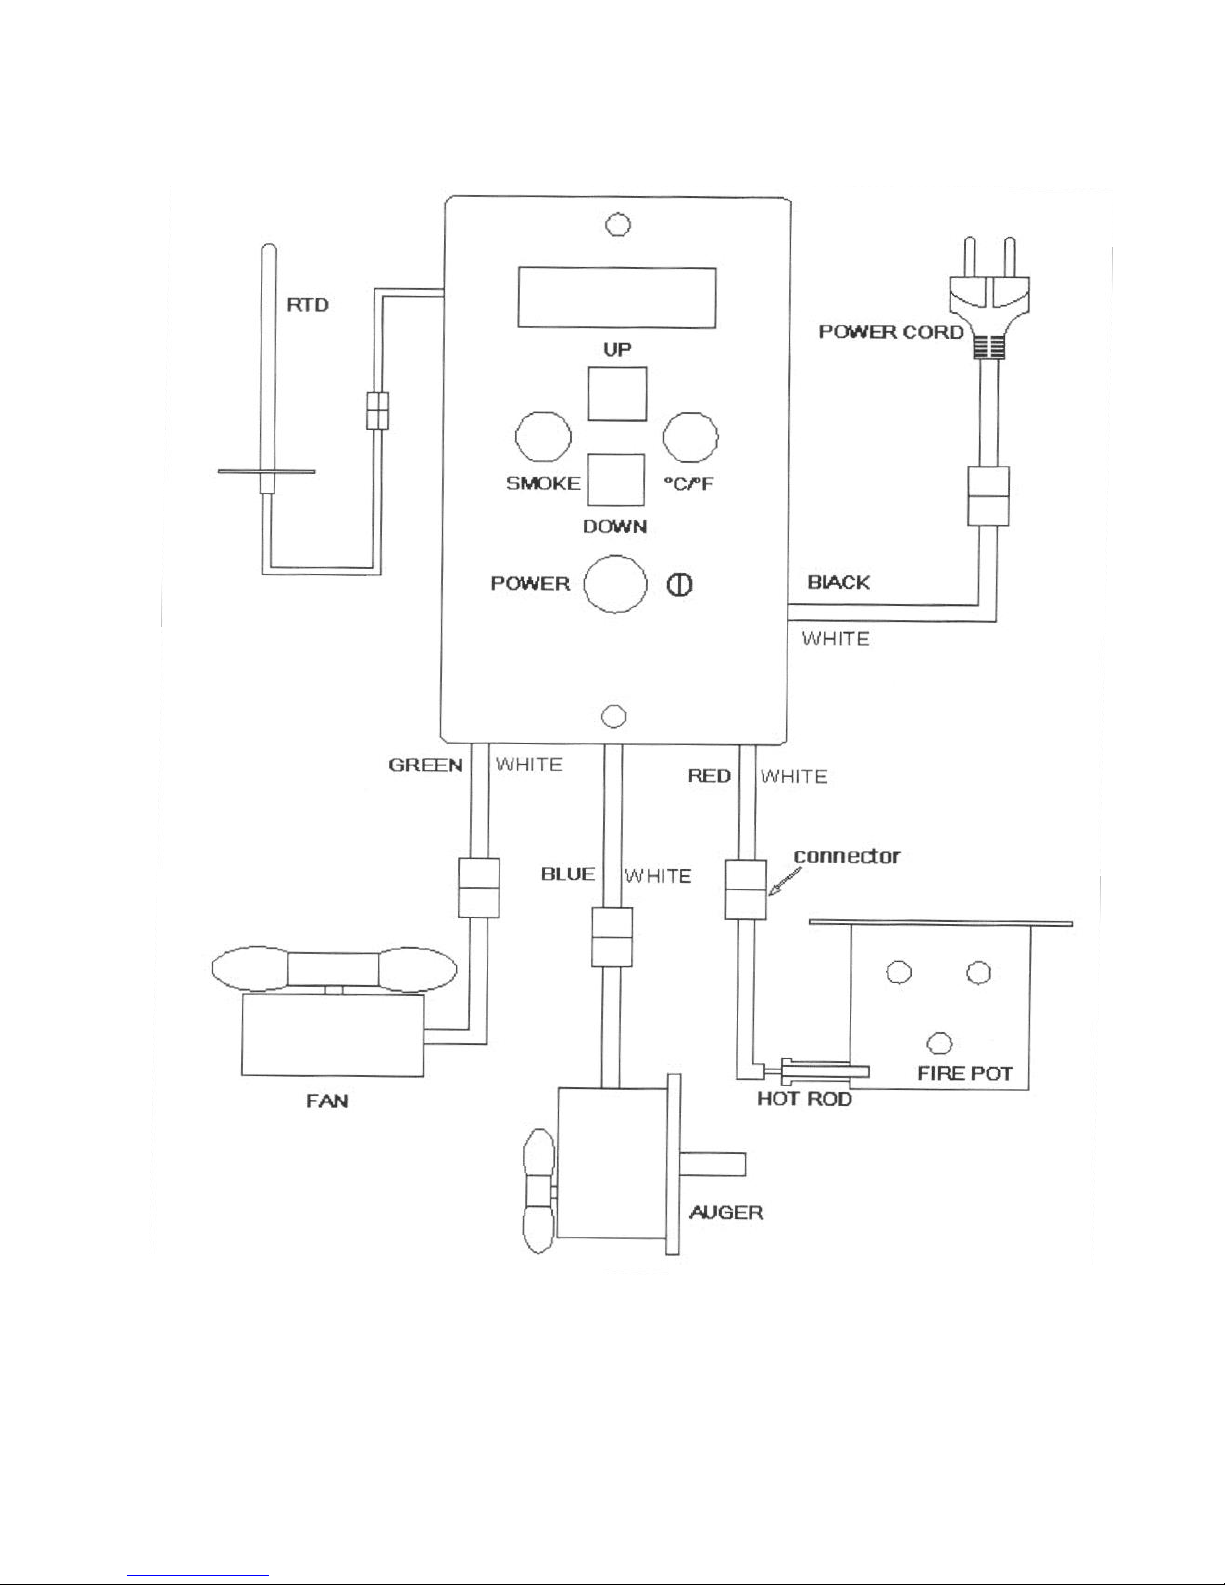
Pellet Pro® Digital Controller Diagram
Operating Voltage: AC100V ± 10%, 50-60Hz
Operating Temperature: -15 ~ 70°C
Storage Temperature: -30 ~ 70°C
Humidity: 0 ~ 95% RH
To view a video on how to
operate the controller, go to
pelletprogrill.com & click on
the Smoke Daddy®
Page 5

5
ALWAYS START THE GRILL ON 180° F WITH
THE LID CLOSED
Once the grill reaches 180° F set your desired temperature
and then wait 10 min to allow your grill to settle in.
NOTE: When operating this grill, maintain a minimum
clearance of 10in between the grill and any combustibles.
Pellet Pro® Startup
SECTION ONE: INITIAL FIRING INSTRUCTIONS
(To be used on initial firing or anytime the grill runs out of pellets)
In order to ensure proper operation of the grill, you must first allow the auger
tube to be “charged” with pellets.
1) Open the door and remover the porcelain grill, grease drain pan and heat baffle
from inside the grill.
2) Make sure the power switch is in the OFF position. Plug the power cord into an
appropriate, grounded electrical outlet. 15- 20 Amp GFCI (20 Amp preferred)
3) Open the pellet hopper lid and locate the auger. Make sure there are no foreign
objects in the auger. Turn the power on and look into the pellet hopper to confirm
the auger is turning then fill hopper with pellets. At the same time, place your
fingers over the fire pot and feel the air flow from the inducer fan. Look and see if
the hot rod is getting hot. (Will take about 2 mins to see hot rod turn red) DO
NOT TOUCH IT!
4) Place a handful of pellets in the burn pot to start process. ( Not to exceed ½ cup
of pellets) WARNING! Never use heating fuel pellets in the Grill. Place heat
diffuser over burn pot. You should start to see white smoke. Set the temperature
to 180°. Note: During the initial charging of the auger, it will take time for the
pellets to travel from the pellet hopper to the fire pot. When the pellets begin to
fall into the fire pot, if it doesn't light, turn off and repeat process.
5) Set the temperature to High. Let the pellets come to full flame. Once you see
flames come out of the fire pot, replace drip pan and grates. Close lid and let the
grill run for 45 mins on high to season. This should be done before cooking any
food on the grill.
6) For future cooks the grill should be allowed to pre-heat for approximately 10 mins
with the door closed before placing food in the grill.
Page 6

6
SECTION TWO: SUBSEQUENT START-UP
With the door open, turn the power switch on and temperature to 180° F. In approximately 2
minutes you will notice whitish-gray smoke coming out of the grill as the pellets ignite. After
assuring the pellets have ignited, close the door and set the temperature to any cooking
temperature desired.
If the auger fan and/or induction fan are not working properly please contact your dealer
for further instructions.
Although, if the grill fails to light or if the fire in the firepot goes out while cooking or
smoking, follow these steps:
1) Turn the power off. Open the lid and remove all food, porcelain grill, grease drain pan,
and heat baffle.
2) IMPORTANT: Remove all unburned pellets and ash from inside and around the firepot.
3) Before replacing the heat baffle, grease drain pan and porcelain grill. Restart the grill
and confirm that the ignition cycle is working. (The hot rod should begin to turn red and
pellets should fall into the firepot from the auger tube.)
4) If this procedure is not successful, refer to the Manual Lighting Instructions.
MANUAL LIGHTING INSTRUCTIONS:
If the hot rod only is not operating, the grill can still be used to cook and smoke using the
MANUAL LIGHTING PROCEDURE below:
1) Making sure the power switch is set to OFF and the hot rod connector (red / white wire
pair) is disconnected, plug the power cord into an appropriate, grounded electrical
outlet and switch it back ON.
2) If the control box doesn’t power up, the fuse located in the back of the control box may
need to be replaced
3) Open the pellet hopper and fill with BBQ PELLETS.
WARNING! Never use heating fuel pellets in the grill.
4) Remove the porcelain grill, grease drain pan and heat baffle to expose the fire pot in the
bottom of the grill.
5) Pour 1 / 2 cup of BBQ PELLETS into the fire pot.
6) Squirt 2 tablespoons of lighter fluid on the pellets in the fire pot or use a propane torch to
light the pellets.
7) Light the lighter fluid with a fireplace match or a long-reach butane lighter.
WARNING! NEVER SQUIRT LIGHTER FLUID INTO A BURNING FIRE OR A HOT FIRE POT.
THE LIGHTER FLUID CONTAINER COULD EXPLODE AND CAUSE SERIOUS INJURY.
8) Let the lighter fluid and pellets burn for approximately 4 minutes.
9) After assuring the pellets have ignited, install the heat baffle, grease drain pan and
porcelain grill back in place.
10) Turn the power switch on and the temperature to any setting desired. With the door
closed, let the grill pre-heat for approximately 10 minutes before placing food in the grill.
Page 7

7
SECTION THREE: OPERATING TIPS
OVERVIEW:
The Temperature can be changed at any time to increase or decrease the cooking
temperature of the Grill. The HIGH Temperature setting is for Grilling. The
UP/DOWN RANGE Temperature settings are for Slow Cooking. The SMOKE setting
is for Smoking and adding Smoke Flavor to foods being cooked. The SMOKE setting
can also be used to smoke foods at 180° F and below.
1) SETTING OPERATION:
First is LED Display:
The first three digits display the temperature, the fourth shows
temperature unit “ C/F ”
GRILL SETTING FOR TEMPERATURES 180° F to 450° F
Turn power on
Push “Up”/”Down” button to desired temperature, similar
to a conventional oven to maintain a constant heat
setting.
SETPOINT:
Press “C/F” button to switch temperature unit (default to “F”)
On the highest setting the display will read “HHHH” and the auger will run
continuously.
Page 8

10
After making an adjustment to your temperature, allow 15 minutes to allow your
grill to settle in before making any other adjustments.
There will be some fluctuation in temperature due to the fact that this is a wood
burning system, but the desired temperature will average out.
o Now, if the temperature is consistently reading higher than your desired
temperature, push both “Up”/”Down” buttons at the same time until you
see the “E”, then raise your auger timing.
o If the temperature is consistently reading lower than your desired
temperature, then lower you auger timing.
REMEMBER: the auger timing is the amount of time between dumping
pellets into the burn pot to help maintain your set temperature.
Ex: 50 sec every 50 sec, pellets dump into burn pot.
120 sec every 120 sec, pellets dump into burn pot.
Another thing that could affect the temperature is a dirty RTD probe. This can
be cleaned with rubbing alcohol or dishwasher detergent, but DO NOT clean
it while it is hot or running.
NOTE: If the RTD is not connected properly, it will show “ERRO”, the ignition fan and
feed motor will stop running.
SMOKE SETTING FOR TEMPERATURES 180° F AND BELOW
The SMOKE displays an “S” which does not run off of the RDT but an
auger timed cycle. This can be set from 50-120 sec auger off-time, and it
feeds in 15 sec of pellets per cycle. The lowest setting (50 sec) creates
the highest temperature, and the high setting (120 sec) creates the lowest
temperature.
To activate the Smoke Setting, press the smoke button until the Fourth
Digit becomes an “S”. To deactivate it press the smoke button again until
it becomes an “F” or “C”. Being that this is a wood pellet burning system,
the BTUs and ambient temperature play a factor in this setting. You may
need to adjust the cycle time to meet your needs. After you make an
adjustment, please allow 15-20 min before making another adjustment.
The Temperature Control Maintenance timing and the Smoke Setting
timing are set by pressing the “Up” and “Down” buttons at the same time
until you see the Fourth Digit turn to an “E”. Then use the “Up” or “Down”
button to adjust your desired setting. After 5 sec the display will default to
show the internal temperature of the grill.
Page 9

11
SECTION FOUR: MAINTAINING
YOUR NEW PELLET PRO® GRILL
1. Change the aluminum foil on the Grease Drain Pan frequently. Periodically clean
the grease out of the V-shaped Grease Drain and Grease Drain Tube and off of the
interior surfaces of the Grill. Empty the Grease Bucket occasionally and line with
aluminum foil for easy clean-up. It is easier to clean off accumulated grease when
the Grill is warm. Be careful not to burn yourself. If too much grease is allowed to
build up on the Grease Drain Pan and the V-shaped Grease Drain, or is allowed to
plug the Grease Drain Tube, a grease fire could result. We recommend cleaning
these locations regularly.
2. Outside surfaces: DO NOT use oven cleaner, abrasive cleansers or abrasive
cleaning pads on the outside Grill surfaces. Use warm soapy water to cut the
grease.
3. If the Grill is stored outside during the rainy season, care should be taken to ensure
that water does not get into the Pellet Hopper. Wood pellets, when wet, expand
greatly and will jam your Auger.
4. Depending on use, periodically remove the Porcelain Grill, Grease Drain Pan, and
Heat Baffle to clean the ash from in and around the Firepot. A shop-vac is handy for
this chore. Make sure the Grill is COLD before starting this procedure.
5. We recommend keeping a long-handled cleaning brush near the Grill. After
removing your food, give the Porcelain Grill a quick brushing. I takes only a minute
and it will be ready the next time you want to use the Grill. Be careful not to burn
yourself.
NOTE:
1) The electric power supply cord should be replaced by a special line or
personal module available from the manufacturer or its maintenance
department when it is damaged.
2) The equipment should be placed on a smooth either indoors or outdoors with
inclination not more than 15 degrees.
3) Children should be supervised to make sure they won't run into equipment.
4) The equipment will not be available to the following persons (including
children): person who has a physical or mental problem or lack of experience
and the knowledge. Unless they get supervision or guidance about the usage
of this product from their guarders.
“WHO’S YOUR SMOKE DADDY?”
Pellet Pro® Grill
www.pelletprogrill.com
 Loading...