

Page 1

USER GUIDE
ENG
Translation of the original
user guide
CONTENTS:
• A hedge trimmer without blade
• A power cord for the battery
• A torx screwdriver
• A user guide
• 1 armband
• 3 bolts for the cutting head
• The warranty card
READ THE USER GUIDE CAREFULLY BEFORE USING THE TOOL
54_14_16B
54_117575_F - 07/2017
Page 2

Page 3

Table of contents
SAFETY INSTRUCTIONS .....................................................................4
GENERAL SAFETY INSTRUCTIONS FOR THE TOOL ..................................................................5
SAFETY WARNING FOR THE HEDGE TRIMMER .....................................................................6
SAFETY MEASURES FOR THE CHARGER AND THE BATTERY .........................................................6
SAFETY INDICATIONS .......................................................................7
SAFETY EQUIPMENT ...........................................................................................7
SAFETY INDICATIONS ..........................................................................................7
DESCRIPTION AND TECHNICAL CHARACTERISTICS .............................................8
TECHNICAL CHARACTERISTICS ..................................................................................8
PRESENTATION OF THE CUTTER BARS ...........................................................................9
ACCESSORIES PROVIDED WITH EACH CUTTER BAR ...............................................................9
PUTTING THE TOOL INTO SERVICE ........................................................... 10
ASSEMBLY / DISASSEMBLY OF THE HANDLE ......................................................................10
ASSEMBLY / DISASSEMBLY OF THE CUTTER BAR ..................................................................11
INSTALLATION OF THE DEFLECTOR ON THE CUTTER BAR L63 .......................................................12
TRIMMER BLADE PROTECTION .................................................................................12
USE OF THE FAST CONNECTOR .................................................................................13
USE OF THE FAST CONNECTOR .................................................................................14
ORIENTATION OF THE HANDLE ..................................................................................15
ST ARTING AND USE ........................................................................ 16
USING THE TRIGGER CONTROL AND FRONT HANDLE ..............................................................16
STARTING ...................................................................................................17
SPEED SELECTOR ............................................................................................17
TIPS FOR USING THE ADAPTABLE CUTTER BAR ...................................................................18
WORKING TECHNIQUES .......................................................................................18
SERVICING ................................................................................19
SERVICING SCHEDULE ........................................................................................19
PELLENC TOOL MAINTENANCE RECOMMENDATIONS ..............................................................20
TIGHTENING THE BLADES (DIFFICULTY 1) ........................................................................20
CLEANING ...................................................................................................20
LUBRICATION OF THE CUTTER BAR GEARS (DIFFICULTY 1) .........................................................21
SHARPENING THE BLADES (DIFFICULTY 2) .......................................................................21
STORAGE ....................................................................................................22
STORAGE OUT OF SEASON ....................................................................................22
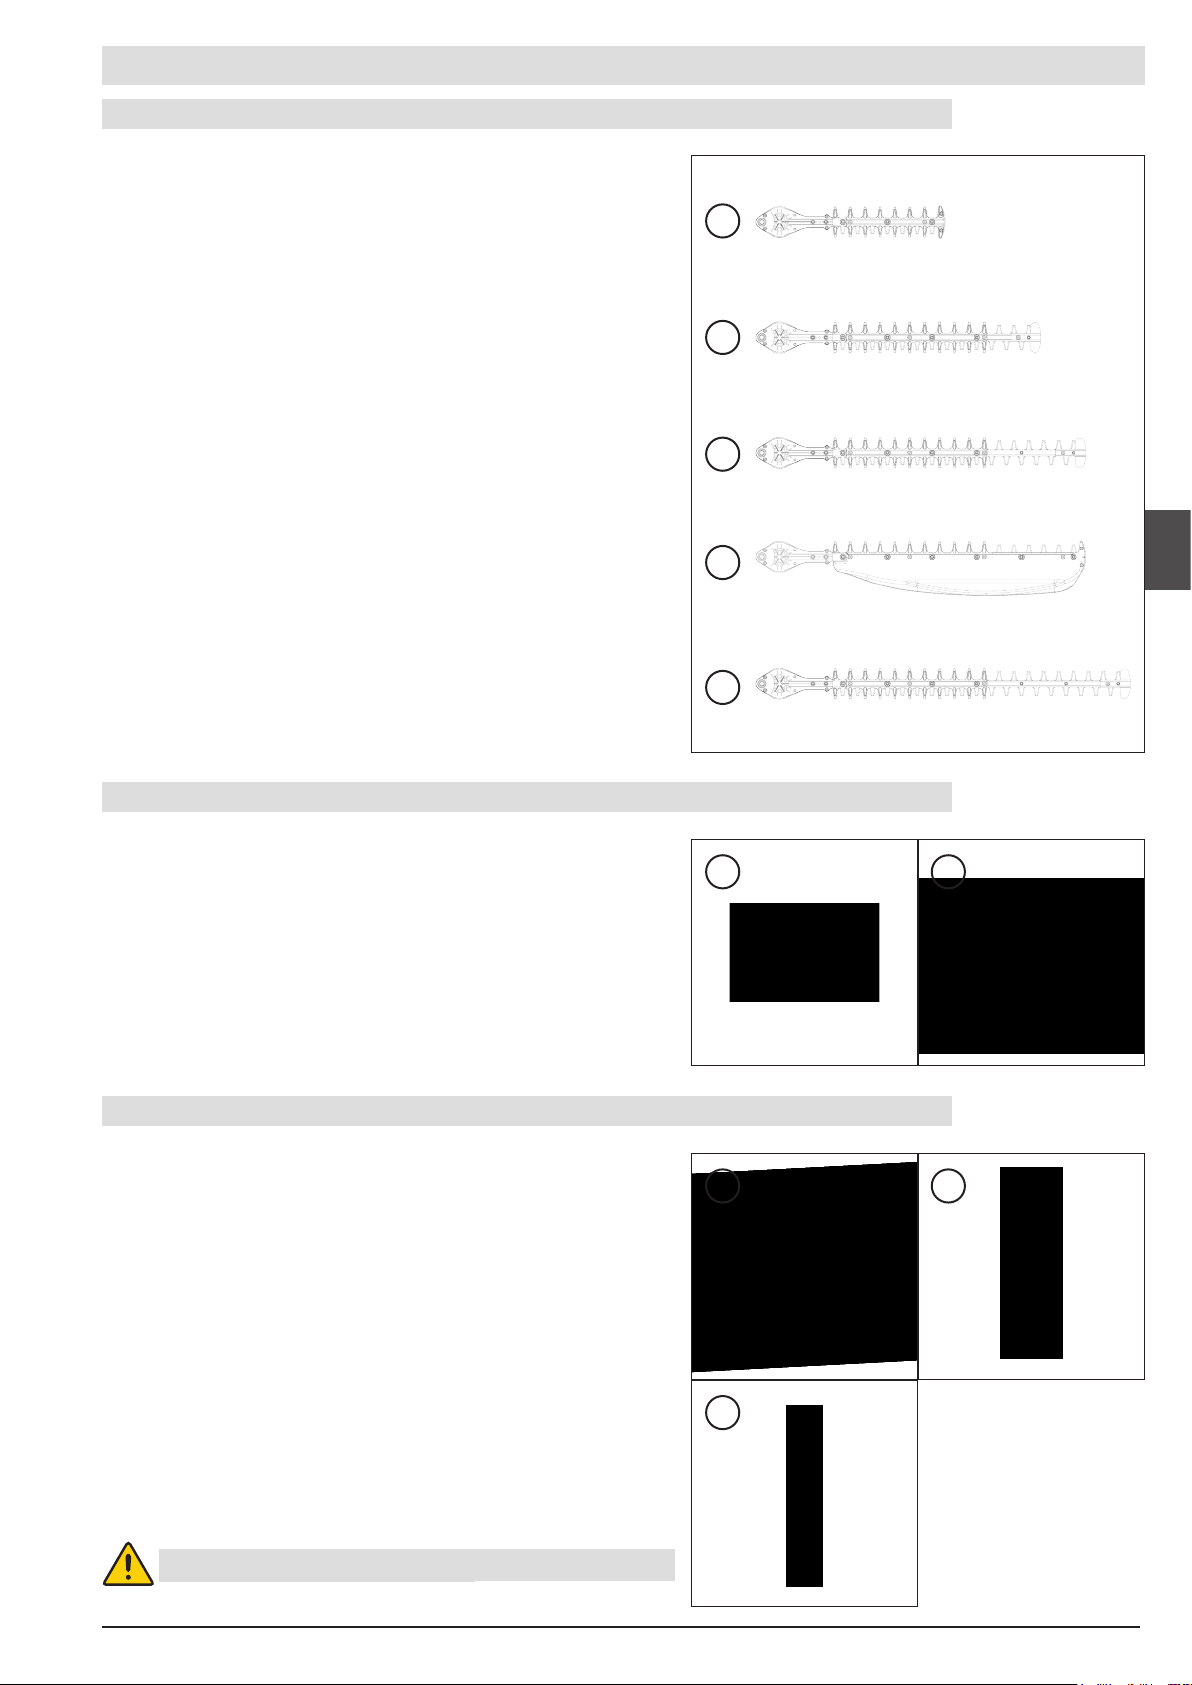
CUTTING TOOLS ..............................................................................................23
ACCESSORIES ...............................................................................................23
CONSUMABLE ................................................................................................23
TROUBLESHOOTING AND TOOL PROTECTION .................................................24
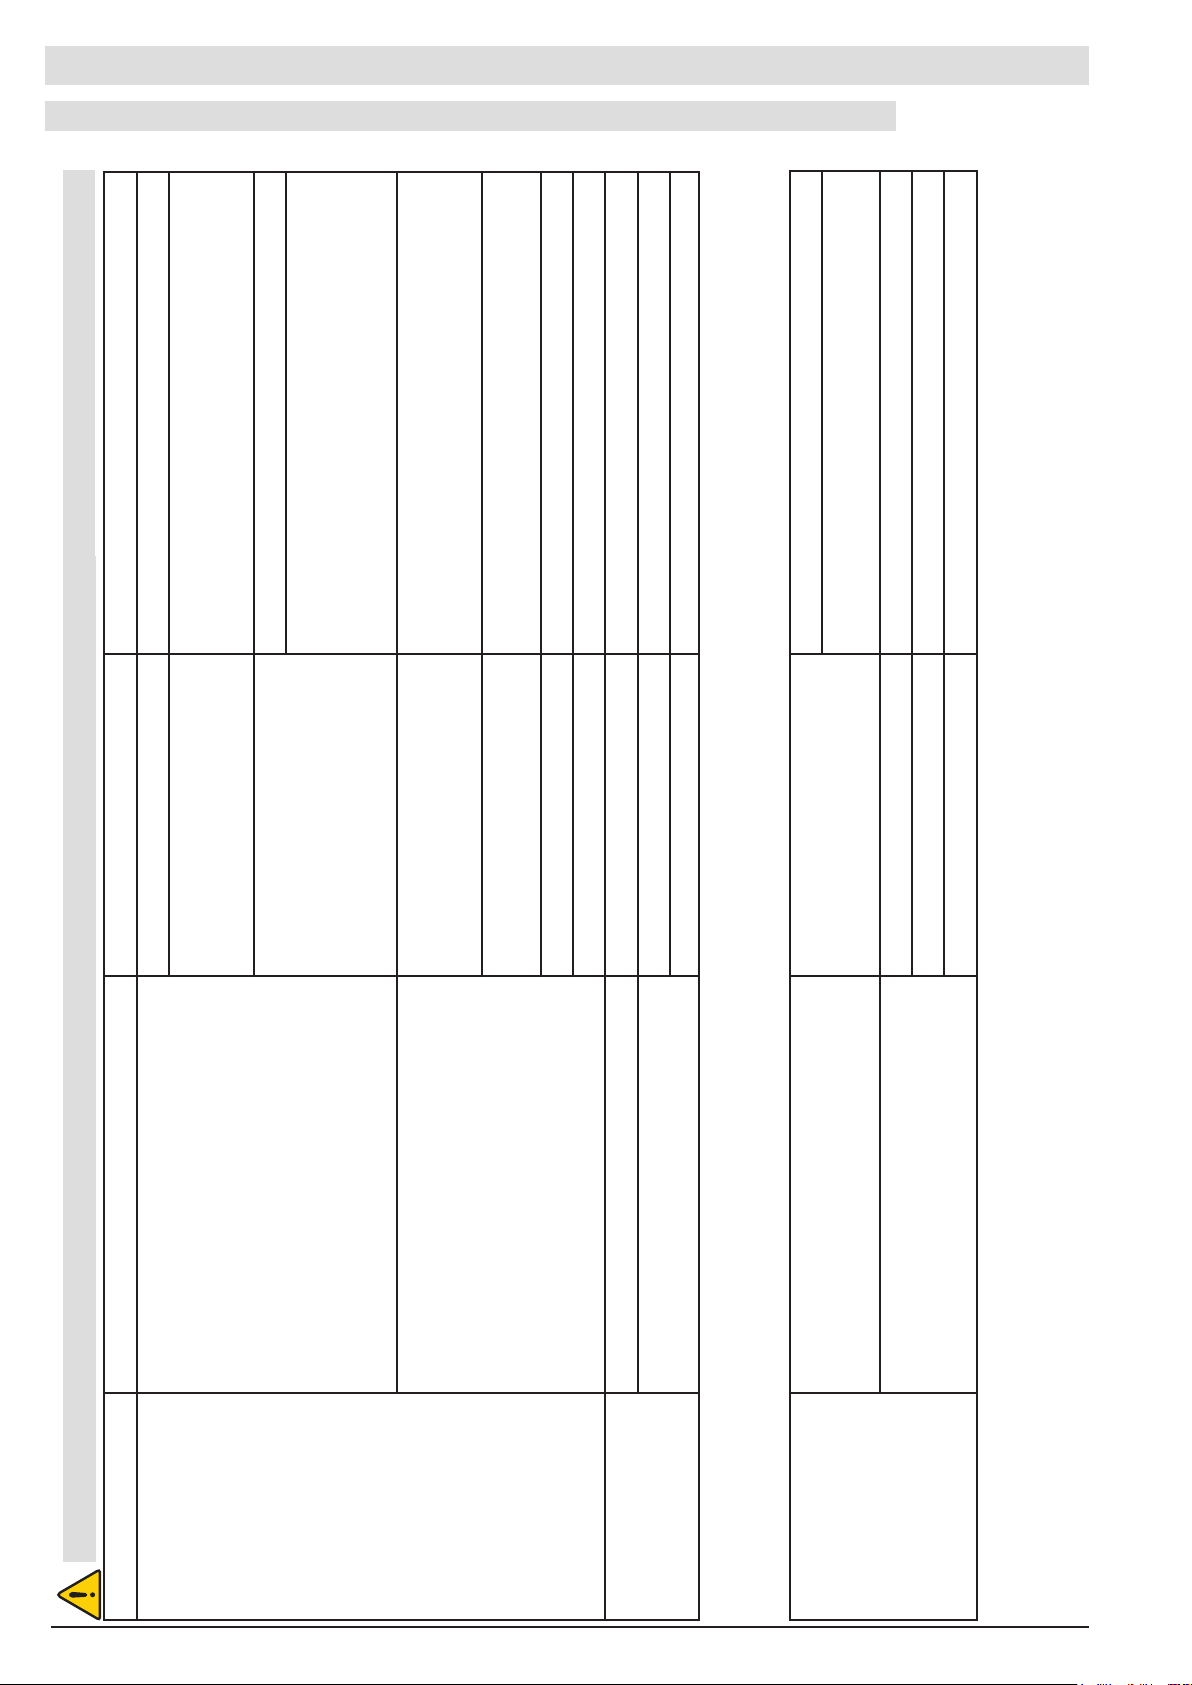
POSSIBLE DEFECTS AND DIAGNOSTICS * ........................................................................24
PELLENC S.A. WARRANTY AND AFTER SALES SERVICE .........................................25
"EC" DECLARATION OF CONFORMITY ........................................................26
3
Page 4

SAFETY INSTRUCTIONS
PLEASE SAVE THESE INSTRUCTIONS
This manual contains important information and operating instructions for the following
tool: HELION 2 COMPACT.
You must read THE WHOLE of this user guide before using the tool or before carrying out
servicing operations.
Comply scrupulously with the instructions and illustrations given in this document.
All through this user guide you will nd advisory notes and information entitled: REMARK, CAUTION /
WARNING.
A REMARK provides additional information, claries a point or explains a step to be followed in detail.
The CAUTION and WARNING advisories are used to dene a procedure which, if neglected or incorrectly
performed, may lead to serious damage to the equipment and/or personal injury.
This advisory:
be covered by the warranty and the owner will be responsible for the repair costs.
Safety indications are also given on the tool; they remind you of the safety precautions to be taken. Identify
and read these indications before using the tool. Immediately replace any indications that may become
partially illegible or deteriorated.
Refer to the «SAFETY INDICATIONS» heading in order to identify the location of the safety
indications on the tool.
No part of this manual may be reproduced without the written consent of PELLENC. The illustrations
given in this manual are for information purposes and are in no way contractual. PELLENC reserves the
right to make any modication or improvement to its products as deemed necessary without informing
customers already in possession of a similar model. This manual forms an integral part of the tool and must
accompany the tool if it changes hands.
indicates that if the procedures or instructions are not complied with, any damage will not
G
4
Page 5

SAFETY INSTRUCTIONS
KEEP THESE INSTRUCTIONS
GENERAL SAFETY INSTRUCTIONS FOR THE TOOL
CAUTION Read all the safety measures and all the instructions.
Retain all the safety measures and instructions for later reading.
This appliance is not intended for use by persons (including children) with reduced physical,
sensory or mental capabilities, or lack of experience and knowledge, unless they have been given
supervision or preliminary instructions by a person responsible for their safety.
• The HELION 2 COMPACT hedge trimmer is a professional tool whose use is reserved exclusively for
trimming vegetation.
• PELLENC SA accepts no liability for any damage caused by improper use or use other than that for
which it is intended.
• PELLENC SA accepts no liability for any damage caused by the use of non-original parts or accessories.
Work area safety
a. Keep the work area clean and well lit.
b. Do not use electric tools in an explosive atmosphere, for example in the presence of ammable
liquids, gases or dust.
c. Keep children and persons present away when using the tool.
Electrical safety
a. The plugs of the electric tool must be adapted to the base. Never modify the plug in any way
whatsoever. Do not use adaptors with grounded tools.
b. Avoid any body contact with grounded surfaces such as pipes, radiators, cookers and refrigerators.
c. Do not misuse the power cord. Never use the power cord to carry, pull or disconnect the tool. Keep
the power lead away from heat, lubricant, sharp edges or moving parts.
Personal safety
a. Remain vigilant, watch what you are doing and use common sense when using the tool. Do not use a
tool if you are tired or under the inuence of drugs, alcohol or medication.
b. Wear safety equipment. Always wear eye protection.
c. Avoid any untimely starting of the device. Make sure the switch is in the off position before connecting
the tool to the mains and/or battery pack, picking it up or carrying it.
d. Remove any adjustment key before starting the tool.
e. Do not rush. Adopt a suitable position and remain balanced at all times.
f. Wear appropriate clothing. Do not wear loose clothing or jewellery.
g. Keep hair, clothing and gloves away from moving parts.
h. If systems are provided to connect dust extraction and recovery equipment, make sure these
systems are connected and properly used.
5
Page 6

56_10_016A
SAFETY INSTRUCTIONS
Tool usage and maintenance
a. Do not force the tool. Use a tool suited to your application.
b. Do not use the tool if the switch does not allow it to be switched on and off.
c. Disconnect the plug of the power supply source and/or battery pack from the tool prior to any
adjustment, change of accessories or before putting the tool away.
d. When not in use, keep tools out of reach of children, and do not allow persons to use the tool if they
do not know how to use it and if they have not read these instructions.
e. Comply with tool servicing instructions. Check that the moving parts are not misaligned or jammed,
that there are no broken parts or that there is no other condition which could affect the operation of
the tool. In the event of damage, have the tool repaired before using it.
f. Keep the cutting components sharp and clean.
g. Use the tool, accessories, blades etc., in accordance with these instructions, taking into account the
working conditions and the work to be performed.
Use of battery-operated tools and usage precautions.
a. Only recharge using the charger specied by the manufacturer.
b. Only use the tools with specically designated battery packs.
c. When a battery pack is not used, store it away from other metal objects such as paper clips, coins,
keys, nails, screws or other small items which can form a connection from one terminal to another.
d. In poor conditions, liquid can be ejected from the battery; avoid any contact. In the event of accidental
contact, clean with water. If the liquid gets into your eyes, seek medical help.
Maintenance and upkeep
a. Have the tool serviced by a qualied repairer using only identical spare parts.
SAFETY WARNING FOR THE HEDGE TRIMMER
1– Keep the cutting blade away from all parts of your body. Do not remove the cut material or hold the
material to be cut when the blades are moving. Make sure that the switch is closed when removing the
stuck material.
2– Carry the hedge trimmer by the handles with the cutting blades off. Always t the protective sheath on
the cutting device during transport or storage of the hedge trimmer.
3– Hold the tool by the isolated gripping areas only because the cutting blades can get in contact with the
hidden wiring or the own hedge trimmer power cord.
4– It is advised that you check for the presence of foreign bodies in the hedge, such as
wire fences son of iron and metal stakes.
SAFETY MEASURES FOR THE CHARGER AND THE BATTERY
Refer to the Pellenc tools battery manual.
WARNING:
Before working on the tool, check that the On / Off switch is in the off
position «0» and disconnect the battery power lead.
6
Page 7

SAFETY INDICATIONS
SAFETY EQUIPMENT
1 5
2 6
3
4
SAFETY INDICATIONS
Protective equipment Wearing is
1 Helmet Recommended
2 Visor Recommended
3 Hard-wearing gloves Mandatory
7
8
4 Safety footwear Recommended
5 Ear protection Mandatory
6 Safety goggles Mandatory
7 Safety jacket or over-sleeves Recommended
8 Work trousers Recommended
1
4
1– LwA sound power level guaranteed.
2– Risk of burns (motor)
3– IP54
4– Read the user guide.
5– Wearing glasses and hearing protection is required.
6– Wearing gloves is mandatory.
The IP54 protection concerns only the tool, not the battery . This means that it is protected against
dust and against water spray from all directions.
2
5
3
6
7
Page 8

DESCRIPTION AND TECHNICAL CHARACTERISTICS
1 3 4 6 5 7 8
1– Rear handle
2– Operating trigger
3– Speed selector
92
8– Front handle safety trigger
9– Handle rotation button
10– Blade
10
4– LED power and speed indicator
5– Front handle
6– Crankcase
7– Hand guard
TECHNICAL CHARACTERISTICS
HELION 2 COMPACT
Power 1200 Watts
Blade
Cutter bar weight
Tool + cutter bar weight 3.0 Kg 3.4 Kg 3.5 Kg 3.7 Kg 3.6 Kg
Dimensions (l x w x h) in mm 745
Effective cutting length/Cutter bar 270 mm 510 mm 630 mm 750 mm
Distance between teeth 33 mm
Tooth height 24 mm
Blade speed 3200 to 3800 strokes/mn
Battery life Depending on the use and type of battery
L27 L51 L63 L63D L75
1.0 1.4 1.5 1.7 1.6
*232*181
985
*232*181
1105
*232*181
1225
*232*181
Determining the sound levels and vibration rates is based on the operating conditions at the maximum nominal rating with a 75mm
cutter bar.
Maximum weighted acoustic pressure level (ref. 20 µPa) at the user's position LpA = 80 dB(A) K = 1.5 dB(A)
C-weighted peak sound pressure level (ref. 20 µPa) at the user's position L
Values dened as per sound measurement standards NF EN ISO 11203 and NF EN ISO 3744.
Symbol Value Unit Reference Comment
L
WAm
L
The recording of the measured sound power level and of the guaranteed sound power level has been performed according to a
procedure in accordance with directive 2000/14/CE appendix V.
WAg
Vibration emission value as per EN 60745-2-15 :2009
91 dB(A) 1 pW Measured sound power level
92 dB(A) 1 pW Guaranteed sound power level
Handle uncertainty
ah = 3.4m/s²
< 130 dB(C)
pC
Kd = 1.5 m/s²
8
Page 9

DESCRIPTION AND TECHNICAL CHARACTERISTICS
PRESENTATION OF THE CUTTER BARS
L27
réf = 57096
L51
alone
L63
Deector Kit
D
réf = 56206 + réf = 57097
réf = 56205
réf = 56206
L75
ACCESSORIES PROVIDED WITH EACH CUTTER BAR
- Protective sheath
- Assembly instructions
- The blade's certicate of conformity
réf = 56207
9
Page 10
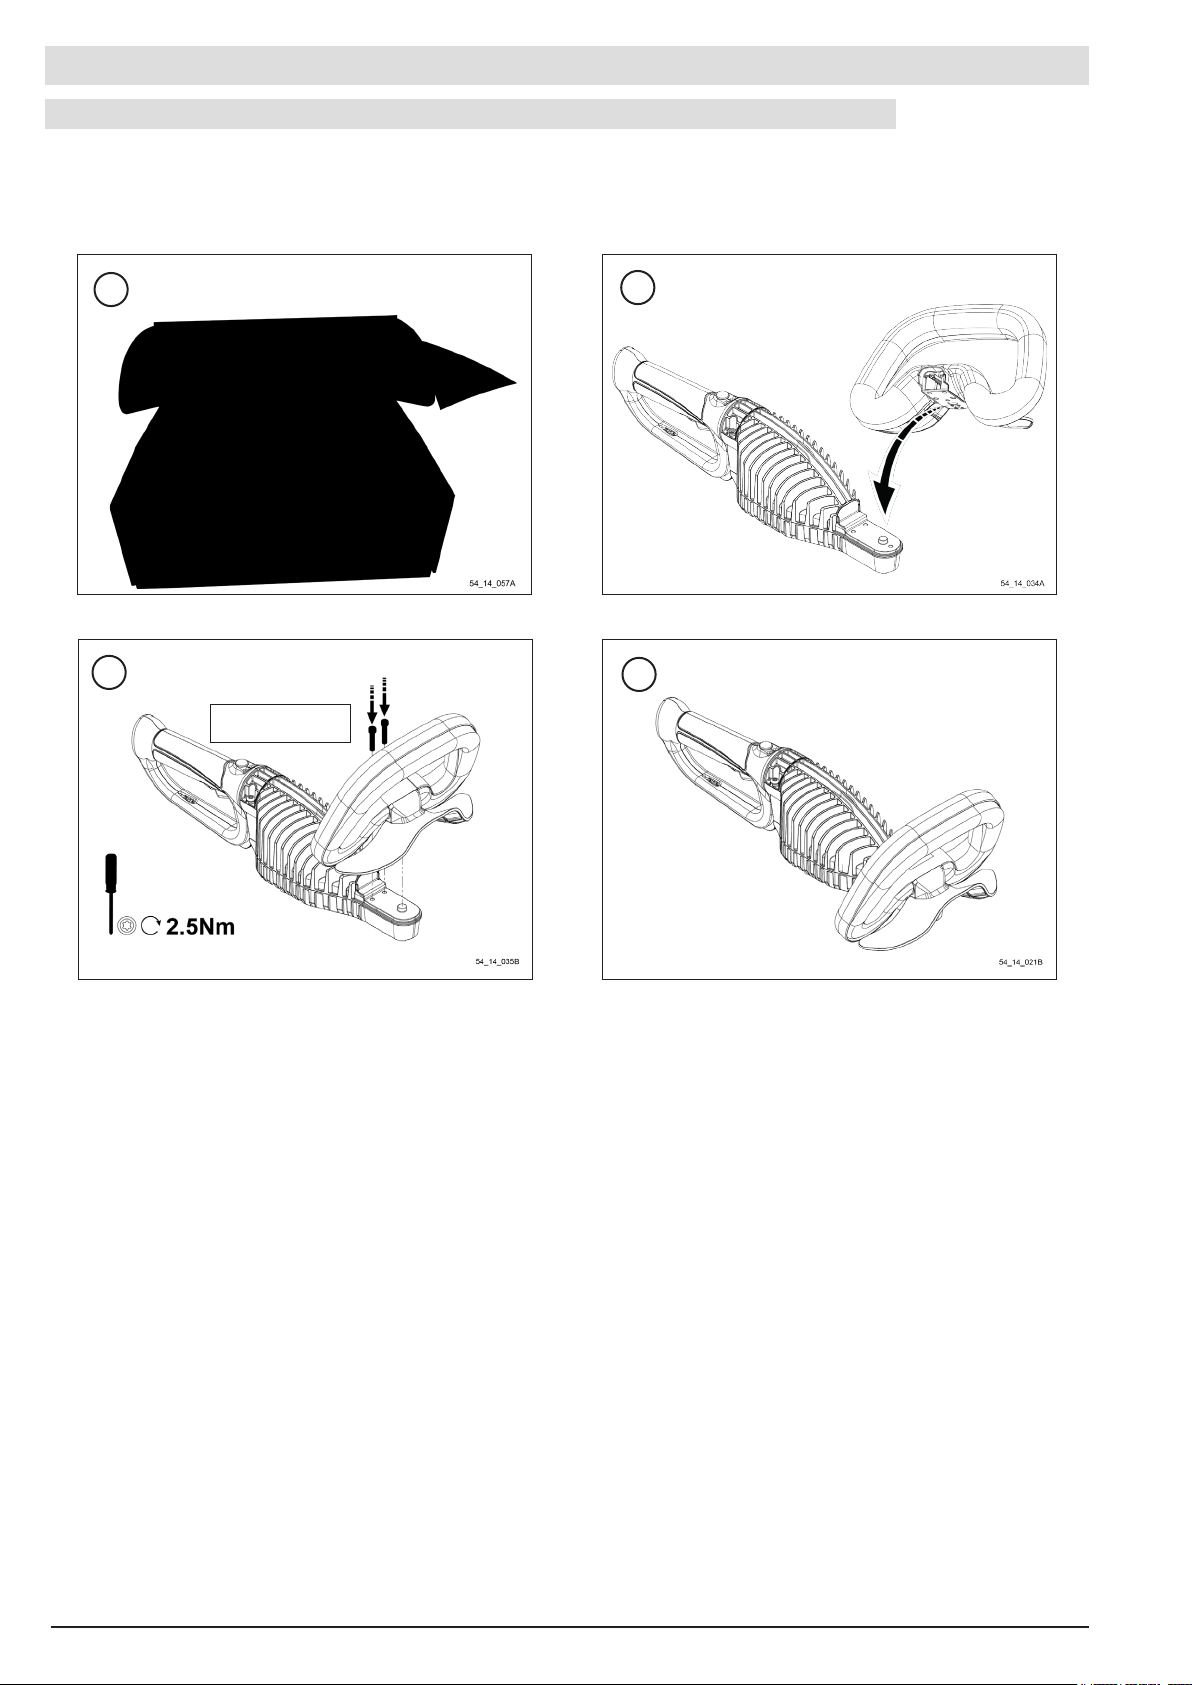
PUTTING THE TOOL INTO SERVICE
ASSEMBLY / DISASSEMBLY OF THE HANDLE
1
3
(2x)M5x25
2
4
10
Page 11
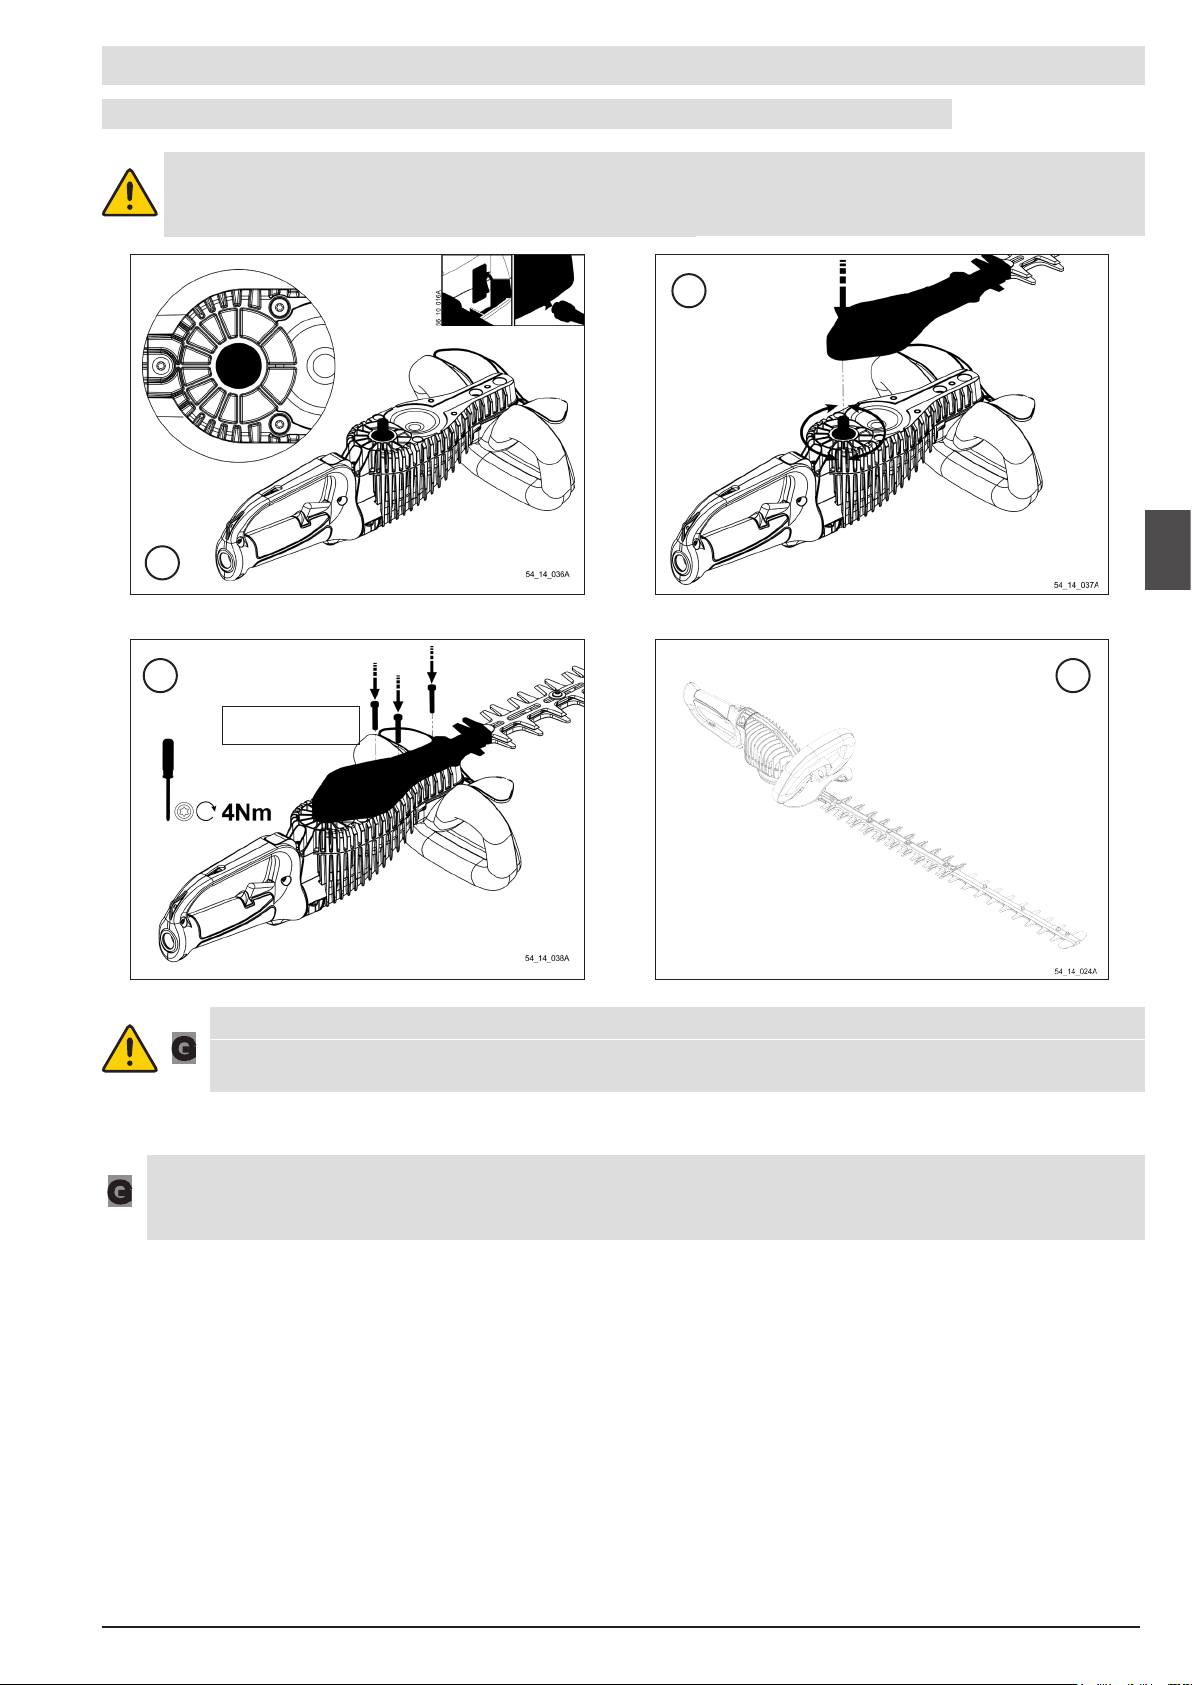
PUTTING THE TOOL INTO SERVICE
ASSEMBLY / DISASSEMBLY OF THE CUTTER BAR
WARNING:
Before working on the tool, check that the ON/OFF switch is set to the OFF position «0» and
disconnect the power supply lead from the battery.
1
2
3 4
(3x)M5x25
WARNING:
Never use a trimmer blade other than the one specied by PELLENC. Failure to do so will
G
result in a risk of personal injury.
WARNING:
G
Running-in of the cutter bar must be done for 1 minute at each change of the cutter bar in a dry run.
Check the tightness of the cutter bar after running-in.
11
Page 12
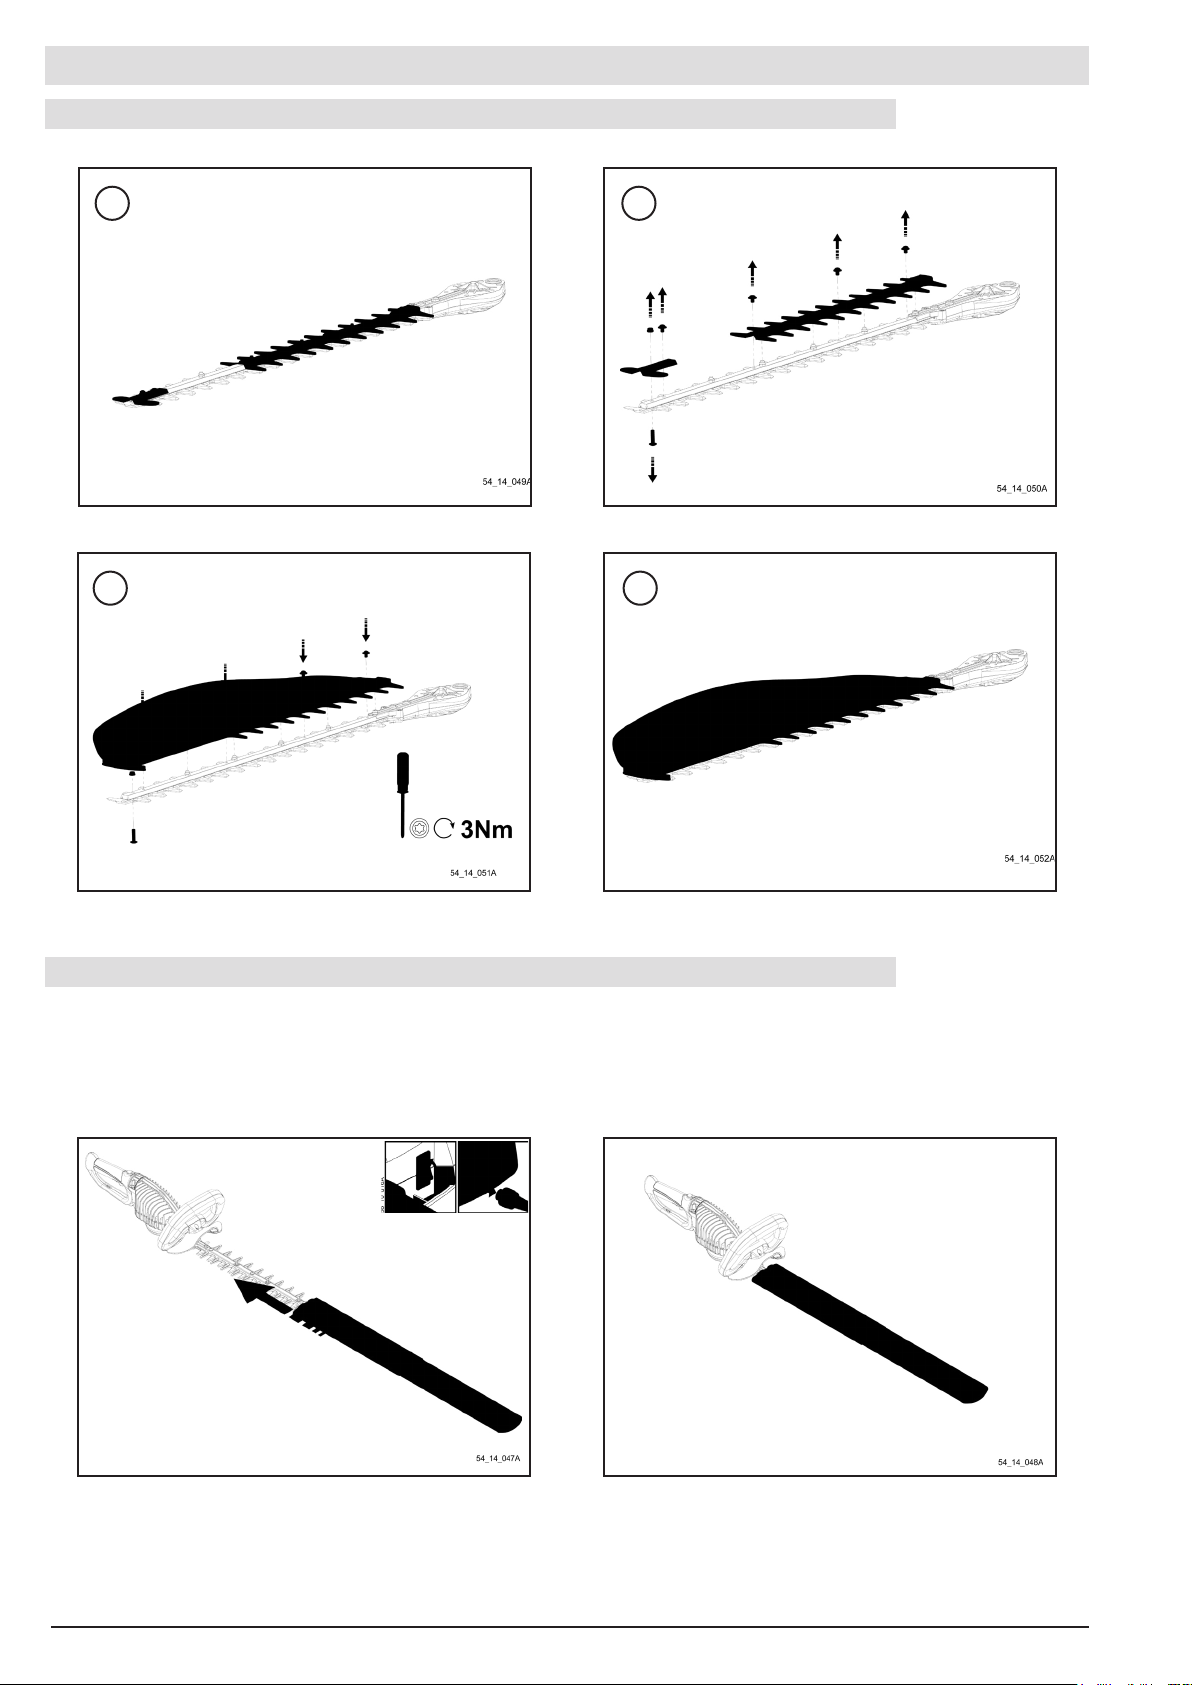
PUTTING THE TOOL INTO SERVICE
INSTALLATION OF THE DEFLECTOR ON THE CUTTER BAR L63
1 2
3 4
TRIMMER BLADE PROTECTION
Cover the cutter bar with the sheath in all of the following
cases: transport, adjustment, handling and storage of the
tool.
12
Page 13
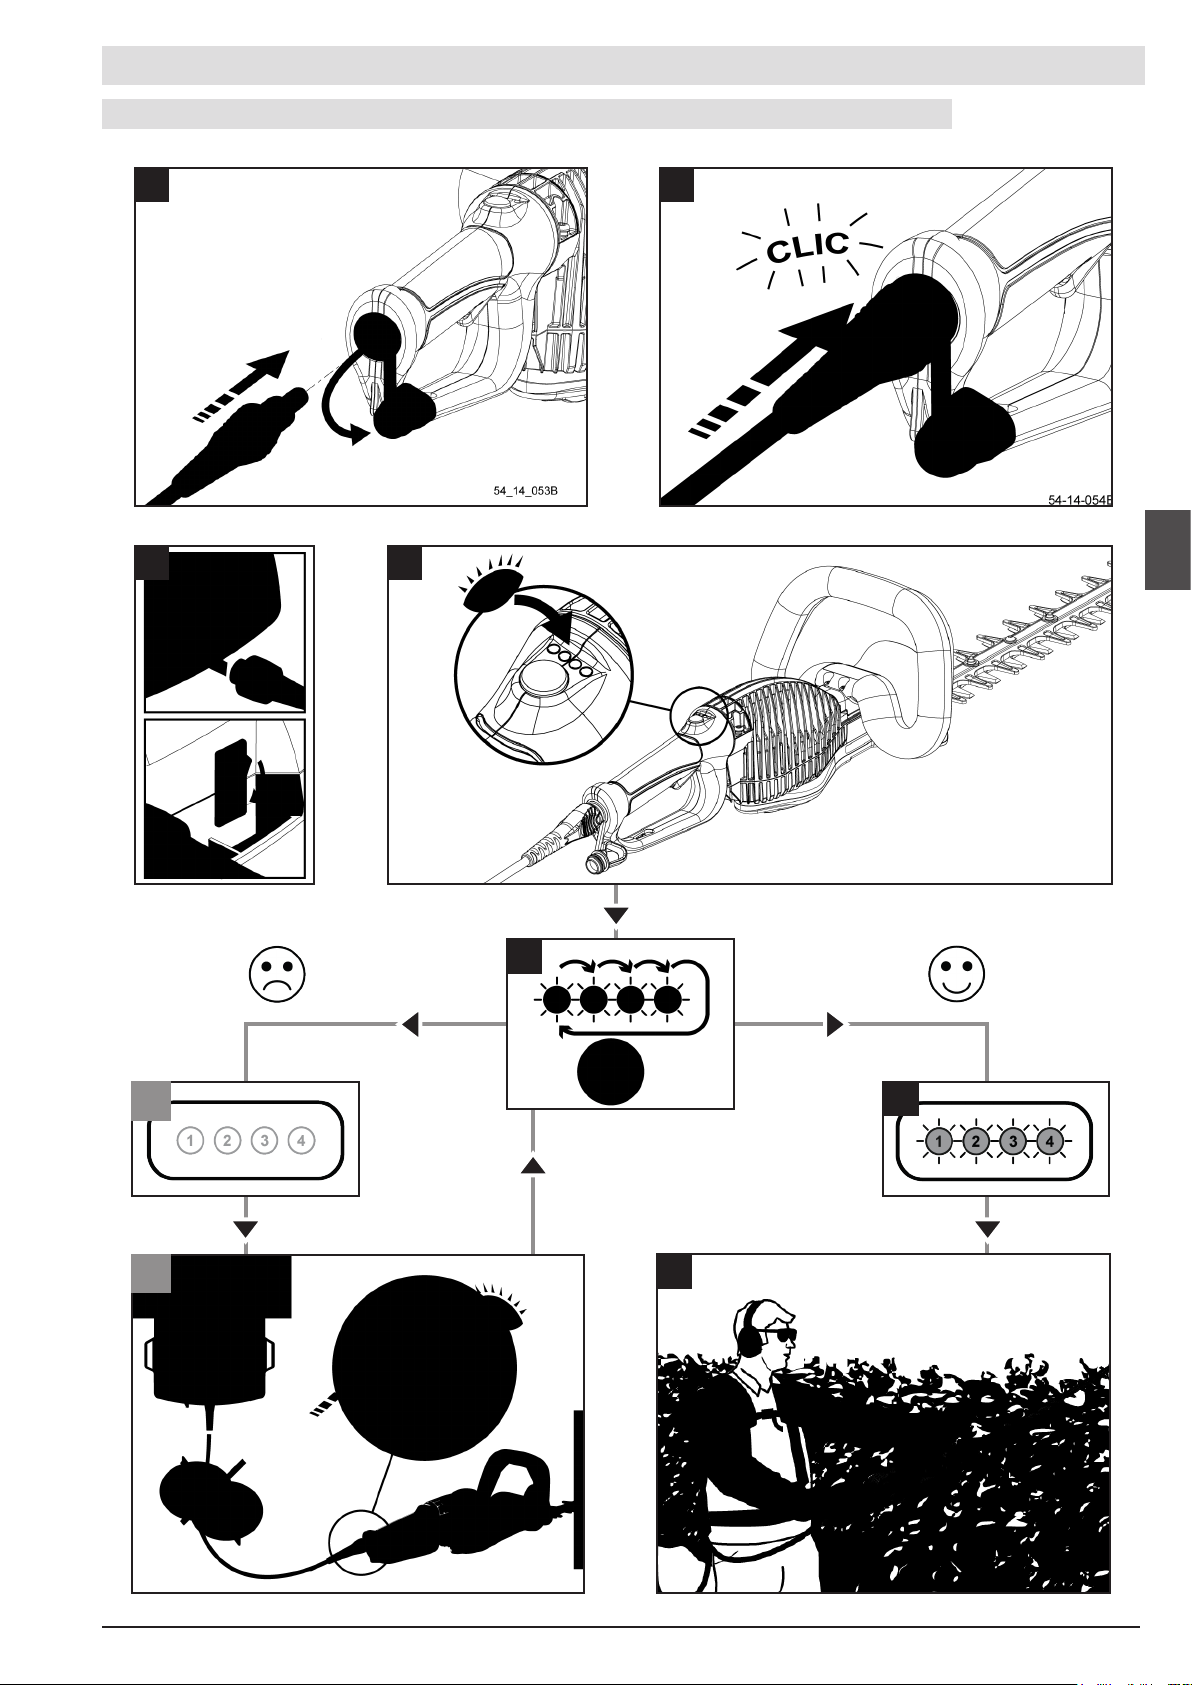
PUTTING THE TOOL INTO SERVICE
USE OF THE FAST CONNECTOR
A
B
ED
F
F
F
1
2
H
G
13
Page 14
PUTTING THE TOOL INTO SERVICE
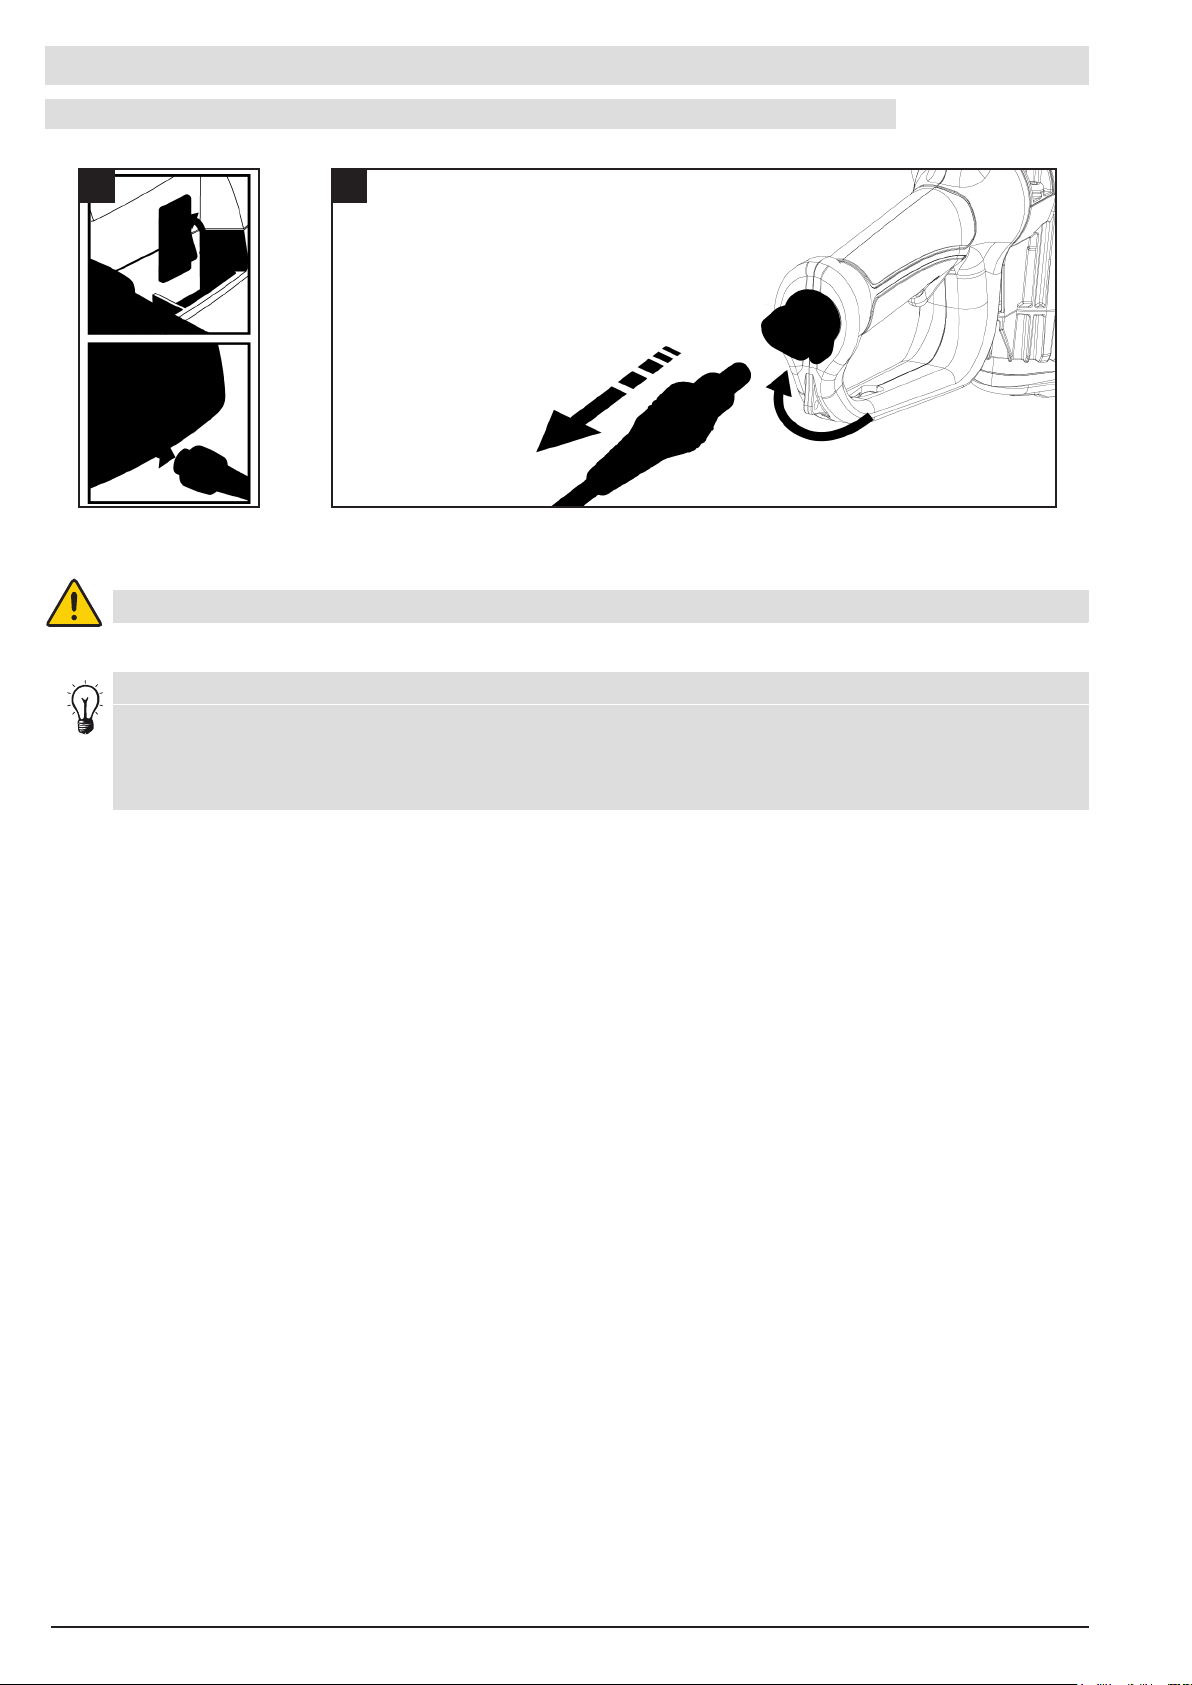
USE OF THE FAST CONNECTOR
JI
Do not manipulate the retractable connector ring. If the ring is damaged, replace the cable.
To prolong the life of the connector, it is advisable to protect it when in the unplugged:
• rstly, on the tool by systematically repositioning the connector plug to protect the connection
area and prevent the entry of foreign bodies.
• secondly, on the cord by avoiding contact of the connector with abrasive or dirty surfaces,
or subjecting it to important shocks (falls).
14
Page 15
PUTTING THE TOOL INTO SERVICE
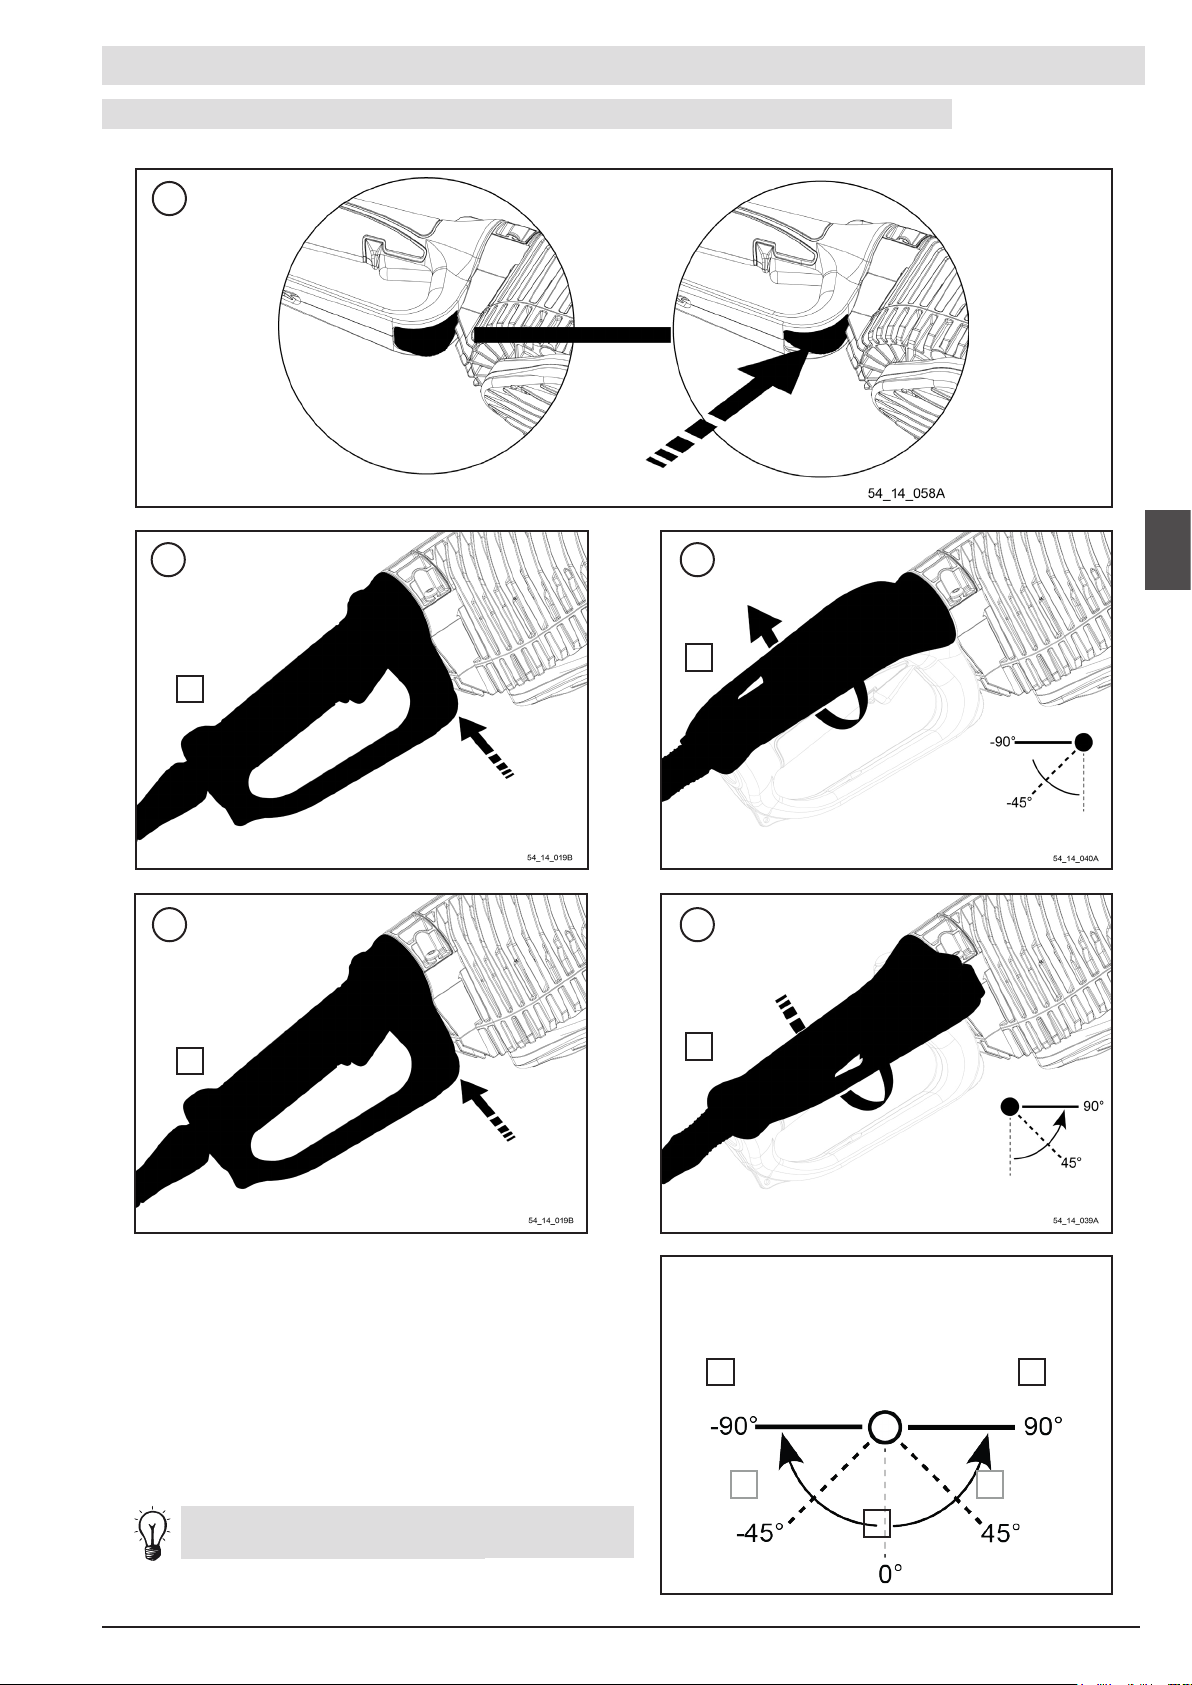
ORIENTATION OF THE HANDLE
1
2 3
E
A
4
A
5
C
The handle must be in one of the 5 locking
positions in order to operate.
15
E C
BD
A
Page 16
56_10_017A
56_10_017A
ST ARTING AND USE
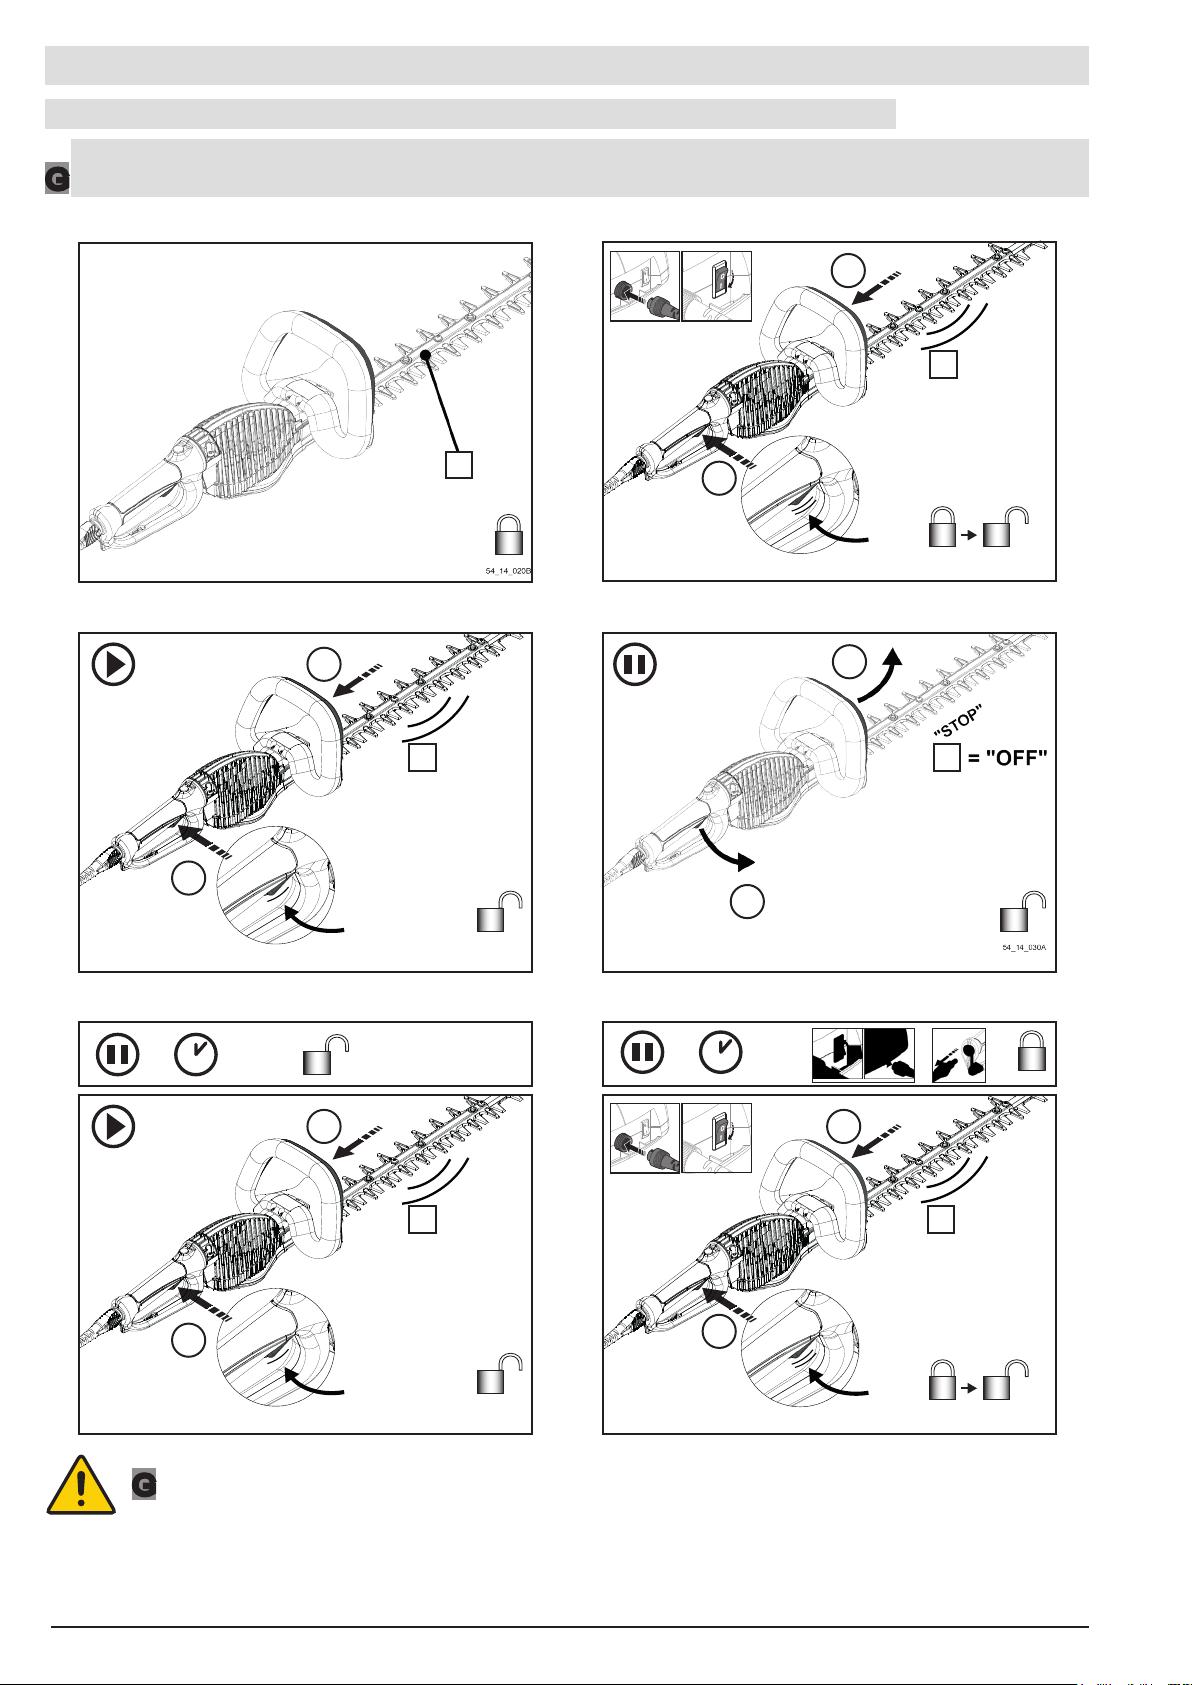
USING THE TRIGGER CONTROL AND FRONT HANDLE
WARNING:
Check that the safety devices operate correctly before starting work.
G
1
C = "ON"
C
C
3
C = "ON"
C
2
X2
54_14_018A
5
C
4
6
X1
54_14_041A
< =
5mn
7 9
C = "ON"
C C
8
X1
WARNING: Never disable the tool safety devices.
G
54_14_041A
> / / =
5mn
C = "ON"
10
X2
54_14_018A
16
Page 17
ST ARTING AND USE
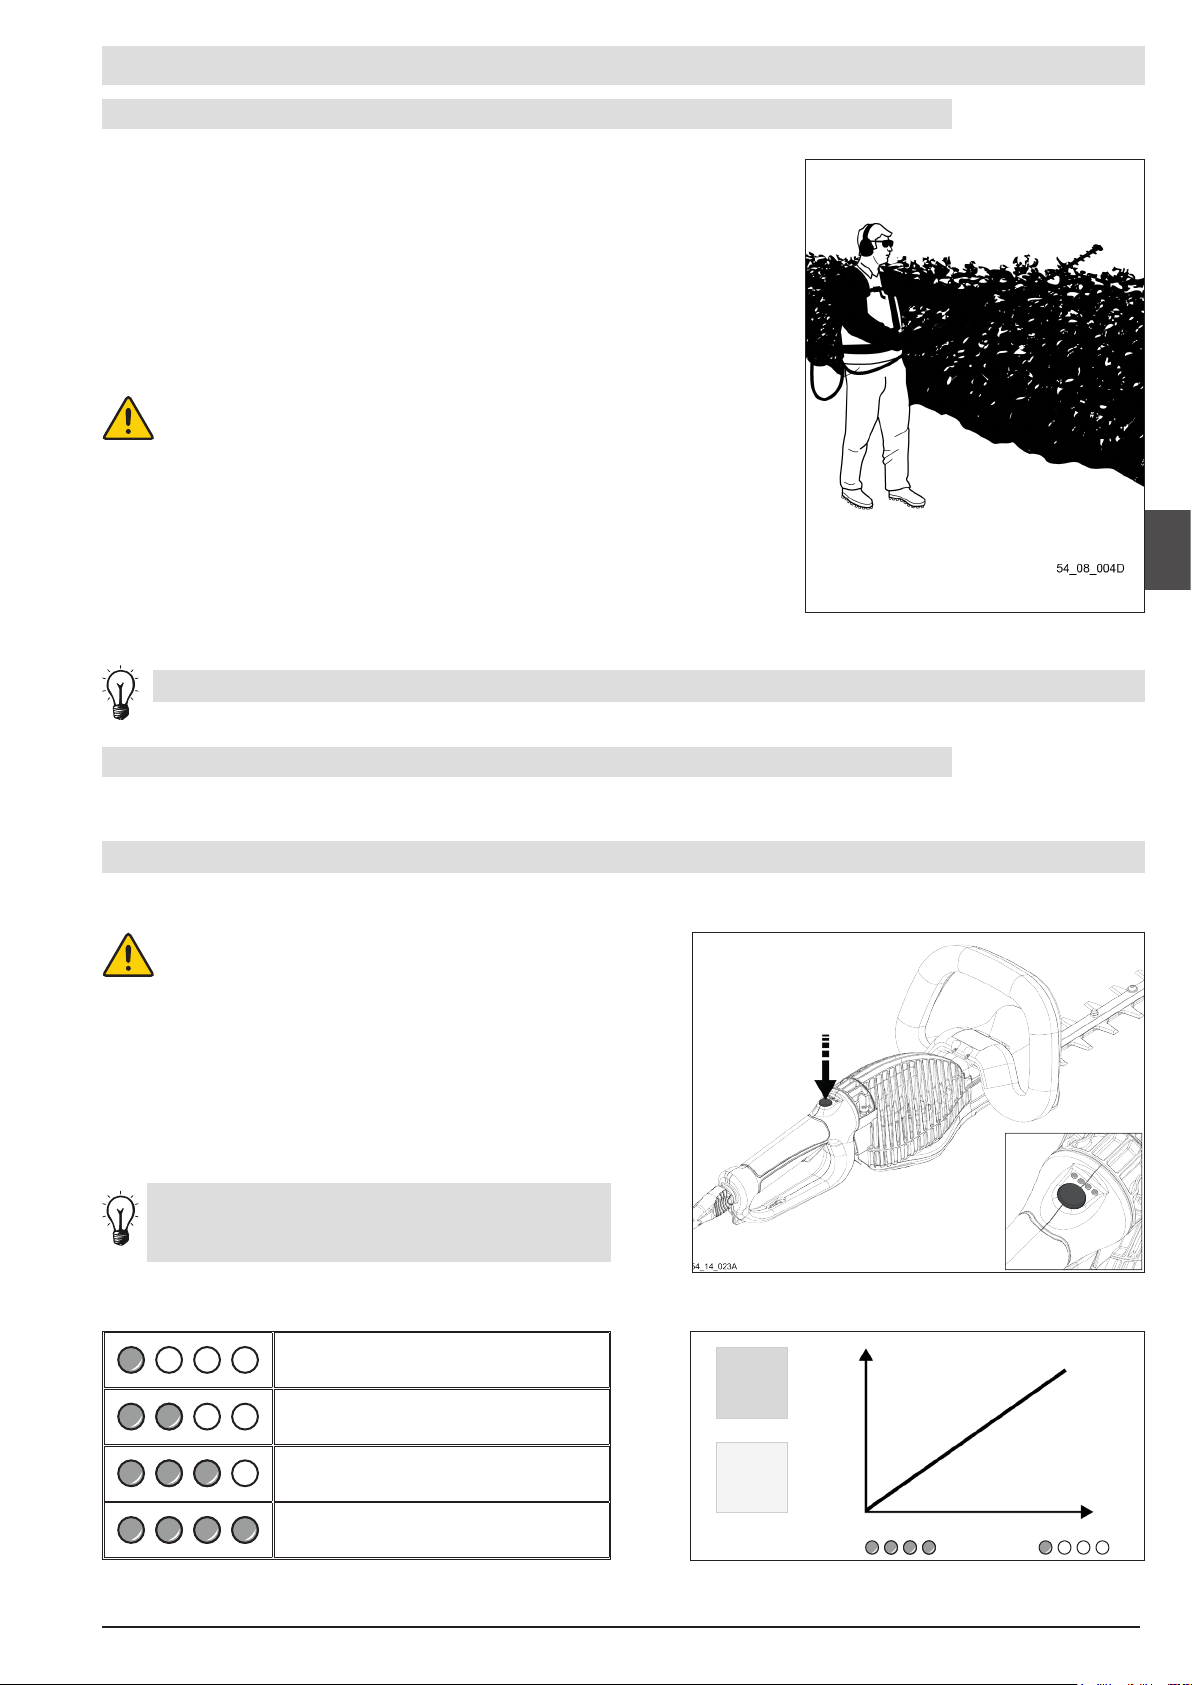
STARTING
A. Check the site (fence, posts, etc.)
B. Put the tool in its start-up position. Remove the cover of the
cutter bar.
C. Attach the power cord to the arm using the armband
supplied.
D. Place the rear handle in the correct position.
E. Flip the ON/OFF switch of the Pellenc power tool battery to
"ON"
If at least 1 light on the handle is lit, the tool is
suppied with electrical power
F. Press the safety of the front handle.
G. Press the trigger on the rear handle (double click or single
click)
The blades of the cutter bar function when the safety trigger of
the front handle and the control trigger of the rear handle are
held down.
Always start the motor before bringing the trimmer blade into contact with the wood.
SPEED SELECTOR
Your tool is equipped with a speed selector system. The speed selector is located on the handle and allows
you to optimize the desired quality of work.
Four lights located on the handle indicate the selected speed level..
These lights may ash when the temperature
of the tool approaches the safe temperature
limit
Reduce speed to a minimum for greater
autonomy or when at least two lights are
ashing.
Speed 1 (3200 strokes / mn)
Speed 2 (3400 strokes / mn)
Speed 3 (3600 strokes / mn)
Speed 4 (3800 strokes / mn)
Leaf size
Speed
17
Page 18
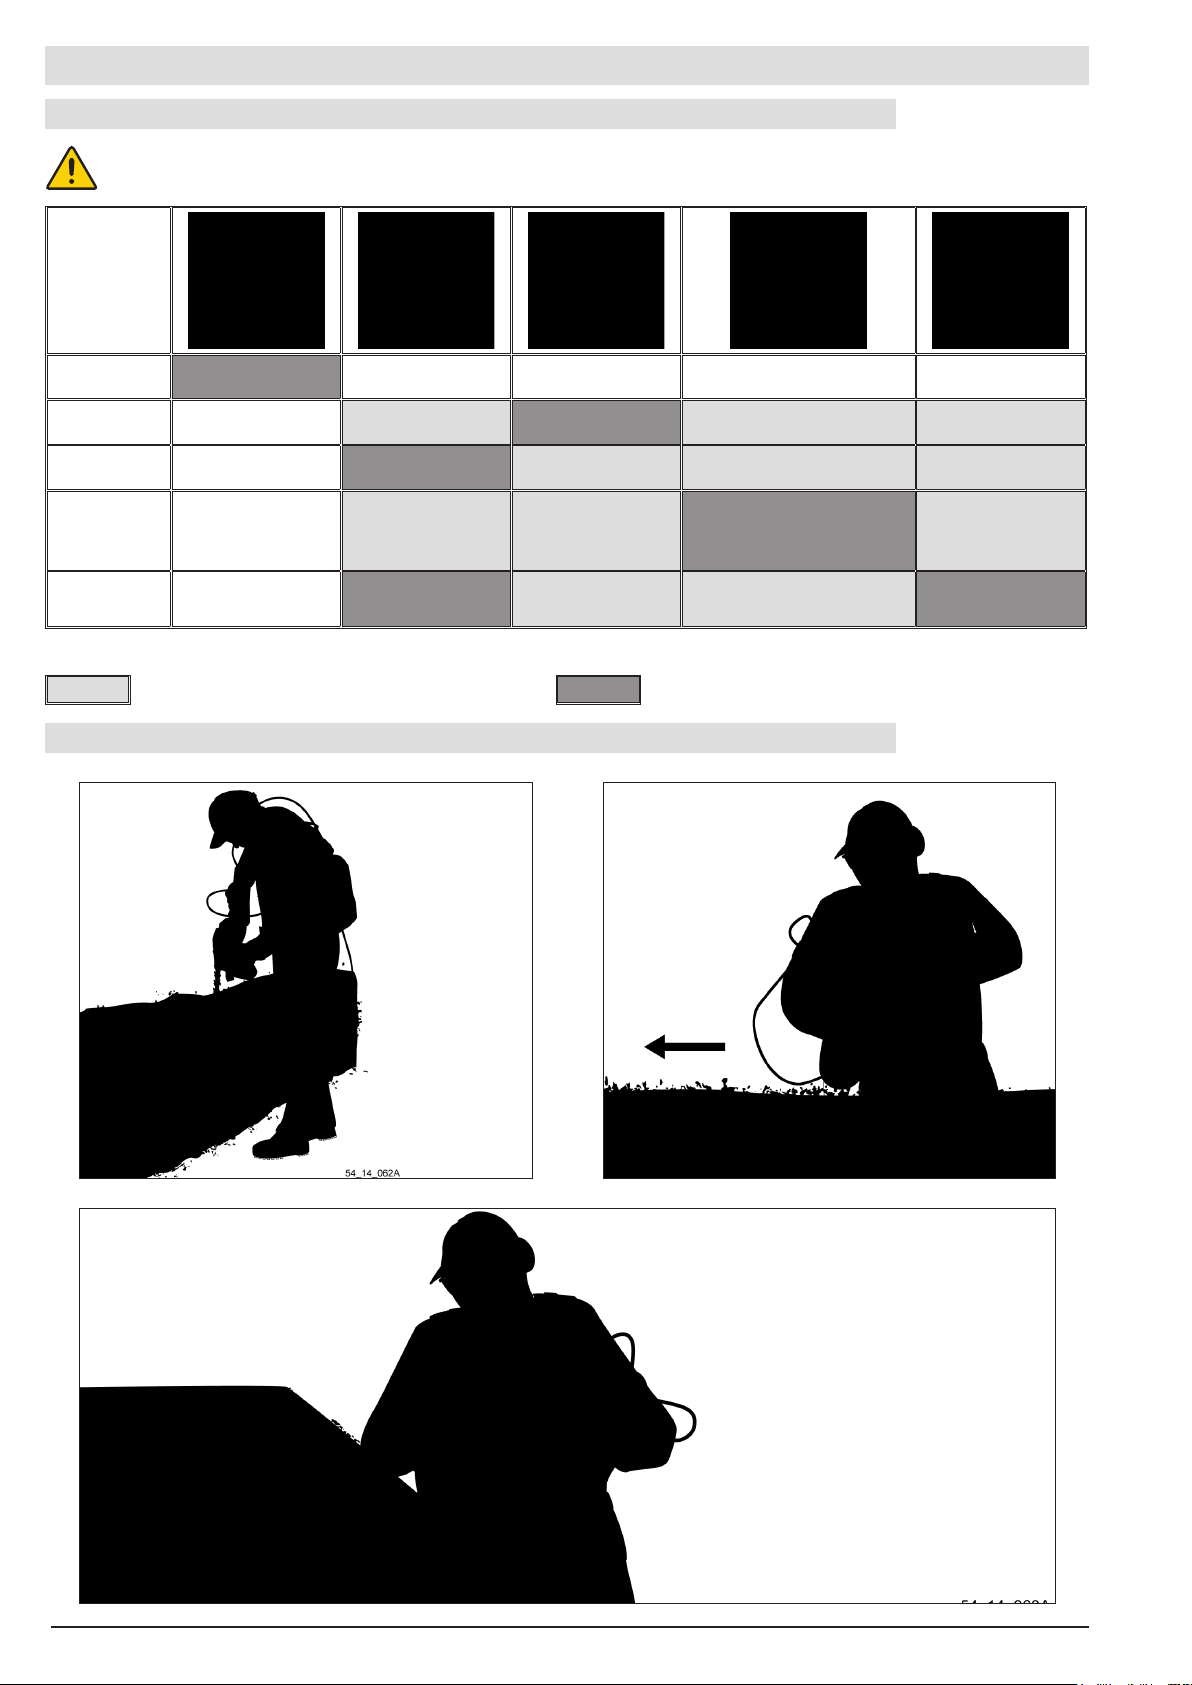
ST ARTING AND USE
TIPS FOR USING THE ADAPTABLE CUTTER BAR
WARNING! Never cut anything other than vegetation.
L27
Shrubs and shaping
L51
L63
L63D
L75
possible use optimal use
WORKING TECHNIQUES
Dense vegetation in
small sections
Gain depth of work on
the top of the hedge
Pruning work over
large areas
The top of the hedge.
Objective: to have a beautiful
nish, prevent the cuttings from
falling inside the hedge.
Little density -
requires efciency.
18
Page 19

SERVICING
SERVICING SCHEDULE
Very important Directly affects consumption
(autonomy).
Use PELLENC spray ref.: 121633
Blade screws: 3.0 N.m
3 xing screws: 4.0 N.m
20g max. of PELLENC grease ref. 74588 or
ref: 115174
Difculty Notes
Frequency
When
necessary
hours
Every 50
use
After each
use
Prior to each
X X 1
Elements concerned Operations
safeties
Cleaning X 1
Visual inspection of the
General appearance
Handles / Triggers Operation X 1
Tightening X 1
blade)
Hardware (excluding
Cleaning X 1
Lubrication X X 1
19
Hardware X 1
Blade
Adjustment X 2 Height of the posts
Sharpening X 2 45°
Greasing of the reducer X 1
Battery Please refer to the battery operating instructions
Difculty level:
1 = Can be performed by the user
2 = Can be performed by approved distributor
Page 20
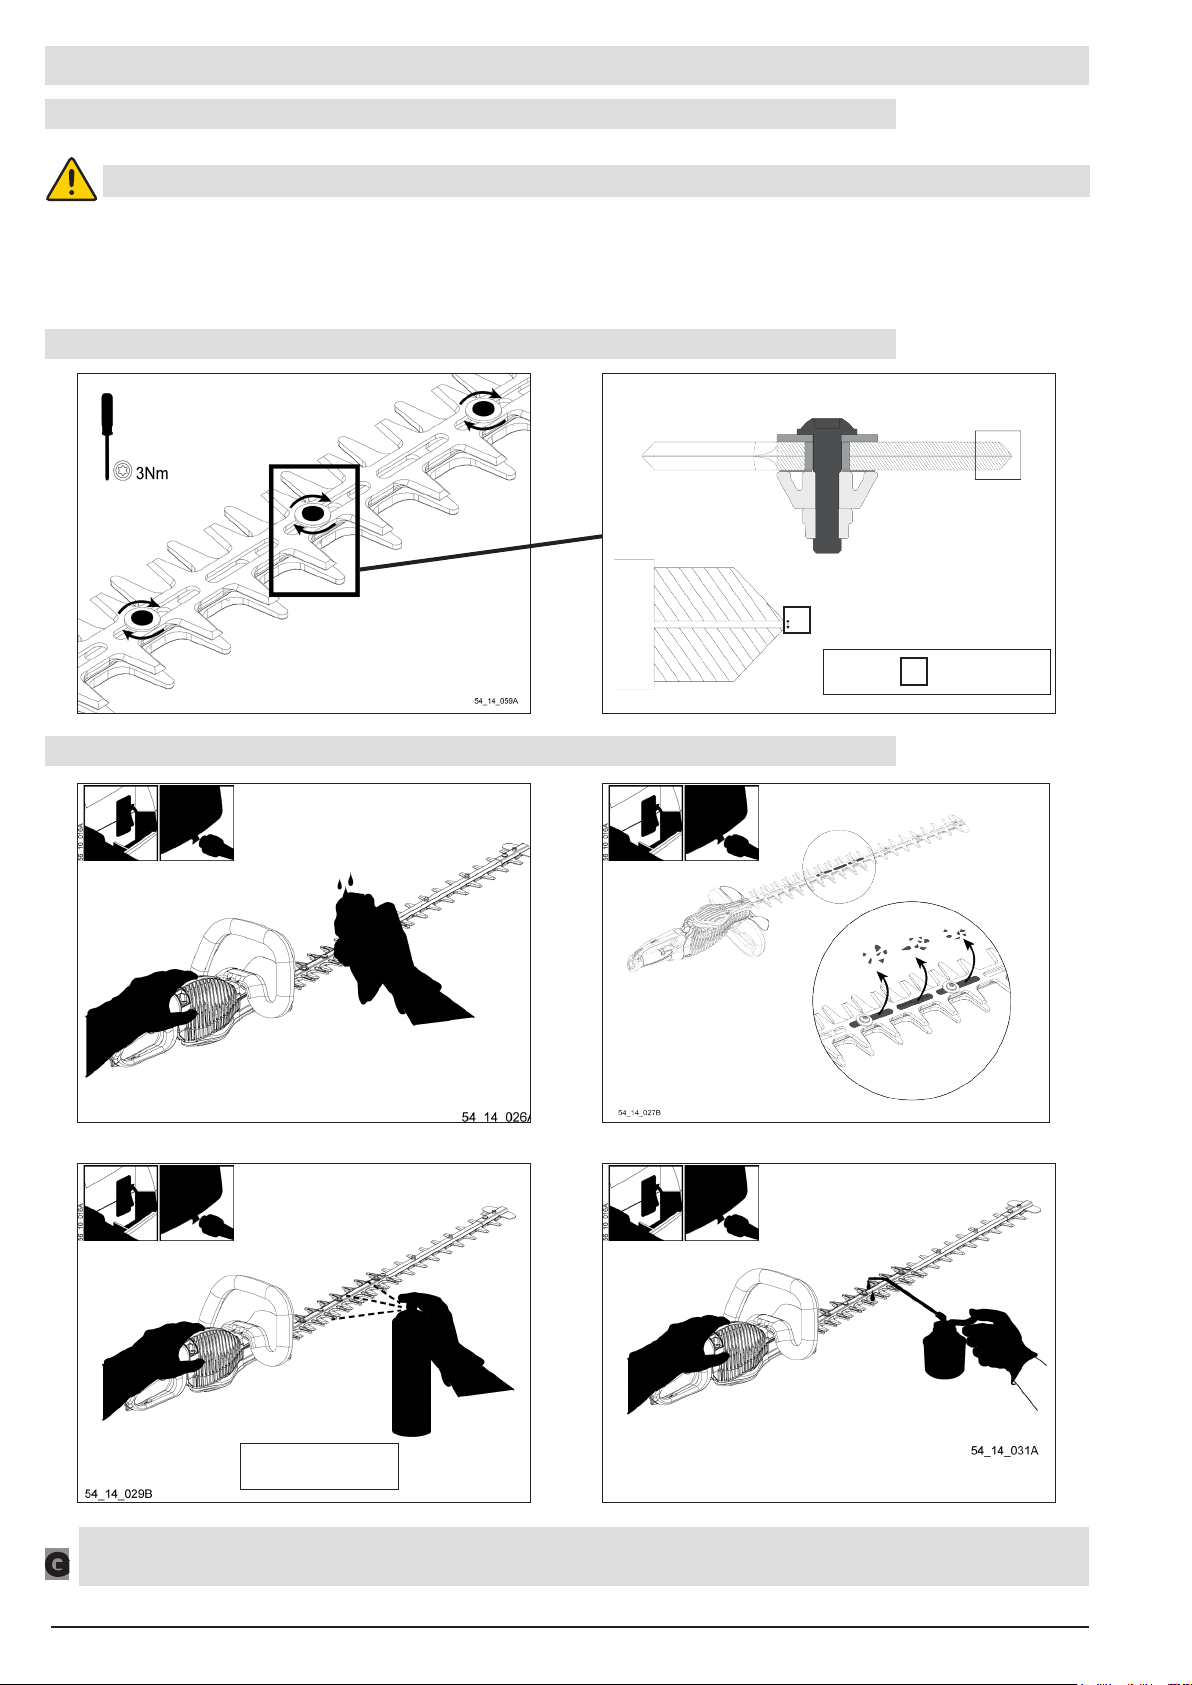
SERVICING
PELLENC TOOL MAINTENANCE RECOMMENDATIONS
WARNING! Always disconnect the hedge trimmer from the battery before working on the blades.
• Use products recommended by PELLENC.
• Ask you approved PELLENC distributor in case of any problems.
TIGHTENING THE BLADES (DIFFICULTY 1)
A
CLEANING
0.2< <0.4mm
A
2X/day
CAUTION:
G
Never use solvents (Trichlorethylene, White-Spirit, gasoline, etc) to clean the tool.
20
Page 21
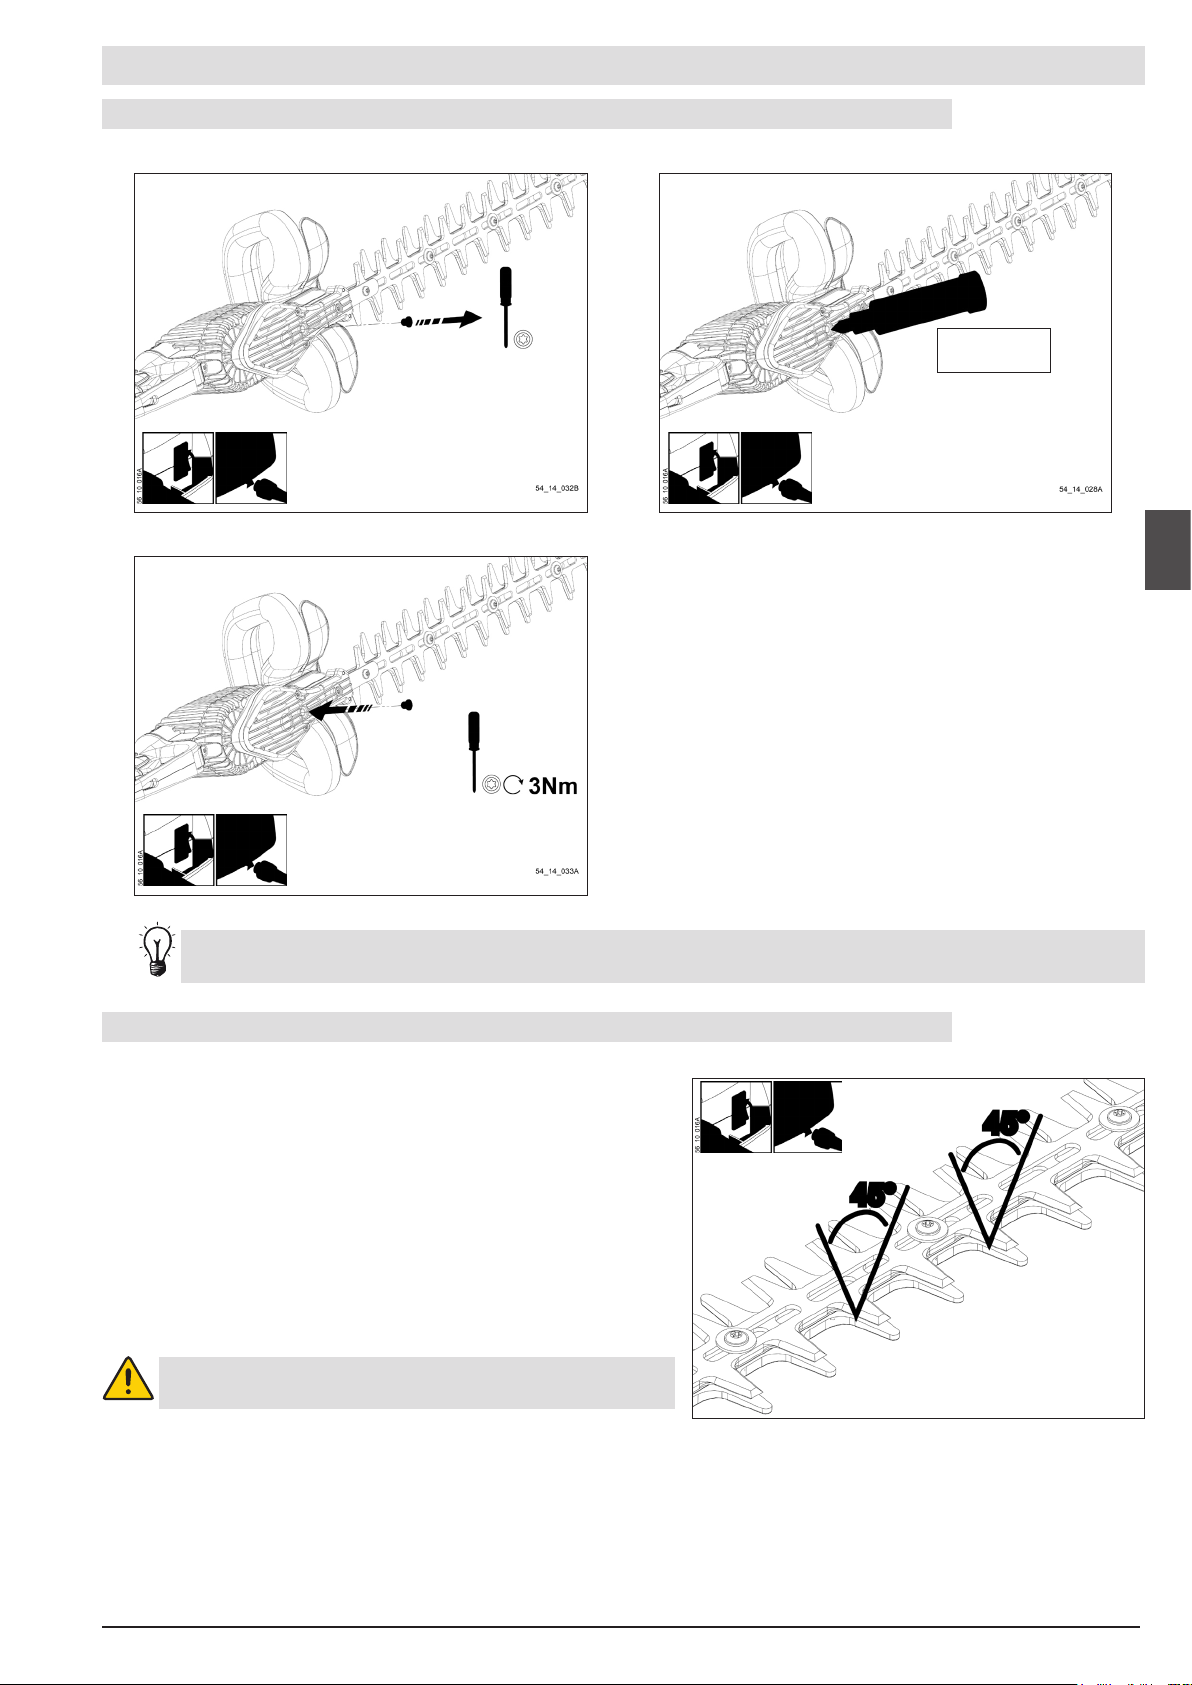
SERVICING
LUBRICATION OF THE CUTTER BAR GEARS (DIFFICULTY 1)
20g
The cutter bar gears must be lubricated after the rst 25 hours of operation and every 50 hours
thereafter.
SHARPENING THE BLADES (DIFFICULTY 2)
Sharpen the blades little but often.
Check the sharpness of the blades regularly during the
rst hours of work in order to determine the necessary
sharpening frequency.
Ensure an angle of 45° on the blade during sharpening.
WARNING! Always disconnect the hedge trimmer
from the battery before working on the blades.
21
Page 22
SERVICING
REMARK:
G
Send the hedge trimmer for overhaul every 200 hours or at least once per year.
When the tool is stored, it must be clean and the battery must be charged.
These parts must be replaced as a precautionary measure or at least once a year.
- Protective plate, ref. 71297
- Hardware kit, ref. 120445
- Anti-rebound bumper, ref 117524
- Strip for cutter bar, ref.117541 (L 51) ref.117542 (L 63) ref.117543 (L 75).
- Joint, ref. 71306
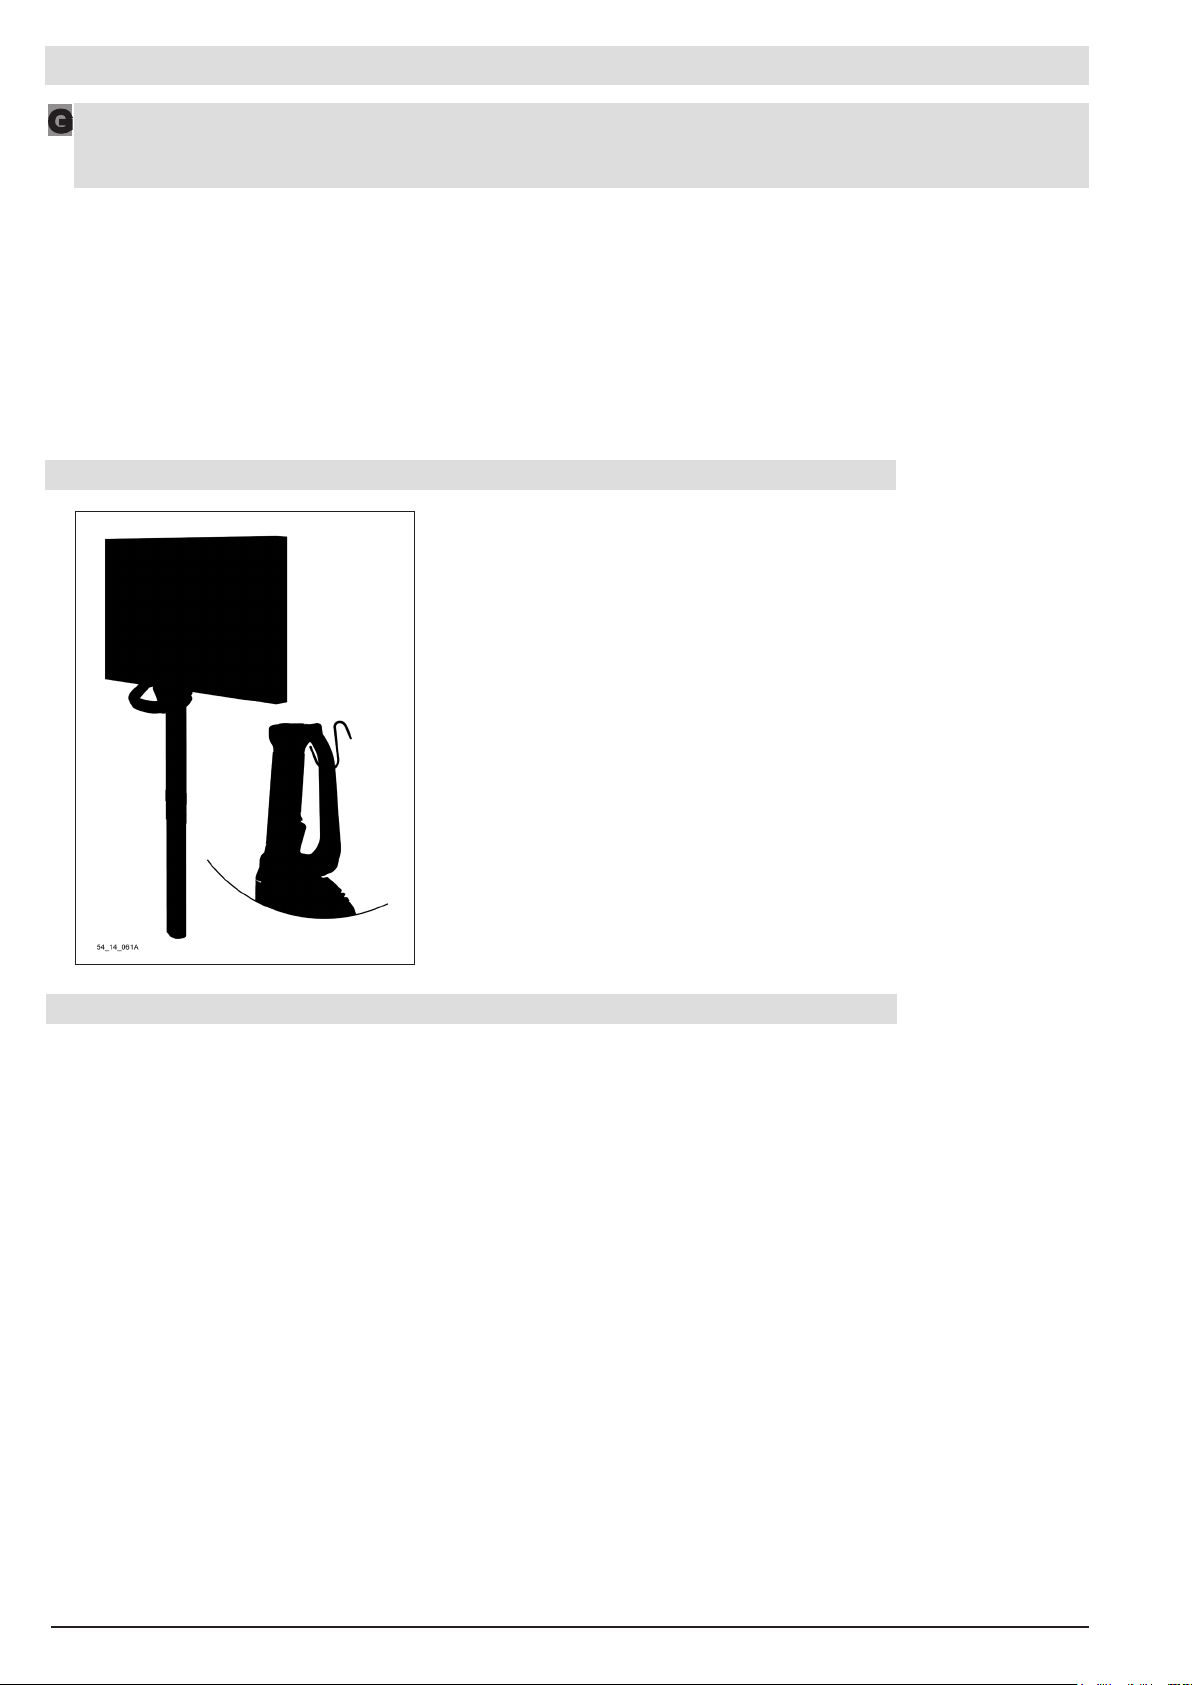
STORAGE
STORAGE OUT OF SEASON
• Always store clean tools.
• Always store the tool with a greased blade.
• Always store a greased tool reducer.
• Cover the blade of the cutter bar during transport and storage.
22
Page 23
SERVICING
CUTTING TOOLS
1– Cutter bar L27 = ref: 57096
2– Cutter bar L51 = ref: 56205
3– Cutter bar L63 = ref: 56206
4– Deector Kit Cutter bar L63 = ref: 57097
5– Cutter bar L75 = ref: 56207
1
2
3
4
ACCESSORIES
1– HELION armband = ref.74338
2– 10.3 m Extension = ref. 100994
CONSUMABLE
1– PELLENC 400g Grease cartridge = ref.: 115174
2– PELLENC Cleaning Spray = ref.: 121633
3– Grease gun = ref.: 68518
5
1
1
2
2
Consumables sold separately
3
23
Page 24
TROUBLESHOOTING AND TOOL PROTECTION
POSSIBLE DEFECTS AND DIAGNOSTICS *
* To be conrmed by an approved PELLENC distributor.
Check the power cable
Check the connections (tool and battery).
Clean them with compressed air if necessary.
Check that all switches are active.
Repeat the operation if necessary.
Double-click the trigger of the rear handle and pull the
trigger of the front handle.
Unplug and replug the power cable.
Restart the battery
Clean and lubricate the cutter bar
Allow the tool to cool down
Battery discharged Charge the battery
Battery US Change the battery
the LEDs are off
Wrong connection with the battery
Safety at start-up/Standby (Delay >
5min)
The On/Off switches are defective
Cutting element blocked Clean and lubricate the cutter bar
The LEDs are lit
Internal loose connection Contact your authorised PELLENC dealer
Cutter bar is dirty Clean and lubricate the cutter bar
The On/Off switches are defective Contact your authorised PELLENC dealer
The LEDs light-up intermittently Damaged power cords Change the power cable
The diodes are always on
Thermal protection of the tool
The LEDs ash before shutting down
The battery makes 1 long beep and four short
Internal loose connection Contact your authorised PELLENC dealer
beeps before shutting down
Over-voltage Restart the tool
Empty battery Charge the battery
The diodes are lit before shut-down
WARNING! Always disconnect the hedge trimmer from the battery before working on the blades.
Problem Check Probable cause Possible action
The hedge trimmer does
not work
24
The hedge trimmer works
intermittently
Tool Protection
The hedge trimmer shuts-
down when working
For any problems concerning the battery, refer to the manual that comes with the battery.
PELLENC recommends contacting an authorised PELLENC dealer in all cases of breakdown.
Page 25

PELLENC S.A. WARRANTY AND AFTER SALES SERVICE
I. Legal warranty
A. Warranty against latent defects
Apart from the commercial warranty provided for under Article II, Article 1641 of the Civil Code provides that "the seller is bound to a warranty on account of latent defects
of the object sold which render it unt for the use for which it was intended, or which would impair said use to the extent that the buyer would not have acquired it, or would
only have given a lesser price for it, had he known of them".
Article 1648 of the Civil Code "The action resulting from latent defects must be brought by the purchaser within two years after the discovery of the defect. "
B. Legal warranty of conformity
Article L.217-4 of the Consumer Code "The seller delivers goods in conformity with the contract and is liable for defects of conformity existing upon delivery.
The seller is also liable for any lack of compliance resulting from the packaging, assembly or installation instructions whenever its contractual liability is engaged in this
regard or the latter are carried out under its responsibility
Article L.217-5 of the Consumer Code "The goods are comply with the contract:
1) If they are suitable for the purpose usually expected of similar goods and, where applicable:
- If it matches the description given by the seller and possess the qualities that were presented to the buyer in the form of a sample or model;
- If it has the qualities that a buyer can reasonably expect given the public statements made by the seller, the producer or its representative, especially in advertising or labelling;
2. Or, if it has the characteristics dened by mutual agreement of the parties or is t for any particular purpose that the buyer made known to the seller and that the latter
accepted.
Article L.217-12 of the Consumer Code "legal action resulting from lack of conformity lapses two years after delivery of the goods".
II. Pellenc Commercial Warranty
A. Contents
1. General Information
In addition to legal warranties, client users benet from the commercial warranty on PELLENC products covering the exchange and replacement of parts recognised out
of use, caused by machining defects, assembly defects or material defects, whatever the cause.
The warranty forms an inseparable whole with the product sold by PELLENC.
2. Spare Parts
The commercial warranty also covers original PELLENC spare parts, excluding labour and to the exclusion of certain parts of each product provided at delivery.
B. Duration of the warranty
1. General Information
PELLENC products are guaranteed under the commercial warranty as from delivery to the customer for a period of two (2) years for products connected to a PELLENC
battery, and for a period of one (1) year for other PELLENC products.
2. Spare Parts
PELLENC spare parts replaced under the product warranty are guaranteed under the commercial warranty as from delivery of he PELLENC product to the customer for
a period of two (2) years for products connected to a PELLENC battery, and for a period of one (1) year for other PELLENC products.
In the case of products connected to a Pellenc battery, parts that are replaced in the under the product warranty after the 12th month of use, are covered for a period of
one (1) year.
C. Warranty exclusions
Excluded from the commercial warranty are products that have been subject to abnormal use, or were used under conditions and for purposes other than those for which
they were manufactured, especially in the case of non-compliance with conditions stipulated in this user manual.
It does not apply in case of shock, fall, neglect, lack of supervision or maintenance or in case of transformation of the product. Also excluded from the warranty are products
that have been subject to tampering, alteration or modication by the client user.
Wear parts and/or consumables cannot be covered by the warranty.
III. Implementation of the commercial warranty
1. Product commissioning and commissioning declaration
The DISTRIBUTOR undertakes to complete the computer commissioning declaration form, no later than eight days after the delivery of the property to the user customer,
in order to activate the latter on the www.pellenc.com website under "warranties and training" in the "extranet" menu, using the identier previously provided to them by
PELLENC.
Failing that, commissioning declaration will not be effective and implementation of the PELLENC commercial warranty will not occur. As a consequence thereof, the
DISTRIBUTOR must ensure the nancial burden of its intervention under the warranty without being able to pass on the cost to the client user.
The DISTRIBUTOR shall also undertake to complete the warranty card or the certicate of warranty and commissioning for self-propelled equipment provided with the
product after having the client user sign and date it.
IV. Paid after-sales service
A. General Information
Malfunctions, breakdowns, breakages resulting from misuse, neglect or improper maintenance by the client user as well as malfunctions resulting from normal wear of the
product are subject to the payment of after-sales service, even during the period of the legal and commercial warranty. After-sales service repairs that fall outside of the
legal and commercial warranty also include maintenance, adjustments, diagnostics of all types, and cleaning without the present list being exhaustive.
B. Wear parts and consumables
Wear parts and consumables also fall within the after-sales service.
C. Spare Parts
Paid after-sales service also covers original PELLENC spare parts, excluding labour and outside the legal and commercial warranty period.
In case of replacement of original PELLENC spare parts in the context of after-sales service, said latter are covered by a warranty of one year as from the installation date.
25
Page 26
"EC" DECLARATION OF CONFORMITY
MANUFACTURER PELLENC SA
ADDRESS QUARTIER NOTRE-DAME
ROUTE DE CAVAILLON - CS 10047
84122 PERTUIS CEDEX (FRANCE)
PERSON/ENTITY AUTHORISED T O COMPILE THE TECHNICAL
PELLENC SA
DOSSIER
ADDRESS QUARTIER NOTRE-DAME
ROUTE DE CAVAILLON - CS 10047
84122 PERTUIS CEDEX (FRANCE)
WE HEREBY DECLARE THAT THE MACHINE HEREINAFTER REFERRED TO AS :
GENERIC DENOMINATION ELECTRIC HEDGE TRIMMER
FUNCTION
BATTERY POWERED ELECTRIC HEDGE TRIMMER INTENDED FOR PRUNING
BUSHES / HEDGES
COMMERCIAL NAME HELION 2 COMPACT
TYPE HELION 2 COMPACT
MODEL HELION 2 COMPACT
54R00001 - 54R49999
SERIAL No.
54S00001 - 54S49999
54T00001 - 54T49999
COMPLIES WITH THE RELEVANT PROVISIONS OF THE MACHINERY DIRECTIVE (2006/42/EC)
IS IN CONFORMITY WITH THE FOLLOWING OTHER DIRECTIVES AND/OR RELEVANT PROVISIONS :
- 2014/30/EU EMC Directive
- 2003/10/EC Noise Directive
- 2002/44/EC Vibrations Directive
- 2011/65/EU ROHS Directive
- 1907/2006 REACH Regulation
- 2012/19/EU WEEE Directive
THE FOLLOWING HARMONIZED EUROPEAN STANDARDS WERE USED :
- EN 60745-1 :2009+A11 :2010
- EN 60745-2-15 :2009+A1 :2009
- EN 60529 :1991+A1 :2000+A2 :2013
- EN 55014-2 :2009
THE FOLLOWING OTHER STANDARDS AND TECHNICAL SPECIFICATIONS HAVE BEEN USED :
- EN 55014-1 :2012
- EN 61000-4-2 :2009
- EN 61000-4-3 :2011
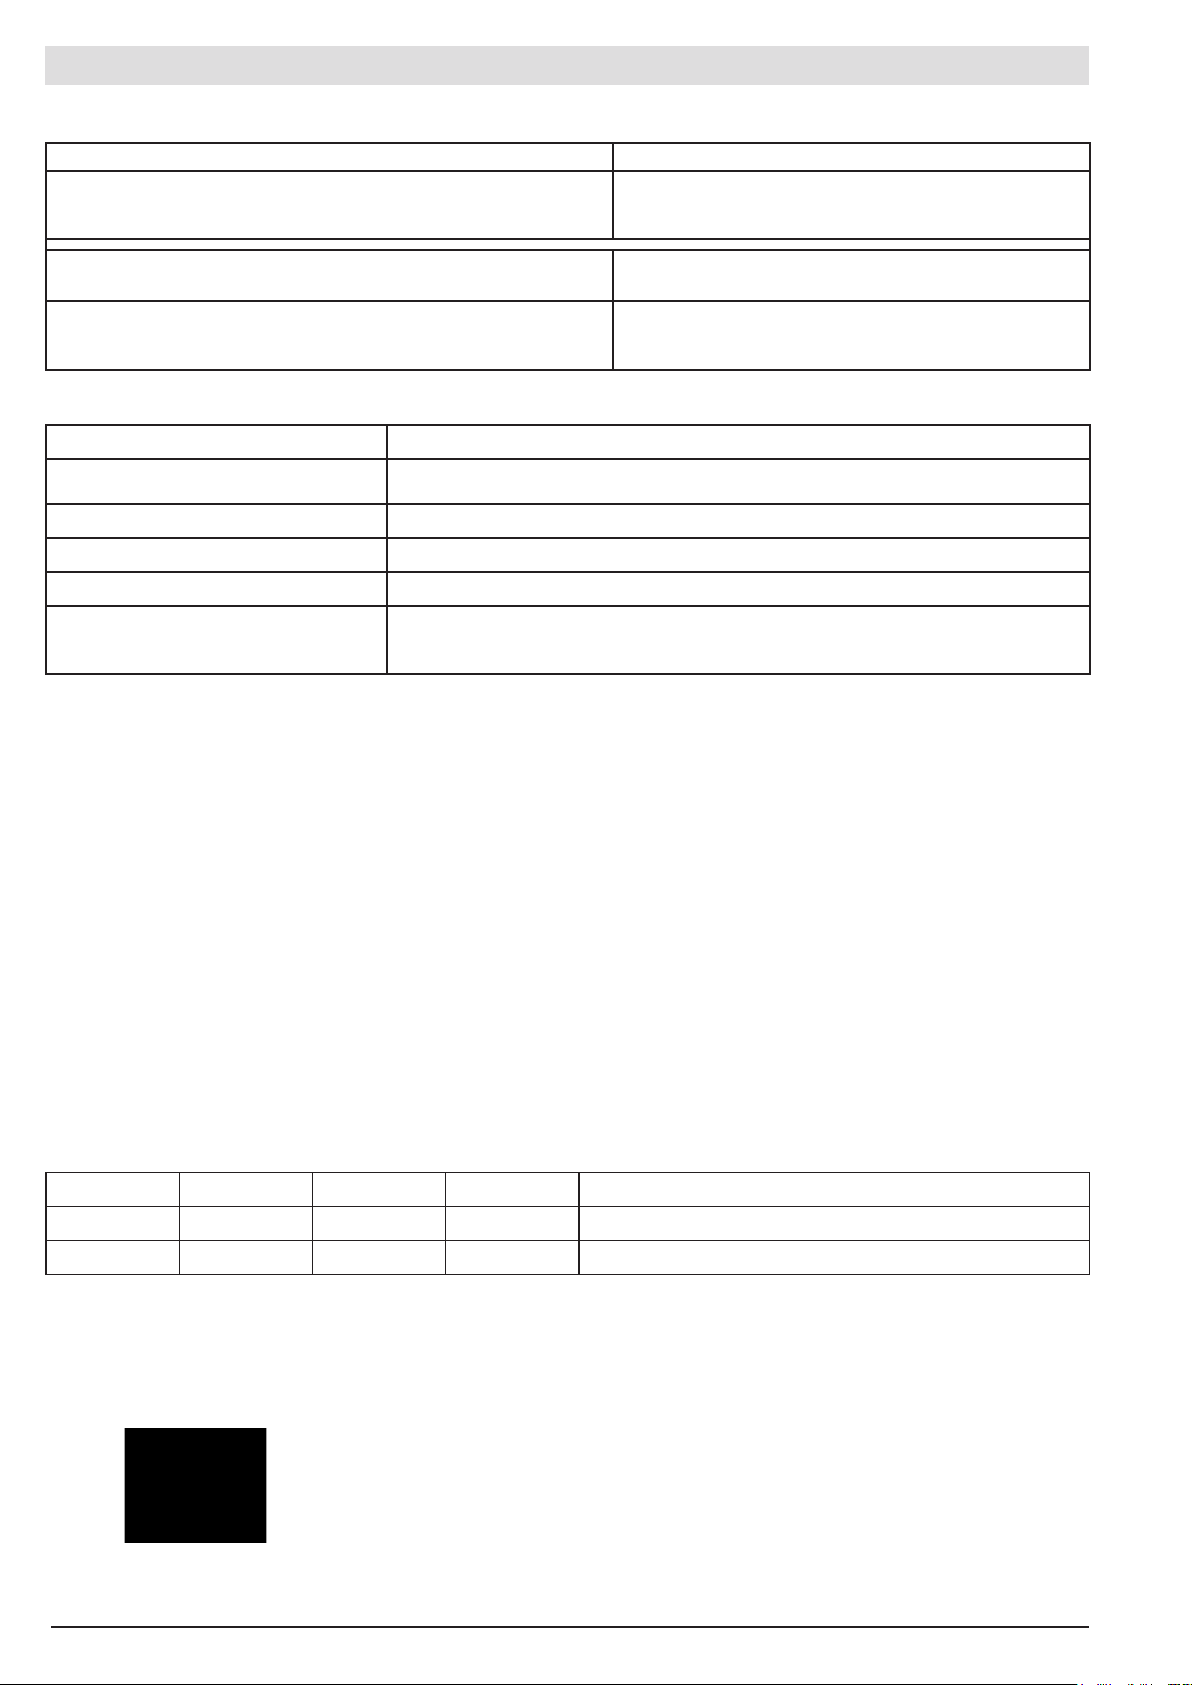
Sound Level at the maximum operating rating
Symbol Value Unit Reference Comment
L
L
WAm
WAg
91 dB(A) 1 pW Measured sound power level
92 dB(A) 1 pW Guaranteed sound power level
The recording of the measured sound power level and of the guaranteed sound power level has been performed according to a
procedure in accordance with directive 2000/14/EC appendix V.
CONCLUDED AT PERTUIS, DATED 02/05/2017
JEAN MARC GIALIS
Deputy Managing Director
26
Page 27

 Loading...