

Page 1

Het toestel-identifi catieplaatje bevindt zich aan de achterkant van het toestel.
The appliance identifi cation plate is attached to the back of the appliance.
La plaquette signalétique de l’appareil se trouve à l’arrière de l’appareil.
Die Geräteidentifi kationsplakette befi ndet sich auf der Rückseite des Geräts.
PCM128RVS
Houd, wanneer u contact opneemt met de serviceafdeling, het complete typenummer bij de hand.
If you contact the service department, please have the complete type number on hand.
Lorsque vous prenez contact avec le service après-vente, assurez-vous d’avoir le numéro complet sous
la main.
Halten Sie, wenn Sie mit der Serviceabteilung Kontakt aufnehmen, die komplette Typennummer bereit.
Adressen en telefoonnummers van de serviceorganisatie vindt u op de garantiekaart.
The service organisation addresses and telephone numbers can be found on the guarantee card.
Vous trouverez les coordonnées du service après-vente sur la carte de garantie.
Adressen und Telefonnummern der Serviceorganisation fi nden Sie auf der Garantiekarte.
Handleiding
combi-magnetron
Manual
combi-microwave
Manuel
four à micro-ondes combiné
Anleitung
Kombi-Mikrowelle
700004906100
Page 2
NL
Handleiding NL 3 - NL 30
EN
Manual EN 3 - EN 30
FR
Manuel FR 3 - FR 31
DE
Anleitung DE 3 - DE 31
Gebruikte pictogrammen - Pictograms used
Pictogrammes utilisés - Verwendete Piktogramme
Belangrijk om te weten - Important information
Important à savoir - Wichtig zu wissen
Tip - Tip - Conseil - Tipp
Page 3

INHOUDSOPGAVE
Uw combi-magnetron
Inleiding 4
Beschrijving 5
Bedieningspaneel 6
Veiligheid
Aansluiten en reparatie 7
Veilig gebruik 7
Materialen 11
Gebruik
Plaatsen 12
Vóór het eerste gebruik 12
Bediening
ZERO ON 13
Uitschakelen/inschakelen 13
Algemeen 13
Keukenwekker instellen 14
Magnetron 14
Grill 15
Oven met voorverwarmen 16
Oven 17
Combi oven/magnetron 18
Ontdooien op gewicht 19
Ontdooien op tijd 20
Auto cook 20
Snelstart 22
Stop 22
Warmhouden 23
Steamcleaning 23
Kooktips 24
Onderhoud
Reinigen 28
Storingen 29
Technische gegevens 30
Milieuaspecten
Afvoeren toestel en verpakking 31
NL 3
Page 4

UW MAGNETRON
Inleiding
U heeft gekozen voor een combi-magnetron van Pelgrim.
Optimaal gebruikscomfort en een eenvoudige bediening stonden
voorop bij de ontwikkeling van dit product.
De combi-magnetron verenigt de eigenschappen van een
magnetron met die van een traditionele oven. De uitgebreide
instelmogelijkheden maken het mogelijk exact die bereidingswijze
te kiezen die u voor ogen staat. De bediening is niettemin eenvoudig. De display informeert en helpt u bij het instellen.
Met deze handleiding willen we vooral inzicht geven in alle
mogelijkheden van dit toestel. In het hoofdstuk bediening zijn de
verschillende functies overzichtelijk gerangschikt. Er zijn ook tips
opgenomen waarmee u uw voordeel kunt doen.
Lees eerst de gebruiksaanwijzing geheel en aandachtig
door voordat u het apparaat gaat gebruiken en bewaar deze
zorgvuldig voor latere raadpleging.
De handleiding dient bovendien als referentie voor de servicedienst. Het gegevensplaatje bevat alle informatie die de servicedienst nodig heeft om adequaat op uw vragen te reageren.
NL 4
Veel kookplezier!
Page 5

UW MAGNETRON
Beschrijving
4
1. Display
2. Bedieningspaneel
3. Deur openen
4. Aandrijving
5. Glazen draaiplateau (vóór gebruik altijd
in de magnetron plaatsen)
6. Ring voor draaiplateau (vóór gebruik
altijd in de magnetron plaatsen)
7. Metalen rek: gebruik dit rek samen met
het draaiplateau
1
2
3
5
6
7
NL 5
Page 6

UW MAGNETRON
Bedieningspaneel
1. Display
2. Auto cook toets
1
2
39
410
3. Magnetrontoets
4. Grilltoets
5. Instelknop (tijd/gewicht/aantal)
6. Ontdooitoets
7. Toets ‘warmhouden’
8. Stoptoets
9. Oventoets
10. Combitoets
11. ZERO ON toets
12. Timertoets
13. Cleantoets
14. Starttoets
5
612
713
814
11
NL 6
Page 7

VEILIGHEID
Aansluiten en reparatie
• Controleer het toestel op transportschade. Sluit
een beschadigd toestel niet aan.
• De elektrische aansluiting moet voldoen aan de
nationale en lokale voorschriften.
• Wandcontactdoos en stekker moeten altijd
bereikbaar blijven.
• Als u een vaste aansluiting wilt maken, moet u
er voor zorgen dat er een omnipolaire schakelaar
met een contactafstand van minimaal 3 mm in de
toevoerleiding wordt aangebracht.
• Het apparaat mag niet via een verdeelstekker
of verlengsnoer op het elektriciteitsnet worden
aangesloten. Hiermee kan veilig gebruik van het
apparaat niet worden gewaarborgd.
• WAARSCHUWING: open nooit de behuizing van
het toestel. Alleen een service technicus mag het
toestel openen.
• Maak het toestel spanningsloos voordat met
de reparatie wordt gestart. Defecte onderdelen
mogen alleen vervangen worden door originele
onderdelen. Alleen van die onderdelen
kan de fabrikant garanderen dat zij aan de
veiligheidseisen voldoen.
• Indien de aansluitkabel beschadigd is mag deze
alleen worden vervangen door de fabrikant,
zijn service-organisatie of gelijkwaardig
gekwalificeerde personen, teneinde gevaarlijke
situaties te voorkomen.
Veilig gebruik
• WAARSCHUWING: dit apparaat en de
toegankelijke delen worden heet tijdens het
gebruik. Zorg dat u de hete delen niet aanraakt.
Houd kinderen jonger dan 8 jaar uit de buurt
tenzij er voortdurend op hen wordt gelet.
• Dit apparaat kan worden gebruikt door kinderen
van 8 jaar en ouder, alsmede personen met
beperkte lichamelijke, zintuiglijke of mentale
vermogens of met ontbrekende ervaring en
kennis, mits zij onder toezicht staan of instructies
krijgen in veilig gebruik van het apparaat en
NL 7
Page 8

VEILIGHEID
begrijpen wat de betreffende gevaren zijn.
Kinderen mogen niet spelen met het apparaat.
Kinderen mogen het apparaat niet reinigen of
onderhouden als zij niet onder toezicht staan.
• WAARSCHUWING: het is gevaarlijk voor
onbevoegden om reparaties uit te voeren waarbij
het nodig is dat de behuizing van het toestel
geopend wordt. De behuizing beschermt tegen
het vrijkomen van micro-energie.
• WAARSCHUWING: wanneer de deur of de
afdichting beschadigd is, mag de magnetron
niet gebruikt worden totdat de magnetron
gerepareerd is door een hiertoe bevoegd
persoon.
• WAARSCHUWING: de inhoud van zuigflessen
en potjes babyvoeding moet geschud en
geroerd worden. Controleer de temperatuur voor
consumptie om verbranding te voorkomen.
• WAARSCHUWING: verwarm nooit gesloten
conservenblikken.
Er ontstaat een overdruk in het blik, waardoor het
kan exploderen.
• WAARSCHUWING: probeer de magnetron niet
te gebruiken met geopende deur. Er kan gevaar
ontstaan door magnetron straling.
• Dit apparaat is alleen voor huishoudelijk gebruik
bestemd. Gebruik het uitsluitend voor het
bereiden van gerechten.
• Gebruik het toestel alleen binnenshuis.
• Gebruik het toestel niet in vochtige ruimtes of in
de buurt van een waterkraan.
• Houd het snoer uit de buurt van warme
oppervlakken.
• Dek de ventilatieopeningen nooit af.
• Het apparaat is niet bedoeld om te worden
bediend door middel van een externe timer of
een apart afstandsbedieningssysteem.
• In verband met de elektrische veiligheid mag
het toestel niet met hogedrukreinigers of
stoomreinigers schoongemaakt worden.
• De magnetron is geïsoleerd. Desondanks vindt
NL 8
Page 9

VEILIGHEID
er altijd enige warmte-overdracht plaats, waarbij
de buitenzijde van het toestel opwarmt. Deze
opwarming valt ruimschoots binnen de normen.
• Bij het bereiden van gerechten die alcohol
bevatten kan de alcohol door de hoge
temperaturen verdampen. De damp kan vlam
vatten als het in aanraking komt met hete delen.
• Gebruik uitsluitend bestek en serviesgoed dat
geschikt is voor gebruik in de magnetron (let op
met goud- of zilverkleurige randjes).
• Gebruik de magnetron niet voor het opbergen
van brand gevaarlijke of licht vervormbare
materialen.
• Zorg ervoor dat gerechten altijd voldoende verhit
worden. De tijd die daarvoor nodig is, hangt
van vele factoren af, zoals de hoeveelheid en
het soort gerecht. De eventueel in het voedsel
aanwezige bacteriën worden alleen gedood
als het voedsel minimaal 10 minuten bij een
temperatuur hoger dan 70 °C verhit wordt. Laat
het voedsel wat langer garen als u niet zeker
weet of het voedsel genoeg verhit is.
• Zet een kunststof lepeltje in het kopje als u
vloeistof (bijvoorbeeld water) wilt koken. Het kan
namelijk gebeuren dat de vloeistof kookt zonder
dat u belletjes ziet. Zodra u het kopje uit de
magnetron neemt, kan de vloeistof opeens heftig
gaan koken en uit het kopje spatten, met het
risico dat u zich brandt.
• Een magnetron is alleen veilig als de deur goed
sluit! Plaats nooit een voorwerp tussen de deur
van de magnetron en zorg dat de deur en de
afdichting altijd schoon zijn.
• Gebruik de magnetron alleen voor het ontdooien,
bereiden en verwarmen van voedsel en niet voor
bijvoorbeeld het drogen van kleding of papier.
Deze kunnen vlam vatten.
• Als u kleine hoeveelheden droge of
poedervormige producten in de magnetron
verwarmt (zoals bij het drogen van kruiden)
bestaat de kans op zelfontbranding. Schakel
de magnetron uit en neem de stekker uit het
NL 9
Page 10

VEILIGHEID
stopcontact indien iets in de magnetron vlam vat.
Houd de magnetrondeur dicht.
• Schakel de magnetron uit of trek de stekker
uit het stopcontact wanneer rook wordt
waargenomen. Houd de deur gesloten om
eventuele vlammen te smoren.
• Schakel de magnetron niet in als deze leeg is. De
magnetron kan hierdoor beschadigd raken.
• Verwijder metalen sluitstrips van plastic zakken
en gebruik schalen en schotels die geschikt zijn
voor de magnetron.
• Kijk altijd eerst op de verpakking van het gerecht
hoe u het in de magnetron moet plaatsen.
Vloeistoffen of etenswaren in luchtdichte
verpakking mag u meestal alleen opwarmen
indien u een paar gaatjes in de verpakking prikt.
Dit in verband met toename van de druk tijdens
het opwarmen.
• Vloeistoffen en ander voedsel mogen niet worden
verwarmd in hermetisch afgesloten verpakkingen
omdat ze kunnen ontploffen.
• Bij het verwarmen van voedsel in plastic of
papieren verpakkingen is het aanbevolen een
oog te houden op de magnetron in verband met
de mogelijkheid van ontbranding.
• Verwarm nooit langer dan noodzakelijk is, houdt
rekening met het ‘nagaren’.
• Prik met een vork of ander puntig voorwerp even
in het vel van vlees, kip of vis. Hiermee voorkomt
u dat deze gerechten gaan spetteren.
• De magnetron moet regelmatig worden gereinigd
en alle voedsel resten moeten worden verwijderd.
Achtergebleven kruimels en vocht absorberen
microgolven en verlengen de kooktijd. Tevens
kan door achtergebleven voedselresten de
binnenzijde beschadigd raken wat tot gevaarlijke
situaties kan leiden.
• Gebruik geen schuurmiddelen of metalen
schrapers voor het reinigen van de glazen deur.
Het oppervlak raakt hierdoor bekrast, waardoor
het glas kan barsten.
NL 10
Page 11

VEILIGHEID
Materialen
Een magnetron is niet geschikt voor:
• het inmaken van voedsel;
• het koken van eieren in de schaal en het
verwarmen van hele hardgekookte eieren, deze
spatten uit elkaar door de druktoename;
• het verhitten van frituurolie.
Indien de veiligheidsinstructies en
waarschuwingen niet worden opgevolgd, kan de
fabrikant niet aansprakelijk worden gesteld voor
de schade die daarvan het gevolg is.
Als u besluit het toestel, vanwege een defect,
niet langer te gebruiken, adviseren wij u, nadat u
de stekker uit het stopcontact heeft verwijderd,
het snoer af te knippen. Breng het toestel naar
de betreffende afvalverwerkingsafdeling van uw
gemeente.
Niet alle materialen kunnen in de magnetron. In de onder staande
tabel is aangegeven welke materialen u wel en niet kunt gebruiken.
Materiaal Magnetron
Papier ja*
Aluminiumfolie ja**
Huishoudfolie ja
Aluminium bakjes nee
Hittebestendig plastic ja
Ongeglazuurd aardewerk nee
Metalen kookgerei nee
Normaal glas ja
Pyrex, ander ovenvast glas en keramiek ja
Borden met metaalhoudende sierrand nee
Metalen sluitstrip nee
Kwikthermometer nee
Afgesloten pot nee
Fles met een nauwe hals nee
Braadzakken ja
* Gebruik niet-gedecoreerd keukenpapier voor het afdekken van een schaal of
onder brood bij het ontdooien.
** Door dunnere gedeelten van gerechten (zoals kippenpoten) af te dekken,
voorkomt u dat ze te snel garen.
NL 11
Page 12
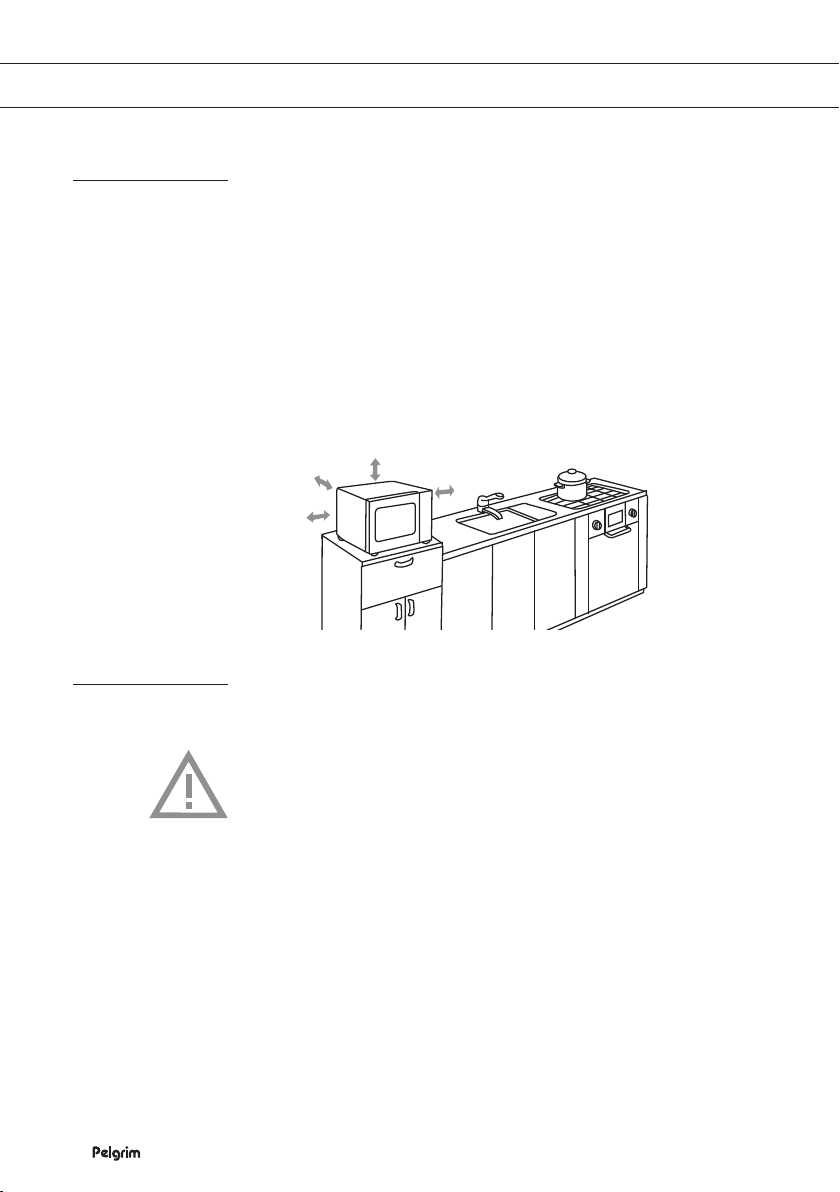
GEBRUIK
Plaatsen
• Plaats de magnetron op een stevige en vlakke ondergrond.
• Zorg voor voldoende ventilatie rondom de magnetron. Houd
• Dek de ventilatieopeningen niet af.
• De stelvoetjes mogen niet verwijderd worden.
• Plaats de magnetron niet in de buurt van warmtebronnen.
• Zend- en ontvangstapparatuur zoals radio’s en
7.5 cm
Vóór het eerste gebruik
Neem het toebehoren uit de magnetron en reinig het met een mild
reinigingsmiddel. Plaats daarna het frame weer op de aandrijving.
aan de bovenzijde 30 cm ruimte vrij. Houd aan de achterzijde
en zijkanten minimaal 7,5 cm ruimte vrij.
televisietoestellen kunnen de werking van de magnetron
beïnvloeden.
30 cm
7.5 cm
7.5 cm
NL 12
Let op
Gebruik de magnetron altijd met het frame op de aandrijving in
combinatie met een draaiplateau!
Plaats een hittebestendige schaal met 200 ml water in de
magnetron. Druk op oventoets. Stel de tijd in op 5 minuten
en druk op de starttoets. Tijdens de fabricage gebruikte
beschermingsvetten worden dan verwijderd. Laat de magnetron na
afloop van de 5 minuten afkoelen en reinig de magnetron met warm
water. De magnetron is nu klaar voor gebruik.
Opmerking
Als de magnetron voor de eerste maal sterk verhit wordt, zult u een
‘nieuwigheidsluchtje’ ruiken. Dit is normaal. Schakel eventueel de
wasemkap in of open een raam
.
Page 13
BEDIENING
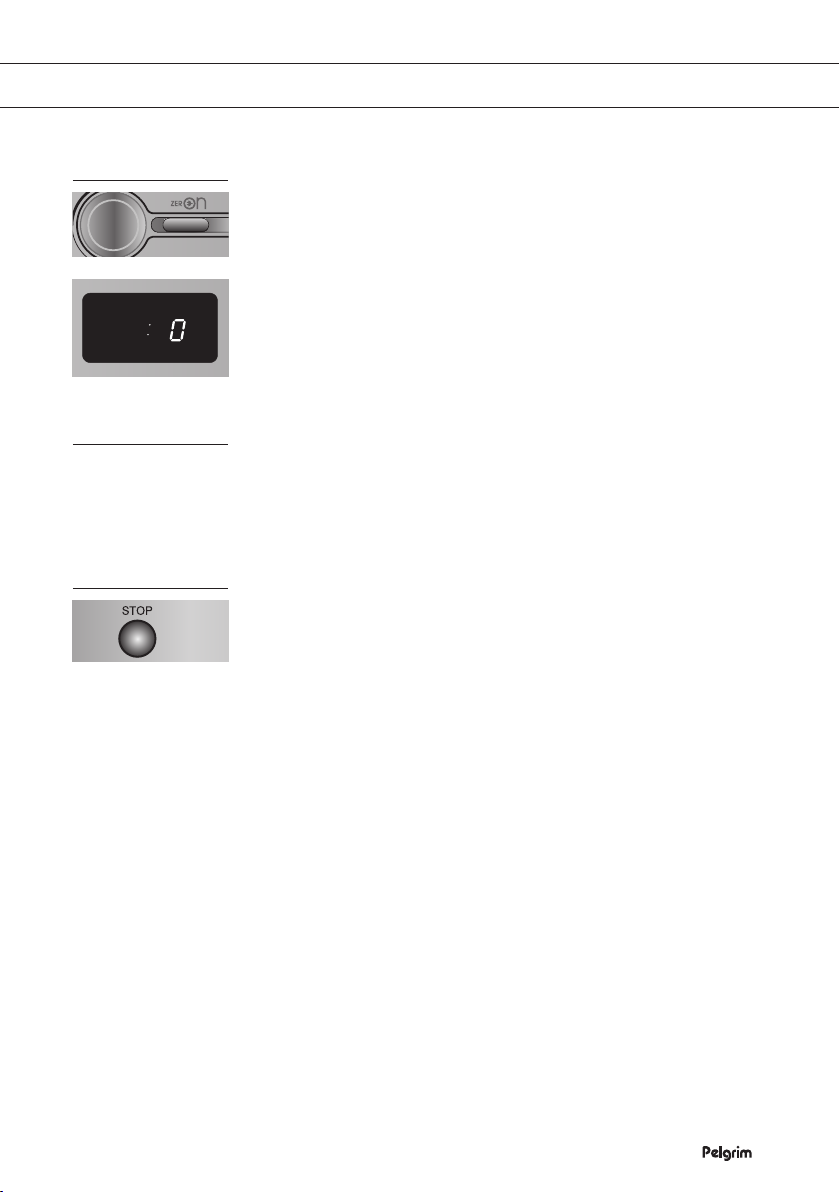
ZERO ON
Wanneer het toestel voor de eerste keer op het elektriciteitsnet
wordt aangesloten, is er nog niks te zien in de display. Het toestel
staat in de standby modus.
1. Druk op de ZERO ON toets.
Er klinkt een geluidssignaal en in de display verschijnt ‘: 0’.
U kunt nu de magnetron gebruiken.
▷ Als de magnetron niet wordt gebruikt gedurende 10 minuten,
Uitschakelen/inschakelen
U kunt de magnetron ook in standby modus schakelen door na
gebruik de stoptoets ingedrukt te houden totdat er niks meer te
zien is in de display. Door weer op de ZERO ON toets te drukken is
de magnetron weer gereed voor gebruik.
Algemeen
• Als u iets wilt instellen is het belangrijk dat in de display de
timer tijd (of ‘:0’) staat en geen gekozen functie. Door altijd eerst
op de stoptoets te drukken, bent u er zeker van dit het geval is.
• Is de magnetron klaar met de ingestelde functie, dan klinken
er drie geluidssignalen en ‘END’ verschijnt in de display. De
magnetron
de stoptoets is gedrukt of de deur is geopend.
• De ventilator zal na afloop nog enige tijd doordraaien om te
koelen. In de display verschijnt afwisselend de ingestelde tijd
(of ‘:0’) en ‘COOL’.
• Door de deur te openen, wordt een lopend programma
onderbroken. Dit gebeurt ook als u op de stoptoets drukt.
De ventilator blijft wel draaien. U kunt het programma weer
starten door op de starttoets te drukken.
• Gebruik de magnetron niet wanneer deze leeg is.
• Na gebruik van de grill-/oven-/combi-functie moet u de magnetron eerst laten afkoelen voordat u deze weer gaat gebruiken.
•
zal het toestel automatisch weer naar de standby modus
schakelen. Er is dan niets meer te zien in de display.
zal elke minuut een geluidssignaal geven totdat op
NL 13
Page 14
BEDIENING
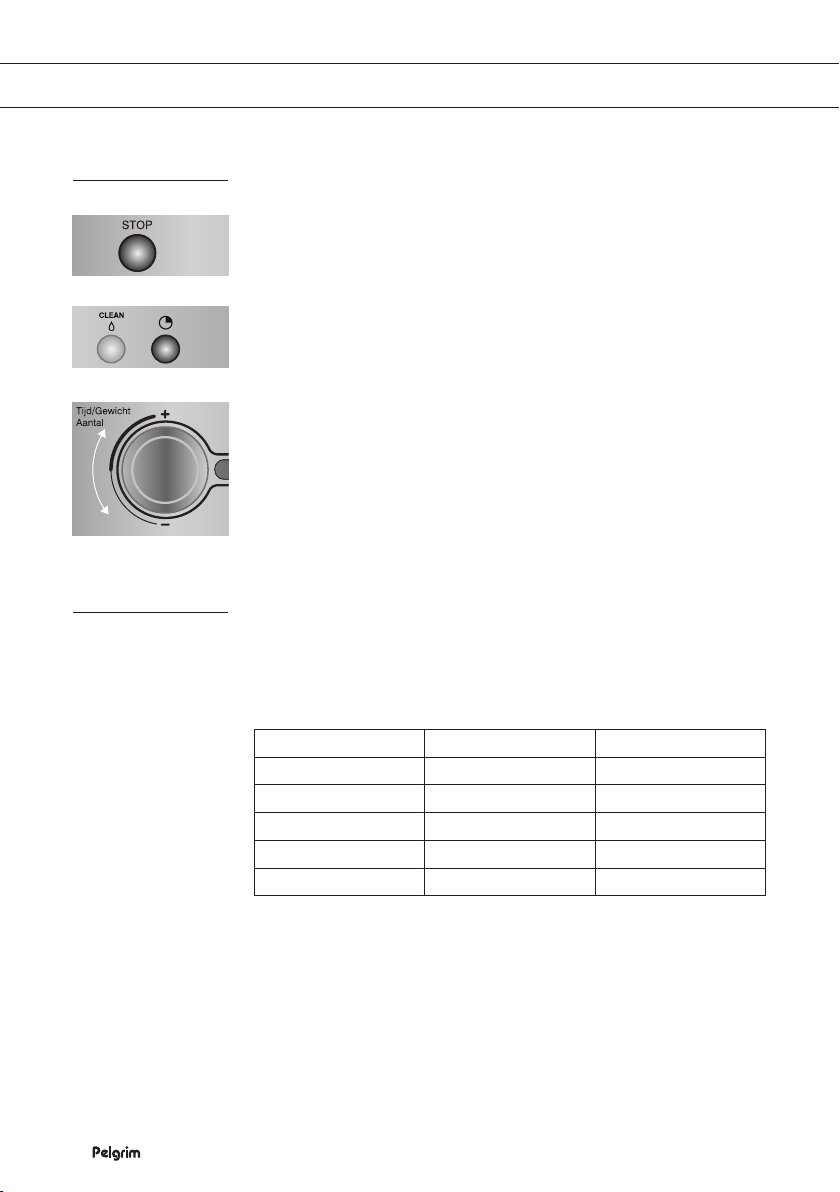
Keukenwekken instellen
1. Druk op de stoptoets.
In de display verschijnt ‘0’
2. Druk op de timertoets.
3. Draai aan de instelknop om de keukenwekkertijd in te stellen.
In de display verschijnen de tijd die is ingesteld.
4. Druk op de starttoets.
In de display verschijnt de keukenwekkertijd.
Magnetron
Bij deze functie kunt u zelf het vermogen en de tijd instellen.
Stelt u geen vermogen in, dan zal de magnetron inschakelen op
het hoogste vermogen. In de volgende tabel kunt u zien welke
vermogens u kunt instellen.
NL 14
Stand in de display Percentage Vermogen
P-HI 100 % 900 W
P-90 90 % 810 W
P-80 80 % 720 W
P-70 70 % 630 W
P-60 60 % 540 W
Page 15
BEDIENING
Stand in de display Percentage Vermogen
P-50 50 % 450 W
P-40 40 % 360 W
P-30 30 % 270 W
P-20 20 % 180 W
P-10 10 % 90 W
P-00 0 % 0 W
1. Druk op de ZERO ON toets indien er niks in de display staat.
Er klinkt een geluidssignaal en in de display verschijnt de
huidige tijd of ‘: 0’. U kunt nu de magnetron gebruiken.
2. Druk op de magnetrontoets.
In de display verschijnt ‘P-HI’ en het indicatielampje gaat
branden.
▷ Druk nogmaals (meerdere keren) op de vermogentoets als
u een ander vermogen in wilt stellen.
3. Draai aan de instelknop om de tijd in te stellen.
In de display verschijnt de ingestelde tijd.
▷ U kunt maximaal 60 minuten instellen. Er verschijnen eerst
stappen van 10 seconden in de display. Na de instelling van
5 minuten worden het stappen van 30 seconden.
Grill
4. Druk op de starttoets.
De magnetron start met de gekozen instellingen; de magnetronverlichting gaat aan, het draaiplateau gaat draaien en de tijd in
de display telt af.
▷ Na afloop klinken er drie geluidssignalen. De magnetron
schakelt uit.
• U kunt op elk moment tijdens de bereiding het ingestelde
vermogen bekijken door op de magnetrontoets te drukken.
Met de grillfunctie kunt u gerechten verhitten en van een bruin
korstje voorzien, zonder gebruik te maken van microgolven.
De combi-magnetron heeft een boven- en onderelement die
onafhankelijk van elkaar gebruikt kunnen worden.
1. Druk op de ZERO ON toets indien er niks in de display staat.
Er klinkt een geluidssignaal en in de display verschijnt de
huidige tijd of ‘: 0’. U kunt nu de magnetron gebruiken.
NL 15
Page 16

BEDIENING
2. Druk op de grilltoets.
In de display verschijnt ‘: 0’ en het indicatielampje gaat branden.
3. Draai aan de instelknop om de tijd in te stellen.
In de display verschijnt de ingestelde tijd.
▷ U kunt maximaal 60 minuten instellen. Er verschijnen eerst
4. Druk op de starttoets.
De magnetron start met de gekozen instellingen; de magnetronverlichting gaat aan, het draaiplateau gaat draaien en de tijd in
de display telt af.
▷ Na afloop klinken er drie geluidssignalen. De magnetron
Oven met voorverwarmen
Bij de ovenfunctie is het raadzaam om eerst voor te verwarmen
(behalve bij een temperatuur van 40 °C). De maximale
voorverwarmtijd is 30 minuten. Indien na deze 30 minuten
voorverwarmen niet gestart wordt met het bereiden van
een gerecht, zal de ovenindicatie blijven knipperen en de
voorverwarmtemperatuur worden weergegeven in de display.
Na 15 minuten zal het voorverwarmen automatisch uitschakelen.
1. Druk op de ZERO ON toets indien er niks in de display staat.
Er klinkt een geluidssignaal en in de display verschijnt de
huidige tijd of ‘: 0’. U kunt nu de magnetron gebruiken.
2. Druk op de oventoets.
In de display verschijnt ‘180C’ en het indicatielampje gaat
branden.
▷ Druk nogmaals (meerdere keren) op de oventoets als
▷ De volgende temperaturen kunt u kiezen: 180C, 190C, 200C,
3. Druk op de starttoets.
De magnetron start met voorverwarmen; in de display verschijnt
afwisselend ‘PrE -’ en de voorverwarmtemperatuur en de
ovenindicatie knippert.
stappen van 10 seconden in de display. Na de instelling van
5 minuten worden het stappen van 30 seconden.
schakelt uit.
u een andere temperatuur in wilt stellen.
210C, 220C, 40C, 100C, 110C, 120C, 130C, 140C, 150C,
160C, 170C.
NL 16
Page 17

BEDIENING
Oven
4. Als het voorverwarmen klaar is klinkt er een geluidssignaal en in
de display verschijnt de oventemperatuur.
5. Open de deur en plaats het gerecht in de magnetron.
In de display staat de temperatuur.
6. Draai aan de instelknop om de tijd in te stellen.
In de display verschijnt de ingestelde tijd.
▷ U kunt maximaal 60 minuten instellen. Er verschijnen eerst
stappen van 10 seconden in de display. Na de instelling van
5 minuten worden het stappen van 30 seconden.
7. Druk op de starttoets.
De magnetron start met de gekozen instellingen; de magnetronverlichting gaat aan, het draaiplateau gaat draaien en de tijd in
de display telt af.
▷ Na afloop klinken er drie geluidssignalen. De magnetron
schakelt uit.
• U kunt op elk moment tijdens de bereiding de ingestelde
temperatuur bekijken door op de oventoets te drukken.
Met de ovenfunctie kunt u gerechten bereiden zoals in een
conventionele oven, zonder gebruik te maken van microgolven.
Het boven- en onderelement worden beide ingeschakeld.
1. Druk op de ZERO ON toets indien er niks in de display staat.
Er klinkt een geluidssignaal en in de display verschijnt de
huidige tijd of ‘: 0’. U kunt nu de magnetron gebruiken.
2. Druk op de oventoets.
In de display verschijnt ‘180C’ en het indicatielampje gaat
branden.
▷ Druk nogmaals (meerdere keren) op de oventoets als
u een andere temperatuur in wilt stellen.
▷ De volgende temperaturen kunt u kiezen: 180C, 190C, 200C,
210C, 220C, 40C, 100C, 110C, 120C, 130C, 140C, 150C,
160C, 170C.
3. Draai aan de instelknop om de tijd in te stellen.
In de display verschijnt de ingestelde tijd.
▷ U kunt maximaal 60 minuten instellen. Er verschijnen eerst
stappen van 10 seconden in de display. Na de instelling van
5 minuten worden het stappen van 30 seconden.
NL 17
Page 18

BEDIENING
4. Druk op de starttoets.
• U kunt op elk moment tijdens de bereiding de ingestelde
Combi oven/magnetron
Met deze functie worden de oven- en grillfunctie gecombineerd
met de magnetronfunctie. Traditionele gerechten zijn op deze
manier sneller klaar.
1. Druk op de ZERO ON toets indien er niks in de display staat.
2. Druk op de combitoets.
3. Druk op de oventoets.
4. Draai aan de instelknop om de tijd in te stellen.
De magnetron start met de gekozen instellingen; de magnetronverlichting gaat aan, het draaiplateau gaat draaien en de tijd in
de display telt af.
▷ Na afloop klinken er drie geluidssignalen. De magnetron
schakelt uit.
temperatuur bekijken door op de oventoets te drukken.
Er klinkt een geluidssignaal en in de display verschijnt de
huidige tijd of ‘: 0’. U kunt nu de magnetron gebruiken.
In de display verschijnt ‘C-0’ en het indicatielampje gaat branden.
▷ Druk nogmaals (meerdere keren) op de combitoets als u een
ander vermogen in wilt stellen.
▷ U kunt kiezen uit ‘C-0’ (30 % vermogen), ‘C-HI’
(40 % vermogen) en ‘C-Lo’ (20 % vermogen).
In de display verschijnt ‘180C’ en het indicatielampje gaat
branden.
▷ Druk nogmaals (meerdere keren) op de oventoets als u een
andere temperatuur in wilt stellen.
▷ De volgende temperaturen kunt u kiezen: 180C, 190C, 200C,
210C, 220C, 40C, 100C, 110C, 120C, 130C, 140C, 150C,
160C, 170C.
In de display verschijnt de ingestelde tijd.
▷ U kunt maximaal 60 minuten instellen. Er verschijnen eerst
stappen van 10 seconden in de display. Na de instelling van
5 minuten worden het stappen van 30 seconden.
NL 18
5. Druk op de starttoets.
De magnetron start met de gekozen instellingen; de magnetronverlichting gaat aan, het draaiplateau gaat draaien en de tijd in
de display telt af.
Page 19

BEDIENING
• Na afloop klinken er drie geluidssignalen. De magnetron
• U kunt op elk moment tijdens de bereiding het ingestelde
• U kunt op elk moment tijdens de bereiding de ingestelde
Ontdooien op gewicht
Met deze functie hoeft u alleen maar het gewicht van het voedsel in
te stellen. De ontdooitijd verschijnt automatisch in de display als de
magnetron wordt gestart.
1. Druk op de ZERO ON toets indien er niks in de display staat.
2. Druk één keer op de ontdooitoets.
3. Draai aan de instelknop om het gewicht in te stellen.
schakelt uit.
vermogen bekijken door op de combitoets te drukken.
temperatuur bekijken door op de oventoets te drukken.
Er klinkt een geluidssignaal en in de display verschijnt de
huidige tijd of ‘: 0’. U kunt nu de magnetron gebruiken.
In de display verschijnt ‘0’ en het indicatielampje gaat branden.
In de display verschijnt het ingestelde gewicht.
▷ U kunt een ontdooigewicht instellen van 200 gram t/m 3000
gram in stappen van 50 gram.
4. Druk op de starttoets.
De magnetron schakelt in en in de display verschijnt automatisch de aftellende ontdooitijd.
▷ Tijdens het ontdooien zal een geluidssignaal u erop attent
maken om het gerecht te controleren/om te draaien.
5. Open de deur; de magnetron schakelt uit.
6. Sluit de deur na het controleren/omdraaien, druk op de
starttoets en de magnetron gaat verder met het ingestelde
programma.
▷ Na afloop van het ontdooien klinken er drie geluidssignalen.
De magnetron schakelt uit.
NL 19
Page 20

BEDIENING
Ontdooien op tijd
Met deze functie hoeft u alleen maar de ontdooitijd van het voedsel
in te stellen.
1. Druk op de ZERO ON toets indien er niks in de display staat.
Er klinkt een geluidssignaal en in de display verschijnt de
huidige tijd of ‘: 0’. U kunt nu de magnetron gebruiken.
2. Druk twee keer op de ontdooitoets.
In de display verschijnt ‘: 0’ en het indicatielampje gaat branden.
3. Draai aan de instelknop om de ontdooitijd in te stellen.
In de display verschijnt de ingestelde tijd.
▷ U kunt maximaal 60 minuten instellen. Er verschijnen eerst
stappen van 10 seconden in de display. Na de instelling van
5 minuten worden het stappen van 30 seconden.
4. Druk op de starttoets.
De magnetron schakelt in en in de display verschijnt automatisch de aftellende ontdooitijd.
▷ Tijdens het ontdooien zal een geluidssignaal u erop attent
maken om het gerecht te controleren/om te draaien.
5. Open de deur; de magnetron schakelt uit.
6. Sluit de deur na het controleren/omdraaien, druk op de
starttoets en de magnetron gaat verder met het ingestelde
programma.
▷ Na afloop van het ontdooien klinken er drie geluidssignalen.
De magnetron schakelt uit.
NL 20
Auto cook
Met deze functie kunt u heel eenvoudig populaire gerechten
bereiden. U stelt het juiste gewicht in en de magnetron kiest
automatisch de juiste tijd.
Functie Min. gewicht Max. gewicht
AC-1 GEROOSTERD VARKENSVLEES 500 g 2000 g
AC-2 GEROOSTERD RUNDVLEES 500 g 2000 g
AC-3 GEROOSTERDE KIP 800 g 3000 g
AC-4 GEBAKKEN VIS 300 g 900 g
AC-5 VERSE GROENTEN 100 g 900 g
Page 21

BEDIENING
1. Druk op de auto cook toets.
In de display verschijnt ‘AC-1’ en het indicatielampje gaat
branden.
2. Druk nogmaals (meerdere keren) op de auto cook toets om een
functie te kiezen (zie tabel).
3. Draai aan de instelknop om het gewicht in te stellen.
In de display verschijnt het ingestelde gewicht.
▷ U kunt een gewicht instellen t/m 2000 gram in stappen van
50 gram.
• Raadpleeg de tabel voor de instellingen en kies het juiste
gewicht.
4. Druk op de starttoets.
De magnetron start met de gekozen instellingen; de magnetronverlichting gaat aan, het draaiplateau gaat draaien en de tijd in
de display telt af.
• U kunt op elk moment tijdens de bereiding de instellingen
bekijken door op de auto cook toets te drukken.
Tabel Auto Cook
In de volgende tabel vindt u per gerecht informatie over de
werkwijze en het te gebruiken kookgerei.
Werkwijze Kookgerei
1 1. Plaats het varkensvlees direct op het rek met draaiplateau.
2. Strijk een beetje olie erover met een kwast.
3. Braad op ‘AC-1’.
4. Haal het vlees uit de combi-magnetron. Laat het overtollig
braadvocht weglopen.
5. Wikkel het vlees in aluminiumfolie en laat het 10 minuten rusten.
6. Serveer het vlees met appelmoes.
2 1. Plaats het rundvlees direct op het metalen draaiplateau.
2. Strijk een beetje olie erover met een kwast.
3. Braad op ‘AC-4’.
4. Haal het vlees uit de combi-magnetron. Laat het overtollig
braadvocht weglopen.
5. Wikkel het vlees in aluminiumfolie en laat het 10 minuten rusten.
6. Serveer met gekookte aardappels en jus.
Rek met draaiplateau.
Rek met draaiplateau.
NL 21
Page 22
BEDIENING
Werkwijze Kookgerei
3 1. Was de kip en droog deze af. Bind de poten losjes bijeen met
braadtouw.
2. Prik net onder de poten enkele gaatjes in het vel.
3. Vet met een kwast de hele kip in met gesmolten boter
4. Plaats de kip direct op het rek met draaiplateau.
5. Braad op ‘AC-3’.
6. Haal de kip uit de oven. Laat het overtollig braadvocht weglopen.
Strooi zout erover indien gewenst.
7. Wikkel de kip in aluminiumfolie en laat het 10 minuten rusten.
8. Serveer met gebakken aardappels en sla.
4 1. Alle soorten verse vis (behalve gepaneerde/in beslag gedompelde
vis) kunnen bereid worden, zowel hele vissen als visfilets of
vissteaks.
2. Plaats de voorbereide vis in een beboterde schaal.
3. Bestrooi met zout en peper, sprenkel er citroensap over en leg er
klontjes boter op. Dek de schaal niet af.
4. Plaats op hoog rek op het draaiplateau.
5. Bak op ‘AC-4’.
5 1. Groenten wassen en schoonmaken.
2. Plaats de voorbereide groenten in een passende schaal.
3. Besprenkel de groenten met 4-5 eetlepels water.
4. Dek de schaal af met huishoudfolie waarin gaatjes geprikt zijn of
met een deksel.
5. Plaats de schaal op het draaiplateau.
6. Bereid op ‘AC-5’.
* Snij de groenten in gelijke stukjes voor het beste resultaat.
Rek met draaiplateau.
Magnetron- en hittebestendige lage schaal,
bijvoorbeeld Pyrex. Rek met
draaiplateau.
Magnetronbestendige
schaal, bijvoorbeeld Pyrex,
met draaiplateau.
NL 22
Snelstart
Met één druk op de starttoets kunt u de magnetron starten op vol
vermogen gedurende 30 seconden. Drukt u meerdere keren op de
starttoets, dan zal de tijd vermeerderen in stappen van
30 seconden tot maximaal 5 minuten.
Stop
U kunt een lopend programma stoppen of annuleren door de deur
te openen of op de stoptoets te drukken. Om het programma weer
te starten, drukt u op de starttoets.
• Wanneer u het programma helemaal wilt annuleren, drukt u
nogmaals op de stoptoets.
De huidige tijd (of ‘:0’) verschijnt in de display.
Page 23

BEDIENING
Warmhouden
Met deze functie kunt u een uur lang uw gerecht warmhouden op
een temperatuur van ongeveer 60 °C.
1. Druk op de ZERO ON toets indien er niks in de display staat.
Er klinkt een geluidssignaal en in de display verschijnt de
huidige tijd of ‘: 0’. U kunt nu de magnetron gebruiken.
2. Druk op de toets ‘warmhouden’.
In de display verschijnt ‘60C’ en het indicatielampje gaat
branden.
3. Draai aan de instelknop om de tijd in te stellen.
In de display verschijnt de ingestelde tijd.
▷ U kunt maximaal 60 minuten instellen. Er verschijnen eerst
stappen van 10 seconden in de display. Na de instelling van
5 minuten worden het stappen van 30 seconden.
4. Druk op de starttoets.
De magnetron start met de gekozen instellingen; de magnetronverlichting gaat aan, het draaiplateau gaat draaien en de tijd in
de display telt af.
▷ Na afloop klinken er drie geluidssignalen. De magnetron
schakelt uit.
Steam cleaning
Deze functie maakt het mogelijk om in 10 minuten uw combimagnetron van binnen te reinigen. Het stoomproces weekt de
achtergebleven etensresten los, zodat u deze naderhand makkelijk
kunt wegvegen met een zachte doek.
Let op: plaats eerst een beker/mok/schaal met 150/200 cc water in
het midden op het draaiplateau.
1. Druk op de ZERO ON toets indien er niks in de display staat.
Er klinkt een geluidssignaal en in de display verschijnt de
huidige tijd of ‘: 0’. U kunt nu de magnetron gebruiken.
2. Plaats een beker/mok/schaal met 150/200 cc water in het
midden op het draaiplateau.
3. Druk op de cleantoets.
Het indicatielampje gaat branden. De magnetron zal gedurende
10 minuten opwarmen.
NL 23
Page 24

BEDIENING
4. Na afloop van de 10 minuten verschijnt ‘door’ ‘oPEn’ in de
display gedurende 5 minuten. Open de deur. Wees voorzichtig
met de vrijkomende stoom. Laat de magnetron even afkoelen
en droog daarna de binnenkant van de magnetronruimte met
een droge doek.
NL 24
Page 25

KOOKTIPS
Opwarmen en koken
• De magnetron verwarmt altijd met dezelfde intensiteit. Hoe
meer u in de magnetron plaatst, des te langer de kooktijd.
• Vlakke en platte gerechten zijn sneller warm dan smalle, hoge
gerechten.
• Gerechten afdekken met magnetronfolie of een passende
deksel voorkomt spetteren, verkort de gaartijd en helpt de
vochtigheidsgraad te behouden. Na afloop de folie of het
deksel voorzichtig verwijderen. Let op! De vrijkomende stoom
kan zeer heet zijn!
• Gerechten die snel uitdrogen eventueel bevochtigen. Zet
aardappels en groenten eerst even in koud water voordat u ze
in de magnetron plaatst. Hiermee voorkomt u dat er zich een
velletje op vormt.
• Voor een gelijkmatig resultaat kunt u het beste gerechten ééntot tweemaal roeren of keren.
• Kies voor het opwarmen van reeds bereide gerechten altijd de
hoogste magnetronstand.
• Bij het koken hoeft u maar weinig water, zout en kruiden te
gebruiken. Zout kunt u het beste na afloop toevoegen. Hiermee
voorkomt u dat het vocht aan het gerecht wordt onttrokken.
• Nadat de magnetron is uitgeschakeld gaart het gerecht nog
enige tijd na. Houd hier rekening mee door het gerecht niet te
lang op te warmen.
• Let op! Plaats, bij het opwarmen van kleine hoeveelheden
poedervormige producten (zoals bij het drogen van kruiden),
altijd een bekertje water in de magnetron. Anders bestaat er,
door de geringe hoeveelheid, kans op zelfontbranding.
Ontdooien
• Ontdooi grote compacte stukken altijd met behulp van
het ontdooiprogramma. Doordat het gerecht geleidelijk en
gelijkmatig ontdooit, loopt u niet de kans dat de buitenkant
uitdroogt terwijl de kern nog bevroren is.
• Om het ontdooiproces sneller te laten verlopen, wordt
aanbevolen om het gerecht na enige tijd in stukken te verdelen.
• Las, bij grote stukken vlees en compacte gerechten, tweemaal
een pauze in.
NL 25
Page 26

KOOKTIPS
• Bij het ontdooien van onregelmatig gevormde gerechten kunt
u dunne delen na de helft van de ontdooitijd afdekken of
omwikkelen met aluminiumfolie.
Factoren die van invloed zijn op het kookproces
• De temperatuur van ingrediënten is van invloed op de
bereidingstijd. Een koude maaltijd heeft een langere kooktijd
nodig dan een maaltijd op kamertemperatuur.
• Lichte, poreuze gerechten garen sneller dan zware en massieve
gerechten, zoals stoofgerechten of rollades. Let op bij het
bereiden van lichte, poreuze gerechten. De randen worden snel
droog en taai.
• Kleine gerechten worden gelijkmatiger verwarmd als u ze los
van elkaar, liefst cirkelvormig, in de magnetron plaatst.
• Botten en vet geleiden hitte beter dan vlees. Aluminiumfolie
blokkeert de magnetrongolven. Door dunnere gedeelten van
gerechten (zoals kippenpoten en -vleugeltjes) af te dekken
voorkomt u dat ze te snel garen.
• Vetvrij papier voorkomt spetteren en helpt warmte vast te
houden.
Basistechnieken
• Plaatsen
▷ Plaats dikkere stukken aan de buitenkant op het draai-
plateau. Gerechten die aan de buitenkant op het draaiplateau geplaatst worden ontvangen de meeste microgolven.
• Roeren
▷ Door gerechten regelmatig te roeren verspreidt u de
opgeslagen warmte. Roer altijd van buiten naar binnen,
aangezien de buitenkant van het gerecht altijd het eerste
warm wordt.
• Omdraaien
▷ Grote, dikke gerechten regelmatig omdraaien. Ze garen dan
regelmatiger en sneller.
• Prikken
▷ Gerechten met een vel of schaal, zoals eierdooiers,
schaaldieren en fruit, barsten open in de magnetron.
Voorkom dit door er van te voren enkele keren met een vork
of satéprikker in te prikken.
NL 26
Page 27

KOOKTIPS
• Controleren
▷ Gerechten garen snel. Controleer ze daarom regelmatig. Haal
gerechten net voordat ze gaar zijn uit de magnetron.
• Nagaren
▷ Laat gerechten, nadat u ze uit de magnetron hebt gehaald,
over het algemeen 3 tot 10 minuten afgedekt staan. De
gerechten garen dan na. Gerechten met een droge korst,
zoals cake, niet afdekken.
• Invriezen
▷ Bij het invriezen kunt u al rekening houden met het
ontdooien in de magnetron, door geen aluminiumfolie of
-bakjes te gebruiken en door plattere porties in te vriezen.
Koken van groente
• Gebruik indien mogelijk verse groenten. Als groenten al wat
slap zijn geworden doordat ze te lang gelegen hebben kunt u ze
een tijdje in koud water leggen, zodat ze zich weer vol kunnen
zuigen.
• Gebruik voor het koken van groente een ruime schaal, zodat de
schaalbodem bedekt wordt met een niet al te dikke laag.
• Kook groente bij voorkeur met aanhangend water.
• Dek de schaal altijd af met een deksel of magnetronfolie.
• Voeg geen zout toe. De van nature in de groente aanwezige
zouten geven meestal voldoende smaak. Indien u toch zout toe
wilt voegen, doe dat dan na het koken.
• Kook groente zo kort mogelijk. Houd rekening met het nagaren.
• Controleer met een satéprikker of vork of de groente gaar is.
Koken van vis
• Vis moet geleidelijk gaar worden. Schakel daarom bij dunne
vissen, vette vissen of kleine porties het vermogen in op 30%.
In andere gevallen kunt u het vermogen gerust iets hoger
instellen. Houd wel rekening met nagaren. Vis is gaar als het
ondoorschijnend is geworden.
NL 27
Page 28

ONDERHOUD
Reinigen
• GEBRUIK GEEN schuurmiddelen of metalen schrapers voor het
reinigen van de glazen ovendeur. Het oppervlak raakt hierdoor
bekrast, waardoor het glas kan barsten.
• GEBRUIK GEEN hogedruk- of stoomreiniger om de magnetron
schoon te maken.
• Maak de binnenzijde direct na gebruik schoon. Gebruik
een vochtige doek om condens, overgekookt vocht en
voedselresten te verwijderen. Achtergebleven kruimels en vocht
absorberen magnetronenergie en verlengen de kooktijden.
• Reinig de binnen- en buitenzijde regelmatig; gebruik een sopje
van afwasmiddel en maak de magnetron met een droge doek
goed droog.
• Zorg dat de afdekking van de microgolfverdeler schoon is.
Vervuiling van de afdekking kan leiden tot vonkvorming.
• Reinig het toebehoren regelmatig; gebruik een sopje van
afwasmiddel met een borstel en maak het toebehoren met een
droge doek goed droog. Het toebehoren mag ook afgewassen
worden in de vaatwasmachine.
• Geurtjes verdwijnen als u een glas azijn of water met citroen
in de magnetronruimte zet. Schakel de magnetron gedurende
twee minuten in op vol vermogen. Daarna afnemen met een
vochtige doek.
• Controleer de deursluiting en het deurrubber regelmatig op
beschadigingen. Gebruik de magnetron niet wanneer de deur of
deursluiting beschadigd zijn.
• Als de afdichting van de magnetron sterk is vervuild, sluit de
deur niet goed. De aangrenzende voorzijden van meubels
kunnen worden beschadigd. Houd de afdichting schoon.
• Zout is erg agressief. Wanneer dit zich in de ovenruimte afzet,
kunnen plaatselijk roestplekken ontstaan.
• Scherpe sauzen zoals ketchup en mosterd of gezouten
gerechten, bijv. pekelvlees, bevatten ingrediënten die het
oppervlak kunnen aantasten. Na gebruik moet u de ovenruimte
altijd schoon maken.
NL 28
Page 29

STORINGEN
Wanneer u twijfelt over de goede werking van uw toestel, betekent
dit niet automatisch dat er een defect is. Controleer in elk geval
de volgende punten. Bel de servicedienst indien onderstaande
adviezen niet helpen.
• Zit de stekker in het stopcontact?
• Is de deur goed gesloten?
• Is de zekering in de meterkast defect?
• Zijn het vermogen en de bereidingstijd goed ingesteld?
• Staan er voorwerpen in de magnetron die er niet thuishoren?
• Heeft u het juiste keukengerei gebruikt?
• Zijn de ventilatieopeningen geblokkeerd?
• Is het voedsel voldoende ontdooid?
• Heeft u het voedsel tijdens de bereiding gekeerd of geroerd?
• Is het kinderslot ingeschakeld?
Vonken in de magnetron
Als u vonken in de magnetron ziet, schakel dan direct de
magnetron uit. Vonken kunnen worden veroorzaakt door:
• metaal of aluminiumfolie dat de binnenkant van de magnetron
aanraakt;
• aluminiumfolie dat niet correct om het voedsel is gewikkeld
(punten die omhoog staan en als een antenne werken);
• metaal van een sluitstrip of servies met metaalhoudende
sierrand;
• gerecycled papier dat kleine metalen deeltjes bevat.
Foutcodes (bel de servicedienst)
Err2 Temperatuur te hoog of temperatuursensor defect.
Err3 Temperatuursensor niet aangesloten.
NL 29
Page 30

TECHNISCHE GEGEVENS
Aansluiting 230V~, 50Hz
Vermogen 2700 W
Inhoud 25 liter
Afmetingen (bxdxh) 514 x 397 x 311 mm
Gewicht 17,2 kg
NL 30
Page 31

MILIEUASPECTEN
Afvoeren toestel en verpakking
Bij de vervaardiging van dit toestel is gebruik gemaakt van
duurzame materialen. Dit toestel moet aan het eind van zijn
levenscyclus op verantwoorde wijze worden afgevoerd. De
overheid kan u hierover informatie verschaffen.
De verpakking van het toestel is recyclebaar. Gebruikt kunnen zijn:
• karton;
• polyethyleenfolie (PE);
• CFK- vrij polystyreen (PS- hardschuim).
Deze materialen dient u op verantwoorde wijze en conform de
overheidsbepalingen af te voeren.
Om op de verplichting tot gescheiden verwerking van elektrische
huishoudelijke apparatuur te wijzen, is op het product het symbool
van een doorgekruiste vuilnisbak aangebracht. Dit betekent dat
het apparaat aan het einde van zijn levensduur niet bij het gewone
huisvuil mag worden gevoegd. Het toestel moet naar een speciaal
centrum voor gescheiden afvalinzameling van de gemeente worden
gebracht of naar een verkooppunt dat deze service verschaft.
Het apart verwerken van huishoudelijke apparaten voorkomt
mogelijk negatieve gevolgen voor het milieu en de gezondheid
die door een ongeschikte verwerking ontstaat. Het zorgt ervoor
dat de materialen waaruit het apparaat bestaat, teruggewonnen
kunnen worden om een aanmerkelijke besparing van energie en
grondstoffen te verkrijgen.
Conformiteitsverklaring
Wij verklaren dat onze producten voldoen aan de van toepassing
zijnde Europese Richtlijnen, Besluiten en Verordeningen en de eisen
die zijn vermeld in de normen waar naar wordt verwezen.
NL 31
Page 32

CONTENTS
Your microwave
Safety
Use
Operation
Introduction 4
Description 5
Control panel 6
Connection and repair 7
Safe use 7
Materials 11
Positioning 12
Prior to first use 12
ZERO ON 13
Turning off and on 13
General 13
Kitchen timer mode 14
Microwave 14
Grill 15
Oven with pre-heat 16
Oven 17
Combi oven/microwave 18
Defrosting according to weight 19
Defrosting according to time 20
Auto cook 20
Quick start 22
Stop 22
Keep warm 23
Steam cleaning 23
Cooking tips 25
Maintenance
Cleaning 28
Faults 29
Technical data 30
Environmental aspects
Disposal of the appliance and packaging 31
EN 3
Page 33

YOUR MICROWAVE
Introduction
You have opted to purchase a Pelgrim combi-microwave. Optimum
user comfort and easy operation were paramount during the
development of this product.
The combi-microwave combines the properties of a microwave
with those of a traditional oven. The wide range of programming
options makes it possible to choose your preparation method
precisely. Operation is easy even so. The display provides
information and helps you with settings.
This manual gives insight into all the possibilities this appliance
offers. The different functions are listed clearly in the chapter on
controls. Tips that may help you are also included.
First read the user instructions carefully and completely before
starting to use the appliance, and keep them safely for future
reference.
The manual also serves as reference material for service
technicians. The appliance identification card contains all the
information the service technician will need in order to respond
appropriately to your needs and questions.
EN 4
Enjoy cooking!
Page 34

YOUR MICROWAVE
Description
4
1. Display
2. Control panel
3. Open door
4. Shaft
5. Glass turntable (always place in the
microwave before use)
6. Ring for turntable (always place in the
microwave before use)
7. Metal rack: use this rack together with
the turntable
1
2
3
5
6
7
EN 5
Page 35

YOUR MICROWAVE
Control panel
1. Display
2. Auto cook button
1
2
39
410
3. Microwave button
4. Grill button
5. Control dial (time/weight/quantity)
6. Defrost button
7. ‘Keep warm’ button
8. Stop button
9. Oven button
10. Combi button
11. ZERO ON button
12. Timer button
13. Clean button
14. Start button
5
612
713
814
11
EN 6
Page 36

SAFETY
Connection and repair
• Check the appliance for transport damage. Do
not connect a damaged appliance.
• The electrical connection must comply with
national and local regulations.
• The wall plug socket and plug should always be
accessible.
• If you want to make a fixed connection, make sure
that a multi-polar switch with a contact separation
of at least 3 mm is fitted in the supply line.
• The equipment should not be connected to the
network via a multi-plug socket or extension
lead, as the safe use of the equipment can then
not be guaranteed.
• WARNING: never open the casing of the
appliance. The casing may only be opened by a
service technician.
• Disconnect the appliance from the mains supply
before starting any repair work.
• Faulty parts may only be replaced by original
parts. The manufacturer can only guarantee that
original parts meet safety requirements.
• To avoid dangerous situations resulting from any
damage to the connecting cable, this should
only be replaced by the manufacturer, the
manufacturer’s service organisation or suitably
qualified persons.
Safe use
• WARNING: this appliance and its accessible
parts become hot during use. Do not touch the
hot components. Keep children younger than 8
away from the appliance unless you can watch
them continuously.
• This equipment may be used by children older
than 8, as well as by people with physical,
sensory or learning difficulties or with a lack of
experience and knowledge, if they are supervised
and instructed in the safe use of the appliance
and understand the associated dangers. Children
may not play with the appliance. Children may
not clean or maintain the appliance unless
supervised.
EN 7
Page 37

SAFETY
EN 8
• WARNING: it is dangerous for unqualified people
to carry out repairs which require the opening
of the appliance's casing. The casing protects
against the release of micro-energy.
• WARNING: if the door or the seal is damaged,
the microwave may not be used until it has been
repaired by a qualified person.
• WARNING: the contents of baby bottles and
pots of baby food should be shaken and stirred.
Check the temperature prior to consumption to
prevent scalding.
• WARNING: never heat food in unopened tins.
Pressure develops in the tin which can make it
explode.
• WARNING: do not try to use the microwave
with the door open. Microwave radiation can be
dangerous.
• This appliance is only designed for household
use. Use it only for food preparation.
• Only use the appliance inside the home.
• Do not use the appliance in damp areas or near
taps.
• Keep the cable away from hot surfaces.
• Never cover the ventilation openings.
• The appliance is not intended to be operated by
means of an external timer or separate remote
control system.
• In connection with electrical safety, the appliance
may not be cleaned with high-pressure cleaners
or steam cleaners.
• The microwave is insulated. Nevertheless, heat
transfer always occurs, with the outer casing of
the appliance heating up. This heating up falls
well within the norm.
• In preparing meals containing alcohol, high
temperatures may cause the alcohol to
evaporate. The steam can catch fire if it comes
into contact with hot parts.
• Use only cutlery and tableware suitable for
microwave use (take care with gold or silvercoloured edging).
• Do not use the microwave for storing flammable
Page 38

SAFETY
materials or materials which can warp easily.
• Ensure that food is always heated thoroughly.
The time required for this depends on many
factors including the quantity and type of
food. Any bacteria present in the food are only
destroyed if the food is heated at a temperature
higher than 70 °C for more than 10 minutes.
Allow the food to cook for longer if you are not
sure if the food has been heated through.
• Place a plastic spoon in a cup if you want to boil
liquid (for example water). It is possible for the
liquid to boil without bubbling. As soon as you
take the cup out of the microwave, the liquid can
suddenly start to boil furiously and spit out of the
cup, which may scald you.
• A microwave is only safe if the door closes
properly! Never place an object between the
door of the microwave and ensure that the door
and the door seal are always clean.
• Only use the microwave for defrosting,
preparation and heating food and not, for
example, for drying clothes or paper. These can
catch fire.
• Self-combustion is possible if you heat small
quantities of dry or powdery products in the
microwave (such as when drying herbs). Switch
off and unplug the microwave if something in
the microwave catches fire. Keep the microwave
door closed.
• Switch off or unplug the microwave if you see
smoke. Keep the door closed to smother any
flames.
• Never switch the microwave on if it is empty as
this may damage the microwave.
• Remove metal strips from plastic bags and use
bowls and dishes that are microwave safe.
• Always first check on the packaging how food
should be placed in the microwave. Liquids
or foodstuffs in air-tight packaging may only
be heated after pricking a few holes in the
packaging. This is because the pressure builds
up during heating.
EN 9
Page 39

SAFETY
• Liquids and other foodstuffs may not be heated
in hermetically-sealed packaging as they can
explode.
• Keep an eye on the microwave when heating
foodstuffs in plastic or paper packaging, in
connection with the possibility of combustion.
• Never heat longer than necessary, and remember
that food continues to cook after it is removed
from heat.
• Pierce the skin of meat, chicken or fish with a
pointed object. This prevents spitting.
• The microwave should be cleaned regularly and
all food remains should be removed. Remnants
of crumbs and moisture absorb microwaves
and increase cooking time. Food remnants can
also damage the interior which may result in
hazardous situations.
• Do not use any abrasive cleaners or metal
scrapers to clean the glass door. This will scratch
the surface which can break the glass.
A microwave is not suitable for:
• preserving foods;
• cooking eggs in the shell or warming up hardboiled eggs, as they shatter through pressure
build-up;
• heating of frying oil.
EN 10
If the safety functions and warnings are not
followed, the manufacturer cannot be held
responsible for any resulting damage.
If you decide to discontinue using the appliance
because of a fault, we recommend you cut off the
cable after removing the plug from the plug socket.
Take the appliance to your municipality's waste
disposal site.
Page 40

SAFETY
Materials
Not all materials can be used in the microwave. The
table below indicates which materials you can and
cannot use.
Material Microwave
Paper yes*
Aluminium foil yes**
Cling film yes
Aluminium trays no
Heat-resistant plastic yes
Unglazed pottery no
Metal cooking utensils no
Normal glass yes
Pyrex, other oven-safe glass and ceramics yes
Plates with metallic decorative edging no
Metal closing strips no
Mercury thermometer no
Closed pot no
Bottle with a narrow neck no
Roasting bags yes
* Use non-decorated kitchen paper to cover a dish
or place under bread during defrosting.
** By covering thinner areas of food (such as
chicken legs) you prevent them from cooking too
quickly.
EN 11
Page 41

USE
Positioning
Prior to first use
• Put the microwave on a solid, flat surface.
• Ensure that there is adequate ventilation around the microwave.
Keep 30 cm of space free at the top. At the back and sides,
keep at least 7.5 cm free.
• Do not cover the ventilation openings.
• The adjustable feet may not be removed.
• Do not place the microwave in the vicinity of heat sources.
• Broadcasting and transmitting equipment such as radios and
TVs can affect the working of the microwave.
30 cm
7.5 cm
7.5 cm
7.5 cm
Remove the accessories from the microwave and clean them with
a mild cleaning agent. Then put the frame back on the shaft.
EN 12
Please note
Always use the microwave with the frame on the shaft together
with a turntable!
Put a heat-resistant dish with 200 ml of water in the microwave.
Press the oven button. Set the time to 5 minutes and press the
Start button. This will remove any protective grease used during
manufacture. When the 5 minutes are finished, allow the microwave
to cool down, and clean the microwave with warm water. The
microwave is now ready for use.
Note
When you heat the microwave to a high temperature for the first
time, you will notice a ‘new-oven smell’. Don’t worry, this is normal.
If desired, switch on the cooker hood or open a window
.
Page 42

OPERATION
ZERO ON
Turning off and on
General
When the appliance is connected to mains power for the first
time, the display does not show anything yet. The appliance is in
standby mode.
1. Press the ZERO ON button.
A beep sounds and the display shows ‘: 0’. You can now use
the microwave.
▷ If the microwave is not used for 10 minutes, the appliance
will automatically return to standby mode. Then the display
shows nothing again.
You can also put the microwave into standby mode after use by
holding the stop button down until nothing shows on the display
any more. Press the ZERO ON button again to make the microwave
ready for use again.
• If you want to set something, it is important that the display
shows the time (or ‘:0’) and not a selected function. If you
always press the stop button first, you can be sure that this is
the case.
• When the microwave is ready with the set function, you hear
three beeps and the display shows ‘END’. The microwave
continue to give a beep every minute until the stop button is
pressed or the door is opened.
• When the function has finished, the fan will continue to run for
some time to cool down. The display will alternately show the
set time (or ‘:0’) and ‘COOL’.
• When you open the door, a running programme stops. This also
happens if you press the stop button. The fan will continue to
run. You can start the programme again by pressing the start
button.
• Do not use the microwave if it is empty.
• After the grill/oven/combi function has been used, you must let
the microwave cool down before you use it again.
will
EN 13
Page 43

OPERATION
Kitchen timer mode
Microwave
1. Press the stop button.
The display reads ‘0’.
2. Press the timer button once.
3. Turn the control dial to set the amount of time you want to
count down.
The kichen time appear in the display.
4. Press the start button.
The display counts down the time remaining in Kitchen timer
mode. When Kitchen timer mode ends, you will hear 3 beeps.
With this function you can set the power and time yourself. If you
don't set the power, the microwave will switch on at the highest
power. In the following table you can see which power levels can
be set.
EN 14
Level in the display Percentage Power output
P-HI 100 % 900 W
P-90 90 % 810 W
P-80 80 % 720 W
P-70 70 % 630 W
P-60 60 % 540 W
Page 44

OPERATION
Level in the display Percentage Power output
P-50 50 % 450 W
P-40 40 % 360 W
P-30 30 % 270 W
P-20 20 % 180 W
P-10 10 % 90 W
P-00 0 % 0 W
1. Press the ZERO ON button if the display does not show anything.
A beep sounds and the display shows the current time or
‘: 0’. You can now use the microwave.
2. Press the microwave button.
The display shows ‘P-HI’ and the indicator lamp comes on.
▷ Press the power button again (a number of times) if you wish
to set a different power.
3. Turn the control dial to set the time.
The display indicates the set time.
▷ You can set a maximum of 60 minutes. The display first
shows steps of 10 seconds. After a period of 5 minutes has
been set, the steps become 30 seconds.
Grill
4. Press the start button.
The microwave starts with the chosen settings; the
microwave light comes on, the turntable starts rotating and
the time in the display counts down.
▷ At the end, three beeps are given. The microwave switches off.
• You can check the set power at any moment during the cooking
by pressing the microwave button.
You can heat dishes with the grill function and brown them without
using the microwaves. The combi-microwave has a top and bottom
heating element which can be used independently of each other.
1. Press the ZERO ON button if the display does not show anything.
A beep sounds and the display shows the current time or
‘: 0’. You can now use the microwave.
EN 15
Page 45

OPERATION
Oven with pre-heat
2. Press the grill button.
The display reads ‘: 0’ and the indicator light comes on.
3. Turn the control dial to set the time.
The display indicates the set time.
▷ You can set a maximum of 60 minutes. The display first
shows steps of 10 seconds. After a period of 5 minutes has
been set, the steps become 30 seconds.
4. Press the start button.
The microwave starts with the chosen settings; the
microwave light comes on, the turntable starts rotating and
the time in the display counts down.
▷ At the end, three beeps are given. The microwave switches off.
When using the oven function, it is advisable to pre-heat (except if
the temperature is 40 °C). The maximum pre-heating time is
30 minutes. If these 30 minutes of pre-heating are not followed by
the cooking of a meal, the oven indicator light will keep flashing
and the pre-heat temperature will be shown in the display. The
pre-heat will switch off automatically after 15 minutes.
1. Press the ZERO ON button if the display does not show anything.
A beep sounds and the display shows the current time or
‘: 0’. You can now use the microwave.
2. Press the oven button.
The display shows ‘180C’ and the indicator light comes on.
▷ Press again (a number of times) on the oven button if you
wish to set a different temperature.
▷ You can select from the following temperatures: 180C, 190C,
200C, 210C, 220C, 40C, 100C, 110C, 120C, 130C, 140C,
150C, 160C, 170C.
3. Press the start button.
The microwave starts pre-heating; the display alternately
shows ‘PrE -’ and the pre-heat temperature and the oven
indicator light flashes.
EN 16
Page 46

OPERATION
Oven
4. When pre-heating is ready, a beep sounds and the display
shows the oven temperature.
5. Open the door and place the dish in the microwave.
The display shows the temperature.
6. Turn the control dial to set the time.
The display indicates the set time.
▷ You can set a maximum of 60 minutes. The display first
shows steps of 10 seconds. After a period of 5 minutes has
been set, the steps become 30 seconds.
7. Press the start button.
The microwave starts with the chosen settings; the
microwave light comes on, the turntable starts rotating and
the time in the display counts down.
▷ At the end, three beeps are given. The microwave switches
off.
• You can check the set temperature at any moment during the
cooking by pressing the oven button.
You can cook dishes with the oven function the same way as in
a conventional oven, without using the microwaves. The top and
bottom heating element are both turned on.
1. Press the ZERO ON button if the display does not show anything.
A beep sounds and the display shows the current time or
‘: 0’. You can now use the microwave.
2. Press the oven button.
The display shows ‘180C’ and the indicator light comes on.
▷ Press again (a number of times) on the oven button if you
wish to set a different temperature.
▷ You can select from the following temperatures: 180C, 190C,
200C, 210C, 220C, 40C, 100C, 110C, 120C, 130C, 140C,
150C, 160C, 170C.
3. Turn the control dial to set the time.
The display indicates the set time.
▷ You can set a maximum of 60 minutes. The display first
shows steps of 10 seconds. After a period of 5 minutes has
been set, the steps become 30 seconds.
EN 17
Page 47

OPERATION
4. Press the start button.
• You can check the set temperature at any moment during the
Combi oven/microwave
This function combines the oven and grill functions with the
microwave function. Traditional dishes are cooked faster this way.
1. Press the ZERO ON button if the display does not show anything.
2. Press the combi button.
3. Press the oven button.
4. Turn the control dial to set the time.
The microwave starts with the chosen settings; the
microwave light comes on, the turntable starts rotating and
the time in the display counts down.
▷ At the end, three beeps are given. The microwave switches off.
cooking by pressing the oven button.
A beep sounds and the display shows the current time or
‘: 0’. You can now use the microwave.
The display shows ‘C-0’ and the indicator light comes on.
▷ Press again (a number of times) on the combi button if you
wish to set a different power.
▷ You can select from ‘C-0’ (30% power), ‘C-HI’ (40% power)
and ‘C-Lo’ (20% power).
The display shows ‘180C’ and the indicator light comes on.
▷ Press again (a number of times) on the oven button if you
wish to set a different temperature.
▷ You can select from the following temperatures: 180C, 190C,
200C, 210C, 220C, 40C, 100C, 110C, 120C, 130C, 140C,
150C, 160C, 170C.
The display indicates the set time.
▷ You can set a maximum of 60 minutes. The display first
shows steps of 10 seconds. After a period of 5 minutes has
been set, the steps become 30 seconds.
EN 18
5. Press the start button.
The microwave starts with the chosen settings; the
microwave light comes on, the turntable starts rotating and
the time in the display counts down.
Page 48

OPERATION
▷ At the end, three beeps are given. The microwave switches
off.
• You can check the set power at any moment during the cooking
by pressing the combi button.
• You can check the set temperature at any moment during the
cooking by pressing the oven button.
Defrosting according to weight
With this function you only need to set the weight of the food.
The defrost time appears automatically in the display when the
microwave starts.
1. Press the ZERO ON button if the display does not show anything.
A beep sounds and the display shows the current time or
‘: 0’. You can now use the microwave.
2. Press once on the defrost button.
The display shows ‘0’ and the indicator light comes on.
3. Turn the control dial to set the weight.
In the display you will see the set weight.
▷ You can set a defrosting weight from 200 grams to
3000 grams in steps of 50 grams.
4. Press the start button.
The microwave switches on and the defrosting time counts
down automatically in the display.
▷ During defrosting a beep sounds to alert you to check or
turn over the food.
5. Open the door; the microwave switches off.
6. Close the door after checking/turning over, press the start
button and the microwave continues further with the set
programme.
▷ When the defrosting is finished, three beeps are given. The
microwave switches off.
EN 19
Page 49

OPERATION
Defrosting according to time
With this function you only need to set the defrost time of the food.
1. Press the ZERO ON button if the display does not show anything.
A beep sounds and the display shows the current time or
‘: 0’. You can now use the microwave.
2. Press twice on the defrost button.
The display reads ‘: 0’ and the indicator light comes on.
3. Turn the control dial to set the defrosting time.
The display indicates the set time.
▷ You can set a maximum of 60 minutes. The display first
shows steps of 10 seconds. After a period of 5 minutes has
been set, the steps become 30 seconds.
4. Press the start button.
The microwave switches on and the defrosting time counts
down automatically in the display.
▷ During defrosting a beep sounds to alert you to check or
turn over the food.
5. Open the door; the microwave switches off.
6. Close the door after checking/turning over, press the start
button and the microwave continues further with the set
programme.
▷ When the defrosting is finished, three beeps are given. The
microwave switches off.
Auto cook
With this function you can prepare popular dishes very simply.
You set the weight and the microwave selects the correct time
automatically.
EN 20
Function Min. weight Max. weight
AC-1 ROAST PORK 500 g 2,000 g
AC-2 ROAST BEEF 500 g 2,000 g
AC-3 ROAST CHICKEN 800 g 3,000 g
AC-4 BAKED FISH 300 g 900 g
AC-5 FRESH VEGETABLES 100 g 900 g
Page 50

OPERATION
1. Press the auto cook button.
The display shows ‘AC-1’ and the indicator light comes on.
2. Press again (a number of times) on the auto cook button to
select the function (see table).
3. Turn the control dial to set the weight.
In the display you will see the set weight.
▷ You can set a weight up to 2000 grams in steps of 50 grams.
• See the table for the settings and select the correct weight.
4. Press the start button.
The microwave starts with the chosen settings; the
microwave light comes on, the turntable starts rotating and
the time in the display counts down.
• You can check the settings at any moment during the cooking
by pressing the auto cook button.
Auto cook table
The table below provides information for each dish on the
procedure and the cookware to use.
Procedure Cookware
1 1. Place the pork directly on the rack with the turntable.
2. Brush a little oil on it.
3. Roast at ‘AC-1’.
4. Take the meat from the combi-microwave. Drain off the excess
roasting juices.
5. Wrap the meat in aluminium foil and let it stand for 10 minutes.
6. Serve the meat with apple sauce.
2 1. Place the beef directly on the rack with the turntable.
2. Brush a little oil on it.
3. Roast at ‘AC-4’.
4. Take the meat from the combi-microwave. Drain off the excess
roasting juices.
5. Wrap the meat in aluminium foil and let it stand for 10 minutes.
6. Serve with boiled potatoes and gravy.
Rack with turntable.
Rack with turntable.
EN 21
Page 51

OPERATION
Procedure Cookware
3 1. Clean and dry the chicken. Tie the legs together loosely with string.
2. Pierce the skin a few times just below the legs.
3. Brush the entire chicken with melted butter.
4. Place the chicken directly on the rack with the turntable.
5. Roast at ‘AC-3’.
6. Take the chicken out of the oven. Drain off the excess roasting
juices. Sprinkle salt on it, if desired.
7. Wrap the chicken in aluminium foil and let it stand for 10 minutes.
8. Serve with baked potatoes and salad.
4 1. All kinds of fresh fish (except crumbed fish or fish in batter) can be
cooked, whole fish as well as fish fillets or fish steaks.
2. Place the prepared fish in a buttered dish.
3. Season with salt and pepper, sprinkle with lemon juice, and dot with
butter. Do not cover the dish.
4. Place dish on the high rack on the turntable.
5. Bake at ‘AC-4’.
5 1. Wash and clean vegetables.
2. Place the prepared vegetables in a suitable dish.
3. Sprinkle the vegetables with 4-5 tablespoonfuls of water.
4. Cover the dish with cling foil with holes pricked in it, or with a lid.
5. Place the dish on the turntable.
6. Cook at ‘AC-5’.
* Cut the vegetables in equal-size pieces for the best result.
Quick start
With one press of the start button you can start the microwave
on full power for 30 seconds. If you press more times on the start
button, the time will increase in steps of 30 seconds to a maximum
of 5 minutes.
Rack with turntable.
Microwave and heat
resistant low dish, Pyrex
for example. Rack with
turntable.
Microwave resistant
dish, such as Pyrex, with
turntable.
EN 22
Stop
You can stop or cancel a running programme by opening the door
or pressing the stop button. In order to start the programme again,
press the start button.
• If you want to cancel the programme entirely, press the stop
button again.
The current time (or ‘:0’) is visible in the display.
Page 52

OPERATION
Keep warm
Steam cleaning
With this function you can keep your dish warm for one hour at a
temperature of around 60 °C.
1. Press the ZERO ON button if the display does not show anything.
A beep sounds and the display shows the current time or
‘: 0’. You can now use the microwave.
2. Press the ‘keep warm’ button.
The display shows ‘60C’ and the indicator light comes on.
3. Turn the control dial to set the time.
The display indicates the set time.
▷ You can set a maximum of 60 minutes. The display first
shows steps of 10 seconds. After a period of 5 minutes has
been set, the steps become 30 seconds.
4. Press the start button.
The microwave starts with the chosen settings; the
microwave light comes on, the turntable starts rotating and
the time in the display counts down.
▷ At the end, three beeps are given. The microwave switches off.
With this function you can clean the inside of your combimicrowave in 10 minutes. The steaming process soaks off the food
residue left behind, allowing you to wipe it away easily with a soft
cloth afterwards.
Please note: first place a cup/mug/dish with 150/200 cc of water
in the middle on the turntable.
1. Press the ZERO ON button if the display does not show anything.
A beep sounds and the display shows the current time or
‘: 0’. You can now use the microwave.
2. Place a cup/mug/dish with 150/200 cc of water in the middle
on the turntable.
3. Press the clean button.
The indicator light comes on. The microwave will heat up for
10 minutes.
EN 23
Page 53

OPERATION
4. At the end of the 10 minutes, the display shows ‘door’ ‘oPEn’
for 5 minutes. Open the door. Be careful with the escaping
steam. Let the microwave cool down for a moment, and then
dry the inside of the microwave with a dry cloth.
EN 24
Page 54

COOKING TIPS
Warming up and cooking
• The microwave always heats with the same intensity. The more
you place in the microwave, the longer the cooking time.
• Flatter dishes heat up more quickly than thin, tall dishes.
• Covering dishes with microwave film or a fitting lid prevents
spattering, reduces cooking time and helps retain moisture
levels. After cooking remove the foil or lid carefully. Please
note! The steam released can be extremely hot!
• Dishes that dry out quickly can be moistened. Place potatoes
and vegetables in cold water briefly before you place them in
the microwave. This prevents a skin forming.
• For an even result it is best to stir or turn a dish a few times.
• For warming up dishes which have already been cooked,
always use the highest microwave setting.
• You don't need much water, salt or herbs for the cooking. Salt
is best added after cooking. This prevents moisture from being
withdrawn from the food.
• After the microwave is switched off, the dish continues cooking
for a short time. Take this into account and don't heat up the
dish for too long.
• Please note! When heating small quantities of powder-forming
products (such as when drying herbs), always place a small cup
of water in the microwave. Self-combustion is possible if small
quantities are heated.
Defrosting
• Always use the defrost programme to defrost large compact
items. Because the dish is defrosted gradually and evenly,
you don't run the risk that the outside dries out while the
core is still frozen.
• To accelerate the defrosting process, it is advised to separate
the item into sections after a certain amount of time.
• For large pieces of meat and compact dishes, have two breaks
in the process.
• When defrosting an irregularly-formed dish you can cover thin
areas halfway through the defrosting process or wrap them with
aluminium foil.
EN 25
Page 55

COOKING TIPS
Factors that influence the cooking process
• The temperature of the ingredients influences the preparation
time. A cold meal needs more cooking time than a meal at
room temperature.
• Lighter, porous dishes cook faster than heavier and solid
dishes, such as stews or rolled meats. Take care in preparing
light, porous dishes. The edges will quickly become dry and
tough.
• Smaller dishes are warmed more evenly if you place them in the
microwave separate from each other, preferably in a circle.
• Bones and fat conduct heat better than meat. Aluminium foil
blocks the microwaves. By covering thinner areas of dishes
(such as chicken legs and wings) you prevent them from
cooking too quickly.
• Grease-proof paper prevents spattering and helps retain the heat.
Basic techniques
• Positioning
▷ Place thicker pieces on the outside of the turntable. Dishes
placed on the outside of the turntable receive the most
microwaves.
• Stirring
▷ Stirring dishes regularly distributes the stored heat. Always
stir from the outside in, since the outside of the dish always
heats up first.
• Turning over
▷ Large, thick dishes should be turned over regularly. They
then cook more evenly and quickly.
• Piercing
▷ Food with a skin or shell bursts open in the microwave, such
as egg yolks, seafood and fruit. Prevent this by pricking it
before cooking a few times with a fork or satay stick.
• Checking
▷ Dishes cook quickly. That's why you should check them
regularly. Take them out of the microwave just before
they're ready.
EN 26
Page 56

COOKING TIPS
• Continued cooking
▷ In general, allow dishes to stand covered for 3 to 10 minutes
after removing them from the microwave. The dishes continue
to cook. Don't cover dishes with a dry crust, such as cake.
• Freezing
▷ When freezing food you should take defrosting in the
microwave into account, by not using aluminium foil or trays
and by freezing in flat portions.
Cooking vegetables
• If possible, always use fresh vegetables. If vegetables have
become a little limp because they've been left for too long, you
can place them in cold water for a while so that they absorb
moisture.
• Use a large dish to cook vegetables, so that the layer covering
the dish base is not too thick.
• Don't add any more water to vegetables than that remaining
after rinsing.
• Always cover the dish with a lid or microwave film.
• Do not add salt. The salts present naturally in the vegetables
should give sufficient flavour. If you still wish to add salt, you
can do this after cooking.
• Cook vegetables for the shortest time possible. Take into
account the fact that the vegetables will continue to cook.
• Check with a satay stick or fork whether the vegetables
are ready.
Cooking fish
• Fish needs to cook evenly. For thin fish, oily fish or small
portions set the power to 30%. In other cases you can set the
power somewhat higher. Take continued cooking into account.
Fish is ready when it becomes opaque.
EN 27
Page 57

MAINTENANCE
Cleaning
• DO NOT USE any abrasive cleaners or metal scrapers to clean
the glass door. This will scratch the surface which can break the
glass.
• DO NOT USE high pressure cleaners or steam cleaners to clean
the microwave.
• Clean the interior directly after use. Use a damp cloth to remove
condensation, boiled over liquid and food remnants. Remnants
of crumbs and moisture absorb microwave energy and increase
cooking time.
• Clean the interior and outer casing regularly; use some washingup liquid and water and dry the microwave well with a dry cloth.
• Ensure that the cover of the microwave distributor is clean. Dirt
in the cover can lead to spark formation.
• Clean the accessories regularly; use some washing-up liquid
and water with a brush and dry the accessories well with a dry
cloth. The accessories may also be washed in the dishwasher.
• Smells will disappear if you place a glass of vinegar or water
with lemon in the microwave area. Switch the microwave on at
full power for two minutes. Then rub down with a damp cloth.
• Check the door closure and the door rubber regularly for
damage. Do not use the microwave if the door or door closure
is damaged.
• If the seal of the microwave is very dirty, the door won't close
properly. The front of adjacent furniture can become damaged.
Keep the seal clean.
• Salt is extremely aggressive. When this is deposited in the oven
interior, rust patches can be created.
• Spicy sauces such as ketchup and mustard or salty dishes
such as salted meat contain ingredients that can erode the
surface. After use, you should always clean the oven interior.
EN 28
Page 58

FAULTS
If you are uncertain about whether your appliance is working
properly, this does not automatically mean there is a defect. Try
to deal with the problem yourself first by checking the points
mentioned below: If the recommendations below do not solve your
problem, call our service department.
• Is the plug in the socket?
• Is the door closed properly?
• Is the fuse in the fuse box faulty?
• Are the power settings and times set properly?
• Are there objects in the microwave that shouldn't be there?
• Did you use the correct kitchen utensils?
• Are the ventilation openings blocked?
• Has the food been defrosted sufficiently?
• Did you turn over or stir the food during preparation?
• Is the child lock activated?
Sparks in the microwave
If you see sparks in the microwave, turn the microwave off
immediately. Sparks can be caused by:
• metal or aluminium foil that touches the interior of the microwave;
• aluminium foil that is not correctly covering the food (points that
stick up act as an antenna);
• metal from a closing strip or tableware with metallic edges;
• recycled paper that contains small metal particles.
Error codes (call the service department)
Err2 Temperature too high or temperature sensor faulty.
Err3 Temperature sensor not connected.
EN 29
Page 59

TECHNICAL DATA
Connection 230V~, 50Hz
Power 2700 W
Capacity 25 litres
Dimensions (wxdxh) 514 x 397 x 311 mm
Weight 17.2 kg
EN 30
Page 60

ENVIRONMENTAL ASPECTS
Disposal of the appliance and packaging
Sustainable materials have been used during manufacture of this
appliance. This appliance must be disposed of responsibly at
the end of its service life. The government can provide you with
information about this.
The appliance packaging is recyclable. The following may have
been used:
• cardboard;
• polyethylene film (PE);
• CFC-free polystyrene (PS hard foam).
You should dispose of these materials responsibly and in
accordance with government regulations.
The product is marked with a crossed-out dustbin symbol
to remind you to dispose of electrical household appliances
separately. This means that the appliance may not be included with
normal domestic refuse at the end of its service life. The appliance
must be taken to a special municipal centre for separated waste
collection or to a dealer providing this service.
Separate collection of household appliances helps to prevent
potential negative impact on the environment and on human health
caused by improper disposal. It ensures that the materials that
make up the unit can be recycled to achieve a significant saving in
terms of energy and raw materials.
Declaration of conformity
We hereby declare that our products satisfy the applicable
European directives, orders and regulations, as well as the
requirements stated in the referenced standards.
EN 31
Page 61

SOMMAIRE
Votre four à micro-ondes
Introduction 4
Description 5
Panneau de commande 6
Sécurité
Connexion et réparation 7
Sécurité d’utilisation 7
Matériaux 11
Utilisation
Mise en place 12
Avant la première utilisation 12
Commande
Zero on 13
Arrêt/mise en marche 13
Généralités 13
Réglage de l’horloge 14
Micro-ondes 14
Grill 15
Four avec préchauffage 16
Four 17
Four/micro-ondes combiné 18
Décongélation selon le poids 19
Décongélation selon le temps 20
Auto cook 20
Démarrage rapide 22
Arrêt 22
Maintien au chaud 23
Nettoyage vapeur 23
Conseils de cuisson 25
Entretien
Nettoyage 28
Pannes 29
Spécifications techniques 30
Environnement
Élimination de l’appareil et de l’emballage 31
FR 3
Page 62

VOTRE FOUR À MICRO-ONDES
Introduction
Vous avez choisi un four à micro-ondes combiné Pelgrim.
La souplesse et la simplicité de l’utilisation sont les principes qui
ont guidé son développement.
Le four à micro-ondes combiné réunit les propriétés d’un four à
micro-ondes à celles d’un four traditionnel. Ses réglages très divers
vous permettent de choisir exactement le mode de préparation
que vous envisagez. Cet appareil est néanmoins simple à
utiliser. L’écran affiche des informations et vous aide lors de la
programmation.
Ce manuel donne un aperçu de toutes les possibilités offertes
par cet appareil. Le chapitre « Utilisation » détaille clairement les
différentes fonctions. Vous y trouverez également des astuces qui
peuvent vous être utiles.
Lisez le manuel en entier et avec attention avant de commencer
à utiliser l’appareil, et conservez-le pour pouvoir le consulter
ultérieurement.
Le manuel sert également de référence pour le service d’entretien.
La plaquette signalétique contient toutes les informations
nécessaires pour que le service d’entretien puisse répondre
correctement à vos questions.
FR 4
Nous vous souhaitons beaucoup de plaisir en cuisine !
Page 63

VOTRE FOUR À MICRO-ONDES
Description
4
5
1
2
3
1. Écran
2. Panneau de commande
3. Ouverture de la porte
4. Propulsion
5. Plateau tournant en verre (à toujours
placer dans le four à micro-ondes avant
utilisation)
6. Anneau pour plateau tournant (à toujours
placer dans le four à micro-ondes avant
utilisation)
7. Grille métallique : utilisez-la avec le
plateau tournant
6
7
FR 5
Page 64

VOTRE FOUR À MICRO-ONDES
Panneau de commande
1. Écran
2. Touche auto cook
1
2
39
410
5
612
713
3. Touche micro-ondes
4. Touche grill
5. Bouton de réglage (durée/poids/
quantité)
6. Touche de décongélation
7. Touche de maintien au chaud
8. Touche d’arrêt
9. Touche four
10. Touche fonction combinée
11. Touche ZERO ON
12. Touche du minuteur
13. Touche clean
14. Touche de démarrage
11
814
FR 6
Page 65

SÉCURITÉ
Connexion et réparation
• Contrôlez que l’appareil n’ait pas été endommagé
durant le transport. Ne branchez pas un appareil
endommagé.
• Le branchement électrique doit se produire
conformément aux consignes nationales et locales.
• La prise d’alimentation réseau et la fiche de
l’appareil doivent toujours être accessibles.
• Si vous décidez de réaliser une connexion
électrique fixe, la connexion d’alimentation devra
être équipée d’un interrupteur omnipolaire dont la
distance de contact sera d’au moins 3 mm.
• Il est interdit de brancher cet appareil sur le réseau
électrique par l’intermédiaire d’une prise multiple ou
d’une rallonge. La sécurité d’utilisation de l’appareil
ne peut dans ce cas pas être garantie.
• AVERTISSEMENT : n’ouvrez jamais vous-même le
corps de l’appareil. Seul un technicien de service
qualifié a le droit d’ouvrir l’appareil.
• Débranchez l’appareil du secteur avant de
commencer toute réparation.
• Les composants défectueux doivent toujours être
remplacés uniquement par des pièces d’origine.
Ces pièces sont les seules pour lesquelles le
fabricant peut garantir que les exigences de
sécurité sont satisfaites.
• Si le câble de raccordement est endommagé, il
peut être remplacé uniquement par le fabricant,
son service après-vente ou une autre personne
qualifiée, afin d’éviter toute situation dangereuse.
Sécurité d’utilisation
• AVERTISSEMENT : cet appareil et ses parties
• Cet appareil peut être utilisé par des enfants âgés
accessibles deviennent chauds durant l’utilisation.
Veillez à ne pas toucher les éléments chauds. Les
enfants âgés de moins de 8 ans doivent être tenus
à distance de l’appareil sauf s’ils sont sous une
surveillance de tous les instants.
de plus de 8 ans ainsi que par des personnes ayant
un handicap physique, sensoriel, mental ou moteur,
et par des personnes inexpérimentées, à condition
FR 7
Page 66

SÉCURITÉ
qu’une personne responsable de leur sécurité
les surveille, ou après avoir reçu les instructions
nécessaires et compris les dangers. Ne laissez pas
des enfants jouer avec l’appareil.
Ne laissez pas des enfants nettoyer ou s’occuper
de l’entretien de l’appareil sans surveillance.
• AVERTISSEMENT : il est dangereux pour
des personnes non qualifiées d’effectuer des
réparations nécessitant l’ouverture du corps de
l’appareil. Le corps protège contre la libération
d’énergie micro-onde.
• AVERTISSEMENT : si la porte ou le joint est
endommagé, il faut attendre qu’une personne
qualifiée ait réparé le four à micro-ondes pour
l’utiliser à nouveau.
• AVERTISSEMENT : il faut secouer les biberons
et remuer le contenu des petits pots pour bébés.
Vérifiez la température avant la consommation pour
éviter les brûlures.
• AVERTISSEMENT : ne réchauffez jamais de boîtes
de conserve fermées. La chaleur fait monter la
pression à l’intérieur de la boîte et peut la faire
exploser.
• AVERTISSEMENT : n’essayez pas d’utiliser le four
à micro-ondes en laissant la porte ouverte. Ceci
peut être dangereux en raison du rayonnement
micro-onde.
• Cet appareil est uniquement destiné à un usage
domestique. Il doit servir uniquement à préparer de
la nourriture.
• N’utilisez l’appareil qu’à l’intérieur.
• N’utilisez pas l’appareil dans une pièce humide ou
à proximité d’un robinet d’eau.
• Tenez le cordon éloigné des surfaces chaudes.
• Ne recouvrez jamais les ouvertures de ventilation.
• L’appareil n’est pas conçu pour être commandé
au moyen d’un minuteur externe ou d’une
télécommande séparée.
• Pour des questions de sécurité électrique, ne
nettoyez pas l’appareil avec un jet à haute pression
ou une machine à vapeur.
• Le four à micro-ondes est isolé. Cependant, un
FR 8
Page 67

SÉCURITÉ
peu de chaleur s’échappe toujours et l’extérieur de
l’appareil se réchauffe. Cette chaleur est tout à fait
acceptable selon les normes en vigueur.
• Lors de la préparation de plats contenant de
l’alcool, celui-ci peut s’évaporer en raison
des températures élevées. Cette vapeur peut
s’enflammer au contact d’éléments brûlants.
• Utilisez uniquement des couverts et de la vaisselle
appropriés à l’usage dans un four à micro-ondes
(attention aux bordures dorées ou argentées).
• N’utilisez jamais le four à micro-ondes pour stocker
des matériaux inflammables ou risquant une légère
déformation.
• Veillez à toujours chauffer suffisamment vos plats.
La durée nécessaire dépend de nombreux facteurs
dont la quantité et le type d’aliments. Les bactéries
éventuellement présentes dans l’alimentation ne
sont tuées que si le produit est chauffé au moins
10 minutes à une température supérieure à 70 °C.
Pour avoir la certitude que la cuisson est suffisante,
laissez vos mets cuire un peu plus longtemps.
• Mettez une cuillère en plastique dans la tasse
lorsque vous souhaitez faire bouillir un liquide (par
exemple de l’eau). Le liquide peut en effet bouillir
sans que vous puissiez voir de formation de bulles.
Au moment où vous sortez la tasse du four, le
liquide peut brusquement se mettre à bouillir et
déborder de la tasse, risquant ainsi de vous brûler.
• Un four à micro-ondes n’est sûr que si la porte se
ferme bien ! Ne placez jamais d’objet entre la porte
et l’appareil. Veillez à ce que la porte et le joint
soient toujours bien propres.
• Utilisez le four à micro-ondes exclusivement pour
la décongélation, la préparation et le chauffage
d’aliments et non pas, par exemple, pour le
séchage de vêtements ou de papier. Ceux-ci
peuvent en effet s’enflammer.
• Si vous chauffez des petites quantités de produits
secs ou sous forme de poudre (séchage d’herbes),
il existe un risque d’auto-inflammation. En cas de
flammes dans l’appareil, éteignez-le et retirez la
fiche de la prise. Laissez la porte du four à microondes fermée.
FR 9
Page 68

SÉCURITÉ
• En cas de fumée dans l’appareil, éteignez-le et
retirez la fiche de la prise. Laissez la porte fermée
pour étouffer les éventuelles flammes.
• Ne faites pas fonctionner le four à micro-ondes
lorsqu’il est vide. Il risque d’être endommagé.
• Enlevez les liens de fermeture métalliques des
sacs en plastique et utilisez des plats appropriés à
l’usage dans un four à micro-ondes.
• Consultez toujours les instructions figurant sur
l’emballage du produit pour savoir comment le
mettre dans le four à micro-ondes. Vous ne pouvez
réchauffer des produits liquides ou des aliments
qui se trouvent dans des emballages hermétiques
qu’après avoir percé quelques trous dans
l’emballage. Ceci en raison de l’augmentation de la
pression pendant le réchauffement.
• Les produits liquides et autres aliments ne
doivent pas être chauffés dans des emballages
hermétiques car ils risquent d’exploser.
• Lors du réchauffement d’aliments qui se trouvent
dans des emballages en plastique ou en papier, il
est recommandé de surveiller le four à micro-ondes
en raison du risque d’inflammation.
• Ne réchauffez jamais plus que nécessaire, tenez
compte du fait que la cuisson se poursuit après
l’arrêt de l’appareil.
• Piquez avec une fourchette ou un autre objet
pointu dans la peau de la viande, du poulet ou
du poisson. Vous éviterez ainsi que ces produits
n’éclatent.
• Le four à micro-ondes doit être nettoyé
régulièrement et les résidus alimentaires doivent
être ôtés. Les miettes et l’humidité qui restent dans
le four absorbent les micro-ondes et prolongent la
durée de cuisson. Les résidus alimentaires risquent
également d’endommager l’intérieur du four, ce qui
peut aboutir à des situations dangereuses.
• N’utilisez pas de produits à récurer ni de grattoirs
métalliques pour nettoyer la porte en verre. Ceux-ci
risquent de rayer la surface et faire éclater le verre.
FR 10
Page 69

SÉCURITÉ
Matériaux
Un four à micro-ondes ne convient pas pour :
• faire des conserves ;
• cuire des œufs à la coque et réchauffer des
œufs durs entiers (ceux-ci éclatent en raison de
l’augmentation de la pression) ;
• réchauffer de l’huile de friture.
Si les instructions de sécurité et les
avertissements ne sont pas respectés, le
fabriquant décline toute responsabilité pour les
dommages qui peuvent s’ensuivre.
Si vous décidez de ne plus utiliser l’appareil parce
qu’il est défectueux, nous vous conseillons de
couper le cordon après avoir retiré la fiche de la
prise du secteur. Apportez l’appareil dans un centre
communal de collecte sélective.
Certains matériaux ne sont pas admis dans un four à microondes. Le tableau ci-dessous vous indique les matériaux que
vous pouvez utiliser ou non.
Matériaux Micro-ondes
Papier oui*
Papier d’aluminium oui**
Film alimentaire oui
Barquettes en aluminium non
Plastique résistant à la chaleur oui
Poterie brute non
Ustensiles de cuisine métalliques non
Verre normal oui
Pyrex, verre et céramique résistants à la chaleur oui
Assiettes avec bordure décorative métallique non
Lien de fermeture métallique non
Thermomètre au mercure non
Bocal fermé non
Bouteille à goulot étroit non
Sachets de cuisson oui
* Utilisez du papier essuie-tout non décoré pour recouvrir un
plat ou mettre sous du pain lors de la décongélation.
** En couvrant les parties plus fines des produits (comme les
cuisses de poulet), vous éviterez qu’elles ne cuisent trop
rapidement.
FR 11
Page 70

UTILISATION
Mise en place
• Placez le four à micro-ondes sur une surface solide et plate.
• Veillez à une bonne aération autour du four à micro-ondes. Laissez
un espace libre de 30 cm au-dessus du four. Laissez un espace
libre d’au moins 7,5 cm à l’arrière et sur les côtés du four.
• Ne recouvrez pas les ouvertures de ventilation.
• Les pieds réglables ne doivent pas être retirés.
• Ne placez pas le four à micro-ondes à proximité d’une source de
chaleur.
• Les émetteurs ou les récepteurs (tels que radios et téléviseurs)
peuvent influencer le fonctionnement du four à micro-ondes.
7.5 cm
7.5 cm
Avant la première utilisation
Sortez les accessoires du four à micro-ondes et nettoyez-les avec un
détergent doux. Replacez ensuite l’anneau sur l’axe de propulsion.
30 cm
7.5 cm
FR 12
Attention
Avant d’utiliser le four à micro-ondes, vérifiez que l’anneau et le
plateau tournant sont placés correctement (sur l’axe de propulsion) !
Mettez un plat résistant à la chaleur contenant 200 ml d’eau dans
le four à micro-ondes. Appuyez sur la touche four. Programmez la
durée sur 5 minutes et appuyez sur la touche de démarrage. Ceci
élimine les graisses de protection utilisées durant la fabrication. Une
fois les 5 minutes écoulées, laissez le four à micro-ondes refroidir
avant de le nettoyer avec de l’eau chaude. Le four à micro-ondes est
maintenant prêt à être utilisé.
Remarque
La première fois que vous échaufferez fortement le four à microondes, il dégagera une « odeur de neuf ». Ceci est normal.
Si nécessaire, allumez la hotte ou ouvrez la fenêtre
.
Page 71

COMMANDE
ZERO ON
Lorsque l’appareil est raccordé au réseau électrique pour la
première fois, l’écran n’affiche rien. L’appareil est en mode veille.
1. Appuyez sur la touche ZERO ON.
Arrêt/mise en marche
Après utilisation, il est également possible de passer en mode veille
en appuyant sur la touche d’arrêt jusqu’à ce que l’écran soit vide.
Appuyez encore une fois sur la touche ZERO ON et le four à microondes sera de nouveau prêt à être utilisé.
Généralités
• Pour effectuer une programmation, il est important que l’écran
• À la fin de la fonction programmée, un signal sonore retentit trois
• Le ventilateur continue de tourner un moment pour refroidir le four.
• En ouvrant la porte, vous interrompez le programme en cours.
• N’utilisez par le four à micro-ondes lorsqu’il est vide.
• Après avoir utilisé la fonction grill, four ou combinée, il faut d’abord
Un signal sonore retentit et l’écran affiche « : 0
maintenant utiliser le four à micro-ondes.
▷ Si le four à micro-ondes n’est pas utilisé pendant 10 minutes,
l’appareil passera automatiquement en mode veille. L’écran
n’affichera rien.
affiche l’heure (ou « :0 ») et non pas une fonction sélectionnée.
En appuyant d’abord sur la touche d’arrêt, vous serez assuré que
c’est le cas.
fois et l’écran affiche « END ». Le four à micro-ondes
signal sonore chaque minute jusqu’à ce que la touche d’arrêt soit
enfoncée ou la porte ouverte.
L’écran affiche en alternance la durée programmée (ou « :0 ») et
« COOL ».
C’est le cas aussi lorsque vous appuyez sur la touche d’arrêt.
Le ventilateur continue toutefois de tourner. Il est possible de
relancer le programme en appuyant sur la touche de démarrage.
laisser refroidir le four à micro-ondes avant de pouvoir l’utiliser à
nouveau.
». Vous pouvez
émettra un
FR 13
Page 72

COMMANDE
Mode Minuteur de cuisine
1. Appuyez sur la touche Arrêt.
Apparaît sur l’affichage.
2. Appuyez une fois sur la touche Minuteur de cuisine.
3. Tournez le bouton de sélection pour régler le nombre de
minutes du compte à rebours
Pour régler une durée de 11 minutes, tournez le bouton de
sélection sur 11:00 (la durée maximale est de 60 minutes)
4. Appuyez sur la touche Démarrage.
L’affichage compte à rebours le temps restant en mode
Minuteur de cuisine. À la fin du mode Minuteur de cuisine,
vous entendrez 3 bips.
Micro-ondes
Cette fonction vous permet de régler la puissance et la durée.
Si vous ne sélectionnez aucune puissance, le four à micro-ondes
s’enclenchera à la puissance la plus élevée. Le tableau suivant
vous indique les puissances qu’il est possible de sélectionner.
.
FR 14
Position affichée sur
l’écran
P-HI 100 % 900 W
P-90 90 % 810 W
P-80 80 % 720 W
P-70 70 % 630 W
P-60 60 % 540 W
Pourcentage Puissance
Page 73

COMMANDE
Position affichée sur
l’écran
P-50 50 % 450 W
P-40 40 % 360 W
P-30 30 % 270 W
P-20 20 % 180 W
P-10 10 % 90 W
P-00 0 % 0 W
Pourcentage Puissance
1. Appuyez sur la touche ZERO ON si l’écran est vide.
Un signal sonore retentit et l’écran affiche l’heure actuelle ou
« : 0 ». Vous pouvez maintenant utiliser le four à micro-ondes.
2. Appuyez sur la touche micro-ondes.
L’écran affiche « P-HI » et le témoin s’allume.
▷ Appuyez encore une fois (plusieurs fois) sur la touche micro-
ondes pour sélectionner une autre puissance.
3. Tournez le bouton de réglage pour programmer la durée.
La durée programmée s’affiche sur l’écran.
▷ Il est possible de programmer une durée maximale de
60 minutes. Sur l’écran, la durée s’affiche d’abord par palier
de 10 secondes. Au-delà de 5 minutes, les paliers passent à
30 secondes.
4. Appuyez sur la touche de démarrage.
Le four à micro-ondes s’enclenche selon les sélections
programmées ; l’éclairage du four s’allume, le plateau tournant
se met à tourner et le décompte de la durée s’affiche sur
l’écran.
▷ Une fois la durée écoulée, un signal sonore retentit trois fois.
Le four à micro-ondes s’éteint.
• Vous pouvez, à tout moment de la préparation, vérifier la
puissance programmée en appuyant sur la touche micro-ondes.
Grill
La fonction grill permet de chauffer et de dorer des plats, sans
utiliser les micro-ondes. Le four à micro-ondes combiné est pourvu
d’éléments chauffants en haut et en bas qui peuvent s’utiliser
indépendamment l’un de l’autre.
1. Appuyez sur la touche ZERO ON si l’écran est vide.
Un signal sonore retentit et l’écran affiche l’heure actuelle ou
« : 0 ». Vous pouvez maintenant utiliser le four à micro-ondes.
FR 15
Page 74

COMMANDE
2. Appuyez sur la touche grill.
3. Tournez le bouton de réglage pour programmer la durée.
4. Appuyez sur la touche de démarrage.
Four avec préchauffage
Lorsque vous utilisez la fonction four, il est conseillé de préchauffer
le four (sauf avec une température de 40 °C). La durée de
préchauffage maximale est de 30 minutes. Si vous ne commencez
pas la préparation d’un plat après cette durée de préchauffage de
30 minutes, le témoin four continuera de clignoter et la température
de préchauffage s’affichera sur l’écran. Après 15 minutes, le
préchauffage cessera automatiquement.
1. Appuyez sur la touche ZERO ON si l’écran est vide.
2. Appuyez sur la touche four.
L’écran affiche « : 0 » et le témoin s’allume.
La durée programmée s’affiche sur l’écran.
▷ Il est possible de programmer une durée maximale de
60 minutes. Sur l’écran, la durée s’affiche d’abord par palier
de 10 secondes. Au-delà de 5 minutes, les paliers passent à
30 secondes.
Le four à micro-ondes s’enclenche selon les sélections
programmées ; l’éclairage du four s’allume, le plateau tournant
se met à tourner et le décompte de la durée s’affiche sur
l’écran.
▷ Une fois la durée écoulée, un signal sonore retentit trois fois.
Le four à micro-ondes s’éteint.
Un signal sonore retentit et l’écran affiche l’heure actuelle ou
« : 0 ». Vous pouvez maintenant utiliser le four à micro-ondes.
L’écran affiche « 180C » et le témoin s’allume.
▷ Appuyez encore une fois (plusieurs fois) sur la touche four pour
sélectionner une autre température.
▷ Il est possible de sélectionner les températures suivantes :
180C, 190C, 200C, 210C, 220C, 40C, 100C, 110C, 120C,
130C, 140C, 150C, 160C, 170C.
FR 16
3. Appuyez sur la touche de démarrage.
Le préchauffage du four à micro-ondes commence ;
l’écran affiche en alternance « PrE - » et la température de
préchauffage ; le témoin four clignote.
Page 75

COMMANDE
Four
4. Lorsque le préchauffage est terminé, un signal sonore retentit et
la température du four s’affiche sur l’écran.
5. Ouvrez la porte et enfournez le plat.
L’écran affiche la température.
6. Tournez le bouton de réglage pour programmer la durée.
La durée programmée s’affiche sur l’écran.
▷ Il est possible de programmer une durée maximale de
60 minutes. Sur l’écran, la durée s’affiche d’abord par palier
de 10 secondes. Au-delà de 5 minutes, les paliers passent à
30 secondes.
7. Appuyez sur la touche de démarrage.
Le four à micro-ondes s’enclenche selon les sélections
programmées ; l’éclairage du four s’allume, le plateau tournant
se met à tourner et le décompte de la durée s’affiche sur
l’écran.
▷ Une fois la durée écoulée, un signal sonore retentit trois fois.
Le four à micro-ondes s’éteint.
• Vous pouvez, à tout moment de la préparation, vérifier la
température sélectionnée en appuyant sur la touche four.
La fonction four permet de préparer des plats comme dans un four
traditionnel, sans utiliser les micro-ondes. Les éléments chauffants
en haut et en bas sont allumés tous les deux.
1. Appuyez sur la touche ZERO ON si l’écran est vide.
Un signal sonore retentit et l’écran affiche l’heure actuelle ou
« : 0 ». Vous pouvez maintenant utiliser le four à micro-ondes.
2. Appuyez sur la touche four.
L’écran affiche « 180C » et le témoin s’allume.
▷ Appuyez encore une fois (plusieurs fois) sur la touche four pour
sélectionner une autre température.
▷ Il est possible de sélectionner les températures suivantes :
180C, 190C, 200C, 210C, 220C, 40C, 100C, 110C, 120C,
130C, 140C, 150C, 160C, 170C.
3. Tournez le bouton de réglage pour programmer la durée.
La durée programmée s’affiche sur l’écran.
▷ Il est possible de programmer une durée maximale de
60 minutes. Sur l’écran, la durée s’affiche d’abord par palier
de 10 secondes. Au-delà de 5 minutes, les paliers passent à
30 secondes.
FR 17
Page 76

COMMANDE
4. Appuyez sur la touche de démarrage.
Le four à micro-ondes s’enclenche selon les sélections
programmées ; l’éclairage du four s’allume, le plateau tournant
se met à tourner et le décompte de la durée s’affiche sur
l’écran.
▷ Une fois la durée écoulée, un signal sonore retentit trois fois.
Le four à micro-ondes s’éteint.
• Vous pouvez, à tout moment de la préparation, vérifier la
température sélectionnée en appuyant sur la touche four.
Four/micro-ondes combiné
Cette fonction combine les fonctions four et grill avec la fonction
micro-ondes. Les plats traditionnels sont ainsi prêts plus vite.
1. Appuyez sur la touche ZERO ON si l’écran est vide.
Un signal sonore retentit et l’écran affiche l’heure actuelle ou
« : 0 ». Vous pouvez maintenant utiliser le four à micro-ondes.
2. Appuyez sur la touche fonction combinée.
L’écran affiche « C-0 » et le témoin s’allume.
▷ Appuyez encore une fois (plusieurs fois) sur la touche fonction
combinée pour sélectionner une autre puissance.
▷ Vous avez le choix entre « C-0 » (30 % de puissance), « C-HI »
(40 % de puissance) et « C-Lo » (20 % de puissance).
3. Appuyez sur la touche four.
L’écran affiche « 180C » et le témoin s’allume.
▷ Appuyez encore une fois (plusieurs fois) sur la touche four pour
sélectionner une autre température.
▷ Il est possible de sélectionner les températures suivantes :
180C, 190C, 200C, 210C, 220C, 40C, 100C, 110C, 120C,
130C, 140C, 150C, 160C, 170C.
FR 18
4. Tournez le bouton de réglage pour programmer la durée.
La durée programmée s’affiche sur l’écran.
▷ Il est possible de programmer une durée maximale de
60 minutes. Sur l’écran, la durée s’affiche d’abord par palier
de 10 secondes. Au-delà de 5 minutes, les paliers passent à
30 secondes.
5. Appuyez sur la touche de démarrage.
Le four à micro-ondes s’enclenche selon les sélections
programmées ; l’éclairage du four s’allume, le plateau tournant
se met à tourner et le décompte de la durée s’affiche sur
l’écran.
Page 77

COMMANDE
▷ Une fois la durée écoulée, un signal sonore retentit trois fois.
Le four à micro-ondes s’éteint.
• Vous pouvez, à tout moment de la préparation, vérifier la
puissance sélectionnée en appuyant sur la touche fonction
combinée.
• Vous pouvez, à tout moment de la préparation, vérifier la
température sélectionnée en appuyant sur la touche four.
Décongélation selon le poids
En utilisant cette fonction, vous n’aurez qu’à programmer le poids.
La durée de décongélation s’affiche automatiquement sur l’écran
lorsque le four à micro-ondes s’enclenche.
1. Appuyez sur la touche ZERO ON si l’écran est vide.
Un signal sonore retentit et l’écran affiche l’heure actuelle ou
« : 0 ». Vous pouvez maintenant utiliser le four à micro-ondes.
2. Appuyez une fois sur la touche de décongélation.
L’écran affiche « 0 » et le témoin s’allume.
3. Tournez le bouton de réglage pour programmer le poids.
Le poids programmé s’affiche sur l’écran.
▷ Vous pouvez programmer un poids de décongélation de 200 à
3000 grammes, par palier de 50 grammes.
4. Appuyez sur la touche de démarrage.
Le four à micro-ondes s’enclenche et le décompte de la durée
de décongélation s’affiche automatiquement sur l’écran.
▷ Durant la décongélation, un signal sonore retentit pour vous
signaler qu’il est temps de contrôler/retourner le plat.
5. Ouvrez la porte ; le four à micro-ondes s’éteint.
6. Une fois le plat contrôlé/retourné, fermez la porte. Appuyez
sur la touche de démarrage, le four à micro-ondes poursuit le
programme sélectionné.
▷ À la fin de la décongélation, un signal sonore retentit trois fois.
Le four à micro-ondes s’éteint.
FR 19
Page 78

COMMANDE
Décongélation selon le temps
En utilisant cette fonction, vous n’aurez qu’à programmer la durée
de décongélation.
1. Appuyez sur la touche ZERO ON si l’écran est vide.
Un signal sonore retentit et l’écran affiche l’heure actuelle ou
« : 0 ». Vous pouvez maintenant utiliser le four à micro-ondes.
2. Appuyez deux fois sur la touche de décongélation.
L’écran affiche « : 0 » et le témoin s’allume.
3. Tournez le bouton de réglage pour programmer la durée de
décongélation.
La durée programmée s’affiche sur l’écran.
▷ Il est possible de programmer une durée maximale de
60 minutes. Sur l’écran, la durée s’affiche d’abord par palier
de 10 secondes. Au-delà de 5 minutes, les paliers passent à
30 secondes.
4. Appuyez sur la touche de démarrage.
Le four à micro-ondes s’enclenche et le décompte de la durée
de décongélation s’affiche automatiquement sur l’écran.
▷ Durant la décongélation, un signal sonore retentit pour vous
signaler qu’il est temps de contrôler/retourner le plat.
5. Ouvrez la porte ; le four à micro-ondes s’éteint.
6. Une fois le plat contrôlé/retourné, fermez la porte. Appuyez
sur la touche de démarrage, le four à micro-ondes poursuit le
programme sélectionné.
▷ À la fin de la décongélation, un signal sonore retentit trois fois.
Le four à micro-ondes s’éteint.
FR 20
Auto cook
Cette fonction permet de préparer des plats courants en toute
facilité. Il vous suffit de programmer le poids. Le four à microondes sélectionne automatiquement la durée correspondante.
Fonction Poids min. Poids max.
AC-1 VIANDE DE PORC GRILLÉE 500 g 2000 g
AC-2 VIANDE DE BŒUF GRILLÉE 500 g 2000 g
AC-3 POULET GRILLÉ 800 g 3000 g
AC-4 POISSON FRIT 300 g 900 g
AC-5 LÉGUMES FRAIS 100 g 900 g
Page 79

COMMANDE
1. Appuyez sur la touche auto cook.
L’écran affiche « AC-1 » et le témoin s’allume.
2. Appuyez encore une fois (plusieurs fois) sur la touche auto cook
pour sélectionner une fonction (voir tableau).
3. Tournez le bouton de réglage pour programmer le poids.
Le poids programmé s’affiche sur l’écran.
▷ Vous pouvez programmer un poids maximal de 2000 grammes,
par palliers de 50 grammes.
• Consultez le tableau pour découvrir les différentes fonctions et
sélectionner le poids approprié.
4. Appuyez sur la touche de démarrage.
Le four à micro-ondes s’enclenche selon les sélections
programmées ; l’éclairage du four s’allume, le plateau tournant
se met à tourner et le décompte de la durée s’affiche sur
l’écran.
• Vous pouvez, à tout moment de la préparation, vérifier les
sélections programmées en appuyant sur la touche auto cook.
Tableau Auto Cook
Le tableau suivant donne des informations, par plat, sur la marche
à suivre et les ustensiles à utiliser.
Marche à suivre Ustensiles de cuisine
1 1. Mettez la viande de porc directement sur le trépied posé sur le
plateau tournant.
2. Badigeonnez-la d’un peu d’huile avec un pinceau.
3. Sélectionnez « AC-1 ».
4. Sortez la viande du four à micro-ondes combiné. Égouttez le jus de
cuisson superflu.
5. Enveloppez la viande dans du papier aluminium et laissez-la reposer
10 minutes.
6. Servez la viande avec de la compote de pommes.
2 1. Mettez la viande de bœuf directement sur la grille posée sur le
plateau tournant.
2. Badigeonnez-la d’un peu d’huile avec un pinceau.
3. Sélectionnez « AC-4 ».
4. Sortez la viande du four à micro-ondes combiné. Égouttez le jus de
cuisson superflu.
5. Enveloppez la viande dans du papier aluminium et laissez-la reposer
10 minutes.
6. Servez avec des pommes de terre nature et du jus.
Grille avec plateau tournant.
Grille avec plateau tournant.
FR 21
Page 80

COMMANDE
Marche à suivre Ustensiles de cuisine
3 1. Lavez le poulet et séchez-le. Liez les pattes avec de la ficelle de
cuisine sans trop les serrer.
2. Piquez quelques trous dans la peau, juste en dessous des pattes.
3. Badigeonnez le poulet de beurre fondu avec un pinceau.
4. Mettez le poulet directement sur la grille posée sur le plateau
tournant.
5. Sélectionnez « AC-3 ».
6. Sortez le poulet du four. Égouttez le jus de cuisson superflu. Salez,
selon vos goûts.
7. Enveloppez le poulet dans du papier aluminium et laissez-le reposer
10 minutes.
8. Servez avec des pommes de terre rissolées et de la salade.
4 1. Il est possible de préparer toutes sortes de poisson frais (sauf du
poisson pané/trempé dans de la pâte), que ce soit du poisson entier
ou du filet/steak de poisson.
2. Mettez le poisson préparé dans un plat beurré.
3. Salez et poivrez, arrosez de jus de citron et parsemez de morceaux
de beurre. Ne recouvrez pas le plat.
4. Placez le plat sur la grille haute posée sur le plateau tournant.
5. Sélectionnez « AC-4 ».
5 1. Lavez les légumes et nettoyez-les.
2. Mettez les légumes préparés dans un plat approprié.
3. Arrosez les légumes avec 4-5 cuillères à soupe d’eau.
4. Recouvrez le plat avec du film alimentaire percé de trous ou un
couvercle.
5. Mettez le plat sur le plateau tournant.
6. Sélectionnez « AC-5 ».* Coupez les légumes en morceaux de taille
identique pour obtenir le meilleur résultat.
Grille avec plateau tournant.
Plat peu profond, résistant
à la chaleur et adapté au
micro-ondes, par exemple
un Pyrex. Grille avec plateau
tournant.
Plat adapté au micro-ondes,
par exemple Pyrex, avec
plateau tournant.
Démarrage rapide
Arrêt
FR 22
En appuyant une fois sur la touche de démarrage, il est possible
d’enclencher le four à micro-ondes à pleine puissance pendant
30 secondes. En appuyant plusieurs fois sur la touche de
démarrage, la durée augmentera par palier de 30 secondes
(la durée maximale est de 5 minutes).
Arrêtez ou annulez un programme en cours en ouvrant la porte
ou en appuyant sur la touche d’arrêt. Pour lancer le programme à
nouveau, appuyez sur la touche de démarrage.
• Pour annuler le programme, appuyez encore une fois sur la touche
d’arrêt.
L’heure actuelle (ou « :0 ») apparaît sur l’écran.
Page 81

COMMANDE
Maintien au chaud
Cette fonction permet de tenir un plat au chaud, pendant une
heure, à une température d’environ 60 °C.
1. Appuyez sur la touche ZERO ON si l’écran est vide.
Un signal sonore retentit et l’écran affiche l’heure actuelle ou
« : 0 ». Vous pouvez maintenant utiliser le four à micro-ondes.
2. Appuyez sur la touche de maintien au chaud.
L’écran affiche « 60C » et le témoin s’allume.
3. Tournez le bouton de réglage pour programmer la durée.
La durée programmée s’affiche sur l’écran.
▷ Il est possible de programmer une durée maximale de
60 minutes. Sur l’écran, la durée s’affiche d’abord par palier
de 10 secondes. Au-delà de 5 minutes, les paliers passent à
30 secondes.
4. Appuyez sur la touche de démarrage.
Le four à micro-ondes s’enclenche selon les sélections
programmées ; l’éclairage du four s’allume, le plateau tournant
se met à tourner et le décompte de la durée s’affiche sur
l’écran.
▷ Une fois la durée écoulée, un signal sonore retentit trois fois.
Le four à micro-ondes s’éteint.
Nettoyage vapeur
Cette fonction permet de nettoyer l’intérieur du four à micro-ondes
combiné en 10 minutes. La vapeur décolle les résidus alimentaires
que vous pouvez ensuite enlever facilement avec un chiffon doux.
Attention : placez d’abord un gobelet/une tasse/un plat contenant
150/200 cc d’eau au centre du plateau tournant.
1. Appuyez sur la touche ZERO ON si l’écran est vide.
Un signal sonore retentit et l’écran affiche l’heure actuelle ou
« : 0 ». Vous pouvez maintenant utiliser le four à micro-ondes.
2. Placez un gobelet/une tasse/un plat contenant 150/200 cc
d’eau au centre du plateau tournant.
3. Appuyez sur la touche clean.
Le témoin s’allume. Le four à micro-ondes chauffe pendant
10 minutes.
FR 23
Page 82

COMMANDE
4. Une fois les 10 minutes écoulées, « door » « oPEn » s’affiche
sur l’écran pendant 5 minutes. Ouvrez la porte. Soyez prudent
car de la vapeur peut s’échapper du four. Laissez le four à
micro-ondes refroidir un instant avant d’essuyer l’intérieur avec
un chiffon sec.
FR 24
Page 83

CONSEILS DE CUISSON
Réchauffer et cuire
• L’intensité de chauffage du four à micro-ondes est toujours la
même. Plus la quantité placée dans le four est importante, plus la
durée de cuisson sera longue.
• Les produits plats sont plus vite chauds que les produits étroits et
hauts.
• Le fait de recouvrir les plats d’un film à micro-ondes ou d’un
couvercle approprié évite les projections d’aliments, diminue la
durée de cuisson et permet de conserver l’humidité des aliments.
À la fin de la cuisson, retirez prudemment le film ou le couvercle.
Attention ! La vapeur qui s’échappe du plat peut être très
chaude !
• Humectez éventuellement les plats qui risquent de dessécher
rapidement. Plongez d’abord un instant les pommes de terre et
les légumes dans de l’eau froide avant de les mettre dans le four à
micro-ondes. Vous éviterez ainsi la formation d’une peau.
• Pour obtenir un résultat uniforme, mélangez ou retournez les
produits une ou deux fois.
• Pour réchauffer des plats déjà préparés, sélectionnez toujours la
position micro-ondes la plus élevée.
• La cuisson au micro-ondes ne nécessite pas beaucoup d’eau,
ni de sel ni d’épices. Il est préférable d’ajouter du sel à la fin de la
cuisson. Vous éviterez ainsi que le plat ne se dessèche.
• Une fois que le four à micro-ondes est arrêté, la cuisson se
poursuit encore pendant quelques instants. Tenez-en compte en
ne réchauffant pas le plat trop longtemps.
• Attention ! Lorsque vous chauffez des petites quantités de
produits sous forme de poudre (séchage d’herbes), placez
toujours une tasse d’eau dans le four à micro-ondes. Il y a risque
sinon d’auto-inflammation en raison de la faible quantité présente.
Décongélation
• Décongelez toujours les grosses pièces compactes à l’aide du
programme de décongélation. Comme le produit se décongèle de
façon progressive et régulière, vous ne risquez pas que la partie
extérieure soit desséchée et le centre encore congelé.
• Pour accélérer le processus de décongélation, il est recommandé
de diviser le produit en morceaux au bout d’un certain temps.
• Insérez deux pauses en cas de grosses pièces de viande et de
produits compacts.
FR 25
Page 84

CONSEILS DE CUISSON
• En cas de décongélation de produits de forme irrégulière, couvrez
ou enveloppez de papier aluminium les parties fines pendant la
seconde moitié de la durée de décongélation.
Les facteurs qui ont une influence sur le processus de cuisson
• La température des ingrédients a une influence sur la durée de
préparation. Un repas froid nécessite une durée de cuisson plus
longue qu’un repas qui se trouve à température ambiante.
• Les produits légers et poreux cuisent plus vite que les produits
lourds et massifs (comme les ragoûts et les roulades). Faites
attention lorsque vous préparez des produits légers et poreux.
Les bords en tendance à sécher et devenir durs rapidement.
• Les petits produits se réchauffent de façon plus régulière si vous
les tenez séparés les uns des autres et que vous les disposez en
rond dans le four à micro-ondes.
• Les os et la graisse conduisent mieux la chaleur que la viande. Le
papier aluminium bloque les micro-ondes. En couvrant les parties
plus fines des produits (comme les cuisses et les ailes de poulet),
vous éviterez qu’elles ne cuisent trop rapidement.
• Le papier sulfurisé empêche les projections d’aliments et retient
mieux la chaleur.
Techniques de base
• Mise en place
▷ Sur le plateau tournant, placez les pièces plus grosses vers
l’extérieur. Les produits placés sur la partie extérieure du
plateau tournant reçoivent le plus grand nombre de microondes.
• Mélanger
▷ En mélangeant régulièrement les produits, vous répartissez la
chaleur stockée. Mélangez toujours de l’extérieur vers l’intérieur
étant donné que la partie extérieure est toujours la première à
être chaude.
• Retourner
▷ Retournez régulièrement les produits gros et épais. Ils cuiront
de façon plus régulière et rapide.
• Piquer
▷ Les produits recouverts d’une peau ou d’une coquille (oeufs,
crustacés et fruits) éclatent dans le four à micro-ondes. En les
piquant auparavant à l’aide d’un bâtonnet ou d’une fourchette,
vous évitez cette situation.
FR 26
Page 85

CONSEILS DE CUISSON
• Contrôler
▷ Les produits cuisent rapidement. C’est pourquoi il faut les
contrôler régulièrement. Sortez les produits du four à microondes avant qu’ils ne soient cuits à point.
• Poursuite de la cuisson
▷ Après avoir sorti les produits du four à micro-ondes, laissez-
les reposer, couverts, pendant 3 à 10 minutes. Les produits
poursuivent leur cuisson. Ne couvrez pas les produits qui ont
une croûte sèche (comme un cake).
• Congélation
▷ Lors de la congélation, tenez déjà compte de la décongélation
au four à micro-ondes en évitant d’utiliser de l’aluminium ou
des barquettes en aluminium et en préparant des portions plus
plates.
Cuisson des légumes
• Utilisez si possible des légumes frais. Si les légumes sont un peu
fanés du fait que vous les avez depuis un certain temps, mettezles dans de l’eau froide pendant quelques instants afin qu’ils
reprennent de la vigueur.
• Utilisez un grand plat pour la cuisson des légumes. Répartissezles de façon à couvrir le fond d’une couche pas trop épaisse.
• Faites cuire les légumes non égouttés.
• Couvrez toujours le plat avec un couvercle ou du film à microondes.
• N’ajoutez pas de sel. Les sels présents naturellement dans les
légumes donnent en principe suffisamment de goût. Si vous
souhaitez néanmoins ajouter du sel, faites-le après la cuisson.
• Le temps de cuisson des légumes doit être le plus court possible.
Tenez compte du fait que la cuisson se poursuit une fois que le
four à micro-ondes est arrêté.
• Vérifiez à l’aide d’un bâtonnet ou d’une fourchette si les légumes
sont cuits.
Cuisson du poisson
• Le poisson doit cuire de façon régulière. Enclenchez de ce fait la
puissance sur 30 % en cas de poisson fins, de poissons gras ou
de petites portions. Dans d’autres cas, il est tout à fait possible
d’augmenter légèrement la puissance. Tenez compte du fait que la
cuisson se poursuit une fois que le four à micro-ondes est arrêté.
Le poisson est cuit lorsque sa chair n’est plus transparente.
FR 27
Page 86

ENTRETIEN
Nettoyage
• N’UTILISEZ PAS de produits à récurer ni de grattoirs métalliques
pour nettoyer la porte du four en verre. Ceux-ci risquent de rayer
la surface et faire éclater le verre.
• N’UTILISEZ PAS de jet à haute pression ou de machine à vapeur
pour nettoyer le four à micro-ondes.
• Nettoyez directement l’intérieur après usage. Utilisez un chiffon
humide pour éliminer la condensation, le liquide qui a débordé et
les résidus alimentaires. Les miettes et l’humidité qui restent dans
le four absorbent l’énergie micro-onde et prolongent la durée de
cuisson.
• Nettoyez régulièrement les faces intérieures et extérieures en
utilisant de l’eau mélangée à un produit de vaisselle. Séchez
ensuite correctement le four avec un chiffon sec.
• Le recouvrement du distributeur à micro-ondes doit être propre.
Un risque d’étincelle peut se présenter en cas d’encrassement du
recouvrement.
• Nettoyez régulièrement les accessoires en utilisant une brosse
avec de l’eau mélangée à un produit de vaisselle. Séchez ensuite
correctement les accessoires avec un chiffon sec. Il est également
possible de laver les accessoires au lave-vaisselle.
• Les odeurs disparaîtront si vous mettez un verre de vinaigre
ou d’eau avec du citron dans le compartiment de cuisson.
Enclenchez le four pendant 2 minutes à pleine puissance. Essuyez
ensuite à l’aide d’un chiffon humide.
• Vérifiez régulièrement que la fermeture de la porte et le joint de
la porte ne sont pas endommagés. N’utilisez pas le four à microondes s’ils sont endommagés.
• Si le joint du four à micro-ondes est très sale, la porte ne se
fermera pas correctement. Cela pourrait endommager l’avant des
meubles adjacents. Maintenez le joint propre.
• Le sel est une substance très agressive. Si du sel se dépose dans
le compartiment de cuisson, de la rouille peut se développer à
divers endroits.
• Les sauces acides comme le ketchup et la moutarde ou les
aliments salés (comme le petit salé) contiennent des ingrédients
qui peuvent affecter la surface. Nettoyez toujours le compartiment
de cuisson après chaque utilisation.
FR 28
Page 87

PANNES
Si vous avez un doute quant au bon fonctionnement de votre
appareil, ceci ne signifie pas automatiquement qu’il est défectueux.
Vérifiez en tout cas les points suivants. Appelez le service aprèsvente si les conseils ci-dessous ne vous aident pas.
• L’appareil est-il branché ?
• La porte est-elle bien fermée ?
• Le fusible dans le placard à compteurs est-il défectueux ?
• La puissance et la durée de préparation sont-elles bien
programmées ?
• Y a-t-il des objets dans le four à micro-onde qui ne doivent pas s’y
trouver ?
• Avez-vous utilisé des ustensiles de cuisine appropriés ?
• Les ouvertures de ventilation sont-elles bloquées ?
• Le produit était-il suffisamment décongelé ?
• Avez-vous retourné ou mélangé le produit pendant la
préparation ?
• La sécurité enfants est-elle activée ?
Étincelles dans le four à micro-ondes
Si vous apercevez des étincelles dans le four à micro-ondes,
éteignez-le immédiatement. Des étincelles peuvent se produire en
raison de :
• métal ou de papier aluminium touchant la face intérieure du four à
micro-ondes ;
• papier aluminium qui n’a pas été enveloppé correctement autour
de l’aliment (des pointes dépassent et font office d’antenne) ;
• métal provenant d’un lien de fermeture ou d’un service avec une
bordure métallique ;
• papier recyclé contenant des particules métalliques.
Codes d’erreur (appelez le service après-vente)
Err2 Température trop élevée ou capteur de température
défectueux.
Err3 Capteur de température non connecté.
FR 29
Page 88

SPÉCIFICATIONS TECHNIQUES
Raccordement 230 V~, 50 Hz
Puissance 2 700 W
Capacité 25 litres
Dimensions (l x p x h) 514 x 397 x 311 mm
Poids 17,2 kg
FR 30
Page 89

ENVIRONNEMENT
Élimination de l’appareil et de l’emballage
Des matériaux durables ont été utilisés dans la fabrication de cet
appareil. Cet appareil doit être éliminé de façon appropriée à la fin
de son cycle de vie. Les autorités peuvent vous renseigner à ce
sujet.
L’emballage de l’appareil est recyclable. Peuvent être utilisés :
• le carton ;
• la feuille de polyéthylène (PE) ;
• le polystyrène sans CFC (mousse rigide PS).
Ces matériaux doivent être éliminés de façon appropriée et
conformément aux dispositions réglementaires.
Pour signaler l’obligation de traitement sélectif des appareils
électroménagers, le symbole représentant une poubelle barrée a
été apposé sur le produit. Cela signifie qu’à la fin du cycle de vie de
l’appareil, celui-ci ne peut pas être mis au rebut avec les ordures
ménagères courantes. L’appareil doit être porté dans un centre
communal spécialement dédié à la collecte sélective des déchets
ménagers, ou dans un point de vente proposant ce service.
Le retraitement séparé des appareils électroménagers permet de
prévenir les éventuels effets négatifs sur l’environnement et la santé
causés par un traitement inapproprié. Il garantit que les matériaux
qui composent l’appareil pourront être récupérés pour de notables
économies d’énergie et de matières premières.
Déclaration de conformité
Nous déclarons que nos produits satisfont aux directives, mesures
et règlements européens en vigueur ainsi qu’aux exigences qui
sont mentionnées dans les normes auxquelles il est fait référence.
FR 31
Page 90

FR 32
Page 91

INHALTSVERZEICHNIS
Ihre Mikrowelle
Einleitung 4
Beschreibung 5
Bedientafel 6
Sicherheit
Elektroanschluss und Reparatur 7
Sicherer Gebrauch 7
Materialien 11
Gebrauch
Platzieren 12
Vor der ersten Inbetriebnahme 12
Bedienung
ZERO ON 13
Ausschalten/Einschalten 13
Allgemein 13
Uhr einstellen 14
Mikrowelle 14
Grill 15
Ofen mit Vorwärmen 16
Ofen 17
Kombi-Ofen/Mikrowelle 18
Auftauen nach Gewicht 19
Auftauen nach Zeit 20
Auto-Cook 20
Schnellstart 22
Stopp 22
Warmhalten 23
Dampfreinigung 23
Kochtipps 25
Wartung
Reinigung 28
Störungen 29
Technische Daten 30
Umweltschutz
Entsorgung des Geräts und der Verpackung 31
DE 3
Page 92

IHRE MIKROWELLE
Einleitung
Sie haben sich für eine Kombi-Mikrowelle von Pelgrim entschieden.
Ein optimaler Anwendungskomfort und eine einfache Bedienung
standen bei der Entwicklung dieses Produkts an erster Stelle.
Die Kombi-Mikrowelle verbindet die Eigenschaften einer Mikrowelle
mit denen eines herkömmlichen Ofens. Die umfangreichen
Einstellungsoptionen ermöglichen es Ihnen, genau die
Zubereitungsweise zu wählen, die Sie wünschen. Die Bedienung ist
trotzdem einfach. Das Display informiert Sie und hilft Ihnen bei der
Einstellung.
Mit dieser Anleitung möchten wir vor allem einen Überblick über
alle Möglichkeiten dieses Geräts geben. Im Kapitel Bedienung sind
die verschiedenen Funktionen übersichtlich aufgelistet. Es wurden
auch einige Tipps aufgenommen, die Sie nutzen können.
Lesen Sie die Gebrauchsanweisung erst vollständig
aufmerksam durch, bevor Sie das Gerät verwenden, und
bewahren Sie sie sorgfältig auf.
Diese Anleitung enthält auch Hinweise für den Kundendienst. Der
Datenaufkleber enthält alle Informationen, die der Kundendienst
benötigt, um auf Ihre Fragen zu reagieren.
DE 4
Viel Spaß beim Kochen!
Page 93

IHRE MIKROWELLE
Beschreibung
4
1. Display
2. Bedientafel
3. Tür öffnen
4. Antrieb
5. Gläserne Drehscheibe (vor Gebrauch
immer in die Mikrowelle platzieren)
6. Ring für Drehscheibe (vor Gebrauch
immer in die Mikrowelle platzieren)
7. Metallgestell: verwenden Sie dieses
Gestell zusammen mit der Drehscheibe
1
2
3
5
6
7
DE 5
Page 94

IHRE MIKROWELLE
Bedientafel
1. Display
2. Auto-Cook-Taste
1
2
39
410
3. Mikrowellentaste
4. Grilltaste
5. Einstellknopf (Zeit/Gewicht/Anzahl)
6. Auftautaste
7. Taste ‘Warmhalten’
8. Stopptaste
9. Ofentaste
10. Kombitaste
11. ZERO ON-Taste
12. Timertaste
13. Reinigungstaste
14. Starttaste
5
612
713
814
11
DE 6
Page 95

SICHERHEIT
Elektroanschluss und Reparatur
• Kontrollieren Sie das Gerät auf Transportschäden.
Schließen Sie ein beschädigtes Gerät nicht an.
• Die Installation hat nach den geltenden Vorschriften
des Landes und vor Ort zu erfolgen.
• Wandsteckdose und Stecker müssen jederzeit
zugänglich bleiben.
• Wenn Sie einen festen Anschluss herstellen
möchten, achten Sie darauf, dass ein allpoliger
Schalter mit einer Kontaktöffnung von mindestens
3 mm in der Zufuhrleitung installiert wird.
• Das Gerät darf nicht mit einem Verteilerstecker
oder einer Verlängerungsschnur an das Stromnetz
angeschlossen werden. Hierbei kann eine sichere
Verwendung des Geräts nicht gewährleistet
werden.
• WARNUNG: Öffnen Sie niemals das Gehäuse des
Geräts. Nur ein Kundendiensttechniker darf das
Gerät öffnen.
• Trennen Sie das Gerät von der
Spannungsversorgung, bevor Sie mit der Reparatur
beginnen.
• Defekte Teile dürfen nur durch Originalteile ersetzt
werden. Nur bei diesen Teilen kann der Hersteller
garantieren, dass sie die Sicherheitsanforderungen
erfüllen.
• Wenn das Anschlusskabel beschädigt ist, kann
dieses nur vom Hersteller, seinem Servicepartner
oder einer anderen qualifizierten Person
ausgetauscht werden, um eine gefährliche Situation
zu verhindern.
Sicherer Gebrauch
• WARNUNG: Dieses Gerät und seine Teile werden
bei Gebrauch heiß. Achten Sie darauf, die heißen
Teile nicht zu berühren. Halten Sie Kinder unter
acht Jahren von dem Gerät fern, es sei denn, diese
werden dabei ständig beaufsichtigt.
• Dieses Gerät kann von Kindern ab acht Jahren und
von Personen mit eingeschränkten körperlichen,
Wahrnehmungs- oder geistigen Fähigkeiten bzw.
fehlender Erfahrung verwendet werden, sofern sie
dabei beaufsichtigt werden oder über die sichere
DE 7
Page 96

SICHERHEIT
DE 8
Verwendung des Geräts unterrichtet wurden und
die damit verbundenen Gefahren verstehen. Kinder
dürfen nicht mit dem Gerät spielen. Kinder dürfen
das Gerät nicht reinigen oder warten, wenn sie dabei
nicht beaufsichtigt werden.
• WARNUNG: es ist für Unbefugte gefährlich,
Reparaturen auszuführen, bei denen das Gehäuse
des Geräts geöffnet werden muss. Das Gehäuse
schützt gegen das Austreten von Mikrowellenenergie.
• WARNUNG: Wenn die Tür oder die Abdichtung
beschädigt ist, darf die Mikrowelle nicht verwendet
werden, bis sie durch eine dafür befugte Person
repariert ist.
• WARNUNG: Der Inhalt von Saugflaschen und
Gefäßen mit Babynahrung muss geschüttelt und
gerührt werden. Kontrollieren Sie die Temperatur
vor der Verabreichung, um eine Verbrennung zu
vermeiden.
• WARNUNG: Erwärmen Sie niemals geschlossene
Konservendosen. In der Dose entsteht dabei ein
Überdruck, der zu einer Explosion führen kann.
• WARNUNG: Versuchen Sie nicht, die Mikrowelle mit
geöffneter Tür zu verwenden. Dabei kann eine Gefahr
durch die Mikrowellenstrahlung entstehen.
• Dieses Gerät ist ausschließlich für die Verwendung
im Haushalt bestimmt. Verwenden Sie des nur zum
Zubereiten von Speisen.
• Verwenden Sie das Gerät ausschließlich im Haus.
• Verwenden Sie das Gerät nicht in feuchten Räumen
oder in der Nähe eines Wasserkrans.
• Halten Sie die Schnur von warmen Oberflächen fern.
• Decken Sie niemals die Lüftungsöffnungen zu.
• Das Gerät ist nicht für die Bedienung mit
einem externen Timer oder einem gesonderten
Fernbedienungssystem geeignet.
• Aus Gründen der elektrischen Sicherheit darf
das Gerät nicht mit Hochdruckreinigern oder
Dampfreinigern gereinigt werden.
• Die Mikrowelle ist isoliert. Dennoch findet immer eine
gewisse Wärmeübertragung statt, wobei sich die
Außenseite des Geräts aufwärmt. Diese Aufwärmung
liegt deutlich innerhalb der Normen.
Page 97

SICHERHEIT
• Bei der Zubereitung von Gerichten, die Alkohol
enthalten, kann der Alkohol durch die hohen
Temperaturen verdampfen. Der Dampf kann sich
entzünden, wenn er mit heißen Teilen in Berührung
kommt.
• Verwenden Sie ausschließlich Besteck und Geschirr,
das für die Verwendung in der Mikrowelle geeignet
ist (Vorsicht mit silber- und goldfarbigen Rändern).
• Verwenden Sie die Mikrowelle nicht zur
Aufbewahrung feuergefährlicher oder leicht
verformbarer Materialien.
• Achten Sie darauf, dass die Speisen immer
ausreichend erhitzt werden. Die dafür erforderliche
Zeit hängt von vielen Faktoren ab, etwa der
Menge und Art der Speisen. Die eventuell in dem
Lebensmittel vorhandenen Bakterien werden nur
dann abgetötet, wenn es mindestens 10 Minuten bei
einer Temperatur von über 70 °C erhitzt wird. Lassen
Sie das Lebensmittel etwas länger garen, wenn Sie
sich nicht sicher sind, ob es ausreichend erhitzt
wurde.
• Stellen Sie einen Kunststofflöffel in die Tasse, wenn
Sie eine Flüssigkeit (z. B. Wasser) kochen wollen.
Es kann nämlich passieren, dass die Flüssigkeit
kocht, ohne dass Blasen erscheinen. Wenn Sie die
Tasse aus der Mikrowelle holen, kann die Flüssigkeit
plötzlich heftig zu kochen anfangen und aus der
Tasse spritzen, mit dem Risiko, dass Sie sich
verbrennen.
• Eine Mikrowelle ist nur dann sicher, wenn die Tür
gut schließt! Legen Sie niemals einen Gegenstand
zwischen die Tür der Mikrowelle und sorgen Sie
dafür, dass die Tür und die Abdichtung immer sauber
sind.
• Verwenden Sie die Mikrowelle ausschließlich für
das Auftauen, Zubereiten und Aufwärmen von
Lebensmitteln, und nicht etwa zum Trocknen von
Kleidung oder Papier. Diese können sich entzünden.
• Wenn Sie kleine Mengen trockener oder
puderförmiger Produkte in der Mikrowelle erwärmen
(wie beim Trocknen von Kräutern), besteht die
Möglichkeit einer Selbstentzündung. Schalten Sie
DE 9
Page 98

SICHERHEIT
DE 10
die Mikrowelle aus und ziehen Sie den Stecker
aus der Steckdose, wenn etwas in der Mikrowelle
sich entzündet. Halten Sie die Mikrowellentür
geschlossen.
• Schalen Sie die Mikrowelle aus oder ziehen Sie
den Stecker aus der Steckdose, wenn Sie Rauch
wahrnehmen. Halten Sie die Tür geschlossen, um
eventuelle Flammen zu ersticken.
• Schalten Sie die Mikrowelle nicht ein, wenn sie leer
ist. Die Mikrowelle kann dadurch beschädigt werden.
• Entfernen Sie metallene Verschlussstreifen von
Plastikgegenständen und verwenden Sie Schalen
und Schüsseln, die für die Mikrowelle geeignet sind.
• Sehen Sie zuerst auf der Verpackung des
Gerichts nach, ob es für die Mikrowelle geeignet
ist. Flüssigkeiten und Lebensmittel in luftdichten
Verpackungen können Sie meist nur aufwärmen,
wenn Sie ein Paar Löcher in die Verpackung
stechen. Dies hängt zusammen mit der
Druckzunahme beim Aufwärmen.
• Flüssigkeiten und andere Lebensmittel dürfen nicht
in hermetisch geschlossenen Verpackungen erwärmt
werden, da sie explodieren können.
• Beim Erwärmen von Lebensmitteln in Plastik- oder
Papierverpackungen empfiehlt es sich, aufgrund der
Brandgefahr die Mikrowelle im Auge zu behalten.
• Erwärmen Sie nicht länger als nötig, berücksichtigen
Sie das ‘Nachgaren’.
• Stechen Sie mit einer Gabel oder einem anderen
spitzen Gegenstand kurz in die Haut von Fleisch,
Huhn oder Fisch. Dadurch vermeiden Sie, dass
diese Gerichte spritzen.
• Die Mikrowelle muss regelmäßig gereinigt werden
und alle Speisereste müssen entfernt werden.
Zurückgebliebene Krümel und Feuchtigkeit
absorbieren Mikrowellen und verlängern die
Kochzeit. Außerdem kann durch zurückgebliebene
Speisereste die Innenseite beschädigt werden, was
zu gefährlichen Situationen führen kann.Verwenden
Sie keine Scheuermittel oder Metallschaber zum
Reinigen der Glastür. Die Oberfläche erhält dadurch
Kratzer, wodurch das Glas zerspringen kann.
Page 99

SICHERHEIT
Materialien
Eine Mikrowelle ist nicht geeignet für:
• das Einmachen von Lebensmitteln;
• das Kochen von Eiern in der Schale und das
Aufwärmen ganzer hartgekochter Eier, diese
platzen infolge der Druckzunahme auf.
• das Erhitzen von Frittieröl.
Wenn die Sicherheitsanweisungen und
Warnungen nicht befolgt werden, kann der
Hersteller nicht für den dadurch entstandenen
Schaden haftbar gemacht werden.
Wenn Sie beschließen, das Gerät aufgrund eines
Defekts nicht länger zu verwenden, raten wir
Ihnen, die Schnur abzutrennen, nachdem Sie
den Stecker aus der Steckdose gezogen haben.
Bringen Sie das Gerät zu der entsprechenden
Abfallverarbeitungsabteilung in Ihrer Gemeinde.
Nicht alle Materialien dürfen in die Mikrowelle. In der folgenden
Tabelle ist aufgeführt, welche Materialien verwendet werden
können und welche nicht.
Material Mikrowelle
Papier ja*
Aluminiumfolie ja**
Haushaltsfolie ja
Aluminiumschälchen nein
Hitzebeständiges Plastik ja
Nicht-glasiertes Steingut nein
Metallenes Kochgeschirr nein
Normales Glas ja
Pyrex, sonstiges ofenfestes Glas und Keramik ja
Teller mit metallhaltigem Zierrand nein
Metallener Verschlussstreifen nein
Quecksilberthermometer nein
Geschlossener Topf nein
Flasche mit engem Hals nein
Bratschläuche ja
* Verwenden Sie Küchenpapier ohne Dekoration zum Abdecken einer Schale oder
unter Brot beim Auftauen.
** Durch das Abdecken dünnerer Teile von Gerichten (wie Hühnerbeine) vermeiden
Sie, dass diese zu schnell garen.
DE 11
Page 100

GEBRAUCH
Platzieren
• Stellen Sie die Mikrowelle auf einen festen und ebenen
Untergrund.
• Sorgen Sie für ausreichende Belüftung um die Mikrowelle herum.
Halten Sie auf der Oberseite 30 cm Abstand frei. Halten Sie auf
der Rückseite und an den Seitenwänden mindestens 7,5 cm
Abstand frei.
• Decken Sie die Lüftungsöffnungen nicht zu.
• Die Stellfüße dürfen nicht entfernt werden.
• Platzieren Sie die Mikrowelle nicht in der Nähe von Wärmequellen.
• Sende- und Empfangsgeräte wie Radios und Fernsehgeräte
können die Funktion der Mikrowelle beeinflussen.
30 cm
7.5 cm
7.5 cm
7.5 cm
Vor der ersten Inbetriebnahme
DE 12
Nehmen Sie das Zubehör aus der Mikrowelle und reinigen Sie sie
mit einem schonenden Reinigungsmittel. Platzieren Sie danach den
Rahmen wieder auf dem Antrieb.
Achtung
Verwenden Sie die Mikrowelle immer mit dem Rahmen auf dem
Antrieb in Kombination mit einer Drehscheibe!
Stellen Sie eine hitzebeständige Schale mit 200 ml Wasser in die
Mikrowelle. Drücken Sie auf die Ofentaste. Stellen Sie die Zeit
auf 5 Minuten ein und drücken Sie auf die Starttaste. Bei der
Herstellung verwendete Schutzfette werden dadurch entfernt.
Lassen Sie die Mikrowelle nach Ablauf von 5 Minuten abkühlen und
reinigen Sie die Mikrowelle mit warmem Wasser. Die Mikrowelle ist
jetzt bereit für den Gebrauch.
Bemerkung
Wenn die Mikrowelle zum ersten Mal stark erhitzt wird, werden
Sie einen “neuen” Geruch feststellen. Das ist normal. Schalten Sie
eventuell die Abzugshaube ein oder öffnen Sie ein Fenster.
 Loading...