

Page 1
®
WLV2500 Series
Wireless Control Link and
Video Transmission Systems
Installation/Operation Manual
C914M (7/96)
Pelco • 3500 Way, Clovis, CA 93612-5699 • USA • (800) 289-9100 or (1-559) 292-1981
FAX (800) 289-9150 or (1-559) 292-3827
Page 2

TABLE OF CONTENTS
Section Page
1.0 WARNINGS ........................................................................................................................................1
2.0 SCOPE ............................................................................................................................................... 2
3.0 DESCRIPTION ................................................................................................................................... 2
3.1 MODELS...................................................................................................................................2
4.0 ANTENNA LOCATION ....................................................................................................................... 3
5.0 INSTALLATION ...................................................................................................................................4
5.1 ENCLOSURE MOUNTING .......................................................................................................4
5.2 WIRING .................................................................................................................................... 5
5.3 POWER .................................................................................................................................... 5
5.4 ANTENNA ALIGNMENT...........................................................................................................6
5.5 TROUBLESHOOTING ..............................................................................................................7
5.5.1 No Picture ..................................................................................................................... 7
5.5.2 Poor Picture ..................................................................................................................7
6.0 EXPLODED ASSEMBLY DIAGRAM .................................................................................................. 8
6.1 MECHANICAL PARTS LIST .....................................................................................................9
7.0 INTERCEPT® DOME MODIFICATION .............................................................................................10
8.0 WIRING DIAGRAM ..........................................................................................................................13
9.0 MAINTENANCE ............................................................................................................................... 13
10.0 SPECIFICATIONS ............................................................................................................................13
11.0 WARRANTY AND RETURN ............................................................................................................15
®Pelco and the Pelco logo are registered trademarks of Pelco.
©Copyright 1996, Pelco. All rights reserved.
ii Pelco Manual C914M (7/96)
Page 3

LIST OF ILLUSTRATIONS
Figure Page
1Typical WLV500 Control Link and WLV2000 Video Link Configuration............................................ 2
2Transmitter-Receiver Placement at Same Site ................................................................................3
3 Multiple System Interference ...........................................................................................................4
4 Power Connections (Outdoor Models Only) ....................................................................................6
5 Antenna Signal Strength versus Distance .......................................................................................7
6 Outdoor Enclosure Exploded Assembly Diagram ...........................................................................8
7 Dome Drive Layout ........................................................................................................................10
8 Video Board Component Locations .............................................................................................. 11
9 Block Diagram ...............................................................................................................................11
10 Coaxitron® Receiver Backplane PCB - Wire Lead Additions and Wiring Diagram ........................12
11 Outdoor Enclosure Wiring Diagram............................................................................................... 13
LIST OF TABLES
Table Page
AVideo Coaxial Cable Wiring Distances ............................................................................................ 5
REVISION HISTORY
Manual # Date Comments
C914M 7/96 Original manual.
8/96 Revised Section 7.0 and Figure 8 to include Rev. G of video board.
11/96 Revised Figure 6 per ECO 96-284. Added Section 8.0, “Wiring Diagram.”
Pelco Manual C914M (7/96) iii
Page 4

(This page intentionally left blank.)
iv Pelco Manual C914M (7/96)
Page 5
INSTALLATION/OPERATION MANUAL
WLV2500 SERIES
WIRELESS CONTROL LINK AND VIDEO
TRANSMISSION SYSTEMS
1.0 WARNINGS
Prior to installation and use of this product, the following WARNINGS should be observed.
1. Installation and servicing should only be done by
qualified service personnel and conform to all FCC
regulations and Local codes.
2. Unless the unit is specifically marked as a NEMA
Type 3, 3R, 3S, 4, 4X, 6 or 6P enclosure, it is designed for indoor use only and it must not be installed where exposed to rain and moisture.
3. The product may bear the following marks:
This symbol indicates that dangerous voltage
constituting a risk of electric shock is present
within this unit.
CAUTION:
TO REDUCE THE RISK OF ELECTRICAL
SHOCK, DO NOT REMOVE COVER. NO
USER-SERVICEABLE PARTS INSIDE.
REFER SERVICING TO QUALIFIED
SERVICE PERSONNEL.
4.Only use replacement parts recommended by
Pelco.
5. After replacement/repair of this unit’s electrical
components, conduct a resistance measurement
between line and exposed parts to verify the exposed parts have not been connected to line circuitry.
This symbol indicates that there are important
operating and maintenance instructions in the
literature accompanying this unit.
CAUTION:
RISK OF ELECTRIC SHOCK.
DO NOT OPEN.
Please thoroughly familiarize yourself with the information in this manual
prior to installation and operation.
Pelco Manual C914M (7/96) 1
Page 6
2.0 SCOPE
3.1 MODELS
This manual covers the installation of the WLV2500
Series of outdoor wireless systems.
3.0 DESCRIPTION
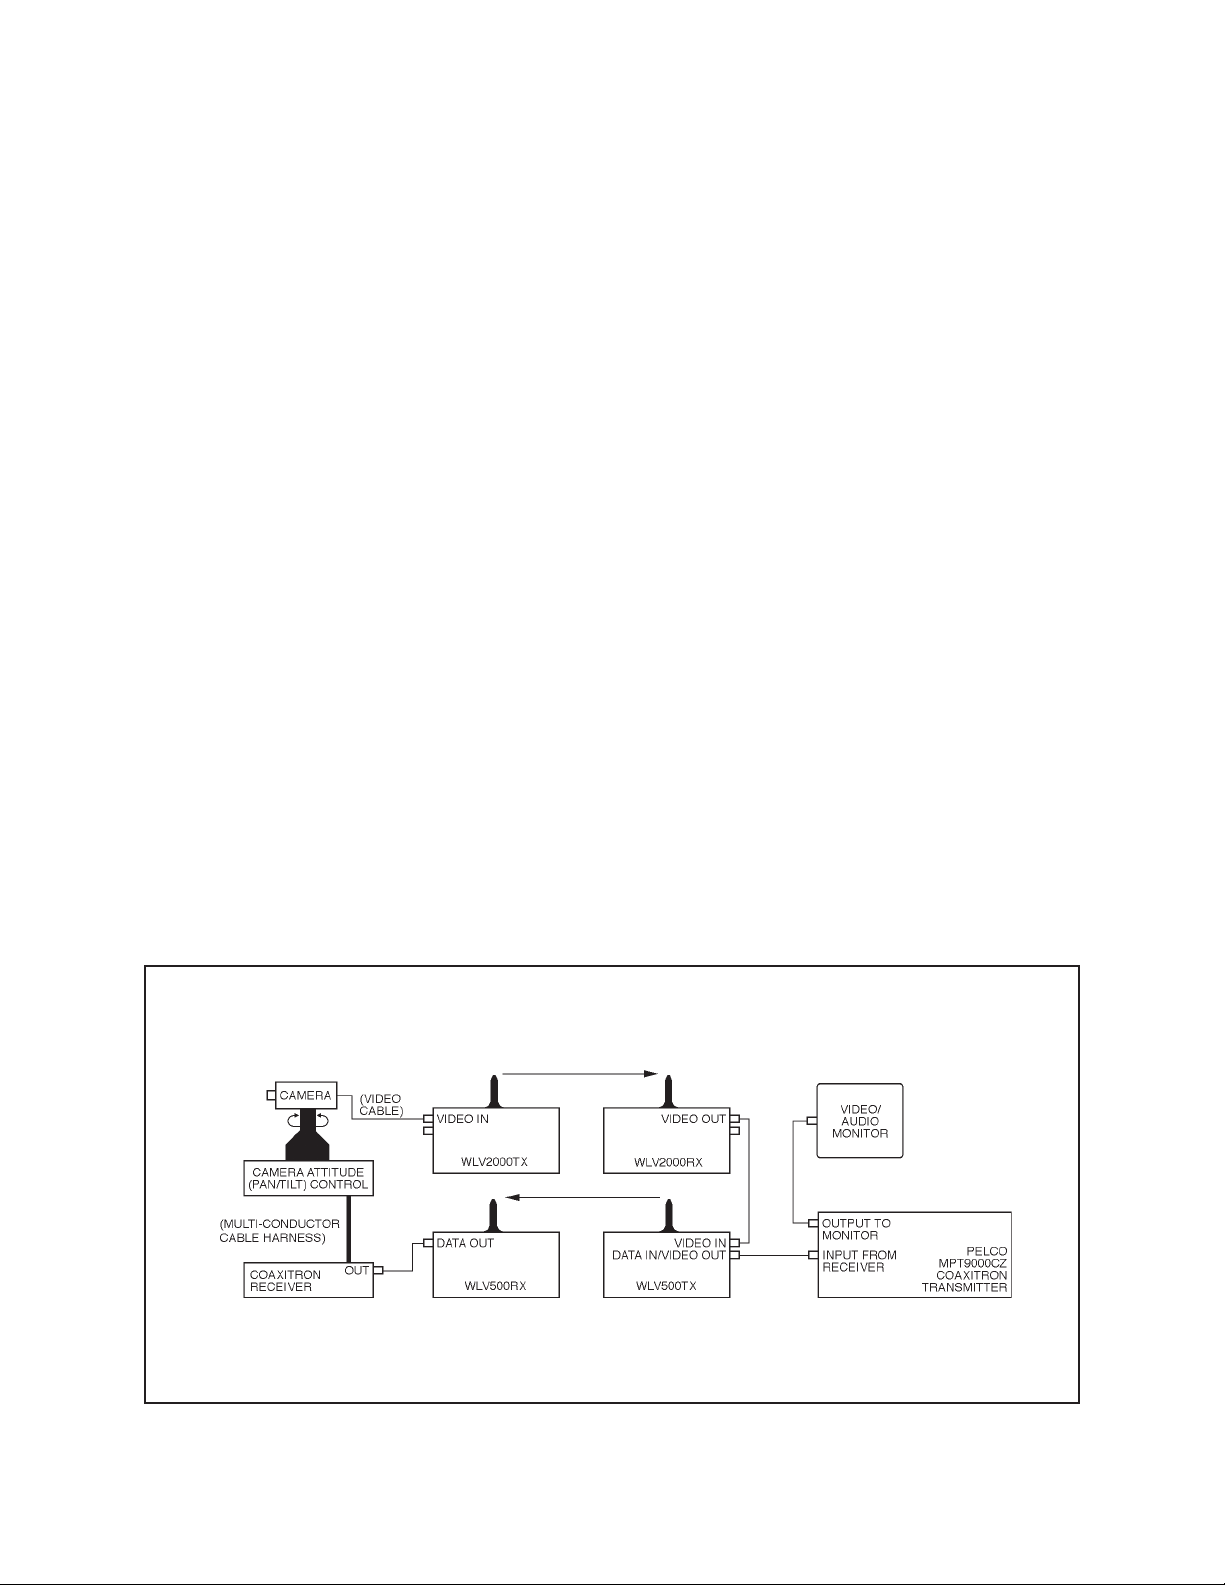
To make a WLV2500 system, a WLV500 control system is combined with a WLV200 video transmission
system (refer to Figure 1).
The wireless control systems of the WLV500 Series
provide wireless remote control of camera positioning
and zoom functions.
The wireless video transmission systems of the
WLV2000 Series provide wireless distribution of a
single channel of a full-motion color video and audio
signal. The systems are compatible with all RS-170A
(NTSC) camera and video monitor systems.
WLV2500KTE-1 - Consists of the following:
1. WLV500KTE-1L - Coaxitron®-control transmitter
and receiver operating at 2481 MHz. Includes
power supplies and directional antennas that are
left-hand circularity polarized (LHCP). Receive antenna has 11 dBi of gain. Installed in NEMA-rated
enclosures with selectable voltage input.
2. WLV2000KTE-1R - Transmitter and receiver operating at 2421.5 MHz. Includes power supplies
and directional antennas that are right-hand circularity polarized (RHCP). Receive antenna has 11
dBi of gain. Installed in NEMA-rated enclosures
with selectable voltage input.
WLV2500KTE-3 - Consists of the following:
1. WLV500KTE-3R - Coaxitron®-control transmitter and receiver operating at 2402 MHz. Includes
power supplies and directional antennas that are
right-hand circularity polarized (RHCP). Receive
antenna has 11 dBi of gain. Installed in NEMArated enclosures with selectable voltage input.
2. WLV2000KTE-3L - Transmitter and receiver operating at 2461.5 MHz. Includes power supplies
and directional antennas that are left-hand circularity polarized (LHCP). Receive antenna has 11
dBi of gain. Installed in NEMA-rated enclosures
with selectable voltage input.
Figure 1. Typical WLV500 Control Link and WLV2000 Video Link Configuration
2 Pelco Manual C914M (7/96)
Page 7

4.0 ANTENNA LOCATION
To provide the best reception, proper placement of the
transmit and receive antennas is important. Reception
will be best when:
• The antennas do not exceed their maximum range.
Indoors this is about 300 feet (91.4 m), depending
on the number and type of obstacles. Outdoors this
is 2,000 feet (609.6 m) with no obstacles blocking
the direct line of sight between the antennas.
• The antennas are a minimum of 8-10 feet above
the floor (indoors) or ground (outdoors).
• The transmit and receive antennas point directly
at each other.
• The receive antenna is attached directly to the receiver. If you must extend the cable between the
antenna and receiver, use a high-quality, low-loss,
50-ohm cable (RG-8 or similar for WLV500, or
RG-316 or similar for WLV2000). Keep the extension as short as possible. The shorter the extension, the better the reception will be.
• There are as few obstacles as possible between the
transmit and receive antennas. Obstacles such as
walls, floors, shelves, machinery, boxes, trees,
chain link fences, and vehicle traffic will degrade
the signal. If possible, do the following to avoid
obstacles:
- Raise the antennas 8-10 feet above the obstacles.
- Move the antennas to different locations.
• The control link and video link antennas at the same
site are a minimum of three feet apart. To reduce
interference, only use polarized antennas on the
video link. It is recommended, but not required,
that the control link be the opposite polarity of the
video link. Refer to Figure 2.
• Polarized antennas on the transmitter and receiver
are the same polarity. If the transmit antenna is a
left-hand circularity polarized (LHCP) antenna, the
receive antenna must be left-hand polarity. If the
transmit antenna is a right-hand circularity polarized (RCHP) antenna, the receive antenna must be
right-hand polarity (refer to Figure 2).
•A WLV2000 transmitter is not too close to a
WLV2000 receiver on a different frequency. In Figure 3, transmitter 1 is closer to receiver 2 than transmitter 2 and is interfering with the signal between
transmitter 2 and receiver 2. Provide more separation between equipment if you are getting interference.
- Move the obstacles.
Figure 2. Transmitter-Receiver Placement at Same Site
Pelco Manual C914M (7/96) 3
Page 8

Figure 3. Multiple-System Interference
5.0 INSTALLATION
NOTE: Proper placement of the
transmit and receive antennas is
important for best reception.
Read Section 4.0, “Antenna Location,” before installing the
equipment.
Install the WLV500 receiver and WLV2000 transmitter at the remote site where your camera will be. Install
the WLV500 transmitter and WLV2000 receiver at the
site where your video/audio monitor will be (refer to
Figure 1).
5.1 ENCLOSURE MOUNTING
Mount the enclosures. You can attach an enclosure directly to a flat mounting surface or you can use the adjustable mounting brackets that are supplied.
An enclosure can be mounted directly to a flat surface
if the enclosure will be at the same elevation and parallel in both directions (vertically and horizontally) as
the enclosure for the receiver. Hardware is not supplied.
NOTE: If you mount the WLV2000 receiver
enclosure directly to a flat surface, you will not
be able to adjust the enclosure in Section 5.4,
“Antenna Alignment,” for the best signal reception.
To mount an enclosure to a flat surface with the adjustable mounting brackets, refer to Figure 6 and perform
the following steps:
1. Fasten two of the four mounting brackets (item 12)
to the desired mounting surface. Install the brackets 10.75 inches (27.31 cm) apart. Hardware is not
supplied.
2. Using the hardware items A, B, and C, attach the
four adjustable straps (item 13) to the brackets installed in (a) above. At this time do not tighten the
screws.
3. Using hardware items B, C, D, and E, attach the
other two mounting brackets to the enclosure.
4. Attach the enclosure to the adjustable straps with
hardware items A, B, and C. The straps have multiple holes so that you can aim the enclosure toward the opposite site. When you have the enclosure positioned properly, tighten all screws. (If you
are installing a WLV2000 receiver enclosure,
tighten all screws just enough to keep the enclosure from moving. The final tightening of the
screws will be done later.)
Proceed to Section 5.2, “Wiring.”
To mount an enclosure to a pole using the adjustable
mounting brackets, refer to the manuals for the PA9000
adapter and PA102 pole mount to install the pole mount
and adapter. Then follow steps a through d in the next
paragraph.
4 Pelco Manual C914M (7/96)
Page 9

5.2 WIRING
5.3 POWER
NOTE: In the following steps when you as-
semble coaxial cable, install a BNC connector
on only one end. Run the bare end of the cable
through the cable entry gland on the enclosure
so that the end with the BNC connector is inside
the enclosure. Then add a BNC connector to the
other end of the cable. Refer to Table A for the
type of coaxial cable to use.
Refer to Figure 1 to see the connections between equipment.
1. Connect a coaxial cable from the DATA IN of the
WLV500 wireless transmitter to the input of the
Coaxitron® transmitter.
2. Connect a coaxial cable from the VIDEO IN of
the WLV500 wireless transmitter to the VIDEO
OUT of the WLV2000 wireless receiver.
3. Connect a coaxial cable from the DATA OUT of
the WLV500 wireless receiver to the output of the
Coaxitron® receiver.
NOTE: If you are connecting the wireless receiver to Intercept® dome drives DD08CXX,
DD08EXX, DD14CXX, or DD14EXX (domes
with 360 degree rotation), refer to Section 7.0,
“Intercept® Dome Modification,” to modify the
dome to work with the wireless receiver.
4. Connect a coaxial cable from the video input of the
CCTV monitor to the VIDEO OUT connector on
the WLV2000 wireless receiver.
1. Supplied with the enclosure are three electrical
plugs, one with blue jumper wires, one with green
jumper wires, and one with white jumper wires.
Select the jumper to match the AC power input
you will use and discard the other two plugs:
Blue 120 VAC input
Green 230 VAC input
White 24 VAC input
2. Connect the plug to the mating socket inside the
enclosure.
3. Connect power:
• 120 VAC - Plug the power cord into 120 VAC.
• 230 VAC - Either remove the power cord and
connect 230 VAC directly to the power terminal block as shown in Figure 4, or cut the plug
off the end of the power cord, connect a 230
VAC plug to the cord, and plug in the cord.
• 24 VAC - Either remove the power cord and
connect 24 VAC directly to the power terminal block as shown in Figure 4, or cut the plug
off the end of the power cord and connect the
cord to 24 VAC.
The transmitter or receiver should become fully
operational within two minutes after the power is
applied.
Proceed to Section 5.4, “Antenna Alignment.”
5. If you are using sound, connect a coaxial cable from
the audio input of the monitor to the AUDIO OUT
connector on the WLV2000 wireless receiver. Connect another coaxial cable from the camera, microphone amplifier, or other audio source to the
AUDIO connector on the WLV2000 wireless transmitter.
NOTE: Do not refer to Table A. The video
cables are 75 ohms. The audio impedance is
600 ohms and you must use 600-ohm cables.
Proceed to Section 5.3, “Power.”
Pelco Manual C914M (7/96) 5
Table A. Video Coaxial Cable Wiring Distances
Cable Type Maximum Distance
RG59 750 ft (229 m)
RG6 1,000 ft (305 m)
RG11 1,500 ft (457 m )
Page 10

Figure 4. Power Connections (Outdoor Models Only)
5.4 ANTENNA ALIGNMENT
NOTE: This section applies only to the
WLV2000 wireless receiver.
1. Connect a high impedance voltmeter to the RSSI
(Received Signal Strength Indication) test points
on the bottom of the enclosure:
a. Set the voltmeter on a low-volt DC scale (3 or
10 volts).
b. Connect the negative lead from the voltmeter
to the flat-head Phillips screw on the left on
the bottom of the enclosure (part of item I in
Figure 6).
c. Connect the positive lead from the voltmeter
to the Phillips screw to the right of the screw
where you connected the negative lead.
6 Pelco Manual C914M (7/96)
d. Adjust the enclosure until the voltmeter indi-
cates minimum voltage (strongest RSSI signal). Refer to Figure 5 as a guideline to see
how the voltage changes with distance. The
meter reading will vary depending on the obstacles between antennas and the types of antennas used.
e. Tighten all screws on the mounting bracket.
Page 11

SYSTEM WLV2000 PATH LOSS
RANGE SYSTEM NO OBSTACLES
Feet (Meters) RSSI dBm
2,025 (617) 0.634 -96
1,600 (488) 0.579 -94
1,275 (389) 0.532 -92
1,015 (309) 0.489 -90
805 (245) 0.448 -88
640 (195) 0.412 -86
507 (155) 0.377 -84
403 (123) 0.347 -82
320 (98) 0.318 -80
255 (78) 0.292 -78
202 (62) 0.269 -76
160 (49) 0.248 -74
128 (39) 0.229 -72
101 (31) 0.214 -70
80 (24) 0.200 -68
64 (20) 0.188 -66
51 (16) 0.179 -64
40 (12) 0.173 -62
32 (10) 0.170 -60
25 (8) 0.168 -58
20 (6) 0.166 -56
16 (5) 0.165 -54
13 (4) 0.164 -52
RSSI versus LOSS-OF-SIGNAL RANGE
WLV2000 WIRELESS VIDEO SYSTEM
WITH OMNIDIRECTIONAL TRANSMIT ANTENNA
AND HIGH GAIN LINEAR RECEIVE ANTENNA
1
0.5
RSSI (DC Volts)
0
160
80
320
640
1275
2025
WITH NO OBSTACLES BETWEEN ANTENNAS
L.O.S. RANGE (Feet)
40
20
Figure 5. Antenna Signal Strength versus Distance
5.5 TROUBLESHOOTING
CAUTION: Do not service the
transmitter or receiver. If you
open the transmitter or receiver
unit, you will break the seals and
void the warranty.
5.5.1 No Picture
1. To verify if the camera is operating properly, connect the camera directly to a monitor that you know
is good.
2. To verify if the monitor is operating properly, connect the monitor directly to a camera that you know
is good.
3. Check the cables between the wireless transmitter
and receiver and the equipment to which they connect.
4. Check the power supply voltages for the wireless
transmitter and receiver. If the voltage at the transmitter or receiver is less than 11 VDC, replace the
unit’s power supply.
5.5.2 Poor Picture
1. Refer to Section 4.0, “Antenna Location,” and
verify that the transmit and receive antennas are
positioned properly.
2. If you can not eliminate interference from other
signals, contact Pelco about replacing your wireless transmitter and receiver with units that operate on a different frequency.
Pelco Manual C914M (7/96) 7
Page 12

6.0 EXPLODED ASSEMBLY DIAGRAM (OUTDOOR MODELS ONLY)
Figure 6. Outdoor Enclosure Exploded Assembly Diagram
8 Pelco Manual C914M (7/96)
Page 13

6.1 MECHANICAL PARTS LIST
Item Quantity Description Part Number
119-Pin Connector CON03-06-1091
22Gland EH400010003
32Gland Nut EH400010004
41Gland CX950010000
51Gland Nut CX950010001
62Fuse Holder FUS342012L
71Power Supply Assembly PCB9000281ASSY
813-Position Terminal Block TRB3-140Y
91Transformer TRF21162.01.OCM
10 1 Power Cord (not shown) WIRC1318006BL
11 1 Transmitter/Receiver Mounting Plate WLV4100COMP
12 4 Fixed Tilt Bracket WLV4155COMP
13 4 Adjustment Bracket WLV4156COMP
14 1 Enclosure Box WLVEH4000COMP
15 1 Mounting Plate WLVEH4151COMP
16 1 Antenna Mounting Bracket WLVEH5152COMP
17 1 Wireless Transmitter or Receiver —
18 1 Receiver Antenna —
19 2 1/4 Amp, Slow Blow, 3AG Fuse FUS1/4SB
A8Screw, 1/4-20 x 1/2-inch ZH1/4-20X.500CH
B12Split Lock Washer, 1/4-inch ZH1/4LWSSL
C12Flat Washer ZH260X562X65C
D4Bolt, 1/4-20 x 5/8-inch ZH1/420X.625CH
E41/4-20 Nut ZH1/4-20NUTCH
F6Screw, 10-32 x 1/2-inch, Pan Head, Phillips ZH10-32X.500SPP
G6Internal Tooth Lock Washer, #10 ZH10LWSIS
H6Flat Washer, #10 ZH204X436X60C
I2Screw, 8-32 x 1/2-inch, Flat Head, Phillips ZH8-32X.500SFS
J48-32 Nut ZH8-32NUTSH
K10Screw, 6-32 x 3/8-inch, Pan Head, Phillips ZH6-32X.375SPP
L12Internal Tooth Lock Washer, #6 ZH6LWSIS
M8Flat Washer, #6 ZH148X375X32C
N46-32 Nut ZH6-32NUTSH
O2Screw, 6-32 x 1/2-inch, Pan Head, Phillips ZH6-32X.500SPP
P4Screw, 4-40 x 1/4-inch, Pan Head, Phillips ZH4-40X.250SPP
Q4Internal Tooth Lock Washer, #4 ZH4LWSIS
Pelco Manual C914M (7/96) 9
Page 14

7.0 INTERCEPT® DOME MODIFICATION
To use the WLV500 wireless control system with Intercept® dome drives DD08CXX, DD08EXX,
DD14CXX, or DD14EXX (domes with 360 degree rotation), the following steps must be performed:
NOTE: Refer to Figure 7, which gives a general layout of the dome drive and indicates the
items that need to be accessed in order to accomplish the change.
1. Refer to Figure 7 and remove the cover that houses
the VIDEO, CPU and POWER SUPPLY boards
plugged into the Coaxitron® receiver backplane.
2. After removing the cover, extract the VIDEO
BOARD. Remove or clip one lead of the 75-ohm
termination resistor: R26 on Rev. F boards or R20
on Rev. G boards. Also remove or clip one lead of
capacitor C56 on Rev. G boards. Refer to Figure 8
for the location of the components. Reinstall the
board after removing or clipping the components.
3. Disconnect all plugs and connectors to the
Coaxitron® receiver backplane and remove the
screws whose locations are indicated in Figure 7
(that part of the card cage holding the boards will
also detach as a unit along with the backplane).
4. After freeing the backplane and card cage, orient
the backplane to display the back of the backplane.
Solder wires as indicated in Figure 10: Solder a
wire from P13 to pin 1 of Plug 8 (slip ring plug)
and solder a wire from P14 to pin 8 of Plug 8 (slip
ring plug).
NOTE: This step has changed Plug 13 on the
batwing by making pin 11 ground and pin 19
video core. This is indicated in the abbreviated
reference wiring diagram at the bottom of Figure 10.
5. Reinstall the backplane and card cage.
6. On the back box, use pins 11 and 19 to create a
coaxial connection to the WLV2000 wireless transmitter. Connect the WLV500 receiver to the existing video connection (refer to Figures 9 and 10).
Figure 7. Dome Drive Layout
10 Pelco Manual C914M (7/96)
Page 15

Figure 8. Video Board Component Locations
Figure 9. Block Diagram
Pelco Manual C914M (7/96) 11
Page 16

Figure 10. Coaxitron® Receiver Backplane PCB - Wire Lead Additions and Wiring Diagram
12 Pelco Manual C914M (7/96)
Page 17

8.0 WIRING DIAGRAM
NOTE: Output voltage is 15 VDC, not 10.5
Figure 11. Outdoor Enclosure Wiring Diagram
9.0 MAINTENANCE
In cold, wet areas periodically visit the transmitter and
receiver sites to prevent the buildup of snow and ice on
the enclosures. A buildup of ice and snow will severely
attenuate the microwave signals, producing snow in the
picture. If the buildup is heavy enough, the system will
stop working.
The enclosure has two one-quarter ampere slow-blow
fuses. Fuse F1 protects the input power (24, 120, or
230 VAC). Fuse F2 is for 24 VAC operation only. Refer to Figure 4. To order replacement fuses, specify the
part number FUS1/4SB.
10.0 SPECIFICATIONS
GENERAL (WLV500 AND WLV2000)
Power Input: 24, 120, or 230 VAC
Operating Distance: 2,000 feet (609.6 m) line-of-
sight maximum range
Construction
Enclosure: Fiberglass box with NEMA
4X rating
Transmitter/
Receiver: Aluminum
IEC 144 Rating: IP66
Dimensions: 4.3" H x 11.5" L x 9.5" W
(10.92 x 29.21 x 24.13 cm)
Cable Entry: One (1) gland for power cord
Two (2) glands for video and
audio coaxial cables
Locking Method: Latches with holes for pad-
locks
Weight (including wireless transmitter or receiver)
WLV500 Trans: 9.5 lbs (4.31 kg)
WLV2000 Trans: 9.5 lbs (4.31 kg)
WLV500 Receiver 10.2 lbs (4.63 kg)
WLV2000 Receiver 10.4 lbs (4.72 kg)
Shipping (all units): 47.25 lbs (21.43 kg)
Operating
Temperature: -4° to 149° F (-20° to 65° C)
Storage
Temperature: -58° to 185° F (-50° to 85° C)
Humidity: 90% non-condensing
ELECTRICAL
DATA (WLV500)
Format: NRZ
Pulse Width: 1 microsecond.
Duty Cycle: 50%
Level (Video
Compatible): 1 V p-p
Pelco Manual C914M (7/96) 13
Page 18

Impedance: 75 ohms
Connectors: BNC
RF (WLV500)
Transmitter
Radiated Power: FCC Part 15 (15.249)
Transmit Antenna: Attached, circular-polarized,
patch antenna
Receive Antenna: Removable, 11 dBi, circular-
polarized, patch antenna
Receiver Connector: TNC
Receiver Input
Impedance: 50 ohms
Maximum VSWR: Open and short-circuit pro-
tected, all phases
Transmit Antenna: Attached circular polarized
patch antenna with 90° trans-
mission path
Connectors:
Video Input BNC
Audio Input BNC
RECEIVER (WLV2000)
Operating Frequencies
(Factory Set):
WLV2000KTE-1R 2421.5 MHz
WLV2000KTE-3L 2461.5 MHz
Frequency Stability: ±0.01%
Frequency Range: 2400 to 2483 MHz
Operating Frequencies
(Factory Set):
WLV500KTE-1L 2481 MHz
WLV500KTE-3R 2402 MHz
Modulation: Wideband FM
Frequency Stability: ±0.005%
TRANSMITTER (WLV2000)
Operating Frequencies
(Factory Set):
WLV2000KTE-1R 2421.5 MHz
WLV2000KTE-3L 2461.5 MHz
Transmitter Power: FCC Part 15 (15.249)
Frequency Stability: ±0.01%
Modulation: FM
Video Input: 1.0 volt P-P, 75 ohms
NTSC, PAL, SECAM (Color)
EIA-170 (B &W)
EIA-330 (CCTV)
Audio Subcarrier: 6.5 MHz above video fre-
quency
Audio Input
Impedance: 600 ohms
Video Output: 1.0 volt P-P, 75 ohms
NTSC, PAL, SECAM (Color)
EIA-170 (B &W)
EIA-330 (CCTV)
Image Rejection: 30 dB minimum
RF Input
Impedance: 50 ohms
Audio Output
Impedance: 600 ohms
Receive Antenna: Detachable, polarized, 11 dBi
Connectors:
Video Output BNC
Audio Output BNC
Antenna TNC
AUDIO (WLV2000)
Frequency Response: 100 Hz to 15 KHz
Level: 1V p-p
Impedance: 600 ohms
Connector: BNC
Pre-Emphasis/
De-Emphasis: 75 microseconds
14 Pelco Manual C914M (7/96)
Page 19

11.0 WARRANTY AND RETURN
INFORMATION
WARRANTY
Pelco will repair or replace, without charge, any merchandise proved
defective in material or workmanship for a period of one year after the date
of shipment.
Exceptions to this warranty are as noted below:
• Five years on FT/FR8000 Series fiber optic products.
• Three years on Genex
keyboard).
• Three years on Camclosure
CC3701H-2, CC3701H-2X, CC3751H-2, CC3651H-2X, MC3651H-2,
and MC3651H-2X camera models, which have a five-year warranty.
• Two years on standard motorized or fixed focal length lenses.
• Two years on Legacy
DF5/DF8 Series fixed dome products.
• Two years on Spectra
ing when used in continuous motion applications.
• Two years on Esprit
®
Series products (multiplexers, server, and
®
and fixed camera models, except the
®
, CM6700/CM6800/CM9700 Series matrix, and
®
, Esprit®, ExSite™, and PS20 scanners, includ-
®
and WW5700 Series window wiper (excluding
wiper blades).
• Eighteen months on DX Series digital video recorders, NVR300
Series network video recorders, and Endura
™
Series distributed
network-based video products.
• One year (except video heads) on video cassette recorders (VCRs).
Video heads will be covered for a period of six months.
• Six months on all pan and tilts, scanners or preset lenses used in
continuous motion applications (that is, preset scan, tour and auto scan
modes).
Pelco will warrant all replacement parts and repairs for 90 days from the
date of Pelco shipment. All goods requiring warranty repair shall be sent
freight prepaid to Pelco, Clovis, California. Repairs made necessary by
reason of misuse, alteration, normal wear, or accident are not covered
under this warranty.
Pelco assumes no risk and shall be subject to no liability for damages or
loss resulting from the specific use or application made of the Products.
Pelco’s liability for any claim, whether based on breach of contract,
negligence, infringement of any rights of any party or product liability,
relating to the Products shall not exceed the price paid by the Dealer to
Pelco for such Products. In no event will Pelco be liable for any special,
incidental or consequential damages (including loss of use, loss of profit
and claims of third parties) however caused, whether by the negligence
of Pelco or otherwise.
The above warranty provides the Dealer with specific legal rights. The
Dealer may also have additional rights, which are subject to variation from
state to state.
If a warranty repair is required, the Dealer must contact Pelco at (800) 2899100 or (559) 292-1981 to obtain a Repair Authorization number (RA),
and provide the following information:
1. Model and serial number
2. Date of shipment, P.O. number, Sales Order number, or Pelco invoice
number
3. Details of the defect or problem
If there is a dispute regarding the warranty of a product which does not fall
under the warranty conditions stated above, please include a written
explanation with the product when returned.
Method of return shipment shall be the same or equal to the method by
which the item was received by Pelco.
RETURNS
In order to expedite parts returned to the factory for repair or credit, please
call the factory at (800) 289-9100 or (559) 292-1981 to obtain an
authorization number (CA number if returned for credit, and RA number
if returned for repair).
All merchandise returned for credit may be subject to a 20% restocking
and refurbishing charge.
Goods returned for repair or credit should be clearly identified with the
assigned CA or RA number and freight should be prepaid. Ship to the
appropriate address below.
If you are located within the continental U.S., Alaska, Hawaii or Puerto
Rico, send goods to:
Service Department
Pelco
3500 Pelco Way
Clovis, CA 93612-5699
If you are located outside the continental U.S., Alaska, Hawaii or Puerto
Rico and are instructed to return goods to the USA, you may do one of the
following:
If the goods are to be sent by a COURIER SERVICE, send the goods to:
If the goods are to be sent by a FREIGHT FORWARDER, send the goods
to:
Pelco
3500 Pelco Way
Clovis, CA 93612-5699 USA
Pelco c/o Expeditors
473 Eccles Avenue
South San Francisco, CA 94080 USA
Phone: 650-737-1700
Fax: 650-737-0933
Pelco, the Pelco logo, Camclosure, Esprit,
Genex, Legacy, and Spectra are registered
trademarks of Pelco.
Endura and ExSite are trademarks of Pelco.
© Copyright 1996, Pelco. All rights reserved.
Pelco Manual C914M (7/96) 15
Page 20

Pelco
3500 Pelco Way, Clovis, CA 93612-5699 (559) 292-1981 • (800) 289-9100
FAX (800) 289-9150 or (559) 292-3827
International customers call 1-559-292-1981 or FAX 1-559-348-1120
(Product specifications subject to change without notice.)
C914M
 Loading...