


VideoXpert Professional
Power 2 Series Server™
QuickStart Guide
Before You Begin
Before you connect and configure your system:
l Update your new VideoXpert™ Software to the latest version, which is available at
www.pelco.com.
l Ensure that the Microsoft OS on each computer on your system, including this server, has the latest
updates that address the most current known vulnerabilities. You can find this information at
www.microsoft.com.
On a continual basis:
l Frequently update the OS to ensure newly discovered vulnerabilities are patched as soon as a patch
is available.
l Frequently update anti-virus libraries with the latest patches.
Initial System Configuration
Your Video Management System (VMS), VideoXpert Professional Power 2 Series Server™, comes fully
prepared for use, with all drives and software installed. Just plug your server into a network with one or
more VideoXpert Workstations™, and you are ready to begin using VideoXpert Professional (VxPro)™.
For more information about your VxPro hardware and software, go to www.pelco.com/vxpro.
About VxPro
l Your system comes with the server-side components of VxPro installed. VxOpsCenter™ is not
installed; you should not use this system as a client workstation. See Using VxOpsCenter with
VxPro for more information.
l VxPro Server™ records video, routes media, administers users and permissions, and performs all
the server-side operations that you would expect from your VMS.
C5698M-F | 09/20 1
VideoXpert Professional Power 2 Series Server™ QuickStart Guide
l System performance varies based on your environment (for example: the number of channels).
l VxToolbox™ is the administrative application for VxPro; from VxToolbox, you can configure VxPro
servers and find cameras.
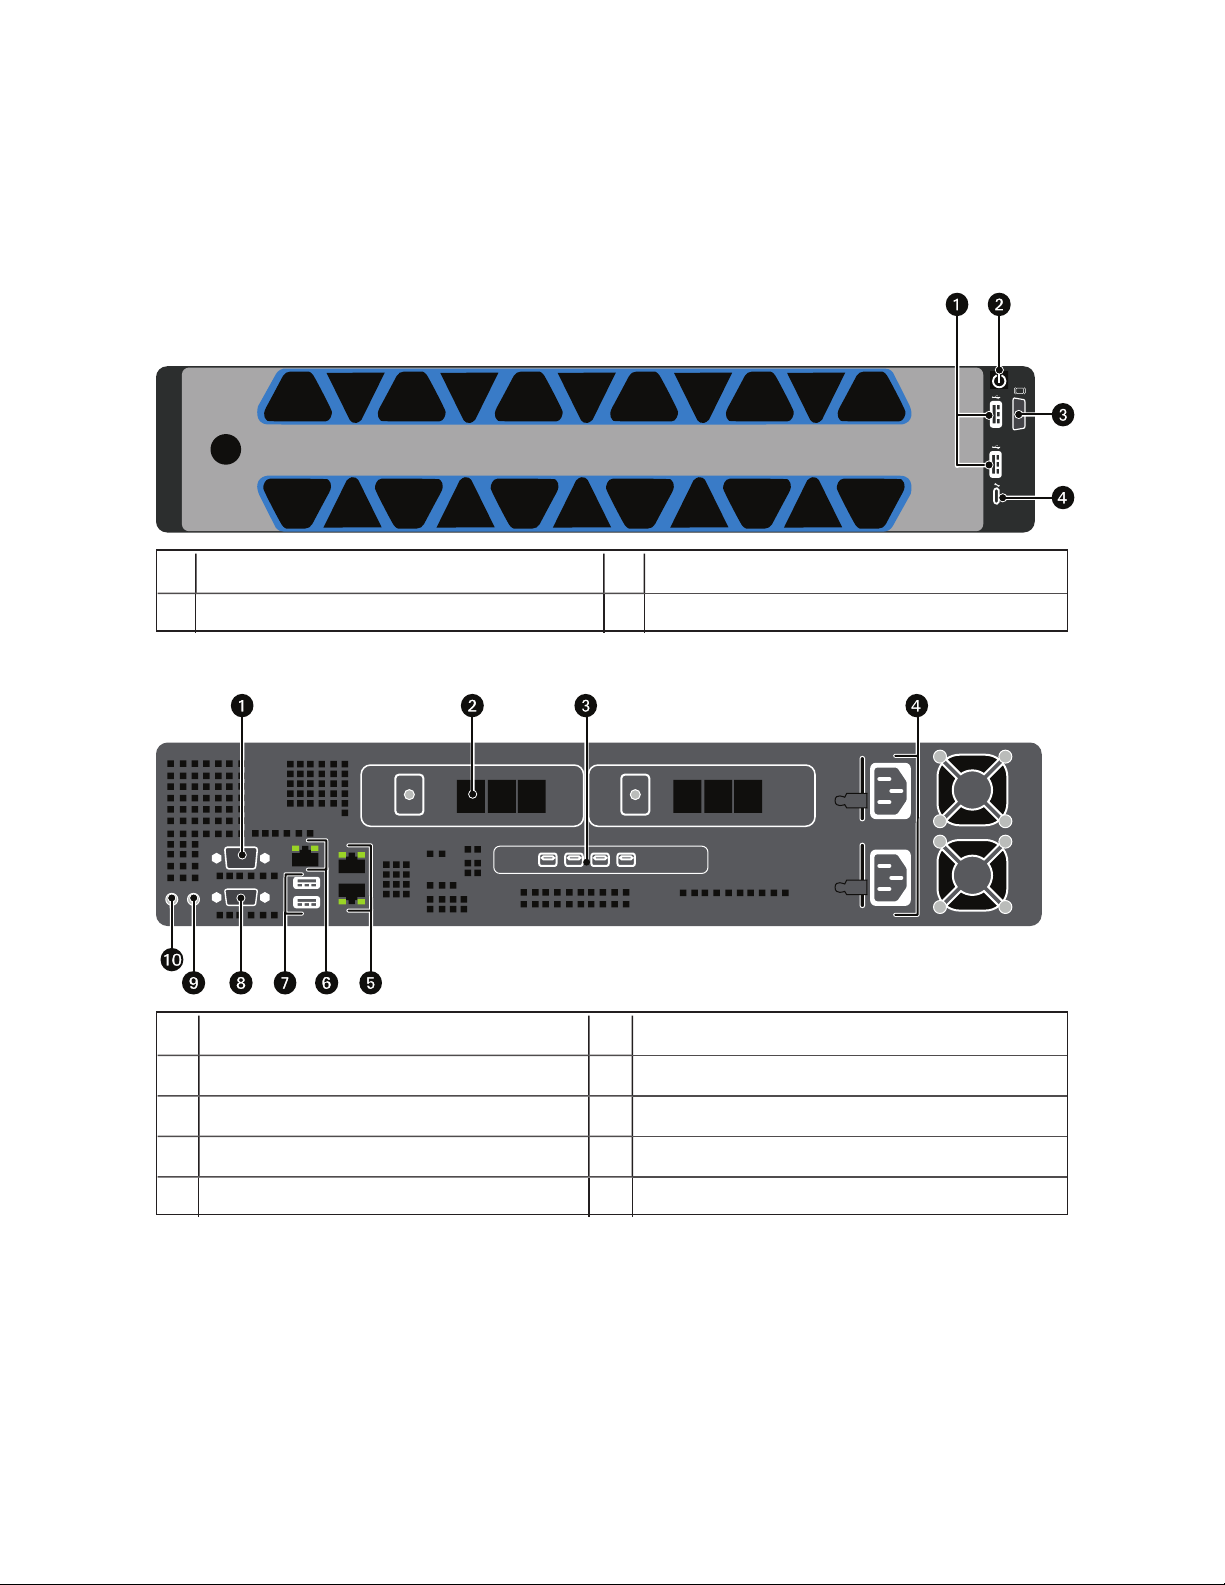
Locating Connections on the Front Panel
1 USB ports 3 Do not use (VGAport)
2 Power button and indicator 4 iDRACdirect port
Locating Connections on the Back Panel
1 Serial port 6 iDRACdedicated network port
2 Drive (rear) 7 USB ports
3 Videocontroller, use instead of VGA(8) 8 Do not use (VGAport)
4 Power supply units (PSU) 9 CMApower port
5 Ethernet ports 10 System identification button
C5698M-F | 09/20 2

VideoXpert Professional Power 2 Series Server™ QuickStart Guide
Setting Up Your System
1. Unpack the server.
2. (Optional)Mount the Power 2 Server in a rack.
The Power 2 Server ships with a cable management mount bracket at the end of each rack rail, as
shown in the red box in the image below.
This extends the server depth to 1000 mm, as opposed to 800 mm. To mount the Power 2 Server in
a rack:
l For a standard rack that has 800 mm depth, remove the cable management mount brackets
from the rack rails.
l For a rack that has 1000 mm depth, do not remove the cable management mount brackets.
3. Connect the system and its peripherals.
l Connect the monitor to an independentvideo controller (item 3 in Locating Connections on the
Back Panel); onboard VGA is disabled.
l Connect the VxPro system to the network using one of the Ethernetports (item 5 in Locating
Connections on the Back Panel).
l You can also connect to the iDRACport (item 6 in Locating Connections on the Back Panel) to
configure and monitor the system remotely; however, the iDRAC port will not connect the
VxPro system to the network.
4. Connect both power supply units (item 4 in Locating Connections on the Back Panel) to an
electrical outlet.
5. Power on the system by pressing the power button on the front panel or using iDRAC.
Getting Started with VxPro
Upon starting your VxPro system, you will start a fully-functional 60-day trial of the VxPro software. You
must install a license before the 60-day period is over to continue using VxPro.
1. Start your VxPro hardware.
2. Log on using the following default Windows user account credentials:
l Username:Pelco
l Password:Pel2899100
3. Pelco recommends that you change the default Windows password immediately, to secure access
to the system.
This automatically opens the Initialize Pelco VideoXpert Professional window.
C5698M-F | 09/20 3

VideoXpert Professional Power 2 Series Server™ QuickStart Guide
4. Click Get Started. This starts the initialization process.
Note:
This also starts the 60-day trial of the VxPro software.
5. If the initialization process is interrupted, or you need to launch it again for any reason, do one of the
following:
l Log out and log back in.
l Reboot the system.
6. When prompted by VxToolbox (which launches automatically), set the password for the admin user
on your VxPro system, and then click Set Password.
7. When prompted, enter the Company Name and the VideoXpert System Name, and then click Save.
This is the information by which the Pelco licensing portal will recognize your VxPro server.
Caution:
After these values are set, they cannot be changed.
8. Exit VxToolbox.
9. Go to www.pelco.com/vxpro to download and upgrade to the latest version of the VxPro software.
10. Launch VxToolbox from the desktop icon.
11. Click the System tab, click the General Settings tab on the System page, and then enter a friendly
name in the VideoXpert System Name field. This is the name by which VxOpsCenter workstations
and aggregation servers will recognize your VxPro server.
12. Click Save Settings.
13. Find and add cameras to the VxPro system:
a. Click the Devices tab.
b.
Click the Advanced Discovery Options icon ( ) to the right of the Quick Discovery icon ( ).
c. Click Quick Discovery and Add.
All Devices and Data Sources that are discovered by VxToolbox are added to the VxPro
system to which you are connected.
VxPro is now recording cameras and ready to be accessed by VxOpsCenter workstations. You can add
users to the system, manually add cameras, configure events, or perform other administrative and operator
tasks. For more information about VxPro hardware and software, and to access the current version of the
VideoXpertProfessional Operations Manual, go to www.pelco.com/vxpro.
Caution:The 60-day trial of the VxPro software has begun. Before the 60-day period is over, activate
SUPs and install all channel licenses for your system. See the current version of the
VideoXpertProfessional Operations Manual for instructions.
Using VxOpsCenter with VxPro
Your system does not have VxOpsCenter installed. Connect to your system using a workstation running
VxOpsCenter over a network.
Note: You cannot run VxOpsCenter on the VxPro server. VxOpsCenter must be installed on a
separate client machine.
For more information about VxOpsCenter, go to www.pelco.com/vxpro.
C5698M-F | 09/20 4

VideoXpert Professional Power 2 Series Server™ QuickStart Guide
Pelco, Inc.
625 W. Alluvial Ave., Fresno, California 93711 United States
(800) 289-9100 Tel
(800) 289-9150 Fax
+1 (559) 292-1981 International Tel
+1 (559) 348-1120 International Fax
www.pelco.com
Pelco, the Pelco logo, and other trademar ksassociated with Pelco products referred to in thispublication are trademarks of Pelco, Inc.
or its affiliates. ONVIF and the ONVIF logo are trademarks of ONVIF Inc. All other product names and services are the propertyof their
respective companies. Product specifications and availabilityare subject to change without notice.
© Copyright 2020, Pelco, Inc. All rights reserved.
 Loading...