


VideoXpert Enterprise Server Setup and
the Admin Portal
v 2.2 User Guide
USER GUIDE
C5668M-Q | 4/18

Contents
Installation and Configuration Process Overview . . . . . . . . . . . . . . . . . . . . . . . . . . . . . . . . . . . . . . . . . . . . . . . . . . . . . . . . . . . . . . . . .1
VideoXpert Hardware Vs Software Distributions . . . . . . . . . . . . . . . . . . . . . . . . . . . . . . . . . . . . . . . . . . . . . . . . . . . . . . . . . . . . . 1
Single Server Vs Clustered Installations . . . . . . . . . . . . . . . . . . . . . . . . . . . . . . . . . . . . . . . . . . . . . . . . . . . . . . . . . . . . . . . . . . . .1
Installing Core . . . . . . . . . . . . . . . . . . . . . . . . . . . . . . . . . . . . . . . . . . . . . . . . . . . . . . . . . . . . . . . . . . . . . . . . . . . . . . . . . . . . . . . .1
Logging In . . . . . . . . . . . . . . . . . . . . . . . . . . . . . . . . . . . . . . . . . . . . . . . . . . . . . . . . . . . . . . . . . . . . . . . . . . . . . . . . . . . . . . . . . . . 2
Configuring your VideoXpert Site . . . . . . . . . . . . . . . . . . . . . . . . . . . . . . . . . . . . . . . . . . . . . . . . . . . . . . . . . . . . . . . . . . . . . . . . .2
Installing the Media Gateway . . . . . . . . . . . . . . . . . . . . . . . . . . . . . . . . . . . . . . . . . . . . . . . . . . . . . . . . . . . . . . . . . . . . . . . . . . . .4
Licensing Your System . . . . . . . . . . . . . . . . . . . . . . . . . . . . . . . . . . . . . . . . . . . . . . . . . . . . . . . . . . . . . . . . . . . . . . . . . . . . . . . . . 4
Using LDAP Authentication . . . . . . . . . . . . . . . . . . . . . . . . . . . . . . . . . . . . . . . . . . . . . . . . . . . . . . . . . . . . . . . . . . . . . . . . . . . . . . 5
Discovering, Adding, and Commissioning Devices in VideoXpert . . . . . . . . . . . . . . . . . . . . . . . . . . . . . . . . . . . . . . . . . . . . . . . . . . . .7
Adding Pelco Cameras and Devices or Third-Party Servers Running VideoXpert . . . . . . . . . . . . . . . . . . . . . . . . . . . . . . . . . . . .7
Adding Third-Party Cameras . . . . . . . . . . . . . . . . . . . . . . . . . . . . . . . . . . . . . . . . . . . . . . . . . . . . . . . . . . . . . . . . . . . . . . . . . . . . .7
Ensuring Driver Support Using VX Storage Failover . . . . . . . . . . . . . . . . . . . . . . . . . . . . . . . . . . . . . . . . . . . . . . . . . . . . . . . . . . . 8
Adding Pelco Devices to VideoXpert . . . . . . . . . . . . . . . . . . . . . . . . . . . . . . . . . . . . . . . . . . . . . . . . . . . . . . . . . . . . . . . . . . . . . . .8
Manually Adding Cameras or Encoders to VideoXpert . . . . . . . . . . . . . . . . . . . . . . . . . . . . . . . . . . . . . . . . . . . . . . . . . . . . . . . . .9
Commissioning and Decommissioning Devices . . . . . . . . . . . . . . . . . . . . . . . . . . . . . . . . . . . . . . . . . . . . . . . . . . . . . . . . . . . . . .9
Cameras Requiring Credentials (Closed Authentication) . . . . . . . . . . . . . . . . . . . . . . . . . . . . . . . . . . . . . . . . . . . . . . . . . . . . . . .9
Configuring Device Discovery for Clustered Environments . . . . . . . . . . . . . . . . . . . . . . . . . . . . . . . . . . . . . . . . . . . . . . . . . . . .10
Deleting Devices from the Registry . . . . . . . . . . . . . . . . . . . . . . . . . . . . . . . . . . . . . . . . . . . . . . . . . . . . . . . . . . . . . . . . . . . . . .10
Assigning Pelco Cameras to Recorders . . . . . . . . . . . . . . . . . . . . . . . . . . . . . . . . . . . . . . . . . . . . . . . . . . . . . . . . . . . . . . . . . . .12
Configuring VideoXpert Storage Recorders . . . . . . . . . . . . . . . . . . . . . . . . . . . . . . . . . . . . . . . . . . . . . . . . . . . . . . . . . . . . . . . . 13
Recording Groups, Schedules, and Triggers . . . . . . . . . . . . . . . . . . . . . . . . . . . . . . . . . . . . . . . . . . . . . . . . . . . . . . . . . . . . . . . . 14
Advanced VideoXpert Storage Configuration . . . . . . . . . . . . . . . . . . . . . . . . . . . . . . . . . . . . . . . . . . . . . . . . . . . . . . . . . . . . . . . 17
Aggregating Systems . . . . . . . . . . . . . . . . . . . . . . . . . . . . . . . . . . . . . . . . . . . . . . . . . . . . . . . . . . . . . . . . . . . . . . . . . . . . . . . . . . . . . 22
Tags . . . . . . . . . . . . . . . . . . . . . . . . . . . . . . . . . . . . . . . . . . . . . . . . . . . . . . . . . . . . . . . . . . . . . . . . . . . . . . . . . . . . . . . . . . . . . . . . . . . 23
Creating Global Tags . . . . . . . . . . . . . . . . . . . . . . . . . . . . . . . . . . . . . . . . . . . . . . . . . . . . . . . . . . . . . . . . . . . . . . . . . . . . . . . . . . 23
Editing Tags . . . . . . . . . . . . . . . . . . . . . . . . . . . . . . . . . . . . . . . . . . . . . . . . . . . . . . . . . . . . . . . . . . . . . . . . . . . . . . . . . . . . . . . . . 23
Deleting Tags . . . . . . . . . . . . . . . . . . . . . . . . . . . . . . . . . . . . . . . . . . . . . . . . . . . . . . . . . . . . . . . . . . . . . . . . . . . . . . . . . . . . . . .24
Assigning Tags to Sources . . . . . . . . . . . . . . . . . . . . . . . . . . . . . . . . . . . . . . . . . . . . . . . . . . . . . . . . . . . . . . . . . . . . . . . . . . . . . 24
Managing Users . . . . . . . . . . . . . . . . . . . . . . . . . . . . . . . . . . . . . . . . . . . . . . . . . . . . . . . . . . . . . . . . . . . . . . . . . . . . . . . . . . . . . . . . . 25
Internal and Restricted User Accounts . . . . . . . . . . . . . . . . . . . . . . . . . . . . . . . . . . . . . . . . . . . . . . . . . . . . . . . . . . . . . . . . . . . .25
Adding Users . . . . . . . . . . . . . . . . . . . . . . . . . . . . . . . . . . . . . . . . . . . . . . . . . . . . . . . . . . . . . . . . . . . . . . . . . . . . . . . . . . . . . . . . 25
Duplicating Users . . . . . . . . . . . . . . . . . . . . . . . . . . . . . . . . . . . . . . . . . . . . . . . . . . . . . . . . . . . . . . . . . . . . . . . . . . . . . . . . . . . . 26
Deleting Users . . . . . . . . . . . . . . . . . . . . . . . . . . . . . . . . . . . . . . . . . . . . . . . . . . . . . . . . . . . . . . . . . . . . . . . . . . . . . . . . . . . . . . . 26
Deactivating and Activating Users . . . . . . . . . . . . . . . . . . . . . . . . . . . . . . . . . . . . . . . . . . . . . . . . . . . . . . . . . . . . . . . . . . . . . . .26
Resetting Passwords . . . . . . . . . . . . . . . . . . . . . . . . . . . . . . . . . . . . . . . . . . . . . . . . . . . . . . . . . . . . . . . . . . . . . . . . . . . . . . . . . . 26
Assigning Roles . . . . . . . . . . . . . . . . . . . . . . . . . . . . . . . . . . . . . . . . . . . . . . . . . . . . . . . . . . . . . . . . . . . . . . . . . . . . . . . . . . . . . . 27
Managing Roles . . . . . . . . . . . . . . . . . . . . . . . . . . . . . . . . . . . . . . . . . . . . . . . . . . . . . . . . . . . . . . . . . . . . . . . . . . . . . . . . . . . . .27
Configuring and Managing Events . . . . . . . . . . . . . . . . . . . . . . . . . . . . . . . . . . . . . . . . . . . . . . . . . . . . . . . . . . . . . . . . . . . . . . . . . . .34
Setting Event Log Retention Periods . . . . . . . . . . . . . . . . . . . . . . . . . . . . . . . . . . . . . . . . . . . . . . . . . . . . . . . . . . . . . . . . . . . . . .34
Using the Event Log . . . . . . . . . . . . . . . . . . . . . . . . . . . . . . . . . . . . . . . . . . . . . . . . . . . . . . . . . . . . . . . . . . . . . . . . . . . . . . . . . . . . . . . 36
Responding to Events . . . . . . . . . . . . . . . . . . . . . . . . . . . . . . . . . . . . . . . . . . . . . . . . . . . . . . . . . . . . . . . . . . . . . . . . . . . . . . . . . 36
Troubleshooting and Downloading Server Logs . . . . . . . . . . . . . . . . . . . . . . . . . . . . . . . . . . . . . . . . . . . . . . . . . . . . . . . . . . . . . 36

Watching Live Video . . . . . . . . . . . . . . . . . . . . . . . . . . . . . . . . . . . . . . . . . . . . . . . . . . . . . . . . . . . . . . . . . . . . . . . . . . . . . . . . . . . . . .37
Viewing Settings and Behaviors . . . . . . . . . . . . . . . . . . . . . . . . . . . . . . . . . . . . . . . . . . . . . . . . . . . . . . . . . . . . . . . . . . . . . . . . . 37
Using PTZ Controls . . . . . . . . . . . . . . . . . . . . . . . . . . . . . . . . . . . . . . . . . . . . . . . . . . . . . . . . . . . . . . . . . . . . . . . . . . . . . . . . . . . 38
Downloading Reports . . . . . . . . . . . . . . . . . . . . . . . . . . . . . . . . . . . . . . . . . . . . . . . . . . . . . . . . . . . . . . . . . . . . . . . . . . . . . . . . . . . . .39
Event Types and Reporting . . . . . . . . . . . . . . . . . . . . . . . . . . . . . . . . . . . . . . . . . . . . . . . . . . . . . . . . . . . . . . . . . . . . . . . . . . . . .39
Additional Setup . . . . . . . . . . . . . . . . . . . . . . . . . . . . . . . . . . . . . . . . . . . . . . . . . . . . . . . . . . . . . . . . . . . . . . . . . . . . . . . . . . . . . . . . . 46
Getting Started . . . . . . . . . . . . . . . . . . . . . . . . . . . . . . . . . . . . . . . . . . . . . . . . . . . . . . . . . . . . . . . . . . . . . . . . . . . . . . . . . . . . . . 46
Installing an NTP Client Application . . . . . . . . . . . . . . . . . . . . . . . . . . . . . . . . . . . . . . . . . . . . . . . . . . . . . . . . . . . . . . . . . . . . . . 49
SNMP Monitoring . . . . . . . . . . . . . . . . . . . . . . . . . . . . . . . . . . . . . . . . . . . . . . . . . . . . . . . . . . . . . . . . . . . . . . . . . . . . . . . . . . . .50
Migrating to VideoXpert . . . . . . . . . . . . . . . . . . . . . . . . . . . . . . . . . . . . . . . . . . . . . . . . . . . . . . . . . . . . . . . . . . . . . . . . . . . . . . .50
Backing Up VideoXpert . . . . . . . . . . . . . . . . . . . . . . . . . . . . . . . . . . . . . . . . . . . . . . . . . . . . . . . . . . . . . . . . . . . . . . . . . . . . . . . . . . . . 52
Configuring Backups . . . . . . . . . . . . . . . . . . . . . . . . . . . . . . . . . . . . . . . . . . . . . . . . . . . . . . . . . . . . . . . . . . . . . . . . . . . . . . . . . .52
Taking a One-Time Backup . . . . . . . . . . . . . . . . . . . . . . . . . . . . . . . . . . . . . . . . . . . . . . . . . . . . . . . . . . . . . . . . . . . . . . . . . . . . .52
Scheduling Backups . . . . . . . . . . . . . . . . . . . . . . . . . . . . . . . . . . . . . . . . . . . . . . . . . . . . . . . . . . . . . . . . . . . . . . . . . . . . . . . . . .53
Restoring the Database (Replacing a Member of a Cluster) . . . . . . . . . . . . . . . . . . . . . . . . . . . . . . . . . . . . . . . . . . . . . . . . . . . 53
Restoring the Database (Replacing an Entire Environment) . . . . . . . . . . . . . . . . . . . . . . . . . . . . . . . . . . . . . . . . . . . . . . . . . . . . 53
Updating Software . . . . . . . . . . . . . . . . . . . . . . . . . . . . . . . . . . . . . . . . . . . . . . . . . . . . . . . . . . . . . . . . . . . . . . . . . . . . . . . . . . . . . . . 55
Updating Software (Uninstall/Reinstall Method) . . . . . . . . . . . . . . . . . . . . . . . . . . . . . . . . . . . . . . . . . . . . . . . . . . . . . . . . . . . . 55

Installation and Configuration Process Overview
KE&/'hZd/KE
/E^d>>d/KE
^ŽĨƚǁĂƌĞͲKŶůLJ
/ŶƐƚĂůů
WĞůĐŽ
&ĂĐƚŽƌLJ
/ŶƐƚĂůůĞĚ
/ŶƐƚĂůůΘ
ŽŶĨŝŐƵƌĞ
>ŽĂĚĂůĂŶĐĞƌ
&ƵŶĐƚŝŽŶĂů
^LJƐƚĞŵ
ŶŚĂŶĐĞĚĚĞĐŽĚĞƌ
ŝŶƐƚĂůůĐŽŶĨŝŐ
;ŽƉƚŝŽŶĂůͿ
DŝŐƌĂƚĞĚĂƚĂĨƌŽŵ
ŶĚƵƌĂ^
/ŶƐƚĂůůDŽŶŝƚŽƌŝŶŐ
ĂĐŬƵƉ^ƵƉƉŽƌƚ
^ĞƌǀĞƌƐ
/ŶƐƚĂůůŽƌĞ
^ŽĨƚǁĂƌĞ
/ŶƐƚĂůůDĞĚŝĂ
'ĂƚĞǁĂLJ
^ŽĨƚǁĂƌĞ
ŽŶĨŝŐƵƌĞ
DĞĚŝĂ'ĂƚĞǁĂLJ
ŽŶĨŝŐƵƌĞKƉƐ
ĞŶƚĞƌ
>ŝĐĞŶƐĞĂŶĚ
ZĞŐŝƐƚĞƌĂůů
ĐŽŵƉŽŶĞŶƚƐ
ZĞŐŝƐƚĞƌĂůů
ĐŽŵƉŽŶĞŶƚƐ
/ŶƐƚĂůůKƉƐĞŶƚĞƌ
^ŽĨƚǁĂƌĞ
ŽŶĨŝŐƵƌĞ
ŽƌĞ
/ŶĚŝĐĂƚĞƐĂŶŽƉƚŝŽŶĂů
ŽƌƐŝƚƵĂƚŝŽŶĂůƉƌŽĐĞƐƐ
^ŽĨƚǁĂƌĞͲŝŶƐƚĂůůĂƚŝŽŶ
ƉƌŽĐĞĚƵƌĞƐ
ŽŶĨŝŐƵƌĂƚŝŽŶ
WƌŽĐĞĚƵƌĞƐ
The order in which you install and configure VideoXpert servers is determined by the number of servers your system contains and
whether you are installing VideoXpert applications on existing hardware or purchased purpose-built hardware from Pelco.
The diagram below represents the recommended installation process for both Pelco factory-installed products, or for software-only
installations on recommended hardware. It is strongly recommended that you follow the process outlined below to install and configure
your VideoXpert system.
Figure 1: Recommended Installation Process Diagram
IMPORTANT: If you are upgrading to a newer version of the software, ensure that you upgrade all instances of VxCore before you
upgrade any instances of Media Gateway.
VideoXpert Hardware Vs Software Distributions
If you purchased a VideoXpert hardware solution, you will not have to apply a license to your system. If you’ve installed VideoXpert on
your own hardware, you will need to apply licensing to continue using VideoXpert past the 60-day grace period.
Single Server Vs Clustered Installations
For Single-Server Installations, you can host both the Core and Media Gateway server applications on the same physical server or
on separate servers. You cannot have more than one of each server active on the network unless the servers are clustered behind a load
balancer.
For Clustered Installations, complete each operation in the installation diagram for each server in the cluster before moving to the
next operation.
Installing Core
Before installing VideoXpert, ensure that all network interfaces besides the primary NIC are disabled. Additional network interfaces may
prevent the system from discovering devices. While you can cluster Core servers through a load balancer to increase the capacity of your
VideoXpert network, you cannot have separate, individual Cores operating on the same network.
Do not run Microsoft Internet Information Services (IIS) on your Core server.
4

1. Run the MSI installer. If prompted, elect to run the installer as an administrator. Follow the on-screen instructions to complete the
installation. As a part of the installation process, you will:
a. Accept the license agreement, and then click Next. Declining the license agreement will quit the installer.
b. Set your installation, data, and event directories, and then click Next.
2. Click Finish when the installation process is complete.
Logging In
Log in to the Admin Portal to configure the system or to watch video without the VxOpsCenter application. The default user name and
password for the Admin Portal are both admin. It is recommended that you change the password for the admin user after logging into
the system for the first time.
1. Open a browser.
2. Enter the IP address or host name of your Core in the navigation bar.
3. Enter your credentials at the login page. The default user name and password are both admin.
4. Click Log In.
Configuring your VideoXpert Site
Before you configure your system and bring VideoXpert online, you should install an NTP client and edit your NTP.conf file to point all
potential members of the system to the same NTP server.
When you login to the system for the first time, the system will prompt you for basic configuration information. You may return to the
Config page after setting up the system to edit the system configuration.
NOTE: If you change the address of your physical Core server through Windows before configuring VideoXpert, you must restart the
server before you configure (or update the configuration of) VideoXpert. If you change the physical address of one or more Cores in a
cluster before setup, you should take all Core servers in the cluster offline, and then restart them all before configuring VideoXpert.
NOTE: You cannot change the IP Address of your Core server(s) or add a new Core server after you configure your site.
1. Provide your company name. The company name is a field you will enter during initial setup; you cannot change the company
name after setting up the system
2. Provide the Site Name; the site name identifies the particular instance of VideoXpert. If you aggregate the VideoXpert environments, the site name will identify the various environments belonging to the aggregation server.
3. Provide an IP address for the Core.
4. If configuring an environment with a VideoXpert Accessory server or a cluster of Core servers, select Multiple Cores.
a. Provide a Virtual IP address for your Core Servers. This is the address by which users will access the system.
b. Click Add and enter addresses for additional Core servers.
c. Change settings for device discovery if your cluster is not governed by a VideoXpert Accessory Server.
5. Provide the address of your Media Gateway server. If you have multiple Media Gateway servers, provide the virtual IP address
your Media Gateway cluster, and enter the IP of individual Media Gateway servers as well.
6. Determine whether or not to store exported video in an alternate location. If you elect to store exports in an alternate network location, provide the path and credentials (if required) to the alternate location.
of
7. Click Save Configuration. It may take several minutes for the configuration process to complete.
5

Storing Exports
As a part of Core configuration, you can select the Store Exports in Alternate Location option to store exported video in a network
location off the Core. This saves space and bandwidth to your Core server(s). In a clustered environment, exports are stored only on a
single Core; storing exports in an alternate location ensures that the loss of a Core will not prevent you from accessing any of your
exports.
Configuring a Cluster
A clustered environment requires at least two Core or CMG servers and an Accessory Server, which will act as a load balancer. When
configuring a cluster, you should fully configure a single Core, including the virtual IP address and addresses of other Cores, first; after
configuring the first Core, you can configure the accessory server. For more information about clustering an environment, refer to the
system design guide.
Device Discovery Load Balancing
If you are not load balancing a VideoXpert cluster using a VideoXpert Accessory Server, and your load balancer supports UDP traffic, you
can uncheck the appropriate option to reveal additional settings for load balancing device discovery traffic.
You may want to load balance discovery traffic for especially large environments, to prevent a single core from becoming overloaded
with UDP discovery traffic.
Changing the Addresses of Media Gateways or VXS Recorders
Within VideoXpert, Media Gateway and Storage devices are considered unique by IP address; changing the IP address of Media Gateways or Storage recorders will cause them to appear as new devices. Before you change the addresses of Media Gateways or Storage
recorders, you should first remove them from the Devices page, then discover and commission them again at their new IP addresses.
To change the address of a Media Gateway or VXS recorder.
1. Go to the Devices page of Admin Portal and remove the Media Gateway or VXS recorder for which you want to change the IP
address.
2. Change the IP address of the Media Gateway or VXS recorder you removed from VideoXpert in the previous step.
3. Restart the Media Gateway or VXS recorder.
4. Return to the Devices page in the Admin Portal and click Add and select Discover and Add Pelco Devices.
5. If necessary re-commission the server or recorder at the new IP address.
Configuring Media Gateway Communications
Your Media Gateway is capable of trans-casting to suit your network topology and needs. While the system is configured to get multicast
streams from sources and to issue multicast streams to clients, you can select the appropriate communication method both from sources
to the Media Gateway and from the Media Gateway to clients. Your network topology and need for users to access sources simultaneously should inform your choice.
1. Go to the Config page.
2. Select the communication method that best supports your needs.
3. Click Save Configuration.
6

Installing the Media Gateway
It is recommended that you install all instances of the Core server and the Media Gateway application. You can then configure the clusters (Cores and Media Gateways) using Admin Portal. See “Configuring a Cluster”.
The VideoXpert Media Gateway serves video to users connected to your VideoXpert system. You can install the Media Gateway software
on the same physical server as Core or on a separate server.
You will configure your Media Gateway through the Admin Portal, hosted by your Core server.
1. Run the MSI installer.
2. Accept or reject the End User License Agreement. Rejecting the EULA will cause the installer to quit.
3. Follow the instructions provided by the installer to complete the installation process.
4. Open a Web browser and log in to the Admin Portal as an administrator.
5. Navigate to the Devices page, and click Load All.
6. Select your Media Gateway, and click Commission to activate it within VideoXpert.
Licensing Your System
VideoXpert is licensed for the system, for upgrades, and by channel--the video streams you record. It comes with four (4) licenses to
start,? but you must license additional channels to view or record additional streams.
VxToolbox allows you to apply licenses to various systems. For assistance, contact Pelco Product Support at 1-800-289-9100 (USA and?
Canada) or+1-559-292-1981 (international).
You must have your activation ID and access to the Entitlement Fulfillment Server at http://licensing.pelco.com to apply license packs
to the system. If you cannot connect to the Entitlement Fulfillment Server directly, you will need to transfer your Entitlement Request File
to a computer with Internet access during the activation process. If you received multiple activation IDs for VideoXpert products, you
must complete the process below for each individual activation ID.
As a part of this process, you will download an Entitlement Request File and a Entitlement File; both files are specific to the product for
which they were requested. It is recommended that you rename both files to reflect the system for which they are intended to prevent
confusion during the licensing process.
1. Open VxToolbox and click the Licensing tab.
2. At the lower right corner of the Entitlements table (top panel), click the Add License icon ( ).
3. Enter your activation ID in the Activation ID box.
4. Click to deselect the checkbox to Automatically activate online.
5. Click Enter.
• The Entitlement Pending status message appears at the top of the Entitlements table.
• An entitlement named Pending will be listed in the table. At the far left of the Pending entitlement row will be two icons:
Download a new request (.bin) file ( ) and Remove this activation ID ().
6. Click the Download a new request (.bin) file icon ( ), select a folder, (optional) type in a file name, and then click Save.
An Entitlement Request File (named either what you typed in or the same name as the Activation ID) with a .bin extension is downloaded to your computer.
7. On a system connected to the Internet, open a new browser window or tab and go to the Pelco licensing server at
http://licensing.pelco.com.
7

8. Under Login, click to select logging in With User Name, With Entitlement ID, or With Activation ID. You can also register as
a New Us
9. Enter your credentials, and then click Login to access the Pelco licensing server.
er.
10. Click Generate License The Entitlement File, named response.bin, will be downloaded to your computer. Copy th
it to the s
11. Return to the Licensing page within VxToolbox.
12. Click Choose file under Upload Entitlement File.
13. Select your Entitlement File (response.bin), and then click Open.
14. Click Import License File.
When the process is complete, VxToolbox will display the installed license in the Entitlements table.
R
ESULT:
When the process is complete, the Web portal will display the installed license, and, if applicable, its expiration date.
ystem on which you are hosting VxToolbox.
e file and save
Adding and Updating Entitlements
The Licensing page contains options to update or add entitlements to VideoXpert. The page shows your current entitlements and the
licenses used on the system.
• Click Add to add a new license. Follow the on-screen instructions to add a license.
• Place your cursor over an existing entitlement to reveal additional options; you may delete entitlements that have not yet been fully
applied.
Installing Entitlements After Restoring Your System
It is highly recommended that you back up your system and save the response file used to apply your initial entitlement.
• If restoring your system after uninstalling VideoXpert, you can re-apply your initial entitlement or license.
• If you re-image your system, you cannot apply your previous entitlement. If you have re-imaged your system, contact Pelco Produc
Support at 1-800-289-9100 (USA and Canada) or+1-559-292-1981
(international) for assistance.
Using LDAP Authentication
You can configure VideoXpert to validate user credentials from an LDAP server; VideoXpert supports LDAP for Microsoft Active Directory.
While the system can validate credentials over LDAP, you must create corresponding users within VideoXpert to validate credentials
against. You must also assign roles and permissions through VideoXpert; there are no analogs for VideoXpert permissions in Active
Directory or LDAP.
NOTE:
• After changing a password in an environment using LDAP authentication, a user’s old password may still work for a short period of
time (less than one hour). This is a Windows NTLM authentication behavior, designed to allow accounts logged in to mu
computers or netw
• LDAP Authentication does not affect restricted system users. When LDAP is enabled, you can
aggregator, an
authenticated by VideoXpert no matte
ork services to access the network while the password change propagates.
still change passwords for admin,
d rule_engine user accounts. (For VideoXpert Enterprise, this is done through the Admin Portal.) These accounts a
r how you authenticate other users.
t
ltiple
re
8

While VideoXpert may support other LDAP authentication schemes, this guide focuses on -- and the product has been tested against -two common methods for LDAP authentication: simple (single bind) and two-stage bind with a service account:
• Simple (single-bind) authentication, associates a user name and password with a distinguished name (DN) to validate user credentials.
• Two-stage bind authentication uses a service DN and a service DN password to establish the initial bind with the LDAP server.
Upon a successful initial bind, a search is performed using the base DN, the first key from the Search Attributes box, and the user
name. If the user’s information is found, the second bind is performed using the DN to authenticate user credentials.
Configuring LDAP Authentication
1. Go to the Config page and click LDAP.
2. In the Authentication Method area, click to select the radio button for LDAP.
3. Enter the host name or IP address of the LDAP server in the Server Path field.
4. (Optional) Click the SSL/TLS box if your LDAP server requires SSL/TLS authentication.
5. (Optional) Edit the Port field if the LDAP server is not on the default port (389).
6. Configure Search Settings for your LDAP server. See Configuring Simple Authentication or Configuring Two-Stage Bind Authentication later in this guide for more information.
7. Click Test Connection to verify that your LDAP connection and search settings are correct.
8. Click Save Authentication Preferences.
Configuring Simple Authentication
Configuring search settings for simple LDAP authentication only requires the Base DN and the Search Attributes. Leave other fields
blank. When inputting multiple entries in a field, separate entries with commas.
1. Type a distinguished name (DN) that will be combined with a user attribute key and value pair in the Base DN field.
2. Type an attribute key name that is combined with the User Name attribute in the Search Attributes field.
Configuring Two-Stage Bind Authentication
Configuring search settings for two-stage LDAP authentication requires that all fields be populated. When typing multiple entries in a
box, separate entries with commas.
1. Type a distinguished name (DN) that will be combined with a user attribute key and value pair in the Base DN field.
2. Type a fully qualified DN associated with a service account that will bind with the LDAP server and perform user searches in the
Search DN field.
3. Type the password that allows the server DN to bind with the LDAP server in the Search DN Password field.
4. Type the two attribute keys in the Search Attributes field that are combined with the User Name attribute; separate the two keys
with a comma.
• The first key identifies the attribute containing the user name.
• The second key identifies the fully qualified DN used for the second bind and credential validation.
9

Discovering, Adding, and Commissioning Devices in VideoXpert
The Devices page provides an interface add and remove devices in your VideoXpert system. VideoXpert does not automatically discover
devices. You can prompt the system to search for, add, and automatically commission Pelco devices. You must manually add third-party
video sources for use with VideoXpert Storage.
You must commission a device to use it within VideoXpert; VideoXpert commissions devices automatically when you add them to the
system. Devices with a next to them consume a license when you commission them. The License Summary on the Devices page
lists the number of licenses you have for each type of device. You can reclaim licenses by decommissioning devices, or add additional
licenses by applying license packs to the system.
Adding Pelco Cameras and Devices or Third-Party Servers Running VideoXpert
When adding Pelco devices to VideoXpert, the system issues a discovery message and then listens for Pelco devices for up to 5 minutes.
VideoXpert automatically adds and commissions your VideoXpert devices and Pelco cameras.
If your installation requires licenses, the discovery process will consume the necessary licenses to commission discovered devices. If
you do not have the necessary licenses to commission the discovered devices, VideoXpert will add the devices it discovers but leave
them decommissioned. You must then manually commission devices when you either add more licenses or decommission devices of a
similar type to reclaim the necessary licenses.
The discovery process also discovers and adds third-party devices connected through Digital Sentry-based recorders and third-party
devices connected through UDI5000-CAMs to VSM or NSM5200-based recorders
Adding Third-Party Cameras
You must manually add third-party cameras to the system when using third-party cameras with VideoXpert Storage.
When adding a third party camera or video source directly through VideoXpert, you must also associate it with a VideoXpert Storage
recorder; the recorder hosts the driver for the camera, and begins recording continuously.
10

Third-party cameras connected through Digital Sentry or to VSM/NSM5200 models using a UDI5000-CAM are discovered through the
simple discovery process. You cannot reassign cameras connected through DS recorders within VideoXpert. You can only reassign third
party cameras connected through a UDI5000-CAM from one VSM/NSM5200 recorder to another within VideoXpert; you cannot assign
them to other recorders.
Ensuring Driver Support Using VX Storage Failover
Drivers for third-party cameras added directly through VideoXpert (not using a UDI5000-CAM or Digital Sentry) are hosted by VideoXpert
Storage. If your Storage recorder does not use a failover scheme, then a failure of the Storage recorder hosting a third-party camera will
prevent access to the driver for that camera; this may prevent operators from using the camera as normal while the recorder is in a failed
state. A failover scheme is important not only to ensure uninterrupted recording, but continued access to video and live video functionality for third-party cameras.
Though drivers for Optera cameras are hosted by VideoXpert Storage as well, driver support will failover to a Core server, should the
Storage recorder(s) driving an Optera camera fail. This ensures that Optera cameras are always available, even if recorders fail.
Adding Pelco Devices to VideoXpert
When adding Pelco devices to the system, the system issues a discovery message and then listens for Pelco devices for up to 5 minutes.
If your system requires licenses and you have the necessary licenses, VideoXpert automatically adds and commissions your Pelco devices
upon discovery. If you do not have the necessary licenses, the system discovers and adds the devices, but you will not be able to commission your devices for use within VideoXpert until you either add more licenses or decommission devices of a similar type to reclaim the
necessary licenses.
After adding and discovery devices, you may have to click Load All to refresh the device list; Ops Center users will have to refresh their
source list to show newly-added devices.
NOTE:
• If you change the address of a source device (camera, encoder, etc) that is already in the VideoXpert database, VideoXpert will no
find and re-assoc
it to recorders. You
removing a devi
• For some older-model Pelco cameras, audio must be enabled before you discover a device. If you discover an older device suppor
audio, and
the camera in live or recorded video. Audio should be enabled or disabled on the camera side in accordance with the availability of
an audio source; if you physically disconnect an audio source from a Sarix camera while leaving audio enabled within the camera
interface, VideoXpert may continue to report that audio is available for the camera.
To add Pelco devices to VideoXpert:
1. Go to the Devices page.
2. Click Add and select Discover and Add Pelco Devices.
iate the device at its new address. If this happens, you must re-discover the device at its new address and re
can remove the older instance of the device (at its old address), but you should wait until its video has
ce from the database will prevent you from finding video recorded from the device.
then enable audio later, VideoXpert may not discover the audio source. This will prevent you from listening to audio from
Devices and Data Sources
The audio and video sources produced by cameras are referred to as data sources. These data sources are not necessarily one per
device. For example, a multi-channel encoder may have multiple cameras connected to it, each with its own data source; a camera may
have a microphone, producing both audio and video data sources.
t
assign
expired;
ting
On the Devices page, when you select a device, you can find its associated Data Sources in the Details panel of the page.
If the device has an audio source, you can associate the audio source with other video sources.
11

Manually Adding Cameras or Encoders to VideoXpert
This procedure is for third-party devices that you want to add to VideoXpert Storage-based recorders, or Pelco devices that you want to
add to VideoXpert Storage by IP address (as opposed to discovery). If adding a camera to a Digital Sentry, you should add the camera
through the recorder’s native interface. If adding a camera to NSM/VSM, add the camera using Admin Portal.
When you add a third-party video source, you must also associate it with a recorder; the recorder hosts the driver for the camera, and
will begin recording the camera continuously after you add it. Once the camera is in the system, you can add the camera to recording
groups, set a schedule, and configure recording triggers.
1. Go to the Devices page.
2. Click Add and select Add a Third-Party Camera.
3. Provide the IP Address, credentials, and a friendly name for the camera.
4. Select the VideoXpert Storage device that will host the camera.
5. Select the driver you want to use.
6. Click Add.
Commissioning and Decommissioning Devices
You must commission a device to use it within VideoXpert; VideoXpert typically commissions devices automatically when you add them
to the system. You may want to decommission a camera if the camera has failed but you want to preserve access to recorded video for
the camera.
NOTE: If operating within the licensing grace period, it may take up to 30 minutes to commission recorders. If you receive an error when
commissioning a recorder, log out and back in, and then try commissioning the recorder again.
1. Go to the Devices page.
2. Select the devices you want to commission or decommission.
3. Click Commission to make the device available within VideoXpert or Decommission to render devices unavailable.
Cameras Requiring Credentials (Closed Authentication)
Some cameras may require a user name and password in order to retrieve video. In Pelco cameras, this is known as Closed Authentication.
If your cameras are configured using closed authentication, you must provide VideoXpert with the camera’s credentials before you can
view live or recorded video from your cameras.
To provide credentials to cameras:
1. Go to the Devices page within VideoXpert.
12

2. Click next to the camera or encoder you want to configure.
3. Provide the user name and password of an account with administrator privileges.
4. Click OK.
Configuring Device Discovery for Clustered Environments
When configuring your cluster, you must manually edit device discovery settings to optimize device discovery and subscriptions for your
Core servers.
1. Open Program Files/Pelco/Core/config/deviceDiscovery.yml using Notepad or another plain text editor.
2. Set useMulticastSourceSpoof to 1 if using the loadBalancerIP and Port settings. This spoofs the device
address as the
ages individually; this reduces discovery times and load on the Cores in the cluster.
mess
3. Set loadBalancerIP to the Device Discovery IP Address that you set on the load balancer governing your clus
address over which your cluster w
4. Set port to the port your load balancer uses for Device Discovery.
5. Save and close the file.
discovery callback IP address, preventing each Core server in the cluster from sending and receiving device disc
ill receive device subscriptions.
discovery virtual IP
ter; this is the IP
Deleting Devices from the Registry
Once discovered, a device will persist in the system’s device registry until deleted, even if the device no longer exists on the network.
Deleting a device will prevent you from retrieving any associated recordings through VideoXpert Storage. If you want to preserve access
to recordings on VideoXpert Storage devices, you should decommission the devices until video for the device has expired or you are sure
you will no longer need to access recordings for the device.
1. Go to the Devices page.
2. Select the device you want to remove from VideoXpert.
3. Click Remove.
Editing Friendly Names and Numbers
overy
Users with appropriate rights can edit the name and number of a video source or device. Numbers are not assigned by default. Well
formed friendly names and numbers can help you search for and sort cameras.
NOTE: Changing the name of a device listed on the Devices page doesn’t affect video sources listed on the Live page or within VxOp-
sCenter. This is because the Devices page lists physical devices, which are not necessarily a 1:1 relation with video streams.
On the Live page or within the VxOpsCenter, right a video source and click Edit Source to assign a number or assign a friendly name.
13

On the Devices page, click next to an item to change or assign a friendly name to a physical device.
Changing Source Settings
From the Live page, you can right click a source and opt to go directly to the web interface for the source (where applicable), and change
settings directly for the camera or source device.
You must make changes to settings for devices connected through a Digital Sentry server using DS Admin or DS Quick Setup on the host
DS server.
Changing certain settings may interrupt video streaming or recording for a source within the VideoXpert system. For example, changes
made to video compression settings for a particular source may not register with the Media Gateway for up to 15 minutes; during this
time, users will be unable to stream video from the source.
Associating Audio to Video Sources
You can associate an audio source (microphone) with video sources through the Admin Portal.
When you associate audio with a video source, any recorded audio – even if recorded prior to the association – will also be associated
with the video source; you can seek back to any moment of recorded video, and if associated audio exists at the moment of recorded
video, it will be played back accordingly.
1. Go to the Devices page in the Admin Portal.
2. Select the device containing the audio source you want to associate with video sources.
3. Select Video Associations under Data Sources.
4. Select the data sources with which you want to associate the microphone/audio source.
14

5. Click Done.
Figure 1: Associating Audio Streams (Microphones) with Video Sources
Assigning Pelco Cameras to Recorders
From the Recorders tab of the Recording page, you can add data sources originating from Pelco devices to VideoXpert Storage and
VSM/NSM5200 recorders. If a device produces multiple data sources (for example: an encoder or a camera with a microphone), and you
assign a data source from that device to a recorder, VideoXpert will automatically assign all data sources belonging to the device to the
recorder. You cannot split data sources from a device among different recorders.
For Digital Sentry, you cannot add third-party cameras to VideoXpert Storage through this page. You must either add the camera to VideoXpert through the Devices page or directly through the Digital Sentry interface (for DS recorders).
For NSM5200 and VSM recorders, you should assign cameras through the VideoXpert Admin Portal and not through the storage
manager’s interface. The Admin Portal may not immediately reflect camera assignments made through the storage manager’s interface,
resulting in inaccurate reports and camera searches or filters based on recording status and recording assignments.
Figure 2: The Recorders Page
15

1. Go to the Recording page, and select the Recorders tab.
2. Select the recording device or pool to which you want to add or remove cameras, and then click Add or Remove Cameras.
3. Select the cameras you want to add or remove, and then click Add to Recorder or Remove from Recorder to preform the appropriate action. You can sort the list of available cameras using the tags or search box above.
Recording Cameras Redundantly
You can assign cameras to one or more recorders through VideoXpert to record video redundantly. To record redundantly using Digital
Sentry recorders, you should assign a camera to one or more Digital Sentry recorders through DS Admin.
When recording redundantly, VideoXpert will populate video timelines to fill gaps across recorders. However, when the system reaches
a recording gap on the recorder currently fulfilling the request for video, playback may stop; click again on the timeline to fulfill the
request for video from the redundant recorder. The likelihood of this happening is dependent on the recorders to which your cameras are
redundantly assigned.
If you are adding a recorder to VideoXpert that belongs to (or previously belonged to) an Endura environment, VideoXpert will get camera
associations from the NSM5200 or VSM model directly; you do not need to duplicate the camera assignment in VideoXpert. You can
assign cameras to a redundant VXS recorder and record redundantly across recording platforms.
Configuring VideoXpert Storage Recorders
You can configure the transmission method and maximum retention period for VideoXpert Storage recorders directly through the Admin
Portal; these settings appear when you select a VideoXpert Storage recorder on the Recorders tab of the Recording page.
The Maximum Retention Period is the maximum number of days for which VideoXpert Storage stores video; the recorder will discard
video after the number of days you specify on the Recording page. Set the Retention Period to zero if you want to discard video only
when the recorder reaches its maximum capacity.
The Transmission Method determines whether VideoXpert Storage will get unicast or multicast streams from the cameras you assign
to it. The transmission method you set for VideoXpert Storage is not related to the Media Gateway transmission method setting.
NOTE: Changing the Transmission Method after assigning cameras to a recorder may prevent users from accessing video from the
recorder for up to 5 minutes.
Stream to Record indicates wehther you want to record the primary or secondary streams. This setting applies to all data sources
assigned to the recorder.
Figure 3: Recorder Configuration for VideoXpert Storage
Using Digital Sentry Servers as VideoXpert Recorders
Digital Sentry servers operating on version 7.9 or later can be used as VideoXpert storage servers. To fully support VideoXpert, your
Digital Sentry server must have the DSFrameServerService, DSPelcoAPI, and DSNSMRest services installed and running.
While Digital Sentry servers will appear as recorders within VideoXpert, you cannot add or remove cameras to Digital Sentry through
the Recording page within the Admin Portal. You must add or remove cameras directly from the DS Admin application on the DS server.
16

Cameras belonging to Digital Sentry servers are named in the format DS System Name - Camera Name and display the IP address of the
DS server through which they are connected, rather than the source IP address. When using Optera cameras through Digital Sentry
systems operating as VideoXpert recorders, set the camera’s connection speed to 100 Mbps to ensure the best possible viewing and
recording experience
Digital Sentry returns search results for recorded video in 15-minute intervals. If the DS server acting as a VideoXpert recorder recorded
any video within the 15 minute interval covered by your search, VideoXpert will report that recorded video is available for the entire 15
minute period; the timeline displaying recorded video in the Ops Center will be green for the 15-minute period, even if a point in time
contains no recorded video.
If the Ops Center reaches a recording gap when playing back video from a DS recorder, it may loop video from within the gap, rather than
skipping to the next recording or indicating that there is no video available. Move playback to a different time to correct the issue.
Recording Groups, Schedules, and Triggers
When recording cameras, you will group cameras into recording groups, set the schedule during which the group of cameras records,
and then determine the event triggers that initiate recording during the scheduled period.
A camera can only belong to one recording group. If you add a camera to a recorder before adding it to a schedule (which you must do
for third party cameras, and may do for Pelco-cameras), VideoXpert will record it continuously as a part of a “default” schedule. If you
want to add a camera to a schedule other than the default, you must first remove it from the default schedule.
You can set a schedule to record continuously, or to record based on one or more event triggers. You cannot switch between the two. If
you want to switch between continuous or event-based recording, you must first delete the current recording method and then configure
a new one.
Configuring Recording Groups
A Recording Group is a group of cameras to which you want to apply the same recording schedule and triggers. A camera can only
belong to one group.
If you add a camera to a recorder before adding it to a schedule (which you must do for third party cameras, and may do for Pelco
cameras), VideoXpert will record it continuously as a part of a “default” recording group. If you want to add a camera in the default group
to another group, you must first remove it from the default schedule.
1. Go to the Recording page and select the Scheduling tab.
Click
2.
3. Give the schedule a name and click Add.
to create a new schedule or to edit an existing schedule.
17

4. Click next to Sources to add video sources to the recording group.
• Use the Selected Resources and choose the individual cameras you want to associate with the schedule. The list of avail-
able sources will only show cameras that have not yet been assigned to a schedule.
• Select All Resources to add all cameras that have not yet been assigned to another recording sc
sc
hedule you are configuring.
hedule to the recording
Figure 4: Selecting Resources for the Recording Group
5. Click Done.
Configure a Continuous Recording Schedules
When recording continuously, you can opt to record the full frame rate or a reduced frame rate for the primary camera stream. The Full
Frame Rate setting records the primary video stream at the maximum framerate; the Reduced Frame Rate setting records the primary
video stream in i-frame only mode. Select the Reduced Frame Rate setting if you want to schedule “Bump on Alarm” recording.
1. Go to the Recording page and select the Scheduling tab.
2. Select the recording group for which you want to create or edit a recording schedule.
Click
3.
4. Select Continuous and then choose between Full Frame Rate, and Reduced Frame Rate modes.
5. Click Save.
under Schedules and Triggers to add a new trigger or click to edit an existing trigger.
18

6. If you selected one or more event triggers, determine recording parameters for each event.
• Under Start Recording, set the number of seconds to record before an event.
•
Under Stop Recording, you can either set the number of seconds to record after an event, or you can set the system to record
until the corresponding event occurs (Motion Not-Detected or Alarm Inactive).
Configuring Event-based Recording Schedules
An event-triggered schedule records video in accordance with VideoXpert events. When triggering recording from events, you can determine the amount of time to record before and after an event or to stop recording when a corresponding event occurs.
VideoXpert events do not have a concept of duration; there are, however, events that indicate activity or inactivity; the span between
the two can indicate the “duration” of an event. This is the concept used when stopping recording by Event.
VideoXpert does not use a “post-alarm” concept, nor can you use both Event and Timeout-based methods to stop recording. If you indicate that you want to end recording using a timeout, the timeout is measured from the active or originating event. For example, setting
a timeout of 5 seconds based on a “Motion Detected” alarm will set the system to record for 5 seconds after the “Motion Detected”
event occurs, whether or not the system has recorded a corresponding “Motion Not-Detected” event.
To configure event-based recording:
1. Go to the Recording page and select the Scheduling tab.
2. Select the recording group for which you want to create or edit a recording schedule.
3. Select the event types you want to trigger recording
4. Click under Schedules and Triggers to add a new trigger or click to edit an existing trigger. Select Alarm-Triggered
High Quality.
5. Under Start Recording, determine the VideoXpert events that will trigger recording and the amount of time, in seconds, you want
to record before the event:
• Motion Detected records video when the system detects motion.
• Alarm Active records video when cameras’ physical alarm inputs are active.
6. Under Stop Recording, determine when to end recording for each event.
• Select Timeout to end recording the specified number of seconds after the event.
• Select Event to record until the corresponding event occurs (Motion Not-Detected, Alarm Inactive, etc).
7. Click Save.
Bump on Alarm Recording Schedules
A Bump on Alarm records continuous i-frame only video during normal situations, and records high-quality recording during an alarm
or event activity. The video timeline for cameras set to record using a bump on alarm schedule shows a small green bar for continuous
recording and a larger blue bar during event or alarm-driven recordings.
To configure a bump on alarm schedule, you’ll create a Continuous Low-Quality recording trigger and a concurrent Alarm-Triggered
High-Quality recording trigger for the same recording group.
Figure 5: Bump on alarm in the Ops Center
Figure 6: Bump on alarm (when hovering) in the Ops Center
19

Deleting Recording Groups, Schedules, and Triggers
Click to delete a recording schedule or trigger. If you delete a recording schedule to which you have assigned cameras, these
cameras may remain assigned to a recorder but will not record until you assign them to another schedule.
Advanced VideoXpert Storage Configuration
While you can perform basic storage assignments and configuration through the VideoXpert Admin Portal, the VxStorage portal provides
access to advanced settings and status that can help you fine-tune and monitor your VideoXpert Storage devices.
Access the Web interface by opening a browser and pointing to the IP address of your recorder on port 9091 (example: 1.2.3.4:9091).
Accessing the VxStorage Portal
1. Open a web browser and go to the IP address of your VxStorage unit on port 9091. (example: 1.2.3.4:9091)
2. Provide your credentials. The default user name and password are both admin.
Changing the VxStorage Password
You should change the default password for VxStorage to keep your environment secure. Click Change Password in the upper-right of
the interface to change the password for VxStorage.
NOTE: When you change the password for VxStorage, you must also change the password within the Admin Portal to ensure that Vide-
oXpert can authenticate against VxStorage and continue recording video.
Checking VideoXpert Storage Status
The Status page provides basic status information about your recorder, including the assigned bit rate of the recorder, retention period,
and the number of events you are recording per hour. Use this page to determine whether you are under-utilizing or over-burdening your
recorder.
Storage Assignments
You can check the status of individual streams and whether or not they are recording from the Assignments page in the Storage Interface.
20

Downloading Storage Logs
Storage logs can provide insight to an anomaly with the recorder or one of the sources recording to it. When requesting support from
Pelco, a Pelco technician may request logs from the recorder. To get Storage logs:
1. Go to the Status page within the Storage Web interface.
2. Click Generate Logs....
3. Click Download Logs.
The Configuration Page
The Configuration page is where you will assign an NTP address to the recorder. You should assign the recorder to the same NTP server
as the rest of your VideoXpert network to ensure time is properly synchronized.
From this page, you can also change the Transmission Method and retention period for the recorder; this option is also available from
within the Admin Portal.
Volume Groups and Volumes
You can organize your device video storage by creating and managing Volumes and Volume Groups.
•A volume is a logical directory in which you want to store video.
•A volume group is a group of volumes to which cameras are assigned and distributed. You can use volume groups to:
– Separate types of storage (like internal vs. external)
– Set different retention parameters for different sets of drives.
– Write video to more than one volume. When all volumes are full, the system will overwrite volume containing the oldest stored
video.
The system ships with a volume group called Default Volume Group. You can rename or delete this volume group.
• An archive volume group is a volume group to which the recorder will move the oldest video from the other volume groups, instead
of deleting the oldest video. See Using External NAS Storage (Archive Volume Group)for more information about the archive volum
group.
Assi
gning an NTP Address to VideoXpert Storage
1. Connect to your recorder at <ipaddress>:9091.
2. Go to the Configure page.
3. Provide the IP address of your NTP server.
4. Click Save.
Using External NAS Storage (Archive Volume Group)
By connecting an external volume (network storage/NAS), you can extend your retention time for VideoXpert Storage recorders. When
your VideoXpert Storage recorder achieves its maximum capacity and would normally begin to delete the oldest video, it will send video
over to the NAS instead. Video will still adhere to retention parameters, even when moved over to external storage. The experience in
accessing video is the same, whether a recording is served from a the VXS recorder or an external server.
e
To use external storage, the external storage server reside on the VideoXpert network, and should not have login credentials. If the server
requires login credentials, VXS will not be able to transfer video to the external server.
21

As video transfers from a VXS recorder to an external storage server, bandwidth of your incoming cameras is equal to the bandwidth out
to external storage. When using external storage, you should plan storage distribution to ensure bandwidth availability for incoming
cameras, storage overflow, and user impact in viewing recorded video.
NOTE: While each VXS recorder can only have a single archive group, multiple VXS recorders can use the same NAS server. In this case
each VXS must point to a different path/folder on the NAS server; pointing multiple VXS recorders to the same archive group
network path will cause video to expire earlier than expected and without warning.
Configuring an External Volume
1. Connect to your recorder at <ipaddress>:9091.
2. Go to the Volumes page.
Click
3.
to add a new Volume Group.
4. Provide a name for the group and select the Designate this Volume Group as the Archive Volume Group option.
Click
5.
to add a new Volume.
6. Provide the address and folder location where you want to store data in the format //1.2.3.4/folder1/folder2.
7. Click Save.
Database Backups and Recovery
VideoXpert Storage takes database recovery points daily, and stores recovery points for 8 days. If your database enters an error state,
you can restore to one of the available points from the Database page. If you have performed some maintenance or made changes to
your recorder, you can click Create Database Backup to initiate a manual restore point.
NOTE: VxStorage backups can only recover video from the date and time the backup was taken to the present (or when the database
entered a failed state); you cannot currently recover video older than the date of the backup. Currently, VxStorage can store up to 8 daily
backups, allowing you to restore up to 8 days of video. You should record cameras redundantly if you might need to recover more than
8-days of video in the event of a failure.
Restoring the Database
Restoring the database restores camera associations (provided the camera still exists within the VideoXpert environment) and Storage
settings; restoring the database will not affect video directly; you will not lose video when restoring to an earlier time. However, if you
have added cameras to the recorder after a backup was taken, and restore to that backup, you will lose access to video for any cameras
the database restore process removes from the database.
NOTE: The NTP server address is not recovered during backup or restore. The NTP address must be reset manually after the backup or
restore is complete.
22

Rebuilding the Database
If there are no suitable restore points, and your database or recorder are not in working states, you can click Rebuild Database to
recover the recorder. Clicking Rebuild Database will attempt to restore the recorder to a working state by creating an empty database
and restoring all available files from the present database instance. While rebuilding the database should restore functionality to the
unit, you should not expect to regain your lost video or camera associations.
Rebuilding the database takes significantly longer than restoring the database.
VideoXpert Storage Failover Recording
By putting VxStorage units in failover mode, you can assign VxStorage models to act as hot standbys for live recorders and ensure uninterrupted recording when active recorders fail. It is recommended that you use this feature to implement a failover strategy that ensures
full time recording and video availability in your environment in the event of possible network, power, or hardware failures.
Putting recorders in Failover mode allows you to assign them to monitor and act as a hot standbys for active recorders; if any of the active
recorders fail, the failovers will record the camera groups and schedules in place of the failed recorders ensuring nearly uninterrupted
recording.
You should not over-assign failover capacity. If a unit in failover mode is already engaged at capacity and another recorder it is assigned
to monitor fails, the additional cameras will go unrecorded until you can correct the issue. Failover recording also doesn’t ensure access
to historical data from failed recorders; it ensures uninterrupted recording. If you want to maintain uninterrupted access to recorded
video, even when a recorder fails, then you should record cameras redundantly across multiple recorders.
NOTE: During a failover, you may experience a recording gap of up to 30 seconds.
Assigning VxStorage to a Failover Group
In failover mode, you have the option to assign recorders to failover groups. A failover group is a number of failover recorders designated to monitor a set of active recorders; when one or more active recorders fails, the streams from the failed recorders will be distributed among the group. (For example, if three active recorders, each recording 100 streams with identical bitrates/settings, were
monitored by a failover group with two recorders, and the three active recorders failed, then both failover recorders would record 150
streams until the active recorders came back online.)
When you designate VxStorage as a failover recorder, it assigns itself to its own recording group. You can then assign the recorder to
another group by clicking under Recorders in Group. Assigning a VxStorage recorder to another group will strip the unit of its
failover recording associations (recorders listed under Monitor These Recorders will disappear.) You must assign recorders you want
the group to monitor from the failover group manager.
Configuring Failover Recording
1. Open a Web browser and connect to the IP address of the Storage recorder you want to configure as a failover unit.
2. Go to the Failover page.
3. Click Designate this VxStorage as a Failover.
23

4. Determine whether to assign VxStorage to a failover group or to monitor active recorders
• If VxStorage will be the group manager, or you do not want
to assign VxStorage to another group, click
under Monitor
These Recorders to begin assigning recorders to monitor.
• If you want to assign VxStorage to another group
, click
under Recorders in Group to assign VxStorage to the group.
Assigning a recorder to another group will cause it to lose its failover monitoring associations.
5. Provide the IP address and credentials for the recorders you want to monitor, or the recording group you want to join.
Figure 7: Failover Recording Settings and Options
24

Aggregating Systems
VideoXpert Ultimate Core systems support an aggregation server, providing centralized access to a series of member systems and
cameras.
When you add a system to the VideoXpert Ultimate aggregation server, the video for the member system becomes available at the aggregation level. However, you may not be able to change settings for the member system and some components from the aggregation level;
you may have access the member system directly to change settings.
When adding a member system to the aggregation server, you will use the aggregator account. This user account is visible only to
VideoXpert system administrators. and authorizes connections between the aggregation server, the member system you are aggregating, and other member systems. The system administrator can change the password for the aggregator user, but the account cannot
be otherwise modified or deleted.
1. Go to the Config page and select the Aggregation tab.
2. Click Add System, or c
3. Provide the IP address of the system you want to aggregate in the Server Address field. If aggregating a clustered system, enter
the IP address of the load balancer governing the cluster of systems you want to aggregate.
4. Enter the port number the system uses for HTTP/HTTPS communications in the Port field.
5. Provide the connection speed between the Core acting as the aggregation server and the VideoXpert s
in the Band
speeds lower than 100 Mbps will cause all cameras for the aggregated system to return MJPEG video.
NOTE: The Media Gateway transcodes MJPEG video, and returns the full I-Frame rate requested by the camera. Cameras configured
to deliver more than 2 I-frames per second will stress the perf
recommended that cameras
cameras from taxing the Media Gateway.
6. Enter the password for the aggregator user.
7. Click Add System or Save.
width field. The higher the connection speed, the better aggregated devices will perform within VideoXpert. Selecting
lick
to edit a system.
ystem you are aggregating
ormance of the Media Gateway and consume more bandwidth. It is
expected to return MJPEG video are configured to deliver no more than 2 I-frames per second to prevent
25
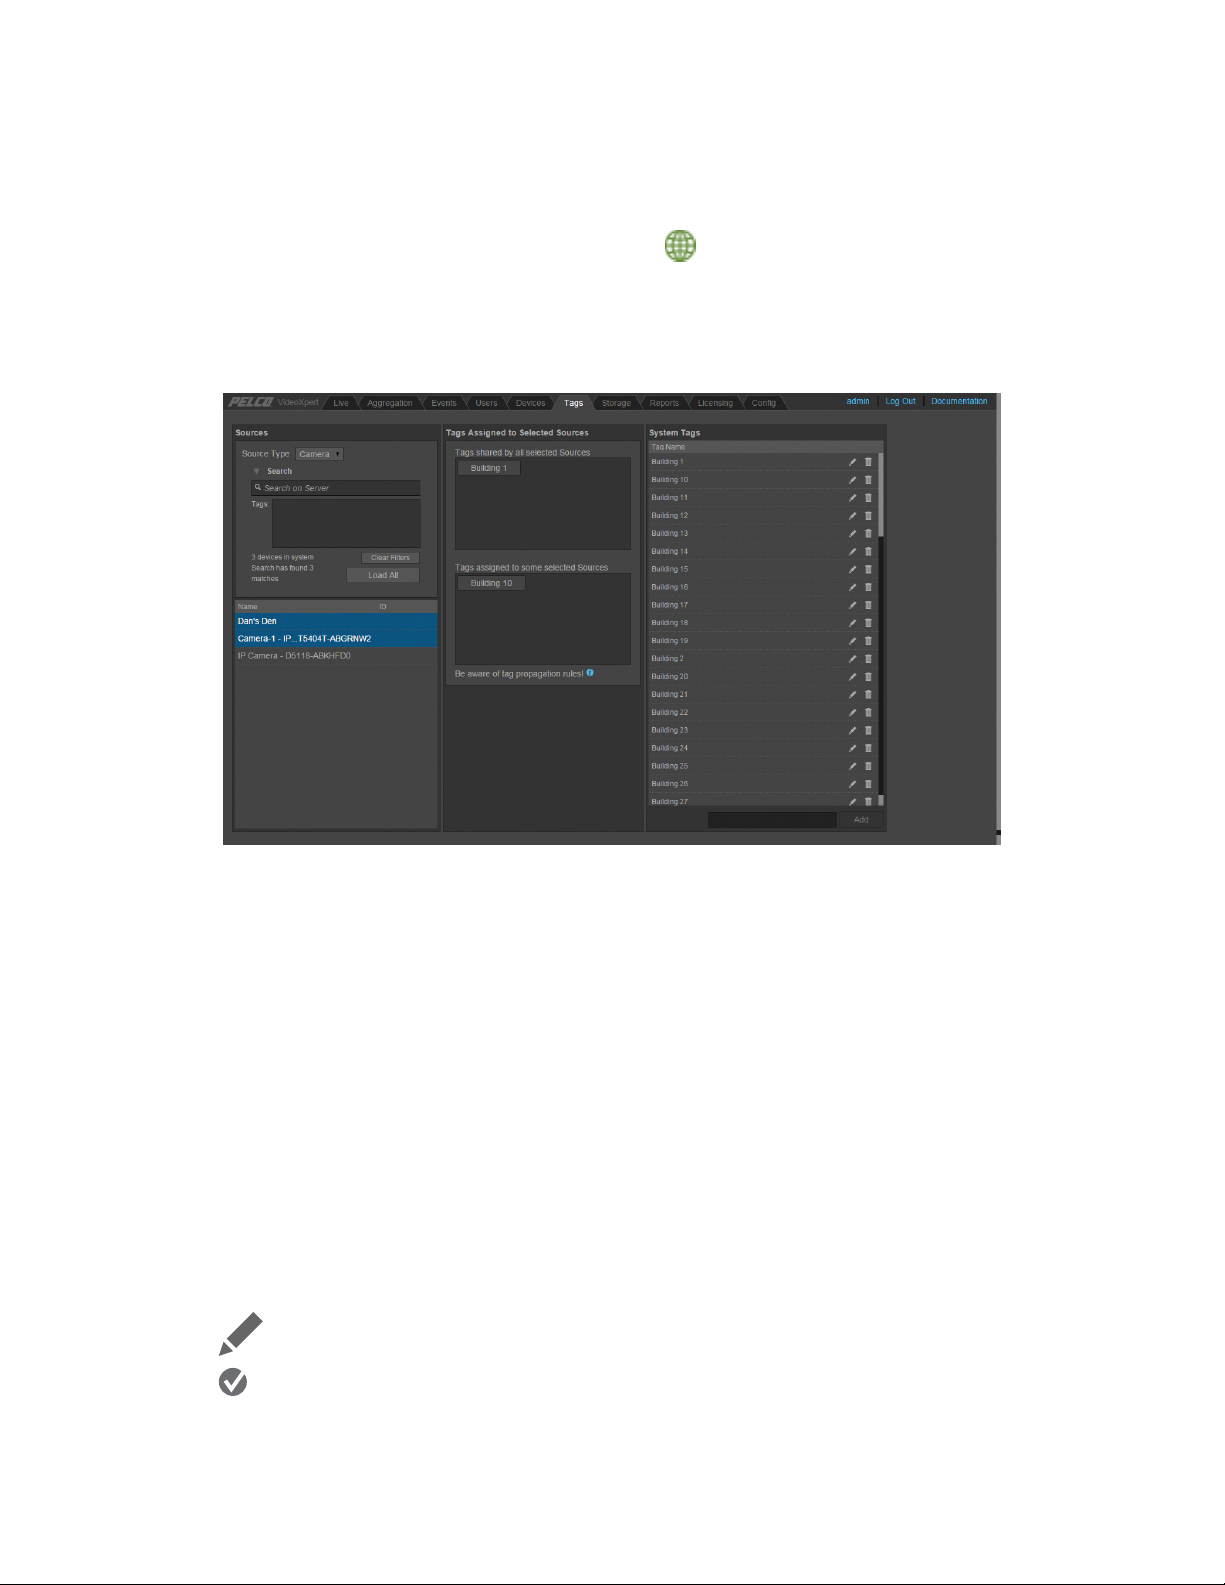
Tags
Tags are custom attributes that users with sufficient rights can create and assign to cameras and devices, helping organize resources
within your VideoXpert environment. Tags can help users find items in searches where normal search fields (name, number, etc.) may
not reveal all the right results. In search fields, tags populate as tokens, ensuring that users cannot search for a tag that does not exist.
Through the Admin Portal, you can create global tags only. Global tags are available to all users within the system. All users can
filter sources, exports, and bookmarks according to the listed tags. If you want to create personal tags, you must do so through the Ops
Center Client.
The ability to assign tags is determined by permissions. Likewise, a search for a particular tag will only reveal components a user has
permission to view.
Figure 1: The Tags Page
Creating Global Tags
Within the Admin Portal, you can only create and edit global tags. If you want to create or edit personal tags, you must do so through
the Ops Center Client.
1. Go to the Tags page.
2. Select the devices or sources to which you want to apply the tag.
3. Enter the name of the tag you want to create in the field under Tags shared by all selected Sources.
4. Press Enter.
Editing Tags
Editing a tag does not affect tag assignments; any resources to which the original tag was assigned will reflect the edited tag title.
1. Go to the Tags page.
Click
2.
3. Click .
next to the tag you want to edit.
26

Deleting Tags
On the Tags page, click next to any tag you want to delete.
Assigning Tags to Sources
1. Go to the Tags page.
2. Search for the source or sources to which you want to assign tags.
3. Select the source or sources to which you want to assign tags.
4. In the Tags shared by all selected sources box, type the name of the tags you want to assign.
27

Managing Users
The Users page is the interface for managing user accounts, the roles assigned to each user, and the permissions assigned to each role.
Each user must be assigned at least one role to be effective within the system.
If authenticating users via LDAP, see Using LDAP Authentication.
Figure 1: The Users Page and Tab
Internal and Restricted User Accounts
VideoXpert contains some hard-coded user accounts that are integral to the system. You cannot edit, disable, delete these accounts, nor
can you change roles or permissions for these users. You can, however, change the password for these accounts; in the case of the admin
and aggregator accounts, it is recommended that you change the password from the default.
User Description
admin The basic administrative user for VideoXpert. This user account possesses the “administrator” role is
granted all available permissions within the system.
aggregator Used internally by VideoXpert’s aggregation feature to communicate across sites.
rule_engine Supports the rules engine.
snmp This role is used to collect diagnostic information for the SNMP service that is available on the product.
Adding Users
When adding users to the system, you give them a temporary password. Upon logging in for the first time, the system will require users
to change their passwords.
You can also provide the user’s real name, to easier associate user names with real names; real names appear anywhere the system
provides a user name.
1. Go to the Users tab on the Users page.
2. Click New User.
3. Enter a user name and password.
28

4. Provide the user’s real first and last name.
5. Click Save.
Duplicating Users
Duplicating a user creates a new user with the same attributes as another user, but does not grant the new user the same permissions
as the original. You must change the user name and assign permissions after duplicating a user.
1. Go to the Users tab on the Users page.
2. Click and select Duplicate.
3. Enter a password for the user and change the user’s name.
4. Click Save.
Deleting Users
1. Go to the Users tab on the Users page.
2. Select the user you want to remove.
3. Click and select Delete.
4. Confirm your selection.
Deactivating and Activating Users
You can prevent a user from accessing the system for a period of time without deleting the user from the system by deactivating the
user. You can then re-activate the user at a later time.
Deactivated user accounts still appear in the list of users, but are struck through.
1. Go to the Users tab on the Users page.
2. Select the user you want to activate or deactivate.
3. Click and select Activate or Deactivate.
Resetting Passwords
By default, users must change their passwords every 60 days. Users with appropriate permissions can either reset users’ passwords or
force users to change their passwords early.
Resetting a user’s password will allow you to grant the user a temporary password. Upon logging in, the system will require the user to
change his or her password. You may want to reset a user’s password if a user does not remember his or her password, or the user is
locked out of the system because he or she is locked out of the system due to failed login attempts or let the password change timer
lapse.
1. Go to the Users tab on the Users page.
2. Select the user whose password you want to affect.
3. Click and select Reset Password or Force User to Reset Password depending on your application.
4. If you selected Reset Password, provide a new password for the user, and click Save.
29

Assigning Roles
1. Go to the Manage Users page.
2. Select the user for whom you want to assign or remove roles.
3. Click the checkboes corresponding to the roles you want to add or remove from the user. You can filter roles using the box un
Assigned Roles. Selecting a sys
tem provides the user with all roles within the aggregated system.
Managing Roles
A role is a group of permissions defining abilities and responsibilities within a system. A user must be assigned at least one role to
perform actions within the system.
der
Figure 2: The Roles Tab on the Users Page
Creating a Role
1. Go to the Roles tab on the Users page.
2. Click New.
3. Provide a name for the new Role
4. Click OK.
Renaming a Role
Renaming a role does not affect the users to whom the role is assigned.
1. Go to the Roles tab on the Users page.
2. Click and select Rename.
3. Provide a new name for the role. Click OK.
30

Duplicating a Role
By default, a duplicate role retains the permissions of the original role.
1. Go to the Roles tab on the Users page.
2. Click and select Rename.
3. Provide a name for the duplicated role, and click OK. Deselect edit permissions now if you want to leave the duplicate roles with
identical permissions.
Deleting a Role
1. Go to the Roles tab on the Users page.
2. Click and select Rename.
3. Click Delete, and confirm your selection.
Assigning Permissions to Roles
By default, a new role contains no permissions. When assigning permissions to a role, you can determine resource restrictions, if any,
for the permission.
Permissions assigned to a user display the resource restrictions associated with the permission.
1. Go to the Users page and select the Roles tab.
2. Select the role for which you want edit permissions.
3. Select the permission you want to assign or edit.
4. Select the Resources the user can access.
• Any Camera indicates that the permission is not restricted for the role; the permission applies to all cameras.
• Selected Resources, Selected Cameras, etc allows you to select the resources/devices available for that permission; this
feature functions as a whitelist.
• All Resources Except, All Data Sources except, etc allows you to select the resources/devices that
the permission; this feature functions as
Restricting Resource Access for a Permission
Changing a permission’s Resource Access setting to Selected Data Sources disables all cameras for the permission. You must then
assign cameras to the permission, making them available to users possessing that permission.
Changing a permission’s Resource Access setting to All Data Sources Except enables all cameras for the permission. You must then
restrict resources available to the permission.
Use the Search Cameras field to quickly determine whether or not the permission allows access to a camera.
a blacklist.
are not available for
31

Figure 3: Selecting the Resources Available to a Permission
1. When Resource Access is set to Selected Cameras, click Configure Resources.
2. Use the search fields to locate cameras you want to assign or unassign. Assigned cameras are available to users possessing th
permission; una
ssigned cameras are not.
3. Click Done when you have finished assigning resources to the permission.
Permissions
Permissions define the actions a user can perform within the system. You can assign permissions to roles from the Roles tab on the
Users page within the Admin Portal. Where necessary, permissions are defined in a parent-child hierarchy; to assign a child permission,
you must first define the parent permission.
Some features are not mapped to an obvious permission. And, in some cases, a feature may require compounding permissions. For
example, users may have the “Place Cameras on Map” permission. However, users must also possess the “View Video Sources” permission for cameras they want to place in order to view video thumbnails and verify that they are placing maps in the right locations on the
map. Pay attention to compound or complex cases listed below to ensure that your users have the permissions they require to perform
their surveillance roles within VideoXpert.
Permission Resource Restrictions
Permissions grant access to resources. Some permissions allow all-or-nothing access, using the “Any” setting; some permissions allow
you to select the resources to which a user has access using the “selected resource” settings.
Any indicates that a permission is available in all cases. If the permission does not support restrictions, but is an “on/off” permission,
“Any” is the only resource option; if the permission allows “Selected Resources,” selecting “Any” allows a user to all resources covered
by the permission. For example, selecting “Any” for the “View Video Sources” permission grants a user access to view live video from
all video sources within VideoXpert. If that same user was restricted to “Selected Resources” for the “Use PTZ Mode” permission, then
the user would be able to view video from all cameras but could only initiate PTZ controls for the cameras to which he or she had access.
e
Plug-in Permissions
Plug-in permission provide access to plug-ins and related features within plug-ins. Plug-ins operate in accordance with the “View Live
Video” surveillance permission; even if a user has access to a plug in, the user may not be able to effectively use the plug-in without
access to related cameras.
32

Sel
ect
Permission Actual Resource Any
ed Description
Use eConnect eConnect plug-in ? This permission provides access to eConnect data. The
permission is for “Any Resource” but operates in accordance
with the “View Video Sources” permission. If a user has
access to “View Video Sources” for a particular camera, and
this permission is enabled, a user can view eConnect data
for that camera.
Use Map Mapping plug-in ? Allows users to access the mapping plug-in.
View Maps Drawing (Map) ? ? Determines the maps to which a user has access. Maps only
show cameras for which the user possesses the “View Video
Sources” permission.
Manage Map
Files
Place Cameras on
map
Drawing (Map) ? ? Allows users to upload, delete, and select available map
layers
Drawing (Map) ? ? Allows users to add and arrange cameras on the map;
camera availbility is limited by the “View Video Sources”
permission.
Supervision and Reports Permissions
Supervision and Report permissions provide access to supervisors checking user activities auditing the system. These permissions are
not hierarchical.
Sel
ect
Permission Actual Resource Any
ed Description
Multiview Users ? Enables a supervisor to see users that are viewing a camera
in real time.
Access Reports Reports ? Allows users to export reports
Audit User Activity User Action Report ? Allows users to export User Actions reports.
Access User Views Users ? ? Provides access to workspaces and tabs created by other
users. Note that you can restrict this permission by user, but
not by tab or workspace. Users with this permission can
access all tabs or workspaces created by selected users.
Manage System Views Views ? Allows users to delete, rename, etc user views.
Event Management
Event management permissions enable users to view, act on, and configure event notifications. There is no hierarchy for these permissions, but in most cases, a user that can configure events should have access to the eevent log and be able to handle events.
33

Sel
ect
Permission Actual Resource Any
ed Description
Handle Events Event notifications ? Allows a user to act on event notifications, marking them as
“in progress” or acknowledging them. Note: this permission
does not guarantee that a user will receive events, only that
the users with this permission can act on event notifications
the receive. event notifications are defined within each
event; the ability to modify events is granted by the
“Configure Events” permission.
Configure Events Events ? Provides the ability to configure events.
View Event History Events ? Allows users to view the event history (both from within the
Admin Portal or using the Event Viewer in the Ops Center.
User Management
Sel
ecte
Permission Actual Resource Any
d Description
Manage User Accounts Users ? ? Grants the ability to create, update, or delete user accounts.
Manage Aggregator
Account
Aggregator User ? Grants the ability to manage (change the password for) the
“Aggregator” user account.
Assign Roles to Users Users ? Grants the ability to assign roles to users.
Manage Roles Roles ? Grants the ability to create, delete, and assign permissions to
roles.
Device Management
These permissions grant users the ability to edit devices on the devices page, or tags at the system level -- both through the Admin
Portal’s Tags page and the Ops Center.
Sel
ect
Permission Actual Resource Any
Configure Monitor Wall
Decoders
Decoders/Worksta
tions
ed Description
? ? Provides the ability to configure decoders through the
Devices page in the Admin Portal; presently, Ops Centers
operating in Shared Display Mode are the only devices
appearing as decoders.
Setup Edge Devices Devices ? ? Allows configuration of devices.
34

Sel
ect
Permission Actual Resource Any
ed Description
Manage System Tags Tags ? Provides the ability to create, edit, delete, and assign
System/Global tags. This permission does not apply to
personal tags created or assigned through the Ops Center;
personal tags only appear to the creating user and only the
creating user can assign, modify, or delete his or her own
personal tags.
System Management
System Management permissions should be reserved for administrators. Users with these permissions can modify system configuration
settings; these changes should be carefully planned by administrators to ensure that they do not interfere with video recording or interrupt surveillance operations.
Sel
ect
Permission Actual Resource Any
ed Description
Configure Recording Recorders ? Allows configuration of recording, including recording
schedules, camera assignments, and retention periods; this
permission does not affect access to the VXS Recorder
interface (hosted by the VXS recorder, independent of the
Admin Portal).
Manage System Servers Core ? Provides the ability to edit settings on the Config page of the
Admin Portal.
Surveillance Permissions
Surveillance permissions are common permissions required by operators in your VideoXpert environment. These permissions grant
access to view live or recorded video, control cameras, ad bookmark moments of interest.
Sel
ect
Permission Actual Resource Any
View Video Sources Cameras/Audio
Sources
ed Description
? ? Enables users to access live video or audio. Audio sources
are tied to video sources; granting access to a video source
automatically grants access to associated audio sources.
Launch Saved Views
Remotely
Create System
Bookmarks
Delete System
Views ? Allows a user to send a view to another user. Users with this
permission can also force recipients to accept views.
Bookmarks ? Allows a user to create or edit bookmarks. This permission
also requires
Bookmarks ? Allows a user to delete bookmarks
Bookmarks
35

Sel
ect
Permission Actual Resource Any
ed Description
Use PTZ Mode Cameras ? ? Provides the ability to pan, tilt, and zoom a camera. This
permission includes a priority; priority determines who can
control a camera in the event of competing users. If two or
more users attempt to control a camera, the user with the
highest priority will take command and lower priority users
will be locked out.
Manage PTZ
Mode
Lock PTZ Mode Cameras
Cameras
(Any/Selected)
(Any/Selected)
? ? Provides the ability to set PTZ priorities?
? ? Provides the ability to lock a camera into a particular PTZ
position. PTZ locks may be overridden by users with higher
priority than the user who set the lock.
Investigation Permissions
Investigation permissions grant access to recorded video and the ability to export video from the system. Typical setups will want to
assign the same access level to “view recorded video” permissions as to “view video sources”
Sel
ect
Permission Actual Resource Any
View Recorded Video Cameras/Audio
Sources
ed Description
? ? Enables users to access live video or audio. Audio sources
are presently tied to video sources; granting access to a
video source automatically grants access to associated
audio sources.
Manage Exports Exports ? Allows a user to edit or delete entries in the “Manage
Exports” window.
Export Media Clips Exports ? Allows a user to export and download recorded video; a user
can only export recorded video for sources defined in the
“View Recorded Video” permission.
Special Cases for Permissions
Some features don’t map directly to a permission; they may either require compound permissions, or a permission that is not plainly
apparent. To use the following features, ensure that the user has the listed permissions.
Feature Required Permission(s)
Collaborative Tabs Manage System Views
Bookmarking View Video Sources; View Recorded Video; Create System Bookmarks
36

Configuring and Managing Events
On the Manage Event Types page, you can configure the way in which the system reports events and the users who will receive notifications for each event type.
1. Go to the Events page, and select the Manage Event Types tab.
2. Select the event you want to c
3. Edit the Display Name to change the name of the event in both notifications and reports.
4. (Optional) Change the Status to determine whether or not the system logs events. By default, all events are active.
5. (Optional) Change the Notification Type to determine whether or not the event is reported
caus
e the system to send notifications through both the Admin Portal and the Ops Center.
6. (Optional) Set the Notification Details if you enabled a notification.
a. Determine whether or not to play a sound accompanying the event notification banner. You can upload a custom audio file for
the alert, and set the number of times to play the sound.
b. If you selected the Banner Requiring Acknowledgment option, determine whether or not to allow the s
the event and set the number of minutes for which users can s
c. If you selected the Banner option, determine whether or not to automatically acknowledge the event after some period
time. By default, all ba
d. Determine whether or not to hide Cell Alerts. Events associated with individual video sources provide alerts within Ops Cente
cells
; these alerts automatically hide after 3 seconds. Select this option to prevent the alert from hiding.
onfigure. Click
nners are set to persist until manually acknowledged.
next to the event details you want to edit, and configure the event.
nooze the event.
in a banner; enabling a banner will
nooze function for
of
r
7. (Optional) If you enabled a banner, determine the User Roles to Notify for the event.
8. Click Done.
Setting Event Log Retention Periods
By default, events expire every 30 days. However, you can opt to keep events for up to 90 days, and you can set different expiration
periods for both events local to the system and events from aggregated sites. These event retention settings are listed in the upper right
corner of the page in a statement: System events discarded after <x> days. <y> days for events coming from remote systems.
NOTE: Event retention settings for aggregated events only affect the event log on the local system. The event log on the remote system
has its own event log and may have different retention settings.
To change event retention settings:
1. Go to the Events page and click Manage Events.
37

2. Click <pencil> next to the event retention statement in the upper right corner of the page.
3. Set the retention periods for both local events and events coming from remote systems.
4. Click Save.
38

Using the Event Log
By default, the Event Log contains a list of events that have occurred in the last 30 days, initially sorted between events that require
attention, and events that have either been acknowledged or do not require acknowledgment. Use the Filter functions to find specific
events in the log. Select events in the log to reveal more information and options to respond to the event.
Responding to Events
Users with appropriate permissions can respond to events that trigger notifications. Users’ responses to events are logged with the
system, indicating whether or not the event has been acknowledged and by whom.
Figure 1: The Event Log
1. Go to the Events page. If an event triggers a notification banner, you can click the banner to go to the Events page.
2. Select the event requiring your attention.
3. Select an action.
• Acknowledge indicates that you have alleviated the condition causing the event.
• In Progress indicates that a user is in the process of correcting an event condition or performing work on the system that may
result in additional events.
• Snooze Hides an event notification for up to 60 minutes. The snooze function only affects notifications locally; it does not hide
event notifications from other users.
Troubleshooting and Downloading Server Logs
Should you ever have trouble with your VideoXpert system, you will need system logs to help troubleshoot the system yourself or to help
Pelco support pinpoint the problem.
VxCore archives logs when they reach 50 MB. Core stores up to 20 logs before it rotates out; when you download logs on a system, you
may receive a single zip with up to 19 archives and the current .log file.
To download system logs:
1. Log into the VideoXpert Admin Portal.
2. Go to the Reports page.
3. Click Export Logs.
39

Watching Live Video
The Live page provides access to live video. Live video is subject to the network bandwidth restrictions set by your administrator and the
transcoding limitations of aggregated systems. Surpassing either limitation will prevent you from watching additional video streams.
1. Go to the Live page.
2. Click one of the layout icons to arrange cells in your workspace
3. Locate the camera or cameras you want to view in the sidebar. You can sort cameras by location or group; you can also search for
cameras by name or number.
4. Add the camera to the page. You can double-click the camera to add it to the next video cell, or you can click and drag the cam
to the video cell of your choic
e.
Viewing Settings and Behaviors
Click Viewing Settings to reveal settings determining the behavior of video playback. Viewing settings are available on the Live or Search
pages, but affect video playback on any page of the interface.
Display camera names on videos: Select whether or not camera names appear over your video cells.
Video Quality Preference: Choose whether video performance aims for better picture quality or higher frame rates.
Connection Speed: Set your connection speed to match the connection speed of the client you are using to access the Web portal.
Your connection speed setting determines the quality of video streamed through the Web portal; setting your connection speed too high
or too low (by comparison with your client’s actual connection speed) can impact video performance. The client-side Connection Speed
setting is subject to bandwidth restrictions set by the administrator.
Sidebar: Choose whether the sidebar, containing cameras, viewing settings, and server information, appears on the left or right side of
the interface.
View Video Using: Choose whether you want to view video using the Pelco Media Plugin (PMP) or your browser’s native motion JPEG
viewer. The PMP displays H.264 video, resulting in better picture quality, a higher framerate, and potentially lower resource usage, but
it is only available in certain network configurations (typically LAN). It is recommended that you stream video using the PMP when available.
era
Installing the Pelco Media Plugin
Microsoft® Internet Explorer® 11 and Mozilla® Firefox® support the Pelco Media Plugin; Google Chrome does notsupport the Pelco Media
Plugin.
NOTE: The Pelco Media Plugin is not compatible with Windows 10.
The Pelco Media Plugin (PMP) enables you to view H.264 video through your Web browser. To view video using the PMP, you must be
able to receive UDP traffic directly from the system containing the camera you want to view; the port over which you receive the UDP
traffic is auto-negotiated when you access a PMP video stream. This typically means that you should be able to use the PMP when you
have access to systems over LAN, but you will likely be limited to motion JPEG viewing when accessing systems over WAN.
It is recommended that you update your graphics driver before installing the Pelco Media Plugin.
1. Click the link in the web interface. If you have Internet access, the Web portal will attempt to direct you to the Pelco Medi
page on www.Pelco.com. If you do not have Internet access, you will download the version o
server thro
2. Run the PMP installer.
3. Restart your Web browser.
40
ugh which you’re accessing the Web portal.
f the PMP
stored directly on the Vx
a Plugin

Video Overlay Controls
Place your mouse cursor over a video cell to reveal additional controls.
Opens one or more video cells in a new browser window. Click over an individual cell to expand the cell in a separate
browser window; click the icon in the sidebar to expand your entire workspace in a separate browser window.
Closes a video cell; open video cells consume the resources of the system from which the video stream originates. Closing a
stream makes those resources available to other users.
Enables and disables PTZ control. Click when the icon is gray to enable PTZ; click when the icon is blue to disable PTZ. PTZ
controls are only available to PTZ cameras in Live view, and are subject to user roles and prioritization rules.
Plays back video; playback controls are available when previewing recorded video.
Using PTZ Controls
When watching live video, you can issue PTZ controls to cameras identified by the dome icon . PTZ controls are subject to user
permissions (determined by roles) and prioritization rules. If your user account does not have the appropriate role or permissions to issue
PTZ controls to a camera, or a user with a higher priority is already controlling the camera, you will be unable to control the camera.
1. Click the PTZ icon to enable PTZ controls.
• Pan and Tilt: Click within the video to center the camera’s field of view on your cursor. You can double-c
camera’s field of view and zoom in on a partic
• Zoom: Use the slider or the scroll wheel on your mouse to zoom in or zoom out.
• Lock: Click
defined within each aggregated system. The camera will automatically unlock after 15 minutes or when the user who has
locked the camera closes the video stream.
2. Click the PTZ icon again when you have finished positioning the camera to disable PTZ controls.
the lock icon
to prevent lower priority users from controlling the camera. Priority is determined by user roles
ular point.
lick to center the
Engaging Presets and Patterns
When PTZ controls are engaged for a camera, you can execute PTZ presets and patterns.
• A preset is a set PTZ position; calling the preset will move the camera to the preset location.
• A pattern is a series of presets, causing the camera to move at a particular interval.
Presets and patterns are set and stored on the camera. You must go to the camera’s interface to set or change patterns. For Pelco
cameras and encoders, you can create, delete, and modify presets using VxOpsCenter; for all other cameras, you must go to the camera’s
interface to set or change presets.
To engage a preset or pattern:
1. Click the PTZ icon to enable PTZ controls.
2. Right click within the cell containing the PTZ-enabled camera, and select whether you want to engage a pattern or preset.
3. Select the pattern or preset you want to engage.
41

Downloading Reports
From the Reports page, you can download reports from the system. Reports are exported in CSV format contained within a ZIP archive.
Reports using the require a start-date and time; other reports provide current data.
Generating reports containing a large number of events may take some time. You can navigate away from the Reports page while the
system generates your report. If your report parameters are too large, the request may time-out and the system may ask you to narrow
your search.
NOTE: In all reports, cameras and other devices connected through Digital Sentry servers display the IP address of the DS server through
which they are connected rather than their direct IP address.
1. Select the reports you want to download.
2. Set start and end dates for the report you want to download. Reports based on events logged by the system must be captured within
the event-retention time period; by default, the system stores events for 30 days.
3. Click Export Reports.
Event Types and Reporting
You can pull reports (in CSV format) containing events and configuration information to audit your system and VideoXpert users. Reports
requiring a start date and time include an event history; reports that do not require a start date and time provide current configuration
information only. Depending on the date and time range you set, some reports may take several minutes for the system to process.
Event types typically refer to who or what is the cause of an event, and do not necessarily determine the report in which an event will
appear:
• Admin events typically occur at the administrative level.
• Analytic events are the result of software analytics.
• Client events that are reported by the client.
ternal events, which are injected into the system by a third party.
• Ex
• Hardware events resulting from physical hardware issues and sensor readings.
• System events are typically the result of normal operator actions.
42

The system holds events for 30 days. You cannot obtain reports past the 30 day threshold.
Event Event Type Online/Offline User Actions Event History
Core DB Backup Failed Admin ?
Core DB Backup Halted Admin ? ?
Core DB Backup Removed Admin ? ?
Core DB Backup Restore Admin ? ?
Core DB Backup Started Admin ? ?
CoreDB Backup Success Admin ?
Device Added Admin ? ?
Device Commissioned Admin
Device Decommissioned Admin
Device Modified Admin ? ?
Device Removed Admin ? ?
Drawing Added Admin ? ?
Drawing Image Modified Admin ? ?
Drawing Image Removed Admin ? ?
Drawing Image Retrieved Admin ? ?
Drawing Marker Added Admin ? ?
Drawing Marker Modified Admin ? ?
Drawing Marker Removed Admin ? ?
Drawing Modified Admin ? ?
Drawing Removed Admin ? ?
License Expired Admin ?
Notification Added Admin ? ?
Notification Added Role Admin ? ?
Notification Removed Admin ? ?
Notification Removed Role Admin ? ?
Privilege Added Admin ? ?
43

Event Event Type Online/Offline User Actions Event History
Privilege Modified Admin ? ?
Privilege Removed Admin ? ?
Role Added Admin ? ?
Role Modified Admin ? ?
Role Removed Admin ? ?
Schedule Added Admin ? ?
Schedule Modified Admin ? ?
Schedule Removed Admin ? ?
Situation Added Admin ? ?
Situation Modified Admin ? ?
Situation Notification Added Admin ? ?
Situation Notification Removed Admin ? ?
Situation Removed Admin ? ?
User Added Admin ? ?
User Modified Admin ? ?
User New Password Admin ? ?
User Removed Admin ? ?
User Role Added Admin ? ?
User Role Removed Admin ? ?
Abandoned Object Analytic ?
No Abandoned Object Analytic ?
Adaptive Motion Analytic ?
No Adaptive Motion Analytic ?
Directional Motion Analytic ?
No DIrectional Motion Analytic ?
Loitering Analytic ?
No Loitering Analytic ?
44

Event Event Type Online/Offline User Actions Event History
Object Count Analytic ?
No Object Count Analytic ?
Object Removal Analytic ?
No Object Removal Analytic ?
Sabotage Analytic ?
No Sabotage Analytic ?
Stopped Vehicle Analytic ?
No Stopped Vehicle Analytic ?
Motion Detected Analytic ?
No Motion Detected Analytic ?
User Logged Off Client ? ?
User Logged On Client ? ?
Client Snoozed Event Client ? ?
Saved View Accepted Client ? ?
Saved View Recieved Client ? ?
Saved View Sent Client ? ?
Client Tab Added Client ? ?
Cliented Tab Modified Client ? ?
Cliented Tab Removed Client ? ?
Client Workspace Added Client ? ?
Client Workspace Modified Client ? ?
Client Workspace Removed Client ? ?
CPU Load Hardware ?
Disk Failure Hardware ?
Fan Failure Hardware ?
Input Loss Hardware ?
Input Restored Hardware ?
45

Event Event Type Online/Offline User Actions Event History
Link Speed Changed Hardware ?
Memory Load Hardware ?
Packet Loss Hardware ?
Power Supply Failure Hardware ?
Temperature Issue Hardware ?
UPS Low Hardware ?
Volume Full Hardware ?
Alarm Active System ?
Alarm Inactive System ?
Bookmark Added System ? ?
Bookmark Modified System ? ?
Bookmark Removed System ? ?
Client Push System ?
Client Push Acknowledged System ?
database_fault System ?
Device Offline System ? ?
Device Online System ? ?
Export Deleted System ? ?
Export Download System ? ?
Export Failure System ?
Export Started System ? ?
Export Successful System ?
Fault System ?
PTZ Lock System ? ?
PTZ Pattern Triggered System ? ?
PTZ Preset Triggered System ? ?
PTZ Unlock System ? ?
46

Event Event Type Online/Offline User Actions Event History
Quick Report Downloaded System ? ?
Retention Low System ?
Stream Loss System ?
Stream View Denied System ?
Stream View Started System ? ?
Stream View Stopped System ? ?
Stream View Timeout System ?
Tag Added System ? ?
Tag Linked System ? ?
Tag Merged System ? ?
Tag Modified System ? ?
Tag Removed System ? ?
Tag Unlinked System ? ?
Camera Configuration Report
The Camera Configuration report provides the address, name, and number (if set) for cameras in the system (appearing on the Devices
page in the Admin Portal), and the recorders to which each camera is assigned.
Online/Offline Report
The Online/Offline report provides a list of all device_online and device_offline events happening in the time frame you specify with
relevant details for devices associated with each event.
Recorder Camera Assignment Report
The Recorder Camera Assignment report contains the complete list of recorders and the video sources assigned to each recorder. It
contains similar information to the Camera Configuration report, but is sorted by recorder.
Recorder Diagnostics Report
The Recorder Diagnostic report provides the current status and health of your VideoXpert recorders, including hard drive status.
User Actions Report
The User Actions report lists the events in the system for which users are directly responsible within VideoXpert. For example, the report
would not show a device_offline event, but would show a device_decommissioned event, listing the user responsible for decommissioning the device. The complete list of events in the User Actions report is available in the table above.
47

Event History Report
The Event History report provides a complete list of all events that occurred within the time frame you specify, including the source of
the event (device, user, etc) and the state of the event (acknowledged, in progress, etc.).
VX Cluster Configuration Report
The Cluster Configuration report provides a list of the Core and Media Gateway servers in your VideoXpert system and their online or
offline status.
Analytic and Other Video-Related Events
Analytic events generated by cameras are associated with video in VideoXpert. Within the Ops Center, you can use the Event Viewer
and video-associated events to drive to relevant video.
48

Additional Setup
Depending on your system configuration, you may need to install additional software or perform additional operations to ensure your
VideoXpert system performs optimally.
Getting Started
Before setting up a VideoXpert Accessory Server, you should have already set up and configured your Core or CMG servers. If using
multiple servers in a small cluster, all servers must have their virtual IP address configured before you begin configuring the Accessory
Server.
Before you start the Accessory Server, ensure that it is connected to the same network as your VideoXpert resources.
• The accessory server(s) must have network connectivity to other VX resources. However, the AS(s) do NOT have to be on the same
subnetwork.
• The virtual IP of Cores and Media Gateways must be on the same subnetwork as the accessory servers. The virtual IP does not have
to be on the same subnetwork as the Core or Media Gateway servers.
Take care when assigning the Accessory Server’s IP address; you cannot change the address after initial setup, as it becomes an integral
part of your VideoXpert network.
1. Start the accessory Server.
2. Provide the IP address you want to assign to the Accessory Server.
3. Provide the Netmask and Gateway of the Accessory Server.
ESULT:
R
The system completes the setup process and returns you to a command prompt. You can now connect to the Accessory Server’s Web
interface using the IP address you assigned to it, through which you can configure services supporting your VideoXpert network.
About the VideoXpert Accessory Server
The VideoXpert accessory Server is designed to provide supplemental services for VideoXpert, offloading your system’s support requirements to a separate server. The Accessory Server provides the following services:
s a load balancer for a small cluster and provide active failover services: The Accessory Server acts as a load
Act a
•
balancer for multi-CMG clusters. Presently, the accessory Server’s load balancer functionality is recommended for clusters of 2
CMG servers; the servers in the cluster must use the same virtual IP address to utilize the accessory Server as a load balancer. The
load balancer maximizes the processing throughput of your VideoXpert servers while maintaining the availability of your VideoXpert
servers; should one of the servers in the cluster fail, the other(s) will continue operating as normal.
NOTE: The failover model supports failure of a single server in a dual CMG environment. It does not provide protection against
more than one failed server (e.g. 2 CMG’s, 2 Accessory Servers, or a CMG and an Accessory Server) in this sort of environment.
Act as an arbiter for your c
•
(2) servers, you can enable the Accessory Server’s Arbiter service. The arbiter provides the deciding vote in elections determining
the primary server in the cluster; the arbiter does not contain the system database. Setting your accessory Server as the cluster’s
arbiter prevents you from having to run another server to provide arbitration services for the cluster.
DHCP Serve
•
address ranges supported on your network.
r: The accessory server can act as the DHCP server for devices in your VideoXpert network. You can define the
luster: VideoXpert clusters must contain exactly two (e) servers. If your cluster has more than two
NTP Server: VideoXpert servers must be time-synchronized to ensure proper operation. The accessory Server can act as both an
•
NTP server for your VideoXpert network, or simply as an NTP client to remain synchronized with the rest of your VideoXpert devices.
49

You must configure the accessory Server as either an NTP server or client; you cannot save the accessory Server’s
configuration without selecting NTP options.
Configuring the Accessory Server
The accessory Server’s web interface allows you to select the support services you want to run. If, after configuring a service, you want
to turn it off, simply deselect the option in the web interface.
Load Balancer functionality requires all servers in the cluster to use the same virtual IP address. You do not need to enable the functionality; the load balancer takes effect as soon as you point the accessory Server to the address of a CMG server in the cluster.
1. Open a web browser and go to the IP address of your accessory Server.
2. Provide the IP address of a Core server.
3. Provide the password of the admin user for VideoXpert.
50

4. In the MongoDB Password field, navigate to C:\ProgramData\Pelco\Core\db\security\ on the Core server, and select key.pem.
5. Select the support services you want to employ.
6. Select an NTP option. The accessory Server can act as an NTP client, or an NTP server for your VideoXpert network.
Changing the IP Address
You cannot change the address of the accessory Server through the Web interface. You must SSH into the accessory Server, edit the
interfaces file and then restart the server.
Enabling a Second Accessory Server (Failover)
Select Enable 2nd Accessory Server if running two accessory Servers in a failover (high-availability) configuration. In a high-availability configuration, the accessory Server that you configure first will act as the primary accessory Server; the secondary server will
come online only if the primary falls offline.
You only need to run the initial setup on the primary server. The primary server transfers settings to the secondary automatically. You
cannot configure the secondary server independent of the primary server; in the event of a failover, you must wait until the original
primary server comes back online to make configuration changes to the accessory Server.
NOTE: The failover model supports failure of a single server in a dual CMG environment. It does not provide protection against more than
one failed server (e.g. 2 CMG’s, 2 Accessory Servers, or a CMG and an Accessory Server) in this sort of environment.
Using the Accessory Server as an Arbiter
Select Run Arbiter if your CMG environment contains an even number of servers and you want the accessory Server to act as the
cluster’s arbiter. The arbiter serves as the deciding vote in elections determining the primary server for the cluster, but does not actually
store the VideoXpert database or serve data to users.
NOTE: If you re-image or replace your primary Core server, you must disable, and then re-enable the Arbiter service, so that the Accessory
Server will recognize the new server.
Configuring DHCP Services
Select Run DHCP if you want the accessory server to act as a DHCP server for your VideoXpert network. Provide the subnet IP, Netmask,
Broadcast Address, Gateway Address, and IP Range to configure DHCP services. Select ranges with an ample number of extra addresses
to cover any cameras or VideoXpert devices you may add to the system later; presently. To add additional IP ranges, click Add Another.
You cannot set or delete MAC reservations through the accessory Server interface at this time.
Configuring NTP Services
You must configure the accessory server as an NTP server or client before you can save your accessory server’s configuration. Servers
and devices within VideoXpert must be time-synchronized. The accessory server can act as an NTP client if your VideoXpert network
already contains an NTP server; if you opt to run as an NTP client, you must provide the address of an NTP server on the network. Otherwise, you should configure the accessory server as an NTP server. When enabling the NTP server, you can provide time in one of two
ways:
51

Get time from another NTP server: select this option to get and verify time against another time server; you must provide the
•
address of the NTP server providing time before you can save your configuration.
• Set time manually. Select this option to manually set a date, time, and timezone for the VideoXpert system.
NOTE: Changing time within an active VideoXpert system is likely to cause errors in data access and retrieval.
Server Status
Go to the Status page of the Accessory Server’s web interface to view the up/down status for the Accessory Server’s services. If DHCP
is enabled, the Status page will also list leases.
Updating the Accessory Server
The Accessory Server will fall offline while updating. It is recommended that you schedule the update to prevent impact on the network.
Updates for the Accessory Server come in the form of zip files. Do not unpack the zip files to update the server.
1. Go to the Update page.
2. Click Browse and select the .zip update package.
3. Click Update Server.
Restoring the Accessory Server to Defaults
You can go to the Restore Defaults page to return the Accessory Server to its factory defaults. The Accessory Server does not have a
“backup” function; you will lose your current settings if you restore the server to its factory defaults.
Installing an NTP Client Application
All servers in your VideoXpert system must reference a time server to ensure that all devices belonging to the system use the same time.
Time disparities may result in errors when recording and recalling video. It is recommended that your NTP server be independent of your
VideoXpert servers.
As a part of the setup process, you must install an NTP application separate from VideoXpert. VideoXpert has been tested with Meinberg
NTP client software, versions 2.4.6 and later. The software is available at https://www.meinberg-
global.com/english/sw/ntp.htm#ntp_stable.
1. Run the Meinberg installer as an administrator.
2. Follow the installation process.
3. When requested, select Create an initial configuration file with the following settings and specify the address of your NTP
server and then click Next. You may add or edit servers later directly from the NTP.conf file.
4. When setting up NTP services, it is recommended that you select Create and use a special NTP account, and then click Next.
This account is used only for NTP services.
52

5. Specify the name and password for the Windows user account that will run NTP services.
6. Finish the installation process.
SNMP Monitoring
Install VideoXpertSNMP.msi to enable Windows SNMP services and monitor your system via SNMP. Refer to the VideoXpert SNMP
Agent Installation, Configuration, and User Guide.
Migrating to VideoXpert
You can migrate your database from Endura or Digital Sentry to VideoXpert using the appropriate migration utility. You can migrate from
your previous system permanently, or you can run your VideoXpert system in tandem with another video management system. If running
systems in tandem, you can run the migration process periodically to capture the change from your Endura or Digital Sentry system and
“catch up” the VideoXpert system.
Migrating the Endura Database to VideoXpert
It is highly recommended that you perform an SM backup from Endura Utilities before migrating to VideoXpert.
If your Endura environment contains an SM5200 operating on version 1.5 or later, you can migrate your entire Endura database from
Endura to VideoXpert to ensure a relatively seamless transition between video management systems using the sm_export and sm_im-
port utilities. However, due to the differences between the Endura and VideoXpert databases, the migration process translates some
aspects of your Endura database for use with VideoXpert.
The migration process transfers user names, roles, permissions and the associations for all three items. Passwords for accounts in VideoXpert must be 8 characters or more; if an Endura user’s password was less than 8 characters, their password will be appended with 1s
until it reaches 8 characters. For example, a password of “ABC” would become ABC11111. Users with a password appended in this way
will have to change their passwords upon logging into VideoXpert.
The migration process transfers all camera names, numbers, groups, and locations to VideoXpert. Locations and Groups are converted
to VideoXpert tags during the migration process. For example, a camera that was assigned to the “PTZ Cameras” group in the “Parking
Deck” location in your Endura environment becomes a camera that is assigned “PTZ Cameras” and “Parking Deck” tags in your VideoXpert environment.
The migration utility does not import cameras. Your VideoXpert system must have access to cameras – they must appear in the Admin
Portal’s Devices Tab – for the migration tool to successfully import their data.
1. Go to the Devices page in VideoXpert and discover your Pelco cameras and devices or manually add third-party devices to VideoXpert. The migration process only migrates groups, locations, and other information (as tags) for cameras that are already recognized by VideoXpert.
2. Run the sm_export utility.
3. Provide the address of your primary system manager, in the format sm_export -s 192.168.0.1.
• By default, the backup utility will attempt to use the default administrative account to export the database. If necessary, yo
can s
pecify another user account using the -user and -password arguments in the format: sm_export -s
username -password password.
The utility outputs a SQL file in the formatexport_192.168.0.1.sqland a JSON file in the format migrate_192.168.0.1.json. You
•
can change the name of the JSON file with the -o argument in the format: sm_export -s 192.168.0.1 -o outputFileName.json
192.168.0.1 -user
u
4. Run the ve_import utility providing the IP address of the system to which you want to im
administrative user, and the name of the file exported in previous steps. Use the format: ve_import 192.168.0.2 user password
migration_192.1
68.0.1.json.
port a database, the credentials of an
53

Migrating from Digital Sentry to VideoXpert
Before migrating your Digital Sentry database, you should perform a complete system backup.
The Digital Sentry export process captures users, roles, permissions, friendly names of cameras, and groups. User passwords will not
migrate; upon logging into VideoXpert for the first time, a users migrated from Digital Sentry must provide a new password.
VideoXpert does not have a direct analog for Digital Sentry’s groups. When migrating from Digital Sentry to VideoXpert, groups become
tags, maintaining the same associations as in the Digital Sentry database. The migration utility does not import cameras. Your VideoXpert system must have access to cameras – they must appear in the Admin Portal’s Devices Tab – for the migration tool to successfully
import their data.
1. Go to the Devices page in VideoXpert and discover your Pelco cameras and devices or manually add third-party devices to VideoXpert. The migration process only migrates groups, locations, and other information (as tags) for cameras that are already recognized by VideoXpert.
2. Run the ds_export utility.
3. Provide the IP address of the server from which you want to export the database in the format: ds_export -s 192.168.0.1
• The utility attempts to use the dsserviceuser account with the default password. If this account has changed, you
new c
redentials with the -user and -password paramaters. in the format ds_export -s 192.168.0.1 -user username -pa
pass
word
• The utility outputs filenames in the format migrate_192.168.0.1.json. You can change the filename with the -o param
the format: ds_export -s
4. Run the ve_import utility providing the IP address of the system to which you want to im
192.168.0.1 -o outputName
port a database, the credentials of an
administrative user, and the name of the file exported in previous steps. Use the format: ve_import 192.168.0.2 user password
migration_192.1
68.0.1.json.
can specify
ssword
eter in
54

Backing Up VideoXpert
It is recommended that you back up your system after initial setup, when you have configured a significant number of users and devices,
and after significant changes to your system configuration.
A system backup will contain the system database, including the previous 30 days’ events. Backups will not capture exported video or
any settings that you may have changed outside the Admin Portal application (for example, changes made to configuration scripts
directly).
The speed of each backup is dependent on the size of the VideoXpert database, network bandwidth constraints, and other variables. For
a large database, a backup can take up to several hours.
Configuring Backups
1. Go to the Config page in the Admin Portal and click Backup.
2. Provide the network location where you want VideoXpert to store backups. If necessary, provide the username and passw
required to
3. Determine the number of backups you want to retain. If the retention quantity is met in the download location, VideoXpert wil
delete the oldest backup an
4. Determine whether or not to backup automatically. If you elect to run automatic backups, determine the time of day during whi
you want to take backups
5. Click Save Configuration to save your configuration.
6. Click Backup Now to take an immediate backup.
access the network location.
d add the newest.
and how often you want to take system backups.
Taking a One-Time Backup
If backups are already correctly configured, you can take a one time backup at any time.
1. Go to the Config page in the Admin Portal and click Backup.
2. Click Backup Now.
ord
l
ch
55

Scheduling Backups
Ensure that you have configured your backup location before attempting to schedule backups.
1. Go to the Config page in the Admin Portal and click Backup.
2. Select the option to Backup Automatically.
3. Indicate the time of day during which you want to take backups. and the interval between backups. Remember, backups
cons
ume system resources, so you should schedule backups when they will have the least impact on the system.
4. Set the Expiration period for backups, in number of days. The Expiration period is the interval between backups.
5. Click Save Configuration.
Restoring the Database (Replacing a Member of a Cluster)
Before you attempt to restore a database, you must install, but not configure, VideoXpert Core on all servers to which you
want to restore the database. You cannot restore a database backup on a system that has already been configured.
You should configure your replacement servers with the same IP addresses as the severs you want to replace. Replacing failed servers
with servers operating on different IP addresses will result in incorrect configurations on your replacement servers.
Use this process to replace a member of a cluster that is still operational; the restore process will run in your live VideoXpert environment
and will not cause VideoXpert to fall offline.
1. Configure the Windows instance(s) on the servers to which you
address(es
2. Install VideoXpert on all Cores to which you will restore the database; do not configure VideoXpert.
3. On each Core server you are restoring, run the following command, providing the IP address of an operational Core server in t
clus
"c:\program files\pelco\core\tools\restoreUtil.bat" –-coreIp IPAddressOfWorkingCore
--password PasswordOfTheAdminUser --dbPassword DatabasePassword
The database password is stored on an operational Core at c:\programdata\pelco\core\db\security\key.pem.
) as the servers you are replacing.
ter and the password of the “admin” user:
will restore VideoXpert; the server(s) should use the same IP
can
he
This may take a few minutes, depending on your network, the size of the database you want to restore, etc. The restore utility does
not indicate progress, but will tell you when the restoration process is complete.
R
ESULT:
When the restoration utility has finished copying the database from the live server to the server you are restoring, it will start the Core
and other applicable services, and the server will become a functional member of your VideoXpert environment.
Restoring the Database (Replacing an Entire Environment)
Before you attempt to restore a database, you must install, but not configure, VideoXpert Core on all servers to which you
want to restore the database. You cannot restore a database backup on a system that has already been configured.
The servers to which you restore the database should use the same IP addresses as the servers from which you took your backup.
Attempting to restore the backup on servers with different IP addresses than the servers recorded by the backup will result in incorrect
configuration information on your restored servers.
Use this process to recover from a catastrophic failure of all VideoXpert servers in an environment. Following this process will restore
all Core instances in a VideoXpert environment. Do not use this process to restore one or more Core servers in a clustered VideoXpert
environment that is still operational. Pay careful attention; some steps are specific to certain versions of the VideoXpert Core software.
56

All file paths specified assume that you have installed the Core server application to the default directory, C:\Program Files\Pelco\Core.
When running commands or opening a command prompt as a part of this process, you must execute commands as an administrator.
1. Configure the Windows instance(s) to which you will restore VideoXpert; the server(s) should use the same IP address(es) as t
environment from which y
ou took your backup.
he
2. Install VideoXpert on all Cores to which you will restore the database; do not configure VideoXpert.
3. Make your backup directory available to the Core server(s) to which you are restoring VideoXpert if it is not already.
• Mount the network share containing the backup to the Core server(s).
• Copy the contents of the backup directory to a local disk on each Core server.
4. On each server, open a command prompt and run: "c:\program files\pelco\core\tools\
<path-to-configuration.tx
ESULT:
R
t>
restoreUtil.bat" -–backup
When the restore process has completed, the utility starts Core and other applicable services.
A
FTER COMPLETING THIS TASK:
Go to the Devices page in the Admin Portal for your newly restored Core, and remove, and then re-discover all Media Gateway devices.
Failing to remove and re-discover Media Gateways may prevent video streaming in the newly-restored VideoXpert environment.
57

Updating Software
It is recommended that you update your Core server by running an updated installer; the upgrade process preserves your configuration
and database. During the update process, the Core will fall offline and the system will restart. Ensure that you are prepared for the Core
to go offline, either by failover or by scheduling maintenance at an appropriate time before attempting to update the Core.
Updating Software (Uninstall/Reinstall Method)
NOTE: This is not the preferred method to update your Core software; in most cases, you should simply run the updated installer in your
Core environment to update, rather than uninstalling and then reinstalling Core.
The uninstall process does not delete your data and events folders. If you must uninstall the Core software before installing a newer
version of the software, you may recover your data and events manually.
When reinstalling the Core software, install in the same directory as your previous installation to recover your Core data and events.
58

elco, Inc.
P
625 W. Alluvial, Fresno, California 93711 USA
(800) 289-9100 Tel (800) 289-9150 Fax
+1 (559) 292-1981 International Tel
+1 (559) 348-1120 International Fax
www.pelco.com
Pelco, the Pelco logo, and other trademarks associated with Pelco products referred to in this publication are trademarks of Pelco, Inc. or its affiliates. © Copyright 2018, Pelco, Inc.
ONVIF and the ONVIF logo are trademarks of ONVIF Inc. All other product names and services are the property of their respective companies. All rights reserved.
Product specifications and availability are subject to change without notice.
 Loading...