

Page 1

QUICK START
PMCL500BL Series LCD Monitors
Pelco by Schneider Electric
3500 Pelco Way, Clovis, California 93612-5699 United States
USA & Canada Tel: (800) 289-9100 • FAX: (800) 289-9150
International Tel: +1 (559) 292-1981 • FAX: +1 (559) 348-1120
www.pelco.com www.pelco.com/community
C3915M-A (10/12)
Page 2
(PMCL532BL)
(PMCL542BL/
PMCL546BL/
PMCL555BL)
(PMCL532BL)
M3 x 6 mm 16 pcs
M4 x 6 mm 8 pcs
M3 M4
(PMCL542BL/
PMCL546BL/
PMCL555BL)
M3 x 6 mm 8 pcs
M4 x 6 mm 12 pcs
M4 x 10 mm 16 pcs
M4
VIDEO
6
OUT
IN
7
AUDIO IN
AUDIO1
8 9
AUDIO OUT
SPEAKERS
+ R - + L -
( 8Ω )( 8Ω )
R
L
AUDIO IN
AUDIO2 AUDIO3
AC SWITCH
ON/OFF
100-240V~50-60Hz
2.8A
IN
10
1.4A
OUT
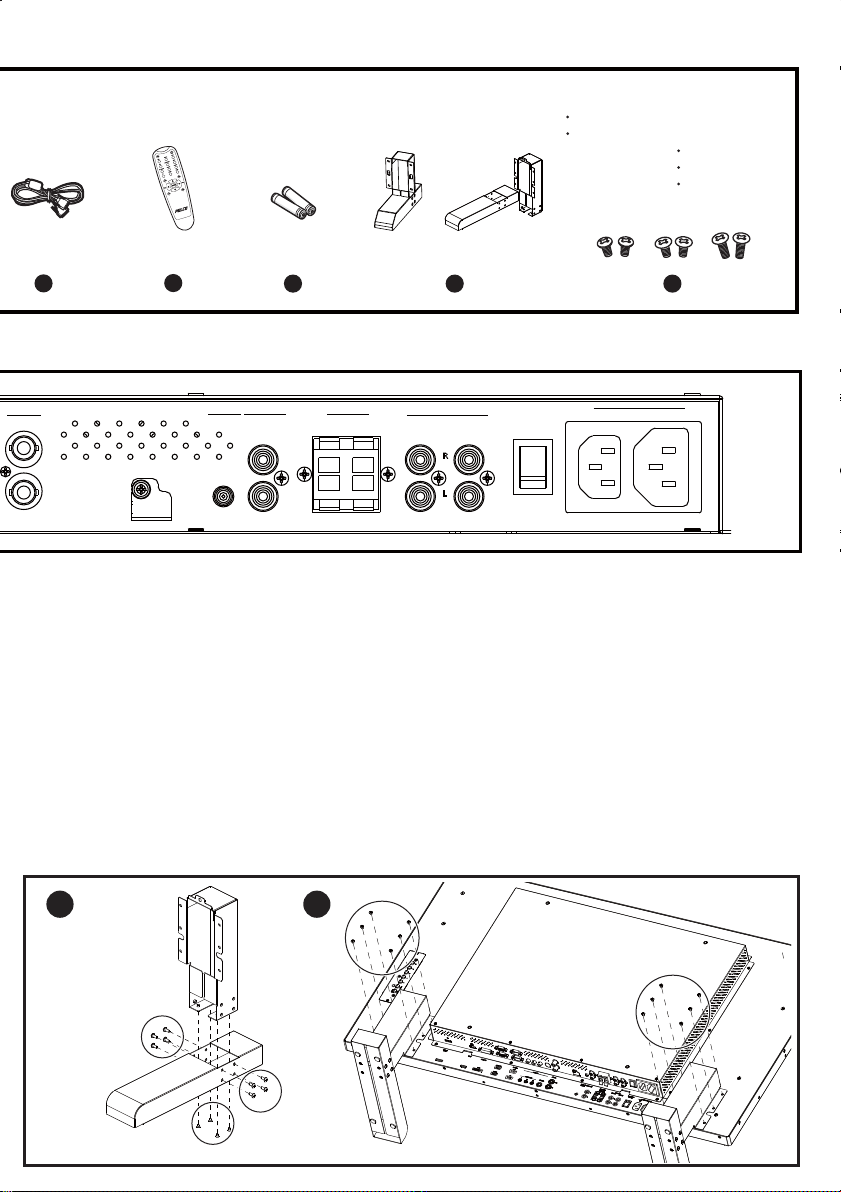
• Stand installation (PMCL542BL/PMCL546BL/PMCL555BL)
A B
M4 x 6 mm
M4 x 10 mm
M4 x 6 mm
M4 x 10 mm
M3 x 6 mm
Page 3

Step 1
Step 2
1 2 43 5
Step 3
DISPLAY
PORT
100-240V~50-60Hz
2.8A
IN
HDMI
VIDEO IN
Step 4
1.4A
OUT
• Stand installation (PMCL532BL)
A B
M4 x 6 mm
VGA OUT
VGA IN
RS-232C
OUT
IN
VIDEO IN
COMPONENT S-VIDEO
Y
Pb Pr
M4 x 6 mm
M3 x 6 mm
P/N: 4J.20R01.002
M3 x 6 mm
Page 4

English
Step 1: Check the package contents
1
Color LCD Flat Panel Monitor
2
Quick start guide
3
Installation manual (CD-ROM)
Power Cords
4
DVI-D to DVI-D cable
5
6
VGA to VGA (D-Sub) cable
Remote control
7
AAA battery
8
Stands
9
Screws (for stand installation)
10
Step 2: Connect input/output signals
Step 3: Connect power
Step 4: Power on the monitor
• Stand installation
Français
Étape 1 : Vérifiez le contenu du paquet
1
Moniteur à écran plat LCD couleur
2
Guide de démarrage rapide
3
Manuel d’installation (CD-ROM)
Cordons d’alimentation
4
Câble DVI-D à DVI-D
5
Étape 2 : Connectez les signaux d'entrées/sorties
6
Câble VGA à VGA (D-Sub)
Télécommande
7
Pile AAA/LR3
8
Pied
9
Vis (pour l’installation du pied)
10
Étape 3 : Connectez l'alimentation
Étape 4 : Allumez le moniteur
• Installation du pied
Deutsch
Schritt 1: Lieferumfang prüfen
1
Farb-LCD Flachbildmonitor
2
Kurzanleitung
3
Installationshandbuch (CD-ROM)
Stromkabel
4
DVI-D zu DVI-D Kabel
5
Schritt 2: Eingangs-/Ausgangssignale anschließen
Schritt 3: Stromversorgung herstellen
Schritt 4: Bildschirm einschalten
• Ständerinstallation
6
VGA zu VGA (D-Sub) Kabel
Fernbedienung
7
AAA-Batterie
8
Ständer
9
Schraube (für Ständerinstallation)
10
Page 5

Italiano
Fase 1: Controllare i contenuti della confezione
1
Monitor a schermo piatto LCD a colori
2
Guida rapida
3
Manuale di installazione (CD-ROM)
Cavi di alimentazione
4
Cavo da DVI-D a DVI-D
5
6
Cavo da VGA a VGA (D-Sub)
Telecomando
7
Batteria AAA
8
Supporto
9
Vite (per l’installazione del supporto)
10
Fase 2: Connettere i segnali ingresso/uscita
Fase 3: Connettere l'alimentazione
Fase 4: Accendere il monitor
• Installazione del supporto
Español
Paso 1: Comprobar el contenido del paquete.
1
Monitor en color de pantalla plana LCD
2
Guía de inicio rápido
3
Manual de instalación (CD-ROM)
Cables de alimentación
4
Cable DVI-D a DVI-D
5
6
Cable VGA a VGA (D-Sub)
Control remoto
7
Batería AAA
8
Soporte
9
Tornillo (para instalación del soporte)
10
Paso 2: Conectar las señales de entrada y salida.
Paso 3: Conectar la alimentación.
Paso 4: Encender el monitor.
• Instalación del soporte
Português
Passo 1: Verificar os conteúdos do pacote
1
Monitor de painel plano LCD colorido
2
Guia de início rápido
3
Manual de instalação (CD-ROM)
Cabos de alimentação
4
Cabo DVI-D para DVI-D
5
Passo 2: Ligar os sinais de entrada/saída
Passo 3: Ligar a energia
Passo 4: Ligar o monitor
• Instalação do suporte
6
Cabo VGA para VGA (D-Sub)
Controle remoto
7
Bateria AAA
8
Suporte
9
Parafuso (para instalação do suporte)
10
Page 6

Pусский
Шаг 1: Проверка комплектности
1
Цветной плоскопанельный ЖК-монитор
2
Краткое руководство
3
Руководство по установке (CD-ROM)
Шнуры питания
4
Кабель DVI-D/DVI-D
5
Шаг 2: Подключение входов и выходов
Шаг 3: Подключение питания
Шаг 4: Включение монитора
• Установка основания
简体中文
第1步:检查包装内的物品
1
彩色液晶平板显示器
2
快速入门指南
3
安装手册(CD-ROM)
电源线
4
DVI-D 至 DVI-D 线
5
第2步:连接输入/输出信号
第3步:连接电源
6
Кабель VGA/VGA (D-Sub)
Пульт дистанционного управления (ДУ)
7
Батарейка типа AAA
8
Подставка
9
Винт (для установки основания)
10
6
VGA 至 VGA(D-Sub)线
遥控器
7
3A 电池
8
支架
9
螺丝(用于支架安装)
10
第4步:打开显示器电源
• 安装支架
Pelco, the Pelco logo, and other trademarks associated with Pelco products referred to in this publication are trademarks of Pelco, Inc. or its aliates.
All other product names and services are the property of their respective companies. ONVIF and the ONVIF logo are trademarks of ONVIF Inc.
Product specications and availability are subject to change without notice. ©Copyright 2012, Pelco, Inc. All rights reserved.
 Loading...