

MC3800 Series
1/3-Inch Monochrome
Camera
Installation/
Operation Manual
C1901M (4/99)
Pelco • 3500 Pelco Way • Clovis, CA 93612-5699 USA • www.pelco.com
In North America and Canada: Tel (800) 289-9100 or FAX (800) 289-9150
International Customers: Tel (1-559) 292-1981 or FAX (1-559) 348-1120
IMPORTANT SAFEGUARDS AND WARNINGS
1. Installation and servicing should only be done by qualified service personnel and
conform to all local codes.
2. To prevent fire or shock hazard, do not expose the unit to rain or moisture.
The product and/or manual may bear the following marks:
This symbol indicates that
dangerous voltage constituting a
risk of electric shock is present
within this unit.
RISK OF ELECTRIC SHOCK.
This symbol indicates that there
are important operating and
maintenance instructions in the
literature accompanying this unit.
Please thoroughly familiarize yourself with the information in this manual prior to installation
and operation.
DESCRIPTION
The MC3800 Series cameras are 1/3-inch format monochrome CCD (charge coupled
device) cameras. They have the following features:
• High resolution and high sensitivity
• CCD iris function
• AGC (automatic gain control)
• AC line lock
• C/CS lens mount
• Auto-iris connector for DC-driven lenses
• Level and backlight control (BLC) for various lighting conditions
• Isolated power circuit
CAUTION:
DO NOT OPEN.
MODELS
MC3800-2 24 VAC, EIA standard
MC3800-2X 24 VAC, CCIR standard
MC3800-3 230 VAC, CCIR standard
2 Pelco Manual C1901M (4/99)
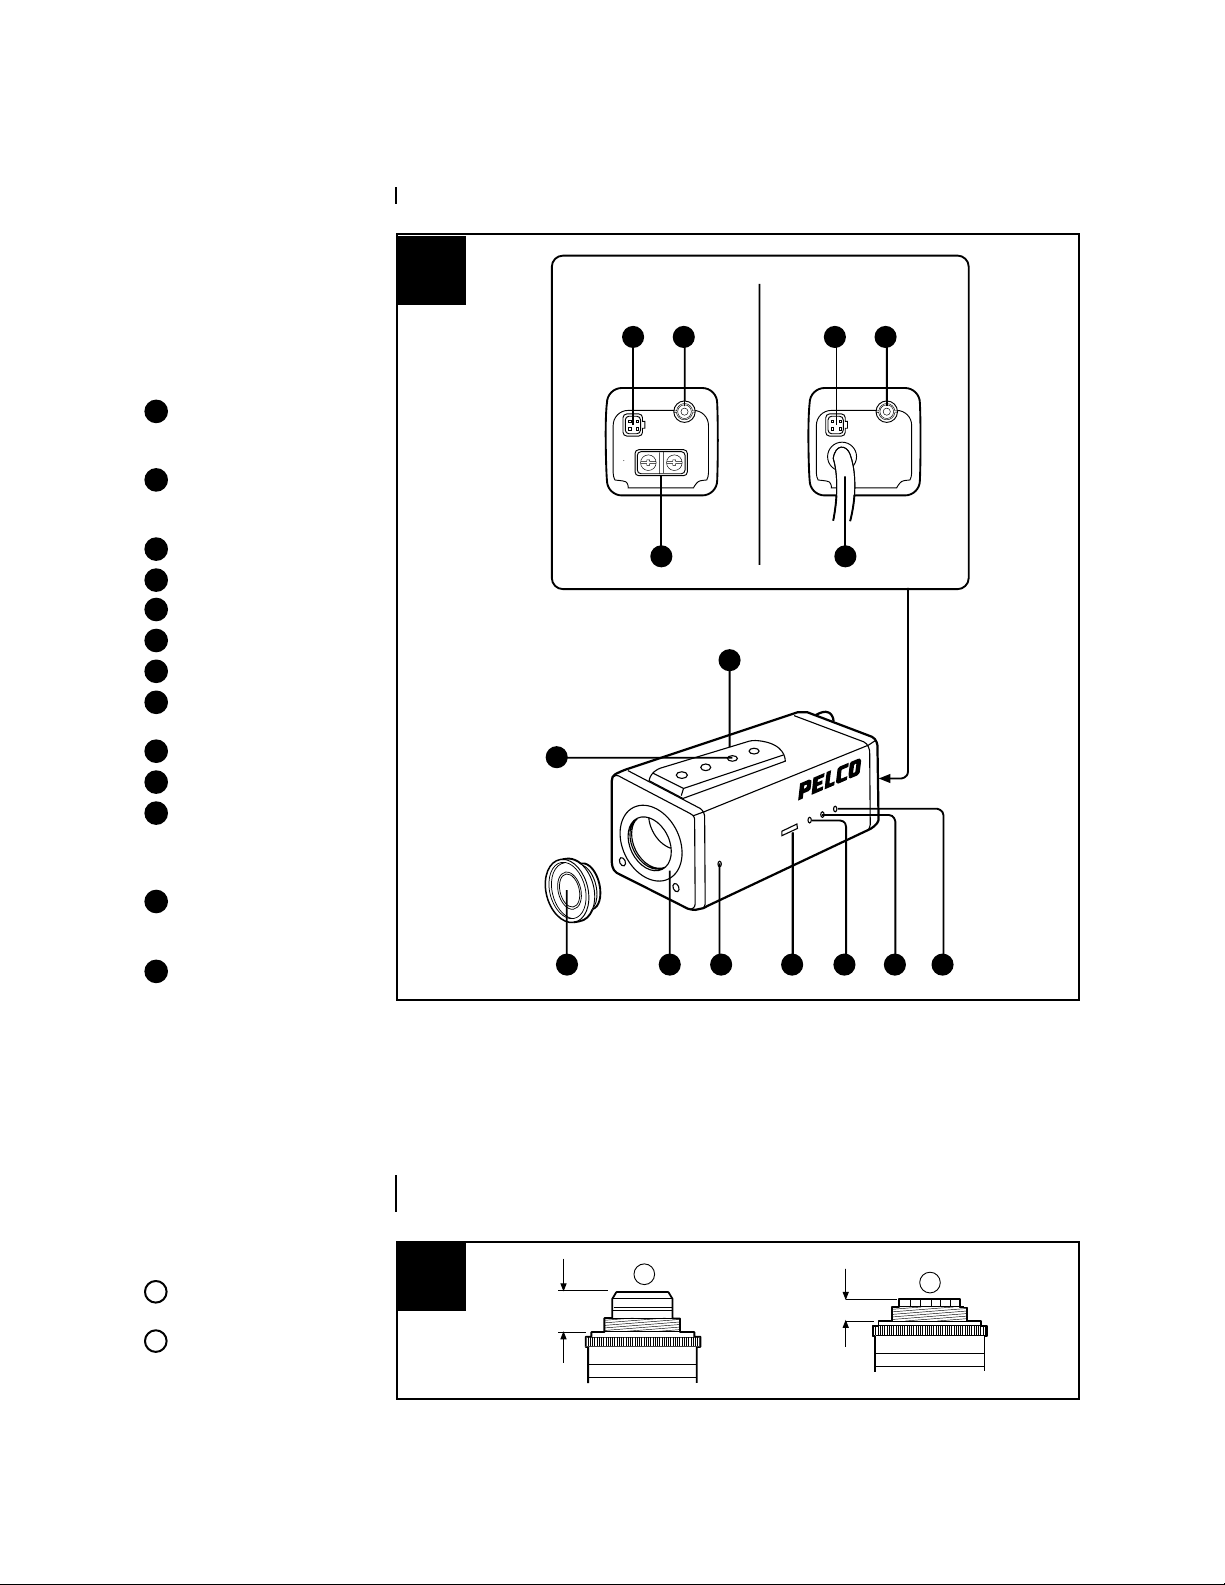
LOCATION AND FUNCTION OF PARTS
Refer to Illustration B for the location of the camera parts.
NOTE:
trations in this manual are
keyed to the illustrations in
the manual that is supplied
with the camera.
10
11
12
13
References to illus-
Tripod adapter (may be
1
attached to top or bottom
of camera)
Camera mounting
2
receptacle (1/4-inch
UNC-20)
Lens mount cap
3
C/CS lens mount
4
5
C/CS adjustment pot
CCD iris switch
6
Level adjustment pot
7
Backlight control (BLC)
8
adjustment pot
9
V-phase adjustment pot
Lens connector (four-pin)
Video output (BNC
connector). Connect to
the VIDEO IN connector
of a monitor.
MC3800-2/MC3800-2X:
24 VAC power input
terminals
MC3800-3: 230 V AC
power cord
B
MC3800-2
MC3800-3
MC3800-2X
10 11 10 11
1312
1
2
3 4 5 6 7 8 9
Top/Front/Side/Rear Views of MC3800 Series Cameras
INSTALLATION
LENS
The lens must be either a C- or CS-mount type weighing less than 1 kg (2.2 lb). The
protrusion behind the mounting surface must be within the limits shown in Illustration C.
1 C-mount lens
1/2-inch (12 mm) or less
2
CS-mount lens
9/32-inch (7 mm) or less
C
1)
1
2)
Compatible Lenses
Pelco Manual C1901M (4/99) 3
2
Be sure to attach the lens mount cap when the lens is not mounted.
When using an auto-iris lens, use only a DC-driven type or a direct current drive coil with a
resistance value over 150 ohms.
When using an auto-iris lens, attach it as follows. For a manual lens, omit step 3. Refer to
Illustration E.
1. Unscrew the lens mount cap.
2. Screw in the lens. Make sure the C/CS adjustment ring is set properly.
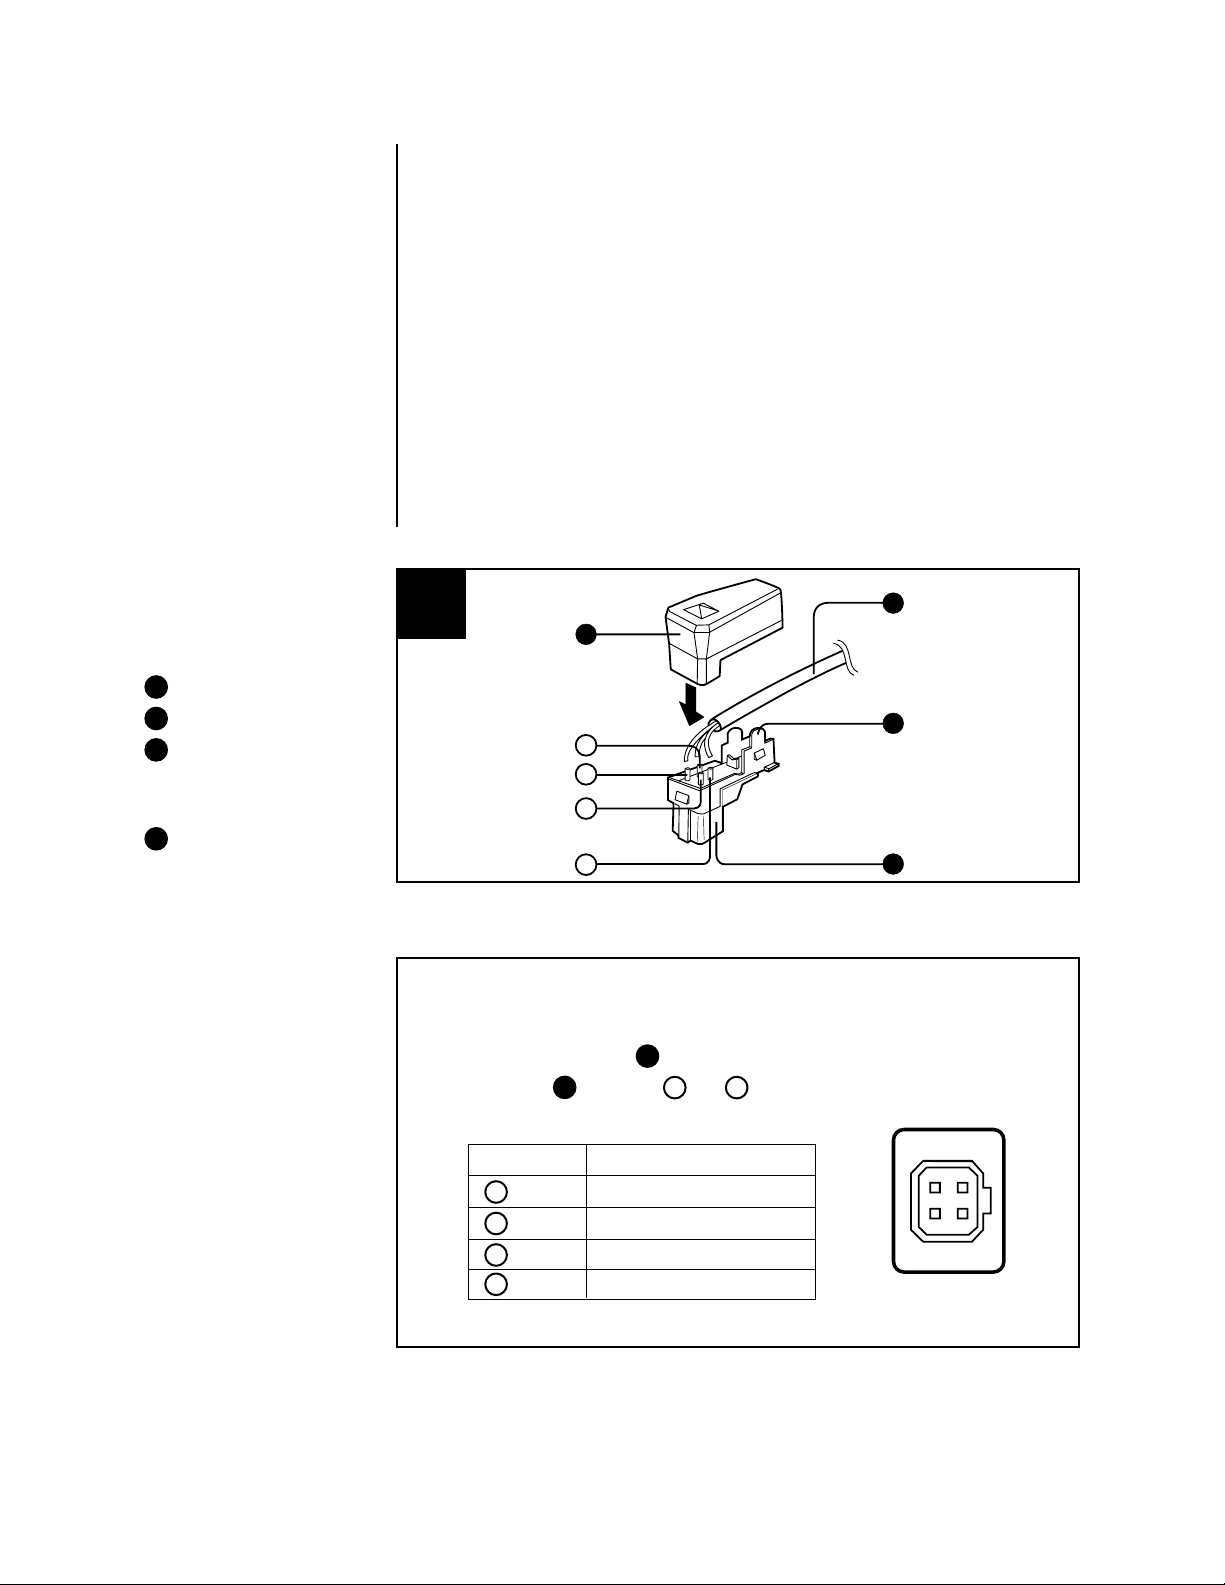
3. Check the plug wiring on the lens cable against Illustration D and the pin-outs in the
“Plug Change on Auto-Iris Lens Cable” box. If you need to replace the existing plug,
follow the instructions in the box.
4. Adjust the backfocus. Follow the appropriate instructions in the “Lens/Camera Setup
and Backfocusing” Information Box. These instructions cover the setting of the CCD
IRIS switch (Illustration A in the owner’s manual). Also, if necessary, refer to the
“Camera/Lens Geometry-General Information” sheet.
Cover (supplied)
1
Auto-iris lens cable
2
Rib (If the cable is thick
3
and the plug cover does
not seat properly , cut
away this rib.)
Lens plug (supplied)
4
D
1
1
2
3
4
2
3
4
Changing the Plug on an Auto Iris Lens Cable
PLUG CHANGE ON AUTO IRIS LENS CABLE
1. Remove the old lens plug from the cable.
2. Remove the plug cover , add heat shrink tubing to the wires and solder the lens
cable wires to the pins thru on the plug supplied. Apply heat to the heat
shrink tubing. The pin assignments are as follows:
1
2
3
4
3. Put the cover on the plug.
2
Pin # DC-servo Lens
Pin 3: Drive (+)
Pin 1: Control (-)
Pin 2: Control (+)
Pin 4: Drive (-) (Ground)
1
1 4
42
13
Auto Iris Plug
Pin-out (Back of Plug)
4 Pelco Manual C1901M (4/99)

E
1
3
A
2
Lens Installation
CCD-Iris Function
C
4
CS
CCD-IRIS
ON OFF
Pelco Manual C1901M (4/99) 5

CAMERA/LENS GEOMETRY–GENERAL INFORMATION
Incident Light
MANUAL
LENS
The lens has
a focus ring
adjustment
on it.
MOTORIZED IRIS
MOTORIZED
ZOOM LENS
Zoom lens which
can be remotely
controlled for
zoom and focus.
• Iris has motor on it which
is controlled remotely by
the operator
• No automatic compen-
sation for light changes
LENS
IRIS
MANUAL IRIS
(STYLIZED)
CCS
• Iris adjustment ring is
on the lens
• Fixed position applica-
tions
• Indoor use
• Minimal light variations
CAMERA
CCD Iris (Electronic Shutter) CCD out-
put voltage is electronically sampled
and used to adjust for small variations
in light levels. Normally used in indoor,
fixed position applications where small
CCD
IMAGER
C/CS adjustment (all models) conditions camera mount
for lens type being used by changing physical distance
of imager face with respect to back of lens. Adjustment screw or ring is initially positioned at the corresponding C or CS position (corresponding to lens type)
and not some setting in between. Factory set at C
position.
Iris opening (sometimes referred to as aperture) is
defined by f/stop numbers. The higher the number
the more closed the iris is.
DC CONTROL
• Iris operation con-
trolled by DC motor
voltages from the
camera
variations in light levels might be encountered. CCD iris must be turned OFF
when performing camera/lens adjustments.
AUTO-IRIS
Used when large variations in lighting are expected (usually outside).
There are two types of
auto-iris control:
VIDEO CONTROL
NOT AVAILABLE ON
3800 SERIES
• Level control ON THE
CAMERA
• Only choice available
if you wish to use the
auto-iris feature with
B/W cameras
6 Pelco Manual C1901M (4/99)

Information Box
The purpose of backfocusing is to make the adjustments necessary for the picture to remain in focus throughout the camera‘s
zoom range, which is the case for instance, in motorized zoom, auto iris configurations. Manual Iris lens/camera combinations
also need to be backfocused. Follow the general instructions listed below to adjust backfocus appropriate to your camera/lens
combination.
LENS TYPE
Lens/Camera Setup and Backfocusing
Information Box
A
MANUAL IRIS
VARIABLE LIGHT CONDITIONS
• Turn Manual Iris ring so
iris is fully open and set
the Focus ring for ∞ (or
distant object).
• Adjust Backfocus with
CCD IRIS switch initially
set to the OFF position.
• Use the C/CS adjust-
ment POT on the side of
the camera to obtain the
best picture. This moves
the imager with respect
to the lens. (The picture
may bloom on either side
of the best setting within
the C/CS adjustment
range).
Sample Generic
Lens w/Manual
Iris & Focus
Manual
Iris
Generic example of best
setting for C mount lens.
Manual
Focus
c
cs
CCD Iris
ON OFF
Best setting
Picture will be out
of focus on either
side of best setting
AUTO IRIS
STATIC LIGHT CONDITIONS
• Adjust Backfocus the same
as was done for V ariable Light
conditions except CCD iris is
left in the OFF position; therefore, there is no need to adjust the L VL control; follow all
other steps, however.
B
ON OFF
LEVEL
L
CCD Iris
H
• Turn CCD IRIS switch to
ON position.
• Re-adjust manual iris, if
necessary, for optimal
lighting.
• Fine tune the LEVEL
control for best picture.
Pelco Manual C1901M (4/99) 7

Information Box
The purpose of backfocusing is to make the adjustments necessary for the picture to remain in focus throughout the camera’s
zoom range, which is the case for instance, in motorized zoom, auto iris configurations. Manual Iris lens/camera combinations
also need to be backfocused. Follow the general instructions listed below to adjust backfocus appropriate to your camera/lens
combination.
LENS TYPE
Lens/Camera Setup and Backfocusing
Information Box
AUTO IRIS
DC SERVO
• To Adjust Backfocus, set CCD
Iris switch to the OFF position.
• Use a neutral density filter or
some other physical means to
decrease the amount of light
entering the camera lens so that
the auto-iris response is to open
the iris up as wide as possible.
BACKFOCUS ADJUSTMENT
• Adjust focus to far, zoom to
wide angle.
• Adjust C/CS adjustment Ring
on the camera for the best picture.
• Zoom to a close object; adjust
lens controller or focus for best
picture.
• Repeat above until lens re-
mains in focus throughout the
zoom range (far to near).
.
• Tighten the Lock Screw.
B
CCD Iris
ON OFF
MANUAL IRIS
Iris operation controlled by DC motor voltages from camera.
LEVEL control is ON THE CAMERA
Auto -Iris lenses used with Black and White (B/W) cameras use
DC SERVO control ONLY.
Generic example of best
setting for C mount lens
c
cs
LEVEL
Best setting
Picture will be out
of focus on either
side of best setting
A
LH
The ability of a zoom lens to remain in focus throughout its zoom range is known as Tracking
• Adjust the LEVEL POT on the
camera for best picture.
• Adjust other settings on camera as needed.
8 Pelco Manual C1901M (4/99)

CAMERA
Install the camera where it will not be affected by fluorescent lights or window reflections.
If the camera is used under illumination that is not steady, the picture may flicker.
The MC3800-2 must be operated with a 24 VAC, 60 Hz, Class 2 power supply.
The MC3800-2X must be operated with a 24 VAC, 50 Hz power supply.
The MC3800-3 must be operated with a 220-240 VAC, 50 Hz, power supply.
To connect the camera:
1. Refer to Illustration G. Connect the video cable (2) from the monitor to the VIDEO
2. MC3800-2/MC3800-2X: Connect the power leads to the camera. Refer to Illustration F.
3. Refer to Illustration G. Connect the power cord or leads (3) to a power source (4). For
OUT connector (1) on the camera.
a. Remove the insulation from the power cable wires.
b. Attach the terminal tips.
c. Connect the wires to the terminals on the camera.
d. Ground the unit or an irregular voltage may be generated in the AC power cord
and may cause malfunction or damage to the video camera. Ground the camera
at the screw labeled “G.”
Maximum cable lengths for 24 VAC: 18 AWG, 200 ft (60 m); 16 AWG, 325 ft (100 m).
the MC3800-3, the brown wire is the hot lead, the blue wire is neutral, and the green
and yellow wire is ground.
F
G
123
1
MC3800-2
CC3300-2
CC3300-3
MC3800-2X
MC3800-3
Connecting the MC3800-2
1 2
3
4
2
Connecting the Monitor to the MC3800 Series Cameras
Pelco Manual C1901M (4/99) 9

1
Camera switcher
2
Monitor
3
Voltage phase
4
Vertical drive signal
5
Adjustable range
V-PHASE ADJUSTMENT
Vertical phase adjustment is required only if your system uses two or more cameras.
The vertical phase can be manually adjusted within the range of approximately -90 degrees
to +90 degrees (refer to Illustration H).
H
-90°
+90°
1 2
-90° 0°+90°
3
4
0°
5
AC Line Lock Adjustment
Vertical phase adjustment is not vertical roll adjustment. Each camera is adjusted to the
AC zero crossover point at the factory. Problems arise, however, especially in larger
systems, when:
1. Switching rapidly between widely separated cameras with manual or sequential
switchers.
2. Switching between cameras not operating off the same phase of the AC line. When
using a single power source, make sure each AC line lead is connected to the same
input terminal on all cameras.
3. Both of the above.
In such cases camera switching may produce what appears to be vertical roll on the
monitor between the two views (Illustration I).
To adjust the vertical phase:
Turn the V-phase pot (while switching as rapidly as possible between the two camera
views) to adjust the relative phase angle between the two cameras and the point at which
one camera synchronizes to the AC line with respect to the other. Adjust the pot until the
switching is clean and there is no vertical roll or flip.
I
Vertical Phase
10 Pelco Manual C1901M (4/99)

INCIDENT LIGHT LEVEL ADJUSTMENT
Since the incident light level has been preset at the factory, usually no further adjustment is
required. If the picture is too dark, however, or if the picture’s highlights are extremely
overexposed, adjust the LEVEL adjustment screw. This adjustment can only be used for
auto-iris lenses or CCD iris control.
J
Adjusting the Incident Light Level
1. Turn toward L (low) to make the picture darker.
2. Turn toward H (high) to make the picture brighter.
BACKLIGHT CONTROL ADJUSTMENT
You can compensate for backlight conditions by turning the backlight control (BLC) screw.
When using this unit under backlight conditions, turn the BLC screw toward AV.
LEVEL
L H
12
SPECIFICATIONS
Image Device: 1/3-inch CCD (charge coupled device)
Picture Elements:
MC3800-2: 250,000: 510 H x 492 V
MC3800-2X: 290,000: 500 H x 582 V
MC3800-3: 290,000: 500 H x 582 V
Sensing Area: 3.3 mm x 4.4 mm
Signal System:
MC3800-2: EIA standard
MC3800-2X: CCIR standard
MC3800-3: CCIR standard
Sync System: AC line lock
Horizontal Resolution: Approximately 380 lines (at center of screen)
Lens Mount: C/CS mount
Minimum Illumination: 0.1 lux (f/1.2)
S/N: 45 dB (AGC off)
Automatic Control: Electronic iris (exposure priority, up to 1/100,000 second
Power Requirements:
MC3800-2: 24 VAC, 60 Hz, screw terminal
MC3800-2X: 24 VAC, 50 Hz, screw terminal
MC3800-3: 230 VAC to power cable (plug not supplied)
linear shutter speed control); AGC (automatic gain control)
Video Output: BNC-type, unbalanced, 1.0 Vp-p, 75 ohms
Lens Connector: 4-pin connector.
Pelco Manual C1901M (4/99) 11

Power Consumption:
MC3800-2: Approximately 4.5 W
MC3800-2X: Approximately 4.5 W
MC3800-3: Approximately 6.0 W
Operating Temperature: 14° to 122°F (-10° to 50°C)
Humidity: 20 to 80%
Storage Temperature: -40° to 140°F (-40° to 60°C)
Acceptable Lens Weight: Less than 2.2 lb (1 kg)
Construction: Aluminum case
Finish: Neutral beige
Tripod Receptacle: 1/4-inch UNC-20
Dimensions:
MC3800-2/MC3800-2X 5.19 in. L x 2.25 in. H x 2.09 in. W
MC3800-3 7.03 in. L x 2.25 in. H x 2.09 in. W
Weight:
MC3800-2: 10.6 oz (0.30 kg)
MC3800-2X: 10.6 oz (0.30 kg)
MC3800-3: 1 lb 9 oz (0.70 kg)
(131.83 x 57.15 x 53.09 cm)
(178.56 x 57.15 x 53.09 cm)
(Design and specifications are subject to change without notice.)
REGULATORY NOTICES
REVISION HISTORY
Manual # Date Comments
C1901M 11/96 Original version.
4/99 Added MC3800-2X model. Revised manual to new format.
NOTE: This equipment has been tested and found to comply with the limits of a Class B
digital device, pursuant to part 15 of the FCC rules. These limits are designed to provide
reasonable protection against harmful interference in a residential installation. This
equipment generates, uses, and can radiate radio frequency energy and, if not installed
and used in accordance with the instructions, may cause harmful interference to radio
communications. However there is no guarantee that the interference will not occur in a
particular installation. If this equipment does cause harmful interference to radio or
television reception, which can be determined by turning the equipment off and on, the user
is encouraged to try and correct the interference by one or more of the following measures:
• Reorient or relocate the receiving antenna.
• Increase the separation between the equipment and the receiver.
• Connect the equipment into an outlet on a circuit different from that to which the
receiver is connected.
• Consult the dealer or an experienced radio/TV technician for help.
® Pelco and the Pelco logo are registered trademarks of Pelco. © Copyright 1999, Pelco. All rights reserved.
12 Pelco Manual C1901M (4/99)
 Loading...