

Page 1

IPCT01 Pelco IP
Camera Installation
Tool User Manual
C3922M-A (9/14)
Page 2

Contents
Important Safety Instructions .................................................................................................................................................. 4
Important Notices ................................................................................................................................................................... 5
Regulatory Notices ......................................................................................................................................................... 5
Radio and Television Interference ................................................................................................................................. 5
Legal Notice ................................................................................................................................................................... 5
Legal Notice (Audio Notice) .................................................................................................................................................... 5
Warranty ................................................................................................................................................................................. 5
Overview ................................................................................................................................................................................ 6
Features ......................................................................................................................................................................... 6
Package Content ........................................................................................................................................................... 7
Dimensions .................................................................................................................................................................... 8
Name and Function of Each Part ................................................................................................................................... 9
Battery Charge ............................................................................................................................................................. 12
Powering On ................................................................................................................................................................ 12
Touch Panel Calibration ....................................................................................................................................................... 13
Screen Layout ...................................................................................................................................................................... 14
Status Icons ................................................................................................................................................................. 14
Buttons ......................................................................................................................................................................... 14
IP Camera Live View ............................................................................................................................................................ 18
Connect IP Camera (Direct Connection) ...................................................................................................................... 18
Device Search .............................................................................................................................................................. 20
AV In (Analog Video Live View)............................................................................................................................................ 21
Fixed Camera Live View .............................................................................................................................................. 21
Cable Test (CAT5) ....................................................................................................................................................... 22
Power over Ethernet (PoE) .................................................................................................................................................. 23
Enable PoE .................................................................................................................................................................. 23
PoE Setup .................................................................................................................................................................... 23
Snapshot .............................................................................................................................................................................. 26
Implement Snapshot .................................................................................................................................................... 26
Video Recording ................................................................................................................................................................... 27
2
Page 3

Implement Video Recording ......................................................................................................................................... 27
IP Camera Setup .................................................................................................................................................................. 28
Setup- IP Connection (Alter Camera Settings) ............................................................................................................. 30
Setup- IP Camera (Load the Network Settings) ........................................................................................................... 31
Setup- Firmware Upgrade ............................................................................................................................................ 32
Setup- License Activation / De-activation ..................................................................................................................... 32
AV Video Setup .................................................................................................................................................................... 37
Snapshot Setup .................................................................................................................................................................... 38
Video Setup .......................................................................................................................................................................... 40
Video Playback ................................ ................................................................ ............................................................ 41
System Setup ....................................................................................................................................................................... 43
Restore Streaming Format ................................................................................................................................................... 45
Appendix A: Portable User Kit .............................................................................................................................................. 46
Appendix B: Technical Specification .................................................................................................................................... 48
Troubleshooting.................................................................................................................................................................... 49
Pelco Product Support Contact Information ......................................................................................................................... 49
3
Page 4

Important Safety Instructions
This symbol indicates that there are important operating and maintenance instructions in the literature
accompanying this unit
WARNING: This product is sensitive to Electrostatic Discharge (ESD). To avoid ESD damage to this product,
use ESD safe practices during installation. Before touching, adjusting or handling this product, correctly attach an
ESD wrist strap to your wrist and appropriately discharge your body and tools. For more information about ESD
control and safe handling practices of electronics, please refer to ANSI/ESD S20.20-1999 or contact the
Electrostatic Discharge Association (www.esda.org).
1. Read these instructions.
2. Keep these instructions.
3. Heed all warnings.
4. Follow all instructions.
5. Do not use this apparatus near water.
6. Clean only with dry cloth.
7. Only use attachments/accessories specified by the manufacturer.
8. Refer all servicing to qualified service personnel. Servicing is required when the apparatus has been damaged in any way,
such as power-supply cord or plug is damaged, liquid has been spilled or objects have fallen into the apparatus, the
apparatus has been exposed to rain or moisture, does not operate normally, or has been dropped.
CAUTION: Danger of explosion if battery is incorrectly replaced. Replace only with the same or equivalent type. Dispose of
used batteries according to the instructions provided by the battery manufacturer.
The product and/or manual may bear the following marks:
4
Page 5

Important Notices
REGULATORY NOTICES
This device complies with Part 15 of the FCC Rules. Operation is subject to the following two conditions: (1) this device may not
cause harmful interference, and (2) this device must accept any interference received, including interference that may cause
undesired operation.
RADIO AND TELEVISION INTERFERENCE
This equipment has been tested and found to comply with the limits of a Class A digital device, pursuant to Part 15 of the FCC
rules. These limits are designed to provide reasonable protection against harmful interference when the equipment is operated
in a commercial environment. This equipment generates, uses, and can radiate radio frequency energy and, if not installed and
used in accordance with the instruction manual, may cause harmful interference to radio communications. Operation of this
equipment in a residential area is likely to cause harmful interference in which case the user will be required to correct the
interference at his own expense.
Changes and Modifications not expressly approved by the manufacturer or registrant of this equipment can void your authority
to operate this equipment under Federal Communications Commission’s rules.
In order to maintain compliance with FCC regulations shielded cables must be used with this equipment. Operation with
non-approved equipment or unshielded cables is likely to result in interference to radio and television reception.
This Class A digital apparatus complies with Canadian ICES-003.
Cet appareil numérique de la classe A est conforme à la norme NMB-003 du Canada.
LEGAL NOTICE
SOME PELCO EQUIPMENT CONTAINS, AND THE SOFTWARE ENABLES, AUDIO/VISUAL AND RECORDING
CAPABILITIES, THE IMPROPER USE OF WHICH MAY SUBJECT YOU TO CIVIL AND CRIMINAL PENALTIES.
APPLICABLE LAWS REGARDING THE USE OF SUCH CAPABILITIES VARY BETWEEN JURISDICTIONS AND MAY
REQUIRE, AMONG OTHER THINGS, EXPRESS WRITTEN CONSENT FROM RECORDED SUBJECTS. YOU ARE SOLELY
RESPONSIBLE FOR INSURING STRICT COMPLIANCE WITH SUCH LAWS AND FOR STRICT ADHERENCE TO ANY/ALL
RIGHTS OF PRIVACY AND PERSONALTY. USE OF THIS EQUIPMENT AND/OR SOFTWARE FOR ILLEGAL
SURVEILLANCE OR MONITORING SHALL BE DEEMED UNAUTHORIZED USE IN VIOLATION OF THE END USER
SOFTWARE AGREEMENT AND RESULT IN THE IMMEDIATE TERMINATION OF YOUR LICENSE RIGHTS
THEREUNDER.
Legal Notice (Audio Notice)
NOTE: Improper use of audio/visual recording equipment may subject you to civil and criminal penalties. Applicable laws
regarding the use of such capabilities vary between jurisdictions and may require, among other things, express written consent
from the recorded subjects. You are solely responsible for insuring strict compliance with such laws and for strict adherence to
any/all right of privacy and personalty.
Warranty
For information about Pelco’s product warranty and thereto related information, refer to www.pelco.com/warranty.
5
Page 6

Overview
The IPCT01 Pelco IP Camera Installation Tool combines an IP digital video tester and an analog video tester into a
single hand-held device, utilizing an ultra-bright, high-resolution 3.5 Inch Color LCD Screen, which makes all camera
adjustments a snap.
The IPCT01 benefits users by providing various network protocol compatibilities. With customized built-in codec, the
IPCT01 is capable of decoding video streaming simultaneously and allowing users to view and to adjust focus on the
monitor. The IPCT01 also operates on both NTSC and PAL TV system by standard BNC video input. Moreover, it
has a phone-jack that allows users to test for audio if available. Furthermore, the IPCT01 runs by a rechargeable
battery that provides the IPCT01 with up to three hours of operating time.
Blending functionality and compatibility, the IPCT01 is a versatile video IPCT01 for both analog and IP applications.
FEATURES
Built-in 3.5” LCD monitor with QVGA resolution
10/100 Mbps Ethernet with RJ-45 connector
Built-in touch panel / keypad
High capacity Lithium battery
UTP cable test
H.264 and MJPEG video compression
NTSC / PAL Video in / Audio in / Speaker out
PoE / PoE+ function support
PoE voltage, current, and power consumption measurement
Built-in memory for local recording and playback (AVI / MJPEG)
6
Page 7

PACKAGE CONTENT
IP Camera Tester
Soft Silicone Gel Case
Li-ion Battery Pack
CD: User’s Manual
Soft Carrying Pouch
(with Neck Strap)
Network Cable
BNC Cable
UTP Terminal Block
DC 12V Adaptor
The items included in a standard package of the IPCT01 Pelco IP Camera Installation Tool are as shown below.
7
Page 8
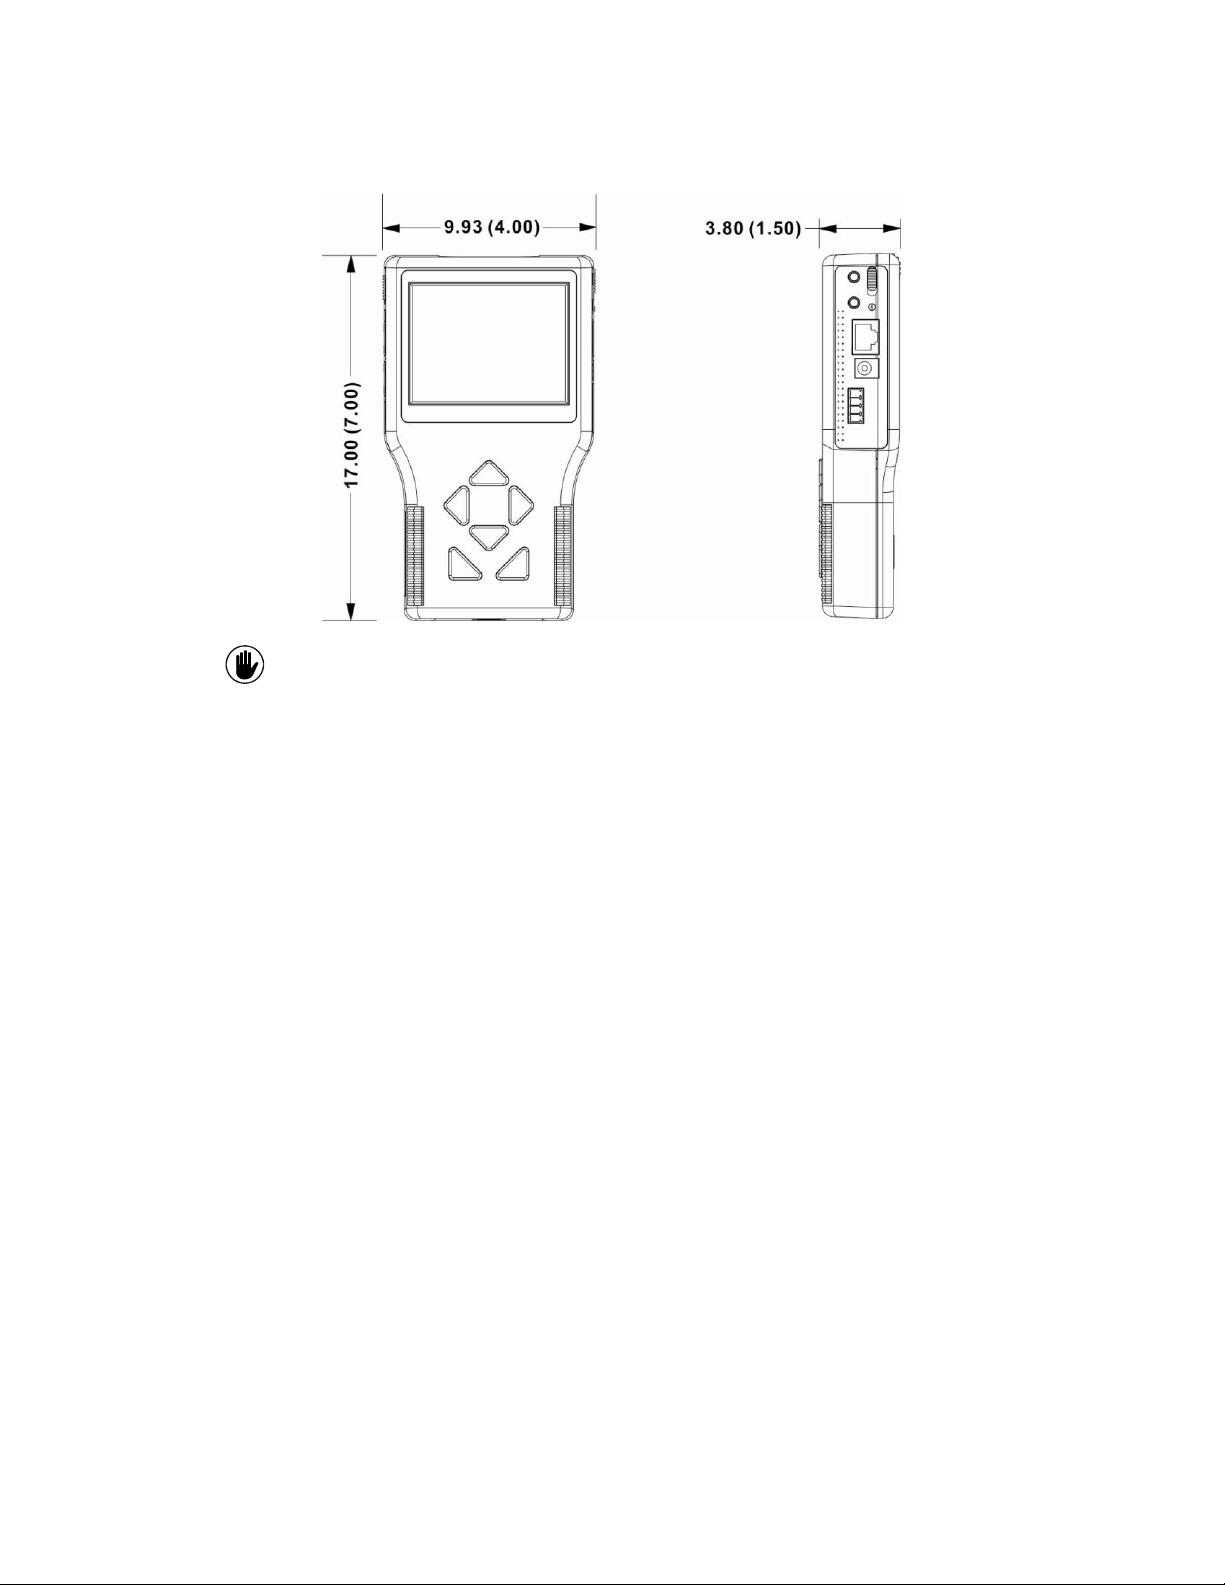
DIMENSIONS
NOTE: VALUES IN PARENTHESES ARE INCHES; ALL OTHERS ARE CENTIMETERS.
Please refer to the below diagram for the dimensions of the IPCT01.
8
Page 9
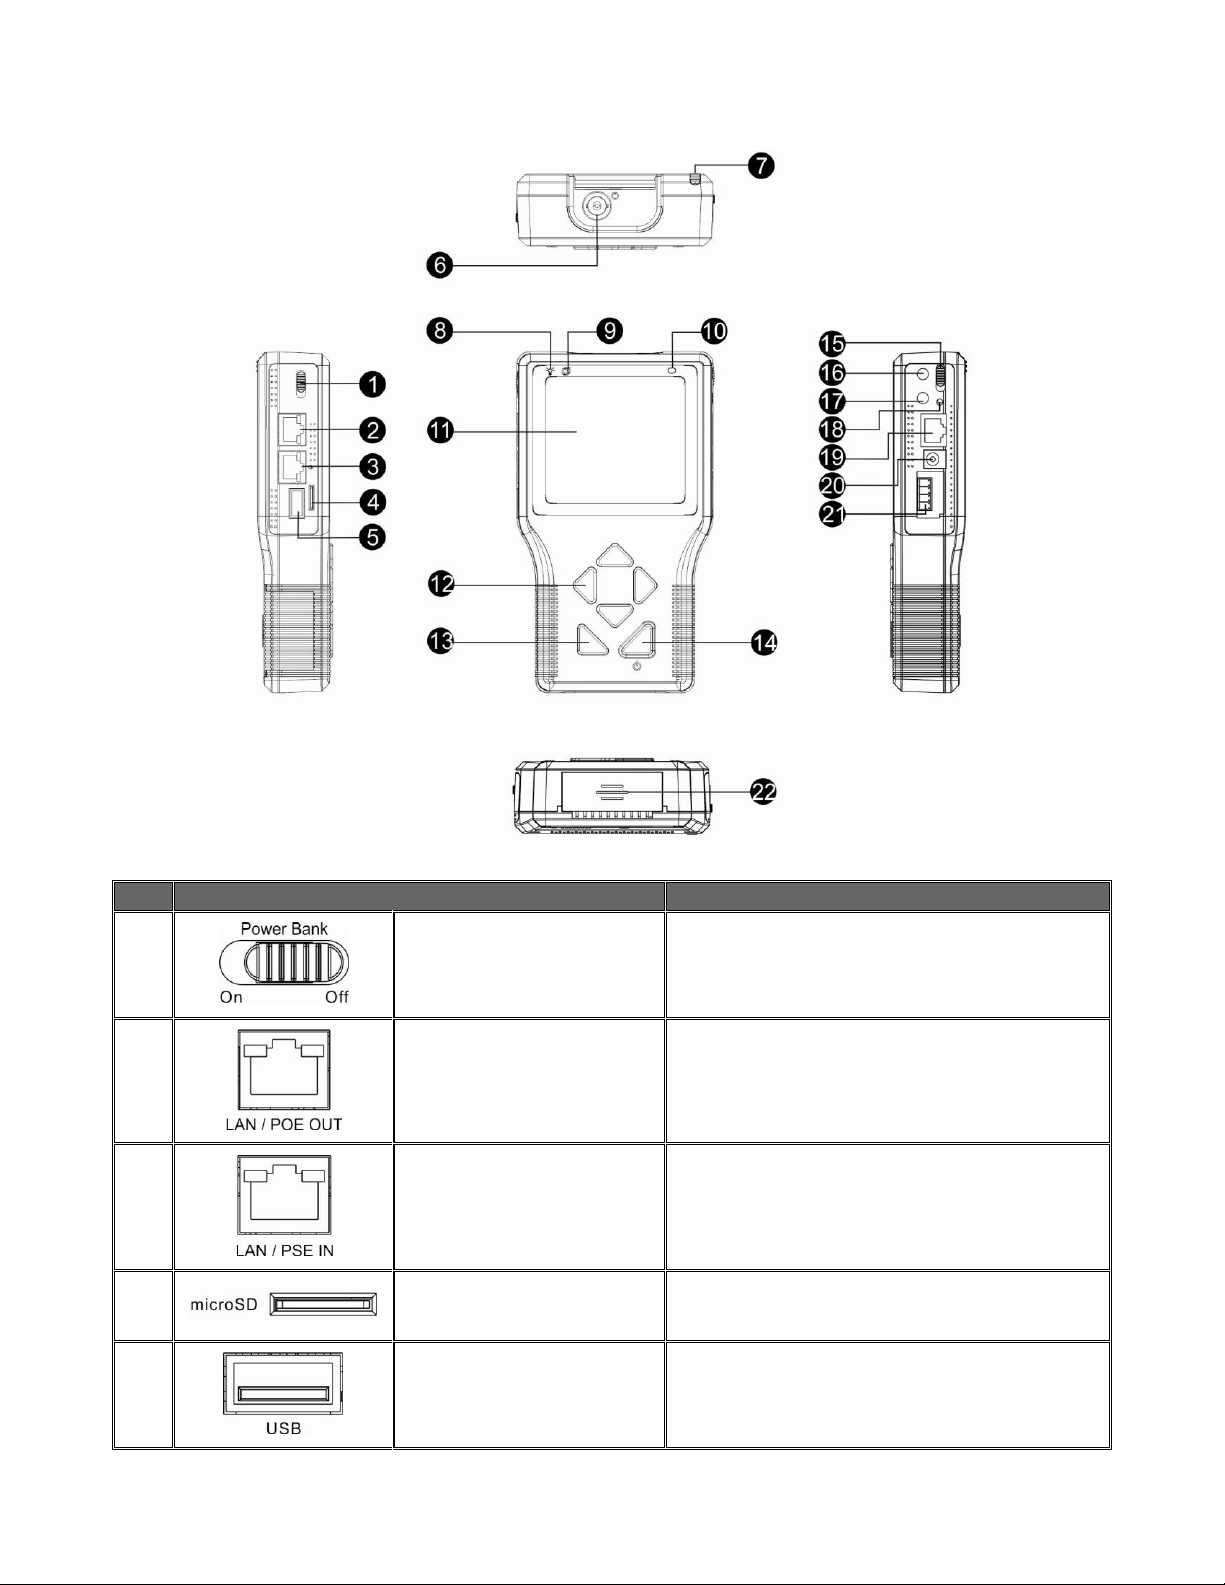
NAME AND FUNCTION OF EACH PART
No.
Item
Description
1 Power Bank Switch
Switch OFF to use internal battery, external battery or
DC 12V power. Switch ON to use PoE pass through
power. Default position is OFF.
2 LAN / PoE Port
Connect the LAN cable from the IP Camera that is
PoE enabled to this port.
3 LAN / PSE Port
Connect the LAN cable from the switch or head end.
Noted that PoE from head in switch can be plugged
in and power camera from here if camera PoE is not
used.
4 microSD Slot
Insert the microSD card into the slot for data storage.
5 USB Slot
Connect the USB storage devices to the slot for
firmware upgrade or data storage.
9
Page 10
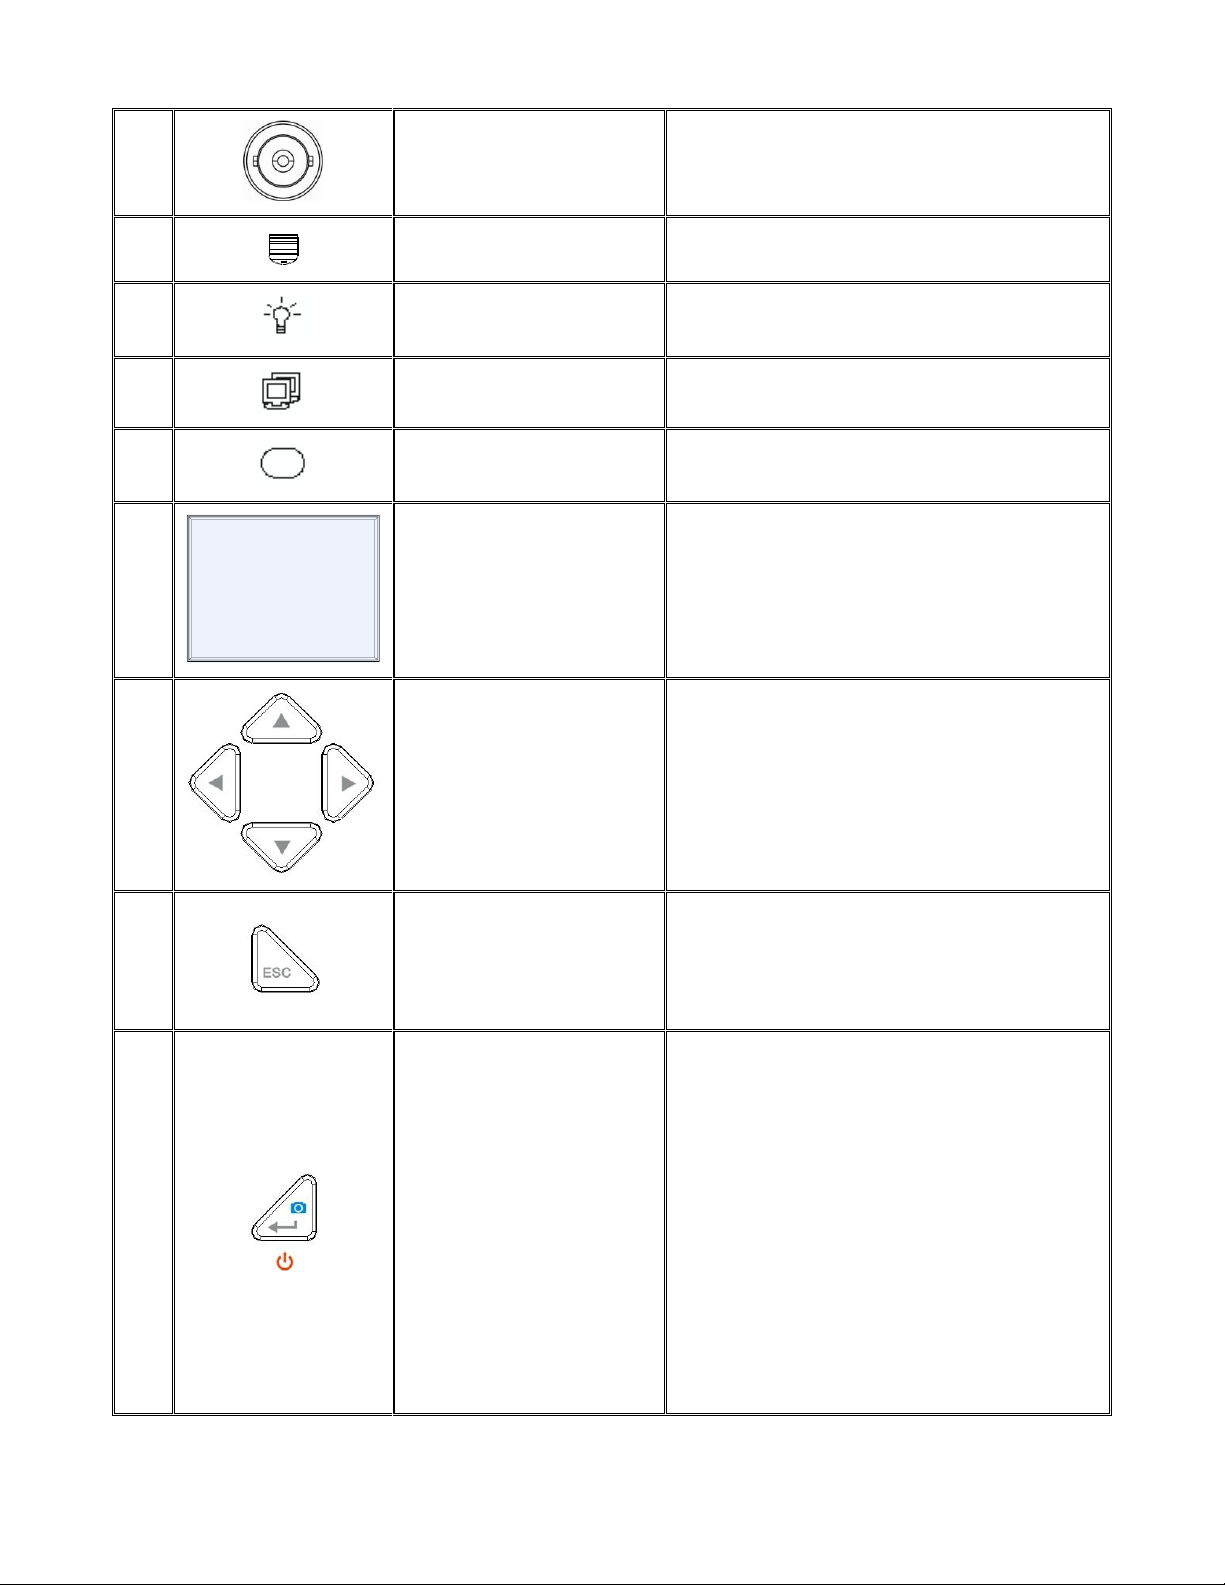
6 Video In
Connect the BNC cable to the Video In from the
camera.
7 Stylus Touch Pen Slot
Use the embedded stylus touch pen for touch screen
operation.
8 Power Indicator LED
Light LED indicates the power is on.
9 Data TX/RX Indicator LED
The LED flashes when the IPCT01 is under operation
10 Light Sensor
The light sensor on the above right of the screen
can detect environmental brightness to adjust the
LCD screen brightness automatically.
11 3.5” LCD Screen
The 3.5” LCD screen displays video and various
setup menus.
12 Shift
Press the left / right / up / down arrow keys to
navigate among the icons or move through the items
within a menu.
13
ESC / Restore Streaming
Format Key
1) ESC Function:
Press this key to exit without saving or returning to
the previous page.
2) Restore Streaming Format Function:
Streaming Format of the IP Camera can be restored
by pressing this key.
14 Start / Enter / Snapshot Key
1) Start Function:
Turn on the Main Power Slide Switch, and then press
this key for about 3 seconds to start up the Tester.
2) Enter Function:
Press this key to enter the sub-menu or to save the
setups.
3) Snapshot Function:
When viewing IP Camera video, press this key for
image snap shot. Press the key and the snapshot
setup menu will come out within 5 seconds. Click the
“Enter” icon to save the settings of the snapshot
image.
10
Page 11
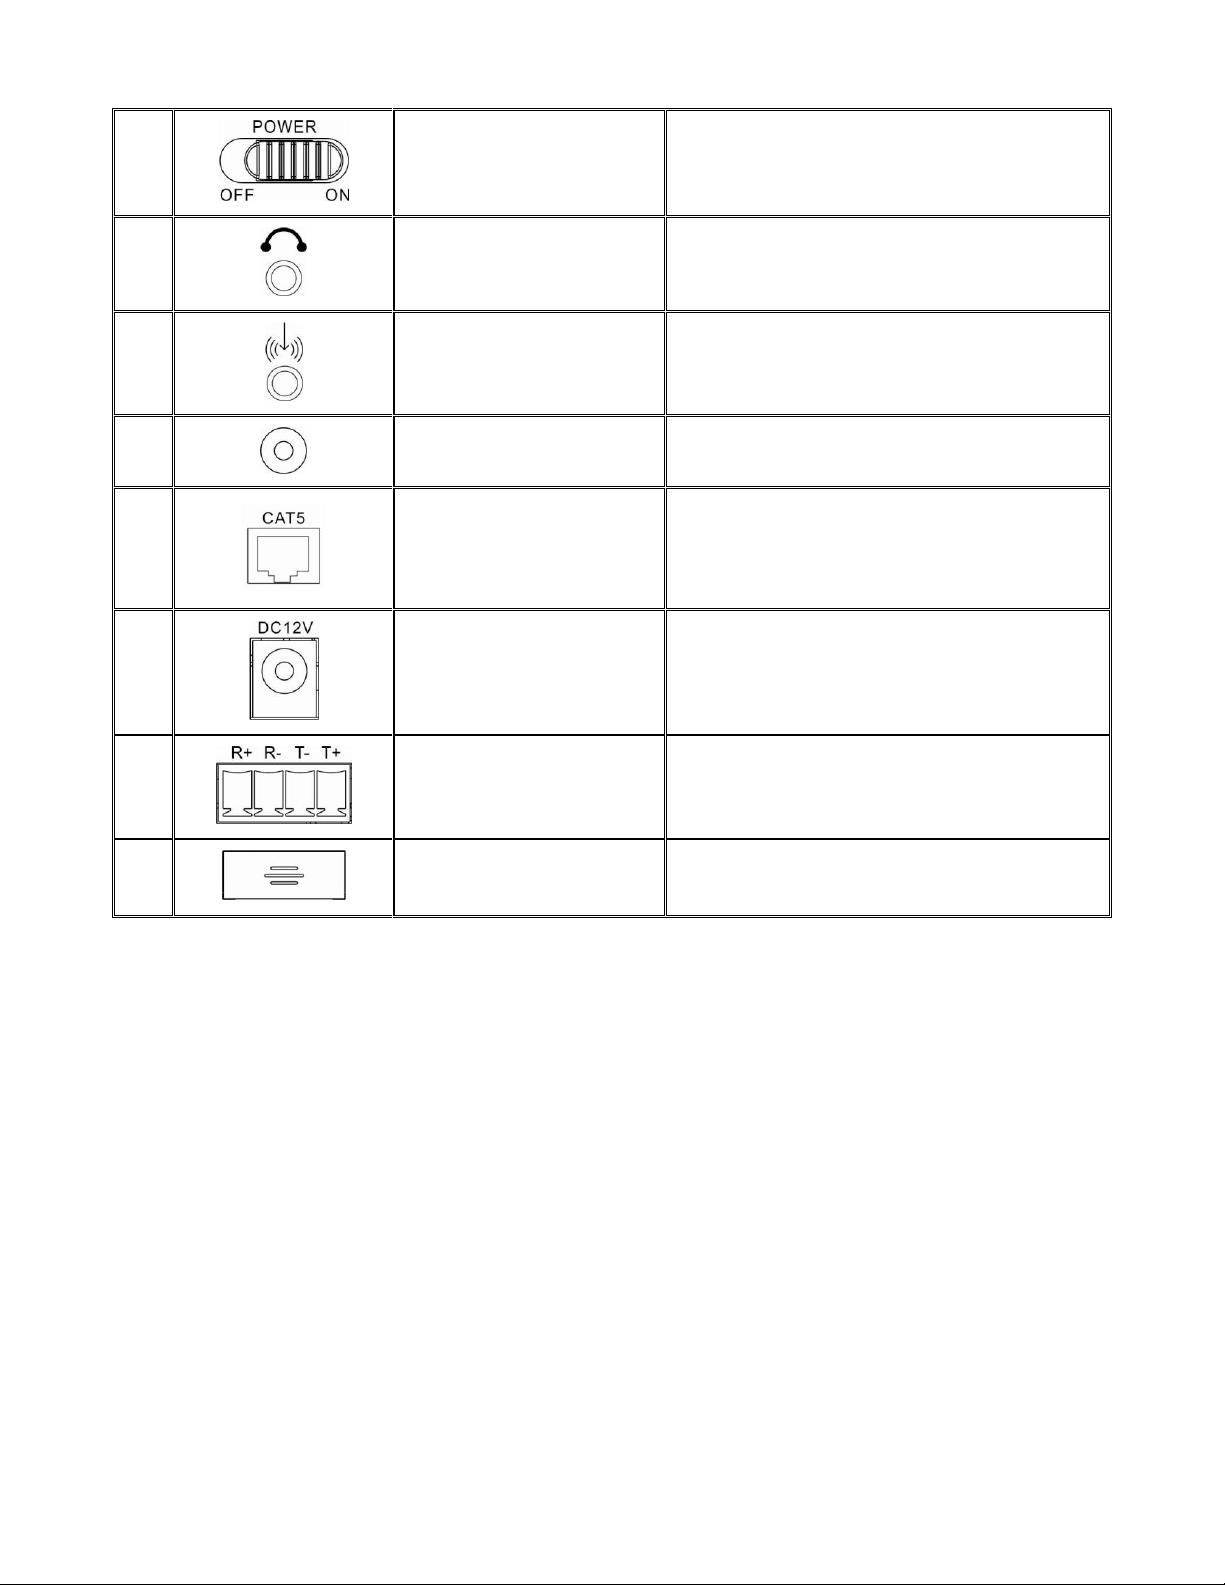
15 Main Power Slide Switch
Turn on the slide switch before pressing the Start
key.
16 Audio Out
Plug the headset into the phone jack.
17 Audio In
Connect the microphone to the audio input jack.
18 Charging Indicator Light
The light will stay on while the IPCT01’s battery is
charging.
19 UTP Cable Tester
For UTP cable test, connect one end of the network
cable to this port and the other end to the CAT5 UTP
terminator for detecting wiring types (Straight / Cross)
or errors (Open / Short / Miswired) from the displayed
wire map on the screen.
20
DC 12V Power Adapter
Connector
Connect the supplied DC adapter cord to the DC
input jack.
21 RS-485 Terminal Block
The RS-485 Terminal Block is a future option.
22 Loudspeaker
For audio output.
11
Page 12
BATTERY CHARGE
The Li-ion battery provided is able to support up to three hours of operating time, and takes approximately two hours
to recharge.
To recharge the battery pack, please connect the DC 12V adaptor cord to the DC input jack on the side of the
IPCT01. While battery is charging, the charging indicator LED will be on. The LED will be off after charging is
completed.
The IPCT01 IP Camera Installation Tool will support cameras with PoE IEEE802.3af, Class 2. Cameras with high
power consumption (IEEE802.3at, Class 3) must use an external battery similar to a BP-930 battery. Note that when
powering Class 3 devices, the 2,200 mAh battery will only last for 5-10 minutes.
NOTE: Batteries exceeding 2,200 mAh will not fit the battery cover and the soft silicone gel case.
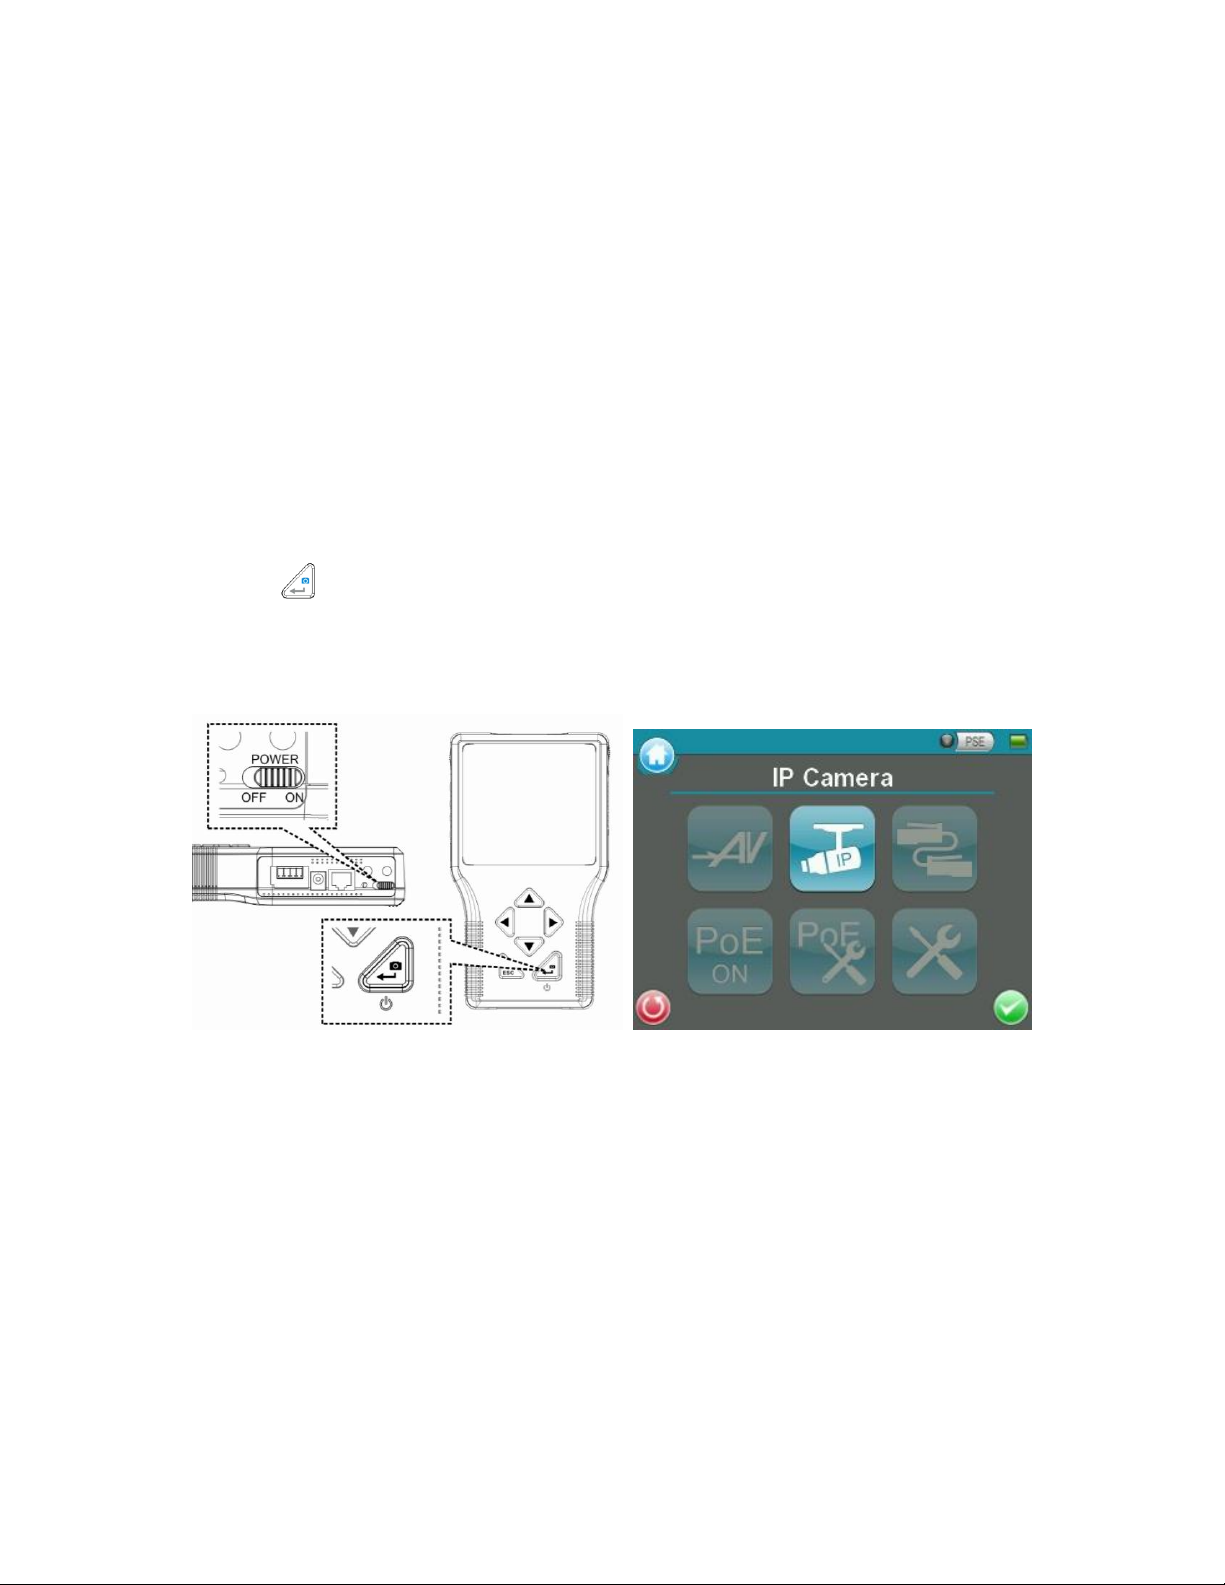
POWERING ON
To power on the IPCT01, please set the Power Slide Switch on the side to “ON” position, and press and hold the
Start Key for 3 seconds.
The IPCT01 will start booting up, with a loading bar displayed on the screen for about 10 seconds. In the mean time,
the Data TX/RX Indicator LED will be blinking. The Main Menu will come out within 50 seconds, as shown in the right
figure below.
12
Page 13
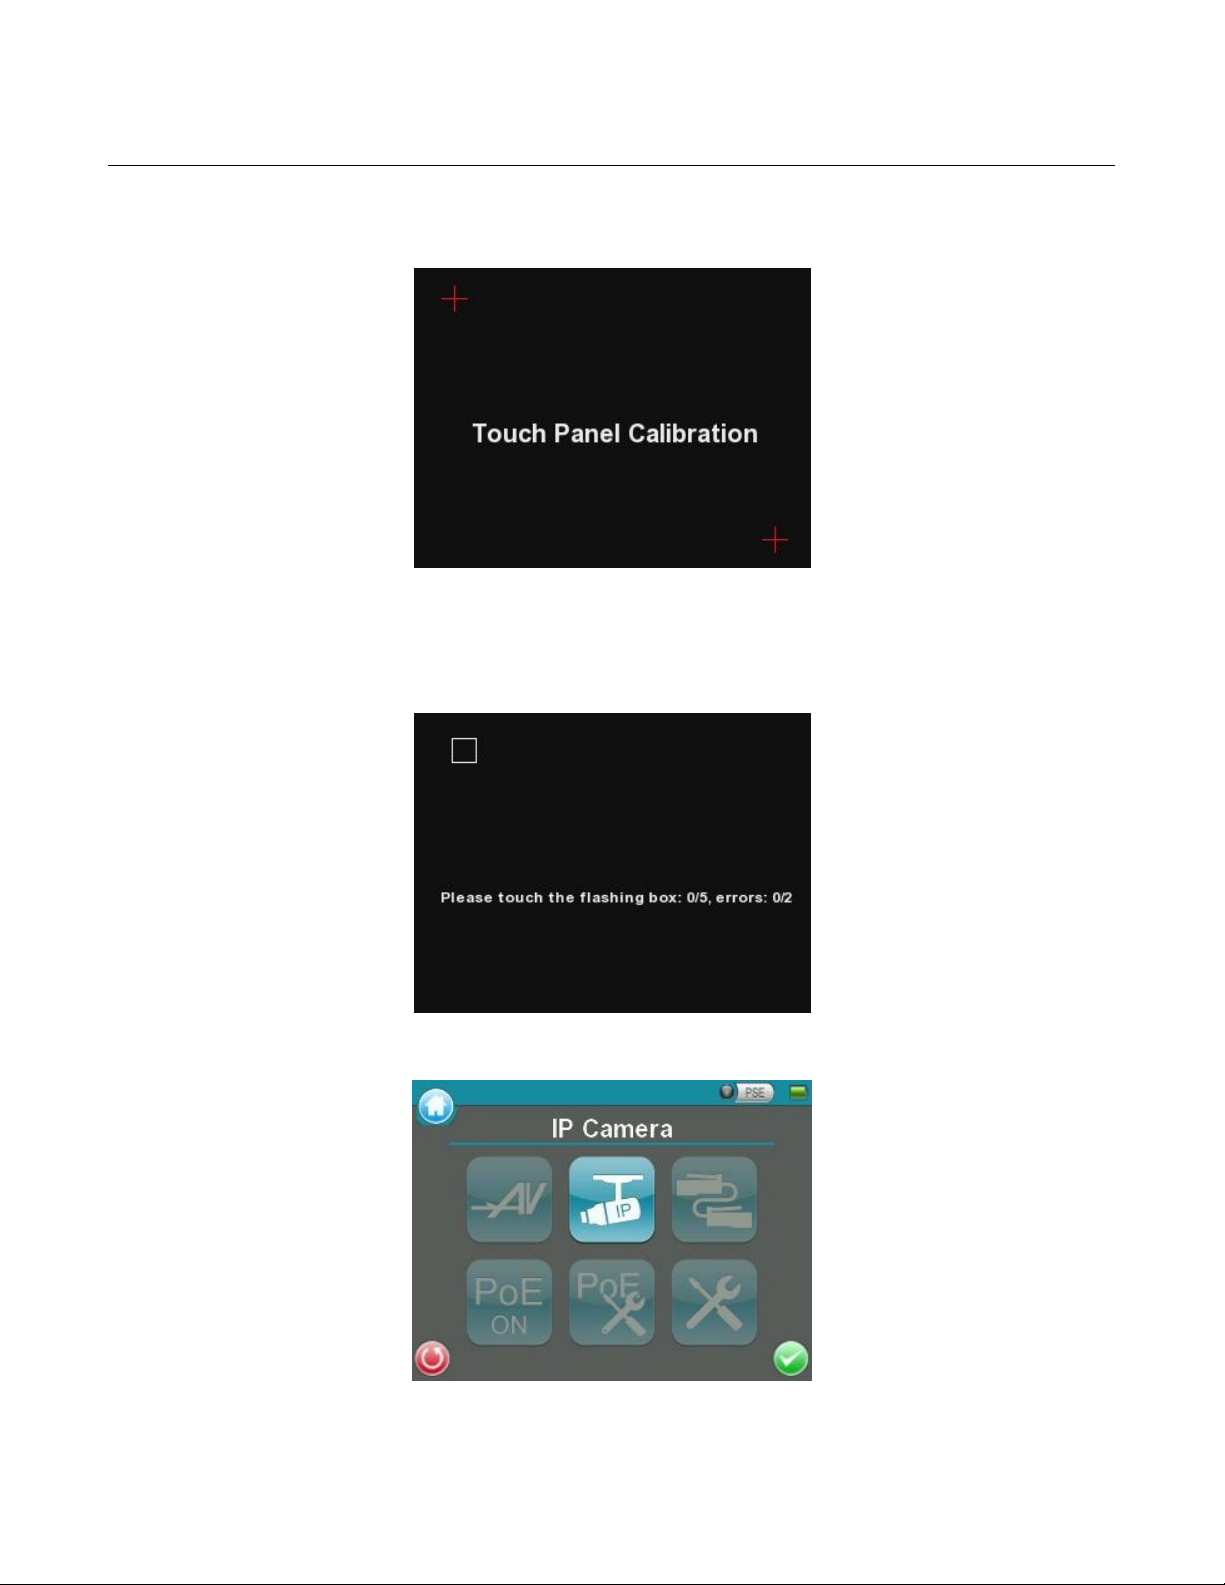
Touch Panel Calibration
For initial access or after system reset, the system will enter the Touch Panel Calibration mode (as shown below)
before accessing to the Main Menu.
Step 1: Tap the flashing cross on the top left of the screen.
Step 2: Tap the other flashing cross located diagonally.
Step 3: Tap each flashing box as instructed.
The screen mode will switch to Main Menu (as the figure below) after Touch Panel Calibration is completed.
13
Page 14
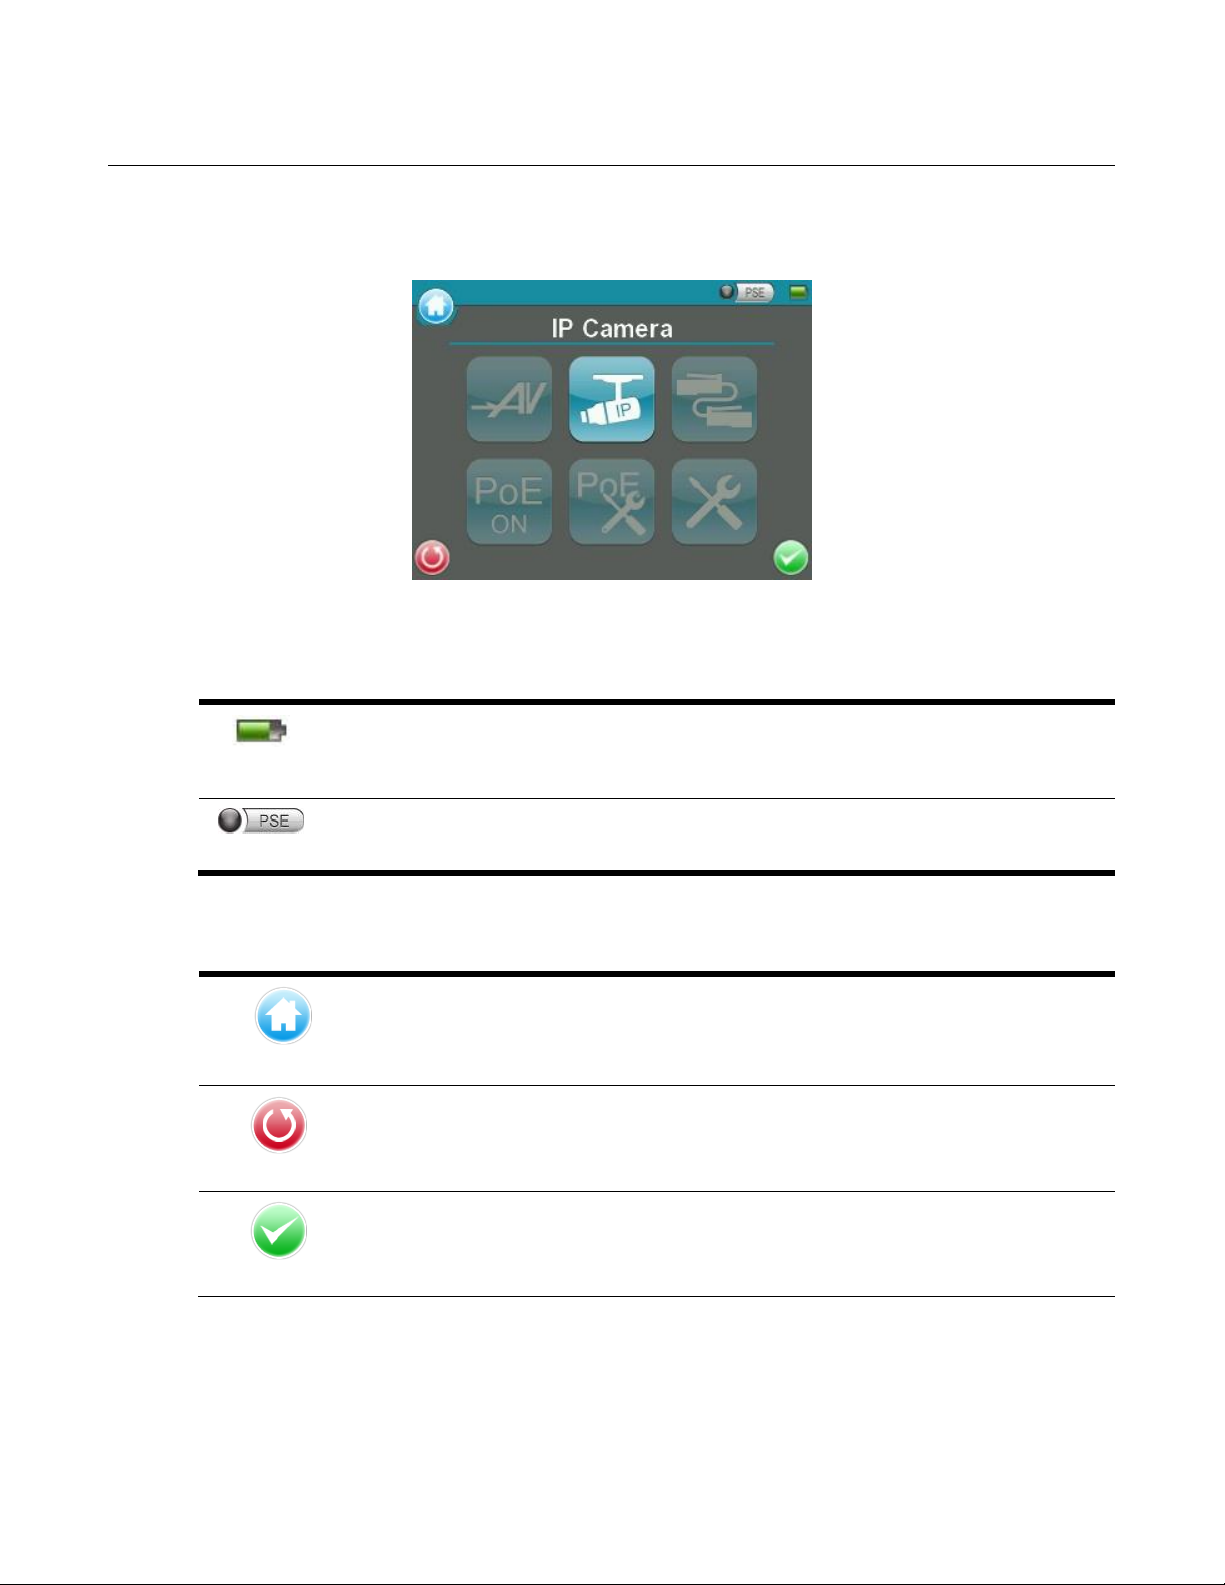
Screen Layout
Battery
Status
Indicates the battery level and charging status.
PSE
When the Tester is connected to an IP Camera that is PoE enabled with the IPCT01’s PoE
function on, the PSE button will be light up, and the Camera will draw power from the IPCT01’s
internal battery.
Main Menu
Return to the Main Menu.
Return
Click on this icon to go back to the previous page.
Enter/Save
Enter the submenu of a function or to save settings.
Main Menu
The Main Menu of the IPCT01 is shown as follows:
STATUS ICONS
BUTTONS
14
Page 15
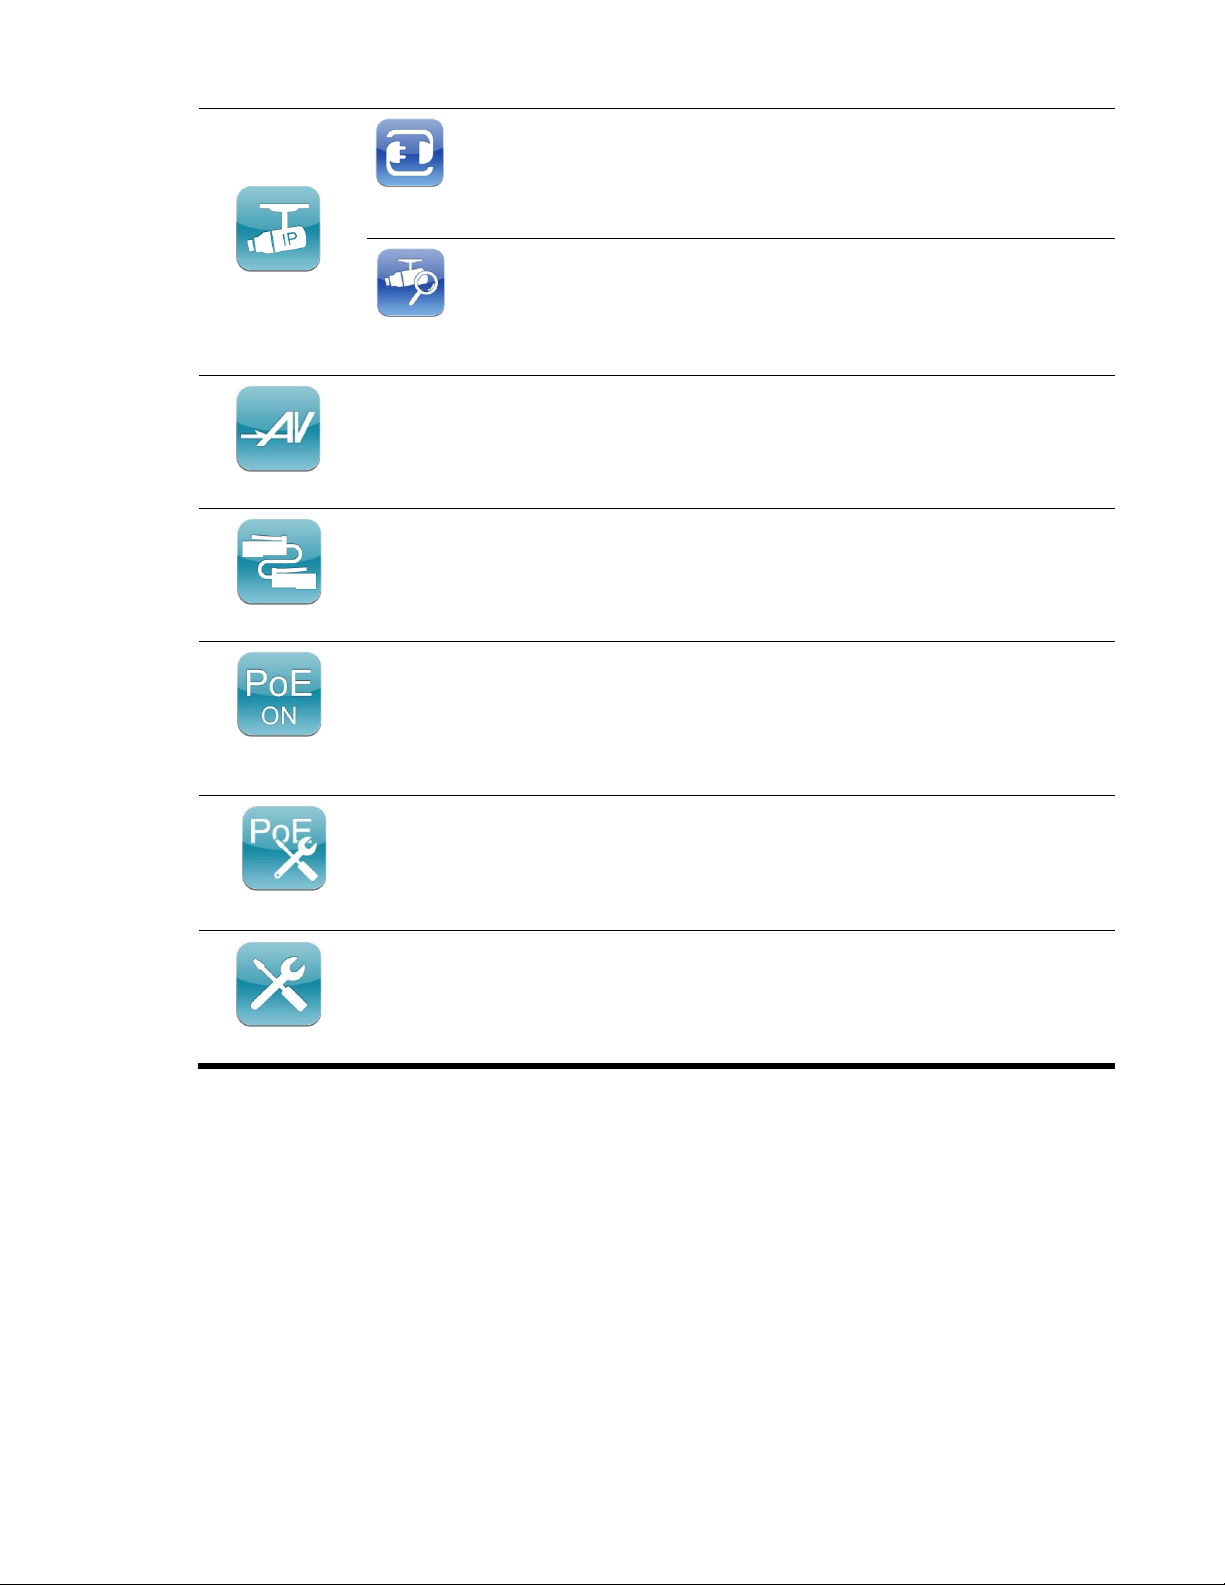
IP Camera
Connect
Directly connect to the IP Camera with one touch.
Device
Search
Ideal for testing multiple IP Cameras. Tap this icon to find all the IP Cameras in
the network. Then select a specific IP Camera by IP or MAC from the address
list. Users can access “Setup> Setup- IP> Setup- IP connection” to choose
the Camera Type. The relative IP Cameras will be filtered out.
AV In
View the video display on the LCD screen via the video output of the BNC supported
Camera.
Cable Test
Detects the CAT5 Cable for wiring types (Straight / Cross) or errors (Short / Open /
Miswired).
Power Over
Ethernet
Tap this icon to enable Power over Ethernet (PoE) output for IP Cameras that are PoE /
PoE Plus enabled. And the Camera will draw power from the IPCT01’s internal battery.
PoE Setup
Select for PoE Setups including Power Level, Power over Ethernet (PoE) measurement,
PoE measurement display, Enable PoE when booting, and PoE auto-shutdown time.
Setup
Various Setups for cameras and the IPCT01 can be configured here. Each setup is shown
in the following section: Setup Menu.
15
Page 16
Setup Menu
Setup- IP
Setup- IP
connection
The IPCT01’s IP address and the IP Camera’s basic profile including IP
address, camera type, user name, password, and streaming relevant
information can all be altered here.
Setup- IP
camera
Configure the IP Camera’s network settings. Additionally, it is allowed to
load the relevant settings from an IP Camera to the IPCT01.
Setup- IP
script
Adjust IP Camera video’s brightness, color level, contrast and sharpness
by editing the API commands. Additionally, it is allowed to import the
relevant API commands from other IP Camera to the IPCT01.
Setup- AV
Setup- AV
Video
Adjust analog video’s brightness, contrast and sharpness.
Setup- Snapshot
Preview and manage the snapshot files.
Press the <Setup> button in the Main Menu, and users will be automatically directed to the Setup Menu as
shown below.
16
Page 17

Setup- Video
Video- Rec
Setup
Setup the recording video file name, description, and saving path.
Video-
Playback
Preview, playback and manage the video files.
Setup- System
The IPCT01’s system settings include volume, LCD brightness, firmware upgrade, factory
default reset and auto shutdown setup. The MAC address of the IPCT01 is also displayed
on this page for users’ reference.
17
Page 18

IP Camera Live View
The IPCT01 can automatically detect and recognize the IP camera that is connected to it. Please connect the IP
camera to the IPCT01’s LAN port; plug in the IP camera if not using PoE. For further information about PoE, please
refer to Power Over Ethernet (PoE).
Automatically Change IP Camera Tester’s IP Address
After the IP camera is powered on, the IPCT01’s IP address will be automatically detected and displayed on the
screen.
Please refer to the following sections for connecting the IP camera and viewing the live video in alternative ways.
CONNECT IP CAMERA (DIRECT CONNECTION)
Setup for Direct Connecting
Tap the <IP Camera> icon on the Main Menu to enter the submenu.
Check the IP Camera Profile in the field under the <Connect> icon as shown below. The IP camera’s profile
details including IP address, camera type, username, password, etc.
If there is any setting required to be altered, please go to <Setup- IP connection> to change the related IP
camera settings. For more setup information, please refer to Setup- IP Connection (Alter Camera Settings).
18
Page 19

Access the Camera
Tap the <Connect> icon on the IP Camera Submenu, and wait for searching to finish. Then the live video will
be displayed on the LCD screen.
Digital PT Control (For Fixed Camera)
In the IP Camera’s live view mode, the text “ZOOM” will be displayed on the bottom right of the screen. Tap the text
“ZOOM”, and the video will switch to the digital zoom mode (at maximum digital zoom ratio). Meanwhile, the text “P
& T” will be displayed on the bottom left of the screen as shown below.
Press the Left / Right Shift Keys ( ), and the image can be horizontally shifted to the left / right with four steps
respectively; Press the Up / Down Shift Keys ( ), and the image can be shifted upward / downward with
four steps respectively. To leave the Digital PT Control mode, simply tap “ZOOM.”
Exit the Viewing Mode
Press the ESC Key on the IPCT01’s button pad to exit the live view mode, and return to the IP Camera
Submenu.
NOTE: The streaming format will not be restored if the <ESC> button is not pressed before the camera is
disconnected from the IPCT01.
19
Page 20

DEVICE SEARCH
If there are multiple IP Cameras in the network, utilize <Device Search> to find all of the cameras. <Device Search>
can be accessed in IP Camera Submenu.
Implement Device Search
Tap <Device Search> icon, and wait for the searching to finish. Then the Device Search page will appear (as
shown below).
Tap <IP/MAC> to switch the detected IP Camera displaying form between IP address and MAC. Select the target IP
Camera from the device finding list on the top left of the screen. And setup the duration to wait until connecting to
devices. For a custom setting, select <Custom> from the drop-down list and then enter the value in the field at the
bottom of the setup page. Then tap <CONNECT> beneath the Password column to start connecting. The live view
video will be displayed on the screen.
20
Page 21

AV In (Analog Video Live View)
Users can view the analog video through the BNC IN connector on top of the IPCT01 as shown below.
Connect the BNC cable from the video output connector of the Camera to the BNC IN port on the IPCT01. Tap the
<AV In> button on the Main Menu and users can view live video on the LCD screen.
NOTE: To view live video from an IP Camera which supports BNC via AV In function, please make sure the IP
Camera streaming is set as “BNC Out”.
FIXED CAMERA LIVE VIEW
In the live view mode of the Fixed Camera, the TV System (NTSC / PAL) of the camera will be displayed on the
bottom left of the screen as shown below.
NOTE: Users may adjust video brightness, contrast or sharpness for different live viewing quality in the <Setup- AV
Video> function, which can be accessed by the following path: Setup> Setup- AV> Setup- AV Video.
For more detail, please refer to AV Video Setup.
21
Page 22

CABLE TEST (CAT5)
Users can check the RJ-45 cable wiring with the supplied UTP Terminal Block
Setup for Testing
Connect one end of the RJ-45 connector to the UTP Terminal Block and the other end to the CAT5 port at the side
of the IPCT01.
Cable Testing
Step 1: Tap the <CAT5> icon on the Main Menu.
Step 2: Tap the <Test> icon and wait for wiring detection.
Step 3: Then the cable’s wire map will be displayed on the screen. Users can check the RJ-45 cable for its wiring
type (Straight / Crossover) and error connection (Short / Open / Miswired).
Step 4: Tap <Return> to return to the Main Menu.
22
Page 23

Power over Ethernet (PoE)
The IPCT01 can function as a power sourcing equipment (PSE) and provide power to IP Cameras that are PoE /
PoE Plus enabled.
ENABLE POE
Step 1: Connect the Ethernet cable from the IP Camera to the LAN / PoE OUT Port on the side of the IPCT01.
Step 2: Tap the <PoE ON> icon on the Main Menu to enable the PSE, then the PSE indicator light
Step 3: The <PoE ON> icon will turn into <PoE OFF> when the PoE is enabled. Users may tap <PoE OFF>
POE SETUP
Tap the <PoE Setup> icon on the Main Menu to setup including Power Level, Power over Ethernet (PoE)
measurement, PoE measurement display, Enable PoE when booting, and PoE auto-shutdown time, etc.
will be on, which means the Tester is now providing power to the IP Camera.
to turn off the PoE function.
23
Page 24

Power Level
The output Power Consumption Level range can be set according to different needs. The options include <Very
Low(~3W)>, <Low(3~6W)>, <Mid(6~8.5W)> and <High(8.5~25W+EXT 12V)>. If the camera requires IEEE802.3at
Class 3 power, an external higher-capacity battery similar to BP-930 is required, and set the power level to <High>.
NOTE: Please make sure the PoE function is off before accessing the Power Level setting.
PoE Measurement
The information includes voltage (V), current (I) and power consumption (P) of the Power over Ethernet (PoE) can
be measured according to different Ethernet circumstances. Select from the drop-down list of the <PoE
Measurement> to fit the Ethernet condition to show the PoE Measurement information on the screen while using
PoE.
PoE Measurement Display
There are several combinations in <PoE Measurement Display>, select from the drop-down list to show PoE
Measurement information including Voltage (V), Current (I), and Power Consumption (P) in different combination.
24
Page 25

Enable PoE after IPCT01 Bootup
For users who wish to enable PoE in the meantime while the IPCT01 is booting up, please select <ON> from the
drop-down list of <Enable PoE when booting>, and the IPCT01 will provide electricity to the IP Camera right after
system startup.
PoE Auto-shutdown
Select the PoE auto-shutdown interval between 20 seconds, 40 seconds and 60 seconds. The setup can aid
conserving battery power when there is no IP Camera or other device using the IPCT01 as the PSE. The reminder
of PoE shutdown will pop out around 5 seconds in advance of shutting down.
Tap <Enter/Save> to save all the settings and go back to the Main Menu automatically. Or tap <Return>
to exit the setting page without saving settings.
25
Page 26

Snapshot
The advanced Snapshot function facilitates saving images in the assigned path when necessary.
IMPLEMENT SNAPSHOT
In the IP Camera’s live view mode, press the <Snapshot> key on the IPCT01’s button pad. Then enter the
Snapshot setup page as shown below.
Snapshot File Setup
Assign a storage location among the three options (Tester / USB / SD) located on the very top of the snapshot setup
page for the snapshot by tapping the round button on the left side of the option. And then enter the file name and
description respectively for the snapshot.
Tap <Enter/Save> to save all the settings and go back to the live view mode, or tap <Return> to exit the
setting page without saving settings.
Files in USB / SD
For files that are saved to the USB drive or microSD card will automatically be in the created folder named
“IMAGE-DATA”. Each snapshot’s description can be found in the attached .txt file.
26
Page 27

Video Recording
The IPCT01 supports Video Recording, Video Setup, Video File Managing and Video Playback function for IP
Camera live views when necessary.
IMPLEMENT VIDEO RECORDING
In the IP Camera’s live view mode, tap the white text “REC” on the top right corner of the live view screen to start
Video Recording. During the recording process, the text will be in red. Tap the text “REC” one more time to stop
Video Recording, and the text will be back in white again.
27
Page 28

IP Camera Setup
Users can change the IP Camera’s setting, e.g. IP address, camera type, user name, password, streaming format,
network settings, in the Setup- IP Submenus: <Setup- IP Connection> and <Setup- IP Camera> .
Access <Setup- IP Connection> and <Setup- IP camera>
Step 1: Tap the <Setup> icon on the Main Menu to enter the Second Screen.
Step 2: Tap <Setup- IP> on the Setup Menu, and then enter the IP Setup Submenu.
28
Page 29

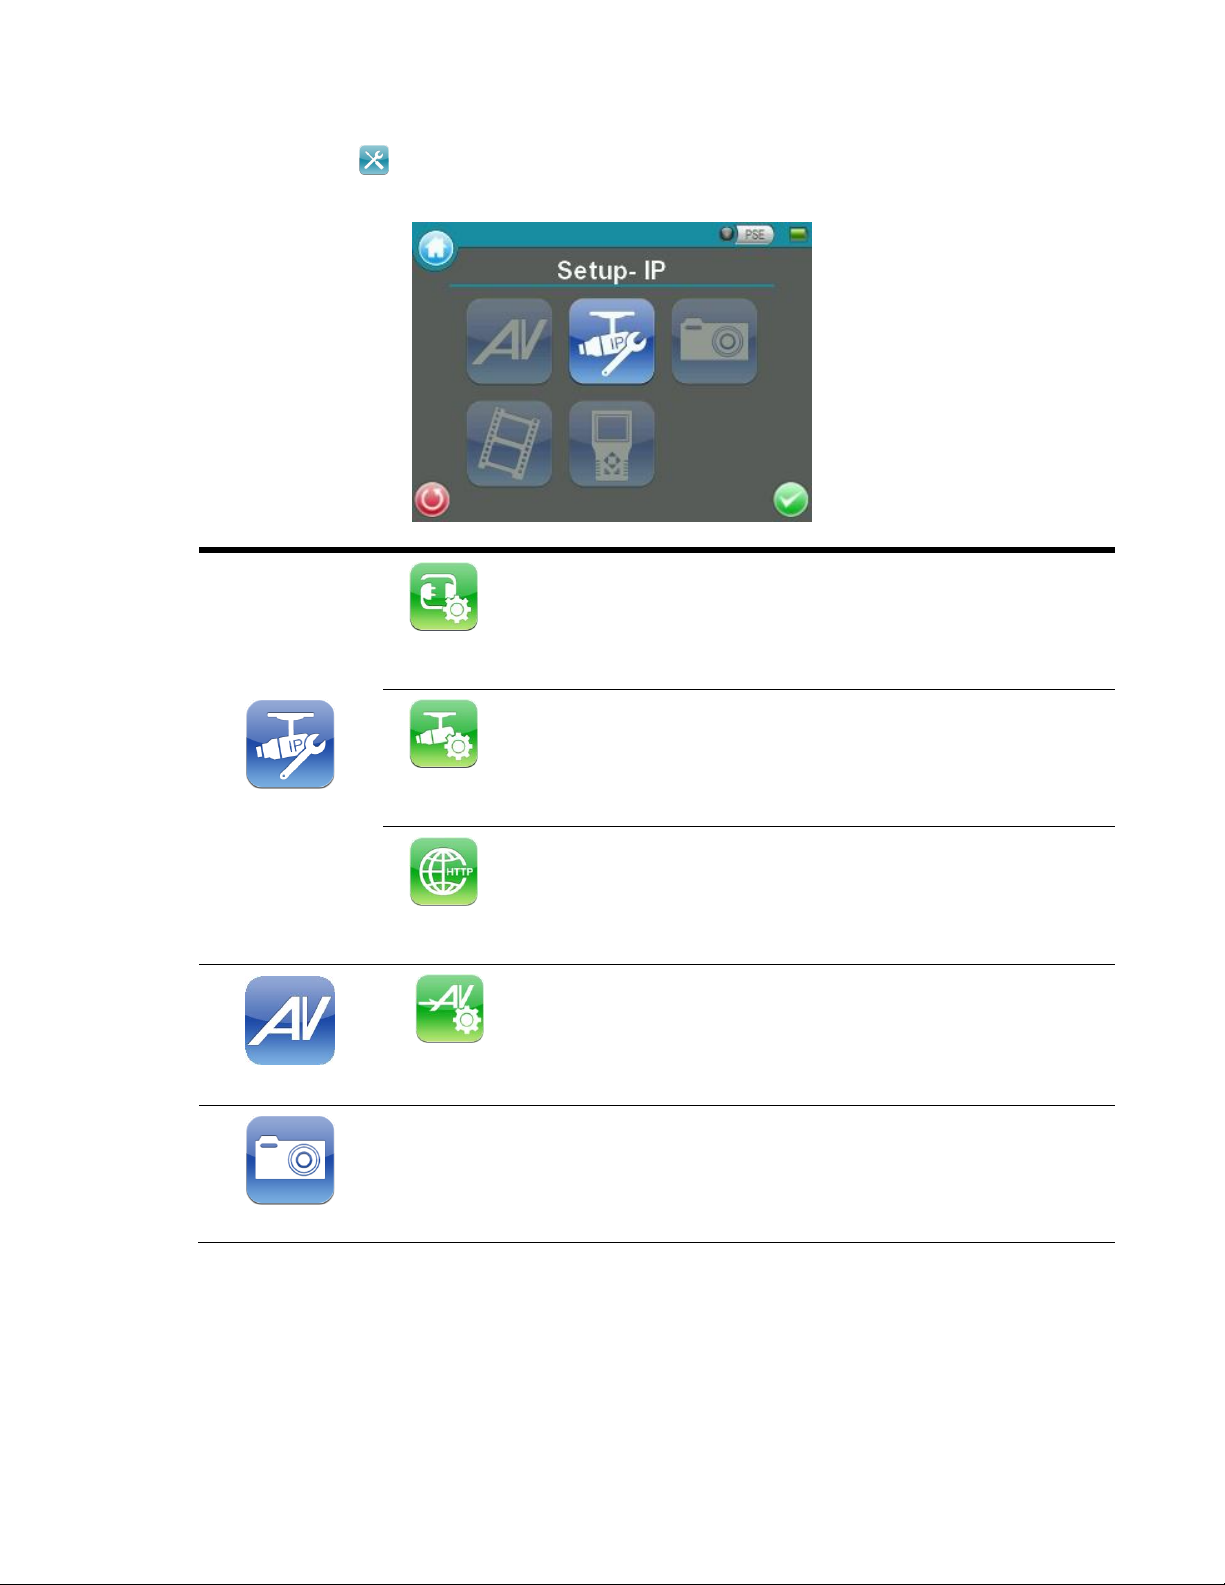
The <Setup- IP Connection> icon and <Setup- IP Camera> icon are in the IP Setup Submenu.
29
Page 30

SETUP- IP CONNECTION (ALTER CAMERA SETTINGS)
Tap the <Setup- IP Connection> icon and enter its setup page as shown below.
IPCT01 Addr.: Set the IP address of the IPCT01.
Camera Profile: Save the settings into multiple profiles for faster retrieve.
Camera IP: Set IP address for the camera, select check box to ping the camera IP.
Camera Type: ONVIF
User Name: Enter the user name of the IP Camera.
Password: Enter the password of the IP Camera.
Streaming Protocol: RTP + RTSP (RTP & RTSP)
RTP / RTSP (RTP over RTSP)
30
Page 31

Specify Camera Settings
Please specify the IP address, camera type, user name, password and streaming protocol of the connected IP
Camera in each column by the stylus touch pen.
Add a Camera to List
To add a camera to the Camera Profile list, please enter its model name in the <Camera Profile> column and tap the
icon on the right side of this column; while canceling a camera, select the camera to be deleted, and then tap
the icon . Up to 128 IP Cameras can be assigned for testing.
Tap <Enter/Save> to save all the settings and go back to the previous screen automatically. Or tap <Return>
to exit the setting page without saving settings.
SETUP- IP CAMERA (LOAD THE NETWORK SETTINGS)
For checking or altering the IP Camera’s network settings such as Subnet mask, Default gateway, Primary DNS,
Web server port, etc., users can go to the <Setup- IP Camera> page. Tap the <Setup- IP Camera> icon
and enter its setup page as shown below.
Load Settings from the IP Camera
Please tap the <Load from Camera> button on the top of the menu and the IP Camera’s network settings will be
shown in the blank field.
NOTE: Make sure the target camera’s settings are correctly configured, or the loading here will fail. For altering the
camera settings, please go back up one level by tapping on <Return> button. Then enter <Setup- IP
Connection> to change camera settings.
Reload the Settings to the IP Camera
After making network setting changes, users may tap the <Set to Camera> button on the top of the setup page to
reload the network settings to the camera.
Tap <Enter/Save> to save all the settings and go back to the previous screen automatically. Or tap <Return>
to exit the setting page without saving settings.
31
Page 32

SETUP- Firmware Upgrade
Step 1: Access the IPCT01 webpage to download the latest firmware version of the IPCT01:
http://www.pelco.com/sites/global/en/products/camera-solutions/range-presentation.page?p_function_id=9
510&p_family_id=30176&p_range_id=62225#.
Step 2: In the IPCT01 webpage, select the “Software / Firmware” tab, and then click on the link of Software and
Firmware Download Center.
Step 3: Log in the Software and Firmware Download Center with Pelco account/password. Then, download the
latest firmware version of the IPCT01. The firmware will be downloaded in *.rar format to the PC.
Step 4: Extract two files, *.tgz and *.md5 , from the rar file. Save both files in the root folder of the USB drive.
Step 5: Insert the USB to the IPCT01. In <Setup- IP Connection> page, tap the <Upgrade> button, and the file
selection dialogue will appear as below.
Step 6: Press the <USB> button, and the firmware in the USB drive shall be found. The firmware details will be
displayed in the blank field of the file selection menu.
Step 7: Check the <Complete upgrade> tick box by tapping, and tap <Enter/Save> button to start upgrade.
Then the notice of firmware upgrade confirmation will pop up. Tap <OK> and the firmware upgrade will
proceed.
SETUP- LICENSE ACTIVATION / DE-ACTIVATION
The license activation function allows the IPCT01 to search not only the IP cameras with Pelco protocol, but also the
IP cameras with ONVIF protocol. If users de-activate the license, the IPCT01 will only search the IP cameras with
Pelco protocol via device search. With different network connection status (Online / Offline), the procedures of
license activation / de-activation are also different. It is recommended to activate / de-activate the license when the
IPCT01 is connected to the network. Refer to the following for further information.
Users will receive an activation code after purchasing the license. Save the activation code to the root folder of a
USB drive before the license activation. To save the activation code, open a Notepad file, and input the activation
code. Save the file with the filename containing “activation”, e.g. “activation” or “ACTIVATION1”. Modify the filename
extension to “.bin” as “activation.bin”.
NOTE: This license activation function is only available for users who purchased the license. Those who did not
purchase the license, the IPCT01 will only search IP cameras with Pelco protocol via device search. Please contact
the manufacturer for more information about purchasing the license.
32
Page 33

NOTE: ONE license can ONLY be applied to ONE IPCT01 at a time. If users only have one license, and wish to
activate another IPCT01, please de-activate the activated IPCT01 before activating the other IPCT01.
ONLINE- License Activation
Before activating the license via network, users must ensure that the DHCP function of the IPCT01 is enabled. In
addition, make sure that the network switch supports DHCP function and is able to assign IP addresses to the
connected devices. Follow the steps below to activate the license.
Step 8: Tap the <Setup- IP Connection> icon and enter its setup page.
Step 9: Tap <License> <Online>. Select <OK> from the message window. Select <OK> again.
Step 10: Connect the USB drive with the activation code file to the IPCT01.
Step 11: Tap <USB>. The filename will be listed.
Step 12: Select the file from the list and tap <Enter/Save> . Select <OK> from the pop-up window to continue.
Step 13: A message window will be displayed as below. Select <OK> and reboot the IPCT01.
ONLINE- License De-Activation
Step 1: Tap the <Setup- IP Connection> icon and enter its setup page.
Step 2: Tap <License>. A message window will be displayed to inform users that the license has been activated.
Select <OK>.
Step 3: Tap <Online>. Select <OK> from the message window. Select <OK> again.
Step 4: Connect the USB drive with the activation code file to the IPCT01.
Step 5: Tap <USB>. The filename will be listed.
Step 6: Select the same file used in license activation and tap <Enter/Save> . Select <OK> from the pop-up
window to continue.
Step 7: A message window will inform that the license is de-activated. Select <OK>, and the IPCT01 will
automatically shutdown. The license de-activation process is completed.
33
Page 34

OFFLINE- License Activation
To activate the license when the IPCT01 is not connected to the network, follow the steps below. The process of
license activation is divided into three parts: Generate Request (on the IPCT01 side), Retrieve response.bin (on the
PC side), and Process Response (on the IPCT01 side).
Part I: Generate Request (on the IPCT01 side)
Step 1: Tap the <Setup- IP Connection> icon and enter its setup page.
Step 2: Tap <License> <Offline> <1.Generate Request> <OK>.
Step 3: Connect the USB drive with the activation code file to the IPCT01.
Step 4: Tap <USB>. The filename will be listed.
Step 5: Select the file from the list and tap <Enter/Save> . Select <OK> from the pop-up window to continue.
Step 6: A warning window will be displayed as below. The file “IPCT01_Request” will be saved in the USB drive.
Select <OK>.
Part II: Retrieve response.bin (on the PC side)
Step 7: Connect the USB drive ejected from the IPCT01 to a PC with network connection.
Step 8: Enter the following IP address: http://licensing.tac.com/flexnet/operationsportal/showActivationIdLogon.do
to the address bar of a web browser.
Step 9: Input the activation code under <Activation Id:>, and click <Login>.
Step 10: Select the <Manage Devices> tab. Click <Generate License> under <Devices>.
34
Page 35

Step 11: Click <Choose File>, and choose the file “IPCT01_Request” from the USB drive. Click <Submit> to upload
the file to the License Server.
Step 12: Click <Download> to download the file “response.bin” to the USB drive.
Part III: Process Response (on the IPCT01 side)
Step 13: Tap <License> <Offline> <2.Process Response> <OK>.
Step 14: Connect the USB drive with the response.bin file.
Step 15: Tap <USB>. The response.bin file will be listed.
Step 16: Select the file and tap <Enter/Save> . Select <OK> from the warning window to continue.
Step 17: A message window will inform users the license is activated as below. Select <OK> and reboot the
IPCT01.
OFFLINE- License De-Activation
Step 1: Tap the <Setup- IP Connection> icon and enter its setup page.
Step 2: Tap <License>. A message window will be displayed as below, select <OK>.
Step 3: Tap <Offline> <1.Generate Request> <OK>.
Step 4: Connect the USB drive with the activation code file to the IPCT01.
Step 5: Tap <USB>. The filename will be listed.
Step 6: Select the same file used in license activation and tap <Enter/Save> . Select <OK> to continue.
35
Page 36

Step 7: A warning window will be displayed as below. The file “IPCT01_DeRequest” will be saved in the USB drive.
Select <OK>.
Step 8: Follow Step 7 to Step 10 in OFFLINE-License Activation.
Step 9: Click <Choose File>, and choose the file “IPCT01_DeRequest” from the USB drive. Click <Submit> to
upload the file to the License Server.
Step 10: Click <Download> to download the response.bin file to the USB drive.
Step 11: On the IPCT01 side, tap <License> <OK> <Offline> <2.Process Response> <OK>.
Step 12: Follow Step 14 to Step 16 in OFFLINE-License Activation.
Step 13: A message window will be displayed as below. The file “PCT01_DeRequestFinal” will be saved in the USB
drive. Select <OK> and reboot the IPCT01.
Step 14: Follow Step 7 to Step 10 in OFFLINE-License Activation.
Step 15: Click <Choose File>, and select the file “IPCT01_DeRequestFinal” from the USB drive. Click <Submit> to
submit the file to the License Server.
The web page will inform users that the license is successfully de-activated.
36
Page 37

AV Video Setup
The <Setup- AV Video> can be accessed by the following path: Setup> Setup- AV> Setup- AV Video. In the <SetupAV Video> menu, users can adjust analog video’s brightness, contrast or sharpness for favorable video display
on the IPCT01’s LCD screen under different operating circumstances.
Access <Step- AV Video>
Step 1: Tap <Setup> on the Main Menu and enter the Second Screen.
Step 2: Tap <Setup- AV> on the Setup Menu to enter the AV Setup Screen, and then tap <Setup- AV Video>
to enter the setting page as shown below.
In the <Setup- AV Video> setting page, the live video is displayed on the upper screen.
Adjust Brightness / Sharpness / Contrast Value
Move the slider bar by touching the screen or using the IPCT01’s Left / Right Shift Keys ( ).
Switch to another Item
Tap the <AV Mode> icon next to the slider bar or press the IPCT01’s Up / Down Shift Keys to switch among
Brightness, Sharpness and Contrast setting.
Tap <Enter/Save> to save all the settings and go back to the previous page automatically. Or tap <Return>
to exit the setting page without saving settings.
37
Page 38

Snapshot Setup
Users can preview, copy and delete the image on the <Setup- Snapshot> setup page. Tap the <Setup> icon
on the Main Menu and tap on <Setup- Snapshot> icon to enter the snapshot file managing page as shown
below.
Image Preview
On the <Setup- Snapshot> page, select the snapshot storage path (Tester / USB / SD) where the saved files are
located. Then all the files will be listed in the <File List> field. To view a snapshot, tap the file name in the list and the
image will appear in <Image Preview> as shown above.
Single File Copy
Tap the file name in the list to Copy, and then tap the <Copy> icon in <File Manager> section below
<Image Preview>. Select the location to copy the file to in the pop out window, and then tap <Enter/Save> .
All Files Copy
Tap the <Select All> icon in <File Manager> section below <Image Preview> to select all the files in <File
List>. Then tap the <Copy> icon to copy all the files. Select the location to copy the files to in the pop out
window, and then tap <Enter/Save> .
Single File Deletion
Tap the file name in the list to delete then tap the <Delete> icon in <File Manager> section below <Image
Preview>. Tap <OK> on the pop out window to allow file deletion.
38
Page 39

All Files Deletion
Tap the <Select All> icon in <File Manager> section below <Image Preview> to select all the files in <File
List>. Then tap the <Delete> icon to delete all the files. Tap <OK> on the pop out window to allow all files
deletion.
39
Page 40

Video Setup
Follow the steps below to setup for video recording.
Video Recording Setup (Video- Rec Setup)
Step 1: Tap the <Setup> icon on the Main Menu to enter the Second Screen. Enter <Setup- Video> by
tapping the icon.
Step 2: Tap <Video- Rec setup> icon on the Video Setup Screen to access video recording setup page.
Assign a storage location among the three options (Tester / USB / SD) located on the very top of the setup page to
save the videos by tapping the round button on left side of the option. And then enter the file name and description
respectively for the snapshot.
40
Page 41

Tap <Enter/Save> to save all the settings and go back to the live view mode, or tap <Return> to exit the
setting page without saving settings.
VIDEO PLAYBACK
Users can preview, copy and delete the video on the <Video- Playback> page. Tap the <Setup> icon on the
Main Menu and tap on <Setup- Video> to enter the Video Setup Screen. Then tap on <Video- Playback>
icon to access video play back page.
Video Playback
On the <Setup- Snapshot> page, select the recording video storage path (Tester / USB / SD). Then all the video files
will be listed in the <File List> field. To view a video, tap the file name in the list and tap the <Playback> button on the
bottom, the video will appear as full screen.
41
Page 42

In the Video Playback mode, press the <ESC> key on the IPCT01’s button pad to stop playback and return to
video playback page.
Single File Copy
Tap the file name in the list to Copy, and then tap the <Copy> icon in <File Manager> section below
<Image Preview>. Select the location to copy the file to in the pop out window, and then tap <Enter/Save> .
All Files Copy
Tap the <Select All> icon in <File Manager> section below <Image Preview> to select all the files in <File
List>. Then tap the <Copy> icon to copy all the files. Select the location to copy the files to in the pop out
window, and then tap <Enter/Save> .
Single File Deletion
Tap the file name in the list to delete then tap the <Delete> icon in <File Manager> section below <Image
Preview>. Tap <OK> on the pop out window to allow file deletion.
All Files Deletion
Tap the <Select All> icon in <File Manager> section below <Image Preview> to select all the files in <File
List>. Then tap the <Delete> icon to delete all the files. Tap <OK> on the pop out window to allow all files
deletion.
42
Page 43

System Setup
On the system setup page, users can adjust the volume or the brightness of the IPCT01’s LCD screen, implement
firmware upgrade, and restore all the system settings to factory default and auto shutdown time.
Access <Setup- System>
Step 1: Tap the <Setup> icon on the Main Menu.
Step 2: Tap the <Setup- System> icon on the Setup Menu to enter the IPCT01’s system setup page.
43
Page 44

Adjust IPCT01 Volume
Move the slider bar of <Volume>. Greater volume represents louder sound.
Adjust IPCT01 Screen Brightness (Backlight)
Move the slider bar of <Backlight>. Greater value represents higher brightness.
Tap the <Auto Control> tick box below the <Backlight> slider bar to lock the level on the slider bar. Tap the
<Auto Control> tick box again to cancel the selection; then the slider bar above will become movable again.
Reset to Factory Defaults
Users can restore the IPCT01 system to factory defaults by implementing this function.
Step 1: Tap the <Default> button. Then the notice of resetting to factory default will pop up. Tap <OK> to continue.
Step 2: The pop-up message of stating successful reset with request for system reboot will display on the screen.
Tap <OK> and the IPCT01 will be shut down.
Step 3: Reboot the IPCT01 after system reset. Users will be first directed to the Touch Panel Calibration mode as
shown below.
Step 4: Tap the flashing cross on the top left of the screen, and then tap the other flashing cross located diagonally.
44
Page 45

Step 5: Then touch each flashing box as instructed.
The screen mode will switch to Main Menu after Touch Panel Calibration is completed.
Auto Shutdown
The system can be automatically shut down after pre-determined time range when idle. Select the specific time
interval from the drop-down list for system auto shutdown. To disable the <Auto Shutdown> function, please select
<OFF>.
Restore Streaming Format
IMPORTANT. FOLLOW THIS PRODCEDURE BEFORE EXITING CAMERA SET-UP. After the adjustment of the
camera is finished, users can restore the streaming format to the default setting by pressing the <ESC> button .
To display live video on the IPCT01, the camera’s streaming format will be changed.
NOTE: Press the <ESC> button to restore the camera to its original resolution format.
45
Page 46

Appendix A: Portable User Kit
STEP 1:
Unzip the soft carrying pouch and thread the outward Velcro strap through the
slot located at the bottom of the IPCT01, as shown in the figure.
Then pull the strap through and press it securely to the self-adhesive Velcro
surface inside the soft carrying pouch.
STEP 2:
Thread the Velcro strap through the slot located on the top of the IPCT01,
as shown in the figure.
Pull the strap through and press it tightly across the case join to the Velcro on
the opposite side.
Users can carry the IPCT01 safely with the soft carrying pouch. Please follow the instructions below for installation.
46
Page 47

STEP 3:
Take the folding sunshade and face the side with Velcro down. Lift the front part
of the IPCT01 up and put the sunshade’s short wing into the space between the
IPCT01 and the self-adhesive Velcro surface. Meanwhile, align the wing’s left
edge with the left edge of the IPCT01. Press the short wing to the Velcro
surface tightly.
STEP 4:
Fold one of the sunshade’s long wings around the edge of the IPCT01, and
insert the tail of the wing into the space between the IPCT01 and the Velcro
surface, as shown in the figure. Press the tail to the Velcro tightly.
Repeat step 3 and step 4 to settle the other wing.
The sunshade can be folded down for closing the case.
STEP 5:
Hook up the soft carrying pouch with the neck strap. Wear the strap and slide
the clip along the strap to adjust its length.
47
Page 48

Appendix B: Technical Specification
Features
Color LCD Field Display
3.5", 320 x 240
AV
Video Input
BNC x 1
IP Camera
LAN In
10/100 Mbps, PoE Meter Function (Watt, Current, and Voltage Display)
LAN Out
10/100 Mbps
IP Camera Setting
IP Address setting, Image Setting
PELCO Support Models
PELCO IWIS series / IXE series / IMP series / IME series / IP series
CAT-5
CAT-5 Port
1
Operation
Weight
450 g (with Battery)
Battery Type
2 x 3.7 V Li-Ion, 2200mAh
Charge Cycles
> 300 @ 80% capacity
Charging Time
2 Hrs
Operating Time
3 Hrs
Power Consumption
8.5 W
Network
IP Setting
DHCP / Static IP
Size
Dimension (L x W x H)
170 x 99.30 x 38 mm
General Specifications
Electronic
Input Voltage
DC12V, 3A
Video
Signal Format
NTSC / PAL
Video Level
1Vpp, 140 IRE
IP Camera
Connection
RJ-45
CAT-5 Cable Test
Detects
Straight/Cross Cables, Open, Short, Miswire
USB
Type
USB 2.0
SD Card
Type
microSDHC support
Audio
Input
Line In
Output
Built-In Speaker, Phone Jack ∅ 3.5
POE
Device
Internal Battery
48
Page 49

Troubleshooting
The followings are solutions to the error messages shown on the screen.
1. Power check.
The IPCT01 IP Camera Installation Tool will support cameras with PoE IEEE802.3af, Class 2. Cameras with high power
consumption (IEEE802.3at, Class 3) must use an external battery similar to a BP-930 battery. Note that when powering
Class 3 devices, the 2,200 mAh battery will only last for 5-10 minutes.
NOTE: Batteries exceeding 2,200 mAh will not fit the battery cover and the soft silicone gel case.
When connecting to an external battery, please set the power of the unit as follows:
Step 1: Access the Power setting menu.
Step 2: Select High setting.
2. “Please Check IP address”
Please double check if “Camera Type” is selected correctly (Main Menu> Setup> Setup- IP> Setup- IP connection>
Camera Type).
3. “Name or password is wrong”
Please double check whether the user name / password are correct (Main Menu> Setup> Setup- IP> Setup- IP
connection> User Name / Password).
4. “PoE OFF”
Please charge the battery if it is running low.
5. “Please Check IPCT01 or IP CAM Setting”
Please check the setting of the IPCT01 or the network settings of the IP Camera.
Pelco Product Support Contact Information
If the instructions provided fail to solve your problem, contact Pelco Product Support at 1-800-289-9100 (USA and Canada) or
+1-559-292-1981 (international) for assistance. Be sure to have the serial number available when calling.
Do not try to repair the unit yourself. Leave maintenance and repairs to qualified technical personnel only.
49
Page 50

© Copyright 2014, Pelco, Inc
All rights reserved
This equipment contains electrical or electronic components that must be recycled properly to comply with Directive 2002/96/EC of the European Union
regarding the disposal of waste electrical and electronic equipment (WEEE). Contact your local dealer for procedures for recycling this equipment.
Pelco, the Pelco logo and other trademarks associated with Pelco products referred to in this publication and trademarks of Pelco, Inc. or its affiliates.
ONVIF and ONVIF logo are trademarks of ONVIF Inc. All other product name and services are the property of their respective companies.
Product specification and availability are subject to change without notice.
50
Page 51

51
 Loading...