

Pelco DX8116-AUD User Manual

DX8100
8/16-Channel Audio Card
Installation Instructions
DX8100
Digital Video Recorder
C2638M (6/07)


Contents
Introduction. . . . . . . . . . . . . . . . . . . . . . . . . . . . . . . . . . . . . . . . . . . . . . . . . . . . . . . . . . . . . . . . . . . . . . . . . . . 4
Safety Considerations . . . . . . . . . . . . . . . . . . . . . . . . . . . . . . . . . . . . . . . . . . . . . . . . . . . . . . . . . . . . . 4
About the Audio Card Upgrade . . . . . . . . . . . . . . . . . . . . . . . . . . . . . . . . . . . . . . . . . . . . . . . . . . . . . . 5
Parts List. . . . . . . . . . . . . . . . . . . . . . . . . . . . . . . . . . . . . . . . . . . . . . . . . . . . . . . . . . . . . . . . . . . . . . . . 6
Tools Needed . . . . . . . . . . . . . . . . . . . . . . . . . . . . . . . . . . . . . . . . . . . . . . . . . . . . . . . . . . . . . . . . . . . . 6
Other DX8100 Optional Accessories . . . . . . . . . . . . . . . . . . . . . . . . . . . . . . . . . . . . . . . . . . . . . . . . . . 7
Pre-Installation Process . . . . . . . . . . . . . . . . . . . . . . . . . . . . . . . . . . . . . . . . . . . . . . . . . . . . . . . . . . . . . . . . . 8
Getting Ready. . . . . . . . . . . . . . . . . . . . . . . . . . . . . . . . . . . . . . . . . . . . . . . . . . . . . . . . . . . . . . . . . . . . 8
Preparing DX8100 for Audio Card Installation. . . . . . . . . . . . . . . . . . . . . . . . . . . . . . . . . . . . . . . . . . 11
Opening the DX8100 Chassis . . . . . . . . . . . . . . . . . . . . . . . . . . . . . . . . . . . . . . . . . . . . . . . . . 11
Understanding the DX8100 Component Layout . . . . . . . . . . . . . . . . . . . . . . . . . . . . . . . . . . . 12
Installing the Audio Card . . . . . . . . . . . . . . . . . . . . . . . . . . . . . . . . . . . . . . . . . . . . . . . . . . . . . . . . . . . . . . . 13
Removing Capture Card(s) . . . . . . . . . . . . . . . . . . . . . . . . . . . . . . . . . . . . . . . . . . . . . . . . . . . . . . . . . 13
Installing the Audio Card . . . . . . . . . . . . . . . . . . . . . . . . . . . . . . . . . . . . . . . . . . . . . . . . . . . . . . . . . . 15
Reinstalling the Capture Card(s) . . . . . . . . . . . . . . . . . . . . . . . . . . . . . . . . . . . . . . . . . . . . . . . . . . . . 16
Reinstalling the Main Capture Card . . . . . . . . . . . . . . . . . . . . . . . . . . . . . . . . . . . . . . . . . . . . 16
Reinstalling the Optional Capture Card . . . . . . . . . . . . . . . . . . . . . . . . . . . . . . . . . . . . . . . . . 17
Reassembling the DX8100 . . . . . . . . . . . . . . . . . . . . . . . . . . . . . . . . . . . . . . . . . . . . . . . . . . . . . . . . . . . . . . 18
List of Illustrations
1 Audio Card and Capture Card . . . . . . . . . . . . . . . . . . . . . . . . . . . . . . . . . . . . . . . . . . . . . . . 5
2 Removing Power Cord from Wall . . . . . . . . . . . . . . . . . . . . . . . . . . . . . . . . . . . . . . . . . . . . 8
3 Removing Power Cord from DX8100 . . . . . . . . . . . . . . . . . . . . . . . . . . . . . . . . . . . . . . . . . 9
4 ESD Protection . . . . . . . . . . . . . . . . . . . . . . . . . . . . . . . . . . . . . . . . . . . . . . . . . . . . . . . . . . 9
5 Disposable Wrist Strap. . . . . . . . . . . . . . . . . . . . . . . . . . . . . . . . . . . . . . . . . . . . . . . . . . . 10
6 Removing the Chassis Cover . . . . . . . . . . . . . . . . . . . . . . . . . . . . . . . . . . . . . . . . . . . . . . 11
7 DX8100 Interior. . . . . . . . . . . . . . . . . . . . . . . . . . . . . . . . . . . . . . . . . . . . . . . . . . . . . . . . . 12
8 Removing the Main Capture Card . . . . . . . . . . . . . . . . . . . . . . . . . . . . . . . . . . . . . . . . . . 13
9 Removing the Second Capture Card. . . . . . . . . . . . . . . . . . . . . . . . . . . . . . . . . . . . . . . . . 14
10 Example: Installing Audio Card. . . . . . . . . . . . . . . . . . . . . . . . . . . . . . . . . . . . . . . . . . . . . 15
11 Reinstalling the Main Capture Card . . . . . . . . . . . . . . . . . . . . . . . . . . . . . . . . . . . . . . . . . 16
12 Reinstalling the Optional Capture Card . . . . . . . . . . . . . . . . . . . . . . . . . . . . . . . . . . . . . . 17
13 Replacing the Chassis Cover . . . . . . . . . . . . . . . . . . . . . . . . . . . . . . . . . . . . . . . . . . . . . . 18
List of Tables
A DX8108-AUD/DX8116-AUD Kit Items . . . . . . . . . . . . . . . . . . . . . . . . . . . . . . . . . . . . . . . . . . . . . . . . . 6
B Required Tools . . . . . . . . . . . . . . . . . . . . . . . . . . . . . . . . . . . . . . . . . . . . . . . . . . . . . . . . . . . . . . . . . . . 6
C DX8100 Optional Accessories . . . . . . . . . . . . . . . . . . . . . . . . . . . . . . . . . . . . . . . . . . . . . . . . . . . . . . . 7
C2638M (6/07) 3
Introduction
CAUTION:
RISK OF ELECTRIC SHOCK.
DO NOT OPEN.
Welcome to the DX8108-AUD/DX8116-AUD audio card installation instructions for the DX8100 Series
digital video recorder (DVR). This manual covers DX8100 version 1.0 and version 1.1 for Windows® 2000
and DX8100 version 1.1 for Windows XP Embedded. Before you install the DX8100 audio, familiarize
yourself with the instructions in this manual.
SAFETY CONSIDERATIONS
The audio card for the DX8100 DVR is installed inside the DX8100 chassis. In this case, the DX8100 must
be taken off line and turned off before starting the upgrade process. Before continuing with the upgrade
procedure, read these safety instructions.
1. Read
Important Safety Instructions
the Pelco Web site at: http:/www.Pelco.com, and navigate to Products > Control Site Equipment >
Video Recorders > Digital Video Recorders > DX8100 Series Digital Video Recorders > Documents.
2. The security surveillance service provided by the DX8100 is interrupted when the DX8100 is taken
off line.
3. The DX8100 must be turned off to install the audio card option.
4.
WARNING:
cord because current continues to flow through the DX8100 even when the unit is off. First, unplug
the power cord from the wall socket, then unplug it from the rear of the DVR.
5. Only use attachments/accessories specified by the manufacturer.
6. Make sure you protect the unit and its components from electrostatic discharge (ESD).
7. The audio card must be installed correctly, to avoid damaging the capture card or audio card
connector pins.
The product and/or manual may bear the following marks:
It is critical that the DX8100 be unplugged for your safety. You must remove the power
that came with the DX8100. You can access this document on
This symbol indicates that dangerous voltage
constituting a risk of electric shock is present within this
unit.
This symbol indicates that dangerous voltage constituting
a risk of electric shock is present within this unit.
WARNING: This product is sensitive to Electrostatic Discharge (ESD). To avoid ESD damage to this product,
use ESD safe practices during installation. Before touching, adjusting or handling this product, correctly attach
an ESD wrist strap to your wrist and appropriately discharge your body and tools. For more information about
ESD control and safe handling practices of electronics, please refer to ANSI/ESD S20.20-1999 or contact the
Electrostatic Discharge Association (www.esda.org).
The materials used in the manufacture of this document and its components are compliant to the requirements
of Directive 2002/95/EC.
This equipment contains electrical or electronic components that must be recycled properly to comply with
Directive 2002/96/EC of the European Union regarding the disposal of waste electrical and electronic equipment
(WEEE). Contact your local dealer for procedures for recycling this equipment.
4 C2638M (6/07)
ABOUT THE AUDIO CARD UPGRADE
The DX8100 supports the 8- or 16-channel audio card upgrade. Up to two audio cards can be installed in
the DX8100. For information about DX8108-AUD/DX8116-AUD combinations, refer to
Optional Accessories
The DX8108 and DX8116 comes with one main capture card installed (required for system operation).
The DX8124 and DX8132 have a second capture card installed. Each capture card accommodates one
audio card.
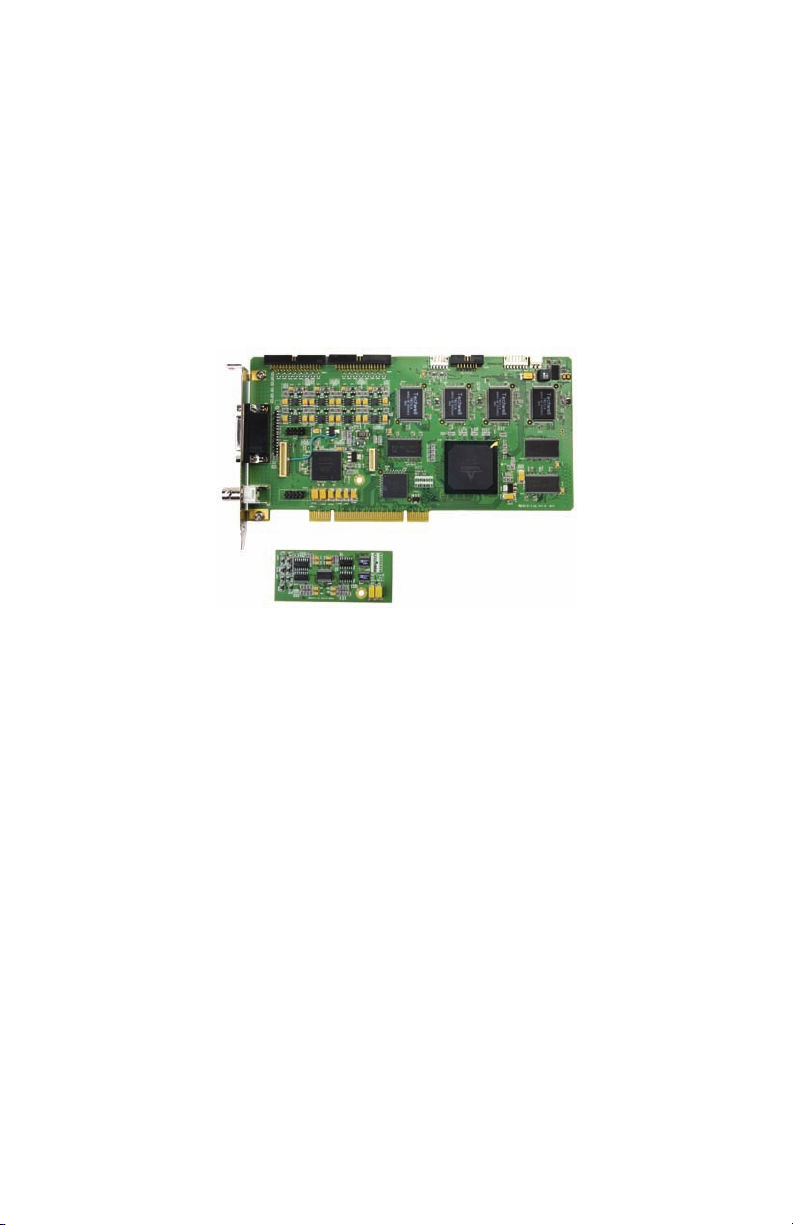
The capture card provides an external audio connector for connecting the optional audio cable (one
included with the audio card), to interface audio devices to the DX8100. There are no jumper or switch
settings on the audio card.
Figure 1 shows the audio card and capture card.
on page 7.
Other DX8100
Figure 1.
This manual describes how to install the audio card to upgrade the DX8100 for audio recording and is
organized into the following major sections:
•
Pre-installation process:
card installation. For more information about this topic, refer to
•
Installing the audio card:
summary involves the following steps:
– Remove the capture card(s)
– Install the audio card(s)
– Re-install the capture card and reconnect the internal cabling.
•
Reassembling the DX8100:
DX8100 before you connect the audio cables and devices. For information about reassembling the
DX8100, refer to
C2638M (6/07) 5
Reassembling the DX8100
Audio Card and Capture Card
Describes the initial steps you take to prepare the DX8100 for audio
Provides information about how to install the audio card option and in
After you physically install the audio card(s), you must reassemble the
on page 18.
Pre-Installation Process
on page 8.
PARTS LIST
NOTE:
In addition to the items listed in Table A, an anti-static mat is the recommended work surface to
use when installing the audio card on to the capture card.
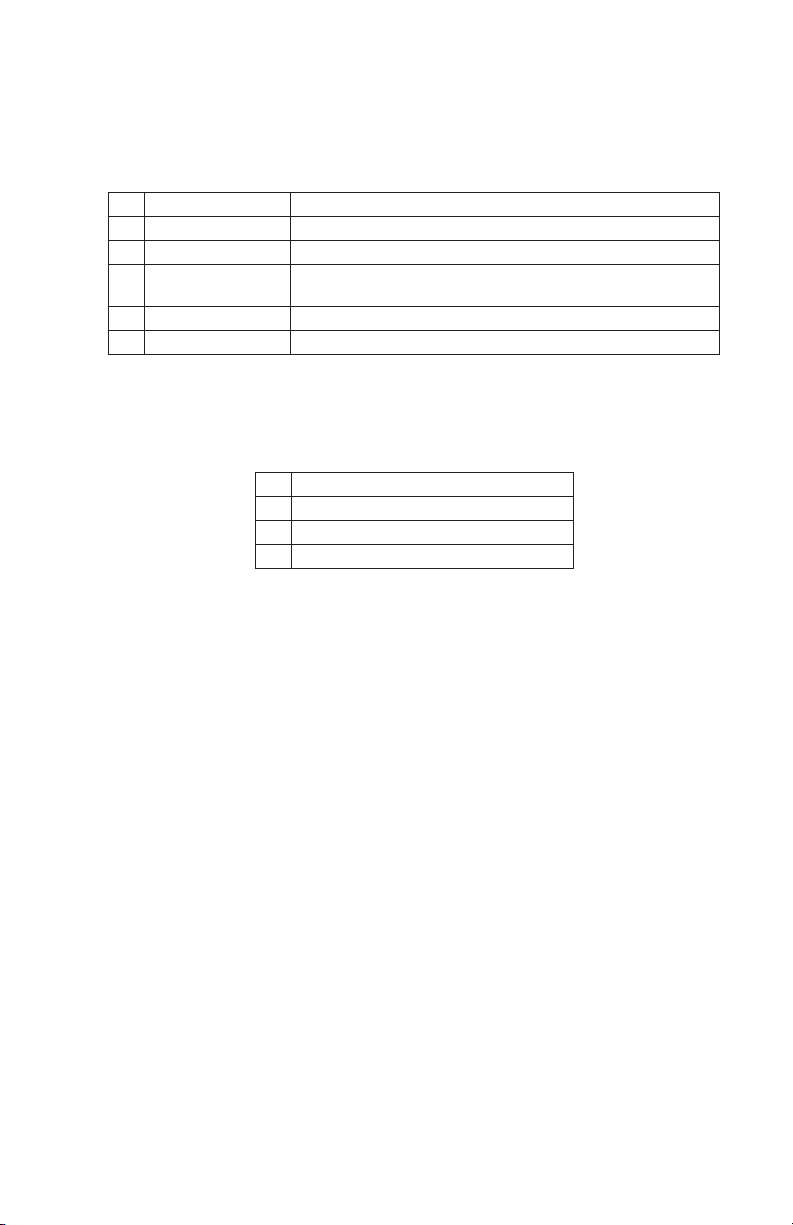
Table A.
DX8108-AUD/DX8116-AUD Kit Items
Qty Description Purpose
1 Audio card Updates one capture card to record up to 8/16 channels of audio data
1 Spacer Secures the audio card to the capture card
1 Audio cable Provides up to 8/16 RCA connectors to interface audio devices to the
1 Grounding wrist strap Protects DX8100 and hard drive components against ESD
1 Manual Describes how to install the audio card
DX8100
TOOLS NEEDED
Table B.
Required Tools
Qty Description
1 Phillips screwdriver #1 (nonmagnetic)
1 Properly grounded ESD wrist strap and mat
4 Small containers for storing screws (optional)
6 C2638M (6/07)
 Loading...