

Page 1

Before operating the Refrigerator,
please read this manual carefully
and retain for future reference.
Refrigerator
Instruction Manual
All cautions & notes on this refrigerator are important: please pay attention to them.
Page 2
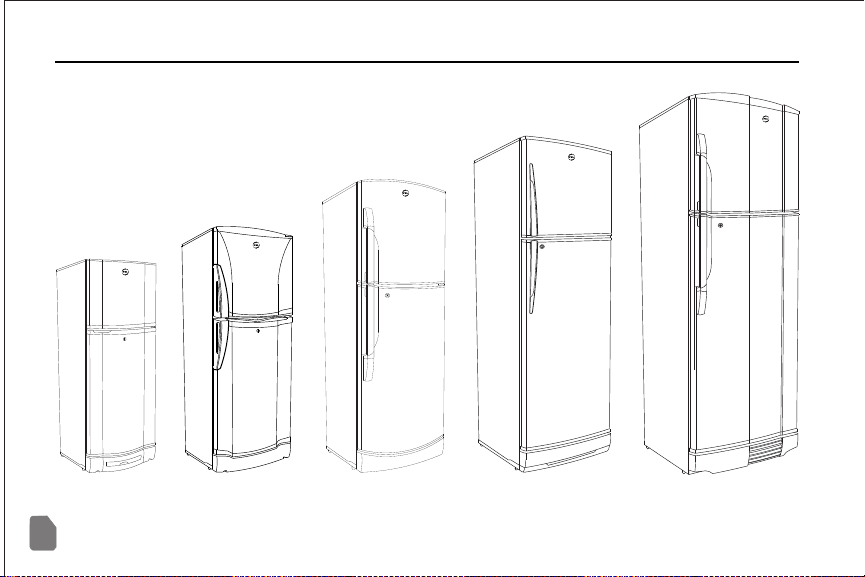
REFRIGERATOR MODELS & SERIES
SL Series
2009
2010
2012
2300JF
2500JF
Slim Line Series
Crystal
01
WB Series
20145JF
20165
2017
6 Series
6200
6300
6400
20175
20185
Slim Line Series
Star Plus
Slim Line Series
Premier
6 Series
Wide Body Series
Please read all safety and operating instructions before operating this appliance.
Page 3

INSIDE YOUR STARTER PACK
Dear Valued Customer
We congratulate you on your choice. You now are a
proud owner of a PEL product having joined millions
of others who are benefitting from quality PEL
products for more than 50 years.
We want to assure you that each PEL product is built
to last with state-of-the-art, energy efficient
technology adapted to suit our local environment.
Distinctive qualities that we are proud to share with all
our valued customers providing high performance,
reliability, durability and most of all prompt customer
care whenever and wherever you need it.
Kindly fill out the Warranty Card and send the
Company's Copy to the given address for Warranty
Registration.
Please read this Instruction Manual carefully as it will
guide you to install, operate and maintain this
appliance in its original condition for years to come.
Welcome to the PEL family, and wishing you many
years of ease and comfort that come with the PEL
name.
Thank you
REFRIGERATOR MODELS & SERIES 01
PARTS IDENTIFICATION 03
INSTALLATION 04
Leveling the Appliance
Personal safety
GETTING STARTED 05
Food storage
Vegetable / Fruit compartment
ICE CUBES MAKING 06
TEMPERATURE CONTROL 06
DEFROSTING 07
Single Door Refrigerator
Double Door Refrigerator
GENERAL CARE AND CLEANING 09
DEODORIZER 10
TROUBLE SHOOTING TIPS 11
SAFETY PRECAUTIONS 13
Page 4
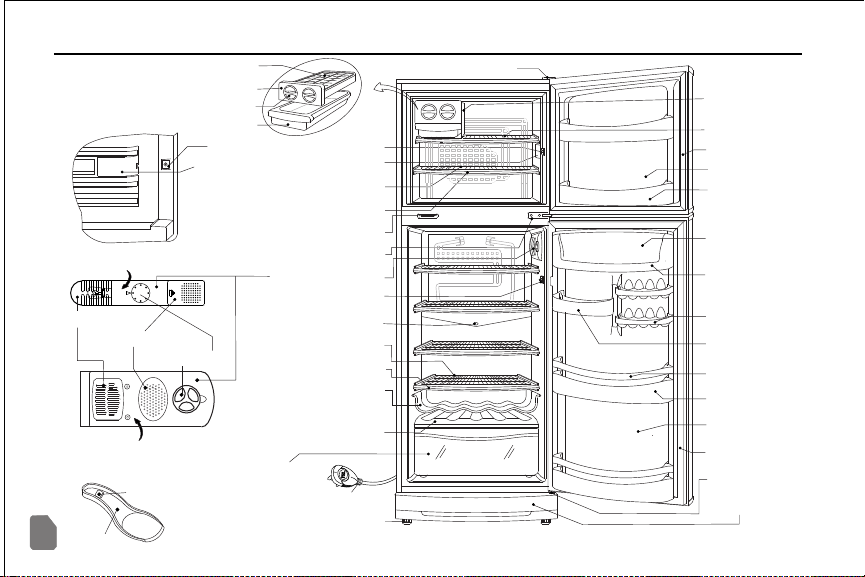
PARTS IDENTIFICATION
Ice Trays
Ice Tray Carrier
Ice Tray Knob
Ice Cube Container
(For 6 Series) Door Switch
(For 6 Series) Frz. Light Cover
Thermostat Box SL & WB Series
Ref. Light Cover
Deodorizer Cover
Thermostat Knob
Thermostat Box 6 Series
Vegetable / Fruit Compartment
03
Bottle Opener
Ice Scraper
Main Cable with 3 pin Plug
Frz. Grid Shelf
Frz. Grid Frame/Trim
Lock Latch
Central Hinge
Thermostat Box
Door Switch
Ref. Drain Hole
Ref. Grid Shelf
Ref. Grid Frame/Trim
Bottle Shelf
Veg./Fruit Cover
Leveling Screw
Upper Hinge
Frz. Central
Supporting Plate
Frz. Supporting Grid
Frz. Door Gasket
Frz. Inner Liner
Frz. Balcony
Butter & Cheese
Cover
Butter & Cheese
Compartment
Eggs Balcony
Utility Pocket
Ref. Balcony Strip
Ref. Balcony
Ref. Inner Liner
Ref. Door Gasket
Lower Hinge
Kick Plate
NOTE: Specifications may vary from model to model.
Page 5
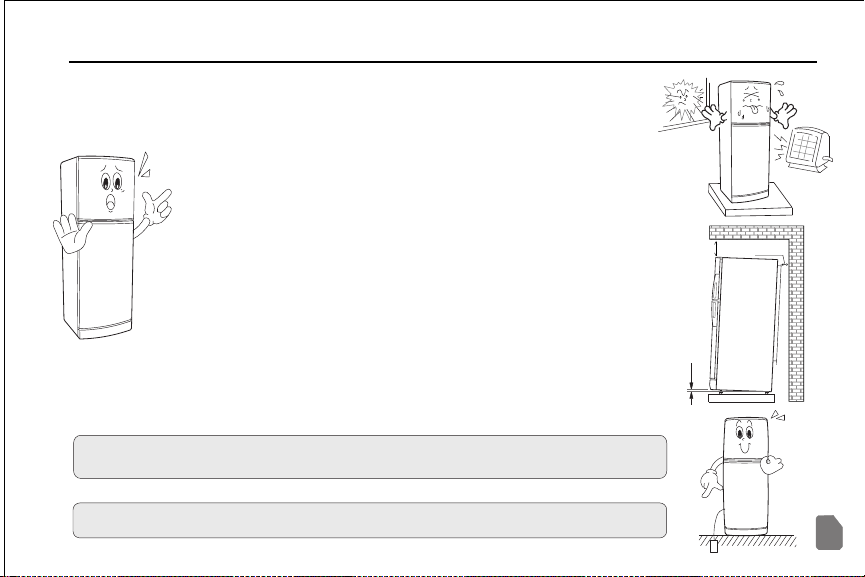
INSTALLATION
1. Remove packing carton and all thermopore pieces from the
refrigerator, specially one at the back of the compressor.
Install the Appliance on a firm, flat surface or a Wooden
Pedestal (Chowki).
2. For optimum performance install the refrigerator in a well ventilated
place. Avoid installing the refrigerator near heat generating home
appliances such as heater, stove and in small nooks / corners, direct
sun light.
Leveling the Appliance
3.
To compensate any floor unevenness, adjust the balance of Appliance
by rotating the Leveling Screws clock wise or anti clock wise.
ab
e 4”ov
above 12”
IMPORTANT:
NOTE:
4. Always install your refrigerator in a tilted position as shown.
5.
For personal safety, properly ground this Appliance.
Do not ground the refrigerator with a telephone line, gas pipe, etc. It is
necessary that refrigerator should be connected to the proper earth point.
The manufacturer will not be responsible for any loss or damage if
precaution in this regard is not observed.
Retain the original packing in case you need to ship it at a later date.
”
3
1/
x.
o
r
p
p
a
04
Page 6
GETTING STARTED
Clean the refrigerator before turning it ON. After plugging check that the light inside the cabinet is ON, when
the door is opened. Turn the thermostat knob to the maximum position “8”, close the refrigerator doors, let it
run idle for 2 ~3 hours, then turn the thermostat knob to the medium position (4) in normal condition, now the
refrigerator is ready to store food . If it is peak summer, set the thermostat position at (5 ~ 6).
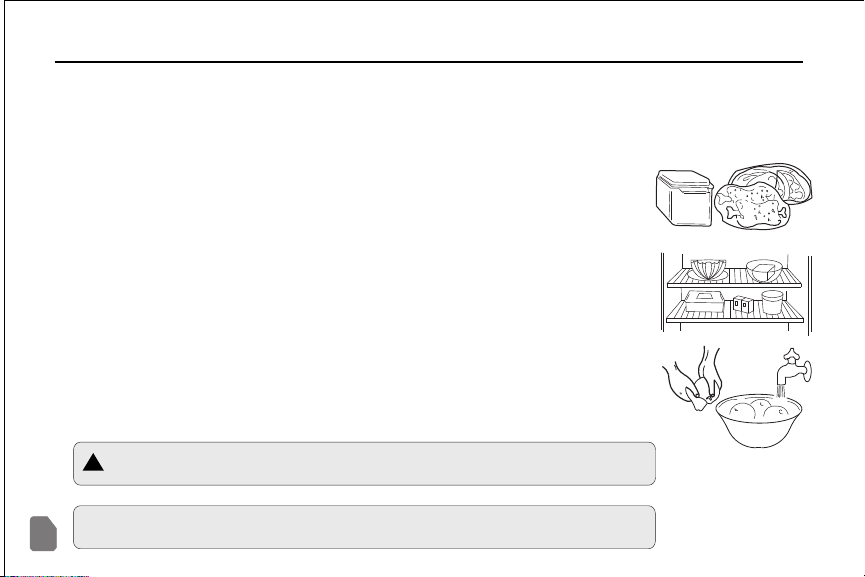
FOOD STORAGE
1. Seal food in containers with lids or in plastic bags to prevent drying and mingling of
odour.
2. In Freezer compartment keep food in small quantities for quick freezing.
3. Allow hot food and drinks to cool down before placing in the refrigerator or freezer.
4. Food should be arranged so as to ensure free circulation of cool air in the
compartment, never cover grid shelves with plastic mats or sheets.
5. Food stored in the refrigerator compartment can be refrigerated up to a certain limit.
6. Wash and dry meat, fruits and vegetables before placing them in the refrigerator.
VEGETABLE / FRUIT COMPARTMENT
This compartment maintains the moisture of veget & , to sustain their freshness
for longer period.
ables fruits
05
CAUTION:
!
NOTE:
Do not freeze the meat again after getting it defrosted. It can be
harmful for health.
Incase of prolonged power failures, it is recommended that stored
food should be consumed within 6~8 hours.
Page 7
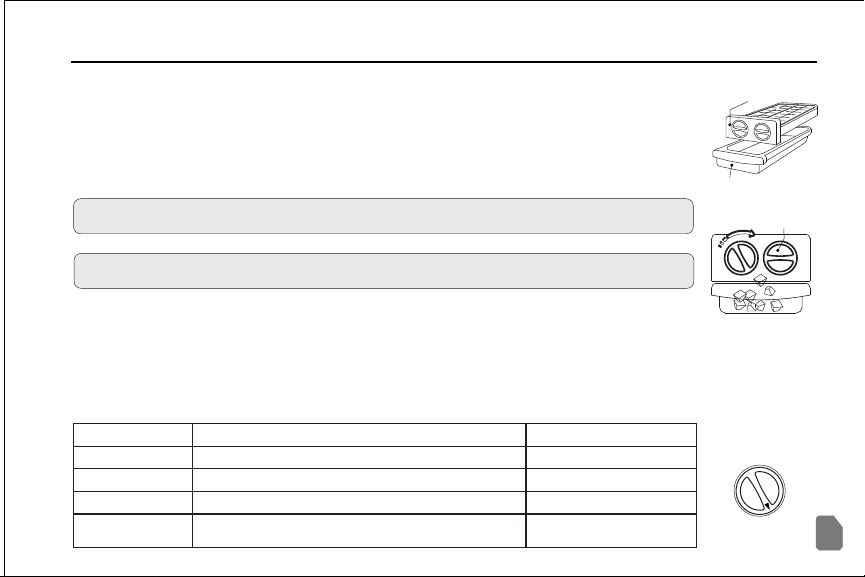
ICE CUBES MAKING
Position “0” Off position
Position “2 ~ 3”
When environmental temperature is below 15 °C
Winter season
Position “4”
When environmental temperature is 15 °C - 30 °C
Moderate season
Position “5 ~ 6”
When environmental temperature is 30 °C - 40 °C
Summer Season
Position “7 ~ 8”
When environmental temperature is above 40 °C
In special cases, not
recommended normally
When you want to make ice cubes, take out complete set of ice tray carrier, pour water in ice
trays and slide it back.
After ice cubes have been formed in the ice trays, free the ice cubes from the ice trays by turning
the ice tray’s knob clockwise. Twist it again and allow ice cubes to drop into the ice cube
container underneath.
PRECAUTION:
Make sure that the ice cube container is beneath the ice trays.
NOTE:
Ice tray design may differ in different models.
TEMPERATURE CONTROL
The temperature inside the refrigerator may vary according to the frequency of door opening,
food status or the amount of food stored in the refrigerator. Adjust the thermostat knob to change
the internal temperature according to the enviro ,nmental temperature. For reference please see
the following table:
Ice Tray set
Ice Cube container
Ice Tray Knob
Thermostat Knob
0
1
8
2
7
3
6
4
5
06
Page 8
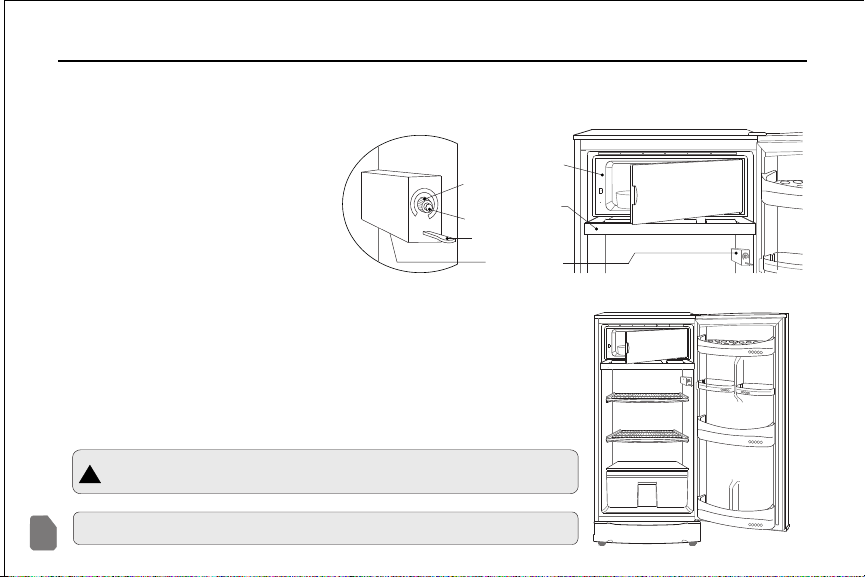
DEFROSTING
Defrosting is necessary for efficient performance of the Appliance. When the layer of frost on the walls of
freezer compartment becomes 5 ~ 8 millimeters or over, the Appliance needs to be defrosted.
Single Door Refrigerator
This refrigerator is equipped with a
semi automatic defrosting
thermostat with a Push-Button.
To defrost the refrigerator, follow
these instructions:
1. Remove food and ice trays from freezer compartment.
2. Press Push-Button of thermostat knob, let the Refrigerator & Freezer
doors open for defrosting.
3. Wait till the frost melts then remove it carefully with the help of Ice scraper.
4. Take out Drip tray carefully when it is filled with water, dispose of
this water and slide it back to its original position. You may repeat
this action till defrosting is completed.
5. Push-Button will automatically come back to its original position
when defrosting is completed.
Freezer Compartment
Thermostat Knob
Drip Tray
Defrosting Push-Button
Door Switch
Thermostat Box
07
CAUTION:
!
Do not remove frost with knife or sharp metal tools.
Always use company provided Ice Scraper.
NOTE: Complete defrosting is recommended after every month.
Page 9
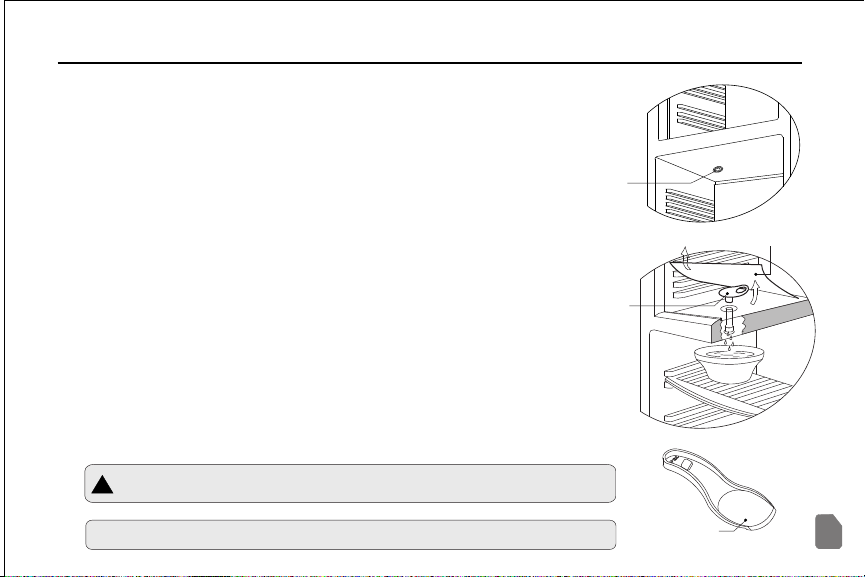
DEFROSTING
Double Door Refrigerator
Refrigerator Compartment
This compartment defrosts automatically. Manual defrosting is not required.
Freezer Compartment
To defrost the freezer compartment, follow the instructions given below:
1. Remove food, ice trays set, ice cube container and grid shelves from Freezer compartment.
2. Turn the thermostat knob to position “0” unplug the Appliance and
let the Freezer door open for defrosting.
3. Wait till the frost melts then remove it carefully with the help of Ice Scraper.
4. When frost is removed, take out protection plate care fully and detach
the drain plug in order to drain out defrosted water.
5. (a) (For 6 series only) Place a container exactly under the drain to
6. Now clean the whole compartment with a soft dry cloth. Insert drain plug
7 d e reloading the food.
collect defrosted water.
(b) In Slim Line series & Wide Body series defrosted water will drain
out and collect in the condensate tray provided at the back of the
cabinet as shown in page # 9.
back to its original position and place protection plate over it.
. Close the Freezer oor and let it run for about one hour befor
Drain Hole 6 Series
Models only
Drain Plug
Frz. Protection Plate
CAUTION:
!
Do not remove frost with knife or sharp metal tools. Always
use company provided Ice Scraper.
NOTE: Complete defrosting is recommended after every month.
Ice Scraper
08
Page 10
GENERAL CARE AND CLEANING
This refrigerator does not require any special maintenance. It is however advised to
keep your refrigerator neat and clean, this will increase the life of your refrigerator.
1. Always unplug the refrigerator before cleaning. Do not use liquid
cleaners or aerosol cleaners.
2. Never apply water directly inside or outside the refrigerator. Water
spoils the insulation of electric parts and may cause electrical shock.
Interior Cleaning
For inside cleaning take out all food and accessories from refrigerator,
use a solution of 9 parts water and 1 part vinegar, rinse thoroughly with
a sponge and fresh water. Finally dry whole cabinet with a soft cloth.
Door Gasket
Clean the gasket thoroughly in order to maintain its sticking quality.
09
NOTE:
Dry all the accessories completely before putting them
back at their original position.
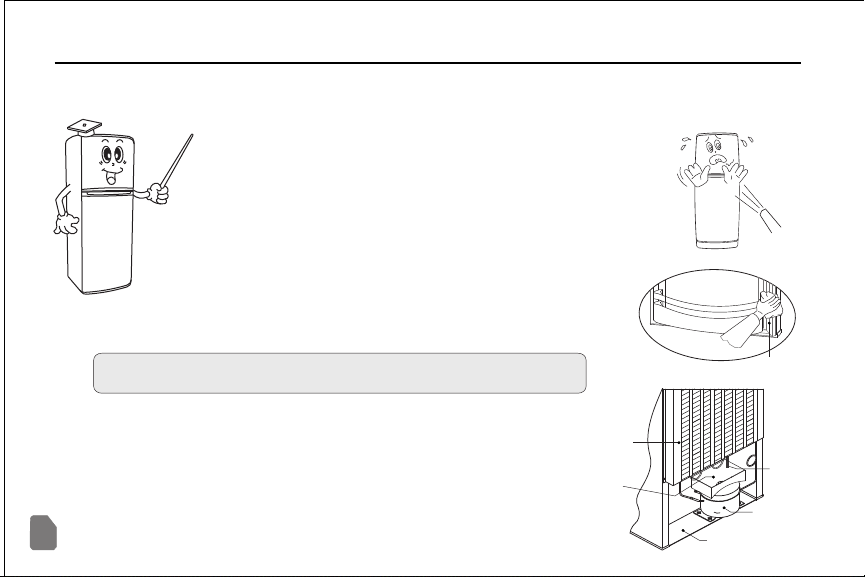
Exterior Cleaning
To clean the external side of the refrigerator use only
a slightly damp soft cloth.
Condenser
Condensate tray
Clean the refrigerator condenser with a brush or vacuum
cleaner, this the efficiency maintains of your refrigerator.
refrigerator.
Gasket
Condenser
Drain Pipe
Compressor
Compressor base plate
Page 11
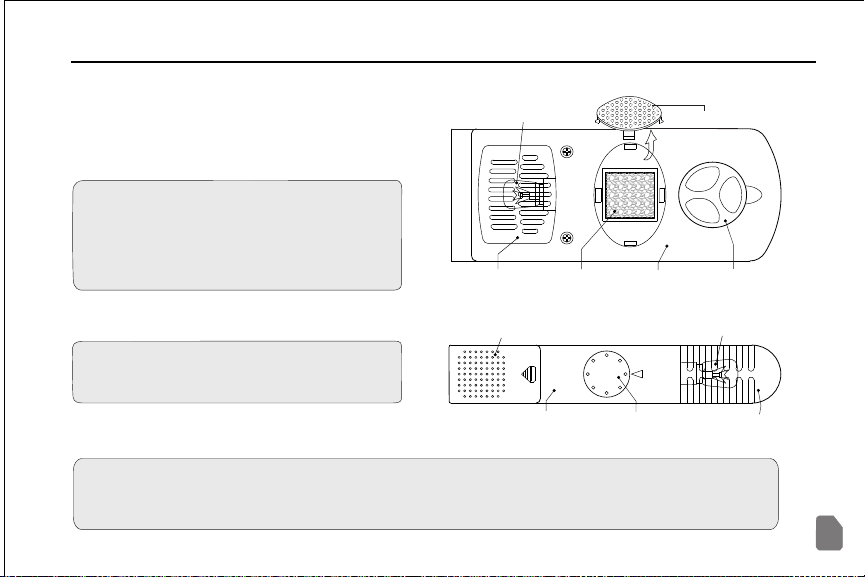
DEODORIZER
DEODORIZER
Deodorizer removes odour from the refrigerator.
Storing food or liquids
PRECAUTION:
NOTE:
IMPORTANT:
which can pick up or
transmit odour or flavors
easily, must be kept in
sealed container.
The deodorizer does not
harm stored Food.
If you are not using the refrigerator for more than 01 week, unplug the appliance,
take out all the food stuffs, clean both Ref. & Frz. inner cabinets properly and keep
the doors open. If you keep the doors in closed position, it will give foul smell.
6 Series
Lamp / Bulb
Light Cover
SL Series & WB Series
Deodorizer Cover
Deodorizer
Thermostat Box
Thermostat Box
Thermostat Knob
Deodorizer Cover
Thermostat Knob
Lamp / Bulb
Light Cover
10
Page 12

PROBLEMS CAUSES SOLUTIONS
When the refrigerator
does not operate at
all.
· There might be a power connection or
electrical failure problem.
· The thermostat knob is at position “0”.
· Check the power cord and plug it
properly.
· Select the appropriate thermostat
position. See page # 6.
When the refrigerator
does not operate well.
· The refrigerator is exposed to direct
sunlight or installed near a heating
device. The appliance does not have
enough clearance from the wall in all
directions.
· The thermostat knob is at position 1or 2.
· The refrigerator contains hot food or too
much food?
· The refrigerator door opening is frequent
or left open for long time.
· Check the installation place. See
page # 4.
· Set the thermostat position
appropriately. See page # 6.
· Check the condition and quantity
of stored food. See page # 5.
· Close the door and avoid opening
it frequently.
When water comes
out of the refrigerator.
· The drain passage is blocked.
· Water accumulates under Fruit &
Vegetable compartment.
· Refrigerator level is improper.
· Check the drain passage and
remove sludge.
· Take out Fruit & Vegetable
compartment, remove water with a
soft dry cloth.
· Adjust the level through Leveling
Screws.
TROUBLE SHOOTING TIPS
11
Page 13

PROBLEMS CAUSES SOLUTIONS
When there is a
severe noise.
· The refrigerator is installed on an
uneven floor.
· The Leveling Screws are set incorrectly.
· The refrigerator is touching back wall.
· Compressor tubes are touching one
another.
· Check the installation place.
See page # 4.
· Adjust the Leveling Screws.
See page # 4.
· Give sufficient space as described
on page # 4.
· Separate them softly.
When food freezes in
the refrigerator
compartment.
· The thermostat knob is at its maximum
position 7 or 8.
· The ambient temperature is too low.
· Set the thermostat position
appropriately. See page # 6.
When there are
dewdrops in the
Refrigerator interior.
· The refrigerator door is being opened
frequently or left open for longtime.
· High moisture air or humidity during
monsoon season.
· Keep the door closed and avoid
frequent opening of door.
· Clean the interior with soft dry
cloth.
When there are
dewdrops on the
Refrigerator exterior.
· High moisture air or humidity during
monsoon season.
· Wipe with a soft dry cloth.
When outer cabinet
gets warm.
· Built-in heating system is used. · No remedial action required.
TROUBLE SHOOTING TIPS
12
Page 14

SAFETY PRECAUTIONS
Do not splash water directly on
the refrigerator. Water impairs
the insulation of electric parts
and may cause an electric shock
or a shock hazard
Do not allow anything to rest on
the power cord. Do not locate
this product where the cord will
be abused by persons walking
on it.
Avoid using flammable sprays
such as lacquer and paint near
the refrigerator.
Do not allow infants to hang on
the door, they may get hurt or
could damage the appliance.
!
13
CAUTION:
Do not leave the doors open for
longer period because it can
affect the efficiency of the
refrigerator.
Do not use extension cords as this
can result in the risk of fire or
electric shock.
Do not store volatile chemicals
such as ether and benzene in the
GASOLENE
ETHER
ADHESIVE
refrigerator. The fumes besides
damaging food can buildup and
cause an explosion.
Do not use the refrigerator if it is not
operating correctly or has been
damaged. Disconnect it from the
powe r supp ly a nd cal l PEL
Customers Service Center or PEL
authorised work shops.
To prevent fire or electrical shock hazard do not expose this product to
rain/moisture or wet locations.
BENZENE
SW
Page 15

PEL Refrigerator Warranty
(To be filled in by the customer & sent back to PEL for necessary registration.)
Sr. No.
Ref. Serial No._____________________ Compressor Serial No. _______________
Model No. ________________________ Date of Purchase ___________________
Buyer’s Name _______________________________ Phone No. _______________
Buyer’s Address _____________________________________________________
___________________________________________________________________
E-mail _____________________ Authorized dealer stamp ____________________
This non-transferable warranty applies to the original buyer only and the unit must have been
purchased from PEL or one of its authorised dealers to avail the warranty coverage.
PAK ELEKTRON LTD.
Customer Services Department
14 Km, Ferozepur Road, P.O Box 1614, Lahore, Pakistan.
Ph: 042- 5811951- 59, Fax: 042-5810156, 5822682
www.pel.com.pk
(Company’s copy)
+
s
r
ea
Y
s
e sor
mpr
o
C
are
Y
r
Pa ts
Page 16

WARRANTY CERTIFICATE
WARRANTY FOR PEL REFRIGERATOR
PEL refrigerators are made par excellence and are free from all workmanship and material defects.
A. Compressor Warranty:
This warranty covers free replacement of a faulty COMPRESSOR with a new or functionally operative compressor only once
within five years from the date of its production*.
B. Cabinet & Parts Warranty:
PEL refrigerators are also backed by a 1-year warranty against rust on cabinet, by either repair or replacement. Other parts
of PEL refrigerator, which if found defective in material or workmanship within 1- year from the date of purchase, will be replaced
or repaired free of cost, however, this does not cover bulbs, grid shelves, plastic and rubber accessories.
C. Terms and conditions:
1. * The Warranty period will commence from the date of production, which will be considered as date of purchase . However
06 months relaxation will be given from actual production date irrespective of the date of purchase.
2. Customer has to pay Rs. 150/- as visit fee in case of complaint after one month of date of purchase.
3. Tra ns po r ta ti on w il l b e ch ar ge d fr om the cu st o me rs in c as e com p la in t is regi st er ed a ft er one
month of date of purchase.
4. In ca se of com pl ain t a fter 0 1 y ear fr om the da te of purcha se, th e c ost of sp are pa rt s and
labour will be borne by the customer.
5 Gas charges will be payable by the buyer, after one year of date of purchase.
6 No claim will be entertained unless the warranty certificate has been registered at our following office within fifteen
days of purchase.
7. This non-transferable warranty applies to the original buyer only and the unit must have been purchased from PEL or
one of its authorised dealers to avail the warranty coverage.
8. It is the obligation of the buyer to supply proper voltage and check the domestic electrical wiring before installation.
9. The warranty will become null & void in case of following:
a. Any defect arising out of improper wiring, high/low voltage, short-circuiting or use of a substandard voltage
stabilizer.
b. The warranty does not cover any part of the refrigerator, which may have been subjected to misuse, neglect,
breakage or accident.
c. If the unit is given to any un-authorized dealer/workshop or tampered with or it's serial numbers are illegible,
Company’s decision regarding any warranty claim would be considered as final.
PAK ELEKTRON LTD: 14 Km, Ferozepur Road, P.O Box 1614, Lahore, Pakistan.
Ph: 042- 5811951- 59, Fax: 042-5810156.
Customer Services Department
Page 17

PEL Refrigerator Warranty
Sr. No.
Ref. Serial No._____________________ Compressor Serial No. _______________
Model No. ________________________ Date of Purchase ___________________
Buyer’s Name _______________________________ Phone No. _______________
Buyer’s Address _____________________________________________________
___________________________________________________________________
E-mail ____________________ Authorized dealer stamp ____________________
This non-transferable warranty applies to the original buyer only and the unit must have been
purchased from PEL or one of its authorised dealers to avail the warranty coverage.
PAK ELEKTRON LTD.
Customer Services Department
14 Km, Ferozepur Road, P.O Box 1614, Lahore, Pakistan.
Ph: 042- 5811951- 59, Fax: 042-5810156, 5822682
www.pel.com.pk
(CSD’s copy)
+
s
r
ea
Y
s
e sor
mpr
o
C
are
Y
r
Pa ts
Page 18

WARRANTY CERTIFICATE
WARRANTY FOR PEL REFRIGERATOR
PEL refrigerators are made par excellence and are free from all workmanship and material defects.
A. Compressor Warranty:
This warranty covers free replacement of a faulty COMPRESSOR with a new or functionally operative compressor only once
within five years from the date of its production*.
B. Cabinet & Parts Warranty:
PEL refrigerators are also backed by a 1-year warranty against rust on cabinet, by either repair or replacement. Other parts
of PEL refrigerator, which if found defective in material or workmanship within 1- year from the date of purchase, will be replaced
or repaired free of cost, however, this does not cover bulbs, grid shelves, plastic and rubber accessories.
C. Terms and conditions:
1. * The Warranty period will commence from the date of production, which will be considered as date of purchase . However
06 months relaxation will be given from actual production date irrespective of the date of purchase.
2. Customer has to pay Rs. 150/- as visit fee in case of complaint after one month of date of purchase.
3. Tra ns po r ta ti on w il l b e ch ar ge d fr om the cu st o me rs in c as e com p la in t is regi st er ed a ft er one
month of date of purchase.
4. In ca se of com pl ain t a fter 0 1 y ear fr om the da te of purcha se, th e c ost of sp are pa rt s and
labour will be borne by the customer.
5 Gas charges will be payable by the buyer, after one year of date of purchase.
6 No claim will be entertained unless the warranty certificate has been registered at our following office within fifteen
days of purchase.
7. This non-transferable warranty applies to the original buyer only and the unit must have been purchased from PEL or
one of its authorised dealers to avail the warranty coverage.
8. It is the obligation of the buyer to supply proper voltage and check the domestic electrical wiring before installation.
9. The warranty will become null & void in case of following:
a. Any defect arising out of improper wiring, high/low voltage, short-circuiting or use of a substandard voltage
stabilizer.
b. The warranty does not cover any part of the refrigerator, which may have been subjected to misuse, neglect,
breakage or accident.
c. If the unit is given to any un-authorized dealer/workshop or tampered with or it's serial numbers are illegible,
Company’s decision regarding any warranty claim would be considered as final.
PAK ELEKTRON LTD: 14 Km, Ferozepur Road, P.O Box 1614, Lahore, Pakistan.
Ph: 042- 5811951- 59, Fax: 042-5810156.
Customer Services Department
Page 19

PEL Refrigerator Warranty
Sr. No.
Ref. Serial No._____________________ Compressor Serial No. _______________
Model No. ________________________ Date of Purchase ___________________
Buyer’s Name _______________________________ Phone No. _______________
Buyer’s Address _____________________________________________________
___________________________________________________________________
E-mail _____________________ Authorized dealer stamp ____________________
This non-transferable warranty applies to the original buyer only and the unit must have been
purchased from PEL or one of its authorised dealers to avail the warranty coverage.
PAK ELEKTRON LTD.
Customer Services Department
14 Km, Ferozepur Road, P.O Box 1614, Lahore, Pakistan.
Ph: 042- 5811951- 59, Fax: 042-5810156, 5822682
www.pel.com.pk
(Customer’s copy)
+
s
r
ea
Y
s
e sor
mpr
o
C
are
Y
r
Pa ts
Page 20

:
*
*
??
1
*
150
8
9
Page 21

CUSTOMER CARE CENTERS
Bahawalpur 062- 2731281 2/2 Adil Town , Dubai Mehal road, Near City school, Bahawalpur.
D. G. Khan 064- 2467277 H. No. 43, St. No. 1, Model Town, X-Block, D.G. Khan.
D. I. Khan 0966- 730707 Madina tul Latif Colony, Near Grid Station, Sheikh Yousaf road, D.I. Khan.
Faisalabad 111-102-103 8-Z-1, Near Bank Morr, Madina Town, Faisalabad.
Gujar Khan 0513-516214 Jinnah Shopping Center, Near TMA Office, GT Road, Gujar Khan.
Gujranwala 055-3846635 H. No. 2-C-1 St. No. 1, Session Court Road, Civil Line, Gujranwala.
Gujrat 053-3028140, 2111993 Kuchery Road, Near Malik Hotel Gujrat.
Hyderabad 111-102-103 H. No. 224, Block C, Unit No. 2, Latifabad, Hyderabad.
Karachi 111-102-103 189-E, Block II, P.E.C.H.S, Near Govt. Girls College, Karachi.
Lahore 111-102-103 99- Shah Jamal, Near Shah Jamal Market, Opp. Takoni Park, Lahore.
Mandi Bahauddin 0546-520508 H. No. B-11/364, St. No.4, Usmania Muhalla, Kachari Rd, Mandi Bahauddin
Multan 111-102-103 11- A/1, Gulgusht Colony, Opp. Pizza Hut, Multan.
Peshawar 091-5853398 H. No. 44, St. No. 6, Gulshan-e-Iqbal Town, University road, Peshawar.
Quetta 081-2839944 141/B, Shahbaz Town, Phase 1, Quetta Cantt.
Rahim Yar Khan 068-5889837 12- Factory road, Near Sukkur Adda, Rahim Yar Khan.
Rawalpindi 111-102-103 223- Block B, Zumarrud Plaza , Sattelite Town, Near Chandni Chowk,
Sahiwal 040-4467575 538- Jail Road, Sahiwal.
Sargodha 048-3725110 Rehmat Center, Main Rd, Shaheen Park, Gate No. 2, Plot No.4, Sargodha.
Sialkot 0523-254455 H. No. 2, Defence road, Opp. Azam CNG Station, Sialkot.
Sukkur 071-5620832 H. No. C-447-2-5-6, Opp. Attma Ram Clinic, Wallice Rd, Gari Ahata, Sukkur
Wah Cantt. 051-4542242 Chachi Mohalla, Near Barrier # 2, Near G T Road, Wah Cantt.
HEAD OFFICE: 14-Km, Ferozepur Road, Lahore. Ph: 042-5811952-59, 5822853, Fax: 042-5822682, 5810156
041-8732485, 8546991
0223-868571, 817547
021-4538217, 4538230
021-4986751 A- 120, Block No. 5, Behind Hamdani Hospital, Gulshan-e-Iqbal, Karachi.
021-6027471, 6027472 33- Sector P, Near Chinot Hospital, Karachi.
042-7552149, 7552643
042-6816336, 6816515 146-Crown Park, Behind Shell Petrol Pump, Baghbanpura G.T Rd Lahore.
051-4454757, 4456077 Rawalpindi.
Page 22

SL Series
2009
2010
2012
2300JF
2500JF
WB Series
20145JF
20165
2017
20175
20185
6 Series
6200
6300
6400
Slim Line Series
Crystal
Slim Line Series
Star Plus
Slim Line Series
Premier
6 Series
Wide Body Series
01
Page 23

Page 24

Page 25

Page 26

Page 27

Page 28

07
Page 29

?
6
Page 30

?
09
Page 31

10
Page 32

11
Page 33

12
Page 34

GASOLENE
BENZENE
ETHER
ADHESIVE
WS
13
 Loading...