


SPORTS SERIES
OWNER’S HANDBOOK
ASSISTANCE
❆!!✁!✂❆✄☎
✆
Retailer Network
▼✝✞✟✠✡☛☞✌✍✟☛✌
✟
✎✏✑✒✓✠✔✕✖✗✘✘✙✚✛✏✏✎✚
McLaren Beverly Hills 24 hours: +1 818 585 9620
McLaren Calabasas 24 hours: +1 818 585 9620
McLaren Chicago 24 hours: +1 773 547 3877
McLaren Dallas 24 hours: +1 214 497 1082
McLaren Greenwich 24 hours: +1 203 537 9128
McLaren Long Island 24 hours: +1 516 478 4326
McLaren Mexico City 24 hours: To be confirmed
The Collection McLaren (Miami) 24 hours: +1 305 442 9696
McLaren Newport Beach 24 hours: +1 714 252 3284
McLaren Philadelphia 24 hours: +1 610 886 3000
McLaren San Francisco 24 hours: +1 650 815 4472
McLaren Santiago 24 hours: +56 994 496 824
McLaren Scottsdale 24 hours: +1 480 544 5592
McLaren Tampa Bay 24 hours: +1 727 537 0626
McLaren Toronto 24 hours: +1 416 877 2620
McLaren Vancouver 24 hours: +1 888 683 3757
McLaren Washington DC 24 hours: +1 610 886 3000
✏
McLaren Client Services UK business hours:
+44 148 326 1500
client.services@mclaren.com
If you have been unable to obtain assistance using the number(s)
listed for towing/roadside assistance, or the dealer is unable to
provide towing/roadside assistance, please call 855-4McLaren (855462-5273).

CONTENTS
❇
EFORE YOU DRIVE.............................................................................. 1.1
DRIVING CONTROLS ........................................................................... 2.1
INSTRUMENTS......................................................................................... 3.1
COMFORT AND CONVENIENCE .................................................. 4.1
MAINTAINING YOUR McLAREN ................................................... 5.1
VEHICLE DATA AND GLOSSARY .............................................. 6.1
INDEX .................................................................................................................7.1
INTRODUCTION
✷✁
✄✂■✜✢✣☎✂✁✜✄
Introduction
)✍✡✟✔✡✠✡✟✤✌✑✥✔✥☛✦✒✠✧✟✌✥✒☛✌✒✦✟✧✥✍✥✟✠✥★
✡
yourself with your McLaren and its features
before you drive. This provides the necessary
information for you to get the optimum
benefit and enjoyment from your McLaren.
This publication describes all options and
features available for the McLaren Sports
Series. Certain descriptions, including those
for display and menu functions, may not apply
to your vehicle due to model variant, country
specifications, optional equipment or the
fitment of McLaren approved accessories.
NOTE: The images shown in this
publication may not exactly reflect your
unique vehicle.
The documents supplied with your McLaren
are an integral part of the vehicle. Ensure that
you pass them onto the new owner if you sell
the vehicle.
The information is divided into specific
sections, to assist in finding the particular
information you require:
✩✪✫✬✭✪✮✬✯✰✭✱✲
✪
❉
✡✌✟✥✍✔✌✑✡✔✡✌✌✥☛✳✔✴✒✓☛✡✡✤✌✒✧
✟✵✡✥☛✌✑
✡
cockpit to ensure you are fully prepared and
have safe and easy access to all controls
before driving.
✶✭✱✲✱✸✹✺✬✸✻✭✬✼✽
❚✑✥✔✔✡✝✌✥✒☛✝✒☛✌✟✥☛✔✤✡✌✟✥✍✡✤✥☛✦✒✠✧✟✌✥✒
☛
regarding the equipment and driving controls
fitted to your McLaren and how to use those
controls to best effect during a journey.
✾
✸✽✻✭✯✿✪✸✻
✽
❚✑✥✔✔✡✝✌✥✒☛✝✒☛✌✟✥☛✔✥☛✦✒✠✧✟✌✥✒☛✒☛✌✑✡
instrument cluster, including information of
how to view and change vehicle settings.
✺
✬✿✫✬✭
✻❈✸✰✺✬✸✲✪✸✱✪✸❀✪
❁
✒☛✌✟✥☛✔✥☛✦✒✠✧✟✌✥✒☛✒☛✌✑✒✔✡
✔✴✔✌✡✧✔✟☛
✤
features which make the cockpit a pleasant
environment in which to spend time.
❂
❈
✱✸✻❈✱✸✱✸✹✮✬✯✭
❂❀❃
❈
✭✪✸
❄☛✦✒✠✧✟✌✥✒☛✒☛✧✟✥☛✌✟✥☛✥☛
✳
✴
✒✓✠▼✝✞✟✠✡☛✥
✔
here. Also included is advice on using your
McLaren in winter weather and if you choose
to drive your vehicle abroad, what to do if
something should go wrong and how to
manage any possible problems which arise as
a result. Information on fuses, lights and what
to do if you experience a puncture.
❱✪❅
✱❀✼✪✶❈✻
❈
❈
✸✰❊✼✬✽✽❈✭
✮
❘
✡✦✡✠✌✒✌✑✥✔✔✡✝✌✥✒☛❋✑✡☛✴✒✓☛✡✡
✤
information regarding the fluids and
quantities that are required for the various
systems on your McLaren, or when you need
to know a specific piece of data relating to
your McLaren or its performance.
The technical glossary contains a brief
explanation of some of the more complex
systems fitted to your McLaren. Your McLaren
Retailer will be able to assist should you need
more information.
✾
✸✰✪
●
❚✑✡✌✟❍✍✡✒✦✝✒☛✌✡☛✌✔✟☛✤✌✑✡✥☛✤
✡
❏
❋
✥✍✍✑✡
✍
❑
you find information quickly, when you need
it.

INTRODUCTION
Information about this document
▼✝✞✟✠✡☛✥✔✝✒☛✔✌✟☛✌
meet and exceed the latest technologies.
McLaren therefore reserves the right to
introduce changes in design, equipment and
technical features at any time.
© McLaren Automotive Limited.
This publication must not be reproduced,
translated or reprinted, in whole or in part,
without written permission from McLaren
Automotive Limited.
The equipment fitted to your McLaren may
vary from that shown depending on vehicle
and market specification. Your McLaren may
vary from the images shown depending on
vehicle and market specification.
All information, illustrations and
specifications in our applications are based on
data available and are correct at the time of
issue. The availability of options may vary
from market to market due to local
restrictions and regulations. Some
illustrations in this applications may not
necessarily reflect the specifications or
options available in your local market and
may show optional equipment. The
✍✴✓
dating its vehicles to
❑
specifications contained in these applications
are for information purposes only and
McLaren Automotive reserves the right to
change product specifications at any time
without notice or incurring obligation. For full
specification details and information on
standard and optional equipment, please
consult your authorized McLaren Retailer.
This vehicle may be covered by patents. See
cars.mclaren.com/patents.
Printed in United Kingdom, 13Q0071CP.01
Electronic User Manual
❄
✦✴✒✓✠◆✡✑✥✝✍✡✥✔✦✥✌✌✡
manual, the Owner!s Handbook and IRIS User
Guide are available on the IRIS screen.
To access the manuals, navigate to the APPS
screen and select USER MANUAL. This will
launch the user manual application.
✤❋✥✌✑✟☛✡✍✡✝✌✠✒☛✥✝✓✔✡✠
▲
INTRODUCTION
❖❙
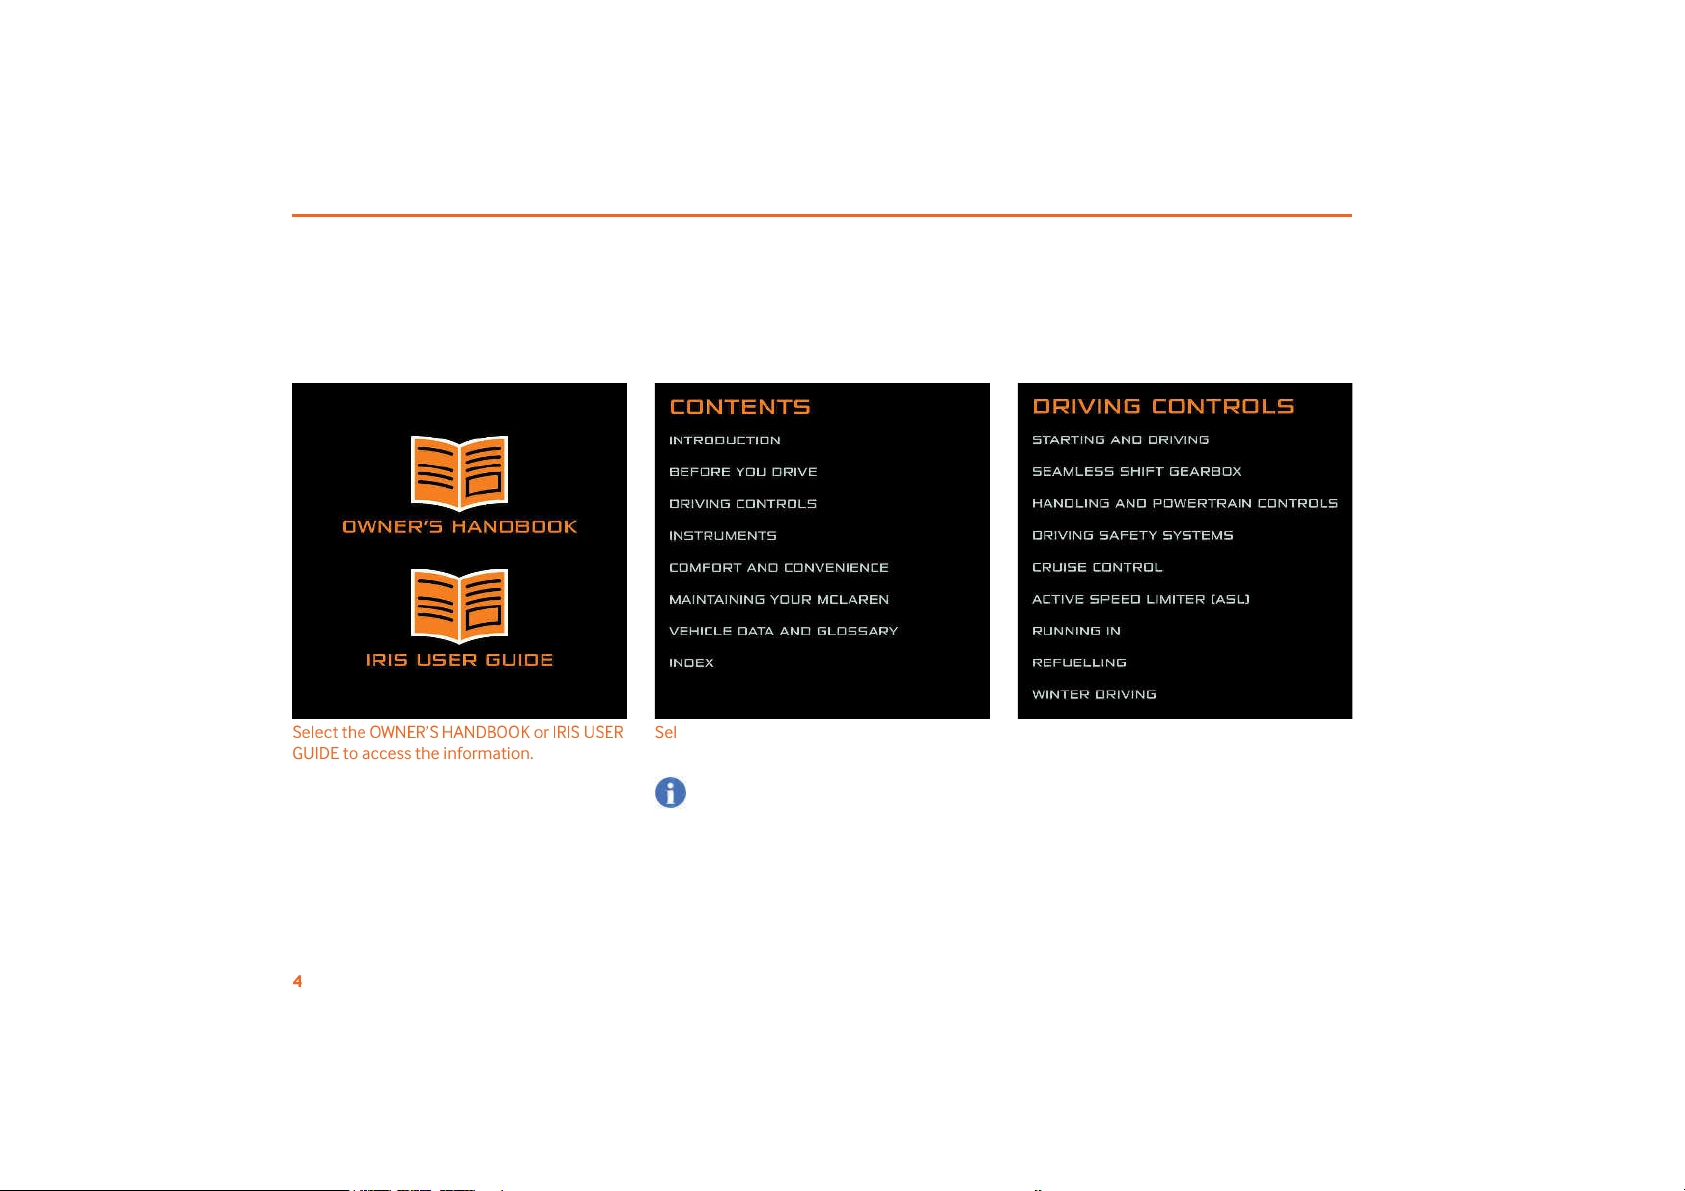
✡✍✡✝✌✌✑✡◗❯❲
❳❘❨❙❩☞❲❉❬◗◗❭✒✠❄❘❄❙❪❙❳
❘
GUIDE to access the information.
Select the chapter required, this will take you
to the chapter contents page.
NOTE: Selecting the INDEX from the
main contents page will navigate you to
an alphabetical index of topics covered
in the Owner!s Handbook. The INDEX is
not available for the IRIS User Guide.
Select the section required from the chapter
contents to access the required information.
When the section is displayed, the screen can
be scrolled by touching the screen and
dragging a finger up or down as required.
Hotspot links are identified by orange
underlined text. Selecting a hotspot link will
navigate you to the information identified in
the text.

INTRODUCTION
❫
❚✑✡✞✥❍✠✟✠✴✥✝✒☛✟
❑
❑
✡✟✠✔✟✌✌✑✡✌✒❑✒
✦
the main contents page. Selecting the
library button will return you to the library
where all available owner information can be
accessed.
The Home icon appears at the top and
the bottom of each page. Selecting the
home button will return you to the main
contents page.
The icons at the bottom of the
screen (end of the section) can
be used to navigate to the previous or next
section as required.
Symbols
❴✒✓❋✥✍✍✦✥☛✤✌✑✡✦✒✍✍✒❋✥
Owner!s handbook. These symbols are
intended to give you an instant visual
message on what type of information is being
displayed.
❵
❈
✭✸✱✸✹
✽
A warning draws your attention to
activities that could cause injury or
death.
Notes
Notes draw your attention to
activities that contain possible risks
to your McLaren, provide advice that
you may find useful, or give additional
information regarding a particular
subject.
Environmental notes
Environmental notes give you tips on
minimizing the impact of you and
your vehicle on the environment.
☛✳✔✴✧❍✒✍✔✥☛✌✑✥✔
Operating safety
❵❛❜❝✾
❝❊❞
❡
❅✪✪✼✪❀✻✭✬✸✱❀✽✮✽✻✪✿✽
fitted to your McLaren interact with
each other. Tampering with these
systems could cause malfunctions in
other interconnected systems. Such
faults could seriously endanger the
operational safety of your McLaren
and your own safety.
Additional work or modifications
made to the vehicle, which have been
carried out incorrectly can also affect
its operating safety.
❱✪❅
✱❀✼✪✯✽✪
◗❍✔✡✠◆✡✌✑✡✦✒✍✍✒❋✥
McLaren:
• the safety notes throughout this
information
• road traffic laws and regulations
WARNING: There are various warning
labels attached to your McLaren.
These are intended to make you and
others aware of various risks. Do not
remove any warning labels from the
vehicle.
☛
✳
✑✡☛✓✔✥☛
❋
✳
✒✓✠
✴

INTRODUCTION
❢
✾
✫✮✬✯✭
✪✿✬✲✪✻❅✪✽✪❣❈✭✸✱✸✹
✼❈❤✪✼✽✐
you or others may not then be aware
of dangers, which may result in an
injury.
❊✭✬✯✸
✰❀✼
✪❈✭❈✸❀✪
❵❛❜❝✾
❝❊❞✶❈✿❈
✹✪✻✬✻❅✪✯✸✰✪✭✽✱✰
✪
of the vehicle may occur when
approaching steep inclines or
declines.
Drive with care when:
• approaching kerbs
• approaching steep inclines
• departing steep declines
• driving on rough roads
• driving in areas where traffic calming
measures have been deployed
• driving in any other environment where
sudden change of road surface height or
elevation are encountered such as car
parks
See Vehicle dimensions, page 6.7.
❡✭❈
❀
❥✰✭✱✲✱✸
✹
❚✒✟✝✑✥✡◆✡
✒❑✌✥✧✓✧❑✡✠✦✒✠✧✟☛✝✡✟☛✤
reliability it is important to ensure the
following preconditions are met before
attempting to drive your vehicle on a track:
• engine oil is at normal operating
temperature
• engine coolant is at normal operating
temperature
• tires should not exceed the safe
operating temperatures
NOTE: Before you use your vehicle on
the track, consult your McLaren Retailer.
McLaren recommend that your vehicle
is inspected before and after track use.
NOTE: Always drive within your limits and
the limits of the vehicle.
✺✬✬✼✱✸✹✰✬❣✸
❯✡✠✡✝✒✧✧✡☛✤✴✒✓✌
✟✵✡✌✥✧✡✌✒✝✒✒✍✌✑
✡
vehicle during track driving due to the high
temperatures that may be generated by the
brakes and transmission which could affect
performance. Time should be taken to drive
the vehicle at a slower speed without using
INTRODUCTION
❦
✑✟✠
✤❍✠
✟✵✥
☛✳✒✠✝✟✠
✠✴✥
☛✳✒✓✌
✡❏✝✡✔✔✥◆✡✳✡✟✠
changes, this uses the airflow to cool the
vehicle.
We recommend that time is allowed for your
vehicle to return to normal operating
temperatures before leaving the track.
NOTE: When stopping the vehicle
directly after performance driving we
recommend that the ignition is not
immediately switched off or the parking
brake is applied. We recommend that the
engine is left to idle prior to the ignition
being switched off.
NOTE: Please refer to your Service &
Warranty Guide for track and
competition use implications.
Stored Data
❚✑✡✠✡✟✠✡✟☛✓
vehicle which collect data and store it
temporarily or permanently. This technical
data provides information relating to areas
such as the condition of the vehicle, any
events which have taken place and any
malfunctions your vehicle may be
experiencing or has experienced in the past.
These include, for example:
• operating conditions of system
components, e.g. fluid levels
• the vehicle!s status messages and those
of its individual components, e.g.
Windscreen Washer Fluid Low
• malfunctions and defects in important
system components, e.g. Light Switch
Fault
• vehicle reactions and operating
conditions in special driving situations,
e.g. air bag deployment
• ambient conditions, e.g. outside
temperature
This data is of an exclusively technical nature
and can be used to:
✧❍✡✠✒✦✝✒✧❑✒☛✡☛✌✔✥
☛✴✒✓✠
• assist in recognizing and rectifying faults
and defects
• analyze vehicle functions, e.g. after an
accident
• optimize vehicle functions
The data cannot be used to trace the vehicle!s
movements.
When your vehicle is serviced, technical
information can be read from the vehicle
including:
• repair service history
• warranty events
• quality assurance
This information can be read by employees of
the service network (including
manufacturers) using special diagnostic
testers. More detailed information can be
obtained from it, if required.
After a fault has been rectified, the
information is deleted from the fault memory
or is continually overwritten.
INTRODUCTION
❧❯
✑✡☛
✒❑✡✠✟✌✥
☛✳✌✑✡◆✡✑✥✝✍
✡♠✔✥✌✓✟✌✥✒☛✔✧
✟
✴
occur where technical data, in connection
with other information, could be traced to a
person.
Examples include:
• accident reports
• damage to the vehicle
• witness statements
McLaren will not access your behavior related
information about a crash event or share it
with others except:
• with the consent of you or, if the vehicle
is leased, of the lessee
• in response to an official request of
police or similar government office
• as part of the manufacturer!s defense in
case of legal proceedings
• as required by law
In addition, McLaren may use the collected or
received diagnostic data:
• for McLaren!s research needs
• to make it available for research needs
where appropriate confidentiality is
maintained and need is shown
• to share summary data which is not tied
to a specific vehicle with other
organizations for research purposes
♥♦♥
OPENING AND CLOSING
♣
✡☛✡✠✟
✍
(((((((((((((((((((((((((((((((((((((((((((((((((((((((((((((((((((((((((((((((((((((((((((((((((((((((((((((((((✗(
✎
Opening a door................................................................................................. 1.5
Locking a door .................................................................................................. 1.6
Mislock ................................................................................................................. 1.7
Individual settings ........................................................................................... 1.8
Locking and unlocking from inside.......................................................... 1.8
Opening a door from inside......................................................................... 1.9
Closing a door.................................................................................................... 1.9
Automatic locking ........................................................................................ 1.10
Service Cover.................................................................................................. 1.11
Luggage compartment.............................................................................. 1.12
+,-✉✈-✇①②-③④③-①
⑤
☞✍✟✠✧
✔✴✔✌✡
✧
(((((((((((((((((((((((((((((((((((((((((((((((((((((((((((((((((((((((((((((((((((((((((((((((((
(✗(
✗
✏
Immobilizer ..................................................................................................... 1.14
Tow-away protection .................................................................................. 1.15
Interior motion sensor................................................................................ 1.16
③①+-③
❙✟✦✡✌
✴((((((((((((((((((((((((((((((((((((((((((((((((((((((((((((((((((((((((((((((((((((((((((((((((((((((((((((((((
(✗(
✗
✘
Manual seats................................................................................................... 1.17
Racing seats.................................................................................................... 1.18
Electric seats................................................................................................... 1.19
③-①
①⑥✉
,
⑦
⑧
✇①①⑨+
,⑩③-①
①⑥✉
,
⑦❶❷⑨❸
⑤
,
▼✟☛✓✟✍✔✌✡✡✠✥☛
✳
❋
✑✡✡✍✟✤❹✓✔✌✧✡☛
✌
(((((((((
(
............................................. 1.24
Electric steering wheel adjustment ...................................................... 1.24
Horn ................................................................................................................... 1.26
❷❶❶❸❺
+,-③+②①-④
❙✡✟
✌❍✡✍✌
✔
(((((((((((((((((((((((((((((((((((((((((((((((((((((((((((((((((((((((((((((((((((((((((((((((((((((((((✗(
✎
✘
Supplementary Restraint System.......................................................... 1.29
Child passengers........................................................................................... 1.35
⑤
✉
⑥⑥❷
⑥
③
❙✟✦✡✌
✴((((((((((((((((((((((((((((((((((((((((((((((((((((((((((((((((((((((((((((((((((((((((((((((((((((((((((((((((
(✗(✚❻
Interior mirror ................................................................................................ 1.38
Exterior mirrors.............................................................................................. 1.38
⑨✉⑦
✇-✉
,
⑦
❳❏✌✡✠✥✒✠✍
✥✳✑✌✥
☛
✳((((((((((((((((((((((((((((((((((((((((
..................................................... 1.40
Light switch..................................................................................................... 1.41
Hi beam headlamps..................................................................................... 1.42
Daytime running lamps.............................................................................. 1.43
Rear fog lamp................................................................................................. 1.43
Turn signals..................................................................................................... 1.44
Hazard warning lamps................................................................................ 1.44
Parking lights.................................................................................................. 1.45
⑧
+③✇
①⑥③+,
⑩
⑧✉❺①⑥
③
❯✥☛✤✔✝✠✡✡
☛❋✥❑✡✠✔
(((((((((((((((((((((((((((((((((((((((((((((((((((((((((((((((((((((((((((((((((((((((✗(
✏
❼
,❷③
①⑨✉②-
❲✒✔✡✞✥✦✌◗❑✡✠✟✌✥✒☛
(((((((((((((((((((((((((((((((((((((((((((((((((((((((((((((((((((((((((((((((((((((✗(
✏
✛
BEFORE YOU DRIVE
BEFORE YOU DRIVE
❽
PENING AND CLOSING
♥♦✷
❾❿➀➁➂➁➃➄➁➅➆➇❾➈➂➁➃
General
❚✑✡◆✡✑✥✝✍✡✝✟☛❍✡✓☛✍✒
✝✵✡✤✒✠✍✒✝✵✡✤✡✥✌✑✡
✠
by using the keyless entry feature, or by
pressing the appropriate button on the key
fob.
The keyless entry feature requires the key to
be within 3 feet 11 inches (1.2 meters) of the
sensors.
For your convenience, provided that the
engine is not running, the car can be locked
irrespective of the electrical status, see
Vehicle electrical status, page 2.2.
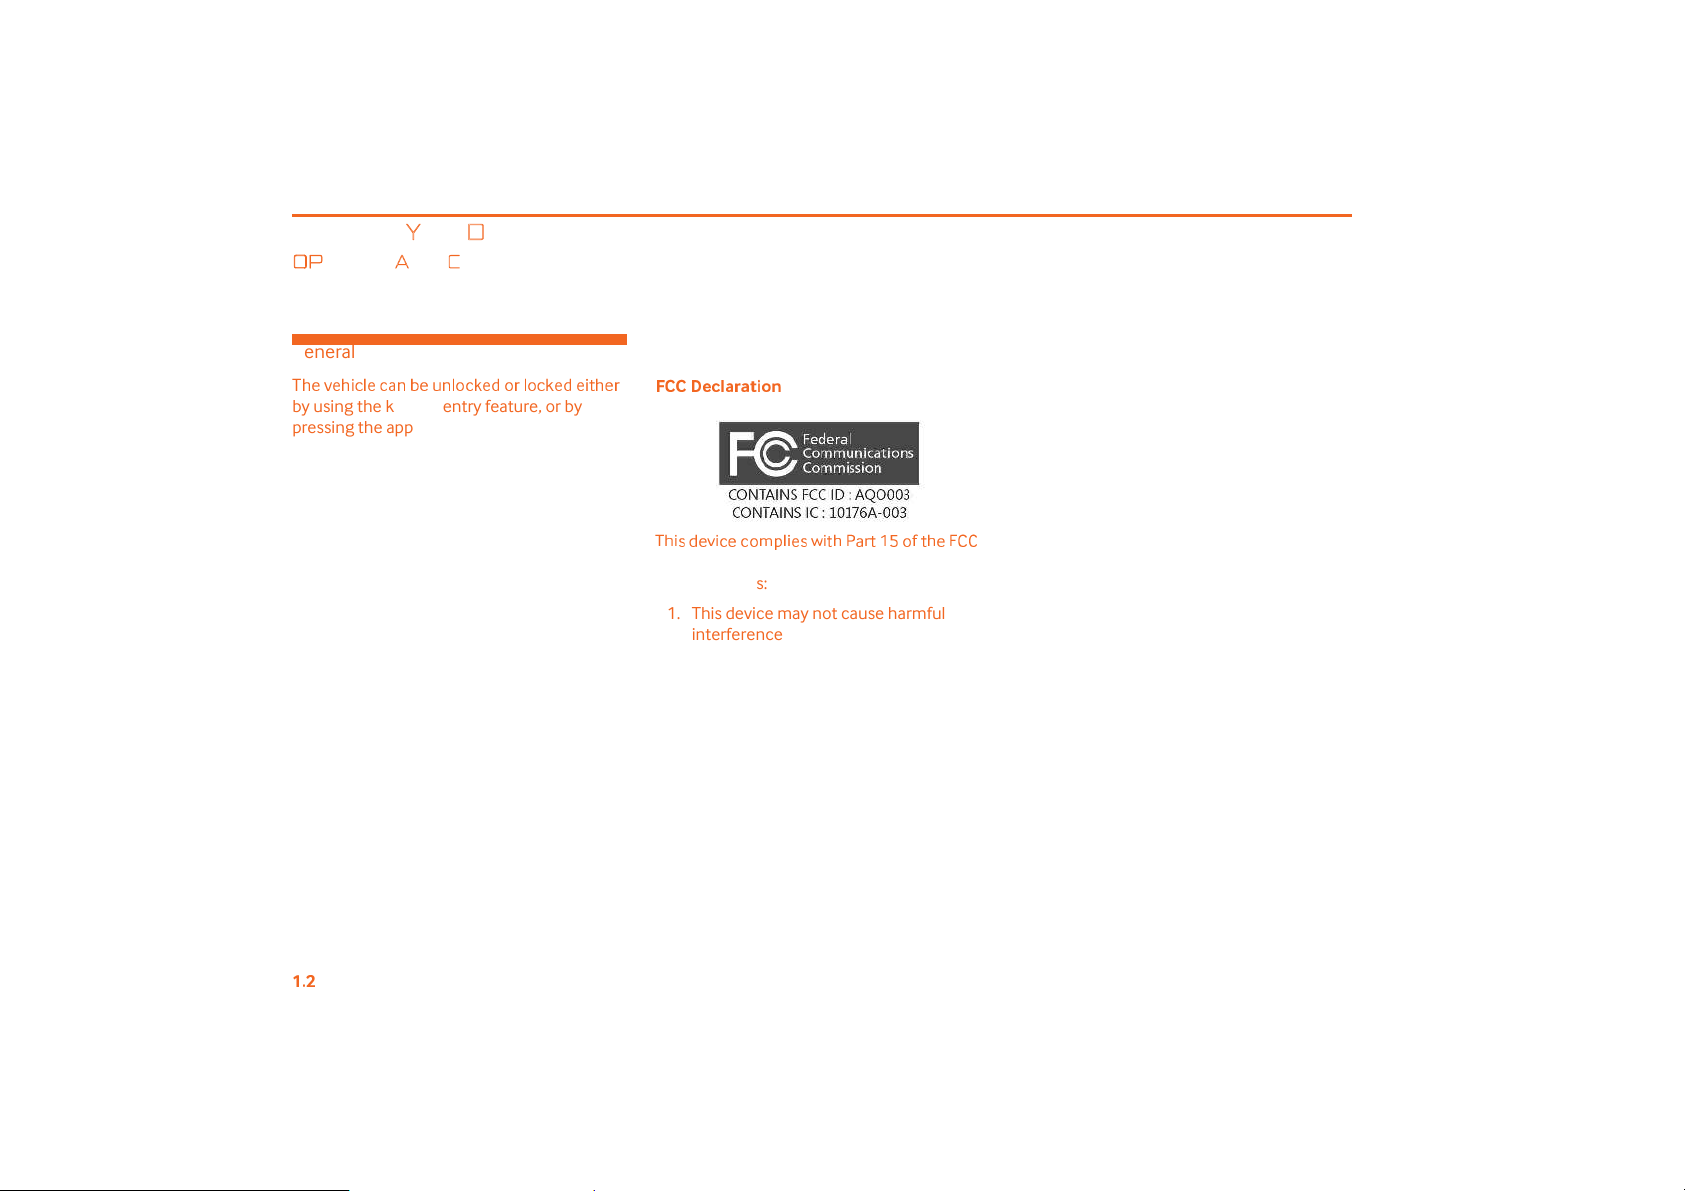
➉✺✺✶✪❀✼❈✭❈✻✱✬
✸
❚✑✥✔✤✡◆✥✝✡✝✒✧❑✍✥✡
✔❋✥✌✑O✟✠✌
✗➊✒✦✌✑✡
➋❁❁
Rules. Operation is subject to the following
two conditions:
1. This device may not cause harmful
interference.
2. This device must accept any
interference received, including
interference that may cause undesired
operation.
No changes shall be made to the equipment
without the manufacturer!s permission as this
may void the user!s authority to operate the
equipment.
This device complies with Part 2.1091 of the
FCC Rules for an uncontrolled environment.
This equipment should be installed and
operated with a minimum distance of 20cm
between the radiator and your body.
This device complies with Industry Canada
license-exempt RSS standard(s).
Under Industry Canada regulations, this radio
transmitter may only operate using an
antenna of a type and maximum (or lesser)
gain approved for the transmitter by Industry
Canada.
To reduce potential radio interference to
other users, the antenna type and its gain
should be so chosen that the equivalent
isotropically radiated power (e.i.r.p.) is not
more than that necessary for successful
communication.
This device complies with Industry Canada
licence-exempt RSS standard(s). Operation is
subject to the following two conditions: (1)
this device may not cause interference, and
(2) this device must accept any interference,
including interference that may cause
undesired operation of the device.
BEFORE YOU DRIVE
❽
PENING AND CLOSING
♥♦▲
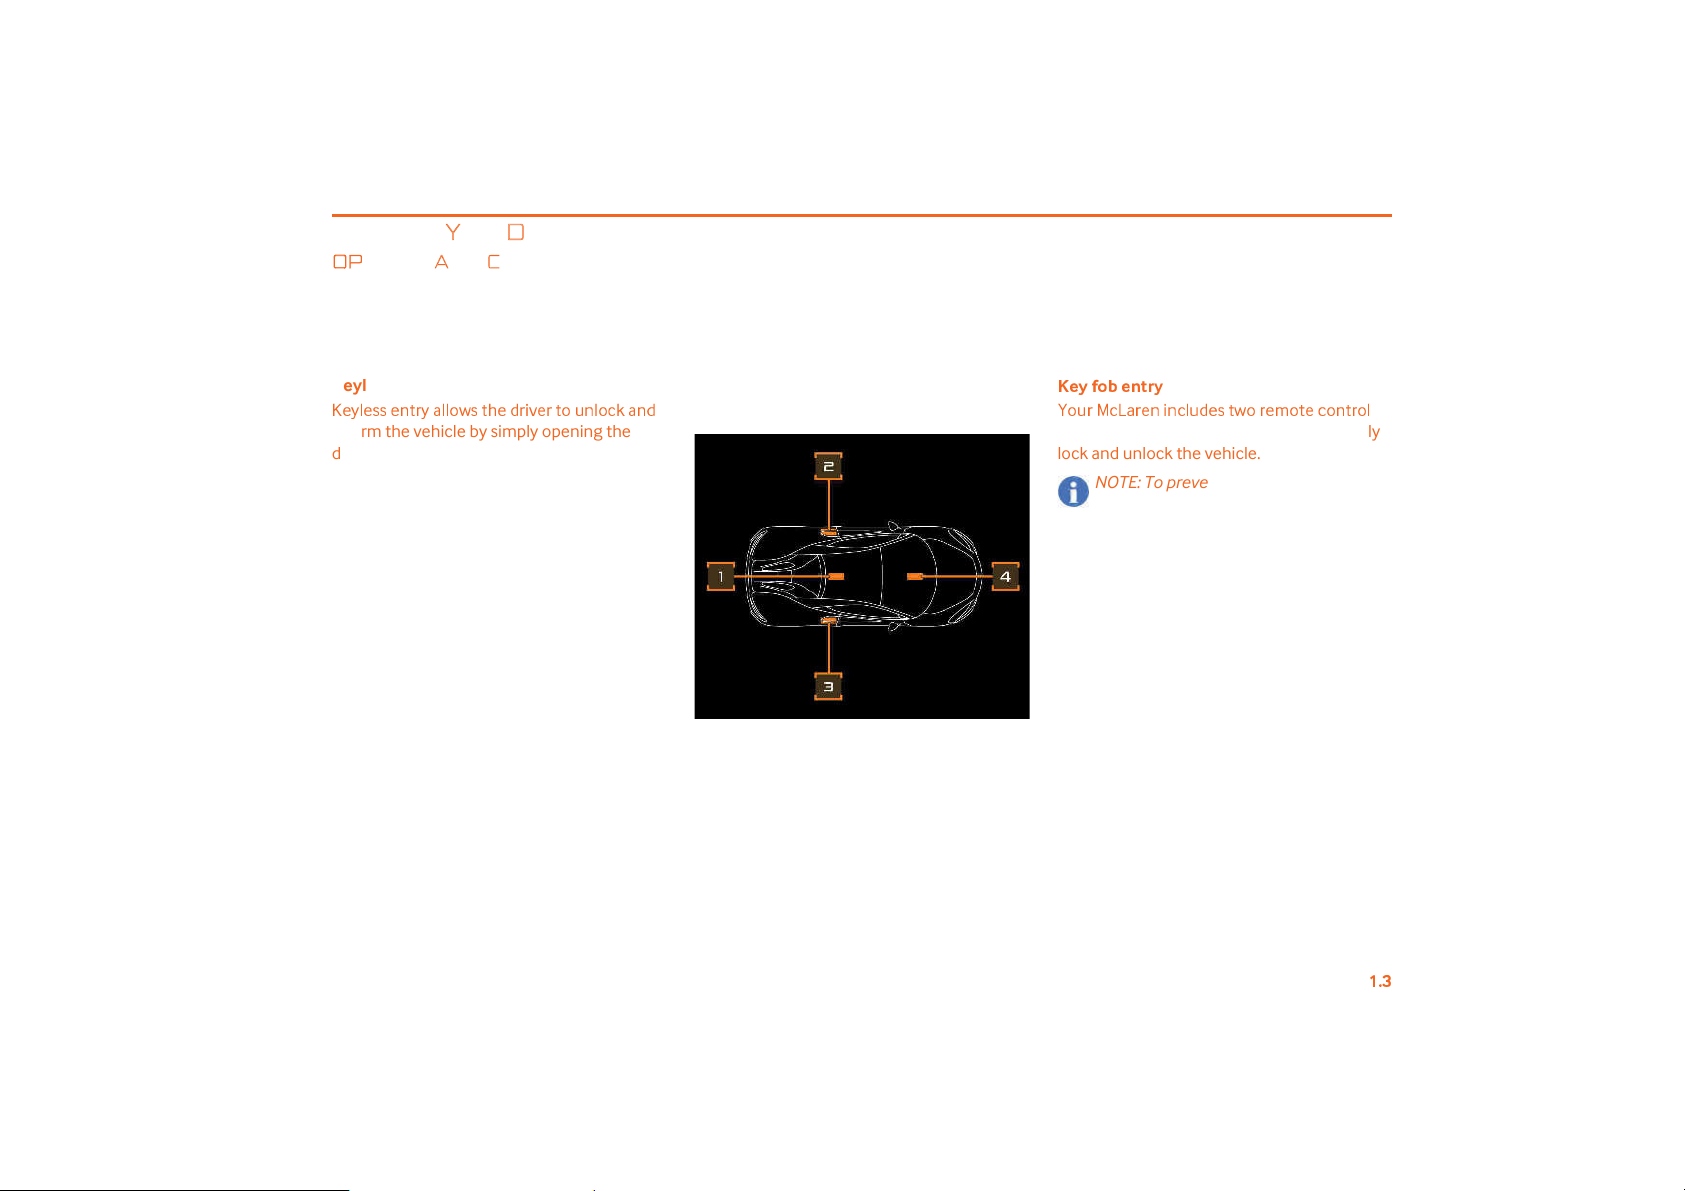
Keyless entry
❭
✡✴✍✡✔✔✡☛✌
✠✴✟✍✍
✒❋✔✌✑✡✤✠✥◆✡✠✌✒✓☛✍✒✝✵✟☛✤
disarm the vehicle by simply opening the
door when the key fob is within 3 feet
11 inches (1.2 meters) of the sensors. The key
fob needs only to be on the driver!s person or
in a non-metallic container such as a bag. It
does not need to be exposed or handled.
Four sensors detect where the key fob is
around the vehicle.
1. In vehicle sensor
2. Left-hand door sensor
3. Right-hand door sensor
4. Cup holder sensor
➌✪✮✫✬❤✪✸✻✭✮
❴✒✓✠▼✝✞✟✠✡☛✥☛✝✍✓✤✡✔
✌❋✒✠✡✧✒✌✡✝✒☛✌✠✒
✍
key fobs. The key fob allows you to remotely
lock and unlock the vehicle.
NOTE: To prevent theft, only use the key
fob in the immediate vicinity of the
vehicle.
The key fob locks and unlocks the following:
• the doors (including fuel filler flap)
• the luggage compartment
• the center console stowage
compartment
BEFORE YOU DRIVE
❽
PENING AND CLOSING
♥♦❖
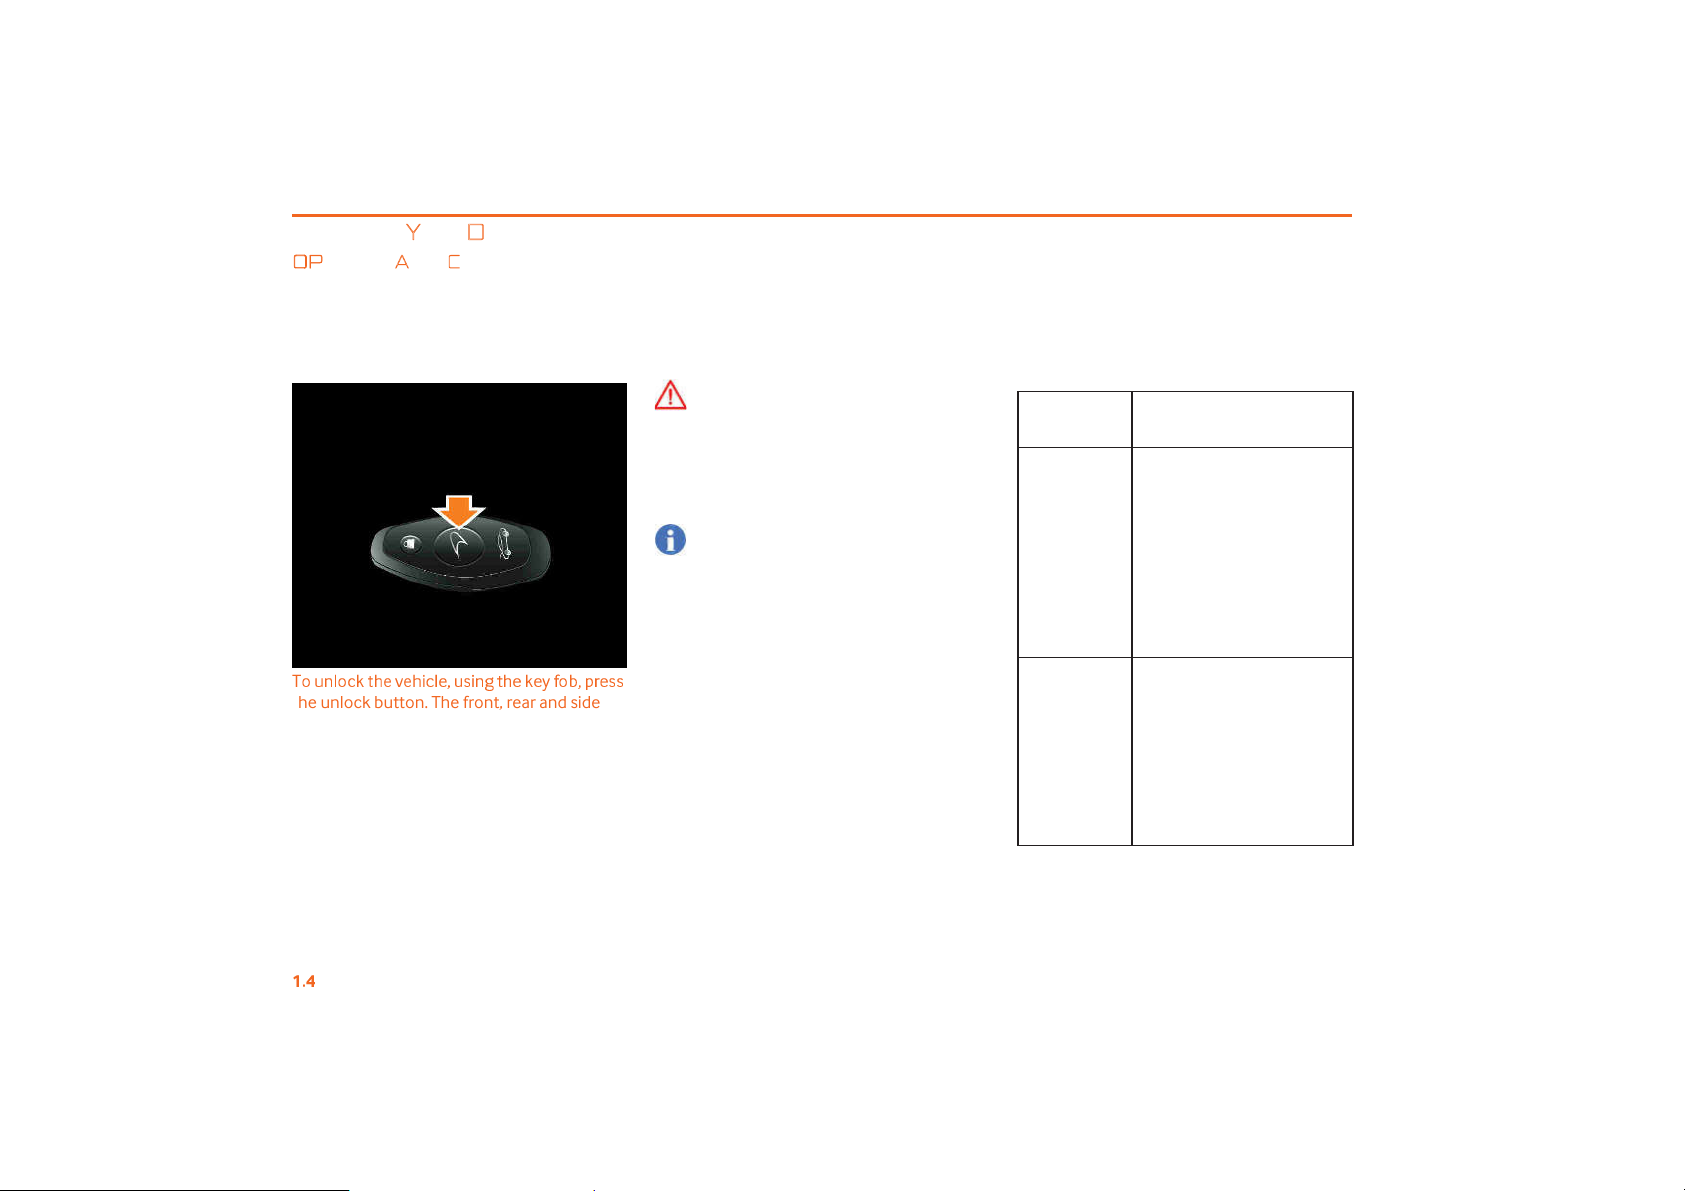
❚✒✓☛✍✒✝✵✌✑✡◆✡✑✥✝✍
✡♠✓✔✥
☛✳✌✑✡✵✡✴✦
✒
❍♠❑
✠✡✔
✔
the unlock button. The front, rear and side
turn signals (market specific) flash twice and
the anti-theft alarm system will be
deactivated.
The unlock button operation changes
depending whether the DRIVER or BOTH is
selected in the vehicle settings, see Door
Unlock, page 3.24.
WARNING: The key fob allows the
engine to be started and is also used
to activate other features on the
vehicle.
Take the key fob with you, every time
you leave the vehicle.
NOTE: Do not expose the key fob to high
levels of electromagnetic radiation.
Doing so may cause it to function
incorrectly. For example close proximity
to laptops, tablets, personal media
players, or cell phones.
➍✸✼
✬❀❥
Outcome
Button
If BOTH is selected, a single
press of the button unlocks
both doors.
If DRIVER is selected, a
Single Press
Double Press
single press of the button
unlocks the driver!s door. A
second press (after a pause)
unlocks the passenger!s
door.
If BOTH is selected, a
double press of the button
unlocks both doors and
unlatches the driver!s door.
If DRIVER is selected, a
double press of the button
will unlock and unlatch the
driver!s door only.
BEFORE YOU DRIVE
❽
PENING AND CLOSING
♥♦❫
Stowing the key fob
➋
✒✠✔✡✝✓✠✥✌
✴
♠
✥✌✥✔✠✡✝✒✧✧✡☛✤✡✤✌✑✟✌✌✑
✡✵✡
✴
fob stays on your person when you are in the
car. If, however, you wish to stow the key fob
within the car, ensure that it is not left in plain
view.
NOTE: If the message "key not found in
vehicle! appears on the instrument
cluster, reposition key fob until it is
detected.
NOTE: Do not stow the key fob in the
center console stowage compartment,
in the cup holders, in the stowage nets
between the seats, or on the shelf
immediately behind the seats as the
system may not detect its presence and
the engine will not start.
✶✱✽❀❅❈✭✹✪✰❤❈✻✻✪✭✮
❄
✦✴✒✓✟✠✡✓☛✦✒✠✌✓☛✟✌✡✡☛✒
✓✳✑✌✒
✡
❏
❑
✡✠✥✡☛✝✡
✟
fully discharged battery, the vehicle can still
be opened using the mechanical key, see
Unlocking - discharged battery, page 5.24.
Opening a door
NOTE: Because the door opens outwards
and then upwards, ensure sufficient side
and overhead clearance before opening
a door, see Vehicle dimensions,
page 6.7.
2. If keyless entry is used, the front, rear
and side turn signals (market specific)
will flash twice, and the anti-theft alarm
system will be deactivated.
3. The door latch will then release, allowing
the door to be partially raised before it
automatically swings outwards and
upwards. The mirrors will unfold if folded.
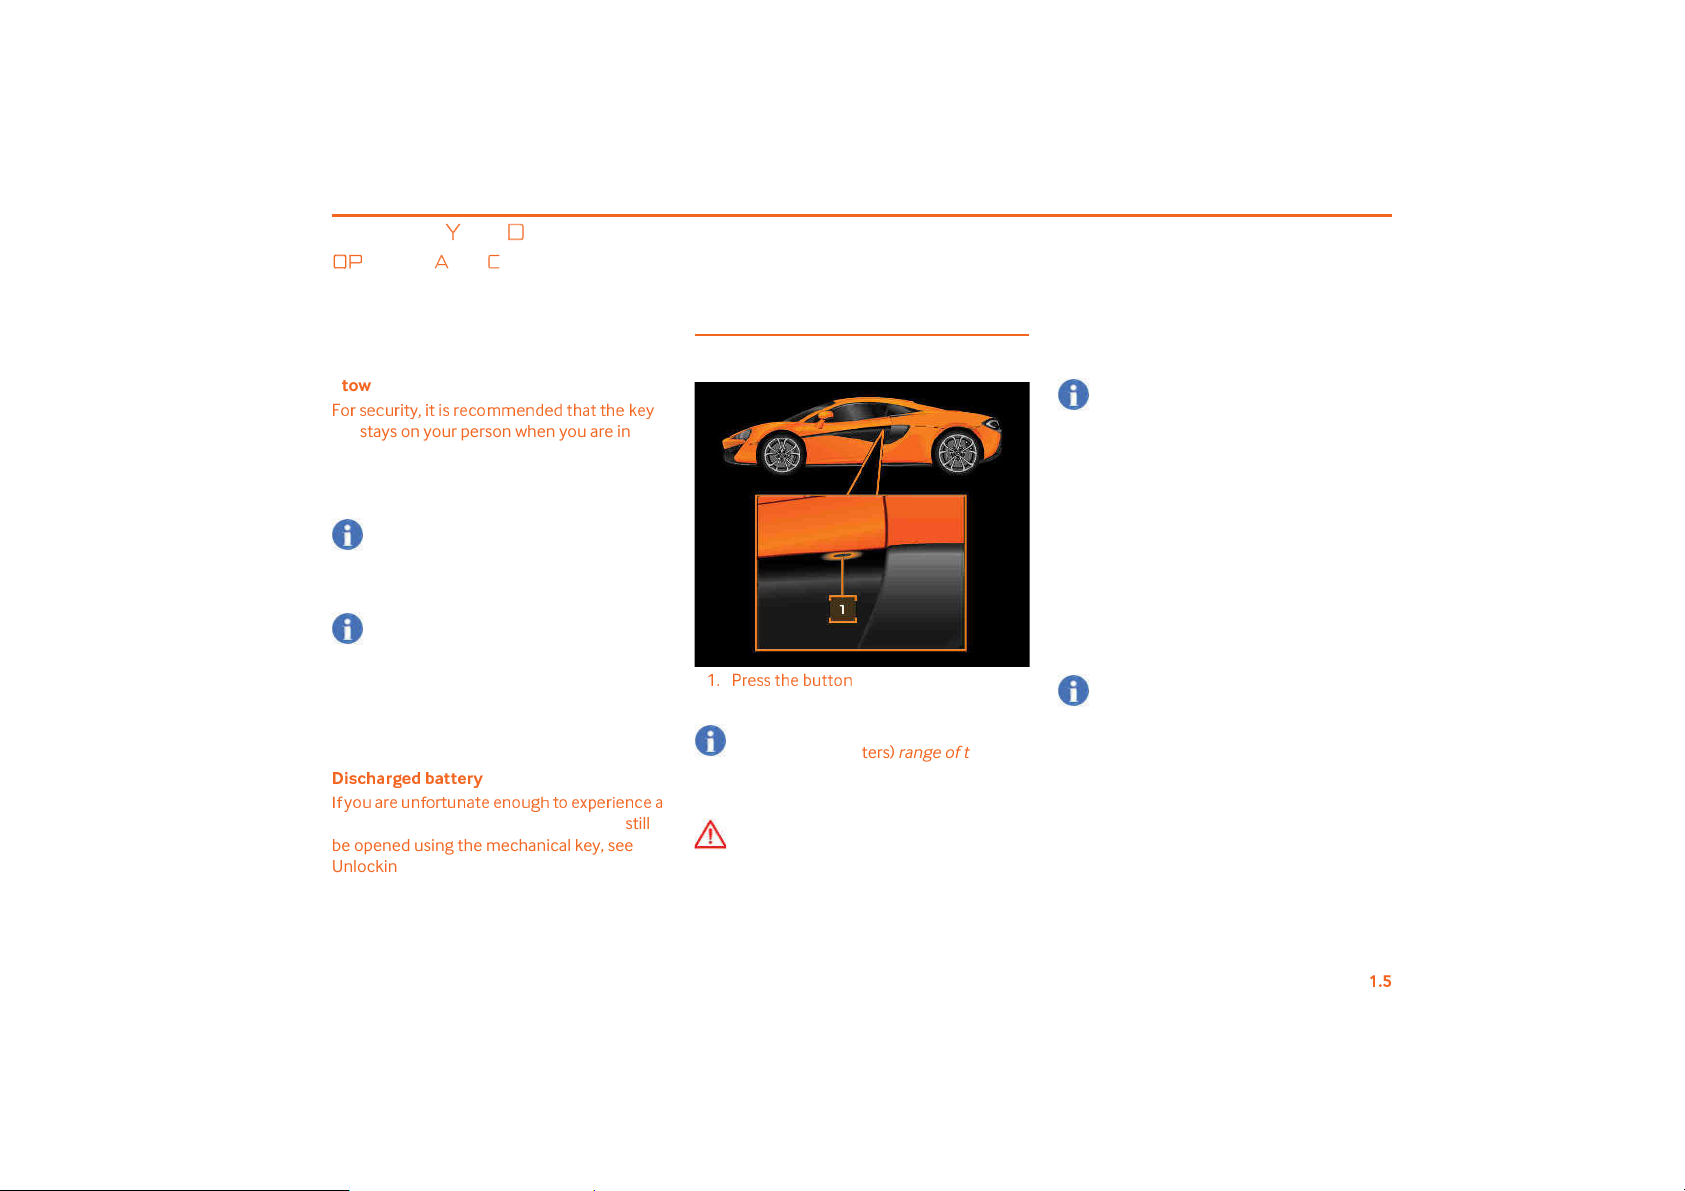
✗HI✠✡✔✔✌✑
✡❍✓✌✌✒☛
(1) firmly to unlock and
unlatch the door.
NOTE: Ensure the key is within a 3 feet
11 inches (1.2 meters) range of the door
sensors when using the keyless entry
feature.
WARNING: Always stand to the rear of
the door before opening it, as the
opening action may cause injury. The
speed that the door opens will be
affected by ambient temperature.
NOTE: When the door is opened, the
window will lower slightly. It will raise to
the closed position once the door is
shut. If the window does not lower, for
example, due to a discharged battery or
freezing temperatures, take care when
opening and closing the door. Do not
force the door during opening or closing,
as this could lead to the door seals or
window becoming damaged.
BEFORE YOU DRIVE
❽
PENING AND CLOSING
♥♦❢
➎➏➐➑➒➓➔→➔➣↔↕➙➛➜➝➞➙➟➠➡➛➔➔↔➙➜➢➞➝➜
on the unlock button will automatically
lower the windows. The windows will
continue to lower until the unlock
button is released or the windows are
fully lowered.
NOTE: If the vehicle is unlocked using
the key fob but the doors or luggage
compartment are not opened, the
vehicle will relock after 30 seconds.
Locking a door
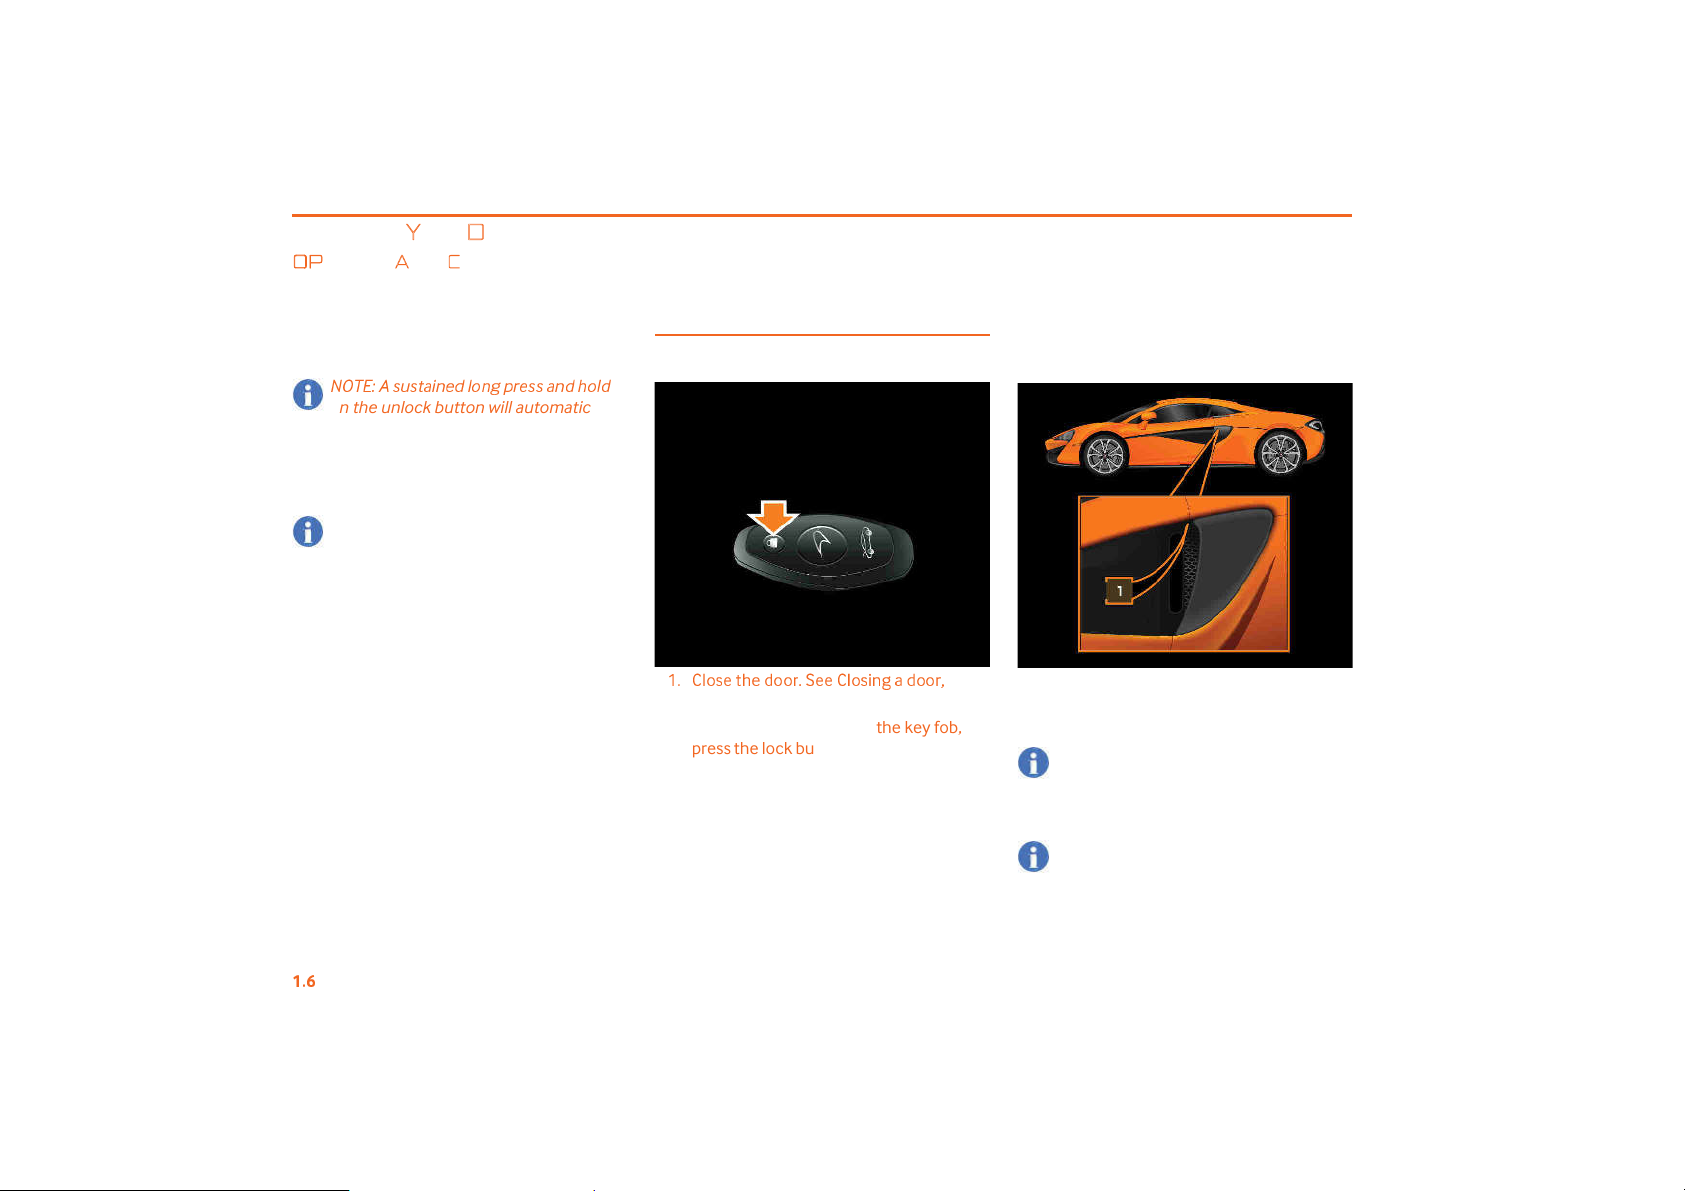
✗
✍✒✔✡✌✑✡✤✒✒✠9❙✡✡❁✍✒✔✥☛✳✟✤✒✒✠
9
❁
page 1.9.
2. To lock the vehicle using the key fob,
press the lock button. The front, rear and
side turn signals (market specific) flash in
a rapid, circular sequence around the
car. The anti-theft alarm system is
activated.
♠
3. If using the keyless entry feature, pass
your hand over the non-contact lock
sensor (1) on in the side pod.
NOTE: Ensure the key is within a 3 feet
11 inches (1.2 meters) range of the door
sensors when using the keyless entry
feature.
NOTE: The lock sensor will recognize a
single touch.
BEFORE YOU DRIVE
❽
PENING AND CLOSING
♥♦❦
➎➏➐➑➒➓➔→➔➣↔↕➙➛➜➝➞➙➟➣➞→➤➢↔➙➜➢➞➝➜
on the lock sensor will automatically
raise the window. The window will
continue to raise until the lock sensor is
released or the window is fully closed.
4. The turn signals flash to indicate that the
anti-theft alarm system is activated.
NOTE: When the door is opened the door
glass will lower slightly to avoid contact
with other parts of the vehicle. When the
door is closed the glass will raise to the
closed position automatically. If for any
reason the door glass does not raise it is
likely that the system has sensed a #trap$
event. This can be caused by debris in
the glass channel or misalignment of the
glass. Ensure there are no obvious signs
of debris in the glass channel, and hold
the lock button. The glass will raise
providing the door is correctly closed
and there are no obstructions
preventing it raising. If the glass does not
close, or the glass repeatedly fails to
automatically raise, contact your
McLaren Retailer.
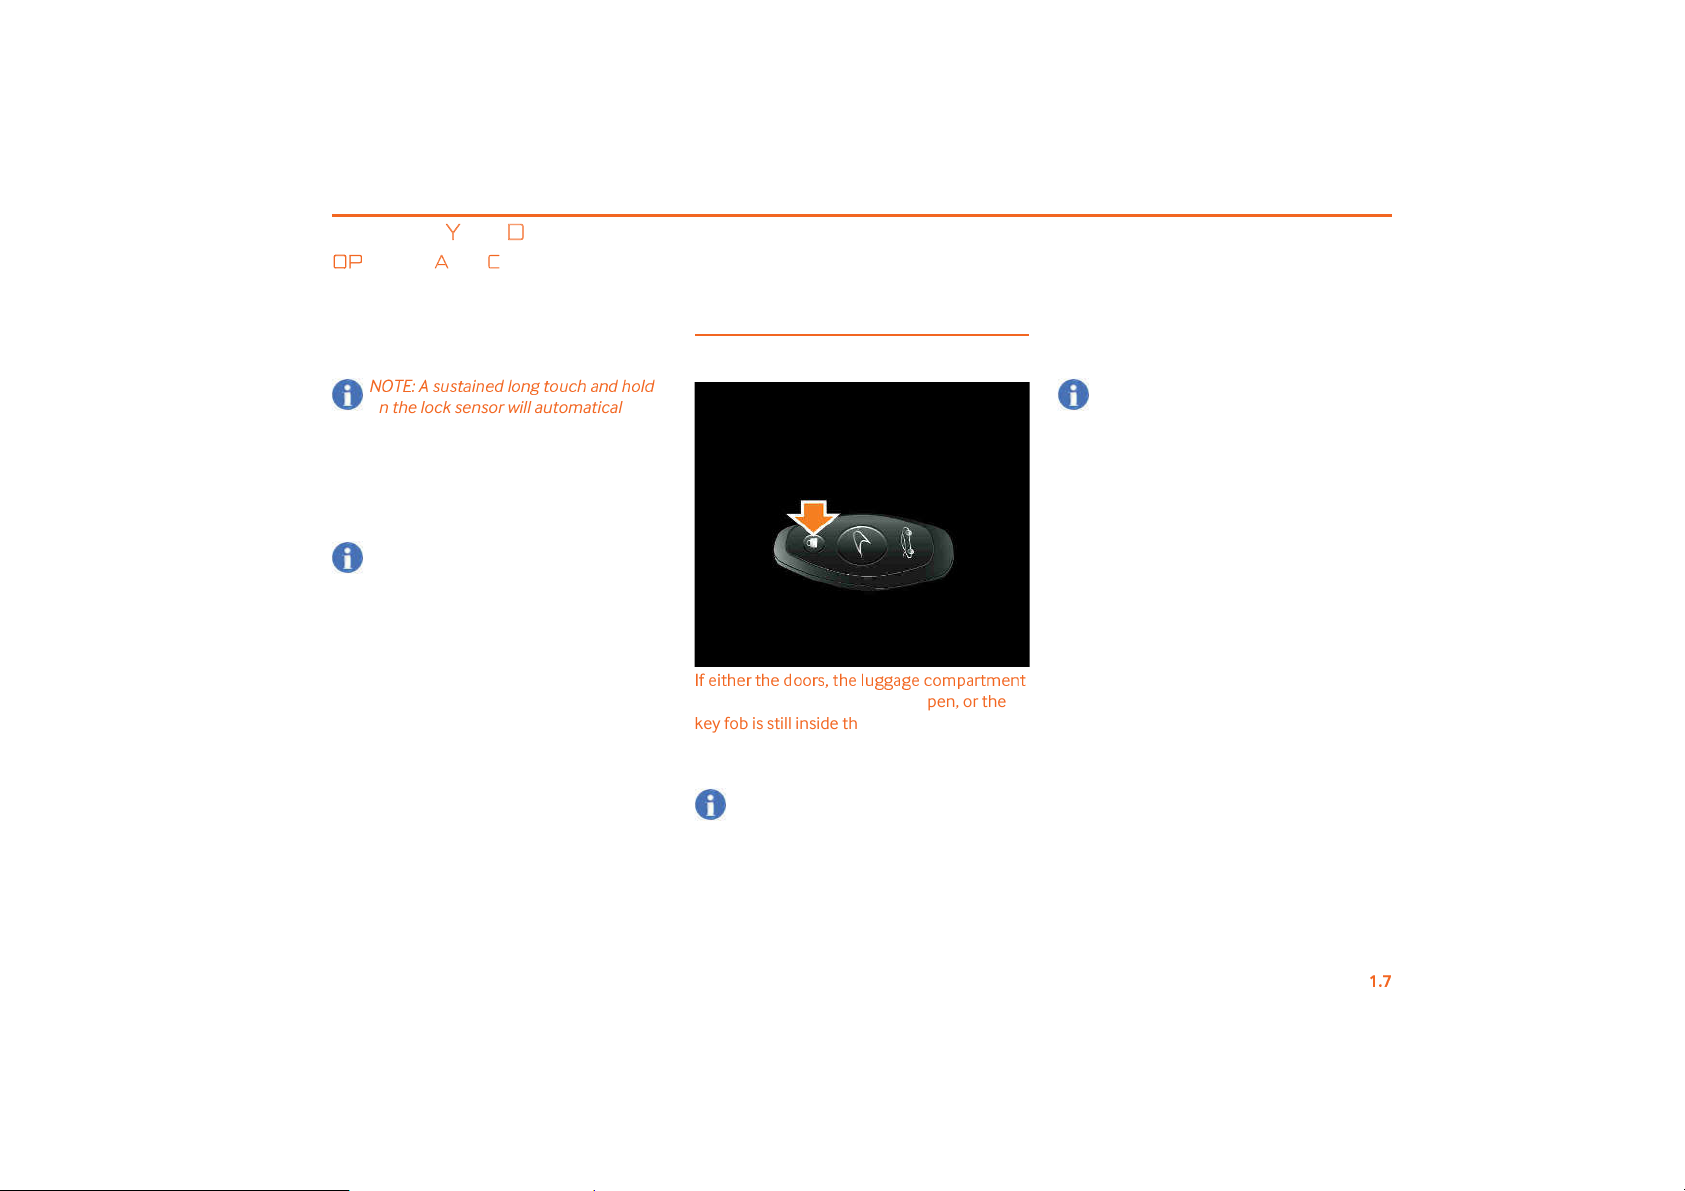
Mislock
❄✦✡✥✌✑✡✠✌✑✡✤✒✒✠
lid or the service cover are left open, or the
key fob is still inside the vehicle, an audible
"mislock! signal will sound when an attempt to
lock the vehicle is made.
NOTE: If the doors are open or the key
fob is still inside the vehicle, a
momentary sounding of the alarm horn
will alert you.
Check that the doors, the luggage
compartment lid and the service cover are all
closed, then relock the vehicle.
✔♠✌✑✡✍✓
✡✝✒
✳✟✳
✧❑✟✠✌✧✡☛✌
✳
NOTE: The car can be locked/alarmed
with the luggage compartment open. A
long tone sounds to alert you to this
condition, and differs to the short tone
sounded for door open/key in car
mislock. The luggage compartment will
become alarmed as soon as the luggage
compartment lid is closed. This will allow
you to connect a McLaren supplied
battery charger to the charging point in
the luggage compartment whilst leaving
the rest of the vehicle locked.
BEFORE YOU DRIVE
❽
PENING AND CLOSING
♥♦❧
Individual settings
❄
✦✴✒✓✦✠✡➥✓✡☛✌✍✴✌✠✟◆✡
you can change the locking system so that
only the driver!s door is unlocked, see Auto
Door Lock, page 3.23.
If only the driver!s door has been configured
to unlock, the passenger!s door can only be
unlocked by either pulling the passenger!s
door internal handle, pressing the unlock
button on the key fob again or by unlocking
the car from the central locking button on the
center console.
✍❋✥✌✑✒✓
✌❑✟✔✔✡☛✳✡✠✔
♠
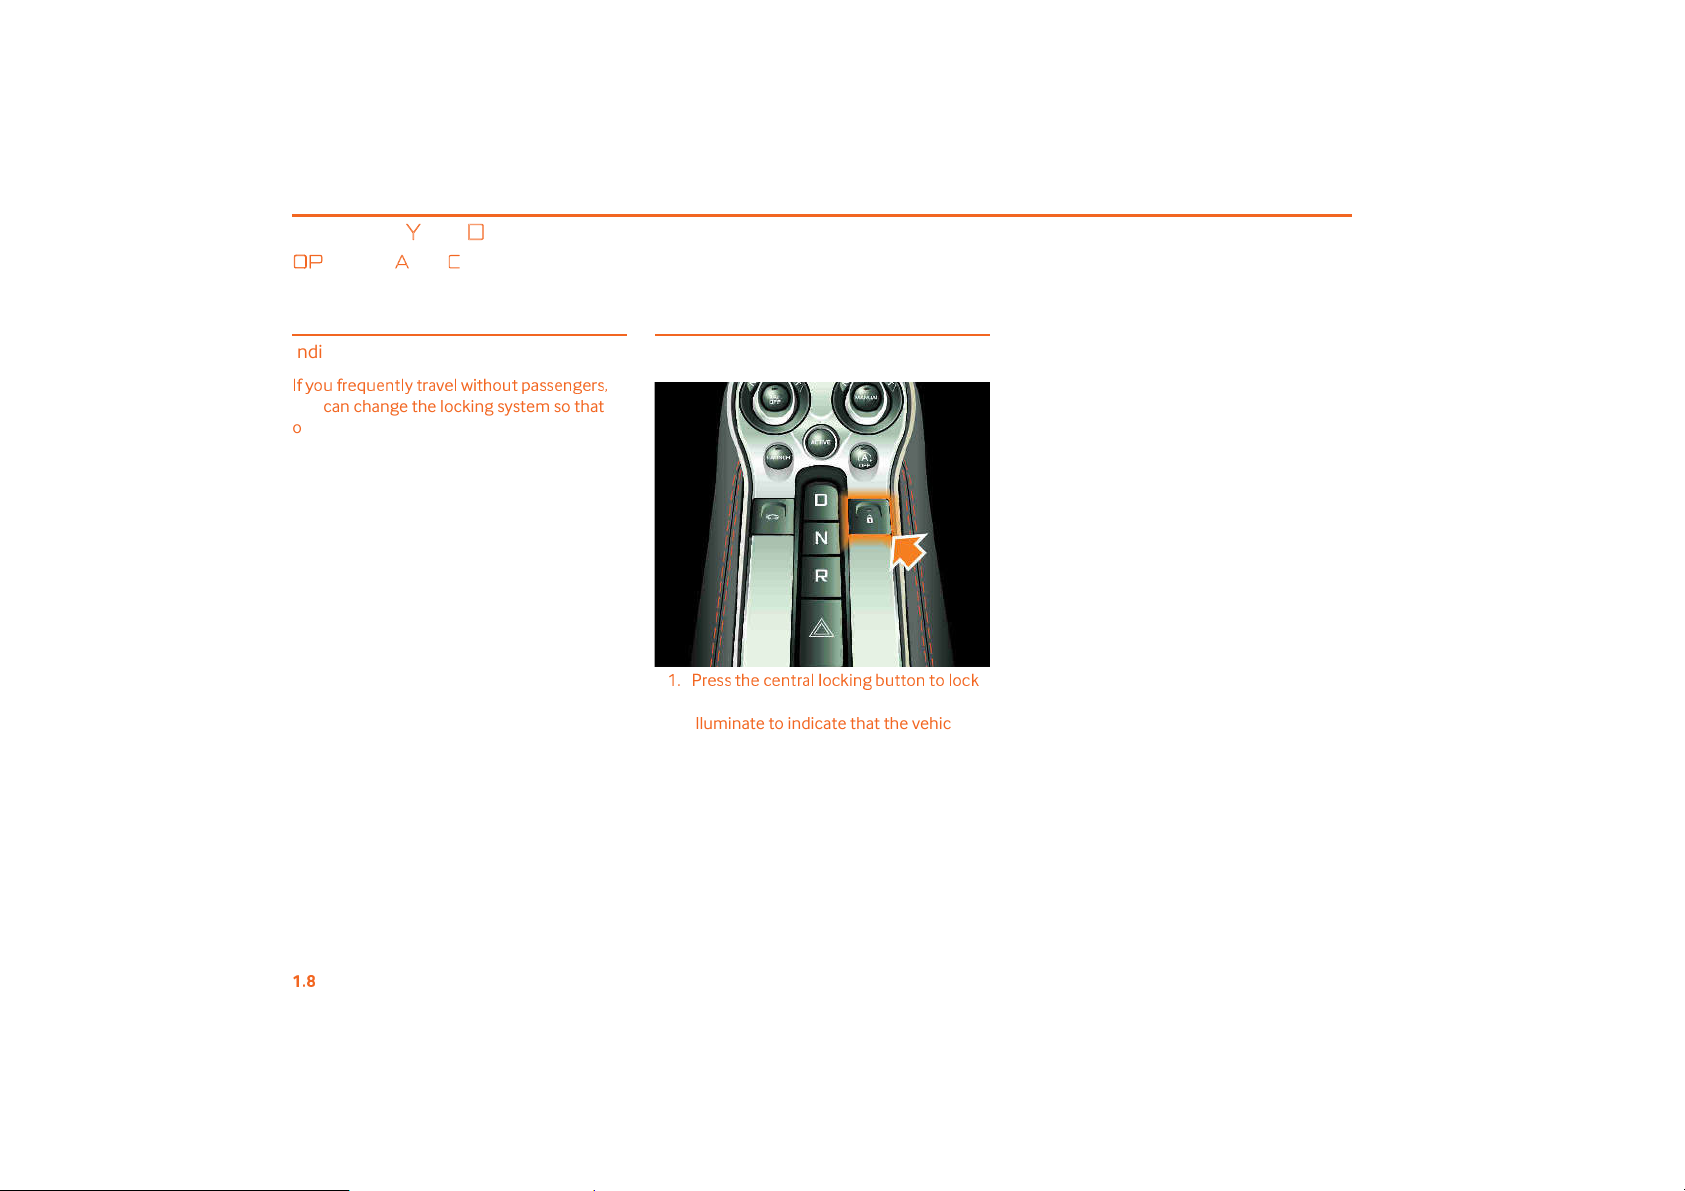
Locking and unlocking from inside
✗9:✠✡✔✔✌✑✡✝✡☛✌✠✟✍✍✒
✝✵✥
☛
✳
✓✌✌✒☛✌✒✍✒
❍
✝
✵
the vehicle, the light in the button will
illuminate to indicate that the vehicle is
locked.
2. Press the central locking button again to
unlock the vehicle and the light in the
button will be extinguished.
BEFORE YOU DRIVE
❽
PENING AND CLOSING
♥♦➦
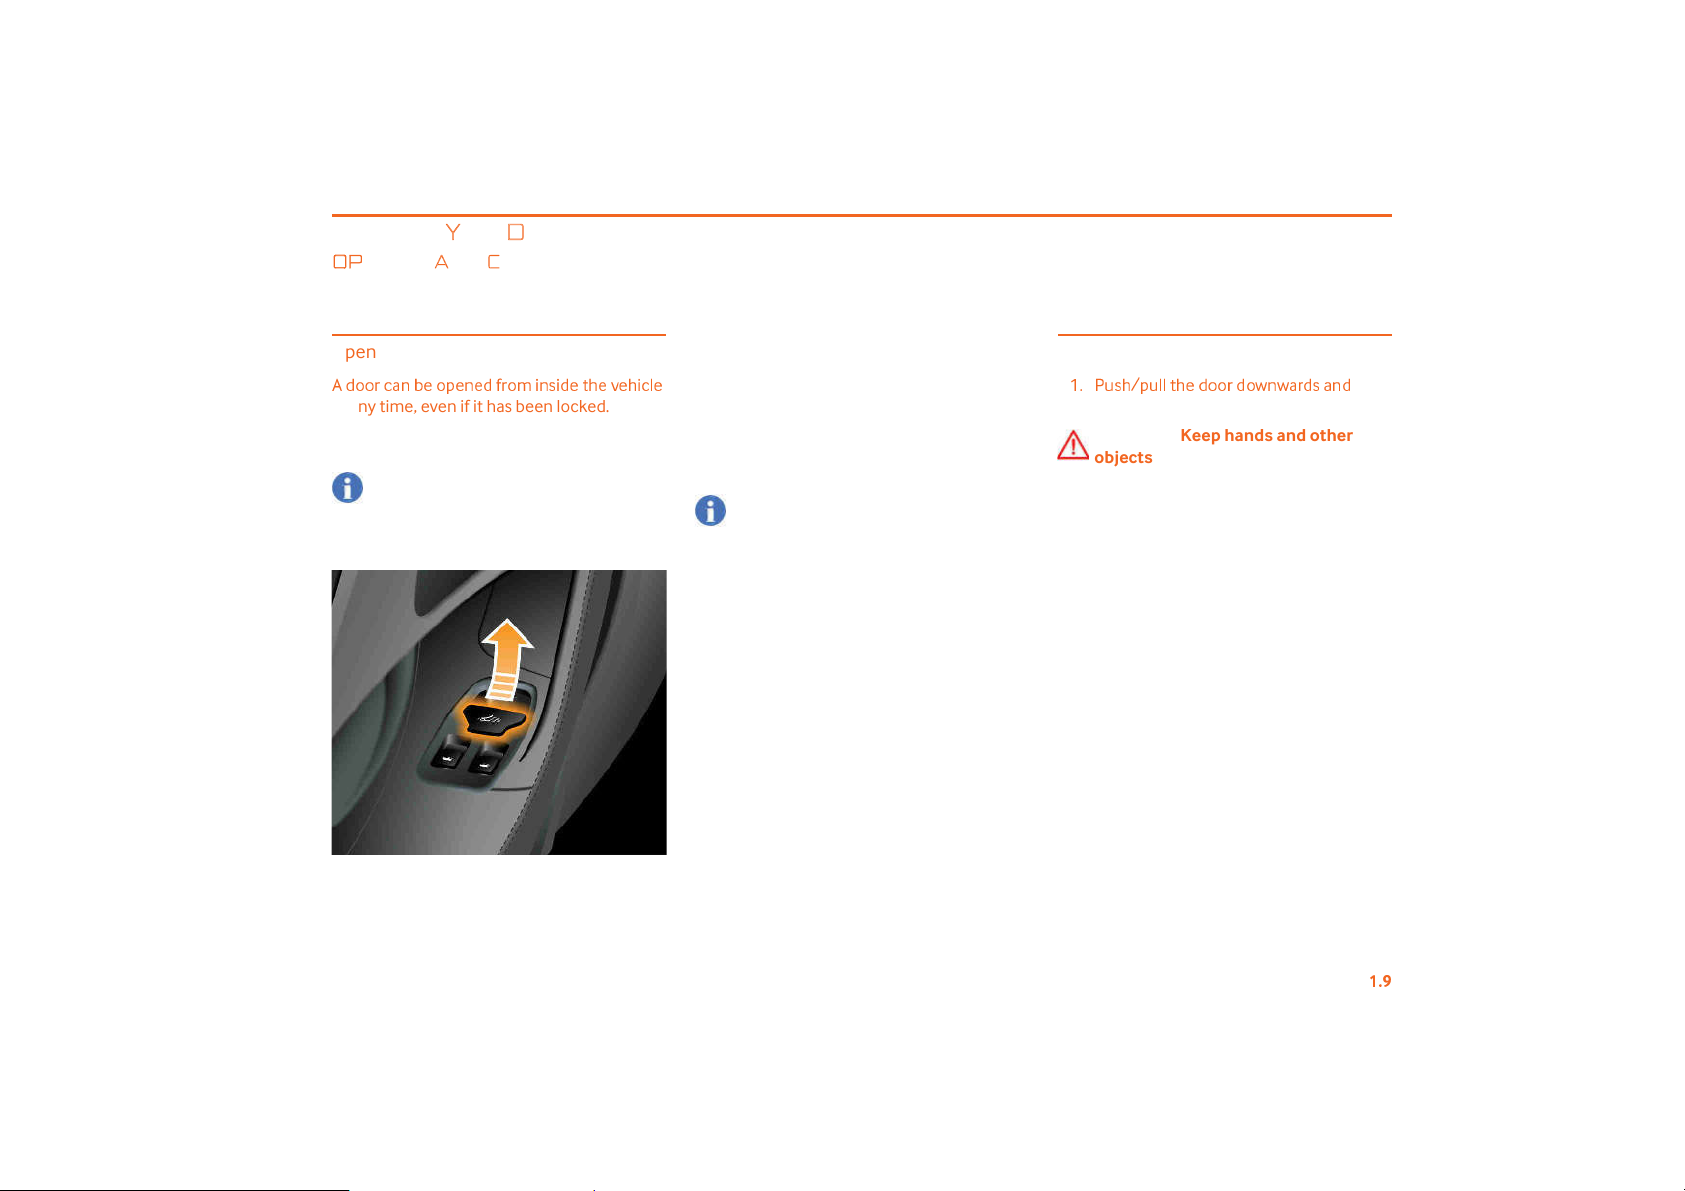
Opening a door from inside
☞✤✒✒✠✝✟
at any time, even if it has been locked. Open
the doors only if the vehicle is stationary and
road and traffic conditions permit.
☛❍✡
✒❑✡☛✡✤✦✠✒✧✥☛✔✥✤✡✌✑✡◆✡✑✥✝✍
NOTE: Because the door opens outwards
and then upwards, ensure sufficient side
and overhead clearance before opening
a door.
✡
1. Pull door handle upwards, in direction of
arrow, and push the door outwards until
the opening mechanism takes over. The
door will then swing outwards and
upwards automatically.
NOTE: When the door is opened, the
window will lower slightly. It will raise to
the closed position once the door is
shut. If the window does not lower, take
care when opening and closing the door.
Do not force the door during opening or
closing, as this could lead to the door
seals or window becoming damaged.
Closing a door
✗78✓✔✑➧❑✓✍✍✌✑✡✤✒✒✠✤
ensure that it latches securely.
WARNING: Keep hands and other
objects clear of the door edge when
closing. This is particularly important
for vehicles fitted with soft close
latches as the door will automatically
continue to the fully closed position
when the first catch has engaged.
There is no anti-trap feature
preventing the door closing if an item
or body part is trapped between the
door and the door aperture, serious
injury and vehicle damage may occur.
If the window does not close, this may be due
to an anti-trap event. Try one of the following:
• reopen and close door
• press lock button on key fob to request
window close
• lock vehicle using button on underside
of door panel
✒❋☛❋✟✠✤✔✟☛✤

BEFORE YOU DRIVE
❽
PENING AND CLOSING
♥♦♥
➨
❄☛✌✑✡✡◆✡☛✌✒✦✝✒☛✌✥☛✓✒✓✔✟☛✌
✥➩✌✠✟❑✡◆✡☛✌
✔
♠
press the button (1) for a few seconds. The
window will continue to raise until you
remove your hand from the button. Only
attempt this if the above methods do not
resolve the problem.
NOTE: Do not force the door closed, the
door seals or window could be damaged.
Automatic locking
❚✑✡✤✒✒✠✔✟☛✤✌✑✡✍
automatically after the vehicle has driven
away.
NOTE: The doors unlock automatically in
an accident if the force of the impact
exceeds a predetermined level.
The automatic locking function is selectable
in the vehicle settings section of the
instrument cluster, see Auto Door Lock,
page 3.23. If automatic locking is ON, the
interior central locking button will illuminate
once the vehicle locks on drive away.
✓
✡✝✒
✳✟✳
✧❑✟✠✌✧✡☛✌✍✒
✳
✝
✵
BEFORE YOU DRIVE
❽
PENING AND CLOSING
♥♦♥
♥
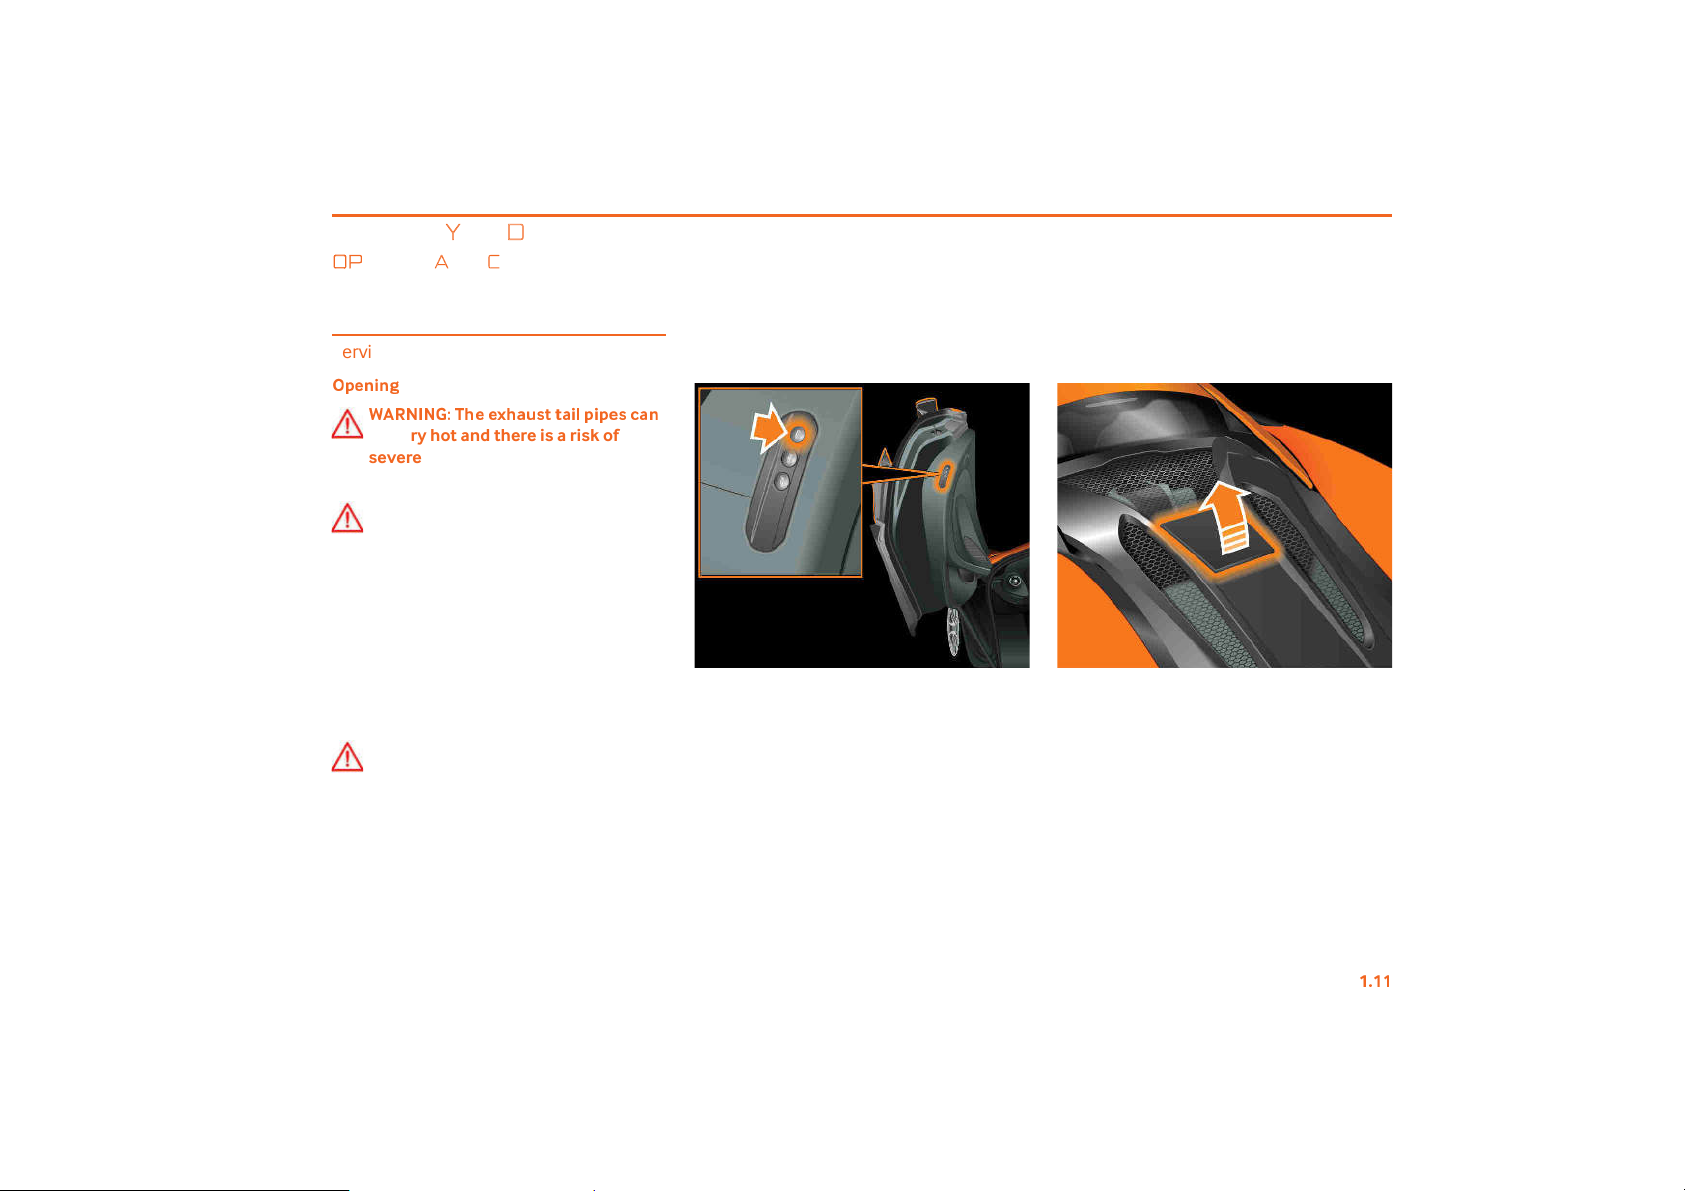
Service Cover
➫
➭
✪✸✱✸✹
❵❛❜❝✾
❝❊❞
❡
❅✪✪●❅❈✯✽✻
be very hot and there is a risk of
severe burns. Only open the service
cover from the side of the vehicle.
WARNING: There is a risk of injury if
the service cover is open, even when
the engine is not running.
Engine components become very hot
and there is a risk of severe burns.
The engine ignition system carries a
high voltage. Never touch ignition
system components; ignition coils,
ignition wiring (spark plug
connections).
WARNING: If the engine is stopped
due to the Eco Start-Stop System, the
engine may restart without warning.
✻❈✱
✼➭✱➭✪
❀
❈
✽
✸
1. Press the release button on the rear
edge of the driver!s door, the service
cover will open slightly.
2. From the side of the vehicle, lift the
service cover. The hinge will support the
cover in the raised position.
See Topping up the engine oil, page 5.3.
See Topping up the coolant, page 5.6.
BEFORE YOU DRIVE
❽
PENING AND CLOSING
♥♦♥
✷
Closing
❵❛❜❝✾
❝❊❞
❡
❅✪✪●❅❈✯✽✻
✻❈✱
✼➭✱➭✪
✽
❀
❈
✸
be very hot and there is a risk of
severe burns. Only close the service
cover from the side of the vehicle.
Press the service cover down squarely from
the side of the vehicle and ensure that the
cover latches securely.
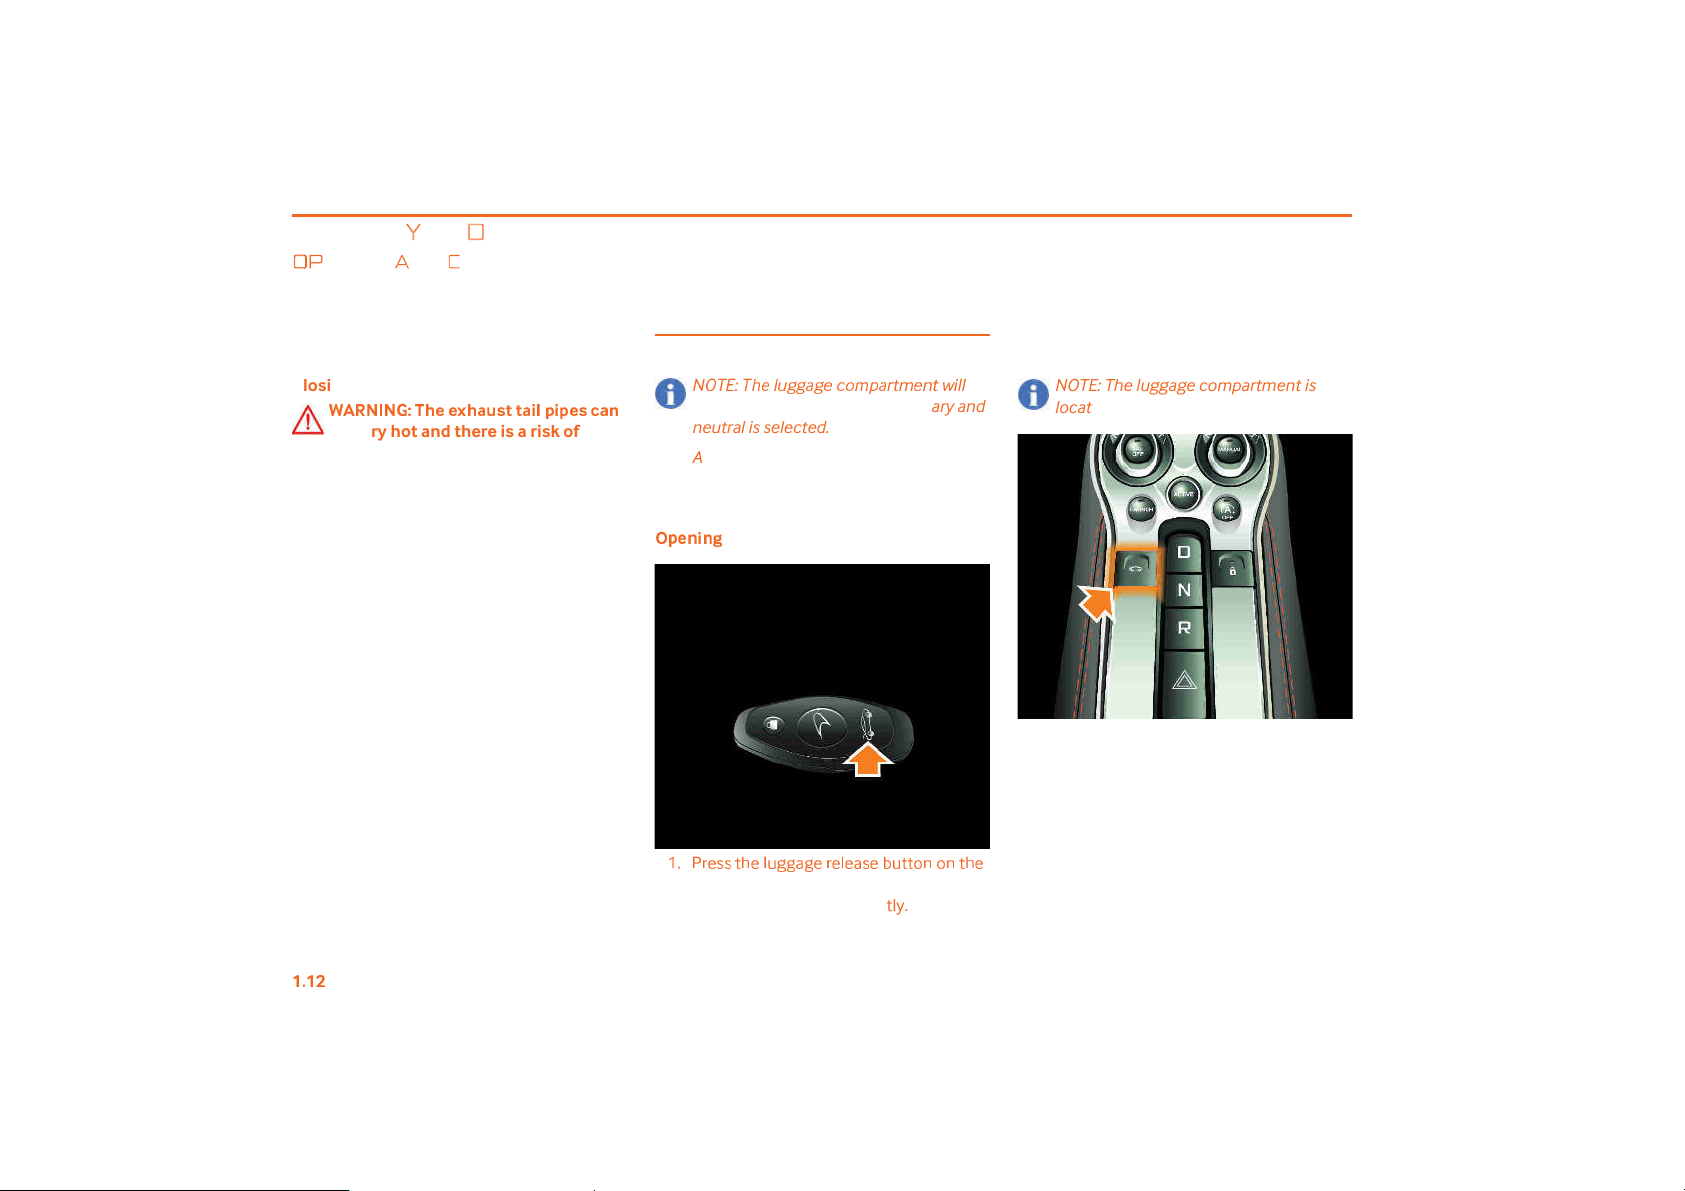
Luggage compartment
➎➏➐➑➒➐➢➛➝→➟➟↔➟➛➤➞➯➠↔➡
only open if the vehicle is stationary and
neutral is selected.
A message will display on the instrument
cluster if the luggage compartment is
open when pulling away.
➫
➭
✪✸✱✸✹
✗OP✠✡✔✔✌✑✡✍
✓
✡✠✡✍✡✟✔
✳
✳✟✳
key fob, the luggage compartment will
fully unlock and open slightly.
➣➯➛➙➣➲↕➝➝
✡❍✓✌✌✒☛✒☛✌✑
NOTE: The luggage compartment is
located at the front of the vehicle.
2. Alternatively, press the center console
button to fully unlock and slightly open
the luggage compartment.
3. Lift the front of the luggage
compartment lid, the gas struts will
support it in the fully open position.
✡
BEFORE YOU DRIVE
❽
PENING AND CLOSING
♥♦♥
▲
Closing
❵❛❜❝✾
❝❊❞
➳✸✽✯✭✪✻
❅❈✻✸✬✬✸
✪
❀
❈
✸❤✪
trapped as you close the luggage
compartment.
1. Pull the luggage compartment lid down
firmly and ensure that it is latched
securely.
NOTE: Do not leave the key fob in the
luggage compartment, as the vehicle
may lock, and you may be locked out of
the car.
NOTE: If the vehicle had previously been
locked, it will still be locked and the turn
signals will flash as the lid closes.
2. The luggage compartment will become
alarmed as soon as the luggage
compartment lid is closed.
NOTE: The car can be locked/alarmed
with the luggage compartment open.
This will allow you to charge the battery
while leaving the rest of the vehicle
locked. A long tone sounds to alert you
to this.
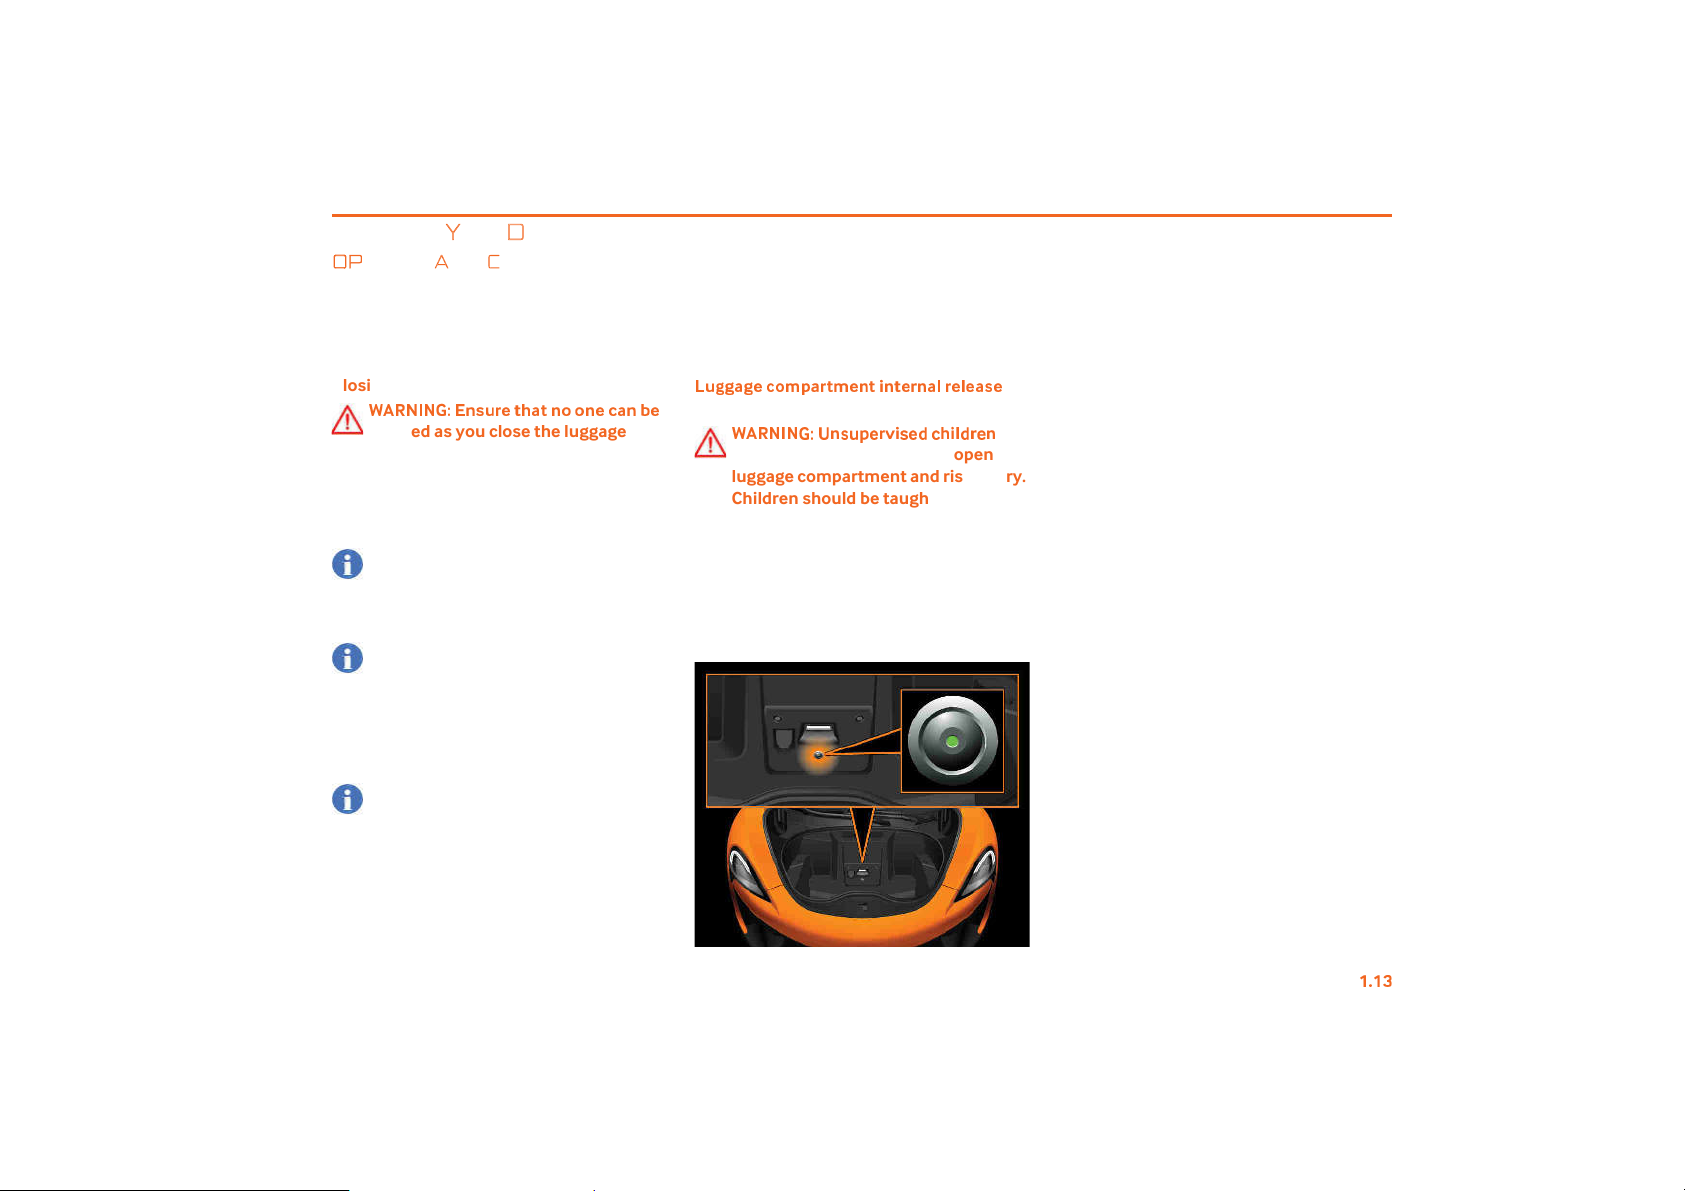
❃
✯✹✹❈✹
✪❀✬
✿➭❈
✭
✻✿✪✸✻✱✸✻✪✭✸❈✼✭✪✼✪❈✽
✪
button
❵❛❜❝✾
❝❊❞
➍✸✽
✯➭✪✭✲✱✽✪✰❀❅✱✼✰✭✪✸
could lock themselves in an open
luggage compartment and risk injury.
Children should be taught not to play
in or around the vehicle.
A mechanical luggage compartment internal
release button is provided as a means of
escape for children and adults in the event
they become locked inside the luggage
compartment.
The button is located in the front luggage
compartment area. The button is illuminated
green when the car is awake and flashes when
the vehicle is locked or shut down. This
operation is completely independent of
ignition state. There are 2 modes to the
button:
1. If the vehicle is in motion when the
button is pressed, the primary latch
releases to allow air to enter the luggage
compartment, but is prevented from
opening by the secondary latch.
2. If the vehicle is stationary, both latches
will release to allow the occupant to exit
the luggage compartment.
BEFORE YOU DRIVE
➵
NTI-THEFT SYSTEM
♥♦♥
❖
➄➁➸➂➺➸➻➀➼➸➈➽➈➸➀
➾
Alarm system
☞◆✥✔✓✟✍✟☛✤✟✓✤
✥❍✍✡✟✍✟✠✧✥✔✌✠
✥
✳
✳
✡✠✡✤✥✦✌✑✡
alarm system is armed and any of the
following are opened:
• a door
• the service cover
• the luggage compartment lid
NOTE: The alarm remains triggered even
if you close the open aperture. To
silence the alarm, unlock the vehicle.
The alarm system also incorporates the
following features:
• tow-away protection
• interior motion sensor
• center console stowage compartment
NOTE: The center console stowage
compartment must be closed for the
interior motion sensor or the Auto Alarm
to become armed.
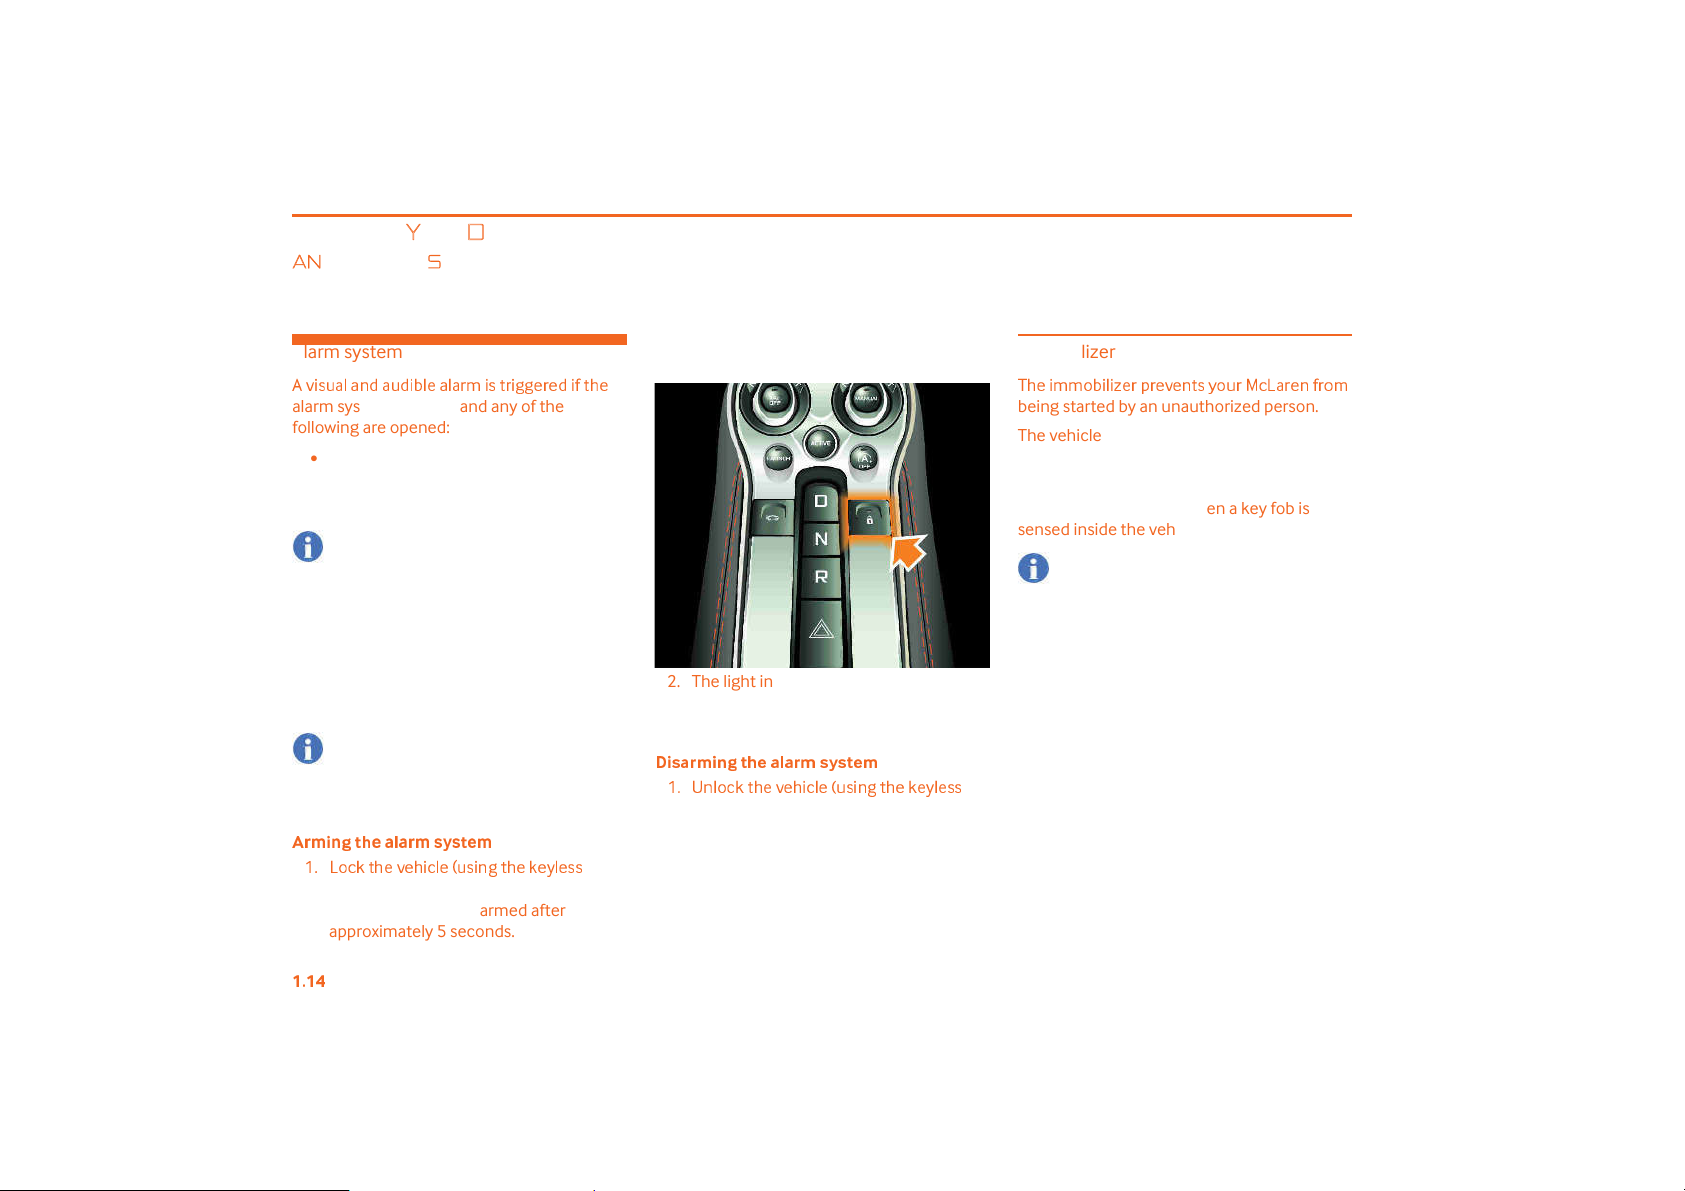
❛✭✿
✱✸✹✻❅
✪❈✼❈✭✿✽✮✽✻✪
✿
✗N✞✒✝✵✌✑✡◆✡✑✥✝✍
✡➚✓✔✥
☛✳✌✑✡✵✡✴✍✡✔
✔
system or the key fob). The anti-theft
alarm system will be armed after
approximately 5 seconds.
2. The light in the central locking button
will illuminate for approximately
60 seconds after locking the vehicle
✶✱✽❈✭✿✱✸✹✻❅
✪❈✼❈✭✿✽✮✽✻✪
✿
✗N❪☛✍✒✝✵✌✑✡◆✡✑✥✝✍
✡➚✓✔✥
☛✳✌✑✡✵✡✴✍✡✔
✔
system or the key fob), the alarm will
disarm and the light in central locking
button will stop flashing.
Immobilizer
❚✑✡✥✧✧✒❍✥✍✥★✡
being started by an unauthorized person.
The vehicle is automatically immobilized
when it senses that there is no key fob
present in the vehicle.
Remobilization occurs when a key fob is
sensed inside the vehicle.
NOTE: Immobilization will only occur if
the engine is not running
✠❑✠✡◆✡☛✌✔✴✒✓✠▼✝✞✟✠✡☛✦✠✒
✧
BEFORE YOU DRIVE
➵
NTI-THEFT SYSTEM
♥♦♥
❫
Tow-away protection
❚
✒
❋
any attempt to steal the vehicle by suspended
tow or by lifting onto a trailer.
The alarm is triggered if the vehicle is raised or
tilted in any way.
Tow-away protection is armed approximately
30 seconds after the vehicle has been locked
and is disarmed when the vehicle is unlocked.
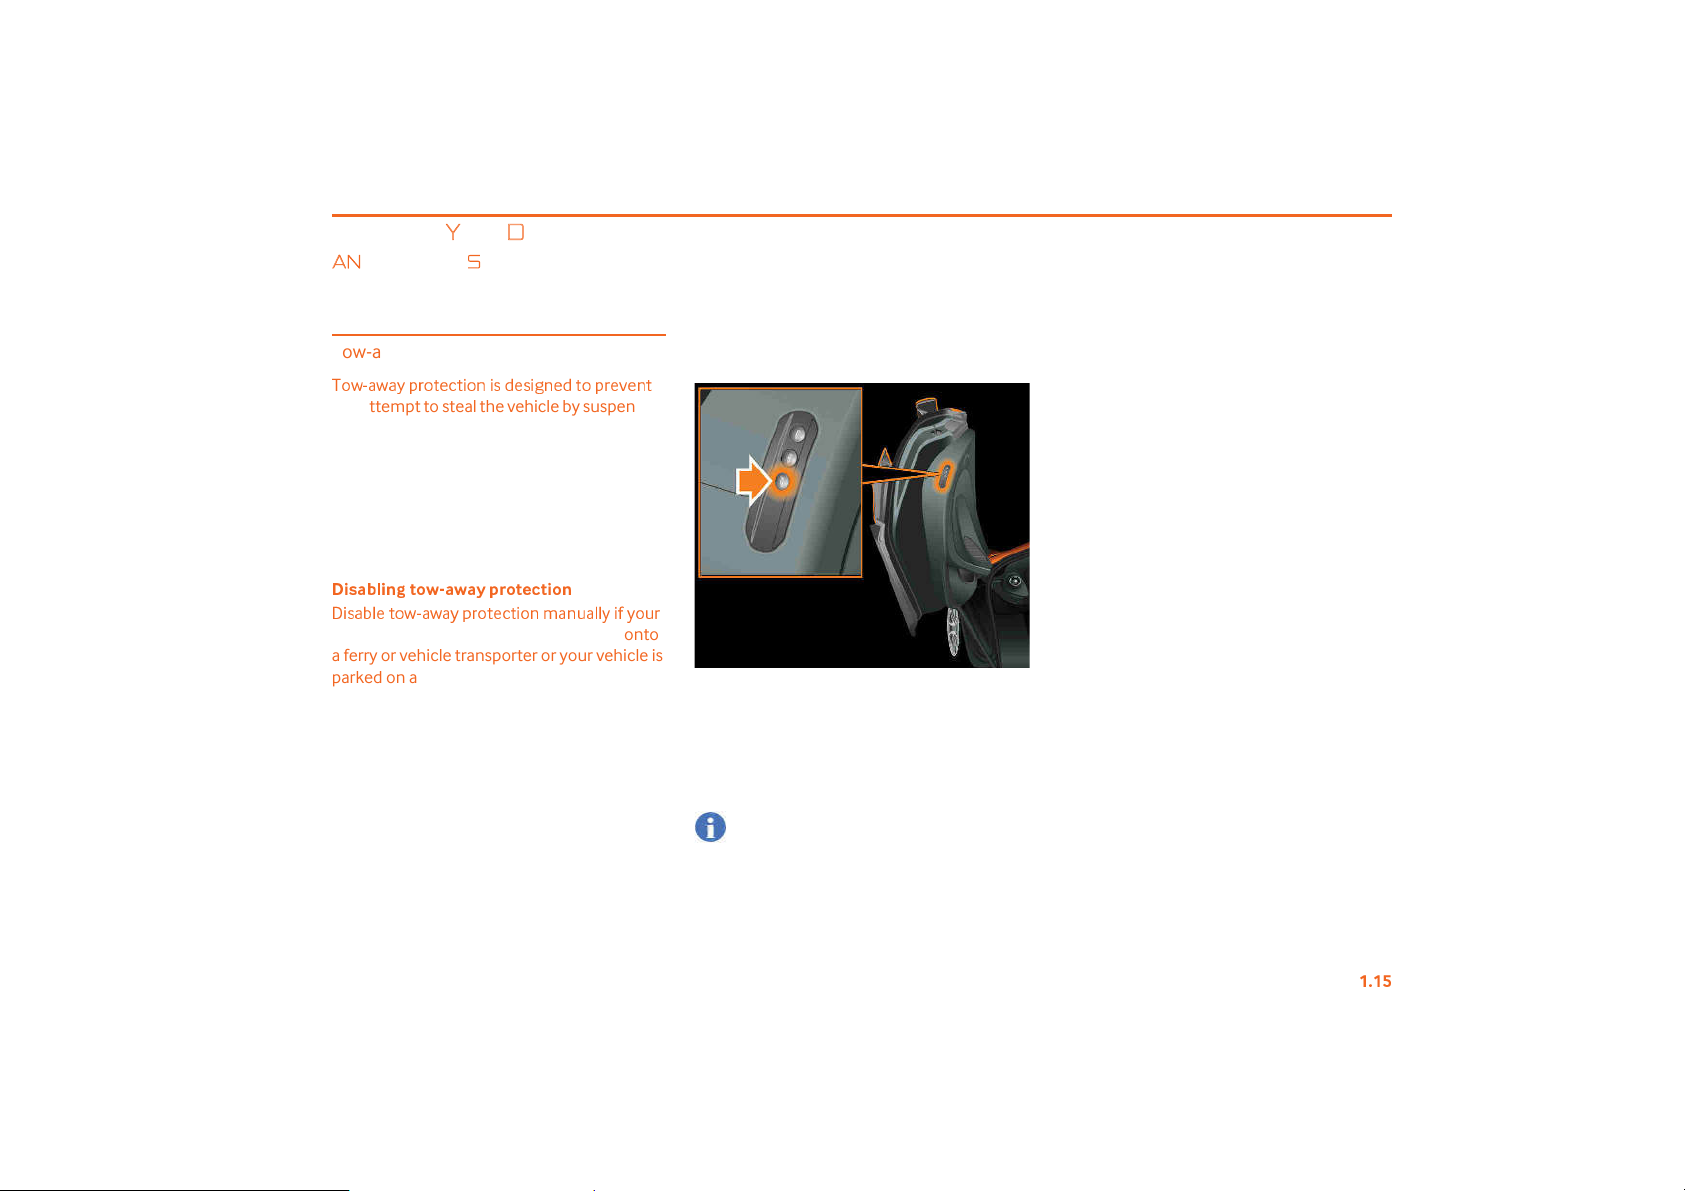
✶✱✽❈❤✼✱✸✹✻✬
✥✔✟❍✍✡✌
❉
vehicle is being transported, e.g. loaded onto
a ferry or vehicle transporter or your vehicle is
parked on a movable surface, e.g. in a splitlevel garage.
✠✒✌✡✝✌✥✒☛✥✔✤✡✔✥✳☛✡✤✌✒❑✠✡◆✡☛
➩✟❋✟✴
❑
➪
❈❣❈✮➭
❣
✒
❋
➩✟❋✟✴
✭✬✻
✠✒✌✡✝✌✥✒☛✧✟☛✓✟✍
❑
✪❀✻✱✬
✌
✸
✍✴✥
✦✴✒✓✠
1. To disable tow-away protection, switch
off the ignition, open the driver!s door
and press the button on the rear edge of
the driver!s door. The light in the switch
will illuminate to indicate that tow-away
protection has been disabled.
NOTE: You cannot disable tow-away
protection if the ignition is switched on.
2. Close the driver!s door and lock the
vehicle (using the keyless system or the
key fob). Tow-away protection remains
disabled until you unlock the vehicle.
BEFORE YOU DRIVE
➵
NTI-THEFT SYSTEM
♥♦♥
❢
Interior motion sensor
❚✑✡✟✍✟✠✧✥✔✌✠✥
and movement is detected inside, e.g. if
someone breaks a window or reaches into the
vehicle through an open window.
The interior motion sensor is armed
approximately 30 seconds after the vehicle
has been locked and is disarmed when the
vehicle is unlocked.
NOTE: To prevent false alarms close the
windows when leaving the vehicle and
do not hang anything on the interior
mirror.
✡✠✡✤✥
✦✴✒✓✠◆✡✑✥✝✍✡✥✔✍✒✝✵✡
✳
✳
✤
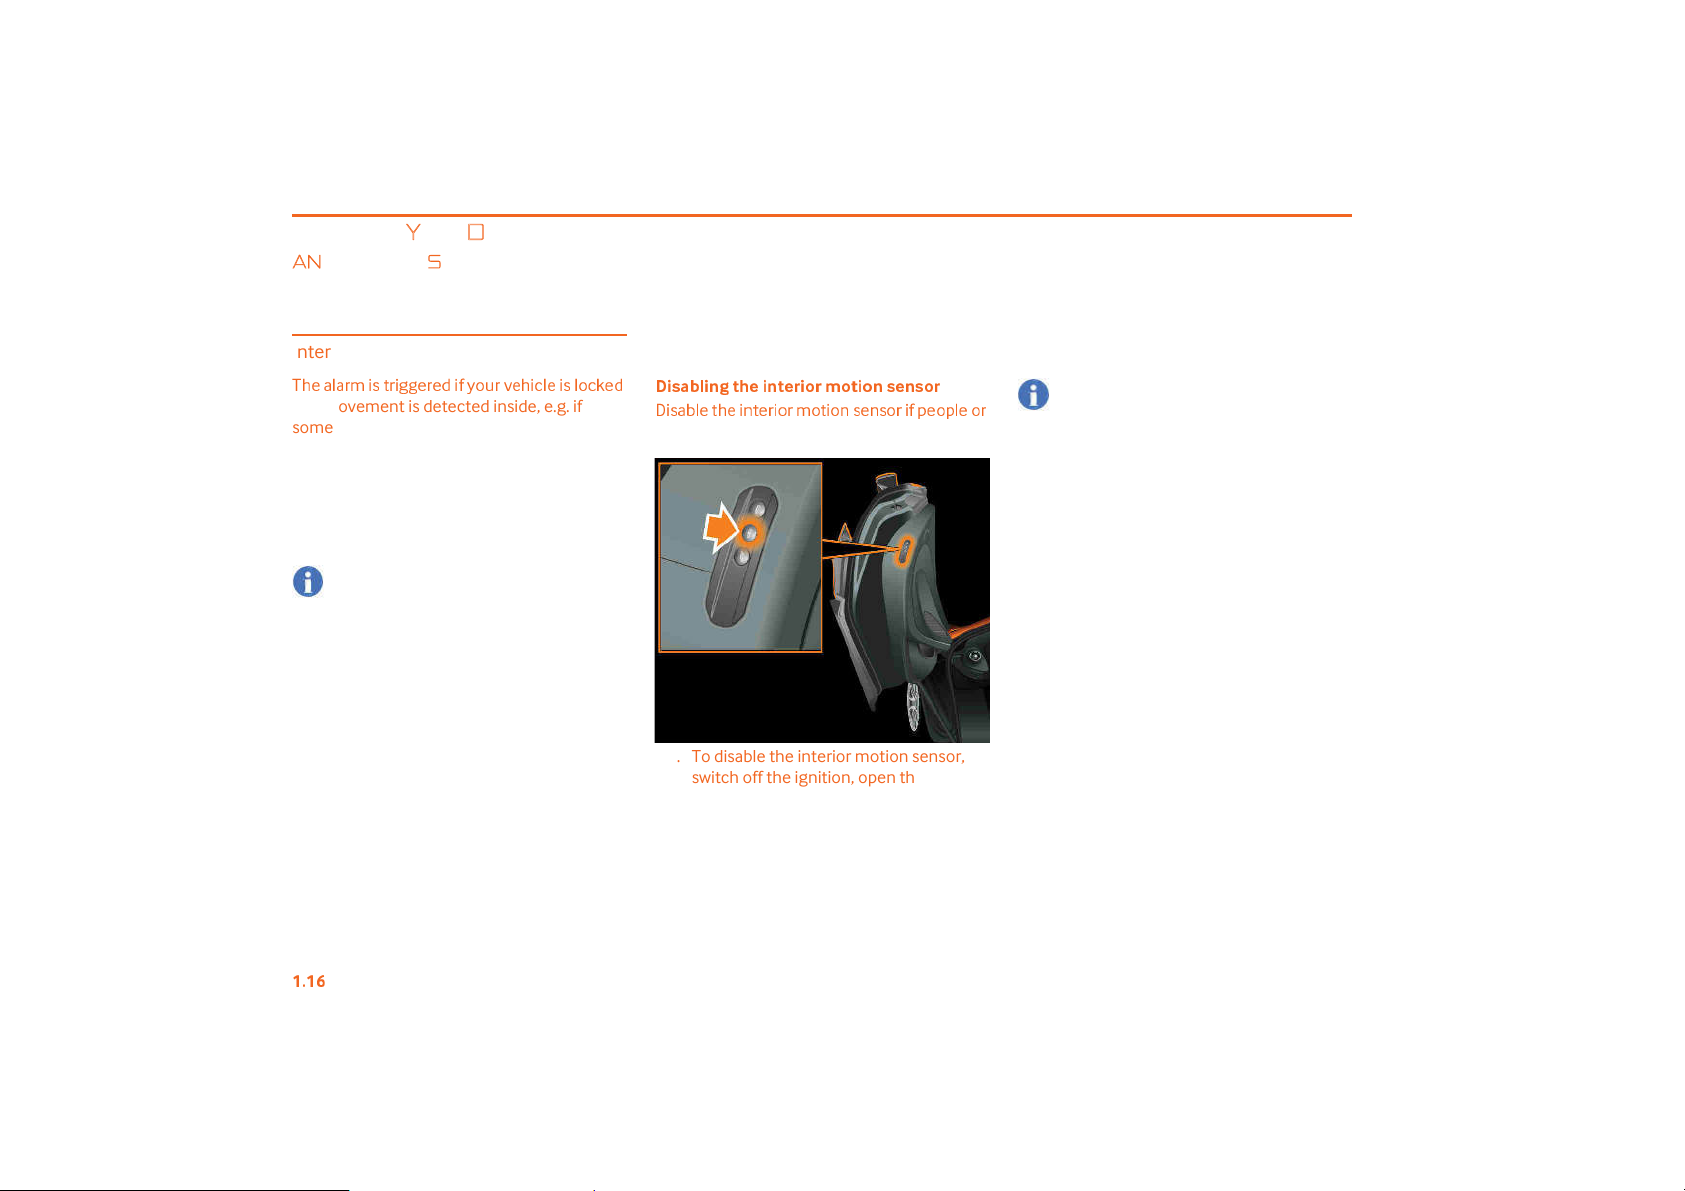
✶✱✽❈❤✼✱✸✹✻❅✪✱✸✻✪✭✱✬
✥✔✟❍✍✡✌✑✡✥☛✌✡✠✥✒✠✧✒✌✥✒☛✔✡☛✔✒✠✥✦❑✡
❉
✭✿✬✻✱✬✸✽✪✸✽✬✭
animals are to remain in the locked vehicle.
1. To disable the interior motion sensor,
switch off the ignition, open the driver!s
door and press the button on the rear
edge of the driver!s door. The light in the
switch will illuminate to indicate that the
interior motion sensor has been
disabled.
✒❑✍✡✒
NOTE: You cannot disable the interior
✠
motion sensor if the ignition is switched
on.
2. Close the driver!s door and lock the
vehicle (using the keyless system or the
key fob). The interior motion sensor
remains disabled until you unlock the
vehicle.

BEFORE YOU DRIVE
➶
EATS
♥♦♥
❦
➈➀➄➸➈
Safety
❵❛❜❝✾
❝❊❞
❛✰➹
✯✽✻✻❅
e driver!s seat
when the vehicle is stationary. You
may not be able to observe road and
traffic conditions and you could lose
control of the vehicle as a result of
the seat moving. You could therefore
cause an accident.
WARNING: The seats can be moved
even without a key fob in the vehicle.
Do not leave children unattended in
the vehicle, they could be injured if a
seat is moved accidentally.
WARNING: Ensure that no one can
become trapped as the seat moves.
To reduce the risk of injuries in the
event of an accident, observe the
following:
•
All vehicle occupants must select a
seat position that allows the seat belt
to be worn correctly, but is as far
away from the front air bags as
possible. The position of the driver!s
seat must allow the driver to drive the
vehicle safely. The distance from the
driver!s seat to the pedals must be
such that the driver can fully depress
the pedals. The distance between the
driver!s chest and the center of the air
bag cover must be more than
10 inches (25 centimeters). The
driver!s arms should be slightly bent
when holding the steering wheel.
•
Vehicle occupants must always wear
their seat belt correctly.
•
Position the passenger!s seat as far
back as is comfortable.
WARNING: McLaren Automotive does
not recommend the use of child seats
in this vehicle, but if you choose to do
so, please follow the guidelines
below:
•
Children under 4 ft 5 in (1.35 meters)
tall or younger than 12 years of age
must be secured in a suitable child
restraint.
•
If you are using a child restraint on
the passenger!s seat, move the seat
as far back as possible.
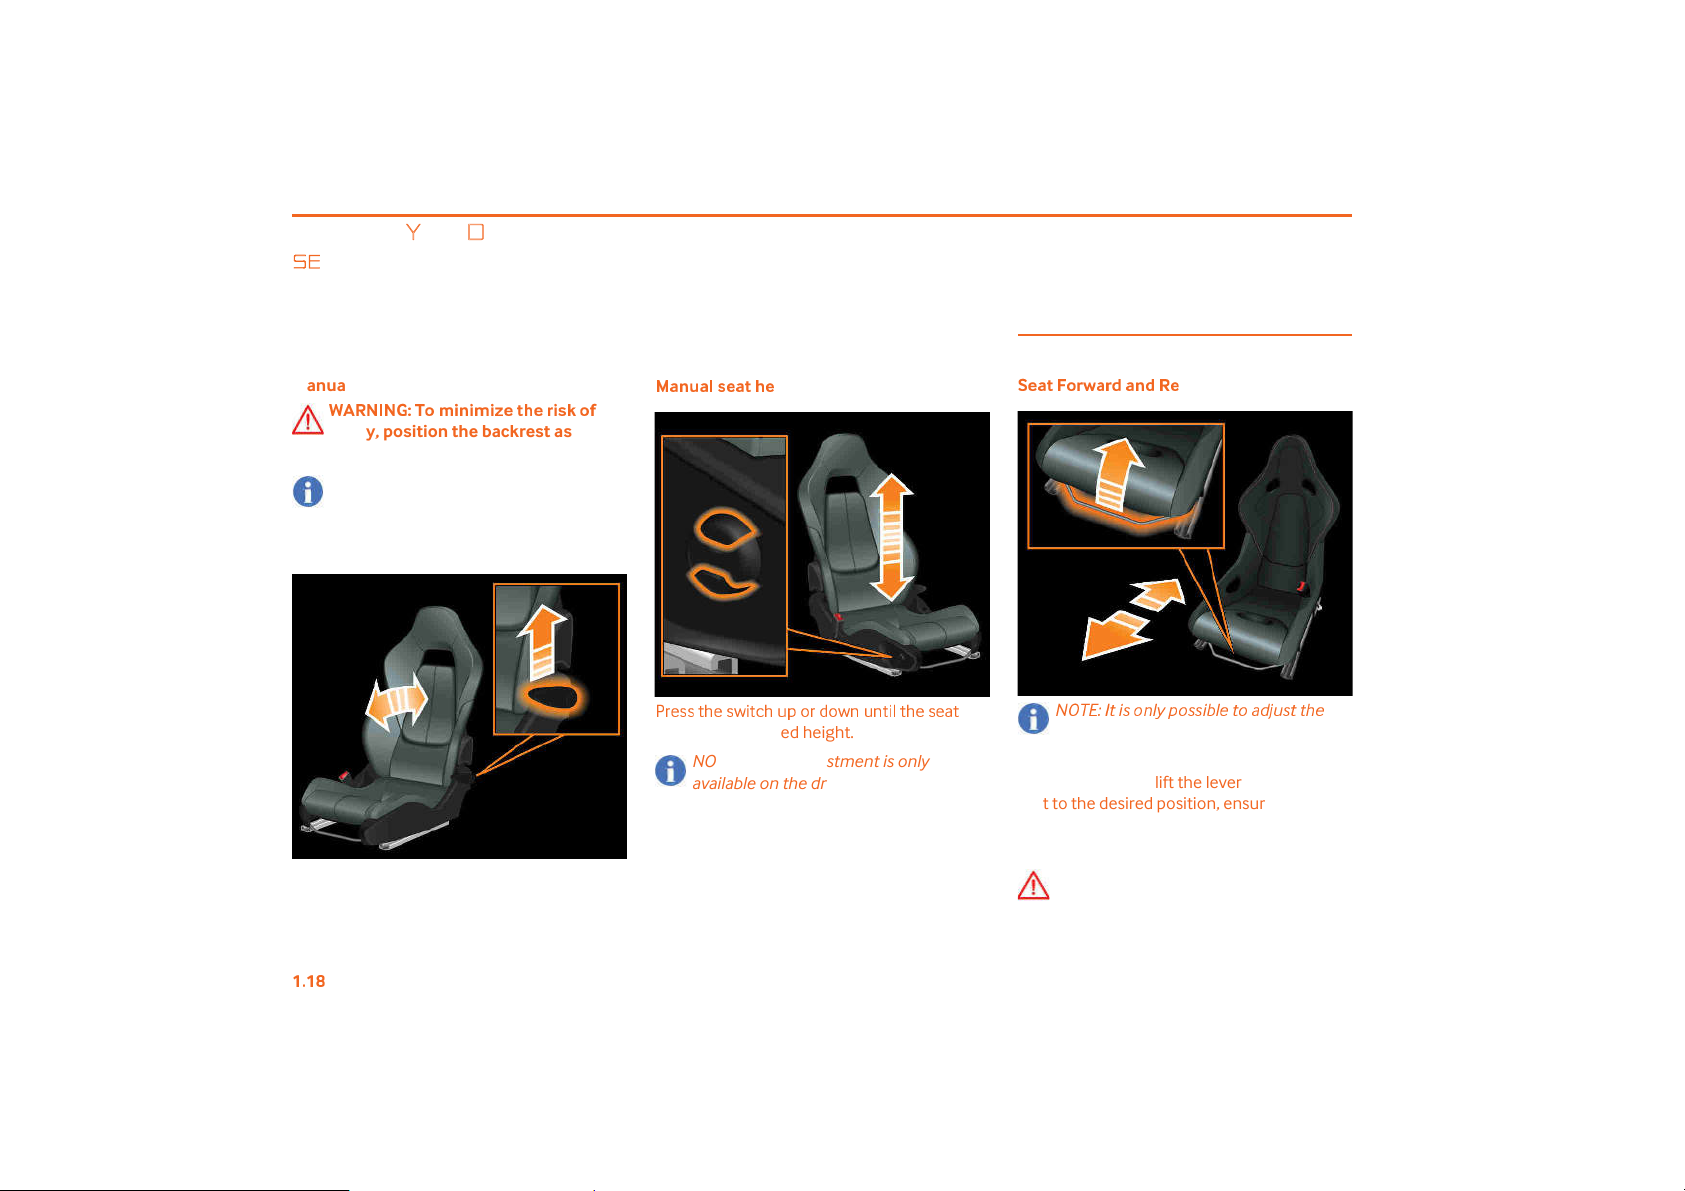
Manual seats
❂
❈
✸
✯❈✼✽✪❈✻✫✬✭❣❈✭
adjustment
✞✥✦✌✌✑✡✍✡◆✡
✠♠✧✒◆✡✌✑✡✔✡✟✌✌✒✌✑✡✤✡✔✥✠✡✤
position and release the lever to lock the seat.
WARNING: Ensure the seat is locked
in position before driving.
NOTE: Ensure that there are no items of
luggage in the footwell or behind,
underneath or to the side of the seats.
This may lead to the seats being
damaged.
✰❈✸✰✭
✪❈✭
❣❈✭
✰
BEFORE YOU DRIVE
➶
EATS
♥♦♥
❧
Manual seat backrest rake adjustment
❵❛❜❝✾
❝❊❞
❡✬✿
✱✸✱✿✱➘✪✻❅✪✭✱✽❥✬
✫
injury, position the backrest as close
as possible to vertical.
NOTE: Do not recline the seat backrest
so that it repeatedly contacts the rear
bulkhead as this could lead to damage
over time.
Lift the lever, move the seat backrest to the
position required, and release the lever.
❂
❈
✸
✯❈✼✽✪❈✻❅✪
ight adjustment
<✠✡✔✔✌✑✡✔❋✥✌✝✑✓❑✒✠✤
✒❋☛✓☛✌✥✍✌✑✡✔✡✟✌
reaches the desired height.
NOTE: Height adjustment is only
available on the driver!s seat.
Racing seats
➴✪❈
✻➉✬✭❣❈✭
✰❈✸
➎➏➐➑➒➷➣↕➔➞➙
forward and rearward position of the
seat.
To adjust the seat, lift the lever and slide the
seat to the desired position, ensuring you can
comfortably reach all pedals and are able to
move them through their full travel.
WARNING: Ensure the seat is locked
in position before driving.
arward Adjustment
✰❜✪
➝➬➠➞➔➔↕➮➝➛➣➞↔
➜➱→➔➣➣➢
➛
BEFORE YOU DRIVE
➶
EATS
♥♦♥
➦
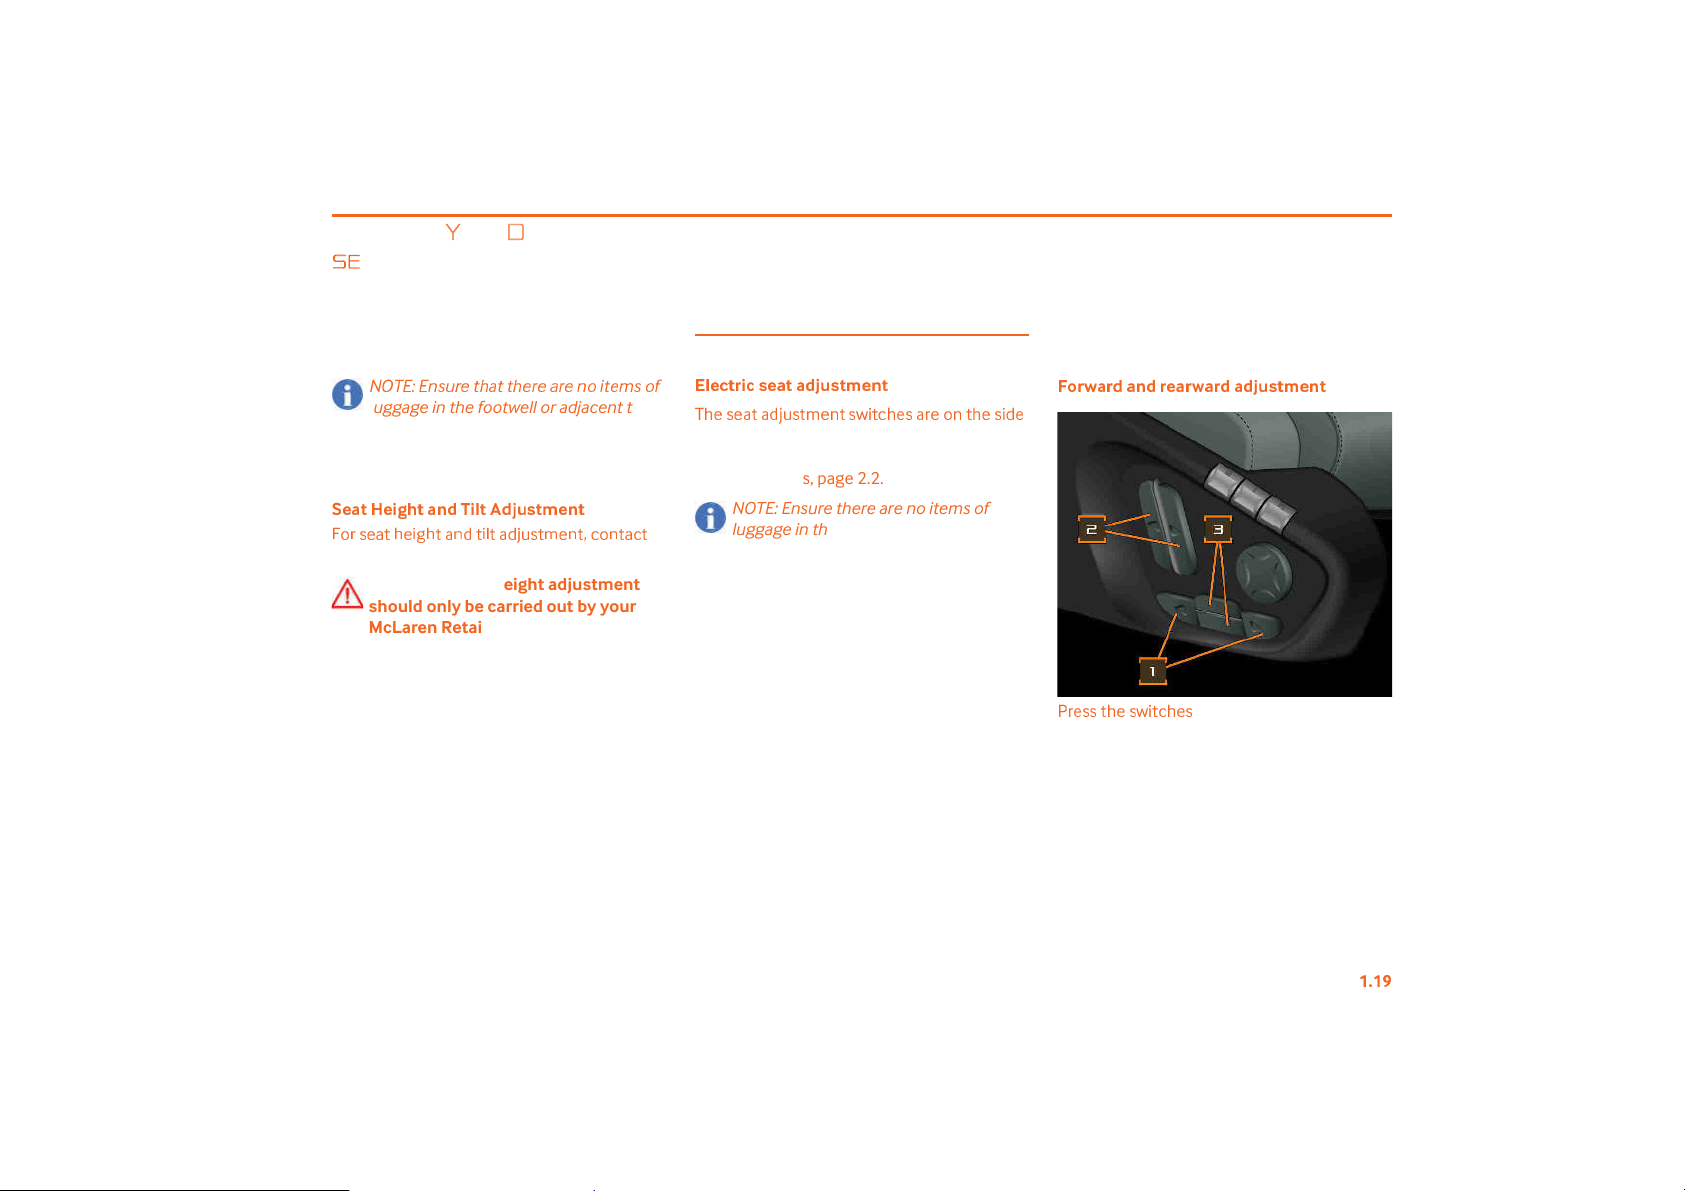
➎➏➐➑➒➑➙➔→➡➛➣➢↔➣➣➢➛➡➛↔➡➛➙➞↕➣
➛➯➔➞✃
luggage in the footwell or adjacent to
the seats as this may lead to the seats
being damaged or not getting full
adjustment.
➴✪❈✻❐
✪✱✹❅✻❈✸
✰❡✱✼✻❛✰➹✯✽✻✿✪✸✻
➋
✒✠✔✡✟✌✑✡✥✳✑✌✟☛✤✌✥✍✌✟✤❹✓✔✌✧✡☛✌♠✝✒☛✌✟✝✌
your McLaren Retailer.
WARNING: Seat height adjustment
should only be carried out by your
McLaren Retailer.
Electric seats
➳✼✪❀✻✭✱❀✽
❚✑✡✔✡✟✌✟✤❹✓✔✌✧✡☛✌
of the seat base and can be used when the
vehicle is in any awake status, see Vehicle
electrical status, page 2.2.
✪❈✻❈✰➹✯✽✻✿✪✸✻
✔❋✥✌✝✑✡✔✟✠✡✒☛✌✑✡✔✥✤
NOTE: Ensure there are no items of
luggage in the footwell or behind,
beneath or to the side of the seats, or
the seats may be damaged.
➉✬✭
❣❈✭
✡
`✠✡✔✔✌✑✡✔❋✥✌✝✑✡
the desired position.
✰❈✸✰✭
✪❈✭
❣❈✭
✰❈✰➹✯✽✻✿✪✸✻
✔
(1) until the seat reaches
BEFORE YOU DRIVE
➶
EATS
♥♦✷
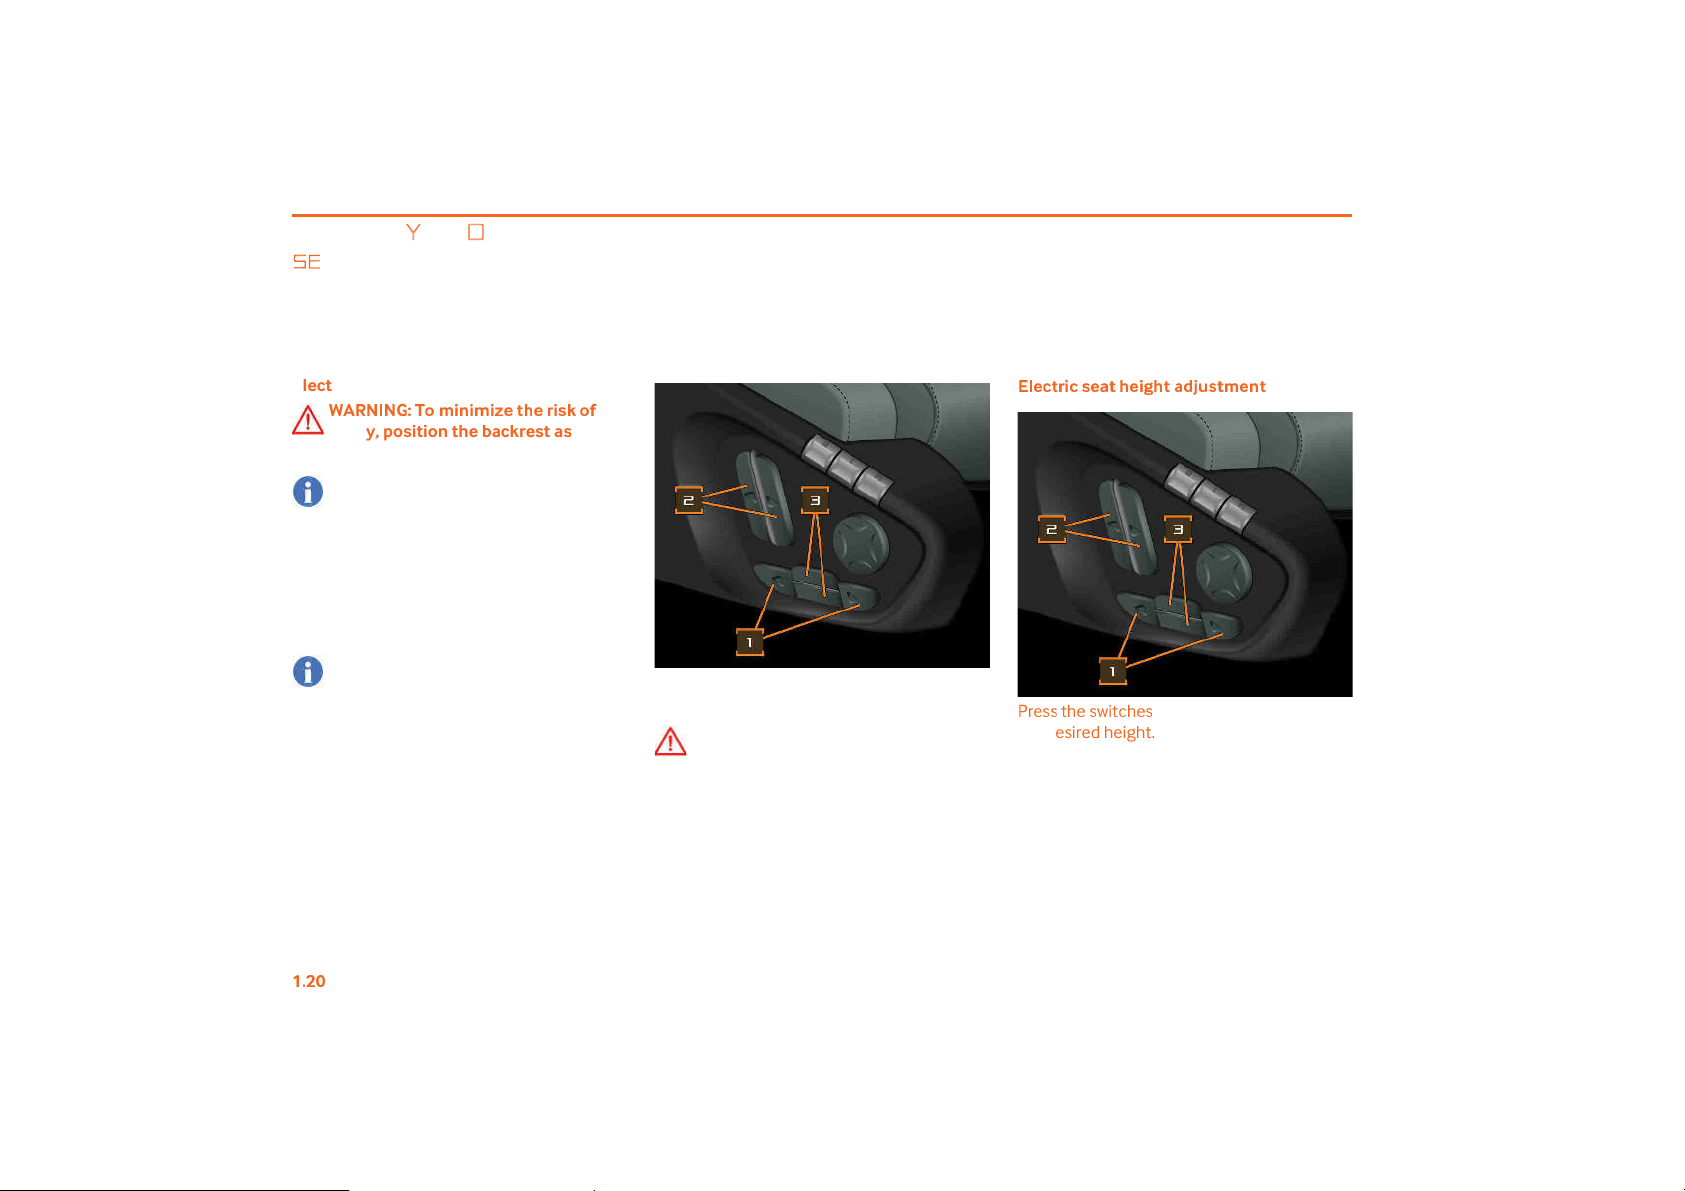
➨
Electric seat backrest rake adjustment
❵❛❜❝✾
❝❊❞
❡✬✿
✱✸✱✿✱➘✪✻❅✪✭✱✽❥✬
✫
injury, position the backrest as close
as possible to vertical.
NOTE: When reclining the backrest, the
seat base will automatically move
forward, depending on its position
relative to the rear bulkhead. If the seat
base is moved backwards when the
backrest is fully reclined, the backrest
will automatically raise to prevent
contact with the rear bulkhead.
NOTE: Do not recline the seat backrest
so that it repeatedly contacts the rear
bulkhead as this could lead to damage
over time.
Press the switches (2) until the backrest is in
the required position.
WARNING: Ensure there are no items
beneath the passenger!s seat or the
occupant protection system may not
function correctly.
➳✼✪❀✻✭✱❀✽
✪❈✻❅✪✱✹❅✻❈✰➹✯✽✻✿✪✸✻
A✠✡✔✔✌✑✡✔❋✥✌✝✑✡
✔
(3) until the seat reaches
the desired height.

BEFORE YOU DRIVE
➶
EATS
♥♦✷
♥
Electric seat lumbar adjustment
$✠✡✔✔
(1) to raise or (2) to lower the position of
the lumbar support.
Press (3) to inflate or (4) to deflate the lumbar
support.
➴
✻✬✭✱✸
✹
❈
✿✪✿
✬✭✮➭✬✽✱✻✱✬✸
❙❑✡✝✥✦✥✝✔✡✟
✌♠✡❏✌✡✠✥✒✠✧✥✠✠✒
✠♠✟☛✤✔✌✡✡✠✥
☛
✳
wheel positions can be stored for up to two
drivers.
NOTE: Exterior mirror and steering wheel
positions can only be stored or recalled
using the driver!s memory buttons.
NOTE: Steering wheel position can only
be stored or recalled if electric steering
column is fitted.
Set the seat, mirrors, and steering wheel to
the desired positions; see Electric seats,
page 1.19, Electric steering wheel
adjustment, page 1.24 and Exterior mirrors,
page 1.38.
Press and hold the memory set button (1) and
then simultaneously press one of the
memory position buttons (2) to store the
setting.

BEFORE YOU DRIVE
➶
EATS
♥♦✷
✷
Recalling a memory position
❵❛❜❝✾
❝❊❞
➫
✸✼✮✭✪
❀
❈
✼
✼❈✽
✪❈✻
✐✿✱✭✭✬✭
✐
and steering wheel position, when the
vehicle is stationary. You may not be
able to observe road and traffic
conditions this could lead to you
losing control of the vehicle which
may result in an accident.
NOTE: Exterior mirror and steering wheel
positions can only be stored or recalled
using the driver!s memory buttons.
NOTE: Steering wheel position can only
be stored or recalled if electric steering
column is fitted.
Press the button (2) where the required
setting is stored, and hold until the seat,
exterior mirrors and steering wheel have
completed their adjustment.
✺
✬✿✫✬✭✻✪●✱
✻
❵❛❜❝✾
❝❊❞
➳✸✽✯✭✪✻
❅❈✻✸✬✬✸
✪
❀
❈
✸
become trapped as the seat moves.
When comfort entry/exit is active, the driver!s
seat will move fully rearwards and to its lowest
position and the steering wheel will move
inwards and to its highest position when the
engine is off and the driver!s door is opened.
This assists exit from the vehicle. To switch
the feature on or off, see Comfort Entry/Exit,
page 3.24.
NOTE: Steering wheel will only change
position if electric steering column is
fitted.
✺
✬✿✫✬✭✻✪✸✻✭✮
☞✦✌✡✠✡☛✌✡✠✥
☛✳✌✑✡◆✡✑✥✝✍
✡
♠
✴
✒✓✝✟☛✠✡✌✓✠☛✌✑
✡
driver!s seat and steering wheel to its most
recent position using the control stalk on the
left of the steering column.
NOTE: Steering wheel will only change
position if electric steering column is
fitted.

BEFORE YOU DRIVE
➶
EATS
♥♦✷
▲
❚✑✡✦✓☛✝✌✥✒☛❋✥✍✍✒☛
✍
✴
❍
✡✟◆✟✥✍✟❍✍
✡❋✑✡☛❒❚
✒
Return Seat, Pull left Stalk or Press OK to
Clear$ is displayed on the left-hand display.
The vehicle must be awake with ignition off,
the driver!s door closed, and comfort
entry/exit ON.
1. Pull the control stalk towards you once
to initiate the comfort entry function.
2. If at any point you wish to cancel the
function, operate the control stalk or
open the driver!s door. A message #Seat
Returning, Operate Stalk or Open Door
to Cancel$ will appear in the left-hand
display.
NOTE: This function will only return the
seat and steering wheel to the position
they were in prior to the comfort
entry/exit function being used. It will not
use any of the memory positions, unless
the previous position was one of the
stored memory positions.
3. If the seat or steering wheel are
manually adjusted before the stalk is
used, the function will be lost and will not
be available until the next time comfort
entry/exit function is used.
NOTE: Cancel the comfort entry/exit
function by starting the engine, or by
pressing a seat or steering column
switch while the seat is returning to
position.
4. If the comfort entry/exit function is
canceled, it will not be possible to return
the seat and steering wheel to their
previous positions using this function.
The message in the left-hand display will
disappear and the control stalk will
return to its normal use. The function will
be available when comfort entry/exit is
next used.
5. Once the seat and steering wheel have
returned to their previous positions, the
message in the left-hand display will
disappear and an audible alert will
confirm that the process has been
completed.
❐✪❈
✻✪✰✽✪❈✻
✽
❩✡✟✌✡✤✔✡✟✌✔✝✟
☛❍✡
accessed using the
climate control screen on IRIS. See Heated
seats, page 4.10.
NOTE: The heated seat function is only
available when the engine is running.

BEFORE YOU DRIVE
➶
TEERING WHEEL AND STEERING COLUMN
♥♦✷
❖
➈➸➀➀❮➂➁➃❰➻➀➀➇➄➁➅➈➸➀➀❮➂➁➃➆❾➇3➾
➁
Manual steering wheel adjustment
❵❛❜❝✾
❝❊❞
➫
✸✼✮❈✰➹✯✽✻✻❅✪✽✻✪✪✭✱✸
✹
wheel position when the vehicle is
stationary. You may not be able to
observe road and traffic conditions
this could lead to you losing control
of the vehicle which may result in an
accident.
The steering wheel can be adjusted for height
and reach.
Push the lever (highlighted) downwards and
position the steering wheel so that:
• your arms are slightly bent when you
hold the wheel
• you can move your legs freely
• you can see all the displays in the
instrument cluster clearly
Pull the lever up to secure the steering wheel.
Ensure the lever is locked before driving.
Electric steering wheel adjustment
❵❛❜❝✾
❝❊❞
➫
✸✼✮❈✰➹✯✽✻✻❅✪✽✻✪✪✭✱✸
wheel position when the vehicle is
stationary. You may not be able to
observe road and traffic conditions
this could lead to you losing control
of the vehicle which may result in an
accident.
The steering wheel position may be adjusted
for height and reach using the column control
switch when the vehicle is in any awake
status, see Vehicle electrical status, page 2.2.
The column control switch is located on the
left-hand side of the steering column.
✹

BEFORE YOU DRIVE
➶
TEERING WHEEL AND STEERING COLUMN
♥♦✷
❫
✗&❩✡✥✳✑✌✕❘✟✥✔
✡
2. Height: Lower
3. Reach: Away
4. Reach: Towards
Moving the column control switch in
directions 1 & 2 adjusts the steering wheel
height, raising or lowering the wheel!s
position.
Moving the column control switch in
directions 3 & 4 adjusts the steering wheel
reach, moving it closer or further away.
NOTE: The column control switch will
only adjust the steering wheel in one
direction at a time.
Using the column control switch, position the
steering wheel so that:
• your arms are slightly bent when you
hold the wheel
• you can move your legs freely
• you can see all the displays in the
instrument cluster clearly
❛
✯✻✬
✿
❈
✻
✱❀✽✻✪✪✭✱✸✹❣❅✪✪✼❈✰➹✯✽✻✿✪✸✻
❄
✦✴✒✓✠◆✡✑✥✝✍✡✥✔✡➥✓
✥
❑
❑
✡
✤❋✥✌✑✡✍✡✝✌✠✥✝✔✡✟✌
✔
♠
the electric steering wheel position is stored
when the seat and mirror positions are stored.
See Storing a memory position, page 1.21.
WARNING: Ensure that your hands
are kept clear of the wheel and
column as the steering wheel moves.
NOTE: Any automatic movement can be
canceled with any input from the
column control switch.
✺
✬✿✫✬✭✻✪✸✻✭✮T✪●✱
✻
❯✑✡☛✝✒✧✦✒✠✌✡☛✌✠✴➧
✡❏✥✌✥✔✟✝✌✥◆
✡♠✌✑✡
steering wheel and column will move fully
inwards (away from the driver) and to its
highest position when the engine is off and
the driver!s door is opened.
You can return the steering wheel and
column to its most recent position using the
control stalk on the left of the steering
column. See Comfort exit, page 1.22.
WARNING: Ensure that your hands
are kept clear of the wheel and
column as the steering wheel moves.
NOTE: Any automatic movement can be
canceled with any input from the
column control switch.

BEFORE YOU DRIVE
➶
TEERING WHEEL AND STEERING COLUMN
♥♦✷
❢
Horn
%✠✡✔✔✌✑✡✝✡☛✌✡✠✒✦✌✑✡✔✌✡✡✠✥
operate the horn.
NOTE: The horn can be operated when
the ignition is switched off.
☛
✑✡✡✍✌
✳
✒
❋

BEFORE YOU DRIVE
❽
CCUPANT SAFETY
♥♦✷
❦
❾➆➆'❿➄➁➸➈➄➼➀➸
➽
Seat belts
❙✡✟
✌❍✡✍✌✔✟☛✤✝✑✥✍✤✠✡✔✌✠✟✥☛✌
✔✴✔✌✡✧✔✟✠✡✌✑✡
most effective means of restraining vehicle
occupants from impact forces, which
minimizes the danger of injury from interior
impacts and the effects of whiplash.
WARNING: A seat belt which is not
worn, worn incorrectly, or has not
been engaged fully in the seat belt
buckle, cannot perform its intended
function. To avoid injuries, ensure
that all vehicle occupants wear their
seat belt correctly at all times.
Ensure that the belt:
•
is routed as low as possible across
your pelvic area, i.e. across your hip
joints and not across your abdomen
•
fits closely
•
is not twisted
•
is routed across the middle of your
shoulder
•
lies flat across the mid point of the
collar bone between the neck and
shoulder
•
fits closely across your pelvis by
pulling the shoulder belt upwards
Do not secure any objects with a seat
belt if the seat belt is being used by a
vehicle occupant.
Avoid wearing bulky clothing.
Do not route the belt across sharp
edged or fragile objects especially if
these are on or in your clothing The
seat belt could be damaged and you
could be injured.
Only one person should use each seat
belt at any one time.
Never allow children to travel on the
lap of another occupant.
Children under 4 ft 5 in (1.35 meters)
tall or younger than 12 years of age
must be secured in a suitable child
restraint. Follow the manufacturer!s
instructions when installing child
restraint systems.
WARNING: Pregnant women should
wear a seat belt to ensure maximum
safety of mother and unborn child.
Position the lap belt across the hips,
beneath the abdomen and position
the shoulder belt between the breasts
and to the side of the abdomen.
Ensure the belt is not slack or twisted.
WARNING: The seat belt only provides
its intended degree of protection if
the seat backrest is positioned close
to vertical, and the occupant is sitting
upright.
WARNING: The seat belt cannot
perform its function correctly if the
seat belt or buckle becomes
excessively dirty or damaged. Ensure
the belt latch engages the buckle
fully.
Check the seat belts regularly to
ensure that they are not damaged, or
routed over sharp edges and are not
trapped. The belt could tear in an
accident, causing injury to occupants.
Have seat belts checked if the belts
have been damaged or subjected to a
heavy load. Work on the seat belts
should only be carried out by your
McLaren Retailer.

BEFORE YOU DRIVE
❽
CCUPANT SAFETY
♥♦✷
❧
Wearing a seat belt
✗&❳☛✔✓✠✡✌✑✟
✌✴✒✓✟✠✡✔✡✟✌✡✤✝✒✧✦✒✠✌✟❍✍
✴
and the controls are within easy reach.
2. Grasp the seat belt latch and pull across
the body, ensuring that the belt lies flat
across the mid point of the collar bone
between the neck and shoulder, then
across the chest and pelvis.
3. With the belt correctly positioned insert
the latch into the buckle and press until
a click is heard to confirm engagement.
Check engagement by attempting to
pull the latch from the buckle.
➴✪❈
✻❤✪✼✻✻✪✸✽✱✬✸✪✭✽
❚✑✡✔✡✟✌❍✡✍✌✔✥☛✝✒✠❑✒✠✟✌✡❍✡✍✌✌✡☛✔✥✒☛✡✠✔
&
Belt tensioners apply tension to the seat belts
in an accident, pulling them tight against the
occupant.
WARNING: Do not insert the belt latch
into the passenger!s seat belt buckle
if the passenger!s seat is unoccupied.
The belt tensioners could be triggered
in an accident.
WARNING: Belt tensioners do not
correct an incorrect seating position
or incorrectly worn seat belts.
Belt tensioners do not pull occupants
back towards the backrests.
The belt tensioner will be triggered for each
seat belt, provided the belt latch is engaged in
the seat belt buckle, if a head-on or rear-end
collision occurs and the vehicle decelerates
or accelerates rapidly.
If the belt tensioners are triggered, a bang will
be heard, a small amount of dust may be
released and the Supplementary Restraint
System warning light will illuminate.
WARNING: Once triggered (or if you
are unsure if they have triggered) you
MUST not drive the vehicle. Contact
your nearest McLaren Retailer
immediately.
✩✪✼✻✫✬✭❀✪✼✱✿✱✻✪✭✽
❚✑✡✔✡✟✌❍✡✍✌✔✥☛✝✒✠❑✒✠✟✌✡❍✡✍✌✦✒✠✝✡✍✥✧✥✌✡✠
✔
&
Belt force limiters are tuned to the front air
bags and gradually release the tension being
applied to the belts during an impact,
reducing the force exerted on occupants.

BEFORE YOU DRIVE
❽
CCUPANT SAFETY
♥♦✷
➦
Seat belt warning light
❚✑✡✔✡✟✌❍✡✍✌❋✟✠☛✥☛✳✍
✥✳✑✌✥☛✌✑✡
instrument cluster and a warning tone
reminds vehicle occupants to fasten their
seat belts. The seat belt warning light
extinguishes and the warning tone ceases
when the driver and passenger have fastened
their seat belt.
Supplementary Restraint System
❛
✱✭❤❈✹✽✮✽✻
❴✒✓✠▼✝✞✟✠✡☛✥✔✡➥✓✥
air bags:
• driver!s front air bag in the steering
wheel
• passenger!s front air bag in the
dashboard
• driver!s and passenger!s knee air bags
• side head air bags in the doors
WARNING: Take note of all warning
labels attached to the sun visors.
✿
✪
✡
✤❋✥✌✑✌✑✡✦✒✍✍✒❋✥
❑
❑
WARNING: Air bags are not a
☛
✳
substitute for correctly worn seat
belts, they enhance the level of
occupant protection offered by seat
belts.
WARNING: Correct operation of the air
bags can only occur if the steering
wheel, the passenger!s air bag cover,
the knee air bag cover and the door
trim are not covered.

BEFORE YOU DRIVE
❽
CCUPANT SAFETY
♥♦▲
➨
❵❛❜❝✾
❝❊❞
❡
✬✭✪✰✯❀✪✻❅✪✭✱✽❥✬
✫
injuries in the event of an accident,
observe the following points:
•
Ensure that the driver!s chest is at
least 10 inches (25 centimeters) from
the air bag cover.
•
Do not lean forward over the
dashboard while the vehicle is in
motion.
•
Do not rest your feet on the
dashboard.
•
Only hold the steering wheel by the
outside of the rim. You could be
injured if the air bag deploys and you
are holding the inside of the steering
wheel.
• Occupants, particularly children,
must not lean on the doors from
inside the vehicle.
•
Ensure that there are no other
objects between the vehicle
occupants and the deployment area
of the air bags.
•
Because of the high speed at which
air bags deploy, there is a risk of
injuries caused by an inflating air bag.
❛
✱✭❤❈✹✭✪➭✼
❈
❀✪✿
✪✸✻
❂❀❃
❈
✭✪✸✭✪❀✬
✿
✿
✪✸✰✽✻
❅❈✻❈✱✭❤❈✹
✽
are replaced every 15 years to
prevent air bags from not firing due to
component operating life.
❛
✱✭❤❈✹✽✮✽✻
✪
✿
✿
✬✰✱✫✱
❀
❈
✻✱✬
✸
❄✦✥✌✥✔☛✡✝✡✔✔✟
✠✴✌✒✧✒✤✥✦✴✌✑✡✟✥
✠❍✟✳✔✴✔✌✡
✧
to accommodate a person with disabilities,
please contact McLaren Automotive Inc at:
McLaren Automotive Inc.
750 3rd Avenue, Suite 2400
New York
NY 10017

BEFORE YOU DRIVE
❽
CCUPANT SAFETY
♥♦▲
♥
Front air bags
❚✑✡✤✠✥◆✡✠❨✔✦✠✒☛✌✟✥✠❍✟
✳
(1) deploys in front of
the steering wheel and the passenger!s front
air bag (2) deploys in front of and above the
dashboard.
The front air bags are deployed if the system
determines they can offer additional
protection for occupants against head and
chest injuries.
NOTE: The passenger!s front air bag is
only triggered if the PASSENGER AIR BAG
OFF warning light on the overhead
console is NOT illuminated, see
Occupant classification system - front
passenger!s seat, page 1.32.
➴
✱✰✪❅✪❈✰❈✱✭❤❈✹
✽
❵❛❜❝✾
❝❊❞
❡
✬✭✪✰✯❀✪✻❅✪✭✱✽❥✬✫✱
✸➹✯✭✮
to occupants if a side head air bag is
triggered, ensure that:
•
there are no other objects between
the vehicle occupants and the
deployment area of the air bags
•
no accessories are attached to the
doors
•
no heavy or sharp objects are left in
the pockets in clothing
•
occupants, particularly children,
must not lean on the doors from
inside the vehicle
The side head air bags (left-hand highlighted)
are located in the upper area of each door
panel, and are deployed if the system
determines they can offer additional
protection for the head of the occupant on
the side of the vehicle on which the impact
occurs.
NOTE: The passenger!s side head air bag
is only deployed if the passenger!s seat is
occupied.

BEFORE YOU DRIVE
❽
CCUPANT SAFETY
♥♦▲
✷
Knee air bags
❵❛❜❝✾
❝❊❞
❡
✬✭✪✰✯❀✪✻❅✪✭✱✽❥✬✫✱
✸➹✯✭✮
to occupants if a knee air bag is
triggered, ensure that:
•
there are no other objects between
the vehicle occupants and the
deployment area of the air bags
•
no heavy or sharp objects are left in
the pockets in clothing
The knee air bags (highlighted) are located in
the lower area of the dash board, and are
deployed if the system determines they can
offer additional protection for the knees and
lower body of the occupant on the side of the
vehicle on which the impact occurs.
NOTE: The passenger!s knee air bag is
only deployed if the passenger!s seat is
occupied.
➫❀❀✯➭
❈
✸
✻❀✼❈✽✽✱✫✱
❀
❈
✻✱✬✸✽✮✽✻✪
✿
➪
✫✭✬✸✻
passenger!s seat
❚✑✡
✔✴✔✌✡✧✝✟☛✤✡✌✡✠✧✥☛✡✥✦✌✑✡❑✟✔✔✡☛✳✡✠❨
✔
seat is occupied using weight sensors or a
capacitance mat fitted in the seat base, and
by checking the seat belt buckle engagement
on the passenger!s seat belt. The passenger!s
front air bag will not be active unless a specific
weight is exceeded. This allows child restraint
systems to be used on the passenger!s seat.
The status of the air bags is indicated by the
PASSENGER AIR BAG OFF warning light on the
overhead console.
The PASSENGER AIR BAG OFF warning light
illuminates when the ignition is switched on
and extinguishes after 5 seconds.
The warning light will remain illuminated if the
passenger!s seat is unoccupied or if a child
seat is fitted.
NOTE: The PASSENGER AIR BAG OFF
warning light is always illuminated unless
the specific weight is exceeded.

BEFORE YOU DRIVE
❽
CCUPANT SAFETY
♥♦▲
▲
❄✦✌✑✡)☞❙❙❳❲♣❳❘☞
❄❘❬
☞♣◗
➋➋❋
✟✠☛✥☛✳✍
✥✳✑
✌
is illuminated, the passenger!s front air bag is
not active. The side head air bag and the belt
tensioner on the passenger!s side remain
active even if the PASSENGER AIR BAG OFF
warning light is illuminated.
WARNING: If the PASSENGER AIR BAG
OFF warning light is not illuminated
when the child seat is fitted, the
passenger!s air bag is not
deactivated. The child could be
seriously injured if the passenger!s
air bag inflates.
WARNING: To ensure that the
occupant classification system
functions correctly, McLaren
recommends that objects are not
placed under a seat. McLaren also
recommends that additional
materials are not applied such as a
blanket, cushion, or aftermarket
equipment such as a seat cover,
heater, or massager. These items can
seriously affect how well the
occupant classification system
operates. McLaren recommends that
aftermarket equipment such as
covers, heaters, and massagers are
NOT used.
WARNING: Any electronic devices
that are either active or connected to
the 12V accessory socket should not
be placed on the passenger!s seat.
They can affect how the occupant
classification system operates.
WARNING: The occupant
classification system may become
affected if any form of liquid
(inclusive of rain) is spilled onto the
passenger!s seat. If the PASSENGER
AIR BAG OFF warning light is not
illuminated when the seat is
unoccupied, do not install a child
restraint or allow anyone to occupy
the seat. Please contact your nearest
McLaren Retailer at your earliest
convenience.
WARNING: Do not place sharp objects
onto the passenger!s seat. These may
damage the occupant classification
system if they puncture the seat
cushion.
WARNING: To ensure that the
occupant classification system
functions correctly, never place
objects (e.g. a cushion) under the
child restraint system. The entire
base of the child restraint system
must be in contact with the seat at all
times. If a child restraint system is
not fitted correctly it may not provide
the intended degree of protection in
the event of an accident and may
cause injuries.
❛
✱✭❤❈✹✰✪➭✼✬✮✿✪✸✻
❄☛✌✑✡✡◆✡☛✌✒✦✟✝✒✍✍✥✔✥✒☛✌✑✡✟✥
✠❍✟✳✔✟✠
✡
deployed by the Supplementary Restraints
System to protect the vehicle occupants. The
system can control the number of air bags
deployed and partially or fully inflate the

BEFORE YOU DRIVE
❽
CCUPANT SAFETY
♥♦▲
❖
✟✥✠❍✟✳✔✤✡❑✡☛✤✥☛✳✒☛✌✑✡✔✡◆✡✠✥
✌✴✒✦✌✑✡
collision to provide the best possible
protection to the vehicle occupants.
The system uses sensors to rapidly evaluate
the collision severity, the number of vehicle
occupants, each occupant!s weight, their
physical size and their seated position in
relation to their air bags. Once all these
factors are known the system will then deploy
the necessary air bags and regulate the
inflation pressure in the impact zone to
ensure the occupant!s safety.
After an accident the air bags begin to
depressurise almost immediately after the
inflation process has taken place. The gas
used to inflate the air bags escapes through
vents in the air bag and this helps reduce the
occurrence of major impact injuries to the
occupants.
An air bag slows down and restricts the
movement of the vehicle occupant reducing
the load on the body, but is not a substitute
for a correctly worn seat belt.
WARNING: If the air bags are
deployed, a bang will be heard and a
small amount of fine powder may be
released. The noise will not damage
your hearing and the powder does not
constitute a health hazard nor does it
imply that a fire has broken out. This
powder could cause short term
breathing difficulties for persons
suffering from asthma or other
respiratory conditions. To prevent
breathing difficulties, leave the
vehicle as soon as possible or open a
window.
WARNING: After an air bag has been
triggered, air bag parts are hot, do not
touch them. Have the air bags
replaced at your McLaren Retailer.
➫
✯
✻➫✫9✬✽✱✻✱✬✸
>➫➫9?
❚✑✡✟✥
✠❍✟✳✔✴✔✌✡✧✥
☛✴✒✓✠▼✝✞✟✠✡☛✑✟✔❍✡✡☛
tested for the correct small child Out Of
Position (OOP) operation. OOP can occur if a
small child is incorrectly positioned in the
passenger!s seat in the event of a collision in
which the air bags are deployed.
➴✯➭
➭
✼
✪✿✪✸✻❈✭
✮❜✪✽✻
✭❈✱✸✻➴✮✽✻
✪✿❣❈✭✸✱✸✹
light
❚✑✡❙✓
❑
❑
✍✡✧✡☛✌✟
✠
✴
❘
✡✔✌✠✟✥☛✌❙✴✔✌✡
✧
performs a self-test at regular intervals
when the ignition is switched on and the
engine is running.
The warning light in the instrument cluster
illuminates when the ignition is switched on
and extinguishes 5 seconds after the engine
is started.
WARNING: Contact your McLaren
retailer immediately should any of
the following occur:
•
the warning light does not illuminate
when you switch on the ignition
•
the light does not extinguish
5 seconds after the engine is running
•
the light illuminates again, after the
engine has started

BEFORE YOU DRIVE
❽
CCUPANT SAFETY
♥♦▲
❫
Safety features
❄
✦✴✒✓✟✠✡✓☛✦✒✠✌✓☛✟✌✡✡☛✒
✓✳✑✌✒❍✡✥☛◆✒✍◆✡✤
in an accident the following events will occur
to assist you and any recovery personnel:
• the doors will unlock
• the hazard warning lights will switch on
• the interior lighting will switch on
In some instances, the fuel system will also be
switched off.
Child passengers
❵❛❜❝✾
❝❊❞
✶✬✸✬✻✼✪❈✲
unsupervised in the vehicle even if
they are secured in a child restraint.
Children could injure themselves on
parts of the vehicle, open a door and
be seriously or even fatally harmed by
prolonged exposure to heat or cold.
If children open a door, they could
cause injury to others in doing so or
get out of the vehicle and possibly
injure themselves or they could be
injured by a passing vehicle.
Do not expose the child restraint
system to direct sunlight. The metal
parts of the child restraint system
could burn the child.
Do not carry heavy or hard objects
inside the vehicle unless they are
secured.
An unsecured or incorrectly
positioned load increases the risk of
injury to the child during sharp
braking, a sudden change of direction
or an accident.
✪❀❅✱✼✰✭✪✸
✺❅✱✼✰✭✪✽✻
▼✝✞✟✠✡☛☞✓✌✒✧✒✌✥◆✡✤✒✡✔☛✒✌✠✡✝✒✧✧✡☛✤
✭❈✱✸✻✽✮✽✻
✿
✪
the use of child seats in this vehicle, but if you
choose to do so, please follow the guidelines
below:
Secure any child under 4 feet 5 inches
(1.35 meters) tall or younger than 12 years of
age traveling in the vehicle in an appropriate
category restraint according to their weight.
Contact your McLaren Retailer for advice.
✟✌✡✳✒
✠
❁
✴
❯✡✥✳✑
✌
Category 0 Up to 22 lb (10 kg)
Category 0+s Up to 28 lb (13 kg)
Category I 20 to 40 lb (9 to 18 kg)
Category II 34 to 55 lb (15 to 25 kg)
Category III 48 to 80 lb (22 to 36 kg)
Please refer to current national and state laws
for specific requirements.

BEFORE YOU DRIVE
❽
CCUPANT SAFETY
♥♦▲
❢
❵❛❜❝✾
❝❊❞
❝
✪✲✪✭✽
✪❀✯✭✪❈✭
✪❈✭
❣❈✭
✰
facing child restraint system on the
passenger!s seat if the passenger!s
front air bag is active. The status is
indicated by the PASSENGER AIR BAG
OFF indicator.
WARNING: If the PASSENGER AIR BAG
OFF indicator does not illuminate, do
not use a rearward facing child
restraint system on the passenger
seat. You may use a forward-facing
child restraint system on the
passenger!s seat. The warning label
on the passenger!s side is there to
remind you of this.
WARNING: If a forward facing child
seat is fitted to the passenger!s seat,
make sure that the passenger!s seat
is fully rearwards and is positioned at
the lowest height. A manual
passenger!s seat does not have
height adjustment.
WARNING: If the child restraint
system has not been fitted correctly,
the child cannot be restrained in an
accident or sudden braking and could
be injured. When fitting a child
restraint system, observe the
manufacturer!s instructions on the
correct use of the child restraint.
➌
✾➴✾
❀
❅✱✼✰✭✪✽✻✭❈✱✸✻✫✯
✸❀✻✱✬
✸
❴✒✓✠▼✝✞✟✠✡☛✥✔✦✥✌✌✡✤❋✥✌✑✟❭❄❙❄✔✴✔✌✡
✧
which is an automatic locking seat belt on the
passenger!s side designed to temporarily lock
the seat belt to securely hold the child
restraint in the passenger!s seat.
1. Extend the passenger!s seat belt fully.
The KISI system only engages when the
seat belt is fully extended.
NOTE: If the vehicle is parked on a hill the
inertia lock may stop the seat belt
extending. If this occurs, release the seat

BEFORE YOU DRIVE
❽
CCUPANT SAFETY
♥♦▲
❦
➮
➛➝➣➔➝↕➟➢➣
➝➬↔➙➜➤➞➙➣↕➙→➛➣➞➛4➣➛➙➜➣➢
➛
seat belt carefully to avoid the
engagement of the inertia lock.
2. Pass the seat belt through the child
restraint as described by the child
restraint manufacturer and engage the
belt latch in the buckle.
3. Adjust the belt so that the lower section
is tight against the restraint and allow
the upper section to retract. The KISI
system will click as the belt retracts.
4. When the seat belt has retracted as far as
possible, pull on the upper section to
check that the seat belt has locked.
NOTE: The KISI system will disengage
when the seat belt has fully retracted
and can then be worn as a normal seat
belt. Once the KISI system has unlocked,
it will be necessary to fully extend the
seat belt to engage the KISI system the
next time a child restraint is used.
❡
✪✻❅✪✭✽✻
✭
❈➭❈✸❀
❅✬✭❈✹✪✽
❵❛❜❝✾
❝❊❞
✺❅✱✼✰✭✪✽✻
✭❈✱✸✻❈✸❀❅✬✭❈✹✪✽
are designed to withstand only those
loads imposed by correctly fitted
child restraints. Under no
circumstances are they to be used for
adult seat belts, harnesses or for
attaching other items or equipment
to the vehicle.
WARNING: When fitting a child
restraint, always pass the upper
tether strap over the top of the seat
back.
Always ensure that if an upper tether
is provided, it is secured and
tightened fully, as this provides
maximum protection for a child.
An upper tether anchorage is provided on the
passenger!s seat.
Install the child seat and pass the upper tether
strap over the top of the seat back, secure it
to the anchorage and tighten fully.
Once the child restraint is installed, test the
security of the installation, before seating a
child. Attempt to twist the child seat from side
to side and to pull it away from the vehicle
seat, to check it is securely in place.

BEFORE YOU DRIVE
IRRORS
♥♦▲
❧
➾➂❮❮❾❮➈
Safety
❵❛❜❝✾
❝❊❞
✩✪✫✬✭✪✰
✭
iving, adjust all
mirrors to give the best possible view
of road and traffic conditions.
Interior mirror
❚✑✡✟✓✌✒✧✟✌✥✝✤✥✧✧✥
interior mirror is activated or deactivated by
pressing the switch (2) on the bottom of the
mirror. The indicator light (1) will illuminate
when automatic dimming is active.
When activated, the interior mirror will
automatically dim when bright light is
detected by the light sensor (3).
If reverse gear is selected or if ambient light
levels are high, the automatic dimming
function will be deactivated.
☛✳✦✓☛✝✌✥✒☛✒✦✌✑✡
Exterior mirrors
❵❛❜❝✾
❝❊❞
✾
✸✽✬✿✪
exterior mirrors have convex glass
fitted. This type of mirror enlarges the
field of vision, but reduces the size of
the image. This means that objects
are closer than they appear.
To avoid misjudging the distance to
vehicles traveling behind and
perhaps causing an accident, check
the actual distance of the vehicle,
before changing direction.
The exterior mirrors control is located on the
dashboard between the steering wheel and
the center console.
✿
❈
✭❥✪✻✽✐✻❅✪

BEFORE YOU DRIVE
IRRORS
♥♦▲
➦
Adjusting mirrors
✗!❙❋✥✌✝✑✌✑✡
✥✳☛✥✌✥✒☛✒
☛
!
2. Rotate the control to the left (1) to
adjust the left-hand mirror or to the right
(2) to adjust the right-hand mirror.
3. Move the control up, down left and right
to adjust the mirror to the desired
position.
➳●✻✪✭✱✬
✭✿✱✭✭✬✭✫✬✼✰
✗!❙❋✥✌✝✑✌✑✡
✥✳☛✥✌✥✒☛✒
☛
!
2. Rotate the control to position (3) to fold
the mirrors.
3. To unfold the mirrors rotate the control
away from position (3).
NOTE: If the switch remains in position
(3) the mirrors will be folded until the
switch is moved.
➳●✻✪✭✱✬
✭✿✱✭✭✬✭❈✯✻✬
✿
❈
✻
✱❀✫✬✼
✰
❚✑✡
✡❏✌✡✠✥✒✠✧✥✠✠✒✠✔✝✟
☛❍✡✔✡✌✔✒✌✑✟✌✌✑✡
✴
fold automatically when the vehicle is locked.
Unfolding occurs as a door is opened, not
when the vehicle is unlocked. See Auto Fold
Mirrors, page 3.23.
❂
✱✭✭✬✭✰✱
➭
➭
✱✸✹✱✸✭✪✲✪✭✽
✪
❚✑✡
✡❏✌✡✠✥✒✠✧✥✠✠✒✠✔✝✟
☛❍✡✔✡✌✌✒✤
✥
❑
❋
✑✡☛
reverse is engaged. This provides a view of the
ground to the rear of the vehicle. See Reverse
Mirror Dip, page 3.24.
❐✪❈
✻✪✰✿✱✭✭✬✭
✽
❳❏✌✡✠✥✒✠✧✥✠✠✒✠✔✟✠✡✑✡✟✌✡
✤❋✑✡☛✌✑✡✔❋✥✌✝✑✥
✔
pressed on the IRIS screen and the engine is
running. see Heated mirror, page 4.11. They
are also heated when the ambient
temperature is below 41°F (5°C).

BEFORE YOU DRIVE
IGHTING
♥♦❖
➨
➇➂➃➻➸➂➁
➃
Exterior lighting
✗,❩✡✟✤✍✟✧❑✑
✥❍✡✟✧
2. Headlamp lo beam
3. Turn signal/Daytime running
lamp/Sidelamp
4. Side turn signal
5. Side marker lamp
1. License plate lamp
2. Stop lamp/Tail lamp/Turn signal
3. Central high mounted stop lamp
4. Side marker lamp
5. Reflector
6. Reverse lamp and rear fog lamp

BEFORE YOU DRIVE
IGHTING
Light switch
❵❛❜❝✾
❝❊❞
❡
❅✪✼✱✹❅✻✽✰✬✸✬✻✽❣✱✻❀❅✬✸
automatically in foggy conditions.
Automatic light control is only an aid,
you are responsible for the vehicle!s
lighting at all times.
The light switch is located between the
steering wheel and the driver!s door and has
the following positions.
At position (0), the lights are off with the
exception of daytime running lamps and tail
lamps.
Rotate the control to position (A) for
automatic light control.
Rotate the control to position (1) for
sidelamps or position (2) for headlamps. The
sidelamp warning light illuminates in the
instrument cluster.
❛
✿
❈
✯✻✬
✻
❚✑✡✔✥✤✡✍✟
✱❀✼✱✹❅✻❀✬✸✻✭✬
✧❑✔✟☛✤✍
✼
✒❍✡✟✧✑✡✟✤✍✟
✧❑✔✟✠
✡
switched on automatically when ambient
light falls below a predetermined level.
To switch on automatic light control, turn the
light switch to position (A).
NOTE: If the vehicle detects rain whilst
the light switch is set to position (A) the
lo beam headlamps will switch on
automatically, regardless of current
external light levels.
NOTE: With the light switch in position
(A) and the fog lights switched on, the lo
beam headlamps will also switch on
irrespective of ambient light conditions.
When the rear fog lamps are switched
off, the lo beam headlamps will also
switch off dependent on ambient light
conditions.
♥♦❖
♥

BEFORE YOU DRIVE
IGHTING
♥♦❖
✷
Sidelamps
❚✑✡✔✥✤✡✍✟
✧❑✔✟☛✤✌✑✡✤✟✴✌✥✧✡✠✓☛☛✥
☛
✳
lamps are a combined series of Light Emitting
Diodes located around the outside of the
headlamp. The sidelamps operate at a lower
intensity than the daytime running lamps, see
Daytime running lamps, page 1.43.
The sidelamps, tail lamps and license plate
lamps illuminate when the light switch is
turned to position (1).
The sidelamps warning light in the
instrument cluster illuminates.
❃
✬❤✪
❈
✿
❅
✪❈✰
✼
❈✿➭
✽
❚✒✔❋✥✌✝✑✒☛✌✑✡✑✡✟✤✍✟
✧❑✔♠✌✓✠☛✌✑✡✍✥✳✑
✌
switch to (2).
NOTE: On your McLaren, the same
headlight lo beam setting applies for
driving on either the left-hand or
right-hand side of the road.
Hi beam headlamps
❚✒✔❋✥✌✝✑✌✒✑
from you.
Pull the stalk towards you, to revert to lo
beams.
✥❍✡✟✧
✔
✓✔✑✌✑✡✔✌✟
♠
❑
✍✵✟❋✟
The hi beam headlamps warning light
illuminates in the instrument cluster.
❐✪❈
❈✿➭
✰
✼
✫
✼❈✽
❅
H✓✍✍✌✑✡✔✌✟✍✵✦✓✍
✍✴✌
✒❋✟✠✤
✔✴✒
✓
J
The hi beam headlamps operate for as long as
the stalk is held.
The hi beam headlamps warning light
illuminates in the instrument cluster.
✴

BEFORE YOU DRIVE
IGHTING
Daytime running lamps
❴✒✓✠▼✝✞✟✠✡☛✥✔✦✥✌✌✡✤❋✥✌✑✤✟✴✌✥✧✡✠✓☛☛✥
lamps which, along with the tail lights,
illuminate automatically when the ignition is
switched on even if all lights are switched off.
The sidelamps and the daytime running
lamps are a combined series of Light Emitting
Diodes located around the outside of the lo
beam headlamp. The daytime running lamps
operate at a higher intensity than the
sidelamps.
☛
✳
Rear fog lamp
➎➏➐➑➒➐➢➛➡➛↔➡✃➞➟➝↔➯➠➞➙
when lo beam headlamps are on.
Ensure that the lo beam headlamps are
switched on or the light switch is in position
(A).
Press the fog light button in the center of the
light switch.
The warning light in the instrument
cluster and the light in the switch both
illuminate.
➝➬➞➠➛➡↔➣➛
➔
NOTE: With the light switch in position
(A) and the rear fog lights switched on,
the lo beam headlamps will also switch
on irrespective of ambient light
conditions. When the rear fog lamps are
switched off, the lo beam headlamps will
also switch off dependent on ambient
light conditions.
♥♦❖
▲

BEFORE YOU DRIVE
IGHTING
Turn signals
$✓✔✑✌✑✡✌✓✠☛✔✥✳☛✟✍➧✑
downwards (1) to switch on the left-hand turn
signal.
Push the turn signal/hi beam stalk upwards
(2) to switch on the right-hand turn signal.
The corresponding warning light in the
instrument cluster will flash.
The stalk returns to its rest position as the
steering wheel returns to its central position.
✥❍✡✟✧✔✌✟✍
✵
❡
✯✭✸✽✱✹✸❈✼
▼✒◆✡✌✑✡✌✓✠☛✔✥✳☛✟✍➧✑
✽➪✼❈✸
✪❀❅❈✸✹✪
✥❍✡✟✧✔✌✟✍✵✓☛✌✥✍
resistance is felt when changing lanes on a
motorway. The appropriate turn signal flashes
three times.
For further information about the lighting see
Light switch, page 1.41.
Hazard warning lamps
❚✑✡✑✟★✟✠✤❋✟✠☛✥☛✳✍✟✧❑✔
ignition is switched off. As a safety feature,
they switch on automatically when an air bag
is triggered.
➫
➭
✪
✭❈✻✱✸✹✻❅✪
✗R$✠✡✔✔✌✑✡✑✟★✟✠
❅❈➘❈✭✰❣❈✭✸✱✸✹
2. All the turn signal lamps and both turn
signal warning lights in the instrument
cluster flash.
3. Press the hazard warning lamps button
again to switch off.
✒❑✡✠✟✌✡✡◆✡☛✥✦✌✑
❈✿➭
✼
✽
✤❋✟✠☛✥☛✳✍✟✧❑✔❍✓✌✌✒☛
✡
R
♥♦❖
❖

BEFORE YOU DRIVE
IGHTING
♥♦❖
❫
➎➏➐➑➒➷✃➣➢➛➢↔0↔➡
➜➲↔➡➙↕➙➟➝
↔➯➠➔➢↔;
➛
been switched on automatically, press
the hazard warning lamps button once
to switch them off.
<
❈
✸
✱
❀
❈✼❈✭✿
❚✑✡❑✟☛✥✝✟✍✟✠✧✦✓☛✝✌✥✒☛✥✔✤✡✔✥✳☛✡✤✌✒
attract attention by sounding the horn and
flashing the turn signal lamps repeatedly.
The panic alarm can be switched on by
pressing the hazard warning lamps button for
a period of 3 seconds or more.
The horn will cease after the panic alarm has
been active for a long period of time, but the
turn signal lamps will continue to flash. The
horn can be re-initiated by pressing the
hazard warning lamps button for a period of 3
seconds or more.
To switch the panic alarm off, press the
hazard warning lamps button briefly.
Parking lights
➬
➎➏➐➑➒➐➢➛➠↔➡V↕➙➟➝↕➟➢➣➔➤↔➙➞➙➝
activated when the ignition is switched
off.
1. To activate the parking lights, press the
turn signal/hi beam stalk down for the
left-hand side or push up for the righthand side until resistance is felt. The
selected parking lights will illuminate
once the vehicle has been locked.
2. To deactivate the parking lights, press
the turn signal/hi beam stalk down for
the left-hand side or push up for the
➮
right-hand side until resistance is felt.
The selected parking lights will then be
deactivated.
NOTE: This will allow parking lights on
both sides to be active at same time, and
also allows one side to be deactivated,
whilst keeping the opposite side
activated.
➛

BEFORE YOU DRIVE
ASHERS AND WIPERS
♥♦❖
❢
❰➄➈➻➀❮➈➄➁➅❰➂❿➀❮
➈
Windscreen wipers
✗0❯✥☛✤✔✝✠✡✡
☛❋✥❑✡✠✔✒✦
✦
2. Automatic wipe
3. Slow wipe
4. Fast wipe
NOTE: Switch off the windscreen wipers
in dry weather, dirt can cause
inadvertent wiper sweeps which could
damage the wiper blades or windscreen.
➫
➭
✪
✭❈✻✱✸✹✻❅✪❣✱✸✰
✽❀✭✪✪✸❣
✱➭✪✭✽
✗0❳☛✔✓✠✡✌✑✡
✥✳☛✥✌✥✒☛✥✔✔❋✥✌✝✑✡✤✒
☛
0
2. Move the wiper stalk to the required
position
NOTE: If the windscreen wipers are
switched on and the vehicle comes to a
halt, the windscreen wipers
automatically switch to intermittent
wipe, until the vehicle moves away.
❛
✯✻✬
✿
❈
✻
✱❀❣
✱➭✪
☞✠✟✥☛✔✡☛✔✒✠♠✍✒✝✟✌✡✤✒☛✌✑
✡❋✥☛✤✔✝✠✡✡☛
behind the interior mirror, measures the
quantity of water on the screen and operates
the wipers at the most appropriate speed.
To select, move the windscreen wiper stalk to
the automatic wipe position (2).
The wipers will wipe once. The wipe frequency
then depends on how wet the windscreen is.
Only select the automatic wipe position in
damp weather conditions or when it is raining.
To adjust the sensitivity of the rain sensor, see
Wiper Sensitivity, page 3.26.
➴
✼✬❣❣✱➭✪
▼✒◆✡✌✑✡❋✥❑✡✠✔✌✟
✍✵✌
✒❑✒✔✥✌✥✒☛
(3), to
operate the wipers at slow speed.
Return the stalk to position (1) to switch off.
➉❈✽✻❣
✱➭✪
▼✒◆✡✌✑✡❋✥❑✡✠✔✌✟
✍✵✌
✒❑✒✔✥✌✥✒☛
(4), to
operate the wipers at fast speed.
Return the stalk to position (1) to switch off.

BEFORE YOU DRIVE
ASHERS AND WIPERS
♥♦❖
❦
Single wipe
✗
&
➋
✒✠✟✔✍
✒❋✔✥☛✳✍
✡❋✥❑✡
♠
❍
✠✥✡✦✍
✴
❑
✓✔✑✌✑
✡
wiper stalk and release. The wipers will
operate once at slow speed, without
washers.
2. For a fast single wipe, push and hold the
wiper stalk down. The windscreen wipers
will perform a continuous fast wipe until
the stalk is released.
❵
✱✸✰
✽❀✭✪✪✸❣❈✽❅E❣✱➭✪
G✓✍✍✌✑✡❋✥❑✡✠✔✌✟
✍✵✌
✒❋✟✠✤
✔✴✒
✓
&
The windscreen washers and wipers will
initially operate at a slow speed while the stalk
is held. If the stalk is held for more than 2
seconds, the wiper will operate at high speed.
When the stalk is released, the wipers will
complete their cycle and return to the parked
position. After a period of time the wipers will
operate once more to wipe any remaining
washer fluid from the windscreen.
NOTE: The position of the washer jets are
set during vehicle manufacture and
should not need adjusting. If a problem
occurs, consult your McLaren Retailer.

BEFORE YOU DRIVE
ASHERS AND WIPERS
♥♦❖
❧
Wiper park positions
❄☛✟✤✤✥✌✥✒☛✌✒✌✑✡☛✒✠✧✟✍❑✟
✠
✵
❑
✒✔✥✌✥✒☛♠✌✑✡✠✡
are two alternative positions.
Ensure the vehicle is in accessory mode.
Pull the wiper control stalk towards you, the
wipers will move through the following park
positions each time the stalk is pulled:
❵
✱✸✻✪✭
➭
❈
✭
❥
❚✑✡❋✥❑✡✠✔✟✠
✡❑✟
✠✵✡✤◆✡✠✌✥✝✟✍✍✴✌✒✠✡✤✓✝✡✌✑✡
risk of damage to the wiper arms during
periods of heavy snowfall and provide access
for easier cleaning of accumulated snow.
➴
✪✭✲
✱❀✪
➭
❈
✭
❥
❚✑✡❋✥❑✡✠✔✟✠
✡❑✟
✠✵✡
✤
diagonally to provide
access for replacing the wiper blades, see
Replacing the wiper blades, page 5.30.
❝
✬
✭
✿
❈✼➭
❈
✭
❥
❚✑✡❋✥❑✡✠✔✟✠
✡❑✟
✠✵✡✤✑✒✠✥★✒☛✌✟✍✍✴✟✍✒
☛✳✌✑✡
lower edge of the windscreen.

BEFORE YOU DRIVE
OSE LIFT
♥♦❖
➦
➁❾➈➀➇➂➼
➸
Nose Lift Operation
❵❛❜❝✾
❝❊❞
➫
✸✸✬
✬
❀❀❈
✽✱✬✸✽❅✬✯✼✰✻❅✪
Nose Lift be used as a jacking system.
Using the Nose Lift to access the
underneath of the car may result in
serious injury.
Nose lift gives you the option to raise or lower
the front of the vehicle dependent on the
current vehicle ride height.
Nose ride height can only be raised when
traveling at speeds below 31 mph (50 kph).
The nose will automatically lower at speeds
above 37 mph (60 kph).
NOTE: If the nose lift icon on the righthand side of the central display is amber,
the system is not available. Do not drive
the vehicle at high speed and contact
your McLaren Retailer as soon as
possible.
The front suspension can be left fully raised
for extended periods, but it may relax to a
lower level over time.
If the nose is left in a raised position for a long
period, a system reset may occur when the
engine is next started to return the nose to
normal ride height.
If nose lift is used when in motion, slight
adjustments to the steering feel may be
experienced, this is normal and does not
affect the operation of the vehicle.
Access to nose lift can be obtained by using
the menu structure, see LEFT-HAND DISPLAY,
page 3.4.
❛❀❀
✪✽✽✱✸✹✻❅✪✿✪✸✯
☞✝✝✡✔✔✌✒☛✒✔✡✍✥✦✌✝✟☛❍✡
✒❍✌✟✥☛✡
✤
❍
✴
✓✔✥
☛
✳
the menu control stalk on the left of the
steering column, whenever the engine is
running and the doors are closed.
NOTE: Nose lift will be unavailable if
launch mode is active.
NOTE: Nose lift lowering is available only
if the door is closed.
Hold the menu control stalk up for one
second to quickly access the menu. A
confirmation tone will be heard.
Alternatively, access nose lift using the menu
structure, see LEFT-HAND DISPLAY, page 3.4.
The left-hand display will exit after the
timeout duration has been exceeded back to
home screen if there is no activity on the
menu.
See Nose Lift, page 3.12, for full information.


✷♦♥
STARTING AND DRIVING
#
✡✑✥✝✍✡✡✍✡✝✌✠✥✝✟✍✔✌✟✌✓
✔
...............................................................................
.✎.
✎
Switching on the ignition ............................................................................. 2.3
Instruments and Warning Lights ............................................................... 2.4
Seamless shift gearbox gear positions.................................................... 2.7
Parking brake..................................................................................................... 2.9
Brake pedal...................................................................................................... 2.10
Starting/stopping the engine.................................................................. 2.11
Driving ............................................................................................................... 2.14
Exhaust Temperature Monitoring.......................................................... 2.15
Parking Sensors............................................................................................. 2.16
Rear View Camera (RVC)............................................................................. 2.17
McLaren Track Telemetry ......................................................................... 2.18
③①2
⑤⑨①③③③✇✉②
8⑦①
2
⑥;❷
=
◗◆✡✠◆✥✡
❋..........................................................................................................
.✎.
✎
✙
Gear positions ................................................................................................ 2.20
Accelerator pedal position........................................................................ 2.21
Manual/Automatic mode.......................................................................... 2.21
✇2B
⑩
⑨
✉
B⑦2
B
⑩❺❷
⑧①⑥8⑥
2✉B
❶
❷
B
8
⑥❷⑨
③
☞✝✌✥◆✡✤✴☛✟✧✥✝✔✝✒☛✌✠✒✍
...........................................................................
.✎.
✎
✏
Active button.................................................................................................. 2.24
Handling control ........................................................................................... 2.25
Powertrain control ....................................................................................... 2.27
Launch control .............................................................................................. 2.29
⑩
⑥✉N
✉
B⑦③2②①8④③④③8①⑤③
♣
✡☛✡✠✟
✍
.............................................................................................................
.✎.
✚
✗
Anti-lock Braking System .......................................................................... 2.31
Brake assist system...................................................................................... 2.32
Brake disc wiping .......................................................................................... 2.32
Hill hold control............................................................................................. 2.33
Brake-steer...................................................................................................... 2.33
Electronic brake pre-fill.............................................................................. 2.33
Electronic Stability Control....................................................................... 2.34
Tire Pressure Monitoring System (TPMS)........................................... 2.37
❶⑥❸
✉③①
❶
❷
B
8
⑥❷⑨
◗◆✡✠◆✥✡
❋..........................................................................................................✎.
✏
✙
Using cruise control .................................................................................... 2.40
Canceling cruise control............................................................................ 2.41
Increasing cruise speed ............................................................................. 2.42
Reducing cruise speed............................................................................... 2.42
Resuming a stored speed.......................................................................... 2.43
2❶8
✉N①
③❺①
①
⑩
⑨
✉⑤✉8①
⑥
T
2
③
⑨
U
❙✡✌✌✥
☛✳✟☛✓
❑
❑
✡✠✔❑✡✡✤✍✥✧✥
t.................................................................... 2.44
⑥
❸
BB✉
B⑦✉
B
❘
✓☛☛✥☛✳✥
☛
.......................................................................................................✎.✏➊
Normal/Road use......................................................................................... 2.45
Track use.......................................................................................................... 2.46
⑥
①
②❸①
⑨
⑨
✉
B
⑦
➋
✥✍✍✥☛
✳
❋
✥✌✑✦✓✡✍
...............................................................................................✎.
✏
✘
Recommended fuel..................................................................................... 2.49
⑧
✉B8
①
⑥⑩⑥✉N
✉
B
⑦
❯✥☛✌✡✠✤✠✥◆✥
☛
✳................................................................................................
.✎.
➊
✙
DRIVING CONTROLS

DRIVING CONTROLS
➶
TARTING AND DRIVING
✷♦✷
➈➸➄❮➸➂➁➃➄➁➅➅❮➂+➂➁
➃
Vehicle electrical status
❚✑✡◆✡✑✥✝✍
✡❋✥✍✍✥✧❑✍✡✧✡☛✌✒☛✡✒✦✌✑
✡
following statuses according to the criteria
detailed.
NOTE: The engine can be started from
any of the following states, except
Locked. If the car is in Sleep mode, the
START/STOP button will need to be
pressed for more than two seconds.
NOTE: If the vehicle detects the battery
charge is getting too low, it will adopt the
Awake status to conserve energy.
Accessory and Ignition will be prohibited,
but Crank will still be available. This is to
allow the engine to be started so that
battery recharging can commence.
❃✬❀
❥✪✰
@
✡✑✥✝✍✡✥✔✍✒✝✵✡✤✥☛✍
✒
❋
❑✒❋
✡✠✧✒✤
✡
E
➴
✼✪✪
➭
@
✡✑✥✝✍✡✥✔✓☛✍✒✝✵✡✤✥☛✍
✒
❋
❑✒❋
✡✠✧✒✤
✡
E
❛❣❈
❥
✪
❉
✒✒✠✥✔
✒❑✡☛✡✤✒
✠
START/STOP button
pressed, when the car is in Sleep mode.
Time, odometer reading and battery status
are available in the left-hand display. Fuel
gauge operates in right-hand display.
If there is no further activity after two
minutes, the vehicle will return to the Sleep
status.
❛❀❀
✪✽✽✬✭
✮
➴❡❛❜❡S➴❡➫
U
button is pressed, when car is
in Awake mode.
Windows and heater/air conditioning
controls operate. IRIS and instrument cluster
menus are available.
If there is no further activity after 15 minutes,
the vehicle will return to the Sleep status.
Accessory mode can also be entered by
pressing the OK button on the instrument
cluster menu stalk. The key must be present
within the cockpit area for this function to be
available.
✾
✹✸✱✻✱✬✸
➴❡❛❜❡S➴❡➫
U
button is pressed, when car is
in Accessory mode.
NOTE: There is no timeout with ignition
on. Be aware that the battery could
become discharged.
✺
✭❈✸
❥
❙✡✡❙✌✟✠✌✥
☛✳➧✔✌
✒
❑
❑
✥
☛✳✌✑✡✡☛✳✥☛✡
♠
❑✟✳
✡
✎E✗
✗
E
U
✬❣✪✭✽❈✲✱✸
✹✿✬✰✪
❪☛✤✡✠◆✡
✠✴✠✟✠✡✝✥✠✝✓✧✔✌✟☛✝✡✔♠✌✑✡◆✡✑✥✝✍
✡
may not be able to supply enough voltage
and will activate power saving mode.
WARNING: When power saving mode
is active, the climate control and
steering will operate with reduced
effect.
NOTE: When power saving mode is
active, the message "Battery
Management Active - See Owners
Manual! appears on the instrument
cluster.

DRIVING CONTROLS
➶
TARTING AND DRIVING
✷♦▲
Switching on the ignition
✗%❳☛✔✓✠✡✌✑✟✌✌✑✡✵✡✴✦
vehicle.
2. To switch on the ignition without
starting the engine, press the
START/STOP button, without
depressing the brake pedal.
NOTE: If the vehicle is in Awake mode,
press the START/STOP button twice with
the brake pedal released.
✒❍✥✔✥☛✔✥✤✡✌✑✡
3. The ignition will switch on, the oil
temperature, water temperature and
fuel gauges will operate and several of
the warning lights will illuminate as a
self-test. The instrument cluster will fully
illuminate.

DRIVING CONTROLS
➶
TARTING AND DRIVING
✷♦❖
Instruments and Warning Lights
❯✟✠☛✥
☛✳✍
✥✳✑✌✔✝✟
☛❍✡✤✥◆✥✤✡✤✥☛✌✒✤✥✦✦✡✠✡☛✌
categories, according to the color that they
illuminate.
• RED, AMBER or YELLOW - indicates that a
fault has been detected. A fault indicated
by a RED light is more important than
one displayed in AMBER or YELLOW.
• BLUE or GREEN - indicates that a system
or feature is switched on and operating.
❂
❈
✱✸✱✸✽✻✭
✯✿✪✸✻
✽➫✲✪✭✲✱✪❣
❃
✪✫✻➪❅❈✸✰✶✱✽➭✼❈✮➫✲✪✭✲✱✪❣
✗C❚✟✝✑✒✧✡✌✡
✠
✡
✚C✎
♠
❑✟✳
2. Speedometer, page 3.3
❚✑✡✍✡✦✌➩✑✟☛✤✤✥✔❑✍
✟
✠✒◆✥✤✡✔✥✧❑✒✠✌✟☛
✴
❑
✌
information to the driver and will vary
depending on the mode and vehicle settings
selected.

DRIVING CONTROLS
➶
TARTING AND DRIVING
✷♦❫
❪✔✡✌✑✡✝✒☛✌✠✒✍✔✌✟✍✵✌✒☛✟◆
✥✳✟✌✡✌✑✠✒
✓✳✑✌✑
✡
menus.
❵
❈
✭✸✱✸✹❃✱✹❅✻✽
➪
❃
✪✫✻➪❅❈✸
✰➴✱✰✪
❚✥✠✡D✠✡✔✔✓✠✡▼✒☛✥✌✒✠✥☛✳❙✴✔✌✡
✧
(TPMS), page 2.37
Turn signals, page 1.44
Seat belt warning light, page 1.29
Rear fog lamp, page 1.43
Hi beam headlamps, page 1.42
Sidelamps, page 1.42
Supplementary Restraint System
warning light, page 1.34

DRIVING CONTROLS
➶
TARTING AND DRIVING
✷♦❢
Right-hand Display Overview
✗%◗✥✍❚✡
✧❑✡✠✟✌✓✠✡
♠
❑✟✳
✡
✚%✚
❼
2. Water Temperature, page 3.36
3. Fuel Level and Range, page 3.37
4. Handling control, page 2.25
Powertrain control, page 2.27
❵
❈
✭✸✱✸✹❃✱✹❅✻✽
➪
❜
✱✹❅
✻➪❅❈✸
✰➴✱✰✪
❳✍✡✝✌✠✒☛✥✝❙✌✟❍✥✍✥
✌
✒☛✌✠✒
✴
✍
❁
♠
page 2.34
Turn signals, page 1.44
Engine warning light, page 2.14
Anti-lock Braking System status light,
page 2.32
Brake warning light, page 2.10
Parking brake status, page 2.9

DRIVING CONTROLS
➶
TARTING AND DRIVING
✷♦❦
Seamless shift gearbox gear positions
❚✑✡✳✡✟✠❍✒❏✒❑✡✠✟✌✡✔✥☛✡✥✌✑✡✠✟✓✌✒✧✟✌✥✝✒✠
manual mode. Automatic mode is selected
unless the driver chooses manual mode, see
Manual/Automatic mode, page 2.21. If
manual mode is active, gear changes are
made using the gearshift paddles, see
Gearshift paddles, page 2.23.
NOTE: The letter on each button will
illuminate red to identify if the vehicle is
in Drive, Neutral or Reverse.
✶✭✱✲✪
☞✍✍✔✡◆✡☛✦✒✠❋✟✠✤✳✡✟✠✔✟✠✡✟◆✟✥✍✟❍✍
✡
@
Gear changes will be automatic, unless
manual mode has been selected.
When drive is selected and the brakes are
released, the vehicle will begin to move slowly
without any throttle use making it useful for
parking maneuvers and for moving off in
queuing traffic.
❝
✪✯✻
✭❈✼
❲
✒✳✡✟✠✥✔✡☛✳✟✳✡
✤
✡✍✡✟✔✥☛✳✌✑✡
@
❘
brakes will allow the vehicle to move
freely, e.g. for pushing or towing. For more
information on use of neutral for towing, see
Towing for recovery, page 5.44.
❜
✪✲✪✭✽
✪
❄☛☛✒✠✧✟✍✝✥✠✝✓✧✔✌✟☛✝✡✔♠✔✡✍✡✝✌✠✡◆✡✠✔✡
gear when the vehicle is stationary.
When carrying out parking maneuvers that
require rapid changes from drive to reverse
and back again, it is possible to engage
reverse or drive at speeds up to 6mph
(10 kph) whilst traveling in the opposite
direction.
NOTE: If reverse or drive is selected at
speeds above 6 mph (10 kph), the
transmission will engage neutral, as a
self protection feature.
When traveling at speeds below 6 mph
(10 kph), neutral can be selected by
pressing the "N! button.
When reverse is selected and the brakes
are released, the vehicle will begin to
move slowly without any throttle use
making it useful for parking maneuvers.

DRIVING CONTROLS
➶
TARTING AND DRIVING
✷♦❧
Gearshift paddles
❚✒✓❑✔✑✥✦✌
♠
❑
✓✍✍✌✑✡✠
✥
ght-hand paddle towards
you. To downshift pull the left-hand paddle
towards you. The current gear position
appears in the gear position display, see Gear
Position Indicator, page 3.35.
NOTE: The single-piece paddle and
central pivot enables upshifts and
downshifts to be made using either
paddle.
As an alternative, upshifts can be made
by pushing the left-hand paddle away
from you and downshifts can be made
by pushing the right-hand paddle away
from you.
The gearshift paddles operate irrespective of
the handling and powertrain program
selected, and there is no need to release the
accelerator pedal to change gear.
WARNING: For safety, in manual
mode only, the vehicle will monitor
engine speed and may perform an
automatic gear change if necessary.
WARNING: Do not change down for
additional engine braking on a
slippery surface.
NOTE: If operating the paddles in
automatic mode, the gearbox will revert
to automatic changes if an eight second
period elapses without a gear change
being made.
To immediately shift to the lowest possible
gear whilst the vehicle is moving, select and
hold a downshift on the paddle. The vehicle
will then go down through all gears
sequentially until the optimum gear is
reached or you release the paddle.
When the vehicle speed is below 6 mph
(10 kph) or the vehicle is stationary with a
gear selected, select a downshift and hold the
paddle to select neutral.

DRIVING CONTROLS
➶
TARTING AND DRIVING
✷♦➦
Parking brake
➎➏➐➑➒)➢➛➙➠↔
slopes, turn the front wheels towards the
kerb. When parking on steep uphill
slopes, turn the front wheels away from
the kerb.
9
❈
✭❥✱✸✹❤✭❈❥✪✽
❄✦✌✑✡❑✟
is flashing, the parking brake has failed
to engage/disengage. To resolve,
engage/disengage the parking brake again.
See Parking brake operation, page 2.9.
✻❈✻✯✽
✠✵✥
☛
✳
❍
➡0↕➙➟➞➙➔➣➛➛➠➜
✠
✟✵✡
✟
✍✥✡✤✔✌✟✌✓✔✍
❑
❑
➞➲➙➢↕➝➝
✥✳✑
9
❈
✭❥✱✸✹❤✭❈❥✪✬➭✪
✌
❚✒✡
☛✳✟✳✡✌✑
✡❑✟
✭❈✻✱✬
✸
✠✵✥
☛
✠
✟✵✡
✳
❍
outwards, the red parking brake applied
status light in the instrument cluster
illuminates.
✓✍✍✌✑✡✔❋✥✌✝
♠
❑
✑
To disengage the parking brake, keep the
brake pedal depressed and push the parking
brake switch inwards, the red parking brake
applied status light in the instrument cluster
extinguishes.
WARNING: If the parking brake is
manually released, the vehicle may
start to move.

DRIVING CONTROLS
➶
TARTING AND DRIVING
✷♦♥
➨
➎➏➐➑➒➷✃➣➢➛➠↔➡2↕➙➟➮➡
↔2➛↕➔➙➞
➣
manually released, it will automatically
release as the vehicle is driven off
forward, or in reverse as long as the
following conditions are met:
•
driver!s door is closed
•
driver!s seat belt is buckled
NOTE: If the parking brake is not
manually applied it will automatically
apply when the engine is switched off.
NOTE: It is only possible to disengage the
parking brake with the ignition on. The
parking brake can be applied in all
ignition states, including car asleep.
NOTE: In the event of total footbrake
failure, the parking brake can be applied
when the vehicle is moving to slow the
vehicle.
Brake pedal
❵❛❜❝✾
❝❊❞
✶✬✸✬✻❥✪
the driver!s footwell. Ensure that floor
mats or carpets are properly secured
and do not obstruct the pedals.
If objects become trapped between
the pedals, you may not be able to
brake or accelerate, and this could
lead to an accident.
WARNING: The braking system is
servo assisted when the engine is
running. The brakes will still function
with the engine off, but more
pressure will be required to operate
them.
WARNING: Do not rest your foot on
the brake pedal while traveling as this
may overheat the brakes, reduce
their efficiency and cause excessive
wear.
WARNING: If the brake warning light
illuminates while the vehicle is in
motion, stop the vehicle as soon as
safety permits and contact your
McLaren Retailer immediately.
➭
❈
✪
✸✮✬
❤➹✪❀✻✽✱
✸
✩
✭❈❥✪✰✱✽❀✽❈✸
❵❛❜❝✾
❝❊❞
➭
❈
✰
✰
✽
❝
✪❣❤
✭❈❥
➭
✪
❈
✰✽✭✪R✯✱✭✪
❈
period of bedding in. For the first
625 miles (1,000 km), avoid situations
where heavy braking is required.
Brake disc and pad wear depends on the
driving style and driving conditions.
✩
✭❈❥✪❣❈✭✸✱✸✹✼✱✹❅
❚✑✡❍✠
✻
✟✵✡❋✟✠☛✥☛✳✍
✥✳✑
✌❋✥✍✍✥✍✍✓✧✥☛✟✌✡
when the ignition is switched on as a
system test. If the brake warning light
illuminates at any other time, a fault is
indicated. Stop the vehicle as soon as safety
permits and contact your McLaren Retailer
immediately.

DRIVING CONTROLS
➶
TARTING AND DRIVING
✷♦♥
♥
Starting/stopping the engine
❵❛❜❝✾
❝❊❞
❝
✪✲✪✭✭✯✸✻❅✪✪✸✹✱✸✪❣❅✪
the vehicle is in an enclosed space.
Exhaust fumes contain poisonous
carbon monoxide. Breathing exhaust
fumes could lead to unconsciousness
and death.
NOTE: Do not depress the accelerator
pedal when starting the engine.
✸
➴✻❈
✭✻✱✸✹✻❅✪✪✸✹✱✸
✗8❳☛✔✓✠✡✌✑✟✌✌✑✡✵✡✴✦
✪
✒❍✥✔✥☛✌✑✡◆✡✑✥✝✍
2. Depress the brake pedal, press and
release the START/STOP button and
the engine will start.
3. If the START/STOP button is pressed
again while the engine is cranking,
cranking is stopped.
➴
➭
➭
✻
✬
✱✸✹✻❅✪✪✸✹✱✸
✡
8
❵❛❜❝✾
❝❊❞
❡
✪
❅✪✹
✪❈✭❤✬●❅❈✽✸✬
Q
❈
✭
❥
position to lock the gears. The parking
brake is the only means of preventing
the vehicle moving.
NOTE: Do not depress the accelerator
pedal when stopping the engine.
Do not switch the engine off
immediately after high speed/high load
running. Allow it to run for 2 minutes so
the engine temperature returns to
normal.
NOTE: When parking on steep downhill
slopes, turn the front wheels towards the
kerb. When parking on steep uphill
slopes, turn the front wheels away from
the kerb.
1. Pull the parking brake switch outwards
to apply.
NOTE: If the parking brake is not applied
manually, it will apply automatically
when the engine is stopped. Automatic
application can be overridden by holding
the parking brake switch in the off
position whilst opening the driver!s door.

DRIVING CONTROLS
➶
TARTING AND DRIVING
✷♦♥
✷
✎%❙✡✍✡✝✌☛✡✓✌✠✟✍
%
3. Press the START/STOP button. The
engine stops, the vehicle enters the
Accessory state, see Vehicle electrical
status, page 2.2. The immobilizer is
activated.
NOTE: If the START/STOP button is
pressed for more than a second, the
vehicle will enter the Awake state for a
brief time before returning to Accessory
state if no further inputs are made, see
Vehicle electrical status, page 2.2.
➳❀✬➴✻❈✭
✻
➪
➴
✻
✬➭✽✮✽✻✪
✿
❚✑✥✔✔✴✔✌✡✧✟✓✌✒✧✟✌✥✝✟✍
✍✴✔✌✒❑✔✌✑✡✡
☛✳✥☛✡
when conditions allow in order to reduce fuel
consumption and exhaust gas emissions and
restarts it again when required.
The following conditions must be met for the
system to automatically stop the engine:
• driver is detected as present
• driving speed exceeded 6 mph (10 kph)
since previous stop
• engine at normal operating temperature
• vehicle battery fully charged
• air conditioning demand not too high
• Normal Powertrain mode active
➴
✮✽✻
✪✿✬➭✪
✭❈✻✱✬
✸
☞✌◆✡✠✴✍
✒❋✔❑✡✡✤✔✟✔✌✟✌✓✔✥✝✒☛❋✥✍✍❍✡✔✑
✒❋☛
in the central display.
The icon will illuminate amber if conditions
have not been met and the system is not
available.
If all conditions have been met and the
system is available, the icon will illuminate
green.

DRIVING CONTROLS
➶
TARTING AND DRIVING
✷♦♥
▲
❚✑✡
✔✴✔✌✡
✧❋✥✍✍✟✓✌✒✧✟✌✥✝✟✍✍✴✔✌✒❑✌✑✡✡☛✳✥☛✡
when the brake pedal is depressed and the
vehicle has come to a complete stop.
The engine will automatically restart when
the brake pedal is released.
NOTE: If the parking brake is engaged
while the engine is stopped, the engine
will not restart when the brake pedal is
released.
Depress the brake pedal, disengage the
parking brake and then release the brake
pedal in order to initiate the automatic
restart.
NOTE: The engine may automatically
re-start before the brake pedal is
released in order to maintain electrical,
air conditioning or other vehicle
demand.
✶
✪
❈
❀
✻✱✲❈✻✱✸
✹
?✠✡✔✔✌✑✡❳✝✒❙✌✟✠
✌➩❙✌✒❑❙✴✔✌✡✧◗
➋➋❍
✓✌✌✒☛
to deactivate the system. The light in the
button will illuminate and the status light in
the instrument cluster will be extinguished.
Press the button again to activate the system.
NOTE: If the deactivation button is
pressed when the engine has been
automatically stopped, the engine will
re-start.
NOTE: The system is active by default
when the ignition is switched on, even if
it has been previously deactivated.

DRIVING CONTROLS
➶
TARTING AND DRIVING
✷♦♥
❖
Driving
✶✭✱✲✱✸✹❈❣❈✮
❵❛❜❝✾
❝❊❞
❝
✪✲✪✭✻✯✭✸✻❅✪✪✸✹✱✸✪✬✫
while driving, there will be no
assistance for the steering or the foot
brake. You will need more effort to
steer and brake and could lose
control of the vehicle and cause an
accident.
NOTE: Do not drive at high engine
speeds until the engine has reached
normal operating temperature.
NOTE: The doors will lock when the
vehicle reaches a speed of
approximately 9 mph (15 kph). Auto lock
can be set in the instrument cluster, see
Auto Door Lock, page 3.23.
NOTE: During extensive parking
maneuvering the steering assistance
might feel slightly stiffer. This is normal
and designed to protect the steering
system from overheating.
ENVIRONMENTAL: When starting from
✫
cold, gear changes occur at higher
engine speeds. The catalytic converter
will reach its operating temperature
quicker and reduce engine emissions.
1. With the engine running, press and hold
the brake pedal.
2. Select drive or reverse gear, or initiate an
upshift by operating the gearshift
paddles. For more information, see
Gearshift paddles, page 2.23 and Gear
positions, page 2.20.
3. Keep the brake pedal depressed and
release the parking brake switch. The red
status light in the instrument cluster will
be extinguished.
WARNING: If the parking brake is
manually released, the vehicle may
start to move.
NOTE: If the parking brake is not
manually released, it will automatically
release as the vehicle is driven off
forward, or in reverse as long as the
following conditions are met:
•
all doors are closed
•
driver!s seat belt is buckled
4. Carefully depress the accelerator pedal.
➳✸✹✱✸✪❣❈✭✸✱✸✹✼✱✹❅
❚✑✥✔✡
☛✳✥☛✡❋✟✠☛✥☛✳✍
✻
✥✳✑✌✥✍✍✓✧✥☛✟✌✡✔
when the ignition is on and extinguishes
as soon as the engine is started, provided no
faults exist.
If the light illuminates while driving, an engine
management fault has been detected and
reduced engine performance may be
experienced. Stop the vehicle as soon as
safety permits and contact your McLaren
Retailer immediately.
❃✱✿
➭
❅
✬✿✪✿✬✰✪
✞✥✧❑✑✒✧✡✧✒✤✡✟✝✌✥◆✟✌✡✔✟✓✌✒✧✟✌✥✝✟✍✍
✴
when vehicle systems detect a fault which
may cause further damage unless vehicle or
system performance is restricted. Care should
be taken while driving in this mode. Contact
your McLaren Retailer immediately.
❀
➳❀✬✸✬✿✱
❄
✧❑✠✒◆✡✤✦✓✡✍✡✝✒☛✒✧✴✝✟☛❍✡✟✝✑✥✡◆✡✤
❈
✼✰✭✱✲✱✸
✹
❍
✴
following this advice:

DRIVING CONTROLS
➶
TARTING AND DRIVING
✷♦♥
❫
%
Accelerate smoothly and gently from a
standing start.
• When in manual mode, avoid high
engine rpm by changing to a higher gear
as soon as possible.
The Gear Shift Indicator (GSI) will
illuminate when an upshift would
maintain optimum economy.
NOTE: Not available in all markets,
consult your McLaren Retailer.
• Avoid laboring or over-revving the
engine.
• Switch off the air conditioning when it is
not needed.
• Avoid journeys where frequent stop start
driving is involved.
• Ensure that your driving style suits the
prevailing road and traffic conditions;
allow time for smooth, progressive
acceleration and braking.
• Use a reputable fuel economy tracking
website to track your mileage and fuel
usage.
Exhaust Temperature Monitoring
❚✑✡◆✡✑✥✝✍✡✝✒☛✌✥☛✓✒✓✔✍✴✧✒☛✥✌✒✠✔✡❏✑✟✓✔✌
temperatures to protect the catalytic
converters from damage caused by
overheating.
If excessive exhaust temperatures are
measured, a warning will be displayed on the
left-hand side of the instrument cluster.
The vehicle speed should be reduced as soon
as this message is observed. Refrain from
maneuvers involving high engine speed and
high engine load (full throttle) to allow the
exhausts to cool. The message will remain
until the temperature has reduced.
If the exhaust temperature remains at an
excessive level, a second warning is displayed
and Limphome mode is activated. The engine
performance will remain limited until the
vehicle is restarted.
NOTE: Catalytic converter over
temperature warnings are not likely to
be observed during normal driving and
are the result of extreme operating
conditions. For example, high exhaust
temperatures can be caused by
extended track driving, maintaining high
engine speed for long durations, and
sudden and repeated changes in throttle
demand.
NOTE: High exhaust temperatures can
cause damage to catalytic converters
and should be avoided by practicing
careful driving.
If the warnings persist, contact your McLaren
Retailer.

DRIVING CONTROLS
➶
TARTING AND DRIVING
✷♦♥
❢
Parking Sensors
❚✑✡❑✟
✠✵✥
☛✳✔✡☛✔✒✠✔✟✍✡✠✌✌✑✡✤✠✥◆✡✠✌✒✟☛
obstructions while maneuvering at low
speeds. The system comprises four ultrasonic
sensors in the front bumper, four ultrasonic
sensors in the rear bumper and two sounders.
Each sounder has a different pitch to indicate
whether the obstruction is at the front or the
rear of the vehicle.
The front parking sensors are automatically
switched on when the engine is running and
drive is selected. The rear parking sensors are
switched on when reverse gear is selected.
✴
The light around the parking sensors button
will illuminate red to indicate that parking
sensors are active.
The center sensors on the front bumper have
a range of approximately 3 feet (1 meter). The
center sensors in the rear bumper have a
range of approximately 5 feet (1.5 meters).
An intermittent tone is heard when an
obstruction is within range. As the vehicle
moves closer to an obstruction, the
frequency of the tone increases. When the
distance between the sensors and the
obstruction is less than approximately
1.5 feet (40 centimeters), the tone becomes
continuous.
WARNING: The parking sensors may
not detect moving objects such as
children and animals until they are
dangerously close. Always maneuver
with caution and always use your
mirrors, turn your head and look
behind you.
NOTE: The parking sensors are for
guidance only and are not intended to
replace the driver!s visual checks for
obstructions when maneuvering. The
parking sensors may not detect some
obstructions, such as narrow posts or
small obstructions close to the ground
such as kerbs.
The rear parking sensors are automatically
switched off when reverse gear is de-selected.
The front parking sensors are automatically
switched off when the vehicle speed exceeds
16 mph (26 kph) and drive is selected. If the
parking sensors have been manually
activated, by pressing the center of the
button, the front parking sensors will become
active again when the vehicle speed reduces
to 12 mph (20 kph).
The parking sensors can be switched off
manually by pressing the center of the
button, when in drive or neutral. The parking
sensors cannot be manually switched off if
Reverse gear is selected. When manually
switched off, the light around the button will
be extinguished.

DRIVING CONTROLS
➶
TARTING AND DRIVING
✷♦♥
❦
❯✑✡☛✌✑✡
✔✴✔✌✡✧✑✟✔❍✡✡☛✧✟☛✓✟✍
✍
✴
switched off, both the front and rear sensors
will still switch on when reverse gear is
selected and remain on until drive or neutral
is selected again.
If a fault is detected, a long high-pitched tone
will sound. If the sensors are obscured by dirt,
ice or snow, clean them. If the problem
persists, contact your McLaren Retailer.
Rear View Camera (RVC)
❚✑✡❘✡✟✠4✥
✡
✟✧✡✠✟
❋
❁
9✥✔✧✒✓☛✌✡✤✥
➚❘4
❁
☛
the center of the rear bumper. The live video
feed is displayed on the IRIS screen when the
function is active.
NOTE: If the video feed is blurred or
unclear, carefully clean the lens with
water and a soft cloth.
A colored grid is overlaid onto the live video
feed as a guide to the proximity of visible
objects to the rear bumper of the vehicle.
Each colored box starts at the rear of the
vehicle and extends 10 inches
(25 centimeters) beyond the widest point of
the vehicle and extends back, away from the
vehicle.
The red static box extends back 1.5 feet
(40 centimeters) from the rear of the vehicle.

DRIVING CONTROLS
➶
TARTING AND DRIVING
✷♦♥
❧
❚✑✡✳✠✡✡☛✔✌✟✌✥
✝❍✒❏✡❏✌✡☛✤✔❍✟
✝✵❼6❼✦✡✡✌
(2 meters) from the rear of the vehicle, with
an additional line at 3.3 feet (1 meter).
The yellow dynamic box extends back 10 feet
(3 meters) from the rear of the vehicle, with
additional lines at 6.6 feet (2 meters) and
3.3 feet (1 meter). The yellow box will curve, in
relation to steering angle, indicating the
current path of the vehicle.
NOTE: The rear view camera is for
guidance only and is not intended to
replace the driver!s visual checks for
obstructions when maneuvering. The
rear view camera may not show some
obstructions in certain ambient light or
weather conditions.
NOTE: The steering guide grid will not be
displayed if a steering angle fault exists.
The RVC is automatically activated when
reverse gear is selected and automatically
deactivated 10 seconds after a forward gear is
selected or immediately if the vehicle!s
forward speed exceeds 6 mph (10 kph).
The RVC can be manually activated by
selecting REAR VIEW CAMERA from the IRIS
APPS screen.
When the RVC has been manually
activated, it can be deactivated by
touching the on-screen icon. The RVC will
also be deactivated if the screen is touched
anywhere below the status bar or any of the
physical IRIS buttons are pressed.
NOTE: The RVC cannot be manually
deactivated if it has been automatically
activated by selecting reverse gear.
McLaren Track Telemetry
❵❛❜❝✾
❝❊❞
❡
❂❀❃
❈
❈
❅
✪
Telemetry system is intended for
track use only. The driver is
responsible for safety and
compliance at all times.
➫
✲✪✭✲✱✪❣
The McLaren Track Telemetry system
M
provides timing data recording and
graphical visualization for track use, e.g.
circuits and hill-climbs.
• Live data recording can be triggered
manually or linked to vehicle movement.
• During a recording, graphical displays
are provided for timing data,
performance delta, track maps and
vehicle speed.
• Track performance can be analyzed in a
data viewer, and navigated via the lap
number, track position or track distance.
• Custom track maps are created
automatically and can be manually
edited. Multiple track layouts or
configurations are supported for each
venue.
✭✪✸❡✭
❀
❥

DRIVING CONTROLS
➶
TARTING AND DRIVING
✷♦♥
➦
%
Different drivers can be associated with
each recording.
• An optional camera system is integrated
to offer interior and exterior views of
track driving.
To launch the application, navigate to the
APPS screen and select MCLAREN TRACK
TELEMETRY.

DRIVING CONTROLS
➶
EAMLESS SHIFT GEARBOX
✷♦✷
➨
➈➀➄➾➇➀➈➈➈➻➂➼➸➃➀➄❮/❾
1
Overview
❚✑✡✳✡✟✠❍✒❏✥✔✟
✘➩✔❑✡✡✤♠✤✓✟✍✝✍✓✌✝
✑
Seamless Shift Gearbox that can be operated
in automatic or manual mode.
Automatic mode is selected unless the driver
chooses manual mode, see
Manual/Automatic mode, page 2.21.
In automatic mode, the gearbox
automatically optimizes the shift points to
suit your style of driving by selecting the most
appropriate gear depending on:
• Powertrain control, page 2.27
• Accelerator pedal position, page 2.21
• Vehicle speed
• Braking effort
NOTE: Allow the engine and gearbox to
warm up before driving at high engine
speeds and high loads.
Avoid prolonged spinning of the rear
wheels when driving on slippery surfaces
as this could damage the drivetrain.
Gear positions
F✠✡✔✔✒☛✡✒✦✌✑✡✳✡✟✠❑✒✔✥✌✥✒☛❍✓✌✌✒☛
NOTE: The letter on each button will
illuminate red to identify if the vehicle is
in Drive, Neutral or Reverse.
✶✭✱✲✪
☞✍✍✔✡◆✡☛✦✒✠❋✟✠✤✳✡✟✠✔✟✠✡✟◆✟✥✍✟❍✍
Gear changes will be automatic, unless
manual mode has been selected.
When drive is selected and the brakes are
released, the vehicle will begin to move slowly
without any throttle use making it useful for
parking maneuvers and for moving off in
queuing traffic.
❝
✪✯✻
✭❈✼
❲
✒✳✡✟✠✥✔✡☛✳✟✳✡
✤
✡✍✡✟✔✥☛✳✌✑✡
I
❘
brakes will allow the vehicle to move
freely, e.g. for pushing or towing. For more
information on use of neutral for towing, see
Towing for recovery, page 5.44.
❜
✪✲✪✭✽
✪
✔
I
❄☛☛✒✠✧✟✍✝✥✠✝✓✧✔✌✟☛✝✡✔♠✔✡✍✡✝✌✠✡◆✡✠✔✡
gear when the vehicle is stationary.
When carrying out parking maneuvers that
require rapid changes from drive to reverse
and back again, it is possible to engage
reverse or drive at speeds up to 6 mph
✡
(10 kph) whilst traveling in the opposite
I
direction.
NOTE: If reverse or drive is selected at
speeds above 6 mph (10 kph), the
transmission will engage neutral, as a
self protection feature.

DRIVING CONTROLS
➶
EAMLESS SHIFT GEARBOX
✷♦✷
♥
$
➢➛➙➣➡↔+➛➝↕➙➟↔➣➔➠➛➛➜
➔➮➛➝➞➲5➯➠
➢
(10 kph), neutral can be selected by
pressing the "N! button.
When reverse is selected and the brakes
are released, the vehicle will begin to
move slowly without any throttle use
making it useful for parking maneuvers.
The gear (manual mode) or the gear position
(automatic mode) selected will be shown in
the instrument cluster.
Accelerator pedal position
❴✒✓✠✔
✌✴✍✡✒✦✤✠✥◆✥
☛✳✥☛✦✍✓✡☛✝✡✔✑
✒❋✌✑✡
Manual/Automatic mode
Seamless Shift Gearbox changes gear.
With light accelerator pedal use, upshifts are
made at lower engine speeds. With firmer
accelerator pedal use, upshifts are made at
higher engine speeds.
➌
✱❀❥✰✬❣✸
❭✥✝✵✤
✒❋☛✥✔✤✡✔✥✳☛✡✤✌✒✟✝✑✥✡◆✡✥✧✧✡✤✥✟✌✡
acceleration when in automatic mode.
Depress the accelerator pedal fully beyond
the pressure point, a click will be felt through
the pedal. The gearbox will downshift
immediately to the lowest appropriate gear,
and maximum acceleration will follow. Once
the pedal pressure is released, kickdown will
cease and normal gear changes will resume.
NOTE: Moderate accelerator pedal
pressure may also cause the gearbox to
downshift, depending on vehicle speed.
U✠✡✔✔✌✑
✡
ACTIVE button (1) to switch on the
active dynamics panel.
The halo around the ACTIVE button will come
on. When selecting the different drive modes,
their respective button will become
illuminated. You can deactivate your drive
mode selection at any time by pressing the
ACTIVE button again. Press the MANUAL
button (2) to select manual mode.

DRIVING CONTROLS
➶
EAMLESS SHIFT GEARBOX
✷♦✷
✷
❚✑✡✳✡✟✠❍✒❏✧✒✤✡✥☛✤✥✝✟✌✒✠✤✥
✔❑✍
✟✴✔
M and
the currently selected gear. All forward gear
changes are made by operating the gearshift
paddles, see Gearshift paddles, page 2.23.
An audible shift indicator will sound to
indicate that an upshift is required to
maintain optimum performance.
For setting options see Performance Shift
Cue (PSC), page 3.23.
When in manual mode and driving more
economically, the Gear Shift Indicator (GSI)
will illuminate when an upshift would
maintain optimum economy. The GSI will not
illuminate if the requested acceleration or
deceleration cannot be met with a higher
gear. See Economical driving, page 2.14.
NOTE: Only available in Normal
powertrain and handling modes.
NOTE: Not available in all markets,
consult your McLaren Retailer.
Press the MANUAL button again to revert to
automatic mode.
The gearbox mode indicator displays A. All
gear changes occur automatically, but if a
gearshift paddle is operated the gearbox will
adopt a temporary manual mode. This mode
will remain active for as long as the driver
continues to make manual gear changes,
each within an eight second period. The
gearbox mode indicator displays A/M, see
Gear Position Indicator, page 3.35.

DRIVING CONTROLS
➶
EAMLESS SHIFT GEARBOX
✷♦✷
▲
➎➏➐➑➒➓➔➔➞➞➙↔➔↔➙➛↕➟➢➣➔➛➤➞➙➜➠➛➡↕➞
➜
has elapsed without a manual gear
change being made, the gearbox will
revert to automatic mode.
❊
✪❈✭✽❅✱✫
✻
➭
❈
✰✰✼✪✽
❚✒✓❑✔✑✥✦✌
♠
❑
✓✍✍✌✑✡✠
✥✳✑
✌➩✑✟☛
✤❑✟✤✤✍✡✌✒❋✟✠✤
✔
you. To downshift pull the left-hand paddle
towards you. The current gear position
appears in the gear position display, see Gear
Position Indicator, page 3.35.
NOTE: The single-piece paddle and
central pivot enables upshifts and
downshifts to be made using either
paddle.
As an alternative, upshifts can be made
by pushing the left-hand paddle away
from you and downshifts can be made
by pushing the right-hand paddle away
from you.
The gearshift paddles operate irrespective of
the handling and powertrain program
selected, and there is no need to release the
accelerator pedal to change gear.
WARNING: For safety, in manual
mode only, the vehicle will monitor
engine speed and may perform an
automatic gear change if necessary.
WARNING: Do not change down for
additional engine braking on a
slippery surface.
NOTE: If operating the paddles in
automatic mode, the gearbox will revert
to automatic changes if an eight second
period elapses without a gear change
being made.
To immediately shift to the lowest possible
gear whilst the vehicle is moving, select and
hold a downshift on the paddle. The vehicle
will then go down through all gears
sequentially until the optimum gear is
reached or you release the paddle.
When the vehicle speed is below 6 mph
(10 kph) or the vehicle is stationary with a
gear selected, select a downshift and hold the
paddle to select neutral.
If under 6mph (10 kph) you can also press the
neutral button on the tunnel to go into
neutral.

DRIVING CONTROLS
ANDLING AND POWERTRAIN CONTROLS
✷♦✷
❖
➻➄➁➅➇➂➁➃➄➁➅❿❾❰➀❮➸❮➄➂➁➆❾➁➸❮❾➇➈
Active dynamics control
❚✑✡✑✟☛✤✍✥
☛✳✟☛✤❑✒❋✡✠✌✠✟✥☛✝✒☛✌✠✒
✍
switches, on the active dynamics panel, allow
the driver to change the handling and
performance characteristics of the vehicle.
The active dynamics panel contains the
following controls, and will only function with
the engine running or the ignition switched
on.
1. Engine START/STOP button, see
Vehicle electrical status, page 2.2
2. Powertrain control, page 2.27
Manual/Automatic mode, page 2.21
3. Active button, page 2.24
4. Eco Start-Stop system, page 2.12
5. Launch control, page 2.29
6. Handling control, page 2.25
Electronic Stability Control, page 2.34
Active button
B✠✡✔✔✥☛✳✌✑✡
active dynamics panel. This activates the
launch, handling and powertrain controls. The
ACTIVE button and handling and powertrain
switches will illuminate.
ACTIVE button switches on the
NOTE: When the active dynamics panel
is on, the current handling and
powertrain modes will appear in orange
on the instrument cluster. When the
panel is off, the handling and powertrain
modes will appear in white.

DRIVING CONTROLS
ANDLING AND POWERTRAIN CONTROLS
✷♦✷
❫
➎➏➐➑➒)➢➛➙➣➢➛↕➟➙↕➣↕➞➙↕➔➔➲↕➣➤➢➛➜➞✃✃
6
the controls on the active dynamics
panel will also switch off. The handling
and powertrain control settings will be
remembered but it will be necessary to
press the ACTIVE button again to
operate the controls when the ignition is
next switched on or the vehicle will
revert to automatic gear changes.
Handling control
❚✑✡✑✟☛✤✍✥
following vehicle characteristics:
➴
✪✼✪❀✻✱✸
☛✳✝✒☛✌✠✒✍
• Adaptive damping
• ESC settings
✹❈✽✪✻✻✱✸✹
✔❋✥✌✝✑✟✦✦✡✝✌✔✌✑
✡
2. Rotate the handling control to select
one of the following settings.
✗RS✠✡✔✔✌✑
✡
ACTIVE button to switch on
the active dynamics panel.

DRIVING CONTROLS
ANDLING AND POWERTRAIN CONTROLS
✷♦✷
❢
Settings
➎➏➐➑➒➐➢➛↕➙✃➞➡➯↔➣↕➞➙➜↕➔➠➝↔➬➛➜➞➙➣➢➛
instrument cluster will change
dependent on the handling mode
selected. See Handling and Powertrain
Display, page 3.35.
The mode selected will remain active, until
the selection is changed, the ignition is
switched off, or the active dynamics panel is
deactivated.
NOTE: If all the following conditions are
not met when the selection is made, the
mode will not be implemented until they
are met:
•
no fault conditions existing
•
no vehicle dynamic or stability
interventions activated, e.g. Electronic
Stability Control;
•
steering wheel in straight ahead
position, and not being turned, if the car
is moving
When the active dynamics panel is off, the
Handling display in the right-hand display will
show Normal, see Handling and Powertrain
Display, page 3.35.
NOTE: In Track handling mode, the
Electronic Stability Control system is still
in operation. For further information, see
Electronic Stability Control, page 2.34.
N Normal
Suspension at its softest
setting, offers a compliant
ride while maintaining good
body control through corners.
S Sport
Suspension is stiffer, giving a
firmer ride coupled with
enhanced handling
characteristics.
T Track
The suspension is at its
stiffest, giving almost race car
handling and ride
characteristics.
The Electronic Stability
Control warning light is
permanently illuminated.

DRIVING CONTROLS
ANDLING AND POWERTRAIN CONTROLS
✷♦✷
❦
Powertrain control
➴
✪✼✪❀✻✱✸
✹❈✽✪✻✻✱✸✹
✗/0✠✡✔✔✌✑
✡
ACTIVE button to switch on
the active dynamics panel.
2. Rotate the powertrain control to select
one of the following settings.
➴
✪✻✻✱✸✹✽
❲❲✒✠✧✟✍
S Sport
T Track
Gear changes are configured
to offer the optimum
economy without sacrificing
the vehicle!s inherent
performance.
Gear changes will occur at a
higher engine speed and with
a reduced shift duration and
are further enhanced with
cylinder cut. See Cylinder cut,
page 6.14.
Gear change strategy is at its
sharpest. Changes occur
instantly, according to throttle
response and are further
enhanced with cylinder cut
and inertia push. See Cylinder
cut, page 6.14 and Inertia
push, page 6.15.

DRIVING CONTROLS
ANDLING AND POWERTRAIN CONTROLS
✷♦✷
❧
➎➏➐➑➒➐➢➛↕➙✃➞➡➯↔➣↕➞➙➜↕➔➠➝↔➬➛➜➞➙➣➢➛
instrument cluster will change
dependent on the powertrain mode
selected. See Handling and Powertrain
Display, page 3.35.
The different gear change strategies outlined
above are only relevant with automatic mode
selected.
The mode selected will remain active, until
the selection is changed, the ignition is
switched off, or the active dynamics panel is
deactivated.
When the active dynamics panel is off, the
Powertrain display in the right-hand display
will show Normal, see Handling and
Powertrain Display, page 3.35.
NOTE: The use of the Track setting on
the public road is not recommended.
The Track setting is strictly intended for
high performance track/off road use
only.
➳❀✬✸✬✿✮✿✬✰✪
❯✑✡☛✌✑✡◆✡✑✥✝✍✡✥✔✒❑✡✠✟✌✥
☛✳✥☛✟
☛
✴
powertrain setting with automatic gear shifts
selected, the transmission adapts to an
economical shift strategy during periods of
gentle driving. This is determined by the
vehicle speed, acceleration, braking and road
gradient.
Depending on the current active shift
strategy, the word "NORMAL!, "SPORT! or
"TRACK! changes color to green when
economy mode is active. For information on
other ways to save fuel, see Economical
driving, page 2.14.
NOTE: When the active dynamics panel
is on, the current handling and
powertrain modes will appear in orange
on the instrument cluster. When the
panel is off, the handling and powertrain
modes will appear in white.

DRIVING CONTROLS
ANDLING AND POWERTRAIN CONTROLS
✷♦✷
➦
Launch control
✞✟✓☛✝✑✝✒☛✌✠✒✍✥✔✤✡✔✥✳☛✡✤✌✒✒✦✦✡✠✌✑✡
maximum acceleration from a standing start.
WARNING: Do not initiate launch
control unless on a track. Before
initiating launch control, ensure that
all doors, luggage compartment and
service cover are closed, and the
prevailing conditions are suitable for
performing maximum acceleration
maneuvers.
NOTE: Launch control can be operated
in either automatic or manual modes
and any handling or powertrain mode,
but only when the active dynamics panel
is activated.
NOTE: The launch sequence can be
aborted at any point by carrying out any
of the following actions:
•
applying the parking brake
•
pressing the ACTIVE button to switch off
the vehicle dynamics panel
•
or pressing the launch button to switch
off launch control
NOTE: If there is a fault or the launch
procedure has not been followed
correctly, a warning message Launch
mode unavailable - see Owners Manual
will be shown in the left-hand display.
Repeat the launch procedure, ensuring
that it is followed correctly. If the
warning message remains, contact your
McLaren Retailer.
NOTE: Launch mode is only available if
the following conditions are met:
•
both doors are closed
•
vehicle ride height normal and nose lift
function inactive
•
atmospheric altitude has no detrimental
effect with respect to engine
performance
•
engine coolant at normal operating
temperature
❃
❈
✯
✸❀❅❀✬✸✻✭✬
✗B❳☛✔✓✠✡✌✑✡✔✌✡✡✠✥
✼➭✭
✬❀✪✽✽
☛
✑✡✡✍✥✔✥☛✟✔✌✠✟
✳
❋
ahead position.
2. Depress the brake pedal firmly with your
left foot and select first gear.
3. Press the ACTIVE button to switch on
the active dynamics panel.
✥✳✑
✌

DRIVING CONTROLS
ANDLING AND POWERTRAIN CONTROLS
✷♦▲
➨
✏&'✠✡✔✔✌✑
✡
LAUNCH button.
NOTE: L will flash in the gearbox mode
indicator, see Manual/Automatic mode,
page 2.21 and "Launch Mode Active Awaiting Throttle! will be shown in the
left-hand display.
5. With your left foot remaining on the
brake pedal, press and hold the
accelerator pedal down fully with your
right foot, the engine speed will increase
to 3,000 rpm.
NOTE: To abort launch control release
the brake pedal before pressing the
accelerator pedal or wait for
approximately 100 seconds until launch
control is deactivated. The message
"Launch Aborted! will be shown in the
left-hand display.
NOTE: The message "Launch Mode
Active - Boost Building! will be shown in
the left-hand display. Once sufficient
boost has been achieved, the message
"Launch Mode Active - Boost Ready! will
be shown in the left-hand display.
6. Release the brake pedal with your left
foot and the launch control system will
perform a launch start to give maximum
acceleration.
NOTE: To abort launch control release
the accelerator pedal or wait for
approximately 5-10 seconds until launch
control is deactivated. If the launch is
aborted, release the accelerator pedal
and then press again to drive away. The
message "Launch Aborted! will be shown
in the left-hand display.
7. Launch control will operate if procedure
has been followed correctly until
aborted.
NOTE: Whilst in launch control, the
vehicle will carry out automatic gear
shifts, and optimize traction. It will
continue to do so until launch control is
aborted. To abort launch control, release
the accelerator pedal, apply the brake, or
operate one of the gearshift paddles.

DRIVING CONTROLS
RIVING SAFETY SYSTEMS
✷♦▲
♥
➅❮➂(➂➁➃➈➄➼➀➸➽➈➽➈➸➀➾
➈
General
❚✑✥✔✔✡✝✌✥✒☛✝✒☛✌✟✥☛✔✥☛✦✒✠✧✟✌✥✒☛✟❍✒✓✌✌✑
✡
following safety systems:
• Anti-lock Braking System
• Brake assist system
• Brake disc wiping
• Hill hold
• Brake-steer
• Electronic brake pre-fill
• Electronic Stability Control
WARNING: The risk of an accident
increases when driving quickly,
especially when cornering, on wet
and icy roads. Always maintain a safe
distance to the vehicle in front.
The driving safety systems described
in this section are unable to override
the laws of physics.
Always adapt your driving style to
suit the road and weather conditions
and maintain a sufficient distance
from other road users and objects on
the road.
NOTE: In winter conditions, the
maximum effect of the Anti-lock Braking
System, brake assist system and
Electronic Stability Control can only be
achieved if you use winter tires, with
snow socks where they are necessary.
Anti-lock Braking System
❚✑✡☞☛✌✥➩✍✒✝✵❬✠✟✵✥
wheels from locking when you brake. This
allows the vehicle to be steered during
braking maneuvers.
The Anti-lock Braking System works from a
speed of approximately 5 mph (8 kph)
upwards, regardless of road surface
conditions. It works on slippery surfaces, even
when you brake gently.
WARNING: Do not depress the brake
pedal repeatedly in quick succession
(pumping). Depress the brake pedal
firmly and evenly. Pumping the brake
pedal reduces the braking effect.
If the Anti-lock Braking System operates
during braking, the warning light flashes, and
the brake pedal pulses as this happens.
When the Anti-lock Braking System is
activated, maintain the force on the brake
pedal until the braking situation is over.
WARNING: Always adapt your driving
style to suit the prevailing road and
weather conditions and maintain
sufficient distance from other road
users and objects on the road.
☛✳❙✴✔✌✡
✧❑✠✡◆✡☛✌✔✌✑
✡

DRIVING CONTROLS
RIVING SAFETY SYSTEMS
✷♦▲
✷
Anti-lock Braking System status light
❄✦✌✑✡✠✡✥✔✟✧✟✍✦✓☛✝✌✥✒☛❋✥✌✑✌✑
✡
system, the status light will illuminate.
Do not drive your vehicle, contact your
McLaren Retailer as soon as possible.
WARNING: If the Anti-lock Braking
System malfunctions, brake assist
system and Electronic Stability
Control are also deactivated.
If the Anti-lock Braking System
malfunctions, the wheels could lock
when you brake. This may increase
the stopping distance and impair your
ability to steer.
Brake assist system
❬✠✟✵✡✟✔✔✥✔✌
braking situations. If you depress the brake
pedal quickly, the brake assist system
automatically increases the force applied to
the brakes and thus shortens the stopping
distance.
Continue to depress the brake pedal firmly
until the emergency situation is over, the
Anti-lock Braking System prevents the wheels
from locking.
When you release the brake pedal, the brakes
will work as normal. Brake assist system is
deactivated.
✔✴✔✌✡✧✒❑✡✠✟✌✡✔✥☛✡✧✡
✠✳✡☛✝
✴
WARNING: If the brake assist system
malfunctions, the brakes will still
operate. However, the braking force is
not automatically boosted and this
may increase the stopping distance.
Brake disc wiping
❬✠✟✵✡✤✥✔✝❋✥❑✥
when the windscreen wipers are switched on.
It prevents moisture build up on the brake
discs during periods of heavy rain, improving
braking performance.
☛✳✒
erates automatically
❑

DRIVING CONTROLS
RIVING SAFETY SYSTEMS
✷♦▲
▲
Hill hold control
❄✦✌✑✡❍✠
✟✵✡❑✡✤✟✍✥✔✟
vehicle on a hill, this function will continue to
apply the brakes for two seconds after the
pedal is released to assist a smooth start.
✍✥✡✤✌✒✑✒✍✤✌✑✡
❑
❑
Brake-steer
❬✠✟✵✡✔✌✡✡✠✒✦✦✡✠✔✌✑✡❍✡☛✡✦✥✌✔✒✦✟✌✒✠➥✓
vectoring differential, but is integrated into
the braking system reducing weight and
providing excellent speed of response.
Torque vectoring gives the differential the
ability to change the amount of power that is
sent to each of the rear wheels to provide
optimum stability and traction.
If the system detects that the car is starting to
understeer through a corner, the inside rear
brake is gently applied. This helps to increase
the yaw rate of the car, making the car feel
more resistant to understeer. The lateral "g!
force is also increased giving better handling
characteristics.
If the driver uses too much throttle exiting a
corner, the inside rear wheel increases speed,
which without brake steer could cause the car
to become unstable. In this situation, brake
steer will again gently apply the brake on the
inside rear wheel, thereby restoring traction
and stability.
✡
Electronic brake pre-fill
❄✦✌✑✡✟✝✝✡✍✡✠✟✌✒
the electronic brake pre-fill function
immediately brings the brake pads into
contact with the discs, ensuring rapid braking.
✠❑✡✤✟✍✥✔✔✓✤✤✡☛✍✴✠✡✍✡✟✔✡
✤
♠

DRIVING CONTROLS
RIVING SAFETY SYSTEMS
✷♦▲
❖
Electronic Stability Control
❳✍✡✝✌✠✒☛✥✝✔✌✟❍✥✍✥
stability and traction between the tires and
the road surface.
Electronic stability control detects when a
wheel starts to spin or the vehicle starts to
skid and stabilizes the vehicle by braking
individual wheels, and/or limiting the engine
power output. This also assists when pulling
away on wet or slippery road surfaces and
stabilizes the vehicle when braking.
NOTE: Electronic stability control only
functions properly if wheels with the
recommended specification tires are
used.
Electronic stability control is activated
automatically as soon as the engine is
running.
WARNING: If the electronic stability
control warning illuminates, do not
deactivate Electronic Stability
Control. Adapt your driving style to
suit road and traffic conditions.
✌✴✝✒☛✌✠✒✍✧✒☛✥✌✒✠✔✤✠✥◆✥☛
✳
❡✭❈
❀
✻✱✬
✸❀✬✸✻✭✬✼✽✮✽✻✪
❚✑✡✌✠✟✝✌✥✒☛✝✒☛✌✠✒✍✔✴✔✌✡✧✥✔✟☛✥☛✌
✿
✡✳✠✟✍❑✟✠✌
of Electronic Stability Control.
The traction control system reduces engine
torque to prevent the wheels from spinning. If
additional intervention is required to stop the
wheels from spinning, the vehicle will apply
the rear brakes individually. The traction
control system brakes individual drive wheels
to prevent them from spinning. This means
that the vehicle can accelerate on slippery
surfaces.
WARNING: The traction control
system cannot reduce the risk of an
accident if you drive too fast. The
traction control system is unable to
override the laws of physics.
❈
❀
✶
✪
✻✱✲❈✻✱✸✹➳✼✪❀✻✭✬✸✱
❵❛❜❝✾
❝❊❞
❵
❅✪✸➳✼
❀
➴✻❈
❤✱✼✱✻✮✺✬✸✻✭✬✼
✪❀✻✭✬✸✱
❀
➴✻❈
❤✱✼✱✻
✮
Control is deactivated, the risk of the
vehicle skidding is increased. Adapt
your driving style to suit road and
traffic conditions.
WARNING: Do not deactivate
Electronic Stability Control unless on
a track and prevailing conditions are
suitable.
NOTE: When you deactivate Electronic
Stability Control, the following
conditions result:
•
the "ESC OFF! warning light illuminates
•
the light on the ESC OFF button
illuminates
•
Electronic Stability Control no longer
improves driving stability
•
the engine!s torque is no longer limited
and the drive wheels could spin
•
the anti-lock braking system remains
activated

DRIVING CONTROLS
RIVING SAFETY SYSTEMS
✷♦▲
❫
Dynamic ESC modes
❚✑✡✍✡◆✡✍✒✦❳✍✡✝✌✠✒☛✥✝❙✌✟❍✥✍✥
✌
✴
❁
✒☛✌✠✒✍✝✟☛❍✡
adjusted to various dynamic modes to suit
the driver!s requirements and is dependent
on the handling mode currently active.
Electronic Stability Control dynamic modes
can be selected at any vehicle speed.
Ensure Sport or Track handling mode is
active, see Handling control, page 2.25.
➴
➭
✬✭✻✰✮
✸
❈
✿✱❀
✿
✬✰✪
✗E❙✡✍✡✝✌❙❑✒✠✌✑✟☛✤✍✥
☛✳✧✒✤
✡
E
The Electronic Stability Control is ON by
default.
2. Press the ESC OFF button briefly to
activate Sport Dynamic mode which
allows more dynamic freedom over the
default ESC ON mode.
ESC DYN will be displayed on the
instrument cluster.
❡✭❈
❀
❥✰✮
✸
❈
✿✱❀
✿
✬✰✪
✗E❙✡✍✡✝✌❚✠✟
✝✵✑✟☛✤✍✥☛✳✧✒✤
✡
E
The Electronic Stability Control is ON by
default, but allows slightly increased
wheel slip during acceleration over the
default ESC ON condition in Normal and
Sport handling modes.
2. Press the ESC OFF button briefly to
activate Track Dynamic mode which
allows a further increase in dynamic
freedom over Sport Dynamic mode.
ESC DYN will be displayed on the
instrument cluster.
➳➴✺➫✫
✫
✗E❙✡✍✡✝✌❙❑✒✠✌✒✠❚✠✟✝✵✑✟☛✤✍✥☛✳✧✒✤
✡
E
2. If not already in a dynamic ESC mode,
press the ESC OFF button briefly to
activate a dynamic ESC mode.
3. Press and hold the ESC OFF button for
2 seconds, followed by a confirmation
press again within 5 seconds to
deactivate the Electronic Stability
Control.
ESC OFF will be displayed on the
instrument cluster and the light on the
ESC OFF button will illuminate.

DRIVING CONTROLS
RIVING SAFETY SYSTEMS
✷♦▲
❢
Reactivating Electronic Stability Control
❯✑✡☛❳✍✡✝✌✠✒☛✥✝❙✌✟❍✥✍✥
✌
✴
❁
✒☛✌✠✒✍✥
✔
reactivated, the Electronic Stability Control
OFF warning light in the instrument cluster
extinguishes.
NOTE: Electronic Stability Control is
automatically reactivated when the
ignition is next switched off and on
again.
❜✪❈
❀
✻✱✲❈✻✱✬
✸?✭
✬❀✪✰✯✭✪
C✡✠✦✒✠✧✟☛✴✒✦✌✑✡✦✒✍✍
✒❋✥
☛✳✌✒✠✡✟✝✌✥◆✟✌
✡
Electronic Stability Control:
• Press the ESC OFF button briefly, the
light on the button will be extinguished.
• Change the setting on the handling
control to Normal.
• Switch the ignition off and then switch
on again.

DRIVING CONTROLS
RIVING SAFETY SYSTEMS
✷♦▲
❦
Tire Pressure Monitoring System (TPMS)
%✠✥✒✠✌✒✡◆✡✠✴✌✥✧✡✌✑✡◆✡✑✥✝✍✡✥✔✌✒✤✠✥◆✡
each tire should be checked when cold and
inflated/deflated to the inflation pressure
recommended by the vehicle manufacturer
on the vehicle placard or tire inflation
pressure label. (If your vehicle has tires of a
different size than the size indicated on the
vehicle placard or tire inflation pressure label,
you should determine the proper inflation
pressure for those tires).
In certain circumstances it is possible that the
Tire Pressure Monitoring System (TPMS)
pressure warning will display without the loss
of air from the tire. This may be due to
temperature variations between the locations
where the tire pressure was set and where the
vehicle is driven. For example setting
pressures in an air conditioned or heated
garage and then driving the vehicle outside
may induce a tire pressure warning after a
short period of driving. The warning may also
display when extreme ambient temperature
variations occur or during seasonal
temperature changes.
☛
♠
WARNING: Never ignore a tire
pressure warning. Check tire
pressures immediately and if
necessary contact your McLaren
retailer.
❡
✱✭✪9✭✪✽✽✯✭✪❂✬✸✱✻✬✭✱✸✹➴✮✽✻
❚✑✡❚✥✠✡%✠✡✔✔✓✠✡▼✒☛✥✌✒✠✥
☛✳❙✴✔✌✡
✪✿✬✲✪✭✲✱✪
✧❋✟✠☛
you when the pressure drops or the
temperature increases above an acceptable
level in one or more of the tires.
The system monitors the tire pressures and
temperatures in each wheel using sensors
located in each tire valve and a receiver
located within the vehicle. Communication
between the sensors and the receiver is via
Radio Frequency (RF) signals.
❣
NOTE: The Tire Pressure Monitoring
System can suffer interference if you are
operating radio transmitting equipment
(e.g. radio headphones, two-way radios)
in or near the vehicle.
NOTE: The Tire Pressure Monitoring
System will begin transmitting once the
vehicle is traveling over 6mph (10kph),
there will be a delay of up to 40 seconds
before this information is displayed on
screen.
❡
✱✭✪9✭✪✽✽✯✭✪❂✬✸✱✻✬✭✱✸✹➴✮✽✻
operation
✔
❄✦✟✍✒❋✌✥✠
✡❑✠✡✔✔✓✠✡✥✔✤✡✌✡✝✌✡✤♠✌✑✡
Tire Pressure Monitoring System
warning light will illuminate along with an
associated error message in the left-hand
display.
✿
✪

DRIVING CONTROLS
RIVING SAFETY SYSTEMS
✷♦▲
❧
❙✌✒❑✌✑✡◆✡✑✥✝✍✡✟✔✔✒✒☛✟
✔❑✒✔✔
✥❍✍
✡♠✝✑✡
✝✵✟✍✍
your tires and inflate them to the
recommended pressure, see Tire pressures,
page 5.35. The warning light will be
extinguished once the tires have been
inflated to the correct pressure.
Driving on a significantly under-inflated tire
causes the tire to overheat and can lead to
tire failure. Under-inflation also reduces fuel
efficiency and tire tread life, and may affect
the vehicle!s handling and stopping ability.
WARNING: TPMS is not a substitute
for proper tire maintenance, and it is
the driver!s responsibility to maintain
correct tire pressure, even if underinflation has not reached the level to
trigger illumination of the TPMS low
tire pressure warning light.
Each tire should be checked weekly when
cold and inflated/deflated to the inflation
pressure recommended on the tire inflation
pressure label.
Navigate through the "Vehicle Info! screen in
the left-hand display to view the current tire
pressures, see Vehicle Info, page 3.9.
The display shows the pressures of each of
the four tires. If the pressure figure appears in
green, no action is required. If it appears as
red text, inflate the associated tire to the
correct pressure as soon as possible.
Inspect the tire(s) for any possible causes of
reduced tire pressure.
WARNING: The tire pressures
indicated in the left-hand display will
be more accurate with a pressure
gauge. The Tire Pressure Monitoring
System is not a substitute for
manually checking tire pressures or
checking for wear and damage. The
system only provides a low tire
pressure warning and does not reinflate the tires.
The Tire Pressure Monitoring System
cannot alert you to damage to a tire.
Regularly check the condition of your
tires.
WARNING: If low pressure warnings
occur frequently, have the tires
checked at your McLaren Retailer.
Driving on an under-inflated tire will
causes the tire to overheat and can
lead to tire failure.
ENVIRONMENTAL: Under-inflated tires
reduce fuel efficiency and tire tread life,
and may affect the vehicle!s handling
and braking characteristics.
ENVIRONMENTAL: Check tire pressures
at least every 7 days.
 Loading...