


ECP200 EXPERT PULSE
Use and maintenance manual
Rel. Software: 4
REV. 01/04
Use and maintenance manual
ELECTRICAL BOARDS FOR REFRIGERATING INSTALLATIONS
READ AND KEEP
REV. 03-18
ENG
ECP200 EXPERT PULSE
ECP 200 EXPERT PULSE PER EEV PULSE 230V
ENGLISH

ECP200 EXPERT PULSE
INTRODUCTION
Page 3 1.1 General
Page 4 1.2 Product ID codes
Page 4 1.3 Overall dimensions
Page 4 1.4 Identification data
INSTALLATION
Page 5 2.1 Important information for the installer
Page 5 2.2 Standard assembly kit
Page 6 2.3 Installing the unit
TECHNICAL CHARACTERISTICS
Page 8 3.1 Technical characteristics
WARRANTY
Page 9 4.1 Warranty
PARAMETER PROGRAMMING
Page 10 5.1 Control panel
Page 10 5.2 Frontal keypad
Page 11 5.3 LED display
Page 12 5.4 Key shortcut
Page 12 5.5 Setting and displaying set points
Page 13 5.6 Level 1 programming
Page 13 5.7 List of Level 1 variables
Page 14 5.8 Level 2 programming
Page 14 5.9 List of Level 2 variables
Page 18 5.10 Level 3 programming
Page 18 5.11 List of Level 3 variables
Page 21 5.12 Loading defaults under variable EEV
Page 21 5.13 Temperature table for refrigerant fluids
Page 22 5.14 Quick menu displaying variables
Page 22 5.15 List of quick menu displaying variables
Page 23 5.16 Mode of operation thermostat
Page 23 5.17 Password protection
Page 23 5.18 Emergency operation in case of error E0
Page 23 5.19 Manual activation of defrost
Page 24 5.20 Force manual defrost end
Page 24 5.21 Defrost with heater and temperature control
Page 24 5.22 Hot gas defrosting
Page 24 5.23 Displaying temperature after defrost
Page 24 5.24 Pump down function
OPTIONS
Page 25 6.1 TeleNET monitoring / supervision system
Page 25 6.2 Net configuration with Modbus-rtu protocol
TROUBLESHOOTING
Page 26 7.1 Troubleshooting
APPENDICES
Page 28 A.1 EU declaration of conformity
Page 29 A.2 Connection Diagram
Page 30 A.3 Part list
REV. 01/04
CHAP. 1
CHAP. 2
CHAP. 4
CHAP. 5
CHAP. 6
CHAP. 7
CONTENTS
CHAP. 3
Contents

ECP200 EXPERT PULSE
Use and maintenance manual
GENERAL
DESCRIPTION:
The ECP200 EXPERT PULSE is a new control panel for cold rooms with magneto-thermal
cut-out switch for the management of the refrigeration system with integrated control of
electronic expansion valve ON / OFF with coil to 230VAC and single-phase compressor up
to 2 HP.
It allows the user to control all the components on a refrigerating system: compressor,
EEV pulse, evaporator fans, defrosting elements room light and thermostat-holder
demisting element.
APPLICATIONS:
- Complete management of single-phase static or ventilated refrigeration systems up to
2 HP, with off-cycle or electrical defrosting and with direct or pump-down compressor
stop.
- For plants with evaporator managed by the electronic expansion valve ON/OFF at
230Vac.
- Real time clock defrosting.
- Control of single-phase evaporator unit only with electronic expansion valve ON/OFF
230Vac or remote condensing unit enable signal.
MAIN CHARACTERISTICS:
- Compatible with 22 gases:
R404, R134, R22, R407A, R407F, R407H, R410A, R450A, R507, R513A, R744(CO2),
R449A, R290, R32, R448A, R452A, R600, R600A, R1270, R1234ze, R23, R717(NH3).
- Cold room temperature displaying and regulation with decimal point.
- Evaporator temperature displaying from parameter.
- Plant control activation/deactivation.
- Plant alarms signaling (probe error, minimum and maximum temperature alarm,
compressor protection).
- LED indicators and large display illustrate system status.
- User-friendly keypad.
- Evaporator fans management.
- Manual and automatic defrost (static, through heaters, through cycle reversal).
- Direct or pump-down management and control of condensing unit up to 2HP.
- Cold room light activation through key on the panel or through door-switch.
- Direct control of compressor, defrosting elements, evaporator fans, room light with
outputs directly connectable to the various units.
- Magneto-thermal cut-out switch for isolation and protection of the refrigeration unit.
- Innovative, smartly designed ABS cover with transparent cover for access to the
magneto-thermal cut-out switch, all with an IP65 protection rating so that panel can be
used outside the room.
- Auxiliary relay with parameter-configured.
- Possibility, as an alternative to an auxiliary relay, of a RS485 port for connection to the
TeleNET supervision net or to a net with MODBUS-RTU protocol.
REV. 01/04
CHAPTER 1: INTRODUCTION
Chap. 1 - Introduction

ECP200 EXPERT PULSE
Use and maintenance manual
PRODUCT ID CODES
ECP200 EEV Controls and manages compressor, defrosting
elements, evaporator fans and room light.
Aux/Alarms relay.
It is compatible with the most common 230VAC
ON/OFF electronic expansion valves.
Evaporator superheat control.
Differential magneto thermic circuit breaker 16A
Id=300 mA (Id=30 mA on request)
OVERALL DIMENSIONS
Dimensions (mm)
IDENTIFICATION DATA
The unit described in this manual has an ID plate on the side showing all the relevant
identification data:
• Name of Manufacturer
• Code of unit electrical board
• Serial number
• Power supply
• Rated current
• IP protection rating
Chap. 1 - Introduction

ECP200 EXPERT PULSE
Use and maintenance manual
Chap. 2 - Installation
GENERAL WARNINGS FOR THE INSTALLER
1. Install the device in places where the protection rating is observed and try not to
damage the box when drilling holes for wire/pipe seats.
2. Do not use multi-polar cables in which there are wires connected to inductive/power
loads or signalling wires (e.g. probes/sensors and digital inputs).
3. Do not fit power supply wiring and signal wiring (probes/sensors and digital inputs)
in the same raceways or ducts.
4. Minimise the length of connector wires so that wiring does not twist into a spiral
shape as this could have negative effects on the electronics.
5. All wiring must be of a cross-section suitable for relevant power levels.
6. When it is necessary to make a probe/sensor extension, the wires must have a
cross-section of at least 1mm2. Probes extension or shortening could alter their
factory calibration; therefore to check and calibrate the probes through an external
thermometer.
STANDARD EQUIPMENT INCLUDED FOR INSTALLATION AND OPERATION
The electronic controller ECP200 EXPERT PULSE, is equipped with the following for
installation and operation:
• 3 sealing gaskets, to place between the fastening screws and the base of the box;
• 1 user manual.
CHAPTER 2: INSTALLATION

ECP200 EXPERT PULSE
Use and maintenance manual
Chap. 2 - Installation
INSTALLING THE ELECTRICAL PANEL
Fig. 1: Lift the transparent door that
protects the differential magneto
thermic circuit breaker and remove
the cover for the screws on the right
side.
Fig. 2: Remove the 4 fastening screws
from the front panel of the box.
Fig. 3: Close the transparent door that
protects the differential magneto
thermal circuit breaker.
Fig.4: Open the front panel of the box by
lifting it and sliding the two hinges
until they reach the end stop.
Fig. 5: Press on the sides of each hinge to
unlodge it and completely remove
the front panel.

ECP200 EXPERT PULSE
Use and maintenance manual
Chap. 2 - Installation
Fig. 6: Use the three pre-existing holes to
fasten the base of the box with three
adequately long screws based on the
thickness of the wall that the panel will
be installed on. Place a rubber washer
(included) between each fastening
screw and the base of the box.
Fig. 7: Hook the front panel back on to the
base of the box by re-inserting the
hinges into their slots and making
them bend.
Rotate the panel downwards by 180°
to access the PCB.
Make all of the electrical connections according to the attached diagrams for the
corresponding model (see the relative tables in ANNEXES). To make the electrical
connections in a secure manner and maintain the degree of IP protection of the box it
is advisable to use suitable cable and/or conduit glands to seal all of the cables. It is
advisable to distribute the arrangement of the conductors inside the panel in the most orderly
manner possible, and especially keep the power conductors away from the signal ones. Use
sealing straps if necessary.
Fig. 8: Close the front panel again, paying
attention that the cables are inside the
box and that the gasket for the box is
correctly lodged into place. Fasten the
front panel with the 4 screws.
Power the panel and perform a
thorough reading/programming of all
of the set parameters.
Be sure not to tighten the closing screws excessively as this could cause the box to
become deformed and jeopardise its correct functioning and tactile effect of the
keyboard on the panel. Install protection devices against power surges for shortcircuits, in order to avoid damage to the device on all of the loads connected to the
electronic controller ECP200 EXPERT PULSE. Every time repair and/or maintenance is performed
the panel must be disconnected from the power supply and from all possible inductive and power
loads that it may be connected to; this is to guarantee the maximum safety conditions for the
operator.

ECP200 EXPERT PULSE
Use and maintenance manual
Chap. 3 – Technical features
TECHNICAL FEATURES
Power supply
Voltage
230V~ 10% 50/60Hz
Max. absorbed power (only electronic control)
~ 7 VA
Maximum absorption allowed
(With all loads connected)
16A
Climatic Conditions
Working temperature
-5 ÷ +50 °C
Storage temperature
-10 ÷ +70 °C
Ambient relative humidity
Below 90% Hr
General Features
Type of temperature probes that can be connected
temperature probes: NTC 10K 1%
Resolution
0.1 °C
Precision of the probe readings
± 0,5 °C
Range of reading
-45 ÷ +45 °C
Type of pressure probe that can be connected:
pressure probe: 4/20mA / ratiometric 0-5V
Output features
Description
Relay installed
Features outputs board
Notes
Compressor
(Relay 30A AC1)
10A 250V~ (AC3) (2HP)
(100000 cycles)
The sum of
contemporary
absorptions
of the following
loads must not
exceed 16A
Resistances
(Relay 30A AC1)
16A 250V~ (AC1)
Fans
(Relay 16A AC1)
2,7A 250V~ (AC3)
Cold room light
(Relay 16A AC1)
16A 250V~ (AC1)
Alarm/Aux (voltage-free
contact)
(Relay 8A AC1)
8(3)A 250V~
Pulse valve
triac
50VA Pulse valve
General electric protection
Bipolar magneto thermal differential circuit breaker 16A
Id=300mA (Id=30mA upon request)
Power of interruption 4.5 kA
Features of the measurements
Measurements
18cm x 9.6cm x 26.3cm (HxPxL)
Insulation and mechanical features
Degree of IP protection for the box
IP65
Box material
ABS self-extinguishing
Type of insulation
Class II
CHAPTER 3: TECHNICAL FEATURES

ECP200 EXPERT PULSE
Use and maintenance manual
Chap. 4 – Warranty
WARRANTY
ECP200 EXPERT PULSE series products are covered by a 24-months warranty against
all manufacturing defects as from the date indicated on the product ID code.
In case of defect the product must be appropriately packaged and sent to our production
plant or to any authorized Service Center with the prior request of the Return Authorization
Number.
Customers are entitled to have defective products repaired, spare parts and labour
included. The costs and the risks of transport are at the total charge of the Customer.
Any warranty action does not extend or renew its expiration.
The Warranty does not cover:
Damages resulting from tampering, impact or improper installation of the product and
its accessories.
Installation, use or maintenance that does not comply with the instructions provided
with the product.
Repair work carried out by unauthorized personnel.
Damage due to natural phenomena such as lightning, natural disasters, etc…
In all these cases the costs for repair will be charged to the customer.
The intervention service in warranty can be refused when the equipment is modified or
transformed.
Under no circumstances Pego S.r.l. will be liable for any loss of data and information,
costs of goods or substitute services, damage to property, people or animals, loss of sales
or earnings, business interruption, any direct, indirect, incidental, consequential,
damaging, punitive, special or consequential damages, in any way whatsoever caused,
whether they are contractual, extra contractual or due to negligence or other liability arising
from the use of the product or its installation.
Malfunction caused by tampering, bumps, inadequate installation automatically declines
the warranty. It is compulsory to observe all the instructions in this manual and the
operating conditions of the product.
Pego S.r.l. disclaims any liability for possible inaccuracies contained in this manual if due
to errors in printing or transcription.
Pego S.r.l. reserves the right to make changes to its products which it deems necessary
or useful without affecting its essential characteristics.
Each new release of the Pego product user manual replaces all the previous ones.
As far as not expressly indicated, is applicable the Law and in particular the art. 1512 C.C.
(Italian Civil Code).
For any controversy is elected and recognized by the parties the jurisdiction of the Court of
Rovigo.

ECP200 EXPERT PULSE
Use and maintenance manual
Chap. 5 – Parameter programming
FRONT KEYBOARD
KEYBOARD
AUXILIARY RELAY COMMAND/VIEWING CURRENT DATE AND TIME
Command the relay manually if parameter AU1=2
If pressed for 3 seconds it displays the current date/time (when AU1≠2).
UP / MUTE KEY BUZZER ALARM
Increments the values / Scrolls the parameters upwards
Mutes the acoustic alarm if included / Acquires an alarm (if the alarm has been
resolved and the bell is still on, it can be turned off by pressing this key which
acquires the alarm).
If pressed for 3 seconds at the same time as the stand-by key you can access menu
level 3 (EEV parameters).
STAND BY
Pressed for more than 1 sec. alternates the Stand-by status to normal functioning
status, and vice-versa. A confirmation beep is emitted upon occurred change-over.
In stand-by status the system stops and the screen displays the word OFF and the
temperature alternately.
(If included in programming the word OFF will not be displayed alternately).
SET AMBIENT TEMPERATURE
View the set point
Enables setting the set point if pressed at the same time as the Down or UP key.
Restores audio alarm, if included.
CHAPTER 5: PARAMETER PROGRAMMING

ECP200 EXPERT PULSE
Use and maintenance manual
Chap. 5 – Parameter programming
DOWN / DEFROST
When pressed for more than 3 seconds manual defrost is turned on (if the conditions
to turn it on subsist).
When pressed for more than 3 seconds during a defrost function, this operation will
be terminated.
COLD ROOM LIGHT
DISPLAY LED
VALUE OF THE AMBIENT TEMPERATURE / PARAMETERS
MICRO DOOR / COLD ROOM LIGHT ICON
Led OFF = Micro door not Active or not used and cold room light off
Led ON = Cold room light ON
Flashing Led = Micro door Active and cold room light ON
OUTPUT STATUS ICON EEV Output status for the electronic valve EEV (if enabled)
Led OFF = EEV output OFF
Led ON = EEV output ON
COLD CALL / COMPRESSOR DRIVE ICON
Led OFF = Cold call OFF
Led ON = Cold call ON
Flashing Led = Cold call ON but awaiting waiting time C1
FANS CALL ICON
Led OFF = Fans call OFF
Led ON = Fans call ON
Flashing led = Fans paused after defrost (see parameter F5)
DEFROST CALL ICON
Led OFF = Defrost call OFF
Led ON = Defrost call ON
Flashing led = Dripping in progress after defrost (see parameter d7)
REAL TIME CLOCK ICON
Led OFF = Defrosting in real time clocks disabled
Led OFF = Defrosting in real time clocks enabled
ALARM PRESENT ICON
Led OFF = No alarm present
Led ON = Alarm triggered and then resolved
Flashing Led = Alarm present
DECIMAL POINT (flashing in night mode)
AUXILIARY (show AUX relay state, if AU1 = +/-2 or +/-3)

ECP200 EXPERT PULSE
Use and maintenance manual
Chap. 5 – Parameter programming
COMBINATION OF KEYS
+
1ST LEVEL PROGRAMMING
If pressed simultaneously for more than 3 seconds they
enable access to first level programming menu.
EXIT FROM PROGRAMMING
If pressed simultaneously for more than 3 seconds within
any programming menu, they save the settings made
exiting the same menu.
+ +
2ND LEVEL PROGRAMMING
If pressed simultaneously for more than 3 seconds, they
enable access to second level programming menu.
Entering this menu puts it in stand-by.
+
3rd LEVEL PROGRAMMING
(EEV parameters)
If pressed simultaneously for more than 3 seconds, they
enable access to third level programming menu.
Entering this menu puts it in stand-by.
+
QUICK VARIABLES VIEWING MENU
(READ ONLY)
If pressed simultaneously for more than 3 seconds, they
enable access to quick variables viewing menu.
From inside this menu the up and down arrows allow you
to view the label and the variables.
By pressing the Set key the label and its value are
displayed alternately.
When you view the value of the current label you exit value
viewing to the label by pressing the up or down arrows.
You exit this menu automatically after 2 minutes of
keyboard inactivity or by pressing arrow up + arrow down.
SETTING AND VIEWING THE SET POINT
1. Press the "Set" key to view the current SET POINT value (temperature).
2. By holding down the "Set" key and pressing one of the () or () keys you can change the SET POINT
value.
Release the "Set" key to go back to viewing the cold room temperature, any changes will be memorised
automatically.

ECP200 EXPERT PULSE
Use and maintenance manual
Chap. 5 – Parameter programming
FIRST LEVEL PROGRAMMING (User level)
To access the first level configuration menu you must:
1. Simultaneously keep keys () and () pressed down for more than 3 seconds until the first
programming variable appears on the display.
2. Release keys () and ().
3. Select the variable to amend using key () or key ().
4. After having selected the wanted variable it will be possible:
• To display its setting by pressing the SET key.
• To amend the setting by keeping the SET key pressed and press one of the () or () keys.
To exit the menu once the configuration values are set, simultaneously keep keys () and () pressed for
a few seconds until the cell humidity value appears again.
5. Memorisation of the amendments made to the variables will happen automatically when exiting the
configuration menu.
LIST OF FIRST LEVEL VARIABLES (User level)
VARIA
BLES
MEANING
VALUES
DEFAULT
r0
Temperature differential referred to the main set point.
This is expressed in absolute value and defines the hysteresis of the
temperature referred to as the SET POINT.
0,2 ÷ 10,0 ℃
2,0 ℃
d0
Interval for defrost (hours)
With d0=0 and dFr=0 the Defrosting operations are excluded
0 ÷ 24 hours
4 hours
d2
Set point for the end of defrost.
Defrost is not carried out if the temperature read by the defrost probe is
greater than the value of d2.
(If the probe is broken defrost is performed based on time)
-35 ÷ 45 ℃
15℃
d3
Maximum defrost time (minutes)
1 ÷ 240 min
25 min
d7
Dripping time (minutes)
At the end of defrosting, the compressor and the fans remain still for
the d7 set time, the defrosting led on the front of the panel flashes.
0 ÷ 10 min
0 min
F5
Fans pause after defrosting (minutes)
Enables keeping the fans still for an F5 time after dripping. This time
starts from the end of dripping. If dripping is not set, at the end of
defrosting the fans pause occurs directly.
0 ÷ 10 min
0 min
A1
Minimum temperature alarm
The absolute temperature referred to the ambient probe below which, once
the Ald delay time is over, the LOW temperature alarm is activated, which
consists in activating the Buzzer (if included), with the entry EL which
alternates with the temperature on the display screen and the flashing icon
indicating the presence of the alarm.
When the alarm is resolved the "alarm present" icon stays on (steady)
indicating that the repair has been made until you press the UP key.
-45 ÷ (A2-1) °C
-45℃
A2
Maximum temperature alarm
The absolute temperature referred to the ambient probe above which, once
the Ald delay time is over, the HIGH temperature alarm is activated, which
consists in activating the Buzzer (if included), with the entry EH which
alternates with the temperature on the display screen and the flashing icon
indicating the presence of the alarm.
When the alarm is resolved the "alarm present" icon stays on (steady)
indicating that the repair has been made until you press the UP key.
(A1+1) ÷ +45°C
+45℃
dFr
Enabling evaporator defrosting in real time
With d0=0 and dFr=1 it is possible to set up to 6 real time defrosting
episodes in a single day using parameters dF1…dF6
0 = disabled
1 = enabled
0

ECP200 EXPERT PULSE
Use and maintenance manual
Chap. 5 – Parameter programming
dF1
…
dF6
Programming evaporator defrosting times.
It is possible to set up to 6 times for defrosting episodes.
The time is in the HH.M format where HH represents the hour and M
tens of minutes (Ex. 0=0 min; 1=10 min, etc.). The flashing period (.)
indicates that a time is being viewed, and not a temperature.
00.0 ÷ 23.5
--
tdS
Day start time programming
00.0 ÷ 23.5
6,0
tdE
Day end time programming
00.0 ÷ 23.5
22,0
2nd LEVEL PROGRAMMING (Installer level)
To access second level programming, keep the UP (), DOWN () and COLD ROOM LIGHT key pressed
for more than 3 seconds.
When the first programming variable appears, the system automatically switches to stand-by.
1. Select the variable to amend using key () or key (). After having selected the wanted variable it will be
possible:
2. To display its setting by pressing the SET key.
3. To amend the setting by keeping the SET key pressed down, and press one of the () or () keys.
4. Once the configuration of the values has been set, in order to exit the menu press () and ();
Keep them simultaneously pressed for a few seconds, until the temperature value appears.
5. Memorisation of the amendments made to the variables will happen automatically when exiting the
configuration menu.
6. Press the STAND-BY key to enable electronic control.
LIST OF 2nd LEVEL VARIABLES (Installer level)
VARIA
BLES
MEANING
VALUES
DEFAULT
F3
Fans status with compressor off
0 = Fans in continuous start
1 = Fans running only when the
compressor is running
2 = Fans DISABLED
1
F4
Fans pause during defrosting
0 = Fans working during defrosting
1 = Fans not working during defrosting
1
F6
Evaporator fans activation for air recirculation.
The fans activate for a time defined by F7 if they
have not started working for the F6 time. If activation
time coincides with the defrosting time, end of
defrosting is awaited.
0 ÷ 240 min
0 = (function not activated)
0 min
F7
Evaporator fans duration for air recirculation.
Fans working time for F6
0 ÷ 240 sec.
10 sec
dE
Probe included
By excluding the evaporator probe defrosting will be
performed cyclically with a period of d0 and will
terminate when the time expires on d3.
0 = evaporator probe included
1 = evaporator probe not included
0
d1
Type of defrosting, at cycle inversion (hot gas) or
resistance.
2 = Heater with temperature control
1 = with hot gas
0 = with resistance
0
dPo
Defrost at Power On
0 = disabled
1 = defrost at power-on (if possible)
0
dSE
Smart defrost
0 = disabled
1 = enabled
0
dSt
Smart defrost Setpoint (if dSE=1)
The counting of the time between the defrost is
incremented only if the compressor is ON and
the evaporator temperature is less than dSt.
-30 ÷ 30 °C
1 °C

ECP200 EXPERT PULSE
Use and maintenance manual
Chap. 5 – Parameter programming
dFd
Display viewing during Defrost
0 = current temperature
1 = temperature at the start of the
defrost
2 = “DEF”
1
Ad
Net address for connection to TeleNET
supervision system or Modbus
0 ÷ 31 (with SEr=0)
1 ÷ 247 (with SEr=1)
0
SEr
RS-485 communication protocol
0 = TeleNET protocol
1 = Modbus-RTU protocol
0
Bdr
Modbus baudrate
0=300 baud
1=600 baud
2=1200 baud
3=2400 baud
4=4800 baud
5=9600 baud
6=14400 baud
7=19200 baud
8=38400 baud
5
Prt
Modbus parity check
0 = none | 1 = even | 2 = odd
0
Ald
Minimum and maximum temperature
signalling and alarm display delay
1 ÷ 240 min
120 min
C1
Minimum amount of time between switch off and
the next Time the compressor is switched on.
0 ÷ 15 min
0 min
CA1
Cold room sensor value correction
-10,0 ÷ +10,0 °C
0,0 °C
CE1
Operating time ON for the compressor in case of
broken ambient probe (Emergency function).
With CE1=0 the emergency function with an E0
error remains disabled, the compressor stays off
and defrosting is inhibited in order to preserve the
residual cold.
0 ÷ 240 min
0 = disabled
0
CE2
Operating time OFF for the compressor in case of
broken ambient probe (Emergency function)
5 ÷ 240 min
5
doC
Compressor guarding time for the micro door,
when the micro door opens the evaporator fans
switch off and the compressor will continue
operating for the amount of time of doC, then it will
switch off.
0 ÷ 5 minutes
0
tdo
Re-insert compressor time after opening the
door. When the micro door opens and the tdo time
is up the normal operation of the control will be
restored and the open door alarm (Ed) will be
sound.
If the door switch is closed and the light stays on
for a longer time than tdo light cell alarm is
signaled (E9).
With tdo=0 the parameter is disabled.
0 ÷ 240 minutes
0 = disabled
0
Fst
FAN blocking TEMPERATURE
The fans do not switch on if the value of the
temperature read by the evaporator probe is
higher than the value of this parameter. The block
is deactivated when the evaporator probe is
disabled or presents an error.
-45 ÷ +45°C
+45℃
Fd
Differential for Fst
1 ÷ +10°C
2℃
LSE
Minimum value attributable to setpoint.
-45 ÷ (HSE-1) °C
-45 °C
HSE
Maximum value attributable to setpoint.
(LSE+1) ÷ +45°C
+45 °C

ECP200 EXPERT PULSE
Use and maintenance manual
Chap. 5 – Parameter programming
AU1
Auxiliary/alarm relay 1 control
-6 (NC) = relay de-energized during
stand-by.
-5 (NC) = Contact for casing element
control (AUX relay closed with
compressor output inactive).
This output also remains active
when the QE is in STAND-BY.
-4 (NC) = pump down function (see
CHAP 5.23).
-3 (NC) = automatic auxiliary relay
managed by StA temp. setting
with 2°C differential.
-2 (NC) = manual auxiliary relay
controlled via AUX key.
-1 (NC) = alarm relay.
0= relay deactivated.
1 (NO) = alarm relay.
2 (NO) =manual auxiliary relay
controlled via AUX key.
3 (NO) = automatic auxiliary relay
managed by StA temp. setting
with 2°C differential.
4 (NO) = pump down function (see
CHAP 5.23).
5 (NO) = free voltage contact for
condensing unit (AUX relay and
compressor relay in parallel).
6 (NO)=relay excited during stand-by.
-1
StA
Temperature setting for auxiliary relay
-45 ÷ +45°C
0 °C
nSC
Correction factor for the SET button during
night operation (energy saving)
(with In1 or In2 = 8 o -8)
During night operation the control set is:
Set Control = Set + nSC
In night mode decimal point flashes.
-20,0 ÷ +20,0 °C
0,0 °C

ECP200 EXPERT PULSE
Use and maintenance manual
Chap. 5 – Parameter programming
In1
Digital input DI1 and activation status setting.
8 = Night mode digital input (energy
saving, N.O.)
7 = Stop defrosting remotely (N.O.)
(reads rising edge of impulse)
6 = Start defrosting remotely (N.O.)
(reads rising edge of impulse)
5 = Stand-by remotely (N.O.) (In order
to indicate Stand-By mode, the
display shows ‘In5’ alternating with
the current view)
4 = Pump-down pressure switch (N.O.)
3 = Man-in-room alarm (N.O.)
2 = Compressor protection (N.O.)
1 = Door switch (N.O.)
0 = disabled
-1 = Door switch (N.C.)
-2 = Compressor protection (N.C.)
-3 = Man-in-room alarm (N.C.)
-4 = Pump-down pressure switch (N.C.)
-5 = Stand-by remotely (N.C.) (In order
to indicate Stand-By mode, the
display shows ‘In5’ alternating with
the current view)
-6 = Start defrosting remotely (N.C.)
(reads falling edge of impulse)
-7 = Stop defrosting remotely (N.C.)
(reads falling edge of impulse)
-8 = Night mode digital input (energy
saving, N.C.)
2
In2
Digital input DI2 and activation status setting.
(look at n.°1 )
1
bEE
Buzzer enable
0 = disabled
1 = enabled
1
P1
Password: type of protection
(active when PA is different from 0).
0 = displays only the set point and
allows you to silence the alarms
1 = displays the set point, allows you to
silence the alarms, + defrost + light
+ aux key + menu with read-only
access to the variables
2 = access blocks in programming for
levels 1 and 2 and 3 (all other
functions are allowed)
3 = access blocks in programming for
levels 2 and 3 (all other functions
are allowed)
4 = access blocks in programming for
level 3 (all other functions are
allowed)
3
PA
Password
(see P1 for the type of protection)
0 ÷ 999
0 = deactivated function
0
Yr
Set the year
0 ÷ 99
Mo
Set the month
1 ÷ 12
dy
Set the day
1 ÷ 31
Hr
Set the time
0 ÷ 23
min
Set the minutes
0 ÷ 59
reL
release software
read only
read only

ECP200 EXPERT PULSE
Use and maintenance manual
Chap. 5 – Parameter programming
3rd LEVEL PROGRAMMING (EEV PARAMETERS)
To access third level programming, keep the UP () and STAND-BY keys pressed for more than 3 seconds.
When the first programming variable appears, the system automatically switches to stand-by.
1. Select the variable to amend using key () or key (). After having selected the wanted variable it will be
possible:
2. To display its setting by pressing the SET key.
3. To amend the setting keeping the SET key pressed down, and press one of the () or () keys.
4. Once configuration values have been set, to exit the menu press the () and () keys;
Keep them simultaneously pressed for a few seconds, until the temperature value appears.
5. Memorisation of the amendments made to the variables will happen automatically when exiting the
configuration menu.
6. Press the STAND-BY key to enable electronic control.
LIST OF 3rd LEVEL VARIABLES (EEV PARAMETERS)
VARIA
BLES
MEANING
VALUES
DEFAULT
ESH
Overheating set point.
0,1 ÷ +25.0 ℃
6.0℃
EEV
Electronic valve EEV management
With EEV=0 all controls and relative alerts are disabled.
Relative errors for probe S4 (Extraction temperature) and S5
(Evaporation pressure) are also disabled and excluded
The settings from 1 to 4 load default values in the ECt, EPb,
EtI, Etd, ELS variables
When you exit programming if the selected value for EEV
is different from the one that was previously memorised, the
relative defaults for this selection will be loaded.
Pressing only the Set key to see the current value for EEV
will not load the defaults.
0 = disabled
1 = EEV control (default 1)
2 = EEV control (default 2)
3 = EEV control (default 3)
4 = EEV control (default 4)
5 = EEV control (default 5)
1
ErE
Type of refrigerant GAS employed.
Setting this parameter is essential for correct operation.
0 = R404
1 = R134
2 = R22
3 = R407A
4 = R407F
5 = R407H
6 = R410A
7 = R450A
8 = R507
9 = R513A
10 = R744(CO2)
11 = R449A
12 = R290
13 = R32
14 = R448A
15 = R452A
16 = R600
17 = R600A
18 = R1270
19 = R1234ze
20 = R23
21=R717(NH3)
0
ECt
Cycle time
This represents the sum of EEV valve opening / closing
cycle times. This is used to calculate the EEV opening and
closing times.
Example: if the EEV valve must be opened by 30% we will
have:
EEV valve opening time = ECt* 30/100
EEV valve closing time = ECt * (100-30)/100
1 ÷ 20 seconds
6 sec
EPb
Proportional band (gain) PID overheating adjustment.
1 ÷ 100%
15%
EtI
Integral time PID overheating adjustment algorithm
0 ÷ 500 sec
100 sec
Etd
Derivative time PID overheating adjustment algorithm
0.0 ÷ 10.0 sec
2.0 sec
EOE
Percentage of the EEV valve opening in case of error with
probes S4 or S5.
This function allows you to continue with the adjustment,
although not in an optimal fashion, in case the adjustment
probes breakdown.
0 ÷ 100%
50%

ECP200 EXPERT PULSE
Use and maintenance manual
Chap. 5 – Parameter programming
ESO
During the Start phase the EEV valve opens as far as the
ESO percentage and for the ESt time
0 ÷ 100%
85%
ESt
During the Start phase.
In this phase the MOP, LOP, LSH alarms are disabled.
0 ÷ Edt tens of seconds
6
tens of
seconds
EdO
After Defrost the EEV valve opens as far as EdO percentage
for the Edt time.
0 ÷ 100%
100%
Edt
During the opening phase of the EdO valve after Defrost.
In this phase the MOP, LOP, LSH alarms are disabled.
Est ÷ 250 tens of seconds
24
tens of
seconds
EHO
Maximum percentage for the EEV valve opening: If the valve
is oversized this variable allows you to limit the maximum
opening and the set percentage.
0 ÷ 100%
100%
EPP
Type of pressure transducer (S5):
set the type of transducer used to detect the Evaporation
pressure (S5)
0 = 4÷20mA-type pressure
transducer connected to the
instrument
1 = ratiometric 0-5V-type
pressure transducer connected
to the instrument
0
EP4
Pressure (bar) corresponding to 4mA or to 0V Referred to
the Evaporation pressure probe (S5).
-1.0 ÷ EP2 Bar
0.0
EP2
Pressure (bar) corresponding to 20mA or to 5V Referred to
the Evaporation pressure probe (S5).
EP4 ÷ 60.0 Bar
12.0
CA4
Calibration of the Extraction temperature transducer (S4)
-10.0 ÷ +10.0 ℃
0,0
CA5
Calibration of the Evaporation pressure transducer (S5)
-10,0 ÷ +10,0 Bar
0,0
LSH
LSH threshold (Low overheating temperature)
Overheating values that are too low can cause liquid to
return to the compressor or strong oscillations.
Below the LSH value the ELS protection intervenes and acts
by increasing the PID speed when closing the valve to reach
the set overheating set.
0,0 ÷ Set SH °C
2,0 ℃
ELS
LSH protection
If enabled, when tSH < LSH the integration time for the PID
is set based on the ELS selection from 1 to 7.
The setting of 1 is the setting that generates a quicker
closing.
When this protection is entered the SHd count for LSH alarm
activation will begin.
THE LSH PROTECTION HAS PRIORITY OVER THE LOP
PROTECTION.
LSH PROTECTION IS NOT ACTIVATED.
DURING THE START PHASE (ESt TIME), DURING THE
DEFROST OR POST-DEFROST PHASE (Edt TIME).
0 = disables the protection LSH
and relative LSH alarm alert
1 = 5% EtI
2 = 10% EtI
3 = 15% EtI
4 = 20% EtI
5 = 25% EtI
6 = 30% EtI
7 = 35% EtI
8 = 50% EtI
9 = 100% EtI (no correction and
only the LSH alarm is active)
2
SHd
Delay in activating the LSH alarm: the LSH overheating
alarm is signalled only after it has been active for the
amount of the SHd time. In case of an LSH alarm, the valve
closing is nevertheless instantaneous;
The alarm is self-restoring and stops when tSH ≥ LSH
With an active alarm, you have:
- Flashing LSH written on the display screen
- Buzzer
0 ÷ 240 tens of seconds
30

ECP200 EXPERT PULSE
Use and maintenance manual
Chap. 5 – Parameter programming
MOP
MOP threshold (Maximum saturated evaporation
Temperature referred to the sensor S5)
This represents the maximum evaporation pressure,
expressed in saturated degrees, and activates the MOP
protection when it is exceeded (EMO parameter). If the
MOP kicks in the control will close the valve gradually
to limit the evaporation temperature and avoid the
compressor from stopping for thermal protection.
(LOP+1) ÷ +45°C
+45℃
EMO
MOP protection (active with tS5>MOP )
With MOP protection on the valve abandons its control
PID and at any other cycle time it closes as established
by the EMO percentage starting from the opening
percentage of the abandoned PID.
When this protection is entered the MOd count for MOP
alarm activation will begin.
THE MOP PROTECTION IS NOT ACTIVATED DURING
THE START PHASE (ESt TIME), DURING THE DEFROST
OR POST-DEFROST PHASE (Edt TIME)
0 = disables the MOP protection
and relative MOP alarm alert
0 ÷ 100%
0
MOd
Delay in activating the MOP alarm: the MOP alarm is
signalled only once the MOP protection has been active for
the amount of the MOd time.
The alarm is self-restoring when "Temp.S5" ≤ MOP
With an active alarm, you have:
- Flashing MOP written on the display screen
- Buzzer
0 ÷ 240 tens of seconds
60
LOP
LOP threshold (Minimum saturated evaporation
Temperature referred to the sensor S5)
This represents the minimum evaporation pressure,
expressed in saturated degrees, and activates the LOP
protection when it falls below this value. In case of LOP
the control opens the valve to avoid the compressor
from stopping due to low pressure (mechanical
pressure switch).
-45°C ÷ (MOP-1)
-45℃
ELO
LOP protection (active with tS5>LOP )
With LOP protection on the valve abandons its control
PID and at any other cycle time it opens as established
by the ELO percentage starting from the opening
percentage of the abandoned PID.
When this protection is entered the LOd count for LOP
alarm activation will begin.
THE LSH PROTECTION HAS PRIORITY OVER THE LOP
PROTECTION
THE LOP PROTECTION IS NOT ACTIVATED DURING
THE START PHASE (ESt TIME), DURING THE DEFROST
OR POST-DEFROST PHASE (Edt TIME)
0 = disables the LOP protection
and relative LOP alarm alert
0 ÷ 100%
0
LOd
Delay in activating the LOP alarm: the LOP alarm is
signalled only once the LOP protection has been active for
the amount of the LOd time.
The alarm is self-restoring when "Temp.S5" ≥ LOP
With an active alarm, you have:
- Flashing LOP written on the display screen
- Buzzer
0 ÷ 240 tens of seconds
30
Note: all calculation times for the LSH, MOP, LOP alarms are reset when adjustment is complete OR
DURING THE START PHASE (ESt TIME), DURING THE DEFROST OR POST-DEFROST PHASE (Edt
TIME)

ECP200 EXPERT PULSE
Use and maintenance manual
Chap. 5 – Parameter programming
Loading default settings based on the EEV variable:
EEV = 1
PEGO DEFAULT
EEV = 2
(TN COLD ROOM
or BENCH
REFRIGERATOR
control with built-in
compressor)
EEV = 3
(BT COLD ROOM
or BENCH
REFRIGERATOR
control with built-in
compressor)
EEV = 4
(control of COLD
ROOM or BENCH
REFRIGERATOR,
DUCTED TN)
EEV = 5
(control of COLD
ROOM or BENCH
REFRIGERATOR,
DUCTED BT)
ESH
6 °C
6 °C
6 °C
11 °C
11 °C
EPb
15 %
15 %
15 %
15 %
15 %
EtI
100 sec
100 sec
100 sec
150 sec
150 sec
Etd
2 sec
2 sec
2 sec
5 sec
5 sec
LSH
2 °C
2 °C
2 °C
5 °C
5 °C
ELS 2 2 2 2
2
MOP
+45 °C
5 °C
-15 °C
+5 °C
-15 °C
EMO 0 5 5 5
5
LOP
-45 °C
-25 °C
-45 °C
0
0
ELO 0 15
15 0 0
Temperature table for refrigerant fluids
The following table shows the evaporation temperature limits (tS5, see chapter 5.15) according to the type of
refrigerant fluid (ErE parameter).
Parameter
ErE
Code
Temperature
range
Parameter
ErE
Code
Temperature
range
0
R404
-50 ÷ 70 °C
11
R449A
-50 ÷ 70 °C
1
R134A
-50 ÷ 70 °C
12
R290
-50 ÷ 70 °C
2
R22
-50 ÷ 70 °C
13
R32
-50 ÷ 70 °C
3
R407A
-50 ÷ 70 °C
14
R448A
-50 ÷ 70 °C
4
R407F
-50 ÷ 70 °C
15
R452A
-50 ÷ 70 °C
5
R407H
-50 ÷ 70 °C
16
R600
-20 ÷ 70 °C
6
R410A
-50 ÷ 70 °C
17
R600A
-30 ÷ 70 °C
7
R450A
-40 ÷ 70 °C
18
R1270
-50 ÷ 70 °C
8
R507
-50 ÷ 70 °C
19
R1234ZE
-30 ÷ 70 °C
9
R513A
-45 ÷ 70 °C
20
R23
-50 ÷ 25 °C
10
R744 (CO2)
-50 ÷ 40 °C
21
R717 (NH3)
-50 ÷ 70 °C

ECP200 EXPERT PULSE
Use and maintenance manual
Chap. 5 – Parameter programming
QUICK VARIABLES VIEWING MENU (READ ONLY)
During system start-up it can be useful to check the reading of the various probes or a number of
values in a simple fashion, or optimise the process.
To access quick variables viewing menu, keep the DOWN () and STAND-BY keys pressed for
more than 3 seconds.
From inside this menu the up or down arrows allow you to view the label and the variables.
By pressing the SET key the label and its value are displayed alternately. (To make the reading
easier press the set key to switch from label to value: it is not necessary to keep the set key
pressed down).
When you view the value of the current label you exit value viewing to the label by pressing the up
or down arrows.
You exit this menu automatically after 2 minutes of keyboard inactivity or by pressing arrow up +
arrow down.
LIST OF VARIABLES QUICK VIEWING MENU (READ ONLY)
VARIABLES
MEANING
VALUES
tS0
View Ambient Temperature probe (S0)
(read only) °C
tS1
View Defrost Temperature probe (S1)
(read only) °C
tS4
View Extraction Temperature probe (S4)
(read only) °C
tS5
View Evaporation Temperature probe (S5)
(read only) °C
PS5
View Evaporation Pressure probe (S5)
(read only) Bar
tSH
View Overheating temperature tSH = tS4 – tS5
(read only) °C
oEV
Percentage of EEV valve opening
(read only) %

ECP200 EXPERT PULSE
Use and maintenance manual
Chap. 5 – Parameter programming
THERMOSTAT OPERATING MODE
CHILL CALL MODE
The DO1 output is activated when the temperature measured by the Ambient probe reaches or exceeds the
SET POINT+r0 value and stays active until the temperature falls below the SET POINT.
This way the DO1 output mode is coordinated with the chill call icon switching on.
PASSWOD FUNCTION
The password function activates by setting a value different from 0 for parameter PA. See parameter P1 for
the different protection levels.
Protection is enabled automatically after approx. 2 minutes of inactivity on the keyboard.
The digits 000 appear on the display screen. Use the up/down keys to change the number and the SET key
to confirm it.
The mask to enter the password 000 disappears if you do not use the keyboard within 30 seconds.
If password is forgotten use the universal number 100.
EMERGENCY FUNCTION WHEN ERROR E0 OCCURS
(AMBIENT PROBE OUT OF ORDER)
This safety mode guarantees the compressor will operate even if the ambient probe is not working (error E0).
With probe error E0 and CE1 other than 0, the compressor works in work pause mode, with compressor ON
for the amount of time of CE1 and OFF for the amount of time of CE2.
With CE1>0, when error E0 occurs defrosting will be managed as in the normal mode of operation.
With CE1=0, the emergency operation with an E0 error stays disabled: the compressor stays off and
defrosting is inhibited in order to preserve the residual cold.
Eliminate the cause of error E0 as soon as possible and reactivate normal control operations to correctly
adjust the temperature.
MANUAL DEFROST ACTIVATION
To activate defrost simply press the DOWN key for more than 3 seconds; this will activate the relay for
resistances. Defrosting is not activated if conditions for activation are not met (the set temperature to
terminate defrosting (d2), is lower than the temperature detected by the evaporator probe).
Defrosting will terminate when the defrosting temperature has been reached (d2) or for the maximum
duration of defrost (d3) or when terminate defrost is forced manually (terminate defrost key or digital input).
Ambient
Temperature
Set point
r
Output
DO1

ECP200 EXPERT PULSE
Use and maintenance manual
Chap. 5 – Parameter programming
MANUALLY FORCE TERMINATE DEFROST IN PROGRESS
When defrost is in progress press the DOWN button for 3 seconds to force defrost in progress to terminate.
When terminating defrost manually the drip phase is also skipped.
DEFROST WITH HEATER AND TEMPERATURE CONTROL
Set the parameter d1 = 2 for the management of heater defrost by time with temperature control. During the
defrost, the output is activated when the evaporator’s temperatures are lower than d2. Defrost stops after d3
minutes. It allows energy saving and a better defrost process.
HOT GAS DEFROST
Set parameter d1 = 1 for managing cycle inversion defrosting.
The compressor relay and the defrosting relay are activated for the entire defrosting phase (defrost).
For the correct management of the plant, it will be the responsibility of the installer to use the defrost output,
that must allow the opening of the cycle inversion solenoid valve and the closing of the liquid solenoid valve.
For the capillary plants (without thermostatic valve) it is sufficient to control the cycle inversion electro valve
using the defrosting relay control (defrost).
VIEW TEMPERATURE AMBIENT AFTER DEFROSTING
After defrost the display screen will continue to display the last value for the ambient temperature read prior
to defrost, for 1 minute.
PUMP DOWN FUNCTION
By setting the parameter In1 or In2 = 4/-4 the stop compressor in pump down function will be activated.
The digital input will become the work pressure switch input and will manage the compressor output directly.
Connect evaporator solenoid valve on the AUX relay. The evaporator solenoid and EEV solenoid are
controlled directly by thermostat.
ECP200 EXPERT PULSE
Use and maintenance manual
Chap. 6 – Options
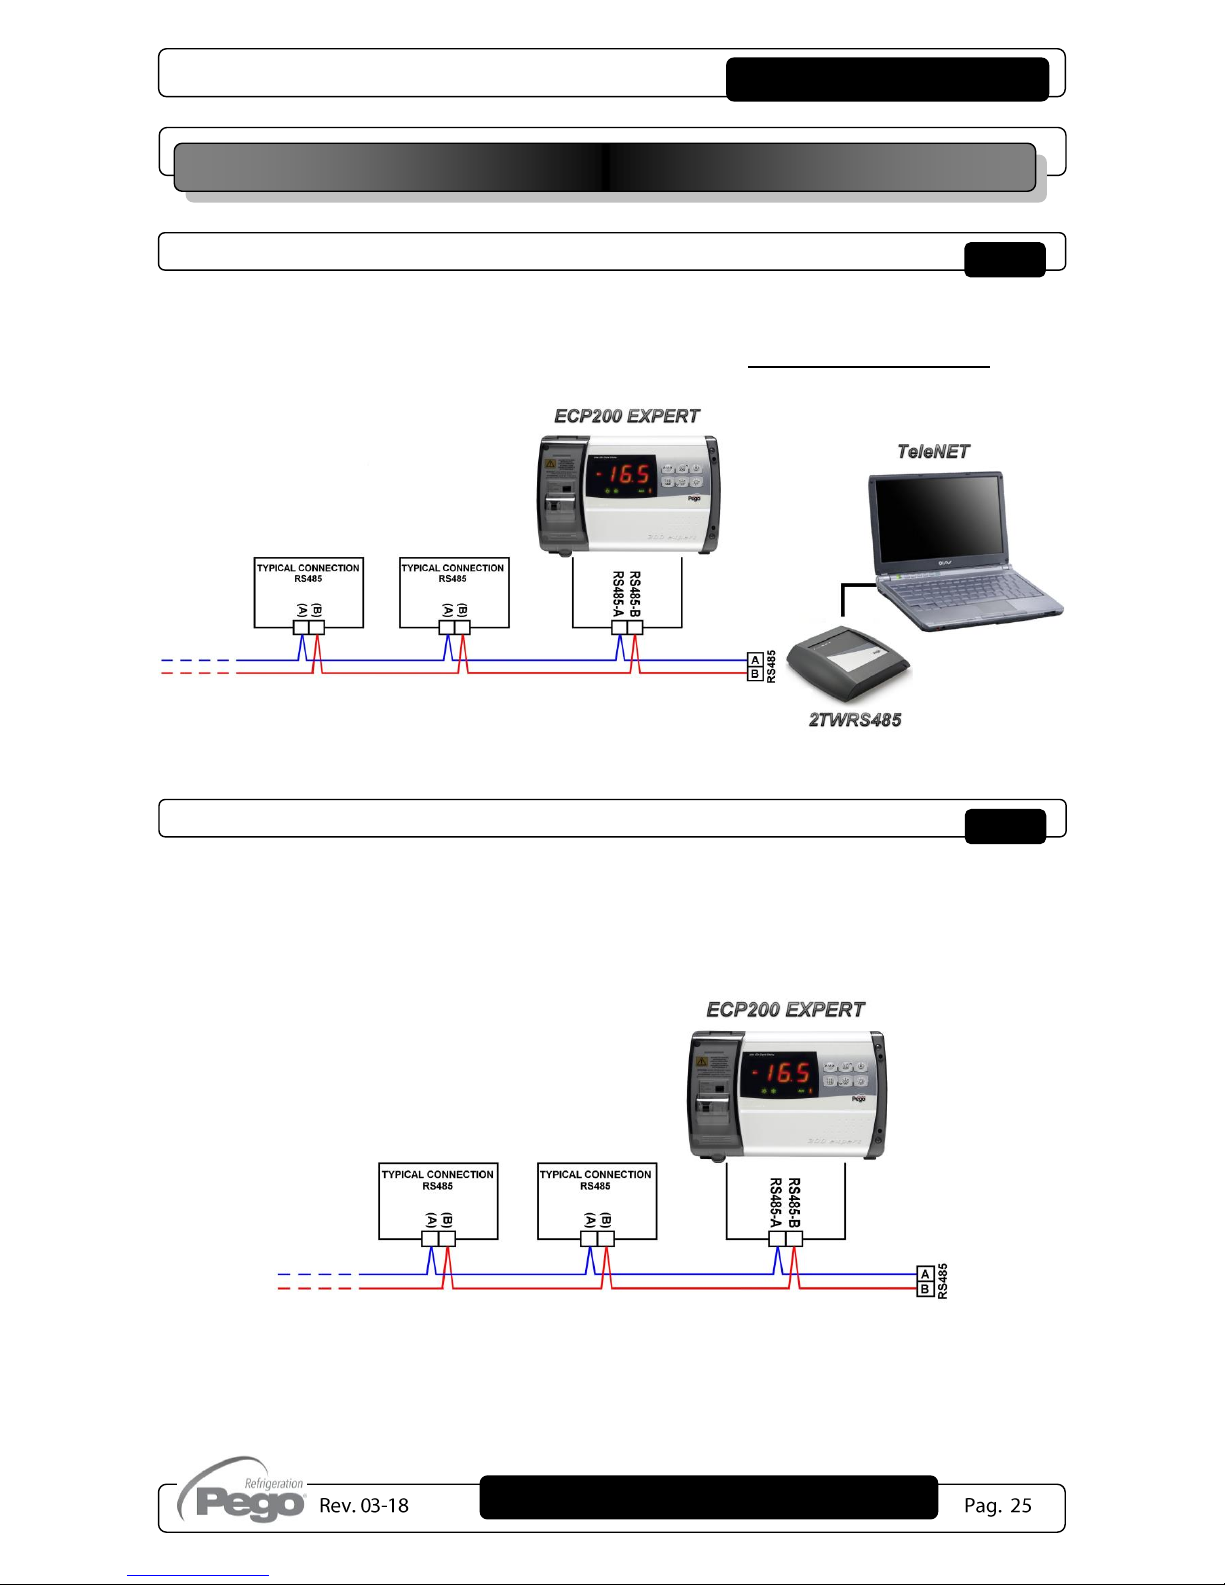
TELENET MONITORING AND SUPERVISION SYSTEM
For TeleNET connections to enable RS485 follow the scheme below. Refer to TeleNET
user manual for instrument configuration.
WARNING: During configuration, at entry “Module” select "Instrument ECP200EEV ".
NET CONFIGURATION WITH MODBUS-RTU PROTOCOL
For RS485 connections with Modbus-RTU protocol, to enable RS485 output follow the
scheme below.
Refer to MODBUS-RTU_ECP200EEV user manual (available on Pego web site) for
MODBUS-RTU communication protocol specification.
CHAPTER 6: OPTIONS

ECP200 EXPERT PULSE
Use and maintenance manual
Chap. 7 – Diagnostics
DIAGNOSTICS
In case of anomaly, the ECP200 EXPERT EEV controller will alert the operator through the alarm codes
displayed on the screen and with an acoustic signal emitted by a buzzer (if included).
The acoustic alarm can be switched off by pressing the UP key (the error code remains) and can be
reactivated by pressing the SET key.
If an alarm condition arises, one of the following messages will appear on the display screen:
ALARM CODE
POSSIBLE CAUSE
OPERATIONS
TO BE PERFORMED
E0
Functional anomaly of the ambient probe (S0)
Check that cold room
temperature sensor is working
properly
If the problem persists replace
the sensor
E1
Functional anomaly of the defrosting probe (S1)
(In this case any defrosting will last for the amount of time
established by d3).
Check that cold room
temperature sensor is working
properly
If the problem persists replace
the sensor
E4
Functional anomaly of the Extraction temperature probe
(S4).
Check that Extraction
temperature probe is working
properly
E5
Functional anomaly of the Evaporation Pressure probe
(S5).
Check that Evaporation
Pressure probe is working
properly
EE
Eeprom alarm
An error has been found in the EEPROM memory.
(All of the outputs have been deactivated except for the
alarms, if configured).
Switch unit off and back on
E6
Low battery alarm; the control will work for at least 20
more days, after which time, if there is no longer a power
supply to the panel the time setting will be lost.
E8
Man in cold room alarm
The man in cold room alarm button was pressed from
inside the cold room to signal a hazardous situation.
Reset the alarm input inside
the cold room
E9
Alarm cold room light. Turning on the light with the key,
spent the tdo time the alarm E9 goes off. If it is silenced
and is not turned off the light, after a new time tdo, the
alarm recurs.
Turn off the cold room light
Ec
Insert compressor protection (ex. Thermal protection or
max. pressure switch).
(All of the outputs have been deactivated except for the
alarm, if configured).
Check that compressor is
working properly
Check compressor absorption
If the problem persists contact
the technical assistance
service
Ed
Door open alarm. When the micro door opens and the tdo
time is up the normal operation of the control will be
restored and the open door alarm (Ed) will be sound.
Check door switch status
Check door switch
connections
If the problem persists contact
the technical assistance
service
CHAPTER 7: DIAGNOSTICS

ECP200 EXPERT PULSE
Use and maintenance manual
Chap. 7 – Diagnostics
EL
Minimum temperature alarm
The words EL flash alternately with the temperature
(See parameter A1)
Check that the compressor is
working properly.
Sensor not reading
temperature properly or
compressor start/stop control
not working.
EH
Maximum temperature alarm.
The words EH flash alternately with the temperature
(See parameter A2)
Check that the compressor is
working properly.
Sensor not reading
temperature properly or
compressor start/stop control
not working.
LSH
Low overheating temperature alarm
MOP
Maximum saturated evaporation temperature alarm
referred to sensor S4
LOP
Minimum saturated evaporation temperature alarm
referred to sensor S4

ECP200 EXPERT PULSE
Use and maintenance manual
Appendices
EU DECLARATION OF CONFORMITY
LA PRESENTE DICHIARAZIONE DI CONFORMITA’ E’ RILASCIATA SOTTO LA RESPONSABILITA’ ESCLUSIVA
DEL FABBRICANTE:
THIS DECLARATION OF CONFORMITY IS ISSUED UNDER THE EXCLUSIVE RESPONSIBILITY OF THE
MANUFACTURER:
PEGO S.r.l. Via Piacentina 6/b, 45030 Occhiobello (RO) – Italy –
DENOMINAZIONE DEL PRODOTTO IN OGGETTO / DENOMINATION OF THE PRODUCT IN OBJECT
MOD.:
ECP200 EXPERT EEV
IL PRODOTTO DI CUI SOPRA E’ CONFORME ALLA PERTINENTE NORMATIVA DI ARMONIZZAZIONE
DELL’UNIONE EUROPEA:
THE PRODUCT IS IN CONFORMITY WITH THE RELEVANT EUROPEAN HARMONIZATION LEGISLATION:
Direttiva Bassa Tensione (LVD): 2014/35/UE
Low voltage directive (LVD): 2014/35/EU
Direttiva EMC: 2014/30/CE
Electromagnetic compatibility (EMC): 2014/30/EU
LA CONFORMITA’ PRESCRITTA DALLA DIRETTIVA E’ GARANTITA DALL’ADEMPIMENTO A TUTTI GLI EFFETTI
DELLE SEGUENTI NORME:
THE CONFORMITY REQUIRED BY THE DIRECTIVE IS GUARANTEED BY THE FULFILLMENT TO THE
FOLLOWING STANDARDS:
Norme armonizzate: EN 60730-1:2016, EN 60730-2-9:2010, EN 61000-6–1:2007, EN 61000-6–3:2007
European standards: EN 60730-1:2016, EN 60730-2-9:2010, EN 61000-6–1:2007, EN 61000-6–3:2007
IL PRODOTTO E’ COSTITUITO PER ESSERE INCORPORATO IN UNA MACCHINA O PER ESSERE ASSEMBLATO
CON ALTRI MACCHINARI PER COSTITUIRE UNA MACCHINA CONSIDERATE DALLA DIRETTIVA: 2006/42/CE
“Direttiva Macchine”.
THE PRODUCT HAS BEEN MANUFACTURED TO BE INCLUDED IN A MACHINE OR TO BE ASSEMBLED
TOGHETER WITH OTHER MACHINERY TO COMPLETE A MACHINE ACCORDING TO DIRECTIVE: EC/2006/42
“Machinery Directive”.
Firmato per nome e per conto di:
Signed for and on behalf of:
APPENDICES
Luogo e Data del rilascio:
Place and Date of Release:
Occhiobello (RO), 01/03/2018
ECP200 EXPERT PULSE
Use and maintenance manual
Appendices
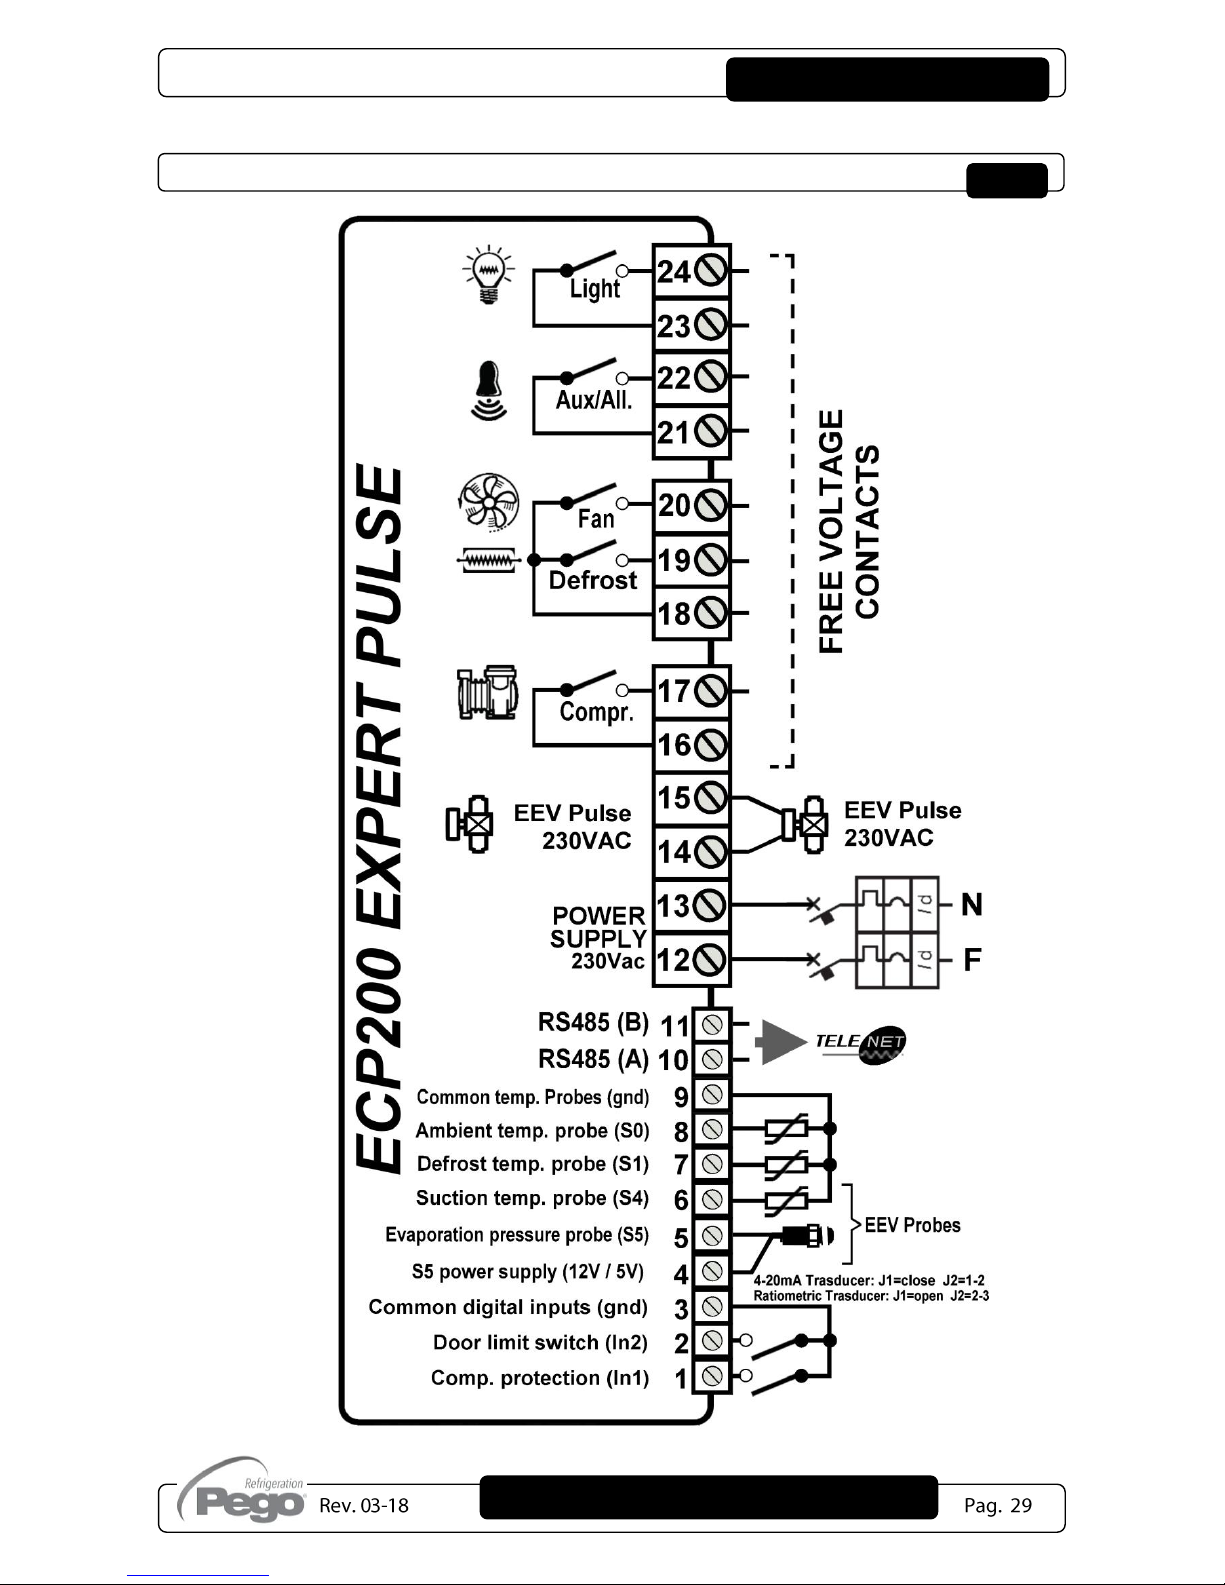
CONNECTIONS DIAGRAM

ECP200 EXPERT PULSE
Use and maintenance manual
Appendices
PART LIST
LEGEND
REF.
DESCRIPTION
1
BOX REAR IN ABS
2
BOX FRONT IN ABS
3
FRONT COVER IN TRANSPARENT POLYCARBONATE
4
BOX FRONT OPENING HINGE
5
BOX CLOSURE SCREWS
6
BOARD FIXING SCREWS
7
MAGNETO-THERMAL CUT-OUT / POWER BREAKER
8
CPU BOARD
9
POLYCARBONATE SCREW COVER
10
TERMINAL FOR EARTH CONNECTIONS
11
COVER PROTECTION BOARD

ECP200 EXPERT PULSE
Use and maintenance manual
NOTES

ECP200 EXPERT PULSE
Use and maintenance manual
Appendices
PEGO s.r.l.
Via Piacentina, 6/b 45030 Occhiobello ROVIGO - ITALY
Tel. +39 0425 762906 Fax +39 0425 762905
e.mail: info@pego.it – www.pego.it
AFTER-SALES ASSISTANCE CENTRE
Tel. +39 0425 762906 e.mail: tecnico@pego.it
Distributor:
PEGO s.r.l. reserves the right to make amendments to this user manual at any moment.
 Loading...