

Page 1

REX™ Digital Music System
User Guide
DRAFT 4
Page 2
The lightning ash with arrowhead, within an equilateral triangle, is intended
to alert the user to the presence of uninsulated “dangerous voltage” within the
product’s enclosure that may be of sufcient magnitude to constitute a risk
CAUTIO N
To prevent electric shock do not use this (polarized) plug with an extension cord,
receptacle or o ther outlet unless the b lades can be fully insert ed to prevent
blade exposure.
WARNING
To reduce the risk of re or electric shock, do no t expose this appliance t o rain
or moisture.
IMPORTANT S AFETY INST RUCTIONS
1. Read these instructions.
2. Keep these instructions.
3. Heed all warnings.
4. Follow all instructions.
5. Do not use this apparatus near water – This apparatus shall not be exposed to
dripping or splashing, and no objects lled with liquids, such as vases, shall be
placed on the apparatus.
6. Clean only with dry cloth.
7. Do not block any ventilation openings. Install in accordance with the
manufacturer’s instructions. The apparatus should not be situated on a
bed, sofa, rug or similar surface that may block the ventilation openings.
The apparatus must not be placed in a built-in installation, such as a closed
bookcase or cabinet that may impede the ow of air through the ventilation
openings. Ventilation should not be impeded by covering the openings with
items such as newspapers, tablecloths, curtains, etc.
8. Do not install near any heat sources such as radiators, heat registers, stoves, or
other apparatus (including ampliers) that produce heat.
9. No naked ame sources, such as lighted candles, should be placed on the apparatus.
10. Do not defeat the safety purpose of the polarized or grounding-type plug. A
polarized plug has two blades with one wider than the other. A grounding type
plug has two blades and a third grounding prong. The wide blade or the third
prong are provided for your safety. If the provided plug does not t into your
outlet, consult an electrician for the replacement of the obsolete outlet.
11. Protect the power cord from being walked on or pinched – particularly at plugs,
convenience receptacles, and the point where they exit from the apparatus.
12. Do not install in an area which impedes the access to the power plug.
Disconnecting the power plug is the only way to completely remove power to
the product and must be readily accessible at all times.
13. Power source – Use only power supplies of the type specied in the operating
instructions or as marked on the appliance. If a separate power supply is
included with this apparatus, do not substitute with any power supply – use
only manufacturer-provided power supplies.
14. Unplug this apparatus during lightning storms or when unused for long
periods of time.
electric shock to persons.
Caution: To prevent the risk of electric shock, do not remove cover (or back). No
user-serviceable parts inside. Refer servicing to qualied service personnel.
15. Refer all servicing to qualied service personnel. Servicing is required when the
apparatus has been damaged in any way, such as power-supply cord or plug is
damaged, liquid has been spilled or objects have fallen into the apparatus, the
apparatus has been exposed to rain or moisture, does not operate normally, or
has been dropped. For service, refer to qualied service personnel, return to the
dealer, or call the Altec Lansing service line for assistance.
16. For products which incorporate batteries, please refer to local regulations for
proper battery disposal.
17. Only use attachments/accessories specied by the manufacturer.
18. Use only with the cart, stand, tripod, bracket, or table specied by
the manufacturer or sold with the apparatus. When a cart is used,
use caution when moving the cart/apparatus combination to
avoid injury from tip-over.
Altec Lansing One Year Limited Warranty
(Two-Year Limited Warranty In the European Union and Asia)
What Does The Warranty Cover?: Altec Lansing warrants that its products shall
be free from defects in materials or workmanship, with the exceptions stated below.
What Is The Period Of Coverage?: For units purchased in European Union or Asia,
this warranty runs for two years from the date of purchase. For units not purchased
in Europe or Asia, this warranty runs for one year from the date of purchase. The
term of any warranties implied by law shall expire when your limited warranty
expires. Some states and/or Member States in the European Union do not allow
limitations on how long an implied warranty lasts, so the above limitation may
not apply to you.
What Does The Warranty Not Cover?: This warranty does not cover any defect,
malfunction or failure that occurs as a result of: improper installation; misuse or
failure to follow the product directions; abuse; or use with improper, unintended
or faulty equipment. (For information on proper installation, operation and use
consult the manual supplied with the product. If you require a replacement manual,
you may download a manual from www.alteclansing.com.) Also, consequential
and incidental damages are not recoverable under this warranty. Some states do
not allow the exclusion or limitation of incidental or consequential damages, so the
above limitation or exclusion may not apply to you.
What Will Altec Lansing Do To Correct The Problem?: Altec Lansing will, at its
option, repair or replace any product that proves to be defective in material or
workmanship. If your product is no longer being manufactured, or is out of stock,
at its option, Altec Lansing may replace your product with a similar or better Altec
Lansing product.
How To Get Warranty Service: To get a covered product repaired or replaced,
you must contact Altec Lansing during the warranty period by e-mail (csupport@
alteclansing.com). You must include in your e-mail, your name, address, e-mail
address, telephone number, date of purchase and a complete description of the
problem you are experiencing. In the United States, you may alternatively contact
Altec Lansing by telephone at 1-800-ALTEC88 — please be prepared to provide the
same information. If the problem appears to be related to a defect in material or
workmanship, Altec Lansing will provide you a return authorization and instructions
for return shipment. Return shipments shall be at the customer’s expense, and the
return must be accompanied by the original proof of purchase. You should insure
the shipment as appropriate because you are responsible for the product until it
arrives at Altec Lansing.
The exclamation point within an equilateral triangle is intended to alert the user
to the presence of important operating and maintenance
(servicing) instructions in the literature accompanying the appliance.
How Will State Law Affect Your Rights?: This warranty gives you specic legal
rights, and you may also have other rights which vary from state to state. Please
note that in the European Union, you as a consumer might have other legal rights
under national legislation of European Union Member States governing the sale of
Altec Lansing’s goods. Those rights are not affected by this guarantee.
The above limited warranties and remedies are sole warranties and remedies
available to purchaser, if, and to the extent, valid and enforceable under the
applicable law.
Customer Service
The answers to most setup and performance questions can be found in the
Troubleshooting guide. You can also consult the FAQs in the customer support
section of our Web site at www.alteclansing.com. If you live in North America
and still can’t nd the information you need, please call our customer service
team for assistance before returning the speakers to your retailer under their
return policy.
Tel: 800-258-3288
E-mail: csupport@alteclansing.com
If you live outside of North America, please visit our web site at
www.alteclansing.com and select your region to locate your country’s distributor.
For the most up-to-date information, be sure to check our Web site at
www.alteclansing.com.
International Distribution
International customers: For information regarding the distribution of
Altec Lansing products in your country, please visit www.alteclansing.com
and click on your region.
Disposal of Old Electrical & Electronic Equipment
This symbol on the product or on its packaging indicates that this
product shall not be treated as household waste. Instead it shall be
handed over to the applicable collection point for the recycling of
electrical and electronic equipment. By ensuring this product is
disposed of correctly, you will help prevent potential negative
consequences for the environment and human health, which could otherwise
be caused by inappropriate waste handling of this product. The recycling of
materials will help to conserve natural resources. For more detailed information
about recycling of this product, please contact your local city ofce or your
household waste disposal service.
Page 3

FEDERAL COMMUNICATIONS COMMISSION
INTERFERENCE STATEMENT
This equipment has been tested and found to comply with the limits for a Class B digital device, pursuant to Part 15 of the FCC Rules.
These limits ar e designed to provide reasonable protection against harmful interference in a residential installation. This equipment
generates, uses and can radiate radio frequency energy and, if not installed and used in accordance with the instructions, may cause
harmful interference to radio communications. However, there is no gua rant ee tha t inte rfere n ce w ill not occu r in a part icu lar installation.
If this equipment does cause harmful interference to radio or television reception, which can be determined by turning the equipment
off and on, the user is encouraged to try to correct the interference by one or more of the following measures:
– Reorient or relocate the receiving antenna.
– Increase the separation between the equipment and receiver.
– Connect the equipment into an outlet on a circuit different from that to which the receiver is connected.
– Consult the dealer or an experienced radio/TV technician for help.
CAUTION:
Any changes or modifications not expressly approved by the party responsible for compliance could void the user's authority to
operate the equipment.
RF exposure warning
This equipment must be i nstalled and operated in accordance with provided instructions and the antenna(s) used for this transmi tter
must be installed to provide a separation distance of at least 20 cm from all persons and must not be co-located or operati ng i n
conjunction with any other antenna or transmitter. End-users and installers must be provide with antenna installation instructions and
transmitter operating conditions for satisfying RF exposure compliance.
Canada Warning
"Industry Canada regulatory information Operation is subject to the following two conditions: (1)
this device may not cause interference, and (2) this device must accept any interference, including
interference that may cause undesired operation of the device.""The user is cautioned that this
device should be used only as specified within this manual to meet RF exposure
requirements. Use of this device in a manner inconsistent with this manual could lead to
excessive RF exposure conditions."
Page 4

Hello
Meet Rex
Welcome to the REX Digital Music System—a revolution in home audio entertainment.
REX is elegant and simple, designed to be at home in any room where you want your music.
You might have a music library on the computer in the home ofce, a CD playing on
the stereo in the family room, and a fresh playlist on the iPod charging in the bedroom.
REX brings all this music to you, so you can listen to your music in any room with a REX.
You can easily browse libraries of digital music from the various sources available on
your home network or attached to REX units in your home. Build a REX Queue or listen
to playlists, albums, tracks grouped by artist and genre, or individual tracks.
REX exes to your home-music needs. To bring your music to another room, just add
another REX. With the REX Legacy, you can even make your home stereo part of your
network, wirelessly.
Register your Rex at www.rex.com/owners so we can let you know about new
features as they become available. While you’re there, give us your feedback so we can
make REX even better.
Use the Quick Start Guide to connect and congure your Rex right away or see
Set up + software, page 22, for more details.
Thanks for inviting Rex into your home!
Altec Lansing REX™ Digital Music System 3
Page 5

Contents
To start using REX quickly, please see the Quick Start Guide.
Hello
Meet REX .............................................................................................................................................................3
Controls ...............................................................................................................................................................6
REX .................................................................................................................................................................. 6
Remote control ...........................................................................................................................................8
Listen to your digital music .......................................................................................................................9
Choose a source ......................................................................................................................................... 9
Network Browsing ..................................................................................................................................... 10
Browse iPod and mp3 players ...............................................................................................................11
Build a REX Queue .................................................................................................................................... 11
Control your REX Queue .........................................................................................................................12
Listen to other sources ................................................................................................................................13
Link to another REX .................................................................................................................................. 13
FM radio ........................................................................................................................................................ 13
AUX ................................................................................................................................................................. 15
Compatibility ...................................................................................................................................................16
Connect REX......................................................................................................................................................18
Your home network .................................................................................................................................. 18
iPod .................................................................................................................................................................19
USB ..................................................................................................................................................................20
AUX ................................................................................................................................................................. 21
4 Contents
Page 6

Power supply ............................................................................................................................................... 21
Ethernet ......................................................................................................................................................... 21
FM Antenna.................................................................................................................................................. 21
Headphones ................................................................................................................................................. 21
Set up + software ........................................................................................................................................... 22
Set-up wizard ..............................................................................................................................................22
Manage settings ......................................................................................................................................... 24
Media player software ............................................................................................................................. 26
Automatic updates .................................................................................................................................... 26
Clock, alarm + sleep features .................................................................................................................. 27
Clock and alarm settings ........................................................................................................................ 27
Alarm 1/Alarm 2 ........................................................................................................................................27
Set Clock mode ..........................................................................................................................................28
Sleep timer ................................................................................................................................................... 28
Getting help ...................................................................................................................................................... 29
Frequently asked questions ................................................................................................................... 29
Technical support ......................................................................................................................................31
Glossary .............................................................................................................................................................. 32
Technical specications .............................................................................................................................. 34
Contents 5
Page 7
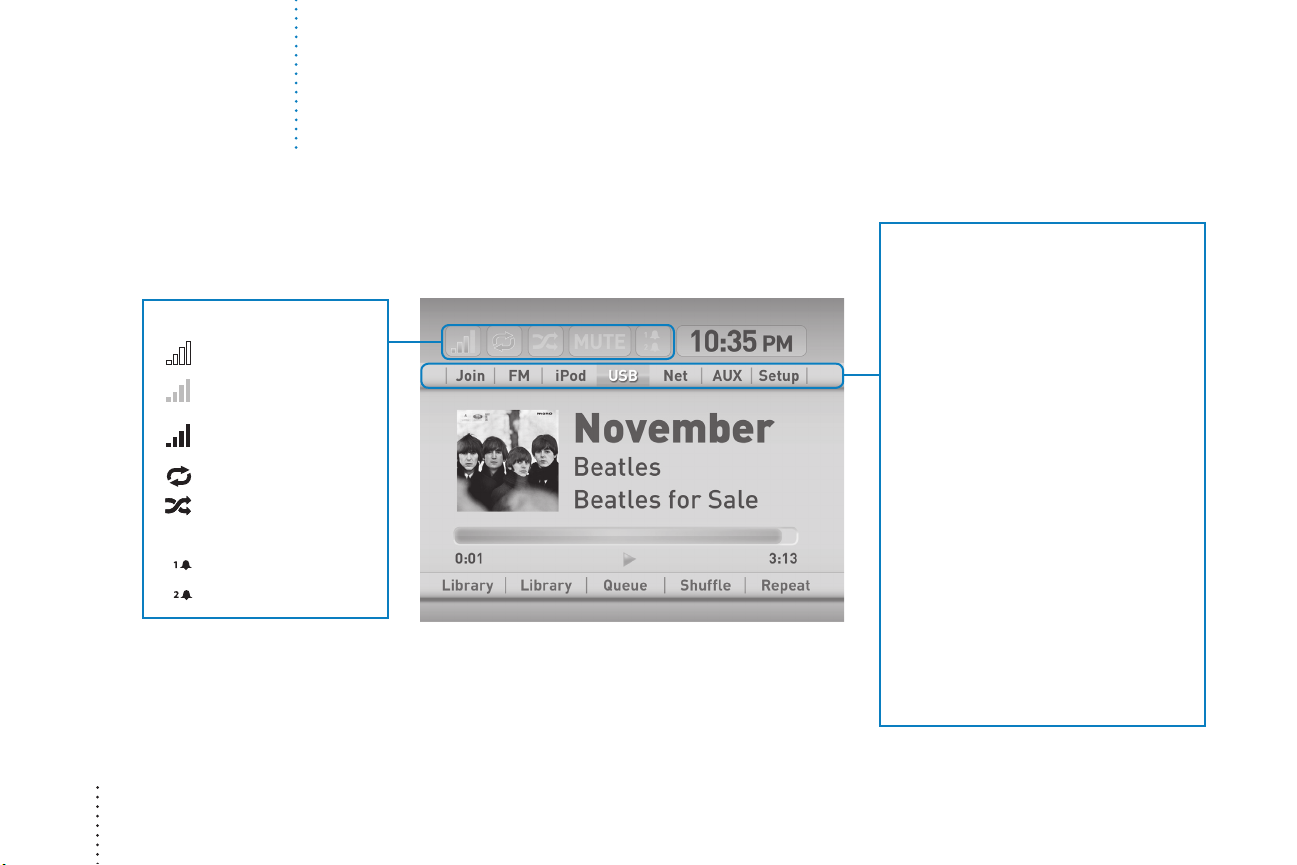
Controls REX
STATUS BAR ICONS
No wireless signal
Wireless signal present,
but no Internet
Wireless signal present,
with Internet
“Repeat queue” is active
Queue has been shufed
MUTE
Mute is active
Alarm 1 enabled
Alarm 2 enabled
™
Control Panels + Display
Display
SOURCE SELECT ICONS
Listen to the same music that
Link
is playing on another REX.
FM
Listen to FM radio.
iPod
Browse and listen to music
from an attached iPod (with
optional dock).
USB
Browse and listen to music
from a compatible MP3 player
or USB drive.
Net
Browse and listen to music from
sources connected to your home
network, including PCs and Macs
and USB mass storage devices
attached to a REX.
AUX
Listen to music from portable
music players, such as CD players
connected to AUX jack in back
of the REX.
Setup
Manage REX settings
6 Controls
Page 8
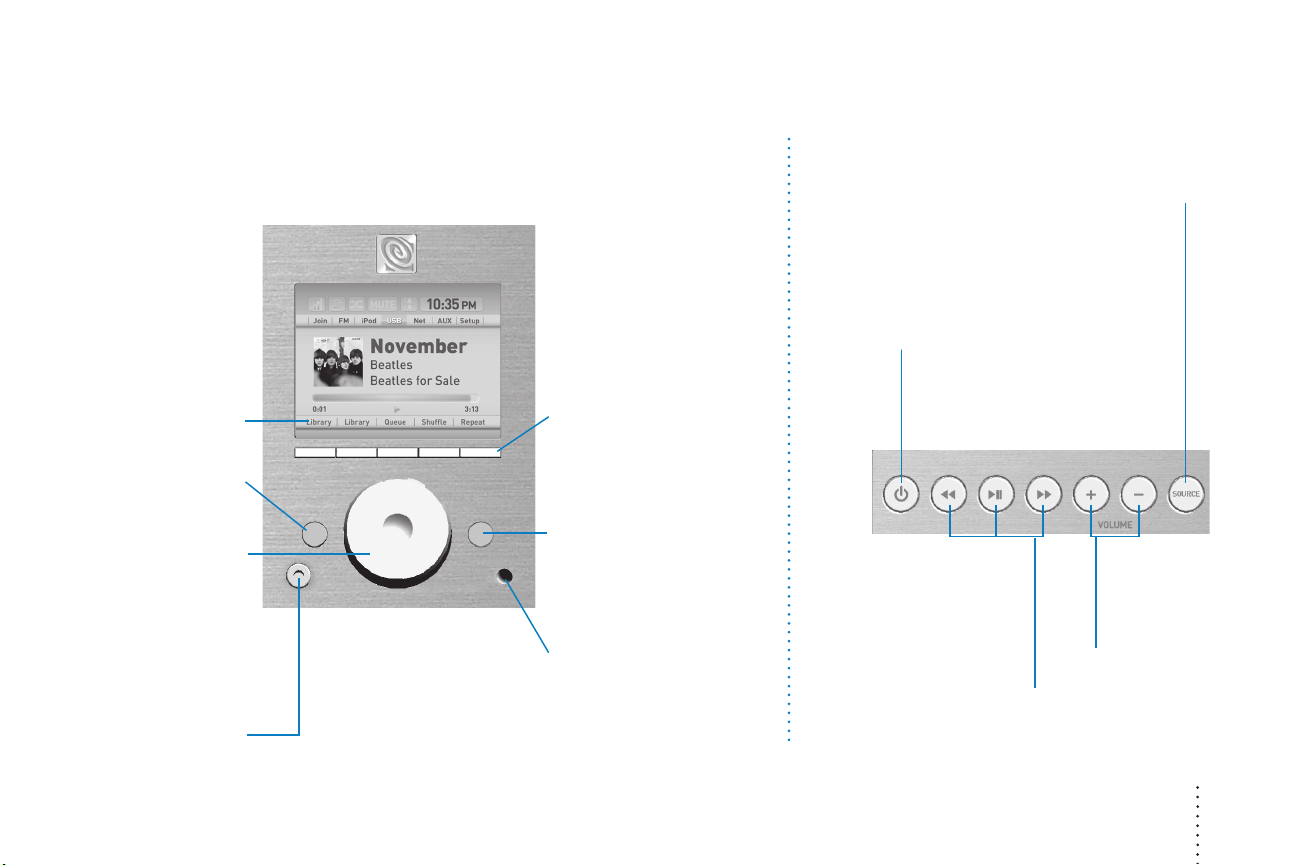
MULTIFUNCTION
KEY LEGENDS
BACK
Press to move backward
through menu screens.
CLICKABLE KNOB
Turn the knob to highlight
on-screen options. Press
the knob to select an
option and move ahead.
In Now Playing mode,
turn knob to adjust
volume.
Front Control Panel
MULTIFUNCTION KEYS
Function changes based
on what you’re doing with
REX. Labels in the display
show the current function.
ADD TO QUEUE/PLAY
Add music to your REX
Queue or play selected
music as you browse in iPod,
USB, or Net source mode.
REMOTE CONTROL SENSOR
Top Control Panel
Press source to select between music
sources that REX can play (or manage
REX settings). You can also power on
REX by pushing the Source button.
POWER
Press to power REX on to
listen to music and off to
enter Stand By mode.
PLAY/PAUSE, REWIND,
FAST FORWARD
Control music playback in a
Now Playing mode. In FM
Mode seek up or down
the dial.
SOURCE
VOLUME
CONTROLS
Adjust volume
up or down
HEADPHONE JACK
Controls 7
Page 9
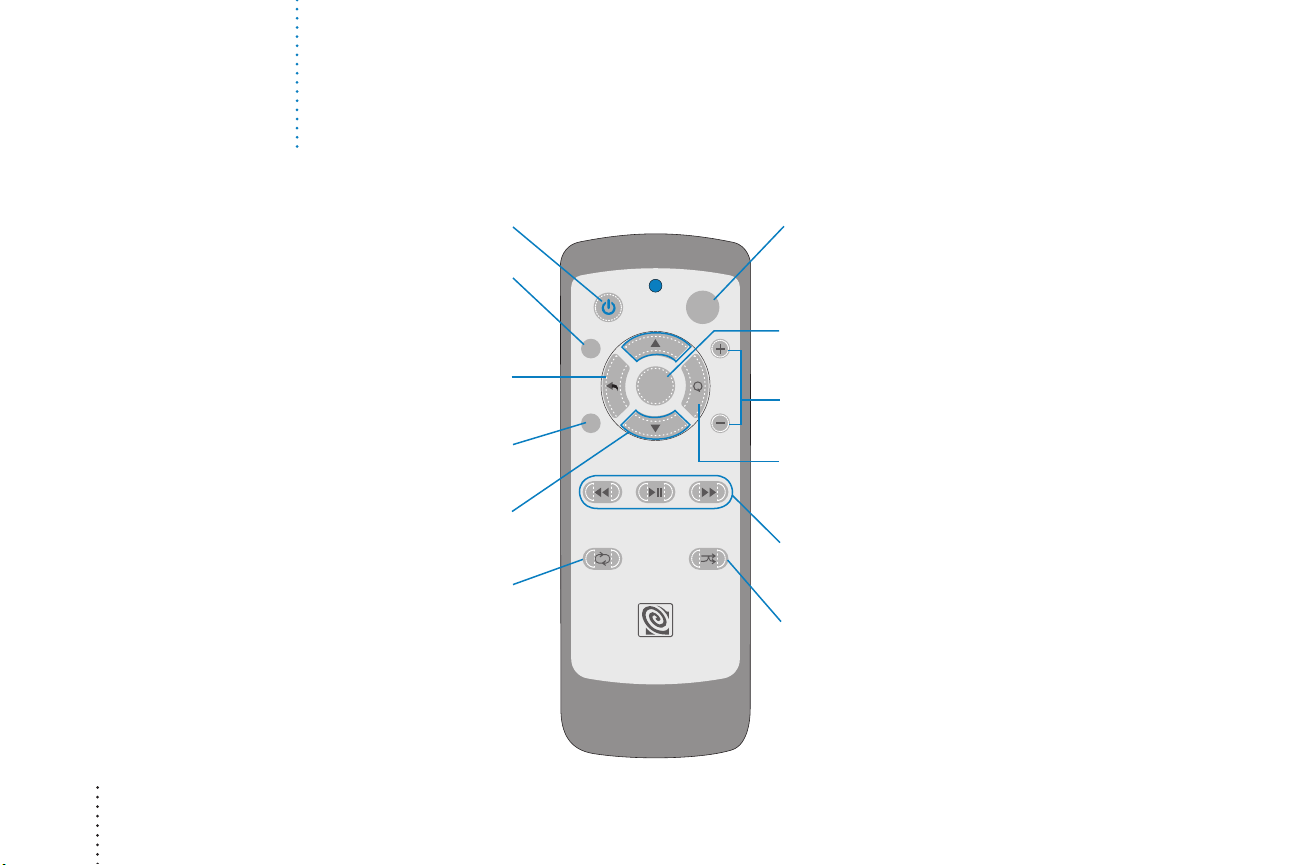
Controls Remote Control
8 Controls
POWER
Power REX on and off.
PRESET
Press to navigate FM radio presets.
Use the arrow keys to move to the
desired preset, then press select.
BACK
Press to move backward
through menu screens.
MUTE
Press to mute the sound.
UP/DOWN ARROWS
Use the arrows to move between
and highlight on-screen options.
RE PEAT
Press to set a playlist or
track to repeat.
PRESETS
MUTE
ENTER
SOURCE
SHUFFLEREPEAT
SOURCE
Press to select a music source (or manage REX
settings). Use up/down arrows to highlight the
source you want; press enter to select.
ENTER
Press to select an option and move ahead.
VOLUME
VOLUME CONTROLS
Adjusts volume up (+) or down (–).
ADD TO QUEUE/PLAY
Add music to your REX Queue or play selected music
as you browse in iPod, USB, or Net source mode.
PLAY/PAUSE, REWIND, FAST-FORWARD
Control attached iPods and other
MP3 players or your REX Queue.
SHUFFLE
Press to shufe the current playlist.
Page 10
Listen to your digital music
FIGURE 1
We do not have a
“Network Sources” display
FPO
will need supplied to us.
“Network source”
With REX, your home network can include not just home computers but also iPods and other
MP3 players, ash drives, and USB hard drives that are attached to a REX. REX lets you see
and listen to the music stored in all these places.
Browsing is the process of navigating these music sources. You browse REX as much as you
do an iPod or another MP3 player. As you browse, you can build a REX Queue or play albums,
existing playlists, tracks sorted by artist or genre, or individual tracks. With REX, the big
difference is that you can browse and play all the music on your home network, not just
what’s on a single device.
Choose a source
To browse for music, select the source you want: iPod, USB, or Net (see FIGURE 1). To select
a source, press the source button, rotate the clickable knob to highlight the source you want
to browse, then press the clickable knob.
Browsing Net provides access to the most music. That’s because Net allows REX to access
all the sources on your network, including iPods and other MP3 players attached to other
REX units. Choosing Source: iPod or Source: USB lets you browse only those devices attached
directly to the REX you are using at the time.
Listen to your digital music 9
Page 11

FIGURE 2
Network browsing
When you browse Net, what you see on the REX display will depend in part on whether you
have set a favorite server in the REX settings.
If you have not set a favorite server, you’ll see a screen that looks like
Source: Net>All Servers to nd the server you want to browse.
If you have set a favorite server, you’ll see a screen that looks like
available on the network, you have immediate access to the music on that server. You can
browse by playlists, artists, albums, genres, and tracks. Even if you have set a favorite server,
you can always browse other servers on your network by selecting Source: Net>All Servers.
FIGURE 2 . Go to
FIGURE 3 . If that server is
FIGURE 3
10 Listen to your digital music
Browsing Source: Net lets you build a REX Queue from different sources throughout
your home.
What’s a server?
Any computer on your network that holds music les can be used as a server.
To browse these sources, media player software must be congured to “share”
the music les and the software must be running. Please see your computer’s
media player software for how to set it to share music.
In addition, you can attach a USB mass storage device to a REX, making a de facto
server. To browse such a de facto ser ver, select Source: Net>All Servers. You’ll nd
the USB mass storage device nested under the REX to which it is attached.
Page 12
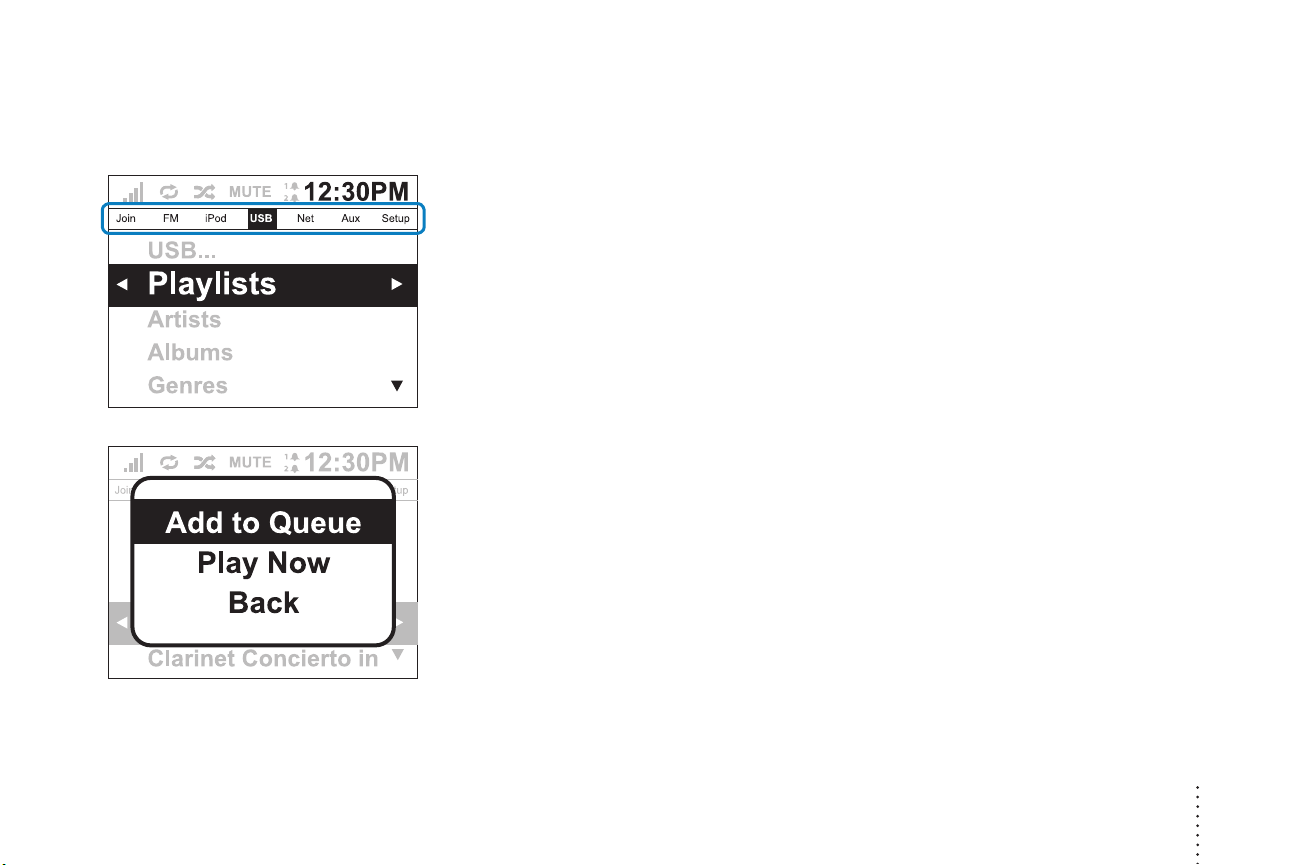
FIGURE 4
FIGURE 5
When choosing Add to Queue on a group
of playlists, single playlist or single track,
you can add the music to the end of the
REX Queue, play the music immediately,
or go back to the previous listing.
Browse iPod and MP3 players
You can browse the contents of iPods and other MP3 players that are attached to a REX. When
these devices are connected to the REX you are using, they show up under Source: iPod or
Source: USB (see FIGURE 4).
If they are attached to another REX, you can browse them under Source: Net>All Servers
nested under the name of the remote REX.
You may notice that you cannot browse an iPod from more than one REX at the same
time. If the iPod is in use by the REX to which it is connected, other REXes can’t browse or
select music from that iPod. However, the remote REX can Link to listen to the same music
the iPod is already playing. If a REX starts using an iPod to which it is physically attached,
while that iPod is in use by a remote REX, the remote REX will lose access to the iPod. This
limitation does not apply to MP3 players connected via USB.
Build a REX Queue
As you browse, you can build a REX Queue by pressing the add to queue button. You can add
albums, all tracks by artist or genre, and individual tracks to the REX queue. Your REX Queue
can also include playlists you set up on another device. Highlight the item you want to add
to your REX Queue, then press the add to queue button.
REX will ask if you want to Play Now to play the selection or Add to Queue to add to the
end of your current REX Queue (see FIGURE 5). Choose Add to Queue to add the selection
and continue building your REX Queue. Choose Play Now to empty your REX Queue and listen
to the selection immediately.
Listen to your digital music 11
Page 13

FIGURE 6
FIGURE 7
Browse: Return to Browse mode
S h u f e : Shufe the queue
R e p e a t : Repeat the queue
Clear: Clear the queue
Show: Show the queue
Once you add at least one item to your REX Queue, you can start playing it. To do so,
press the PAUSE/PLAY button (
). You can continue to browse and add selections to
the REX Queue while you listen to your music.
Remember, if you choose the Play Now option after pressing the add to queue button
while browsing, you empty your REX Queue, replacing the whole list with the selected item.
Control your REX Queue
You can shufe, repeat, clear and show your REX Queue. To use these controls, select
Source: Net>Now Playing or Source: Net>Current Queue (see FIGURE 6). From there,
control your playlist using the multifunction keys beneath the display.
To view and scroll though your REX Queue, choose Source: Net>Current Queue or
Source: Net>Now Playing>Show Q (see FIGURE 7). To jump to a track within the list,
highlight the track and press the clickable knob.
BROWSE AND LISTEN
You don’t need to build a REX Queue to listen to music. You can browse and listen to playlists
as well as tracks sorted by album, artist, and genre without building a REX Queue rst.
12 Listen to your digital music
Page 14

FIGURE 8
FIGURE 9
Listen to other sources
Link to another REX
Each REX plays music independently of the others in your home unless you choose to
synchronize, or Link, them. To synchronize music playback, press the source button and select
Link (see FIGURE 8). Use the clickable knob to highlight and select the REX unit to which you
want to link. Now you’ll hear the same music that REX is playing, beautifully synchronized.
(see FIGURE 9).
Having a Party?
Use Source: Link mode to have all your REXes play the same music. It’s great for
parties or anytime you want to listen to the same music ever ywhere in the house.
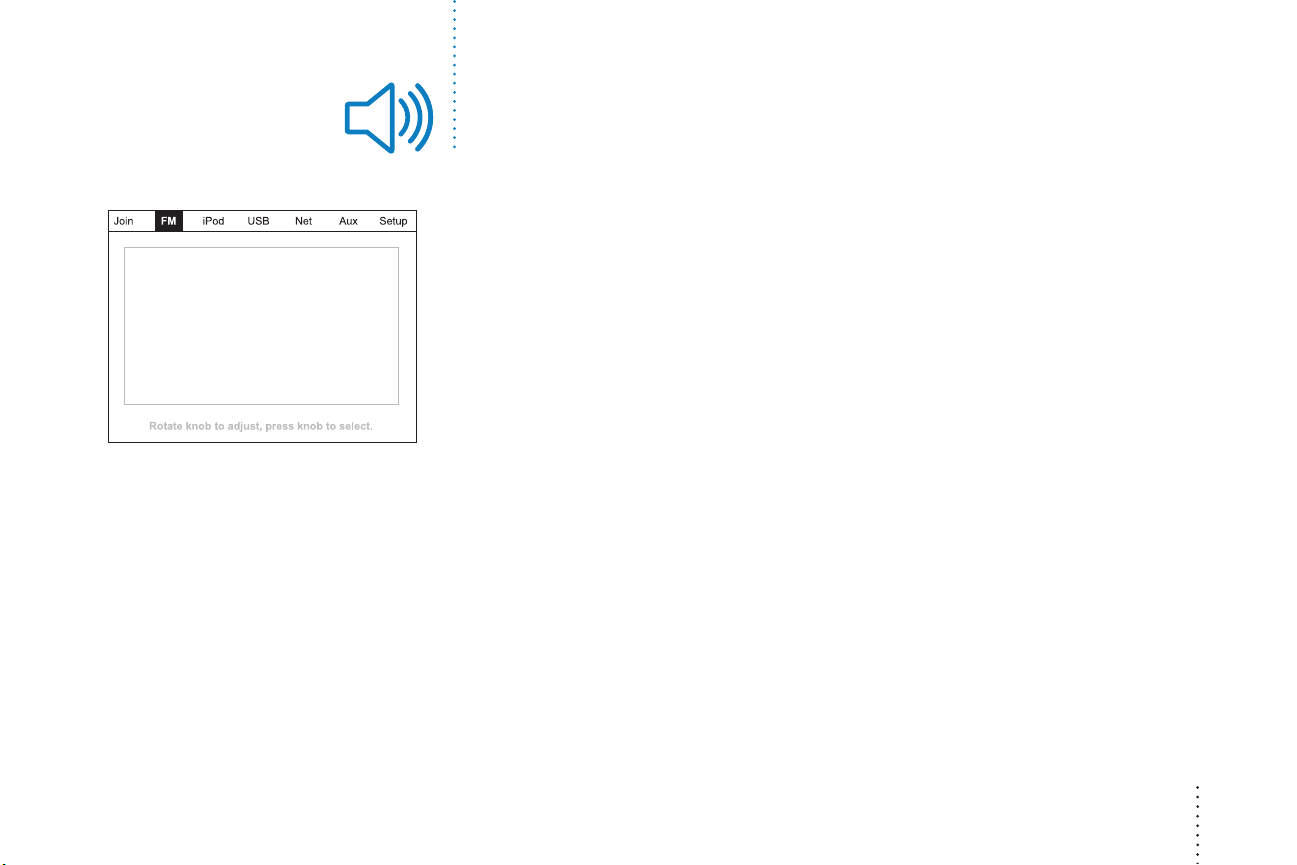
FM Radio
To listen to the FM Radio: Press the source button, highlight FM with the clickable knob, then
select FM by pressing the clickable knob.
TUNING
In FM mode, turning the clickable knob tunes the radio. If you press and hold the clickable
knob for 3 seconds, the tuner seeks the next strong signal moving up the dial. You can also
seek up and down the dial using the fast forward (
) / rewind ( ) buttons.
Listen to other sources 13
Page 15

FIGURE 10
PRESET STATIONS
You can store up to ve preset stations. Use the multifunction keys beneath the display
to set and select your presets. Tune to the station you want to save as a preset. Press and
hold a multifunction key until the screen ashes. The saved station will appear above the
key you selected (see FIGURE 10). In the future, just press this key while in FM mode to
tune to that station.
REMOTE CONTROL RADIO
You may tune the radio to a preset station using the remote. In FM mode, press preset
button on the remote and use up and down arrows to move to the preset station you
want to hear. Then press the enter key to choose.
FIGURE 11
14 Listen to other sources
RADIO BROADCAST DATA SYSTEM (RBDS)
In addition to playing your favorite FM stations, REX receives and displays information
that many stations now broadcast about the station and its content. When available,
REX will display this information.
Page 16

AUX
You can connect a variety of analogue audio devices using the 1/8” mini stereo patch cable
that comes with REX. Any audio source that has a 1/8” stereo mini jack can be connected
to REX. This includes compact CD players and even iPods and other MP3 players that are
otherwise not compatible with REX. To control music play back, you must use the controls
on the device.
Once connected, select Source: Aux to play through REX.
Playing AUX devices through REX
CD Player
Stereo mini cable
Casset te Player
Listen to other sources 15
Page 17

Compatibility
MEDIA PLAYERS
Software known as media players allow digital media to play on your computer. Some media
players, such as iTunes and Windows Media Player, also act as “servers” making music les
available over your home network. This server feature is what allows REX to nd and play
music stored on your home computers.
REX works with most widely used media players, including:
• iTunes for Mac, version X and higher
• iTunes for Windows, version X and higher
• Windows Media Player for Windows, version X and higher
• Allegro Media Server for Mac OS X, version X and higher
• Allegro Media Server for Mac OS 9, version X and higher
• Allegro Media Server for Windows, version X and higher
AUDIO FILE TYPE
REX can play music les stored on compatible devices in the following formats:
• AAC (MPEG4)
• ACC DRM (via analogue only)
• Apple Lossless
• WAV-LPCM (uncom-pressed)
• FLAC (lossless)
• Ogg Vorbis
• MP3
• WMA
16 Compatibility
Page 18

IPOD
REX is compatible with the following iPod models when connected to them using
the optional iPod dock.
• iPod
• Video iPod
• iPod Mini
• iPod Nano
• iPod Shufe (1GB)
USB MASS STORAGE DEVICE CLASS
REX can play music stored on devices that follow the USB mass storage device class
protocols and which meet the USB 2.0 standards. Devices in this category include many
MP3 players, ash drives and USB hard drives.
When you connect a compatible MP3 player using a USB cable, you can use REX to control
music on that player. The player will also recharge while connected to REX.
ANALOGUE AUDIO SOURCES
Any audio source that has a 1/8” stereo mini jack can be connected to REX. This includes
iPods and other MP3 players that are otherwise not compatible with REX. To control music
play back, you must use the controls on the device.
NETWORKING AND SECURITY
The built-in wireless capability of REX is compatible with the 802.11b and 802.11g wireless
local area network standards. REX can join networks secured using WEP or WPA protocols.
REX can connect to most wired home networks using a standard Ethernet cable.
Compatibility 17
Page 19

Connect REX
Power
18 Connect to REX
Ethernet AUX
USB FM Antenna
Optional
iPod Dock
Your home network
If you have a home network connecting computers to each other, or sharing an Internet
connection, REX easily becomes part of that network. REX units have built-in wireless
networking capability. If your home network is wireless, REX can connect wirelessly.
You can connect REX to a wired home network using the built-in Ethernet jack and
an Ethernet cable. DSL and cable modems often have a built in router, which enables
sharing the Internet connection.
Page 20

FIGURE 12
iPod Dock: Sold Separately
If you don’t have a separate router, you may be able to connect at the DSL or cable modem.
(Check the documentation that came with your router or modem for details.) Do not connect
REX directly to a computer.
Some routers allow both wired and wireless connections. These routers include a wireless
access point that lets REX connect wirelessly to your network. They also allow wired
connections using Ethernet. In this case, you can choose to have a REX connect whichever
way is more convenient for you.
Some popular models of routers with wireless access points include: Linksys® WAP 54G,
Netgear® WGR series, and D-Link® AirPlus G.
To access music on a wired network, you must physically connect each REX to your router
using Ethernet cable unless your router includes a wireless access point.
CHANGING NETWORK SETTINGS
When you rst set up REX, REX establishes network connections as part of the set-up wizard.
You can turn the network connection off and on and view, edit, and test the settings manually.
Select Source: Setup>Network Settings (see FIGURE 12).
iPod
While it is OK to connect an iPod to REX via USB, the USB connection only allows REX to play
music les that were copied to the iPod in “disk mode.” When connected to an iPod by USB,
REX can’t play music that was loaded on that iPod using iTunes. This is because the iPod uses
a proprietary format for managing music. The optional REX iPod dock provides full functionality
and serves as a charging stand. Visit your REX dealer or www.alteclansing.com to purchase an
iPod dock for REX.
Connect to REX 19
Page 21

FIGURE 1
When you connect an iPod to a REX via the optional iPod dock, music les on the iPod can
be selected and played on that REX. Other REX units browsing in Net mode may also select
and play music from that iPod. If the iPod is in use by the REX to which it is connected, the
iPod les may not be available to other REXes.
While connected to REX, your iPod battery recharges. (Rex must be connected to power.)
“Network Sources” display
will need supplied to us.
20 Connect to REX
We do not have a
FPO
“iPod playing”
Cataloguing
REX automatically catalogues music les stored on computers and MP3 players that
are connected to your home network or a REX. During cataloguing, you can’t listen to
music from the device. The catalogue of contents allows faster browsing from REX.
A record of the catalogue is left on computers and non-iPod MP3 players for REX to
reference when you browse for music.
USB
You can connect a variety of music storage devices to REX via USB. Most USB mass
storage devices will work with REX. Included in this class are iPods and other MP3 players,
ash drives, and USB hard drives. You can listen to music les stored on these kinds of
devices on a REX. On the REX to which they are physically connected, select Source: Net
or Source: USB to browse these devices. From a networked REX, you can browse these
devices from Source: Net.
Page 22

AUX
You can connect most portable audio players to REX using the AUX stereo mini jack on the
back of REX. For example, you may connect from the headphone jack of a portable CD player
to the AUX stereo mini jack on the REX.
Power supply
REX connects to AC power using an external power supply. When you disconnect REX from
power, the REX settings are saved. However, the contents of your REX Queue will be lost.
Ethernet
You can connect REX to your wired home network using the built-in Ethernet jack and an
Ethernet cable. Connect to your network through a router. Do not connect REX directly
to a computer
FM antenna
REX comes with an external FM antenna to enhance reception.
Headphones
REX has a headphone jack on the front near the clickable knob. Plugging in headphones will
shut off the sound to the speakers.
Connect to REX 21
Page 23

Set up + software
Set-up wizard
Before you can listen to music, REX needs to learn about you and your home network. When
you rst connect a REX to power, a set-up wizard automatically begins. The wizard guides you
though the set-up process. During set-up, REX collects information about other REX devices,
your home network, and your preferences. It takes only a few minutes to complete set up and
start listening to music.
The wizard lets you skip steps in the set-up process. If you choose to skip steps, you may not
be able to use all the capabilities of REX until you input the settings manually at a later time.
Set-up Wizard Welcome Screen
FIGURE 13
22 Set up + software
BEFORE YOU START
Before using the set-up wizard to guide you through set up, a bit of preparation is helpful.
• If REX will use a wired connection to your network, connect REX to the
network router with an Ethernet cable.
• If you have a wireless network, make sure your router is turned on.
• Share the media player software on the home computer you will most often use to
access music.
ADDITIONAL REXES
Setting up an additional REX is even easier than setting up the rst. Additional units will copy
most of their settings from a REX you’ve already set up. You’ll just need to name the additional
unit and allow it to be “discovered” by another REX (see FIGURE 13). For this reason, don’t run
the set-up wizard on more than one REX at a time.
If you’re setting up more than one REX, don’t worry about which one to set up rst. It
doesn’t matter—pick one and get started.
Page 24

Step 1
CONNECT REX TO POWER
Connect REX to the external power supply and connect the power supply to an electrical outlet.
SET-UP CONTROLS
To set up REX, you’ll use two simple REX controls: the clickable knob and the back button. Just
rotate the clickable knob to highlight an on-screen option. Press the knob to select an option
and move ahead. To move back, or cancel out of an option, press the back button.
Step 2
Step 3
Step 4
Step 5
Set-up Steps
Step 1. Name the REX
Step 2. Connect to another REX
Step 3. Connect to home network
Step 4. Set favorite server
Step 5. Set date and time
COPY SETTINGS FROM ANOTHER REX
When you set up an additional REX, you’ll be asked to have an existing REX “discover” the
new one. This lets the new REX copy settings. When prompted, go to any other REX that
you’ve already set up. Press the two far left multifunction keys at the same time. Hold them
down until the REX enters Discovery mode, about 3 seconds.
SAVE YOUR SETTINGS
After you complete the set-up wizard, REX saves your settings even if you unplug the unit.
If you unplug a REX unit prior to completing the wizard, however, REX erases the settings
from memory. If you want to erase your settings and restart the wizard from the beginning,
just unplug the unit before you complete the wizard.
CHANGE YOUR SETTINGS
You can always change settings after set up. Select Source: Setup to manage your settings.
Set up + software 23
Page 25

FIGURE 14
Manage settings
After initial set up, you can view and change settings on REX in Setup mode. Press the source
button and use the clickable knob to select Setup. In Setup mode, you can select one of four
submenus: REX Settings, Clock/Alarm Settings, Network Settings, and Favorite Server
(see FIGURE 14).
REX SETTINGS
Select REX Settings to:
•
View the unit’s name
•
Change the unit’s name
•
Change the Stand By brightness level
•
Change the Power On brightness level
•
View the unit’s current software version
CLOCK/ALARM SETTINGS
Select Clock/Alarm Settings to:
•
Set Alarm 1
•
Set Alarm 2
•
Change the default sleep-timer period
•
Choose between network time or manual time
•
Set the current time manually
•
Set the current date manually
•
Change the daylight saving time observance period
•
Change the unit’s time zone
•
Set the time format (12/24 hour)
•
Set the date format (M/D/Y or D/M/Y)
24 Set up + software
Page 26

FIGURE 14
FIGURE 15
FIGURE 16
NETWORK SETTINGS
If you prefer to set network settings manually or have special requirements, select
Source: Setup>Network Settings>Wired or Source: Setup>Network Settings>Wireless
(see FIGURE 14 and FIGURE 15). From there, you can view, change, and test those settings
and turn the network connection on or off.
Within Network Settings, you can manually congure IP and subnet addresses, enter
the name of “hidden” wireless networks, and input passwords (see FIGURE 16). You enter
addresses and names using the clickable knob to select characters from the on-screen text
input wheel.
FAVORITE SERVER
Select Source: Setup>Favorite Server to view your current favorite server, if one is selected,
or choose a favorite.
By setting a favorite server you create a short cut to that server when browsing in Net mode.
You can always browse other servers on your network by selecting Source: Net>All Servers.
Set up + software 25
Page 27

Media player software
Music les stored on your computer hard drive are accessed by REX in a client-server
arrangement. REX is the “client” that is “served” music from the computer. For REX to
access music stored on a computer on your network, that computer must have media
player software installed, running, and congured to share that music.
REX works with any UPnP media server. The two most common media player programs for
music in use today are iTunes® and Windows Media Player®. See the REX home page at
www.alteclansing.com for information on media player software and REX .
Automatic updates
To keep REX up-to-date, new software will become available for REX periodically. These
software updates will add new capabilities and address changes in media player software,
security, and other aspects of the networked computing environment.
When REX is connected to the Internet though your home network, software updates take
place automatically, at a time when REX is unlikely to be in use. You will see a message on
the REX display telling you a software update is in progress. During the update, music cannot
play and the REX controls are disabled. Updates usually take 30 minutes or less. At the end of
the update, REX will automatically shut down, restart, and let you know that an update has
taken place.
For information on the latest updates and documentation describing new functions, visit the
REX home page at www.alteclansing.com.
26 Set up + software
Page 28

Clock, alarm + sleep features
FIGURE 13
FIGURE 14
When not Powered On, REX is in Stand By mode and displays a digital clock. You can set the
clock’s alarm to start playing music at a specied time. And you can set a sleep timer to shut
music off after a specied time period.
Clock and alarm settings
You can get to the clock settings two ways. When REX is powered on, you can select
Source: Setup>Clock/Alarm. Alternatively, when REX is in Stand By mode, you can use the
multifunction keys. In Stand By mode, REX displays the current time and date and offers
three multifunction key options: Alarm 1, Alarm 2, and Set Clock (see FIGURE 13). To select
an option, press the appropriate key.
Alarm 1 / Alarm 2
The alarm settings allow you to select music for the alarm, set the alarm time and volume,
schedule alarms to repeat, and turn alarms on and off. You can set your alarms to play FM radio
or music from an iPod, another MP3 player, or your network (see FIGURE 14). Or you can select
the alarm chime.
When the alarm sounds, it can be “snoozed” or dismissed. To snooze the alarm, just press the
clickable knob. To dismiss the alarm, press the power button. If you rotate the clickable knob or
press other buttons, REX will dismiss the alarm and remain powered on so you can continue to
listen to your music.
After you dismiss an alarm, it is ready to repeat at the next scheduled setting.
Clock, alarm + sleep features 27
Page 29

FIGURE 15
Set Clock mode
To access a menu of clock-related settings, press the multifunction key for Set Clock. Use the
clickable knob to highlight and select an item to edit.
Sleep timer
You can set REX to stop playing music automatically using the sleep timer. To set the sleep
timer, press the power button. Your music will stop playing. Use the clickable knob to select
the Sleep-timer option and set a time period. Your music will resume playing and continue
to play for the period of time you selected.
You can also enter the sleep-timer menu by using the multifunction key to select Set Clock in
Stand By mode.
28 Clock, alarm + sleep features
Page 30

Getting Help
Frequently asked questions
Q: Can I nd more information about REX online?
A: Yes. Visit the REX home page at www.alteclansing.com
Q: REX is connected to my home network but doesn’t see the computer that holds my music.
What should I do?
A: Media player software must be installed and congured to “share” content. Check the status of
your media player software. Also, if a rewall is installed on that computer, the rewall could
be preventing REX from accessing the computer. Check the rewall settings and follow the
manufacturer’s instructions for providing access to each REX.
Q: I attached an MP3 player to REX, but I can’t listen to the music. Why?
A: REX may be cataloging the music les on that MP3 player. Until cataloging is complete,
you won’t be able to listen to the music.
Q: Can I adjust the REX display?
A: You can adjust the brightness of the display. There are two separate settings. One setting
controls the brightness of the display in Stand By mode. The other setting, called Power On
Brightness, controls the brightness of all other screens. Both settings can be found under
Source: Setup>REX Settings. You can also adjust Stand By Brightness by selecting
Set Clock using the multifunction keys while in Stand By mode.
Getting help 29
Page 31

Q: I made changes to my home network. Now REX can’t connect. How do I update settings on REX?
A: You need to edit the REX settings to reect the changes you made to your home network.
Select Source: Network Settings>Wired or Source: Network Settings>Wireless to
edit the settings. Within Network Settings, you can manually congure IP and subnet
addresses, enter the name of “hidden” wireless networks, and input passwords. You enter
addresses and names using the clickable knob to select characters from the on-screen text
input tool.
Q: I have a “hidden” wireless network that REX can’t nd. How can I set up REX to connect
to my network?
A: You can manually enter the name of a hidden network. Select Enter SSID Manually
from the bottom of the list of networks that REX can see. You’ll see this list as you move
though the set-up wizard. If you’ve already completed the set-up wizard, choose Source:
Setup>Network Settings>Wireless>Edit Settings to nd this option. You’ll use the
on-screen text input wheel to enter the name of your network.
Q: My network uses static IP conguration. Can I assign a static IP address to REX?
A: Yes, but you can’t do it during the set-up wizard. The set-up wizard will use DHCP to
assign an IP address. After the wizard is complete, choose Source: Setup>Network
Settings. From there, you can edit the IP settings in wired and wireless networks. Note,
if you set up another REX after setting a static IP address, that address will be copied
to the second REX. This will trigger an error message during the wizard. After the wizard is
complete, you must manually congure the IP address.
Q: Lorem ipsum dolor sit amet, consectetuer adipiscing elit.
A: Lorem ipsum dolor sit amet, consectetuer adipiscing elit. Praesent justo. Sed pretium
vulputate justo. Etiam viverra lorem et tortor. Donec consectetuer egestas odio. Aenean
nisi nisi, commodo vel, ultricies eu, commodo sit amet, lacus. Ut ultrices, felis a faucibus
porttitor, felis neque tempor justo, ut aliquet urna orci et diam.
30 Getting help
Page 32

Q: Lorem ipsum dolor sit amet, consectetuer adipiscing elit.
A: Lorem ipsum dolor sit amet, consectetuer adipiscing elit. Praesent justo. Sed pretium
vulputate justo. Etiam viverra lorem et tortor. Donec consectetuer egestas odio. Aenean
nisi nisi, commodo vel, ultricies eu, commodo sit amet, lacus. Ut ultrices, felis a faucibus
porttitor, felis neque tempor justo, ut aliquet urna orci et diam.
Q: Lorem ipsum dolor sit amet, consectetuer adipiscing elit.
A: Lorem ipsum dolor sit amet, consectetuer adipiscing elit. Praesent justo. Sed pretium
vulputate justo. Etiam viverra lorem et tortor. Donec consectetuer egestas odio. Aenean
nisi nisi, commodo vel, ultricies eu, commodo sit amet, lacus. Ut ultrices, felis a faucibus
porttitor, felis neque tempor justo, ut aliquet urna orci et diam. Sed non nisl ac neque
dapibus euismod. Aenean quis nibh. Mauris volutpat, augue non fermentum placerat, mi
est dignissim dolor, ac blandit mauris eros sed augue.
Q: Lorem ipsum dolor sit amet, consectetuer adipiscing elit.
A: Lorem ipsum dolor sit amet, consectetuer adipiscing elit. Praesent justo. Sed pretium
vulputate justo. Etiam viverra lorem et tortor. Donec consectetuer egestas odio. Aenean
nisi nisi, commodo vel, ultricies eu, commodo sit amet, lacus. Ut ultrices, felis a faucibus
porttitor, felis neque tempor justo, ut aliquet urna orci et diam. Sed non nisl ac neque
dapibus euismod.
Technical Support
For online information, visit www.domain.com. To speak with a customer service
representative, call 1-800-xxx-xxxx.
Getting Help 31
Page 33

Glossary
Browsing
Browsing is the process of navigating lists
of music available on your home network.
Browsing on a REX is much the same as on an
MP3 player. A big difference is that you’ll usually
have a lot more choice of music because REX
lets you browse all the music available on your
home network.
Clickable knob
The clickable knob is the large knob
centered under the REX display. It has two
related functions. By turning the knob, you
navigate menus on the REX display. By
pressing the knob, you select the currently
highlighted option and more forward. The
clickable knob also adjusts volume when in
Now Playing mode.
Digital music libraries
Music les stored on computers and USB
mass storage devices are organized into music
libraries that you can browse from REX or
from other devices.
Favorite Server
REX lets you set a favorite server. If you select
one, you’ll be given a short cut to that server
when you browse for music in Net.
Home network
Home networks are local area networks
(LANs) that allow home computers to share
les, printers, and an Internet connection.
Other devices, such as REX, may be connected
to a home network. Home networks are
either wired or wireless, although some wired
networks provide wireless bridging to allow a
wireless connection. Typically, a router is used
to allow the necessary interconnections to form
the network.
iPod
The iPod is the popular MP3 player from Apple.
This manual makes a distinction between iPod
and other MP3 players. This is because the iPod
uses a proprietary standard for managing and
playing music les. For this reason, REX connects
to and interacts with iPod differently than other
MP3 players.
Link
If you select Source: Link, you can listen to the
same music that is playing on another REX in
you home. This is a great feature for parties or
anytime you want to listen to the same music
wherever you are at home.
32 Glossary
Page 34

Media player software
Software that allows digital media to play on a
computer. Some media players, such as iTunes
and Windows Media Player, also act as “servers”
by making music les available to REX and other
devices over your home network.
MP3 player
MP3 players are hand-held music players that
store, manage, and play digital music les. The
best known MP3 player is the iPod, but there are
many competing players on the market. MP3
players are named after the well known musicle format but they usually handle a variety of
le formats.
Now Playing mode
Now Playing mode is the default mode for a REX
that is playing music. If you are browsing or viewing the Current Queue while listening to music,
the display will default to Now Playing after a
period of inactivity. In Now Playing mode, the
display shows the current track, artist, album,
album art, and a playback progress bar. You can
select Now Playing mode while browsing or
viewing the Current Queue.
Playlist
A list of tracks organized for playback is a
common feature of digital media players and
MP3 players. REX will recognize and follow these
playlists when you select them for playback. You
can also build a REX-specic playlist called the
REX Queue.
Power On/Off
From Stand By mode, REX must be Powered
On to play music. To stop playing music and
return to Stand By mode, the unit must be
Powered Off. To Power On (or Off), press the
power button.
REX Queue
Using REX, you can build a REX-specic playlist
of music les. Your REX Queue is stored in the
REX memory until you clear it or until the REX
is disconnected from power. The REX-specic
playlist is different from playlists that you
create using media player software, an iPod,
or another MP3 player. However, REX can play
music using those playlists, too.
Stand By mode
Stand By is the default mode for a REX when
attached to power. In Stand By mode, the display
serves as a digital clock. To leave Stand By
mode and listen to music, Power On the unit by
pressing the power or source button. To return to
Stand By mode, Power Off the unit by pressing
the power button.
SSID
A service set identier (SSID) is a unique alphanumeric code that serves as the name for a
wireless local area network. The SSID is used
by each device that is part of the network to
facilitate the exchange of data over the network.
USB mass storage devices
USB mass storage devices can store digital data
and, in the case of MP3 players, sort and play
music les. This class of device includes MP3
players, ash drives, and USB hard drives.
Glossary 33
Page 35

Technical specications
Audio drivers Two 4” low-frequency to mid-range drivers
Two 1” soft-dome tweeters
Base enhancement <<<TBD>>>
Ethernet RJ-45, 100BASE-T, 100 megabits per second
FAT 12 Not supported
FAT 16 Supported
FAT 32 Supported
DLNA Interoperability Guidelines Compliant
Universal Plug and Play (UPnP) Compliant
Wireless networking Compatible with 802.11b and 802.11g standards
34 Technical Support
Page 36

Technical specications 35
Page 37

15G 068272000
 Loading...