


Haier Z360
User Manual

Table of contents
Safety and use.........................................................................................................................................4
General information.................................................................................... ............................................7
Protection against theft....................................................................................................................7
Your mobile..............................................................................................................................7
1.1
1.2 Main screen icons
Getting started.........................................................................................................................................9
2.1 Set-up
2.2 Switching your telephone ON.................................................................................................11
2.3 Switching your telephone OFF ............................................................................................... 11
Calls
3.1 Making a call......................................................................... ..........................................11
3.2 Calling your voicemail
3.3 Receiving a call.......................................................................................................................13
3.5 Conference calls
Call memory..........................................................................................................................................14
Menu.....................................................................................................................................................15
5.1 Accessing the menu
keys
..........................................................................................................................................11
.......................................................................................................................7
(1)
.............................................................................................8
................................................................................................................................9
(1)
........................................................................................................12
(1)
...............................................................................................14
.............................................................................................15
5.2 Organisation of functions................................................................................15
Directory...............................................................................................................................................18
6.1 Consulting your directory
6.1.1 Searching for a name by its first letter .................................................................................19
6.1.2 Read a contact file................................................................................................................19
6.1.3 Making the call.......................................................................................................... ...........19
6.2 Creating a file..........................................................................................................................19
6.2.1 SIM Directory........................................................ ..... .........................................................19
6.2.2 Phone directory (Z300 only)................................................................................................19
6.3 Available options in the SIM directory . ..................................................................................20
6.4 Available options in the phone directory (Z300 only)..........................................................20
6.5 My phone number
Messages...............................................................................................................................................21
7.1 Create an SMS ........................................................................................................................21
7.3 Outbox
...........................................................................................................................22
7.4 Canned messages
7.5 Archives (Z300 only)
(2)
...................................................................................................18
.................................................................................................21
..................................................................................................22
.........................................................................................23
7.6 Parameters..................................................................................................................23
7.7 SMS CB (Cell Broadcast)
Customise..............................................................................................................................................23
8.1 Ring tones
...................................................................................................................24
..............................................................................23
8.3 Graphical environment (Z300 only)
.......................................................24

8.4 Settings..........................................................................................................................24
8.6 Keys setup Keys
8.7 Security
Tool.......................................................................................................................................................26
9.1 Calculator
9.2 Alarm
.........................................................................................................................25
....................................................................................................................26
..............................................................................................................................27
9.3 Diary (Z300 only)
(1)
9.4 Converter
.....................................................................................................25
.................................................................................................27
...............................................................................................................28
Call services............................................................................................................28
10.1 Voicemail
10.2 Call memory...........................................................................................................29
10.5 Call forward
10.6 Call barring.............................................................................................................31
Album (Z300 only)...............................................................................................................................31
11.1 Images album
11.2 Melodies album
11.3 Available memory
WAP (Z300 only)............................................................................................ ......................................32
12.1 Accessing W AP services
..................................................................................................................28
............................................................................................................30
........................................................................................................31
...................................................................................................32
..............................................................................................32
(1)
.........................................................................32
12.3 My bookmarks
Games ...................................................................................................................................................34
13.1 Snake
............................................................................................................................34
.....................................................................................................33
13.2 Bricks...........................................................................................................................34
Telephone warranty ...............................................................................................................................36
Accessories
Troubleshooting....................................................................................................................................38
(1)
.......................................................................................................................................38

Safety and use
We recommend that you read this chapter carefully before using your phone. The manufacturer
disclaims any liability for damage, which may result as a consequence of improper use or use
contrary to the instructions contained in this manual.
TRAFFIC SAFETY
Given recent studies, which show that using a mobile phone while driving a vehicle
constitutes a real risk, even when the hands-free kit is used (headset...), drivers are
requested to refrain from using their mobile when the vehicle is not parked
When switched on, your phone emits electromagnetic waves that can interfere with the
vehicle’s electronic systems such as ABS anti-lock brakes or airbags. To ensure that
there is no problem:
-Do not place your phone on top of the dashboard or within an airbag deployment area.
-Check with your dealer or car manufacturer to mak e sure that the car electronics is
well insulated.
CONDITIONS OF USE
- Always treat the phone with care and in a clean and dust-free place.
- Switch off the phone before boarding an aircraft to avoid prosecution.
- Switch off the phone when you are in health care facilities, except in designated
areas.
-
As with other types of equipment now in regular use, mobile phones can interfere
with the operation of other electric, electronic or radio frequency devices in their
vicinity.
- When the telephone is on, it should not be placed in a part of the clot hing close to a
medical device (i.e. cardiac pacemaker, hearing aid, insulin pump, etc.).
- Switch the phone off when you are near gas or flammable liquids. Strictly obey the
rules relating to the use of mobile phones at fuel depots, petrol stations, chemical
plants or in any potentially explosive atmosphere.
- Do not allow children to use your mobile phone without supervision.
- Do not open or attempt to repair your mobile phone yourself. Only use your
telephone with Haier batteries, chargers and accessories compatible with your model
(see page 70). The manufacturer disclaims any liability for damage caused by the use
of other chargers or batteries.
- Do not allow your phone to be exposed to adverse weather or environmental
conditions (dampness, rain, infiltration, dust, sea air, etc.). The minimum and
maximum temperatures reco mmended by the manufacturer are between -10°C and
+55°C. Beyond 55°C, the legibility of the display may be impaired, but this is
temporary and not serious.

BATTERY
- Before removing the battery from your phone, please make sure that the phone is
switched off.
- Observe the following precautions for battery use:
Do not attempt to open the battery (due to the risk of toxic fumes and burns);
Do not puncture, disassemble or cause a short-circuit;
Do not burn batteries or dispose of them in household rubbish;
Do not expose to temperatures in excess of 60°C. Batteries must be disposed of
in accordance with locally applicable environmental regulations;
Only use the battery for the purpose for which it was designed.
Never use damaged batteries.
CHARGERS
Mains powered chargers will operate within the temperature range: 0° to 40°.
The chargers designed for your mobile phone meet with the standard for safety of
information technology equipment and office equipment use. They should be used
for this purpose only.
RADIO WAVES
Proof of compliance with international standards (ICNIRP) or with European Directive
1999/5/EC (R&TTE) is required of all mobile phone models before they can be put on
the market. The protection of the health and safety for the user and any other person is
an essential requirement of these standards or this directive.
THIS MOBILE PHONE COMPLIES WITH INTERNATIONAL AND EUROPEAN
REQUIREMENTS REGARDING EXPOSURE TO RADIO WAVES.
Your mobile phone is a radio transmitter/receiver. It was deigned and manufactured to
comply with the radiofrequency (RF) exposure thresholds recommended by
international requirements (ICNIRP) (1) and by the Council of the European Union
(Recommendation 1999/519/EC) (2).
These limits are part of a set of requirements and establish authorised radiofrequency
levels for the public. These limits were established by groups of independent experts
on the basis of regular and detailed scientific assessments. They include a significant
safety margin intended to ensure the safety of all, regardless of age or state of health.

The exposure standard for mobile phones is determined by a measurement unit known
as the Specific Absorption Rate or “SAR”. The SAR limit is set by international
requirements or by the Council of the European Union at 2 watts/kilogram (W/kg)
averaged over ten grams of body tissue. The tests used to determine SAR levels were
carried out on the basis of standard usage modes with the phones transmitting at their
maximum power level over the entire range of frequency bands.
Although the SAR was established at the highest certified level, the actual SAR level
for the phone during use is generally much lower than the maximum values. In fact,
since mobiles are designed to operate at many different power levels, they only use the
minimum level of power required to provide a connection to the network. In theory,
the closer you are to a base station antenna, the lower the power level required by the
mobile phone.
The highest tested SAR value for this mobile phone for use at the ear and compliance
against the standard is XXX W/kg. While there may be differences between the SAR
levels on various phones and at various positions, they all meet the relevant
international guidelines and EU requirements for RF exposure.
The World Health Organisation considers that “present scientific information” does
not indicate the need for any special precautions for use of mobile phones. If
individuals are concerned, they might choose to limit their own or their children’s RF
exposure by limiting the length of calls, or using “hands-free” devices to keep mobile
phones away from the head and body.” (fact sheet n° 193). Additional information
about electromagnetic fields and public health are available on the following site:
http://www.who.int/peh-emf
(1) The ICNIRP requirements are applicable in the following regions: Central America (except
Mexico), South and North Africa, Pacific Asia (except Taiwan, Korea and Australia).
(2) The European recommendation (1999/519/EC) is applicable in the following regions: Europe,
Eastern Europe, Israel.
General information
Website
: www.haier.com
Haier Hot Line Number: see the “Haier Services” leaflet
Your telephone operates on GSM networks within bandwidths of
900/1800MHz or 850/1900MHz.
The
mark certifies that your telephone complies with 1999/5/EC (R&TTE) directive
and that the applicable accessories comply with current EC dir ectives.
Protection against theft
Your mobile phone has an identification number called IMEI (phone serial number) shown on the
packaging label and in the product ’s memory. We reco mmend t hat you note t his numb er the fir st time
you use your teleph one by entering *, #, 0, 6, # and k eep it saf ely. It may be requeste d by the pol ice or
your operator if your telephone is stolen. This number allows your mobile telephone to be blocked,
preventing a third person from using it, even with a different SIM card.
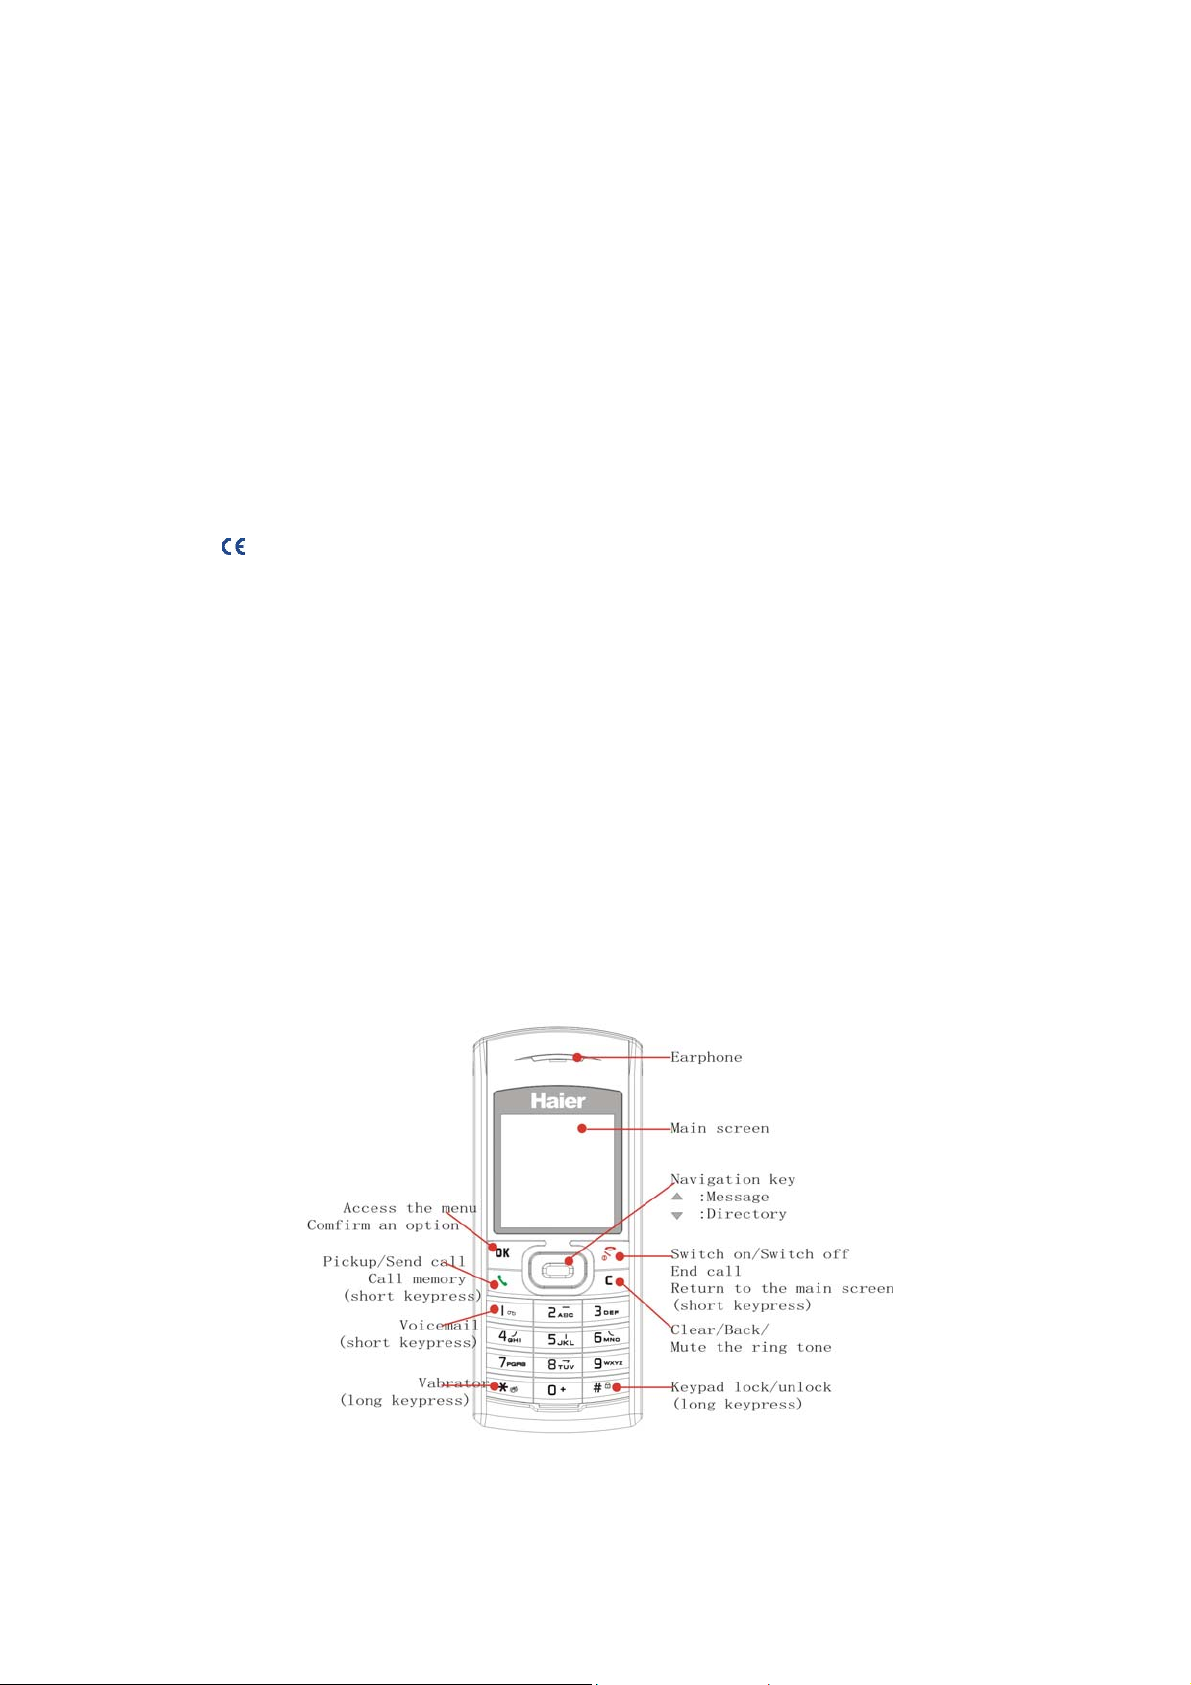
Your mobile
1.1 keys
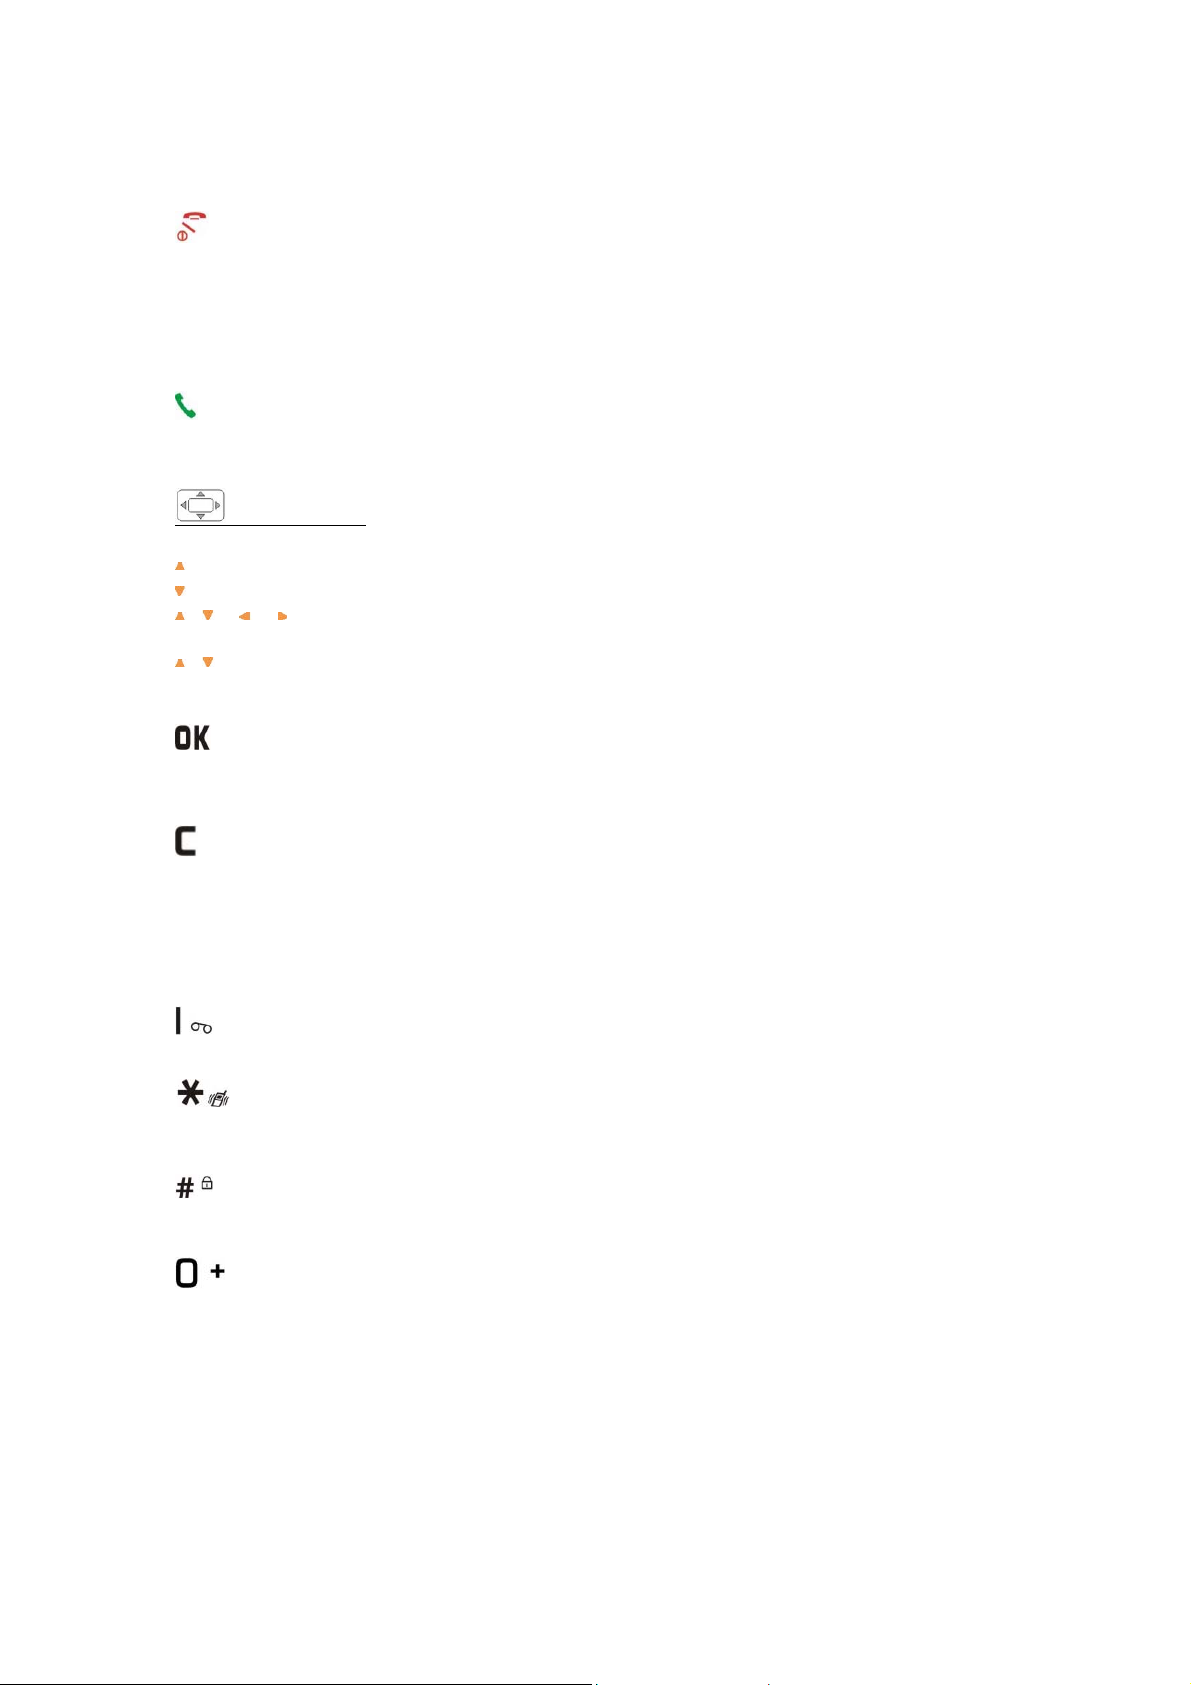
Switch on the phone (short keypress) from the main screen
Switch off the phone (long keypress) from the main screen
Hang up
Reject an incoming call
Return to the main screen (long keypress)/one step in the menu
Call / Pick up
Access the call memory (short keypress)
Navigation key:
Scroll to select an option
: Previous item/Access to Messages (from the main s creen)
: Next item/Access to Directory (from the main screen)Main screen
, , , Move
, Adjust the volume during a call
Access the menu
Menu / Confirm
Display a message received
Delete a character (short keypress) keypress)
Delete all characters (long keypress)
Return to the previous screen (short keypress)
Mute the ringtone of an incoming call
Consult your voicemail (long keypress)
Activate/Deactivate the vibrator (long keypress)
Upper case/Lower case/Automatic capitals in toggle mode
Automatic keypad lock/unlock (long keypress)
Predictive mode/Normal mode/Digits in toggle mode
Access the symbols in toggle mode
(1)
1.2 Main screen icons

Battery charge level.
Vibrator mode: your phone vibrates but neither rings nor beeps except for
the alarms (see page ).
Silence mode: your phone neither rings, beeps nor vibrates except for the alarms.
Unread message .
Message list is fu ll : your terminal cannot accept any new messages. You must
access the message list and delete at least one message on your SIM card (see page).
Voicemail message arrived
Unanswered call
WAP alert (Z300 only).
Call forwarding activated: y our calls are forwarded (see page).
Timer or alarm clock programmed (see page ).
Signal strength indicator.
Preferred tariff areas
Keypad lock.
Roaming out of your country of subscription.
(1) The icons and illustrations in this guide are provided for informational purposes only.
(2) Contact your network operator to check service availability.
(2)
.
Getting started
2.1 Set-up
Inserting the SIM Card
You must insert your SIM card in order to use your phone. To insert your
SIM card, turn off your phone with a long keypress on the
Before inserting the SIM card into the slot, push the SIM card catch to release it as shown
in the fig above. Lift the catch and p lace the SIM card into the slot with care.
(1)
key.
Make sure the cardnotch is on the upper left hand side.
Press and hold down the catch and push it until it is locked.
(1)
Check with your network operator to make sure that your SIM card is 3V
compatible. The old 5 Volts cards can no longer be used. Please contact your operator.
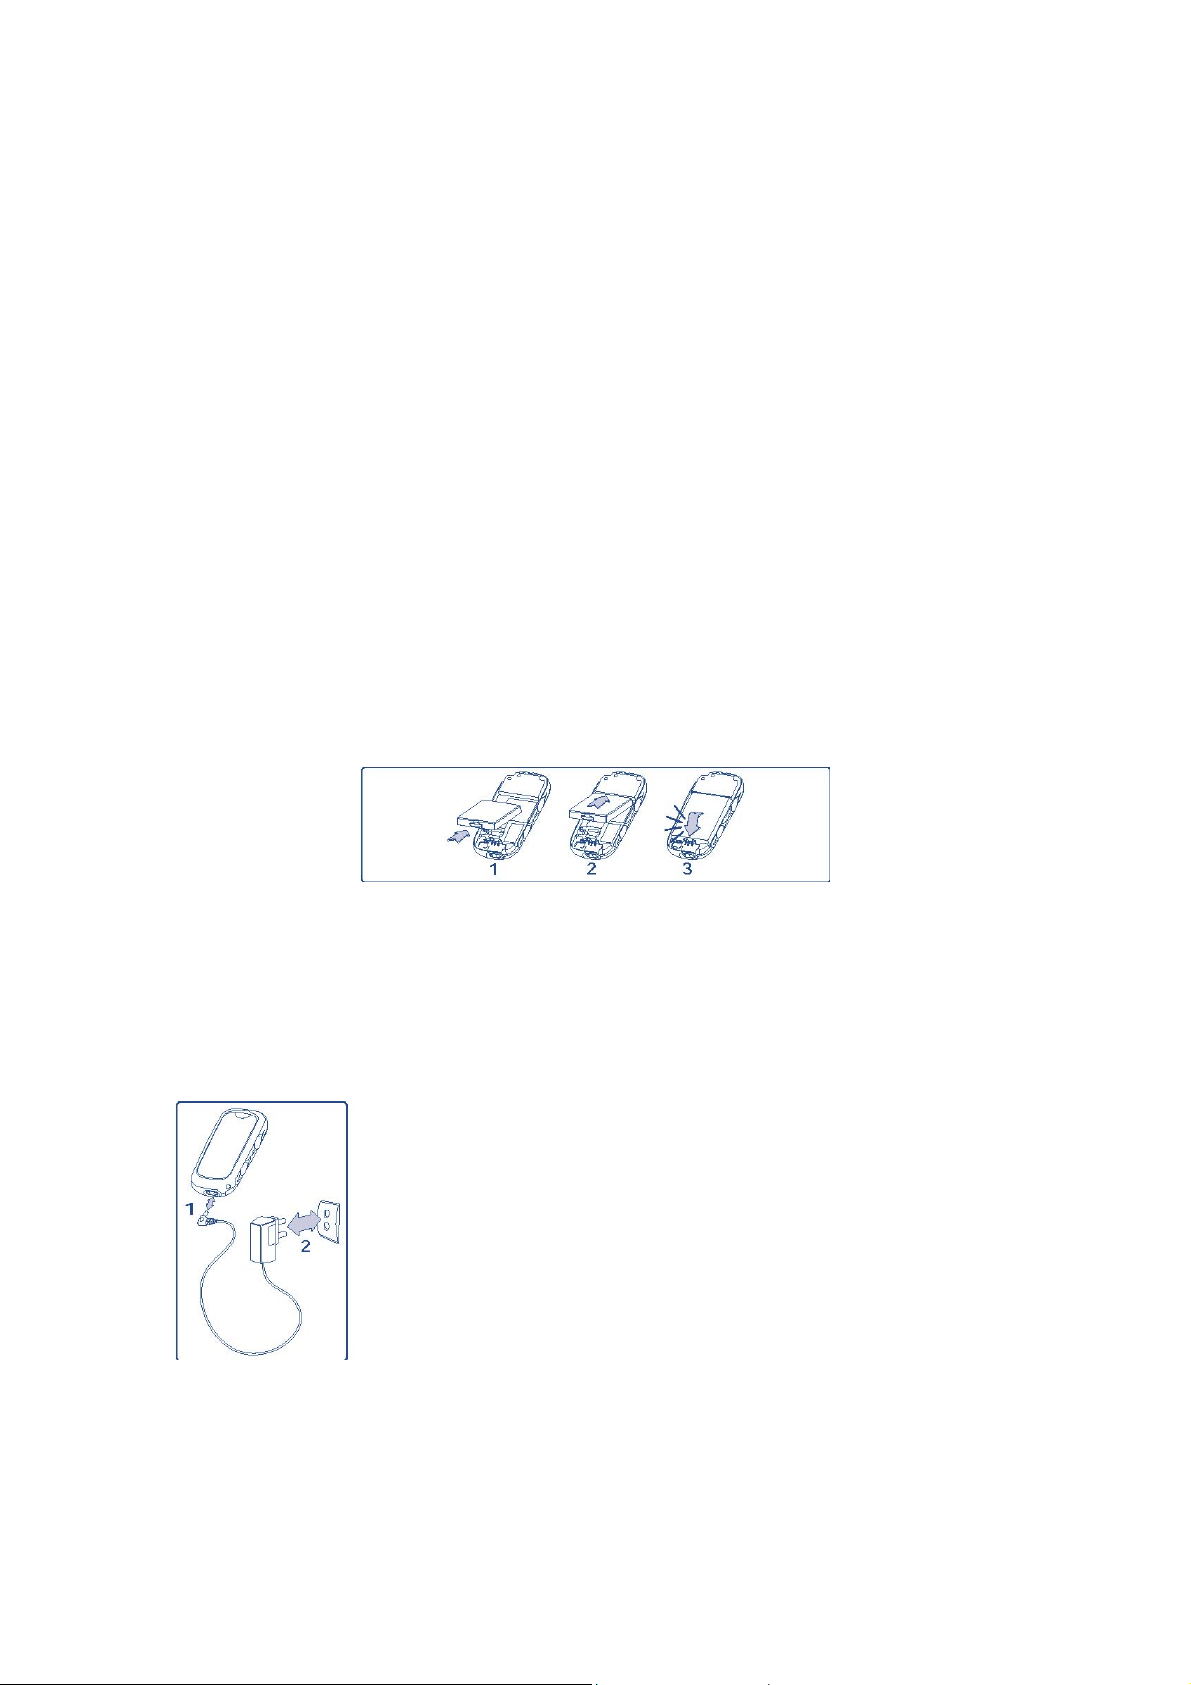
Inserting the battery
Align the tab on top of the battery with the slot in the battery compartment of your phone.
Press down the battery until the latch is completely locked.
Charging the battery
Connect the charger
- An animation will be on while charging.
- It may take several minutes before the charging starts.

- Do not force the plug into the socket.
- The battery icon will take several minutes before the level is shown.
Before connecting to the charger, make sure the battery is inserted correctly.
-
- The mains socket must be near to the phone and easily accessible (avoid power extension cables).
*** Before using your phone for the first time, completely charge your battery
(approximately 3 hours). Only use Haier chargers. We recommend charging the battery
once a day so that the phone operates at an optimum level.
2.2 Switching your telephone ON
Press the
Type your PIN code if necessary, then confirm with the
*** If you do not know your PIN code or if you have forgotten it, contact y our network
operator. Do not leave your PIN code near your telephone. It should be stored in a safe
place when not needed.
2.3 Switching your telephone OFF
From the main screen, press the key (long keypress).
key (long keypress). A welcome animation is displayed for 2 seconds.
key.
Calls
3.1 Making a call
Dial the desired number then press the key to place the call. To hang up, press the
key.
If you make a mist ake, press the
key once to remove the last digit. Press and hold

the key to delete all the digits.
*** To enter “+” use the
key (long press). To enter “P” (pause) use the key
(long press).
Making an emergency call
In case of emergency, dial 112 or any other number provided by your network operator.
Press the
key.
Emergency calls can be performed at any time without your SIM card or PIN code. Once
the call is made, the screen displays: “SOS call only”.
Making an international call
Make a long keypress on the
key, when “+” is displayed, enter the country and area
codes, complet e the number and send the call.
Call a number from the directory
Press the
and press
key to access the directory. Select the desired phone number
(see “Directory” on page).
Automatic Redial
If this feature is activated, the person you are unable to reach will be called back
automatically.
Speed dial
From the main screen, make a long keypress on any key from
to to dial one
telephone number stored in your directory, or access to a function, providing you have
already programmed the key (see page ).
3.2 Calling your voicemail
(1)
Your vo icemail is provided by your network so that you do not miss any calls: it works
like an answering machine that you can consult at any time.
To access your voicemail from the main screen, make a long keypress on the
key.

If the access number for your operator’s voicemail service does not appear, dial the
number that you were given. To program or change this number at a later date, refer to
“Call services/Voicemail/Enter number” (see page ).
*** To use your voicemail service from abroad, contact your network operator before
leaving.
(1)
Contact your network operator to check service availability.
3.3 Receiving a call
When you have an incoming call, your phone rings or vibrates depending on the
parameters chosen, and displays an animation with a “New call!” message.
-To pick up a call, press the
-To reject a call, press the
-To mute the ring, press the
key.
key.
key.
*** The number of the calling party is displayed if transmitted by your network and if the
service is subscribed. However, if the number has been stored in your directory, the
caller’s name will be displayed.
3.4 During the call
Available functions
You can access the following “Options” during a call by pressing the
Notepad Enter a number given to you by phone to save it.
Mute Activate/deactivate the microphone.
Directory Access the directory.
Message Access the message
Call memory Access your call memory.
(1)
•
Diary
Access your diary.
*** You can adjust the sound level during a call using the navigation
(1) Z300 only
Handling two call
Call waiting
(1)
If a second call comes in while you are on line, you will be notified by a tone, an
key:
key.

animation and the backlight. You can then accept the call by pressing the key. Your
current call will be automatically put onhold. You can then swap between your two
correspondents by pressing the key and by selecting the “Swap call” opt ion in the
menu.
Making a second call
To call a second party during a call, dial the number or select it fro m the directory by
accessing the menu, then press the
(1)
Contact your network operator to check service availability.
(1)
3.5 Conference calls
Your phon e allows you to talk to 3 people at the same time. When on a double call: press
the key to access the menu and select “Conference”. The conference tone is heard.
If a third call comes in, answer it by pressing the key and speak with
your new correspondent.
Press the
by pressing
You can remove a correspondent from the conference in order to speak to him/her in
private. Press the
to be deleted. The conference is put on hold.
Pressing
(1) Depending on your operator’s network.
key to access the “Opti ons” menu, select “Add conf.”, and then confirm
. The new correspondent becomes amember of the conference.
key, select “Delete corresp.” Then select the numb er or the name
disconnects the current call.
key to send the call.
Call memory
From the main screen, press the key and your phone displays a call li st. Each call
is displayed with an icon indicating the type of the call (Outgoing call, Answered call,
Unanswered call).

Select a telephone number in the list and press the
key to access the “Call memory”:
Send message Create an SMS.
Details Display the information of the call selected.
Save Store the number in your directory.
Delete Delete the number selected.
Delete list Delete the entire list.
***You can also access the call memory via the “Menu/Call Services/Call memory”.
key to redial it or press the
Menu
5.1 Accessing the menu
From the main screen, press the
with small icons beside each function.
Select the item you require using the navigation keys (
confirm.
key, the menu is displayed as a list
, ), then press again to
5.2 Organisation of functions
For each of the listed functions, refer to the appropriate chapter in this User Guide.
Directory: Access/create directory files and make calls from your directory.

Messages: Read, write and send you r SMS. View your messages in your inbox,
outbox, adjust the settings and activate/deactivate CB broadcast message reception.
Customise: Customise your graphi cal and audio environmen t. Set the time, date,
language, keypad lock, softkeys, security mode and network.
Tools: Set your telephone’s alarms for appointments, birthdays, etc to remind you
(1)
or to wake you up. Access the functions such as Di ary
converter and Demo mode
(1)
.
, Calculator, Alarms, Currency
(1)
Z300 only.
Call services: Access functions such as: Voicemail number, Call memory, Call
settings, Network, Call Forward and call Barring.
Albums
(1)
: All your visual and sound items in your telephone.
WAP (1): -Canned messages,Access the Internet services with your phone.
Games: Play with th e 2 or 3
Services: Access the Operator services
(1)
games embedded in your telephone
(2)
.
(1) Z300 only
(2) Depending on your operator’s work.
Directory
- Creat
- Name list
- My phone number
CUSTOMISE
- Ring tones
Melody
Volume
Vibrator
Message sound
Keep beep
Low battery alert
- Main screen(2)
- Graphical environment(1)
Download new
Mainscreen

Themes
Slide show
- Main setting
Contrast
Time
Date
Language
Keypad lock
Answer mode
- Energy saver(1)
- Keys setup
- Security
Message
- Canned message
- Create SMS
- Inbox
- Outbox
- Archives(1)
- Parameters
- SMS CB
TOOLS
- Calculator
- Alarm
- Diary(1)
- Convert. Euro -> Currency
- Convert. Currency -> Euro
CALL SERVICES
- Voicemail number
- Call memory
- Call settings
Beep duration
Call waiting
Auto redial
Billing
Conceal ID
- Network
Preferred network
Search mode
Access settings (1)
- Call Forward
Voice

Fax
Date
(2)
- Call barring
Outgoing calls
Incoming calls
Settings
ALBUMS
(1)
- Images album
- Melodies album
- Available memory
WAP (1)
- Launch WAP
- My Bookmarks
- Settings
GAMES
OPERATOR Service
(1)
(2)
Z300 only.
Depending on your operator’s network.
Directory
The directory allows you to store phone numbers and names (or files) either in the SIM
memory and/or the phone memory
(1)
memory
.
6.1 Consulting your directory
From the main screen, press the key to access the directory. The phone displays:
(1)
. You may store up to 100 entries in the phone
(2)

(1)
Z300 only.
(2)
By default, the SIM directory is selected. To select a different directory, access
“Menu/Directory/Select Dir./SIM” or “Telephone” (Z300 only).
6.1.1 Searching for a name by its first letter
Yo u can search fo r the person’s name by pres sing the key asso ciated with the first lett er
of his/her name.
6.1.2 Read a contact file
Select a name from your directory and press . The information stored will be
displayed:
-Name and phone number (SIM Directory),
(1)
-Details: mobile, home, e-mail (Phone Directory)
.
6.1.3 Making the call
Press the key when the name is selected to make a call.
If several nu mbers are associated wi th the name to be call ed, you must first cho ose the
(1)
number from the list
(Mobile, Home, Office, etc.) using the navigation key.
6.2 Creating a file
You can only create a file in the directory (either “SIM” or “Telephone”) that you have
(1)
selected
.
6.2.1 SIM Directory
When you are in the “SIM” directory, select “[Create]”, enter the name and the phone
number, then press the
to confirm.
The created files will be displayed in alphabetical order.
*** If y ou make a mistake, press the
key to erase the last character. Press and hold
the key to erase the whole entry.
6.2.2 Phone directory (Z300 only)
Select “[Create]” and enter the name. The telephone prompts you to choose your mobile
number, office number, etc.... Make your choice and enter the number. You may also
assign that number to a group if you wish.

If you want to modify or add a number to the file, select “Details” and the nu mber to edit,
or “[Create]” the number.
*** The fax number and e-mail address will be saved, but you can neither send a mail nor
a fax.
When you have filled in the desired fields, press
to save the file.
(1)
Z300 only.
6.3 Available options in the SIM directory
The following options will be displayed when the contacts have been created in the phone
directory:
Details Display the details of the selected contact
Assign key Assign a key (2 to 9) to the selected contact
Send message Create a message to send to the selected contact.
Modify Modify the data of the selected contact.
Delete Delete the selected contact. Send message
(1)
Copy
Copy SIM->Phone
Select. Dir. Select the “SIM” or “Te lephone”
Copy the file to the telephone directory.
(1)
Copy all files from SIM to Phone memory
(1)
directory.
(1)
6.4 Available options in the phone directory (Z300 only)
The following options will be displayed when the contacts have been created in the phone
directory :
Details
Display the details of the selected contact (name, phone number, office
phone or mobile phone number.)
Assign a key (2 to 9) to the selected contact.
Send message Create a message to send to the selected contact.
Modify Modify the data of the selected contact
Select Group Include this contact to a Contact Group.
Delete Delete the selected contact.
Delete all Delete all the contacts in Phone memory.
(1)
Copy SIM->Phone
Memory available
Copy all files from SIM to Phone memory.
(1)
Display the phone memory space available in terms of contacts.
Set Caller group CLI Assign ring tones & pictures for each Contacts Groups.
(1)
Select. Dir Select the “SIM” or “Telephone”
directory.
(1) Z300 only

6.5 My phone number
My phone number: Save your telephone number in case you might forget it.
Messages
From your telephone, you can read, write, send and receive “Text/SMS”, messages and
share them with o ther mobiles.
To access the messages fr om the ma in screen, press t he top of t he
key and select the
(“Messages”) icon.
key or press the
7.1 Create an SMS
You can customise your message by adding pictur es and sounds.
In the “Messages” menu, select “Create SMS” and en ter your message.
Press the
Send to group Send the message to a group of people you have defined.
Send to Send the message to a recipient.
key to access the following options.

Save Save the message and send it later.
Add image Liven up your message by adding images or animations.
Add sound Liven up your message by adding sounds.
7.2 Inbox
Select the message you want to read and then press
following options:
Reply Reply to the sender of the message by SMS.
Forward Forward the message received to other people.
Delete Delete the message.
Save number Save the sender’s number.
Retrieve number Save or use the number contained in the message.
Archive
(1)
Archive your messages in the telephone memory.
Delete all Delete all messages in the inbox.
. You now have access to the
7.3 Outbox
The last written message saved is displayed on top of the list. Select the message you
want to view and press the
key.
Press again the key to access the following options :
Delete Delete the message.
Send Forward the message.
Save number Save the sender’s number.
Retrieve number
(1)
Archive
Save or use the number contained in the message.
Archive your messages in the telephone memory.
(1)
Memory available Display the storage capacity of your SIM card or your telephone
in terms of SMS.
Delete all Delete all messa ges in the outbox.
(1)
Z300 only.
7.4 Canned messages
A list of predefined messages are avail able. Select one, edit it if required, and then send
it.

7.5 Archives (Z300 only)
The “Archives” menu allows you to access messages you have archived (“Options”
menu). Archived messages are stored in the telephone memory to save memory space in
the SIM card.
7.6 Parameters
You can change the message parameters:
Acknowledgement
Validity Set the time period during which attempts to send the message to the recipient
will be repeated in case of failure.
Service centre
automatically).
Auto. save Messages sent will be automatically saved, but you can choose to not keep
them (“Activ ./Deac t.”).
Quick reply Activate /deactivate the “Quick reply” option in order to reply with a
single click.
Request for acknowledgement of receipt for each message sent.
The phone number of y our operator’s service centre (it may be provided
7.7 SMS CB (Cell Broadcast)
These are messages broadcast over the network (weather forecast, traffic conditions,
etc..).
Auto Reception Activate /deactivate the automatic display of the programmed SMS
CB.
CB codes list List of SMS CB code s for messages you want to view (“[Create]”
or “CB codes List”).
Customise
From the main screen, press the to access the menu then select the icon and
select one of the following options in order to customize your telephone.

8.1 Ring tones
Melody: Select a melody to assign to an incoming call. You can download
new melodies
Volume: The volume can be adjusted to one of the levels proposed
(“Silence” “Low”, “Medium”, “High”, “Increasing”).
Vibrator: Activate/deactivate the vibrator.
Message sound: Select a melody to assign to a received message.
Key beep: Activate/deactivate the beep played with each keypress
(“Normal” or “Si lent”).
Low battery alert: Activate/deactivate the sound emitted when the
battery level is low.
“Download new” (Z300 only).
8.2 Main screen (Z100 only)
Select the image you wish to be displayed as the main screen.
8.3 Graphical environment (Z300 only)
Customise your telephone to suit your own taste via the “Graphical environment”.
- Choice of main screen
- Themes (colours)
- Slide show.
When “Slide show” is activated, select the pictures to view them as a slide show. The
slide show starts automatically 30 seconds after the main screen is displayed and if there
is no message to read.
8.4 Settings
Available options
Contrast: Set the contrast of your telephone by choosing one of the 5 levels proposed.
Time: Enter the time and press the
Date: Enter the date and press the
key to save it.
key to save it.

Languages
This feature allows to choose the language in which the messages will be display ed. You
may, however, choose another language if available.
Keypad lock
If this option is activated, the keypad will be automatically locked if no keys are pressed
for a certain period of time. The keypad will automatically unlock when you receive a
call and will lock again when you hang up. To unlock, make a long keypress on the
key.
Answer mode
You have two opti ons to answer a call:
- Call key: answer the incoming call by pressing the
-
Any key:
answer the call by pressing any key.
key.
8.5 Energy saver (Z300 only)
Adjust the settings to save your battery energy using this menu.
By default, the “Energy Saver” mode is activated to save your battery.
You can also set the duration of the backlighting .
8.6 Keys setup Keys
You can assign a function or a number that you use frequently, to keys to
on the keypad.
When they have been programmed, make a lon g keypress on the appropriate key from
the main screen to go directly to the number or function desired.
8.7 Security

This function allows you to display and man age the security settings of your telephone.
By selecting the function, you will access the following options:
PIN Code
Activate/deactivate the PIN code (Personal Identification Number). It will be requested
each time you switch on your telephone.
The PIN2 code allows you to activate or deactivate certain functions, such as Billing etc..
*** If you enter an incorrect PIN code three times in a row, your SIM card will be
disabled and your phone will display “SIM blocked!”. You will then have to enter a PUK
(PIN Unblocking Key) code, which you can obtain from your network operator.
Change PIN
To change the PIN code, enter the old code then the new one when prompted (“Enter
PIN:” and “Enter new PIN”). The new PIN code is a number consisting of 4 to 8 digits.
You must confirm it by entering it again (“Repeat New PIN”).
Change PIN2
This option allows you to change your PIN2 code. Process as for the PIN code change.
FDN status
Enter your PIN2 code to activate your list of Fixed Dialed Numbers (authorised numbers).
FDN Directory
Create a directory of up to 10 numbers that you can delete or modify.
Tool
9.1 Calculator
Enter a number and select the type of operation to be performed using the navigati on key.
Confirm with the
key.

*** To enter decimals (“,”), use the key (long keypress). To return to the main
screen, press the
key.
9.2 Alarm
You can progr amme an alarm with your telephone.
Activate/Deactivate Activate or deactivate the alarm.
Set time Set the alarm time :
every day- once
every day except Saturday and Sunday
Alarm Select the alarm mode from the following:
Melody: select the desired ring tone for thisalarm.
Vibrator
Repeat
(1)
(1)
Z300 only.
(1)
(1)
.
If you choose this option, the alarm will go off
in regular intervals of 7 minutes. When the alarm goes off, press
the key to stop it completely and then confirm by pressing
again the
key, otherwise, the alarm will repeatevery 7
minutes during one hour.
9.3 Diary (Z300 only)
Your telephone has a diary so that you can create and record events such as holidays,
meetings or tasks to do. From the main menu, select “Diary” and press
following options will be displayed:
Create Select the type of event to be created (Holidays, Meeting , To Do).
(1)
Events View the events
created and recorded in your diary. They can be edited,
deleted, etc.
You can also delete all expired even ts with the “DeleteExp. ” option. Enter the date, pr ess
twice and all events before this date will be deleted. For example: to delete all events
in your diary, enter a date a long time in the future (for example: 31/12/2010).
*** The Diary shares memory space with other menus such as the Directory, Images
Album, Sounds Album etc. The more events you record, the less memory will remain for
new contacts, etc.
(1)
Events are listed with the start date and time.
Create a new event
You can progr amme an event (Holidays, Meeting, To Do etc.) at a certain date and time.
. The

Select “Create” and press
confirm by pressing
and define whether the event is a one-off or repeated (everyday/week/month/year).
You can progr amme an alarm to remind you of an event using the “Alarm” function.
Modify an event
Select the event and press
When the details of the event are displayed, scroll through the date, time, subject etc.,
select the element you wish to change and press
pressing
Delete a one-off or repeated event
To delete a one-off event, select the event and press
confirm once more.
To delete a repeated event that has expired, select the event. When the data (date, time,
subject etc.) of the event is displayed, press
pressing
To delete a repeated event that has not expired, select the event and press . When the
data (date, time, subject etc.) of an event isdispla yed, select “Delete” and press
to confirm. All repetitions of the event will be deleted.
once you have made the change.
once more.
. Enter a start and an end date for th e event, enter the subject
(1)
. Then select “Holidays”, “Meeting” or “To Do” and
.
.Choo se “Modify” and confirm by
twice, choose“Delete” and then
then select “Delete” and confirm by
9.4 Converter
The “Convert. Currency->Euros” menu allows you to convert an old local currency into
Euros by entering the amount then pressing
The “Convert. Euros->Currency” menu allows you to convert an amount in Euros i nto an
old local currency by entering this amount then pressing
amount.
The currency used for conversion will be the one in your country of subscription.
(1)
Euroland countries only.
to display the converted amount.
to display the converted
Call services
10.1 Voicemail

Modify the number of your voicemail.
10.2 Call memory
Access the following number lists:
Outgoing calls List of the last calls made.
Answered calls List of ca lls received and answered.
Unanswered calls List of unanswer ed calls received.
If you select a number from the call memory list and press
, you can access the
following options:
Send msg.
Send a message to the selected nu mber.
Details View the details of the call (number, date, time etc.).
Save Store the selected number in your directory.
Delete number
Delete the selected number.
Delete list Delete the entire list.
10.3 Call settings
Beep duration
Activate/cancel the sounding of a beep during a call at a frequency to be set (enter the
frequency and confirm).
Call waiting
Activate/cancel/check the tone that notifies a second incoming call.
Automatic redial
This option enables automatic callback of the last dialed busy number, if it is activated.
(1) Contact your network operator to check service availability.
Billing
- Call duration Display the duration of the last call made or of all calls made.
- Reset Reset the cumulative duration for all calls.
- Last call Display the cost of the last call or all calls made. Th e “Available
credit” function shows the amount remaining as a proportion of the “Maximum credit”.
- Reset cost Reset the total call cost.
- Unit cost - Choice of currency, enter the currency.
(1)
(1)
(1)

- Choice of unit, enter the Telecom unit.
- Maximum credit Set a maximum credit beyond which all charged calls will be
barred.
Conceal ID (CLIR)
(1)
You can choo se to hide your identity (or your telephone number) from the person you are
calling.
- Conceal ID Hide your telephone number.
- Show ID Show your telephone number
- Status Check the current Anonymous status.
(1)
Contact your network operator to check service availability.
10.4 Networks
Preferred list
Create a list of networks to which you wish to be connected as a priority. A list will be
displayed. Press
Search mode
-Automatic The network sought is the last one used.
-Manual The choice of network is left up to the user.
Access settings
You can set or modify your WAP access settings.
to add a network to the list.
10.5 Call forward
This function enables you to activate/cancel or check the call forwarding of
voice/fax/ data calls to t he v o i c e m ai l o r an y specified numb er (enter the na me an d co n firm
with the
Unconditional Systematic forwarding of all your calls. The
on the idle screen.
If no reply Only if you do not answer.
If unreachable Only if you are outside the range of the network.
If busy
Conditional If your line is busy, if you do not answer, if you are outside the
network range.
Cancel all Cancellation of all activated call forwarding options.
key) according to the following options:
icon is displayed
Only if your line is busy.

Status See the actual set ting.
10.6 Call barring
Outgoing Calls Activate/deactivate or display the call barring of outgoing calls.
This option is applied as follows:
All Calls (1) All outgoing calls are barred.
International (1) Outgoing international calls are barred.
Except->Home Outgoing international calls except those to your country of
subscription are barred.
Incoming Calls Activate/deactivate or display the call barring of incoming calls.
This option is applied as follows:
All Calls (1) All incoming calls are barred.
If abroad(1) Incoming calls are barred when you are abroad.
Settings Deactivate all call barring options you have setup.
Cancel outgoing Cancel all outgoing call barring.
Cancel incoming Cancel all incoming call barring.
Password Change the password.
(1) Contract your network operator to check service availability.
Album (Z300 only)
To access the “Album” menu from the main screen, press and sel ect “Album”. The
Multimedia Album groups together all visual and sound items in your phone, whether
they be imbedded, downloaded or recorded. The options of this menu are: “Images
Album”, “Melodies Album” and “Available memory”.
11.1 Images album
This menu allows you to manage and display the images that are embedded or
downloaded in your mobile phone.
Select an image and press
->Main screen
Send Send the picture to a person.
Rename
Delete
(2)
(1)
D ispl ay the image as the main screen.
(2)
Change the name of the image.
Delete the image.
to access the following options:

Delete all
(2)
Delete all images.
(1)
If format compliant.
(2)
For downloaded images only.
11.2 Melodies album
You can download sounds from your service providers via WAP.
The melodies album allows you to manage and listen to sounds saved in your telephone.
When the melody has been selected, press
to access the following functions:
Melody
(1)
Assign this m elody to the incoming calls.
Send Send the melody to a person.
(2)
Rename
Delete
Delete all
You can change the name of the melody.
(2)
Delete the melody.
(2)
Delete all melodies.
1 1.3 A vailable memory
You can at any time check the available memory in your mobile phone.
(1)
If format compliant.
(2)
Except for embedded melodies.
WAP (Z300 only)
(1)
12.1 Accessing W AP services
WAP (Wireless Application Protocol) is a service that allows you to access mobile
Internet. Thanks to WAP, you can obtain information such as weather conditions, stock
market information, traffic information, etc.
The “Launch Browser” option launches the WAP browser on the homepage of the default
profile if it has been defined.
The “My Bookmarks” option allows you to access the list of your favourite sites and add
to them.

The “Settings” option allows you to program the connection parameters for your WAP
services access provider. In most cases, the connection parameters for your browser will
have already been filled in
In WAP mode you can:
1) Confirm your choice by pressing
2) Scroll the lines using the
3) Go to the previous page with the
4) Access the options with the
(1) Contact your network operator to check service availability.
(2) Contact your operator for details to fill in the fields.
(2)
.
.
and keys.
key.
key.
12.2 List of options
Back Back to the last page (option available if at least two pages have been viewed).
Home Access the home page of the WAP site you are visiting.
Next Back to the next page when you have previously used the “Back” option.
Reload Refresh the current page.
Bookmark Bookmark by saving y our favourite page.
Go to URL You may enter the URL for a WAP website that you want to visit.
Save When you access a WAP page, you can save the images on that page using this
option. Selec t th e image with the
to access the options. Select “Save” and press Rename the image if you wish
and press to save it in your album.
Save page Save the current page as ho me page launcher. You can give a name to this
page.
Exit End your WAP connection. Press
Settings Choose your WAP access settings.
and keys. When theimage is highlighted, press
to confirm and exit the WAP mode.
12.3 My bookmarks
The option allows you to add your favourite or frequently accessed websites to “My
Bookmarks” menu. The next time you enter the browser, you will be able to access sites
in “My Bookmarks” directly without entering any URL. Web pages can be added to “My
Bookmarks”.
Select a URL from the list. Press
“Create” if you want to enter a new URL, then type the name and address of the page you
want.
to launch WAP or to modify the URL. Select

12.4 Settings
From the “Settings” option, you can:
• Modify the home page launcher,
• Select a pre-stored profile
• Select the connection parameters
• Choose the display options for WAP images,
• Rename your profile,
•
Set the WAP download options.
(1)
connection parameters.
Contact your operator to obtain the necessary information for the WAP
(1)
,
(1)
,
Games
13.1 Snake
The aim of this game is to move a snake so that it eats the largest possible number of
eggs. The player should avoid hitting the snake body or the edges of the play zone.
Each time an egg is eaten, the snake’s tail gets longer.
Move the snake using key
(up), (left), (down) and (right).
13.2 Bricks
The aim of this game is to break the bricks with a ball and a racket.
When the ball hits a brick, the brick di sappears. When all the br icks h ave been destroy ed,
the game moves up a level. Move the racket using keys
Throw the ball using key
To pause, press the
or .
key.
(1)
(right) and (left).
13.3 Brain Activity
The aim of "Brain Activity" is to guess the combination of various geometric forms.
The player guesses a combination of shapes using the scroll keys and number keys and

confirm by pressing the key.
Pawns are displayed on the left of the screen after each guess:
- no pawn: the form is not in the final combination,
- green pawn: the form is in the final combination but at a different location,
- red pawn: the form is in the final combination and at the same location.
The game is over when the player has guessed the combination or no other attempts are
allowed.
There are 3 levels (select using
- easy: 6 possible forms + location of correction pawns matching the pawn’s location.
- average: 6 possible forms + location of correction pawns not matching the pawn’s
location.
- difficult: 7 possible forms + location of correction pawns not matching the pawn’s
location.
) :
Characters table
To enter a word in normal mode, press the key corresponding to the desired letter several
times until the letter appears.

(1)
Z300only.
The predictive mode allows you to type your messages more quickly without the need to
press the same key several times.
Simply press the key required and the phone wil l suggest the most common words from
the dictionary.
Confirm the suggested word by pressing the
at the end o f the word) ,
word) or
Press the
Symbols tables
You hav e 3 symbols tables. Press the
and
desired table and press the key corresponding to the character.
For example, select Table 1 and press the
key (confirm witho ut space adding) .
key to exit the predictive mode anytime.
keys to move from one table to the other. To display a character, access the
key (confirm and add a punctuation mark at the end of the
key to display the symbols table. Use the
or key (confirm and in sert a space
key to display “?”.
Telephone warranty
Congratulations on choosing this mobile phone - we hope that you will be totally satisfied
with it. Notwithstanding any other applicable statutory warranti es, this mobile phone is
guaranteed against any manufacturing defect for a period of ONE (1) year from the date
of purchase shown on your invoice. Nevertheless if the statutory warranty in force in
your country exceeds ONE (1) year, thestatutory warranty is not affected by the
manufacturer’s warranty.

The present warranty terms also apply to the battery and accessories but for a period of
SIX (6) months from the date of purchase shown on your invoice.
Under the terms of this warranty, you must inform your phone dealer or any maintenance
centre approved by Haier without delay of any defects and present the invoice given to
you at the time of purchase. The phone dealer or the maint enance centre will decide, as
appropriate, to replace or repair all or part of the telephone or t he accessory found to be
defective. This warranty covers parts and labour but excludes all other costs. Repair or
replacement may be carried out using reconditioned products offering features equivalent
to new products.
Any operations under this warranty, especially repair, modification or replacement of
products, will be covered by a warranty of three months, unless other stat utory provisions
apply. This warranty shall not apply to damage or defects (to your telephone and/or
accessory) caused by:
1) Non-compliance with instructions for use or installation,
2) Non-compliance with technical and safety standards in force in the area where the
phone is used,
3) Improper maintenance of power sources and of overall electrical facilities,
4) Accidents or the consequences of theft (of the vehi cle), acts of vandalism, lightning,
fire, humidity, infiltration of liquids, atmospheric influences,
5) Using the phone in conjunction with or connected to hardware not provided nor
recommended by Haier, without Haier’s explicit consent.
6) Any service, modification or repair by persons not authorised by the manufacturer, the
phone dealer or an approved maintenance centre,
7) Use for a purpose other than that for which the products were intended,
8) Normal wear,
9) Deterioration caused by external causes (e.g.: RF interference produced by other
equipment, fluctuations in mains voltage and/or voltages on telephone lines, etc.),
10) Modifications made, even if unavoidable, due to changes in regulations and/or
changes in network parameters,
11) Connection problems resulting from unsatisfactory radio transmission or caused by
the absence of radio-relay coverage.
Telephones or accessories from which markings and or serial numbers have been
removed or modified, as well as telephones from which the labels are missing or
damaged are excluded from this warranty.
The above provisions constitute the only claims, which can be made against the
manufacturer and dealer on the grounds of equipment defect s, this warranty excludes any
other explicit or implied warranty except the statutory warranty in force in the user’s
country.

Accessories
(1)
*** Only use your telephone with Haier batteries, chargers and accessories compatible
with your model.
(1)
Depending on availability.
Troubleshooting
Before contacting the after-sales service, we advise you to perform the following checks:
My mobile phone does not switch on
- Press
- Check the battery charge level
- Check the battery contacts, remove and reinstall your battery, then turn your
telephone back on
until the screen comes on

My phone does not respond since several minutes
- Press the
- Remove the battery and re-insert it, then switch the phone back on
My screen is difficult to r ead
- Clean your screen
- Use your mobile phone in accordance with the recommended conditions of use
My mobile phone turns off by itself
- Check that your keypad is locked when you are not using your mobile phone
- Check the battery charge level
My mobile phone does not charge properly
- Make sure that your batt ery is not compl etely discharged; the battery charge indicator
can take several minutes and may be accompanied by a quiet hissing sound.
- Make sure charging is carried out under normal conditions (0°C +40°C)
- Make sure your battery is inserted. It must be inserted before plugging in the
charger
- Make sure you are using an Haier battery and charger
- When abroad, check that the electrical current is compatible
My mobile phone does not connect to a network
- Try connecting in another location
- Verify the network coverage with your operator
- Check with your operator that your SIM card is valid
- Try selecting the available network(s) manually (see page 54)
- Try connecting at a later time if the network is overloaded
SIM card error
- Make sure the SIM card was correctly inserted (see page 14)
- Verify with yo ur operator that your SIM card is 3V compatible; the old 5V SIM
cards cannot be used
- Make sure the chip on your SIM card is not damaged or scratched
Unable to make outgoing calls
- Make sure you have dialled a valid number and pressed the
- For international calls, make sure you have entered the country and area codes
- Make sure your mobile phone is connected to a network, and t hat the network is not
key
key

overloaded or unavailable
- Check your subscription with your operator (credit, SIM card valid, etc.)
- Make sure you have not barred outgoing calls (see page 56)
Unable to receive incoming calls
- Make sure your mobile phone is switched on and connected to a network (check for
overloaded or unavailable network)
- Check your subscription with your operator (credit, SIM card valid, etc.)
- Make sure you have not forwarded incoming calls (see page 55)
- Make sure that you have not barred certain calls
The caller’s name does not appear when a call is received
- Check that you have subscribed to this service with your operator
- Your caller has concealed his/her number
The sound quality of the calls is not optimal
- You can adjust the volume during a call by means of the
- Check the radio reception icon
key
I am unable to use the features described in the manual
- Check with your operator to make sure that your subscription includes this service
- Check to be sure this feature does not require an Haier accessory.
When I select a number from my directory, the number is not dialled
- Make sure that you have correctly recorded the number in your file
- Make sure that you have selected the country prefix when calling a foreign country
I am unable to create a file in my directory
-
Make sure that your directory is not full; delete some files or save the files in the
product directory
(1)
- Check the “Other settings” option in the “Directory” to be sure that the
“FDN Status” feature is not activated
My callers are unable to leave messages on my voicemail
- Contact your network operator to check service availability
I can’t access my voicemail

- Make sure your operator’s voicemail number is correctly entered in “Menu/Call
Services/Enter number”
- Try later if the network is busy
(1)
Z300 only.
I am unable to send and receive messages
- Check your phone memory as it might be full, if necessary, delete some messages
(see page)
- Contact your network operator to check service availability, see parameters (see
page )
- Verify the server centre number with your operator
- The server centre may be saturated; try again later
The << - >> icon is displayed
- You are outside the network coverage area
I have already entered 3 incorrect PIN codes
- Contact your network operator to obtain the PUK code (Personal Unblocking Key)

A
Safety and Use
Radio Waves
FCC SAR
We recommend that you read the chapter carefully before using the phone.Haier disclaims any
liability for damages, which caused by improper use or use contrary to the safety instruction.
Your phone complies with all relevant safety standards. The CE mark on your phone shows compliancy with
European electromagnetic compatibility (Ref. 89/336/EEC) and low voltage directives (Ref. 73/23/EEC). The
GSM system limits transmission power (up to 2 watts/KG)
Your phone complies with all applicable safety standards and the Radio Equipment and Telecommunications
Terminal Equipment Directive 1999/5/EC
Individual concern focused on the possible health risks for users of cellular phones. Therefore they might
choose to limit RF exposure by limit call length or use 'Hand Free' to keep cellular phone away from head and
body.
This equipment generates, uses, and can radiate radio frequency energy and, if not installed and used in
accordance with the instructions, may cause harmful interference to radio communications.
However, there is no guarantee that interference will not occur in a particular installation. If this equipment
does cause harmful interference to radio or television reception, which can the interference by one or more of
the following measures:
• Reorient or relocate the receiving antenna.
• Increase the separation between the equipment and receiver.
• Connect the equipment into an outlet on a circuit different from that to which the receiver is connected.
• Consult the dealer or an experienced radio/TV technician for help.
Cautions
ny changes or modifications to your phone not expressly approved in this document could void your warranty
for this equipment and void your authority to operate this equipment. Only use approved batteries, antennas
and chargers. The use of any unauthorized accessories may be dangerous and voids the phone warranty if
said accessories cause damage or defect to the phone.

Body-W
cc.go
Although your phone is quite sturdy, it is a complex piece of equipment and can be broken. Avoid dropping,
hitting, bending or sitting on it.
orn Operation
To maintain compliance with FCC RF exposure requirements, Body-worn operations are restricted to beltclips, holsters or similar accessories that have no metallic component in the assembly and that provide at
least 1.5 cm separation between the device, including its antenna whether extended or retracted, and the
user’s body. The use of accessories that do not satisfy these requirements may not comply with FCC RF
exposure requirements. For more information about RF exposure, please visit the FCC website at
www.f
v.
Specific Absorption Rate (SAR) for Wireless Phones
The SAR is a value that corresponds to the relative amount of RF energy absorbed in the head of a user of a
wireless handset. The SAR value of a phone is the result of an extensive testing, measuring and calculation
process. It does not represent how much RF the phone emits. All phone models are tested at their highest
value in strict laboratory settings. But when in operation, the SAR of a phone can be substantially less that the
level reported to the FCC. This is because of a variety of factors including its proximity to a base station
antenna, phone design and other factors. What is important to remember is that each phone meets strict
federal guidelines. Variations in SARs do not represent a variation in safety. All phones must meet the federal
standard, which incorporates a substantial margin of safety. As stated above, variations in SAR values
between different model phones do not mean variations in safety. SAR values at or below the federal
standard of 1.6 W/kg are considered safe for use by the public.
The highest reported SAR values of Z360 are:
Cellular (Part 22)-head: 0.290mW/g; Body-worn: 0.352mW/g
DCS (Part 24)-head: 0.299mW/g; Body-worn: 0.273mW/g be determined by turning the equipment off and on,
the user is encouraged to try to correct
FCC Radio Frequency Emission
This phone meets the FCC Radio Frequency Emission Guidelines. FCC TD number:
SRO04100Z360. More information on the phone’s SAR can be found from the following FCC website:
http://www.fcc.gove/oet/fccid
Always Power-off
Before boarding in an aircraft, you have to keep your phone power-off. Use of the phone may be dangerous
for the aircraft operation.

Traffic safety
Battery
Charger
In hospitals and other places close to medical equipment, you have to keep your phone power-off.
Before entering petrol stations and other places close to explosive atmosphere, you have to keep your phone
power-off.
Using cellular phone while driving a vehicle constitutes a real risk, even when the hands-free kit is used. In
some countries, using cellular phone while driving is illegal activity. Furthermore, your phone emits
electromagnetic waves that can interfere with the vehicle’s electronic systems such as ABS anti-lock brakes
or airbags.
To ensure your safety, we recommend that
-Do not place your phone on top of the dashboard or within an airbag deployment area.
-Check with the vehicle manufacturer to make sure that the car electronics is well insulated.
Your phone is powered by a rechargeable battery. A new battery is partially charged
and an alarm will warn you when the battery reaches low.
Before removing the battery from your phone, please make sure that the phone is power-off.
We recommend you observe the following precautions for battery use:
'-Do not attempt to open the battery (due to the risk of toxic fumes and burns);
'-Do not puncture, disassemble or cause a short-circuit;
'-Do not expose to temperatures in excess of 60°C, or 140°F;
'-Only use the battery for the purpose for which it was designed;
'-Never use damaged batteries;
'-Do not burn batteries or dispose of them in household rubbish.
Mains powered chargers will operate within the temperature range: 0° to 40°.
The chargers designed for your mobile phone meet with the standard for safety of information technology
equipment and office equipment use. For your safety, NEVER USE CHARGER NOT HAIER PROVIDED.

Conditions
Once the battery indicators are clipped on the phone, plug the charger
(supplied with the phone, in the box) into the right hand socket at the base of
the phone.
Plug the transformer unit into a main AC power socket with easy access. The
battery symbol indicates the state of charge:
• During charging the 4 charge indicators change; Each bar represents 25%
of charge.
• When all 4 bars are steady the battery is fully charged and you
can disconnect the charger. Normally it takes 2 and a half hours.
• When the battery is charged, remove the connector by pressing the
release button on top of the connector.
Keeping the charger plugged to the mobile when the battery is fully charged doesn’t
damage the battery. The only way to turn off the charger is to unplug it, so use an
easily accessible AC power socket.You can connect the charger to an IT supply (Belgium only).
Note: When empty battery is recharging, the battery indicator may appear after 5 mins charging
period.
-Do not allow children to use your mobile phone without supervision.
-Do not open or attempt to repair your mobile phone yourself.
-Only use your phone will HAIER batteries, chargers and accessories compatible with your phone.
-Do not allow your phone to be exposed to adverse weather or environmental conditions (dampness, rain,
infiltration, dust, sea air, etc.). The minimum and maximum temperatures recommended by the manufacturer
are between -10°C and +55°C.
 Loading...